INJECTION TECHNIQUES FOR THE MAXILLARY TEETH AND FACIAL HARD AND SOFT TISSUES
The injection techniques available to anesthetize the maxillary teeth and the facial hard and soft tissues include supraperiosteal injection, ASA nerve block, MSA nerve block, infraorbital nerve block, and PSA nerve block.
Supraperiosteal Injection (Local Infiltration)
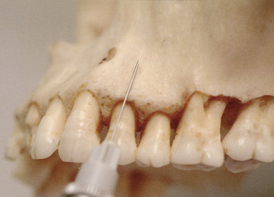
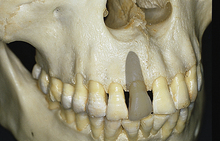
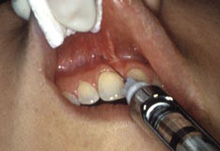
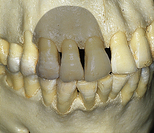
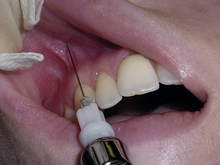
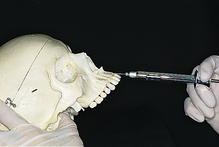
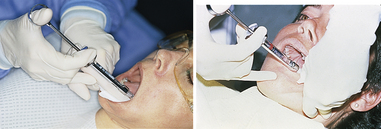
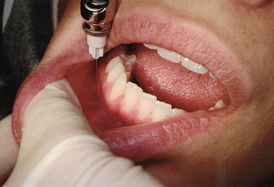
A supraperiosteal injection (Table 39-9), more commonly referred to as a local infiltration, involves depositing anesthetic solution near the apex of a single tooth, thus providing anesthesia of the tooth and the immediate surrounding area (Figure 39-55). This injection is most often used to anesthetize maxillary teeth. The rather thin, porous nature of the bone in the maxilla facilitates diffusion of the anesthetic solution from the deposition site to the apex of the tooth to be treated.
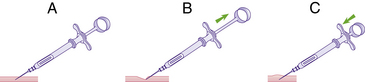
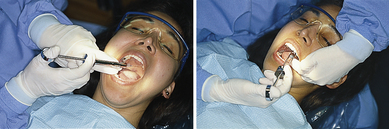
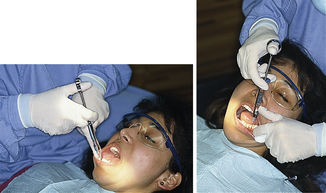
By contrast, the mandible consists of much denser bone, which prevents diffusion of the anesthetic agent to the apices of the posterior teeth, therefore precluding the supraperiosteal injection in this area. A supraperiosteal injection may be used to anesthetize the central and lateral teeth in the mandible because the bone in this area is thinner and nutrient canals may be present. Figure 39-56 shows hand rests that may be used for a maxillary supraperiosteal injection and ASA and MSA nerve blocks.
Indications for this injection include the need for pulpal anesthesia of maxillary teeth when only a limited number of teeth are to be treated and for soft-tissue procedures to be performed on a circumscribed area. Because the anesthetic and vasoconstrictor are deposited so near the area to be treated, this injection provides effective hemostasis, which is often needed during dental hygiene care. Conversely, if there is infection or severe inflammation in the area, administration of the anesthetic solution at a distance from the area of inflammation (i.e., nerve block) provides better and safer pain control because of the presence of more normal tissue conditions at the deposition site. Furthermore, if a large area involving several teeth needs to be treated, the supraperiosteal injection is not suitable because of the need for multiple needle insertions and the necessity of administering large volumes of anesthetic solution.
Table 39-9 summarizes the criteria pertinent to a supraperiosteal injection and provides tips for success.
TABLE 39-9 Supraperiosteal Injection (Local Infiltration)
| Nerves anesthetized |
Large terminal branches of dental plexus |
| Areas anesthetized |
Entire region innervated by the large terminal branches of the plexus:
|
| Needle gauge and length |
25- or 27-gauge short |
| Operator position |
8 or 9 o'clock |
| Penetration site |
Height of the mucobuccal fold above the apex of the target tooth (Figure 39-58) |
| Landmarks |
|
| Syringe orientation |
Parallel to the long axis of the tooth (see Figure 39-55) |
| Hand rests |
Forefinger, or wrist of operator's opposite hand (see Figure 39-56) |
| Deposition site |
Apical region of the target tooth |
| Penetration depth |
Usually only a few millimeters, no more than 5 mm or one quarter of a short needle |
| Amount of anesthetic to be deposited |
0.6 mL, or one third of a cartridge |
| Length of time to deposit |
Approximately 30-60 seconds |
| Potential Problems |
Technique Tips |
| Anesthetic deposition below apex of target tooth, resulting in insufficient pulpal anesthesia. |
Increase depth of penetration so the needle is at the apical region of the target tooth. |
| Needle too far from bone, and therefore solution deposited into buccal tissue. |
Redirect needle closer to periosteum. |
| Dense bone may cover apices. Most often occurs on permanent maxillary first molars in children because the apex is located under the dense zygomatic bone. May occur on central incisors where the apex lies beneath the nose. |
Administer a nerve block. |
| Pain on insertion with the needle against the periosteum. |
Withdraw the needle and reinsert farther away (laterally) from the periosteum. |
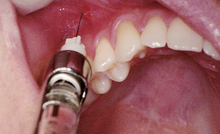
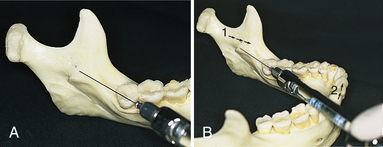
Anterior Superior Alveolar Field Block
The ASA nerve block is recommended for management of pain when treatment is to be done only on the maxillary anterior teeth. Table 39-10 describes the criteria specific to the ASA nerve block.
TABLE 39-10 Anterior Superior Alveolar (ASA) Field Block
| Nerves anesthetized |
Anterior superior alveolar |
| Areas anesthetized |
Pulpal tissue of the following maxillary teeth unilaterally:
Facial periodontal tissues and bones of these same teeth ( Figure 39-59) |
| Needle gauge and length |
25- or 27-gauge short |
| Operator position |
8 or 9 o'clock |
| Penetration site |
Height of the mucobuccal fold just mesial to the canine (Figure 39-60) |
| Landmarks |
Canine and canine eminence |
| Syringe orientation |
Parallel to the long axis of the canine (Figure 39-61) |
| Hand rests |
Forefinger, or wrist of operator's opposite hand (see Figure 39-56) |
| Deposition site |
Apical region of the canine |
| Penetration depth |
Usually only a few millimeters, no more than 5 mm or one quarter of a short needle |
| Amount of anesthetic to be deposited |
0.6-0.9 mL, or one third to one half of a cartridge |
| Length of time to deposit |
Approximately 30-60 seconds |
| Potential Problems |
Technique Tips |
| Anesthetic deposition below apex of target tooth, resulting in insufficient pulpal anesthesia. |
Increase depth of penetration so the needle is at the apical region of the canine. |
| Needle too far from bone, and thus solution deposited into buccal tissue. |
Redirect needle closer to periosteum. |
| Pain on insertion with the needle against the periosteum. |
Withdraw the needle and reinsert farther away (laterally) from the periosteum. |
| Persistent sensitivity at mesial surface of central incisor resulting from cross-innervations. |
Infiltrate contralateral central incisor. |
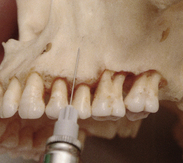
Middle Superior Alveolar Field Block
The MSA nerve block is the injection of choice when treatment involves only the premolars or if the infraorbital nerve block fails to provide pain control distal to the maxillary canine (Table 39-11).
Research indicates that the MSA nerve is present in only 28% to 40% of the population, in which case this area is most often innervated by the ASA nerve.1 Regardless of its presence or absence, this area can be anesthetized easily by means of the MSA technique described in Table 39-11. This table provides the guidelines for administering an MSA nerve block and suggestions to ensure success.
TABLE 39-11 Middle Superior Alveolar (MSA) Nerve Block
| Nerves anesthetized |
Middle superior alveolar |
| Areas anesthetized |
Pulpal tissue of the following maxillary teeth unilaterally:
Mesial root of first molar Buccal periodontal tissues and bones of these same teeth (see Figure 39-64) |
| Needle gauge and length |
25- or 27-gauge short |
| Operator position |
8 or 9 o'clock |
| Penetration site |
Height of the mucobuccal fold above second premolar (see Figure 39-63) |
| Landmarks |
|
| Syringe orientation |
Parallel to the long axis of the second premolar (closer to vertical than in the anterior maxilla) (see Figure 39-62) |
| Hand rests |
Forefinger, or wrist of operator's opposite hand (see Figure 39-56) |
| Deposition site |
Above the apical region of the second premolar |
| Penetration depth |
Usually only a few millimeters, no more than 5 mm or one quarter of a short needle |
| Amount of anesthetic to be deposited |
0.9-1.2 mL, or one half to two thirds of a cartridge |
| Length of time to deposit |
Approximately 60-90 seconds |
| Potential Problems |
Technique Tips |
| Anesthetic deposition below apex of target tooth, resulting in insufficient pulpal anesthesia. |
Increase depth of penetration so the needle is at the apical region of the second premolar. |
| Needle too far from bone, and therefore solution deposited into buccal tissue. |
Redirect needle closer to periosteum. |
| Pain on insertion with the needle against the periosteum. |
Withdraw the needle and reinsert farther away (laterally) from the periosteum. |
| Dense bone of the zygomatic arch at the injection site prevents diffusion of anesthetic solution. |
Administer an infraorbital block instead of the MSA block. |
| Buccal frenum present at preferred penetration site. |
Penetrate slightly mesial to the frenum. |
Infraorbital Nerve Block
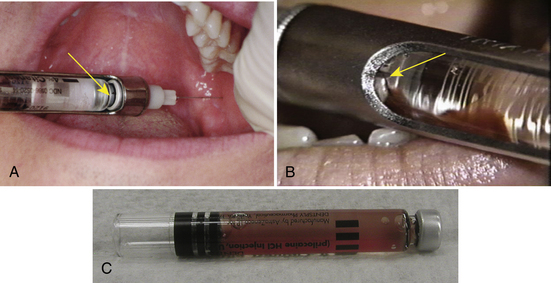
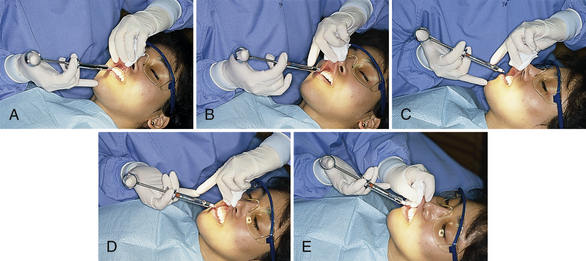
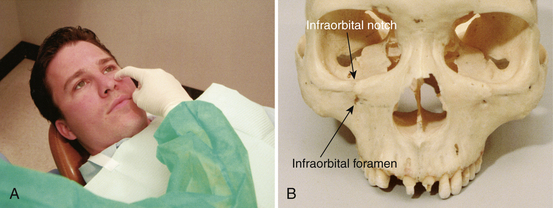
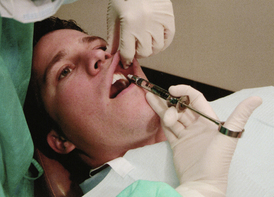
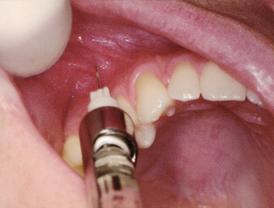
Whereas the ASA (see Table 39-10) and the MSA (see Table 39-11) nerve blocks can be employed by oral healthcare professionals when they are anesthetizing the maxillary anterior and premolar teeth, the infraorbital nerve block is the injection of choice for many authorities when pain control is provided to this area.1 The infraorbital nerve block provides both pulpal and facial soft-tissue anesthesia of the maxillary central incisor through the premolars in approximately 60% of individuals.1 One injection of 0.9 to 1.2 mL of solution provides pain control in a relatively large area, effectively minimizing needle penetrations and volume of solution administered. Despite these advantages, this injection is not used as often as indicated because many operators are fearful of injuring the client's eye. This fear, however, is unfounded, and when the appropriate procedures are followed, this injection is highly effective and safe (Figures 39-65, 39-66, and 39-67).
Table 39-12 describes the criteria applicable to the infraorbital nerve block and includes directions for locating the infraorbital foramen and directing the needle and anesthetic solution to the nerve.
TABLE 39-12 Infraorbital (IO) Nerve Block
| Nerves anesthetized |
Anterior superior alveolar |
| Areas anesthetized |
Pulpal tissue of the following maxillary teeth unilaterally:
Mesial root of first molar Buccal periodontal tissues and bone of these same teeth Lateral aspect of the nose |
| Needle gauge and length |
25- or 27-gauge short (in rare instances a long needle may be preferred) |
| Operator position |
8 or 9 o'clock (see Figure 39-66) |
| Penetration site |
Height of the mucobuccal fold above first premolar (see Figure 39-67) |
| Landmarks |
|
| Syringe orientation |
Parallel to the long axis of the first premolar; follow the angle (see Figures 39-66 and 39-67) |
| Hand rests |
Forefinger, or wrist of operator's opposite hand (see Figure 39-56) |
| Deposition site |
Upper rim of the infraorbital foramen; the needle should gently contact bone before deposition (Figure 39-69) |
| Penetration depth |
16 mm or three quarters of a short needle |
| Amount of anesthetic to be deposited |
0.9-1.2 mL, or one half to two thirds of a cartridge |
| Length of time to deposit |
Approximately 60-90 seconds |
| Technique Notes |
1. Locate the infraorbital foramen: With your forefinger, palpate across the zygomatic arch; the foramen lies at the area of concavity directly below the medial border of the client's iris when the client gazes straight ahead. 2. Maintain finger pressure over the foramen throughout the injection and for 1 to 2 minutes after deposition. This will aid in directing the needle to the foramen and assist in directing the anesthetic solution to the foramen. |
| Potential Problems |
Technique Tips |
| Needle contacting bone below the infraorbital foramen; anesthesia of the lower eyelid, nose, or upper lip with little or no pulpal anesthesia. |
Keep needle in line with the infraorbital foramen during penetration; line the syringe up with your finger over the foramen. |
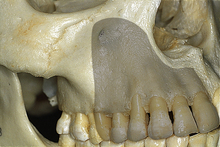
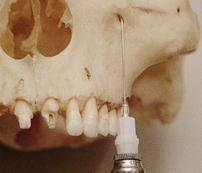
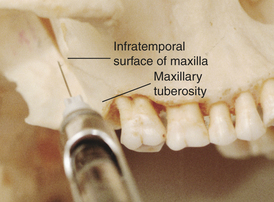
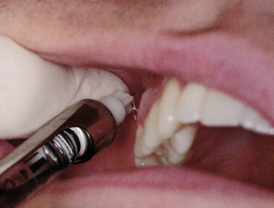
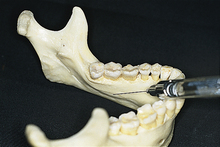
Posterior Superior Alveolar Nerve Block
The PSA nerve block, employed to anesthetize the maxillary molars, is preferred to supraperiosteal (infiltration) injections because it minimizes both the number of injections required and the volume of anesthetic solution administered. Also, because the anesthetic solution is deposited into an area of soft tissue with no bony landmarks (hence no bone contact), it is a comfortable injection for the client (Figures 39-70 and 39-71).
Complete pulpal anesthesia is obtained in the first, second, and third molars in at least 60% of persons.14 Dissection studies reveal, however, that the MSA nerve, when present, may supply sensory innervation to the mesiobuccal root of the first molar, therefore necessitating either a supraperiosteal injection, an MSA nerve block, or an infraorbital nerve block to anesthetize the remainder of this tooth. Furthermore, if access is difficult or if the third molar is missing and treatment is limited to only the first and second molars, supraperiosteal injections may be substituted.
Other considerations are safety and needle length. A long 25-gauge needle is often recommended for this injection. Problems associated with needle length, however, may result in an increased risk of hematoma formation. There are no anatomic safety features to prevent inadvertently inserting the needle too far posteriorly into the pterygoid plexus of veins and the facial artery, thereby causing a hematoma. Therefore, to minimize the risk of hematoma formation after the PSA nerve block, a short 25- or 27-gauge needle is recommended. Although depth of insertion with the long needle is 16 mm, or one half of its length, the short needle is inserted three fourths of its length. Thus the risk of overinsertion and hematoma formation decreases when a short needle is used. Regardless of the needle length used, multiple aspirations and slow anesthetic deposition are imperative to ensure a safe injection.
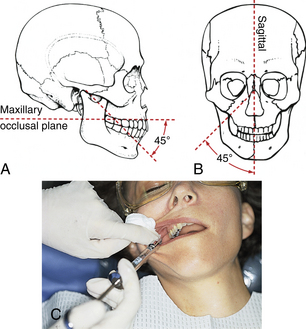
Table 39-13 provides the essential criteria for a PSA nerve block. Of particular significance to this injection is the syringe orientation of 45 degrees to the maxillary occlusal plane and 45 degrees to the midsagittal plane. This angulation, maintained throughout the injection, advances the needle around the maxillary tuberosity to reach the deposition site.
TABLE 39-13 Posterior Superior Alveolar (PSA) Nerve Block
| Nerves anesthetized |
Posterior superior alveolar |
| Areas anesthetized |
(Figure 39-72) |
| Needle gauge and length |
25- or 27-gauge short (in rare instances a long needle may be preferred) |
| Operator position |
8 or 9 o'clock |
| Penetration site |
Height of the mucobuccal fold posterior and superior to the last molar present (see Figure 39-71) |
| Landmarks |
|
| Syringe orientation |
45 degrees to the maxillary occlusal plane and 45 degrees to the midsagittal plane (Figure 39-73) |
| Hand rests |
Forefinger, or thumb of opposite hand as it retracts client's buccal tissue |
| Deposition site |
Posterior and superior to the posterior border of the maxilla at the PSA nerve foramina (see Figure 39-70) |
| Penetration depth |
16 mm or three quarters of a short needle |
| Amount of anesthetic to be deposited |
0.9-1.8 mL, or one half to one cartridge |
| Length of time to deposit |
Approximately 60-120 seconds |
| Technique Notes |
| Owing to the high vascularity of the deposition site for the PSA, a triple aspiration is recommended to ensure that the needle bevel is not against the interior wall of a vessel, thus providing a false-negative aspiration (see Figure 39-53). To aspirate in multiple planes, perform a single aspiration as usual, then rotate the body of the syringe toward you slightly, reaspirate, then rotate the body of the syringe back to the original position and perform a final aspiration. If all three aspiration tests are negative, it is safe to administer the anesthetic solution. |
| Potential Problems |
Technique Tips |
| Bone is contacted when the angle of needle is too great in reference to the midsagittal plane. |
Withdraw the needle and bring the syringe closer to the midline. |
| Mandibular anesthesia: The mandibular division of the trigeminal nerve is lateral to the PSA nerves. |
Review landmarks and syringe orientation so as not to deposit lateral to the PSA nerves. |
INJECTION TECHNIQUES FOR THE PALATAL HARD AND SOFT TISSUES
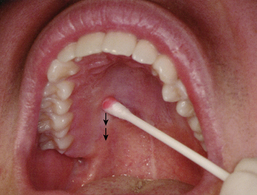
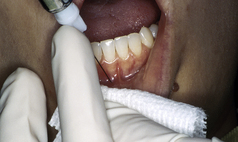
When dental hygiene care involves the hard and soft tissues of the palate, such as during therapeutic scaling, root planing, and soft-tissue curettage procedures, anesthesia of the palatal tissue may be needed. Unfortunately, for many clients these injections are traumatic, but palatal injections need not be painful if appropriate techniques are followed. Especially important to facilitate comfort during palatal injections are the following tasks:

Provide pressure anesthesia with a cotton swab at the penetration site both before (
Figure 39-74) and during (
Figure 39-75) the injection because topical anesthetics have limited value on keratinized tissues such as the palate.
Deposit the solution slowly to avoid tearing the palatal tissue, which is dense and firmly attached to the bone.
Be confident that you, the dental hygienist, will administer the injection with minimal discomfort to the client.
Use a triple injection technique whenever possible when administering the nasopalatine nerve block to minimize client discomfort (this technique is described in the following discussion of the nasopalatine nerve block) (see
Figure 39-74).
Injection techniques used to anesthetize the palatal hard and soft tissues are the greater palatine nerve block and the nasopalatine nerve block.
Greater Palatine Nerve Block
The greater palatine nerve block is used to anesthetize the hard and soft palatal tissues overlying the molars and premolars; no pulpal anesthesia is obtained (see Figure 39-74). This nerve block provides anesthesia to a large area, thereby minimizing the number of needle penetrations and total amount of anesthetic solution needed; however, the greater palatine nerve can be blocked at any point after it emerges from the foramen and passes anteriorly between the hard and soft tissues. As a result, anesthesia is obtained only anterior to the site of the injection. For example, if treatment is limited to the first molar and premolars, the injection site should be slightly posterior to the first molar along the greater palatine nerve path. This practice ensures that the areas to be treated are anesthetized but that the posterior region of the palate is not unnecessarily anesthetized.
Table 39-14 provides the criteria pertinent for the administration of a greater palatine nerve block and includes suggestions for locating the greater palatine foramen and maximizing client comfort.
TABLE 39-14 Greater Palatine (GP) Nerve Block (Anterior Palatine)
| Nerves anesthetized |
Greater palatine |
| Areas anesthetized |
Hard palate and overlying soft tissue unilaterally from the maxillary third molar to the first premolar (see Figure 39-74) |
| Needle gauge and length |
25- or 27-gauge short |
| Operator position |
8 or 9 o'clock |
| Penetration site |
Just anterior to the greater palatine foramen (see Figure 39-75) |
| Landmarks |
Junction of alveolar process and palatine bone |
| Syringe orientation |
Approaches from opposite the side being injected with the needle at a right angle to the penetration site (Figure 39-76) |
| Hand rests |
|
| Deposition site |
Just anterior to the greater palatine nerve foramen |
| Penetration depth |
3-6 mm; often only the bevel is inserted |
| Amount of anesthetic to be deposited |
0.45 mL, or one quarter of a cartridge; determine by development of blanching of palatal tissues |
| Length of time to deposit |
Approximately 20-30 seconds |
| Technique Notes |
1. To locate the greater palatine foramen, palpate the posterior palate with a cotton-tipped applicator or your forefinger at the junction of the hard palate and the alveolar process near the second molar until a depression is felt. 2. Topical anesthetics have very limited action on keratinized tissue such as the palate.
To ensure client comfort, pressure anesthesia with a cotton-tipped applicator is recommended for a minimum of 1 minute before injection and throughout deposition (see Figure 39-49). |
| Potential Problems |
Technique Tips |
| Deposition of the anesthetic solution too far anterior of the foramen, resulting in inadequate anesthesia. |
Move the needle posteriorly. |
| Inadequate anesthesia of the first molar resulting from cross-innervation from the nasopalatine nerve. |
Infiltrate palate in area of first molar. |
Nasopalatine Nerve Block
The nasopalatine nerve block anesthetizes the palatal hard and soft tissues from the mesial aspect of the right premolar to the mesial aspect of the left premolar. As with the greater palatine nerve block, a minimal number of needle penetrations and a small amount of anesthetic solution are needed to anesthetize a wide area. Because the soft tissue is dense, firmly attached to the bone, and very sensitive, however, this nerve block is potentially the most painful of all the injections unless the protocol for an atraumatic injection is closely followed.
Two techniques are available for giving this injection. The first involves only one needle penetration on the lateral side of the incisive papilla (Figure 39-78, D). The second technique includes giving two or three sequential injections, one between the maxillary central incisors followed by a second penetration into the papilla between the maxillary central incisors. In some cases these two injections provide sufficient pain control for dental hygiene care. If not, an injection is made into the partially anesthetized palatal tissues on the lateral side of the incisive papilla to complete the nasopalatine nerve block (see Figure 39-78, A to D).
Each approach is acceptable, and dental hygienists should select the procedure they feel most comfortable with and that provides the most atraumatic injection possible for the client (Table 39-15).
TABLE 39-15 Nasopalatine (NP) Nerve Block
| Nerves anesthetized |
Neopalatine |
| Areas anesthetized |
Hard palate and overlying soft tissue bilaterally from the maxillary canine to canine (Figure 39-79) |
| Needle gauge and length |
25- or 27-gauge short |
| Operator position |
8 or 9 o'clock |
| Penetration site |
Just lateral to posterior portion of the incisive papilla (Figure 39-80; see Figure 39-78, D) |
| Landmarks |
|
| Syringe orientation |
Approaches from canine or premolar region at a 45-degree angle to the incisive papilla (see Figure 39-78, D) |
| Hand rests |
Syringe can be stabilized against the corner of the client's mouth (see Figure 39-77) |
| Deposition site |
Incisive foramen, beneath incisive papilla |
| Penetration depth |
3-6 mm; often only the bevel is inserted |
| Amount of anesthetic to be deposited |
0.45 mL, or one quarter of a cartridge; determine by development of blanching of palatal tissues |
| Length of time to deposit |
Approximately 20-30 seconds |
| Technique Notes |
1. Topical anesthetics have very limited action on keratinized tissue such as the palate. To ensure client comfort, pressure anesthesia with a cotton-tipped applicator is recommended for a minimum of 1 minute before injection and throughout deposition (see Figure 39-52). 2. For greatest client comfort, the nasopalatine nerve block is best administered in a triple injection sequence as follows: infiltration of a central incisor, papillary infiltration of teeth 8 and 9, and then the nasopalatine. Each injection anesthetizes the area of the subsequent injection, resulting in an atraumatic procedure for the client (see Figure 39-78). |
| Potential Problems |
Technique Tips |
| Unilateral anesthesia due to deposition of anesthetic solution to one side of incisive foramen. |
Reinsert the needle until it is directly over the incisive foramen. |
| Inadequate anesthesia of canine or first premolar due to cross-innervation from the greater palatine nerve. |
Infiltrate the palate at the area of the canine or first premolar. |
INJECTION TECHNIQUES FOR THE MANDIBULAR TEETH AND HARD AND SOFT TISSUES
The dense bone of the mandible that covers the apices of the teeth eliminates the possibility of supraperiosteal injections into the posterior teeth. In addition, because of mandibular bone density, anesthetic solution must be deposited within 1 mm of the target nerve to obtain pulpal anesthesia.
The injection techniques available to anesthetize the mandibular teeth and hard and soft tissues include the inferior alveolar, lingual, buccal, mental, and incisive nerve blocks. Of these, only the inferior alveolar and incisive nerve blocks cause pulpal anesthesia.
Inferior Alveolar Nerve Block and Lingual Nerve Block
The inferior alveolar and lingual nerve blocks are often employed when dental hygiene care involves the mandible. The biggest advantage is that one penetration anesthetizes the entire quadrant, with the exception of the facial soft tissue over the molars. The disadvantages, however, are formidable, and the success rate of the inferior alveolar nerve block is considerably lower than that of many other injections. Reasons for lack of success are as follows:
The anatomic variations with regard to the height of the mandibular foramen on the medial side of the ramus
Accessory innervation by means of the mylohyoid nerve or a bifid inferior alveolar nerve
The considerable depth of soft-tissue penetration needed to reach the nerve
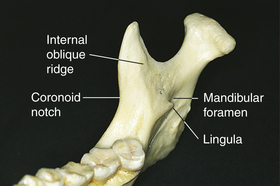
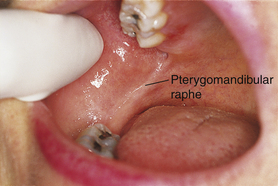
In addition, the inferior alveolar nerve block has the highest rate of positive aspiration of all the intraoral injections.1 Table 39-16 describes the criteria essential for administering the inferior alveolar and lingual nerve blocks. It is important to carefully follow the guidelines regarding the landmarks for the penetration and deposition sites to ensure a successful injection and minimize or eliminate complications. To determine the height of the injection, place the index finger or thumb of your nondominant hand in the coronoid notch (Figure 39-81). An imaginary line extends posteriorly from the fingertip in the coronoid notch to the deepest part of the pterygomandibular raphe, determining the height of injection. This imaginary line should be parallel with the occlusal plane of the mandibular molar teeth and usually lies 6 to 10 mm above the occlusal plane (Figure 39-82).
TABLE 39-16 Inferior Alveolar (IA) and Lingual (Li) Nerve Blocks
| Nerves anesthetized |
|
| Areas anesthetized |
Mandibular teeth unilaterally to midline Inferior portion of the ramus Facial tissue anterior to the first molar All lingual gingival tissue unilaterally to midline Anterior two thirds of the tongue |
| Needle gauge and length |
25- or 27-gauge long |
| Operator position |
8 or 9 o'clock |
| Penetration site |
Middle of the pterygomandibular triangle (formed by the pterygomandibular raphe medially and the internal oblique ridge laterally) at the height of the coronoid notch, 6-10 mm above the mandibular occlusal plane (see Figure 39-83) |
| Landmarks |
Anterior border of the ramus Pterygomandibular triangle |
| Syringe orientation |
Approaches from contralateral premolar area, parallel to the occlusal plane |
| Hand rests |
Small finger on client's chin |
| Deposition site |
IA: Superior to the mandibular foramen
Li: Withdraw needle halfway after deposition for IA
|
| Penetration depth |
Approximately 20-25 mm or two thirds to three quarters of needle (withdraw 1 mm before deposition) Li: Withdraw needle halfway after deposition for IA
|
| Amount of anesthetic to be deposited |
IA: 0.9-1.8 mL, or one half to one cartridge
Li: 0.45 mL, or one quarter of a cartridge
|
| Length of time to deposit |
|
Technique Notes
1. To locate the pterygomandibular triangle, place your thumb or index finger on the greatest depression on the anterior border of the ramus; this is the coronoid notch. Roll your finger medially to locate the internal oblique ridge. The point of penetration is between the internal oblique ridge and the pterygomandibular raphe (in the pterygomandibular triangle), 6-10 mm above the mandibular occlusal plane (see Figures 39-81 and 39-82). While inserting, advancing, and withdrawing the needle, it is important to place the thumb or index finger on the internal oblique ridge and at the same time grasp the posterior border of the mandible with the remainder of the hand. This technique provides stabilization and control in the event the client moves unexpectedly during the procedure. 2. Owing to the high vascularity of the deposition site for the IA, a triple aspiration is recommended to ensure that the needle bevel is not against the interior wall of a vessel, thus providing a false-negative aspiration (see Figure 39-53). To aspirate in multiple planes, perform a single aspiration as usual, rotate the body of the syringe toward you slightly and reaspirate, then rotate the body of the syringe back to the original position and perform a final aspiration. If all three aspiration tests are negative, it is safe to administer the anesthetic solution. 3. If bone is contacted prematurely, before half of the needle length has entered the tissues, it is likely that the needle is too far anterior and has contacted the lingululm, which covers the mandibular foramen ( Figure 39-86, A). To correct, withdraw the needle halfway but do not remove from the tissues. Bring the body of the syringe over the mandibular anterior teeth and reinsert past the depth previously penetrated. Redirect the body of the syringe back over the contralateral premolars and continue to penetrate until bone is contacted ( Figure 39-86, B). 4. If bone is not contacted and the penetration depth is nearing the hub of the needle, it is likely that the needle is too far posterior ( Figure 39-87, A). To correct, withdraw the needle halfway but do not remove it from the tissues. Redirect the syringe further over the contralateral molars and continue insertion until bone is contacted ( Figure 39-87, B). 5. At the deposition site, deposit two thirds of the solution. Withdraw the needle halfway and deposit the remaining one third of the solution to anesthetize the lingual nerve. |
| Potential Problems |
Technique Tips |
| Deposition of anesthetic below the mandibular foramen. |
Reinject at a higher penetration site. |
| Deposition of anesthetic too far anterior on the ramus, indicated by early bone contact, with less than one half the needle length inserted. |
See technique note 3. |
| Incomplete pulpal anesthesia of the molars (often mesial root of the first molar) or premolars. Theorized that the mylohyoid nerve, which is not blocked by the IA, provides accessory innervations to these areas. |
Using a 27-gauge long needle, direct syringe from opposite corner of mouth and penetrate the apical region of the tooth just distal to the unanesthetized tooth. Advance 3-5 mm and deposit 0.6 mL or one third of a cartridge over 20 seconds (Figure 39-88). |
| Incomplete anesthesia of the central or lateral incisors. May be due to cross-innervation from the opposite side inferior alveolar nerve. |
Using a 27-gauge short needle, infiltrate the mucobuccal fold and advance to the apical region of the unanesthetized tooth. Deposit 0.6 mL or one third of a cartridge over 20 seconds (Figure 39-89). |
To locate the pterygomandibular triangle, roll the index finger or thumb of your nondominant hand from the coronoid notch to locate the internal oblique ridge (see Figure 39-81). The point of needle penetration is between the internal oblique ridge and the pterygomandibular raphe in the pterygomandibular triangle. The syringe barrel is placed in the corner of the mouth on the contralateral side (Figures 39-83 and 39-84).
Appropriate care planning is important when the mandible is anesthetized. Bilateral inferior alveolar and lingual nerve blocks should be avoided. Such procedures produce anesthesia of the client's entire tongue and lingual soft tissues, resulting in an inability to swallow and enunciate and a lack of sensation. Thus anesthetizing the entire mandible creates a high risk of client self-injury to the soft tissues and is not recommended. The optimal care plan is to anesthetize only the right side or only the left side at one appointment. Another alternative is to administer the inferior alveolar nerve block to the side that requires the most treatment (particularly involving lingual tissue) or has the greatest number of teeth, and administer the incisive nerve block (see Table 39-19) on the opposite side. Because the incisive nerve block does not provide pain control to the lingual tissues, a lingual infiltration may be given, if necessary.
In many instances the deliberate deposition of anesthetic solution to anesthetize the lingual nerve is unnecessary because solution deposited for the inferior alveolar nerve block diffuses and anesthetizes the lingual nerve; however, a separate technique for a lingual nerve block is described in Table 39-16 in the event that deliberate deposition of anesthetic solution is needed.
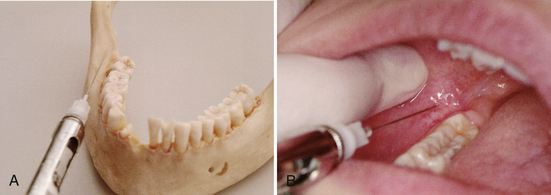
Buccal Nerve Block
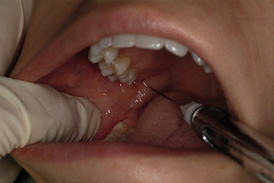
The buccal nerve block provides pain control to the soft tissues buccal to the mandibular molars. This injection, along with the inferior alveolar and lingual nerve blocks, anesthetizes the entire quadrant in which it is given. If dental hygiene care involves manipulation of the buccal tissues of the molars, such as therapeutic scaling, root planing, and soft-tissue curettage, this injection is indicated. If treatment does not include these tissues, however, the dental hygienist may simply forgo this injection. Unlike the other injections needed to anesthetize the mandible, the buccal nerve block is easy to administer (Figure 39-90) and has a high success rate. Table 39-17 describes technique for the buccal nerve block.
TABLE 39-17 Buccal Nerve Block (Long Buccal)
| Nerves anesthetized |
Buccal |
| Areas anesthetized |
Soft tissues buccal to the mandibular molars unilaterally (Figure 39-91) |
| Needle gauge and length |
25- or 27-gauge long |
| Operator position |
8 or 9 o'clock |
| Penetration site |
In the vestibule, distal and buccal to the most distal molar at the height of the occlusal plane (see Figure 39-62) |
| Landmarks |
|
| Syringe orientation |
Parallel to the mandibular occlusal plane on the buccal side of the teeth (see Figure 39-90) |
| Hand rests |
Client's cheek or chin |
| Back of operator's opposite hand (Figure 39-92) |
| Deposition site |
Buccal nerve as it passes over the anterior border of the ramus |
| Penetration depth |
1-4 mm, often only the bevel is inserted |
| Amount of anesthetic to be deposited |
0.3-0.45 mL, or one eighth to one quarter of a cartridge |
| Length of time to deposit |
Approximately 10-20 seconds |
| Technique Notes |
|
| The buccal nerve block can be administered immediately after the IA/Li. Therefore the penetration sites can be prepared simultaneously with topical anesthetic. |
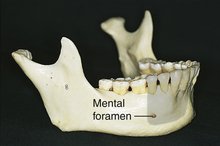
Mental Nerve Block
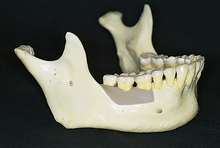
At or near the apices of the premolars, the mental nerve exits the mental foramen and innervates the facial soft tissues anterior to the foramen, the lower lip, and the chin on the side of the injection. Because of the easy access of the anatomic landmarks, the mental nerve block is simple to administer, has a high success rate, and is usually atraumatic (Figure 39-93).
Although this injection has limited application in restorative dentistry, it may be used more commonly by dental hygienists doing gingival curettage in the anterior portion of the mandible. Because the mental nerve block does not provide pain control to the lingual tissues, a lingual infiltration may be needed.
Table 39-18 presents essential criteria for administration of the mental nerve block, including suggestions for locating the mental foramen.
TABLE 39-18 Mental Nerve Block
| Nerves anesthetized |
Mental (terminal branch of inferior alveolar nerve) |
| Areas anesthetized |
Facial soft tissues unilaterally from the mental foramen anterior to midline |
| Needle gauge and length |
25- or 27-gauge short |
| Operator position |
8 or 9 o'clock or 11 or 1 o'clock |
| Penetration site |
Mucobuccal fold directly over the mental foramen (see Figure 39-93) |
| Landmarks |
|
| Syringe orientation |
Directed toward the mental foramen |
| Hand rests |
|
| Deposition site |
Directly over the mental foramen, between the apices of the premolars |
| Penetration depth |
5-6 mm, or one quarter the needle length (do not enter the mental foramen) |
| Amount of anesthetic to be deposited |
0.6 mL, or one third of a cartridge |
| Length of time to deposit |
Approximately 30-60 seconds |
| Technique Notes |
1. To locate the mental foramen, place your forefinger in the mucobuccal fold against the body of the mandible near the first molar. Palpate anteriorly until a depression is felt or the bone feels irregular. This is the mental foramen, which is most often found between the apices of the first and second premolars ( Figure 39-96). 2. Use radiographs to assist you in finding the mental foramen ( Figure 39-97). |
Incisive Nerve Block
The incisive nerve originates at the mental foramen and innervates the teeth anterior to the foramen. As a terminal branch of the inferior alveolar nerve, the incisive nerve is anesthetized when an inferior alveolar nerve block is successfully given. The incisive nerve block, however, may be the injection of choice in several instances. Because bilateral inferior alveolar and lingual nerve blocks are contraindicated as a result of client discomfort, an alternative may be to administer the inferior alveolar and lingual nerve blocks to the side needing the most treatment or having the greatest number of teeth and to administer the incisive nerve block on the other side. The incisive nerve block also may be used concurrently on both the right and left sides when dental hygiene care requires the incisive nerve block. If lingual soft tissues in isolated areas require anesthesia, local infiltration can be accomplished readily by inserting a 27-gauge short needle through the interdental papilla on both the mesial and distal aspect on the tooth being treated. Because the incisive nerve block already anesthetized the buccal soft tissues, the needle penetration is atraumatic. Local anesthetic solution should be deposited as the needle is advanced through the tissue toward the lingual aspect.
Table 39-19 presents the criteria necessary for administration of the incisive nerve block and suggestions for locating the mental foramen. Although some authorities recommend penetrating the needle into the mental foramen to reach the incisive nerve, anesthesia can be obtained much more easily and safely by depositing the solution outside the foramen and using digital pressure over the site to direct the anesthetic into the foramen.
TABLE 39-19 Incisive Nerve Block
| Nerves anesthetized |
Mental (terminal branch of inferior alveolar) |
| Areas anesthetized |
Mandibular second premolar to central incisor unilaterally Facial soft tissues unilaterally from the mental foramen anterior to midline |
| Needle gauge and length |
25- or 27-gauge short |
| Operator position |
8 or 9 o'clock or 11 or 1 o'clock |
| Penetration site |
Mucobuccal fold directly over the mental foramen |
| Landmarks |
|
| Syringe orientation |
Directed toward the mental foramen |
| Hand rests |
Back of operator's opposite hand or wrist (see Figure 39-97) |
| Deposition site |
Directly over the mental foramen, between the apices of the premolars |
| Penetration depth |
5-6 mm, or one quarter of the needle length (do not enter the mental foramen) |
| Amount of anesthetic to be deposited |
0.6-0.9 mL, or one third to one half of a cartridge |
| Length of time to deposit |
Approximately 30-60 seconds |
| Technique Notes |
1. The incisive nerve block is administered in the same manner as the mental, differing only in the application of pressure over the deposition site to direct the anesthetic solution into the mental foramen, resulting in pulpal anesthesia. 2. To locate the mental foramen, place your forefinger in the mucobuccal fold against the body of the mandible near the first molar. Palpate anteriorly until a depression is felt or the bone feels irregular. This is the mental foramen, which is most often found between the apices of the first and second premolars (see Figure 39-66). 3. Use radiographs to assist you in finding the mental foramen (see Figure 39-68). 4. Maintain pressure over the mental foramen with your finger for 1-2 minutes after the injection. This aids the flow of solution into the foramen, providing the pulpal anesthesia. |
| Potential Problems |
Technique Tips |
| Incomplete anesthesia of the central or lateral incisors. May be due to cross-innervation from the opposite side inferior alveolar nerve. |
Using a 27-gauge short needle, infiltrate the mucobuccal fold and advance to the apical region of the unanesthetized tooth. Deposit 0.6 mL or one third of a cartridge over 20 seconds (see Figure 39-61). |
| Incomplete pulpal anesthesia. |
Redirect needle toward mental foramen and maintain pressure over the deposition site. |
LOCAL COMPLICATIONS
Despite careful preanesthetic client assessment and adherence to the recommended procedures for local anesthetic administration, the following local complications may develop.
Needle Breakage
The introduction of disposable stainless steel needles has significantly reduced the incidence of needle breakage; however, virtually all needle breaks are preventable. When breakage does occur, it is primarily caused by a sudden, unexpected movement by the client during needle insertion or by poor injection technique.1 If a needle does break during insertion and can be retrieved without surgical intervention, no emergency exists. Those needles that are not retrieved most often remain in place and become encased by scar tissue. Leaving the needle in the tissue often produces fewer difficulties than the surgery required for its removal.
To prevent needle breakage, do the following:
Inform the client about the local anesthetic procedure both before and during the injection. Effective communication helps the individual anticipate the dental hygienist's actions and control anxiety.
Use long, large-gauge needles (e.g., 25-gauge) when penetrating significant tissue depth. These are less likely to break than smaller needles.
Never bend the needle, because it weakens the metal.
Advance the needle slowly. A forceful contact with bone may break the needle or may precipitate a quick movement by the client because of associated pain.
Never force a needle against firm resistance such as bone.
Do not change the direction of the needle while it is almost completely within the tissues. If it is necessary to redirect the needle, first withdraw almost completely out of the tissue and then modify the direction.
A needle should not be inserted into the tissues all the way to the hub. This juncture at the needle shaft and hub is the weakest part of the needle and is vulnerable to breakage. If needle breakage occurs at this point, a portion of the shaft must be exposed in order for the needle to be retrieved without surgery.
When a needle breaks, do the following:
Remain calm; do not panic.
Instruct the client not to move. Do not remove your hand from the client's mouth, and keep the client's mouth open. If possible, place a bite block in the client's mouth.
If the needle fragment is protruding, attempt to remove it with cotton pliers or a hemostat.
If the needle fragment is not visible and cannot be readily retrieved:
Calmly inform the client; attempt to alleviate fears and apprehension.
Refer the client to an oral and maxillofacial surgeon for consultation.
Document the incident and the client's response in the client's chart. Keep the remaining needle fragment. Inform your insurance carrier immediately.
When a needle breaks, surgical removal should be considered, as follows:
If the needle fragment is superficial and easily located through radiologic and clinical examination, removal by an oral and maxillofacial surgeon is possible.
If, despite the superficial location, retrieval is unsuccessful, it is prudent to abandon the attempt and allow the needle fragment to remain in the tissue.
If the needle is located in deeper tissues or is difficult to locate, permit it to remain without an attempt at removal. There is considerable precedent to justify the retention of a fragment of a broken needle if removal appears difficult.
Pain during the Injection
Pain during local anesthetic agent administration may be attributed to several factors: a careless injection technique and callous attitude toward the client; a dull needle from multiple injections; a barbed needle from hitting bone; or rapid deposition of the anesthetic solution. It is not possible to ensure that every injection is totally free from discomfort because the reactions of clients vary; however, the dental hygienist should take every precaution to prevent pain during the injection or prevent its recurrence.
To prevent pain during injection, do the following:
Deposit a few drops and then wait 5 seconds before advancing the needle 2 to 3 mm. Repeat the process until the deposition site is reached.
Use sharp, disposable needles.
Apply topical anesthetic before insertion of the needle.
Use sterile anesthetic agents.
Inject the anesthetic agent slowly.
Store anesthetic solutions at room temperature and avoid using cartridge warmers.
Burning during the Injection
A burning sensation reported by the client during deposition of the local anesthetic agent may be caused by a local anesthetic with a vasopressor that is more acidic than the tissue in which it is deposited. The burning sensation, which lasts only a few seconds, disappears as anesthesia develops and is unapparent when the anesthesia fades. A more acute burning may occur, however, if the local anesthetic solution is contaminated from improper storage of the cartridge in a chemical disinfectant; if the cartridge is overheated in a cartridge warmer; if the expiration date of the solution has lapsed; or if the solution is deposited too rapidly, particularly on the palate. When burning occurs as a result of these factors, the tissue is damaged and subsequent postanesthetic trismus, edema, or possible paresthesia may develop.
To prevent burning during the injection, do the following:
Store the cartridges in a dark place at room temperature in the original container. Avoid storing cartridges in chemical disinfectants or using cartridge warmers.
Check the expiration date of each cartridge before use. Anesthetic solution that has exceeded the expiration date should be discarded.
Inject the anesthetic solution slowly.
Most often, burning during an injection is a temporary condition and needs no specific treatment.
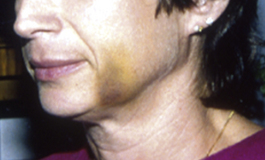
Hematoma
A hematoma is a swelling and discoloration of the tissue resulting from the effusion of blood into the extravascular spaces (Figure 39-99). Hematomas occur subsequent to an inadvertent puncture of a blood vessel, particularly an artery, during local anesthetic administration. They appear most often after the administration of a PSA or inferior alveolar nerve block because the tissues associated with these injections are less dense and readily accommodate large volumes of blood. Bleeding continues until extravascular pressure exceeds intravascular pressure or until clotting occurs. A hematoma is less likely to develop after a palatal injection because of the density of the tissue in this area.
A hematoma that ensues after a PSA nerve block is the largest and most visible. The bleeding occurs in the infratemporal fossa, and swelling and discoloration appear on the side of the face. Clinical manifestations of a hematoma following an inferior alveolar nerve block include intraoral tissue discoloration and swelling on the lingual aspect of the ramus. Other than the bruise, which may or may not be visible extraorally, a hematoma may be accompanied by trismus and pain.
To prevent a hematoma, do the following:
Be attentive to anatomic detail involved in each injection.
Modify the injection technique as indicated by the client's anatomy. For example, the depth of needle penetration for a PSA nerve block may be shallower for a client with small anatomic features.
Use a short needle for the PSA nerve block to minimize the risk of overinsertion and the potential for hematoma formation.
Minimize the number of needle insertions.
Observe the appropriate techniques for local anesthetic administration.
Management includes the following:
If swelling appears, immediately apply direct pressure to the site of the bleeding for at least 2 minutes. For an inferior alveolar nerve block, the pressure point is the medial side of the ramus. For the mental or incisive nerve block, pressure is applied over the mental foramen. If hematoma formation follows an infraorbital nerve block, the pressure point is the skin over the infraorbital foramen. Unfortunately, it is difficult to apply pressure directly to the site of bleeding after a PSA nerve block because the vessels are located posterior, superior, and medial to the maxillary tuberosity. Pressure may be applied to the tissues of the mucofacial fold as far distally as the client can tolerate.
Apply ice to the region when hematoma formation begins. Ice constricts the blood vessels, minimizes the size of the hematoma, and acts as an analgesic.
Inform the client about the possibility of soreness and limitation of movement. If soreness develops, analgesics may be taken. Beginning the next day, warm, moist towels may be applied to the affected region for 20 minutes every hour. This provides comfort and helps blood resorption. Heat therapy should not commence for at least 4 to 6 hours after hematoma formation, however. Before this time, heat may produce further vasodilation and an even larger hematoma.
Advise the client that the swelling and discoloration will gradually disappear over 7 to 14 days.
Dismiss the client when the bleeding has stopped. Avoid further dental hygiene care in the area until signs and symptoms of the hematoma have disappeared. Document the incident and the client's response in the client's chart.
Facial Nerve Paralysis
Facial paralysis is a loss of motor function of the facial expression muscles. Unilateral facial nerve paralysis occurs when the local anesthetic solution is inadvertently deposited into the parotid gland, located on the posterior border of the ramus, during an inferior alveolar nerve block.
The loss of motor function is temporary and subsides in a few hours; however, during this time, the client is unable to control these muscles and the face appears lopsided. It also may be impossible for the client to voluntarily close the eye on the affected side. Fortunately, the corneal reflex is functional, and tears continue to lubricate the eye.
To prevent facial nerve paralysis, do the following:
Adhere to the techniques recommended for the inferior alveolar nerve block.
Make sure the needle contacts bone (medial aspect of the ramus) before deposition of the local anesthetic solution.
If bone is not contacted, withdraw the needle almost entirely out of the tissue, bring the barrel of the syringe more posterior (thereby directing the needle more anterior), and readvance the needle until bone is contacted.
Following these steps precludes deposition of the solution into the parotid gland.
Within a short time after deposition of the anesthetic solution into the parotid gland, the client senses a weakening of the facial muscles on the affected side. The inferior alveolar nerve is not anesthetized. Management includes the following1:
Reassure the client. Explain that the paralysis lasts only a few hours and resolves with no residual effects.
Instruct the client to remove contact lenses.
Ask the client to close the eyelid manually to keep the cornea lubricated.
There are no contraindications to proceeding with treatment at this time, but it may be advisable to reschedule the client.
Document the incident and the client's response in the client's chart.
Paresthesia
Prolonged anesthesia or paresthesia is a condition wherein the client experiences numbness for many hours or days after a local anesthetic injection. Paresthesia may be the result of irritation to the nerve after injection of an anesthetic agent that has been contaminated with alcohol or a disinfectant. The ensuing edema places pressure on the nerve, leading to paresthesia. Persistent anesthesia also may result from trauma to the nerve sheath caused by the needle contacting the nerve during an injection. Clients often report the sensation of an electric shock when this occurs. Finally, hemorrhage into or around the neural sheath may create pressure and subsequent paresthesia.
A complication of paresthesia is the client inadvertently precipitating a biting, thermal, or chemical injury from the diminished sensation in the area.
To prevent paresthesia, do the following:
Store dental cartridges properly. Avoid placing cartridges in disinfectants.
Most often paresthesia involves the lingual nerve or the inferior alveolar nerve. The sensory deficit usually is minimal and rarely is accompanied by permanent nerve damage. Fortunately, most incidents resolve within 8 weeks. Recommendations for the management of a client with paresthesia are as follows1:
Reassure the client. The client usually contacts the dental office the day after treatment to report continuing numbness. Explain that paresthesia after local anesthetic administration is not uncommon.
Arrange for an examination of the client by the dentist, who will determine the location and extent of paresthesia. Explain to the client that paresthesia often continues for 2 months and may last longer.
Arrange to have the client examined every 2 months until cessation of the paresthesia. Consultation with an oral and maxillofacial surgeon is advisable if paresthesia persists after 12 months or sooner if the client and dentist consider it appropriate.
Record the incident, conversations with the client, and all clinical findings in the client's chart. Inform your liability carrier of the circumstances.
Dental and dental hygiene care may continue. Avoid injecting into the area of the traumatized nerve, and employ alternative pain control techniques.
Trismus
Trismus, a spasm of the muscles of mastication that results in soreness and difficulty opening the mouth, most often occurs as a result of trauma to the muscles in the infratemporal space after intraoral injections. This trauma may be the result of multiple needle insertions, administration of an anesthetic solution contaminated with a disinfectant, injection of large amounts of local anesthetic solution into a restricted area causing distention of the tissues, hemorrhage that leads to muscle dysfunction as the blood is resorbed, or a low-grade infection.
To prevent trismus, do the following:
Store the local anesthetic cartridges properly. Avoid immersing the cartridges in a disinfectant.
Use sharp, sterile, disposable needles.
Follow appropriate infection-control protocol. Needles that become contaminated should be replaced.
Use minimal effective amounts of local anesthetic solution, and deposit the solution slowly.
Adhere to the recommended techniques of local anesthetic administration as outlined in
Procedure 39-3 and
Tables 39-9 to 39-19. Observe anatomic landmarks and strive to improve administration techniques. Each of these recommendations facilitates atraumatic injections and prevents repeated needle insertions.
Clients often complain of soreness and difficulty in opening the mouth the day after the administration of an inferior alveolar or a posterior superior nerve block. Recommendations for management of clients with trismus follow1:
Arrange for an examination of the client by the dentist.
Start heat therapy immediately. Place moist, hot towels on the affected area for 20 minutes every hour. Analgesics may be recommended to manage the discomfort. Codeine and muscle relaxants may be prescribed by the dentist if needed.
Direct the client to open and close and move the mandible from side to side (lateral) for 5 minutes every 3 to 4 hours. This exercise may be accomplished by chewing gum.
Continue heat therapy, analgesics, and exercise until the client is free of symptoms. Improvement is often reported within 48 hours, and symptoms diminish gradually over several days.
If symptoms continue after 48 hours, the possibility of an infection exists. Antibiotic therapy (prescribed by the dentist) should be added to the recommended care regimen.
If severe pain and dysfunction continue despite therapy, refer the client to an oral and maxillofacial surgeon for consultation.
Record the incident, conversations with the client, the results of clinical examinations, and care recommended in the client's chart.
Avoid elective dental hygiene care until symptoms resolve and the client is more comfortable.
Infection
Infection from local anesthetic administration occurs rarely with the introduction of sterile disposable needles and glass cartridges; however, postinjection infection may be precipitated by contamination of the needle before the injection, improper handling of the local anesthesia armamentarium, or improper tissue preparation before the injection. When a contaminated needle or local anesthetic solution is introduced into the deeper tissues, infection may occur. If infection is not recognized and treated, trismus may ensue.
To prevent infection, do the following:
Use sterile, disposable needles.
Sheath the needle before use and resheath it after use to prevent it from coming in contact with nonsterile surfaces.
Use appropriate infection-control protocol when handling the anesthetic cartridges. Store the cartridges in their original container, and, if necessary, wipe the diaphragm of the cartridge with a disinfectant before syringe assembly.
To reduce microorganisms at the penetration site, wipe the tissue with gauze and apply a topical antiseptic before the initial needle insertion.
When infection occurs, the client often reports pain and dysfunction, similar to trismus, a few days after dental hygiene care. At this point signs and symptoms of infection often are not obvious, and immediate treatment includes procedures for managing trismus (e.g., heat therapy, physiotherapy, analgesics, and muscle relaxants). If the client does not respond to therapy within 3 days, an infection most likely exists, and antibiotic therapy should be prescribed by the dentist or physician. Document the recommended therapy and client progress in the client record.
Edema
Edema, a swelling of the tissues, is a clinical sign of a complication. It may be caused by trauma during the injection, administration of contaminated solutions, hemorrhage, an infection, or an allergic response. Most often edema manifests as localized pain and dysfunction. In the most severe case, edema precipitated by an allergic response may produce airway obstruction and represents a life-threatening emergency.
To prevent edema, do the following:
Follow appropriate infection-control protocol when storing and handling components of the local anesthesia armamentarium.
Observe the guidelines for administering atraumatic injections, as described in Procedure 39-3.
Conduct an adequate preanesthetic client assessment before local anesthetic administration.
The course and treatment of edema depend on its cause.1 When produced by the administration of a contaminated anesthetic solution or traumatic injection, edema usually subsides in 1 to 3 days without treatment. Analgesics may be recommended. If edema is caused by hemorrhage, the tissue appears discolored and should be managed in the same manner as a hematoma. Resolution of the edema may take 7 to 14 days as the blood is resorbed into the tissues. Edema produced by infection often becomes progressively worse. If the pain and dysfunction do not subside in 3 days, antibiotic therapy may be instituted by the dentist or physician. The treatment of edema caused by an allergic reaction depends on the degree and location of the tissue swelling. If there is no airway obstruction, treatment involves the administration of intramuscular and oral antihistamines and consultation with an allergist or physician. If the edema occurs in an area where it compromises the airway, the recommendations outlined in the section on systemic complications should be followed.
Tissue Sloughing
Surface layers of epithelium may be lost because of tissue irritation caused by the application of topical anesthetic for an extended period or a client's heightened sensitivity to the local anesthetic. A sterile abscess—a form of tissue sloughing most frequently occurring on the hard palate—may develop after prolonged ischemia induced by the inclusion of a vasoconstrictor in the local anesthetic agent.
To prevent tissue sloughing, do the following:
Use topical anesthetics appropriately. Apply a limited amount of topical anesthetic to the tissue for 1 to 2 minutes to minimize irritation and maximize effectiveness.
When using vasoconstrictors for hemostasis, avoid using high concentrations. Epinephrine 1:50,000 and norepinephrine (Levophed) 1:30,000 are the agents most likely to cause prolonged ischemia leading to a sterile abscess.
Tissue sloughing usually requires no treatment and disappears within a few days. A sterile abscess resolves in 7 to 10 days. Analgesics may be recommended for discomfort, and topical ointment can be applied to minimize irritation. Document the progress and response of the client in the client's record.
Soft-Tissue Trauma
Lip, tongue, or cheek trauma results when the client inadvertently chews or bites these tissues while they are still anesthetized. Trauma—most often observed in children or in mentally or physically disabled individuals—may lead to swelling and significant discomfort when the anesthesia subsides.
To prevent soft-tissue trauma, do the following:
Select a local anesthetic agent with appropriate duration for the length of the dental hygiene appointment.
Warn the client not to eat, drink, or test the anesthetized area by biting until normal sensation has returned. The client's guardian also should be advised of the potential for injury.
If anesthesia is still present on dismissal, place a cotton roll between the teeth and soft tissues. The cotton roll can be held in position with dental floss wrapped around the teeth.
Warning stickers may be placed on children to serve as a reminder to the child and the guardian to be careful.
Management of soft-tissue trauma includes the following:
Coat the lip with petrolatum to minimize irritation and discomfort.
Recommend warm saline rinses to help decrease swelling.
Recommend analgesics for pain.
If infection occurs, the dentist or physician may prescribe antibiotic therapy.
Postanesthetic Intraoral Lesions
Intraoral lesions, such as those from aphthous stomatitis or herpes simplex virus, may develop after the administration of local anesthesia or trauma to the intraoral tissues. Aphthous stomatitis occurs on tissue not attached to bone, such as the mucofacial fold or inner lip. Herpes simplex virus lesions may develop intraorally on tissues attached to bone, such as the hard palate, or extraorally. Trauma to the area by a needle or any equipment used during the dental hygiene care appointment may activate herpetic recurrence.
Preventing the development of postanesthetic intraoral lesions is impossible in susceptible clients; however, minimizing trauma during procedures for local anesthetic administration is advisable.
Approximately 2 days after the dental hygiene care appointment, the client reports ulcerations and intense pain, usually near the injection site(s). If the discomfort is tolerable, no management is necessary. If the pain is acute, topical anesthetic solutions or protective pastes, such as Orabase, may provide relief. The lesions last for 7 to 10 days. Reassure the client, and document the occurrence of the lesion in the client's record.
SYSTEMIC COMPLICATIONS
Client assessment is a key factor in preventing systemic complications associated with local anesthetic administration. It is estimated that a comprehensive health assessment will prevent approximately 90% of potential life-threatening situations.2 The remaining 10% occurs despite all preventive efforts.
The dental hygienist should be able to recognize the signs and symptoms of an adverse drug reaction and properly manage the emergency that may develop. To be adequately prepared for an emergency, the dental hygienist, as well as all members of the oral health team, should be able to recognize and manage medical emergencies, monitor vital signs, administer oxygen, and perform basic life support procedures. By establishing an airway and performing basic cardiopulmonary resuscitation, the dental hygienist administers care to reverse the emergency or to sustain the client until advanced life support systems arrive (see Chapter 8).
Local Anesthetic Overdose
A drug overdose reaction or toxic reaction is defined as those signs and symptoms that result from overly high blood levels of a drug in various organs and tissues.1 Normally the drug is continually absorbed from its site of administration into the circulation. Concurrently the drug is being removed from the blood as it undergoes redistribution and biotransformation. When this equilibrium exists, high blood levels of the drug seldom occur. If this equilibrium is altered, however, the elevation of the blood level of the drug may be sufficient to produce an overdose reaction.
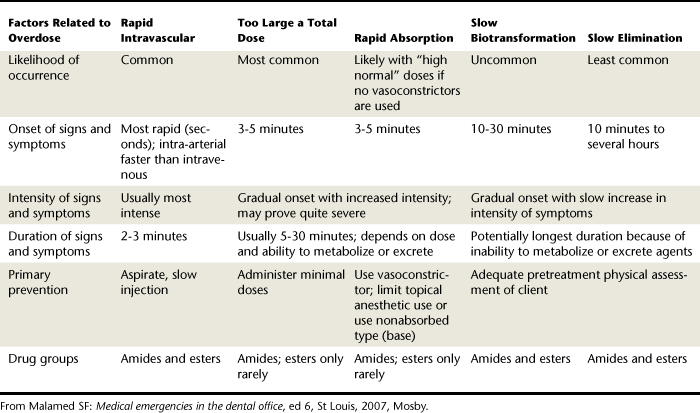
Many factors influence the rate at which a local anesthetic drug level is elevated and the length of time it remains elevated. The presence of one or more of these factors predisposes the client to the development of an overdose reaction. These factors are divided into predisposing client factors and drug factors. Client factors modify the response of an individual to the usual drug dosage. Drug factors involve the drug and its site of administration. Table 39-20 describes how each of these factors influences the potential for an overdose reaction.
TABLE 39-20 Predisposing Factors to Local Anesthetic Overdose Reaction
| Predisposing Factors |
Causative Factors |
| Client Factors |
| Age |
Biotransformation may not be fully developed in younger age groups and may be diminished in older age groups. |
| Body weight |
Lower body weight increases risk. |
| Genetics |
Genetic deficiencies may alter response to certain drugs (e.g., atypical plasma cholinesterase). |
| Disease |
Presence of disease may affect the ability of the body to biotransform the drug into an inactive substance (e.g., hepatic or renal dysfunction, cardiovascular disease). |
| Mental attitude and environment |
Psychologic attitude affects response to stimulation; anxiety decreases seizure threshold. |
| Gender |
Very slight risk increases during pregnancy. |
| Drug Factors |
| Vasoactivity |
Vasodilation increases risk. |
| Drug dose |
Higher dose increases risk. |
| Route of administration |
Intravascular route increases risk. |
| Rate of injection |
Rapid injection increases risk. |
| Vascularity of injection site |
Increased vascularity increases risk. |
| Presence of vasoconstrictors |
Presence decreases risk. |
| Other medications |
Concomitant medications may influence local anesthetic drug levels. |
Adapted from Malamed SF: Medical emergencies in the dental office, ed 6, St Louis, 2007, Mosby.
Causes and Prevention
High blood levels of local anesthetics may occur in one or more of the following ways1:
Biotransformation of the anesthetic is unusually slow.
Elimination of the anesthetic from the body through the kidneys is unusually slow.
The total dose administered is too large.
Absorption of the anesthetic from the site of injection is unusually rapid.
The anesthetic is inadvertently administered intravascularly.
The first two potential causes of an overdose—delayed biotransformation and elimination of the anesthetic agent—relate to the health of the client. Therefore it is imperative that the dental hygienist carefully assess the client's health status, obtain medical consultation if necessary, and modify the dental hygiene care plan as indicated to prevent drug-related complications.
The three remaining causes of an overdose reaction—excessive dose, rapid absorption, and intravascular injection—may be prevented through adherence to proper technique of local anesthetic agent administration. Thus careful assessment of the client before dental hygiene care and proper administration technique minimize the risk of a local anesthetic overdose.
Biotransformation and Elimination of the Anesthetic
Ester anesthetics are biotransformed primarily in the blood by the enzyme pseudocholinesterase, which causes the drug to undergo hydrolysis to para-aminobenzoic acid. Clients with a familial history of atypical pseudocholinesterase may be unable to detoxify ester anesthetic agents at the usual rate. As a result, high blood levels of anesthetic may develop. Amide anesthetics may be administered to these individuals without an increased risk of overdose.
Biotransformation of amide anesthetics occurs in the liver. A history of liver disease may indicate some hepatic dysfunction, and the ability of the liver to biotransform amide anesthetics may be compromised. Clients with a history of liver disease who are ambulatory may still receive amide local anesthetics; however, only small amounts should be injected because average amounts may produce an overdose reaction.
Both ester and amide anesthetics are eliminated to some degree through the kidneys. Renal dysfunction may delay elimination of the local anesthetic from the blood, precipitating accumulated levels of local anesthetic and increased potential for an overdose. Those clients who have significant renal impairment or who require renal dialysis should receive the minimal amount of local anesthetic needed for effective pain control.
Excessive Total Dose of Anesthetic
If an excessive total dose of local anesthetic is administered to a client, toxic effects develop. Responses to drugs vary considerably, but guidelines exist for the dental hygienist to calculate maximal safe doses of local anesthetic agents based on body weight. The dental hygienist also needs to factor in the client's age and physical status and adjust the dose accordingly. A more detailed discussion can be found under the earlier section on maximal safe doses of local anesthetics.
Rapid Absorption of Anesthetic into the Circulation
The addition of a vasoconstricting drug in the local anesthetic solution reduces the systemic toxicity of the anesthetic agent by slowing its absorption into the CVS. Therefore, unless specifically contraindicated because of health status or limited duration of dental hygiene care, local anesthetic solutions containing a vasoconstrictor should be employed. A vasoconstrictor minimizes the potential for an overdose reaction and subsequently increases client safety.
Topical anesthetic agents applied to the oral mucosa are absorbed rapidly into the circulation. The concentration of these topical agents is much greater than that of injectable anesthetic solutions. When small amounts are used in a localized area, there is little chance of complications developing. If topical anesthetic agents are applied over a large area such as a quadrant or the entire arch, a significant increase in blood level may occur, precipitating an overdose reaction.1 To prevent complications with topical anesthetics, it is recommended to limit the area of application and avoid topical anesthetic aerosol sprays because of lack of dosage control and sterility concerns.
Intravascular Injection
The introduction of a local anesthetic solution directly into the bloodstream via an intravascular injection (intravenous or intra-arterial) may produce an overdose response. An intravascular injection may result with any intraoral injection; however, it is more likely to occur during a nerve block, particularly an inferior alveolar, mental, incisive, or PSA nerve block.
Fortunately, an overdose reaction from an intravascular injection can be prevented by having a complete knowledge of the anatomic features of the area to be anesthetized and by adhering to careful injection technique. This includes using an aspirating syringe, using a 25- or 27-gauge needle, aspirating in two planes before deposition, and slowly administering the anesthetic agent.
Clinical Manifestations and Management
The onset, intensity, and duration of a local anesthetic toxic reaction may vary depending on the original cause of the overdose. Table 39-21 compares the various patterns of local anesthetic overdose reactions.
Table 39-22 describes the clinical signs and symptoms that may occur during an overdose reaction (with minimal-to-moderate and moderate-to-high blood levels of anesthetic) and the procedures for managing a local anesthetic overdose response. Management of an overdose response depends on the severity of the reaction. Most often the reaction is mild and transitory, with little or no specific treatment need.1 A severe or longer-duration reaction necessitates prompt recognition and immediate care.
TABLE 39-22 Clinical Manifestations and Management of a Local Anesthetic Overdose Reaction
| Signs and Symptoms |
Management |
| Minimal to Moderate Blood Levels (Mild Overdose Reaction) |
Ringing in ears (tinnitus) Muscular twitching and tremor of face and extremities Blurred vision, unable to focus Numbness of perioral tissues Flushed or chilled feeling Drowsiness, disorientation Elevated respiratory rate |
Position client comfortably. Provide basic life support as indicated. Summon medical assistance if needed. Allow client to recover, and discharge. |
| Moderate to High Blood Levels (Severe Overdose Reaction) |
Tonic-clonic seizure, followed by:
Central nervous system depression Depressed blood pressure, heart rate, and respiratory rate |
Position client supine, legs elevated. Summon medical assistance. Manage seizure: protect client from injury. Provide basic life support as indicated. Administer an anticonvulsant (prolonged seizure). Transport client to hospital after stabilization. |
Some data from Malamed SF: Medical emergencies in the dental office, ed 6, St Louis, 2007, Mosby.
Epinephrine Overdose
Although several vasoconstrictors are currently used in oral healthcare (Table 39-23), epinephrine is the most potent and most widely employed. Consequently, overdose reactions occur more often with epinephrine than with other vasopressor agents because the latter agents are weaker and are used less frequently.
TABLE 39-23 Clinical Manifestations and Management of a Client with an Epinephrine Overdose Reaction
| Signs and Symptoms |
Management |
Sharp elevation in blood pressure, primarily systolic |
Provide basic life support as indicated. Summon medical assistance if needed. Administer oxygen if needed. Allow client to recover, and discharge. |
Some data from Malamed SF: Medical emergencies in the dental office, ed 6, St Louis, 2007, Mosby.
Causes and Prevention
An epinephrine overdose reaction is more likely to develop if concentrations of epinephrine greater than 1:100,000 are administered. Some authorities state that a concentration of 1:250,000 epinephrine provides adequate duration of action for dental procedures and minimal toxicity. Therefore the use of a 1:50,000 concentration of epinephrine for pain control is unwarranted. The only benefit this concentration may have over lesser concentrations is its ability to control bleeding. If epinephrine is to be used for hemostasis, only small quantities of solution need be infiltrated into the immediate area. Overdose reactions under these circumstances are rare. Therefore to avoid an epinephrine overdose reaction it is recommended that the dental hygienist use the lowest effective concentration of epinephrine needed to produce the desired effect and carefully observe dosage guidelines (Table 39-24).
TABLE 39-24 Clinical Manifestations and Management of an Allergic Reaction
| Type of Allergic Response |
Signs and Symptoms |
Management |
| Delayed |
| Skin |
Angioedema (localized swelling of extremities, lips, tongue, pharynx, larynx) |
Administer antihistamine. Obtain medical consultation. |
| Respiration |
|
Position client semierect. Provide basic life support as indicated. Summon medical assistance if needed. Administer antihistamine. Allow client to recover, and discharge. |
| Laryngeal edema |
Swelling of vocal apparatus and subsequent obstruction of airwayRespiratory distressExaggerated chest movementsHigh-pitched sound to no soundCyanosisLoss of consciousness |
Summon medical assistance.Administer epinephrine.Maintain airway.Administer oxygen.
Additional drug management: antihistamine, corticosteroid. Cricothyrotomy if needed. Transfer client to hospital. |
| Immediate Anaphylaxis |
| Skin |
Urticaria (face and upper chest) Feeling of hair standing on end Conjunctivitis, vasomotor rhinitis |
Position client supine, legs elevated. Provide basic life support as indicated. Summon medical assistance. Additional drug management: antihistamine, corticosteroid. Transport client to hospital. |
| Gastrointestinal or genitourinary |
|
Same as management of anaphylaxis related to skin. |
| Respiratory |
Substernal tightness or chest pain Cyanosis of mucous membranes, nail beds |
Same as management of anaphylaxis related to skin. |
| Cardiovascular |
Palpitations, tachycardia |
Same as management of anaphylaxis related to skin. |
Clients with cardiovascular disease have a greater potential for epinephrine overdose. An increased workload may precipitate further cardiac distress on an already compromised CVS. Therefore the total dose of vasoconstrictor must be reduced to avoid systemic complications (see Table 39-3).
An intravascular injection may also produce an epinephrine overdose reaction.1 Recommendations for prevention of an intravascular injection may be found in the preceding section on local anesthetic overdose.
Clinical Manifestations and Management
Clinically the signs and symptoms of epinephrine toxicity resemble the fight-or-flight response. Table 39-23 identifies signs and symptoms of an epinephrine overdose reaction and procedures for management. Most cases of epinephrine overdose are of short duration and need little or no definitive management. If a prolonged reaction occurs, however, the dental hygienist must be prepared to respond accordingly.
Allergy
Allergic reactions are the result of an antigen-antibody response to a specific agent. Exposure to an initial dose of a medication causes an immunologic response. The drug acts as an antigen, prompting antibodies to be produced. As a result, administration of a subsequent dose causes the client to develop an allergic response to the drug, its chemical preservative, or a metabolite. Once clients manifest a specific drug allergy, they remain allergic to that drug indefinitely.
Causes
Allergic reactions to amide-type local anesthetics are extremely rare (see Table 39-1). As a result of their nonallergenic nature, amides are now used almost exclusively for pain control during dental and dental hygiene procedures.
Allergic responses to other contents of the dental cartridge have been demonstrated. Reports of allergy to sodium bisulfite and metabisulfite are numerous.5-8 Bisulfites are incorporated in all dental cartridges containing a vasoconstrictor; however, they are not included in cartridges that contain no vasopressor. These agents are also sprayed on fruits and vegetables to prevent discoloration. A client with a history of bisulfite allergy (e.g., asthmatic clients) should alert the dental hygienist to the possibility of a similar reaction if a local anesthetic containing a vasoconstrictor is administered. See the earlier section on preanesthetic client assessment and allergies for further discussion.
Prevention
The preanesthetic client assessment is the primary measure for prevention of an allergic reaction. A client who has multiple allergies (e.g., asthma, hay fever, allergy to foods) has an increased potential for allergic reactions to medications.2 Thus the dental hygienist must proceed cautiously when considering administration of local anesthetics to these clients.
If the client reports that he or she has experienced an allergic reaction to local anesthetics, it is important that the dental hygienist assume that the client is truly allergic to the local anesthetic in question until proven otherwise. Unfortunately, any adverse drug reaction is often labeled an allergy by clients when in fact overdose reactions occur much more frequently than allergic reactions.2 Thus it is imperative for the dental hygienist to seek as much information as possible from the client so that the exact nature of the reaction can be determined. A dialogue history is used, whereby the dental hygienist asks the client a series of questions to ascertain the validity of the allergy2 (Box 39-8). It is important that the anesthetic agent or any closely related agent to which the client claims to be allergic not be used until the allergy is disproved.
BOX 39-8 Dialogue with Patient to Evaluate an Alleged Allergic Reaction to a Local Anesthetic
Adapted from Malamed SF: Handbook of local anesthesia, ed 5, St Louis, 2004, Mosby.
•
Describe exactly what occurred.
•
What treatment was given?
•
What position were you in during the injection?
•
What was the time sequence of events?
•
What amount of drug was administered?
•
Did the drug contain a vasoconstrictor?
•
Were you taking any other medications at the time of the incident?
•
What is the name and address of the doctor (dentist, physician, hospital) who was treating you when the reaction occurred?
If, after the dialogue history, questions remain about the cause of the reaction, the dental hygienist should consult with the dentist and the client's physician, and referral for allergy testing should be considered. Dental hygiene care requiring local anesthetics (topical or injectable) should be delayed until an evaluation of the client is complete. Dental hygiene procedures not requiring anesthesia may be performed during the interim.
For clients who have a confirmed allergy to local anesthetics, management varies according to the nature of the allergy. Table 39-8 describes alternative drugs that may be employed in place of agents that cause an allergic response.
Clinical Manifestations and Management
The amount of time that elapses between exposure to an allergenic agent and manifestation of signs and symptoms is important. As a rule, the more rapid the onset of signs and symptoms after exposure, the more severe the ultimate reaction.2 Conversely, the greater the time between exposure and onset of signs and symptoms, the less severe the reaction. This time factor helps the dental hygienist determine the appropriate management of the reaction.
The most common allergic reaction associated with local anesthetics is a dermatologic reaction. A skin reaction that appears alone or after a considerable lapse of time (60 minutes or more) is usually not life-threatening; however, if a skin reaction develops rapidly, it may be the first indication of an ensuing generalized reaction.
An allergic reaction may manifest solely in the respiratory tract or may accompany other systemic responses. In slowly evolving generalized allergic reactions, respiratory distress follows skin and gastrointestinal reactions but occurs before cardiovascular signs and symptoms.
Generalized anaphylaxis is the most life-threatening allergic reaction. Most reactions develop quickly, reaching maximum intensity within 5 to 30 minutes of exposure, although delayed responses have been reported.2
Table 39-24 describes the signs and symptoms and the management of clients with dermatologic and respiratory reactions and generalized anaphylaxis. The reaction types are further defined as delayed or immediate.
CLIENT EDUCATION TIPS
Explain the advantages of receiving a local anesthetic agent during dental hygiene procedures that may produce discomfort.
Explain measures taken to ensure comfortable local anesthetic delivery.
Explain normal, anticipated sensations associated with local anesthesia, including areas that will be anesthetized and the anticipated duration of the anesthesia.
Explain the importance of following postoperative instructions to minimize the possibility of self-inflicted soft-tissue injury.
LEGAL, ETHICAL, AND SAFETY ISSUES
It is the legal responsibility of the dental hygienist to practice within the scope authorized by state law concerning local anesthetic agent delivery.
It is imperative that the dental hygienist carefully evaluate the client's health history to determine suitability for local anesthetic procedures.
The client treatment record must accurately reflect any local anesthetic procedure completed, including complete drug name and amount agent delivered.
KEY CONCEPTS
Local anesthesia is the temporary loss of sensation in a circumscribed area brought about by the reduction of nerve membrane permeability to sodium ions. When sodium ions are blocked, the nerve cell cannot depolarize, stopping transmission of a stimulus to the brain.
Local anesthetic agents are classified chemically as either amides or esters, which differ in how they are metabolized: esters are metabolized in the blood by pseudocholinesterase, and amides are metabolized in the liver.
Local anesthetic agents produce vasodilation. For the maximum anesthetic effect, vasoconstrictors are often combined with local anesthetics to slow down absorption, reduce hemorrhage, and increase the length of time the anesthesia is effective.
Many local anesthetic drugs are available. The clinician must choose the best agent for the circumstances, considering each of the following: the health of the client, medications taken by the client, possible client allergies, the amount of time anesthesia is desired, the areas being anesthetized, the planned procedure and injections, the client's past response to anesthesia, and the possible need for hemostasis.
There is a maximum amount of local anesthetic agent and vasoconstrictor that can safely be administered to a client at one time. This amount varies with the client's weight, health status, and age, and the specific agent administered.
A thorough health history evaluation before local anesthetic delivery is crucial. Many medications influence a client's response to local anesthesia. There are also several systemic conditions that require modifications of local anesthetic delivery, such as pregnancy, hyperthyroidism, liver dysfunction, renal dysfunction, allergies to sulfa or bisulfite, atypical plasma cholinesterase, methemoglobinemia, and malignant hyperthermia.
Medications that are excreted renally may be retained in the body of the diabetic client with kidney disease, causing toxic effects. When local anesthetic agents are administered, minimal use of vasoconstrictors is required because epinephrine is capable of raising blood glucose.
The local anesthetic armamentarium includes a syringe, a needle, local anesthetic agent, topical anesthetic agent, cotton-tipped applicators, gauze, cotton forceps, and a mouth mirror.
Oral anesthetic procedures involve the maxillary and mandibular branches of cranial nerve V, the trigeminal nerve.
There are three categories of local anesthetic procedures: local infiltration, field block, and nerve block. These differ in the relationship between the area anesthetized and the area of delivery of the anesthetic agent, and in the scope of the area anesthetized; nerve blocks are delivered further from the treatment site and anesthetize a larger area when compared with local infiltrations, which are delivered directly at the apex of the target tooth and anesthetize only one to two teeth.
The attitude and demeanor of the clinician have a significant impact on the comfort of the client and the overall success of the local anesthetic injection.
Local anesthetic procedures for maxillary anesthesia include local infiltration, anterior superior alveolar field block, middle superior alveolar field block, infraorbital nerve block, posterior superior alveolar nerve block, greater palatine nerve block, and nasopalatine nerve block.
Local anesthetic procedures for mandibular anesthesia include inferior alveolar nerve block, lingual nerve block, buccal nerve block, mental nerve block, and incisive nerve block.
Local anesthetic delivery has the potential to cause both local and systemic complications. Potential local complications include needle breakage, pain during injection, burning during injection, hematoma, facial nerve paralysis, paresthesia, trismus, infection, edema, tissue sloughing, soft-tissue trauma, and postanesthetic intraoral lesions. Potential systemic complications include local anesthetic overdose, epinephrine overdose, and allergy. Most of these potential complications can be avoided with proper preanesthetic client assessment, careful selection of anesthetic agent, conscientious delivery techniques, and proper postoperative instructions.
CRITICAL THINKING EXERCISES
Scenario: Ms. S.
Client Profile: 45-year-old woman who lives alone.
Chief Complaint: “I want my periodontal maintenance scheduled at 4-month intervals. I have experienced discomfort during previous scaling throughout my upper jaw.”
Dental History: Past history of orthodontic treatment. Received four quadrants of scaling and root planing 3 years ago with a very good result. Third molars removed. Low caries rate. Clinically client exhibits extensive maxillary buccal recession.
Social History: Limited social drinking, nonsmoker, exercises regularly.
Health History: Noncontributory; weighs 123 lb.
Oral Health Behaviors: Client is compliant with homecare regimen and maintains appropriate recare schedule.
Assessment: Client requires local anesthetics to allow for comfortable periodontal maintenance.
Review the previous client profile and make the following determinations:
Client suitability for local anesthetic agent administration
Preferred local anesthetic agent
Preferred injection(s)
Maximum dose of local anesthetic agent
REFERENCES
1. Malamed S.F. Handbook of local anesthesia, ed 5. St Louis: Mosby; 2004.
2. Malamed S.F. Medical emergencies in the dental office, ed 6. St Louis: Mosby; 2007.
3. Goulet J.P., Pérusse R., Turcotte J.Y. Contraindications to vasoconstrictors in dentistry. Part III. Pharmacologic interactions. Oral Surg Oral Med Oral Pathol. 1992;74:692.
4. Wong M., Jacobsen P.L. Reasons for local anesthesia failures. J Am Dent Assoc. 1992;123:69.
5. Schwartz H.J. Sensitivity to ingested metabisulfites: variations in clinical presentation. J Allergy Clin Immunol. 1983;71:487.
6. Simon R.A., Green L., Stevenson D.D. The incidence of ingested metabisulfite sensitivity in an asthmatic population. J Allergy Clin Immunol. 1982;69:118.
7. Twarog F.J., Leung D.Y.M. Anaphylaxis to a component of isoetharine (sodium bisulfite). J Am Med Assoc. 1982:248. 2030
8. Seng G.F., Gay A.J. Dangers of sulfites in dental local anesthetic solutions: warning and recommendations. J Am Dent Assoc. 1986;113:769.
9. DuBrul E.L. Sischer and DuBrul's oral anatomy, ed 8. St Louis: Ishiyaku EuroAmerican, 1988.
Visit the  website at http://evolve.elsevier.com/Darby/Hygiene for competency forms, suggested readings, glossary, and related websites..