CHAPTER 8 Medical Emergencies
Life-threatening emergencies can and do happen in the oral healthcare setting. Although the occurrence of such emergencies is infrequent, many factors increase the likelihood of such incidents during oral healthcare. These factors include the increasing number of older, medically compromised adults seeking care, medical advances in drug therapy, increased number of surgical procedures (e.g., dental implants), longer appointments, and the increasing use of drugs in the oral healthcare setting such as local anesthetics, sedatives, analgesics and antibiotics.1 Fortunately, other preventive factors minimize the occurrence of life-threatening incidents. These factors include a client pretreatment physical assessment consisting of a thorough health history questionnaire with special attention to medication usage and vital signs; an interview dialogue history; observation of general physical status using the American Society of Anesthesiologists (ASA) physical status classification (Box 8-1); anxiety recognition; and possible modification of care to minimize medical risks1 (see Chapter 10Chapter 11Chapter 12Chapter 37). Comprehensive documentation of all assessment findings is made in the client’s record and updated at each subsequent visit. The dental staff must be prepared to assist in the recognition and management of any potential emergency situation. Should a medical emergency arise, thorough knowledge of medical emergency protocols, well-trained office personnel, and availability of appropriate, well-maintained emergency equipment are vital in obtaining the best possible outcome.1
BOX 8-1 The American Society of Anesthesiologists (ASA) Physical Status Classification
Adapted from Malamed SF: Medical emergencies in the dental office, ed 6, St Louis, Mosby, 2007.
∗ Normally, oral healthcare is received in the hospital setting due to high-risk nature of health condition.
PREVENTING MEDICAL EMERGENCIES
Office Personnel and Environment Preparation
Preparation of all dental staff members and the office for medical emergencies should include:
Client Assessment
Client assessment data are used to create a care plan that will reduce the likelihood of a medical complication. If a client is found to be at high risk, the dentist and the client’s physician of record are consulted (Box 8-2). Medical consultation is obtained after the client’s dental and physical evaluation has been completed. The dental professional should be prepared to discuss fully with the physician the proposed oral healthcare plan and any anticipated problems. Based on this consultation the care plan is modified, or medications may be modified, to avoid emergencies. Reduction of the stressful environment by careful appointment planning, good communication and client rapport, and administration of antianxiety premedication also can improve clinical outcomes. The primary goal in the client assessment process is to determine the client’s physical and psychologic ability to handle the stress of the planned oral healthcare.1
Adapted with permission from Dr. W.H. Davis, Bellflower, California.
Most health history forms include a medical alert box. This blank box usually appears on the top corner of the health history form. If a client has a condition (e.g., allergy, hypertension, adrenal insufficiency, requirement for antibiotic premedication) that if unrecognized places the client at risk for a medical emergency, this condition is written in red in the medical alert box clearly visible on the top of the health history form. The practitioner can then consider this condition as the care plan is developed and implemented.
Anxiety Recognition
Heightened anxiety and fear of dental care can lead to an acute exacerbation of medical problems such as angina, seizures, and asthma, as well as other stress-related problems such as hyperventilation and syncope (fainting). One of the goals of client assessment is to determine whether a client is psychologically capable of tolerating the stress associated with the planned care. Three methods of recognizing the presence of anxiety are the health history, the Dental Anxiety Questionnaire, and direct observation.1
Health History
Comprehensive health history questionnaires include one or more items relating to the client’s attitudes toward professional oral healthcare. An affirmative response to any question on the health history relating to prior negative dental experiences alerts the clinician to initiate a more in-depth discussion with the client to determine the cause of the fear and to discuss strategies available to help reduce fear and anxiety.
Dental Anxiety Questionnaire
An additional aid in the recognition of anxiety is the Dental Anxiety Questionnaire (see Chapter 37Figure 37-2Figure 37-3).2 This questionnaire has been reported to be a reliable aid in the recognition of anxiety. Answers to individual questions are scored 1 through 5 with response option “a” being assigned a score of 1 and response option “e” being assigned a score of 5. The maximum score possible is 20. Scores of 8 or above are associated with higher-than-normal anxiety levels and indicate that client anxiety needs to be addressed by the clinician before oral healthcare begins.
Direct Observation
Careful observation may permit recognition of unusually anxious individuals. Severely anxious individuals may be recognized by the following:
Severely anxious persons most commonly appear in the dental office when they have a severe oral infection accompanied by a severe toothache. Although these individuals wish to have their dental problems alleviated, their underlying dental fear often makes it impossible for them to tolerate the procedure. As a result, severely anxious individuals usually are candidates for the use of either intravenous (IV) sedation or general anesthesia for dental treatment. A moderately anxious client (Box 8-3), however, is usually managed effectively by conscious sedation (Chapter 40) and/or behavioral techniques (Chapter 37).
Stress Reduction Protocols
Many medical emergencies are associated with stress. The stress-reduction protocols listed in Box 8-4 are based on the belief that the prevention or reduction of stress should start before the dental appointment, continue throughout treatment, and follow through into the postoperative period, if necessary.1
BOX 8-4 Stress-Reduction Protocols
Medical Risk Client (ASA II, III, IV)
Recognition of Unconsciousness
Unconsciousness, whatever its cause, must be recognized quickly and managed effectively. In all cases in which loss of consciousness occurs, several basic life support steps must be implemented as soon as possible (Figure 8-1).
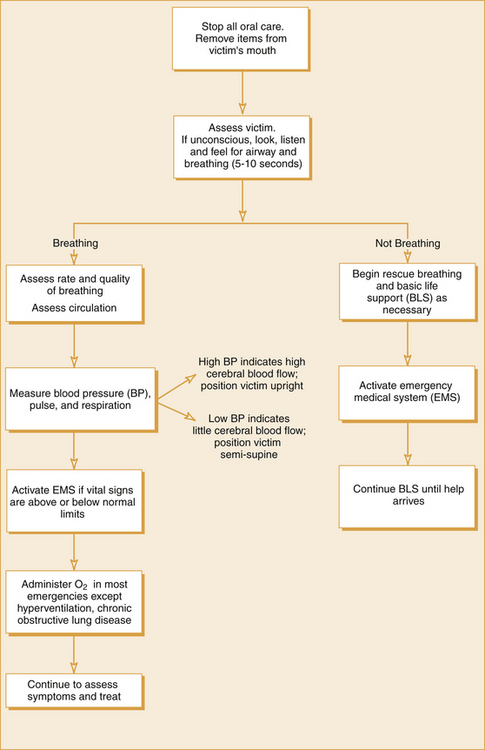
BASIC LIFE SUPPORT SEQUENCE
Basic Life Support (BLS), also known as P-A-B-C (positioning, airway, breathing, circulation), consists of applying, as needed, the procedures of positioning (P), airway maintenance (A), breathing (B), and circulation (C) to any medical emergency victim. These procedures are applied until recovery, until the victim can be stabilized and transported to an emergency care facility, or until advanced life support is available. Cardiopulmonary resuscitation (CPR) and emergency cardiac care include defibrillation (D) as part of BLS for healthcare providers.3 All dental personnel need to be certified at least at the level of BLS for the healthcare provider. In addition, all dental personnel need to be trained together at least annually so that they may interact effectively as a team when medical emergencies arise. BLS courses are sponsored by many organizations, including the American Heart Association, the American Red Cross, and fire departments.
Recognition of Unconsciousness
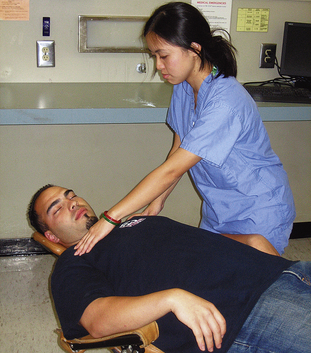
The unconscious person is one who does not respond to sensory stimulation such as shaking and shouting “Are you alright?” (Figure 8-2). Pain is another stimulus that may be used to determine the client’s level of consciousness. Pinching of the suprascapular region usually evokes a motor response from a conscious person.1 Lack of response to this stimulation indicates the person is unconscious.
Terminate Dental Hygiene Care, Summon Assistance, and Position the Client
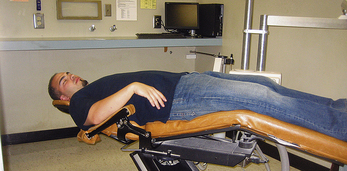
As soon as the loss of consciousness is recognized, the hygienist terminates the dental hygiene procedure, activates the office emergency team, and places the unconscious person into the supine (horizontal) position. In the supine position, the brain is at the same level as the heart and the feet are slightly elevated to a 10- to 15-degree angle. A major objective in the management of unconsciousness is the delivery of oxygenated blood to the brain. The horizontal position helps the heart to accomplish this, and elevating the feet further increases the return of blood to the heart (Figure 8-3). Any extra head supports such as pillows need to be removed from the headrest of the dental chair when the client loses consciousness (Figure 8-4).
Assessment of Airway, Breathing, and Circulation
After the unconscious person is positioned (P), the next step is to assess and maintain an open airway (A), check for breathing (B), and check for circulation (C) (Procedure 8-1). If breathing and pulse rate are below normal limits, summon help to call for emergency medical services (EMS) (e.g., 911 in the United States and Canada; 000 in Australia; 119 in Japan; 112 or 999 in the United Kingdom; and 112 in most of Europe; standard on Global System for Mobile Communications [GSM] mobile phones). See Box 8-5 for information to be given to the EMS dispatcher.
Procedure 8-1 INITIAL ASSESSMENT
STEP 1
Tap the person on the shoulder and shout, “Are you okay? Are you okay?” (For an infant, gently tap the shoulder or flick the foot.) (See Figure 8-2.)
STEP 2
If no response, summon help to call emergency medical services (EMS) (e.g., 911) and to bring an automated external defibrillator (AED) in case it is needed.
STEP 3
Place the unconscious client in the supine position with feet slightly elevated (See Figure 8-3).
STEP 4
STEP 5
STEP 6
If there is a pulse but no movement or breathing:
STEP 7: WHAT TO DO
If there is breathing and a pulse:
If there is a pulse but no movement or breathing:
STEP 8
After emergency care, document the situation on an incident report form (see Figure 8-48) and in the client’s chart. Provide a copy of incident report to EMS technician if victim is being transferred to a hospital.
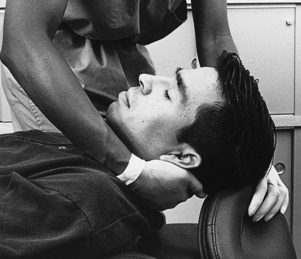
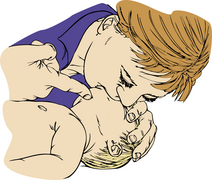
In an unconscious person the tongue falls backward against the wall of the pharynx, producing airway obstruction. The head tilt–chin lift technique is the most important step in maintaining an open airway. The procedure is performed by placing one hand on the unconscious person’s forehead and applying a firm, backward pressure with the palm; then the tips of the index and middle fingers of the other hand are placed on the symphysis of the mandible, lifting the mandible as the forehead is tilted backward. For an adult, the victim’s head is extended so that the chin points up into the air in line with the earlobes, lifting the mandible and tongue off the pharyngeal wall (Figure 8-5). For a child, the head is only slightly tilted past the neutral position (Figure 8-6). Maintaining the person’s head in the head tilt–chin lift, the clinician then places his or her ear 1 inch from the unconscious person’s nose and mouth while looking toward the chest for visual signs of chest respiratory movements (Figure 8-7). Breathing is assessed for at least 5 seconds, but no more than 10 seconds. Feeling or hearing air at the person’s nose and mouth indicates effective spontaneous breathing is present. Although head tilt–chin lift establishes an open airway in most situations, occasionally an airway may remain obstructed. In such cases, additional forward movement of the mandible using the jaw-thrust technique usually will remove the obstruction. To perform the jaw-thrust maneuver, the clinician must be located behind the top of the supine unconscious person’s head, and the clinician’s elbows are stabilized on the surface of the dental chair. The clinician places his or her fingers behind the posterior of the ramus of the mandible and then displaces the mandible forward while tilting the head backward (Figure 8-8).
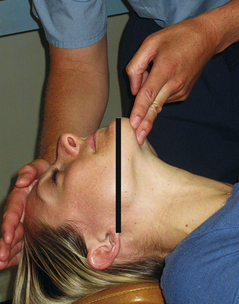
Figure 8-5 For an adult, when the unconscious person’s head is extended properly, the tip of the chin points up into the air in line with the earlobes (black line), lifting the mandible and tongue off the pharyngeal wall.
(From Malamed SF: Medical emergencies in the dental office, ed 6, St Louis, 2007, Mosby.)
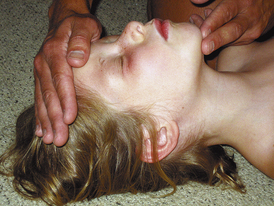
Figure 8-6 Head tilt–chin lift position in a child.
(From Malamed SF: Medical emergencies in the dental office, ed 6, St Louis, 2007, Mosby.)
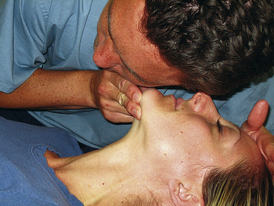
Figure 8-7 The look-listen-feel technique. While maintaining head tilt, the clinician assesses airway patency by placing the ear 1 inch from the client’s nose and mouth and watching the chest for spontaneous respiratory movements.
(From Malamed SF: Medical emergencies in the dental office, ed 6, St Louis, 2007, Mosby.)
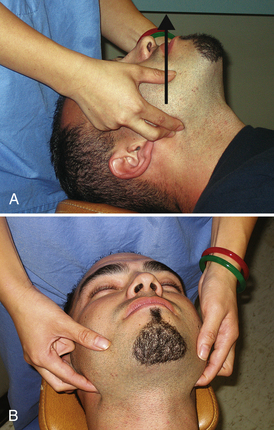
Figure 8-8 To perform the jaw-thrust technique, the clinician must grasp the angles of the mandible with both hands and displace the mandible forward. A, Side view. B, Front view.
(From Malamed SF: Medical emergencies in the dental office, ed 6, St Louis, 2007, Mosby.)
Circulation is checked by palpating the carotid artery in the neck for a pulse (Figure 8-9).
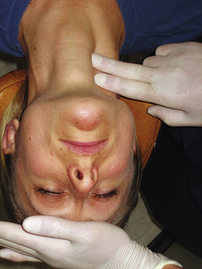
Figure 8-9 Carotid artery is located in groove between the trachea and the sternocleidomastoid muscle. Head tilt must be maintained.
(From Malamed SF: Medical emergencies in the dental office, ed 6, St Louis, 2007, Mosby.)
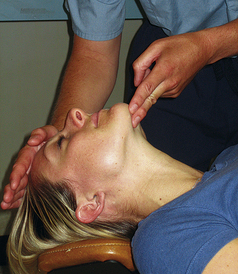
Figure 8-10
(From Malamed SF: Medical emergencies in the dental office, ed 6, St Louis, 2007, Mosby.)
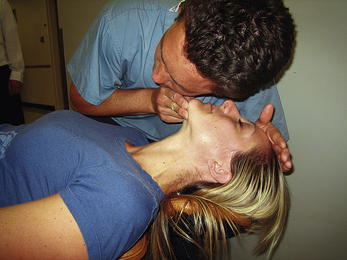
Figure 8-11
(From Malamed SF: Medical emergencies in the dental office, ed 6, St Louis, Mosby, 2007.)

Figure 8-12 Position the resuscitation mask, and breathe into the mask while tilting the head and lifting the chin to open the airway.
(From Henry M, Stapleton E: EMT: prehospital care, ed 3, St Louis, 2007, Mosby/JEMS.)
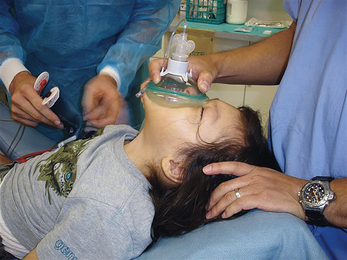
Figure 8-13 Holding pocket mask on face.
(From Malamed SF: Medical emergencies in the dental office, ed 6, St Louis, 2007, Mosby.)
What to Do
Further assessment and decision making are based on the following:
 If the unconscious person is breathing and there is a carotid pulse, the airway is managed via head tilt–chin lift and the dental team proceeds with additional management including the administration of oxygen and monitoring of vital signs (blood pressure, heart rate, and respiration). The pulse needs to be rechecked every 2 minutes for at least 5 seconds but not more than 10 seconds. If there is a pulse but breathing is absent or inadequate, two rescue breaths are delivered. If each of the rescue breaths causes the chest clearly to rise, then the airway is determined to be open. Because there is a palpable pulse, it is necessary to continue with rescue breathing only (Procedure 8-2). If there continues to be no breathing with each of the two rescue breaths, then the airway is repositioned using the jaw-thrust technique and two rescue breaths are delivered again. If the rescue breaths still do not make the chest clearly rise, then the procedure for unconscious choking is initiated. (See Procedure 8-7 for the unconscious choking adult or child.) The pulse, however, continues to be checked every 2 minutes for at least 5 seconds but no more than 10 seconds. If there is no carotid pulse, cardiopulmonary resuscitation (CPR) is initiated immediately. (See Procedures 8-3 and 8-4 for CPR for adult, child, and infant.)
Procedure 8-2 RESCUE BREATHING—ADULT, CHILD, INFANT
STEP 7
Perform rescue breathing if there is a pulse but no movement or breathing.
STEP 10: WHAT TO DO
If there is a pulse but still no movement or breathing:
STEP 11
After emergency care, document the situation on an incident report form (see Figure 8-48) and in the client’s chart. Provide a copy of incident report to EMS technician if victim is being transferred to a hospital.
Procedure 8-3 ONE-RESCUER CARDIOPULMONARY RESUSCITATION (CPR) FOR ADULT, CHILD, AND INFANT
STEP 7
STEP 10
Do cycles of 30 compressions and two rescue breaths. Reassess victim after four cycles (i.e., two ventilations, 30 compressions each cycle).
STEP 12
After emergency care, document the situation on an incident report form (see Figure 8-48) and in the client’s chart. Provide a copy of incident report to EMS technician if victim is being transferred to a hospital.
Procedure 8-4 TWO-RESCUER CARDIOPULMONARY RESUSCITATION (CPR)—ADULT AND CHILD
STEP 15
STEP 17
After emergency care, document the situation on an incident report form (see Figure 8-48) and in the client’s chart. Provide a copy of incident report to EMS technician if victim is being transferred to a hospital.
Rescue Breathing
Rescue breathing is a technique for breathing air into a victim to give him or her oxygen needed to survive. The air the healthcare provider exhales contains enough oxygen to keep a person alive. Although there are several techniques for rescue breathing, in this chapter the mouth-to-mask ventilation primarily is emphasized. When giving rescue breaths, a normal breath is taken and then breathed into the victim’s mouth and nose using a resuscitation mask (Figures 8-14 and 8-15). If no mask is available, mouth-to-mouth ventilation is initiated (see Procedure 8-2). Each breath should last about 1 second and make the chest clearly rise. For an adult, one breath is given every 5 to 6 seconds (10 to 12 breaths per minute) (Box 8-6). For a child or infant, one breath is given every 3 seconds. The carotid pulse is checked again after 2 minutes.3 Rescue breathing is continued until one of the following occurs:
BOX 8-6 Rescue Breathing for the Adult Victim
Adapted from American Heart Association: BLS for healthcare providers student manual, Dallas, 2006, American Heart Association.
Adapted from American Heart Association: BLS for healthcare providers student manual, Dallas, 2006, American Heart Association.
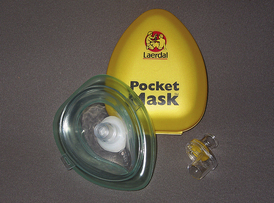
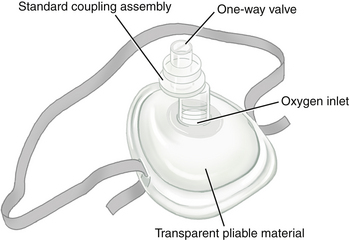
Resuscitation Masks
Resuscitation masks are flexible, dome-shaped devices that cover a victim’s mouth and nose and allow the healthcare provider to breath air into a victim without making mouth-to-mouth contact. It is recommended that dental hygienists have their own resuscitation mask in their operatory. Resuscitation masks have several benefits:
A resuscitation mask should have the following characteristics:
Mouth-to-Mask Ventilation
For mouth-to-mask ventilation to be performed, head tilt–chin lift must be maintained. The mask is placed on the victim’s face with the narrow portion over the bridge of the nose and the wider part in the cleft of the chin (see Figure 8-13). Using the hand that is closer to the top of the victim’s head, the index finger and thumb are placed along the border of the mask while the thumb of the other hand is placed along the lower margin of the mask (Figure 8-16). The remaining fingers of the hand closer to the victim’s neck are placed along the bony inferior border of the mandible, which is then lifted. Head tilt–chin lift is then performed to establish a patent airway. While head tilt–chin lift is maintained, the rescuer presses firmly and completely around the outside margin of the mask to obtain an airtight seal, with the remaining fingers along the lower margin of the mask to seal the mask against the victim’s face. The mask is held in position with one or two hands as needed, maintaining both an airtight seal and a patent airway. The rescuer’s mouth is placed on the breathing port of the mask, and air is forced into the victim until the chest is seen to rise (see Figure 8-12). The rescuer positions himself or herself at the victim’s side, enabling a lone rescuer to perform chest compressions if needed. Air is delivered over 1 second to make the victim’s chest rise (see Box 8-6).
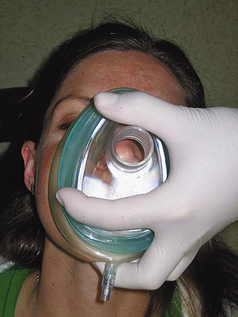
Figure 8-16 Mouth-to-mask ventilation demonstrating finger positioning.
(From Malamed SF: Medical emergencies in the dental office, ed 6, St Louis, 2007, Mosby.)
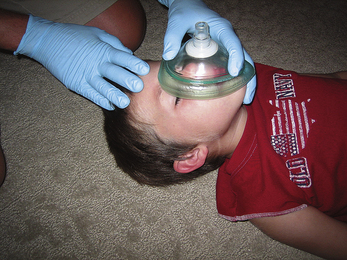

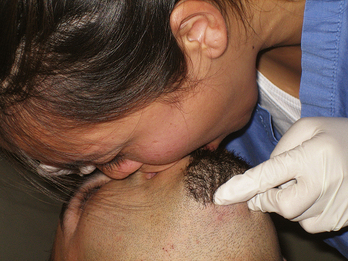
Figure 8-19
(From Malamed SF: Medical emergencies in the dental office, ed 6, St Louis, 2007, Mosby.)


Oxygen-Enriched Ventilation
Whenever possible, the rescuer should ventilate with supplemental oxygen (O2); however, rescue breathing must never be delayed until supplemental O2 becomes available. It is recommended that every oral healthcare setting have at least one portable E cylinder of O2 with adjustable O2 flow and a positive-pressure demand-valve mask unit (Figure 8-23). The E cylinder of O2 provides approximately 30 minutes of O2. Although O2 is beneficial to the unconscious patient, the clinician should receive adequate training in airway management through mouth-to-mask or mouth-to-mouth ventilation because administration of enriched O2 is effective only as long as O2 remains in the compressed gas cylinder.
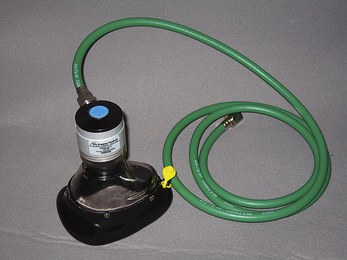
Figure 8-23 Positive-pressure demand valve.
(Courtesy Sedation Resource, Lone Oak, Texas, www.sedationresource.com.)
CARDIAC ARREST
Each year, approximately 500,000 people die of cardiac arrest, which stops respiration and blood circulation. Cardiac arrest may result from an acute reaction to medication, myocardial infarction, respiratory arrest, electric shock, drowning, trauma, asphyxiation, shock, or cardiac arrhythmia. The heart’s electrical system controls its pumping action.
The Heart’s Electrical System
Under normal conditions, (1) specialized cells of the heart initiate and transmit electrical impulses that travel through the upper chambers of the heart (the atria) to the lower chambers of the heart (the ventricles) and (2) electrical impulses reach the muscular walls of the ventricles and cause the ventricles to contract. This contraction forces blood out of the heart to circulate through the body. The contraction of the left ventricle results in a pulse. The pauses between the pulse beats are the periods between contractions. When the heart muscles contract, blood is forced out of the heart. When they relax, blood refills the chambers.
Any damage to the heart from disease or injury can disrupt the heart’s electrical system, which can stop circulation. The two most common treatable abnormal rhythms initially present in sudden cardiac arrest victims are ventricular fibrillation (V-fib) and ventricular tachycardia (V-tach). V-fib is a state of totally disorganized electrical activity in the heart resulting in quivering of the ventricles. In this state, the ventricles cannot pump blood and there is no movement or breathing and no pulse. V-tach is very rapid ventricular contraction. Although there is electrical activity resulting in a regular rhythm, the rate is often so fast that the heart is unable to pump blood properly. As with V-fib, there is no movement or breathing and no pulse.
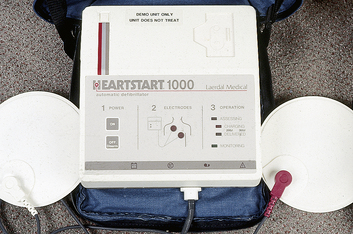
Clinical death is cessation of the heart and respiratory effort; it may be reversible with CPR if initiated within 4 to 6 minutes. A person who is unconscious, is not moving or breathing, and has no pulse is in cardiac arrest and needs CPR. When started promptly, CPR can help by supplying oxygen to the brain and other vital organs. In many cases, however, CPR by itself cannot correct the underlying heart problem, but V-fib and V-tach can be corrected by early defibrillation. Delivering an electrical shock with an automated external defibrillator (AED) (Figure 8-24) disrupts the electrical activity of the V-fib or V-tach long enough to allow the heart to spontaneously develop an effective rhythm on its own. If V-fib or V-tach is not interrupted, all electrical activity will eventually cease (asystole), a condition that cannot be corrected by defibrillation. AEDs provide an electrical shock to the heart, called defibrillation. The sooner the shock is administered, the greater the likelihood of the victim’s survival.4
Effective Emergency Response
To effectively respond to cardiac emergencies, it helps to understand the importance of the cardiac chain of survival. The four links in the cardiac chain are as follows:
Early recognition of the emergency and early access to EMS. The sooner more advanced personnel or the local emergency number is called, the sooner EMS personnel arrive and take over. Early CPR. CPR helps supply oxygen to the brain and other vital organs to keep the victim alive until an AED is used or advanced medical care is given.Early Recognition and Cardiopulmonary Resuscitation
If a person is seated in the dental chair at the time of collapse, the dental hygienist assesses the ABCs. If there is no breathing or pulse, EMS is summoned (see Box 8-5), and effective CPR may be performed with the unconscious victim supine in the dental chair.1 CPR is a combination of rescue breaths and chest compressions (Table 8-1). Effective chest compressions are essential for high-quality CPR. Effective chest compressions circulate blood to the victim’s brain and other vital organs. CPR prolongs the period of time that the myocardium remains in ventricular fibrillation, increasing the likelihood that defibrillation will terminate ventricular fibrillation and allow the heart to resume an effective rhythm and effective systemic perfusion.
To ensure high-quality CPR, the following requirements must be met:
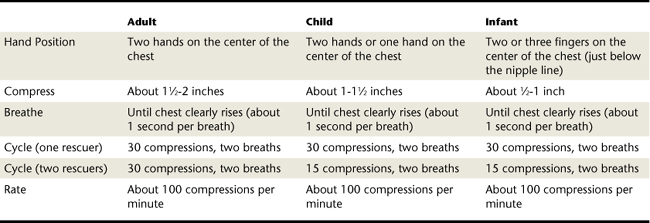
Chest compressions should be deep: 1½ to 2 inches for an adult, 1 to 1½ inches for a child, and ½ to 1 inch for an infant. The chest should fully recoil to its normal position after each compression before the next compression is started.The rescuer compresses the lower half of the sternum in the middle of the chest. The heel of one hand is placed on the middle of the sternum between the nipples with the heel of the other hand placed on top so that the two hands are overlapped and parallel. The fingers of the two hands are then interlaced, with the fingers of the top hand pulling the fingers of the lower hand upward. Only the heel of the lower hand remains in contact with the victim’s chest (Figure 8-25).
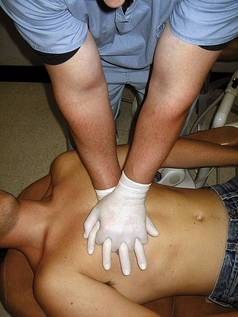
Figure 8-25 Proper location and hand position for adult chest compression.
(From Malamed SF: Medical emergencies in the dental office, ed 6, St Louis, 2007, Mosby.)
To maximize chest compressions, the rescuer’s shoulders must be directly over the victim’s sternum, and the rescuer’s elbows are locked straight. The dental chair is lowered to allow the rescuer to bring shoulders directly over the victim’s sternum (Figure 8-26).
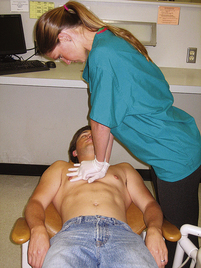
Figure 8-26 Proper rescuer position for adult chest compression.
(From Malamed SF: Medical emergencies in the dental office, ed 6, St Louis, 2007, Mosby.)
Bending of the elbows greatly decreases effectiveness and leads to rapid rescuer fatigue (Figure 8-27).
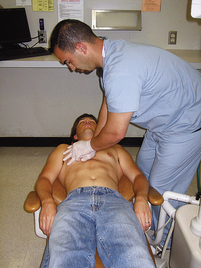
Figure 8-27 Improper positioning (elbows bent, shoulders at angle to chest).
(From Malamed SF: Medical emergencies in the dental office, ed 6, St Louis, 2007, Mosby.)
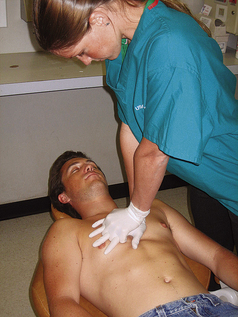
Figure 8-28
(From Malamed SF: Medical emergencies in the dental office, ed 6, St Louis, 2007, Mosby.)
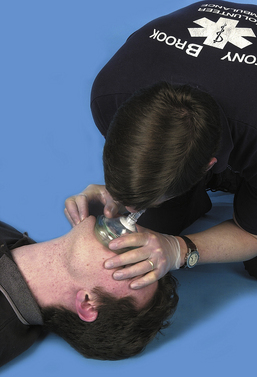
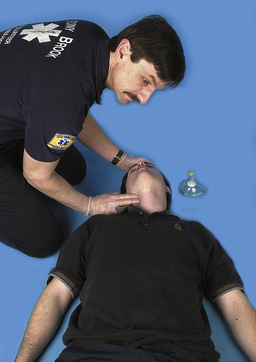
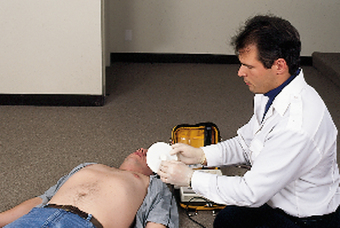
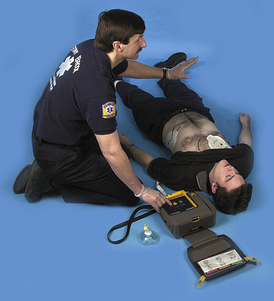
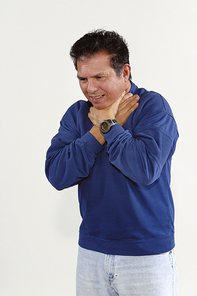
Figure 8-34
(From Chapleau W: Emergency first responder: making the difference, St Louis, 2004, Mosby.)
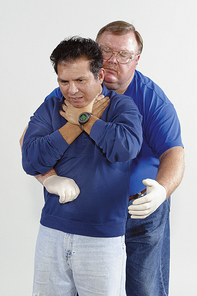
Figure 8-35
(From Chapleau W: Emergency first responder: making the difference, St Louis, 2004, Mosby.)
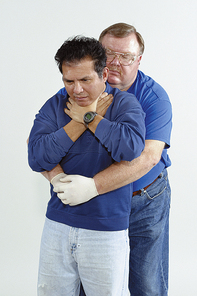
Figure 8-36
(From Chapleau W: Emergency first responder: making the difference, St Louis, 2004, Mosby.)
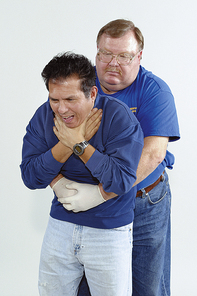
Figure 8-37
(From Chapleau W: Emergency first responder: making the difference, St Louis, 2004, Mosby.)
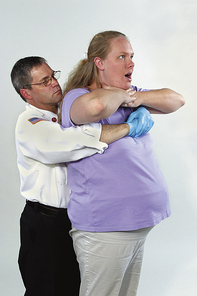
Figure 8-38
(From Chapleau W: Emergency first responder: making the difference, St Louis, 2004, Mosby.)
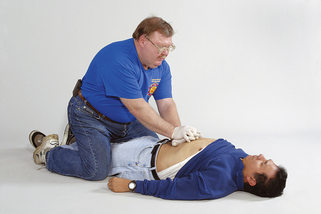
Figure 8-39
(From Chapleau W: Emergency first responder: making the difference, St Louis, 2004, Mosby.)
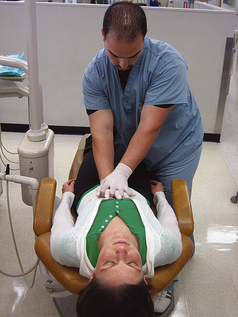
Figure 8-40
(From Malamed SF: Medical emergencies in the dental office, ed 6, St Louis, 2007, Mosby.)
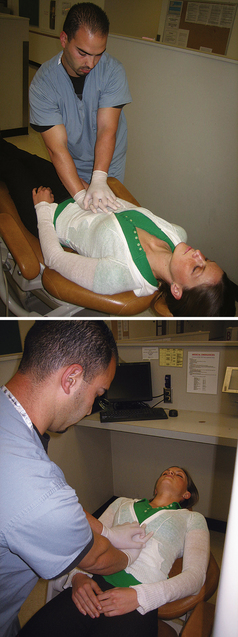
Figure 8-41
(From Malamed SF: Medical emergencies in the dental office, ed 6, St Louis, 2007, Mosby.)
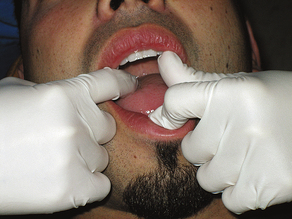
Figure 8-42
(From Malamed SF: Medical emergencies in the dental office, ed 6, St Louis, 2007, Mosby.)
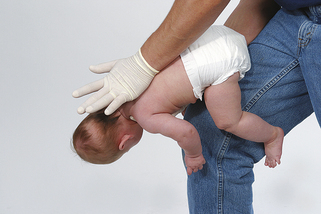
Figure 8-43
(From Chapleau W: Emergency first responder: making the difference, St Louis, 2004, Mosby.)

Figure 8-44
(From Chapleau W: Emergency first responder: making the difference, St Louis, 2004, Mosby.)

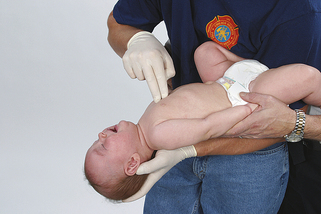
Figure 8-46
(From Chapleau W: Emergency first responder: making the difference, St Louis, 2004, Mosby.)
See Procedure 8-3 for one-rescuer CPR for an adult and child and Table 8-1 for a summary of CPR techniques for adult, child, and infant care. A compression-ventilation ratio of 30 compressions to two breaths is currently recommended for one-rescuer resuscitations. A 30 : 2 compression-ventilation ratio is tiring. Therefore, when an additional rescuer is available, two-rescuer CPR is provided (see Procedure 8-4). In two-rescuer CPR, one rescuer gives rescue breaths and the other rescuer gives chest compressions. It is recommended to switch the compressor every 2 minutes (or after five cycles of compressions). Every effort is made to accomplish the switch in less than 5 seconds. When providing two-rescuer CPR to an adult, rescuers perform 30 compressions and two rescue breaths during each cycle. When performing two-rescuer CPR on a child or infant, rescuers change the compression to ventilation ratio to 15 : 2. This ventilation ratio provides more frequent respiration for children and infants.
Use of an Automated External Defibrillator
An automated external defibrillator (AED) is an automated device that recognizes in an unconscious pulseless person an abnormal heart rhythm that needs a shock to develop a normal heart rhythm by defibrillation (see Figure 8-24). When a cardiac arrest occurs and the victim does not respond to the initial four or five cycles of chest compressions, an AED should be used as soon as it is available and ready to use.
The AED charges itself and prompts the operator if it is necessary to deliver a life-saving shock to the victim by pressing a button. If the AED advises that a shock is needed, the rescuer follows protocols to provide one shock followed by five cycles (about 2 minutes) of CPR.
When a single rescuer encounters a nonresponsive person with no pulse, he or she immediately asks for help to summon EMS (e.g., 911), which is critical for the person’s survival, and to bring an AED if available. The single rescuer starts with 2 minutes (four or five cycles) of CPR. The AED is used after four or five cycles of CPR, only if the victim is not breathing and has no pulse (see Procedure 8-5 for one rescuer using AED). Chest compressions increase the likelihood that a successful shock can be delivered to a victim who has experienced a sudden cardiac arrest, especially if more than 4 minutes have elapsed since the victim’s collapse.
Procedure 8-5 SINGLE RESCUER USING AN AUTOMATED EXTERNAL DEFIBRILLATOR (AED)—ADULT AND CHILD∗
Adapted from American Red Cross: Skill sheet using an AED-adult and child, Washington, DC, American Red Cross.
STEPS 1-6
Complete Initial Assessment (see Procedure 8-1); verify the absence of breathing and pulse (Figure 8-30).
STEP 10
Attach the pads to the victim.
Note: If the pads risk touching each other on a child, place one pad on the child’s chest and the other pad on the child’s back (between the shoulder blades).
STEP 16
After emergency care, document the situation on an incident report form (see Figure 8-48) and in the client’s chart. Provide a copy of incident report to EMS technician if victim is being transferred to a hospital.
∗ Note: If two trained responders are present, one should perform CPR while the second responder operates the AED.
In two-rescuer CPR, while chest compressions are being performed by the first rescuer, the second rescuer prepares to use the AED. Box 8-8 describes the two-rescuer AED technique for an adult.
BOX 8-8 Automated External Defibrillator Two-Rescuer Technique (Adult)
The entire dental team should conduct a cardiac arrest drill at least semiannually. Practicing a variety of scenarios will prepare the staff to respond rapidly and effectively in a real emergency.
OBSTRUCTED AIRWAY
An obstructed airway occurs when an object prevents the exchange of air in an individual. A foreign-body obstruction may occur in the following situations:
If the victim has a partial airway obstruction with good air exchange and can cough forcefully, the hygienist should not interfere with attempts to dislodge the object but should remain with the victim until it is dislodged or help arrives. See Procedure 8-6 for management of partial airway obstruction with poor air exchange and complete airway obstruction in the conscious victim. (See Box 8-9 for signs of complete airway obstruction.) See Procedure 8-7 for management of the unconscious victim with complete airway obstruction. See Procedures 8-8 and 8-9 for management of the conscious and unconscious infant with complete airway obstruction.
Procedure 8-6 CONSCIOUS CHOKING—ADULT AND CHILD
STEP 1
Ask the person, “Are you choking?”
STEP 2
If the person cannot cough, speak, or breathe, have someone else summon advanced medical personnel.
STEP 3
Get consent before helping a conscious choking victim (e.g., “Is it OK if I try to help you?”).
STEP 5
STEP 7
After emergency care, document the situation on an incident report form (see Figure 8-48) and in the client’s chart. Provide a copy of incident report to EMS technician if victim is being transferred to a hospital.
Procedure 8-7 UNCONSCIOUS CHOKING—ADULT AND CHILD
STEP 1
Place the victim in the supine position with his or her head in neutral position.
STEP 2
If rescue breaths still do not make the chest clearly rise, give five chest thrusts.
STEP 3
Look inside the victim’s mouth. Grasp the tongue and lower jaw between your thumb and fingers and the jaw. Look to see if the object has been dislodged and is visible. If the object is visible it should be removed. (New guidelines do not recommend a blind finger sweep.) SeeFigure 8-42.
STEP 5: WHAT TO DO
STEP 6
After emergency care, document the situation on an incident report form (see Figure 8-48) and in the client’s chart. Provide a copy of incident report to EMS technician if victim is being transferred to a hospital.
Procedure 8-8 CONSCIOUS CHOKING—INFANT
STEP 3
STEP 5
Look for object in the mouth. Grasp the tongue and lower jaw between your thumb and fingers and lift the jaw.
STEP 6
If you see an object, remove it with your little finger by sliding it along the inside of the cheek, using a hooking motion to sweep the object out.
STEP 8
After emergency care, document the situation on an incident report form (see Figure 8-48) and in the client’s chart. Provide a copy of incident report to EMS technician if victim is being transferred to a hospital.
Procedure 8-9 UNCONSCIOUS CHOKING—INFANT
STEP 1
If rescue breaths do not make the chest clearly rise, reposition the airway by retilting the infant’s head and try two rescue breaths again.
STEP 2
If rescue breaths still do not make the chest clearly rise, remove the resuscitation mask (if available) and give five chest thrusts.
STEP 3
Look for object in the mouth. Grasp the tongue and lower jaw between your thumb and fingers and lift the jaw.
STEP 4
If you see an object, remove it with your little finger by sliding it along the inside of the cheek, using a hooking motion to sweep the object out.
STEP 6: WHAT TO DO
STEP 7
After emergency care, document the situation on an incident report form (see Figure 8-48) and in the client’s chart. Provide a copy of incident report to EMS technician if victim is being transferred to a hospital.
OXYGEN ADMINISTRATION
During a medical emergency the body tissues may have an increased demand for oxygen or a diminished ability to receive or use oxygen, thus necessitating the administration of higher oxygen concentrations than exist in room air. Indications for oxygen administration include syncope, cardiac problems, and some respiratory difficulties. Oxygen should not be administered to a person experiencing an episode of hyperventilation. High levels of oxygen are contraindicated for individuals with chronic obstructive pulmonary disease (COPD) such as emphysema (see Chapter 49).
As discussed earlier, the E cylinder is the recommended portable oxygen tank for in-office use. A clear facemask with a positive-pressure apparatus (Ambu bag) used to deliver the surrounding air to the victim is particularly valuable to prevent disease transmission between rescuer and victim. Competence in the use of the office oxygen system before an emergency occurs is essential.
For a conscious client, a nasal cannula (Figure 8-47) at a flow rate of 2 to 6 L/min or facemask at 8 to 12 L/min adequately delivers supplemental oxygen. The client should be allowed to breathe at his or her own rate while respiration rate and vital signs are monitored and medical assistance is summoned (see Chapter 11).
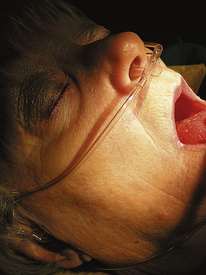
Figure 8-47 The conscious client may receive supplemental oxygen via nasal cannula or the nasal hood (not shown) of an inhalation sedation unit.
(From Malamed SF: Medical emergencies in the dental office, ed 6, St Louis, 2007, Mosby.)
The unconscious client with adequate respiratory effort should receive the same type of oxygen administration, with careful observation should the respiratory effort diminish. An unconscious client without adequate respiratory effort should be placed in a supine position and the airway opened with the head tilt–chin lift maneuver (see the discussion of BLS). The clinician then secures the mask over the client’s face to cover the nose and mouth, starts the oxygen flow from the cylinder so that the flow inflates the positive-pressure bag, compresses the positive-pressure bag once every 3 to 5 seconds to inflate the victim’s lungs, observes for chest movement and exhalation, repositions the victim’s head if lungs are not adequately inflating, proceeds with the ABC assessment of BLS, and activates the EMS.
BASIC EMERGENCY DRUG KIT
The emergency drug kit should contain only drugs that the dental hygienist or dentist is trained to administer. Maintaining IV medications used for advanced life support in an emergency drug kit suggests that the need for these drugs is realized and that they can be administered competently. Maintaining an advanced emergency drug kit without the training to obtain IV access may subject the dental hygienist or dentist to liability claims. The emergency kit should contain the basic drugs and items listed in Table 8-2. In the event of an emergency, the hygienist stops all dental procedures and uses the steps found in Figure 8-1 to take action.
TABLE 8-2 Basic Emergency Drug Kit∗
| Drug/Route Administered | Action | Indication |
|---|---|---|
| Aromatic ammonia/inhaled | Chemical irritant | Syncope (fainting) |
| Epinephrine pen/subcutaneous | Cardiac stimulant and bronchodilator | Acute allergic reaction: acute bronchospasm (asthma) |
| Nitroglycerin/sublingual | Relaxes smooth muscle and dilates coronary arteries | Angina pectoris |
| Glucose/oral as sugar cubes, orange juice, or nondiet soft drink | Elevates blood sugar | Hypoglycemia |
| Bronchodilator/inhaled (albuterol, proventil, terbutaline) | Dilates bronchi | Bronchospasm; asthma |
| Antihistamine/oral (Benadryl) | Decreases the allergic response | Allergic reaction |
| Oxygen/inhaled | Increases oxygen to the brain | Respiratory distress |
∗ Other medications may be included for use in advanced cardiac life support, but advanced training is needed to administer them.
MANAGEMENT OF SPECIFIC MEDICAL EMERGENCIES
Recognition of certain medical emergencies is essential for early intervention and appropriate treatment. When a medical emergency arises, the client’s symptoms and vital signs need to be assessed rapidly. Guided by symptoms and vital signs, an assessment of the client’s state of consciousness and neurologic, respiratory, or cardiac status is performed. From this information, the type of emergency is identified and treatment rendered. Signs and symptoms of various conditions and the treatments for these disease processes are listed in Table 8-3. In all cases the ABCs of BLS should be followed:
TABLE 8-3 Management of Specific Medical Emergencies
| Condition | Signs and Symptoms | Management |
|---|---|---|
| Syncope (fainting) | Feeling of warmth, flushed skin, nausea, rapid heart rate, perspiration, pallor. Sudden, transient loss of consciousness. | Place in Trendelenburg’s position (client’s head lower than legs); loosen any binding clothes; maintain airway; administer oxygen; pass crushed ammonia capsule under victim’s nose; place cool, damp cloth on forehead; reassure; monitor and record vital signs. |
| Shock | Skin pale and clammy, change in mental status and eventual unconsciousness if untreated, drop in blood pressure, increase in pulse and respiratory rate. | Position in Trendelenburg, maintain airway, monitor vital signs, administer oxygen, activate emergency medical services (EMS) and initiate Basic Life Support (BLS) and transport to nearest emergency room; start large-bore intravenous (if trained). (May be lactated Ringer’s solution or blood, depending on the diagnosis.) |
| Hyperventilation | Rapid or excessively deep respirations, light-headedness, dizziness, tingling in extremities, tightness in the chest, rapid heartbeat, lump in throat, panic-stricken appearance. | Terminate procedure, use a quiet tone of voice to calm and reassure the client; encourage slow, deep breaths; have client breathe into a paper bag or cupped hands; do not administer oxygen. |
| Asthma | Coughing, shortness of breath, wheezing, pallor, anxiety, use of accessory muscles for breathing, cyanosis, increased pulse rate. | Assist client to a position that facilitates breathing (upright is usually best), have client self-medicate with inhaler, administer oxygen, monitor vital signs, if necessary activate EMS and initiate BLS. |
| Angina pectoris | Transient ischemia (lack of oxygenated blood) of the myocardium (heart muscle) manifested by crushing, burning, or squeezing chest pain, radiating to left shoulder, arms, neck, or mandible and lasting 2 to 15 minutes; shortness of breath; diaphoresis (sweating). | Terminate procedure, position client upright, monitor and record vital signs, administer oxygen, have client self-medicate with personal nitroglycerin supply (tablets, spray, or topical cream). If client does not have the medication, obtain nitroglycerin from the drug kit; if pain is not relived by rest and/or nitroglycerin (0.4 mg every five minutes for three doses), activate EMS and treat as a myocardial infarction. |
| Myocardial infarction (heart attack) | Mild to severe chest pain; pain in the left arm, jaw, and possibly teeth, not relieved by rest and nitroglycerin; cold, clammy skin; nausea; anxiety; shortness of breath; weakness; perspiration; burning feeling of indigestion. | Terminate procedure, activate EMS, place client supine, initiate BLS as needed, prepare nitroglycerin from the emergency kit, administer oxygen, monitor and record vital signs. |
| Cardiac arrest | Ashen, gray, cold clammy skin; no pulse; no heart sounds; no respirations; unconscious. | Activate EMS and initiate BLS. |
| Congestive heart failure | Shortness of breath, weakness, cough, swelling of lower extremities, pink frothy sputum, distention of jugular veins. | Terminate procedure, place chair back in upright position, administer oxygen, monitor vital signs, consult physician of record, activate EMS if necessary. |
| Stroke or cerebrovascular accident (CVA) | The supply of oxygen to the brain cells is disrupted by ischemia, infarction, or hemorrhage of the cerebral blood vessels; sudden weakness of one side, difficulty of speech, temporary loss of vision, dizziness, change in mental status, nausea, severe headache, and/or convulsions. | Terminate procedure, monitor vital signs, monitor airway, administer oxygen and initiate BLS as needed, activate EMS. |
| Hemorrhage | Compression over hemorrhage: for bleeding from a dental extraction or surgical site, pack the area with gauze and have the client bite down until bleeding stops; for nosebleeds, apply pressure to bleeding side, or pack the bleeding nostril with gauze; for severe bleeding, watch for signs of shock and activate EMS. | |
| Seizure | ||
| Generalized tonic-clonic (grand mal) seizure | Aura (change in taste, smell, or sight preceding seizure), loss of consciousness, sudden cry, involuntary tonic-clonic muscle contractions, altered breathing, and/or involuntary defecation or urination. | Terminate procedure, lower dental chair and clear area of all sharp and dangerous objects, make no attempts to restrain the person; protect the head, assess and establish an airway, monitor vital signs, initiate BLS and activate EMS if needed—if stable, allow client to rest, arrange for medical follow-up, and arrange for assistance in leaving the dental facility. |
| Nonconvulsive (petit mal) seizure | Sudden momentary loss of awareness without loss of postural tone, a blank stare, and a duration of several to 90 seconds, muscle twitches. | Terminate procedure, observe closely, clear area of sharp objects, provide supportive care, may need physician evaluation. |
| Adrenal crisis (cortisol deficiency) | Confusion, weakness, lethargy, respiratory depression, hypercalcemia, shocklike symptoms—weak, rapid pulse and low blood pressure—abdominal pain, loss of consciousness. | Terminate procedure, activate EMS, place in Trendelenburg’s position, monitor vital signs, administer oxygen, establish and maintain airway, initiate BLS as needed, transport to nearest emergency room. |
| Diabetic Emergency | ||
| Hypoglycemia (hyperinsulinism) | Mood changes, hunger, headache, perspiration, nausea, confusion, irritation, dizziness and weakness, increased anxiety, possible unconsciousness. | Terminate procedure, administer oral sugar. If client conscious, ask when ate last and whether has taken insulin. Give concentrated form of oral sugar (e.g., sugar packet, cake icing, concentrated orange juice, apple juice, sugar-containing soda). If client is unconscious, activate EMS and place the sugar on the oral mucosa of the lower lip. Initiate BLS. |
| Hyperglycemia (ketoacidosis) | Polydipsia (excessive thirst); polyuria (excessive urination); polyphagia (excessive hunger); labored respirations; nausea; dry, flushed skin; low blood pressure; weak, rapid pulse; acetone breath (“fruity” smell), blurred vision, headache, unconsciousness. | Terminate procedure, activate EMS and provide BLS if necessary. If client is conscious, ask when ate last, whether has taken insulin, and whether client brought insulin to the appointment. Retrieve client’s insulin. If able, client should self-administer the insulin; monitor and record vital signs. |
| Allergic Reaction | ||
| Localized rash | Itching, skin redness, hives. | Call for assistance; prepare an antihistamine for administration; be prepared to administer BLS if needed. |
| Anaphylaxis | Urticaria (itchy wheals, also known as hives), angioedema (swelling of mucous membranes such as lips, tongue, larynx, pharynx), respiratory distress, wheezing, laryngeal edema, weak pulse, low blood pressure; may progress to unconsciousness and cardiovascular collapse. | Terminate procedure; immediately activate EMS; establish and maintain airway; place in supine position; monitor vital signs; administer oxygen; initiate BLS as needed; if qualified, administer epinephrine. |
| Reactions to local anesthesia | Assess airway, breathing, circulation; initiate BLS as needed, administer oxygen, activate EMS as needed. |
Proper documentation of the emergency is required. The medical emergency incident report form in Figure 8-48 can be used for this purpose. A member of the oral care team should be assigned the responsibility to record information on the medical incident report form during the emergency situation. In the event that the victim is transferred to a hospital, a copy of the incident report and health history forms should accompany the victim.

CLIENT EDUCATION TIPS
LEGAL, ETHICAL, AND SAFETY ISSUES
Taking a complete health, dental, and pharmacologic history is one step to reduce the risk of emergencies. Ensure that clients seek prompt medical care when signs and symptoms of potential disease are evident. Good Samaritan statutes generally provide immunity from civil prosecution to those rendering care in emergency situations. These statutes were enacted so that health professionals can render care to victims and be protected from lawsuits for negligent harm. These statutes vary from state to state, but gross negligence or willful misconduct is not covered in most jurisdictions. Gross negligence is the intentional failure to perform a task with reckless disregard of the consequences that affects the life of another, or a conscious act or omission that may result in grave injury. Under Good Samaritan statutes, services must be provided free of charge at the scene of an emergency (not within a healthcare environment). The definition of scene of an emergency remains open for debate; however, most courts exclude hospitals, dental offices, and other healthcare facilities. These statutes do not cover an emergency resulting from the actions of a provider during the course of treatment. The dental team should be trained in BLS annually and to use all of the basic drugs contained in the emergency kit maintained within the dental practice setting. A medical emergency incident report form needs to be completed to document the situation, the victim’s response and vital signs, treatment and medications administered, and emergency response time. A copy of this form, along with a copy of the client’s health history form, should accompany the victim to the emergency room.KEY CONCEPTS
Complete assessment of the client, including health, dental, and pharmacologic history and vital signs, is essential in the prevention of medical emergencies. Conditions that place a client at risk for a medical emergency should be written in red in the medical alert box of the health history form. If a client is found to be at high risk, the client’s physician should be consulted and the care plan and appointment schedule adjusted to avoid possible emergency situations. The office staff needs to be competent in using the emergency equipment and emergency drug kit and should practice medical emergency drills using a variety of scenarios.CRITICAL THINKING EXERCISES
ACKNOWLEDGMENT
The authors acknowledge Lynn Utecht for her past contributions to this chapter.
Refer to the Procedures Manual where rationales are provided for the steps outlined in the procedures presented in this chapter.
1. Malamed S.F. Medical emergencies in the dental office, ed 6. St Louis: Mosby; 2006.
2. Corah N.L. Development of a dental anxiety scale. J Dent Res. 1969;48:596.
3. American Heart Association in collaboration with International Liaison Committee on Resuscitation. Guidelines 2000 for cardiopulmonary resuscitation and emergency cardiovascular care. Circulation. 2000;102:11.
4. American Red Cross. CPR/AED for the professional rescuer. 2006.
Visit the  website at http://evolve.elsevier.com/Darby/Hygiene for competency forms, suggested readings, glossary, and related websites..