Interpretation of Dental Caries
After completion of this chapter, the student will be able to do the following:
• Define the key terms associated with the interpretation of dental caries
• Explain why caries appears radiolucent on a dental image
• Discuss interpretation tips for evaluating caries on a dental image
• Discuss the factors that may influence the image interpretation of dental caries
• Detail the classification of caries on dental images
• On a dental image, identify and describe the appearance of the following: incipient, moderate, advanced, and severe interproximal caries
• On a dental image, identify and describe the appearance of the following: incipient, moderate, and severe occlusal caries
• On a dental image, identify and describe the appearance of the following: buccal, lingual, root surface, recurrent, and rampant caries
In the practice of dentistry, caries is probably the most frequent reason for obtaining dental images. The dental radiographer must be confident about the identification and recognition of caries as viewed on a dental image. An overview of the interpretation of caries is presented in this chapter. Detailed information about dental caries, however, is beyond the scope of this text. The purpose of this chapter is to describe dental caries and to describe caries detection. In addition, interpretation tips and factors that influence caries interpretation are presented, and an introduction to the classification of caries on dental images is included.
Description of Caries
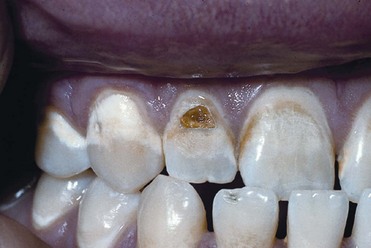
Dental caries, or tooth decay, is the localized destruction of teeth by microorganisms. Normal mineralized tooth structure (enamel, dentin, cementum) is altered and destroyed by dental caries. The term caries comes from the Latin cariosus, which means “rottenness” and literally refers to the “rotting of the teeth.” A carious lesion, or an area of tooth decay, is often referred to as a cavity. In dentistry, the term cavity refers to cavitation, or hole, in a tooth that is the result of the caries process (Figure 33-1).
Detection of Caries
To detect dental caries, careful clinical examination and careful interpretation are both necessary. A dental examination for caries cannot be considered complete without dental images. Dental images enable the dental professional to identify carious lesions that are not visible clinically. In addition, dental images allow the dental professional to evaluate the extent and severity of carious lesions.
Clinical Examination
Some carious lesions can be detected by simply looking into the mouth, and some cannot. All teeth must be examined clinically for dental caries with a mirror and an explorer. The mirror can be used to reflect light, to allow indirect vision, and to retract the tongue. The explorer can be used as a tactile device to detect the presence of any changes in consistency (e.g., “catches” or “tug-back”) in the pits, grooves, and fissures of teeth.
A number of color changes may be seen in teeth with dental caries. Occlusal surfaces may show dark staining in the fissures, pits, and grooves or may show an obvious cavitation. Smooth surfaces may exhibit a chalky white spot, or opacity, indicating demineralization. An interproximal ridge overlying a carious lesion may also appear discolored.
While some teeth with dental caries exhibit a discolored area or a cavitation (Figure 33-2), others have no visible changes. In addition, caries that occur between teeth may be difficult or impossible to detect clinically. In such cases, dental images play an important role. It is important to remember that a clinical examination alone is not adequate to detect dental caries; the clinical examination must be used in conjunction with the exposure of dental images.

Dental Image Examination
Dental images are useful in the detection of caries because of the nature of this disease process. Demineralization and destruction of hard tooth structures result in loss of tooth density in the area of the lesion. Decreased density allows greater penetration of x-rays in the carious area, so the carious lesion appears radiolucent (dark or black) on a dental image. Dental caries is the most frequently encountered radiolucent lesion on dental images.
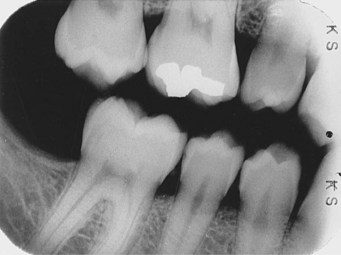
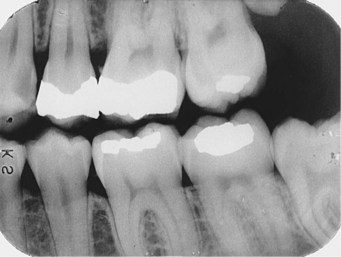
The bite-wing image is the image of choice for the evaluation of caries because it provides the dental professional with diagnostic information that cannot be obtained from any other source. A periapical image using the paralleling technique can also be used for the evaluation of dental caries.
Interpretation of Caries on Dental Images
To recognize caries on a dental image, the dental professional must be confident in the use of interpretation methods and must be able to identify factors that influence the interpretation of caries.
Interpretation Tips
As reviewed in Chapter 28, proper mounting and viewing techniques are essential in the interpretation of dental images, especially the evaluation of dental caries. With film, all images must be properly mounted before image interpretation. Mounted films should be viewed in a room with subdued lighting that is free of distractions. An illuminator or viewbox is required for accurate viewing and interpretation of images. If the screen of the viewbox is not completely covered by the mounted radiographs, the harsh light around must be masked to reduce glare and intensify the detail and contrast of the radiographic images. The use of a pocket-sized magnifying glass is helpful in evaluating the radiographic appearance of dental caries and can be used to detect slight changes in density and contrast in radiographic images.
With digital images, all exposures should be properly displayed on the computer screen before interpretation. Individual images may be enlarged to full screen to view in detail the presence or absence of dental caries. Dental images should be viewed in the presence of the patient (see Chapter 28).
Factors Influencing Caries Interpretation
A number of factors can influence the interpretation of dental caries on dental images. Images must be of diagnostic quality to allow accurate evaluation of dental caries. As described in Chapter 20, errors in technique may result in nondiagnostic images. For example, a bite-wing image used to detect dental caries must be free of overlapped contacts. Improper horizontal angulation causes overlapped contact areas and makes it impossible to identify dental caries in the interproximal regions.
As discussed in Chapter 20, errors in exposure may also result in nondiagnostic images. For example, a dental image used to detect dental caries must have proper contrast and density. Incorrect exposure factors result in images that are too dark or too light and thus useless in the detection of caries.
Classification of Caries on Dental Images
The appearance of caries on dental images can be classified according to the location of the caries on the tooth. Caries that involves interproximal, occlusal, buccal, lingual, and root surfaces may be seen on a dental image. In addition, recurrent and rampant caries may also be viewed on dental images.
Interproximal Caries
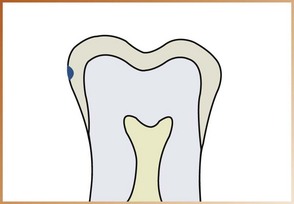
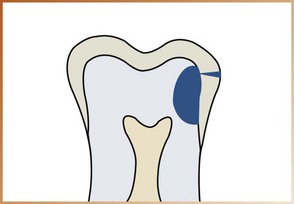
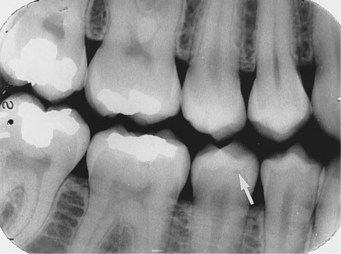
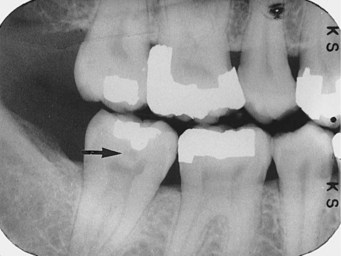
The term interproximal means “between two adjacent surfaces.” Caries found between two teeth is termed interproximal caries (Figure 33-3). On a dental image, interproximal caries is typically seen at or just below (apical to) the contact point (Figure 33-4). This area is difficult, if not impossible, to examine clinically with an explorer.
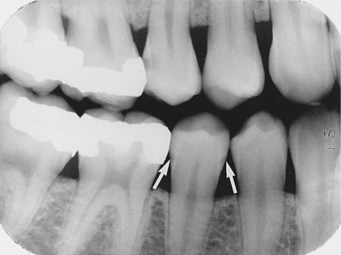
FIGURE 33-3 Interproximal caries found at or just below the contact area. (From Haring JI, Lind LJ: Radiographic interpretation for the dental hygienist, Philadelphia, 1993, Saunders.)
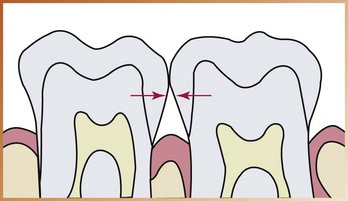
FIGURE 33-4 Caries found at or just below the contact area. (From Haring JI, Lind LJ: Radiographic interpretation for the dental hygienist, Philadelphia, 1993, Saunders.)
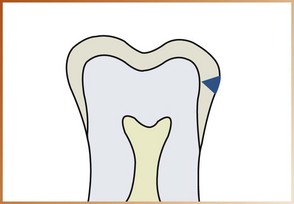
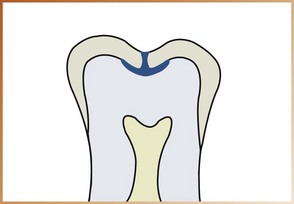
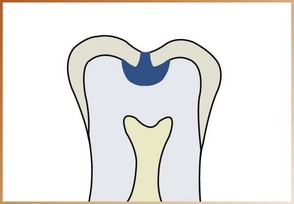
As the caries progresses inward through the enamel of the tooth, it assumes a triangular configuration; the apex (or point) of the triangle is seen at the dentino-enamel junction (DEJ) (Figure 33-5). As the caries reaches the DEJ, it spreads laterally and continues into dentin. Another triangular configuration is seen in dentin; this time the base of the triangle is along the DEJ, and the apex is pointed toward the pulp chamber (Figure 33-6).

FIGURE 33-5 Caries confined to enamel, exhibiting a triangular configuration. (From Haring JI, Lind LJ: Radiographic interpretation for the dental hygienist, Philadelphia, 1993, Saunders.)
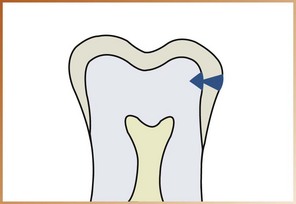
FIGURE 33-6 Caries that has reached the dentino-enamel junction (DEJ) and has spread along the DEJ, resulting in another triangular configuration. (From Haring JI, Lind LJ: Radiographic interpretation for the dental hygienist, Philadelphia, 1993, Saunders.)
Interproximal caries can be classified according to the depth of penetration of the lesion through enamel and dentin. Interproximal carious lesions can be classified as incipient, moderate, advanced, and severe.
Incipient Interproximal Caries
Incipient interproximal caries extends less than halfway through the thickness of enamel (Figures 33-7 and 33-8). The term incipient means “beginning to exist or appear.” An incipient, or class I, lesion is seen only in enamel.
Moderate Interproximal Caries
Moderate interproximal caries extends more than halfway through the thickness of enamel but does not involve the DEJ (Figures 33-9 and 33-10). A moderate, or class II, lesion is seen only in enamel.
Advanced Interproximal Caries
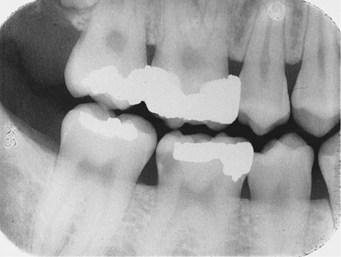
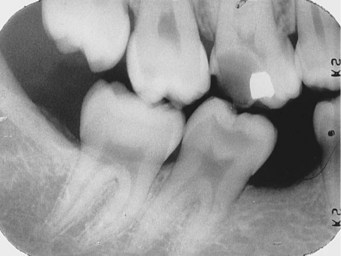
Advanced interproximal caries extends to or through the DEJ and into dentin but does not extend through dentin more than half the distance toward the pulp (Figures 33-11 and 33-12).
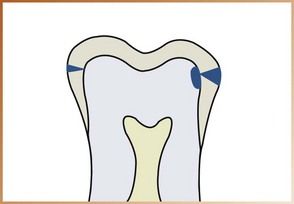
FIGURE 33-11 An advanced carious lesion, which extends through enamel and to or through the dentino-enamel junction (DEJ) but does not extend through dentin more than half the distance to the pulp chamber. (From Haring JI, Lind LJ: Radiographic interpretation for the dental hygienist, Philadelphia, 1993, Saunders.)
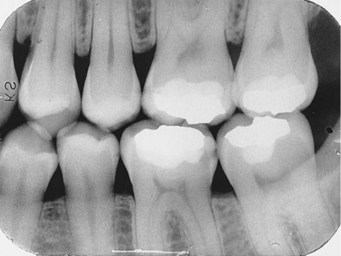
FIGURE 33-12 An advanced carious lesion, which extends through the dentino-enamel junction (DEJ) and into dentin, seen on the distal surface of the mandibular first molar. (From Haring JI, Lind LJ: Radiographic interpretation for the dental hygienist, Philadelphia, 1993, Saunders.)
An advanced, or class III, lesion affects both enamel and dentin.
Severe Interproximal Caries
Severe interproximal caries extends through enamel, through dentin, and more than half the distance toward the pulp (Figures 33-13 and 33-14). A severe, or class IV, lesion involves both enamel and dentin and may appear clinically as a cavitation in the tooth.
Occlusal Caries
The term occlusal refers to the chewing surfaces of teeth. Caries that involves the chewing surfaces of posterior teeth is termed occlusal caries. A thorough clinical examination with the mirror, explorer, and light is the method of choice for the detection of occlusal caries. Because of the superimposition of the dense buccal and lingual enamel cusps, early occlusal caries is difficult to see on a dental image. Consequently, occlusal caries is not seen on a dental image until involvement of the DEJ occurs. Occlusal carious lesions can be classified as incipient, moderate, or severe.
Incipient Occlusal Caries
Incipient occlusal caries cannot be seen on a dental image and must be detected clinically with an explorer.
Moderate Occlusal Caries
Moderate occlusal caries extends into dentin and appears as a very thin radiolucent line (Figures 33-15 and 33-16). The radiolucency is located under the enamel of the occlusal surface of the tooth. On a dental image, little, if any, change is noted in enamel.
Severe Occlusal Caries
Severe occlusal caries extends into dentin and appears as a large radiolucency (Figures 33-17 and 33-18). The radiolucency extends under the enamel of the occlusal surface of the tooth. Severe occlusal caries is apparent clinically and appears as a cavitation in the tooth.
Buccal and Lingual Caries
As the names suggest, buccal caries involves the buccal tooth surface, whereas lingual caries involves the lingual tooth surface. Because of the superimposition of the densities of normal tooth structure, buccal and lingual caries are difficult to detect on a dental image and are best detected clinically. When viewed on a dental image, caries that involves the buccal or lingual surface appears as a small, circular radiolucent area (Figures 33-19 and 33-20). To determine the location of the lesion, clinical examination with an explorer is necessary.

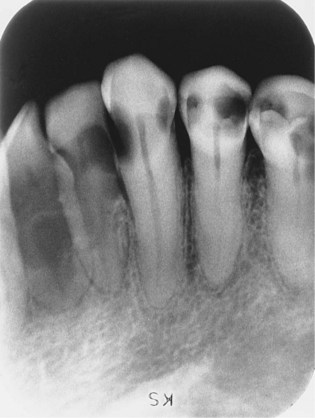
Root Surface Caries
Root surface caries involves only the roots of teeth. The cementum and dentin located just below the cervical region of the tooth are involved (Figures 33-21 and 33-22). No involvement of enamel occurs. Bone loss and corresponding gingival recession precede the caries process and result in exposed root surfaces.
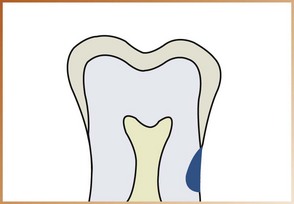
FIGURE 33-21 Root caries involving only cementum and dentin, not enamel. (From Haring JI, Lind LJ: Radiographic interpretation for the dental hygienist, Philadelphia, 1993, Saunders.)
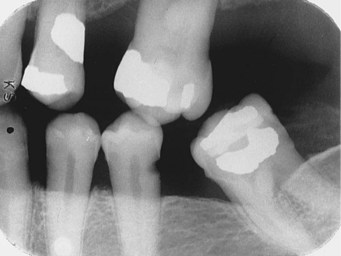
FIGURE 33-22 Root caries appearing as a crater-shaped radiolucency just below the cemento-enamel junction (CEJ) on the mandibular second premolar. (From Haring JI, Lind LJ: Radiographic interpretation for the dental hygienist, Philadelphia, 1993, Saunders.)
Clinically, root surface caries is easily detected on exposed root surfaces. The most common locations include the exposed roots of mandibular premolar and molar areas. On a dental image, root surface caries appears as a cupped-out or crater-shaped radiolucency just below the cemento-enamel junction (CEJ). Early lesions may be difficult to detect on a dental image.
Recurrent Caries
Secondary caries, or recurrent caries, occurs adjacent to a pre-existing restoration. Caries occurs in this region because of inadequate cavity preparation, defective margins, or incomplete removal of caries before placement of the restoration material. On a dental image, recurrent caries appears as a radiolucent area just beneath a restoration (Figure 33-23). Recurrent caries occurs most often beneath the interproximal margins of a restoration.

Rampant Caries
The term rampant means “growing or spreading unchecked.” Rampant caries is advanced and severe caries that affects numerous teeth (Figure 33-24). Rampant caries is typically seen in children with poor dietary habits or in adults with decreased salivary flow.
Summary
• Dental caries is a destructive process that causes decalcification of enamel, destruction of enamel and dentin, and cavitation of teeth.
• To detect dental caries, careful clinical examination and interpretation are necessary.
• Dental images allow the dental professional to identify carious lesions that are not visible clinically.
• Caries appears radiolucent on a dental image. Of all the radiolucent lesions that can be seen on a dental image, dental caries is the most frequently seen.
• The dental professional must be confident in the use of interpretation methods to identify dental caries and to recognize factors that influence caries interpretation (e.g., errors in technique and exposure).
• Dental caries may involve any surface of the tooth crown or root. The appearance of dental caries can be classified according to the location of the caries on the tooth. Caries involving interproximal, occlusal, buccal, lingual, and root surfaces may be seen on dental images.
• On a dental image, the appearance of interproximal caries can be classified as incipient, moderate, advanced, or severe, depending on the amount of enamel and dentin involved in the caries process.
• On a dental image, the appearance of occlusal caries can be classified as moderate or severe, depending on the amount of enamel and dentin involved in the caries process.
• Buccal and lingual carious lesions are difficult to detect on dental images because of the superimposition of normal tooth structure. Instead, these lesions are best detected clinically.
• Root surface caries involves cementum and dentin and is easily detected clinically. On a dental image, root surface caries appears as a cupped-out radiolucency below the cemento-enamel junction.
• On a dental image, other appearances of dental caries include recurrent caries, which appears as a radiolucency adjacent to an existing restoration, and rampant caries, which affects numerous teeth.
Frommer, HH, Savage-Stabulas, JJ, Caries and periodontal disease. Radiology for the dental professional, ed 9, St. Louis, Mosby, 2011.
Haring, JI, Lind, LJ. Dental caries. In: Radiographic interpretation for the dental hygienist. Philadelphia: Saunders; 1993.
Johnson, ON, McNally, MA, Essay, CE, Preliminary interpretation of the radiographs. Essentials of dental radiography for dental assistants and hygienists, ed 8, Upper Saddle River, Pearson Education, Inc, 2007.
Miles, DA, Van Dis, ML, Jensen, CW, Williamson, GF, Interpretation: normal versus abnormal and common radiographic presentation of lesions. Radiographic imaging for the dental team, ed 4, Philadelphia, Saunders, 2009.
White, SC, Pharoah, MJ, Dental caries. Oral radiology: principles of interpretation, ed 6, St. Louis, Mosby, 2009.
Identification
For questions 1 to 5, refer to Figures 33-25 through 33-29. On each dental image, identify the classification of the carious lesion shown.
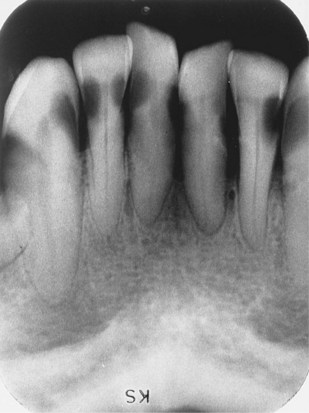
FIGURE 33-25 (From Haring JI, Lind LJ: Radiographic interpretation for the dental hygienist, Philadelphia, 1993, Saunders.)
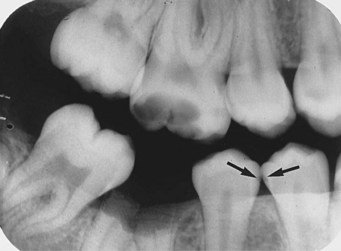
FIGURE 33-26 (From Haring JI, Lind LJ: Radiographic interpretation for the dental hygienist, Philadelphia, 1993, Saunders.)
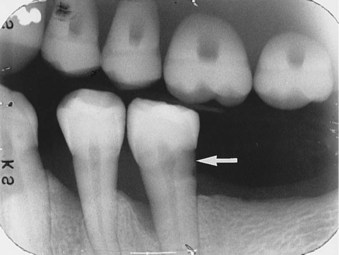
FIGURE 33-27 (From Haring JI, Lind LJ: Radiographic interpretation for the dental hygienist, Philadelphia, 1993, Saunders.)
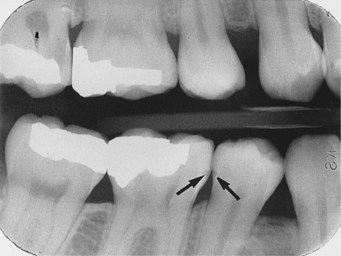
FIGURE 33-28 (From Haring JI, Lind LJ: Radiographic interpretation for the dental hygienist, Philadelphia, 1993, Saunders.)

FIGURE 33-29 (From Haring JI, Lind LJ: Radiographic interpretation for the dental hygienist, Philadelphia, 1993, Saunders.)
Matching
For questions 6 to 12, match the classification of caries with the appropriate description.
a. Caries that extends more than halfway through enamel but does not involve the dentino-enamel junction (DEJ)
b. Caries that extends to or through the DEJ but does not extend more than half the distance to the pulp
c. Caries that cannot be seen on an image
d. Caries that extends through enamel, through dentin, and more than half the distance to the pulp
e. Caries that extends less than halfway through enamel
f. Caries seen as a large radiolucency in dentin under the enamel of the chewing surfaces of teeth
g. Caries seen as a thin radiolucent line in dentin under the enamel of the chewing surfaces of teeth
Short Answer
14. Explain why caries appears radiolucent on a dental image.
15. List the classifications of interproximal caries on a dental image.
16. List the classifications of occlusal caries on a dental image.
17. Describe the appearance of root caries on a dental image.
18. Describe the appearance of recurrent caries on a dental image.
19. Describe the appearance of rampant caries on a dental image.
20. Discuss the factors that may influence the interpretation of dental caries.