Film Mounting and Viewing
After completion of this chapter, the student will be able to do the following:
• Define the key terms associated with film mounting and viewing
• List the individuals who are qualified to mount and view dental radiographs
• Describe when and where films are mounted
• List five reasons to use a film mount
• Describe what information is placed on a film mount
• Discuss the importance of normal anatomy in film mounting
• Describe how the identification dot is used to determine film orientation
• List and describe two methods of film mounting and identify the preferred method
• List and describe the step-by-step procedures for film mounting
• List and describe the necessary equipment for film viewing
• Discuss the importance of masking extraneous viewbox light seen around a film mount
• Describe optimal viewing conditions, as well as when and where images should be viewed
• Explain the importance of examining images in an established viewing sequence
• List and describe the step-by-step procedures for film viewing
• Explain why multiple viewings of dental images are necessary, and list the areas, diseases, and abnormalities that must be included in the examinations
Film mounting is an essential step in the interpretation of dental radiographs. The dental radiographer must be able to mount dental radiographs in correct anatomic order. To mount dental radiographs properly, the radiographer must have a thorough knowledge of the normal anatomy of the maxilla, the mandible, and related structures (see Chapter 27). Film viewing is also essential in the interpretation of dental radiographs; the dental radiographer must understand the importance of examining films under optimal viewing conditions.
The purpose of this chapter is to present the basic concepts of film mounting and film viewing and to describe the step-by-step procedures that must be followed to prepare for the interpretation of radiographs.
Film Mounting
Mounted radiographs, or radiographs placed in a film holder in anatomic order, are invaluable to the dental professional. Compared with individual films, a series of mounted radiographs can be viewed more efficiently and are easier to interpret.
Basic Concepts
The term mount can be defined as “to place in an appropriate setting, as for display or study.” In dental radiography, film mounting is the placement of radiographs in a supporting structure or holder.
What Is a Film Mount?
A film mount is a cardboard, plastic, or vinyl holder that is used to support and arrange dental radiographs in anatomic order (Figure 28-1). Anatomic order refers to how teeth are arranged within the dental arches. Each film mount has a number of windows or frames in which the individual radiographs are placed, or “mounted.” A film mount may be opaque or clear (Figure 28-2). An opaque film mount is preferred because it masks the light around each radiograph. Subtle changes in density and contrast are easier to detect when extraneous light is eliminated. To minimize extraneous viewbox light, each window of a film mount should contain a radiograph. When all the windows are not filled with radiographs, black opaque paper can be placed in the unused frames.

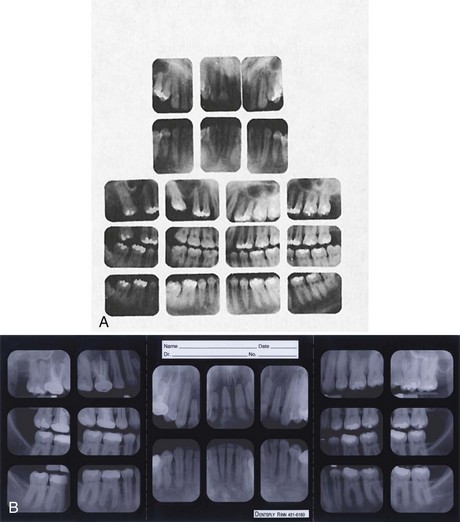
FIGURE 28-2 Full mouth series. A, Clear celluloid mount. B, Opaque mounts. (From Frommer HH, Savage-Stabulas JJ: Radiology for the dental professional, ed 8, St. Louis, 2005, Mosby.)
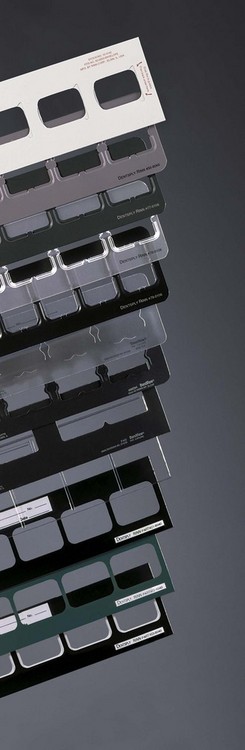
Film mounts are commercially available in many sizes and configurations and accommodate any number of films; mounts are available for single films, bite-wing films, a complete mouth radiographic series (CMRS) of films, and countless other combinations of films (Figure 28-3). The overall size and shape of the film mounts are designed to fit a variety of viewboxes found in the dental office; the size of the film mount should correspond to the size of the viewbox.
Who Mounts Films?
Any trained dental professional (dentist, dental hygienist, dental assistant) with knowledge of the normal anatomic landmarks of the maxilla, the mandible, and related structures is qualified to mount dental radiographs. In most dental offices, mounting films is the responsibility of the dental radiographer.
When and Where Are Films Mounted?
The dental radiographer should always mount films immediately after processing. films should be mounted in an area designated for film mounting. This area should consist of a clean, dry, light-colored work surface in front of an illuminator or viewbox.
Why Use a Film Mount?
The use of a film mount is strongly recommended for the following reasons:
• Mounted radiographs are quicker and easier to view and interpret.
• Mounted radiographs are easily stored in the patient record and are readily accessible for interpretation.
• Film mounts decrease the chances of error in determining the patient’s right and left sides because each film is mounted in anatomic order.
• Film mounts decrease the handling of individual films and prevent damage to the emulsion (e.g., fingerprint marks and scratches).
• Film mounts mask illumination immediately adjacent to individual radiographs and aid in interpretation.
What Information Is Placed on a Film Mount?
The dental radiographer should label the film mount before the films are mounted. A special marking pencil designed to write on paper, plastic, or vinyl can be used to label film mounts. Radiographs are easily identified when the film mount has been clearly and legibly labeled with the following information:
The patient’s name and date of exposure are essential, the dentist’s name is useful if the radiographs are sent to a third party (e.g., insurance company), and the radiographer’s name is important if any questions should arise about the exposure of the images.
Are Mounts Used with Digital Imaging?
Similar to conventional radiography, digital images observed on the computer monitor must also be mounted correctly in anatomic order for proper viewing and interpretation. Most digital imaging software allows the dental radiographer to choose the appropriate-size mount, whether it be one periapical image, four bite-wing images, a full mouth series, or a panoramic image (Figures 28-4 and 28-5). For example, with a full mouth series of radiographs, the dental radiographer must “click and drag” each image to the correct corresponding window or frame on the mount on the computer monitor screen (Figure 28-6).
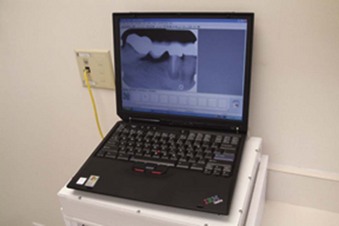
FIGURE 28-4 A digital image of the mandibular right periapical region in a mount as seen on a computer monitor.
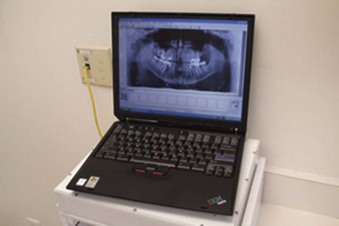
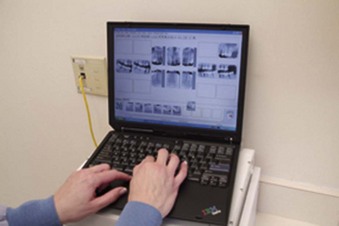
FIGURE 28-6 A full mouth series of radiographs exposed using digital imaging. Each image is placed in the appropriate window on the mount, arranged in anatomic order.
The images should be saved with the patient’s full name and date of exposure. Digital systems vary from each manufacturer, but information regarding the name of the radiographer, amount of radiation the patient received during exposure, and the dentist’s name may also be recorded. Once the mounting has been completed and verified, the images are saved in the patient’s electronic file.
Normal Anatomy and Film Mounting
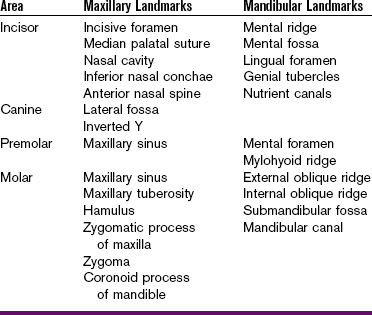
As stressed in Chapter 27, knowledge of normal anatomy is necessary to mount dental radiographs properly. The dental radiographer must be familiar with the characteristic anatomic landmarks seen in each region of the jaws. Identification of landmarks aids in distinguishing maxillary periapical images from mandibular periapical images (Table 28-1).
Film Mounting Methods
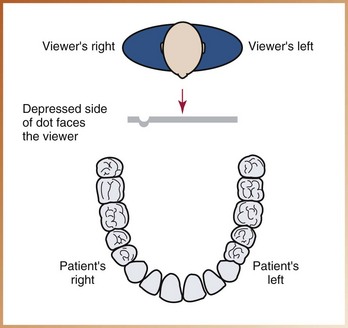
Two methods are used to mount films: (1) labial and (2) lingual. Both methods rely on identification of the embossed dot found on the film. As described in Chapter 7, a small, raised bump, known as the identification dot, is seen in one corner of each intraoral film packet; the dot on the packet indicates the location of the embossed identification dot on the radiograph (Figure 28-7). The film is positioned in the packet such that the raised side of the dot faces the x-ray beam during exposure.
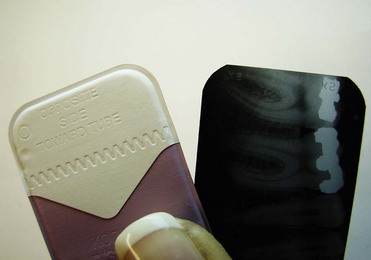
FIGURE 28-7 The dot on the packet indicates the relative location of the embossed identifying dot on the radiograph. (Photo courtesy of Allyson Bowcutt.)
The identification dot is used to determine film orientation (i.e., determining the patient’s right and left sides). After the films are processed, they should be placed in the film mount so that all the embossed dots are either raised (labial mounting) or depressed (lingual mounting); all the embossed dots must face in the same direction. The dental radiographer can then distinguish between the right and left sides of the patient. Either labial or lingual mounting can be used.
Labial Mounting
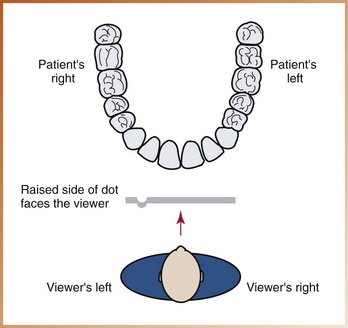
Labial mounting is the preferred method of mounting dental radiographs and is recommended by the American Dental Association. In the labial mounting method, radiographs are placed in the film mount with the raised (convex) side of the identification dot facing the viewer (dental radiographer). The radiographs are then viewed from the labial aspect (thus the term labial mounting). With this method, the radiographs are viewed as if the viewer is looking directly at the patient; the patient’s left side is on the viewer’s right, and the patient’s right side is on the viewer’s left (Figure 28-8). Images of teeth are mounted in anatomic order and have the same relationship to the viewer as they do when facing the patient.
Lingual Mounting
Lingual mounting can be used as an alternative method. Although some practitioners still use lingual mounting, this system of film mounting is not recommended. In the lingual mounting method, radiographs are placed in the film mount with the depressed (concave) side of the identification dot facing the viewer. The dental radiographer then views the radiographs from the lingual aspect (thus the term lingual mounting). With this method, the radiographs are viewed as if the dental radiographer is inside the patient’s mouth and looking out; the patient’s left side is on the viewer’s left, and the patient’s right side is on the viewer’s right (Figure 28-9).
Step-by-Step Procedure
The dental radiographer in training can use the steps for film mounting listed in Procedure 28-1 . As the mounting skills of the radiographer improve, simpler and faster techniques may be used.
PROCEDURE 28-1 Mounting Dental Radiographs
1. Prepare for film mounting by placing a clean, light-colored paper towel over the work surface in front of the viewbox.
3. Label and date the film mount (Figure 28-10).
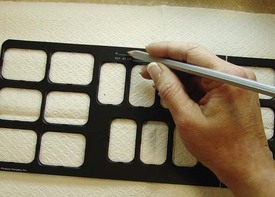
FIGURE 28-10 The dental radiographer must label and date the film mount before mounting the films. (Photo courtesy of Allyson Bowcutt.)
5. Examine each radiograph, identify the embossed dot, and then place each radiograph on the work surface with the raised side of the dot facing up (for labial mounting, as recommended by the American Dental Association). All radiographs must be mounted with the raised side of the dot facing in the same direction. Hold radiographs by the edges only (Figure 28-11).
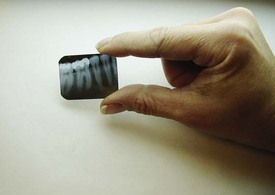
FIGURE 28-11 The dental radiographer should hold radiographs by the edges only. (Photo courtesy of Allyson Bowcutt.)
6. Sort the radiographs into three groups: bite-wings, anterior periapicals, and posterior periapicals. Bite-wing images can be distinguished from periapical images because the crowns of both maxillary and mandibular teeth are seen on the image (Figure 28-12). Anterior periapical images can be distinguished from posterior periapical images because of the orientation of the film: in anterior periapical images, the long axis of the film is oriented vertically, and in posterior periapical images, the long axis is oriented horizontally (Figure 28-13).
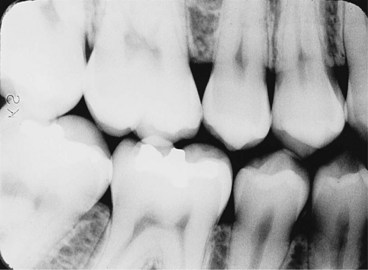

FIGURE 28-13 A, An anterior periapical film is oriented vertically. B, A posterior periapical film is oriented horizontally.
7. Arrange the radiographs on the work surface in anatomic order. The normal anatomic landmarks can be used to distinguish maxillary images from mandibular images. In addition, all maxillary radiographs must be oriented with the roots of teeth pointing upward, and all mandibular radiographs must be oriented with the roots pointing downward (Figure 28-14). The order of teeth can be used to distinguish the right side from the left side (Figure 28-15).
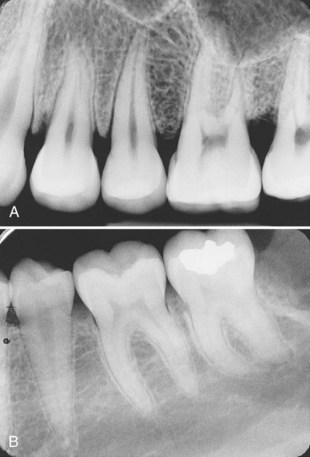
FIGURE 28-14 A, A maxillary periapical film is mounted with the roots pointing upward. B, A mandibular periapical film is mounted with the roots pointing downward.
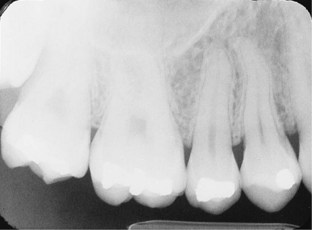
FIGURE 28-15 The order of teeth can be used to distinguish right from left; premolars are located in front of molars; therefore, this is a maxillary right periapical image.
8. Place each film in the corresponding frame of the film mount, and secure it (Figure 28-16).
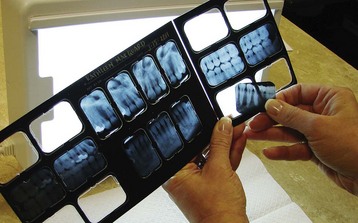
FIGURE 28-16 After the films have been arranged in proper order, the dental radiographer can place each film in the corresponding frame of the film mount.
Helpful Hints
 DO master the normal anatomy of the maxilla, the mandible, and adjacent structures. A working knowledge of normal anatomy is necessary to correctly mount films.
DO label and date the film mount before mounting the films; always include the patient’s full name, the date of exposure, the dentist’s name, and the radiographer’s name.
DO mount films immediately after processing.
DO mount radiographs in a designated area; use a light-colored working surface in front of a viewbox.
DO use an opaque film mount to block out extraneous light around each film.
DO use clean dry hands to mount radiographs, and hold each radiograph by the edges only.
DO identify the embossed dot on each film; always mount radiographs with the raised side of the dot facing the same direction. For labial mounting, all the raised dots must face the viewer.
DO sort the radiographs before mounting them.
DO use normal anatomic landmarks to distinguish maxillary images from mandibular images.
DO use the order of teeth to distinguish the right side from the left side.
DO use a definite order for mounting films. For example, begin with bite-wing images, then mount maxillary anterior periapical films, proceed to mandibular anterior periapical films, and then finish with maxillary posterior periapical films and mandibular posterior periapical films.
DO mount bite-wing radiographs with the curve of Spee (occlusal plane between maxillary and mandibular teeth) directed upward toward the distal.
DO recognize the differences between maxillary and mandibular teeth (e.g., maxillary anterior teeth have larger crowns and longer roots than do mandibular anterior teeth).
DO remember that most mandibular molars have two roots, whereas most maxillary molars have three.
DO recognize that most roots curve toward the distal.
DO verify the following points after mounting the radiographs: all the embossed dots are oriented correctly, the radiographs are arranged in anatomic order, the radiographs are mounted securely, and the film mount is labeled and dated.
DO place the mounted radiographs in the patient’s file as soon as possible to eliminate the possibility of loss or mix-up.
Film Viewing
Film viewing is essential in the interpretation of dental radiographs. The dental radiographer must be knowledgeable about optimal film viewing conditions and the recommended evaluation sequence for film viewing.
Basic Concepts
The term viewing means “examining or inspecting.” In dental radiography, film viewing is the examination of dental radiographs.
Who Views Films?
Any trained dental professional (dentist, dental hygienist, dental assistant) with knowledge of the normal anatomic landmarks of the maxilla, the mandible, and related structures is qualified to view dental radiographs. Although all members of the dental team may interpret dental radiographs, it is the responsibility of the dentist to establish a final or definitive interpretation and diagnosis. Interpretation, or the explanation of what is viewed on a dental radiograph, is discussed in Chapter 30.
What Equipment Is Required for Film Viewing?
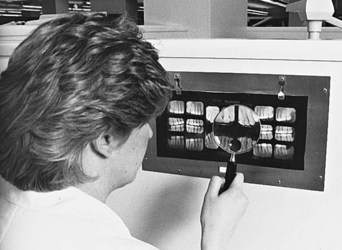
An adequate light source and magnification are required for optimal film viewing; both a viewbox and a magnifying glass are necessary.
• Light source: A light source known as the viewbox, or illuminator (see Chapter 10), is required to view dental radiographs accurately and assist in the interpretation of images (Figure 28-17). The viewing area of the illuminator should be large enough to accommodate a variety of mounted films as well as unmounted extraoral films. The light from the viewbox should be of uniform intensity and evenly diffused. If the screen of the viewbox is not completely covered by the mounted radiographs, the harsh light around the mounted films must be masked to reduce glare and intensify the detail and contrast of the radiographic images (Figure 28-18).
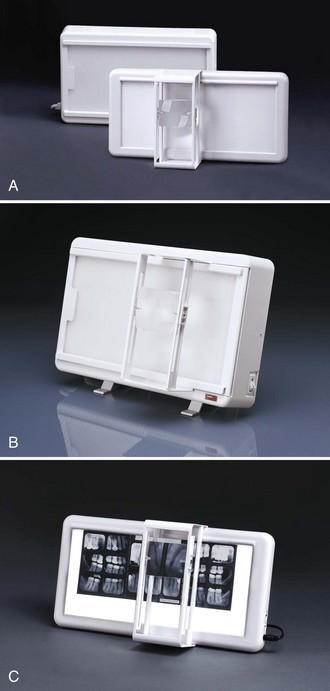
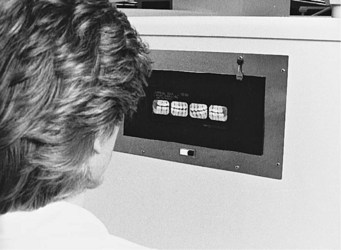
FIGURE 28-18 Extraneous light should be masked to reduce glare and intensify the contrast of the radiographic image. (From Haring JL, Lind LJ: Radiographic interpretation for the dental hygienist, Philadelphia, 1993, Saunders.)
• Magnification: The use of a pocket-sized magnifying glass is useful in interpretation. Magnification aids the viewer in evaluating slight changes in density and contrast in radiographic images (Figure 28-19).
When and Where Are Films Viewed?
The dental radiographer should view radiographs immediately after mounting. Immediate film viewing is necessary to verify the correct arrangement of the images in the mount.
Films are best viewed by the dental radiographer on a viewbox in a room with dimmed lighting. When interpreting dental radiographs, an area free of distractions with subdued lighting provides optimal conditions for film viewing. Because such viewing conditions are typically present only in a medical facility, most films are examined on the viewbox at chairside in the dental setting.
Step-by-Step Procedure
Mounted radiographs must be viewed in sequential order. The dental radiographer must have an established viewing sequence to prevent errors in interpretation. The steps shown in Procedure 28-2 can be used to examine a CMRS of dental radiographs (Figure 28-20).

FIGURE 28-20 The dental radiographer must use a definite order for viewing radiographs. The sequence illustrated here is recommended.
The dental radiographer must use this recommended viewing sequence to examine films for each of the following:
• Unerupted, missing, and impacted teeth
• Dental caries and the size and shape of the pulp cavities
• Bony changes, the level of alveolar bone, and calculus
• All areas not previously examined (e.g., remaining areas of the jaws, sinuses)
Many examinations of dental radiographs are necessary to check for all the problems listed. For example, the dental radiographer should first view the images quickly for evidence of unerupted, bony, or impacted teeth. Next, the examination sequence should be repeated for caries, pulp size, and pulp shape. The sequence must be repeated as many times as necessary to evaluate all surfaces of teeth and supporting structures for evidence of disease and abnormalities.
After film viewing, the dental professional must note any findings in the patient record. A standard diagram is included in the patient record and can be used to record significant findings (Figure 28-21). Although all dental professionals may note significant findings, it is important to remember that the final interpretation and diagnosis are the responsibility of the dentist.
Helpful Hints
DO use a viewbox to examine radiographs; avoid holding mounted films “up to the room light” to view.
DO block out the harsh light on a viewbox that occurs around the edges of the film mount; harsh light must be masked to reduce glare.
DO use a magnifying glass to evaluate slight changes in density and contrast in radiographic images.
DO view films immediately after mounting.
DO view films under optimal viewing conditions whenever possible; use an area free of distractions with dimmed lighting.
DO use a definite order for film viewing. To view a CMRS, start with the films on the upper left side of the mount, move horizontally to the upper right, down to the lower right, across the lower left, up to the bite-wings, and then view the bite-wings from left to right.
DO examine radiographs using the recommended viewing sequence as many times as necessary to evaluate them for (1) unerupted, impacted, and missing teeth; (2) dental caries, pulp size, and pulp shape; (3) bony changes, level of alveolar bone, and calculus; (4) roots and periapical areas; and (5) all areas not previously examined.
Summary
• Film mounting is the placement of radiographs in a supporting structure or holder.
• A film mount is a plastic or cardboard holder used to arrange radiographs in anatomic order (i.e., the order in which teeth are arranged in the dental arches).
• Any trained dental professional with knowledge of normal anatomy is qualified to mount dental radiographs. In most offices, the dental radiographer is responsible for the mounting of films.
• Dental radiographs should always be mounted immediately after processing in an area designated for film mounting.
• Mounted radiographs are quicker and easier to view and interpret and are more easily stored in the patient record. Mounted radiographs also decrease the chances of error in determining the patient’s right and left sides, and they decrease the handling of films.
• A film mount should be labeled before mounting the films. The label includes patient’s full name, date of exposure, dentist’s name, and radiographer’s name.
• Digital images should also be mounted correctly on the computer monitor and properly labeled with patient’s name and date of exposure. The images are saved under the electronic file for each patient.
• The two methods of mounting radiographs based on the orientation of the embossed dot are labial mounting and lingual mounting. The labial mounting method is recommended by the American Dental Association.
• After films are mounted, the following must be verified: all embossed dots are oriented correctly, all films are arranged in anatomic order, all films are mounted securely, and the film mount is properly labeled and dated.
• Film viewing is the examination of radiographs. Films are best viewed on a viewbox (light source) in a room with dimmed lighting. Radiographs can be viewed by any trained dental professional and should be viewed immediately after mounting.
• Radiographs should be viewed in a sequential order as many times as necessary and should be examined for (1) unerupted, impacted, and missing teeth; (2) dental caries, pulp size, and pulp shape; (3) bony changes, level of alveolar bone, and calculus; (4) roots and periapical areas; and (5) all areas not previously examined.
• After film viewing, all significant findings must be noted in the patient record.
Frommer, HH, Savage-Stabulas, JJ, Film mounting and radiographic anatomy. Radiology for the dental professional, ed 9, St. Louis, Mosby, 2011.
Haring, JI, Lind, LJ. The importance of dental radiographs and interpretation. In: Radiographic interpretation for the dental hygienist. Philadelphia: Saunders; 1993.
Johnson, ON, Thomson, EM, Identification of anatomical landmarks for mounting radiographs. Essentials of dental radiography for dental assistants and hygienists, ed 6, Upper Saddle River, Pearson, 2007.
Miles, DA, Van Dis, ML, Razmus, TF. Radiographic processing and processing quality assurance. In: Basic principles of oral and maxillofacial radiology. Philadelphia: Saunders; 1992.
Miles, DA, Van Dis, ML, Williamson, GF, Jensen, CW, Film processing and quality assurance. Radiographic imaging for the dental team, ed 4, St. Louis, Saunders, 2009.
White, SC, Pharoah, MJ, Processing x-ray film. Oral radiology: principles of interpretation, ed 6, St. Louis, Mosby, 2009.
True or False
___ 1. Anatomic order refers to how teeth are arranged in the dental arches.
___ 2. A clear film mount is preferred (instead of an opaque film mount) for better interpretation of radiographs.
___ 3. Only the dentist is qualified to mount dental radiographs.
___ 4. Films may be mounted at any time after processing.
___ 5. Mounted films are quicker and easier to view and interpret.
___ 6. Mounted films decrease the chances of error in distinguishing the patient’s right and left sides.
___ 7. Film mounts decrease the handling of individual films and prevent damage to the emulsion.
___ 8. In the labial film mounting method, all the embossed identification dots are placed in the film mount with the raised (convex) side facing the viewer.
___ 9. The lingual mounting method is widely used and is recommended by the American Dental Association.
___ 10. Bite-wing radiographs must be mounted with the curve of Spee directed downward toward the distal.
___ 11. Film viewing refers to the placing of films in a supporting structure.
___ 12. Although all members of the dental team may view films, it is the responsibility of the dentist to establish a final, or definitive, interpretation and diagnosis.
___ 13. Mounted radiographs may be viewed by holding the film mount up to the room light.
___ 14. If the viewbox screen is not completely covered by the mounted radiographs, the harsh light around the mounted films must be masked to reduce glare and for better interpretation.
___ 15. When interpreting dental radiographs, an area free of distractions and with dimmed room lighting provides optimal viewing conditions.
___ 16. Optimal viewing conditions are typically present in the dental setting.
___ 17. Mounted radiographs must be viewed in an established sequence to prevent errors in interpretation.
___ 18. The dental radiographer must examine mounted radiographs many times to check for the presence of disease and abnormalities.
___ 19. After film viewing, all positive findings must be noted in the patient record.
___ 20. A viewbox is not necessary to examine dental radiographs.