PRINCIPLES OF ENDOTRACHEAL INTUBATION
Placement of an endotracheal tube offers several important advantages. It helps to maintain an open airway and allows inhalant anesthetics and oxygen to be administered precisely. It prevents pulmonary aspiration of stomach contents, blood, fluid, or other debris. It permits careful observation of RR and depth and gives the anesthetist the ability to ventilate the patient when needed. The following equipment is required to perform endotracheal intubation:
• Appropriately sized endotracheal tubes
• Hard roll gauze or IV tubing to secure the tube
• A gauze sponge to grasp the tongue
• A syringe to inflate the cuff (12 ml for small animals and 20 ml for large animals)
• Some species require a laryngoscope with an appropriately sized blade
• Prepare a stylet if intubating small ruminants or swine, if using a narrow diameter tube, or if using any other tube that requires additional support
• Lidocaine to control laryngospasm (cats, small ruminants, and swine)
SELECTING A TUBE
Select a tube of appropriate diameter and length. Always prepare at least three tubes of different sizes so that you are prepared if your first choice does not fit the patient's trachea. The following rules of thumb may be used to select the diameter. Most cats require a 3- to 4.5-mm tube. The appropriate size for a dog is based on the patient's body weight. Prepare a 9-mm tube for a patient weighing 40 lb. Increase or decrease size 0.5 mm for each 5 lb body weight under or over 40 lb. In other words, prepare a 7.5-mm tube for a 25-lb patient or a 10-mm tube for a 50-lb patient. Be aware that usefulness of this rule of thumb depends on a variety of factors, including body condition and conformation, and may not apply to all patients, particularly brachycephalic breeds and small or obese animals.
Prepare a 7- to 12-mm tube for sheep and goats; a 6- to 14-mm tube for swine; a 9- to 16-mm tube for foals; a 9- to 18-mm tube for calves; and a 22- to 30-mm tube for adult horses and cattle.
Next determine if the tube is the appropriate length. The endotracheal tube should ideally extend from the tip of the nose to the thoracic inlet. If the tube is too long, one of two problems may occur. If inserted too far, the beveled end may inadvertently be advanced into only one main stem bronchus, thus only supplying one lung with oxygen and anesthetic. If inserted only to the thoracic inlet, the portion of the tube extending from the mouth will increase mechanical dead space. Either situation will predispose the patient to hypoventilation and hypoxia. If it is too short, it may not be long enough to reach the trachea.
Dead space is defined as the breathing passages and tubes that convey fresh oxygen to the alveoli but in which no gas exchange can occur. Increased dead space decreases the amount of fresh air that reaches the alveoli and is therefore available to the patient. Mechanical dead space is produced by the Y-piece, the portion of the endotracheal tube extending beyond the mouth, and anything placed between these structures, such as an apnea or capnograph monitor sensor, whereas anatomic dead space includes the mouth, nasal passages, pharynx, trachea, and bronchi. It is to the patient's advantage to decrease dead space as much as possible.
PREPARING THE TUBE
Check each tube for blockages, holes, or other damage. Check to be sure that the connector is securely attached and check the cuff by inflating it. If intact, the cuff should remain inflated after detaching the syringe from the valve. If the tube is soft or narrow, use a stylet that does not extend beyond the end of the tube to stiffen it during placement. The tube can be lubricated with a small amount of sterile water-soluble lubricant or with the patient's saliva immediately before placement.
 TECHNICIAN NOTE
Before placing an endotracheal tube, check the length, diameter, and cuff. Be sure that the connector is not loose and the tube is not damaged or blocked with dried mucus.
Successful endotracheal tube placement requires knowledge of the anatomy of the pharynx and larynx including the glottis, epiglottis, vocal folds, and soft palate (Figure 27-27, B and C). Proper restraint, positioning, and visualization are also critical to success. The induction agent must be administered until the patient is in a state of readiness for intubation. Readiness for intubation is characterized by unconsciousness, a lack of voluntary movement, sufficient muscle relaxation to allow the mouth to be held open, and absent pedal and swallowing reflexes.
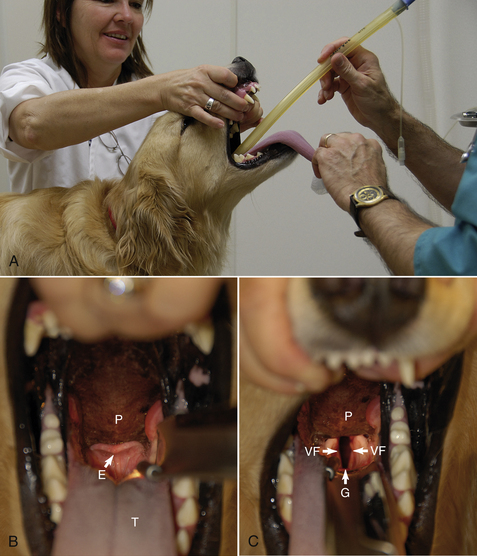
FIGURE 27-27 A, Proper position for endotracheal intubation in a small animal. B, The anatomy of the pharynx and larynx: P, palate; T, tongue; E, epiglottis, which in this view is covering the glottis. C, In this view, the epiglottis has been displaced ventrally with a laryngoscope. The glottis (G) is visible as the dark, oval opening between the vocal folds (VF), which move apart when the patient inspires and relax as the patient expires.
INTUBATION PROCEDURES
Intubation Procedure for Small Animals (see Figure 27-27)
• Place the patient in sternal recumbency.
• Have an assistant grasp the maxilla behind the canine teeth, extend the neck, and raise the head.
• Grasp the tongue with a gauze sponge and open the mouth fully by firmly pulling the tongue out and down.
• Adjust the light so that you have good illumination of the larynx.
• If necessary, use the tube or laryngoscope to gently displace the epiglottis ventrally or the soft palate dorsally until the glottis can be visualized (see Figure 27-27, C).
• Gently insert the tube past the vocal folds using a rotating motion. If the tube is too large to pass easily, change the tube for one of smaller diameter, but never force the tube.
• After the tube is placed, gently transfer the patient into lateral recumbency.
• Check the tube to ensure that it is in the appropriate distance and is oriented to match the natural curve of the trachea.
• Secure the tube with roll gauze or used IV tubing (over the nose for dolichocephalic dogs and behind the head for cats and brachycephalic dogs). Be sure that the tie is secure enough not to slip, but does not compress the tube.
• Connect the tube connector to the breathing circuit.
• Inflate the cuff and check for leaks.
• Ensure a patent airway by checking the position of the patient and tube. The neck and tube should assume a gentle natural curve.
Intubation Procedure for Horses (Figure 27-28)
Endotracheal intubation is performed blindly in this species because the larynx is impossible to see.
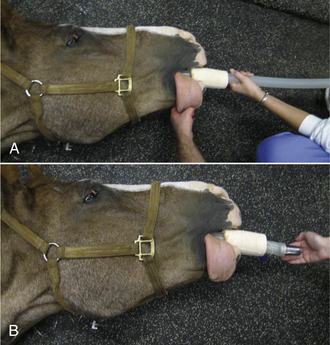
FIGURE 27-28 Equine intubation. A, The anesthetist advances the endotracheal tube blindly through a speculum in the mouth and into the larynx with the head extended. B, The anesthetist feels for movement of air when the horse breathes out to confirm correct placement of the tube in the trachea.
• Extend the head to line up the mouth, oropharynx, and larynx.
• Place a speculum or mouth gag.
• Advance the tube over the tongue taking care to stay in the center of the oropharynx so that the molar teeth do not damage the cuff.
• During inspiration, advance the tube gently.
• If resistance is encountered, stop and pull the tube back 10 to 15 cm.
• Repeat if unsuccessful, each time rotating the tube 90 degrees.
• Once the tube passes easily into the larynx and trachea, check for correct replacement by feeling air passing out of the tube on expiration. If the horse is apneic, pressure on the thorax will produce the same effect.
It may be helpful to apply gentle pressure externally on the larynx (cricoid pressure) or to flex then reextend the head if intubation is difficult.
Intubation Procedure for Adult Cattle (Figure 27-29)
Endotracheal intubation is also performed blindly in this species.

FIGURE 27-29 Bovine intubation. A, A mouth gag is placed and the head extended by an assistant. B, The anesthetist palpates the larynx with her fingers and directs the endotracheal tube into the trachea. C, With the tube in place, the cuff can be inflated and the mouth gag removed.
• Place a speculum or mouth gag.
• Insert your arm in the mouth.
• Palpate, then reflect the epiglottis forward.
• Remove your arm and grasp the endotracheal tube with the beveled end protected in your palm.
• Guide the tube into the larynx using the hand that is in the mouth while using your other hand to advance the tube into the trachea.
Intubation Procedure for Small Ruminants and Small or Young Cattle
These patients are intubated using a similar technique to SA patients. The oral cavity is long and narrow in these animals, so visualization of the larynx requires use of a laryngoscope with a long blade and a stylet.
• Gently pull the tongue down and out by grasping it with a gauze sponge.
• Insert a stylet that protrudes from the patient end of the endotracheal tube to facilitate intubation.
• Once the larynx is visualized, insert the stylet no more than 2 to 5 cm into the trachea.
• Holding the stylet firmly in position, pass the tube over the stylet into the larynx.
Because of limited space in the mouth, it may be necessary to remove the laryngoscope while passing the endotracheal tube. Goats may develop laryngospasm, so topical lidocaine may be used to desensitize the larynx before intubation. It is imperative to inflate the cuff as soon as the patient is intubated to prevent aspiration of regurgitated material or saliva.
CHECKING FOR PROPER PLACEMENT
An endotracheal tube can be easily misplaced in the esophagus and therefore may appear to be correctly placed when it is not. This will result in an inability to keep the patient anesthetized. Therefore confirmation of proper placement is essential. The following techniques may be used to confirm proper placement:
• Revisualize the larynx to confirm successful intubation (dogs, cats, and small ruminants).
• Watch for expansion and contraction of the reservoir bag as the animal breathes.
• Feel for air movement from the tube connector as the patient exhales.
• Check that the motion of the unidirectional valves coincides with breathing.
• Palpate the neck. The only naturally firm structure in the neck is the trachea. If the tube is properly placed, only one firm structure should be palpable. Palpation of two firm structures (the tube and the trachea) indicates placement of the tube inside the esophagus.
• If the patient can vocalize (whine or cry), it is not in the correct location (this most commonly applies to dogs).
• Although a cough reflex during intubation is indicative of proper placement, not all patients exhibit this sign.
CUFF INFLATION
The cuff of the endotracheal tube must be gently inflated until a seal is formed between the trachea and the cuff. This will prevent leakage of anesthetic gases and mixing with room air, which will result in a variety of complications, including contamination of the surgery suite with waste gases and difficulty keeping the patient asleep. To inflate the cuff, extend the patient's head to straighten the airway. Attach an air-filled syringe to the valve port. Have an assistant close the pop-off valve and gently compress the reservoir bag. Listen for gas leakage around the tube, which may sound like a soft hiss or gurgling. Slowly inflate the cuff until the leaking just ceases at pressures under 20 cm of water. Avoid overinflation of the cuff, which can result in a variety of mild to serious complications.
LARYNGOSPASM
Laryngospasm is a complication in which the glottis forcibly closes during intubation. This complication is most commonly encountered in cats, swine, and small ruminants. It is extremely difficult to place a tube in a patient experiencing laryngospasm because the glottis closes as soon as it is touched and cannot be safely forced open. Laryngospasm can lead to hypoxia and cyanosis in severe cases, but is prevented using one or more of the following strategies:
• Apply 2% injectable lidocaine via a syringe directly to the glottis before placement. Wait 30 to 60 seconds for the lidocaine to take effect before attempting intubation; 0.1 ml is appropriate for cats, whereas 1 to 2 ml can be used in sheep, goats, and pigs.
• Be sure that the patient is adequately anesthetized before attempting intubation because laryngospasm decreases with increasing depth of anesthesia.
• Prepare carefully, wait for the glottis to open before attempting placement, and try to get the tube in the first time. Repeat attempts worsen laryngospasm.
• Do not force the tube. This can lead to severe and potentially life-threatening complications, including tracheal rupture, pneumothorax, and pneumomediastinum.
COMPLICATIONS OF INTUBATION (BOX 27-5)
There are a number of hazards associated with endotracheal intubation. Most are associated with tracheal irritation, trauma, or failure to protect the airway. Although the larynx and trachea of mammals are relatively resilient structures, excessive force will result in damage, perforation, rupture, or irritation of the delicate mucosa. An endotracheal tube must therefore be chosen, maintained, placed, and monitored with care.
SMALL ANIMAL ANESTHESIA
A successful anesthetic procedure requires not only careful preparation, but also a good understanding of the sequence of events involved in taking a patient from consciousness to surgical anesthesia and back to consciousness. Box 27-6 summarizes these events when inducing an SA patient with injectable agents and maintaining with an inhalant agent.
SELECTING A PROTOCOL
An anesthetic protocol is a list of the premedications and anesthetics for a particular patient including dosages, routes, and order of administration. Anesthetic protocols are commonly selected by the veterinarian in charge based on training and clinical experience. A suitable protocol takes into account the patient signalment, preexisting problems, the physical status class, and the procedure to be performed (see Box 27-7 for sample protocols used in physical status class P1 and P2 dogs and Box 27-8 for sample protocols used in physical status class P1 and P2 cats).
After the protocol is known, calculate all drug dosages, oxygen flow rates, and fluid administration rates and check them carefully because most anesthetic agents have narrow therapeutic indices and can easily be overdosed.
TECHNICIAN NOTE
The volume (in milliliters) of each injectable anesthetic drug to give must be calculated using extreme care. The general formula for most injectable anesthetics is as follows:

Note: When performing this calculation, drug dosage and body weight units must be the same (kg or lb) as must the drug dosage and drug concentration units (mg or μg).
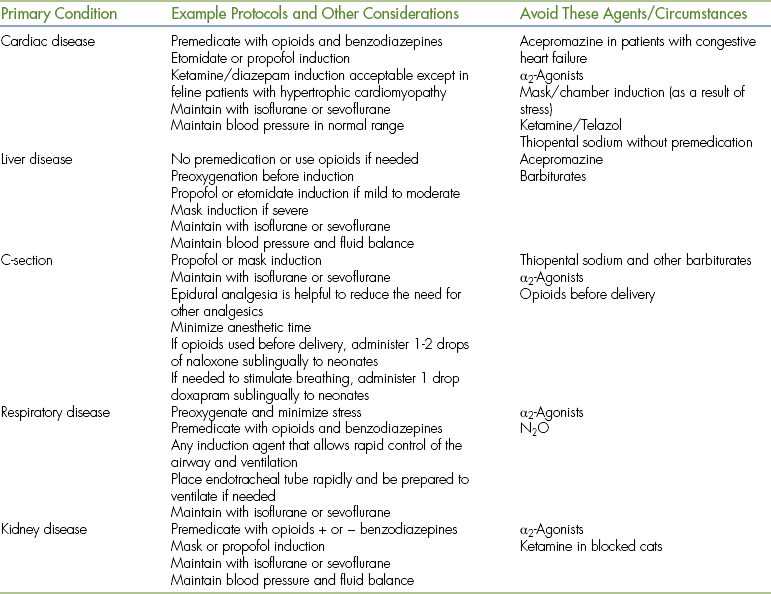
Physical status class P3 to P5 patients require use of modified protocols based on the patient's primary condition (Table 27-10). Management of these cases can be quite challenging and requires customization of the anesthetic protocol by the veterinarian in charge.
EQUIPMENT PREPARATION
During a typical anesthetic induction, anesthetic agents are administered; the patient becomes unconscious and recumbent; the endotracheal tube is placed, secured, cuffed, and attached to the machine; the anesthetic gas level is adjusted; the patient is positioned and monitored; and adjustments are made as needed all within the first few minutes of the procedure. Because these events follow one another so rapidly, the technician has little to no time to leave the patient to locate necessary equipment. Consequently, all equipment must be carefully gathered, checked, and organized before commencing the procedure.
THE PREANESTHETIC PERIOD
The preanesthetic period is the time before induction of general anesthesia. During this period, a physical assessment is performed, the patient history and results of laboratory tests are reviewed, the patient is stabilized, an IV catheter is placed, and fluid administration is started. Premedications, including tranquilizers, α2-agonists, opioids, dissociatives, anticholinergics, or a combination thereof, are administered to calm and prepare the patient for anesthetic induction. Premedications are chosen to produce a specific set of desired effects, such as sedation, analgesia, and muscle relaxation. Most are given IM, although some may be administered IV. Following IM injection, place the patient in a quiet but observable location for about 15 to 20 minutes for the agents to take effect before proceeding; otherwise, the patient may partially override the beneficial effects.
ANESTHETIC INDUCTION
During anesthetic induction, the patient is taken from consciousness to unconsciousness. Agents commonly used for anesthetic induction in small animals include a ketamine and diazepam mixture, thiopental sodium, propofol, etomidate, neuroleptanalgesics, and inhalant anesthetics. Except for the inhalant anesthetics, these agents are most often given IV.
IV Induction
To induce general anesthesia by the IV route, draw up the calculated volume and administer it to effect until you are able to intubate the patient or until the patient is at an adequate plane of anesthesia to complete the planned procedure. The term “to effect” means that the drug is administered gradually in increments until the desired stage of anesthesia is reached. The entire calculated dose may or may not be given.
Immediately after giving the patient an initial dose, check the HR and RR to be sure that the patient is stable and breathing. Remove muzzles and other restraint devices. Make sure that the patient has passed through stage II and is deep enough to intubate. While giving the drug, there must be interplay between administration of the drug and monitoring the patient. Give the initial dose; then rapidly check the vital signs, pedal reflex, palpebral reflex, and jaw tone; give more if needed; check again, etc. If the patient is light and needs more or starts to wake up while being intubated, give a much smaller amount to effect (about one fifth to one tenth of the original volume) until the patient is in an adequate plane of anesthesia. Although all are given to effect, different induction agents are given at slightly different rates.
IM Induction
To induce anesthesia by the IM route, draw up and administer the entire calculated volume. In general, the dosage for IM injection is generally about two to three times the corresponding IV dosage. When given IM, anesthetic agents have a slower onset and longer duration than when given IV. A typical induction will take 5 to 20 minutes. After peak effect, if the patient is still too light, administer additional drug or an inhalant agent with a mask until you are able to intubate the patient. Remember that some drugs, such as propofol, thiopental sodium, and etomidate must not be given IM.
Mask Induction
Mask induction requires the use of a rapid-acting inhalant anesthetic, such as isoflurane, sevoflurane, or desflurane. Once induced, an endotracheal tube can be placed to maintain the patient for the duration of the procedure. Mask induction is a special challenge for several reasons. Many patients struggle necessitating skillful restraint (enough to prevent operator and patient injury, but not so much as to restrict chest excursions or the airway). It is more challenging to monitor mucous membrane color and refill and ocular indicators of anesthetic depth because the mask partially obscures the eyes and muzzle. Therefore monitor carefully and do not be lulled into the belief that the monitoring requirements are less with this method of induction than with others.
To induce a patient by mask, first attach a well-fitted mask to the breathing circuit. Hold the mask over the patient's muzzle. Administer pure oxygen for 2 to 3 minutes at the recommended rate, and then turn on the vaporizer to 0.5% to 1% for about 30 seconds to allow the patient to become accustomed to the smell of the gas. Increase the setting to 4% to 5% if using isoflurane and 6% to 8% for sevoflurane. Some clinicians recommend a gradual increase over several minutes, which allows the patient time to become accustomed to the gas. Other anesthetists increase the vaporizer setting immediately, especially if the patient is difficult to handle when using the gradual method. If the patient struggles, monitor carefully for cyanosis or other problems and be ready to act quickly if the patient becomes compromised. As soon as the patient is laterally recumbent, assess readiness for intubation and adjust the anesthetic level as appropriate. From this point on, the patient is managed much the same as for IV induction. Mask induction is generally not appropriate for brachycephalic breeds.
Chamber Induction
Chamber induction may be used only for patients small enough to fit comfortably into the chamber. This technique is commonly used in place of a mask for small patients that are aggressive or difficult to handle. Once induced, an endotracheal tube can be placed to maintain the patient for the duration of the procedure.
To induce a patient using this method, place the patient in the chamber, close the lid, and attach the breathing tubes of a semiclosed rebreathing system to the ports. Deliver oxygen at 5 L/min and isoflurane at 5% or sevoflurane at 8%. As soon as the patient can no longer stand, shake the chamber gently to assess the patient's mobility. When the patient is immobile enough to allow it to be safely handled, remove it from the chamber, place a mask, and proceed as with mask induction.
Patients can get into trouble easily while inside a chamber from stress, trauma, vomiting, airway blockage, or other issues. Since it is impossible to accurately assess most monitoring parameters while inside a chamber, the anesthetist must be vigilant and prepared to act quickly if the patient shows signs of compromise.
MAINTENANCE OF ANESTHESIA
Following anesthetic induction and endotracheal intubation, the patient must be maintained with injectable anesthetics, inhalant anesthetics, or a combination thereof. The goal during maintenance is to administer enough anesthetic to keep the patient in the desired plane of surgical anesthesia. This requires that the anesthetist frequently evaluate the patient watching for subtle changes and adjust the amount of anesthetic administered based on this observation.
Most patients are light immediately following intubation and must be brought into surgical anesthesia. Because inhalant anesthetics are most commonly used to maintain anesthesia, this discussion will focus on maintenance using these agents. When maintaining with inhalant agents, there is a delay effect between the time the vaporizer dial setting is changed and the change in anesthetic depth because it takes time for the new concentration to fill the breathing circuit, reach the patient's lungs, and equilibrate with the blood and tissues. The time required is influenced by a number of factors, including the patient's respiratory drive, the agent used, the carrier gas flow rate, and the volume of the breathing circuit. For this reason, vaporizer setting adjustments must be anticipated as much as possible through close monitoring. In general, if a patient is significantly light or deep, larger dial changes are indicated, whereas if the patient is slightly too light or deep, more subtle changes are needed. Familiarity with appropriate dial changes is acquired through experience.
IV maintenance agents, such as propofol, may be used to maintain general anesthesia by administering repeat boluses every few minutes to effect or by constant infusion via a syringe pump. A syringe pump is a device that automatically delivers the drug through an IV line at a calculated infusion rate.
PATIENT POSITIONING, COMFORT, AND SAFETY
Below are some considerations that must be observed throughout both the anesthetic induction and maintenance periods.
• Prevent patient trauma by supporting the patient's body as consciousness is lost.
• When using an IV agent for induction: as soon as the patient is intubated, remove the needle and syringe to prevent accidental overdose.
• Following intubation, lay the patient in lateral recumbency and secure and cuff the tube.
• Before surgery begins, check the tube for proper placement and cuff inflation.
• Check the endotracheal tube for kinks or bends. An open airway must be maintained at all times.
• Temporarily disconnect the endotracheal tube from the breathing circuit while turning the patient to prevent trauma to the trachea caused by torsion of the tube.
• Support the corrugated breathing tubes so that they do not exert traction on the endotracheal tube.
• Place the patient in a position that is as normal as possible during the procedure without hyperflexion or hyperextension of the neck or limbs.
• Do not compress the chest with restraint devices or instruments.
• Place the patient on a heat-retaining surface, such as a warm-water circulating blanket. Do not use an electric heating pad, which can burn the patient.
• Do not restrict blood flow by overtightening leg restraint ropes.
• Place sterile lubricant in the eyes every 90 minutes.
• If one lung is diseased, place the normal side up to maximize oxygen exchange.
• Avoid more than a 15-degree elevation of the caudal aspect of the body to prevent pressure on the diaphragm.
ANESTHETIC RECOVERY
The recovery period is the period of time between discontinuation of the anesthetic and the time when the patient is able to walk without assistance. Many factors affect recovery including the length of the procedure, the anesthetic protocol, patient condition, body temperature, and patient signalment.
Preparation for Recovery
Upon completion of the procedure, transfer the patient to a recovery area where it can be extubated and monitored. Turn off the inhalant anesthetic, but continue oxygen administration at a rate of 200 ml/kg/min (1 L/5 kg body weight up to a maximum of 5 L/min) for 5 minutes after discontinuation of the anesthetic or until the animal swallows. If the patient is light and must be extubated, administer oxygen by mask or place an oxygen source close to the nose for 5 minutes. Remove all ties, catheters, monitoring devices, and other unnecessary equipment. Keep the patient warm. Turn the patient at least every 10 to 15 minutes.
Monitoring During Recovery
During recovery, the patient must be watched on a continual basis at close range. Put the patient in the cage in a position that allows observation of the mucous membranes and respirations, but never leave the patient in an open cage or on a table unattended because a recovering patient may fall and be injured. Monitor at least every 5 minutes paying particular attention to vital signs. Watch for and report unusual signs, such as vomiting or hemorrhage.
Signs of Recovery
During recovery, gently comfort and reassure the patient. Recovery may be hastened through gentle stimulation by talking softly to the patient, rubbing or patting the chest, and by turning the patient. Gentle movement of the endotracheal tube will stimulate breathing.
As the patient recovers, it will progress back through the stages and planes of anesthesia. Passage through stage II during recovery may result in a variety of alarming signs, including excitement, vocalization, hyperventilation, and head thrashing. Be prepared to prevent self-trauma if the recovery is unusually violent or stormy.
Extubation
To prepare the patient for extubation, deflate the cuff by drawing out all the air until the pilot balloon is empty. Untie the tube to prepare for rapid removal. Both before and following removal, keep the neck in a natural but extended position to protect the airway. Remove the endotracheal tube gently when the swallowing reflex returns using a slow, steady motion. You may also remove it when signs of imminent arousal are present, such as voluntary movement of the limbs or head, movement of the tongue, or chewing. Delay extubation in brachycephalic dogs until the patient is able to lift its head unassisted.
The Postanesthetic Period
Following recovery, most SA patients should be given nothing by mouth for the first hour or two and no food for at least several hours. Upon discharge, instruct the client to reintroduce water gradually after arriving home and feed a small meal after several hours. Exceptions to these rules include small and neonatal patients, which require shorter withholding times. Monitor the patient for signs of pain and administer analgesics as prescribed.
EQUINE ANESTHESIA
All of the basic principles discussed under SA anesthesia apply to anesthesia of the horse. Additional challenges for the equine anesthetist include the temperament and physical size of the patient, the effects of inhalant anesthetics on cardiorespiratory physiology, and management of recovery. As with SA anesthesia, a successful anesthetic procedure requires careful preparation and a good understanding of the sequence of events involved in taking a horse from consciousness to surgical anesthesia and back to consciousness. Box 27-9 summarizes these events when inducing a horse with injectable agents and maintaining with an inhalant agent.
SELECTING A PROTOCOL
As for SA anesthesia, protocols are commonly selected by the veterinarian in charge. A suitable protocol takes into account the patient signalment, preexisting problems, the physical status class, and the procedure to be performed (see Box 27-10 for sample protocols used in physical status class P1 and P2 horses). After the protocol is known, calculate all drug dosages, oxygen flow rates, and fluid administration rates and check them carefully.
Physical status class P3 to P5 patients require use of modified protocols based on the primary condition (Table 27-11).
EQUIPMENT PREPARATION
It is critical in equine anesthesia to be prepared and check equipment before use, including any hoists and hydraulic tables that are to be used for lifting and positioning horses. Recovery pads, ropes, and other equipment, if used, should be organized before induction, if possible.
THE PREANESTHETIC PERIOD
The preanesthetic procedure in horses differs slightly from small animals. After appropriate patient assessment, the first step is placement of an IV catheter, almost always in one of the jugular veins. Some horses object to venipuncture and must be sedated first. Xylazine IV or IM is commonly used for this purpose. Once the horse is cooperative, a small bleb of local anesthetic is administered over the proposed site of catheterization to desensitize the skin.
Following catheterization, the horse's mouth should be rinsed out using a dose syringe placed between the cheek and teeth on each side of the mouth to flush out any feed material. This prevents aspiration of the material during intubation or in recovery. Feet should be cleaned before sedation, and then shoes should be removed or wrapped. Just before or immediately after premedication, the horse is positioned in an induction area or placed adjacent to a tilt table. Some horses startle easily in a strange environment, and some breeds (such as Arabians and thoroughbreds) have a higher drug tolerance. An excited horse should never be induced to anesthesia because this will increase the anesthetic maintenance requirement. This may result in difficulty keeping the patient anesthetized as a result of high levels of circulating catecholamines, requiring dangerously deep levels of anesthesia. Sedation is considered to be adequate when the horse's head (and lower lip) droops, the horse no longer pays attention to its surroundings, and the horse demonstrates a wide-based stance or reluctance to move (Figure 27-30).
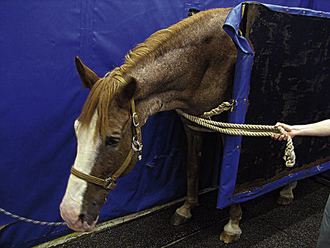
FIGURE 27-30 The horse is positioned behind a gate, which is secured to the fixed wall of the induction stall with a rope. Note the relatively wide-based stance and lowered head position. The horse is also not particularly interested in its surroundings. This indicates that the horse is adequately sedate before induction.
ANESTHETIC INDUCTION
Horses are generally induced to anesthesia by administering drugs intravenously.
IV Induction
Induction typically occurs in a special induction stall that has padded walls and often a padded floor. Induction may be done “free fall” or behind a gate that restrains the horse. Sometimes the induction stall is also used for recovery. In comparison with small animals where IV induction is given to effect, the goal of induction in horses is to rapidly take the horse from standing (sedated) to lateral recumbency (unconscious) so as to minimize excitement, which can lead to the horse injuring itself or personnel. All drugs are thus given as a bolus with the exception of the muscle relaxant guaifenesin, which is administered rapidly intravenously to effect by placing it in a pressure bag. Once the horse shows signs of ataxia, typically knuckling of the forelimbs at the fetlocks, the induction agent is given as a bolus.
Once the horse has been induced, the vital signs should be briefly checked. The horse is then intubated (see Figure 27-28, A and B).
In some practices, the floor of the induction stall forms part of the surgery table, but in many, the horse must be hoisted onto a table (Figure 27-31, A). It is important to understand how the hoist functions so that the horse can be transported safely and any problems can be resolved rapidly.
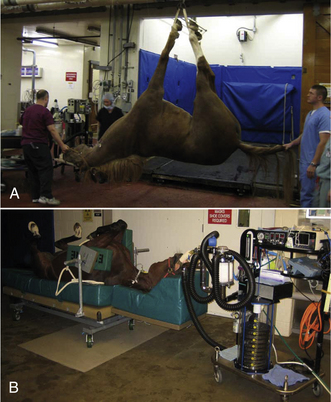
FIGURE 27-31 A, Once the horse is intubated and the anesthetist confirms that it is stable after induction, it is hoisted for placement on the surgery table. The anesthetist controls and supports the head while the patient is on the hoist. B, The horse is positioned on a thick foam pad to prevent muscle damage. Side paddles are used to keep the horse in dorsal recumbency on the table, and smaller foam pads support the large muscles of the upper forelimbs. Once the horse is positioned, it is connected to an LA anesthesia machine.
It is key to ensure that muscles and prominent nerves are protected when a horse is placed on a surgical table or surface (Figure 27-31, B). There are many table designs, and the anesthetist should make sure that muscle groups are well supported to prevent myopathy (“tying up”) and that the facial and radial nerves are supported. Horses in lateral recumbency should have the forelimb closest to the table pulled forward, if possible, to decrease the pressure placed on it by the chest and opposite limb.
MAINTENANCE OF ANESTHESIA
Horses present the biggest challenge of all the domestic species to the anesthetist. Sudden unexpected movement can occur without any change in signs of depth. As a result of the large breathing circuit volume and patient size, response to changes in inhalant anesthetic and oxygen flow rates occur too slowly to return the patient to surgical anesthesia simply by altering machine settings. A syringe of thiopental or ketamine is typically drawn up before anesthesia and either attached to a three-way stopcock in the fluid administration line or kept close to the IV port for this purpose. Approximately one fifth of the IV induction dose is administered to the horse to return it to surgical anesthesia.
Compared with other species, horses are more likely to develop hypoxemia, hypoventilation, and hypotension during maintenance of anesthesia, particularly when using inhalant agents. To monitor blood pressure more accurately and to obtain arterial blood gas values, it is recommended that horses anesthetized with inhalants for procedures lasting more than 1 hour have an arterial catheter placed in a peripheral artery (facial, transverse facial, dorsal pedal) (Figure 27-32). Blood gas samples should be taken every 30 to 60 minutes or more frequently if the situation warrants.
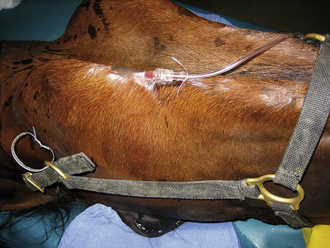
FIGURE 27-32 Placement of a catheter in the facial artery for monitoring blood pressure and taking blood samples for arterial blood gas analysis.
Hypoventilation is so common in anesthetized horses, particularly those placed in dorsal recumbency, that a ventilator is often used to maintain normal ventilation. Hypotension (mean arterial blood pressure less than 70 mm Hg) has been shown to contribute to myopathy, so treatment with drugs is frequently indicated if increased IV fluid rate, decreased anesthetic depth, and surgical stimulation do not increase blood pressure. The most common drug used to support blood pressure is the positive inotrope dobutamine (commonly administered via a syringe pump). Dobutamine and many other positive inotropes may cause arrhythmias, so it is important to monitor the ECG closely when starting an infusion.
Hypoxemia can occur in any horse, regardless of the physical status class, but is more common in horses that are obese, pregnant, or have torsed intestines and those that are placed in dorsal recumbency. Hypoxemia has several possible causes, including hypoventilation, lung disease, and low cardiac output. Wherever possible, the cause should be investigated and corrected.
IV maintenance of anesthesia in horses is generally reserved for shorter procedures (less than 1 hour) in healthy patients and for procedures done away from a veterinary practice (“field anesthesia”). “Triple drip” is the mainstay of IV anesthesia in horses and is generally characterized by higher blood pressure, better breathing, and more active palpebral reflexes than inhalant anesthesia. Use of “triple drip” for short procedures is also associated with recoveries of good quality.
ANESTHETIC RECOVERY
Horses have an instinctive need to stand shortly after awakening from anesthesia, and it is this that makes recovery particularly dangerous. Some steps can be taken to minimize injury to the horse and anesthetist, but there is a high incidence of complications from anesthetic recovery in horses, and clients should be informed of the risks.
Preparation for Recovery
Replace the halter. Place a nasopharyngeal tube before movement if nasal edema is present (Figure 27-33, A). Upon completion of the procedure, turn off the inhalant anesthetic and transfer the horse to a padded recovery stall where it can be extubated and monitored. If possible and particularly if the horse was hypoxemic during anesthesia, provide oxygen support using a demand valve or insufflation (5 to 10 L/min delivered nasally or through the endotracheal tube via tubing that is connected to an oxygen flowmeter) until the horse is extubated or too light to tolerate an insufflation hose. If the recovery is assisted by ropes, a head rope should be attached to the halter and another rope tied to the tail (Figure 27-33, B and C).
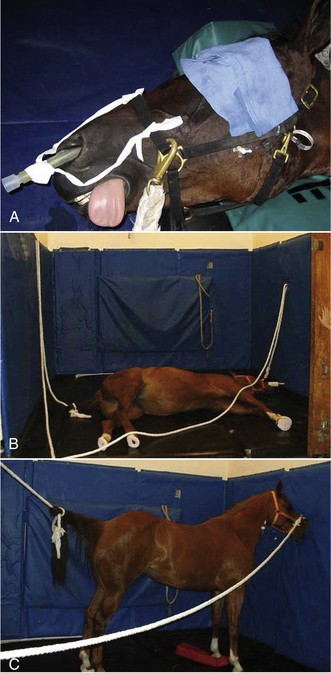
FIGURE 27-33 Recovery. A, A nasopharyngeal tube is placed and secured to the halter to ensure a patent airway. Note that the eye is covered to decrease stimulation during recovery. B, Placement of head and tail ropes for recovery. C, Recovered horse standing quietly. The nasopharyngeal tube stays in place until the horse is fully recovered.
Monitoring During Recovery
During recovery, it is ideal to watch the horse continuously so that it can be assisted or sedated, if necessary. While the horse is lying quietly, the anesthetist should watch respirations to make sure that the horse is breathing normally, take the pulse (facial artery) occasionally, and assess the eye for depth of anesthesia.
Signs of Recovery
As the patient recovers, it will progress back through the stages and planes of anesthesia. Many horses develop nystagmus during recovery, and rapid nystagmus accompanied by “paddling” of the limbs generally means that a horse will try to get up too soon and have a “rough” recovery. In this event, it may be prudent to sedate the horse with 50 to 100 mg xylazine IV. Generally, maintaining control of the head by sitting on the neck or holding the head up off the floor will provide some control over the horse. However, once the horse is strong enough to lift an anesthetist off its neck, the anesthetist should retreat to a safe distance to observe the remainder of recovery.
Extubation
To prepare the patient for extubation, deflate the cuff by drawing out all of the air until the pilot balloon is empty. Both before and following removal, keep the neck in a natural but extended position to protect the airway. Remove the endotracheal tube gently when the swallowing reflex returns using a slow, steady motion. You may also remove it when signs of imminent arousal are present, such as voluntary movement of the limbs or head, movement of the tongue, or chewing. Check to make sure that the horse can breathe without obstruction. Horses can only breathe through their noses and will become distressed and compromised if they are unable to. If a nasopharyngeal tube has not been placed and the nasal passages are or become obstructed, one must be placed immediately. In the event that a nasopharyngeal tube does not alleviate the obstruction, a tracheostomy must be performed by the veterinarian, so materials for performing one must be close to the recovery stall at all times.
The Postanesthetic Period
Once the horse is standing and able to walk steadily, it can be returned to its stall. This can be assessed by walking the horse in a circle inside the recovery stall. Once back in its own stall, the horse should be muzzled for 1 to 3 hours, but should have free access to water.
RUMINANT ANESTHESIA
Ruminants do not pose quite the same challenge to the anesthetist as horses; however, an understanding of their unique digestive physiology is important where it impacts on the well-being of the patient under general anesthesia. Additionally, ruminants come for general anesthesia less frequently than small animals or horses do, so it takes longer to gain anesthetic experience. There are several reasons for this. Because of their relatively calm nature, ruminants require general anesthesia for relatively few procedures. Many surgeries can be conducted using local or regional anesthetic techniques. A discussion of local and regional anesthesia is beyond the scope of this chapter; this subject is covered in most veterinary anesthesia textbooks. Finally, administration of general anesthesia to production animals is often uneconomical.
The general principles discussed for other species also apply to ruminants, and careful preparation and planning is important to a successful anesthetic outcome. Box 27-11 summarizes the sequence of events when inducing a ruminant with injectable agents and maintaining with an inhalant agent.
SELECTING A PROTOCOL
As with other species, protocols are commonly selected by the veterinarian in charge. A suitable protocol takes into account the patient signalment, preexisting problems, the physical status class, and the procedure to be performed (see Box 27-12 for sample protocols used in physical status class P1 and P2 ruminants). After the protocol is known, calculate all drug dosages, oxygen flow rates, and fluid administration rates and check them carefully.
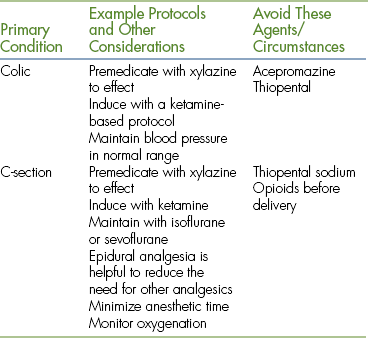
Physical status class P3 to P5 patients require use of modified protocols based on the primary condition (Table 27-12). Management of these cases can be quite challenging and requires customization of the anesthetic protocol by the veterinarian in charge.

EQUIPMENT PREPARATION
It is key to ensure that ruminants have been adequately fasted before anesthesia. Fasting reduces the size of the rumen and also decreases microbial activity. This in turn decreases gas production during anesthesia. Normally, ruminants eructate to expel the gas from the rumen; however, under anesthesia, this does not happen and can lead to bloating. A bloated rumen can put pressure on the diaphragm and large blood vessels (aorta, caudal vena cava) in the abdomen, resulting in respiratory and circulatory compromise. Once an anesthetized ruminant develops severe bloat, it can be difficult to treat and may lead to death if it goes unnoticed or untreated.
Any specialized equipment required for restraining or positioning anesthetized ruminants, such as head gates, transporters, and tilt tables, should be checked. In addition to the standard equipment, it is extremely helpful to have suction available for small ruminants to allow feed material, regurgitus, or saliva to be removed from the pharynx during intubation.
THE PREANESTHETIC PERIOD
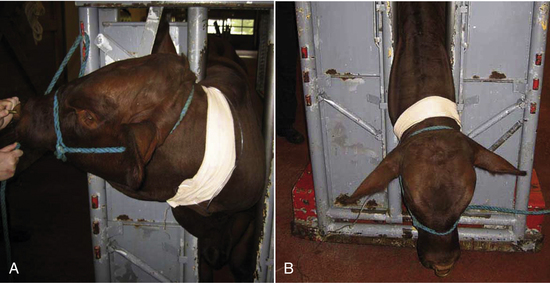
Many ruminants are calm and tractable enough to allow IV catheterization and induction of anesthesia with minimal or no premedication and mild restraint. Adult cattle are typically restrained using the head gate of a transporter or chute. Premedication is often reserved for patients that are aggressive, excited, or stressed. Although many ruminants do not require sedation before anesthesia, premedication will provide benefits, such as decreased dose of induction and maintenance drugs and muscle relaxation (Figure 27-34).
ANESTHETIC INDUCTION
Induction of large cattle may occur in a special induction stall that has padded walls and often a padded floor, in a transporter, or on a tilt table. Smaller ruminants can generally be induced next to the surgery table or if small or severely compromised, while lying on the surgery table. Although ruminants do not typically become excited during induction of anesthesia, the goal with larger patients is similar to that in horses: to rapidly produce unconsciousness and minimize injury of the patient or personnel. Drugs are thus given as an IV bolus, with the exception of “double drip,” which is administered rapidly IV to effect. Smaller ruminants, particularly those that are compromised, can be given induction drugs IV to effect as for SA patients.
Once the patient is unconscious, it should be kept in sternal recumbency for intubation, whenever possible. It is important to be vigilant for regurgitation, which can occur at any point of the anesthetic procedure, but occurs most frequently when anesthesia is light or too deep. If regurgitation occurs, the head should immediately be positioned so that it is lower than the body to prevent aspiration.
Once the patient has been induced, the vital signs should be briefly checked before intubation (see Figure 27-29).
All ruminants should be positioned for surgery with the mouth lower than the pharynx to allow drainage of saliva and any regurgitated material from the mouth, preventing buildup in the pharynx, which could lead to aspiration in recovery. Ruminants produce copious amounts of saliva each day, which is normally swallowed. Under anesthesia, this cannot occur, so it must be allowed to drain. Ruminants, even large cattle, are not predisposed to developing myopathy or neuropathy like horses; however, appropriate physical support and padding during anesthesia is prudent.
MAINTENANCE OF ANESTHESIA
Healthy ruminants typically have relatively few problems during the maintenance phase of anesthesia. Blood pressure is usually well maintained and is often much higher than that seen in SA and equine patients. Ruminants do, however, tend to hypoventilate and are often observed to breathe rapidly and shallowly, somewhat like a panting dog. This type of breathing pattern tends to lead to hypoxemia and difficulty keeping the patient anesthetized because of inadequate delivery of inhalant anesthetic to the lungs. Patients that demonstrate this breathing pattern should be placed on a ventilator.
Most ruminants have accessible arteries in their ears, and these are often catheterized so that blood pressure can be monitored directly and blood samples can be taken for blood gas analysis.
IV maintenance of anesthesia in ruminants is generally reserved for shorter procedures (less than 20 minutes) in healthy patients, although if the patient is intubated, the duration of anesthesia can be extended. “Double drip” is commonly used for this purpose.
ANESTHETIC RECOVERY
Unlike horses, ruminants are generally content to lie in sternal recumbency after they wake up from anesthesia. The development of complications from anesthetic recovery is generally limited to the residual effects of bloat. Ruminants rarely develop nasal edema during anesthesia and usually do not require nasal intubation.
Preparation for Recovery
Upon completion of the procedure, turn off the inhalant anesthetic and transfer the patient to a padded recovery stall where it can be extubated and monitored (large cattle) or a quiet, clean area on the floor (small ruminant). If possible, support or prop the patient in sternal recumbency.
Monitoring During Recovery
The patient should be monitored for signs of excessive bloating (visually large abdomen that feels tight to the touch).
Signs of Recovery
As the patient recovers, it will progress back through the stages and planes of anesthesia. Generally, this is not as dramatic in ruminants as it is in horses, even if the patient did not receive a premedication.
Extubation
In contrast to other species, the endotracheal tube cuff should either be kept inflated or only partially deflated to prevent aspiration of any material that may have become lodged in the pharynx during anesthesia. The anesthetist should wait for strong swallowing movements or coughing before extubation. Both before and following removal, keep the neck in a natural but extended position to protect the airway. Remove the endotracheal tube gently using a slow, steady motion. If there is difficulty removing the tube, remove some more air from the cuff and try again.
The Postanesthetic Period
Once a ruminant is lying in sternal recumbency without support and is no longer in danger of bloating, it can be left unattended. Many ruminants will lie quietly after anesthesia, only standing some time after the anesthetic period, unless they are stimulated to rise. It is not necessary to withhold food or water from ruminants postoperatively unless specifically instructed to do so.
MANUAL AND MECHANICAL VENTILATION
Ventilation is a process in which air or anesthetic gases are artificially forced into a patient's lungs. Although ventilatory support is necessary in patients with preexisting problems, such as lung disease, obesity, abdominal distention, or brain trauma, some ventilatory support is needed even in healthy patients to compensate for the respiratory depression that accompanies general anesthesia. This is especially true in healthy LA patients, and consequently, many practices will ventilate all horses and ruminants under general anesthesia.
Under certain circumstances, such as a loss of the normal vacuum in the chest cavity (e.g., thoracotomy for repair of diaphragmatic hernia, thoracic injuries, or pneumothorax) or paralysis of the respiratory muscles when neuromuscular blockers are used as a part of the anesthetic protocol, a patient may be unable to breathe. At these times, ventilation is mandatory throughout the procedure to keep the patient alive.
This support can be provided by the anesthetist by application of pressure to the reservoir bag with the pop-off valve fully or partially closed (manual ventilation) or by using a ventilator (mechanical ventilation).
MANUAL VENTILATION
Manual ventilation is used when a mechanical ventilator is not available, to provide ventilatory support to patients with temporary apnea or inadequate respiratory depth, or to prevent atelectasis in any patient. Depending on the need, manual ventilation may be either periodic or mandatory.
MECHANICAL VENTILATION
Mechanical ventilation is routinely used for large animals and at other times when mandatory ventilation is required. There are different types of ventilators that function in different ways. Pressure cycle ventilators force air into the lungs until a set pressure is reached. Volume cycle ventilators deliver a preset volume (usually 10 to 15 ml/kg). Time cycle ventilators force air into the lungs according to a set inspiratory time regardless of the volume delivered or pressure generated. Because of the wide variety of ventilators available, safe use requires a careful review of the operating instructions in the owner's manual. To prepare for mechanical ventilation follow the procedure below:
• Connect the ventilator to an electrical supply, an oxygen source, and the scavenging system.
• Insert the pressure feedback sensor between expiratory valve and corrugated breathing tube.
• Remove the rebreathing bag from the anesthetic machine and attach in its place the tube that connects to the bellows of the ventilator.
• Check that the endotracheal tube cuff is inflated and the entire breathing circuit is airtight.
• Set the RR, maximum inspiratory pressure, VT, and/or inspiratory time as indicated in the owner's manual.
• Turn on the ventilator and adjust the settings to achieve the target volume, pressure, and/or time.
PERIODIC VENTILATION
Periodic ventilation is used to support normal healthy patients and patients that are experiencing apnea or hypoventilation. To support healthy patients, many experts advise periodic manual ventilation of all SA patients once every 5 to 10 minutes. This technique used to prevent atelectasis is often referred to as “bagging” or “sighing” the patient. In contrast, hypoventilating or apneic patients may require breaths at 15-second to 5-minute intervals depending on the specific need as determined by observation of monitoring parameters and monitoring equipment. To provide periodic manual ventilation, first close the pop-off valve and gently squeeze the bag until the patient's chest rises as in a normal breath. Then immediately following each breath reopen the pop-off valve.
INTERMITTENT MANDATORY VENTILATION
Intermittent mandatory ventilation is used for the majority of LA patients, which are extremely prone to hypoventilation under inhalant anesthesia. It is also a necessity during procedures in which the thoracic cavity is exposed to the atmosphere and those in which neuromuscular blockers are used. To provide intermittent mandatory ventilation:
• Ventilate at a rate of 12 to 16 bpm (SA) or 6 to 10 bpm (LA) until spontaneous breathing ceases.
• Lower the rate to 8 to 12 bpm (SA) or 6 to 8 bpm (LA).
• For the duration of the procedure, adjust the rate based on data from blood gas analysis, capnography, pulse oximetry, and other monitoring parameters.
• When you are ready for the patient to resume spontaneous breathing, gradually reduce the rate to about 4 bpm (SA) or 2 bpm (LA).
• When the patient begins to spontaneously breathe, support the patient with periodic ventilation, as needed.
COMPLICATIONS OF VENTILATION
There are risks of manual and mechanical ventilation. Positive pressure is generated in the chest during the inspiratory phase of normal ventilator cycling. This leads to a reduction in venous return to the heart and a temporary drop in blood pressure. Ventilation should therefore be used cautiously in the hypotensive patient.
If excess pressure is applied to the airways, alveoli can rupture, resulting in pneumothorax or pneumomediastinum. Additionally, high positive pressure in the thorax will decrease blood returning to the heart. This may lead to a life-threatening reduction in cardiac output. For these reasons, never allow the pressure in the breathing circuit to exceed 20 cm of water in small animals or 30 to 40 cm of water in large animals.
If the respiratory minute volume is excessive, respiratory alkalosis can occur as a result of a loss of CO2. In contrast if respiratory minute volume is inadequate, the patient can develop hypercarbia and respiratory acidosis. For this reason, use of an appropriate RR and volume is critical to maintaining patient safety during ventilation. Capnography is the best noninvasive tool for judging the appropriateness of the rate and volume, with the gold standard as measurement of arterial CO2 through blood gas analysis.
If using a nonprecision, VIC, anesthetic overdose is possible if the patient receives an excessive minute volume. Therefore careful monitoring of anesthetic depth is additionally important in these patients.
Finally, artificial ventilation is generally more efficient at delivering anesthetic gas, even from a precision VOC. A ventilator will thus deliver more inhalant anesthetic to the patient, which may lead to exacerbation of side effects, such as hypotension. Conversely, ventilators are often used in LA patients as anesthetic delivery devices to maintain a smoother plane of anesthesia than sometimes occurs with spontaneous breathing.
ANESTHETIC PROBLEMS AND EMERGENCIES
The majority of general anesthetic procedures are uneventful, but from time to time, problems develop that have the potential to cause transient or permanent harm to the patient. Most studies show that although as many as 1 out of 10 patients have complications of one sort or another, an average of only 1 or 2 out of 1000 healthy patients die as a result of anesthesia. Therefore it is likely that a technician will have experience with many successful anesthetic procedures before a serious complication ever occurs. This can easily lead to a false sense of security, which, unless tempered with increased watchfulness, may impair readiness to handle a crisis.
Although patients with preexisting conditions, such as major organ disease, are more likely to develop complications, healthy patients may also be at greater risk by reason of species, age, breed, reproductive status, body conformation, or a variety of other factors. For instance, brachycephalic dogs and geriatric, young (less than 8 weeks old), obese, and pregnant patients are at greater risk. Ruminants may bloat leading to cardiorespiratory compromise, and equine anesthetic recovery poses many risks, including myopathy and neuropathy. Therefore the anesthetist must approach any anesthetic procedure alert to problems that are likely to arise.
In addition, adverse drug reactions, equipment malfunctions, anesthetic overdose, complications of surgery, and human error are other possible causes of anesthetic problems and emergencies. Most can be managed successfully, however, if recognized early and acted upon before they reach crisis level. There are many indicators, which may be detected by careful and frequent observation throughout the procedure, that warn of developing problems. These indicators usually come from the machine (e.g., an overfilled reservoir bag or exhausted CO2 granules), the patient (e.g., a patient that will not stay anesthetized or is experiencing a rough recovery), or monitoring devices (e.g., an SpO2 below 95% or a cardiac arrhythmia).
The anesthetist may be able to manage some problems independently and quickly, whereas others require rapid and effective communication with the veterinarian in charge in addition to further exploration. For instance, mildly excessive or inadequate anesthetic depth can in most cases be managed by the anesthetist by simply adjusting the vaporizer setting and oxygen flow or altering the administration of injectable agents. On the other hand, problems such as hypotension or cardiac arrhythmias may require more complex action, such as changing the anesthetic protocol, treating blood loss, or interpreting data from a monitoring device. The remainder of this section highlights causes, solutions, and prevention of common anesthetic problems and emergencies.
A flowmeter or oxygen tank pressure gauge that registers zero indicates that the flowmeter is turned off or that the oxygen tank is empty or turned off. If the primary tank is empty, open the reserve tank. If it is impossible to solve the problem right away (there is no reserve tank on the machine and only one machine at your disposal), you should disconnect the endotracheal tube from the breathing system until the problem is rectified, although there is a risk that the patient may wake up or become hypoxemic in the interim.
Lack of movement of the reservoir bag or unidirectional valves when the patient breathes usually indicates that the endotracheal tube is not in the trachea, is disconnected, or is blocked. A disconnected or misplaced tube will result in difficulty keeping the patient anesthetized. A blocked tube will usually cause dyspnea and cyanosis. To manage this problem, first check that the tube is connected to the breathing circuit and is correctly placed. Next disconnect the tube and listen or feel for air flow when the patient breathes to rule out a blockage. If the tube is blocked or incorrectly placed, immediately remove the tube and reintubate the patient. If reintubation is not possible (e.g., no one to help you), administer oxygen and anesthetic via a mask until the tube can be replaced.
An overinflated reservoir bag or pressure manometer reading of more than 2 cm of water while the patient is breathing spontaneously occurs most commonly because the pop-off valve has inadvertently been left too far closed. Occlusions of the scavenging system, high oxygen flow, or overzealous use of the oxygen flush valve are other possible causes. If the pop-off valve is closed, open it immediately. If the pressure is dangerously high, (more than 20 cm of water) immediately disconnect the endotracheal tube from the breathing circuit and then correct the primary problem. If the pressure builds again when the tube is reconnected, check the scavenging system for a blockage. If high oxygen flow is causing the bag to overfill, the pressure in the circuit should not increase, but will remain less than 2 cm of water, even though the bag appears to be overinflated. In that case, gently press the bag to empty it as needed and—if safe to do so—decrease the oxygen flow.
An underinflated reservoir bag indicates inadequate oxygen flow, a leak in the system, a maladjusted scavenging system, or that the pop-off valve is too far open. If it is completely deflated, immediately increase the oxygen flow or use the oxygen flush valve to fill the bag one-half to three-fourths full. Then check the pop-off valve, machine assembly, and scavenging system adjustments. If the problem cannot be corrected quickly, change to another machine.
Violet or off-white, brittle absorbent granules indicate saturation of the CO2 absorbent. The resulting increase in CO2 in the breathing circuit will cause increased inspired and expired CO2 levels on a capnograph and may also cause tachypnea or tachycardia. The solution to this problem is to change the granules as soon as the machine is no longer in use. For the duration of the procedure, change the patient to another machine. If you only have one machine, use high oxygen flow (1 L/5 kg body weight/min), continue close monitoring, and wake the patient as soon as possible, or if the patient is under 7 kg, change to a nonrebreathing system.
A PATIENT THAT WILL NOT STAY ASLEEP
Difficulty keeping a patient adequately anesthetized is most often related to problems with the machine and associated equipment. Check that the oxygen is on and flow is adequate, the vaporizer is not empty and is turned on, the machine is correctly assembled, there are no system leaks, and the endotracheal tube is properly placed and cuffed. Also check the RR and depth, which if decreased, may be insufficient to draw enough anesthetic into the lungs. If this is the case, bag the patient about every 5 to 10 seconds until in surgical anesthesia. If light, it may be necessary to prevent the patient from chewing the tube by applying gentle but firm pressure to the muzzle and to give additional injectable anesthetic until the source of the problem is identified and corrected.
Excessive anesthetic depth is usually due to excessively high vaporizer settings, equipment problems, or preexisting medical problems. Immediately inform the veterinarian, stop administration of all anesthetics, increase the flow of oxygen, and proceed as ordered by the veterinarian. Excessively deep patients may require bagging, IV fluid support, measures to increase body temperature, reversal agents or other drug therapy, and even resuscitation in extreme situations. If there is a suspicion of a vaporizer problem (overfilled, tipped over, out of calibration), change to another machine until the problem is corrected.
Cardiopulmonary arrest (CPA) most often follows uncorrected excessive anesthetic depth, but can happen at any time during anesthesia. Patients in physical status classes P2 to P5 are at especially high risk for CPA. A patient that has arrested has no heartbeat, pulse, or respirations and requires prompt initiation of cardiopulmonary-cerebral resuscitation (CPCR). The reader is directed to Chapter 33 for a complete discussion of CPCR.
Apnea or hypoventilation commonly occurs following any episode of hyperventilation as a result of a decrease in blood CO2 levels. Apnea or hypoventilation is also common following induction with drugs that depress the respiratory system, but can also indicate excessive anesthetic depth and in some cases even respiratory arrest. To manage apnea, rapidly inform the veterinarian, check other vital signs, and then determine the anesthetic depth by assessing other monitoring parameters. If the patient is stable and at an appropriate depth, it may be necessary to “bag” the patient 2 to 10 times/minuntil normal respirations resume. Use the low end of this range if the apnea is secondary to hyperventilation to allow normalization of CO2 levels.
Hypotension is a common anesthetic complication caused by preexisting conditions, blood loss, shock, cardiac arrhythmias, excessive anesthetic depth, and adverse effects of drugs. Hypotension is confirmed with Doppler, oscillometric, or direct monitoring, but may be suspected based on pale mucous membranes, increased CRT, and weak pulses. After informing the veterinarian, treat hypotension as ordered. Treatment often includes IV fluid therapy, reduction of the anesthetic, administration of additional oxygen, warming the patient, and drug therapy.
Cyanosis or low oxygen saturation indicate hypoxemia and can be caused by cardiopulmonary disease, ineffective respirations, airway blockage, or machine problems. Cyanosis is a medical emergency that requires immediate action. Dyspnea often accompanies or precedes cyanosis and must also be treated aggressively. Low oxygen saturation is defined as an SpO2 of less than 95% on a pulse oximeter. Assuming the value is correct and is not due to a machine or probe problem, first inform the veterinarian and then check the oxygen flow, machine assembly, and the endotracheal tube for blockage. Also check that RR and depth is adequate.
Vomiting or regurgitation may occur at any time during an anesthetic procedure and can result in serious complications from pulmonary aspiration if the airway is not protected with a cuffed endotracheal tube. Vomiting is more common during induction and recovery, whereas regurgitation is more common during surgical anesthesia because of relaxation of the lower esophageal sphincter. Keep the tube cuffed at all times, and position the head level with or slightly higher than with the rest of the body during surgical anesthesia to decrease the likelihood of regurgitation. If the patient begins to retch or vomit at any time during general anesthesia, quickly position the patient's head lower than the body so that the vomitus flows out of the oral cavity and away from the pharynx. When the vomiting stops, carefully clean the oral cavity and pharynx with swabs, gauze, or suction.
Prolonged recovery may be seen in patients with preexisting disease or hypothermia, patients that have received barbiturates or dissociatives, or following prolonged procedures. These patients must be supported with IV fluids, good nursing care, measures to treat hypothermia, administration of reversal agents if indicated, and careful monitoring.
A rough or stormy recovery is one in which a patient thrashes, vocalizes, paddles, tries to bite, falls over, or exhibits any other uncontrolled behavior that can result in injury of the patient or personnel during the recovery period. Rough recoveries are more common in unpremedicated patients and may result from pain, fear, or disorientation. To manage a rough recovery, approach the patient with caution, administer sedatives or analgesics as ordered by the veterinarian, calm the patient, and use padding, restraint, and bandaging techniques to prevent self-trauma.
ACKNOWLEDGEMENTS
The authors would like to acknowledge the following individuals for production of the following photographs and graphics: Figures 27-1 through 27-27 (with the exception of 27-13, 27-14 and 27-17): Photography, photo editing, and photo illustration: Steven Ahern, AA, AAB; art direction and photography direction: William Fogarty, M.Ed.
RECOMMENDED READINGS AND REFERENCES
Blaze, C.A., Glowaski, M.M. Veterinary anesthesia drug quick reference. St Louis: Elsevier; 2004.
Greene, S.A. Veterinary anesthesia and pain management secrets. St Louis: Hanley & Belfus; 2002.
Love, L., Harvey, R. Arterial blood pressure measurement: physiology, tools, and techniques. Compend Cont Educ Pract Vet. 2006;28(6):450–462.
Marshall, M. Capnography in dogs. Compend Cont Educ Pract Vet. 2004;26(10):761–778.
McKelvey, D., Hollingshead, K.W. Veterinary anesthesia and analgesia, ed 3. St Louis: Mosby; 2003.
Muir, W.W., et al. Handbook of veterinary anesthesia, ed 4. St Louis: Mosby; 2007.
Muir, W.W., Hubbell, J.A.E. Equine anesthesia. St Louis: Mosby Year Book; 1991.
Thurmon, J.C., et al. Essentials of small animal anesthesia and analgesia. Baltimore: Lippincott Williams & Wilkins; 1999.
Thurmon, J.C., et al. Lumb & Jones' veterinary anesthesia, ed 3. Baltimore: Lippincott Williams & Wilkins; 1996.