Surgical Instruments and Aseptic Technique
When you have completed this chapter, you will be able to:
1 Name and describe the commonly used surgical instruments.
2 State advantages of surgical stapling and list common surgical stapling devices.
3 List commonly used instruments and equipment for ophthalmic, orthopedic, and arthroscopic procedures.
4 List surgical instruments and supplies routinely included in general and emergency surgical packs for small and large animals.
5 Describe procedures for cleaning, packing, and sterilizing instruments.
6 Describe procedures for folding and packing cloth surgical drapes and gowns.
7 Differentiate between sterilization and disinfection.
8 List and describe physical and chemical methods of sterilization and methods of quality control of sterilization methods.
9 State safe storage times for sterile packs.
10 List and describe common antiseptic and disinfectant agents.
11 Describe requirements for preparation of the operating room and maintenance of operating room sterility.
12 Describe preparation requirements for patients, including skin preparation, patient positioning, and draping.
13 Describe preparation requirements for the surgical team and explain the procedures that may be used for hand scrubbing before surgery.
INSTRUMENTATION
Thousands of different surgical instruments are available, and new instruments are continually designed to increase the efficiency and ease of performing surgery. The surgical technician must know the purpose of each instrument to anticipate when it will be used and must understand how to handle and care for it.
GENERAL SURGERY INSTRUMENTS
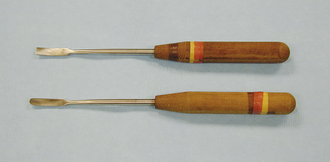
The scalpel is the best instrument for incising tissues with minimal trauma. A variety of disposable blades are designed to fit several different scalpel handles (Figure 28-1). The Bard-Parker No. 3 handle uses detachable blade Nos. 10, 11, 12, and 15 and is the most useful for small animal surgery. The Bard-Parker No. 4 handle is larger and uses detachable blade Nos. 20, 21, and 22. This handle is most commonly used for large animal surgery.
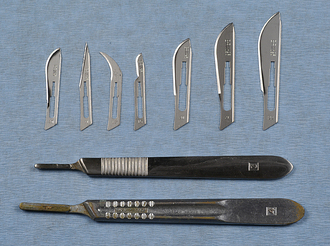
FIGURE 28-1 Scalpel handles and attachable surgical blades. Surgical blade Nos. 10, 11, 12, and 15 fit the Bard-Parker No. 3 scalpel handle, and surgical blade Nos. 20 to 22 fit the Bard-Parker No. 4 handle. The No. 3 handle and No. 10 blade are commonly used in small animal surgery. The No. 4 handle and No. 20 blade are commonly used in large animal surgery.
BIOMEDICAL LASERS
Surgical lasers may be used to cut or ablate (destroy) tissue. There are many different types of lasers. The most commonly used in veterinary medicine are carbon dioxide (CO2) and neodymium:yttrium-aluminum-garnet (Nd:YAG) lasers. Advantages of incising tissue with a laser include some hemostasis and possibly less postoperative swelling and pain as compared with cutting with a scalpel blade. Disadvantages include delayed wound healing and safety issues associated with the use of lasers. Special glasses must be worn by everyone in the room, and care must be taken to prevent ignition of combustible materials. Smoke evacuators and laser-safe surgical masks should be used to reduce the amount of particulate debris inhaled from the smoke plume.
ELECTROSURGERY
Electroscalpels can be used to cut or coagulate tissue and help to minimize bleeding. They work by passing a high-frequency alternating electrical current through the tissue (Figure 28-2, A). Cutting or coagulation can be performed through the same handpiece, and the surgeon can activate it by a switch on the sterile handpiece or by a foot switch (Figure 28-2, B). However, the power level must be adjusted by a nonsterile technician. In monopolar electrosurgery, current passes from the handpiece (Figure 28-2, C) through the patient to a metal ground plate (Figure 28-2, D) that is placed under the patient. Poor contact between the patient’s skin and the ground plate can burn the patient at the site of the ground plate. In bipolar electrosurgery, the current passes between two tips on the handpiece (Figure 28-2, E), which grasp the tissue. No ground plate is needed for bipolar electrosurgery.
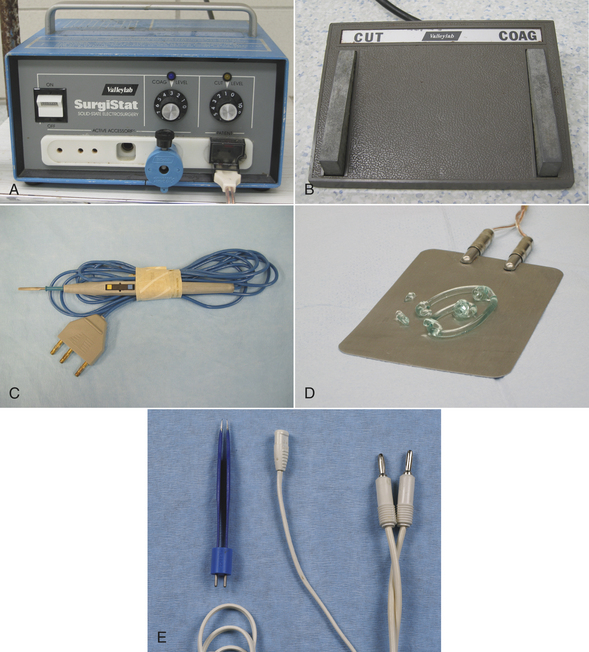
FIGURE 28-2 Electrosurgical equipment. A, Settings on electrosurgical unit are adjusted by nonsterile technician. B, Electrosurgical foot switch is placed near surgeon’s foot. C, Monopolar electrosurgery handpiece. If the handpiece has a cutting-coagulation button, a foot switch is not needed. The handpiece is sterilized and given to the surgeon. The surgeon passes the end of the cord to a nonsterile assistant who plugs it into the electrosurgical unit. D, Ground plate on surgery table with gel to improve skin contact when the animal lies on it. Good contact is important for proper function. E, Bipolar handpiece is sterilized for use. A nonsterile foot switch is needed for activation.
SCISSORS
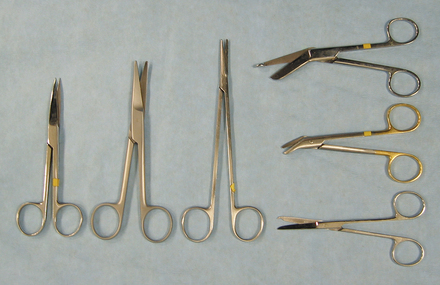
Specific scissors are designed to cut tissue, suture, wire, or bandage material (Figure 28-3). There are many types of dissecting scissors, made for precise cutting and dissection of tissue. Operating scissors vary by the type of blades (straight or curved), the type of points (blunt-blunt, blunt-sharp or sharp-sharp), and the cutting edge of the blades (plain or serrated). Mayo dissecting scissors are heavy scissors used for cutting tough tissue, such as heavy connective tissue. The blades may be straight or curved. Metzenbaum dissecting scissors are fine, curved scissors used for cutting delicate tissue, such as fat or thin muscle. Metzenbaum scissors are preferred for most soft tissue dissection. They should never be used for cutting suture because this dulls the edges and causes the blades to separate and lose effectiveness. Stitch scissors or Littauer suture removal scissors are used to cut all sutures except wire sutures. Wire-suture–cutting scissors can cut wire suture. Lister bandage scissors are available to cut bandage material. One blade of the Lister scissors has a blunt end to facilitate sliding under a bandage without poking the skin. To prolong the life of any scissors, it should be used only for its intended purpose.
NEEDLE HOLDERS
Needle holders are designed for holding curved suture needles during suturing and for performing instrument suture ties. Mayo-Hegar and Olsen-Hegar needle holders are two commonly used needle holders (Figure 28-4). The Olsen-Hegar needle holder has built-in suture scissors, which negates the need for an assistant to cut suture. It allows the surgeon to work alone and cut suture without switching instruments. The potential disadvantage of this needle holder is that the suture may be accidentally cut during suture placement.

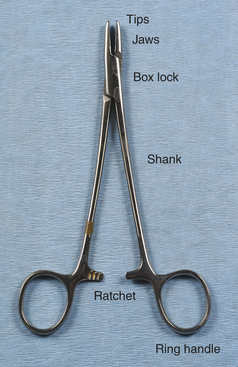
Needle holders consist of a set of jaws, a hinge or box lock, and handles with a ratcheted locking device (Figure 28-5). The size and design of these components vary greatly, depending on the intended use. The jaws commonly have tungsten carbide inserts that provide excellent grip. The tungsten carbide insert is hard, resistant to wear, and can be replaced when worn, thereby prolonging the life of the instrument. Worn inserts can result in improper closure of the jaws or sharp edges that inadvertently cut suture. Needle holders are available in different sizes, depending on the needle sizes they are designed to hold. Improper use of needle holders (such as using a needle holder that is too small for the size of the needle or using the needle holder to bend or twist wire) may not only damage the jaws, but may also spring the box lock and ratchet.
THUMB FORCEPS
Thumb forceps are special tissue forceps designed to hold and easily release tissue with a simple finger motion (similar to tweezers). They have a spring action, and the jaws are opposed by compressing the two metal handles together. Several different jaw surfaces are available and are designed for use with various tissues (Figure 28-6, A to C). Brown-Adson thumb forceps have multiple intermeshing teeth with a broad tip, providing good tissue and needle handling. They are commonly used during suturing and wound closure. Rat-tooth thumb forceps have large interdigitating teeth and are primarily used for skin or fascia. Adson thumb forceps have delicate intermeshing teeth (“rat toothed”) that provide a good, atraumatic grasp of delicate tissues. They are commonly used during dissection. Cooley and DeBakey thumb forceps have long, narrow jaws with multiple delicate sets of teeth that are especially good for vascular surgery. Russian thumb forceps have a broad curved surface good for needle handling, but are traumatic when used to hold tissues. Dressing thumb forceps do not have teeth and are used for applying and removing dressings. They are not designed to grasp tissue and are undesirable for this use because the surgeon must squeeze hard and crush the tissue to grasp it. Thumb forceps are available in a variety of sizes, depending on the intended surgery. For example, thoracic forceps have long handles to enable the surgeon to reach tissues deep within the chest, but these same forceps would be too cumbersome and awkward to use on the skin.
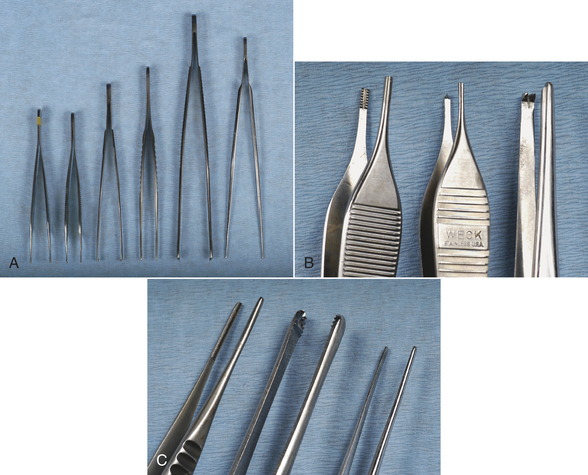
FIGURE 28-6 Thumb forceps. A, Left to right: Brown-Adson thumb forceps, Adson thumb forceps, rat-tooth thumb forceps, DeBakey vascular thumb forceps, Russian thumb forceps, dressing thumb forceps. B, Close-up of tips (left to right): Brown-Adson thumb forceps, Adson thumb forceps, rat-tooth thumb forceps. C, Close-up of tips (left to right): DeBakey vascular thumb forceps, Russian thumb forceps, dressing thumb forceps.
TISSUE FORCEPS
Tissue forceps are locking instruments that clamp tissues (Figure 28-7, A). Different teeth patterns allow them to grip various types of tissues without slipping. Allis tissue forceps securely grasp tissue, but also crush it (Figure 28-7, B). Therefore they are considered to be traumatic and should only be used on tissue that is being removed. Babcock forceps are shaped similarly to the Allis forceps, but are less traumatic because they have a smoother grasping surface and less tip compression (Figure 28-7, B). The Doyen intestinal tissue forceps (Figure 28-7, A) is a more delicate instrument used to occlude and hold intestine. The disadvantage of less traumatic tissue forceps is that they are less secure on the tissues.
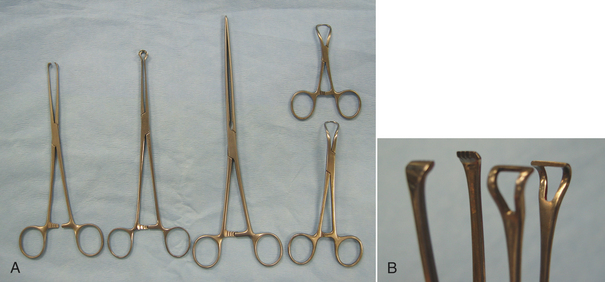
FIGURE 28-7 Tissue forceps. A, Left to right: Allis tissue forceps, Babcock tissue forceps, Doyen intestinal tissue forceps, Backhaus towel clamps (two sizes). B, Close-up of tips: Allis tissue forceps (left), Babcock tissue forceps (right).
Towel clamps are forceps used to attach towels and drapes to the patient. These forceps have pointed tips that curve and join like ice tongs. They are available in different sizes (see Figure 28-7, A). Backhaus towel clamps and Roeder towel clamps are two common designs. The Roeder towel clamp has a metal bead or ball stop attached to the jaws that prevents deep tissue penetration and prevents the towel from slipping toward the box lock of the forceps.
HEMOSTATIC FORCEPS
Hemostatic forceps are tissue forceps used to stop bleeding by crushing blood vessels (Figures 28-8 and 28-9). They are available in different sizes and may be straight or curved. Most hemostatic forceps have transverse grooves on the inside surface of the jaws to better grasp the tissue. Halsted mosquito hemostats are small and designed to occlude small vessels (see Figure 28-8, A). When using hemostatic forceps, the tips of the forceps should be used to grasp only as much tissue as necessary. Crile forceps and Kelly forceps (see Figure 28-8) are larger hemostatic forceps and are used on larger vessels. The jaws of the Crile forceps are transversely grooved for the entire length, but only the distal halves of the Kelly forceps are grooved. Rochester-Péan forceps are large, transversely grooved forceps that are used to clamp tissue bundles and large vessels (see Figure 28-9). Rochester-Ochsner forceps are similar to the Rochester-Péan forceps, but have interdigitating teeth at the tips (see Figure 28-9) that aid in grasping the tissue. Rochester-Ochsner forceps are used most commonly in orthopedic or large animal surgery. Rochester-Carmalt forceps are large crushing forceps with longitudinal grooves and cross-grooves at the tip to provide more traction (see Figure 28-9). These forceps are used for clamping across tissue containing vessels. The Rochester-Carmalt forceps are commonly used to crush the vessels of the ovarian pedicle or the body of the uterus during an ovariohysterectomy (spay) operation. When clamping across vessels, the forceps should be applied with the concave surface facing upward to facilitate tying the ligature. Refer to Chapter 29 for more information on the use of hemostatic forceps.
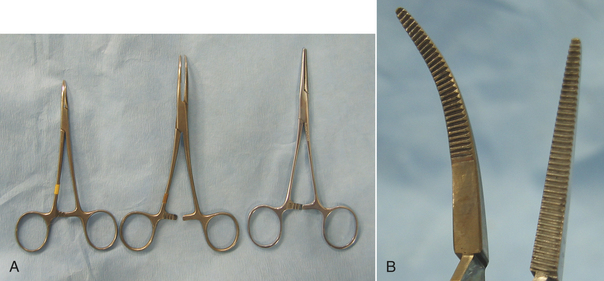
FIGURE 28-8 Hemostatic forceps. A, Left to right: Halsted mosquito hemostatic forceps, Kelly forceps, Crile forceps. B, Close-up of jaws: curved Kelly (left), straight Crile (right).

RETRACTORS
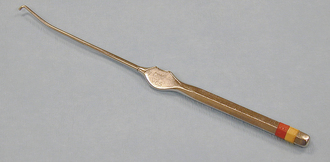
Properly placed retractors do not interfere with the surgery yet provide good visibility of the surgical site and allow more room for the surgeon to work. Retractors may be handheld or self-retaining. A surgical assistant is needed to maintain the position and tissue tension of a hand-held retractor. The Army-Navy retractor and the Senn retractor are double-ended hand-held retractors commonly used to retract skin, fat, or muscle (Figure 28-10). The Army-Navy retractor has smooth blades, whereas the Senn has one smooth blade and one blade with three sharp or blunt prongs. The malleable retractor is made of thin metal that is easily bent to the desired shape (Figure 28-10). It is commonly used to retract abdominal organs. The Snook ovariohysterectomy hook is a specialized type of hand-held retractor used to expose the horn of the uterus during an ovariohysterectomy (see Figure 28-10). The Hohmann retractor consists of a single blade and a handle that are used to lever tissues out of the way for better visibility (see Figure 28-10). It is used almost exclusively in orthopedic surgery and can provide good visibility in certain joint surgeries.
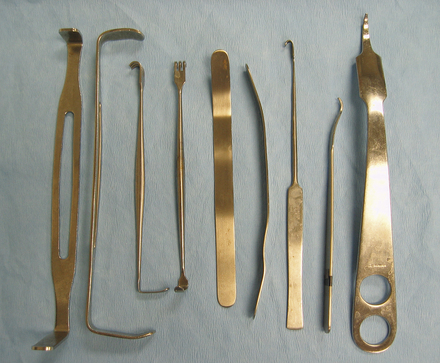
FIGURE 28-10 Hand-held retractors. Left to right: Two Army-Navy retractors, two Senn retractors, two small malleable retractors, Snook ovariohysterectomy hook (spay hook), two Hohman retractors (different sizes).
 TECHNICIAN NOTE
Retractors rather than hands are used to retract tissues and provide good visibility of the surgical site.
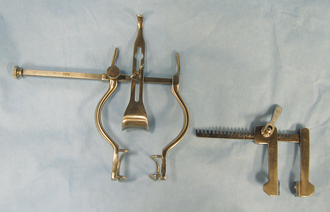
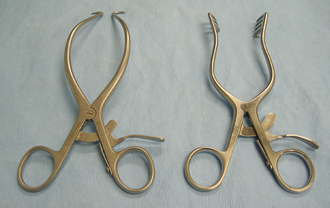
Self-retaining retractors are maintained in the desired position by some type of locking mechanism on the retractor handle. The advantage of the self-retaining retractors is that the surgeon and the assistant have their hands free for other tasks. The Balfour retractor provides increased exposure of the abdominal cavity (Figure 28-11). The two wirelike blades are used to distract the abdominal incision, and the solid spoonlike blade is hooked onto the sternum to distract it cranially. The Finochietto rib spreader retracts the ribs to expose the surgical field within the thoracic cavity (see Figure 28-11). The ratcheted part of the retractors is positioned at the dorsal aspect of the thoracic incision so that it does not interfere with the surgeon. Gelpi retractors and Weitlaner retractors (Figure 28-12) are self-retaining retractors commonly used for muscle retraction, especially in orthopedic and neurologic surgery. Refer to Chapter 29 for more information on retraction techniques.
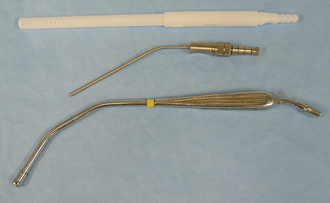
SUCTION TIPS
Several different suction tips are commonly used (Figure 28-13). The Poole tip is used primarily in the abdominal or thoracic cavity because it has an outer sleeve with small holes to prevent tissue, such as fat, from becoming entrapped in the tip. The Frazier tip is most commonly used in orthopedic and neurologic surgery. The Yankauer tip is a general-purpose suction tip. The suction tip is attached to a long, sterile suction tube. The other end of the suction tube is connected to a nonsterile suction canister. Refer to Chapter 29 for more information on the use of suction.
STAPLING EQUIPMENT
Several different surgical stapling devices are available for an array of purposes (Figure 28-14). There are many advantages to using stapling devices in both large and small animal surgery. Stapling devices provide an easier and faster alternative to hand suturing. Some stapling devices also cut tissue after stapling. The staplers are named by an abbreviation of their designed function (Table 28-1). A number may be used after the name thoracoabdominal stapler (TA) or gastrointestinal stapler (GIA) to indicate the length of the row of staples (e.g., a TA 30 places two rows of staples 30 mm long).
TABLE 28-1
| Derivation of Name | Common Use | Comments |
| TA | ||
| Thoracoabdominal | Lung resection | Places double or triple row of staples |
| GIA | ||
| Gastrointestinal anastomosis | Gastrointestinal resection and anastomosis | Places four rows of staples and cuts between the middle two rows |
| EEA | ||
| End-to-end anastomosis | Gastrointestinal anastomosis | Staples two intestinal segments together in a circular manner with a functional lumen |
| Skin and Fascial Stapler | ||
| Skin or fascia closures | Places a single staple | |
| LDS | ||
| Ligate-and-divide stapler | Blood vessel ligation | Places two staples on a vessel, and cuts between them |
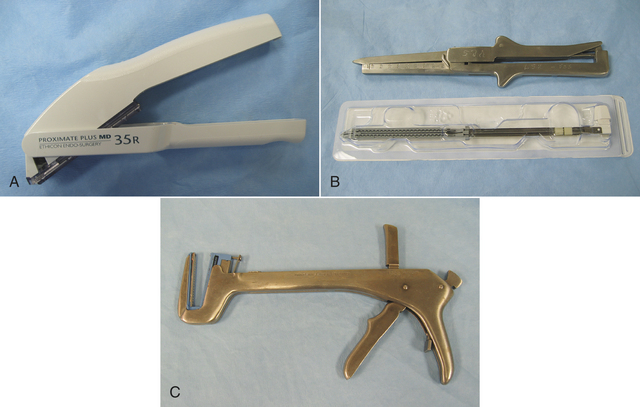
FIGURE 28-14 Surgical stapling equipment. A, Surgical skin stapler applies a single staple with each squeeze of the trigger (staple guns commonly hold 25 to 35 staples). B, Gastrointestinal stapler (GIA). Cartridge of staples are for one-time use and are purchased in presterilized package. C, Thoracoabdominal stapler (TA). Staple cartridges are purchased as for GIA. Shown here with staple cartridge in place.
MICHEL SKIN CLIPS
Drape material is often attached to the incised skin edge during surgical procedures to minimize contamination of the surgical field by the surrounding skin. The use of Michel skin clips is one method of attaching the drape to the wound edges (Figure 28-15). One end of the Michel clip-applying-and-removing forceps grips the clip. When the handles are squeezed, the clip bends to pinch the edges of the drape and the skin together. The other end of the forceps has jaws that remove the clip by bending it backward and disengaging it from the incision edge. There are alternatives to Michel clips, including the use of suture, “scalp clips,” towel clamps, and adhesive drapes.
OPHTHALMIC INSTRUMENTS
Ophthalmic surgery requires the use of delicate instruments that must be handled carefully. Basic ophthalmic instruments include specialized scalpels, scissors, thumb forceps, needle holders, and retractors (Figure 28-16).
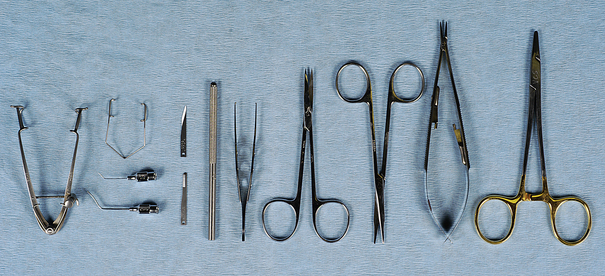
FIGURE 28-16 Common ophthalmic instruments. Left to right: Lid speculum, small lid speculum (above) and lacrimal cannulae (below), beaver blade handle with No. 64 and 65 surgical blades, Bishop-Harmon thumb forceps, iris scissors, tenotomy scissors, Castroviejo needle holder, and Derf needle holder.
ORTHOPEDIC INSTRUMENTS
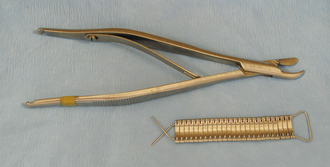
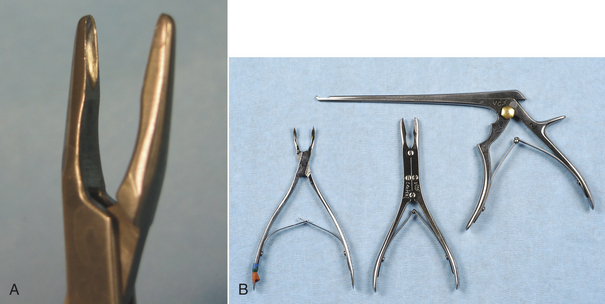
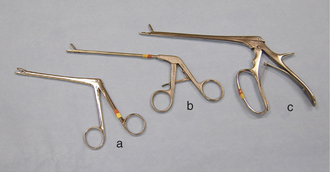
Rongeurs have sharp cupped tips that are used to cut small pieces of dense tissue, such as bone, cartilage, or fibrous tissue (Figure 28-17, A). Rongeurs have a double-action or single-action mechanism (Figure 28-17, B). Double-action rongeurs have a smooth cutting action and are mechanically stronger than single-action rongeurs, but they are also larger. Double-action rongeurs are preferred for removing large amounts of dense tissue. Single-action rongeurs are more commonly used in confined areas, as in removing bone to perform spinal surgery. Kerrison rongeurs have a gun-shaped appearance and are useful for spinal surgery. Bone-cutting forceps are similar to rongeurs, but have paired chisel-like tips. They are used for cutting bone and should not be mistaken for wire cutters (Figure 28-18).
BONE-HOLDING FORCEPS
Bone-holding forceps are designed to hold bone and bone fragments in alignment while orthopedic implants (screws, pins, wires, or plates) are applied (Figure 28-19). Most bone-holding forceps are self-retaining. A Kern bone-holding forceps has a ratcheted handle that allows it to be clamped securely on the bone. The self-retaining bone-holding forceps, also known as speed locks, has a nut that tightens against one handle to squeeze the handles together.
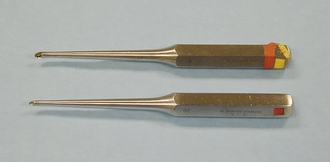
CURETTES
Curettes are used to scrape hard tissue, such as bone or cartilage. Curettes are designed with a small cuplike structure at one or both ends of a handle (similar to an ice cream scoop). The cup has a sharp cutting edge and is available in various sizes (Figure 28-20). A common use of bone curettes is to retrieve cancellous bone from the medullary cavity (tibia, humerus, ilium) for use as a bone graft. Cancellous bone grafts are often used during fracture repair.
PERIOSTEAL ELEVATORS
Periosteal elevators are instruments that are used to pry periosteum or muscle from the bone surface. They have a bladelike structure at one or both ends of a handle. The blades have sharp or blunt edges and are available in various sizes (Figure 28-21).
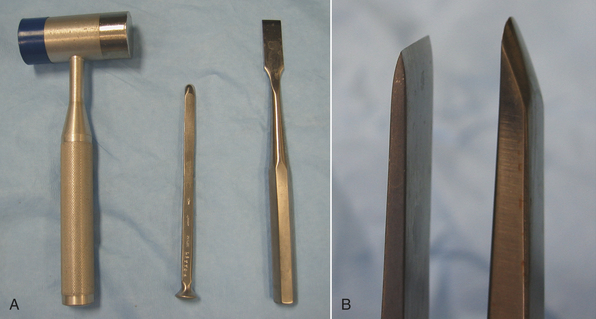
OSTEOTOMES AND CHISELS
Osteotomes and chisels are used to cut bone. Osteotomes and chisels are used by pounding on the flared end of the handle with a mallet (Figure 28-22, A). The cutting edge of the osteotome is tapered on both sides, whereas the chisel is tapered only on one side (Figure 28-22, B).
GIGLI WIRE
Gigli wire is used to cut bone by placing the wire around the bone and drawing it back and forth in a sawing fashion. T-shaped handles hook onto the wire to give the surgeon a firm grasp of the wire.
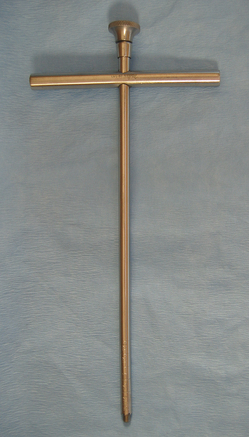
TREPHINES
Trephines are T-shaped tubular instruments with a cylindrical cutting blade (Figure 28-23). Trephines are usually used to remove a core of bone for biopsy.
POWER EQUIPMENT
Some power equipment is commonly used in orthopedic and neurologic surgery. Although some drills are electric or battery powered (Figure 28-24, A and B), many orthopedic drills and saws are powered by nitrogen gas that is supplied via a sterile hose (Figure 28-24, C). The Hall air drill is a specialized high-speed bur that grinds bone (Figure 28-24, D). It is most commonly used for spinal surgery.
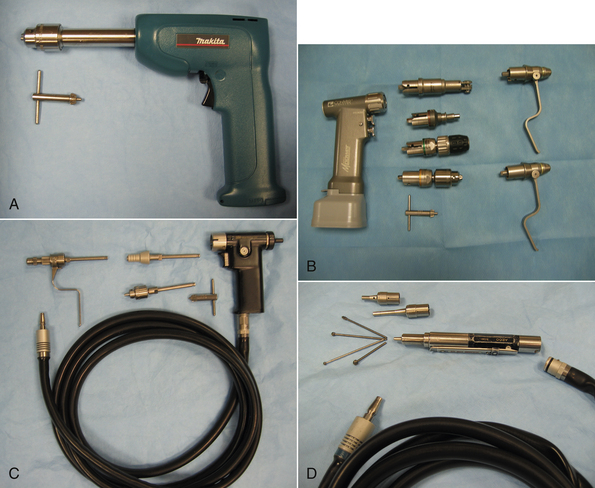
FIGURE 28-24 Power equipment. A, The Makita drill is an example of a battery-powered drill. B, ConMed Linvatec battery-powered handpiece (left). Attachments shown are (center, top to bottom): saw blade attachment, quick release for drill bit, keyless chuck, Jacobs chuck with key, and (right): pin and wire drivers. C, The 3M Mini-driver is powered by a tank of pressurized nitrogen gas. It has an attachment for K-wires and quick-release or chuck attachments for drill bits. D, The Hall air drill has various sizes and shapes of burs, and two different length bur guards.
ORTHOPEDIC IMPLANTS
Orthopedic surgery sometimes involves the use of various products that are placed in or around the bone and left in place permanently or for an extended period of time. Metal implants are usually made of stainless steel alloy, cobalt-chromium alloys, or titanium. Of these three types, titanium is the most resistant to corrosion and has the best fatigue life. It is also the most expensive.
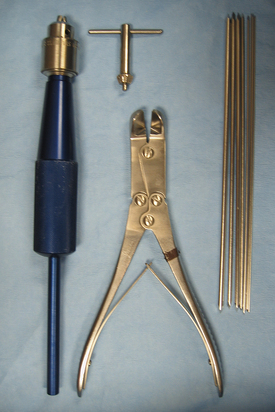
BONE PINS
Bone pins vary in diameter, length, and the type of points. Steinmann pins are smooth, stainless steel pins ranging in diameter from  to ¼ inch. Three different types of pin points are available, including chisel, trocar, or threaded trocar. Some pins have threads, similar to a screw. A power drill or a Jacobs hand chuck is required to insert the pin into bone, and a pin cutter is necessary to cut it to the proper length (Figure 28-25). Steinmann pins may be called intramedullary (IM) pins because they are often placed in the medullary cavity of long bones for fracture fixation. Kirschner wires (K-wires) are similar to Steinmann pins, but are smaller and can be used to pin small bone fragments. The available sizes are 0.035-inch, 0.045-inch, and 0.062-inch in diameter.
INTERLOCKING NAILS
Interlocking nails are similar to IM pins, but have preplaced holes through the pin that allow screw placement. Interlocking nails have more rigid fixation than IM pins. Equipment is similar to that required for pins, but specialized equipment is needed for screw placement.
ORTHOPEDIC WIRE
Stainless steel orthopedic wire is supplied on spools (Figure 28-26). The common sizes used in small animal surgery are 22 gauge, 20 gauge, and 18 gauge (Table 28-2). It is most commonly applied in a cerclage fashion by encircling the bone or bone fragments and twisting the ends in a “twist-tie” manner. Orthopedic wire is often used for fracture repair in combination with pins or bone plates.


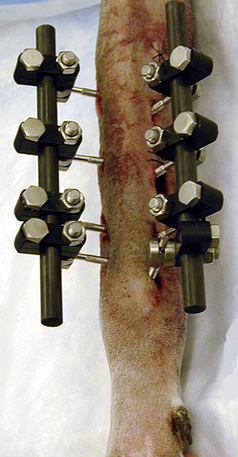
EXTERNAL FIXATORS
External fixation is a means of stabilizing fractures using pins placed through the skin and bone. The pins are held rigid by a metal or acrylic connecting bar that is attached to the pins several centimeters from the skin (Figure 28-27). The metal apparatus uses special clamps to attach a metal connecting bar to the pins. Acrylic (methyl methacrylate) connecting bars are often made from dental acrylics or hoof-wall–repair acrylics because they are less expensive than surgical grades of acrylic. The acrylic connecting bar is more versatile and lighter than the metal apparatus. Ring fixators use special wires instead of pins in the bone. Several metal rings encircle the limb and are fixed in alignment using rods. Each bone wire is clamped to one of the rings.
BONE SCREWS
The two basic screw types are cortical and cancellous screws. Cortical screws are fully threaded screws that are designed for dense (cortical) bone. Cancellous screws are either partially threaded or fully threaded and are made with wider threads to have a better grip in the softer cancellous bone (Figure 28-28).
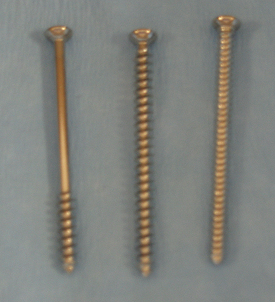
FIGURE 28-28 Bone screws. Left to right: Partially threaded cancellous screw, fully threaded cancellous screw, and fully threaded cortical screw.
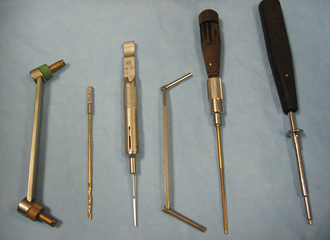
The general steps of screw placement include drilling a hole in the bone, measuring the hole with a depth gauge to determine the proper screw length, using a bone tap (a screwlike instrument with sharp threads) to cut a screw path in the bone, and inserting the screw with a specialized screwdriver. Bone screws may be used alone or in conjunction with a bone plate or interlocking nail.
Bone screws are named by both the screw length and thread diameter (in millimeters). Commonly used screws in small animal surgery are 2.7- and 3.5-mm diameter cortical screws and 4.0-mm diameter cancellous screws. All of these screws have hexagonal heads and are driven by the same hexagonal screwdriver. Smaller screws (1.5- and 2.0-mm diameter) have cruciate heads and require a small, cruciate screwdriver. Larger screws (4.5-, 5.5-, and 6.5-mm diameter) are used in large animal surgery. These screws use a large hexagonal screwdriver.
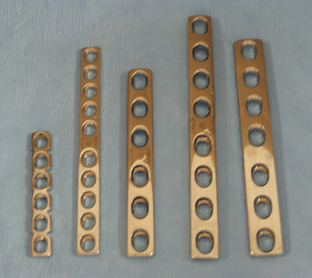
BONE PLATES
There are many different types of bone plates (Figure 28-29). Bone plates are named by the number of screw holes and by the screw diameter size that best fits the plate. For example, a seven-hole, 3.5-mm plate would use seven, 3.5-mm diameter screws. Bone plates must be bent to match the curve of the bone and fastened to it with bone screws. Instrumentation required to apply a bone plate is highly specialized and includes drills, drill bits, drill guides, depth gauges, bone taps, tap sleeves, screws, screwdrivers, and plate benders (Figure 28-30). Although bone plating is more complex than other types of orthopedic fixation, plate fixation is much more stable in most cases.
TOTAL HIP PROSTHESIS
Replacement of the hip joint with a prosthesis may be done in some dogs with severe arthritis. This procedure is done by highly trained veterinary surgeons and requires much specialized orthopedic equipment in addition to the prosthesis itself. The femoral prosthesis consists of a long stem that fits inside the proximal femur and a ball that replaces the femoral head. A special cup replaces the acetabulum.
ARTHROSCOPIC INSTRUMENTS AND EQUIPMENT
The arthroscope is used as a diagnostic and surgical tool in veterinary surgery. It is used mostly to examine various joints of the horse, including the scapulohumeral, humeroradial, carpal, fetlock, distal interphalangeal, coxofemoral (foals only), stifle, and tarsocrural. It is also used to examine various joints in the dog. Arthroscopy is used primarily to remove osteochondral chip fragments and osteochondritic lesions on the articular surface in joints of young horses and dogs. The arthroscope has been used to visualize intraarticular fractures for lag screw fixation, such as third carpal bone slab fractures in the carpus (knee) of horses and meniscal and cruciate injuries in dogs. The arthroscope has also been used to perform tenoscopy of the digital flexor tendon sheath and sinuscopy of the paranasal sinuses through trephined holes in the facial bones overlying the sinuses of horses. Most of the equipment used in veterinary arthroscopy has been adapted from human arthroscopy. New technology is constantly developed that will no doubt influence the veterinary field. This section is intended to allow the veterinary technician to become more familiar with the instruments and techniques of arthroscopy.
ARTHROSCOPE
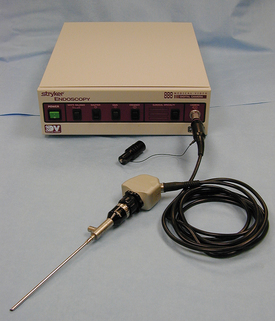
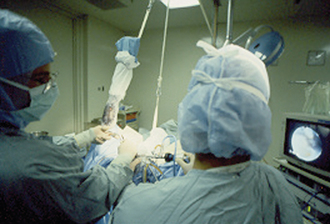
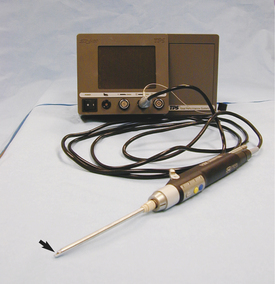
There is a selection of different arthroscopes that have been developed with various diameters and viewing angles. For example, there is a 5-mm-outer-diameter (OD) arthroscope with either a 10-degree, 25-degree, or 70-degree lens angle; a 4-mm OD with a 10-degree, 30-degree, 70-degree, or 110-degree lens angle; a 2.7-mm OD with a 5-degree, 30-degree, or 70-degree lens angle; and a 1.9-mm OD with a 5-degree or 30-degree lens angle. A 4-mm OD, 25-degree or 30-degree angled lens scope is generally used by most equine surgeons (Figure 28-31), whereas a 2.7-mm OD, 30-degree angled lens scope is commonly used for canine arthroscopy. Most arthroscopes have a television camera permanently coupled to them, which allows the surgeon to view the joint on a television monitor (Figure 28-32). A television monitor has the advantage of a larger image. This greatly improves visualization of the intraarticular space compared with direct viewing through the eyepiece of the arthroscope. This method also provides better aseptic technique because the surgeon’s face is not near the surgical field, and an assistant can operate the camera-scope unit, allowing the surgeon more freedom. A monitor also allows several persons to observe the procedure simultaneously, and a videotape record can be made for future replay.
ANCILLARY ARTHROSCOPIC EQUIPMENT
Along with the arthroscope come various instruments used to introduce the scope into the joint. Stab incisions are made in the skin over the joint space once the site is surgically prepared through which the arthroscope and hand instruments will be inserted once the animal is positioned for surgery.
Sharp Trocar and Sleeve
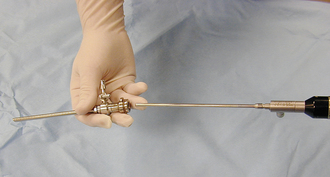
A pointed instrument called a sharp trocar is inserted inside a hollow, cannula type of instrument called the sleeve (Figure 28-33). The trocar and sleeve unit are used to penetrate the fibrous portion of the joint capsule through a stab incision.
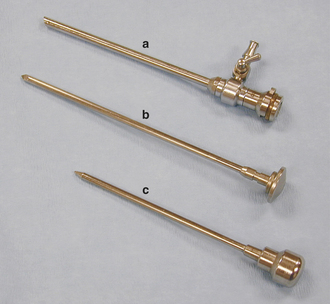
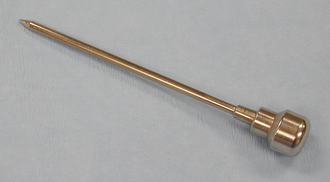
Blunt Obturator
Once the sharp trocar has penetrated the fibrous joint capsule, the sharp trocar is replaced with a conical (blunt) obturator (Figure 28-34), which is used to penetrate the synovial membrane of the joint capsule and advance the sleeve into the joint space with less risk of damaging the articular cartilage. At this point, the obturator is withdrawn from the sleeve. The joint space is distended with a sterile, balanced electrolyte solution (fluids) before placement of the sleeve in the joint, so a rush of fluid through the barrel of the sleeve will occur as the obturator is removed. The obturator is replaced with the arthroscope (Figure 28-35), which is designed to lock onto the sleeve once it is slid into position in the sleeve.
Light Cable, Light Projector, and Television Camera
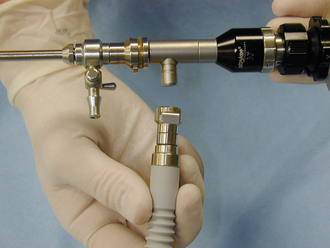
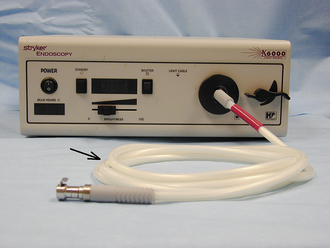
Once the arthroscope is positioned in the joint, a fiber-optic light cable (Figure 28-36) is attached directly to the optical light port on the arthroscope (Figure 28-37). A high-intensity light generated from a specially designed light projector is fed through the fiber-optic cable and through the arthroscope to illuminate the joint space (Figure 28-38).

FLUID DELIVERY SYSTEMS
Fluid, usually a balanced electrolyte solution, is infused into the joint under pressure to maintain distention of the joint capsule, which is essential for visualization of the intraarticular space. Gas insufflation, using CO2 or nitrous oxide, has also been used as a method of distending the joint. However, a special system with a pressure-regulating device is required. One disadvantage of gas is that it does not allow for lavage of the joint space if osteochondral chip fragments become detached in the joint. The fluid is infused into the joint space through the sleeve, around the arthroscope. The sleeve has at least one stopcock that is used as an ingress port to connect a sterile fluid line (Figure 28-39).
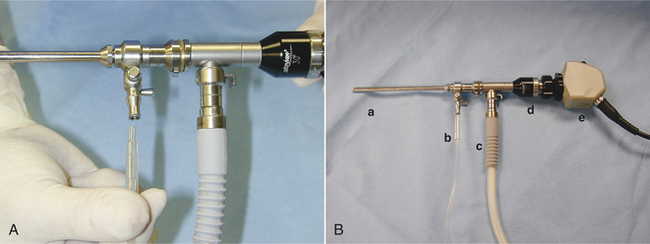
FIGURE 28-39 A, The fluid line is connected to the stopcock of the arthroscope. B, Arthroscopic sleeve (a), fluid line (b), light cable (c), arthroscope (d), and camera (e).
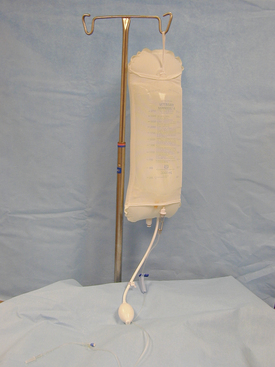
Pressurized Bag System
Various systems are available to deliver fluid to the joint. One system is a pressurized bag design. A pneumatic pressure cuff is slipped around a bag containing sterile fluid. The cuff is inflated with air, which squeezes the fluid bag, thus pressurizing the fluid (Figure 28-40). The amount of pressure is regulated by the amount of cuff inflation.
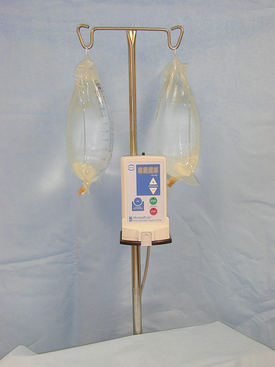
Automated Pump System
Another type of system uses a motorized pump to regulate the fluid rate through the fluid lines connected to the arthroscope. One example of this type of system is the Hydroflex (Davol, Inc.) (Figure 28-41). The pressure and fluid volume going into the joint are automatically regulated within the fluid pump. This automated pressure-sensitive pump system regulates the pressure via a pressure feedback control. This allows the pump to maintain a preset pressure in the joint without the surgeon having to adjust the fluid pressure.
HAND INSTRUMENTS FOR ARTHROSCOPIC SURGERY
Numerous hand instruments of various types are available or have been adapted for arthroscopy. They are used to remove or retrieve osteochondral chip fragments, débride articular cartilage or subchondral bone, or probe cartilage or cartilage lesions. The instruments are inserted into the joint through a separate stab incision, and the arthroscopic operation is performed via a technique called triangulation. Only the most commonly used instruments are discussed here.
Blunt Probe
The blunt probe is used to probe a site in the joint to determine such aspects as cartilage integrity or the extent of a cartilage lesion (Figure 28-42).
Rongeurs and Grasping Forceps
Various types and sizes of rongeurs have been adapted for use in arthroscopy. These instruments have a beveled edge along cupped jaws to cut the attachments of an osteochondral chip fragment as it is removed (Figure 28-43). Forceps are used to retrieve loosely attached fragments (see Figure 28-43).
Elevators and Osteotomes
These instruments have small beveled heads that are designed to cut or break down the attachments of an osteochondral chip fragment and elevate it from the parent subchondral bone bed (Figure 28-44).
Curettes
Curettes are inserted into the joint to débride a defect left in the articular cartilage or subchondral bone after removal of an osteochondral chip fragment or osteochondritic lesion (Figure 28-45).
Motorized Burs
Motorized burs are often referred to as a motorized arthroplasty system. The system consists of a small rounded bur attached to a power-driven shaft. The bur and shaft are enclosed in a sleeve, with a portion of the bur protected to prevent inadvertent damage to surrounding articular cartilage (Figure 28-46). This instrument is also used to débride a defect left in the articular cartilage or subchondral bone after removal of an osteochondral chip fragment or osteochondritic lesion. The speed of rotation of the bur can be adjusted, and the bur is usually operated at several thousand revolutions per minute. Most systems operate with an on-off foot-pedal switch for the surgeon.
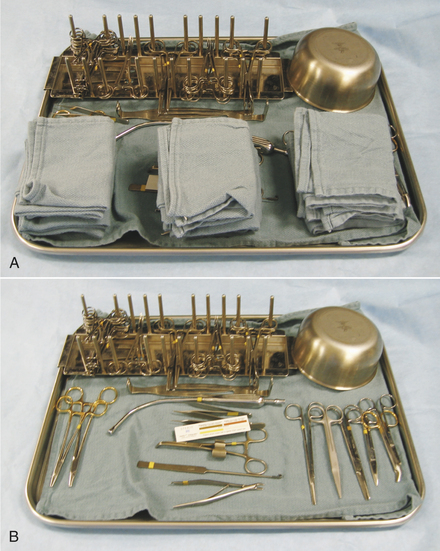
INSTRUMENT PACKS
Most veterinary hospitals organize surgical instruments into several different instrument packs based on the type of surgical procedure. Surgical pack organization is dependent on the type of practice and surgeries performed, but some examples are as follows: general packs for soft tissue surgeries, bone packs for orthopedic surgeries, emergency packs for emergency and minor procedures, and neurologic packs for spinal surgeries (Tables 28-3 and 28-4). A pack system helps to organize the instruments so that the most commonly used instruments are readily available and infrequently used instruments are not contaminated and resterilized unnecessarily. For example, all commonly used instruments for spinal surgery are in one pack, so it is opened, used, cleaned, sterilized, and repacked only when necessary. Infrequently used instruments are typically wrapped individually. Large and bulky instruments are also packed separately. In addition, some commonly used instruments (e.g., scalpel handle, hemostats, thumb forceps, scissors, needle holders, sponges) may be wrapped individually to provide access to an additional instrument without having to open an entire instrument pack.
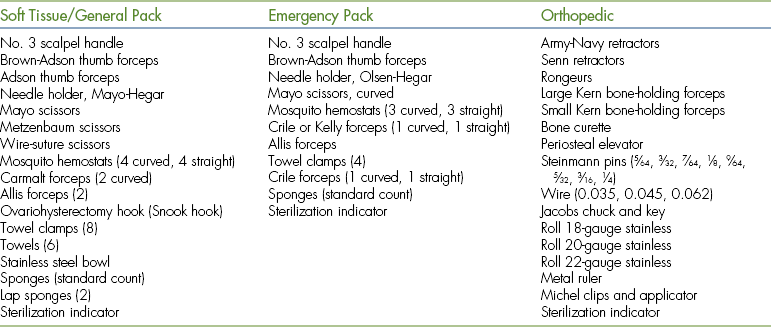
TABLE 28-4
Large Animal Standard and Emergency Packs
| Standard Pack | Emergency Pack |
| No. 3 scalpel handle | No. 3 scalpel handle |
| No. 4 scalpel handle | No. 4 scalpel handle |
| Rat-tooth thumb forceps (3) | Rat-tooth thumb forceps |
| Adson thumb forceps (3) | Brown-Adson thumb forceps |
| Needle holders (2) | Needle holder |
| Mayo scissors (1 curved, 1 straight) | Mayo scissors (1 curved, 1 straight) |
| Operating scissors (2 curved, 2 straight) | Mosquito hemostats (sharp-sharp) |
| Metzenbaum scissors (1 curved, 1 straight) | Allis tissue forceps (2) |
| Bandage scissors | Towel clamps (4) |
| Mosquito hemostats (4 straight, 4 curved) | Towel |
| Kelly or Crile forceps (2 straight, 2 curved) | Sponges (standard count) |
| Ochsner forceps, 15-cm (1 curved, 1 straight) | Sterilization indicator |
| Allis tissue forceps (2) | |
| Towel clamps (16) | |
| Towels (4) | |
| Saline bowl | |
| Sponges (standard count) | |
| Sterilization indicator |
Each type of pack should be organized such that items are always placed in the same location on the tray (Figure 28-47). This makes it easier to inventory the instruments and facilitates finding the instruments quickly during surgery. Sponges may be counted at the beginning and end of each surgery to be sure that none has been left in the patient.
INSTRUMENT CARE
Most surgical instruments are made of stainless steel, which is rust resistant and retains a sharp edge. The two common instrument finishes are polished or satin. The polished finish is durable, but tends to reflect light, which may impair the surgeon’s vision. The satin or dull finish was developed to eliminate glare, but it is less resistant to spotting and discoloration.
Good quality instruments are expensive, but will last for years if treated properly. All instruments should be handled gently, and delicate instruments should be separated from the general instruments before cleaning. Multiple-component instruments should be disassembled before cleaning. Power equipment should be cleaned separately to ensure that water does not get inside the components.
Immediately after use, instruments should be rinsed with cold water to prevent blood and organic debris from drying in the serrations, hinges, box locks, or ratchets. Distilled or deionized water is preferable to tap water to prevent staining or corrosion of the instruments. If there will be a delay before final cleaning, the instruments can be immersed in water containing an instrument detergent. Each instrument is scrubbed with a soft brush in warm water using a neutral pH instrument detergent. Abrasive cleaning agents should never be used on surgical instruments. An ultrasonic (high-frequency sound) cleaner (Figure 28-48) is used after manual cleaning to remove tightly bound soil or clean areas that the brush cannot reach. Instruments should be placed in the ultrasound unit with the box locks open. Instruments of dissimilar metals (e.g., chrome and stainless steel) should not be put together in the ultrasound unit because this may result in pitting of the instruments. Instruments should be thoroughly rinsed and air-dried (wiping instruments may leave lint residue) before autoclaving to prevent rust spots.
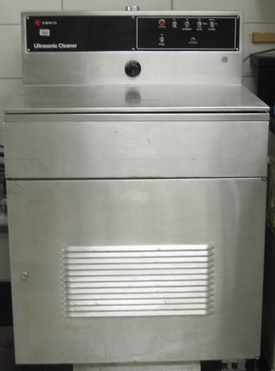
FIGURE 28-48 Ultrasonic cleaners are available in different sizes and models. Follow manufacturer’s recommendations regarding use.
Instruments with a working action, such as a hinge or box lock, should be treated with an instrument lubricant or instrument “milk” after each cleaning. The recommended lubricants are water soluble, so thorough cleaning will remove all the lubrication. Instrument lubricants are not oily or sticky, inhibit rust formation, and do not interfere with steam sterilization. Working components of power equipment should also be lubricated to maximize efficiency and to prolong the working lifetime of the equipment. Before instruments are repacked for sterilization, they should be thoroughly inspected for cleanliness, stiff or “frozen” hinges, improper jaw alignment, rust spots, and worn or broken parts. Defective instruments should be repaired or replaced.
DRAPES AND GOWNS
Surgical drapes and gowns may be paper or cloth. Paper drapes and gowns are designed to be disposable and should be used only once. They are bought prepackaged and sterilized for individual use. Cloth drapes and gowns are designed for repeated use, but they require washing after each use. Immediately soaking the cloth in cold water will prevent blood and other fluid from setting. All cloth drapes and gowns should be washed in a mild detergent and thoroughly dried before sterilization. They should also be inspected for holes or other signs of wear.
Cloth gowns must always be folded and packed in the same manner (Figure 28-49). This technique allows the sterile gown to be unfolded and put on without contaminating the exterior surface. Cloth drapes must also be folded and packed such that sterility can be maintained while they are unfolded and applied to the patient. “Accordion folding” allows easy unfolding and placement of the drape (Figure 28-50). Many specifically designed drapes are also available, including adhesive drapes, transparent drapes, fenestrated drapes, stockinettes, and compressive wraps. After the drapes and gowns have been properly folded, they are usually double wrapped in muslin or a nonwoven barrier before sterilization (Figure 28-51).
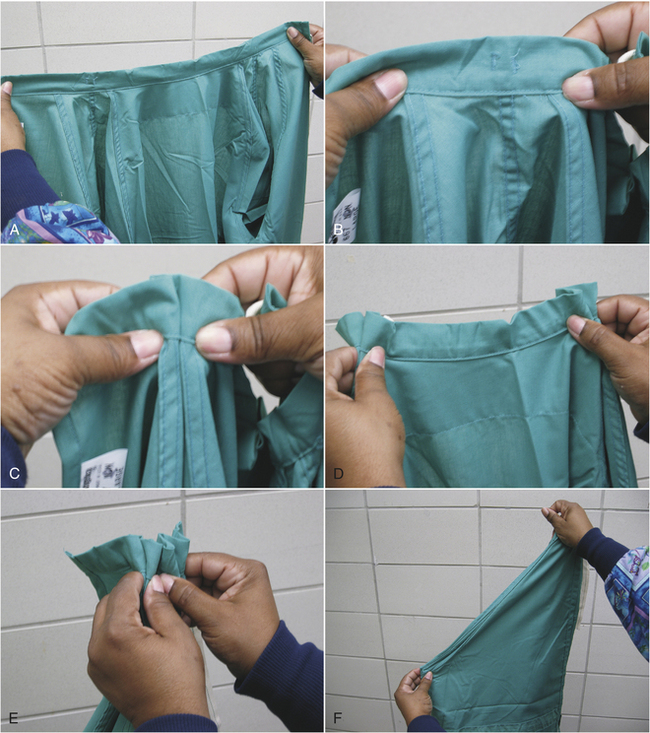
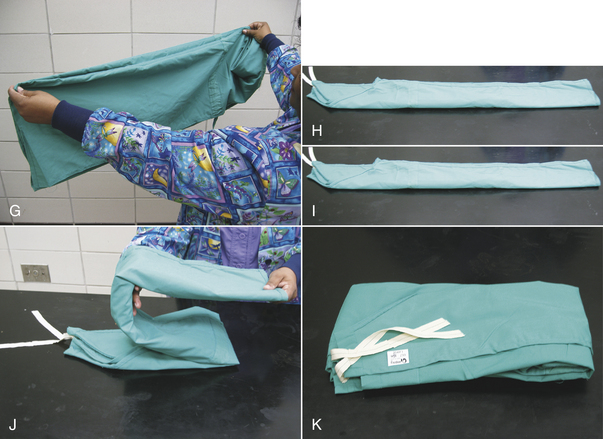
FIGURE 28-49 Method of folding a cloth surgical gown. A, The gown is held by the neck to see the shoulder seams on the inside of the gown. B, Close-up of the three seams of one shoulder. C, The gown is folded so the outer two seams of one shoulder are touching. D, The same fold is done with the other shoulder. E, The gown is folded so the seams of both shoulders are touching. F, The shoulders are held in one hand while the other hand aligns the armpit seams.
G, The shoulders and armpits are held in one hand while the other hand aligns the gown hem. H, The gown is laid flat on the table. (A tabletop method of folding is to first lay the gown open flat on the countertop with the outside of the gown facing up, sleeves on top. The side edges of the gown are each folded to meet near the middle, and then the gown is folded in half.) Only the inside surfaces of the gown are now exposed. I, The gown is folded in half lengthwise. J, The gown is folded in accordion fashion. K, The gown is laid on the table so the neck ties are uppermost. Proceed to Figure 28-51 to wrap the gown.
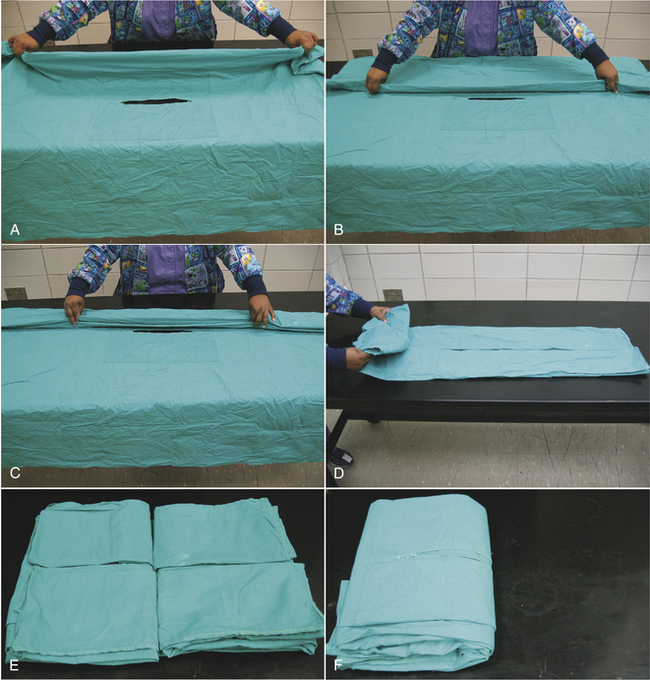
FIGURE 28-50 Cloth drapes are folded in accordion fashion so that they are easily unfolded onto the patient. A, B, A lengthwise fold is created in the drape (approximately 30 cm from the middle), and the folded edge is brought to the fenestration at the middle of the drape. C, This is repeated with a second fold, creating an accordion folding. Each section of folded drape is approximately 15 cm wide. D, The opposite side is folded in a similar manner. Then one end of the drape is folded to the center in accordion fashion. E, The opposite end is folded in the same manner. F, The drape is folded in half (half of the fenestration is visible), and it is ready to be wrapped as in Figure 28-51.
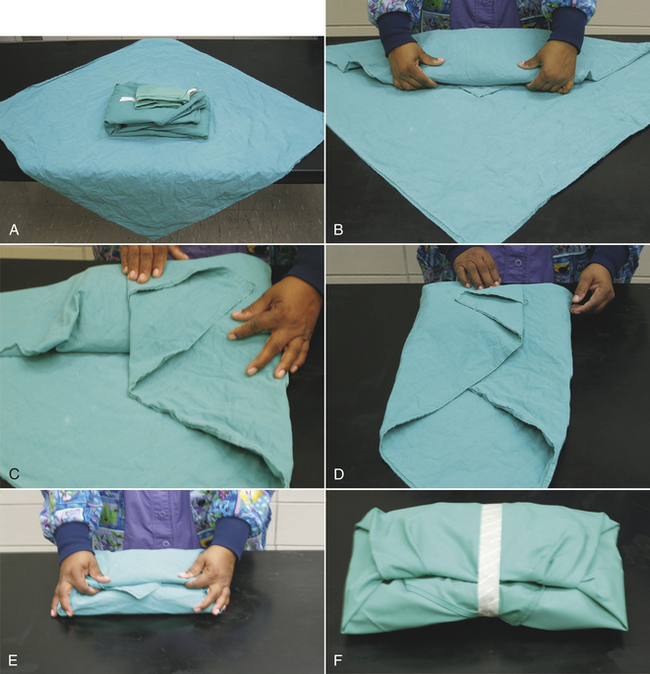
FIGURE 28-51 Wrapping a cloth drape or gown or an instrument pack. A, The gown along with an accordion-folded hand towel and sterilization indicator is placed diagonally onto the drapes. B, One corner is folded over the entire pack and tucked under it, leaving the tip visible. C, An adjacent corner is folded over the end of the pack, and the tip folded back so the drape is flat on top of the pack. D, The opposite corner is folded the same way. E, The pack is turned around, and the final corner is folded over the top of the pack and tucked under the folded drape edges, leaving the tip visible. F, The pack is then wrapped in a second layer in the same manner. The pack is secured with autoclave tape and is then labeled with contents, date, and the initials of the individual preparing the pack.
ASEPTIC TECHNIQUE
Asepsis is a condition of sterility, where no living organisms are present. Aseptic technique includes all steps taken to prevent contamination of the surgical site by infectious agents. A thorough understanding of aseptic technique is required to properly sterilize the surgical equipment and clean the operating room. Certain principles of aseptic technique must also be followed when scrubbing the surgical site and placing sterile drapes on the patient. The technician may need to act as a circulating nurse by getting the patient in the operating room and opening sterile equipment for the surgeon. Additionally the technician may be called upon to scrub in as a scrub nurse or surgical assistant to organize and pass instruments to the surgeon or to assist with the surgical procedure. A working knowledge of aseptic technique is necessary to perform these tasks correctly and also to monitor for inadvertent “breaks” in sterile technique.
Microorganisms must be introduced into the surgical site for infection to develop. The source of microorganisms includes exogenous and endogenous routes. Exogenous sources of contamination include the air, the surgical instruments and supplies, the patient’s skin, and the surgical team. Endogenous contamination arises from within the patient and reaches the wound through the bloodstream. Examples of endogenous sources are bacteria from gingivitis or dermatitis.
During every surgery, some bacterial contamination occurs at the surgical site. Whether the contamination progresses to an infection depends on many factors, including the general health of the patient, the degree of tissue damage in the wound, the virulence of the infectious agent, and the number of infectious agents. The factor over which the surgical team has the most control is the number of infectious agents that are introduced into the wound by an exogenous route. Strict adherence to the principles of aseptic technique will minimize exogenous wound contamination and prevent many infections from developing.
All procedures do not require the same degree of vigilance regarding aseptic technique. For example, the débridement of a cutaneous abscess is considered to be a contaminated or dirty surgery, so aseptic technique would not be strictly followed. The wound would be scrubbed, but surgical instruments may be disinfected (cold sterilization) rather than sterilized (steam autoclave or gas sterilization), and the surgeon may wear sterile gloves, but forgo complete sterile surgical attire. It may be preferable for such a patient to remain outside the operating room to prevent contaminating it. In contrast, total hip replacement surgery involves the implantation of synthetic material, and infection can be devastating to the success of the surgery. In such cases, the surgical team adheres strictly to aseptic protocol. The surgeon will determine the degree to which the principles of asepsis are to be followed for each case.
Sterilization is the destruction of all organisms and spores on an object. Disinfection is the destruction of the vegetative forms of bacteria but not the spores. Both sterilization and disinfection are used to prepare medical and surgical materials. The process used depends on the nature of the material and its intended use. Methods of sterilization and disinfection can be classified as either physical or chemical.
PHYSICAL METHODS OF STERILIZATION
The three general types of physical methods used for sterilization include filtration, radiation, and heat. Filtration and radiation are primarily used during the production and packaging of certain surgical products.
FILTRATION
Filtration is the use of a filter to separate particulate material from liquids or gases. Pharmaceuticals are commonly sterilized by filtration.
RADIATION
Some materials that would be damaged by other methods of sterilization can be safely sterilized by radiation. Radiation destroys microorganisms without causing any significant temperature elevation. Gloves and some suture materials are sterilized by radiation during the manufacturing process.
THERMAL ENERGY
The most common method used for sterilization is heat. The mechanism by which heat destroys microorganisms is not completely understood, but it is believed that death is the result of protein denaturation. This is probably a gradual process and may be reversible during the early stages of sterilization. The thermal susceptibility of microorganisms is influenced by several factors, including inherent resistance, individual variation, and age (young bacteria are more susceptible). There is no one temperature at which all microorganisms are killed instantly because death of bacteria and spores is a function of temperature and duration of heat.
The two basic types of heat sterilization are moist heat and dry heat. Dry heat is used to sterilize materials that cannot tolerate moist heat, but can withstand high temperatures. Oils, powders, and petroleum products are most effectively sterilized by dry heat, whereas rubber, fabrics, and some metals may be damaged by the high temperatures. An advantage of dry heat is that it will not rust or corrode needles or sharp instruments. Dry heat is more difficult to control than moist heat, and the sterilization time is longer.
Both dry and moist heat destroy bacteria through protein denaturation; however, dry heat kills by protein oxidation, whereas moist heat kills by coagulation of critical cellular protein. Moisture facilitates the coagulation of protein; thus moist heat kills bacteria and spores at lower temperatures and shorter exposures than dry heat.
Moist heat sterilization is accomplished by either boiling water or by steam under pressure. Boiling water at ambient pressures is not a reliable means of sterilization because of its relatively low temperature. The bactericidal effect of boiling water can be enhanced by alkalinization with sodium hydroxide (0.1 g/dl) or sodium carbonate (2 g/dl). The addition of these agents reduces instrument corrosion, but they cannot be used with glassware or rubber goods. Boiling water probably results in disinfection rather than sterilization and is rarely used.
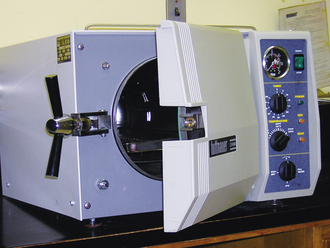
The most common method of sterilization is saturated steam under pressure. Increased pressure causes steam to achieve a higher temperature. Materials to be sterilized in this manner must be penetrable by steam and not damaged by heat or moisture. Sterilizers that employ steam under pressure are called autoclaves (Figure 28-52).
Autoclave Sterilization
Autoclave sterilization is technique sensitive, so operating instructions accompanying the autoclave should be followed. An autoclave load is not sterile unless the steam has penetrated the packs completely so that all materials have been exposed to steam at the proper temperature and for the proper duration. Adequate steam penetration requires that the packs be properly prepared and loaded into the autoclave. The most common autoclaves are gravity displacement or downward displacement sterilizers, meaning the steam is introduced into the top of the chamber and forces the air to the bottom. In prevacuum sterilizers, a vacuum pump evacuates the air before the steam is introduced. This provides a more rapid and even penetration of steam than with gravity displacement, permitting higher temperatures and shorter time duration.
Proper pack preparation begins by checking that all materials are thoroughly clean and free from grease, oil, or protein residues. Complex instruments should be disassembled, and any box locks should be open. Packs must be properly wrapped with steam-permeable wrappers, such as double-thickness muslin (thread count of 140 threads per 6.45cm2) or a nonwoven barrier (crepe paper or polypropylene fabric). Muslin wrappers can be washed and reused, but nonwoven barriers are designed for single use. Packs are usually wrapped in two layers of muslin or nonwoven wrappers. The external wraps are folded around a large pack in the same manner as described for drape and gown packs (see Figure 28-51). Heat-sealable paper or plastic or plastic peel pouches may be used for individual instruments (Figure 28-53). Each pack must be labeled identifying the pack contents, the person who prepared it, and the date it was sterilized.
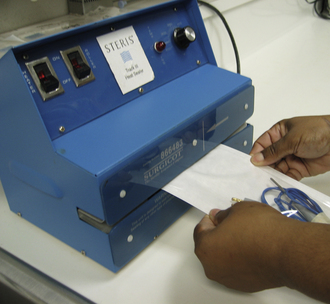
FIGURE 28-53 Individual instruments may be heat sealed in plastic or paper pouches in preparation for steam or chemical sterilization. The instrument should be positioned in the pouch so that the handle will be presented to the surgeon when the pouch is opened.
Materials need to be packed as loosely as is practical to ensure good steam penetration. There should be 2.5 to 7.5 cm of space around each pack, and they should be arranged to allow steam to flow readily from top to bottom. For example, a large pack should not be placed on top of several small ones because it will block the flow of steam down to the smaller packs. Steam flow may be facilitated by positioning packs vertically (on edge). It is recommended that packs be no larger than 30 cm × 30 cm × 50 cm and weigh no more than 5.4 kg, depending on the type of material being autoclaved. In many practices, the pack size is limited by the size of the autoclave.
A number of minimum time-temperature standards have been established for routine sterilization of surgical packs. Exposure to saturated steam at 121° C (250° F) for 13 minutes is considered to be a safe minimum standard. Five to 10 minutes at 121° C will destroy most resistant microbes, and an additional 3 to 8 minutes provides a margin of safety. When the temperature in the exhaust line reaches the desired level, the entire content of the sterilizing chamber has been exposed to steam, so this is the beginning of exposure time. The time required to reach the sterilizing temperature is referred to as the heat-up time and is extremely short (about 1 minute) in prevacuum and pulsing type of sterilizers. Large linen packs require both a longer heat-up time and a longer exposure time. They should be saturated for 30 to 45 minutes at 121° C (250° F) in gravity displacement sterilizers and 4 minutes at 131° C (270° F) in prevacuum sterilizers.
TECHNICIAN NOTE
The safe minimum standard for autoclave sterilization is 121° C (250° F) for 13 minutes.
Emergency sterilization, also called flash sterilization, is usually performed in prevacuum sterilizers. The recommended exposure time is 3 minutes at 131° C (270° F). The unwrapped instruments are placed in a perforated metal tray for sterilization and then carried to the operating room using detachable handles.
After sterilization, the autoclave door is unlocked and “cracked” open. If the autoclave door is opened wide, the cool outside air will condense the steam in the materials, making them soggy and promoting corrosion of metal instruments. About 10 minutes after cracking the door, the remaining moisture will have vaporized and escaped, leaving the contents thoroughly dry. Paper-wrapped products should not be left in the autoclave more than 15 to 20 minutes after cracking the door. If left too long, the heat will dry the paper, making it brittle and likely to crack and split when handled.
Sterilization Quality Control
The only certainty that sterilization has been achieved is through proper technique and the use of dependable sterilization indicators. Indicators should always be checked before using the materials.
There are four types of sterilization indicators used in autoclaves: (1) autoclave tape, (2) fusible melting pellet glass, (3) culture tests, and (4) chemical sterilization indicators. These indicators are meant to be used in combination because no one test alone can provide quality assurance of sterility.
TECHNICIAN NOTE
The four types of sterilization indicators are (1) autoclave tape, (2) melting pellet glass, (3) culture tests, and (4) chemical sterilization indicators.
Autoclave tape is useful for identifying packs and articles that have been exposed to steam, but it does not indicate whether the proper requirements of time, temperature, and steam have been met (Figure 28-54). The fusible melting pellet glass type of indicator indicates that a temperature of approximately 118° C (244° F) was reached, but does not indicate whether proper time or steam saturation was achieved. Culture test indicators are strips that contain a controlled-count spore population of some particular strain of bacterium. This biologic challenge test is useful since it is the only test that proves microorganisms were killed. The disadvantages of this test are that the results are not immediately available and it does not assess steam penetration. Chemical sterilization indicators are available in many types, and they undergo color changes when subjected to saturated steam for adequate periods of time (Figure 28-55). Most practices will use a combination of autoclave tape on the outside of the pack and a chemical sterilization indicator within the center of the pack to assess sterility.
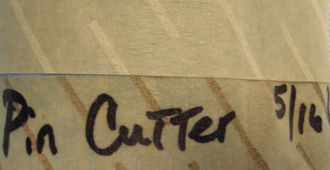
FIGURE 28-54 Autoclave tape before (above) and after (below) sterilization. Notice the appearance of the black stripes indicating exposure to steam.
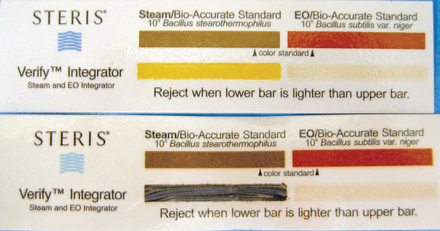
FIGURE 28-55 Chemical indicator strip to be placed inside pack. This strip can monitor steam (left) or gas (right) sterilization. Lower strip has been exposed to adequate steam, as indicated by the darkened bar.
In the prevacuum sterilizers, an air removal test can be run daily to ensure that air is sufficiently removed from the autoclave. In gravity displacement sterilizers, temperature graphs can be kept as a record of autoclave performance. Therefore quality assurance occurs at two levels, one to ensure that the pack runs through a sterilization cycle and another to ensure that the autoclave system is working properly. Quality control is essential for any surgical practice because failure to ensure proper sterilization can have far-reaching consequences.
Care and Handling of Sterile Packs
Sterile packs should be stored in a dust-free, dry, and well-ventilated area away from contaminated equipment. Closed cabinets provide a cleaner storage area than open shelving. Safe pack storage times are listed in Table 28-5. If a pack is dropped, the tape sealing the pack is broken, or the pack wrap becomes wet, punctured, or torn, the pack should be considered contaminated. If there is any doubt as to the sterility of an item, consider it to be nonsterile.
TABLE 28-5
Safe Storage Times for Sterile Packs
| Wrapper | Closed Cabinet | Open Cabinet |
| Single-wrapped muslin | 1 wk | 2 days |
| Double-wrapped muslin | 7 wk | 3 wk |
| Single-wrapped crepe paper | At least 8 wk | 3 wk |
| Single-wrapped muslin sealed in 3-ml polyethylene | At least 9 mo | |
| Heat-sealed paper and transparent plastic pouches | At least 1 yr |
CHEMICAL METHODS OF STERILIZATION
Chemical sterilization is performed with certain liquids or gases. Liquid chemicals can be used for instrument sterilization. The most common agent used for liquid sterilization is glutaraldehyde. Gas sterilization is used for items that cannot tolerate the high temperatures or steam associated with autoclaving (some power equipment or plastic products). The most common agents used for gas sterilization are ethylene oxide and hydrogen peroxide gas plasma.
ETHYLENE OXIDE
Ethylene oxide is a colorless gas at room temperature. It is flammable, explosive, and toxic. It can cause skin burns, respiratory irritation, vomiting, headaches, and birth defects (see Chapter 6). The manufacturer’s guidelines should be followed carefully to prevent injury to hospital personnel and patients. Ethylene oxide penetrates paper and plastic film packaging. The item to be gas sterilized is wrapped in plastic packaging (polyethylene, polycoated paper, and Mylar) and heat sealed before sterilization (see Figure 28-53).
Ethylene oxide destroys metabolic pathways within the cells by alkylation, and it is capable of killing all microorganisms. Effective sterilization with ethylene oxide is dependent on the concentration of gas, exposure time, temperature, and relative humidity. Ethylene oxide activity is enhanced by increasing the temperature or the gas concentration. Ethylene oxide sterilizers usually operate at temperatures between 21° C and 60° C (70° F and 140° F). The activity of ethylene oxide approximately doubles with each 10° C increase in temperature. Doubling the ethylene oxide concentration decreases the sterilization time by approximately one half. Moisture is necessary for the lethal action of ethylene oxide, and optimum relative humidity for sterilization with ethylene oxide is 40%. Exposure time varies from 48 minutes to several hours, but 12 hours of exposure is commonly used when sterilizing at room temperature.
After ethylene oxide sterilization, materials should be quarantined in a well-ventilated area for a minimum of 7 days or in an aerator for 12 to 18 hours. Recommended aeration time varies with the type of material and other factors. Color-coded chemical sterilization indicators are commonly placed within the packs when using ethylene oxide sterilization (see Figure 28-55). Biologic indicators are available for ethylene oxide sterilization and are the only truly reliable test for sterility. Since results are unavailable for several days, biologic indicators are most commonly used to evaluate the sterilization system and not individual packs. External tape can be used to indicate exposure to gas sterilization (Figure 28-56).

HYDROGEN PEROXIDE GAS PLASMA
Gas plasma sterilization has been replacing ethylene oxide because it is safer for the environment and personnel. It can inactivate mycobacteria, bacterial spores, fungi, and viruses and can be used to sterilize most items. Items that cannot be sterilized with this method include linen, wood or paper, endoscopes, some plastics, liquids, and tubes or catheters that are long (greater than 12 inches) or of small diameter (less than 3 mm). Items to be sterilized are wrapped in nonwoven polypropylene fabric or plastic (Tyvek-Mylar) pouches and placed in the sterilization chamber. A vacuum is drawn, and hydrogen peroxide is injected and is vaporized. After 50 minutes, the pressure is lowered, and radio waves are applied to the chamber, creating a gas plasma. This creates free radicals, which kill the microorganisms. The process takes about an hour and requires no aeration. A biologic indicator is used to test for sterility, and a chemical indicator is used to show that hydrogen peroxide was present.
CHEMICAL DISINFECTION
A disinfectant is an agent that destroys bacteria or inactivates viruses. Disinfectants are chemical agents that are applied to inanimate objects to destroy the vegetative form of bacteria, but not necessarily the spore forms. Disinfectants that are capable of destroying vegetative bacteria plus spores, tubercle bacilli, and viruses may be used as chemical sterilizers.
Disinfection time is the time required for a particular agent to produce its maximal effect. It is influenced by many factors, including the nature of the material disinfected, the degree of soil and microbial contamination, and the concentration and germicidal potency of the disinfectant.
Antisepsis is the prevention of infection by inhibiting the growth of infectious agents. Antiseptic agents, such as iodine or chlorhexidine, are substances used on living tissue to effect antisepsis. A glossary of key terms used in describing aseptic technique may be found in Box 28-1.
ANTISEPTIC AND DISINFECTANT COMPOUNDS
Iodine compounds are effective antimicrobial agents, but have limited activity against bacterial spores. Iodine solutions are used for surgical preparation, topical wound therapy, and joint and body cavity lavage. Iodine compounds are available as aqueous solutions, tinctures, and iodophors. Aqueous solutions contain higher levels of free iodine than iodophors and therefore have greater bactericidal activity. However, aqueous solutions are also cytotoxic and cannot be used in living tissue unless they are greatly diluted. Aqueous iodine also stains materials and is corrosive to instruments.
Tincture of iodine is a solution of 2% iodine in 50% ethyl alcohol and is intended for use on intact skin. It is not commonly used in veterinary practices.
Iodophors contain iodine complexed with surfactants or polymers, so free iodine is slowly released. The adverse properties of staining and irritation are reduced, and delivery of iodine to the tissues is enhanced. Povidone-iodine is the most commonly used iodophor and is available as scrubs or solutions. Dilution of stock solutions (common dilutions include 1:10, 1:50, and 1:100) increases the bactericidal activity and decreases the cytotoxicity. The residual bactericidal activity (i.e., continued action when left on the skin) of povidone-iodine is 4 to 6 hours, but this is greatly diminished in the presence of organic matter.
Povidone-iodine is one of the most common surgical scrubs used in veterinary hospitals. Although it is a relatively safe skin preparation, there are several considerations regarding its use. Alcohol, lavage solutions, or organic debris, such as blood, will destroy residual bactericidal activity. Povidone-iodine can cause skin irritation or acute contact dermatitis in up to 50% of canine patients, and it may be a problem for some hospital staff. Rarely, individuals who have repeated contact with iodine scrub solutions may develop systemic iodine toxicity, resulting in metabolic acidosis and thyroid dysfunction.
Chlorhexidine
Chlorhexidine is an antiseptic agent that is available in aqueous, tincture, and detergent formulations. It is an effective antimicrobial agent with activity against bacteria, molds, yeasts, and viruses. Chlorhexidine has a rapid onset and a long residual activity that is not affected by alcohol, lavage solutions, or organic debris. It has become a popular surgical scrub because of its effectiveness and because it is nonirritating to the skin. In several human studies, chlorhexidine has been found to be superior to povidone-iodine as a surgical hand scrub. The effectiveness of povidone-iodine and chlorhexidine is similar when used as surgical scrubs for canine surgery.
TECHNICIAN NOTE
Chlorhexidine is an effective antimicrobial agent with rapid onset and long residual activity.
As a lavage solution for open wounds, chlorhexidine must be diluted 1:40 with sterile water or saline to produce a 0.05% solution. At this concentration, chlorhexidine has significant antibacterial activity with no cytotoxicity and is superior to povidone-iodine, saline, and other antiseptics. Higher concentrations can cause inflammation and cytotoxicity, so they are not recommended in open wounds. When chlorhexidine is mixed with electrolyte solutions (such as lactated Ringer’s solution), it will precipitate, but this does not affect antimicrobial activity and the solution can still be used for wound lavage.
Alcohols
Alcohols are used as disinfectant and antiseptic agents. They are organic solvents that evaporate rapidly and leave no residue. Alcohols are bactericidal, but ineffective against spores and fungi. They have no residual effects and are inhibited by organic debris. Ethyl and isopropyl alcohols are more effective than methyl alcohol as disinfecting agents. Alcohols should never be used in open wounds because they are both painful and cytotoxic.
Phenols
Phenols (carbolic acid) have been used historically as both antiseptics and disinfectants, but phenols have been routinely replaced by newer, safer, and more effective agents. Hexachlorophene, a skin preparation, was one of the most popular phenols, but it has been replaced by povidone-iodine and chlorhexidine.
Quaternary Ammonium
Quaternary ammonium compounds are synthetic cationic detergents that act on cell membranes and are effective against bacteria, but not spores or some viruses. Bland and nontoxic, these agents are quite popular. Benzalkonium chloride is the most commonly used quaternary ammonium compound and is used as a disinfectant.
Chloride
Chloride compounds were among the first agents to be used as medical disinfectants and found popularity for wound treatment in World War I as Dakin’s solution. Antimicrobial chlorine compounds, specifically the hypochlorites, have broad bactericidal and virucidal activity, but can be cytotoxic when improperly used on living tissues. Presently, sodium hypochlorite (bleach) is commonly used as a disinfectant in many hospitals.
Aldehyde
Formaldehyde and glutaraldehyde are the most commonly used aldehydes in veterinary medicine. They are both toxic and irritating, which restricts them from use on living tissues. They are effective antimicrobial agents, but may require several hours of exposure time. Formaldehyde is commonly used in the preservation of tissue specimens. Glutaraldehyde is commonly used for chemical sterilization in cold trays and for endoscopic equipment.
COLD STERILIZATION
Cold sterilization refers to soaking instruments in disinfecting solutions, such as chlorhexidine or glutaraldehyde. Metal trays used to soak instruments in disinfectant are called cold trays (Figure 28-57). Since sterility cannot be guaranteed, cold-sterilized instruments should be used only for minor procedures (superficial lacerations, dental procedures) or for equipment that cannot tolerate other forms of sterilization, such as endoscopic equipment. Exposure times should exceed 3 hours, and the equipment must be rinsed thoroughly before use.
STERILIZATION OF ARTHROSCOPIC EQUIPMENT
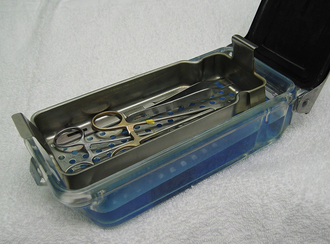
Most hand instruments and ancillary equipment can be steam sterilized. They can also be gas sterilized with ethylene oxide or cold sterilized using a glutaraldehyde-based solution (CidexPlus, Johnson & Johnson Medical Inc.). Cold sterilization affords the ability to use the equipment more than once in a single day, unlike steam and gas sterilization in most situations. The arthroscope, light cable, and camera can be gas sterilized or cold sterilized, but not steam sterilized.
TECHNICIAN NOTE
The arthroscope, fiber-optic light cable, and camera should never be steam sterilized.
With cold sterilization, the instruments are soaked for a minimum of 20 minutes in the Cidexplus just before surgery. The electrical plug of the camera cable is not submerged in the cold sterilization solution, which would damage it. The end is draped out over the top of the container with the Cidexplus. The surgeon or assistant double gloves and removes the instruments from the solution. The instruments are then placed in a sterile autoclave tray containing sterile water. Once the instruments have been submerged in the sterile water, each piece is gently agitated, individually removed from the tray, rinsed with sterile water by a scrub nurse or other assistant, and transferred to the instrument table. The surgeon or assistant removes his or her outer gloves and dries the instruments. It is important that the Cidexplus be thoroughly rinsed from the instruments. Glutaraldehyde can cause a chemical synovitis and is injurious to chondrocytes. A double rinse further reduces the amount of glutaraldehyde residue remaining on the instruments.
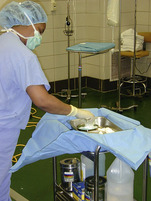
OPERATING ROOM PREPARATION
Operating room design is important for ease of cleaning. The operating room should be simple and uncluttered. Commonly used equipment and materials should be readily available, but excess stock should not be stored in the operating room. When additional equipment is needed, it is brought to the operating room by the circulating nurse.
Operating room cleanliness is essential for proper aseptic technique. A routine daily and weekly cleaning schedule should be established to keep the operating room clean and dust free. The surgery table should be cleaned and disinfected, and soiled areas of the floor should be cleaned and disinfected by damp mopping immediately after each surgery. It is preferable to perform thorough daily cleaning at the end of each day because cleaning creates airborne dust that takes several hours to settle. Buckets should be emptied and cleaned. The operating table and all equipment should be cleaned and wiped with a disinfectant solution. (The operating room is never dry mopped or dusted because this produces excessive airborne dust.) The casters on equipment should be cleaned, and the entire floor should be mopped.
Once a week, the operating room should undergo a thorough cleaning in which movable equipment is removed and cleaned with a disinfectant solution. Permanent structures, such as walls, air vents, window sills, light fixtures, and the surgical table should also be wiped clean. Cabinets should be emptied, washed, and restocked. The operating room floor should be scrubbed and disinfected. Disinfectant can be applied with a mop, although this may actually spread dirt and microorganisms throughout the room. To prevent this, the mop head should be laundered daily and not stored in used disinfectant solution. The wet-vacuum method in which the clean floor is flooded with disinfectant solution and then vacuumed is superior to mopping. Cleaning equipment used in the operating room should be kept separate from all other cleaning equipment.
Daily cleaning of the surgical preparation room is also important because this room is subject to continual contamination. Sinks and plumbing fixtures should be scrubbed. Buckets and vacuum canisters should be emptied. Furniture and cabinets should be wiped clean and the floor scrubbed. If there are holding cages in the preparation room, they should be cleaned and disinfected. All surgical preparation solutions and supplies should be replenished.
SMALL ANIMAL PATIENT PREPARATION
SKIN PREPARATION—SURGICAL CLIP
The surgical site is usually prepared after the animal is anesthetized. The hair is first clipped in the same direction as the hair growth. Then it is clipped against the direction of growth to achieve the closest shave possible (using a No. 40 clipper blade). A wide region of skin is clipped around the proposed surgical incision. A general rule is to shave at least 2 to 4 cm in every direction from the proposed incision, depending on the size of the animal and location of the incision. For abdominal procedures, the clip should extend several centimeters cranial to the xyphoid, caudal to the pubis, and lateral to the nipples. For orthopedic procedures, the entire circumference of the limb is clipped from the foot up onto the body. Long hair growing near the periphery of the clipped area should be cut short enough that it cannot hang over the clipped area. Sterile, water-soluble lubricant may be placed in open wounds before clipping around them. The lubricant will collect hair, allowing it to be rinsed away before the surgical scrub. Areas that appear to be infected should be clipped last so that the clippers do not spread infected material. After clipping, a vacuum cleaner may be used to eliminate loose hairs on the skin. The surgical clip should be thorough but gentle. Unnecessary roughness will result in inflamed or traumatized skin, which can cause greater postoperative complications.
SKIN PREPARATION—SURGICAL SCRUB
Initial skin preparation is done in the preparation room to remove gross contamination. Before scrubbing the abdomen of a male dog, the prepuce should be flushed with an antiseptic solution. Examination gloves are worn to decrease contamination from the hands. The surgical scrub is performed by alternating an antiseptic scrub (such as povidone-iodine or chlorhexidine scrub) with alcohol or sterile saline. (Remember not to use alcohols or detergents in open wounds, eyes, or mucous membranes.) Scrubbing should begin over the proposed incision site and extend outward in a spiraling pattern, never going back toward the center with the same gauze sponge (Figure 28-58). The sponge is replaced with a clean one, and the process is repeated until no dirt is visible on the discarded sponges.
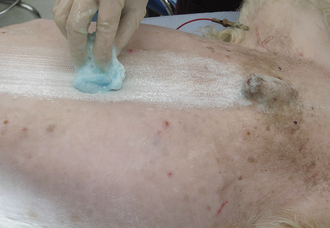
FIGURE 28-58 The surgical preparation should begin at the proposed incision site and should progress outward, never returning to the proposed incision line with the same gauze sponge. Gloves are worn during the preparation to decrease contamination from the hands.
The sterile surgical scrub is done once the animal is properly positioned on the operating table. Sterile gloves should be worn, and sterile sponges are used. If the sterile surgical scrub is performed by alternating povidone-iodine with alcohol, the total contact time of the povidone-iodine should be at least 5 minutes. After the final povidone-iodine scrub, a 10% povidone-iodine solution should be sprayed or painted on the skin. Alternatively the sterile surgical scrub may be performed by alternating chlorhexidine gluconate with either alcohol or sterile saline. Either chlorhexidine or sterile saline may be left on the skin at the end of preparation. Both povidone-iodine and chlorhexidine are effective scrub solutions, but the contact time for chlorhexidine is less critical than for povidone-iodine.
TECHNICIAN NOTE
It is generally recommended that the surgical site be scrubbed and rinsed at least three times. The sterile scrub should provide at least 5 minutes of contact time for povidone-iodine. An antiseptic solution is often applied to the skin following the scrubs.
Several skin preparations are now available that enable a “one-step prep” (Table 28-6). The solution is packaged in a small plastic bottle that is directly attached to an applicator sponge. After squeezing the bottle to activate solution flow, the sponge is used to “paint” a single uniform coat of the solution on the skin, starting at the incision site and working outward in a circular motion (Figure 28-59). It requires a 30-second application time and dries within 2 to 3 minutes, so the preparation time is much faster than the traditional alternating scrub described earlier. They contain isopropyl alcohol, which is a broad-spectrum antimicrobial with rapid onset of activity. The other substances in these preparations result in further antimicrobial action and the formation of a film that adheres strongly to the skin and provides long residual activity. These solutions should be applied to clean, dry skin. However the skin should not be scrubbed beforehand with Betadine or Hibiclens scrub because residues may prevent the one-step preparation from adhering appropriately. These one-step preparations should be applied to intact skin and are not appropriate for open wounds because of the high alcohol content (70% to 74%). These preparations enhance the skin adherence of incise drapes. The region will be flammable until it dries. Alcohol-free solutions are being developed.
FIGURE 28-59 Skin preparation using a one-step prep method. In this case the planned incision will be along the lateral aspect of the femur. The applicator sponge is used to paint a single uniform coat of antiseptic solution on the skin, starting at the planned incision site and working outward in a circular pattern. (Photo courtesy Dr. Susanne Lauer.)
TECHNICIAN NOTE
“One-step preps” are easy to apply, much faster than traditional scrubbing techniques, and effective for antimicrobial kill. They have a rapid onset and long residual effect.
There are many modifications to the surgical preparation technique. For example, in preparation for feline orchiectomy (castration), the scrotal hair is plucked rather than clipped. Feline onychectomy (declawing), tail docking, and dewclaw removal of neonatal puppies are commonly performed without clipping the hair. The surgical site is soaked or gently scrubbed with detergent and swabbed with alcohol or antiseptic solution. Bovine and porcine castrations are performed without clipping the hair, and an alcohol or antiseptic wash is usually used. Equine castrations may be prepared with three thorough washes using dilute chlorhexidine or povidone-iodine solution.
PATIENT POSITIONING
There are several common positions in which to place an animal for surgery. The position of the animal is described by the region of the body that contacts the table. For example, right lateral recumbency means the animal is lying on its right side, dorsal recumbency means the animal is on its back, and sternal recumbency means the animal is on its belly. Maintaining patient positioning is facilitated by the use of adjustable surgical tables, portable tabletop V troughs, sand bags, or vacuum-activated “beanbags.”
In orthopedic surgery, the affected leg is often suspended from an overhead support or intravenous (IV) stand during skin preparation and initial surgical draping. The advantage of hanging the leg is that it allows aseptic preparation of the entire circumference of the limb, so the surgeon can manipulate it during surgery. To hang the leg, the distal limb is wrapped (using gauze or an examination glove covered with tape) to cover any unclipped areas, and strips of tape (“stirrups”) are extended from the end of the foot. The leg is suspended by these stirrups (Figure 28-60). The entire limb circumference is clipped and scrubbed from the foot to the level of the inguinal or axillary region. The skin preparation usually extends to the dorsal and ventral midlines of the body.
FIGURE 28-60 Hanging leg surgical preparation. This is commonly used for orthopedic surgeries of legs, including the shoulder and hip. The operated limb is suspended by tape stirrups that cover all distal leg hair. The surgical scrubs are started at the highest aspect of the clipped leg and worked downward with gravity in a circular fashion. Note the wide area of skin preparation on the body. At surgery, the taped foot is wrapped in a sterile towel, and the stirrups are cut.
EQUINE PATIENT PREPARATION
Positioning of the equine patient for surgery can be quite an involved process. It requires more personnel compared with small animals. In most situations, the minimum number of persons required to position a horse on a surgery table is three. There are various ways in which a horse is moved or transported to the surgical suite and ultimately onto the surgical table. This is determined by the physical setup of the surgical facility. An overhead hoist system greatly facilitates the lifting and positioning of the horse onto the surgery table. As an example, the horse is walked into a padded induction room and anesthetized by using several persons pushing the horse against one of the walls during the induction of the anesthesia. As the animal becomes anesthetized, it is allowed to collapse to the floor and then roll into lateral recumbency. At that point, the horse is positioned in the center of the moveable floor that rolls into the surgical suite. Nylon leg bands are strapped to the front and rear feet, and an overhead chain hoist is hooked to the bands (Figure 28-61). The horse is raised off the floor and moved onto the surgical table by way of a rail system that the chain hoist moves on. Once the animal is over the surgical table, it is gently lowered onto the table in the desired recumbency. If the horse is to be in dorsal recumbency, it is maintained in this position by the use of side poles with pads wedged between the poles and the horse (Figure 28-62). Once the horse is positioned on the table, the leg bands are removed, and the legs may be secured to the positioning poles or table to reduce shifting of the horse during surgery. The chain hoist is rolled away, and the rolling floor is pushed back into the padded induction room, and the surgical doors are closed. Large examination gloves or obstetrical (OB) sleeves are used to cover the feet of the horse to reduce contamination of the surgical suit (Figure 28-63). As with proper technique, the personnel remaining in the surgical suite must wear proper surgical attire, including caps and masks. The surgical nurse should take charge to make sure that all personnel in the surgery suite are following protocol. During this preparation time, an anesthesiologist or anesthesiology technician is often placing arterial catheters in the hind limb or facial artery, attaching the ECG monitor, and attaching fluid lines to the IV catheters.
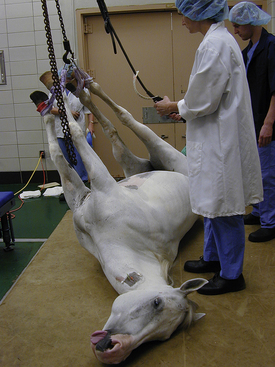
FIGURE 28-61 Nylon webbing leg bands are strapped to a horse’s limbs at the pastern using double half-hitch loops. The leg bands are then attached to a chain hoist to transport the horse to the surgery table.
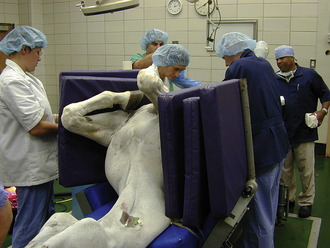
FIGURE 28-62 A horse maintained in dorsal recumbency for surgery, using side poles with pads wedged between the poles and the horse.
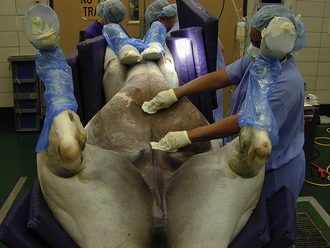
SKIN PREPARATION
For some equine surgical procedures, particularly abdominal surgeries, it is difficult to clip the hair and perform an initial skin preparation before the horse is anesthetized. A wide area of hair at the intended surgical site is removed with electric clippers (Figure 28-64). An initial skin preparation is performed using chlorhexidine or povidone-iodine scrub with a rinse and wipe down of alcohol. During the initial preparation, the opening of a male horse’s sheath (gelding or stallion) is packed with gauze sponges and sutured closed. This prevents urine and smegma from contaminating the surgical field (Figure 28-65). With female horses, it is imperative that the mammary area is cleaned thoroughly. Next a sterile skin preparation is performed with sterile gloves and sterile sponges (Figure 28-66). Three to five surgical scrubs alternating with the chlorhexidine and alcohol are performed, starting at the center of the surgical site and moving outward in a circular fashion (Figure 28-67). Preparation is complete when the sponges no longer collect visible dirt. Then the surgical area is sprayed with a chlorhexidine solution, which is left on the skin (Figure 28-68).

FIGURE 28-64 Surgical preparation of the ventral abdomen of a horse. A wide area of hair is removed with electric clippers.
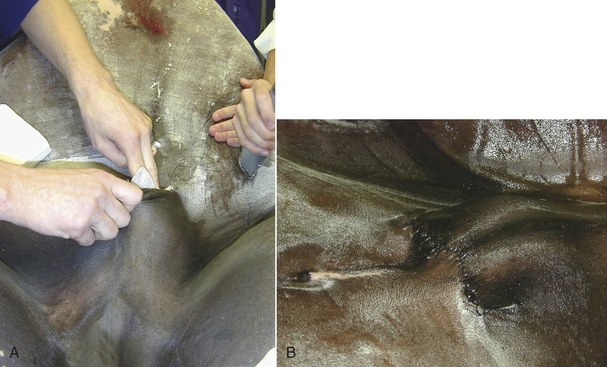
FIGURE 28-65 Surgical preparation of the ventral abdomen of a horse. A, During the initial preparation of the ventral abdomen of a horse for surgery, the opening of the male’s sheath (gelding or stallion) is packed with gauze sponges. B, It is sutured closed to prevent urine and smegma from contaminating the surgical field.
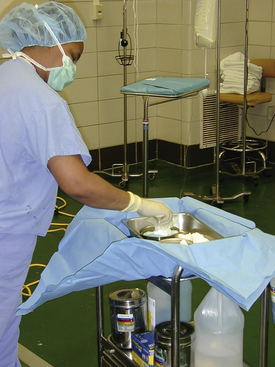
FIGURE 28-66 Sterile bowl and gauze sponges are used to do the final preparation of the surgical site on a horse. The inner sterile wrapping is opened with sterile gloves. The nurse should be wearing cap and mask.
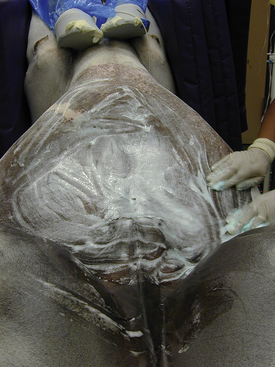
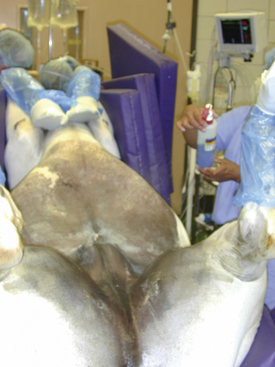
SURGICAL TEAM PREPARATION
Proper surgical attire and proper scrubbing, gowning, and gloving procedures are important aspects of aseptic technique. Street clothing, especially shoes, are a major source of contamination and should not be worn into the operating room. Ideally, each person should have a pair of shoes designated for use only in the operating room. Disposable shoe covers may be worn in the operating room and discarded upon leaving the room. Lint-free scrub suits should be worn in the operating room. The shirt should be tucked into the pants to reduce the amount of skin debris dispersed into the room. Outside the operating room, scrub suits should be protected by a laboratory coat to reduce contamination.
During surgery, surgical caps and masks are worn by all persons who are in the room. The surgical cap covers the hair to reduce airborne contamination. Different types of surgical head covers are available to cover short hair, long hair, or beards (Figure 28-69). The mask protects the wound from saliva droplets, primarily by redirecting air flow out the sides of the mask. Masks are effective for relatively short periods and should be changed between procedures.
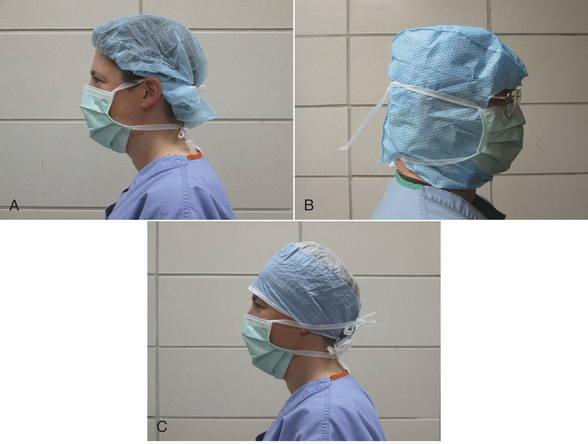
HAND SCRUB
Scrubbing of the hands and arms, followed by gowning and gloving, is performed by all personnel who will be in close proximity to the surgical site. Surgical gloves may have tiny holes, so they cannot be solely relied upon to prevent contamination from the hands. The purpose of scrubbing the hands and arms is to remove dirt and decrease the concentration of bacterial flora. The surgical cap and mask must be donned. The gown pack may be opened before scrubbing (Figure 28-70). All jewelry is removed from hands and arms before beginning the sterile hand scrub, and fingernails should be short and free of polish or artificial nails. Once the scrubbing has begun, the hands and arms should not touch nonsterile objects. If this occurs, the scrub is started over.
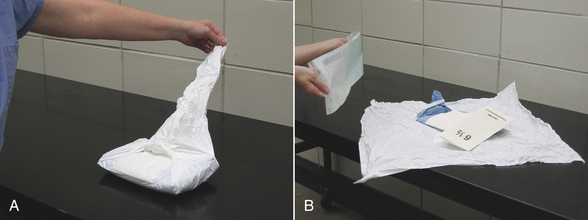
FIGURE 28-70 Open gown pack. A, The gown pack may be opened before scrubbing so that the hand towel is available. When opening a pack, always open the flap away from you first. Keep the arm off to the side, not directly over the pack. Then open the other three sides, touching only the corners of the wrap on the outside surface. B, The sterile gloves are opened onto the gown. With the package positioned at the edge of the sterile field, it is opened symmetrically. This gives the contents enough forward momentum to fall on the sterile field without having to reach over it.
While scrubbing, the hands are always held above the level of the elbows so the water drains off the elbows. Soap is applied to a sterile brush, and a systematic scrub is begun. Scrub all four sides of each finger, with special attention to the fingernails (Figure 28-71, A). The back, both sides, and the palm of the hand are scrubbed. Next the wrist and forearm are scrubbed, working toward the elbow (Figure 28-71, B). After both hands and arms have been scrubbed, they are rinsed in running water (Figure 28-71, C). The entire scrub process is then repeated.

FIGURE 28-71 Surgical hand scrub. A, Imagine each finger as having a tip and four sides. Scrub each surface of each finger. Also scrub the palm, back, and sides of the hand. B, Imagine the forearm as having four sides and scrub each side. C, After scrubbing both hands and arms, rinse the brush, hands, and forearms. The hands are always kept above the elbows. D, After the last scrub, drop the brush, rinse, and let the excess water drip off the elbows.
The two basic methods of surgical scrubs are the counted brush strokes and the timed. The counted brush strokes method is performed by counting the number of brush strokes used on each skin surface. Ten to 25 brush strokes are made on each surface of the fingers, hands, and arms before rinsing. This is performed four times. The timed method is more commonly used. This is done by repeatedly scrubbing and rinsing for a set period of time. The initial scrub of the day should last about 5 minutes. For subsequent scrubs during the day, 2 to 3 minutes is adequate.
TECHNICIAN NOTE
The surgical hand scrub requires that all surfaces of the fingers, hand, and forearm be scrubbed. Skin-soap contact time should last 5 minutes.
Waterless hand antiseptics are now available that are at least as effective as the traditional hand-scrub technique described earlier and cause less skin trauma. These antiseptics contain an alcohol solution, which provides a rapid antimicrobial kill of a broad spectrum of microorganisms. They also contain a lotion to prevent drying of the skin. Hands must be clean and dry, but scrubbing is not necessary. The solution is rubbed briskly and evenly over one hand and forearm; a second application is applied to the other hand and forearm. A final application is applied to both hands and allowed to air-dry. The waterless antiseptics are fast, effective, easy to apply, and nonirritating.
GOWNING AND GLOVING
The hands and arms are thoroughly dried with a sterile towel (Figure 28-72) before gowning (Figure 28-73) and gloving.

FIGURE 28-72 Towel dry. A, One hand is dried first, holding the towel away from the body. B, Move the towel down to dry the arm, using only the top end of the towel. C, The dry hand now grasps the dry end of the towel. D, The other hand and arm are dried. Note that the hands do not switch sides of the towel during the process.
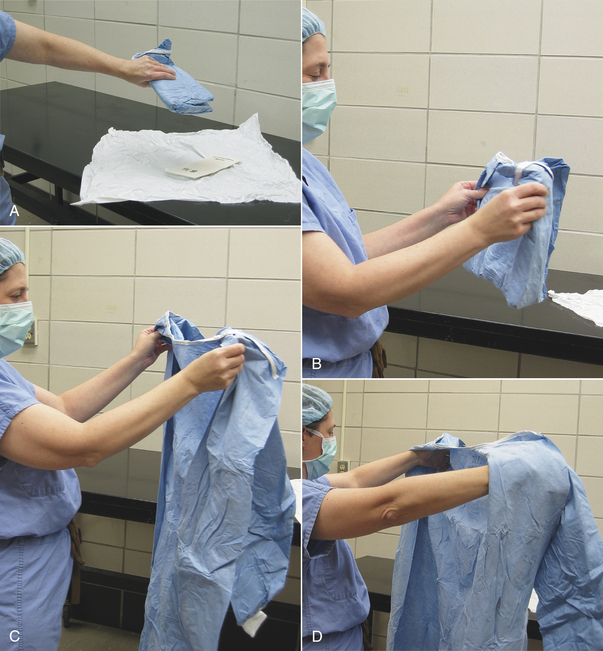
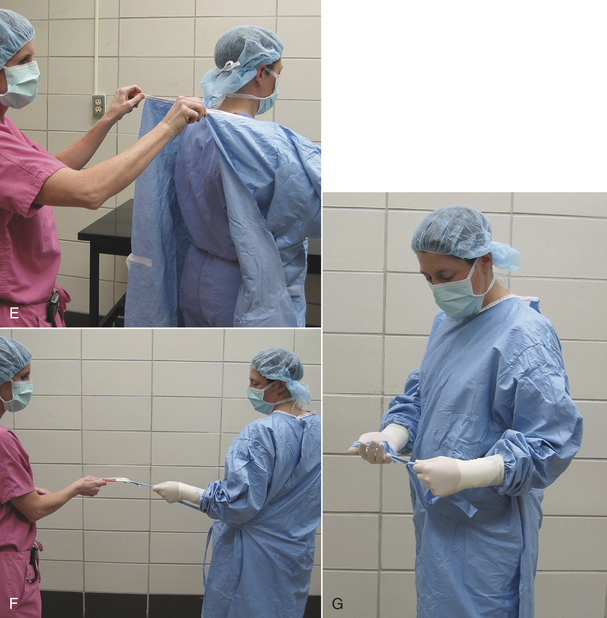
FIGURE 28-73 Gowning. A, The gown is picked up in its folded state. This same technique is used when picking up sterile folded towels or drapes. This reduces the risk of accidental contamination. B, Move to a spacious area to reduce the risk of contamination. C, The gown is held away from the body by the inside shoulder seams and allowed to unfold. D, The arms are slid into the sleeves, but the hands should not extend through the cuff openings.
E, A nonsterile assistant pulls the gown over the shoulders and ties the back of the gown at the neck and waist.F, If the gown has a wraparound back, the last tie is performed after the surgeon has gloved. The surgeon hands the sterile tag to a nonsterile assistant. The assistant holds the end of the tag while the surgeon turns around, causing the gown to cover the surgeon’s back. The surgeon takes the gown tie and pulls, releasing it from the tag that is still in the assistant’s hand. G, The final tie is done in front by the surgeon.
The two methods for gloving yourself are closed gloving and open gloving. The risk of contamination is minimized with closed gloving (Figure 28-74) because the outside of the gloves never contacts skin. There is a much higher risk of contamination during open gloving (Figure 28-75), and it is generally reserved for minor procedures when a gown is not worn (e.g., sterile patient scrub, urinary catheterization). If it is necessary to replace gloves during surgery, it is preferable to have a nonsterile assistant remove the old gloves and simultaneously pull the gown sleeve so that the hands remain inside the sleeves (Figure 28-76). If the old gloves are removed in this manner, new gloves can be put on by the closed gloving method or by assisted gloving (Figure 28-77).
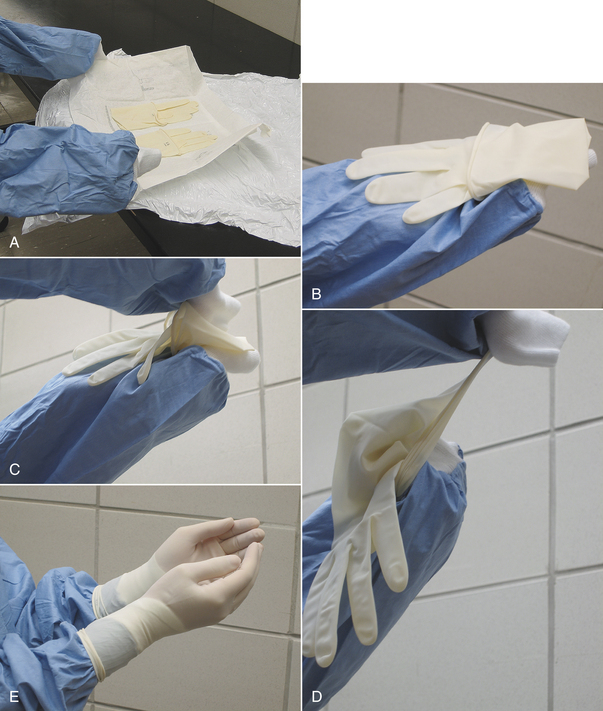
FIGURE 28-74 Closed gloving. A, The sterile pack is close to the table edge so that the surgeon can maintain some distance from the table to prevent contaminating the sterile gown. The sterile paper wrap containing the gloves is unfolded, and one glove is picked up. It is easiest for most people to glove their nondominant hand first. The fingers must be kept inside the sleeves at all times during closed gloving. B, The glove is laid on the hand to be gloved, with the glove fingers pointing toward the elbow and the glove thumb lying against the sleeve. The edge of the glove cuff is grasped through the gown sleeve. C, The opposite side of the cuff is grasped in the other hand. D, E, The glove is pulled over the hand. Now the gown and glove cuff may be grasped together to pull the glove completely onto the hand.
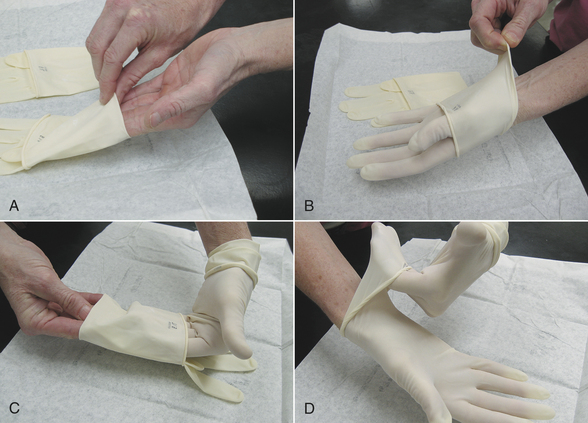
FIGURE 28-75 Open gloving. A, The glove pack is opened near the edge of a table. The hand is inserted into the glove opening, taking care not to touch the outside of the glove. The inside of the glove will not be sterile, so the cuff may be touched. B, The glove is pulled on by grasping the cuff fold with the other hand. The cuff will still be folded, but the glove is on well enough to allow use of the hand. C, The gloved hand is placed between the cuff and the palm of the glove to assist gloving the other hand. This protects the gloved hand from accidental contamination on the arm. D, The cuff can be unfolded. Now adjustments can be made to both gloves, taking care to touch only the sterile areas of the gloves.
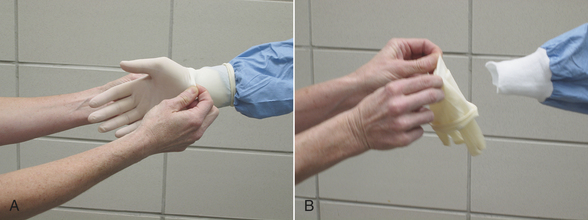
FIGURE 28-76 Removing gloves aseptically. A, A nonsterile assistant grasps the glove and gown cuff together without touching the gown sleeve. B, As the glove is removed, the gown is pulled over the fingers. The gown cuff is considered contaminated. The surgeon can reglove, taking care not to contaminate anything with the gown cuff. It may be preferable to perform an assisted gloving as shown in Figure 28-68.
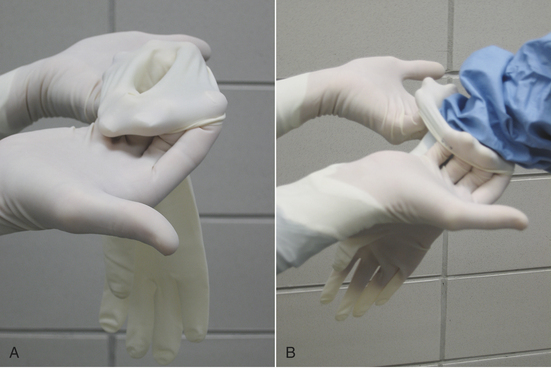
FIGURE 28-77 Assisted gloving. A, A sterile assistant picks up the appropriate sterile glove, holding it so the location of the glove thumb is apparent. The assistant hooks his or her fingers under the glove cuff and pulls to make the glove opening as large as possible. B, The surgeon slides his or her hand into the glove while the assistant pulls the glove cuff up to be sure it covers the gown cuff before releasing.
MAINTAINING STERILITY
It is important for the entire surgical team to be conscious of sterility, even if they are not “scrubbed in” (i.e., gowned and gloved). Nonsterile personnel should only touch nonsterile items or areas and should not lean over or reach across sterile fields. Those who are scrubbed in should only touch sterile items or areas and should always face the sterile field. Only sterilized items can be placed on a sterile field. If anyone on the surgical team notices a potential source of contamination or “break” in sterile technique, it should be mentioned immediately so that steps can be taken to reduce the risk of further contamination. To reduce contamination, only essential personnel should be present in the operating room, and excessive movement should be avoided. Conversation should be kept to a minimum.
Scrubbed-In Personnel
The sterile area on a person is considered to be the front of the gown, from just below the shoulders (the neckline is not sterile) to the waist or the level of the table. The gown sleeves are also considered to be sterile. Note that the back of a gowned person is considered to be nonsterile, so it should not be turned to face any sterile field. Gloved hands may be rested on a sterile drape or clasped in front of the body in the zone between the shoulders and waist. The arms should not be folded across the chest because the armpit region is considered to be nonsterile, and the hands should not drop below waist level.
THE PATIENT
Sterile surgical drapes are used to maintain a sterile field around the surgical site. Draping is performed by personnel who have scrubbed in. First, four small towels (cloth or paper) are placed to surround the area where the surgical incision will be. These are called quarter drapes and they are secured to the skin using towel clamps. During this procedure, one must be careful not to brush the front of the surgical gown against the surgical table. Then a large drape is placed over the animal, surgical table, and instrument stand to provide one continuous sterile field. Cloth drapes have an opening or “fenestration,” which is positioned over the surgical site. If a disposable paper drape is used, the appropriately sized hole may be cut after the drape has been placed. Because skin preparations do not sterilize, but only disinfect, the skin, plastic incise drapes may be used to provide a sterile surface at the start of surgery. These are translucent, adherent plastic drapes that are used to completely cover any visible skin after the barrier drapes have been applied. Incise drapes are often impregnated with an antiseptic. The surgeon can cut through the incise drape simultaneously with the skin incision. Refer to Chapter 29 for more detail on draping procedures.
If a limb has been suspended in preparation for an orthopedic procedure (as described under Patient Positioning), the quarter drapes are placed on the body, around the base of the limb. The distal limb is then held with a sterile wrap while a nonsterile assistant cuts the stirrups. The nonscrubbed, distal portion of the limb is covered with a sterile towel or sterile Vetrap. A sterile cotton stockinette or adhesive incise drape may be used to cover the entire leg. Finally the limb is passed through a hole in the large sterile drape that covers the entire animal.
TECHNICIAN NOTE
The optimal approach to draping includes isolating the surgical site with two layers of drapes: (1) four quarter drapes and (2) a large drape that covers the entire animal and the instrument table.
After draping is completed, sterile instrument packs, light handles, suture material, and other sterile equipment may be opened. Draped tables and instrument trays are considered to be sterile only on the top of the draped surface, so if part of a sterile item slips below the level of the tabletop, it is considered to be contaminated and should no longer be touched by the surgeons.
OPENING STERILE ITEMS
Nonsterile assistants must open all sterile items for the surgeons. Nonsterile assistants can only touch the outside of sterile packs and should never reach over a sterile field. Large or heavy packs, such as an instrument pack, may be set on a table to be opened. The four folded edges of the outer wrap are opened one at a time, while never extending the hand and arm over the top of the pack (see Figure 28-70, A). If the pack can be placed on a Mayo instrument stand, this can be accomplished by moving around the stand and pulling each fold away from the center. The inner wrap may be opened by the surgeon or by a nonsterile assistant. Once the instrument tray is exposed, the surgeon can pick it up and set it on the draped instrument stand.
A smaller wrapped pack may be opened while holding it in one hand (Figure 28-78). As each corner of the pack is unfolded, it is grasped by the hand that is holding the pack. This prevents the edges of the wrap from contaminating the contents of the pack. The exposed item may be grasped by the surgeon or carefully set on the sterile field.
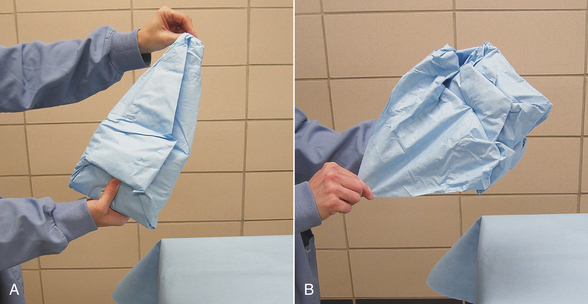
FIGURE 28-78 Opening a sterile pack that can be held in one hand. A, Open the first flap away from you. B, As each flap is opened, it is held together with the hand holding the pack. After the fourth flap is pulled back and secured, the inner package may be grasped by the surgeon. Move the wrap down and toward you as the surgeon lifts the contents up and toward them. Alternatively the package may be set on a sterile field near its edge to avoid reaching over the field.
To open a plastic or paper pouch, scalpel blade, or suture package, the edges of the wrapper should be peeled back slowly and symmetrically, keeping the package opening directed away from the body. Some items may be dropped onto the sterile field; be careful not to lean or reach across the sterile field (see Figure 28-70, B). If the item is small or awkward to handle, the surgeon can grasp it with a gloved hand or sterile instrument. The item should not be allowed to touch the peeled edges of the pouch because the edges are considered contaminated.
Sterile saline may be poured into the sterile saline bowl. To avoid reaching over the sterile field with the saline container, the surgeon may hold the bowl away from the instrument tray or position it on the tray at the edge of the sterile field. The lip of the saline container should be a few inches above the rim of the bowl to reduce the risk of touching it, but not so high that the saline splashes as it is poured. If drapes or gowns (especially those made of cloth) become wet with saline or blood, they may no longer be impermeable to bacteria and are said to have “strike-through.”
Beale, B.S., et al. Small animal arthroscopy. St Louis: Saunders; 2003.
Busch, S. Small animal surgical nursing. St Louis: Mosby; 2005.
Cockshutt, J. Principles of surgical asepsis. In Slatter D., ed.: Textbook of small animal surgery, ed 3, St Louis: Saunders, 2003.
Hobson, H.P. Surgical facilities and equipment. In Slatter D., ed.: Textbook of small animal surgery, ed 3, St Louis: Saunders, 1993.
Lemarie, R.J., Hosgood, G. Antiseptics and disinfectants in small animal practice. Compend Cont Educ Pract Vet. 1996;17:1339–1352.
McIlwraith, C.W., et al. Diagnostic and surgical arthroscopy in the horse, ed 3. Philadelphia: Mosby; 2005.
Mitchell, S.L., Berg, J. Sterilization. In Slatter D., ed.: Textbook of small animal surgery, ed 3, Philadelphia: WB Saunders, 2003.
Nieves, M.A., Wagner, S.D. Surgical instruments. In Slatter D., ed.: Textbook of small animal surgery, ed 3, Philadelphia: Saunders, 2003.
Pavletic, M.M. Surgical stapling. Vet Clin North Am. 1994;24:225–429.
Shmon, C. Assessment and preparation of the surgical patient and the operating team. In Slatter D., ed.: Textbook of small animal surgery, ed 3, Philadelphia: WB Saunders, 2003.
Sonsthagen, T.F. Veterinary instruments and equipment: a pocket guide. St Louis: Mosby; 2006.