Surgical Assistance and Suture Material
GENERAL CONCEPTS WITH SMALL ANIMAL EMPHASIS
Role of the Veterinary Technician in Surgical Assistance
Patient and Instrument Tables Setup
Proper Tissue-Handling Techniques
Incision Irrigation and Suction
Role of the Veterinary Technician in Surgical Assistance with Equine Patients
Patient and Instrument Tables Setup
Proper Tissue Handling Techniques in the Equine Hollow Organ Surgery
When you have completed this chapter, you will be able to:
1 Describe the role of the veterinary technician in surgical assistance for large and small animal patients.
2 Describe the method of placing and securing surgical drapes on the patient and special requirements for surgical draping for orthopedic or neurologic surgeries.
3 Discuss considerations for placement of instruments on the instrument table and considerations for maintaining sterility of the gloved and gowned surgical team.
4 Describe proper handling of skin, hollow organs, muscle, and bone tissue during surgery.
5 Describe procedures and special considerations for retracting tissues during surgical procedures.
6 Describe indications for and complications of sponge hemostasis.
7 Differentiate between monopolar and bipolar electrosurgery modes and describe care, use, and safety issues related to electrosurgical units.
8 Describe commonly used hemostatic and cauterizing agents.
9 List the principles and procedures related to incision irrigation and lavage and surgical drains.
10 List and describe commonly used suture material and needles and methods for their preparation.
GENERAL CONCEPTS WITH SMALL ANIMAL EMPHASIS
ROLE OF THE VETERINARY TECHNICIAN IN SURGICAL ASSISTANCE
The excellent support of a dedicated surgical technician can make a difference between successful surgical outcome and failure. The ideal surgical assistant “prethinks” and anticipates the surgeon’s needs before the surgeon asks for it. Thus already on the day before surgery the surgical assistant generates a plan for the following day. As a rule of thumb, sterile surgeries are performed first and more contaminated surgeries later throughout the day with the intent to prevent surgical infections. The surgical assistant verifies that the required instruments, implants, surgical and diagnostic supplies, medications, anesthetic equipment, and OR are available and set up for surgery.
The surgical assistant supervises or performs preparation of the patient (see Chapter 28 for clipping, scrubbing, preoperative antibiotics) and positions the patient in an ideal secure position on the operating table according to the instructions of the surgeon. The surgical technician will then drape the patient for the surgeon and set up the instruments properly.
 TECHNICIAN NOTE
The ideal surgical assistant anticipates the surgeon’s needs before the surgeon asks for it and plans in advance.
Intrasurgical assistance includes improving the surgeon’s visualization by providing retraction and hemostasis in the surgical field, familiarity with the objectives of the technique, and manipulating the instrumentation and tissues into position for completion of the surgical task. The second charge of the technician is to protect the patient from hazards of surgery, such as infection, by maintaining an aseptic surgical field and expediting surgical completion by anticipating needs for proper instruments and suture readiness. Because the surgeon is often concentrating on the surgical procedure, the technician must be constantly aware of the patient’s anesthetic and cardiovascular status while assisting. After the surgery, the assistant will help with bandaging and anesthetic recovery of the patient.
PATIENT AND INSTRUMENT TABLES SETUP
Before sterile preparation is performed, the surgical patient is moved into the OR and secured to the table. The surgical site must be accessible for the surgeon and the assistant standing (sitting) in a neutral position to prevent long-term health problems secondary to abnormal posture. Depending on the surgical procedure performed, the patient is placed in the appropriate position and secured with V-shaped troughs, ropes, towels, sandbags, and vacuum-activated positioning devices (Figure 29-1). The patient is placed on prewarmed water-circulating heating pads and covered with warm-air circulating blankets (see Chapter 30). Many surgeons prefer the warm-air circulation to be only activated after the patient is draped to prevent potential blowing of particles into the sterile surgical field. If the surgeon plans to use monopolar electrosurgery, the ground plate must be positioned in direct contact with the patient under the animal. Care must be taken that the securing devices do not restrict respiratory function or apply excessive pressure on peripheral nerves, vessels, or muscles. When extremities with intravenous (IV) or arterial catheters or blood pressure monitoring devices are tied to the table, rope tension or position often have to be adjusted to allow for adequate flow of fluid and correct measurements.
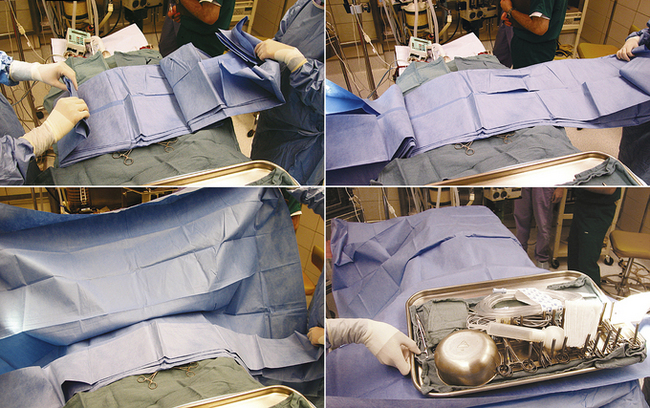
DRAPING
The function of draping is to separate the sterile surgical site from contaminated areas of the patient. Draping can only be performed by a sterile gloved and gowned member of the surgical team. Draping and instrument setup performed by the surgical assistant will speed up the procedure. Sterile quarter (field) drapes, Backhaus towel clamps, and large table-covering drapes are opened on a sterile table by a nonsterile assistant. The first field drape is unfolded and an edge folded under toward the patient. The corners of the drape are wrapped around the hands to protect these from contamination (Figure 29-2). The drape is floated above the patient and placed in the appropriate position without dragging the sterile drape along the patient’s contaminated body. This is easier if the table is positioned relatively low considering the height of the draping person. When applying the drapes, keep in mind that the undraped surgical table is not sterile and cannot be touched by the person doing the draping. Therefore the draping assistant should stand at least 15 minimally once it has been laid onto the patient. If the drape needs to be adjusted, it should only be moved in a direction away from the sterile surgical site and never toward the sterile site. Four quarter drapes are secured to each other and to the patient’s skin with Backhaus towel clamps around the incision site (Figure 29-3).

TECHNICIAN NOTE
If Backhaus towel clamps are positioned directly in the corners (of a four-toweled drape set) to attach the drapes to each other, the edges of the drapes will lie flat and not bulge up.
The Backhaus towel clamps are considered unsterile once they have penetrated the skin. If you need to remove towel clamps for readjustments, do not touch the contaminated tips; hand them off the table (to a nonsterile assistant) and use a new clamp. For final draping, a large fenestrated or unfenestrated drape is placed over the animal and the table (Figure 29-4). The fenestration is placed over the incision site, or a slit is cut into the unfenestrated drape at the incision site (Figure 29-5).
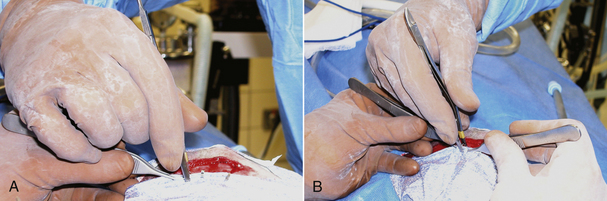
For orthopedic or neurologic surgeries (especially when implants are placed or if lengthy surgery is expected), exposed aseptic skin in the fenestrated area can be covered with additional adhesive drapes (Ioban, 3M Healthcare, St. Paul, Minn.) (Figure 29-6, A and B). Paint preparation of the surgical field with Iodine Povacrylex (3M DuraPrep, 3M Healthcare, St. Paul, Minn.) or even application of a spray adhesive to the skin augments the plastic’s ability to remain in place throughout the surgery (Figure 29-6, C and Chapter 28). Alternatively, sterile towels or drapes may be applied to the margins of the skin incision to protect the deeper incision. These towels may be attached with additional towel clamps spaced every 5 to 10 cm along the incision, with Michel clips (Figure 29-7) or by suturing the rolled edge of the towel or drape to the subcutaneous tissue with a simple continuous pattern of a strong, inexpensive suture material.

FIGURE 29-6 A, B, A sterile adherent plastic drape has been applied to the skin to minimize potential contamination. C, A spray adhesive is recommended to enhance adhesion of the plastic drape.
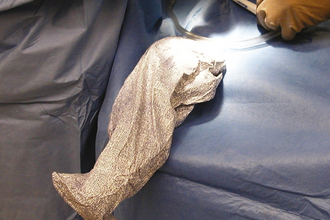
For orthopedic surgery, the limb is often enclosed in a sterile nonpermeable stockinette (General Econopak, Inc., Philadelphia) to allow movement and manipulation and to limit exposed skin (Figure 29-8). The edges of the incised stockinette can be attached to the surgical incision as described above. The cut edge of the stockinette should be rolled under so that cut fragments of the stockinette material will not fall into the incision. The rolled-under stockinette is usually pulled over the skin edge and attached to the subcutaneous tissue to completely cover the cut skin edge. This will also control much of the minor hemorrhage that occurs following skin incision.
INSTRUMENT SETUP AND HANDLING
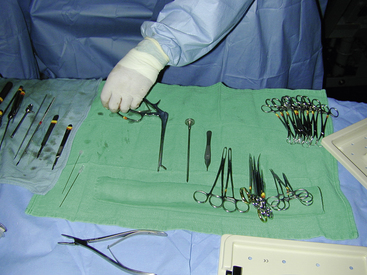
After the patient is draped, instrument packs are opened on an adjacent table with sterile cover. Depending on the surgical procedure and surgeon’s preference, the cover of the instrument table is continuous with the surgical field or remains as an isolated sterile isle that can be independently moved. Cautery and suction tubing are attached approximate to the incision site with specialized nonpenetrating towel clamps (Lorna or Edna clamps) or with Allis tissue forceps to the drape (Figure 29-9). The assistant decides which instruments from the pack are required by the surgeon and the surgical assistant for the procedure and places them according to surgeon’s preference: instruments not required for the procedure (or may be used later) on the back side of the table, instruments directly required by the surgeon (scalpel, Mayo or Metzenbaum scissors) on the surgeon’s side, and instruments and material typically handled by the assistant (suture scissors, sutures, needle holders, hemostats) on the assistant’s side (Figure 29-10). Blades are attached to the surgical knife handles (unless a disposable blade unit is used), and physiologic sterile saline is poured into a bowl for most surgeries. The saline bowl should be placed either inside a sterile tray or on waterproof drapings to prevent wicking from underlying nonsterile surfaces. Although no specific organizational scheme is universally used because of the variation in instruments and specialty equipment, the surgical assistant should be consistent in the general arrangement of the instrument stand. This will save time and effort for the assistant and speed up the procedure.
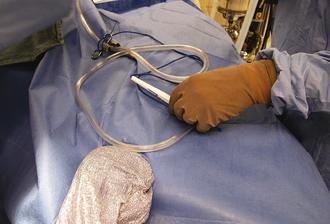
FIGURE 29-9 Cautery and suction are secured with Allis tissue forceps to the drape approximate to the surgical field.
Special precautions are taken for oncologic and contaminated surgeries. Instruments used for manipulation of neoplastic or contaminated tissues are only placed in a so-called dirty corner on the table. In this way, the other instruments are kept sterile and can be used for the remaining “clean” part of the surgical procedure. The surgeon might also consider changing gloves, suction devices, and potentially contaminated drapes and laboratory sponges during the course of surgery.
TECHNICIAN NOTE
Instruments that have been contaminated during the surgical procedure are placed only in a so-called dirty corner on the table. In this way, the other instruments are kept sterile and can be used for the remaining “clean” part of the surgical procedure.
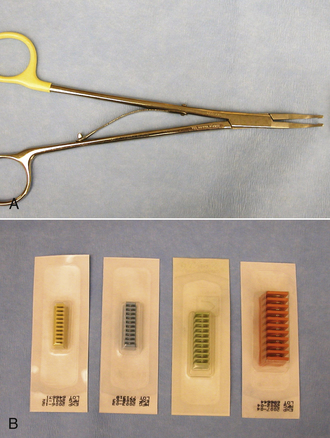
To be truly efficient and effective as a surgical assistant, the veterinary technician must be familiar with the procedure performed. This allows readiness of proper instruments and supplies and minimizes the time spent explaining positioning and retraction. This may require maintenance of a card file detailing necessary equipment and a brief review of the operative technique for each procedure (Figure 29-11). Technicians should follow the progress of the procedure closely to anticipate the surgeon’s needs.
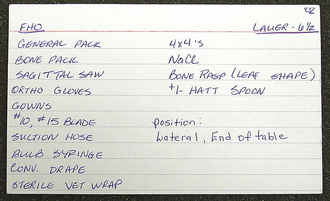
FIGURE 29-11 A technique card that is used to detail the necessary equipment for each surgical procedure.
TECHNICIAN NOTE
Card files about surgical procedures and surgeons’ preferences allow more efficient setup of the OR.
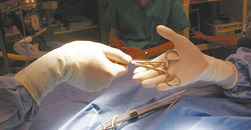
When passing instruments, the assistant should firmly “snap” the handle or handles into the open palm of the surgeon (Figure 29-12). This keeps the instrument firmly under control and in position for use. When the surgeon has finished with an instrument, it should be quickly wiped clean of blood and tissue and returned to its position on the instrument stand. Prolonged soaking of instruments in water (particularly saline) should be avoided because this ultimately causes corrosive damage to sharp cutting edges and hinges.

STERILITY IN THE OPERATING ROOM
Maintaining sterility during surgery is a demanding task and requires that the assistant be constantly aware of the OR environment. Especially in the beginning of surgery, when nonsterile assistants still move around to open instrument packs, to adjust the table height, or to adapt anesthetic equipment, communication is important, and position changes should be announced. The gowned and gloved sterile surgical team should primarily face the sterile field and must not touch or bend over nonsterile regions. The back of the surgical gown is always considered nonsterile, and only the front of the gown extending from below the shoulder level to the level of the surgical field is considered sterile. Therefore the assistant’s hands must be positioned above the waist and below the shoulder. The sleeves of the gowns are considered sterile from 5 cm above the elbow to the level of the cuff (the stockinette cuff is not a bacterial barrier, and it is considered nonsterile and should be always covered by the gloves). Clasping of the hands in front of the body is recommended, or the hands can be simply rested approximate to the incision site ready to assist. Unnecessary traffic and visitors in the surgery suite should be avoided, not only during the procedure but at all times, to help control dust and aerial contamination of the facility.
PROPER TISSUE-HANDLING TECHNIQUES
Surgical manipulation of each tissue by hands and instruments results in trauma. If the technician understands the general surgical principles of each body tissue system, he or she can minimize iatrogenic tissue injuries by simple routine actions and measures (such as handling the gastrointestinal tract with saline-soaked sponges).
SKIN
The preparation of the patient’s skin for surgery is described in Chapter 28. One must remember that preparation results in aseptic but not sterile skin. This means that the number of bacteria has been reduced below the number required to overwhelm the body’s defense mechanism. However, with a depressed immune system or prolonged surgery, these resident bacteria can start to multiply and result in infection. Therefore the surgeon and assistant should avoid unnecessary direct handling of the skin.
TECHNICIAN NOTE
Surgically prepared skin is aseptic, and the number of bacteria on the skin has only been reduced below the number required to overwhelm the body’s defense mechanism.
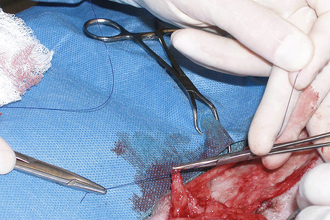
The skin incision itself should be performed with a sharp scalpel blade (Figure 29-13). A scissors will crush and shear skin as it cuts. Skin is generally sensitive to this form of injury and will commonly react with severe swelling and scar formation. The skin is relatively thick and elastic; therefore it will also tend to force or “spring” the blades of the scissors apart, damaging the instrument. A sharp incision with a scalpel blade results in the least trauma, most rapid healing, and the least amount of scar formation, but results in more hemorrhage compared with high-energy cutting incisions. Skin incision with high-energy cutting instruments (electrosurgical scalpel, plasma scalpel, and lasers) reduces resistance of wounds to infection and delays healing. Therefore after high-energy cutting, skin sutures or staples should remain in place 2 to 3 days longer compared with conventional scalpel incisions. The principles and use of the electroscalpel are discussed later under electrosurgery.
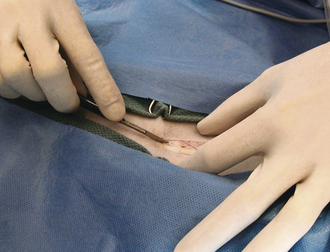
FIGURE 29-13 Skin incision with a scalpel blade results in rapid healing, with minimal trauma and scar formation.
Skin edges can be controlled, rolled, and steadied with the thumb and index finger. Any instrument used to hold or manipulate skin should grip the tissue with teeth or hooks. Instruments that have smooth tips hold the tissue by pressure, which tends to crush skin and damage it in much the same way as scissors do. Traumatic surgical technique is known to contribute to postsurgical seroma formation.
HOLLOW ORGAN SURGERY
Surgery of the hollow organs (i.e., stomach, intestines, bladder, esophagus) requires both complete control of luminal contents to prevent contamination and gentle handling to prevent iatrogenic damage to these delicate tissues. The surgical site is isolated from the body cavity with saline-moistened laparotomy sponges (Figure 29-14). Doyen intestinal forceps have thin bowed jaws with longitudinal grooves that prevent luminal content leakage when performing enterotomies or intestinal resections (Figure 29-15). The jaw tips make tissue contact as soon as the ratchet’s first teeth engage. Doyen intestinal forceps must not be overtightened or left in place too long because this might result in excessive tissue damage (Figure 29-16). Many surgeons prefer the assistant to occlude the intestinal lumen by using moistened gloved fingers (Figure 29-17).
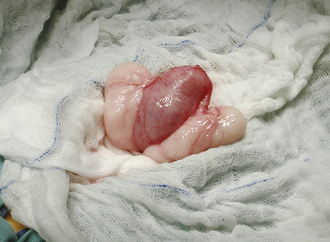
FIGURE 29-14 The bladder is isolated from the abdominal cavity with laboratory sponges before cystotomy.
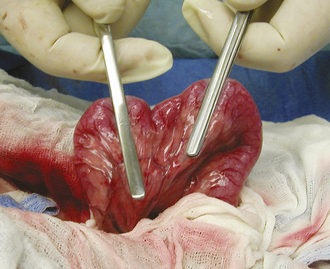
FIGURE 29-15 Use of Doyen intestinal forceps to prevent luminal content leakage during an enterotomy or a resection.
Large, hollow organs, such as the stomach or urinary bladder, often cannot be completely exteriorized. To prevent leakage of contaminated organ contents into the body cavity, the incisional region is elevated and stabilized with stay sutures. Stay sutures are simple loops of suture that pass through the holding layers of the viscus and are held together at the ends with a clamp (Figure 29-18). The surgical assistant applies controlled traction to the clamps to keep the incision in the desired location and elevated to prevent content leakage (Figure 29-19). Stay sutures are removed after the luminal incision has been closed.
MUSCULOSKELETAL SURGERY
Surgery of the musculoskeletal system often requires surgical assistance. Muscle itself is highly vascular and has great healing ability. The natural blood supply of bone is compromised after fractures, and healing only occurs if there is patent blood supply from the adjacent muscles. Consequently, all efforts should be made to preserve soft tissue attachment to the bone as the assistant retracts and manipulates fractures. The assistant must also be cognizant of adjacent nerves and vessels and protect them from damage by bony fragments or the surgeon. Specifically the radial, ulnar, and ischiadic nerves are often exposed during surgical approaches or course closely to commonly occurring fractures. The surgical assistant must be familiar with the anatomic location of these major structures.
RETRACTION TECHNIQUES
Retraction of tissues is used to increase visibility and ease of manipulation in the incision. This can be accomplished with handheld retractors by which the assistant provides traction in one direction with one retractor and countertraction in the opposite direction with a second retractor (see Figure 29-19). Retractors are available with various tips and blades to be used on different tissues (see Chapter 28). Care should be taken that retractors do not slide around or pull out of the incision because this causes significant tissue trauma. Consequently, sharp-tipped retractors that maintain a grip on the tissue (without crushing) are often preferable to blunt-tipped retractors, particularly for muscle and skin retraction (Figure 29-20). Self-retaining retractors are also used to free the assistant for other duties (Figure 29-21, A and B). Excessive retraction for prolonged periods must be avoided with self-retaining instruments to prevent pressure-induced tissue damage.
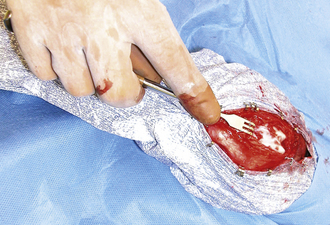
FIGURE 29-20 Use of a sharp-tipped, self-retaining retractor (Gelpi) to increase stifle joint exposure during an arthrotomy.
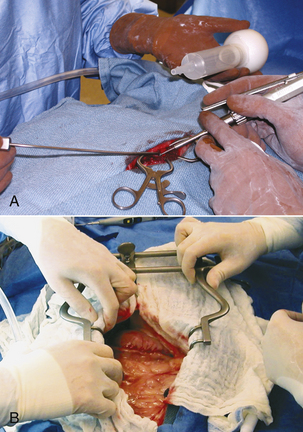
FIGURE 29-21 A, Self-retaining Gelpi retractors applied during a hemilaminectomy free up the hands of the assistant for suction and lavage while the surgeon removes bone with a drill. B, Placement of a blunt-tipped, self-retaining retractor (Balfour) in an abdominal incision verifying that abdominal organs are not entrapped.
Manual traction on adjacent tissues is often used to increase visibility or expose organs.
Visualization of the liver and the diaphragm can be significantly improved if the assistant carefully pulls up the sternum (Figure 29-22). Deep structures of the right abdominal cavity can be clearly visualized by retracting the proximal duodenum with mesoduodenum. If the abdominal viscera are positioned behind the mesoduodenum to the left, the right liver lobes, adrenal gland, kidney, and ureter are exposed (Figure 29-23). The left half of the abdominal cavity may likewise be visualized by retracting the abdominal viscera to the right, behind the mesocolon of the descending colon (Figure 29-24). The pancreas and portal vein are best exposed by gentle traction on the adjacent duodenum. As when using fingers for occluding the intestinal lumen, gloves should be moistened and excessive pressure avoided.
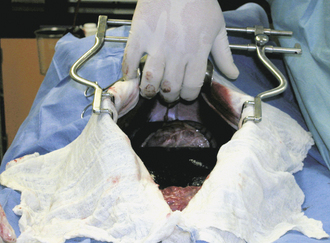
FIGURE 29-22 Gentle lifting of the sternum increases exposure of the diaphragm and liver during abdominal exploratory surgery.
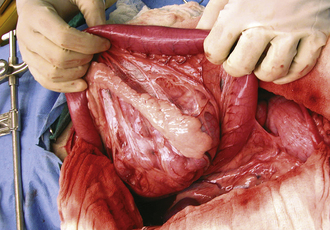
FIGURE 29-23 Retraction of the proximal duodenum and mesoduodenum to the left exposes the right adrenal gland, kidney, and ureter.
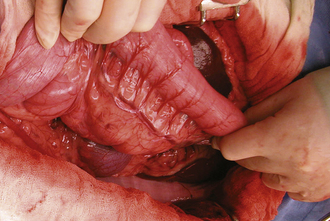
FIGURE 29-24 Retraction of the descending colon to the right exposes the left adrenal gland, kidney, and ureter.
TECHNICIAN NOTE
Bleeders from the ovarian pedicles can be clearly visualized by retraction of abdominal viscera behind the mesoduodenum or mesocolon.
Nerves or large blood vessels are often retracted to improve visualization or to prevent potential damage. Careful blunt dissection is used to free the nerve or vessel from surrounding tissue. A broad, flat band, such as a Penrose drain or moistened umbilical tape, is passed around the structure (Figure 29-25), and the ends are clamped together, much like a stay suture. The assistant can gently retract the nerve or vessel to one side, carefully avoiding entanglement with other instruments or equipment.
HEMOSTASIS
Hemostasis is a physiologic response to arrest bleeding. Various surgical techniques can be used to augment this physiologic clotting process. The surgical assistant should be able to perform or to assist with routine hemostatic procedures.
Excellent hemostasis is vital (1) to obtain optimal visibility at the surgical site, (2) to limit the volume of blood loss, and (3) to decrease risk of infection (extravasated blood is an ideal medium for bacterial growth).
SPONGE HEMOSTASIS
Low-pressure bleeding from small vessels can be controlled by sustained pressure through gauze sponges or similar material. The sponge should be applied with a blotting type of motion. A wiping motion (especially if sponges are not moistened with saline) will irritate tissue and will often renew bleeding by pulling the forming blood clots out of incised capillaries. The pressure apparently stops hemorrhage by collapsing the vessels until clotting can occur. With persistent hemorrhage, pressure may need to be sustained for up to 5 minutes to allow adequate coagulation.
SPONGE COMPLICATIONS
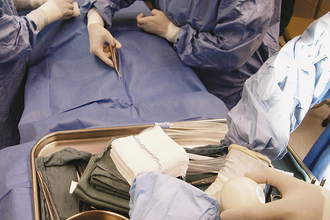
Gauze sponges left in the body after closing of the incision will cause severe inflammatory reaction, adhesions, and drainage. The abdominal and thoracic cavities are particularly hazardous locations for sponges to become lost. Consequently, many surgical assistants count sponges in such areas to make sure all sponges have been removed. Before surgery begins, sterile sponges are counted out in piles on the Mayo stand. Usually, two or three piles of 10 sponges are used to start. The total number is recorded, and all other sponges (e.g., those used for skin preparation) are removed from the area. If additional sponges are required during surgery, they are supplied in packs of 10, and their number is added to the total. The used sponges are saved in a separate pile and are counted at the termination of the procedure before the incision is closed. The number of used sponges plus the remaining clean sponges must equal the total amount to account for all sponges. Additional precautions include use of sponges with radiopaque markers and never placing used or superfluous sponges approximate to the incision.
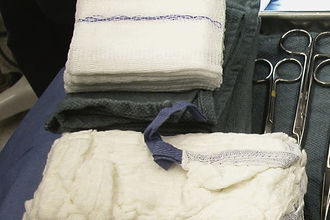
For particularly deep incisions, sponges may be held in a sponge forceps (Figure 29-26), or laboratory sponges can be used (Figure 29-27). The tape attached to the laboratory sponge is left extending out of the incision, and the sponge can be easily removed by pulling on it.

HEMOSTATIC FORCEPS
Hemorrhage from slightly larger vessels can be occluded by clamping with a hemostatic forceps. When the vessel wall is crushed with the hemostatic forceps, the bleeding stops temporarily, and the physiologic clotting mechanism is activated. The clamp should be applied perpendicular to the tissue surface and the bleeding vessel, with a minimal amount of adjacent tissue grasped in the tips of the clamp (Figure 29-28).

SUTURE LIGATION
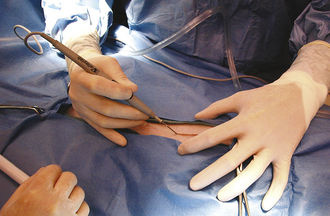
A larger bleeding vessel that has been clamped can be ligated to achieve permanent hemostasis. After the suture material is passed around the vessel, the assistant lowers the handles of the clamp, which raises the tips (Figure 29-29). This causes the ligation loop to form around the vessel and not the instrument. As the first throw of the knot is pulled tight, the assistant releases the clamp. This allows the vessel to totally collapse, thus occluding the lumen. However, the assistant should return the vessel to its origin before releasing the clamp so that the knot is not snapped off the cut end of the vessel. After the surgeon finishes the knot, the assistant cuts off excessive suture, using the tips of the scissors. Care must be taken not to pull the ligature off the end of the vessel. Only enough material to secure the knot should be left. Arteries are commonly ligated twice, particularly if they are more than 2 mm in diameter.
ELECTROSURGERY
Electrocoagulation and Cutting Function
Electrosurgical units not only offer a means of stopping hemorrhage from an already cut vessel with electrocoagulation, but also allow prevention of hemorrhage with an electroscalpel that coagulates as it cuts a vessel. Most electrosurgical units allow both coagulation and cutting, depending on the waveform of the current selected.
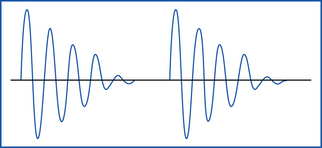
Interrupted damped sine waves primarily result in coagulation, but they also allow for some cutting (Figure 29-30). The current causes protein coagulation of the blood elements within the blood vessel wall. Electrocoagulation should be used only on vessels smaller than 1.5 mm. As a rule of thumb, vessels with visible lumens should be ligated.
Continuous undamped sine waves primarily result in cutting associated with some minimal coagulation (Figure 29-31). Microcoagulation of the tissue protein occurs at a small point of contact.
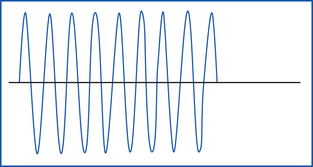
Modulated pulsed sine waves allow simultaneous cutting and coagulation.
Monopolar and Bipolar Electrosurgical Modes
Most electrosurgical units allow both monopolar and bipolar modes of coagulation.
The monopolar mode is most commonly used in veterinary medicine and can be used for coagulation and/or cutting. The current flows from a small handpiece (active electrode) through the animal’s body and returns to the current generator via a ground plate (indifferent electrode) that is necessary to complete the electrical circuit (Figure 29-32). Direct maximal contact between the patient and the ground plate is important to prevent burns approximate to the ground plate. For hemostasis, the current can be applied through a hemostatic forceps clamped on the vessel (Figure 29-33) or directly from the monopolar handpiece tip to the vessel. Monopolar electrocautery only works if all blood and fluid, which would dissipate the current, has been blotted away.
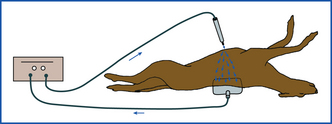
FIGURE 29-32 Diagram of electrical current passing from the handpiece, dispersing in the body, and returning to the generator via the ground plate.

FIGURE 29-33 Application of current to a bleeding vessel by touching the handpiece to the Brown-Adson forceps.
For a truly bloodless incision (modulated pulsed sine wave mode), the handpiece is held in a modified pencil grip perpendicular to the tissue surface. Because the electrode cuts whatever tissue is contacted, continuous visualization is indispensable when the electrode is activated. To prevent lateral heat damage to adjacent tissues, it has been recommended to move the instrument slowly at a speed of 7 mm per second (Figure 29-34).
Bipolar electrocautery uses a thumb forcepslike handpiece as an active electrode (Figure 29-35). The vessel to be cauterized is grasped between the tips of the forceps, and the coagulating current runs from one blade to the other, not through the body (Figure 29-36). For effective use, a slight gap must remain between the tips when the tissue is grasped. Because the short current pathway results in minimal damage to adjacent tissues, this form of electrocoagulation is particularly useful in microvascular, ophthalmic, and neurosurgery. In contrast to the monopolar mode, bipolar coagulation is only used for coagulation, but it has the advantage to function in a wet surgical field.
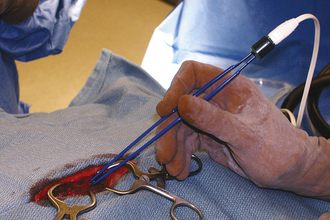

FIGURE 29-36 Diagram of the bipolar coagulation current as it passes from one tip of the handpiece to the other.
The monopolar setup allows for cutting and/or coagulation, but the bipolar setup only allows for coagulation.
Battery-Powered Cautery Units
Disposable battery-powered cautery units can be used for hemostasis of small vessels. Hemostasis is based on protein coagulation produced by a heated filament.
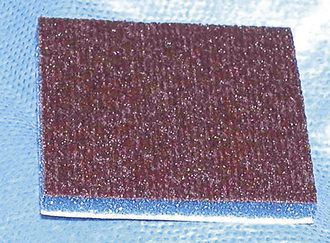
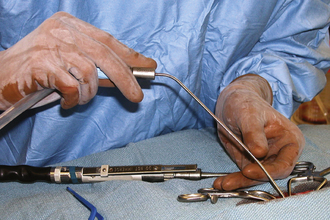
Carbon built up on the active tip of monopolar and bipolar handpieces should be periodically removed by the assistant, who scrapes it on a scratch pad (Figure 29-37) or with a hard metallic edge, such as the backside of a scalpel blade.
Safety With Electrosurgery
Electrosurgery will result in spark formation, and it should not be used when explosive anesthetics, such as ether and cyclopropane, are present. Likewise, some antiseptic preparation materials (alcohol based) and adhesive agents are volatile and should be avoided or allowed to dry thoroughly before using electrosurgery. To avoid a burn at the point of current grounding, most electrosurgical units require generous application of conductive gel or fluid to provide good electrical contact between patient and ground plate. An electrical shock to hands holding the clamp or electrosurgical handpiece is usually caused by a hole in the glove. Regloving should alleviate the problem. Continued shocking reflects poor grounding or an equipment malfunction that should be checked by a qualified service representative.
Tissue healing following the use of the electroscalpel has been shown to be significantly delayed. Likewise, the incidence of incisional infection is somewhat increased. Techniques of asepsis and atraumatic tissue handling must be strictly adhered to when using electrosurgery.
HEMOSTATIC AGENTS
Absorbable hemostatic agents, such as gelatin sponges (Gelfoam, Upjohn), oxidized regenerated cellulose gauze (Surgicel, Johnson & Johnson), or bovine dermal collagen (INSTAT Collagen Absorbable Hemostat, Johnson & Johnson), can be used to achieve hemostasis on tissues that tend to continually ooze or to pack small bleeding cavities (Figure 29-38).

FIGURE 29-38 A, Biologic hemostatic agents, such as gelatin foam, promote coagulation and clot adherence. B, C, The foam is punched out of the sheet and placed in a bleeding liver biopsy site for hemostasis.
Gelatin sponges are applied dry, soak up blood, and provide a lattice for the forming clot to adhere to. They are normally absorbed in 4 to 6 weeks, but should not be used in infected areas.
Cellulose is a knitted material that only activates clotting of whole blood. Therefore it is not useful if oozing occurs in a serohemorrhagic environment.
Bovine collagen triggers clot formation via platelet aggregation and release of coagulation factors. Collagen’s hemostatic capabilities are inactivated by autoclaving.
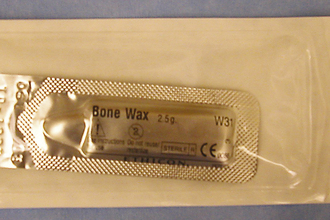
Bone wax is a nonabsorbable agent that is used during orthopedic (midfemoral amputation) and neurologic surgery to control bleeding from bone (Figure 29-39). Bone wax functions as a mechanical plug when pressed into bleeding bony surfaces. Keep in mind that it results in mild inflammation and should be used sparsely.
CHEMICAL CAUTERIZATION
Chemical cauterization by agents, such as phenol, ferric subsulfate, and silver nitrate, will achieve hemostasis by denaturing the protein of the tissues they contact, thus sealing small blood vessels. However, these agents are difficult to apply without contacting and damaging adjacent soft tissues. This usually precludes their use in general surgery. However, silver nitrate is commonly used to stop nail bleeding when the nail bed has been cut during routine nail trimming.
VASCULAR CLIPS
Metal clips made of noncorrosive materials (Hemoclip, Weck Closure Systems) and the specialized forceps to apply them are available in a variety of sizes and designs (Figure 29-40). They are effective and can be applied quickly to occlude vessels up to 5 mm in diameter in locations that are not accessible for ligation. Their use in veterinary surgery is becoming more widespread as the expense relative to convenience decreases. Vascular stapling devices that automatically occlude both sides of a vessel with small metallic staples in addition to dividing it are available (LDS, U.S. Surgical Corp.) and are commonly used in human surgery. Although the staple cartridges are expensive, the supplying company will often lease the application device.
INCISION IRRIGATION AND SUCTION
Incision irrigation and suction (lavage) serve four main purposes. The first is to physically dilute and remove bacteria carried into the incision from the skin or the air or from spillage from incising a contaminated or infected structure, such as the intestine. The body has a tremendous ability to resist infection from low numbers of bacteria. Consequently, lavaging the site after the initial skin incision and periodically throughout the procedure to decrease bacterial numbers will dramatically reduce the incidence of infection. Second, irrigation and suction are used to remove hemorrhage, increasing visibility at the surgical site. This makes both hemostasis and surgical manipulations easier to accomplish. Third, lavage keeps the tissues moist, particularly during longer procedures. If the tissues desiccate (dry out), cell damage and death occur. This decreases the rate of healing and increases the incidence of infection by devitalizing the natural cellular defense mechanisms. There is an old surgical saying that “moist tissues are happy tissues.” Finally, lavage is used to dilute and remove irritating and degenerative material, such as urine, bile, or bony fragments. Although these materials will not cause infection, they can cause undesirable biologic reactions and should be removed.
TECHNICIAN NOTE
Because any dry material is damaging to body tissues, slight moistening of sponges with saline before using them in the incision will reduce tissue trauma.
LAVAGE FLUID
Many different fluids are used for lavage, but they all have common characteristics. The fluid should be a physiologically neutral, isotonic solution (i.e., buffered normal saline or lactated Ringer’s solution), meaning it has the same pH (acidity) and osmolality (mineral concentration) as serum. Excessively acidic or basic fluids can promote bacterial growth and cause cell damage. Hypotonic (less concentrated) solutions, such as distilled or tap water, will be imbibed by the tissues, resulting in significant edema. Hypertonic (more concentrated) solutions, such as hypertonic saline, will pull water out of tissues and result in dehydration. This reaction is occasionally used to reduce preexisting edema.
Antibiotic agents are rarely added to lavage solutions because systemic administration of IV antibiotics in general provides higher antibiotic tissue levels than topical application. Antibiotic solutions (e.g., tetracyclines) can be irritating to tissues when applied topically and result in chemical peritonitis or pleuritis. Antibiotic solutions should not be used with cancellous bone grafts because the antibiotic will diminish the graft’s biologic activity.
Diluted antiseptics, such as povidone-iodine and chlorhexidine hydrochloride, have been used for lavage of wounds. Because these agents are irritating for synovium, pleura, and peritoneum, joints, thoracic cavity, and abdominal cavity are in general not lavaged with antiseptic solutions. The routine use of buffered normal saline is preferred.
LAVAGE TECHNIQUE
Irrigation solutions can be applied with a bulb syringe or a large syringe to obtain a hydraulic cleansing effect (Figure 29-41). They should be warmed to body temperature to prevent causing hypothermia. This is particularly important in small or debilitated patients. Cloth drapes should not become excessively damp during surgery because this will allow capillary movement of bacteria (wicking) from the underlying nonsterile area. Alternatively, waterproof draping materials, such as sterile baby crib sheets or diapers, may be used.
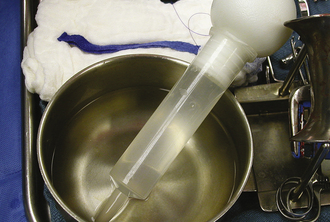
FIGURE 29-41 The saline bowl and bulb syringe are placed on a waterproof drape to prevent wick contamination after spillage.
Suction of the surgical incision requires a suction tip, tubing, and a suction bottle. The suction tip may have a single orifice or multiple fenestrations. The single-orifice tip (Yankauer or Frazier tip) is most useful in orthopedic surgery, neurosurgery, and general surgery in which the exposure is limited and relatively small amounts of liquid must be removed from precise areas (Figure 29-42). The surgical assistant controls the strength of suction by occluding the vent hole in the handle of the suction tip. If the tip becomes plugged, it can be cleared by passing a stylet made of slightly smaller stainless steel wire.
The multiple-fenestrated tips (Poole tip) are used in thoracic and abdominal procedures in which large volumes of fluid are removed (Figure 29-43). Fenestrated tips also reduce the incidence of plugging with movable soft tissue, such as omentum and mesentery. The assistant can also use his or her hands as a barrier between the omentum and the suction tip to prevent plugging. Periodic suction of clean irrigation solution during the surgical procedure will reduce the incidence of suction tube plugging and make cleaning of the tube much easier.
SURGICAL DRAINS
Postoperative drainage of the surgical area may be indicated for several different reasons. Any incision that is thought to be infected should be allowed to discharge. This can be accomplished by leaving the wound open or by inserting a drain. A drain is also indicated when soft tissues cannot be opposed to obliterate dead space. Serum tends to accumulate in such spaces, and seromas (serum pockets under the skin) can develop if a drainage route is not established. Drains commonly used in veterinary surgery are classified as passive and active drain devices. The draining effect of passive systems is based on gravity, whereas active systems produce negative pressure (suction) resulting in drainage.
PASSIVE DRAINS
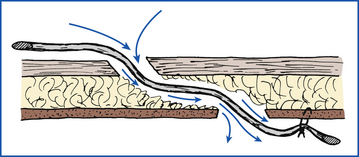
Soft, thin-walled, collapsible, latex rubber tubes named Penrose drains are most commonly used as passive drains in veterinary medicine. Passive drains made of stiffer polypropylene, Silastic, or red rubber tubes are rarely used. Discharge escapes by moving along the outside of the drain (Figure 29-44). Therefore the holes in the tissues through which the drain runs must be kept spread open and clean for the drain to work properly. Cleanliness is particularly important because the hole and drain can act as an avenue for ascending infections.
ACTIVE DRAINS
Active (i.e., suction) drains are thick-walled tubes of rubber or Silastic. Suction is applied to the outside end of the drain, and discharges are pulled through the lumen of the tube. Multiple openings are present in the wall of the tube on the implanted end (Figure 29-45). Suction must be maintained for this type of drain to work. Negative-pressure activated devices are commercially available (Jackson Pratt, Allegiance) (Figure 29-46). A homemade device can be made from a large injection syringe, butterfly catheter, and a hypodermic needle (Figure 29-47).

FIGURE 29-45 A, B, Multiple openings on the implanted end of a commercially available active suction drain (TLS) after mammary resection.
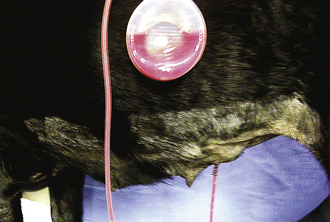
FIGURE 29-46 A commercially available negative-pressure activated, constant-suction device (Jackson Pratt drain).
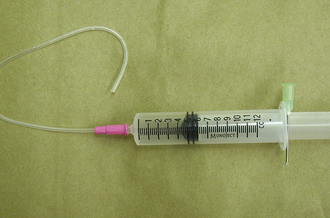
FIGURE 29-47 A homemade constant-suction device constructed from a large syringe, butterfly catheter, and hypodermic needle.
Drains are foreign bodies and can be removed after 2 to 5 days when the discharge volume has decreased and becomes serosanguineous.
TECHNICIAN NOTE
The exit point of the drain at the skin level should always be covered with a sterile dressing to minimize risk of infection along the drain. The dressing must be changed before strike-through occurs (Figure 29-48).
SUTURE MATERIAL
Suture is any material that holds tissues together until they heal. The use of suture has been documented since the first century AD. However, it was not until the advent of sterilization and aseptic technique that suture became commonly used. During the late 1800s and early 1900s, suture materials were derived mainly from natural sources. Synthetic suture materials first became available in the 1930s and are still being developed.
Some uses of suture include the following:
• Apposing the edges of an incision or wound
• Obliterating open space in which serum would tend to accumulate
• Tightening and stabilizing joints that have sustained ligament injury or have luxated
• Strengthening or replacing weakened tissues, as in hernias
QUALITIES OF THE IDEAL SUTURE MATERIAL
The ideal suture material would have the following qualities:
• Able to be used for any procedure with the same characteristics in all tissues
• Is easily handled and tied by the surgeon
• Causes minimal tissue reaction and does not support, spread, or sequester bacterial growth
• Has high tensile strength in a small diameter, yet not cut through tissues
• Knots securely with a minimum number of throws with small knot size
• Is easy and economical to produce and sterilize
• Does not induce allergic, electrolytic, or neoplastic changes
• Holds tissues until healing occurs, then resorbs with minimal tissue reaction
Obviously, no such suture material exists or probably ever will since several of these attributes are contradictory. Consequently, veterinary personnel must be aware of the advantages and disadvantages of all available sutures and choose the one most appropriate for the use at hand. The technician will need to become familiar with all sutures used by the surgeon.
SUTURE NOMENCLATURE
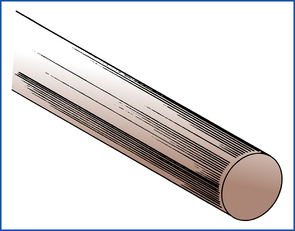
Suture material can be classified by a number of characteristics. Absorbable suture is broken down and resorbed by the body, resulting in a loss of tensile strength within 60 days. Consequently, it should be used in tissues that heal rapidly to adequate strength. Nonabsorbable suture does not significantly weaken with time. It is used in areas that heal slowly and are subject to disruptive stresses. Multifilament or braided suture material is made up of a number of small elements that are braided or twisted together to form the desired diameter (Figure 29-49). Multifilament suture tends to be relatively strong, handles well, and has good knot-holding abilities. However, many braided sutures induce significant tissue reaction and can harbor bacteria, leading to intractable suture tract infections if they become contaminated. Moreover, most braided suture will exhibit capillary or “wicking” characteristics in which fluid travels along the length of the suture between the filaments. Therefore multifilament suture should not be used in hollow organs or in the skin when part of the suture is exposed to a contaminated environment and the wicking fluid can carry bacteria into the body. Monofilament suture (Figure 29-50) prevents the capillary problem and consequently has a lower incidence of infection. It also has a low coefficient of surface friction, making it easy to generally pull through tissues. However, the low surface friction (“drag”) results in poor knot security, necessitating many throws on each knot. Some monofilament suture also has a tendency to return to its original shape (called memory), resulting in poor handling characteristics (Figure 29-51).
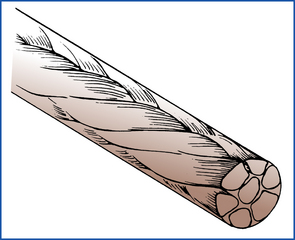
FIGURE 29-49 Constructed multifilament suture. (From Meeker MH, Rothrock JC: Alexander’s care of the patient in surgery, ed 11, St Louis, 1999, Mosby.)
ABSORBABLE SUTURE MATERIAL
Surgical gut is collagenous protein obtained from the submucosal layer of sheep small intestine. It was originally known as kit gut (meaning fiddle string because the material was used for stringed instruments). Over the years, the term kit was mistakenly changed to cat, resulting in the common misnomer catgut. When implanted in tissues, surgical gut incites an inflammatory reaction that ultimately resorbs the suture by phagocytosis. The severity of reaction, and consequently the rate at which the gut loses strength, can be decreased by tanning the material with chromic salts. Surgical gut has been classified into four groups: plain, mild, medium, and extrachromic and treated with resorption times of 10, 20, 30, and 40 days, respectively. Because surgical gut is broken down by phagocytosis, implantation in inflamed, highly vascular, or biologically active tissue will result in a faster rate of resorption. Medium chromic gut is relatively inexpensive and has predictable handling and knotting characteristics. However, its variability in rate of tensile strength loss, particularly in response to an inflammatory environment, should be considered and has led most surgeons away from its use for closure of support layers.
Other natural absorbable suture materials, such as collagen, kangaroo tendon, and fascia lata, have been developed, but have shown few distinct advantages over surgical gut.
Synthetic Absorbable Suture Material
Synthetic absorbable sutures are in general broken down by hydrolysis and have been developed to prevent the variation of resorptive rates in inflammatory environments. Synthetic absorbable sutures can be principally subdivided into sutures retaining strength for more than 21 days (Dexon, Vicryl, Maxon, PDS, and Polysorb) and sutures retaining strength for less than 21 days (MONOCRYL, BIOSYN).
Polyglycolic acid (Dexon, Kendall) is a synthetic polyester polymerized from hydroxyacetic acid. It is produced in fine filaments that are braided into sutures of various sizes. Consequently, it has excellent handling and knot-holding characteristics. Dexon is broken down in the body by enzymatic hydrolysis, which does not induce a significant inflammatory reaction. Further, the rate of absorption is not affected by placement in an inflamed or infected environment. Dexon loses about 35% of its tensile strength in 14 days and 65% of its strength within 21 days. Some studies have shown that Dexon absorbs more rapidly in the presence of urine. Overall, it has a superior initial strength, but it loses its strength more rapidly than surgical gut.
Polyglactin 910 (Vicryl, ETHICON) is a coated multifilament suture consisting of a copolymer of lactic and glycolic acids. Its production and resorption processes are similar to those of Dexon. Vicryl also has a high initial strength that declines rapidly when implanted. Likewise, it has good handling qualities and knot security. Polyglactin 910 has become available with an antiseptic Triclosan coating (Vicryl Plus) to protect against bacterial colonization of the suture. Wound healing properties of Triclosan-coated polyglactin 910 and polyglactin 910 are similar.
Polydioxanone (PDS, ETHICON) and polyglyconate (Maxon, Kendall) are newer synthetic polyester materials that are pliable enough to be produced and used in monofilament form. Consequently, they have significantly less tissue drag in placement. However, they do possess some memory characteristics and must have multiple throws to gain a knot securely. The process of resorption is similar to that of the other synthetic absorbable materials. PDS retains 86% strength at 14 days and 69% strength at 42 days. Maxon retains 70% strength at 14 days and 45% at 21 days. Consequently, these are particularly useful in slow-healing tissues. Despite their absorbable classification, it takes about 180 days until PDS and Maxon are completely absorbed.
Polysorb (Kendall) is a multifilament glycoside-lactide copolymer with good knot-tying capabilities. Polysorb retains 80% strength at 14 days and 30% strength at 42 days. Although entirely absorbed at day 70, its bacterial wicking potential as a result of the braided characteristics should be considered.
Polyglecaprone (MONOCRYL, ETHICON) and Glycomer 631 (BIOSYN, Kendall) are more rapidly absorbed monofilament sutures that can be used in situations where healing occurs more quickly. Their predictability has led to their replacing gut for many applications. Monocryl is not as strong as and BIOSYN is as strong as PDS and Maxon.
Polyglecaprone absorbs at a rate similar to medium chromic gut. Polyglecaprone retains 60% to 70% strength at 7 days, 30% to 40% strength at 14 days, and 0% at day 21. The suture is absorbed between day 90 and 120. Similar to polyglactin 910, polyglecaprone is marketed with an antiseptic coating (MONOCRYL Plus, ETHICON) to inhibit bacterial colonization along the suture in high-risk patients (e.g., animals with diabetes, neoplastic diseases, FIV, FeLV, hypothyroidism, or immune suppression).
BIOSYN consists of 60% glycoside, 26% trimethylene carbonate, and 14% dioxanone. BIOSYN retains 75% strength at 14 days, 40% to 50% strength at 21 days, and 25% at 28 days. The suture is absorbed between day 90 and 120.
Vicryl and Dexon are more rapidly degraded in alkaline environments and dissolve faster in infected urine. Therefore PDS and Maxon have been recommended for closure of the bladder because these sutures retain their strength in urine.
NONABSORBABLE SUTURE MATERIAL
Nonabsorbable suture retains its tensile strength for more than 60 days. It can be organic fiber, metallic, or synthetic and will be described according to origin.
Silk is one of the first and still most commonly used organic nonabsorbable materials. It is obtained from the cocoon of the silkworm and is braided or twisted into multifilament strands. It has excellent handling and knotting qualities and is commonly used in cardiovascular surgery. However, it can induce a severe soft tissue reaction, allow capillary migration of contamination (wicking), and serve as a nidus for infection. Despite its nonabsorbable classification, the inflammatory reaction usually results in complete loss of tensile strength within 6 months.
Cotton and linen are natural fibers that are also used to make suture. They both increase slightly in strength when wet, but otherwise behave much like silk. They have seen limited use in veterinary surgery.
Metallic sutures have been used since the fourteenth century, when the biologically nonreactive nature of gold was first described. Stainless steel is the major metallic suture in use today. It is biologically inert and will not support bacterial growth. Steel retains its high tensile strength when implanted. Consequently, it is particularly useful in infected wounds or tissues that are expected to be stressed while healing slowly. Stainless steel suture is available in monofilament and multifilament forms. The major disadvantage of steel is its poor handling quality and its tendency to kink. Silver, aluminum, and tantalum sutures have some limited use in human surgery.
Synthetic Nonabsorbable Suture Material
Polyamide (nylon, ETHICON) is a polymerized plastic that is available as suture in both monofilament and braided forms. It does not cause tissue reaction when implanted, but it gradually loses its tensile strength over several years. It is somewhat stiff and slippery, and it has significant memory, making handling and knot security exacting. Monofilament nylon is typically used for skin sutures that are removed.
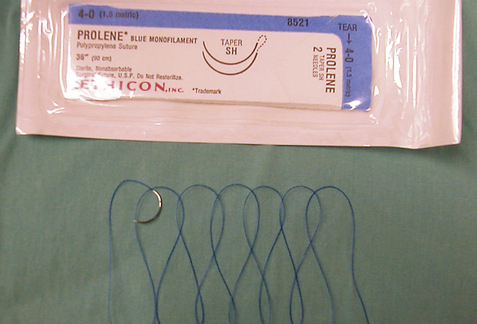
Polypropylene (Prolene, ETHICON; Surgipro, Kendall) is a synthetic plastic that is similar to nylon. However, polypropylene does not weaken with time, making it useful when permanent suture support is needed.
Polybutester (NOVAFIL, Kendall) is a similar synthetic suture that is much more elastic. This means it can stretch and return to its original length without breaking, making it useful for repairing ligaments and other structures that must stretch under weighted motion.
Polyester fibers (MERSILENE, ETHICON; Ti-cron, Kendall) are braided to form a strong noncapillary suture. Handling quality is good, but five or six throws are required for good knot security. It also has significant tissue drag and induces just slightly less tissue reaction than silk. Some manufacturers coat the polyester fibers with Teflon (Tevdek and Polydek, Deknatel) or silicone (Ti-cron, Kendall) to reduce drag and reaction. However, chronic infection and draining fistulas remain common complications of polyester use.
Polymerized caprolactam (Supramid, S. Jackson; Braunamid, Vetcassette II, B. Braun Melsungen AG) is made of synthetic fibers coated with a smooth plasticlike material. It has high tensile strength and does not induce a significant tissue reaction. Because the outer sheath of these sutures often breaks, the underlying multifilament fibers allow bacterial migration. Therefore these sutures should not be used below the skin level because they predispose to fistulation and infection.
SUTURE SIZE AND STRENGTH
The size or diameter of suture has been classified by the United States Pharmacopeia. Table 29-1 lists the established limits of surgical gut from 7-0 (pronounced “seven ott” or “seven zero”) to No. 3. Other suture materials use the same sizing limits and have extended down to an 11-0 nylon for microvascular anastomosis and up to No. 7 stainless steel for orthopedic use. The appropriate-sized suture for each procedure needs to be no stronger than the tissue on which it is used. Oversized sutures do not strengthen a wound and may lead to overtightening and strangulation of tissues. In addition to suture tensile strength, knot security should be considered when selecting suture size. Because the knot is the strength-limiting area of most suture and the relative knot security decreases as suture size increases, smaller suture offers a mechanical advantage. This is particularly true of the synthetic monofilament sutures, which have a low coefficient of friction (slippery). Besides untying, knotting decreases a suture’s strength by converting the longitudinal tensile force into a shearing force that collects at the base of the knot, at which point strands cross and angle. The process of tying the knot also weakens suture by abrading its surface as strands cross. This is particularly true of surgical gut sutures and braided sutures. Excessive suture material should be cut off, leaving the ends just long enough to secure the knot on buried sutures. Of course, this length varies with surface friction and knot security. In general, multifilament and metallic sutures can be cut off quite close to the knot (about 2 mm). Monofilament sutures with memory and polyesters need to have 3 to 4 mm left to prevent knot untying (Figure 29-52). Skin sutures usually have about 0.5- to 1.0-cm tails to aid in easy removal.
TABLE 29-1
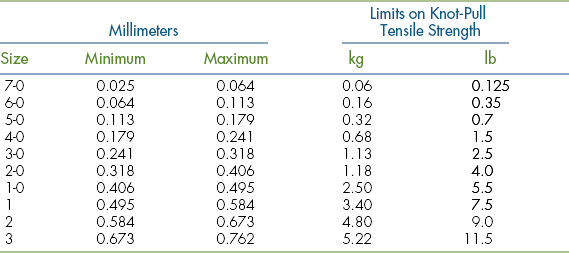
From US Pharmacopeial Convention: United States pharmacopeia, ed 16, Rockville, Md, 1960, The Convention.
SUTURE REACTION
As previously noted, some suture materials induce more tissue reaction than others. In descending order of reactiveness, surgical gut is most reactive, followed by multifilament natural fiber, synthetic multifilament suture, synthetic monofilament suture, and finally metallic suture. Recognizing a suture’s reactivity becomes particularly important when suture reaction might affect function of the tissue, as in neurosurgery or cardiovascular surgery.
Tissue reaction also impedes healing of normal tissue. The presence of infection or contamination has a much greater effect on the more reactive sutures. For example, the inflammatory process associated with infection will often phagocytose surgical gut at an increased rate, leading to resorption before healing and wound dehiscence. Likewise, the presence of silk has been shown to increase the incidence of infection 10,000-fold in contaminated incisions. Finally, nonabsorbable suture, such as silk or polyester, may cause ulceration of the gastrointestinal tract or serve as the nidus for stone formation in the urinary bladder or gallbladder if it penetrates the lumen of those hollow organs.
PREPARATION OF SUTURE MATERIAL
Several methods are used by suture producers to sterilize various suture materials. Many prepackaged sutures are sterilized by gamma irradiation. Ethylene oxide is used on those products that will not tolerate irradiation. Prepackaged suture material has a sterile shelf life that varies as denoted by the expiration date printed on the package. Consequently, expiration dates should be periodically checked and stock rotated when new supplies arrive. Steam sterilization (autoclaving) can be used on some materials, with variable damaging effects. The following describes the effects of autoclaving:
I Severe damage, destroys tensile strength
II Mild damage, reduces tensile strength
III Tolerates at least three autoclavings without loss of tensile strength
Sutures that can be steam sterilized are sometimes bought in bulk and are sterilized in the practice. When preparing such suture, an appropriate number of strand lengths (usually 30 to 60 cm) should be cut and coiled or loosely wound around a card or sponge. This will avoid repeated autoclaving, which will damage even the most steam-tolerant material.
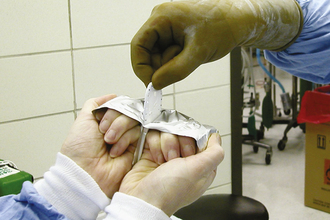
Prepackaged suture material is opened (by a nonsterile assistant) onto the instrument tray by peeling back the outer packaging (Figure 29-53). The surgical assistant opens the inner pack by tearing off one end and grasping the suture end or swaged needle with needle holders as directed on the package. Before use, the suture should be stretched slightly to overcome memory, but not snapped because this commonly leads to contamination of the suture end. Any excessive preserving fluid should be wiped off. The tissue drag of many sutures (particularly the synthetic multifilaments) can be reduced by moistening with sterile saline. However, this will reduce the tensile strength of silk, and surgical gut will imbibe water to swell and soften. Multifilament suture strands tend to accumulate blood as they pass through tissue and should be wiped off with a moistened sponge between uses.
SUTURE NEEDLES
Suture needles vary considerably in shape, point design, method of attachment to the suture (eye), and size. The size and shape of the needle are determined by the thickness of the tissue sutured and the depth of the incision (Figure 29-54, A). Straight needles are usually used superficially in accessible locations where the needle can be manipulated with the fingers. Curved needle types are manipulated with needle holders. One-fourth (¼) circle needles are commonly used in ophthalmologic surgery, whereas three-eighths ( ) and one-half (½) circle needles are most popular in general surgery.
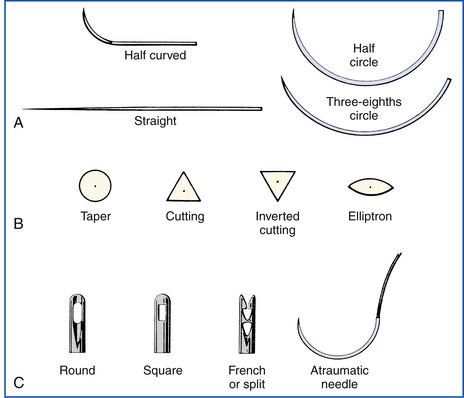
FIGURE 29-54 A, The size and shape of the needle are chosen according to the thickness of the tissue. B, The needle point design is determined according to the toughness of the tissue on which it is used. C, The needle is attached to the suture either by threading through an eye or by being swaged. (Courtesy Sherwood Davis & Geck, Milford, N.J.)
The point design varies with the toughness of tissue being sutured (Figure 29-54, B). Skin, eye tissues, and some tough facial tissues are sutured with a cutting-edged needle. Cutting needles have two or three opposing cutting surfaces. Regular cutting needles have a third cutting surface on the inside curvature resulting in a “cutout” effect. Reverse cutting needles have the third cutting surface on the outside curvature, resulting in a more robust design with less cut-out effect. Reverse-cutting needles (K needles) are therefore preferred by some surgeons because they do not bend or break as easily. The cutout effect makes passage of the needle and suture easier, but a true incision that can leak is created. Cutting-edged needles should not be used when an airtight or watertight suture line is required. Taper needles do not actually cut tissue, but spread it open around the needle and following suture. This spreading effect prevents hemorrhage and results in a sealed suture line. Taper needles and reverse-cutting needles are used in suturing most hollow organs.
TECHNICIAN NOTE
Cutting-edged needles should not be used when an airtight or watertight suture line is required (lung, urinary bladder, intestine, etc.).
The needle can be attached to the suture by three different methods (Figure 29-54, C). Single-eyed needles have one hole in the head of the needle. The eye should be single threaded because double threading leaves a large bulk of suture around the shank, which will cause excessive tissue drag and damage as the needle is passed. A curved needle is threaded from within the curve so that the short end of the suture falls away from the outside curve. About 10 cm of suture should be pulled through the eye. These steps will help to prevent the suture from pulling out of the eye during suturing. Spring or French-eyed needles have a complete eye and an incomplete “spring” eye. Suture is threaded through the complete eye and is forced back through the spring eye, which grips the suture end.
Eyeless or swaged needles are attached directly to the end of the suture by the factory. The surgeon draws a single strand through the tissue and automatically uses a new sharp needle with every strand. Therefore swaged needles are the most atraumatic and most popular surgical needles in veterinary practice.
EQUINE SURGICAL ASSISTANCE
ROLE OF THE VETERINARY TECHNICIAN IN SURGICAL ASSISTANCE WITH EQUINE PATIENTS
It is important, particularly with large animal surgeries, that the technician, whether as a scrub nurse or assistant, anticipates what is needed with regards to preparation of the equine patient and what will be needed during surgery (i.e., instrumentation) to reduce the anesthesia time. This will lessen the potential for any postanesthetic recovery complications. Surgeons rely instinctively on the technician in surgery to be prepared and have things moving in an efficient manner.
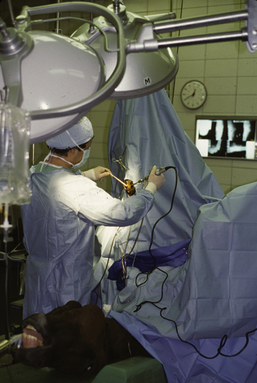
PATIENT AND INSTRUMENT TABLES SETUP
As with small animals, the function of draping is to separate the sterile surgical site from the rest of the contaminated area around the patient. Draping should only be performed by members of the surgical team who are aseptically gowned and gloved. In most cases, it takes at least two persons to correctly perform draping of a horse because of the size of the drapes. Abdominal surgery is one of the most common surgical procedures performed on a horse. Therefore draping of the ventral abdomen for abdominal surgery in the horse is described here as the example.
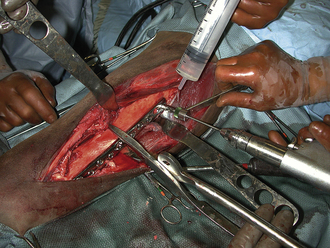
Once the animal has been surgically prepped, sterile stockinettes or leg drapes are placed individually over each hind limb (Figure 29-55). Next, the horse is draped in a similar manner as a small animal would be, with hand towels placed in a four-quarter fashion around the incision site (Figure 29-56). These are secured with several Backhaus towel clamps. Then a large laparotomy drape is placed with a person positioned on opposite sides of the patient carefully unfolding the large drape over the horse. The most effective way of doing this is first placing the drape over the center of the surgical site, on top of the already secured hand towels, and carefully unfolding the large drape with a backward step away from the horse. Then, in a coordinated fashion, the drape is unfolded longitudinally to cover the entire animal (Figure 29-57). If an equine laparotomy drape is used, these drapes are already fenestrated, so no cuts are needed to create the fenestration. Towel clamps are used to secure the laparotomy drape by clamping to the towel clamps underneath the drape (Figure 29-58, A). The exposed towel clamps are covered with a single 4 × 4 gauze, and an adhesive, impervious drape is placed directly over the incision site (Figure 29-58, C). An adhesive spray is necessary to get good contact (Figure 29-58, B). The gauze prevents the adhesive drape from sticking to the clamp. However, it is important that none of these gauze sponges fall into the abdominal cavity unnoticed. Serious life-threatening consequences could occur.
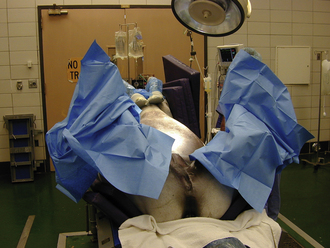
FIGURE 29-55 Draping of an equine surgery patient. Leg drapes are used to cover the rear limbs of the patient.
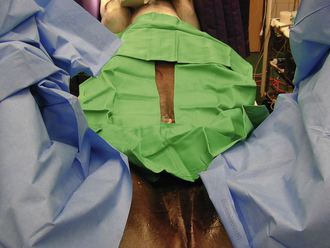
FIGURE 29-56 Draping the ventral abdomen of an equine surgery patient. Hand towels are placed in a four-quarter fashion around the incision site.
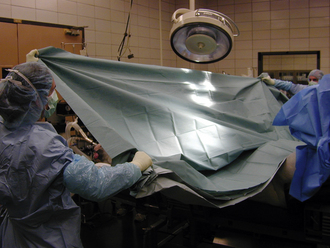
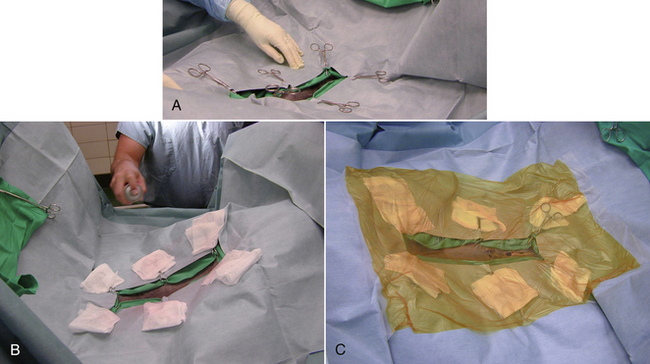
FIGURE 29-58 Draping the ventral abdomen of an equine surgery patient. Towel clamps are used to secure the laparotomy drape by clamping to the towel clamps underneath the drape. A, The exposed towel clamps are covered with a single 4 × 4 gauze, and an adhesive spray is used to improve the adhesiveness of the adhesive drape. B, An adhesive, impervious drape is placed directly over the incision site. C, The gauze prevents the adhesive drape from sticking to the clamp.
INSTRUMENT SETUP AND HANDLING
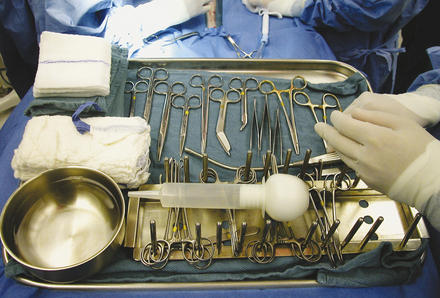
If there is adequate surgical technical personnel, the surgical instrument packs are opened during the time that the surgical team personnel are draping the horse. This will reduce anesthesia time. There are some situations in which two tables are sterily draped, depending on the amount of instruments needed. This is often the case with orthopedic surgeries. Unlike small animal surgery setup, the instrument tray(s) are set up on a table separated from the patient table. The instrument table is draped by a nongowned assistant (Figure 29-59). The surgical instrument packs needed for the surgery are placed on a Mayo stand or similar type of table, and the outer wrap only is opened by the surgical nurse or technician that is not gloved and gowned (Figure 29-60). Then one of the surgical team personnel opens the inner wrap and removes the tray from the stand and moves it onto the instrument table. Setup of the surgery table includes the instrument tray, sterile light handles, suction hose, electrocautery, fluid bowl, and suture. During the positioning of the horse on the table, an electrocautery plate with contact gel is positioned under the animal and plugged into the unit at some point in time during the preparation of the animal. If the horse is draped for abdominal surgery, the surgeon and assistant create a pouch between the back legs of the horse by clamping a hand towel folded to the drape using a nonpenetrating instrument, such as Allis forceps (Figure 29-61). The suction hose and cautery line are run through the rings of these instruments to secure them to the table and held in this pouch. These are then run over the drapes between the legs of the horse and connected by the scrub nurse. A sterile IV fluid line may also be set up at this time. During this setup of the table, the surgeon’s assistant should also be setting up the surgical instruments. The instrument tray is set to the back of the surgical table, a hand towel is placed in front of the tray, and the frequently used instruments are placed on the towel to allow for immediate access (Figure 29-62). The instruments include scissors, forceps, needle holders, and hemostats. The blades are attached at this time to the scalpel handles. The bowl is positioned on the edge of the table so that sterile saline can be poured into the bowl by a nongowned scrub nurse. It is important during the surgical procedure, particularly in horses, that the instruments be kept clean during the surgical procedure. This is done by taking a wet 4 × 4 towel and gently wiping the blood from the used surgical instrument and placing it back onto the instrument table. However, if an instrument becomes contaminated, such as opening a hollow viscus of the GI tract, this instrument is discarded from the surgical table. At any time in which a break in asepsis occurs whether a glove or a gown becomes contaminated, these need to be immediately discarded and replaced. It is important during the surgical procedure that the technical assistant be efficient and develop a thought process of anticipating the next move of the surgeon. This will create a more efficient surgical environment and reduce the anesthesia time.
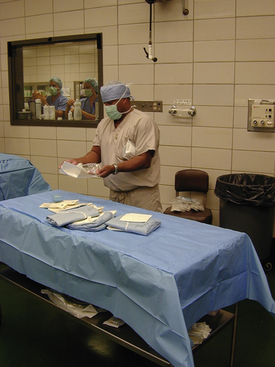
FIGURE 29-59 Instrument table is being set up for equine surgery. The surgical gowns were commercially packaged inside the drape.
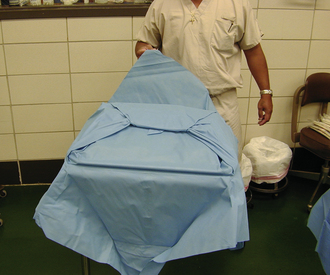
FIGURE 29-60 Preparing for equine surgery. The surgical nurse opens the outer wrap of the instrument pack. One member of the surgical team will aseptically open the inner wrap and move the pack onto the instrument table.
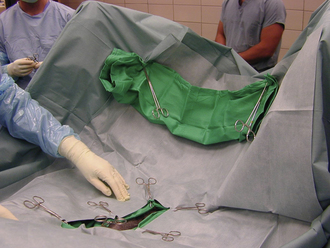
FIGURE 29-61 A pouch is made from a sterile folded hand towel and clamped to the surgery drape by nonpenetrating clamps between the horse’s rear limbs to hold the suction hose and cautery line.
ORTHOPEDIC SURGERY
Positioning of a horse on the surgery table for orthopedic surgery greatly depends upon the location on the limb of the orthopedic problem and the procedure. Arthroscopic procedures in most cases are performed in dorsal recumbency (Figure 29-63). Impervious plastic drapes are used to reduce strike-through contamination and tearing. An adhesive, impervious type of drape is used directly over the surgical site (Figure 29-64). As performed with small animal orthopedic surgery, a stockinette is usually not sutured around the incision site with horses.

PROPER TISSUE HANDLING TECHNIQUES IN THE EQUINE HOLLOW ORGAN SURGERY
Surgical manipulation of tissue in the horse is similar to small animal surgery. Refer to that section regarding this description. There are things that are different that will be expanded upon.
HOLLOW ORGAN SURGERY
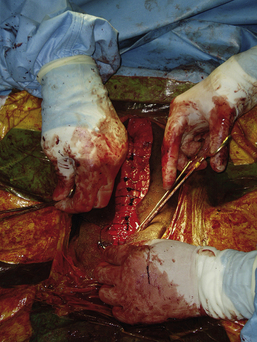
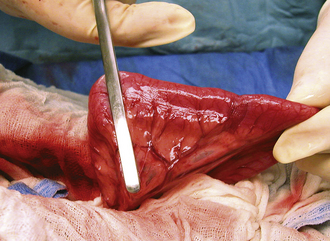
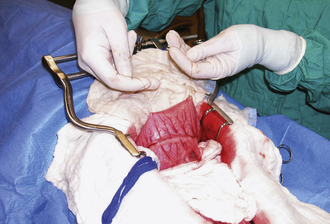
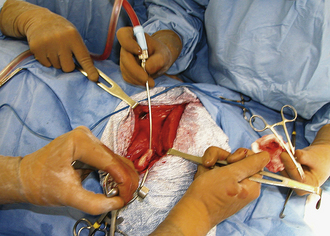
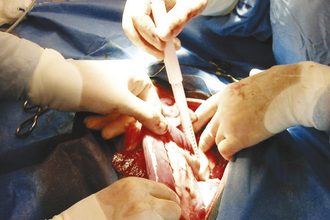
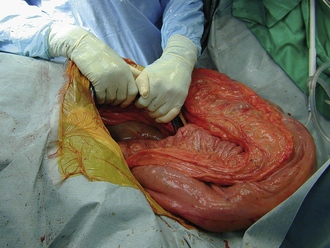
Hollow organ surgery, especially intestinal, can be a quite involved procedure in the horse, mainly because of the size and length of the intestinal tract. The small intestine, for example, is more than 80 feet in length. Whereas the large intestine will contain several pounds of ingesta, which can create a problem when manipulating it. Because of the weight of the large colon in the horse, risk of tearing and ultimate contamination of the abdominal cavity is great. Thus as an assistant, careful handling of the large colon is important (Figure 29-65). If the contents from the large intestine is to be evacuated, this is done via a colon tray that is positioned along side of the horse and draped with sterile impervious drapes that allow the large colon to be placed onto the tray away from the abdominal opening. This allows the colon to be evacuated without the risk of contamination of the abdominal cavity (Figure 29-66). It is the responsibility of the assistant to maintain the large colon on the tray during the evacuation process so that it is not pulled back into the abdominal cavity until the enterotomy site is closed. If a small intestinal resection is performed in a horse, the segment of small intestine is isolated from the rest of the abdominal cavity as much as possible, using laparotomy sponges and impervious drapes. It becomes a coordinated effort between the surgeon and the assistant to ensure that the portion of the small intestine that is undergoing surgery be kept on the table and to keep the majority of the intestine in the abdominal cavity. It is important for the assistant to maintain proper orientation of the segments during reanastomosis and to maintain their proper positioning for the surgeon during this closure and suturing procedure. Any instruments that came in contact with the ingesta should be discarded from the surgical table and after the procedure is completed, a change of gloves may be in order before abdominal closure.
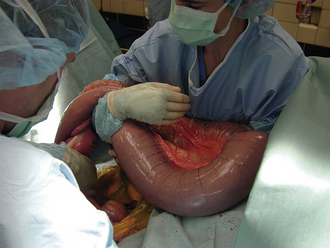
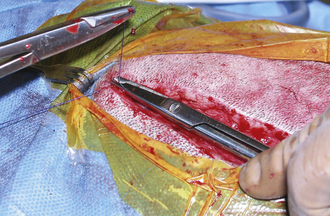
FIGURE 29-65 During abdominal surgery, the large intestines must be carefully handled during exploration of the abdominal cavity. In this photo, the large colon is being cradled by the assistant.
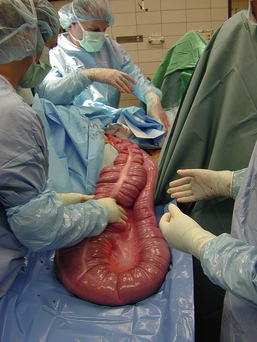
FIGURE 29-66 The large colon placed on the colon tray in preparation for an enterotomy and content evacuation. Notice that the opening of the abdominal cavity is being draped off.
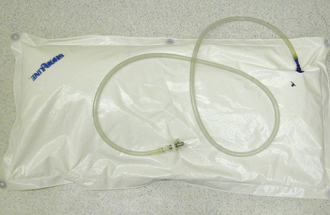
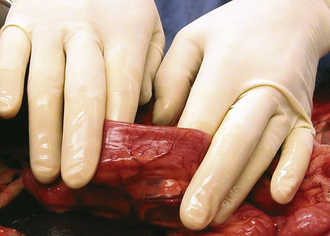
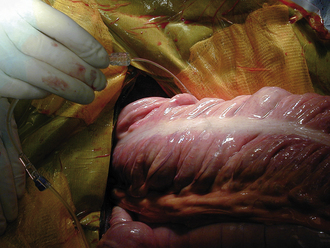
The intestinal tract can easily become dehydrated if the intestines are left out of the abdominal cavity for an extended period of time and ultimately can result in damage and possible risk of creating areas for adhesion formation. It is important that the assistant be aware of tissue dehydration during the entire surgical procedure and that the exposed intestinal segment is kept moist. This can be accomplished by several means, such as an IV drip set hooked to a pressurized fluid bag or a bulb syringe filled with irrigation saline (Figure 29-67).
ORTHOPEDIC SURGERY
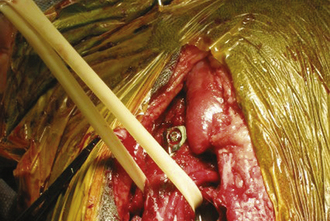
Aseptic technique is an absolute must. Instrument handling or sharp ends of fracture bones can result in glove tearing. It is imperative that torn gloves be replaced immediately. Frequent irrigation of the tissue is absolutely vital. Irrigation is an absolute must during bone drilling (Figure 29-68). Heat from the drilling process will cause thermal damage to the bone. Being proactive in keeping blood removed from the surgical field, via suction or blotting, will allow the surgeon to be more efficient and provide better visualization of the fracture during repair. Proper tissue retraction and fragment reduction during fracture repair are also important roles that an assistant plays in orthopedic surgery on the horse.
RETRACTION TECHNIQUES
Retraction techniques in equine surgery are, for the most part, quite similar as in small animals, with the exception of abdominal surgery. In these cases, it is difficult to maintain self-retaining retractors of any type within the abdominal incision to allow for exploration. Thus in some cases, the assistant retracts the abdominal wall with their hands (Figure 29-69). As with small animal orthopedics, retraction of muscle and tendon is necessary for visualization of fractures in horses. Hohmann retractors are effective hand-held retractors for deep tissue surrounding bone (see Figure 29-68).
HEMOSTASIS
Because of the size of the horse, loss of blood in most surgical procedures is not a major concern. It becomes a concern in surgeries, such as open sinusotomies, nasal septum resections, ovariectomies, castrations, or uterine trauma and cesarean sections (C-sections). Sponge hemostasis is avoided in abdominal surgery because of the potential for loss of a sponge within the abdominal cavity, which can be devastating and quite life threatening to the horse. The sponge will cause a severe inflammatory reaction resulting in peritonitis and adhesions that could significantly impair the normal function of the equine gastrointestinal tract. Thus in these cases, suction is used to evacuate fluids from the area. With actual cut arteries or large veins or a situation with large-vessel bleeding, these are clamped and ligated with suture material similarly described under the small animal section. With small-vessel bleeding, it is a common practice to use hemostats with a combination of electrocautery to fuse the vessel walls together (see Small Animal section).
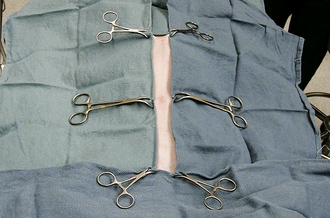
SUTURE MATERIALS USED IN HORSES
Since the basic concept of suture types and use of suture material has already been covered in this chapter, it will not be discussed. However, because of the size of the horse, larger suture material is used compared with small animals. For closure of abdominal organs, in most cases, a 2-0 absorbable material is used. Closure of the ventral abdominal wall of a horse requires at least a No. 2 or a No. 3 absorbable suture material (Figure 29-70). PDS or Vicryl are commonly used suture material. For closure of the subcutaneous space, often a 0 absorbable suture material is used. Zero or 2-0 nonabsorbable material (nylon or Prolene) is used for apposition of the skin. In most cases, suture material with swaged needles are used. This saves time and improves efficiency. It is important for the surgical assistant to have the proper suture material readily available for the surgeon at the time it is needed. Often, the required sutures are discussed before surgery. It is a common practice for the surgical assistant to open the suture material and have it ready by arming a needle holder with suture just before the time it is requested.