Small Animal Surgical Nursing
When you have completed this chapter, you will be able to:
1 Describe the preoperative, intraoperative, and postoperative responsibilities of the veterinary technician in surgical assistance.
2 Describe indications and use of prophylactic antibiotics for surgical patients.
3 Describe signs of blood loss in the postoperative patient.
4 Discuss concerns related to hypothermia in anesthetized patients and describe methods for increasing patient body temperature intraoperatively and postoperatively.
5 Describe postoperative abnormalities that can occur in surgical incisions.
6 Describe the procedure for removal of skin sutures.
7 Discuss general considerations for care of bandages and drains.
8 List and describe indications, preoperative, intraoperative, and postoperative considerations for common elective procedures in dogs and cats.
9 List and describe indications, preoperative, intraoperative, and postoperative considerations for common nonelective procedures in dogs and cats.
10 List considerations related to client education for discharged surgical patients.
PREOPERATIVE PATIENT ASSESSMENT
The veterinary surgical candidate should undergo a complete preoperative assessment. It is important to know what the primary problem is so that specific needs can be anticipated. Elective surgical procedures will not require the same demands that emergency or urgent surgical procedures will. Eating, drinking, urination, and defecation habits of the animal should be ascertained. An animal that has not been eating or drinking will likely require rehydration before anesthesia and surgery. Rehydration may then necessitate a blood or plasma transfusion because dilution of the blood cell volume occurs with rehydration. Fluids should not be withheld to prevent anemia. If the animal has eaten the day of scheduled surgery, the procedure will have to be delayed to decrease the risk of aspiration (inhalation of stomach contents into the trachea and lungs). The animal should not have food for at least 12 hours before anesthesia, but water should not be withheld. Emergency surgeries will have to be performed whether the animal has eaten or not, but owners should be warned of the increased risk of aspiration. Temperature, pulse rate and quality, respiration rate and character, capillary refill time, mucous membrane color, body weight, and demeanor should be assessed before surgery. Abnormalities should be brought to the attention of the surgeon.
Preanesthetic screening will depend on the animal’s condition and reason for surgery. Specifics of this are covered in Chapter 27. From a nursing standpoint, it is important to discuss with the surgeon what diagnostics are appropriate before surgery and ensure that they are performed in a timely manner. Diagnostics might include blood work, such as packed-cell volume (PCV), total plasma protein (TP) concentration, blood urea nitrogen (BUN) concentration, blood glucose concentration, complete blood count (CBC), complete biochemical analysis, and heartworm test; blood gas analysis; electrocardiogram (ECG); radiographs; fine-needle mass aspiration; fecal analysis; and/or urinalysis. Abnormalities detected on the preanesthetic screen should be brought to the attention of the surgeon.
SURGICAL PREPARATION AND ANIMAL POSITIONING
It is the veterinary technician’s responsibility to inquire about the surgical procedure to be performed and what instrumentation will be required. The technician should have all the necessary equipment readily accessible and prepared for use. The operating room should be clean and anesthesia equipment checked for functionality and ready for use. A heated circulating water blanket should be placed on the operating table, turned on, and covered with a towel so that it is warm by the time the animal is positioned on the table. A heated water blanket should also be set up in the recovery cage (or the warmed blanket from the operating table can be placed in the cage with the animal). Hair clippers and skin cleansing solutions should also be made available for use.
Inadequate animal preparation or inappropriate positioning can hinder surgical technique and will result in wasted time spent correcting deficiencies. Aseptic protocol should always be followed with animal preparation and draping and with surgical instrument handling. The hair should be liberally clipped around the surgical site and the skin cleansed appropriately (see Chapters 28 and 29). The veterinary technician should be familiar with the type of surgery performed so that animal preparation is consistent and adequate.
PERIOPERATIVE ANTIBIOTICS
Prophylactic antibiotics are used to decrease the risk of infection in clean or clean-contaminated surgeries, but their use will not entirely eliminate infections associated with a surgical procedure. Using antibiotics to treat active infection is a completely different process and will not be discussed here. Antibiotics should never be given indiscriminately to animals undergoing surgery. All antibiotics have potential side effects, and their use also increases surgery cost. More importantly, indiscriminant use of antibiotics contributes to the development of resistant strains of bacteria (hospital “superbugs”) that are difficult to treat.
 TECHNICIAN NOTE
Antibiotics should never be given indiscriminately to animals undergoing surgery because this contributes to the development of resistant strains of bacteria (hospital “superbugs”) that are difficult to treat.
Indications for Prophylactic Antibiotics
• Operative time is more than 90 minutes. Open surgical wounds are constantly exposed to bacteria from the animal’s skin, the operative team, and the air. The longer the wound is open, the higher the chance of infection. Prolonged anesthesia also increases the risk.
• The patient is at increased risk of infection. Things that might increase the risk of infection include immunosuppressive drugs (steroids), Cushing’s disease (hyperadrenocorticism), some cancers, chemotherapy or radiation therapy, feline leukemia virus (FeLV) and/or feline immunodeficiency virus (FIV) positive, or any other immunosuppressive factor.
• A hollow viscus is to be entered (i.e., gastrointestinal [GI] tract, urinary bladder).
• The incision is to involve an area that is difficult to aseptically prepare (such as a toe or ear).
• Orthopedic implants are placed.
• Joint procedures that are long and aggressive or certain joint procedures that require multiple entrances into the joint (arthroscopy).
• Consequences of infection could be devastating, such as total hip replacement or spinal surgery of any kind.
• Prophylactic antibiotics are not recommended for short, clean surgical procedures, such as simple mass removal, osteochondritis cartilage flap removal, ovariohysterectomy, castration, and simple biopsy.
Therapeutic drug levels must be present in the wound fluid (serum) at the time of surgical incision or the antibiotics will not be effective. They should be given at least 20 minutes before the surgical incision is made. Antibiotics given 3 or more hours before the procedure select for resistant bacteria. Prophylactic antibiotics given more than 3 to 5 hours after the surgical incision has been made will likely not be effective in preventing infection. There is no advantage to continuing antibiotics beyond 6 to 24 hours after surgery unless it is necessary to treat an active infection or a break in sterile technique occurred during surgery. The appropriate antibiotic should be of narrow spectrum (but effective against the potential contaminant), achieve good tissue concentrations, and have minimal side effects. The veterinarian in charge should be questioned as to what antibiotic is appropriate for what surgical procedure and when antibiotic prophylaxis is needed. If a break in sterile technique occurred or the animal has an active infection, antibiotics are continued in the postoperative period according to the manufacturer’s dosing recommendations and under the supervision of the veterinarian in charge. Continuing antibiotics for other reasons (i.e., you want to be on the safe side) is a misuse of prophylactic antibiotics.
MONITORING
Intraoperative and postoperative monitoring are critical to proper surgical nursing care. Chapter 27 covers anesthetic monitoring in detail, and the reader should refer to that chapter for further information. Some important components of patient monitoring as they pertain to surgery and recovery after surgery will be covered here.
During surgery, a surgical plane of anesthesia is crucial to appropriate surgical technique and animal well-being, and careful monitoring in the perioperative period might alert the observer to potential fatal complications. The postoperative phase is a critical transition period from general anesthesia to consciousness, and continual monitoring should be provided until the animal is safely extubated, normothermic, and in sternal recumbency. Surgery can result in several potential problems, including blood loss, hypothermia, pain, and cardiac and respiratory problems. The veterinary surgical technician must be prepared to deal with changes in animal status during and after surgery and address issues as the need arises. Monitoring should involve a series of evaluations and tests. Suspected complications during anesthesia and recovery are based on a group of signs consistent with a problem, not just one abnormality.
Patient monitoring does not stop once the animal has recovered from anesthesia. As long as the animal is hospitalized, vital signs, behavior, appetite, and the surgical incision should be evaluated. Depending on animal status, daily or more frequent observation of these parameters is performed. Abnormalities should be reported to the veterinarian in charge.
TECHNICIAN NOTE
One abnormal sign at one given time is not enough to diagnose a significant problem. All indicators (temperature, pulse, respiration, mucous membranes) should be evaluated serially to determine a trend in the animal’s condition. It is this trend that will determine the severity of the postoperative problem and dictate the appropriate treatment.
BLOOD LOSS
Many procedures can result in substantial blood loss as a complication, or blood loss could be due to the inherent nature of the procedure. PCV and TP should always be assessed before surgery to obtain a baseline value. Preoperative anemia should be brought to the attention of the veterinarian in charge, and, if present, a CBC should be performed. If substantial blood loss occurred during surgery, the PCV and TP should also be assessed postoperatively. It can be difficult to determine if an animal is hemorrhaging or has lost a substantial amount of blood immediately postoperative because a painful, recovering animal can have similar clinical signs. Temperature, heart rate, pulse quality, respiration, and character of mucous membranes should be examined periodically during and after surgery. Animals with substantial blood loss may experience continued hypothermia or a drop in body temperature, rapid heart rate with weak peripheral pulses, rapid respiratory rate, and pale or white mucous membranes. Abnormalities should be promptly reported to the veterinarian in charge. Other signs include abdominal enlargement if intraabdominal hemorrhage occurs, incision swelling or oozing of blood, and dyspnea and decreased ventral lung sounds if intrathoracic hemorrhage occurs. Another important thing to remember is that changes in PCV and TP may not occur immediately with blood loss, and these tests may need to be repeated a few hours after the incident of blood loss to document abnormalities or to assess continued blood loss. It is not unusual for the PCV and TP to drop 10% just as a result of anesthesia and surgery, even when no major blood loss occurred.
Besides PCV and TP determination, abdominocentesis (aspiration of fluid from the abdomen), thoracocentesis (aspiration of fluid from the thoracic cavity), or fine-needle aspiration beneath the incision can be performed when the patient is suspected of having substantial bleeding. If the sampled fluid has a PCV nearly equal to the systemic PCV and clinical signs are consistent with hemorrhage, the index of suspicion should be high. Treatment strategies include crystalloid fluid bolus, colloidal fluid administration, blood transfusion, oxygen carrier fluid administration (Oxyglobin), pressure bandages, and/or reoperation with ligation of bleeding vessels. The treatment of choice depends on the animal’s status and ability to maintain a stable condition. The reader should review the clinical signs and treatment strategies for various types of shock as discussed in Chapter 33.
HYPOTHERMIA
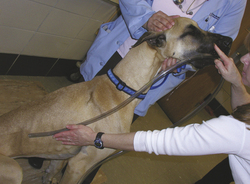
Hypothermia is defined as a subnormal body temperature. Once an animal is anesthetized, its body temperature begins to drop. It is important to monitor body temperature throughout general anesthesia and during recovery. All anesthetized animals should be placed on a heated circulating water blanket that is covered with a towel to help maintain body temperature, especially small dogs and all cats, during surgery. Although rare, if the body temperature rises above normal during the procedure, the heat source can be turned off. Small animals become hypothermic quickly when placed under general anesthesia, especially if a body cavity is opened. It is important to remember that the more surface area exposed (i.e., large incision exposing the abdominal organs), the faster and lower the body temperature is expected to drop. If the exposed area is moist, evaporative cooling occurs. Mechanisms to maintain body temperature during surgery include placing animals on heated circulating water blankets; wrapping paws and the body in plastic wrap to prevent heat loss (Figure 30-1); wrapping warm water bottles (or gloves filled with warm water) with a towel and placing them next to the animal; covering areas not involved in the surgical procedure with an insulated blanket; and using a warm air blanket (Bair Hugger, Arizant Healthcare, Inc.) on areas not involved in the surgical procedure. Heat lamps are not recommended because they can cause thermal burns, especially in an anesthetized animal that cannot respond to painful, concentrated heat. It must be remembered that electric heating pads should never be used to warm anesthetized animals. Electric heating pads concentrate heat and cause thermal burns (Figure 30-2). The veterinarian is liable for burns caused by electric heat units because it is a known cause of thermal skin injury during anesthesia.

FIGURE 30-1 One method of heat retention during surgery is to wrap the animal in plastic. This works well for small dogs and cats.
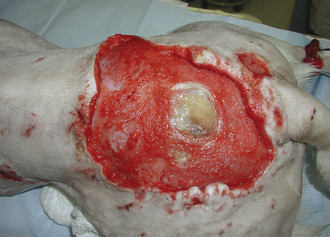
FIGURE 30-2 The area of denuded skin over the rump of this dog is a result of a thermal burn sustained from an electric heating pad used to maintain body temperature during ovariohysterectomy.
After surgery, the animal is placed in a warm area to recover with a heated circulating water blanket. If the patient is severely hypothermic, a warm air blanket and/or warm water bath can be used to raise the temperature quickly (Figure 30-3). A warm water bath is made by filling a large, deep pan, big enough to place the entire animal in, three-fourths full with warm water, placing a thick garbage bag over the pan and water, and placing a towel over the garbage bag where the animal is to be placed (similar to a heated water bed). The animal is placed in the water bath allowing the warm water to “wrap” around the animal; the plastic prevents soaking. The animal must be monitored closely to prevent accidental puncture of the plastic and drowning (Figure 30-4). Only small dogs and cats can be warmed in this way.
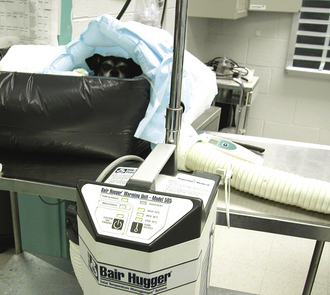
FIGURE 30-3 Blankets that blow warm air and warm water baths can be used to bring the body temperature up quickly. Notice the dog placed under the blue hot air blanket in a well-constructed water bath.
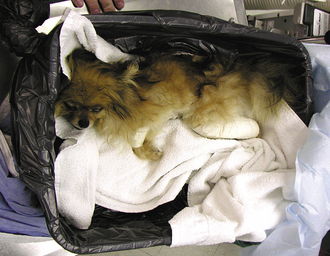
FIGURE 30-4 This is a close-up of a water bath. A large container is filled with warm water and covered with thick plastic and a towel. The dog or cat is placed on the towel in the container and is allowed to sink down into the warm water with the plastic preventing soaking. The animal must be monitored carefully to prevent accidental puncture of the plastic and drowning.
Body temperature should show a steady rise as the animal recovers. When the animal’s temperature approaches 100° F, heating sources can be discontinued, but the animal should be kept covered, and body temperature should be reevaluated periodically to ensure that it returns to and remains normal. If the temperature remains low or continues to fall, it may be an indication of a potential problem, and the veterinarian in charge should be alerted. Heat should be reapplied if the animal’s body temperature begins to drop after heat sources are removed.
PAIN
Intraoperative and postoperative pain assessment is important for animal well-being and health. During surgery, increases in heart rate, respiratory rate, and blood pressure and lightening of the anesthetic plane can indicate that the animal is in pain. During recovery, animals that are in pain, among other things, may vocalize, have elevated heart and respiratory rates, thrash, bite or chew at the surgery site, and/or become aggressive. Other signs of pain include a disinterest in the environment, crying upon manipulation, insomnia, and lack of appetite (Figure 30-5). It should be remembered that changes in vital signs can mean numerous things (e.g., elevated heart rate could also signify substantial blood loss). The animal should be carefully evaluated by the technician and surgeon before drug administration. It is best not to allow the animal to experience pain before giving pain medication. If an incision was made, pain is going to be experienced by the animal. It is up to the veterinary technician and surgeon to decide how much pain a particular procedure might cause. Painful procedures include fracture repair, amputation, declaw, joint surgery, and any major abdominal procedure. Moderately painful procedures include minor abdominal procedures (spay, cystotomy) and simple body wall hernia repair. Mildly painful procedures might include simple mass removal or biopsy. It can be difficult to determine how much pain an animal is in because animals respond so differently to pain. Some animals may act as if in pain after spay, whereas others may not, even though they are both likely experiencing pain. When in doubt, it should be assumed that the animal is having some degree of postoperative discomfort.
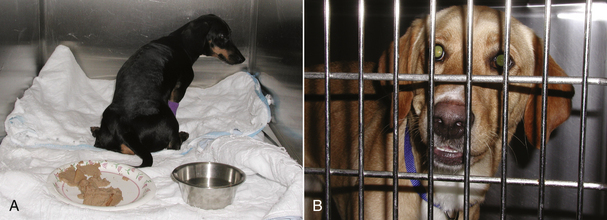
FIGURE 30-5 Note how the dog in (A) does not turn to face the door even when it is opened. Also note the full food dish in the front of the cage. This is a dog suffering from severe spinal pain and is uninterested in her environment. Comfortable animals are often interested in their surroundings and will come to the cage door to greet you. In spite of her tibia fracture, the dog in (B) is more than willing to interact with those around her.
Pain treatment is accomplished in several ways, and it depends on the animal, availability of pain medications, and the type of procedure that was performed as to what sort of regimen is chosen. Most soft tissue surgical pain will last 4 to 5 days after surgery. For bone and joint procedures, this should be extended another 4 to 5 days. It is best to preemptively manage pain rather than wait for the animal to show pain before administration of pain medication. If the animal is allowed to experience pain before administration of pain medication, then the pain is harder to treat and may not be relieved by the medication administered (see Chapter 26). Pain medication should be administered before surgery in the premedicants, and they should be continued throughout the surgical procedure and into the postoperative period according to the dosing regimen for the particular drug used. A wait-and-see attitude should never be adopted because this allows the animal to experience pain before treatment is given.
Another misconception is that animals will stay quiet and calm if they are in pain, so avoidance of pain medication is a form of treatment. You would never be treated that way in a hospital, and animals should not be treated that way. This is an ethical dilemma many veterinarians and technicians must face. An appropriately managed animal will likely sleep for several hours after surgery, should be comfortable when manipulated, should be alert and interested in its environment when aroused, and will likely be willing to eat and drink.
INCISION EVALUATION
Visual and palpable inspection of the surgical wound should be made daily (see Chapter 34 for detailed information on wounds and healing). The surgical incision is usually left uncovered after surgery. Ointments and creams (even antibiotic topicals) should not be placed on the incision because this can cause irritation, and components of the ointment can delay wound healing. The incision can be covered with an adhesive or a wrap bandage for the first few days after surgery to keep the incision clean, prevent contact with the hospital environment, and absorb seepage.
Abnormalities that can occur in the early postoperative period (1 to 3 days) include redness, swelling, drainage, and dehiscence (wound breakdown). An incision should be evaluated with respect to the type of surgical procedure performed. Elective operations, such as ovariohysterectomy and castration, can be expected to produce mild redness and swelling with no drainage from the incision site (Figure 30-6). However, if the wound was contaminated (e.g., laceration, perianal wound) or if the surgical exposure was extensive, the incision is expected to be somewhat swollen, reddened, and warm to the touch and have mild to moderate drainage in the first 24 to 48 hours postoperatively (see Figure 30-6). Swelling secondary to surgical trauma will usually resolve within 3 to 7 days after surgery. However, seromas (serum accumulation under the incision) and hematomas (blood accumulation under the incision) may persist for weeks.

FIGURE 30-6 These photographs were taken 4 hours after surgery. A shows a celiotomy incision following routine ovariohysterectomy, whereas B shows a celiotomy incision following severe traction on the skin during surgery for exposure. Note the minimal redness, swelling, and drainage from incision (A) compared with incision (B).
Surprisingly, most animals will not lick or chew at the surgical incision. Animals will usually lick or chew at the incision only if the character of the incision is irritating. Contributors to incision irritation include sutures placed too tight, traumatic tissue handling, suture reaction, tension on the suture line, clipper burn, prepping irritation, incision infection, and seroma formation. Only rarely will an animal chew the sutures because they are bored. Using appropriate suture technique will minimize incision self-trauma. However, if an animal begins to traumatize the incision via licking or scratching, an Elizabethan collar, bandage, neck brace, T-shirt, and/or chemical restraint should be used to protect the incision.
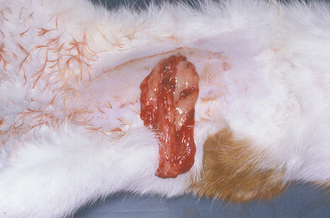
Seromas can form if extensive surgical dissection occurred beneath the incision, tissue planes could not be or were not adequately closed, or excessive motion occurs at the incision site. Seromas are recognized as localized areas of fluctuant swellings that are not usually painful or warm to the touch (Figure 30-7). Seromas will usually resolve without treatment. Warm compresses, hydrotherapy, and bandaging may aid in resolution. If the seroma is large and/or is causing impairment, drainage is warranted. Drainage should be performed aseptically, and an active, closed drain should be placed. It is important to keep animals calm in the postoperative period to decrease the chance of seroma occurrence. Hematomas are treated the same way.
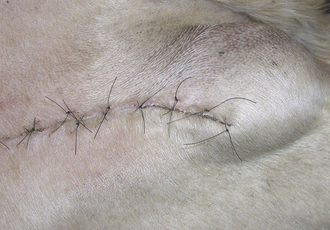
FIGURE 30-7 Note the swelling beneath the incision on cranial thigh of this dog. The swelling was nonpainful, and the dog’s vital signs were normal. The swelling was diagnosed as a seroma.
TECHNICIAN NOTE
Repeated aspiration of seromas can result in infection and should be avoided. If an area must be aspirated, it should be aseptically prepared before aspiration. Suspected abscesses should be aseptically aspirated for cytology and culture, but there is no reason to aspirate a suspected seroma unless for the purpose of treatment, which is rare.
If incision swelling occurs 4 to 6 days postoperative, is warm to the touch, or is associated with an elevated body temperature, reddened, and/or draining, the possibility of infection or cellulitis (infection along tissue planes) must be considered (Figure 30-8). Abscess or infection or cellulites must be treated by drainage, warm compresses, and systemic antibiotics. Some infected incisions can be flushed and managed with an active, closed suction drain, but others will require open wound management (see Chapter 35 for details on infected and open wound management).
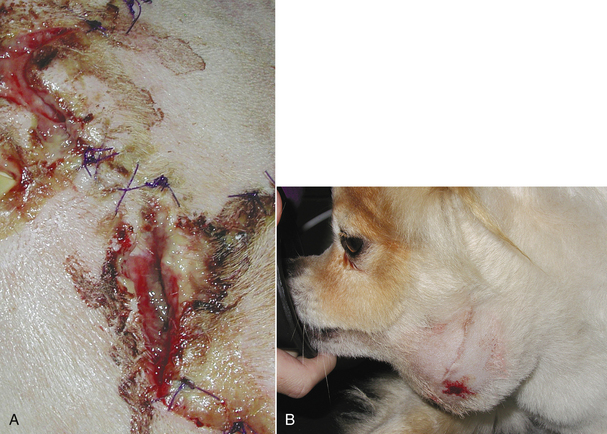
FIGURE 30-8 Incisional infection is recognized by drainage, redness, swelling, fever, dehiscence, and/or abscess formation. Notice the purulent discharge and partial dehiscence of the incision in (A). B shows an abscess that recently ruptured.
Wound dehiscence is defined as the separation of all layers of an incision or wound. Early recognition is imperative in any wound, but especially in abdominal and thoracic incisions. Dehiscence is most often due to technical error in suture technique, but incision complications can also play a role. Things that will contribute to wound dehiscence include using inappropriate suture to close a wound, inappropriate suturing technique, tension on the incision line, incision infection, seroma formation, or disease and/or drug therapy leading to delayed wound healing. Rarely would an animal self-mutilate an incision and cause dehiscence (see previous discussion).
Early detection of surgical incision problems is of paramount importance to help prevent more serious complications. If dehiscence is suspected, the reason for dehiscence should be ascertained. If the external suture layer (skin) is dehiscing and it is only partial, conservative management may be possible. The open portion of the wound will heal by second intention. However, the open wound will likely need to be bandaged and the animal placed in an Elizabethan collar to prevent licking of the open wound and further dehiscence. If the phase of healing is early (first few days after surgery), cleansing and closure of the incision may be necessary depending on the degree of dehiscence. Dehiscence of deeper layers can be more serious and should be brought to the attention of the veterinarian in charge as soon as possible, especially if the incision involves the abdominal or thoracic cavity. Complete dehiscence of an abdominal wound can result in evisceration (exposure) of the abdominal organs, with subsequent contamination and infection (Figure 30-9). Complete dehiscence of a thoracic wound will result in a pneumothorax (air within the chest causing collapse of the lungs), a problem that may result in sudden death.
SUTURE REMOVAL
Suture removal is commonly performed by the veterinary technician. The procedure is usually performed 10 to 14 days after surgery because this is the approximate time that the wound is beginning to strengthen (see Chapter 34). If internal sutures were placed in the dermis with the external skin sutures, external suture removal can be performed in 5 to 7 days because the internal suture layer will hold the incision closed while healing continues. The incision should be inspected carefully for adequate healing before removal. A healed incision is usually confluent, slightly raised, and whitish in color and has no gaps between skin edges (Figure 30-10). An appropriately healed incision should not be draining, severely reddened, or severely swollen. However, if complications were encountered, then some reddening, swelling, and excessive scarring is expected. Incisions that are swollen, draining, reddened, or have obvious separation should be inspected by the veterinarian in charge before suture removal.
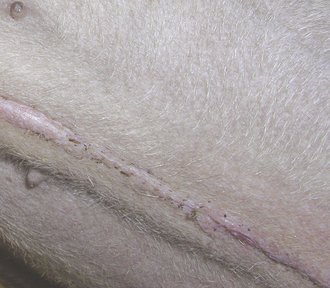
FIGURE 30-10 Healed incision. Note that the incision is not red, swollen, or draining. The skin edges are apposed, and the scar is slightly raised. This photo was taken 12 days after surgery.
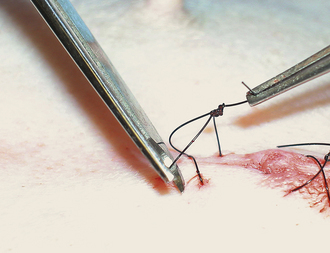
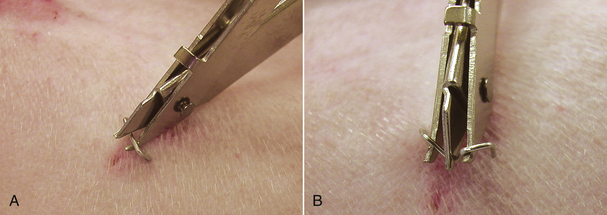
Skin sutures are usually easy to remove in the calm animal. Suture scissors are simple to use and allow removal with minimal discomfort. The suture should be grasped with thumb forceps or your finger. Gentle traction is placed on the suture, and the suture is cut near the skin surface (Figure 30-11). The suture is manually pulled out of the skin after cutting. If metal staples were placed, a staple remover should be used to allow removal with minimal discomfort (Figure 30-12).
BANDAGE CARE
If a bandage was placed, the limb in which the bandage was placed should be monitored carefully. The bandage should be kept clean and dry. A plastic bag or other water-resistant covering should be placed over the bandage when walking the animal outside and removed once back inside. The plastic will prevent the bandage from getting wet, but it should not be left in place because moisture will accumulate under the plastic if left on for extended periods of time. The animal’s toes should be checked twice daily for swelling or coldness as long as a limb bandage is in place. This is especially important immediately after placement. Swollen toes might be an indication the bandage is too tight. If the bandage gets wet, dirty, has an odor, or the toes become swollen or cold, it should be changed. A soiled, wet bandage can lead to sore formation and incision infection. Bandages placed too tight can result in vascular compromise to the skin with death and sloughing. Bandages are changed at intervals designated by the veterinarian in charge and depending on the reason for placement. Bandages covering open wounds will have to be changed daily. Some wounds drain excessively, causing serum to seep through the bandage and extend to the external environment. This is called strike-through (Figure 30-13). Strike-through must be prevented to help prevent wound infection. The bandage must be changed multiple times a day under such circumstances (see Chapter 34 for information on bandaging wounds).
DRAIN CARE
Drains are placed to collect fluid under a wound (surgical incision). They are often placed when large amounts of tissue are resected (mammary chains, amputation, large skin masses) or when a large amount of drainage is expected (a contaminated or infected wound). If a drain is placed, the drain exit site should be kept covered with a bandage. Additionally the animal should be placed in an Elizabethan collar to prevent premature removal or drain breakage by the animal. Active drains (drains that are sealed to the environment and actively collect fluid from the wound into a reservoir) should be emptied as needed (Figure 30-14). Passive drains (drains that provide an exit port for fluid to the external environment) should be avoided because of risk of ascending bacterial infection and difficult maintenance as a result of constant drainage of fluid through the drain exit site, though they are placed under some circumstances (see Figure 30-14). If passive drains are used, the bandage should be changed frequently to prevent strike-through. Drains are removed when the amount of drainage has substantially decreased. Some drainage is expected as long as a drain is in place as a result of tissue irritation by the drain, but it should be minimal.
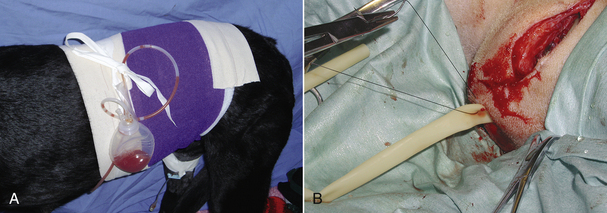
FIGURE 30-14 Drains. A, Active drains actively suck fluid from the wound bed into a sealed reservoir and are preferred over passive drains. B, Passive drains are placed under incisions and just provide surface area for fluid to drain from the wound with gravitational forces. They are more prone to ascending infection and are harder to manage. In photo B the wound is being closed over a rubber drain (yellow). The incision and drain will be bandaged afterward.
RESTRAINT
Animal restraint is important for appropriate surgical technique. Naturally the animal will have to be manually restrained during the preoperative examination and sample collection; however, surgical restraint involves sedation and/or general anesthesia. The type of surgical procedure dictates whether simple sedation or general or local anesthesia will be required. The specifics of anesthetic drug administration are covered in Chapter 27 and should be reviewed. Appropriate protocol should be discussed with the surgeon before surgery so that preparation of the animal and the operating room can be initiated.
All animals should be well controlled after surgery to minimize complications. The length and severity of confinement depend on the type of procedure performed. Animals undergoing routine sterilization or simple mass removal usually require 10 to 14 days of restricted activity, whereas animals undergoing orthopedic surgery will likely require 6 to 8 weeks of confinement. No animal should be allowed to roam free immediately after surgery. Additionally, self-trauma should be prevented.
Besides crate, leash, and room confinement, chemical agents and mechanical devices can also be used for restraint. Tranquilizers and noxious-tasting substances are commonly used chemical restraints. Tranquilizers must be used with caution because they can have undesirable side effects. They are not meant to be used long term. Phenothiazine derivatives (acepromazine) are commonly used tranquilizers in veterinary medicine, but α2-adrenergic agonists, benzodiazepines, and cyclohexamines are also used (see Chapter 27 for more information on drugs used for sedation). Appropriate crate or room confinement usually will suffice without the addition of tranquilization.
Noxious-tasting agents are used to prevent animals from licking or chewing, and they must also be used with discretion. Some commonly used substances include Bandguard Cream (Schering-Plough), Bitter Apple (Grannick’s), Tabasco, and various thumb-sucking preparations. The agent can be impregnated into bandage material, and some can be placed directly on the skin around the incision. These agents should never be placed directly on the incision because they can burn, irritate the incision, and have the potential to delay wound healing.
Mechanical restraint devices include the Elizabethan collar, the body brace, the side bar, hobbles, and various bandages. These devices are used to limit motion, prevent licking and chewing, and prevent weight bearing. The assembly, materials necessary, specific indications, contraindications, and complications have been adequately described elsewhere (see Chapter 34 and Recommended Reading) and are beyond the scope of this chapter. A properly selected, constructed, and applied device will be well tolerated by the animal and effective for its desired purpose.
COMMON SURGICAL PROCEDURES
The veterinary technician must have a working knowledge of common surgical procedures to properly prepare an animal preoperatively, act as an efficient surgical assistant, and manage the immediate and long-term postoperative care. The remainder of this chapter reviews common small animal surgical procedures performed in veterinary practice. A brief description of the procedure, with emphasis on the role of the veterinary technician, will be given.
ELECTIVE VERSUS NONELECTIVE SURGERY
Surgical procedures are divided into elective and nonelective. Elective procedures are performed at the veterinarian and owner’s convenience, usually in healthy animals. Spay, castration, and declaw are examples of such procedures. Some procedures must be done to improve the animal’s quality of life, but are not necessarily urgent, such as stifle stabilization for cranial cruciate ligament rupture, correction of patella luxation, and cancer resection. For these procedures, if animals are not ideal candidates for surgery at the time of presentation, surgery can be delayed. However, ideally, surgery would be performed at some point to alleviate the animal’s clinical signs or to decrease the chance of tumor spread. Nonelective surgical procedures must be done urgently. These are usually emergency procedures performed on compromised animals.
TAIL DOCKING ON PUPPIES
INDICATIONS
Tail docking in young puppies is specifically performed for aesthetic reasons. Dog breeders have traditionally developed breed standards by alteration of the breed character with surgery. Tails are docked according to breed standards set forth by the American Kennel Club.
PREOPERATIVE CONSIDERATIONS
The dam can get upset as puppies are removed from her presence for the procedure. Some dams will even become aggressive. Care must be taken with removal and replacement of the puppies from the nest. If the dam becomes too upset, it may be necessary to place her in another room while the procedure is performed on the puppies. Alternatively, some dams are more comfortable in the same room with the puppies.
Tail docking should be performed during the first week of life (3 to 5 days of age). At this age, the procedure can be performed without general anesthesia and is minimally traumatic to the dam and puppies. It must be remembered that puppies of this age are immunogenetically naive. It is important to perform the procedure in an area where the puppies will not be exposed to a high concentration of infectious agents.
TECHNIQUE AND INTRAOPERATIVE CONSIDERATIONS
The puppy should be cradled in the palm of both hands with the hind limbs held between the index and middle fingers and the tail directed toward the surgeon. The surgical site is prepared using aseptic technique. The desired length of remaining tail is marked, and the skin of the tail is retracted craniad (toward the base of the tail). The tail is amputated with a pair of scissors, bleeding is controlled with electrocautery or pressure, and the skin is released, allowing it to retract over the exposed bone. One simple interrupted absorbable suture is placed to appose the skin edges, or the edges are glued with a tissue adhesive. If a surgical laser is used to remove the claws, the technician should ensure that the appropriate equipment and eye protection is available for the surgical team and that the surgery site is not prepared with alcohol. Furthermore, the technician must also be available to vacuum the emitted smoke from the laser because this smoke is harmful to people and animals.
POSTOPERATIVE CONSIDERATIONS
The puppies should be returned to the mother as soon as hemorrhage is controlled. The surgical site should be monitored for the first few hours for excessive bleeding. During the week following surgery, the tail should be monitored for drainage, redness, and swelling daily. The suture remains until it is absorbed or licked out by the mother. Complications are not expected following tail docking, but may include hemorrhage and infection. In some animals, too much skin is removed during the amputation. Those animals may have chronic wound healing problems and bone exposure at the amputation site. Revision of the surgery site may be necessary to correct the problem.
DEWCLAW REMOVAL ON PUPPIES
The claws located on the medial aspect of the forelegs and hind limbs are known as dewclaws. Dewclaw removal is amputation of the claw.
INDICATIONS
Dewclaws are commonly removed from the forefeet and hind feet of purebred dogs for aesthetic reasons and from hunting dogs because they may be torn as the dog runs over terrain densely covered with shrubs. It should be remembered that in certain breeds (e.g., Great Pyrenees, Newfoundland) the presence of dewclaws is necessary for proper show quality.
PREOPERATIVE CONSIDERATIONS
The preoperative considerations are the same as those described earlier.
TECHNIQUE AND INTRAOPERATIVE CONSIDERATIONS
Dewclaws should be removed during the first week of life (3 to 5 days). Removal is generally performed at the same time as tail docking in most breeds. The surgical site is prepared aseptically. The puppy is cradled in the palm of one hand, and the extremity is extended with the other hand. Scissors are used to amputate the claw. Hemorrhage is controlled with electrocautery or pressure. The skin edges may be left to heal by second intention or apposed with one absorbable suture.
POSTOPERATIVE CONSIDERATIONS
The puppies are returned to the mother immediately. The surgical site should be monitored for the first few hours for excessive bleeding. During the week following surgery, the amputation site should be monitored for drainage, redness, and swelling daily. Complications are not expected following dewclaw removal, but may include hemorrhage and infection.
TAIL DOCKING AND DEWCLAW REMOVAL IN THE ADULT
Tail docking and dewclaw removal should ideally be done within the first week of life if it is performed for aesthetic purposes. In some instances, adult dogs are seen for one or both procedures.
INDICATIONS
Indications for tail docking or dewclaw removal in the adult dog include aesthetics, trauma, infection, and neoplasia.
PREOPERATIVE CONSIDERATIONS
One must consider the reason for tail or claw amputation before animal prepping and initiation of the procedure. If it is done to treat cancer, acceptable tumor-free margins should be taken with the removed tissue, and the appropriate amount of skin must be prepared before surgery. Removed tissues will have to be placed in formalin at a 1:10 ratio for eventual histopathologic evaluation. If trauma is the reason for the procedure, the animal may have to be stabilized before surgery can safely be performed. If amputation is performed as a treatment for infection, the veterinary technician should have culture swabs available so that the veterinarian can obtain appropriate cultures at the time of surgery.
TECHNIQUE AND INTRAOPERATIVE CONSIDERATIONS FOR DEWCLAW REMOVAL
The animal must be placed under general anesthesia. The surgical site is clipped and prepared using aseptic technique. The surgeon will make an elliptical incision at the base of the dewclaw. The dewclaw is dissected free and is transected at the carpometacarpal joint in the front paw or the tarsometatarsal joint in the hind paw. Hemorrhage is controlled with suture, electrocautery, laser, and/or direct pressure. If a surgical laser is used to remove the claws, the technician should ensure that the appropriate equipment and eye protection is available for the surgical team and that the surgery site is not prepared with alcohol. Furthermore, the technician must also be available to vacuum the emitted smoke from the laser because this smoke is harmful to people and animals. The skin edges are apposed with suture. The paw is usually bandaged to prevent swelling and self-trauma.
TECHNIQUE AND INTRAOPERATIVE CONSIDERATIONS FOR TAIL AMPUTATION
The tail should be clipped and hung from an intravenous stand. The skin should be prepared using aseptic technique. If the tail is to be amputated near the base, the rump adjacent to the tail base must also be clipped and aseptically prepared. A tourniquet may be placed at the base of the tail to help control hemorrhage and is placed before the animal is draped for surgery. The tail is amputated at the desired location by skin incision and disarticulation of the caudal vertebra at the appropriate site. The skin incision is made 1 or 2 cm distal to the expected amputation site to ensure adequate skin coverage of the stump. Blood vessels are identified and ligated. The skin edges are sutured over the remaining vertebrae, and the tourniquet is removed.
POSTOPERATIVE CONSIDERATIONS
The surgical sites should be monitored for hemorrhage, swelling, drainage, redness, evidence of self-trauma, and dehiscence. Elizabethan collars should be placed on those animals attempting to traumatize the surgical site. Bandages placed on the foot should be maintained as previously discussed. If placed, skin sutures are removed in 10 to 14 days. Pain medication is generally needed for 4 to 5 days following the procedure. Complications are rare for these procedures, even in adult animals.
FELINE ONYCHECTOMY
INDICATIONS
Onychectomy is an elective procedure to prevent scratching of owners and household items. Most veterinarians recommend declawing the front feet only. This does not significantly impair the cat’s ability to climb trees or defend itself from intruders. Onychectomy is often performed at the same time as castration or ovariohysterectomy.
PREOPERATIVE CONSIDERATIONS
Onychectomy is a painful procedure. Preoperative analgesics should be administered.
TECHNIQUE AND INTRAOPERATIVE CONSIDERATIONS
The cat is placed under general anesthesia. The feet are surgically scrubbed, but need not be clipped unless the cat is a long-haired breed. If a laser is to be used during the procedure, alcohol should not be used to prepare the toes because it is flammable and likely to ignite when the laser beam strikes the soaked area. The nails are left long to aid in nail manipulation during the procedure (Figure 30-15). A tourniquet is usually placed to control hemorrhage during the procedure. It should be placed over the foot before aseptic preparation, but tightened when the surgeon is ready to perform the procedure. The tourniquet should always be placed distal to the elbow to prevent nerve damage (Figure 30-16). The radial nerve is more superficial just proximal to the elbow and can be permanently damaged if the tourniquet is tightened over that area (see Figure 30-16). The tourniquet should only remain in place for no more than 1.5 hours. The veterinarian should be alerted as that time approaches so the tourniquet can be removed.
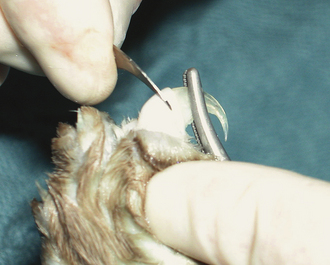
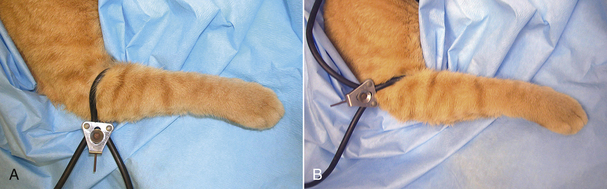
FIGURE 30-16 Declaw. A tourniquet should always be placed, distal to the elbow (A) rather than proximal to the elbow (B) to help prevent permanent radial nerve damage.
Three techniques can be used to remove the claws. The Rescoe (nail trimmer technique), scalpel blade, and the CO2 laser techniques are all effective means to perform the procedure. For the Rescoe technique, a Rescoe nail trimmer is positioned snugly onto the dorsal surface of the toe between the second phalanx and third phalanx. During positioning of the nail trimmer, the claw should be pulled cranially. As little skin as possible should be excised. The cutting edge of the Rescoe nail trimmer is positioned at the cranial edge of the footpad. As the cutting edge is advanced, the pad is moved caudally while rotating the nail dorsally and caudally. The third phalanx is then excised by the Rescoe nail trimmer. Care is taken to prevent cutting the footpad. Each nail is amputated in a similar fashion. A portion of the third phalanx is usually left behind with this technique, but the entire germinal layer is removed to prevent regrowth of the nail. The blade technique amputates the entire third phalanx using a No. 12 scalpel blade. The phalanx is disarticulated dorsolaterally, first by cutting through the collateral ligaments, then the nail is cut away from the underlying tissue and digital pad. The pad is moved out of the way while the nail is removed to prevent inadvertent laceration.
The laser technique is similar to the blade technique except that it uses laser energy to dissect the third phalanx free from the second phalanx instead of a sharp edge. The surgical site usually does not bleed with the laser technique, so a tourniquet is not necessary. If a laser is used, the technician should ensure that plenty of saline-soaked sponges are available to cover the remainder of the cat’s foot, instruments, and surgeon’s fingers to absorb extraneous laser energy and prevent iatrogenic laser burns. It is best to use instruments approved for laser surgery to prevent reflected laser beams from inappropriately penetrating objects and tissues. Everyone in the room should wear safety glasses to prevent inadvertent ocular damage, and the technician should be available to vacuum emitted smoke during the procedure. The technician should be familiar with laser safety before its use.
One to two sutures are often placed to appose the skin edges after nail removal. Surgical glue (cyanoacrylic tissue adhesive) is used instead of sutures in some instances. If surgical glue is used, it should never be placed on the exposed bone of the second phalanx or dropped inside the void (wound) created by removal of the third phalanx (Figure 30-17). Instead, the wound should be manually closed and a drop of glue placed only on the skin edges of the closed wound (see Figure 30-17). Dropping glue into the wound can cause chronic lameness and foreign body reaction. Some veterinarians do not appose the skin edges with anything other than a bandage.

FIGURE 30-17 Declaw. A, When applying tissue adhesive to a wound, the glue should never be placed inside the wound created from removing the claw. B, The wound should be manually apposed and the glue placed along the skin edges.
TECHNICIAN NOTE
Do not place tissue glue into the open wound formed after a claw is removed. The wound should be manually apposed and the glue placed only on the skin edges. Placing surgical glue internally can result in chronic lameness and foreign body reaction.
After surgery, the paws are bandaged snugly with a gauze sponge and strips of tape. The sponge is placed over the ends of the digits. Strips of tape are placed longitudinally along the leg and distally around the paw. Tape is then placed circumferentially around the paw up to the elbow. Care is taken to lay tape on the leg and not to pull too tightly. Bandages placed too tight can result in vascular compromise to the foot with skin sloughing. The tourniquet is removed as soon as bandaging is complete.
POSTOPERATIVE CONSIDERATIONS
Onychectomy is painful. Pain medication should be administered to all cats in the postoperative period. It is appropriate to administer a pure opioid agonist for the first 24 hours after surgery (see Chapter 26 for details on the administration, advantages, and disadvantages of specific pain medications). A fentanyl patch can be placed the day before surgery to allow the fentanyl to take effect and can last up to 3 days postoperative, but pain control can be variable with the patch, and the cat should be monitored closely for continued pain in spite of having a patch in place. Alternatively, injectable pain medication can be given intermittently. Some nonsteroidal antiinflammatory drugs can also be used in cats; however, care must be taken to avoid overdosage. A wait-and-see attitude regarding pain medication for this procedure is not acceptable. Instead, medication should be given at the appropriate dosing intervals for at least 4 to 5 days postoperative.
The bandages are kept on for 24 hours, but no longer, and the cat should be hospitalized while the bandage is in place. After surgery, litter should consist of shredded paper or pellets to prevent accumulation of clay or sand in the surgical wounds with resultant irritation and infection. Normal litter should not be reintroduced until 10 days after surgery. The paws should be monitored for hemorrhage, swelling, drainage, and redness. Cats will be fairly sensitive on the front legs after surgery, but this should start improving within 2 weeks of surgery. If sutures were placed, suture removal is generally not necessary because the cats will remove them on their own, but if they are still present after 2½ weeks, the owner should have them removed by the veterinary staff.
TECHNICIAN NOTE
The bandage from an onychectomy should be removed within 24 hours. The cat should remain in the hospital until the bandages are removed.
Most cats allow removal of the bandages by carefully cutting the bandage apart longitudinally and gently peeling it off the leg. If the cat is intractable, the bandage may be cut and the cat returned to its cage. The cat will then remove the bandage on its own. If this technique is used; however, the cat will have to be monitored to ensure that bandage ingestion does not occur. In severely intractable patients, a light dose of a tranquilizer may be necessary to remove the bandages safely. Cats are monitored carefully for 8 to 12 hours after bandage removal for hemorrhage. Rebandage with prolonged hospitalization will be necessary if hemorrhage occurs.
Onychectomy complications can be divided into those that occur in the early postoperative period and those that occur in the late postoperative period. Early complications include loose bandages and postoperative bleeding. Cats should be checked frequently for evidence of loose, bloody bandages or complete bandage removal and severe hemorrhage. In the event of hemorrhage, the paws should be rebandaged snugly. Infection can also occur and generally becomes evident within the first 3 weeks of surgery. Infection requires antibiotic therapy and/or wound débridement. Late complications include regrowth of the claws, chronic lameness, or both. Claw regrowth requires reoperation and removal of remaining germinal epithelium. Chronic lameness without evidence of regrowth may be seen with incomplete removal of the phalanx or cut footpads. For this reason, it is essential that the pads be preserved during the operative procedure. Other complications include radial nerve damage secondary to tourniquet placement and skin sloughing secondary to tight, prolonged bandage placement.
CELIOTOMY
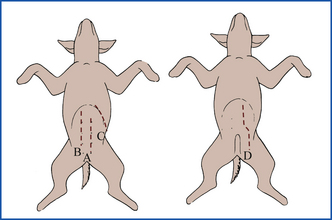
Celiotomy (laparotomy) is a surgical incision into the abdominal cavity. There are several locations in which the incision can be made: ventral midline, paramedian, paracostal, parapreputial, and flank (Figure 30-18). The most commonly used incision site is ventral midline.
INDICATIONS
A celiotomy is performed for both elective and nonelective procedures. Some of the common elective procedures include ovariohysterectomy, organ biopsy, cystotomy, planned cesarean delivery, gastropexy, and retained abdominal testicles. Some common nonelective procedures include emergency cesarean delivery, gastric dilation-volvulus (GDV) (bloated, twisted stomach), intussusception, gastrointestinal foreign bodies, ruptured spleen, penetrating foreign bodies (e.g., knife wound, arrow wound, bullet wound), severe abdominal bleeding, and diaphragmatic hernia. In some instances, the animal is seen for an unknown abdominal problem. These patients may need elective or nonelective celiotomy, referred to as an exploratory celiotomy. Exploratory celiotomy is often performed for abdominal masses of unknown origin and to obtain biopsies for disease diagnosis.
PREOPERATIVE CONSIDERATIONS
Animals should always be clipped widely for abdominal incisions. At times, the incision must be extended, and an inappropriate prep will hinder surgical exposure. Animals undergoing abdominal incision because of illness or trauma may have to be stabilized before anesthesia is administered. If biopsies or cultures are to be taken, the veterinary technician should make sure that culture supplies and tissue sample cups with formalin are available.
TECHNIQUE AND INTRAOPERATIVE CONSIDERATIONS
For ventral midline celiotomy, the patient is placed in dorsal recumbency. Larger dogs should be placed in a V-trough to help stabilize them in that position (Figure 30-19). Smaller dogs and cats can be placed on moldable beanbags or between sandbags. The abdomen is widely clipped from 2 cm cranial to the xiphoid cartilage to 2 cm caudal to the pubis. The skin is aseptically prepared for surgery.

FIGURE 30-19 V-trough is used to stabilize large animals in dorsal recumbency for surgical preparation. A, Trough. B, Proper positioning.
The various incisions (paramedian, paracostal, etc.) are all slight variations of the ventral midline incision and are less commonly used (see Figure 30-18). For this reason, emphasis will be given to the ventral midline incision.
The line of the incision is from the xiphoid process to the pubis. The length used varies with the type of procedure (see specific procedures). A surgical sponge count is performed before entry into the abdominal cavity. The incision is made with a scalpel blade or electrocautery in the cutting mode. The incision is carried through the subcutaneous tissue to the level of the linea alba, which is elevated with forceps to pull it away from the underlying abdominal viscera. This will prevent the inadvertent puncture of abdominal organs when entering the peritoneal cavity. A scalpel blade is used to penetrate the linea alba and enter the peritoneal cavity. The incision is extended the desired length with scissors or scalpel blade and forceps. Moistened laparotomy pads (sponges) are placed along the incision edges for protection during exploratory surgery. This is usually not necessary during ovariohysterectomy because the incision is small and manipulation is minimal. A Balfour self-retaining abdominal retractor can be introduced, if necessary, into the incision to facilitate visualization of abdominal structures (exploratory celiotomy). Surgical lights and air exposure of abdominal organs will quickly dry out abdominal structures. It is important for the surgical assistant to keep exposed tissues moist to prevent damage and decrease adhesion formation. The technician should pay special attention to viscera moved external to the abdominal cavity. Viscera temporarily moved outside of the abdominal cavity should be covered with warm, moist laparotomy pads. Abdominal viscera should be handled carefully and as little as possible. Whenever retraction or manipulation of structures is necessary, atraumatic technique is mandatory. Retract viscera with moistened laparotomy pads, manipulate viscera with moistened gloves, blot any excess hemorrhage with moistened sponges (do not wipe surfaces with sponges), and when using suction, be careful not to suck the walls of visceral structures against the suction orifice. A thorough inspection of the abdomen is performed. A postoperative sponge count should be made before closing the abdomen to ensure that all sponges are accounted for.
TECHNICIAN NOTE
Tissues exposed to the air during surgery should be kept moist to help prevent tissue desiccation with subsequent death or irritation.
TECHNICIAN NOTE
A thorough inspection of the abdomen should be made before closure to prevent leaving instruments or sponges in the abdominal cavity. A preoperative and postoperative sponge count is recommended.
The abdomen is sutured closed in three layers. The linea alba is the layer of strength and must be securely closed. The subcutaneous tissues are then sutured to decrease the amount of dead space. This helps reduce the frequency of postoperative hematoma or seroma formation. The skin is sutured to complete the celiotomy closure.
POSTOPERATIVE CONSIDERATIONS
During the first 24 hours, the skin incision should be examined carefully for swelling, drainage, excessive redness, dehiscence, and evidence of self-trauma. An Elizabethan collar should be considered if the animal appears to lick or chew the incision. Incision problems should be brought to the attention of the veterinarian. Incision monitoring should be continued for 2 weeks after surgery or until suture removal. Animals should be exercise restricted until the abdominal wound is healed. If there is evidence of dehiscence, the veterinary technician should notify the veterinarian immediately. Emergency closure may be necessary.
Some animals may be inappetent or vomit after celiotomy. Intestinal and pancreatic manipulation can lead to intestinal ileus (temporary loss of intestinal motility), nausea, and/or pancreatitis. One or two episodes of vomiting or lack of appetite for the first 24 to 48 hours after celiotomy is usually not concerning in and of itself. However, if the animal appears ill or vomiting and inappetence continues, further evaluation should be performed. Animals not eating or drinking after surgery should be supported with intravenous fluid therapy until oral alimentation is resumed.
GASTROINTESTINAL SURGERY
Gastrotomy is incision (opening) into the stomach. Enterotomy is incision into the intestine. These are often done to obtain biopsies or to retrieve foreign material. Anastomosis is suturing portions of the gastrointestinal tract together to allow confluent ingesta flow. Anastomosis is performed after damaged tissue or tumor requires a segment of the gastrointestinal tract to be removed.
INDICATIONS
Gastrointestinal surgery has many indications. Gastrointestinal foreign body lodgment, neoplasia, biopsy for vomiting or diarrhea of unknown origin, GDV, gastrointestinal trauma, and gastrointestinal obstruction of unknown cause can all be reasons for abdominal exploration and gastrointestinal surgery.
PREOPERATIVE CONSIDERATIONS
Many animals undergoing gastrointestinal surgery have usually been recently vomiting or not eating for several days. The veterinary technician should stabilize the animal with appropriate fluid management to correct dehydration before surgery. The animal should be intubated as soon as possible with a cuffed endotracheal tube to help ward off aspiration of stomach contents should the animal vomit during induction. The veterinary technician should make sure that extra instruments are available in case the primary pack is contaminated with intestinal contents during the procedure. Prophylactic antibiotics are used if the gastrointestinal tract is to be entered.
TECHNIQUE AND INTRAOPERATIVE CONSIDERATIONS
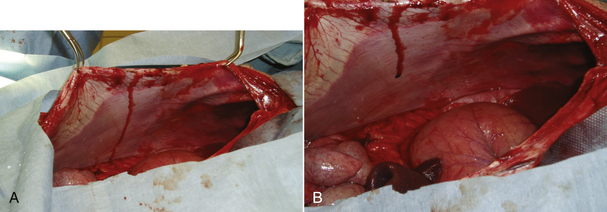
The animal is prepared for a full midline celiotomy (see Figure 30-18). An abdominal exploration is performed. Abnormalities are noted. Foreign bodies leading to gastrointestinal obstruction are removed via gastrotomy or enterotomy. The normal gastrointestinal tract is pink, has visible vasculature on the surface, and has active motility. In some instances, devitalized tissue must be removed via resection and anastomosis. Devitalized intestine is discolored and lacks blood supply. Purple and red discoloration does not necessarily imply devitalization; blood supply must be evaluated by direct visualization of cut sections, Doppler, or injection of vital stains. If the tissue is questionable, it should be resected (Figure 30-20).
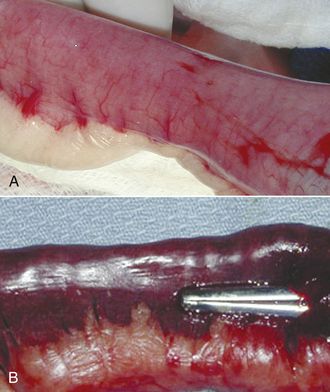
FIGURE 30-20 The normal intestine is pink with visible vessels and motility. Note the difference in color of the normal intestine (A) with the devitalized segment of bowel (B).
Characteristics of intestinal devitalization are:
• Severe thinning of the visceral wall
• Lack of bleeding on cut section
For biopsy or foreign body removal, the affected portion of the gastrointestinal track is isolated with laparotomy pads (Figure 30-21). Laparotomy pads are placed to prevent intestinal contents from leaking into the abdomen if accidental spillage occurs. Stay sutures are placed to steady the tissue on either side of the incision. Biopsy is performed by making a stab incision into the stomach or intestine between the stay sutures and removing a full-thickness portion of the tissue with a blade or scissors. If the incision is made simply to remove intraluminal material, the stab incision is extended enough to remove the material, and no tissue is removed for biopsy. The incision is closed in an interrupted pattern with absorbable, monofilament suture.
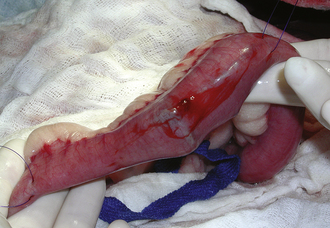
FIGURE 30-21 If a biopsy is to be performed on the gastrointestinal tract, the segment is packed off with laparotomy pads to prevent leaking ingesta from contaminating the abdominal cavity. Note the white pads surrounding the intestine. Ingesta is prevented from leaking from the cut surface of the intestine by placement of intestinal clamps or having an assistant gently pinch off the intestinal lumen on either side of the incision with fingers.
If a resection and anastomosis is to be performed, the vasculature to the portion of the intestine to be removed is ligated; the intestines are clamped with Doyen forceps, or the surgical assistant supports the intestines with fingers to prevent ingesta from leaking onto the surgical field (see Figure 30-21); the portion of the intestines to be removed is excised; and the viable intestinal ends are sutured together in an interrupted pattern similar to a biopsy site. After completion of the anastomosis, the intestine is evaluated for leakage. This is accomplished by occluding the intestine on either side of the anastomosis site and filling the enclosed space with sterile saline using a syringe and small-gauge needle. The surgeon and assistant check for leaks along the incision. Leaks are sealed with additional suture (Figure 30-22). The intestine is flushed, and the laparotomy pads are removed from the abdomen and surgical field, being careful not to contaminate the rest of the abdomen or the surgical field with ingesta that might have leaked onto the pads. The technician should ensure that warm isotonic saline is available for flushing the abdominal cavity. Omentum is placed over the incision, and the abdomen is flushed. The celiotomy is closed routinely. Many surgeons will ask for a clean surgical pack, gloves, and drape to perform the celiotomy closure to prevent contamination of the celiotomy wound with ingesta from instruments used during the intestinal procedure.
POSTOPERATIVE CONSIDERATIONS
Careful patient monitoring is important following intestinal surgery. The main consideration is evaluation for intestinal leakage. If intestinal dehiscence or leakage occurs, septic peritonitis is likely to follow. Animals should be monitored for inappetence, vomiting, fever, painful abdomen, abdominal enlargement, incision drainage, and shock, which are all potential indicators of peritonitis. Most animals are willing to eat within 24 hours of intestinal surgery. Minor vomiting (one to two times) might be expected. However, protracted vomiting and inappetence should alert the technician to a potential impending problem with the intestinal surgery site. If intestinal leakage is suspected, abdominocentesis is performed. Material collected is evaluated for cell population and bacteria. If enough material is not obtained for evaluation from simple abdominocentesis, but leakage is still suspected, a diagnostic peritoneal lavage should be performed. A septic abdominal tap warrants abdominal exploration and correction of the problem.
Feeding animals after intestinal surgery is also a consideration. The gastrointestinal tract requires food for cellular health and proper function. Intestinal surgery can result in ileus and may cause inappetence, nausea, and vomiting. However, animals without complications are most often willing to eat within 24 hours. Unless the animal is vomiting, oral alimentation should be initiated as soon as the animal has an appetite. Animals should be introduced to water first. If no vomiting occurs after water intake, then food is introduced. A small amount of highly digestible, bland food should be fed initially (e.g., 1 to 2 tbsp of Hill’s Science Diet I/D). If no vomiting occurs over 2 to 4 hours, another small amount can be fed. If vomiting does not occur, the amount fed can be gradually increased and frequency decreased. Animals are reintroduced to their normal or another maintenance diet gradually after recovery.
Monitoring as discussed for routine celiotomy should also be done.
GASTRIC DILATION-VOLVULUS
Gastric dilation-volvulus is dilation of the stomach with ingesta and gas with rotation of the stomach into an abnormal position. This is a life-threatening condition that typically occurs in deep-chested, large, and giant-breed dogs. The cause is not specifically known, but genetics and chest/abdomen configuration play a role. Some animals have often eaten a large meal, drunk a large portion of water, and/or engaged in heavy exercise following either; however, others have not. Some animals develop the condition during times of stress, such as hospitalization or boarding. Vomiting, retching, and bloating (severe distention of the stomach) are classic clinical signs. Gastropexy is attachment of the stomach to the body wall with the goal of creating a permanent adhesion. It is performed to substantially decrease the chance of stomach rotation, but it does not prevent bloating. Partial gastrectomy is removal of part of the stomach. Splenectomy is removal of the spleen.
PREOPERATIVE CONSIDERATIONS
Animals suffering from GDV usually are in shock. If left untreated, these animals will die from cardiovascular collapse. The enlarged stomach compresses the caudal vena cava and affects venous return to the heart. Hypovolemic shock results. Large-bore catheters should be placed immediately. It is important to place the catheters in the front legs or jugular vein because venous return from the caudal half of the body is impaired by the dilated stomach. These dogs are often large and require a substantial amount of fluid. It is best to place at least two catheters. Baseline blood work, ECG, and blood gas should be obtained. The veterinary technician should review treatment of hypovolemic shock (see Chapter 33).
TECHNICIAN NOTE
Intravenous catheters should be placed in the front half of an animal suffering from GDV. Venous return is compromised from the back half of the dog as a result of compression of the vena cava from the dilated stomach.
After fluids are started, the stomach must be decompressed to help stabilize the animal and decrease the chance of gastric wall necrosis secondary to vascular compromise from the severe distention. A stomach tube is measured from the nose to the last rib (Figure 30-23). Stomach tubes are large bore and thick. The mouth is held open with a roll of tape or a gag with a hole big enough to pass the tube. An assistant should hold the mouth closed with the gag in place while another person passes the tube (Figure 30-24). The tube is lubricated and gently passed down the esophagus to the stomach up to the premeasured mark. It is difficult to impossible to pass a tube of that size into the trachea, but if the animal begins to cough, the tube should be removed and repassed. It would not be possible to pass the entire measured length of the tube down the trachea without causing severe destruction of the trachea and lungs. Do not forcefully pass the tube if resistance is felt. Overinsertion of the tube may result in gastric rupture if the gastric wall is compromised as a result of vascular impairment. Gas is emptied from the stomach as the tube enters the stomach. Water can be pumped into the stomach to help break up ingesta. If the tube cannot be passed, the animal can be sedated with an opioid and benzodiazepam and another attempt made. The veterinary technician must always remember to pinch off the gastric tube before removing it from the stomach (Figure 30-25). If the tube is not pinched, material from the tube can leak down the trachea as the tube is removed, causing aspiration pneumonia.
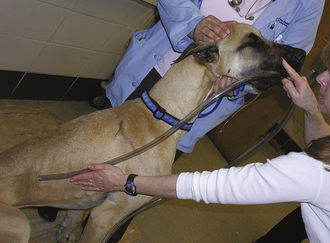
FIGURE 30-23 Before passing a stomach tube, the length of tube to be passed is marked by measuring from the nose to the last rib.
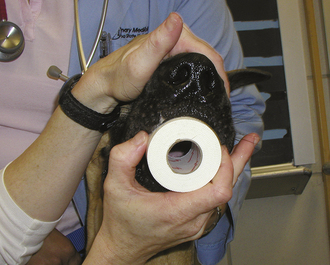
FIGURE 30-24 A roll of tape (pictured) or a mouth gag can be used to hold the mouth open while passing a stomach tube. The assistant should hold the mouth gag in place by holding the mouth shut around the gag.
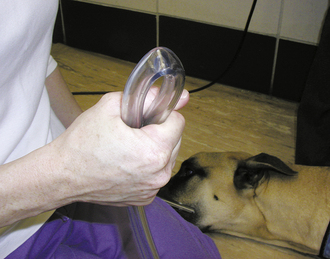
FIGURE 30-25 The assistant passing a stomach tube should pinch the tube off before removing the tube from the animal’s stomach. This helps prevent aspiration of stomach contents into the lungs.
TECHNICIAN NOTE
While removing a gastric tube from a dog, the tube lumen should be pinched or clamped off to prevent leakage of tube contents down the trachea during removal.
If the tube cannot be passed after sedation, the stomach should be decompressed by trocarization. The disadvantage of trocarization is the potential leakage of gastric contents into the abdominal cavity at the stomach puncture site or stomach rupture. For trocarization, the right side of the stomach is aseptically prepared behind the last rib. A large-bore needle is attached to a 60-ml syringe, a three-way stopcock is gently passed into the dilated stomach percutaneously, and air is aspirated until the stomach is decompressed enough to stabilize the dog.
After stabilization is under way and vital signs are improving, right lateral abdominal radiographs are obtained. This view is best for evaluating whether rotation of the stomach or simple bloat without rotation is present. Thoracic radiographs should also be performed because aspiration is a possibility. As a result of vascular compromise to the stomach wall, the animal should also be started on broad-spectrum antibiotics to help prevent septicemia should intestinal compromise lead to bacterial translocation from the gastrointestinal tract to the bloodstream. The animal is stabilized and prepared for emergency surgery.
Anesthesia can be challenging in these cases. Respiratory compromise is often present as a result of the gas-distended stomach compressing the diaphragm. Blood pressure is often low and difficult to maintain. If possible, an arterial access port should be established for continuous pressure and blood gas monitoring. Additionally, cardiac arrhythmias may also occur and may need to be treated. The veterinary technician should review Chapter 27 for specific anesthetic techniques and monitoring.
TECHNIQUE AND INTRAOPERATIVE CONSIDERATIONS
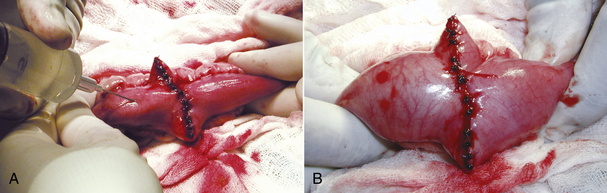
The dog is prepared for a full ventral midline celiotomy. The abdomen is opened carefully to prevent puncture of the stomach because gas distention pushes the stomach against the ventral aspect of the abdomen (Figure 30-26). If the stomach is substantially distended at the time of surgery, further decompression should be performed to make manipulation easier. The veterinary technician should make sure that a stomach tube, bucket, and pump are available in the operating room. The tube should be gently passed down the esophagus after lubrication while the veterinarian manipulates the tube into position within the stomach. The veterinarian can often gently express gas and fluid from the stomach through the tube. If decompression cannot be achieved in this manner, decompression can be performed with a syringe, three-way stopcock, and needle. The stomach must be handled with care. The tissue is often friable as a result of compromise of the tissues. Additionally the ingesta and fluid that accumulates in the stomach following GDV is heavy and can contribute to tissue tearing during manipulation of the stomach back into the normal position. Extreme care must be taken to prevent inadvertent damage. Once the stomach is in its normal position, it is evaluated for viability. The stomach is often discolored at the start of the procedure, but may improve as blood supply and venous drainage returns. A complete abdominal exploratory is performed while circulation is allowed to return to the stomach. The spleen is carefully evaluated. Vascular compromise to the spleen can occur with dilation and rotation of the stomach, or the spleen may rotate. If the spleen is discolored, the vascular pedicle is relieved of compromise, and the spleen is gently placed out of the abdomen and covered with moistened laparotomy pads while a gastropexy is performed. In most instances, the spleen will return to its normal character once blood supply is reestablished. After abdominal exploration, the stomach is reevaluated for viability. Partial resection is performed, if needed.
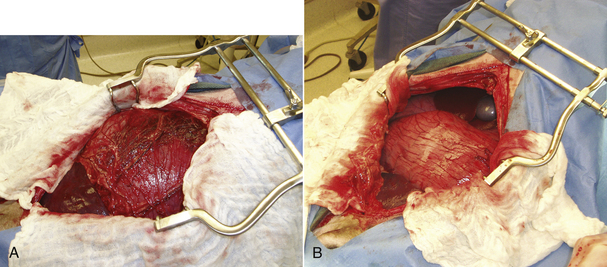
FIGURE 30-26 A, Note how the dilated, rotated stomach is pressed against the ventral abdominal wall and protrudes out of the abdomen. Inadvertent stomach puncture can occur if the abdomen is not entered carefully. B, The normally positioned stomach is still dilated, but recesses back away from the ventral incision and lies completely within the abdomen.
A gastropexy is then performed on the right ventrolateral aspect of the body wall near the last rib. There are many different techniques for performing gastropexy, and the discussion of each technique is beyond the scope of this chapter. Which technique is used depends on the comfort level and skill of the surgeon performing the procedure. Fixation of the stomach into the celiotomy incision at the time of closure is not recommended because future abdominal surgery can result in accidental perforation of the stomach when the abdominal cavity is entered. The surgical assistant is responsible for retraction of tissues and suture manipulation to keep the procedure running smoothly. It will often help the veterinary surgeon if the assistant stands on the right side of the dog and holds the body wall up with towel clamps during the gastropexy. This will often expose the entire surgical field for the surgeon (Figure 30-27). After gastropexy, the spleen is reevaluated. If all or a portion of the spleen does not appear viable, all or part of the spleen is removed, respectively. The abdomen is flushed, and the celiotomy incision is closed routinely.
POSTOPERATIVE CONSIDERATIONS
Dogs suffering from GDV can have many postoperative complications. Arrhythmias can continue for 2 to 3 days postoperative. Treatment for the arrhythmias should be initiated if vascular compromise is present or is expected based on the abnormality. The veterinarian should be alerted as to the type of arrhythmia present. Hypotension and hypovolemia can continue postoperative and should be treated as needed. Urination should be monitored because prolonged hypotension under anesthesia can affect renal function. A urinary catheter should be placed if urine production is questionable. Some dogs will require a blood transfusion because of hemorrhage associated with tearing of blood vessels during bloating and rotation of the stomach and/or spleen. If a partial gastrectomy was performed, the dogs should be monitored for evidence of gastric wall dehiscence. Some of these dogs continue to develop gastric wall compromise after decompression and surgery. Fever, persistent inappetence, and vomiting may be an indication that this is occurring. Signs are similar to intestinal incision dehiscence as previously discussed. Antibiotics should be continued for at least 7 days postoperative. Immediately after surgery, antibiotics should be given intravenously to avoid oral administration. Gastrointestinal protectants, such as H2 blockers, should also be administered for 3 to 5 days postoperative. Finally, gastric dilation can again occur in the postoperative period necessitating decompression. However, gastropexy should prevent rotation of the stomach.
Oral alimentation should be initiated slowly. Water is given in small amounts to start. If no vomiting occurs, food is gradually introduced. Feeding can start as soon as the animal is willing to eat; this is often within 24 hours of surgery. Some animals may require antiemetics in the perioperative period to help control nausea and vomiting. Long-term dietary management should be considered. When home, these dogs should be on a three- to four-times-a-day feeding schedule. If possible, a three-times-a-day feeding schedule should be continued for the rest of the dog’s life. Water should always be available, but gulping of water should be avoided. Heavy activity should be avoided after feeding. Owners should be warned that bloating can still occur, even though gastropexy was performed, but surgery is likely to prevent gastric rotation, which is more life threatening. Stomach decompression may be needed if bloat is severe.
OVARIOHYSTERECTOMY IN THE DOG AND CAT
INDICATIONS
The primary indication for ovariohysterectomy is prevention of pregnancy and subsequent production of unwanted puppies and kittens. Other indications for ovariohysterectomy include endocrine imbalances, infections, injuries, cysts, tumors, prevention of unwanted behavior, and congenital abnormalities. Endocrine disturbances are associated with varied clinical manifestations, such as sterility, skin lesions, mammary tumors, pseudocyesis (false pregnancy), and nymphomania. Ovariohysterectomy before the first estrus will greatly decrease the chance of mammary neoplasia in dogs. Uterine diseases that may require ovariohysterectomy include metritis, pyometra, uterine prolapse, endometrial hyperplasia, neoplasia, injury, neglected dystocia, and congenital abnormalities.
PREOPERATIVE CONSIDERATIONS
Ovariohysterectomy is usually performed between 5 and 6 months of age, but it can be performed at almost any age and during any phase of the reproductive cycle. Performing ovariohysterectomy around 6 months of age decreases anesthetic risk in younger animals and usually allows the procedure to be performed before the first estrus. If performed during estrus or pregnancy, increased vasculature may be encountered with potential for increased hemorrhage. This is more important for dogs than cats. The most favorable time to spay a mature dog is 3 to 4 months after estrus. After whelping, the operation should be done as soon as the puppies or kittens have been weaned and lactation has ceased, about 6 to 8 weeks following parturition.
TECHNIQUE AND INTRAOPERATIVE CONSIDERATIONS
The animal is clipped and aseptically prepared for a ventral midline celiotomy. The skin incision extends caudally 3 to 6 cm from the umbilicus in the dog and from 2 cm caudad to the umbilicus caudally 3 to 4 cm in the cat. When the abdominal cavity is entered, the uterine horns are located and exteriorized from the abdomen using a spay hook or digital manipulation. The ovarian arteries and veins (pedicles) are ligated with the appropriate-size absorbable suture material. The veterinarian or surgical assistant should check to ensure that both ovaries are completely removed after ligation and division of the ovarian pedicles. The uterine body is then exteriorized and ligated. The abdominal cavity is carefully examined for hemorrhage. The celiotomy incision is closed routinely.
Intraoperative complications include hemorrhage and anesthetic problems. If excessive intraabdominal blood is seen during surgery, both ovarian pedicles and the uterine stump should be evaluated before celiotomy closure. The abdominal incision will likely have to be extended. The left ovarian pedicle is evaluated by retraction of the descending colon to the right and viewing the pedicle just caudal to the left kidney. The right pedicle is evaluated by retraction of the descending duodenum to the left and viewing the pedicle just caudal to the right kidney. The uterine stump is visualized between the urinary bladder ventrally and the colon dorsally. Bleeding stumps are religated before abdominal closure.
POSTOPERATIVE CONSIDERATIONS
Postoperative, intraabdominal hemorrhage can also occur and can be fatal if not treated appropriately (see the section on monitoring blood loss). After ovariohysterectomy, the technician should monitor the animal carefully for the first 24 hours. Abnormalities should be promptly reported to the veterinarian in charge.
Incision complications can also occur after ovariohysterectomy. These include irritation, premature suture removal by the animal, seroma formation, infection, suture reaction, and dehiscence. Only rarely are these complications serious. The veterinarian should be alerted to impending incision complications.
Some animals experience renal dysfunction secondary to accidental ureteral ligation during surgery. Ligation typically occurs when overzealous attempts are made to alleviate hemorrhage from a bleeding stump with mass ligation of tissues and poor visualization. It is important to ensure that the ureters are visualized and are not in the mass of tissue to be ligated when controlling hemorrhage from bleeding ovarian or uterine stumps. Animals are unlikely to show signs of renal failure if only one ureter is ligated, but they may be seen for abdominal enlargement, abdominal pain, or signs consistent with renal infection at a later date. If both ureters are inadvertently ligated, the animal will begin to show signs within 24 hours and will die if steps are not taken to alleviate the obstruction of urine flow.
Body weight gain may occur as a late sequel to ovariohysterectomy. The reasons for this excessive weight gain are poorly understood, but may be partially caused by ovarian endocrine deficiency. In actuality, obesity can be controlled by proper diet and exercise. Other late complications include loss of stamina in working dogs (eunuchoid syndrome) and urinary incontinence. Although incompletely understood, urinary incontinence may be related to endocrine alteration following ovariohysterectomy or scar tissue formation around the urinary bladder and proximal urethra. These appear to be rare complications.
PYOMETRA
Pyometra is a condition of the uterus in which endometrial hyperplasia has resulted in increased uterine secretions and accumulation of fluid in the uterus with secondary infection. Progesterone production from the ovaries during diestrus contributes to uterine gland hyperplasia and the disease process. The process typically occurs in middle-aged to older dogs 4 to 8 weeks following estrus. Mucometra or hydrometra is enlargement of the uterus with a sterile mucoid or serous fluid, respectively.
INDICATIONS
Ovariohysterectomy is the recommended treatment for pyometra. This is especially true for closed (nondraining) pyometra. Some owners will elect conservative management for open (draining) pyometras in valuable breeding dogs, but this should be discouraged because septicemia and/or endotoxemia is possible and the incidence of recurrence is high. Conservative management of closed pyometras is not recommended because of the risk of uterine rupture, septicemia and/or endotoxemia, and possible death.
PREOPERATIVE CONSIDERATIONS
An intact female dog with fever, lethargy, polyuria, polydipsia, vaginal discharge, abdominal pain, abdominal enlargement, inappetence, vomiting, and/or diarrhea should be evaluated carefully for pyometra. Animals with closed pyometra are more likely to have severe clinical signs. Baseline biochemical values and blood cell counts should be obtained. Many of these animals are dehydrated, inappetent, and have metabolic and/or electrolyte abnormalities at the time of presentation (renal or hepatic dysfunction, glucose imbalances, etc.). They should be started on intravenous fluids and their metabolic/electrolyte abnormalities corrected, if possible, before surgery. If left untreated, pyometra can result in septicemia and/or endotoxemia and possible death. Additionally, uterine rupture and peritonitis is also possible. Palpation of the abdomen should be done with extreme care and cystocentesis to collect urine should be avoided in animals suspected of having pyometra. Broad-spectrum intravenous antibiotic therapy is initiated before surgery.
TECHNIQUE AND INTRAOPERATIVE CONSIDERATIONS
The animal is prepped for a ventral midline celiotomy. A routine ovariohysterectomy is performed with some exceptions. The uterus is usually large, heavy, and friable (Figure 30-28). It should be manipulated with extreme care during the procedure to prevent rupture and contamination of the abdomen. This means that the celiotomy incision should extend from the xiphoid to the pubis so that excessive tension is not placed on the uterus during manipulation. Vessels are usually prominent and may be increased in number, so care must be taken to ligate and separate vessels appropriately to prevent hemorrhage. The uterine contents should be cultured for aerobic and anaerobic bacteria and a bacterial sensitivity test performed after the uterus is removed from the surgical field. This is performed via aseptic aspiration of the fluid with a needle and syringe before the uterus is contaminated. The abdomen should be flushed before closure. The abdominal closure is routine.
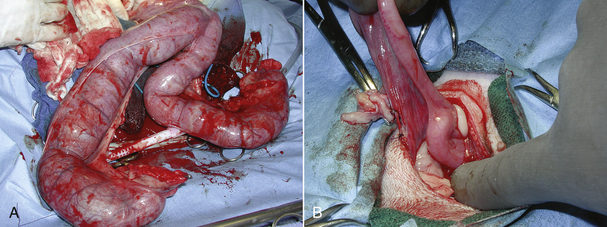
POSTOPERATIVE CONSIDERATIONS
Animals should be monitored as for ovariohysterectomy. Special considerations include continued antibiotic therapy in the postoperative period. Antibiotics are given intravenously until the animal is stable and eating. Antibiotic therapy is continued for 7 to 10 days after surgery based on culture and sensitivity results. Electrolyte and metabolic abnormalities can continue postoperative, and monitoring for this is important. Abnormalities should be corrected. Intravenous fluids should be given until the animal is stable, eating, and drinking.
CANINE CASTRATION
Orchidectomy (castration or neuter) is the removal of both testicles. Scrotal ablation is removal of the scrotum with the testicles at the time of castration.
INDICATIONS
There are numerous indications for canine castration; the most common is an elective procedure in the young male dog to help prevent roaming, aggressiveness, unwanted breeding, or a combination of these. Several medical problems may also be treated by castration, including prostate disorders, anal and perianal tumors, perineal hernias, and testicular tumors. Older dogs with a well-developed scrotum or animals with scrotal abnormalities should undergo scrotal ablation to prevent severe scrotal swelling, improve postoperative aesthetics, and/or treat disease.
PREOPERATIVE CONSIDERATIONS
There is not an optimal age for canine castration, but the procedure is often performed around 6 months of age. Performing castration before the development of unwanted male behavior—before sexual maturity—may help prevent this behavior from occurring. Castration after development of this behavior will often improve behavior, but may not eliminate it in all male dogs. Before surgery, a careful examination should be performed to ensure that both testicles lie within the scrotum.
TECHNIQUE AND INTRAOPERATIVE CONSIDERATIONS
The abdomen is clipped from the tip of the prepuce to the margin of abdominal skin and scrotal skin (Figure 30-29). The clipped area should extend widely into the inguinal region. The scrotum is typically not draped into the surgical field and is not normally clipped during surgical preparation. The scrotum has delicate, thin skin that is easily subject to clipper burn and laceration. If, however, there are long scrotal hairs protruding into the surgical field, they should be trimmed without touching the clippers to the scrotal skin. If scrotal ablation is to be performed, the scrotum is clipped and prepared aseptically along with the rest of the surgical field.
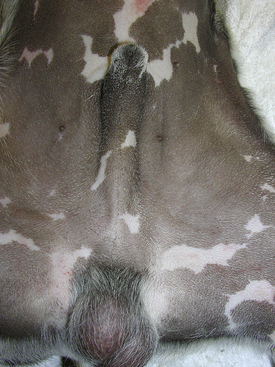
FIGURE 30-29 Proper positioning and preparation for canine castration. Note that the scrotum is not clipped.
For simple castration, the dog is secured in dorsal recumbency, and a standard surgical preparation of the prescrotal skin (craniad to the scrotum) is performed. A testicle is pushed cranial beneath the prescrotal skin. A midline incision is made in the prescrotal skin centrally and over the cranially displaced testicle. With gentle pressure, the testicle is exteriorized through the incision by carefully incising over the common tunic (tissue that encases the testicle). The major vessels are then easily identified and ligated with two absorbable sutures. The remaining scrotal ligament is gently dissected from the testicle. The opposite testicle is handled in a similar fashion and is exteriorized through the same incision as the first. The incision is closed with a continuous subcuticular suture pattern.
For scrotal ablation, the incision is made circumferentially around the base of the scrotum. The subcutaneous tissue is bluntly dissected to expose the testicles and associated structures. Castration is carried out via ligation of these structures as for simple castration. The testicles and scrotum are removed and the incision closed. Care must be taken to avoid removal of too much skin around the scrotum to prevent excessive tension on the closure.
POSTOPERATIVE CONSIDERATIONS
Several postoperative complications can occur. If the presurgical preparation is not done carefully so as to preclude scrotal dermatitis (clipper burn, excessive scrubbing), the dog will lick aggressively at the scrotum and the incision. This often results in severe inflammation and swelling of the scrotal and prescrotal skin. If this problem is not detected early, the results can be premature suture removal and wound dehiscence. The best treatment is prevention. If scrotal dermatitis does occur, the dog should be placed in an Elizabethan collar.
Another less common complication is hemorrhage. When the testicles are removed from the scrotal sac, free space remains in the scrotum. If there is any hemorrhage, either from the subcutaneous tissue or common tunic, the space will fill with a considerable amount of blood before there is enough pressure to create hemostasis, resulting in a large hematoma within the scrotum. If a hematoma is detected early, before the scrotum is full, cold compresses can be applied with slight pressure to the scrotal area to encourage hemostasis. If the scrotum becomes excessively large, not only is it unsightly but trauma and skin sloughing may also occur. At this point, removal of the scrotum may be necessary.
A scrotal seroma is more likely to occur than hemorrhage and can also result in scrotal swelling. In older dogs with a well-developed scrotal tissue, fluid accumulation after castration can be excessive. Some advocate performing a scrotal ablation at the time of castration to help prevent this complication in older animals. Treatment is the same as for hematoma. It is important to restrict activity in these dogs to decrease the amount of fluid accumulation.
FELINE CASTRATION
INDICATIONS
The major indications for feline castration are to prevent fighting, roaming, and urine spraying and to decrease urine odor. Castration in the cat may provide a rapid response (2 to 4 weeks) to these objectionable characteristics, although complete resolution may not occur.
PREOPERATIVE CONSIDERATIONS
The cat is usually castrated around 6 months of age. Preanesthetic evaluation should include palpation of both testicles to confirm the gender of the cat and to detect retained testicles before surgery.
TECHNIQUE AND INTRAOPERATIVE CONSIDERATIONS
There are several acceptable techniques for feline castration. The patient is generally placed in dorsal recumbency with the legs tied craniad (Figure 30-30). Unlike the dog, the scrotum is the site of the primary incision and should be aseptically prepared for surgery. Scrotal dermatitis is not a major concern in the cat, although you should avoid putting alcohol on the scrotum during surgical preparation. Warmed sterile saline is a good substitute for alcohol. The scrotal hairs are gently plucked from the scrotum with the thumb and finger. This is easily accomplished by grasping the base of the scrotum by the thumb and index finger of one hand and gently pushing the testicles into the scrotum (Figure 30-31). With the other hand, the thumb and finger are used to gently strip the hair from the scrotal skin. The scrotum is then scrubbed and draped in an aseptic manner.
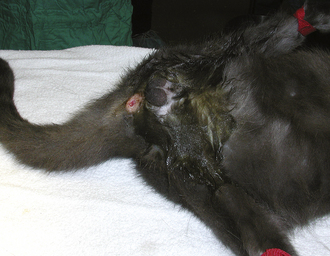
FIGURE 30-30 Proper positioning for feline castration. The legs are pulled forward, and the cat is in dorsal recumbency.
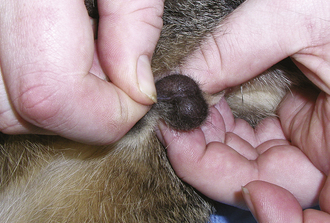
An incision is made directly through the scrotum. The testicle is protruded through the incision by gentle pressure with the thumb and index finger. The testicle and its spermatic cord (vessels) are exteriorized and may be ligated with suture, ligated with metal clips, or tied in a knot on itself, or the vessels can be separated from the vas deferens and tied in a square knot. The scrotum is left unsutured.
POSTOPERATIVE CONSIDERATIONS
Scrotal swelling and bleeding are the two most common complications of feline castration. Scrotal swelling is due primarily to traumatic surgical preparation and hair plucking. An Elizabethan collar may be necessary to control licking. If scrotal hemorrhage is noted after surgery, cold compresses on the scrotum for 5 to 7 minutes will help to encourage hemostasis. Severe hemorrhage can also occur and may actually occur intraabdominally. The veterinary technician should monitor these animals carefully (see discussion on blood loss) and bring clinical abnormalities to the attention of the veterinarian. Scrotal infection occurs rarely and should be treated with drainage (if not already draining), scrotal flushing and abscess drainage, Elizabethan collar, and appropriate antibiotics.
When the cat is sent home, the owner should be informed to change the litter from a gravel type of litter to a shredded or pelleted type of litter for the first 5 to 7 days. This will prevent pieces of litter from contaminating the surgical site.
CESAREAN DELIVERY
Cesarean delivery derived its name from Caesar, allegedly the first to be born by such a technique. The procedure involves making an incision into the abdominal cavity and then into the uterus to deliver a neonate. It is usually performed on animals experiencing dystocia. Dystocia (Greek: dys, difficult + tokos, birth) literally translated means “difficult birth.”
INDICATIONS
Cesarean delivery is indicated when a bitch or queen cannot deliver the pups or kits through the birth canal by normal uterine contractions because of either maternal or fetal abnormalities. Some breeders schedule planned cesarean deliveries in dog breeds that might typically have birthing problems, such as bulldogs. Some of the common causes of dystocia are seen in Figure 30-32. Normal stages of parturition are discussed in Chapter 14.
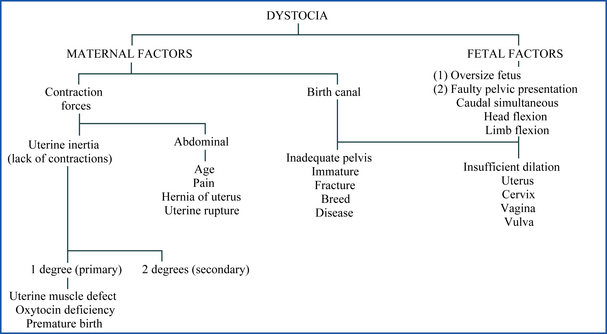
PREOPERATIVE CONSIDERATIONS
The aim of treatment should be the successful delivery of live and undamaged puppies or kittens without harm to the dam. Medical therapy to increase uterine contracture or to treat metabolic abnormalities in the dam should be considered before surgery; however, a diagnosis of the cause of dystocia must be made first. Medical therapy may do more harm than good when used in the wrong type of dystocia (e.g., giving a drug [oxytocin] that would increase uterine muscular contraction in a dam that has a uterine obstruction from a malpositioned fetus or uterine torsion). When proper diagnosis of the type of dystocia is made and medical therapy is either contraindicated or not effective, the dam should be prepared for surgery. Metabolic alterations should be treated before or during anesthesia, if possible.
The anesthetic regimen is of prime importance when considering cesarean delivery. The dam that is dehydrated and exhausted with potential metabolic abnormalities from a prolonged attempted delivery is a poor anesthetic candidate. Anesthetic complications may be encountered. The selected agents should have minimal effects on the newborn. A detailed discussion of anesthetic regimens for the dystocia patient is given in Chapter 27.
TECHNIQUE AND INTRAOPERATIVE CONSIDERATIONS
The animal is clipped before anesthesia. After anesthetic induction and maintenance, the dam is placed in dorsal recumbency. It is important to remember that the increased weight of the gravid uterus on the diaphragm may compromise the normal breathing capacity of the dam, and intermittent manual respiration or a respirator should be considered.
A ventral midline celiotomy is performed (see Figure 30-18). The uterus is exteriorized and isolated with moistened surgical towels. Uterine isolation helps prevent the uterine contents from entering the abdominal cavity. An incision is made into the ventral aspect of the uterine body. Care is taken not to cut a fetus. A neonate and its associated fetal membranes are advanced through the uterine incision by applying gentle traction and pressure on the uterine wall. On presentation, the fetal membranes are removed, the umbilicus is clamped or ligated, and the neonate is handed to the assistant. The fetal membranes can be firmly attached to the uterus if the fetus was not full term. Severe hemorrhage can result if the membranes are pulled from the uterus under those circumstances. Each successive neonate is handled in a similar fashion until all are delivered. The birth canal is checked carefully before closure to ensure that a fetus is not wedged there. The uterine incision is closed in two layers. The abdominal cavity is flushed to remove any debris that might have leaked into it from the gravid uterus. The celiotomy incision is closed in a routine fashion. The skin should be closed internally with an absorbable suture to prevent premature removal by the puppies or kittens during nursing.
Some owners prefer that the dam be spayed at the time of cesarean delivery. This can be accomplished in two ways. An en bloc removal of the gravid uterus can be performed. This entails clamping both ovarian pedicles and the uterine body, cutting the gravid uterus out of the dam, then going back and ligating all the vasculature in the dam. The gravid uterus is given to an assistant, and the assistant cuts each neonate carefully from the uterus using sterile instruments and ligates or clamps the umbilicus. The neonates are then treated as previously described. The second method allows a formal cesarean delivery as already described followed by a routine ovariohysterectomy after uterine body closure. The technique chosen by the surgeon depends upon preference and assistance available to care for the neonates. There is not a proven benefit or downfall to either technique if performed appropriately. Removal of the uterus and ovaries at the time of neonate delivery does not affect milk production or motherly instincts. Alternatively the dam can be returned for ovariohysterectomy after the neonates are weaned.
POSTOPERATIVE CONSIDERATIONS FOR THE NEONATE
The assistant should be ready to grasp the neonate from the surgeon and immediately place it in a dry towel. The assistant can then massage the animal gently to stimulate respiration, dry any secretions around the mouth and nose, and dry the remainder of the body to decrease the chance of hypothermia. The mouth should be inspected for evidence of mucus that may be plugging the airway. Gentle suction of the nostrils or mouth may be necessary to remove debris. If the mouth and nostrils are clogged with mucus and suction does not remove the debris, the neonate can be cradled in the palm of the right hand while the left hand stabilizes the animal; it is then swung smartly downward in an arc, which removes any fluid by centrifugal force. The head should be firmly supported during this maneuver to prevent excess motion and cervical damage. Weak neonates or those with faint respirations may be stimulated by placing doxapram (a respiratory stimulant) under the tongue. A thorough examination for congenital defects is made, and the neonate is placed in an incubator or warm, padded area. Neonates stressed from the prolonged attempted delivery may not survive or may already be dead by the time cesarean delivery is attempted.
The neonates should be returned to the dam as soon as she has recovered from anesthesia. Care should be taken not to return them so early that the dam may unknowingly harm them by stepping or lying on them. The dam should be returned to her home environment as soon as possible so that she can begin caring for the neonates and to prevent transmission of hospital organisms to the immune-challenged neonates.
POSTOPERATIVE CONSIDERATIONS FOR THE DAM
The dam should be awakened from anesthesia as soon as possible so that the neonates can begin nursing. The mother and neonates should be monitored carefully as the two are introduced. Most dams will accept the young readily, but some may be aggressive. If the dam appears painful, pain medication should be considered. It must be remembered that all systemically administered pain medications will be delivered to the neonates through the milk; therefore dosing should be low. Epidural drug administration before surgery will minimize the need for pain medication and transmission of these drugs to the neonate (see anesthetic management of cesarean delivery, Chapter 27). Other considerations include the development of metritis secondary to retained fetal membranes or infection, excessive uterine hemorrhage from overzealous fetal membrane removal, and all the potential complications discussed for routine celiotomy or ovariohysterectomy, if that was performed at the same time. Some dogs may experience infertility after cesarean delivery as a result of scar tissue formation.
CYSTOTOMY
Cystotomy means incision into the urinary bladder to expose the lumen or interior of the urinary bladder.
INDICATIONS
The most common indication for cystotomy in small animals is for removal of cystic calculi (bladder stones). A cystotomy is also indicated to remove tumors, to correct congenital defects, or to repair traumatic rupture of the urinary bladder. A final indication for cystotomy is placement of a cystostomy tube (a tube exiting the urinary bladder and abdominal wall) to provide an alternate outlet of urine in the case of tumor, calculi, or scar tissue causing obstruction of urine flow through the urethra.
PREOPERATIVE CONSIDERATIONS
Animals undergo cystotomy for various reasons. If urinary flow was obstructed, stabilization of the animal before anesthesia and surgery should be performed. Severe metabolic and/or electrolyte abnormalities might exist. Imaging studies may be necessary to identify the extent of disease and its exact location.
TECHNIQUE AND INTRAOPERATIVE CONSIDERATIONS
The abdomen is widely clipped from the xiphoid to the pubis. In male dogs, care is taken to clip the hair from the prepuce. The preputial orifice and penis are then gently flushed with a 1% povidone-iodine (Betadine) solution (Figure 30-33).
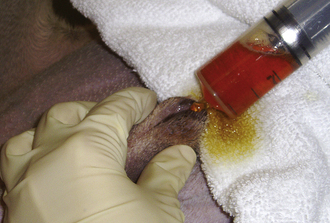
The animal is placed in dorsal recumbency and prepared for surgery with a standard skin preparation. For males, the abdominal skin incision will curve laterally to avoid the prepuce (see Figure 30-18, D). Care should be taken to thoroughly prepare this area aseptically. The prepuce is draped into the surgical field in the case of urinary calculi removal. This allows placement of a urinary catheter through the urethra for urethra flushing to aid in calculi removal. Although it is more common for urinary stones to lodge in the urethra of the male, a urethral catheter should also be passed in the female because urethral calculi have been reported to lodge there occasionally. The urinary catheter in the female dog should be placed aseptically before surgery. Care should be taken if bladder expression is attempted before celiotomy because an outflow obstruction from tumor, calculi, or scar tissue may result in inadvertent bladder rupture. Bladder expression should be avoided in those cases or when urinary bladder wall fragility is expected (e.g., urinary flow obstruction or tumor).
In the female, a standard caudal midline celiotomy is performed (see Figure 30-18, A). In the male, a caudal midline skin incision is made from the umbilicus to the sheath of the penis and is then extended lateral to the sheath. The caudal superficial epigastric artery and vein lateral to the prepuce are encountered. These are ligated and transected. The sheath is retracted laterally, and a ventral midline celiotomy is performed. The bladder is exteriorized and packed off with laparotomy pads to preclude urine spillage into the abdominal cavity. If a urinalysis and urine culture were not obtained before surgery, a syringe and needle are used to obtain a urine sample before cystotomy. An avascular area on the ventral aspect of the bladder is visualized and two stay sutures placed along the intended incision line. An incision is made along the proposed incision line between preplaced stay sutures. If cystic calculi are present, they are removed and submitted for stone analysis. If biopsies are taken for a suspected tumor, samples are placed in formalin and submitted for histologic analysis. Sample collection containers should be readily available; urinary calculi should not always be placed in formalin, and it is best to ask for appropriate sampling technique from the lab where they will be submitted.
Because calculi can lodge in the urethra, after removal, the entire lower urinary tract (bladder to urethra) is flushed with sterile physiologic saline solution until all calculi have been removed. The bladder wall is inspected for abnormalities and is then closed with a simple interrupted or inverting suture pattern. The laparotomy pads are removed, the abdomen is lavaged with sterile physiologic saline solution, and the incision is closed in a routine fashion. In the case of calculi, a postoperative imaging study may be necessary to determine if all the calculi were actually removed.
POSTOPERATIVE CONSIDERATIONS
The animal should be placed on intravenous fluids after cystotomy to help dilute blood clots and flush the urinary bladder. Urine production should be carefully monitored. If the incision was close to or involved the proximal urethra, postoperative swelling can obstruct urine flow. The veterinarian in charge should be alerted if the animal is straining to urinate and does not produce a urine stream or has not produced urine in 12 hours. Some straining to urinate can be expected following cystotomy as a result of swelling and bladder irritation, but a urine stream should accompany the straining, and the bladder should be nearly empty afterwards. During the first 48 to 72 hours postoperative, a mild hematuria (bloody urine) with or without blood clots and frequent urination can be expected. Owners should be informed of this if the animal is released during this time.
TECHNICIAN NOTE
During the first 48 to 72 hours following a cystotomy, a mild hematuria with or without blood clots and frequent urination can be expected.
Treatment ultimately depends on urinalysis, urine culture, and the type of disease present (type of calculi, type of tumor, type of congenital defect). If cystic calculi were removed, stone analysis must be performed before an appropriate treatment regimen can be initiated. Therapy will likely involve dietary alterations and/or antibiotics. The owners should be informed that calculi recurrence is a possibility and that dietary recommendations should be followed strictly to help decrease that chance.
Postoperative complications are rare following cystotomy. They include urinary outflow obstruction as a result of swelling, celiotomy incision complications, uroabdomen secondary to urine leakage through the cystotomy incision, and recurrence of the primary problem. If the animal is unable to urinate following cystotomy, a temporary urinary catheter may have to be placed to keep the bladder decompressed until the surgical swelling decreases. This is not done routinely because catheter placement can cause further irritation to the healing cystotomy incision and because it increases the chance of infection. If the animal is not producing urine or is producing minimal urine and abdominal distention is detected, a complete biochemistry panel, CBC, and paracentesis should be performed. Fluid taken from the abdomen should be spun for PCV determination and should undergo creatinine and BUN determination. Values higher than serum values indicate a problem and should be reported to the veterinarian in charge. Urine leakage through a cystotomy incision is treated with an indwelling urinary catheter or reoperation and appropriate urinary bladder incision closure.
URETHROSTOMY
Perineal urethrostomy is the process of making an external opening in the urethra in the area of the perineum that is large enough for passage of urine, mucus, crystals, and small calculi without obstruction. It bypasses the narrow penile urethra where obstruction often occurs. The procedure is performed in male cats with recurrent urethral obstruction secondary to feline urologic syndrome. Urethrostomy is also performed in other locations and are named by their location (scrotal urethrostomy, prescrotal urethrostomy, antepubic urethrostomy, etc.). Scrotal urethrostomy rather than perineal urethrostomy is performed in male dogs prone to calculi obstruction or with penile scar tissue preventing normal urination because this location provides the best functional outcome. The general technique is the same.
INDICATIONS
The primary indication for a perineal urethrostomy is multiple episodes of obstruction in association with feline urologic syndrome. Other less common indications include rupture of the penile urethra secondary to traumatic catheterization or blunt trauma (e.g., hit by car, abdominal kick), stricture of the penile urethra, or obstruction secondary to cancer.
PREOPERATIVE CONSIDERATIONS
A cat with feline urologic syndrome can come in for examination with an array of clinical findings, as can dogs with urethral obstruction. The presentation often depends on the duration and completeness of the urinary obstruction. A common factor is straining to urinate. If the animal is brought for examination early, there is little chance that other organ systems are affected. If the animal is brought in 12 to 24 hours after a complete obstruction, severe electrolyte abnormalities, cardiac arrhythmias, kidney dysfunction, and shock can be present. These animals must have the obstruction removed and be stabilized with establishment of improved or normal renal function before surgery. Obstruction of urine flow is an emergency situation in both cats and dogs.
Depending on the suspected cause and location of the obstruction, preoperative imaging studies will be necessary to determine the exact location and extent of the problem.
TECHNIQUE AND INTRAOPERATIVE CONSIDERATIONS
The hair on the perineum and external genitalia is clipped. For perineal urethrostomy, the cat is placed in ventral recumbency with the perineum elevated approximately 30 degrees (Figure 30-34). The tail is extended directly over the dorsal midline and immobilized with tape. A purse-string suture is placed in the anus to eliminate fecal contamination of the surgical field. Standard skin preparation is performed. For scrotal urethrostomy in male dogs, the animal is placed in dorsal recumbency, and the area is prepped as for castration and scrotal ablation.
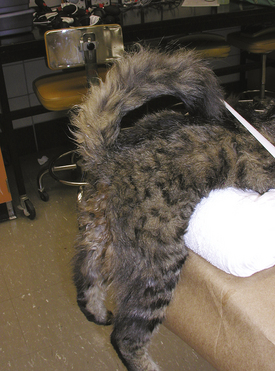
For perineal urethrostomy, an elliptical skin incision is made around the scrotum and prepuce. The testicles are removed if the cat is intact. The penis is dissected free from its pelvic attachments. A catheter is placed in the urethra, and a longitudinal incision is made through the penile urethra extending craniad to the level of the pelvic urethra. The diameter of the pelvic urethra is approximately two times that of the penile urethra. This allows normal urination in the face of crystalluria (sandlike material in the urine) and mucous plugs. The urethral mucosa is sutured to the skin. The remaining portion of the penis is amputated during urethra suturing, and the urinary catheter is removed. This results in a new, permanent opening that will accommodate the excess mucus and crystals. The bladder should be expressed at completion of the procedure to ensure that a good urine stream is obtained (Figure 30-35). Scrotal urethrostomy in male dogs is performed the same way except that the penis is not amputated. A skin incision is made in the area of the scrotum (castration with scrotal ablation is performed in intact dogs), followed by a urethral incision over a presurgically placed urethral catheter and then suturing of the urethral mucosa to the skin as for perineal urethrostomy.
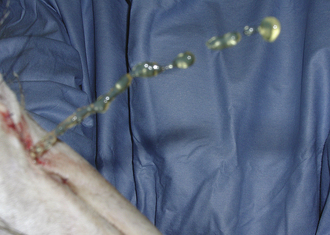
POSTOPERATIVE CONSIDERATIONS
The purse-string suture is removed. Immediate postoperative care includes placement of an Elizabethan collar and examination of the surgical site for evidence of hemorrhage. The Elizabethan collar is essential to keep the animal from licking the sutures. Mild hemorrhage during urination is expected for the first 24 to 72 hours after surgery (this may even continue for 2 weeks postoperative, especially in intact animals undergoing urethrostomy). This is usually of no consequence and will resolve on its own. Rarely is the bleeding severe enough to require additional surgery or transfusion. Animals should be placed on intravenous fluids for at least 24 hours after surgery, especially if urinary outflow obstruction was encountered, to maintain normal renal function and flush the urinary bladder and urethra.
The animal should be monitored carefully for normal urination in the early postoperative period. If no urine is produced for 12 hours after surgery, the bladder should be manually expressed until normal urination is seen. Postoperative catheters are discouraged because of the increased incidence of strictures at the surgery site. The urethrostomy site should be manipulated as little as possible. Ointments and warm cleansings are also discouraged. This may delay healing or aggravate hemorrhage. For cats, the use of shredded paper or pellets in the litter box is recommended for the first 7 to 10 days. Dietary alterations will likely be necessary depending on the composition of the mucous plug, grit, or calculi causing the obstruction and the presence or absence of a urinary tract infection. Owners will have to be counseled on the importance of dietary modification.
The most common late postoperative complication is stricture. This is generally manifested by chronic stranguria (straining to urinate). Complete obstruction of urine flow may also be noted. Stricture requires reoperation.
HERNIAS
The strict definition of hernia is protrusion of tissue from its normal cavity (generally the abdominal cavity) through a congenital or acquired defect in the wall of that cavity. Some common hernias in the dog and cat are umbilical hernias, inguinal hernias, and diaphragmatic hernias.
UMBILICAL HERNIA
An umbilical hernia is one in which bowel or, more commonly, omentum and intraabdominal fat protrudes through a defect in the abdominal wall under the skin at the umbilicus. This hernia is most commonly congenital, and it is recognized on physical examination by the presence of a swelling at the umbilicus (Figure 30-36).

PREOPERATIVE CONSIDERATIONS
Most umbilical hernias are not life threatening and are surgically repaired at the time of ovariohysterectomy or castration. Small hernias in young dogs (2 to 4 months of age) may be self-limiting. Larger hernias or those in older dogs (6 to 9 months of age) generally require surgical repair. Large umbilical hernias can result in intestinal entrapment (incarceration) within the confines of the hernia with resultant strangulation (loss of intestinal blood supply with devitalization and possible intestinal perforation). If intestinal strangulation occurs, surgical repair becomes an emergency.
TECHNIQUE AND INTRAOPERATIVE CONSIDERATIONS
The abdomen is widely clipped from xiphoid to pubis. The patient is placed in dorsal recumbency, and a standard skin preparation is performed. A ventral midline incision is made directly over the hernia, being careful not to perforate the hernia contents. The skin is dissected away from the hernial sac; the contents are then exposed and are either replaced into the abdominal cavity (intestine) or excised (falciform or omental fat). The edges of the hernial ring are trimmed to ensure healing of the defect. The abdomen is closed in a routine fashion as for the celiotomy incision.
INGUINAL HERNIA
An inguinal hernia is one in which intestine, uterus, broad ligament, intraabdominal fat, and/or another abdominal organ protrudes through the inguinal canal as a result of a defect in the constraints of the canal. This is more common in the bitch than in the male dog. An inguinal hernia is diagnosed on physical examination by the presence of a soft, doughy, nonpainful mass in the inguinal region. Inguinal hernias can develop early or late in life. It does not spontaneously regress, and surgical correction is necessary.
PREOPERATIVE CONSIDERATIONS
The opposite inguinal ring should be carefully palpated for weakness. Owners should be told that hernias can develop bilaterally, even if a hernia is not present on the opposite side at the time of presentation. Owners should also be told that recurrence is rare, but possible.
TECHNIQUE AND INTRAOPERATIVE CONSIDERATIONS
The abdomen is widely clipped from the umbilicus to and including the inguinal area. The animal is placed in dorsal recumbency, and a standard skin preparation is performed. A midline skin incision is made in the caudal abdomen between the inguinal folds. The abdominal cavity is not entered. Lateral dissection is performed carefully to expose the affected inguinal ring with its hernial sac and external pudendal vessels. The hernial sac is emptied of its contents with gentle manipulation and pressure toward the abdominal cavity. The empty sac is then excised and sutured along with the margin of the inguinal ring. Care is taken during closure to avoid the external pudendal vessels that exit from the caudal medial aspect of the ring. The skin incision is closed as for celiotomy.
DIAPHRAGMATIC HERNIA
A diaphragmatic hernia exists when abdominal contents protrude through an opening in the diaphragm into the thoracic cavity. Diaphragmatic hernias may be congenital or traumatic.
PREOPERATIVE CONSIDERATIONS
Any animal with a history of trauma or suspected trauma should be examined for presence of a diaphragmatic hernia. Diaphragmatic hernias can be life threatening or insidious and difficult to identify. Signs can also be masked by other problems. Presumptive diagnosis is based on a thorough physical examination. The classic signs of diaphragmatic hernia are a “tucked-up” abdomen (thin, empty abdomen), intestinal sounds in the chest, muffled heart and lung sounds, and dyspnea. However, some animals only have decreased lung sounds over the area of the hernia and mild exercise intolerance, if that. The diagnosis is confirmed by a thoracic radiograph.
TECHNICIAN NOTE
Animals with a diaphragmatic hernia should have oxygen and cage confinement to allow maximal oxygenation, minimal stress, and constant monitoring for respiratory insufficiency before surgery.
An animal with a massive hernia will have a diminished intrathoracic space as a result of the presence of abdominal contents within the thoracic cavity. The resultant space occupying mass does not allow the lungs to expand normally and compromises oxygen delivery to the blood. These animals can have life-threatening respiratory compromise and should be treated appropriately. Any animal with respiratory compromise should be stabilized. This includes minimal stress, oxygen cage or nasal oxygen insufflation, confinement, sternal recumbency, and constant monitoring for respiratory insufficiency or arrest. Sometimes holding the animal gently and with the head up and the rear legs hanging down will allow some abdominal contents to shift back into the abdomen. Along the same lines, the animal can be propped up such that the front half of the chest and shoulders are higher than the hindquarters. Intravenous access should be established in case of an emergency so long as the stress of catheter placement does not cause further respiratory embarrassment. Thoracic radiographs will be necessary for diagnosis and to assess for other pathologic conditions, but the animal should be stabilized as best as possible beforehand. Rarely is diaphragmatic hernia repair an emergency. Mortality is actually higher in those animals operated on acutely for the problem. Only in cases of massive hernia with severe respiratory distress or severe gas distention of a herniated viscus (stomach) is immediate operation necessary.
TECHNIQUE AND INTRAOPERATIVE CONSIDERATIONS
One of the most critical time periods for an animal with a diaphragmatic hernia is anesthetic induction. It is important to be thoroughly familiar with induction procedures and resuscitative techniques in the event of respiratory or cardiac arrest. The animal is placed in dorsal recumbency on an incline, with the head slightly higher than the hindquarters. It is important to remember that severe respiratory compromise may result when the animal is placed in dorsal recumbency, and the technician should be prepared to breathe for the animal. Mechanical ventilation or intermittent manual respiration will be necessary throughout the procedure.
The skin is widely clipped from about 3 inches cranial to the xiphoid to the pubis. The lateral thoracic wall on at least one side, preferably the side of the hernia, should be clipped and aseptically prepared for potential chest tube placement. A ventral midline celiotomy from xiphoid to umbilicus is performed. The edges of the incision are protected with laparotomy pads, and a Balfour self-retaining abdominal retractor is placed to enhance visualization. The diaphragmatic defect is inspected, and any herniated contents are gently reduced into the abdominal cavity. If the herniated contents do not reduce easily, the diaphragmatic defect is enlarged slightly to allow easy reduction. A thorough inspection of abdominal and thoracic viscera is made to rule out organ rupture or vascular compromise.
Diaphragmatic hernia repair requires working in a deep cavity. Gentle retraction of viscera to expose the defect during repair is necessary to preclude damage to abdominal organs to allow adequate visualization by the surgeon. The diaphragmatic defect is sutured with a nonabsorbable suture material in a simple continuous suture pattern. This will affect an airtight and watertight seal. Air is evacuated from the chest by thoracocentesis through the diaphragm or with chest tube placement. The celiotomy is closed in a routine fashion. After celiotomy closure, the chest cavity is once again aspirated from the lateral thoracic wall. If a chest tube was placed, evacuation of the thoracic cavity occurs through the chest tube.
POSTOPERATIVE CONSIDERATIONS
The animal should be monitored carefully for signs of respiratory distress. It is best to waken these animals with oxygen supplementation either through placement in an oxygen cage or through nasal insufflation. If a pulse oximeter is available, oxygen saturation should be checked frequently, especially as an attempt is made to wean the animal off oxygen. If dyspnea occurs or the animal cannot maintain normal oxygen saturation, the chest should be evacuated with a hypodermic needle, three-way stopcock, and a large syringe or through the chest tube. A rapid return to normal negative thoracic pressure and normal lung capacity should occur with evacuation of air and fluid.
If an indwelling chest tube was placed, periodic aspiration using positional changes (right lateral recumbency, left lateral recumbency, standing on hind legs, standing on front legs) will afford maximal removal of air and fluid. It is of utmost importance to keep the animal from chewing a hole in the drain or removing it from the chest cavity, and those involved in tube management should be informed on how the tube should be handled. An Elizabethan collar may be necessary, and the chest tube should be covered with a bandage. It is also imperative to keep all connections on the chest drain airtight. A security clamp should be placed on the tube to keep air from leaking into the chest if the free end of the tube is inadvertently opened. Premature removal, puncture, or inappropriate management (leaving the three-way stopcock open to the atmosphere) can result in acute animal death secondary to pneumothorax and resultant pulmonary dysfunction. Proper management of a chest tube requires full-time patient monitoring. A chart quantitating the amount of air and fluid removed during a given period of time (12 to 24 hours) will help to determine when the tube should be removed. Most chest tubes are removed immediately following surgery once negative intrathoracic pressure is obtained or within 12 hours of hernia repair. Otherwise, the tube can safely be removed as the amount of air and fluid decreases toward zero.
LUMPECTOMY
Lumpectomy refers to local surgical resection of a mass. The term often refers to cutaneous or subcutaneous masses.
INDICATIONS
Indications for lumpectomy include masses of cancerous origin, rapidly growing masses or masses that appear to be changing, ulcerative masses, nonhealing wounds, or masses that are impairing function.
PREOPERATIVE CONSIDERATIONS
Some masses are related to biochemical or blood cell alterations. Blood work should be performed to evaluate for these abnormalities. Abnormalities should be corrected before anesthesia, if possible. Additionally, many animals undergoing surgery for mass resection are older and may have organ system failure, which should be evaluated before anesthesia. After a mass is diagnosed, fine-needle aspiration of the mass is performed. If the mass is considered benign (i.e., lipoma), resection can proceed or the owner can monitor the mass. If changes in the mass are noted, resection should be considered. If the mass appears cancerous, further work-up for detection of metastasis should be considered, and resection is strongly recommended. All surgically resected masses should be submitted for histologic evaluation. Removed masses are placed in formalin at a 1:10 ratio of mass to fluid.
TECHNIQUE AND INTRAOPERATIVE CONSIDERATIONS
The skin around the area to be resected is prepared for surgery. It should be remembered that a generous clip needs to be performed because normal margins will need to be removed with the mass. Additionally, large mass resections will require that normal skin around the mass be pulled into the surgical field during closure. If this skin was not prepared aseptically before surgery, it will contaminate the surgical field. Masses should be manipulated as little as possible before surgery. A sterile marker is used to draw an elliptical pattern around the mass to be removed. One to 3 cm of normal tissue is included in the resection plane with large margins reserved for cancerous lesions. The mass is removed and the wound closed in three layers with absorbable suture placed internally. The mass is marked with ink or suture to note cranial and lateral margins. This will help future surgical planning if the mass was found to be incompletely resected according to histologic evaluation.
POSTOPERATIVE CONSIDERATIONS
The surgical wound should be monitored as any other surgical procedure. Large resections will result in tension on the incision line, making dehiscence more likely. Animals should be exercise-restricted until the wound is healed and sutures are removed. Owners should be told that further steps for treatment may need to be taken once a diagnosis is obtained (future surgery if complete resection was not obtained, chemotherapy, radiation therapy, etc.).
REMOVAL OF MAMMARY NEOPLASIA
Mammary neoplasia is cancer of the mammary gland. It is the most frequently occurring neoplasm in the female dog and the third most frequently found tumor in the female cat. Mastectomy is removal of a mammary gland. Radical mastectomy is removal of a chain of mammary glands on one or both sides of the animal. Lumpectomy is removal of a mammary tumor with approximately 1 cm of normal marginal tissue, not the entire mammary gland.
GENERAL INFORMATION AND INDICATIONS
In dogs, there is a significantly higher incidence of mammary gland tumors in nonspayed females or females that are spayed after their first estrus. Spaying before the first estrus cycle provides a definite protective factor against mammary tumor development.
In the initial stages, the tumor will usually appear as a small, pea-shaped, firm mass in one or more of the glands of the mammary chain. Long-standing or fast-growing tumors may present a sizeable mass with ulceration and drainage. Early diagnosis and therapy is best when dealing with mammary neoplasia.
Before surgery is considered, an examination for possible metastasis of the tumor is done. Malignant tumors will generally metastasize to the lymph nodes and lungs. Chest radiographs may detect pulmonary metastases, and abdominal radiographs may show iliac lymph node enlargement suggestive of metastasis. About 50% of mammary tumors in dogs are malignant, and about 80% to 90% of mammary tumors in cats are malignant. Surgical resection of tumors that have already metastasized does not improve prognosis. At the time of surgery, biopsy of regional lymph nodes should always be performed.
Surgery is currently considered the most effective therapy. The primary objective of surgical treatment is to remove completely the tumor tissue for potential cure and to obtain a histologic diagnosis of type of tumor and behavior.
TECHNIQUE AND INTRAOPERATIVE CONSIDERATIONS
Two techniques are available for tumor resection. In dogs, there appears to be no advantage to radical gland resection versus lumpectomy unless the tumor is incompletely excised. Lumpectomy affords the same long-term outcome as varying forms of mastectomy as long as the tumor is freely movable, small, and on the periphery of the gland. If the tumor is centralized within a gland, multiple tumors are present within a gland or a chain of glands, or the tumor is large and/or fixed, a more radical excision is warranted. In cats, unlike in dogs, recurrence is decreased if a unilateral mastectomy is performed rather than local excision of the mass. If bilateral radical mastectomy is necessary, the procedure must be staged (removal of one side at a time) to allow less tension on the skin closure. The skin is clipped widely to include all affected mammary glands. The animal is placed in dorsal recumbency, and a standard skin preparation is performed. An elliptical incision is made, attempting to include a 1-cm margin around the tumor. The skin and tumor, with or without the mammary gland, are gently undermined and removed. The skin incision is often gaping after tumor excision if an entire gland is removed, requiring a meticulous subcutaneous closure. Subcutaneous tissues are closed with a simple interrupted pattern using absorbable suture material. An active drain may be placed if a large amount of tissue is removed to help prevent fluid accumulation under the skin. The skin is closed in a routine fashion. The excised mammary masses are placed in formalin and sent to a laboratory for histopathologic evaluation.
POSTOPERATIVE CONSIDERATIONS
Major complications that can occur postoperatively are generally related to the tension placed on the skin to adequately close the wound when large amounts of tissue are removed. Seroma formation is common, especially if a drain was not placed at the time of surgery and the resection was large. It is best to bandage these animals for 48 to 72 hours postoperative to help prevent large amounts of fluid from accumulating under the incision and to make the animal more comfortable. Warm compresses may be needed after seroma development. Dehiscence is not common, but the incision should be examined daily for evidence of separation, especially if a large amount of tissue is removed. Bruising along the incision edges is common and should be expected. Immediate postoperative hemorrhage can occur. In the event of oozing blood, an abdominal bandage should be applied with gentle pressure. If a drain was placed, a bandage should be placed over the drain. The drain is emptied several times a day and is removed when minimal drainage is noted. If the animal irritates the incision by licking, an Elizabethan collar should be applied until suture removal. An Elizabethan collar should be applied as long as a drain is in place to prevent self-inflicted pulling or breaking of the drain. The animal should be exercise restricted, especially if a large incision under tension is present, to help prevent dehiscence and seroma formation. Radical mastectomy is a painful procedure, and pain management should be continued for at least 5 days postoperative.
AMPUTATION
Amputation refers to partial or complete removal of a body part, such as a limb or a toe. This section covers limb amputation.
INDICATIONS
Indications for amputation include appendicular cancer not amenable to local excision or other treatment modality (amputation may be curative or may be done as palliative therapy in some instances); severe neurologic dysfunction resulting in repeated trauma of a limb; nonunion fractures that will not result in limb function with orthopedic repair; irresolvable osteomyelitis; vascular disease of the limb, such as thrombosis or arteriovenous fistulae; and congenital deformity resulting in a nonfunctional limb not amenable to orthopedic repair. Simple limb fracture is not an indication for amputation, although some veterinarians may perform the procedure for that problem.
PREOPERATIVE CONSIDERATIONS
Amputation can involve considerable blood loss. It is important to perform presurgical blood work to determine PCV and TP. Transfusion should be given or anticipated depending on the animal’s preoperative values. Additionally, coagulation times should be assessed. A thorough orthopedic examination should be done to evaluate concurrent orthopedic problems. The owner needs to be aware of other orthopedic conditions that are diagnosed and how they may affect function following amputation. Orthopedic problems in other limbs can make ambulation after amputation difficult, depending on the severity and type of problem. The owner should also be made aware of neurologic problems affecting other limbs. This too can lead to difficult ambulation after amputation. When amputation is done because of neoplasia, the animal should be screened appropriately for metastasis. The amputation must be planned such that adequate margins of normal tissue are obtained if cancer is involved. Amputation is a painful procedure, and analgesics are best initiated before surgery and continued without interruption in the postoperative period.
For rear limb amputations with disarticulation of the coxofemoral joint in intact male dogs, scrotal swelling is a major concern. Seroma formation after amputation is common, and fluid tends to accumulate in the scrotum. Scrotal swelling can become so severe that ablation is necessary. Additionally the scrotum is more visible after amputation and may not be aesthetically pleasing to some owners. It is best to perform a scrotal ablation and castration at the time of amputation in these dogs.
TECHNIQUE AND PERIOPERATIVE CONSIDERATIONS
The limb is suspended from an intravenous fluid stand as for an orthopedic procedure. The limb is clipped and aseptically prepared for surgery. The clip should be generous and include the skin around the base of the limb to prevent contamination during closure. In general, a skin incision is made around the limb in the area to be amputated. Subcutaneous and muscle tissue are dissected and transected to remove the limb. Vessels are ligated and transected, and nerves are blocked with local anesthetic and then transected. Depending on the site of amputation, the limb may need to be disarticulated or the bone severed to remove the limb. The remaining muscle and subcutaneous tissue are closed over the bone and/or wound bed. The skin is closed in three layers. If a large amount of dead space is present at the time of closure, a closed, active drain can be placed.
Thoracic limb amputation can be done by removing the scapula and the entire forelimb (forequarter amputation), disarticulation of the scapulohumeral joint, or by ostectomy (cutting of the bone) at the level of the proximal humerus. Forequarter amputation offers the advantages that the major vessels and nerves are well visualized, sectioning the bone is not required, and the prominent scapular spine will not be present as the scapular muscle mass atrophies. It is also indicated in neoplastic diseases of the humerus (especially proximal) or of the scapula. Disarticulation leaves a more full appearance to the thorax and requires less extensive dissection, but muscle atrophy over the scapula can be unsightly in some cases. If disarticulation is performed, the acromion process should be excised to improve appearance. Proximal humeral amputation may be faster for some.
Pelvic limb amputation can be accomplished by disarticulation of the coxofemoral joint or proximal femoral osteotomy. Proximal femoral osteotomy yields a more cosmetic result, particularly in an intact male dog. It is also faster and easier than disarticulation. However, the remaining stump will move as the animal ambulates, and the owners must be made aware of this. Neoplastic diseases of the femur will require disarticulation to obtain a normal margin of tissue.
POSTOPERATIVE CONSIDERATIONS
Postoperative complications are not a major concern, but should not be ignored. Animals undergoing amputation are painful, and analgesics must be given. It is best to give analgesics as schedule doses rather than on an “as needed” basis. Analgesics will likely be required for 4 to 5 days after surgery.
Seroma formation is common. The area can be cold compressed for the first 24 hours after surgery, and if a seroma forms, warm compresses can be initiated. The limb should be bandaged for the first 24 to 48 hours, if possible. This will provide some comfort for the animal and help minimize seroma formation. The animal should be exercise restricted because motion will increase seroma size. Hematoma is also a possibility.
Seroma or hematoma formation after surgery can increase the chance of infection. If infection develops, the incision site will have to be opened, drained, and a culture and sensitivity obtained. Anemia can occur in the postoperative period as a result of blood loss at the time of surgery. Transfusion may be necessary. Intravenous fluids should be administered postoperative until eating and drinking resumes. Additionally the animal should be kept in a well-padded area and supported with a sling when taken out for a walk (until the animal learns to ambulate on three legs). Tension on the incision line, seroma formation, or infection may lead to dehiscence. Depending on the cause and degree of dehiscence, this is managed conservatively or with surgical closure. Animals with neoplasia may develop metastatic disease or have tumor recurrence at the surgery site.
Amputation is generally more traumatic to the owner than their pet. Three-legged dogs and cats are excellent pets, and it is important to help the owner understand that. Most animals are ambulating within 24 hours of surgery, but some may take another day. Almost all are ambulatory within 2 days of surgery. Animals should be kept in the hospital until they are ambulating and their pain seems well controlled. Amputees have an excellent prognosis unless the limb was amputated for neoplastic disease. For neoplasia, the prognosis depends on the type of tumor. Most owners are satisfied regardless of the reason for amputation; the age, breed, or weight of the animals; or the animal’s survival time after surgery.
NEUROLOGIC PATIENT CARE
The most common neurologic disorder in the dog is spontaneous intervertebral disk disease. Disks are normally found between vertebral bodies in the spine and act as shock absorbers during spinal movements. With time, the disks can undergo degeneration and calcification. When this occurs, the normal shock absorber–like effect is impaired, and extrusion (rupture) of the disk material into the spinal canal can occur. This puts pressure on the spinal cord and can cause an array of neurologic deficits or pain. Other neurologic disorders that may be encountered include atlantoaxial subluxation in toy breeds (abnormal articulation between the first and second cervical vertebra), acute spinal trauma (fracture, luxation), cauda equina (compression of the lumbosacral nerve roots), and cervical spinal cord malformation. Many animals with neurologic problems are referred to specialty hospitals for surgery. However, the veterinary technician should be familiar with some of the procedures that might be performed and understand how to manage neurologic patients in general so that when they return to the veterinary hospital for care after surgery, the technician understands what to do.
One neurosurgical procedure occasionally performed in small animal practice is intervertebral disk fenestration. In this procedure, each disk that is calcified or that may become calcified is removed (scraped) from the intervertebral space. This procedure is performed under some circumstances to help deter rupture of the disk material into the spinal canal, although its benefit is unproven. Dogs may develop spontaneous intervertebral disk extrusions in the cervical spine (neck) or the thoracolumbar spine (lower back). If the disk has already ruptured and the animal’s ability to ambulate is affected, a decompressive procedure must be performed to alleviate compression on the spinal cord. The most common decompressive procedures are the ventral slot (for cervical disk rupture) and hemilaminectomy (for thoracolumbar disk rupture). For acute disk herniation, the most commonly affected breed is the dachshund, but the beagle, Pekingese, poodle, and terrier breeds also frequently experience disk herniation.
SURGICAL TECHNIQUE AND PERIOPERATIVE CONSIDERATIONS
When an animal with spinal column instability is anesthetized, the normal protective abilities of muscle support and conscious perception of pain are removed. Conditions that can result in instability include spinal fracture or luxation and atlantoaxial instability. Animals with simple disk herniation or spinal malformation can also be worsened by excessive manipulation while under anesthesia. It is the responsibility of the veterinary technician, anesthesiologist, and surgeon to protect the animal from further neurologic damage by handling the spine with care while under anesthesia. It is important to keep the neck and back as straight as possible when moving the animal from one location to another. To accomplish this, the animal can be taped to a rigid, flat surface, can be carefully cradled in the arm, or placed in a stiff blanket sling supported on all sides. No matter how they are carried, one should be careful to avoid manipulation of the affected area. The means of transportation is often dictated by the size of the animal, but a rigid, flat surface is the preferred method for transporting animals with severe instability.
Animals undergoing cervical disk surgery are placed in dorsal recumbency with the head and neck in slight extension (Figure 30-37). The ventral aspect of the neck is widely clipped from the manubrium sterni to the cranial aspect of the larynx. A standard skin preparation is performed. A ventral midline incision is made through the skin and muscles to expose the intervertebral spaces. For fenestration, a dental tartar scraper, curved needle, fenestration hook, or curette can be used to remove the disk material from the interspace. Fenestration is carried out from the C2-3 to the C6-7 disk space. If decompression is needed, an oblong slot is made through the vertebral bodies into the spinal canal using a pneumatic or electric-powered bur. The disk material is then carefully removed from the spinal canal. A fat graft is placed over the spinal cord in the defect to prevent restrictive scar formation. The surgical wound is closed in layers with a continuous suture pattern using an absorbable suture. The skin is closed in a routine fashion.
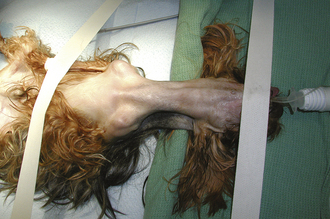
Animals undergoing thoracolumbar disk surgery are placed in ventral recumbency. For fenestration, the dorsum over the back is widely clipped from the midthoracic region to the pelvis. A standard skin preparation is performed. A skin incision is made from T11 to L6. Careful dissection between epaxial muscles (muscles of the back) allows palpation and limited visualization of the disk spaces. For fenestration, each space between T10 and L5 is curetted with a technique similar to that described for cervical disk fenestration. If decompression is needed, a portion of the bony lamina covering the spinal cord is removed with a pneumatic or electric-powered bur or bone rongeurs. The ruptured disk material is then carefully removed from the spinal canal. A fat graft is placed in the defect over the spinal cord. The muscles, subcutaneous tissue, and skin are closed in a routine fashion.
POSTOPERATIVE CONSIDERATIONS
The preoperative and postoperative care of neurologic patients depends on their neurologic status and the type of neurologic disease that they have. Management for the nonambulatory animal is demanding. Animals are subject to decubital ulcers (bed sores or pressure sores), urinary bladder infections, joint stiffness, muscle atrophy (muscle wasting), pneumonia, and gastrointestinal ulceration. Preventing these conditions from occurring is the main objective of proper postoperative management and should include the following:
• Passive range-of-motion exercises, muscle massages, underwater treadmill activity, sling walking, and whirlpool baths encourage joint motion and muscular activity and help decrease the chance of pressure sore formation. Passive range of motion should be performed at least three times a day on all affected limbs until the animal is able to ambulate normally.
• Urinary bladder expression four or five times per day to keep the urinary bladder empty. This will help keep the animal clean, prevent detrusor muscle atony secondary to bladder overdistention (which can lead to permanent bladder dysfunction), and might lower the incidence of infection resulting from urine retention.
TECHNICIAN NOTE
For animals that cannot consciously urinate, it is important to keep the urinary bladder empty by urinary catheterization or manual expression. This will prevent overdistention with permanent urinary bladder dysfunction, keep the animal clean, and help decrease infection rate.
• Flip the animal frequently (every 4 hours) to reduce the incidence of pneumonia and to help prevent pressure sore formation. Slings and wheelchairs can be used to get the animal up and off pressure points for a period of time if their spinal injury is stable.
• Monitor the animal daily for fever, cough, or respiratory distress. The down animal is at risk for pneumonia. Daily coupage and getting the animal up will help prevent this. Fever may also be an indication of severe gastrointestinal ulcer formation.
• Keep the animal in a well-padded area to prevent the formation of sores. A water bed mattress works well for large dogs.
• Keep the animal clean and dry. Soiling will increase the chance of pressure-sore formation. This can be challenging when incontinence and immobility play a role.
• Observation of the stool for evidence of fresh blood (bright red on feces or thermometer) or digested blood (dark, tarry feces), which may be an indicator of colonic or gastric ulceration, respectively, which can occur following spinal cord injury, hospital stress, and/or steroid therapy.
• Observe vomiting. If the vomitus contains coffee ground–like material, it is indicative of gastric bleeding secondary to ulcer formation.
• Observe the animal daily for evidence of pressure sores. Sores tend to form over bone prominences, especially in large dogs (Figure 30-38). Pressure-sore formation can lead to sepsis and death if severe, and their presence should not be taken lightly. Prompt treatment should be initiated to prevent severe complications. Treatment consists of frequent flipping, whirlpool baths, massages, antibiotics, clipping and cleaning of the area, surgical débridement, and/or bandages to alleviate pressure over a prominence, depending on the severity of the lesion. Prevention is the best form of therapy.
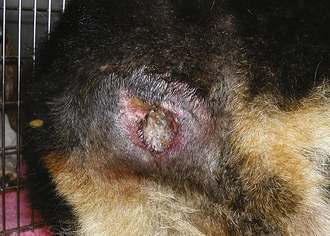
TECHNICIAN NOTE
It is better to prevent pressure-sore formation than to have to treat a pressure sore once it occurs.
• Animals that have lost pain sensation to one or more limbs should be monitored carefully. These animals may begin to lick or chew the asensory portion of their limbs, especially if the area becomes traumatized. Some will even chew off toes or whole limbs. If an animal without sensation to a limb begins to lick the limb, an Elizabethan collar should be placed immediately.
• An animal that cannot walk should never be allowed to roam free. They will traumatize their skin as they drag themselves around and can develop serious abrasions and ulcers.
• Animals with some motor function to the limbs and a stable spinal injury should be gotten up at least three times a day and encouraged to use their limbs. Ambulatory but ataxic animals should be supported when ambulating to help prevent falls that might lead to further spinal damage. Rehabilitation through specialized centers offering underwater treadmill work and other rehabilitation techniques should be considered.
TECHNICIAN NOTE
Animals with injuries to the cervical spine should always be placed in a harness rather than in a collar to prevent further cervical damage.
All animals with neurologic injuries require cage rest and controlled activity to allow the spinal column to heal. They should all be leashed when outdoors (animals with cervical problems should always be placed in a harness rather than in a neck collar to prevent further cervical damage), crated when indoors, and restricted according to the surgeon’s protocol. Owners should be carefully counseled on the importance of confinement for prevention of further spinal injury.
TECHNICIAN NOTE
All animals with a spinal injury will require cage rest, whether surgery is done or not. It is important to emphasize to owners that cage rest is important for proper healing, even if their pet is walking and feeling normal.
As can be seen from the preceding list, the veterinary technician and veterinarian must work diligently and continually to properly manage animals with neurologic dysfunction.
ORTHOPEDIC SURGERY
Preoperative Considerations
When an animal is brought to the veterinary hospital with a fracture, several steps must be taken to ready the animal for a permanent repair. First, the animal must be stabilized with respect to all other body systems (treated for shock, chest injuries, and abdominal injuries). Second, any open wounds associated with the fracture should be managed. Third, the fracture must be immobilized by means of a bandage, cast, or sling if the fracture is in a location amenable to bandaging (review Chapter 34). Once these three things have been achieved, fracture repair can be safely considered. Most long-bone fractures are not life threatening and do not require emergency surgery. Stability of the animal determines when the fracture is repaired.
Intraoperative Considerations
The limb is usually suspended from the foot (Figure 30-39). An extensive hair clip is required on all limb preparations. The limb will usually undergo extensive manipulation during reduction and repair. For this reason, the limb is clipped from the level of the metacarpus or metatarsus to the scapula or pelvis, respectively, including the medial and lateral aspects of the extremity. This may vary slightly, depending on the particular bone that is fractured, but the general rule should be a wide and thorough clip. The remaining hair at the tip of the paw is covered with a rubber glove or plastic wrap that is taped to the clipped skin.
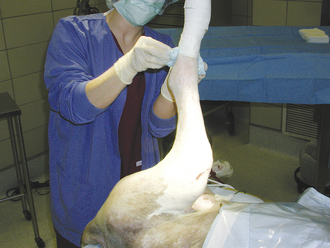
Positioning
Animal positioning depends on the specific bone that is fractured. Generally the following positions are recommended for each fracture:
• Femur: lateral recumbency, affected side up
• Tibia-fibula: lateral recumbency, affected leg down
• Humerus: lateral recumbency, affected leg up
• Radius-ulna: dorsal recumbency, affected leg craniad; or lateral recumbency, affected leg up
With so much skin exposed, skin preparation is time consuming, but it must be meticulous. The surgeon eventually covers the extremity with a sterile stockinette, but this should not preclude an adequate skin preparation.
Surgical Assistance
Orthopedic procedures are often difficult and time consuming and may demand the help of an assistant. Often, the veterinary technician is called on to participate as a surgical assistant and therefore should have a general understanding of orthopedic tissue handling (specifics of intraoperative assistance is covered in Chapter 29).
Several basic maneuvers commonly needed by the surgeon are often performed by the veterinary technician. They include retraction, muscle fatigue, alignment and reduction, and suction of the field. Proper techniques for each are discussed separately.
Retraction
Care should be taken to preserve the soft tissues in the operative field. It will be necessary to have functional muscle groups remaining when the bone is repaired. Retraction should be firm, but not so traumatic as to bruise or tear the muscle. The tissues should also be kept moist. Tissue desiccation can cause tissue death and loss of function.
Muscle Fatigue
Fractures in large-breed dogs or fractures that are 3 to 5 days old may be difficult to reduce because of heavy muscle mass or severe muscle contraction, respectively. In such cases, constant, steady traction on the muscle groups will cause them to fatigue and relax, thus facilitating reduction. Epidural anesthetics and/or paralytics can be used to aid in muscle reduction (review Chapter 27).
Alignment and Reduction
To repair fractured bones, the ends must be reduced and aligned. It is often necessary for an assistant to hold reduction during the fixation of the fracture. Pins, wires, screws, and plates of stainless steel may be used to achieve the necessary fixation.
Suction
Whenever a fracture occurs, bleeding into the fracture site can be massive. Some continuous oozing occurs during fixation. A clean surgical field is of the utmost importance in facilitating early and accurate reduction and fixation.
Postoperative Considerations
Some postoperative orthopedic patients may require external coaptation. Applied bandages should be managed as previously discussed (see Chapter 34). Animals undergoing orthopedic surgery will likely require passive range-of-motion exercises, but activity is otherwise limited. Animals should be encouraged to use the operated limb to increase blood supply to the fracture site, maintain joint and muscle health, and speed fracture healing. However, limb use should be slow, deliberate, and well controlled. No off-leash activity, running, jumping, or playing with other animals should be allowed. A crate is the best place for these animals when the veterinarian, veterinary technician, or owner is not strictly controlling the animal. The only orthopedic procedure in which activity is strongly encouraged is femoral head and neck excision where rehabilitation, building of muscle mass, and encouragement of weight bearing is extremely important for optimal limb function. Animals are restricted to light activity for the first 2 weeks following femoral head and neck excision, but they are then allowed to use the limb fully thereafter. It is also important to realize the relatively unsure gait of a three-legged dog or cat, and when exercising the animal, one must be certain to avoid slippery surfaces (vinyl or wet floors). Cement, grass, dirt, carpet, or rubber matting provides a much more sure-footed environment.
Rehabilitation is an important part of recovery. Flexing and extending the affected limb along with muscle massage will improve blood flow and muscle tone and reduce muscle contraction. Therapy should be done for a period of 7 to 10 minutes each time and be repeated two to three times per day. A demonstration by the technician of proper technique will aid the client in understanding the therapy. Slow leash walking is performed to encourage limb use. The faster the animal is walked, the more likely it will carry the affected limb.
JOINTS
Most orthopedic procedures involving a joint are elective and rarely need emergency care. Traumatic fractures and luxations, however, do require urgent treatment. Preoperative management should include limiting the animal’s activity. External coaptation is rarely necessary for nonurgent cases, but will make the traumatically injured animal (animals with luxations or fractures) more comfortable. For some injuries, such as cranial cruciate ligament tear, joint range of motion can be done before surgery to improve joint health. Indications for joint surgery include dislocations, ligament ruptures, infections, fractures, synovial biopsy, arthrodesis (surgical fusion of a joint), and treatment of osteochondrosis (abnormally thickened portion of the articular cartilage).
Intraoperative Considerations
An extensive clip, as for fractures, should be done for joint surgery. Positions will vary depending on the joint involved. Generally the following positions are recommended for each joint:
Hip: lateral recumbency, affected leg up
Stifle: lateral recumbency, affected leg up; or dorsal recumbency, leg hanging off the end of the table
Shoulder: lateral recumbency, affected leg up
Tarsus: lateral recumbency, affected leg up
Elbow: lateral recumbency, affected leg up (or down for medial approaches)
Carpus: lateral recumbency, affected leg up; or dorsal recumbency
Intraoperative assistance in joint surgery is similar to that necessary in fracture repair. Some special precautions should be taken while joints are exposed.
Retraction
Care should be taken not to place retractors in direct contact with the articular cartilage. This will damage the cartilage, and cartilage has a relatively poor response to trauma. When exposure of the joint is necessary, sharp retraction of the joint capsule will decrease trauma, but increase exposure.
Flush
The cartilage should be frequently flushed with saline to keep it from drying out during the procedure. This is true of all tissues, especially the articular cartilage because of its poor regenerative ability.
Postoperative Considerations
Postoperative care of animals undergoing joint surgery is variable, depending on the surgical procedure, the joint involved, and the surgeon’s preference. Early passive range-of-motion activity with light joint usage is recommended for most animals undergoing joint surgery. Heavy joint use is discouraged in the early postoperative period. Animals should be encouraged to use the affected joint during slow, leash-controlled walks, but are discouraged from running or jumping on the limb. Joint use is increased gradually over the course of recovery, which is variable depending on the procedures performed. Joint immobilization is necessary in some cases, such as luxation, but is discouraged in most instances and can result in severe limitations in joint range of motion after recovery if care is not taken to rehabilitate the joint carefully.
CLIENT EDUCATION
When an animal is discharged from the professional care available in a veterinary hospital, it becomes the responsibility of the hospital staff to instruct the client to provide the same type of care at home. This requires that time be spent with the client and the pet to educate the client on appropriate treatment techniques. There are several methods of client education in surgical cases, the degree of difficulty of which is often associated with the type of surgical procedure performed (e.g., ovariohysterectomy versus fracture repair).
Whenever an animal is sent home with a sutured skin incision, the client must be instructed to observe the incision daily for evidence of swelling, redness, or drainage. The client should also watch the animal for aggressive licking, removal of skin sutures, or both. The owner must be told to inform the veterinarian of problems.
If an animal is sent home with a bandage, a written discharge form should be given to the client describing in detail the proper management necessary to prevent complications.
In orthopedic cases and in many elective soft tissue surgery cases, the owner should be instructed specifically on what kind of limited activity should be enforced. If passive range-of-motion and weight-bearing exercises are expected, the client should be given both oral and written instructions in providing the correct care. A demonstration by the technician of the correct method of therapy is helpful.
In many instances, such as complicated orthopedic and neurologic discharges, a handout explaining in detail the care necessary is informative and provides a handy reference for the client if a problem arises.
The use of visual aids, such as a skeleton or overlay books that illustrate anatomy, can be effective in helping the client understand the scope of the problem. Clients are generally willing and capable of handling postoperative care for their pets if instructed appropriately.
CASE PRESENTATION 30-1
Signalment: Lady, 6-year-old female Labrador retriever (Figure 1)
History: Two-week history of increased drinking and urination. Lady showed progressive lethargy and decreased appetite over the 3 days before presentation. For 24 hours before presentation, Lady was inappetent, depressed, and extremely lethargic. The owner noticed some blood-tinged fluid coming from the vulva 4 days ago and that Lady has been licking her vulva regularly. The owner has noticed some blood in the urine when Lady has accidents in the house, which started happening about 1.5 weeks before presentation.
What to consider at this point: The dog is an intact female, she has not been eating or drinking for 24 hours, she has blood in her urine, she has a bloody discharge from her vulva, and she had been drinking and urinating more frequently than normal.
1. Is Lady current on vaccinations? Yes, rabies, distemper, and Bordetella
2. Has Lady ever had puppies? Yes, two litters, all healthy
3. When was her last heat cycle? About 8 weeks ago
4. When was the last time Lady was bred? 3 years prior
5. Are there toxins around your home, and can Lady free roam? No toxins that owners are aware of, Lady stays indoors or in a fenced yard.
6. Has she had any other illnesses? No
7. Did Lady have any dietary items out of the ordinary before this started? No, she eats adult maintenance dry (1 cup twice a day) and milk bones only. The owner did try to feed her steak last night because she was not eating, but Lady turned that down.
8. Any coughing, sneezing, runny eyes, vomiting, or diarrhea? No
Examination: Physical examination revealed Lady to be depressed, her abdomen to be tense and painful, and to have a mucopurulent discharge coming from her vulva.
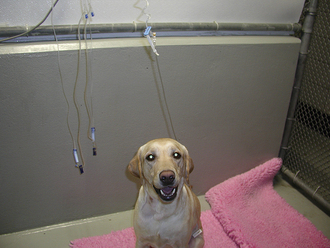
FIGURE 1 Lady: 6-year-old female Labrador retriever that came for treatment of inappetence and lethargy.
Other findings include fleas, waxy debris in both ears, and moderate dental tarter.
What to consider at this point: Lady is febrile, tachycardic, and tachypneic; had weak and thready pulses; and is painful in the abdomen. She appears to be dehydrated and in early shock.
CBC: Mild nonregenerative anemia, mildly low TP, leukocytosis (increased white blood cell count), consisting of a neutrophilia (a high neutrophil count) with a left shift (too many immature neutrophils) and toxic changes to the neutrophils, and a mild thrombocytopenia (low platelets)
Biochemistry panel abnormalities: Elevated Na and Cl, mildly low potassium, elevated BUN (meaning high protein diet, renal insufficiency, or dehydration), elevated creatinine (a kidney value—high means renal insufficiency or the animal is dehydrated), mildly low albumin, mildly low TP, elevated alkaline phosphatase (a liver enzyme)
Abdominal radiographs: Tissue-dense mass in the caudal abdomen displacing the intestines cranial and dorsal and intestinal ileus. The mass is consistent with an enlarged uterus (Figure 2).
Abdominal ultrasound: Enlarge, fluid-filled uterus
Urinalysis collected at the time of ultrasound by cystocentesis: Numerous bacteria, increased white blood cells, hematuria (blood in the urine), urine specific gravity of 1.012 (urine is not concentrated—in a dehydrated dog, this number should be higher. This means that the kidneys may not be functioning normally or the toxins from the disease are causing diuresis—increased filtration of fluid through the kidneys).
Diagnosis: Pyometra, possible renal insufficiency, possible sepsis
What to consider at this point: Lady has been diagnosed with a pyometra. She will require emergency surgery to remove the source of infection (her uterus). However, she is azotemic (has an elevated BUN and creatinine), dehydrated, potentially septic, anemic, thrombocytopenic, and in the early stages of shock. This makes her a poor anesthetic candidate because she is systemically unstable.
1. Place an intravenous catheter.
2. Give shock dose of intravenous crystalloid therapy (may consider adding in a colloid because the protein is low).
3. Begin a cooling process with fans and fluid therapy.
4. Obtain an ECG and blood pressure.
5. Obtain a coagulation profile to check for evidence of early disseminated intravascular coagulation (a disease that results from severe metabolic disruptions that leads to hyperblood clotting followed by hemorrhage in multiple areas).
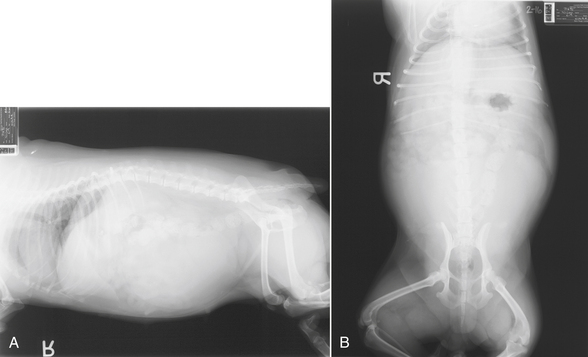
FIGURE 2 Abdominal radiographs of Lady showing a large tissue-dense mass in the caudal abdomen (large dense [more white] structure that is irregular and pushing the intestines cranial and dorsal). A is a lateral radiograph, and B is a ventrodorsal view.
6. Start on intravenous, broad-spectrum antibiotics.
7. Continue crystalloid and/or colloid therapy until improvement in body temperature, pulses, and respiration are noted.
9. Start gastrointestinal protectants because of GI stasis and inappetence with the stress of being in the hospital.
10. Repeat CBC and chemistry panel after Lady’s condition begins to stabilize.
What to consider at this point: Lady’s systemic condition should begin to stabilize within a few hours of admission to the hospital. She has a life-threatening infection of her uterus and must go to surgery sooner rather than later. As soon as she appears to be out of shock and rehydrated (hopefully the BUN and creatinine would come down), she should be prepared for surgery. Lady has bacteria in the urine, and a urine sample should be turned in for culture and sensitivity.
Anesthetic considerations: Lady is not a stable patient. Cardioprotective drugs should be used. Adequate monitoring: blood pressure, temperature, pulse, oxygen saturation, and vitals should be monitored. Only light anesthetics would likely be required and are desired.
Surgical considerations: Lady should be prepped quickly and moved into the OR for surgery. The technician should ensure that the OR is set up with all the necessary equipment and suture so that the surgery proceeds quickly. A general abdominal pack would be required. Culture swabs and a bucket for the uterus should be available. The surgeon would likely hand the infected uterus to the technician, and the technician would have to cut into the uterus with sterile technique and obtain a culture—this should be
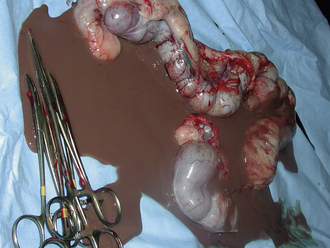
FIGURE 3 This uterus has been cut open with sterile instruments. Notice the brown fluid that exudes from the cut uterus. The fluid should be cultured using sterile technique from inside the incision made into the uterus by sticking a culture swab into the uterine lumen through the incision.
done outside of the OR (Figure 3). The surgical technique would be ovariohysterectomy. However, a wide abdominal preparation will be required because a large incision for gentle uterine handling and abdominal exploration will be needed (Figure 4). A sponge count should be performed before abdominal incision and before incision closure to ensure that none were left in the abdomen. The surgical assistant should remember to keep the tissues moist and not to pull on the uterus because it will be friable and will tear easily (this would cause septic fluid to leak onto the surgical field and into the sterile abdominal cavity). Tissue and culture samples should be promptly submitted.
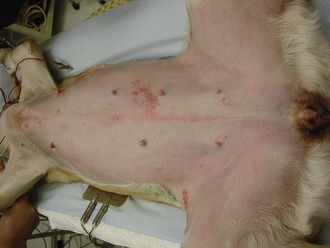
Considerations for recovery: Lady will likely be hypothermic, even though she had a fever before surgery. She should be warmed appropriately. Though the infected uterus was removed, she could still experience complications of septicemia and her illness, such as fever, low blood pressure, anemia, shock, organ failure, and death. All vitals, PCV, TP, ECG, blood pressure, and mucous membranes should continue to be monitored until Lady is stable.
Other postoperative care: Pain should be controlled with intravenous administration on a routine schedule (do not wait for Lady to be painful). Intravenous fluids should be continued until Lady is eating and drinking. Food and water should be offered 12 hours after surgery. The PCV and TP should normalize within a few days, but if they drop too low, colloidal fluid support and/or blood transfusion may be necessary. Coagulation times, CBC, and biochemistry panel should be reevaluated 24 hours after surgery to ensure that improvements are noted. The incision should be monitored for oozing of fluid (which might occur in a dog with low protein and platelets—this should improve in 24 to 48 hours). A bandage should be placed around the belly if incisional oozing occurs. Gastrointestinal protectants are continued until Lady’s appetite returns to normal. As she improves over 24 to 48 hours and begins eating and drinking, fluid therapy is decreased and then stopped, and oral antibiotic therapy is continued in an oral form based on culture and sensitivity results.
What happened to Lady: Surgery was a success, and Lady recovered without complications. Her blood work abnormalities began to normalize, and her appetite returned within 36 hours. She was discharged from the hospital on Enrofloxacin and Tramadol 3 days after surgery. Initial culture results from the urine and uterus revealed E. coli sensitive to enrofloxacin. The owners were instructed to monitor the incision daily and to return for suture removal and blood work in 7 days. Lady was back to normal at that time.
Other: Pyometra generally has a good prognosis if caught early and treated appropriately. Recovery is often quick so long as the animal does not have complications with septicemia.
Busch, S.J. Small animal surgical nursing: skills and concepts. St Louis: Elsevier Mosby; 2006.
Dunning, D. Surgical wound infection and the use of antimicrobials. In Slatter D., ed.: Textbook of small animal surgery, ed 3, St Louis: Saunders, 2002.
Licroy, M.D., Bartels, K.E. Surgical lasers. In Slatter D., ed.: Textbook of small animal surgery, ed 3, St Louis: Saunders, 2002.
Quandt, J.E. Postoperative patient care. In Slatter D., ed.: Textbook of small animal surgery, ed 3, St Louis: Saunders, 2002.
Seim, H.B., III., Creed, J.F. Restraint techniques for prevention of self-trauma. In Bojrab M.J., ed.: Current techniques in small animal surgery, ed 4, St Louis: Lea & Febiger, 1998.
Shmon, C. Assessment and preparation of the surgical patient and the operating team. In Slatter D., ed.: Textbook of small animal surgery, ed 3, St Louis: Saunders, 2002.