Page 291 

APPENDIX 2 Procedures – equipment and techniques

In-Dwelling Nasal Oxygen Catheter Placement

Equipment required

Topical local anaesthetic solution (e.g. proxymetacaine drops)
Appropriately sized red rubber catheter or soft flexible paediatric feeding tube (8-French for most dogs, 5-French for small dogs) or veterinary nasal oxygen catheter if available
Some means of marking the tube (e.g. piece of tape, appropriate pen)
Lubricant gel, preferably containing local anaesthetic
Butterfly tape and suture material, skin stapler or skin glue
(Elizabethan collar)

Procedure

Elevate the patient’s nose and drip a small amount of local anaesthetic solution into the nostril.
Allow enough time for the local anaesthetic to take effect (e.g. 10 min).
Measure the catheter from the tip of the nose to the medial canthus and mark it.
Lubricate the tip of the tube.
Hold the animal’s head with the nose pointing upwards and insert the catheter along the ventromedial aspect of the nasal cavity until the mark is reached; being too forceful here can cause epistaxis.
Fix the catheter in place, first to the lateral aspect of the nose and then to the skin, either between the eyes or to the side of the face. It is important to ensure that the catheter is out of the animal’s visual field. The catheter may be fixed using tape tags that are sutured, using skin staples or with skin glue.
Loop the catheter along the animal’s neck (dorsally or laterally depending on how it has been fixed) and bandage over it with a light dressing. This will help to minimize traction on the fixation. An intravenous fluid line or some other form of tubing may be used to extend the catheter if it is too short to reach the neck.
Connect the catheter to the oxygen supply using appropriate tubing (see Figure 6.3).
Repeat the procedure on the other side if two indwelling catheters are required; a commercial or improvised Y-connector can be used to connect both catheters to the same oxygen tubing.
Use of an Elizabethan collar may be indicated in some patients.
Commence humidified oxygen supplementation at 50–150 ml/kg/min.
Local anaesthetic drops may be reapplied as necessary.

Additional notes

A nasopharyngeal oxygen catheter is placed in the same way but the catheter is premeasured to the ramus of the mandible.

Thoracocentesis

Equipment required

Clippers
Surgical scrub equipment
Sterile gloves
Appropriately sized butterfly needle (typically 21 or 23 gauge for an adult cat or small dog), or intravenous catheter (14–20 gauge depending on the size of the patient) and extension tubing. The size of the needle or catheter is guided both by patient size and the nature of the material to be aspirated
Sterile three-way tap
Appropriately sized syringe (typically 20 ml for cats and small dogs, 60 ml for bigger dogs)
Sample containers (sterile EDTA, serum and additive-free containers)
Jug, bowl or other collection vessel
Ideally a total of three people
  Page 292 

Procedure

The animal is allowed to stand or to sit in sternal recumbency as preferred and gently restrained by one individual; minimal restraint often works best. Lateral recumbency may be acceptable for pneumothorax.
Flow-by oxygen supplementation is provided (if tolerated).
A patch of fur is clipped in the 7th, 8th or 9th intercostal space on both sides of the chest and the area is aseptically prepared on one side (the side that is chosen initially may be guided by auscultation, ultrasonography or a dorsoventral radiograph if one has been obtained). If pleural fluid is suspected, an area in the ventral third of the thorax is chosen for aspiration; if pneumothorax is suspected, an area in the dorsal third of the thorax is chosen; if pleural space disease has yet to be confirmed, an area half-way up the thorax is chosen.
The location for needle insertion should lie just cranial to the rib to avoid the neurovascular bundle that lies caudal to each rib. In smaller animals, this essentially involves inserting the needle in the middle of the intercostal space.
Depending on the animal in question, and wearing sterile gloves, a suitable butterfly needle, or an intravenous catheter attached to extension tubing, is attached to a three-way tap and then to a 20 ml or 60 ml syringe (Figure App2.1). Note that the three-way tap is therefore located away from the patient.
The needle is inserted by a second person gently but briskly into the pleural space at a right angle to the chest wall with the bevel facing dorsally – lingering on the skin is undesirable as this is often a highly sensitive area.
Gentle suction is applied to the syringe by a third person as the needle is inserted into the pleural space. Once in the pleural space the needle can be angled caudally or ventrally to lie flat against the chest wall to reduce the risk of lung trauma.
Aspiration is continued until negative pressure is reached or it feels like the lung is being scratched by the needle.
It may be necessary to reposition the needle (and sometimes the patient) gently either initially or during the procedure to maximize the amount of material removed.
Samples of pleural fluid are collected in sterile EDTA, serum and additive-free containers for cytology, haematocrit measurement, culture and sensitivity or other analyses as appropriate.
The total volume of material removed is recorded.
The procedure may need to be performed on both sides of the thorax – this is decided based on the results of the procedure on the first side and the individual patient’s circumstances. For example:
Is residual pleural space material likely to be reabsorbed?
Is additional material likely to accumulate?
Are there concurrent intrathoracic abnormalities that make the animal less tolerant of residual material?
How compliant was the patient for thoracocentesis on the first side?
image

Figure App2.1 Equipment for thoracocentesis. Butterfly needle attached to 20 ml syringe for cats and small dogs (left); intravenous catheter; extension tubing and 60 ml syringe for larger dogs.

Additional notes

Clinically significant respiratory compromise is generally associated with approximately 20 ml/kg or more of pleural air or fluid. Removal of a smaller volume than this is therefore unlikely to cause significant clinical improvement although smaller volumes may be of greater significance in the presence of concurrent injuries (e.g. pulmonary contusions). If clinical signs do not improve following aspiration of an appropriate volume of pleural air or fluid it suggests that another abnormality exists and is predominantly responsible for the dyspnoea.

This may be the case for example in an animal that has suffered blunt thoracic injury resulting in both pneumothorax and pulmonary contusions. Aspiration of 20 ml/kg of air may only cause partial improvement in clinical signs if pulmonary contusions are significantly involved in the dyspnoea noted. Nevertheless, therapeutic thoracocentesis is still appropriate as it will be of some benefit in improving expansion of the already compromised lungs.

  Page 293 

Pericardiocentesis

Equipment required

Sedative agents (e.g. butorphanol ± midazolam) – not required in many cases
Lidocaine 2% solution (without adrenaline), 2 ml syringe, 23 gauge needle – for local anaesthesia
Lidocaine 2% solution (without adrenaline), 10 ml syringe, needle in case of significant ventricular dysrhythmia
Clippers
Surgical scrub equipment
Sterile gloves
Sterile no. 11 blade
Over-the-needle BD Angiocath™ 14 or 16 gauge, image or 5 inch (a variety of other instruments including central venous catheters and small chest drains may be used for pericardiocentesis; the latter may be left in situ in the pericardial sac for repeat drainage short-term)
Three-way tap
Extension tubing
60 ml syringe
Sample containers (sterile EDTA and additive-free containers)
Jug, bowl or other collection vessel

Procedure

Place and secure a peripheral intravenous catheter.
Restrain the dog in left lateral recumbency so that aspiration is performed from the right side. If lateral recumbency is not tolerated, sternal recumbency may be used. If available, ensure electrocardiogram (ECG) monitoring is in place.
Clip an area ventrally (from sternum to mid-thoracic level) extending from the 3rd to 8th intercostal space.
Identify the site at which the Angiocath™ will be inserted: this is usually cranial to the rib (to avoid the intercostal artery in particular that lies caudal to the rib) at the level of the costochondral junction in the 4th, 5th or 6th intercostal space. Ultrasonography can be used to help identify the best site.
Infiltrate lidocaine (1 ml of 2% solution) at the chosen site subcutaneously and down to the parietal pleura.
Perform a surgical scrub of the clipped area.
Wearing sterile gloves, make a stab incision in the skin and then insert the Angiocath™ at the chosen site pointing towards the heart – the catheter is usually inserted approximately perpendicular to the thoracic wall pointing slightly dorsally. Ultrasonography may be used to guide catheter positioning but is usually not required.
Advance the Angiocath™ until the pericardial sac is penetrated – it may be possible to feel a ‘pop’ as the catheter goes through the pericardium. Pericardial effusion, which is usually sanguineous or port-wine coloured, is not under negative pressure within the pericardial sac and is therefore expelled forcefully once the pericardium has been penetrated. Pericardial effusion may be mistaken for pleural effusion that can have a very similar appearance. However, the latter should not be expelled forcefully through the catheter.
Advance the catheter over the stylet slightly further and then remove the stylet.
Attach one end of the extension tubing to the catheter and hand the other end to an assistant who should then connect the three-way tap and the 60 ml syringe.
Pericardial fluid is then aspirated until no further fluid is returned or the patient is no longer compliant.
Fluid samples should be transferred using sterile technique into the sterile sample containers.
The catheter is then removed and there is usually no need to cover the insertion site.

Additional notes

The ECG should be monitored for significant ventricular dysrhythmia (see Ch. 12) throughout – if this is noted, it may be that the catheter is making contact with the myocardium and it should be withdrawn slightly. If the dysrhythmia is very severe or if it does not improve when the catheter is withdrawn slightly, the catheter should be removed completely. Lidocaine (start with 2mg/kg bolus) should be administered intravenously if a ventricular dysrhythmia is haemodynamiacally significant and fails to improve with catheter withdrawal.

A sample of pericardial effusion withdrawn at the start of the procedure should be checked frequently for clotting while the procedure progresses. Pericardial effusion is devoid of platelets and clotting factors and will not clot unless it is from active or very recent haemorrhage. If the catheter has inadvertently punctured a cardiac chamber or there is rupture of a sizeable vessel, blood will be aspirated and will clot. The haematocrit of pericardial fluid is usually less than that of the patient. In addition drainage of pericardial fluid is typically associated with a rapid improvement in patient status.

Abdominocentesis

Equipment required

Clippers
Surgical scrub equipment
  Page 294 
Sterile gloves
Appropriately sized hypodermic needle (20, 21 or 23 gauge; image or 1 inch long) and syringe (2 or 5 ml)
Sample containers (sterile EDTA, serum and additive-free containers)

Procedure

Restrain the animal in right lateral recumbency (or standing).
Clip and scrub the ventral abdomen around the umbilicus – the site chosen is typically just caudal to the umbilicus and lateral to the midline; alternatively ultrasonography may be used to guide the site of aspiration.
Wearing sterile gloves attach the needle to the syringe.
Advance the needle perpendicular to the abdominal wall into the abdomen in one gentle but purposeful motion.
Aspirate intermittently as the needle is advanced further.
Transfer any fluid removed into the sample containers using aseptic technique.

Additional notes

Lateral recumbency is preferred as it reduces the likelihood of splenic injury.
If aspirated fluid is grossly suggestive of blood, it should be observed for clotting. In contrast to blood accidentally aspirated from the spleen or a vessel, sanguineous effusion is devoid of platelets and clotting factors and will not clot unless it is from active or very recent haemorrhage.
An over-the-needle catheter may be used instead of a hypodermic needle.
An open system using one or more needles inserted into the abdomen without syringes attached may be used to retrieve peritoneal fluid and may be more rewarding in some cases (reduces likelihood of omentum or viscera occluding the needle). However, this technique allows air to leak into the abdominal cavity which may confuse subsequent diagnostic imaging.
If single quadrant abdominocentesis is unrewarding, the technique is repeated in the three other abdominal quadrants (four quadrant abdominocentesis). If free peritoneal fluid is still not obtained, diagnostic peritoneal lavage should be considered (see below).
Abdominocentesis is not recommended in coagulopathic patients.

Diagnostic Peritoneal Lavage

Equipment required

Clippers
Surgical scrub equipment
Sterile gloves
Sterile no. 15 blade
Appropriately sized long over-the-needle intravenous catheter (16, 18 or 20 gauge)
Closed fluid administration system – the precise system will depend on the patient in question (e.g. a single 60 ml syringe may be adequate for a small cat; a fluid bag, infusion set and three-way tap may be needed for a big dog)
10–20 ml/kg of warmed sterile normal saline (0.9% sodium chloride solution)
Standard abdominocentesis equipment (see above)

Procedure

Restrain the animal in lateral recumbency (or standing).
Clip and scrub the ventral abdomen around the umbilicus – the site chosen is typically just caudal to the umbilicus and lateral to the midline.
Wearing sterile gloves cut two or three additional (side) holes into an appropriately sized over-the-needle intravenous catheter using a scalpel blade. In order not to weaken the catheter, the holes should not be longer than 50% of the circumference of the catheter and should not be made opposite each other.
Insert the catheter in a caudodorsal direction into the abdomen in one gentle but purposeful motion.
Once the abdominal wall has been penetrated, advance the catheter over the stylet and then remove the stylet. Connect the fluid administration system.
Infuse 10–20 ml/kg of warmed sterile saline into the abdomen under gravity or via gentle injection pressure.
Allow a dwell time of several minutes (20–30 min if possible) and gently agitate the patient’s abdomen intermittently in the interim to aid dispersal.
Retrieve as much fluid as possible using standard abdominocentesis technique (see above).

Additional notes

It is common to retrieve only a small proportion of the lavage fluid originally infused (the remainder will be absorbed via the peritoneum or removed at surgery).

Due to dilution, fluid obtained via diagnostic peritoneal lavage cannot reliably be subjected to biochemical quantitative analysis; the main uses are cytology and microbiology.

Gastric Decompression – Orogastric Intubation

Equipment required

Roll of tape or mouth gag
Appropriately sized stomach tube, preferably with multiple fenestrations
  Page 295 
Lubricant for stomach tube
Means of marking the stomach tube (e.g. piece of tape, suitable marker pen)
Bucket (or similar) for collecting gastric effluent and lavage fluid
Funnel and jug for performing lavage

Procedure

Ideally have the patient in sternal recumbency but allow to adopt his/her preferred position.
Place a roll of tape (or gag) in the mouth to prevent chewing of the tube.
Premeasure the stomach tube from the tip of the nose to the last rib and mark it.
Lubricate the tube well and pass it through the roll of tape down the oesophagus; the oesophagus starts dorsal to, and to the (patient’s) left of, the larynx. Some resistance is usually encountered as the tube is passed through the distal oesophageal sphincter. Excessive force is to be avoided to reduce the risk of gastric perforation.
Collect the effluent and examine it grossly for evidence of haemorrhage or gastric mucosal sloughing suggestive of more severe ischaemia.
Lavage the stomach several times with warm water (20–50 ml/kg/lavage).

Additional notes

In addition to the opioid that should already have been administered, sedation with an agent that is cardiovascular sparing may be needed for orogastric intubation to be performed (e.g. diazepam to effect).

It must be remembered that the ability to pass a stomach tube does not exclude the presence of some degree of gastric volvulus in gastric dilatation/volvulus syndrome.

Gastric Decompression – Percutaneous Needle Decompression

Equipment required

Clippers
Surgical scrub equipment
Sterile gloves
16 or 18 gauge over-the-needle intravenous catheter (or similar sized hypodermic needle)

Procedure

Restrain the patient in sternal (or left lateral) recumbency.
Identify the point of maximal abdominal distension on the right side of the abdomen and percuss the area for tympany to ensure the stomach and not the spleen lies beneath.
Clip and aseptically prepare the chosen site.
Insert the intravenous catheter percutaneously into the stomach at the chosen site and remove the stylet. Gas with a characteristic smell is released immediately through the catheter.

Additional notes

Needle decompression is a quick and easy procedure that is effective in relieving gaseous distension. However, it does involve blindly placing a needle through a gastric wall that may already be severely compromised. It should perhaps therefore be reserved for the following types of cases:

Animals that are intolerant of orogastric intubation despite appropriate sedation
Animals that are intolerant of orogastric intubation and that are deemed too unstable to sedate
Animals in which a stomach tube cannot be passed.

Nasooesophageal Feeding Tube Placement

Equipment required

Topical local anaesthetic solution (e.g. proxymetacaine drops)
Appropriately sized soft flexible paediatric feeding tube (8-French for most dogs, 3.5 to 5-French for most cats and small dogs)
Some means of marking the tube (e.g. piece of tape, appropriate pen)
Lubricant gel, preferably containing local anaesthetic
Appropriately sized syringe (2.5–10 ml) filled with sterile saline or water for injection
Butterfly tape and suture material, skin stapler or skin glue
(Elizabethan collar)

Procedure

Elevate the patient’s nose and drip a small amount of local anaesthetic solution into the nostril.
Allow enough time for the local anaesthetic to take effect (e.g. 10 min).
Measure the feeding tube from the tip of the nose to the 9th intercostal space and mark it.
Lubricate the tip of the tube.
Hold the animal’s head with the nose pointing upwards and insert the tube along the ventromedial aspect of the nasal cavity. The tube should be inserted in short controlled steps allowing the animal to adjust between each step if necessary. An increase in resistance is likely to be encountered in the mid-nasal region.
  Page 296 
Once the tube has passed through the nose, lower the head and continue to advance the tube until the mark is reached. If the animal coughs during placement, the tube is potentially in the trachea and should be withdrawn and the procedure recommenced; no tube placement is contraindicated in patients unable to cough (e.g. due to reduced mentation).
Inject 2.5–10 ml of saline/water down the tube followed by an equal amount of air – if the animal coughs, the tube is potentially in the trachea.
Fix the tube in place, first to the lateral aspect of the nose and then to the skin, either between the eyes or to the side of the face. It is important to ensure that the tube is out of the animal’s visual field. The tube may be fixed using tape tags that are sutured, using skin staples or with skin glue.
Confirm correct tube placement radiographically; the end should lie in the distal oesophagus.
Loop the feeding tube along the animal’s neck (dorsally or laterally depending on how it has been fixed) and bandage over it with a light dressing. This will help to minimize traction on the fixation. An intravenous fluid line or some other form of tubing may be used to extend the feeding tube if it is too short to reach the neck.

Additional notes

Correct tube placement can also be checked by connecting the feeding tube to a capnograph. If the tube is in the oesophagus, end-tidal carbon dioxide should be approximately 0 mmHg with no waveform. Tracheal placement results in a higher ETCO2 and a capnograph waveform.

Use of an Elizabethan collar may be indicated in some patients (typically young animals and cats).
The small diameter of feeding tubes mandates the use of liquid diets.

Gastric Lavage

Equipment required

Appropriate set-up for general anaesthesia, including cuffed endotracheal tube
Roll of tape or mouth gag
Large bore stomach tube with terminal fenestrations
Means of marking the tube (e.g. piece of tape, suitable marker pen)
Lubricant
Bucket (or similar) for collecting gastric effluent and lavage fluid
Funnel and jug for performing lavage

Procedure

General anaesthesia is mandatory (unless the patient is unconscious).
The use of a cuffed endotracheal tube is mandatory.
Position the animal in sternal (or right lateral) recumbency with the head lower than the thorax.
Insert the roll of tape (or gag) into the mouth to facilitate stomach tube passage.
Premeasure the stomach tube from the tip of the nose to the last rib and mark it.
Lubricate the tube well and then pass it down the oesophagus up to the mark – the opening of the oesophagus lies dorsally and to the (patient’s) left of the trachea.
Some resistance is usually encountered as the tube is passed through the distal oesophageal sphincter; excessive force should be avoided to reduce the risk of iatrogenic damage.
Lavage the stomach with warm water (or normal saline) until the returning effluent is clear (20–50 ml/kg lavage).
If appropriate, administer activated charcoal via the stomach tube.

Additional notes

Great care must be taken throughout and especially during stomach tube removal to prevent aspiration.
The majority of commercial stomach tubes are likely to be too big for use in cats. However, a tube for gastric lavage may be improvised for example by using the tubing from an oesophageal stethoscope into which terminal fenestrations are cut.

Urethral Catheterization of Male Cats with Urethral Obstruction

Equipment required

Minimum of two individuals usually required
Clippers
Surgical scrub equipment
Sterile gloves
Sterile lubricant
Lidocaine 2% solution (without adrenaline)
Feline urethral catheter – typically 3- to 5-French
Lacrimal irrigation cannula (Figure App2.3) or over-the-needle intravenous catheter with needle withdrawn
  Page 297 
Warmed 500 ml bag of 0.9% sodium chloride (normal, physiological saline)
Fluid administration set
Three-way tap
20 ml syringe
Sterile additive-free containers
Jug, bowl or other collection vessel
Urine collection system
image

Figure App2.3 Three types of feline urethral catheter (from top to bottom): red rubber catheter; Portex® Jackson Cat Catheter; Slippery Sam®. A blue Little Herbert® adaptor is connected to the red rubber catheter and the Slippery Sam®. A lacrimal irrigating cannula is shown at the bottom.

Procedure

Generously clip around the preputial opening.
Position the cat in lateral or dorsal recumbency.
Set up the fluid bag, administration set, three-way tap and 20 ml syringe.
Perform a surgical scrub of the clipped area.
Mix 2 mg/kg of lidocaine thoroughly with a small amount of sterile lubricant; use this to coat both the irrigation cannula and the urethral catheter.
Extrude the penis with the nondominant hand and evaluate its appearance; gently palpate the distal urethra for evidence of obstruction. If the obstruction is very distal, the tip of the penis may have a blue appearance and it may be possible gently to massage the obstructing material out.
Gently insert the irrigation cannula or over-the-needle intravenous catheter (with the needle withdrawn to act as a stylet) into the urethra. If the cannula passes, it can be withdrawn and the urethral catheter inserted. Otherwise flushing should commence.
It is usually necessary to flush the urethra in order to facilitate catheter placement. Inject the warmed saline in short sharp bursts with the catheter being simultaneously gently advanced in a twisting motion. In addition, once the catheter has passed a short distance from the external orifice, it is essential to release the penis back into the prepuce and straighten the normal bend in the feline urethra in order for the catheter to pass further. This is achieved by pulling the prepuce caudally (and dorsally).
Once the catheter has been fully inserted, the bladder should be thoroughly lavaged with warmed saline using the fluid administration set, three-way tap and 20 ml syringe. The urine can be markedly haematuric and lavage is ideally continued until the fluid returning from the bladder is clear. However, this is dependent on the patient’s compliance and a risk–benefit assessment of the level of chemical restraint required. The first urine sample obtained via the catheter prior to bladder lavage can be kept for analysis as required.
Connect the urethral catheter to a urine drainage bag in a closed collection system (Figure App2.5). Tape the collection tubing both to the cat’s tail and to the kennel subsequently in order to minimize pull on the urethral catheter.
Apply an Elizabethan collar to the cat to prevent interference with the urinary catheter
image

Figure App2.5 A Slippery Sam® connected to a closed system drainage set (Closed System Drainage Set (Drainset)®, Infusion Concepts, Halifax, UK) via a blue Little Herbert® adaptor.

Additional notes

Great care must be taken throughout catheterization to minimize trauma to the already inflamed and friable urethra and avoid rupture. Although it can take copious flushing and much patience to achieve catheterization in some cases, in the author’s experience it is almost always achievable.

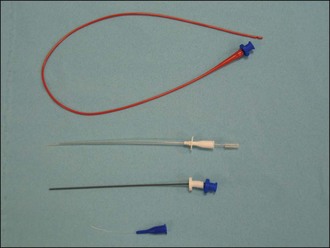
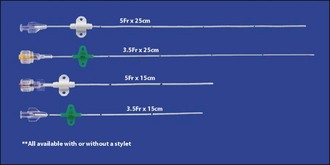
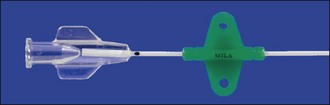
A number of different types of feline urethral catheters are available (Figures App2.2 and App2.3). It is usually necessary to use a rigid catheter to unblock the urethra initially. Although softer catheters can be made stiffer by placing them in the freezer, a rigid catheter such as the Portex® Jackson Cat Catheter (Smiths Medical International Ltd, UK) which is widely available in the United Kingdom is typically used for unblocking. It also has the advantage of a stylet that assists with catheterisation further. However it is preferable not to leave a rigid catheter in situ as there is a greater likelihood of exacerbating urethral and bladder mucosal damage and discomfort. The Jackson catheter is also not very long and can be too short to drain the bladder reliably in bigger tomcats. The rigid catheter should ideally be removed (flushing through the catheter repeatedly as it is pulled out) and replaced with a less traumatic one. MILA® Tomcat Urethral Catheters (MILA International, Inc., Erlanger, KY USA) are provided with optional stylets; they can therefore be used for unblocking and then left in situ. They have wings which can be separated from the catheter tube then repositioned at the appropriate length on the catheter once it has been measured against the cat. The two pieces are then attached together with a suture at each end of the wings, and the wings are sutured to the prepuce using dedicated suture holes (Figure App2.4). As such the catheter is essentially flexible in length. It is also soft and open-ended. Red rubber urethral catheters (3.5- or 5-French; e.g. Kendall Sovereign™, Tyco Healthcare Group LP, Massachusetts, USA) may also be used and are both soft and long. They are fixed to the preputial area using butterfly tapes. The Slippery Sam® (SurgiVet, Smiths Medical Inc., Wisconsin, USA) urethral catheter can be readily sutured in place and connected to a collection system via a suitable luer lock adaptor (e.g. Little Herbert®, SurgiVet, Smiths Medical Inc., Wisconsin, USA). However this catheter is not intended to be left in situ – the warning from the manufacturer at the time of writing is that the catheter and silicone hub are not permanently affixed to each other and it is advised not to leave the catheter in place for more than 6 hours.

image

Figure App2.2 MILA International, Inc. Tomcat Urethral Catheters.

image

Figure App2.4 MILA International, Inc. Tomcat Catheter with suture wing.

  Page 298 

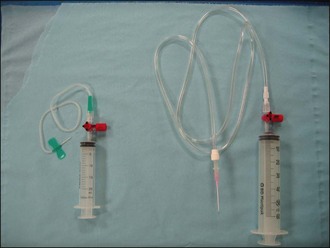
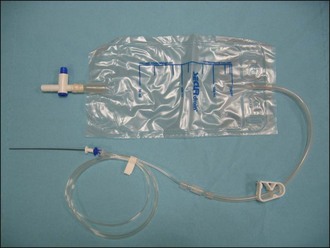
Advantages of a closed urinary collection system include reduced risk of ascending infection, avoiding urine scalding of the perineal region, and overall improved patient welfare (see Figure App2.5). If a proprietary urine collection system is not available, one can be improvised using an intravenous fluid administration set attached to an empty fluid bag. The chances of success with such an improvised system can be maximized by prefilling the administration set (as when setting up an intravenous drip) before it is connected to the urinary catheter and by minimizing the amount of air that gets into the line subsequently. If a closed collection system really cannot be made to work reliably, the urethral catheter can be bunged and the bladder can be manually drained intermittently using aseptic technique. It is clearly essential that this is done regularly. If for some exceptional reason the urethral catheter must be left open, it is recommended to leave a short length of tubing connected to the catheter such that the voided urine will collect at a site away from the cat’s perineum.

Retrograde Urohydropulsion in Male Dogs with Urethral Obstruction

Equipment required

Four individuals usually required
Clippers
Surgical scrub equipment
Sterile gloves (one pair) and nonsterile gloves (at least one pair for rectal palpation)
  Page 299 
Sterile lubricant
Rigid canine urethral catheter of largest appropriate size (usually 6- to 12-French)
Multiple syringes prefilled with sterile 0.9% sodium chloride (normal, physiological saline) – for dogs weighing less than 12 kg, each syringe should contain 5 ml/kg of saline; full 60 ml syringes should be used for dogs weighing more than 12 kg.

Procedure

Place the dog in lateral recumbency.
Clip fur from around the preputial opening as required.
One individual should then extrude the penis and clean the tip thoroughly.
A second individual should lubricate the urethral catheter generously and insert it gently to the level of the most distal obstructing calculus; this is often at the level of the os penis.
The third individual should insert a lubricated finger into the rectum and compress the urethra (lies ventral to the rectum) against the pubis via pressure through the rectal wall. This therefore provides compression proximal to the obstructing calculus.
A fourth individual should then rapidly flush sterile saline into the urethra via the catheter – it can be helpful to occlude the urethral orifice around the catheter during flushing to minimize saline leakage
Once enough flushing under pressure has been performed to cause significant dilation of the urethra, proximal compression via rectal pressure is released by lifting off the finger and an attempt should then be made to advance the urethral catheter further. This will be possible if the build up and sudden release of pressure have dislodged the calculus, flushing it into the bladder or at least more proximally.
The above procedure may need to be performed several times before successful catheterization is achieved. The bladder should be monitored for overdistension as a result of saline that may enter the bladder with each attempt.
Once the obstruction is relieved, it may be appropriate to leave a soft urethral catheter connected to a closed collection system in situ.

Additional notes

Successful retrograde hydropulsion usually requires general anaesthesia or heavy sedation and must therefore only be attempted once the patient has received adequate stabilization of cardiovascular, electrolyte and acid–base status.

Retrograde hydropulsion is intended to flush urethroliths into the bladder and not to push them physically with the catheter. Great care must be taken throughout catheterization to minimize urethral trauma and avoid rupture.