LOWER LEG: ANTEROPOSTERIOR PROJECTION
See Figure 6-64 and Box 6-13.
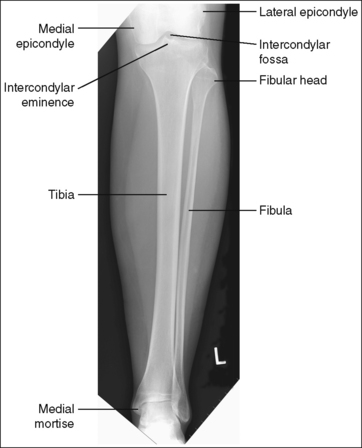
Image density is uniform across the lower leg.
• Position the thicker proximal lower leg at the cathode end of the tube and the thinner distal lower leg at the anode end to take advantage of the anode heel effect and obtain more uniform density across the lower leg.
The lower leg demonstrates an AP projection. The tibia demonstrates only minimal superimposition of the proximal and distal fibula, and the fibular midshaft is demonstrated free of tibial superimposition.
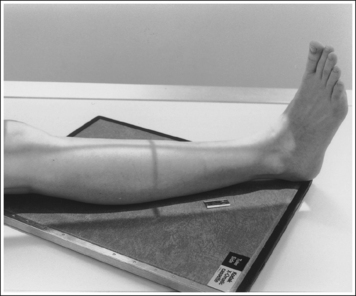
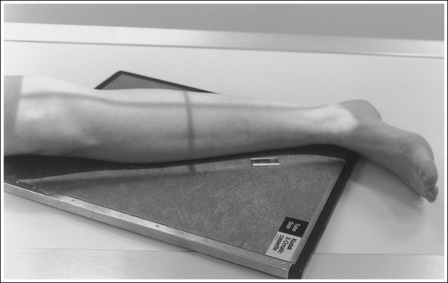
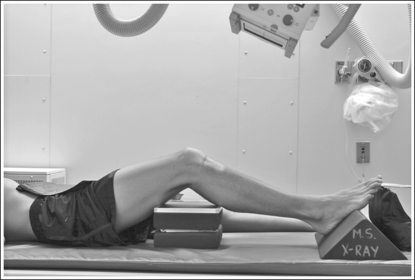
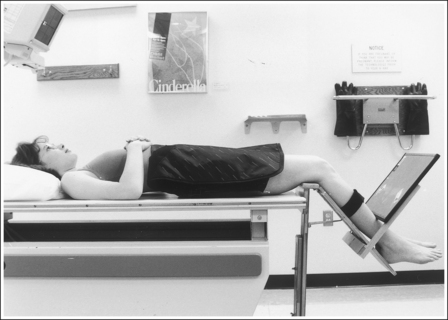
• To obtain an AP projection of the lower leg, place the patient in a supine position with the knee fully extended and the foot placed vertically. Dorsiflex the foot to a 90-degree angle with the lower leg (Figure 6-65).
• Detecting lower leg rotation. Rotation of the lower leg can be identified on an AP lower leg projection by evaluating the relationship of the fibula to the tibia. When the patient's leg is externally (laterally) rotated, the fibula shifts toward and eventually beneath the tibia, obscuring the medial mortise (see Image 48). When the patient's leg is internally (medially) rotated, the head of the fibula draws from beneath the tibia (see Image 49).
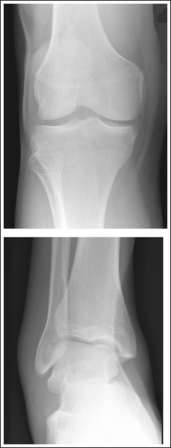
IMAGE 48
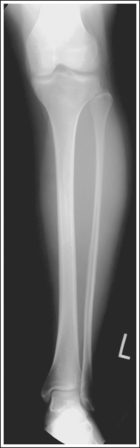
IMAGE 49
• Positioning for fracture. For a patient with a known or suspected fracture who is unable to position both the ankle and knee into an AP projection simultaneously, position the joint closer to the fracture in the truer position. When the fracture is situated closer to the ankle, the ankle should meet the preceding requirements for a true distal lower leg AP projection (see Image 50). When the fracture is situated closer to the knee, the knee should meet the requirements for accurate positioning for a proximal lower leg AP projection. Depending on the degree of tibial and fibular rotation at the fracture site, the other joint may or may not be accurately positioned for an AP projection.
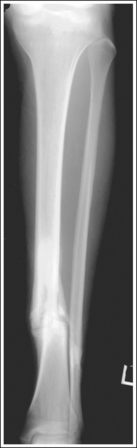
IMAGE 50
The knee and tibiotalar joint spaces are closed.
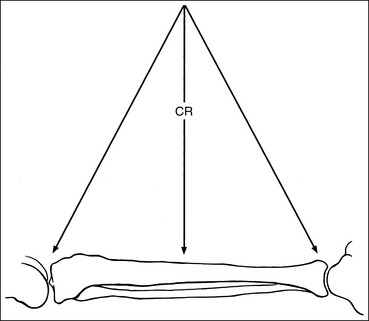
• The proximal tibia slopes distally from the anterior condylar margin to the posterior condylar margin by approximately 5 degrees. When the lower leg is placed parallel with the IR and the central ray is centered to the midshaft of the lower leg, x-rays that diverge in the opposite direction are used to record the image of the proximal tibia (see Figure 6-66). The distal lower leg also slopes distally from the anterior tibial margin to the posterior margin by approximately 3 degrees. Although the x-rays diverge in the same direction as the slope of the distal tibia, they diverge at a greater angle. Because the angle of x-ray divergence is not aligned parallel with either the proximal or distal tibia, the knee and ankle joints are demonstrated as closed spaces on an AP lower leg projection.
The tibial midshaft is at the center of the exposure field. The tibia, fibula, ankle, knee, and surrounding lower leg soft tissue are included within the collimated field.
• A perpendicular central ray is centered to the midpoint of the lower leg to place it in the center of the image.
• To include the ankle and knee joints on the image, you must consider the degree of x-ray beam divergence that occurs when a long body part is imaged (Figure 6-66). A 14- × 17-inch (35- × 43-cm) detailed screen-film or computed radiography IR should be adequate to include both the ankle and knee. When a screen-film system is used, the leg can be positioned diagonally to accommodate the length. For the computed radiography system, it is not advisable to do this unless the system is set to handle this alignment. To ensure that both joints are included, the film should extend 1 to 1.5 inches (2.5 to 4 cm) beyond each joint space. The ankle is located at the level of the medial malleolus, and the knee joint is located 1 inch (2.5 cm) distal to the palpable medial epicondyle.
• Once the lower leg is accurately positioned with the IR, center the central ray to the midpoint of the lower leg and open the longitudinal collimation field until it extends just beyond both the knee and the ankle. For patients with long lower legs, it may be necessary to raise the source–image receptor distance (SID) above the standard to obtain a longitudinally collimated field long enough to include both joints on the same IR. Transverse collimation should be to within 0.5 inch (1.25 cm) of the lower leg skin line.
Anteroposterior Lower Leg Projection Analysis
These are externally rotated AP knee and AP ankle projections that simulate how an externally rotated AP tibial projection would appear.
Analysis
The proximal and distal fibula demonstrate minimal tibial superimposition. The leg was medially (internally) rotated.
LOWER LEG: LATERAL PROJECTION (MEDIOLATERAL)
See Figures 6-67 and 6-68 and Box 6-14.
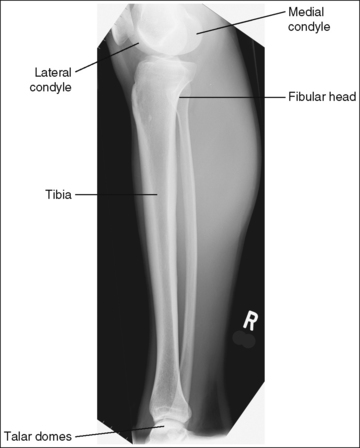
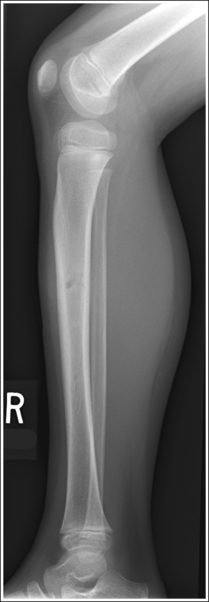
Image density is uniform across the lower leg.
• Position the thicker proximal lower leg at the cathode end of the tube and the thinner distal lower leg at the anode end to take advantage of the anode heel effect and obtain more uniform density across the lower leg.
The lower leg demonstrates a lateral projection. The distal fibula is superimposed by the posterior half of the distal tibia. The fibular midshaft is free of tibial superimposition. The tibia is partially superimposed over the fibular head, and the medial femoral condyle is demonstrated posterior to the lateral condyle if the leg is extended; the condyles are superimposed if the knee is flexed at least 30 degrees (compare Figure 6-67 and Image 51).
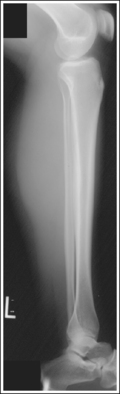
IMAGE 51
• To obtain a lateral lower leg projection, begin by placing the patient in a supine position with the leg extended and the foot dorsiflexed until it forms a 90-degree angle with the lower leg. Next, rotate the leg, positioning the lateral foot surface against the IR and the femoral epicondyles perpendicular to the IR (Figure 6-69).
• Detecting leg rotation. If the distal lower leg was not placed in a lateral projection, the tibiofibular relationship is altered. If the patient's leg was externally rotated (patella positioned too close to the IR and heel elevated off the IR), the distal fibula is situated too far posterior on the tibia, and the fibular head is demonstrated free of tibial superimposition (see Image 52). If the patient's leg was internally rotated (patella positioned too far away from IR and forefoot elevated off the IR), the distal fibula is situated too far anterior on the tibia and fibular head and neck, and possibly the midshaft is superimposed by the tibia (see Image 53).
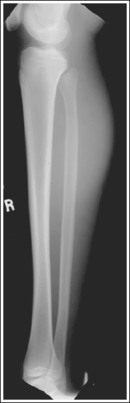
IMAGE 52
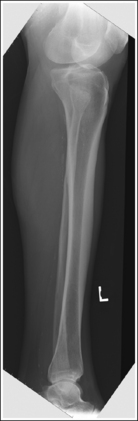
IMAGE 53
• Superimposition of the femoral condyles is not a good indication of rotation on a lateral lower leg projection. The amount of their superimposition depends on the degree of knee flexion and the way in which the diverged x-ray beams are aligned with the medial condyle. See page 364 (lateral knee) for a discussion of central ray alignment and the superimposition of the femoral condyles.
• Positioning for fracture. For a patient with a known or suspected fracture who is unable to position both the ankle and knee into a lateral projection simultaneously, position the joint closer to the fracture in the truer position. If the fracture is situated closer to the distal lower leg, the distal lower leg should meet the preceding requirements for a true lateral projection. If the fracture is situated closer to the proximal lower leg, the proximal lower leg should meet the preceding requirements for a lateral projection. Depending on the degree of tibial and fibular rotation at the fracture site, the other end of the lower leg may or may not be in a lateral projection.
The tibial midshaft is at the center of the exposure field. The tibia, fibula, ankle, knee, and surrounding lower leg soft tissue are included within the collimated field.
• A perpendicular central ray is centered to the midpoint of the lower leg to demonstrate the tibial midshaft in the center of the image.
• To include the ankle and knee joints on the image, you must consider the degree of x-ray beam divergence that occurs when a long body part is imaged (see Figure 6-66). A 14- × 17-inch (35- × 43-cm) detailed screen-film or computed radiography IR should be adequate to include both the ankle and knee. When a screen-film system is used, the leg can be positioned diagonally to accommodate the length. For the computed radiography system, it is not advisable to do this unless the system is set to handle this alignment. To ensure that both joints are included, the IR should extend 1 inch (2.5 cm) beyond each joint space. The ankle is located at the level of the medial malleolus, and the knee is located 1 inch (2.5 cm) distal to the palpable medial epicondyle.
• Once the lower leg is accurately positioned with the IR, center the central ray to the midshaft of the tibia, and open the longitudinal collimation until it extends just beyond both the knee and the ankle. For patients with long lower legs that have to be placed diagonally on the IR, it may be necessary to raise the SID above the standard to obtain a longitudinally collimated field long enough to include both joints on the same image. Transverse collimation should be to within 0.5 inch (1.25 cm) of the lower leg skin line.
Lateral Lower Leg Projection Analysis
The distal and proximal ends of the fibula are superimposed by the tibia, whereas the fibular midshaft is free of superimposition. The knee is flexed approximately 45 degrees, and the femoral condyles are superimposed.
Correction
No corrective movement is required, although knee flexion may result in elevation of the proximal lower leg and foreshortening of the tibia and fibula.
Analysis
The distal fibula is situated too far posterior on the tibia, and the fibular head is free of tibial superimposition. The leg was externally rotated.
Correction
Internally rotate the leg until the lateral foot surface is positioned parallel with the IR.
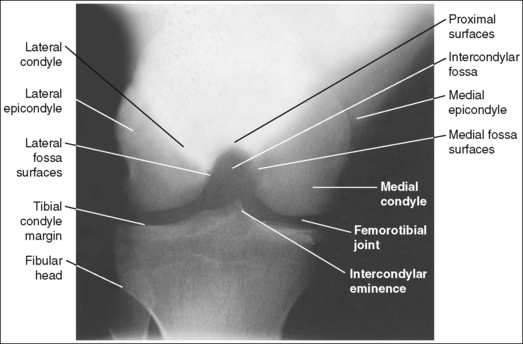
KNEE: ANTEROPOSTERIOR PROJECTION
See Figure 6-70 and Box 6-15.
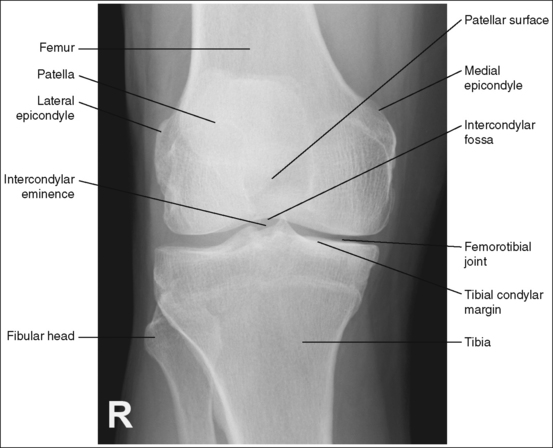
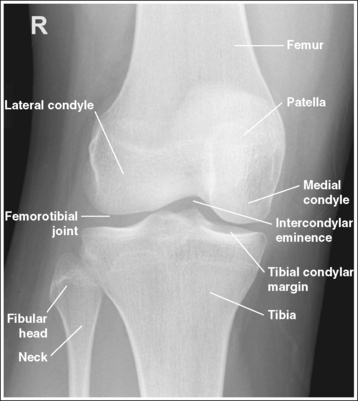
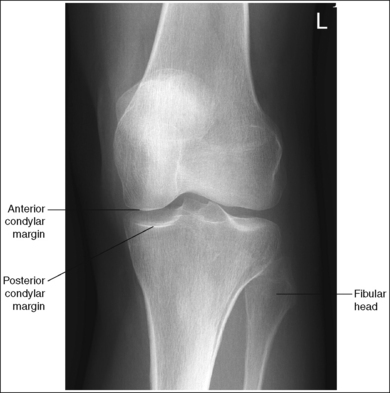
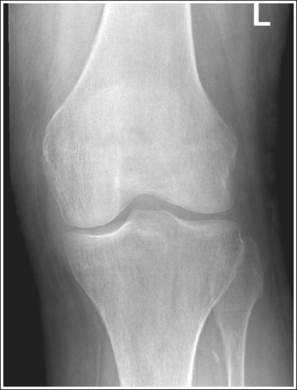
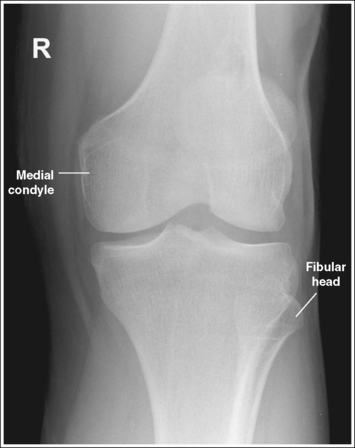
The knee demonstrates an AP projection. The medial and lateral femoral epicondyles are in profile, the femoral condyles are symmetrical, the intercondylar eminence is centered within the intercondylar fossa, and the tibia is superimposed over 0.25 inch (0.6 cm) of the fibular head.
• To obtain an AP knee projection, place the patient in a supine position with the knee fully extended. Internally rotate the leg until an imaginary line drawn between the medial and lateral femoral epicondyles is positioned parallel with the IR (Figure 6-71). This positioning places the medial and lateral femoral epicondyles at equal distances from the IR as well as medially and laterally in profile, respectively. It also centers the intercondylar eminence within the intercondylar fossa and draws the fibular neck and a portion of the fibular head from beneath the tibia.
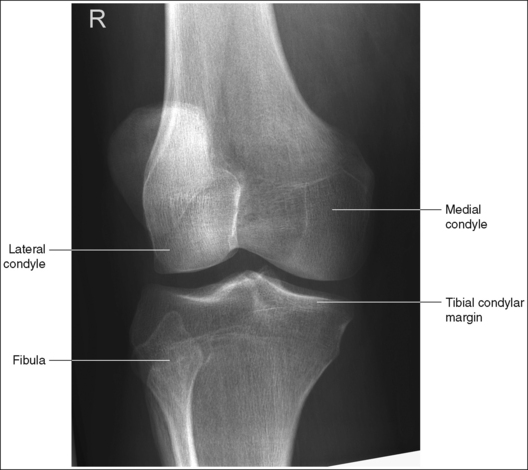
• Effect of rotation. If the femoral epicondyles are not positioned parallel with the IR, an AP projection has not been obtained. If the patient's leg was not internally rotated enough to place the epicondyles at equal distances from the IR, they are not in profile, the medial femoral condyle appears larger than the lateral condyle, and the tibia is superimposed over more than 0.25 inch (0.6 cm) of the fibular head (see Image 54). If the patient's leg was internally rotated more than needed to place the femoral epicondyles at equal distances from the IR, the epicondyles are not demonstrated in profile, the lateral femoral condyle appears larger than the medial condyle, and the tibia is superimposed over less than 0.25 inch (0.6 cm) of the fibular head (see Image 55).
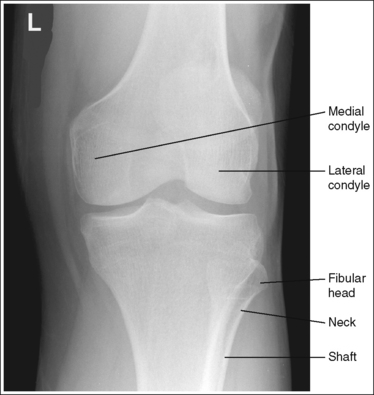
IMAGE 54
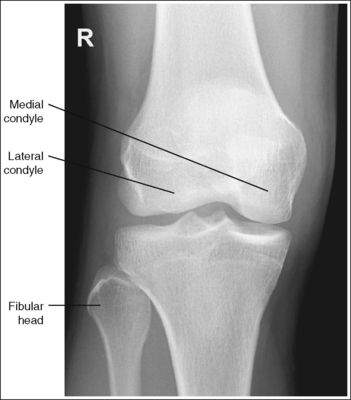
IMAGE 55
The knee joint space is open, the anterior and posterior condylar margins of the tibia are superimposed, the intercondylar eminence and tubercles are demonstrated in profile, and the fibular head is demonstrated approximately 0.5 inch (1.25 cm) distal to the tibial plateau.
• The anterior and posterior condylar margins of the tibia are superimposed if the correct central ray angulation, as determined by the patient's upper thigh and buttocks thickness, is used. By studying the tibial plateau region, you will see that the tibial plateau slopes distally approximately 5 degrees from the anterior condylar margin to the posterior condylar margin on both the medial and lateral aspects (Figure 6-72). Only if the central ray is aligned parallel with the tibial plateau slope is an open knee joint space obtained.
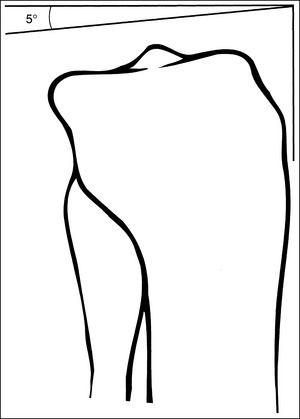
FIGURE 6-72 Slope of the proximal tibia. (Reproduced with permission from Martensen K: Alternative AP knee method assures open joint space, Radiol Technol 64:19–23, 1992. Courtesy Radiologic Technology, published by the American Society of Radiologic Technologists.)
• Determining the central ray angulation. When a patient is placed in a supine position, the degree and direction of the central ray angulation required depend on the thickness of the patient's upper thigh and buttocks. This thickness determines how the lower leg and the tibial plateau align with the IR. Figure 6-73 shows a guideline that can be used to determine the central ray angulation for different body sizes; it illustrates the relationship of the tibial plateau to the imaging table as the patient's upper thigh thickness increases. Note that a decrease occurs in femoral decline, and a shift occurs in the direction of the tibial plateau slope as the thickness of the thigh decreases. Because of this plateau shift, the central ray angulation must also be adjusted to keep it parallel with the plateau and to achieve an open knee joint. For optimal AP knee projections, measure from the patient's anterior superior iliac spine (ASIS) to the imaging table on either side to determine the central ray angulation to use for each knee examination. When measuring this distance, do not include the patient's abdominal tissue. Keep the calipers situated laterally next to the ASIS. If the measurement is less than 18 cm, a 5-degree caudal angle should be used. If the measurement is 19 to 24 cm, a perpendicular beam should be used. If the measurement is greater than 24 cm, a 5-degree cephalad angle should be used. Using the correct central ray angulation not only results in an open knee joint space but also provides optimal demonstration of the intercondylar eminence and tubercles without foreshortening.
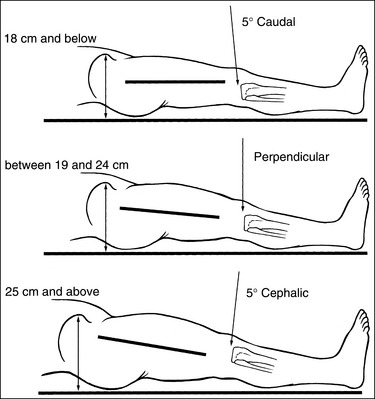
FIGURE 6-73 Determining central ray (CR) angle from the patient's thigh thickness. (Reproduced with permission from Martensen K: Alternative AP knee method assures open joint space, Radiol Technol 64:19–23, 1992. Courtesy Radiologic Technology, published by the American Society of Radiologic Technologists.)
• Analysis of joint space narrowing. On an AP knee projection with adequate positioning, joint space narrowing is evaluated by measuring the medial and lateral aspects of the knee joint, which are also referred to as compartments. The measurement of each of these compartments is obtained by determining the distance between the most distal femoral condylar surface and the posterior condylar margin of the tibia on each side. Comparison of these measurements with each other, with measurements from previous images, or with measurements of the other knee determines joint space narrowing or a valgus or varus deformity. In a valgus deformity the lateral compartment is narrower than the medial compartment; in a varus deformity the medial compartment is narrower (see Images 56 and 57). Precise measurements of the compartments are necessary to ensure early detection of joint space narrowing and are best obtained when the knee joint space is completely open. If an inaccurate central ray angulation was used for an AP knee projection, the knee joint is narrowed or obscured, the intercondylar eminence and tubercles are foreshortened, and the tibial plateau is demonstrated.
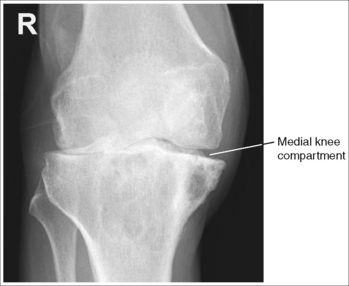
IMAGE 56
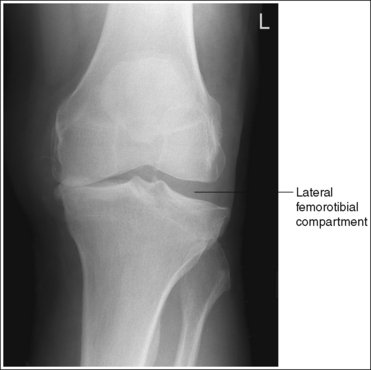
IMAGE 57
• Effect of poor central ray angulation. When examining an AP knee projection for which an inaccurate central ray angulation was used, you can determine how to adjust the angulation by judging the shape of the fibular head and its proximity to the tibial plateau. If the fibular head is foreshortened and demonstrated more than 0.5 inch (1.25 cm) distal to the tibial plateau, the cephalad angle was too great (see Image 58). If the fibular head is elongated and demonstrated less than 0.5 inch (1.25 cm) distal to the tibial plateau, the caudad angle was too great (see Image 59).
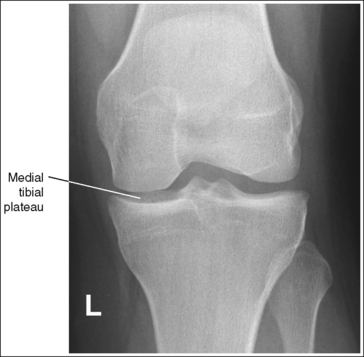
IMAGE 58
IMAGE 59
• Compensating for the nonextendable knee: If the patient is unable to extend the knee fully, an open knee joint can be obtained by doing the following:
1. Aligning the central ray perpendicular with the anterior lower leg surface
2. Decreasing the angulation 5 degrees—placing the central ray parallel with the tibial plateau. For example, if the central ray is perpendicular to the anterior lower leg surface when a 15-degree cephalic angulation is used, the angle should be decreased to 10 degrees if the knee cannot be extended (see Image 60). This setup demonstrates an open knee joint space, a foreshortened distal femur and proximal lower leg, and an elongated intercondylar fossa.
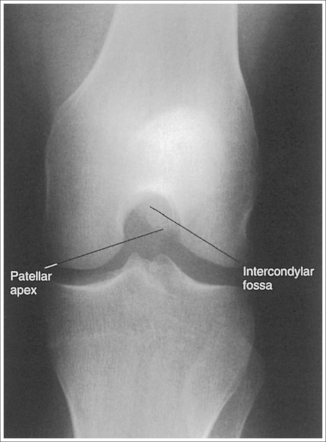
IMAGE 60
The patella lies just superior to the patellar surface of the femur and is situated slightly lateral to the knee midline. The intercondylar fossa is partially demonstrated.
• The position of the patella and the degree of intercondylar fossa demonstration are determined by the amount of knee flexion. To visualize the patella and fossa as required, the leg must be in full extension. As the knee is flexed, the patella shifts distally and medially onto the patellar surface of the femur and then laterally into the intercondylar fossa, duplicating a C-shaped path that is open laterally (Figure 6-74). Thus, the patella is demonstrated at different locations, depending on the degree of knee flexion. Generally, when the knee is flexed 20 degrees, the patella is demonstrated on the patellar surface. With 30 to 70 degrees of knee flexion, the patella is demonstrated between the patellar surface and the intercondylar fossa. At 90 degrees to full knee flexion, the patella is demonstrated within the intercondylar fossa.
• Intercondylar fossa visualization with knee flexion. The extent of intercondylar fossa demonstration also changes with knee flexion. In full extension, only a slight indentation between the distal medial and lateral femoral condyles indicates the location of the intercondylar fossa. As the knee is flexed, the amount of intercondylar fossa that is demonstrated increases. When the knee is flexed to between 50 and 60 degrees, the intercondylar fossa is shown in profile (see Image 60). When the knee is flexed less than 50 degrees or more than 60 degrees, demonstration of the fossa will decrease.
• Patellar subluxation. With patellar subluxation (partial patellar dislocation), the patella may be situated more laterally than normal on an AP knee projection (see Image 61). When an image demonstrates a laterally situated patella, evaluate the symmetry of the femoral condyles and the relationship of the tibia and fibular head to rule out external rotation before assuming that the patella is subluxed. External rotation also results in a laterally located patella.
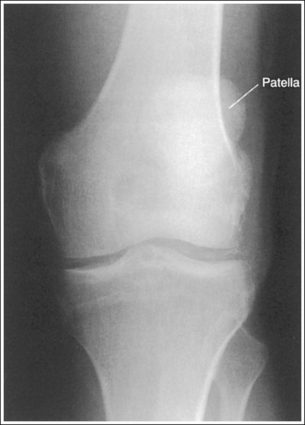
IMAGE 61
The knee joint is at the center of the exposure field. One fourth of the distal femur and proximal lower leg and the surrounding knee soft tissue are included within the collimated field.
• Center the central ray to the midline of the knee at a level 1 inch (2.5 cm) distal to the palpable medial epicondyle to place the knee joint in the center of the exposure field. (As long as the knee remains extended, an alternative central ray placement is 0.5 inch (1.25 cm) distal to the patellar apex.) Open the longitudinal collimation enough to include one fourth of the distal femur and proximal lower leg. Transverse collimation should be to within 0.5 inch (1.25 cm) of the knee skin line.
• An 8- × 10-inch (18- × 24-cm) or 10- × 12-inch (24- × 30-cm) screen-film or computed radiography IR placed lengthwise should be adequate to include all the required anatomic structures.
Anteroposterior Knee Projection Analysis
The femoral epicondyles are not in profile, the medial femoral condyle appears larger than the lateral condyle, and the fibular head demonstrates more than 0.25 inch (0.6 cm) of tibial superimposition. The leg was externally rotated.
Correction
Internally rotate the leg until the femoral epicondyles are at equal distances from the IR.
Analysis
The femoral epicondyles are not in profile, the lateral femoral condyle appears larger than the medial condyle, and the fibular head demonstrates less than 0.25 inch (0.6 cm) of tibial superimposition. The leg was internally rotated.
Correction
Externally rotate the leg until the femoral epicondyles are at equal distances from the film.
Analysis
The lateral knee compartment is narrower than the medial knee compartment. The patient's knee demonstrates a valgus deformity.
Analysis
The medial knee compartment is narrower than the lateral knee compartment. The patient's knee demonstrates a varus deformity.
Analysis
The knee joint space is obscured, the medial tibial plateau is demonstrated, the fibular head is foreshortened and demonstrated more than 0.5 inch (1.25 cm) distal to the tibial plateau. Excessive cephalad angulation is indicated.
Correction
Angle the central ray caudally approximately 5 degrees for every 0.25 inch (0.6 cm) of tibial plateau demonstrated. For this image, approximately 0.5 inch (1.25 cm) of the tibial plateau is demonstrated between the anterior and posterior tibial margins. The central ray should be adjusted approximately 10 degrees, because a 5-degree cephalad angle was used. When the image is retaken, a 5-degree caudal angle should be used.
Analysis
The medial knee joint space is closed, and the fibular head is elongated and demonstrated less than 0.5 inch (1.25 cm) distal to the tibial plateau. Excessive caudal angulation is indicated.
Correction
If an open medial knee joint space is desired, the central ray should be adjusted cephalically.
Analysis
This is an AP knee projection taken with the knee flexed approximately 50 to 60 degrees and the central ray aligned parallel with the tibial plateau. The knee joint space is open, the intercondylar fossa is demonstrated in profile, and the patellar apex is superimposed over the intercondylar fossa. Because of the acute angle of the lower leg and femur with the IR, the distal femur and proximal lower leg are foreshortened and the intercondylar fossa is slightly elongated.
Correction
If the patient's condition allows, fully extend the knee. If the patient is unable to extend the knee, no corrective movement is required.
KNEE: ANTEROPOSTERIOR OBLIQUE PROJECTION (MEDIAL AND LATERAL ROTATION)
See Figures 6-75 and 6-76 and Box 6-16.
The knee joint space is open. The anterior and posterior condylar margins of the tibia are superimposed, and the fibular head is approximately 0.5 inch (1.25 cm) distal to the tibial plateau.
• The anterior and posterior condylar margins of the tibia are superimposed by the use of the correct central ray angulation, as determined by the patient's upper thigh and buttocks thickness. By studying the tibial plateau region, you will see that the tibial plateau slopes distally approximately 5 degrees from the anterior condylar margin to the posterior condylar margin on both the medial and lateral aspects. Only if the central ray is aligned parallel with this slope is a truly open joint space obtained.
• Determining the central ray angulation. When a patient is placed in a supine position, the degree and direction of the central ray angulation required depend on the thickness of the patient's upper thigh and buttocks, because it is this thickness that will determine the central ray angulation that should be used for different body sizes. Figure 6-77 demonstrates how the relationship of the tibial plateau varies as the patient's upper thigh thickness changes. For optimal AP oblique knee projections, measure each patient from the ASIS to the imaging table, after the patient has been accurately positioned, to determine the correct central ray angulation to use for each examination. When measuring this distance, do not include the patient's abdominal tissue in the measurement. Keep the calipers situated laterally, next to the ASIS. If the measurement is 18 cm or below, a 5-degree caudal angle should be used. If the measurement is 19 to 24 cm, a perpendicular beam should be used. If the measurement is above 24 cm, a 5-degree cephalad angle should be used. It is not uncommon to require a cephalic angle for the AP medial oblique knee projection because the patient's hip is often elevated to accomplish the needed degree of internal obliquity or to need a caudal angle for the lateral oblique knee image because the patient's hip is placed closer to the imaging table to obtain the needed external obliquity.
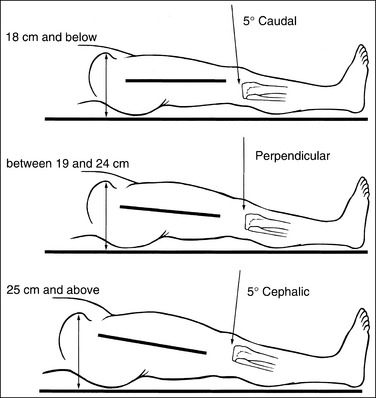
FIGURE 6-77 Determining central ray (CR) angle from the patient's thigh thickness. (Reproduced with permission from Martensen K: Alternative AP knee method assures open joint space, Radiol Technol 64:19–23, 1992. Courtesy Radiologic Technology, published by the American Society of Radiologic Technologists.)
• Effect of poor central ray angulation. If an inaccurate central ray angulation was used for an AP oblique knee projection, the knee joint space is narrowed or obscured and the anterior and posterior margins of the tibial plateau are not superimposed. When evaluating an AP oblique knee projection for which an inaccurate central ray angulation was used, you can determine how to adjust the angulation by judging the shape of the fibular head and its proximity to the tibial plateau. If the fibular head is foreshortened and demonstrated more than 0.5 inch (1.25 cm) distal to the tibial plateau (see Image 62), the cephalad angle was too great and if the fibular head is elongated and demonstrated less than 0.5 inch (1.25 cm) distal to the tibial plateau, the caudad angle was too great (see Image 63).
The knee joint is at the center of the exposure field. One fourth of the distal femur and proximal lower leg and the surrounding knee soft tissue are included within the collimated field.
• The central ray should be centered to the midline of the knee at the level of the knee joint, which is located 1 inch (2.5 cm) distal to the palpable medial femoral epicondyle, to place the knee joint in the center of the exposure field. Open the longitudinal collimation to include one fourth of the distal femur and the proximal lower leg. Transverse collimation should be within 0.5 inch (1.25 cm) of the knee skin line.
• An 8- × 10-inch (18- × 24-cm) or 10- × 12-inch (24- × 30-cm) screen-film or computed radiography IR placed lengthwise should be adequate to include all the required anatomic structures.
KNEE: MEDIALLY (INTERNALLY) ROTATED ANTEROPOSTERIOR OBLIQUE POSITION
The knee has been rotated 45 degrees internally. The fibular head is demonstrated free of tibial superimposition, and the lateral femoral condyle is in profile, without medial condyle superimposition.
• A medially rotated AP oblique knee projection with accurate positioning is obtained by placing the patient in an AP knee projection, and then internally rotating the leg until an imaginary line drawn between the medial and lateral femoral epicondyles is positioned at a 45-degree angle with the IR (Figure 6-78). This position places the lateral condyle in profile and rotates the fibular head from beneath the tibia, opening the proximal tibiofibular articulation. If the femoral epicondyles are rotated less than 45 degrees with the IR, the tibia is partially superimposed over the fibular head (see Image 63). If the femoral epicondyles are rotated more than 45 degrees with the IR, the femoral condyles are almost superimposed (see Image 64).
LATERALLY (EXTERNALLY) ROTATED ANTEROPOSTERIOR OBLIQUE PROJECTION
The knee has been rotated 45 degrees externally. The fibular head, neck, and shaft are superimposed by the tibia, and the fibular head is aligned with the anterior edge of the tibia. The medial femoral condyle is in profile, without lateral condyle superimposition.
• A laterally rotated AP oblique knee projection with accurate positioning is obtained by placing the patient in an AP knee projection, and then externally rotating the leg until an imaginary line drawn between the medial and lateral femoral epicondyles is positioned at a 45-degree angle with the IR (Figure 6-79). This position places the medial condyle in profile and rotates the tibia onto the fibula, demonstrating superimposition of the tibia and fibula on the image. If the femoral epicondyles are rotated less than 45 degrees with the IR, the fibular head demonstrates decreased tibial superimposition or will be positioned more toward the center of the tibia (see Image 65). If the femoral epicondyles are rotated more than 45 degrees with the IR, the fibular head is not aligned with the anterior edge of the tibia but is posterior to the placement. The more posteriorly situated is the fibula, the farther away from 45 degrees the patient was positioned (see Image 66).


Anteroposterior Oblique Knee Projection Analysis
The fibular head is demonstrated without tibial superimposition and the lateral femoral condyle is demonstrated in profile, indicating accurate obliquity. The knee joint space is obscured, and the fibular head is foreshortened and demonstrated more than 0.5 inch (1.25 cm) distal to the tibial plateau. The central ray angulation was too cephalad.
Correction
Decrease the degree of central ray angulation approximately 5 degrees for every 0.25 inch (0.6 cm) of tibial plateau demonstrated. For this image, approximately 0.25 inch of the tibial plateau is demonstrated between the anterior and posterior tibial margins; therefore, the central ray should be adjusted approximately 5 degrees.
Analysis
The tibia is partially superimposed over the fibular head. The patient's knee was rotated less than 45 degrees. The joint space is closed, and the fibular head is elongated and demonstrated less than 0.5 inch (1.25 cm) from the tibial plateau. The central ray angulation was too caudal.
Correction
Increase the medial knee obliquity until the femoral epicondyles are aligned at a 45-degree angle with the IR. Increase the degree of central ray angulation approximately 5 degrees for every 0.25 inch (0.6 cm) of tibial plateau demonstrated.
Analysis
The medial femoral condyle is superimposed over most of the lateral condyle. The patient's knee was rotated more than 45 degrees.
Correction
Decrease the medial knee obliquity until the femoral epicondyles are aligned at a 45-degree angle with the IR.
Analysis
The fibular head, neck, and shaft are not superimposed by the tibia. The patient's knee was rotated less than 45 degrees.
Correction
Increase the lateral knee obliquity until the femoral epicondyles are aligned at a 45-degree angle with the IR.
KNEE: LATERAL PROJECTION (MEDIOLATERAL)
See Figures 6-80 and 6-81 and Box 6-17.

Contrast and density are adequate to demonstrate the suprapatellar fat pads.
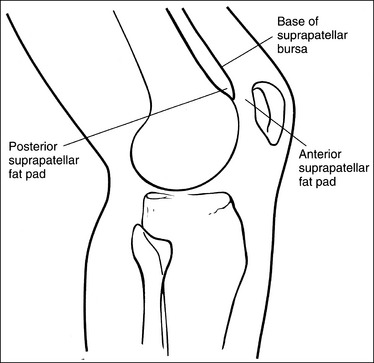
• Suprapatellar fat pads. Two soft tissue structures of interest at the knee are used to diagnose joint effusion and knee injury. They are the posterior and anterior suprapatellar fat pads. Both are located anterior to the patellar surface of the distal femur and are separated by the suprapatellar bursa (Figure 6-82). Fluid that collects in the suprapatellar bursa causes the anterior and posterior suprapatellar fat pads to separate. It is a widening of this space that indicates a diagnosis of joint effusion.
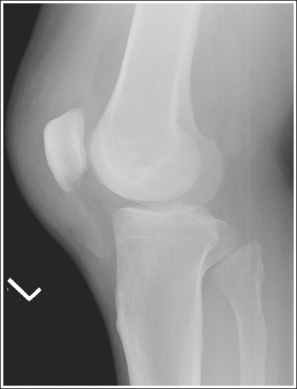
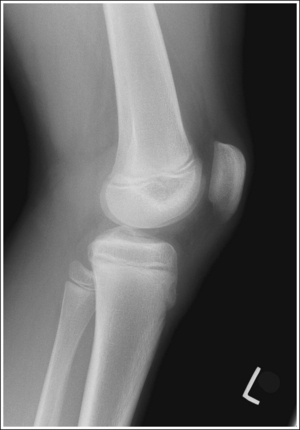
The patella is situated proximal to the patellar surface of the femur, and the patellofemoral joint is open.
• The knee should be flexed 10 to 15 degrees. With less than 20 degrees of knee flexion, the patella is situated proximal to the patellar surface of the femur, the quadriceps are relaxed, and the patella is fairly mobile. In this patellar position the anterior and posterior suprapatellar fat pads can be easily used to evaluate knee joint effusion. Conversely, when the knee is flexed 20 degrees or more, a tightening of the surrounding knee muscles and tendons is present, the patella comes into contact with the patellar surface of the femur, and the anterior and posterior suprapatellar fat pads are obscured, eliminating their usefulness in diagnosing joint effusion (see Image 67). Some authors indicate that 20 to 30 degrees of knee flexion should be used on a lateral knee projection. Facility routines dictate the actual number of degrees that should be used.
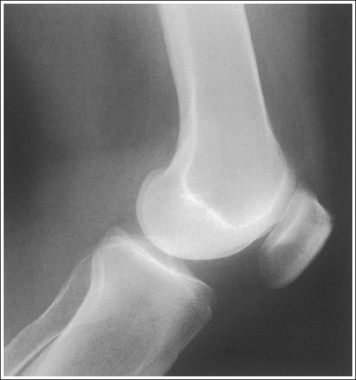
IMAGE 67
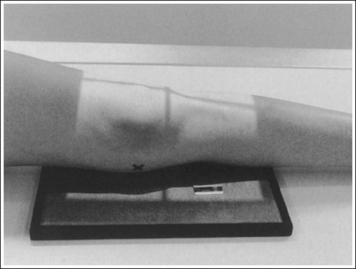
• Positioning for fracture. If a patellar or other knee fracture is suspected, the knee should remain extended to prevent displacement of bony fragments or vascular injury (Figure 6-83).
The distal articulating surfaces of the medial and lateral femoral condyles are superimposed, and the knee joint space is open.
• Take a few minutes to study a femoral bone. Place it upright with the distal femoral condylar surfaces resting against a flat surface. Note how the femoral shaft inclines medially approximately 10 to 15 degrees. When a patient is in an erect position, this is how the femurs are positioned. This femoral incline gives the body stability (Figure 6-84). The amount of inclination a person displays depends on pelvic width and femoral shaft length. The wider the pelvis and the shorter the femoral shaft length, the more medially the femurs incline.
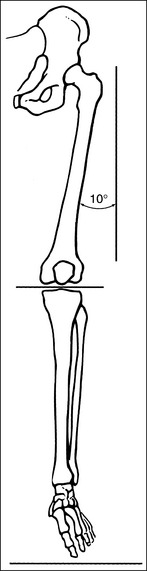
FIGURE 6-84 Femoral inclination in upright position. (Reproduced with permission from Martensen K: The knee, In-Service Reviews in Radiologic Technology, vol 14, no 7, Birmingham, Ala, 1991, In-Service Reviews.)
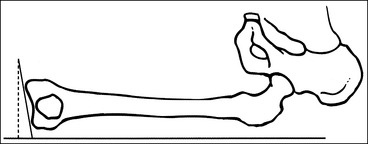
• When the patient is placed in a recumbent projection for a lateral knee image (Figure 6-85), some of the medial femoral inclination is reduced, resulting in projection of the medial condyle distal to the lateral condyle and into the knee joint space (Figure 6-86). This can be demonstrated by laying the femoral bone on its lateral side. Note how the distal condylar surfaces are no longer on the same plane. The medial condyle is situated distal to the lateral condyle. The amount of distance demonstrated between these two condyles depends on the amount of medial femoral incline the femur displayed in the upright position, the length of the femur, and the width of the pelvis from which the femur originated. If the medial condyle remains in this distal position, it obscures the knee joint space on the image. This is why a cephalic angle is needed for most lateral knee projections.
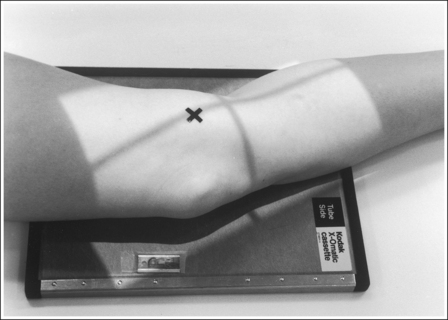
FIGURE 6-85 Proper patient positioning for lateral knee projection. X indicates medial femoral epicondyle.
• Determining central ray angulation. Because the degree of femoral inclination varies among patients, so must the degree of central ray angulation. For a patient with a wide pelvis and short femora, a 5- to 7-degree cephalad angle is the most reliable angulation to use. For a patient with a narrow pelvis and long femora, very little, if any, angulation is required. Although females commonly demonstrate greater pelvic width and femoral inclination and males demonstrate narrower pelvic width and femoral inclination, variations occur in both sexes. Each patient's pelvic width and femoral length should be evaluated to determine the degree of angulation to use.
• Effect of central ray angulation on femoral condylar superimposition. If an inaccurate central ray angulation is used on a lateral knee projection, the distal articulating surfaces of the femoral condyles are not superimposed on the image. Whenever this occurs, the knee joint space is narrowed or closed. If a patient required a cephalic angulation to project the medial condyle proximally, but no angle was used, the image demonstrates the distal articulating surface of the medial condyle distal to the distal articulating surface of the lateral condyle (see Image 68). If a patient did not require a cephalic angulation but one was used, or if the cephalad angle was too great, the distal surface of the medial condyle is projected proximal to the distal surface of the lateral condyle (see Image 69). It should also be noted that the tibiofibular joint is better visualized on this image because the proximal tibia is moved proximally, somewhat off the fibular head.
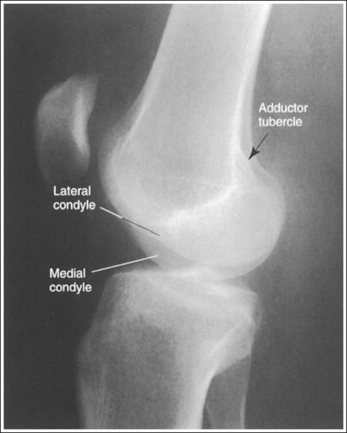
IMAGE 68
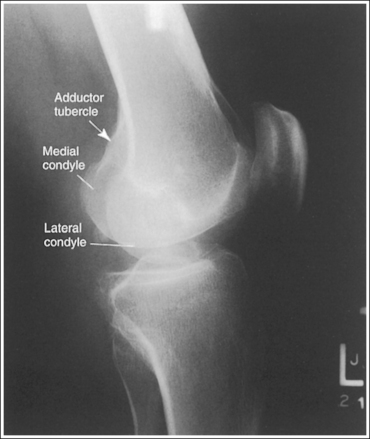
IMAGE 69
• Distinguishing lateral and medial condyles. The first step you should take when evaluating an image on which the distal condylar surfaces are not aligned is to determine which condyle is the lateral and which is the medial. The most reliable method for identifying the medial condyle is to locate the rounded bony tubercle known as the adductor tubercle. It is located posteriorly on the medial aspect of the femur, just superior to the medial condyle. The size and shape of the tubercle are not identical on every patient, although this surface is considerably different from the same surface on the lateral condyle, which is smooth. Once the adductor tubercle is located, the medial condyle is also identified. Another difference between the medial and lateral condyles is evident on their distal articulating surfaces. The distal surface of the medial condyle is convex, and the distal surface of the lateral condyle is flat.
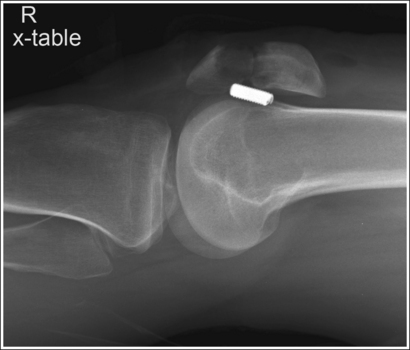
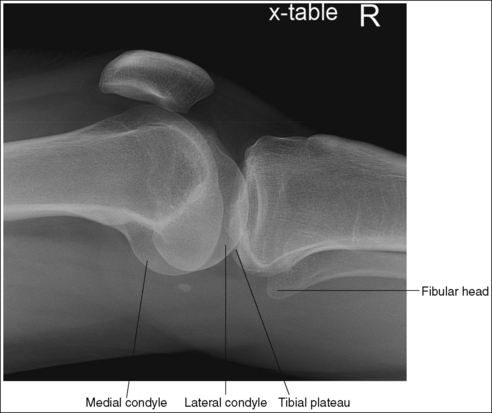
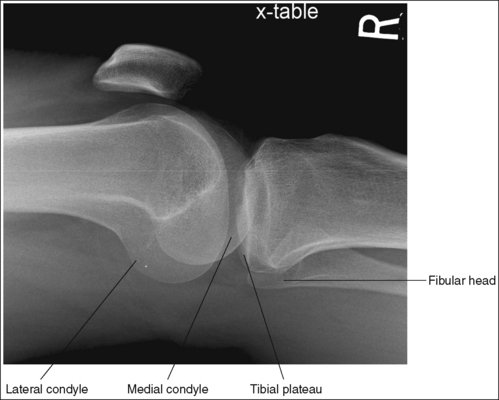
• Supine (cross-table) lateromedial knee projection. When a lateral knee projection is taken using a lateromedial projection, with a horizontal central ray, the cephalad central ray angulation described above is not required, as long as the patient's femoral inclination is not reduced or increased by the distal femur being shifted too laterally or medially, respectively. Images 70 and 71 are cross-table lateral knee projections that demonstrate a femoral condyle within the knee joint space because of poor femoral positioning. Image 70 demonstrates the lateral condyle in the joint space and image 71 demonstrates the medial condyle. When such images are produced, view how far the fibular head is positioned from the tibial plateau. When the distal surfaces of the femoral condyles are accurately superimposed, the fibular head will be positioned about 0.5 inch (1.25 cm) from the tibial plateau. If the central ray (CR) is rotated distally or the leg adducted (moved too medially) for a lateromedial projection of the knee, the lateral condyle will be projected distal to the medial condyle and the fibular head will move farther than 0.5 inch (1.25 cm) from the tibial plateau (see Image 70). If the CR is rotated proximally or the leg abducted (moved too laterally) for a lateromedial projection of the knee, the lateral condyle will be projected proximal to the medial condyle and the fibular head will move closer than 0.5 inch (1.25 cm) from the tibial plateau (see Image 71).
The anterior and posterior surfaces of the medial and lateral femoral condyles are superimposed, and the tibia is partially superimposed over the fibular head.
• How the central ray is aligned with the femur determines the relationship between the tibia and fibula, especially when a cephalic angulation is used. Study a femoral bone that is positioned in a mediolateral projection with the femoral epicondyles placed directly on top of each other. Note that in this position, the medial condyle is situated not only distal but also posterior to the lateral condyle, indicating that the medial condyle must be projected proximally and anteriorly for it to be superimposed over the lateral condyle.
• Positioning to superimpose the anterior and posterior aspects of the femoral condyles. Two positioning methods can be used to accomplish this goal. For the first (easier) method, position the femoral epicondyles directly on top of each other, so that an imaginary line drawn between them is perpendicular to the IR. Then, direct the central ray across the femur, as indicated in Figure 6-87. With this method, the central ray projects the medial condyle anteriorly and proximally. This method also demonstrates the fibular head partially superimposed by the tibia, which is an accurate lateral tibiofibular relationship (see Figure 6-80).
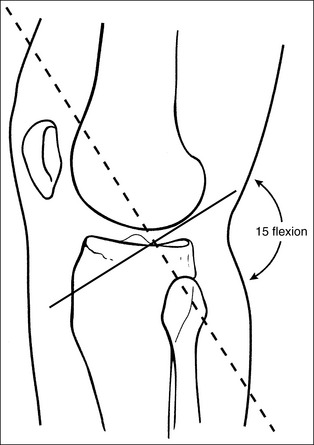
FIGURE 6-87 Proper central ray (CR) alignment for lateral knee projection. (Reproduced with permission from Martensen K: The knee, In-Service Reviews in Radiologic Technology, vol 14, no 7, Birmingham, Ala, 1991, In-Service Reviews.)
• For the second method, align the femoral epicondyles perpendicular to the IR, and then roll the patient's patella toward the IR approximately 0.25 inch (0.6 cm) to move the medial condyle anteriorly onto the lateral condyle. Finally, align the central ray with the femur, as shown in Figure 6-88, projecting the medial condyle proximally. This method produces an image on which the condyles are superimposed but the fibular head is demonstrated without tibial superimposition (see Image 72). Regardless of the method your facility prefers, a true lateral knee projection has not been obtained unless the condyles are superimposed.
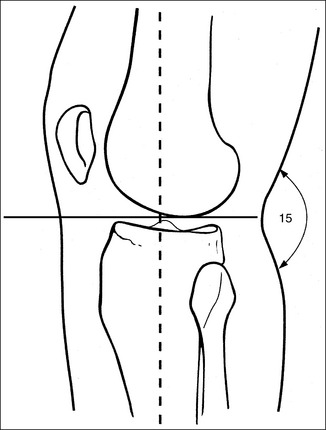
FIGURE 6-88 Central ray (CR) aligned with femur for lateral knee projection. (Reproduced with permission from Martensen K: The knee, In-Service Reviews in Radiologic Technology, vol 14, no 7, Birmingham, Ala, 1991, In-Service Reviews.)
IMAGE 72
• Effect of knee rotation on femoral condylar superimposition. When an image is obtained that demonstrates one femoral condyle anterior to the other, the patella must be rolled closer to (leg externally rotated) or farther away from (leg internally rotated) the IR for superimposed condyles to be obtained. The first step in determining which way to roll the knee is to distinguish one condyle from the other. As noted, the most reliable method is to locate the adductor tubercle of the medial condyle. When a lateral knee projection is obtained that demonstrates the adductor tubercle and medial condyle posterior to the lateral condyle, the patella was situated too far from the IR (leg internally rotated) (Figure 6-89; see Image 73). When a lateral knee projection is obtained that demonstrates the medial condyle anterior to the lateral condyle, the patella was situated too close to the IR (leg externally rotated) (Figure 6-90; see Image 74).
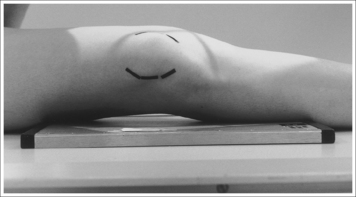
FIGURE 6-89 Poorly positioned lateral knee projection with patella too far from image receptor (leg internally rotated).
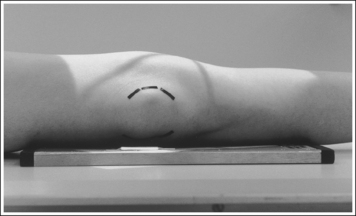
FIGURE 6-90 Poorly positioned lateral knee projection with patella too close to image receptor (leg externally rotated).
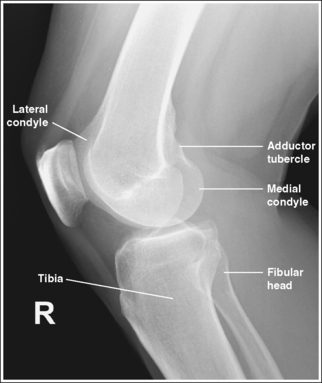
IMAGE 73
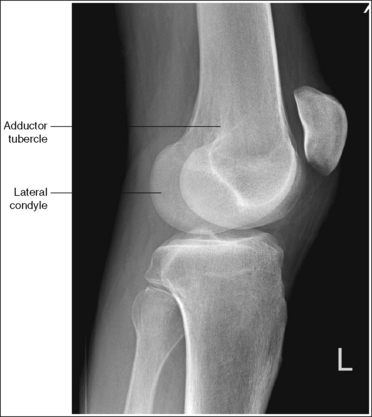
IMAGE 74
Another method used to determine knee rotation is to view the tibiofibular relationship to determine how to reposition for poorly superimposed condyles. If the tibia is superimposed over the fibular head, the patella was positioned too far from the IR. If the fibular head is free of tibial superimposition, the patella was positioned too close to the IR. Although this relationship is reliable for most patients, the alignment of the central ray affects the results. Image 75 demonstrates such a case. If you use the adductor tubercle and medial condyle to determine how this patient should be repositioned, roll the patient's patella toward the IR (externally rotated leg). If you use the tibiofibular relationship, roll the patient's patella away from the IR (internally rotated leg). The adductor tubercle method is more reliable. This patient's patella needed to be rolled toward the IR to superimpose the condyles. It should also be noted that the tibiofibular relationship should not be used when the patient's knee is flexed approximately 90 degrees (see Image 76). When the patient's knee is flexed to this degree, it is femoral elevation and depression that determine the tibiofibular relationship, not leg rotation. To understand this change best, view the skeletal leg in a lateral position with 90 degrees of leg flexion. Observe how the tibiofibular relationship results in increased tibial superimposition of the fibula when the proximal femur is elevated and a decreased tibial superimposition of the fibula as the proximal femur is depressed.

IMAGE 75
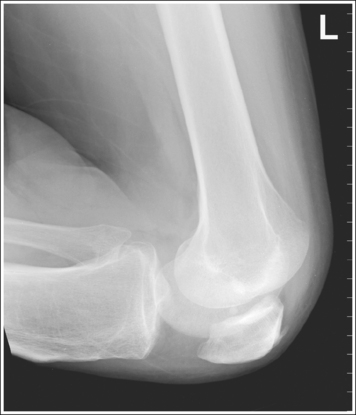
IMAGE 76
The knee joint is at the center of the exposure field. One fourth of the distal femur and proximal lower leg and the surrounding knee soft tissue are included within the collimated field.
• Center the central ray to the midline of the knee at the level of the knee joint space, which is located 1 inch (2.5 cm) distal to the palpable medial epicondyle, to center the knee joint in the collimated field. Open the longitudinal collimation enough to include one fourth of the distal femur and proximal lower leg. Transverse collimation should be to within 0.5 inch (1.25 cm) of the knee skin line.
• An 8- × 10-inch (18- × 24-cm) or 10- × 12-inch (24- × 30-cm) screen-film or computed radiography IR placed lengthwise should be adequate to include all the required anatomic structures.
Lateral Knee Projection Analysis
The patient's knee is overflexed, the patella is in contact with the patellar surface of the femur, and the suprapatellar fat pads are obscured.
Analysis
The distal articulating surfaces of the femoral condyles are not superimposed. The medial condyle is distal to the lateral condyle.
Correction
A cephalic angulation should be used to project the medial condyle proximally. Adjust the angle approximately 5 degrees for every 0.25 inch (0.6 cm) of distance demonstrated between the medial and lateral distal surfaces.
Analysis
The distal articulating surfaces of the femoral condyles are not superimposed. The medial condyle has been projected proximally to the lateral condyle. An excessively cephalad angle was used.
Correction
Decrease the central ray angulation approximately 5 degrees for every 0.25 inch (0.6 cm) of distance demonstrated between the medial and lateral distal surfaces.
Analysis
The lateral condyle is distal to the medial and the fibular head is more than 0.5 inch (1.25 cm) from the tibial plateau. The CR was rotated distally or the leg adducted (moved too medially).
Correction
Rotate the CR proximally the needed amount or abduct the leg half the distance demonstrated between the two distal condylar surfaces.
Analysis
The lateral condyle is proximal to the medial and the fibular head is less than 0.5 inch (1.25 cm) from the tibial plateau. The CR was rotated proximally or the leg abducted (moved too laterally).
Correction
Rotate the CR distally the needed amount or adduct the leg half the distance demonstrated between the two distal condylar surfaces.
Analysis
The femoral condyles are superimposed and the tibiofibular articulation is demonstrated. The image was taken with the femoral epicondyles aligned perpendicular to the IR, and then rolled toward the IR approximately 0.25 inch (0.6 cm) to move the medial condyle anteriorly onto the lateral condyle. The central ray was then aligned with the femur, as shown in Figure 6-88.
Correction
For a more accurate demonstration of the tibia and fibula relationship, position the femoral epicondyles perpendicular to the IR and align the central ray across the femur, as shown in Figure 6-87.
Analysis
The anterior and the posterior aspects of the femoral condyles are not superimposed. The medial condyle is situated posteriorly. The patient's patella was positioned too far from the IR (leg internally rotated).
Correction
Roll the patella closer to the IR (externally rotate the leg). Because both condyles will move simultaneously, the amount of adjustment required is only half the distance demonstrated between the posterior surfaces.
Analysis
The anterior and posterior aspects of the femoral condyles are not superimposed. The medial condyle is situated anteriorly. The patella was positioned too close to the IR (leg externally rotated).
Correction
Roll the patella farther away from the IR (internally rotate the leg). Because both condyles will move simultaneously, the amount of adjustment required is only half the distance demonstrated between the posterior surfaces.
Analysis
The AP aspects of the femoral condyles are not superimposed. The medial condyle is situated posteriorly. The patella was positioned too far from the IR (leg internally rotated).
Correction
Roll the patella closer to the IR (externally rotate the leg). Because both condyles move simultaneously, the amount of adjustment required is only half the distance demonstrated between the posterior surfaces.
Analysis
The knee is flexed 90 degrees, and the medial condyle is demonstrated distal and posterior to the lateral condyle. The fibula is demonstrated without tibial superimposition. The proximal femur was elevated because the patient had a thick proximal thigh, and the patella was positioned too far from the IR.
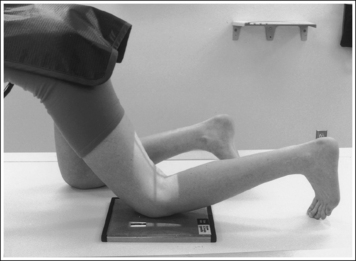
INTERCONDYLAR FOSSA: POSTEROANTERIOR AXIAL PROJECTION (HOLMBLAD METHOD)
See Figure 6-91 and Box 6-18.
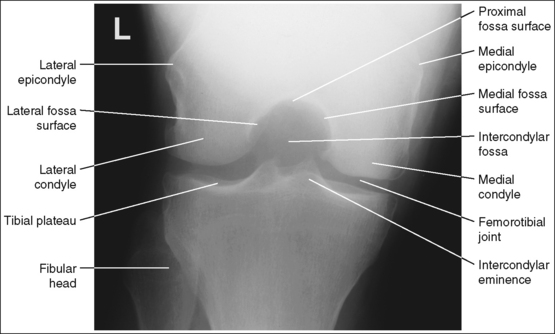
The medial and the lateral surfaces of the intercondylar fossa and the femoral epicondyles are in profile, and the fibular head is partially superimposed over the proximal tibia.
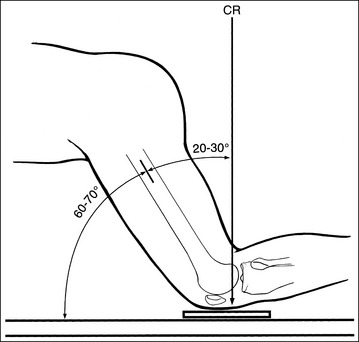
• The PA axial projection (Holmblad method) is performed by positioning the patient on hands and knees on the imaging table and then requesting the patient to lean forward until the femur and central ray form a 20- to 30-degree angle (femur–imaging table angle is 60 to 70 degrees; Figures 6-92 and 6-93). The IR is positioned under the affected knee.
• Mechanics of PA axial projection. To understand how the femur is positioned for this image, study a femoral skeletal bone. Place the femoral bone upright with the distal femoral condylar surfaces resting against a flat surface. While imaging the posterior femoral surface, lean the femur anteriorly until the intercondylar fossa is positioned in profile. In this PA axial projection, note how the femoral shaft inclines medially approximately 10 to 15 degrees. The amount of inclination the femoral bone displays depends on the length of the femoral shaft and the width of the pelvis from which the femur originated. The longer the femur and the wider the pelvis, the more femoral inclination is demonstrated. To obtain an image of the intercondylar fossa with superimposed medial and superimposed lateral surfaces, this inclination should not be offset. If the inclination is offset by shifting the distal femur laterally or the proximal femur medially and positioning the femur vertically, the medial and lateral aspects of the intercondylar fossa are not superimposed and the patella is situated laterally (see Image 77). This can be demonstrated by placing the femoral skeleton bone vertically and imaging the change in the demonstration of the intercondylar fossa.
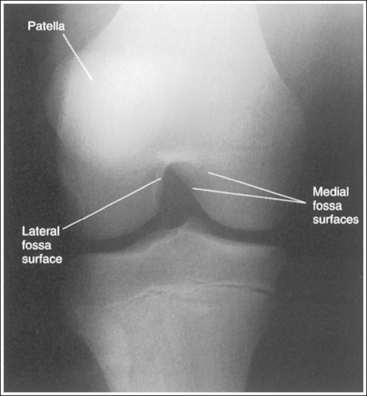
IMAGE 77
• Effect of foot mispositioning. Mispositioning of the patient's foot may also result in rotation of the femur and may demonstrate the medial and the lateral aspects of the intercondylar fossa without superimposition. The long axis of the patient's foot should be positioned perpendicular to the imaging table. If the heel was allowed to rotate medially (internally), the medial and lateral aspects of the intercondylar fossa are not superimposed, and the patella is rotated laterally (see Image 77). If the heel was rotated laterally (externally), the medial and lateral aspects of the intercondylar fossa are not superimposed, the patella is demonstrated medially, and the tibia is demonstrated without fibular head superimposition (see Image 78).
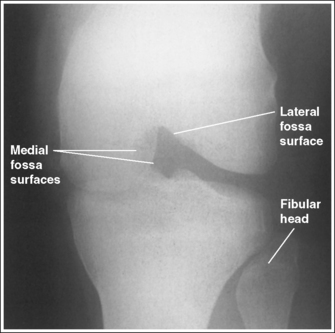
IMAGE 78
The proximal surfaces of the intercondylar fossa are superimposed, and the patellar apex is demonstrated proximal to the intercondylar fossa.
• The proximal surfaces of the intercondylar fossa are superimposed when the femoral shaft is placed at a 60- to 70-degree angle with the imaging table (see Figure 6-92). To study this relationship better, place a femoral skeleton bone in the PA axial projection. While viewing the posterior intercondylar fossa, move the proximal femur closer to and farther away from the imaging table. Note how the proximal surfaces of the fossa are in profile and superimposed only when the femur is at a 60- to 70-degree angle with the imaging table. The position of the femur with respect to the imaging table also determines the position of the patella (see earlier AP knee projection discussion and Figure 6-74). As the knee is flexed (the proximal femur is brought away from the imaging table), the patella moves distally onto the patellar surface of the femur and into the intercondylar fossa. The degree of knee flexion used for the PA axial projection situates the patella just proximal to the fossa.
• Effect of femur positioning. If a PA axial projection is obtained that demonstrates the proximal intercondylar fossa's surfaces without superimposition, view the patella's position to determine whether the patient's proximal femur was positioned too close to or too far from the imaging table. If the patellar apex is demonstrated within the fossa, the knee was overflexed (proximal femur positioned too far away from the imaging table; see Image 79). If the patella is demonstrated laterally and proximal to the fossa, the knee was underflexed (proximal femur position too close to the table; see Image 80).
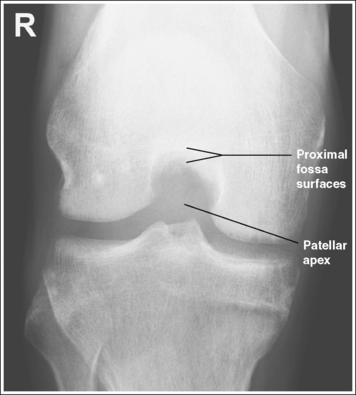
IMAGE 79
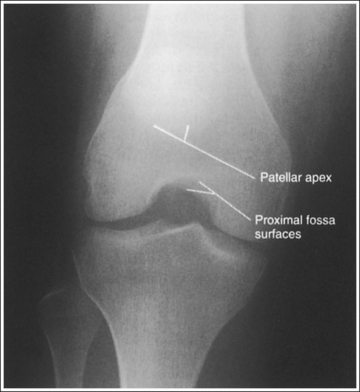
IMAGE 80
The knee joint space is open and the tibial plateau and intercondylar eminence and tubercles are in profile. The fibular head is demonstrated approximately 0.5 inch (1.25 cm) distal to the tibial plateau.
• To obtain an open knee joint space and demonstrate the tibial plateau and intercondylar eminence and tubercles in profile, dorsiflex the patient's foot and rest the foot on the toes. Because the tibial plateau slopes downward from the anterior tibial margin to the posterior margin, this positioning is necessary to elevate the distal tibia and align the anterior and posterior tibial margins perpendicular to the IR. If the foot is not dorsiflexed and resting on the toes, the knee joint space is narrowed or closed and the tibial plateau is demonstrated (see Images 78 and 80).
• Determining repositioning for closed knee joint. If a PA axial knee projection is obtained that demonstrates a closed or narrowed knee joint space and the tibial plateau surface, evaluate the proximity of the fibular head to the tibial plateau to determine the needed adjustment. If the fibular is head is less than 0.5 inch (1.25 cm) from the tibial plateau (see Image 78), the distal lower leg needs to be depressed. If the fibular head is more than 0.5 inch (1.25 cm) from the tibial plateau (see Image 80), the distal lower leg needs to be elevated. The amount of lower leg adjustment required would be half the distance needed to bring the fibular head to within 0.5 inch (1.25 cm) of the tibial plateau. The small amount of lower leg adjustment that would be needed can be accomplished by varying the degree of foot dorsiflexion or plantar flexion.
The intercondylar fossa is at the center of the exposure field. The distal femur, proximal tibia, and intercondylar fossa eminence and tubercles are included within the collimated field.
• Center a perpendicular central ray to the midline of the knee, at a level 1 inch (2.5 cm) distal to the palpable medial femoral epicondyle, to place the intercondylar fossa in the center of the exposure field. Open the longitudinal collimation enough to include the femoral epicondyles. Transverse collimation should be to within 0.5 inch (1.25 cm) of the knee skin line.
• An 8- × 10-inch (18- × 24-cm) screen-film or computed radiography IR placed lengthwise should be adequate to include all the required anatomic structures.
Posteroanterior Axial Knee Projection Analysis
The medial and the lateral aspects of the intercondylar fossa are not superimposed, and the patella is situated laterally. Either the proximal femur was too medially situated, causing the femur to be too vertical or the heel was rotated medially.
Correction
Position the proximal femur laterally allowing the femur to incline medially, and align the long axis of the patient's foot perpendicular to the imaging table.
Analysis
The medial and lateral aspects of the intercondylar fossa are not superimposed, the patella is situated medially, and the tibia is demonstrated without fibular head superimposition. The heel was laterally rotated. The knee joint is obscured, the tibial plateau is demonstrated, and the fibula is positioned closer than 0.5 inch (1.25 cm) to the tibial plateau.
Correction
Rotate the heel medially until the foot's long axis is aligned perpendicular to the imaging table and depress the distal lower leg by decreasing the amount of foot dorsiflexion.
Analysis
The proximal surfaces of the intercondylar fossa are demonstrated without superimposition, and the patella is positioned within the intercondylar fossa. The knee was overflexed (femur positioned too far away from the imaging table).
Correction
Extend the knee (position the proximal femur closer to the imaging table). The amount of movement needed is half the distance demonstrated between the anterior and posterior proximal intercondylar fossa's surfaces.
Analysis
The proximal intercondylar fossa's surfaces are demonstrated without superimposition, and the patella is positioned too far proximal to the fossa. The knee was underflexed (femur positioned too close to the imaging table). The knee joint is obscured, the tibial plateau is demonstrated, and the fibular head is shown more than 0.5 inch (1.25 cm) from the tibial plateau.
INTERCONDYLAR FOSSA: ANTEROPOSTERIOR AXIAL PROJECTION (BÉCLÈRE METHOD)
See Figure 6-94 and Box 6-19.
The intercondylar fossa is shown in its entirety, the medial and lateral surfaces of the intercondylar fossa and the femoral epicondyles are in profile, and the tibia is partially superimposed over the fibular head.
• The AP axial projection (Béclère method) is performed by placing the patient on the imaging table in a supine position, with the affected hip and knee in an AP projection and flexed until the long axis of the femur is at a 60-degree angle with the imaging table. Then, adjust the lower leg until the knee is flexed approximately 45 degrees (Figure 6-95). A curved or regular IR is positioned under the knee and is elevated on an immobilization device until it is as close to the posterior knee as possible and the central ray is aligned parallel with the tibial plateau.
• To demonstrate the intercondylar fossa in its entirety, with superimposed medial and lateral surfaces, the patient's knee needs to be in an AP projection. This is accomplished by internally rotating the leg until an imaginary line connecting the medial and lateral femoral epicondyles is positioned parallel with the imaging table.
• Effect of rotation. If the femoral epicondyles are not positioned parallel with the IR, the medial and lateral surfaces of the intercondylar fossa will not be superimposed and in profile, and the intercondylar fossa will not be fully demonstrated. The direction of poor knee rotation can be detected by evaluating the degree of tibial and fibular superimposition and the difference in femoral condylar width. It the patient's leg is not internally rotated enough, the medial femoral condyle appears larger than the lateral condyle and the tibia demonstrates increased fibular superimposition (see Image 81). If the patient's leg is internally rotated more than the amount needed to align the femoral epicondyles parallel with the IR, the lateral femoral condyle will appear larger than the medial condyle, and the tibia will demonstrate decreased superimposition (see Image 82).
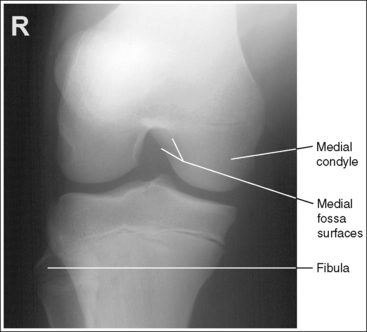
IMAGE 81
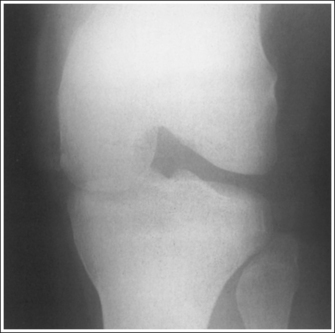
IMAGE 82
The proximal surface of the intercondylar fossa is in profile, and the patellar apex is demonstrated superior to the fossa.
• The proximal surface of the intercondylar fossa is in profile when the central ray is aligned parallel with it. This is accomplished when the long axis of the femur is flexed at a 60-degree angle with the imaging table.
• Adjusting for poor proximal intercondylar fossa visualization. With a set central ray, poor alignment of the proximal surface occurs when the femur is aligned more or less than 60 degrees with the imaging table. If an AP axial projection is achieved and the proximal intercondylar fossa surfaces are demonstrated without superimposition, view the patella apex's position to determine how femoral flexion would need to be adjusted to obtain accurate positioning and demonstrate the entire intercondylar fossa. As the knee is flexed, the patella shifts distally onto the patellar surface of the femur and then into the intercondylar fossa. Therefore, if the long axis of the femur is aligned more than 60 degrees with the imaging table, resulting in increased knee flexion, the patellar apex will be demonstrated within the intercondylar fossa (see Image 83). If the long axis of the femur is aligned less than 60 degrees with the imaging table, resulting in less knee flexion, the proximal intercondylar fossa surfaces will not be aligned and the patellar apex will be shown above the intercondylar fossa (see Image 84).
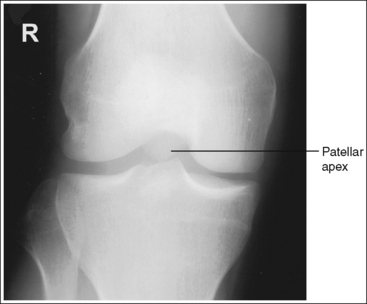
IMAGE 83
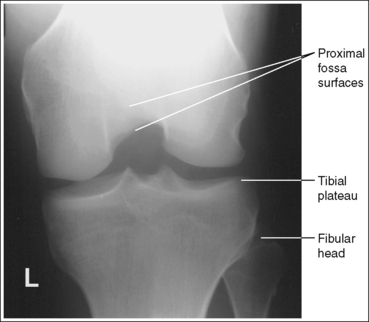
IMAGE 84
The knee joint space is open, the anterior and posterior condylar margins of the tibia are superimposed, the intercondylar eminence and tubercles are in profile, and the fibular head is demonstrated approximately 0.5 inch (1.25 cm) distal to the tibial plateau.
• To obtain an open knee joint space and demonstrate the intercondylar eminence and tubercles in profile, the central ray must be aligned parallel with the tibial plateau. This alignment is obtained by first positioning the central ray perpendicular with the anterior lower leg surface and then decreasing the obtained angulation by 5 degrees. The 5-degree decrease is needed because the tibial plateau slopes distally by 5 degrees from the anterior condylar margin to the posterior condylar margin.
• Effect of poor lower leg positioning. If an AP axial projection demonstrates a closed or narrowed knee joint space, evaluate the proximity of the fibular head to the tibial plateau. If the fibular head is demonstrated more than 0.5 inch (1.25 cm) distal to the tibial plateau, the distal lower leg was elevated too high or the central ray was too cephalically angled (see Image 85). If the fibular head is demonstrated less than 0.5 inch (1.25 cm) distal to the tibial plateau, the distal lower leg was too depressed or the central ray was too caudally angled (see Image 86).
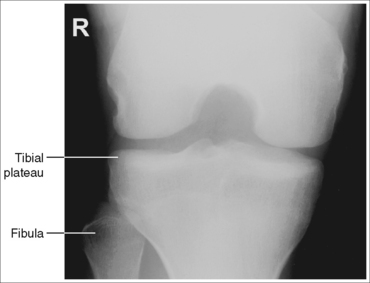
IMAGE 85
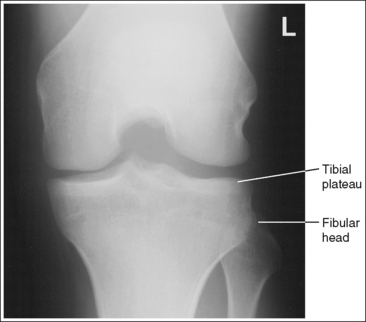
IMAGE 86
The intercondylar fossa is at the center of the exposure field. The distal femur, proximal tibia, and intercondylar fossa eminence and tubercles are included within the collimated field.
• Center the central ray to the midline of the knee, at a level 1 inch (2.5 cm) distal to the palpable medial femoral epicondyle, to place the intercondylar fossa in the center of the exposure field. Open the longitudinal collimation enough to include the femoral epicondyles. Transverse collimation should be to within 0.5 inch (1.25 cm) of the knee skin line.
• An 8- × 10-inch (18- × 24-cm) IR placed crosswise or a curved IR should be adequate to include all the required anatomic structures. A curved IR that is built up on an immobilization device enough to place the IR adjacent to the affected knee will demonstrate the least amount of magnification and distortion of the image. If a curved IR is unavailable, an 8- × 10-inch (18- × 24-cm) screen-film or computed radiography IR should be positioned crosswise and built up on an immobilization device, bringing it as close as possible to the affected knee.
Anteroposterior Axial Intercondylar Fossa Projection Analysis
The medial and the lateral aspects of the intercondylar fossa are not superimposed, the medial femoral condyle is larger than the lateral condyle, and the fibular head demonstrates increased tibial superimposition. The patient's leg was externally rotated.
Correction
Internally rotate the leg until an imaginary line connecting the femoral epicondyles is aligned parallel with the imaging table.
Analysis
The medial and lateral aspects of the intercondylar fossa are not superimposed, the lateral femoral condyle is larger than the medial condyle, and the fibular head demonstrates no tibial superimposition. The patient's leg was internally rotated. The knee joint space is closed, and the fibular head is shown more than 0.5 inch (1.25 cm) distal to the tibial plateau. The distal lower leg was elevated too high, or the central ray was angled too cephalically.
Correction
Externally rotate the leg until an imaginary line connecting the femoral epicondyles is aligned parallel with the imaging table, and depress the distal lower leg until the knee is flexed 45 degrees or adjust the central ray angle caudally.
Analysis
The proximal surfaces of the intercondylar fossa are not superimposed and the patellar apex is demonstrated within the intercondylar fossa. The long axis of the femur was aligned at more than a 60-degree angle with the imaging table.
Correction
Decrease the degree of hip and knee flexion until the long axis of the femur is aligned 60 degrees with the imaging table.
Analysis
The proximal surfaces of the intercondylar fossa are not superimposed, and the patellar apex is demonstrated proximal to the intercondylar fossa. The long axis of the femur was aligned at less than a 60-degree angle with the imaging table. The knee joint is closed, and the fibular head is demonstrated more than 0.5 inch (1.25 cm) distal to the tibial plateau. The distal lower leg was elevated too high, or the central ray was angled too cephalically.
Correction
Increase the degree of hip and knee flexion until the long axis of the femur is aligned 60 degrees with the imaging table. Depress the distal lower leg until the knee is flexed 45 degrees, or adjust the central ray caudally.
Analysis
The knee joint is closed, and the fibular head is demonstrated more than 0.5 inch (1.25 cm) distal to the tibial plateau. The distal lower leg was elevated too high, or the central ray was angled too cephalically.
Correction
Depress the distal lower leg until the knee is flexed 45 degrees, or adjust the central ray caudally.
PATELLA AND PATELLOFEMORAL JOINT: TANGENTIAL PROJECTION (MERCHANT METHOD)
See Figure 6-96 and Box 6-20.
Scatter radiation is controlled.
• An optimal 60- to 70-kVp technique sufficiently penetrates the bony and soft tissue structures of the knee and provides high image contrast. If it is necessary to increase the kilovoltage above 70 to penetrate a thicker knee, a grid is not needed, as described earlier for this examination, because of the long object–image receptor distance (OID). When a long OID is used, scatter radiation that would expose the IR when a short OID is used is scattered at a direction away from the IR. Because scatter radiation is not being directed toward the IR, a grid is not needed to absorb the scatter. This is also referred to as the air-gap technique.
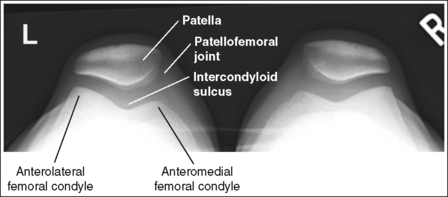
The knee demonstrates no rotation. The patellae, anterior femoral condyles, and intercondylar sulci are demonstrated superiorly, and the lateral femoral condyle demonstrates slightly more height than the medial condyle.
• The tangential projection (Merchant method) uses an axial viewer knee-supporting device, as shown in Figure 6-97. This freestanding device maintains the knees at a set degree of flexion, provides straps that restrain the patient's legs, and contains an IR holder that keeps the receptor at the proper angle with the central ray. To obtain a tangential projection of the patellae, place the patient supine on the imaging table with the legs dangling off the end of the table. Set the axial viewer at a standard 45-degree angle, and position it at the end of the imaging table beneath the patient's knees and calves. Situate the patient's ankles between the viewer's receptor holder, and place the receptor on the ankles so that it rests against the viewer's receptor holder (see Figure 6-97).
To demonstrate the knees without rotation and to position the patellae, anterior femoral condyles, and intercondylar sulci superiorly, internally rotate the patient's legs until the palpable femoral epicondyles are aligned parallel with the imaging table. Then, secure the legs in this position by wrapping the axial viewer's Velcro straps around the patient's calves. This positioning places the distal femurs in an AP projection with the imaging table. Because the lateral condyles are situated anterior to the medial condyles, the lateral condyles demonstrate more height on a tangential projection if the legs are adequately rotated. If the legs are not sufficiently rotated, the patellae are situated laterally, and either the anterior femoral condyles demonstrate equal height or the medial condyles demonstrate greater height than the lateral condyles (see Image 87). Both knees may not be rotated equally; often, only one knee is rotated.
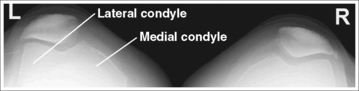
IMAGE 87
• Patellar position on a tangential projection. Because this image is taken to demonstrate subluxation (partial dislocation) of the patella, the position of the patellae above the intercondylar sulci on a tangential (axial) projection may vary. In a normal knee, the patella is directly above the intercondylar sulcus on a tangential projection, as shown in Figure 6-96. With patellar subluxation, the patella is lateral to the intercondylar sulcus, as shown in Image 88. Do not mistake a subluxed patella for knee rotation. Although both conditions result in a laterally positioned patella, the rotated knee demonstrates the femoral condyles at the same height, whereas with a subluxed patella the lateral condyle is higher than the medial condyle.
IMAGE 88
• Positioning to demonstrate patellar subluxation. To demonstrate patellar subluxation, the quadriceps femoris (four muscles that surround the femoral bone) must be in a relaxed position. This is accomplished by instructing the patient to relax the leg muscles, allowing the calf straps to maintain the internal leg rotation. If the patient does not relax the quadriceps muscles, a patella that would be subluxed on relaxation of the muscles will appear normal.
The patellofemoral joint spaces are open, with no superimposition of the upper anterior thigh soft tissue, patellae, or tibial tuberosities.
• The position of the patient's legs on the axial viewer must be precise for an open patellofemoral joint space to be obtained. The height of the axial viewer is adjustable. It should be set to a height that positions the long axis of the patient's femurs parallel with the table. If the distal femurs are positioned closer to the table than the proximal femurs, the angled central ray traverses the anterior thigh soft tissue, projecting it into the patellofemoral joint space (Figure 6-98 and Image 89). Although the patellofemoral joint space remains open on such an image, the space is underexposed.
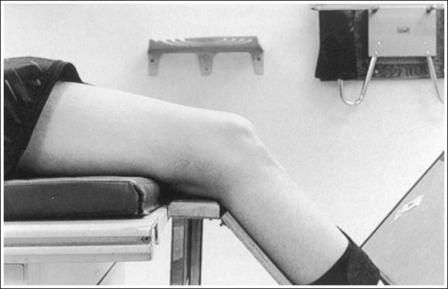
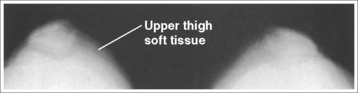
IMAGE 89
• Knee relationship to axial viewer. The relationship of the patient's posterior knee curves to the bend of the axial viewer determines whether the central ray will be parallel with the patellofemoral joint spaces. To demonstrate open patellofemoral joint spaces, position the posterior curves of the knees directly above the bend in the axial viewer, as shown in Figure 6-99. If the posterior curves of the knees are situated at or below the bend of the axial viewer (causing the knees to be flexed more than the degree that is set on the axial viewer), the central ray is not parallel with the patellofemoral joint space, and the patellae are resting against the intercondylar sulci (Figure 6-100; see Image 90). If the posterior curves of the knees are situated too far above the bend of the axial viewer (causing the knees to be extended more than the degree set on the axial viewer), the tibial tuberosities are demonstrated within the patellofemoral joint space (Figure 6-101; see Image 91).
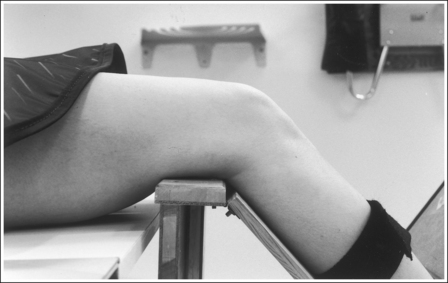
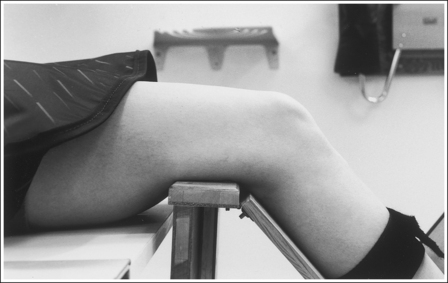
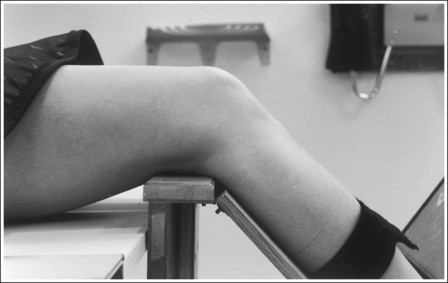
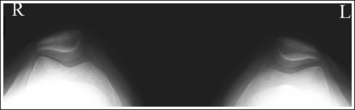
IMAGE 90

IMAGE 91
• Positioning and central ray angulation for large calves. The tibial tuberosities may also be demonstrated within the patellofemoral joint spaces in a patient with large posterior calves, even when the posterior knee curves have been accurately positioned to the bend of the axial viewer. The knees of a patient with large calves are not flexed as much as the axial viewer degree is set. For such patients, the central ray angulation should be increased (5 to 10 degrees) or the axial viewer's angulation should be decreased until the knees are flexed 45 degrees.
• Determining central ray angulation. The angle of the central ray and angle placed on the axial viewer also determine how well the patellofemoral joint space is demonstrated. Although 45 degrees is the standard angle, the reviewer is capable of supporting the leg at 30-, 60-, or 75-degree angles as well. Each of these angles requires a predetermined central ray angulation if an open patellofemoral joint is to be obtained.
The easiest way to determine the central ray angle to use for the different axial viewer angles is to know that the sum of the central ray angle and the axial viewer's angle must equal 105 degrees. For example, if the axial viewer is set at 30 degrees, the central ray angulation must be set at 75 degrees (30 + 75 = 105).
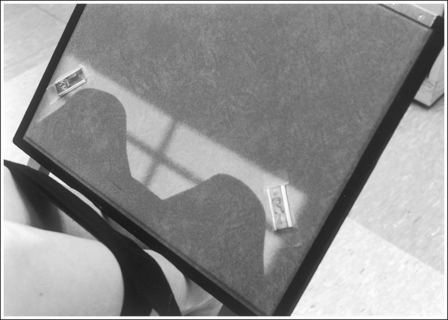
• Using light field shadow to evaluate positioning. Evaluate the shadow of the knees that is created on the receptor when the centering light is on before exposing the IR. When the patient has been accurately positioned, these shadows will display oval silhouettes with indentations on each side that outline the patellae (Figure 6-102).
A point midway between the patellofemoral joint spaces is at the center of the exposure field. The patellae, anterior femoral condyles, and intercondylar sulci are included within the collimated field.
• A standard 60-degree caudally angled central ray is centered between the knees at the level of the patellofemoral joint spaces to place the patellofemoral joint spaces in the center of the collimated field (see Figure 6-102). An SID of 72 inches (183 cm) is generally used to offset the magnification caused by the long OID.
• Open the longitudinal collimated field to include the patellae and the distal femurs. Transverse collimation should be to within 0.5 inch (1.25 cm) of the lateral knee skin line.
• A 10- × 12-inch (24- × 30-cm) or 11- × 14-inch (28- × 35-cm) screen-film or computed radiography IR placed crosswise should be adequate to include all the required anatomic structures.
Tangential Patella Projection (Merchant Method) Analysis
The patellae are demonstrated directly above the intercondylar sulci and are rotated laterally. The medial femoral condyles demonstrate more height than the lateral condyles. The legs were externally rotated.
Correction
Internally rotate the patient's legs until the patellae are situated superiorly, and then restrain the legs by wrapping the axial viewer's Velcro straps around the calves.
Analysis
The femoral condyles are visible superiorly, with the lateral femoral condyles demonstrating more height than the medial condyles. The patellae appear lateral to the intercondylar sulci and demonstrate subluxation.
Analysis
Soft tissue from the patient's anterior thighs has been projected onto the patellae and patellofemoral joint spaces. The height of the axial viewer was not set high enough to position the femurs parallel with the table. The distal femurs were positioned closer to the table than the proximal femurs, as shown in Figure 6-98.
Correction
Increase the height of the axial viewer until the long axes of the femurs are positioned parallel with the table, as shown in Figure 6-97.
Analysis
The patellae are resting against the intercondylar sulci, obscuring the patellofemoral joint spaces. The patient's posterior knee curve was positioned at or below the bend on the axial viewer, as shown in Figure 6-100.
Correction
Slide the patient's knees away from the axial viewer until the patient's posterior knee curvature is just superior to the bend of the reviewer, as shown in Figure 6-99.
Analysis
The tibial tuberosities are demonstrated within the patellofemoral joint spaces. Either the posterior knee curve was positioned too far above the axial viewer's bend, as shown in Figure 6-101, or the patient has large posterior calves.
Correction
Slide the knees toward the axial viewer until the posterior knee curvature is just superior to the bend on the viewer, as shown in Figure 6-99. If the patient was accurately positioned but the calves are large, increase (by 5 to 10 degrees) the central ray angulation or decrease the axial viewer's angulation until the knees are flexed 45 degrees. The total sum of the axial viewer's angle and the central ray angulation will be less than 105 degrees.
FEMUR: ANTEROPOSTERIOR PROJECTION
See Figures 6-103 and 6-104 and Boxes 6-21 and 6-22.
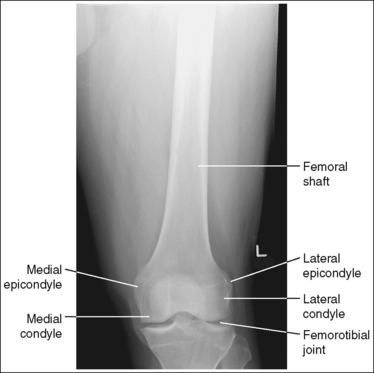
Image density is uniform across the femur.
• Position the thicker proximal femur at the cathode end of the tube and the thinner distal femur at the anode end to take advantage of the anode heel effect and obtain more uniform density across the femur.
Distal Femur
The distal femur demonstrates an AP projection. The medial and lateral femoral epicondyles are in profile, the femoral condyles are symmetrical in shape, and the tibia is superimposed over 0.25 inch (0.6 cm) of the fibular head.
• To obtain an AP distal femoral projection, place the patient in a supine position with the knee fully extended. Internally rotate the leg until the foot is rotated to a 15- to 20-degree angle and an imaginary line drawn between the medial and lateral femoral epicondyles is positioned parallel with the IR (Figures 6-105 and 6-106). This positioning places the medial and lateral femoral epicondyles at equal distances from the IR, as well as medially and laterally in profile, respectively. It also centers the intercondylar eminence within the intercondylar fossa.
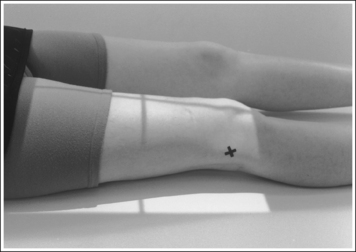
FIGURE 6-105 Proper patient positioning for AP distal femur projection. X indicates lateral femoral epicondyle.
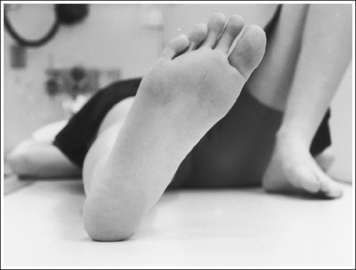
• Effect of leg rotation. If the femoral epicondyles are not positioned parallel with the IR, an AP projection has not been obtained. If the leg was not externally (laterally) rotated enough to place the epicondyles at equal distances from the IR, the epicondyles are not in profile, the medial femoral condyle is larger than the lateral condyle, and the tibia is superimposed over more than 0.25 inch (0.6 cm) of the fibular head (see Image 92). If the leg was internally (medially) rotated more than needed to place the femoral epicondyles at equal distances from the IR, the epicondyles are not demonstrated in profile, the lateral femoral condyle is larger than the medial condyle, and the tibia is superimposed over less than 0.25 inch (0.6 cm) of the fibular head (see Image 93).
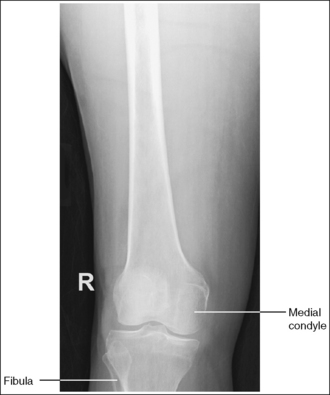
IMAGE 92
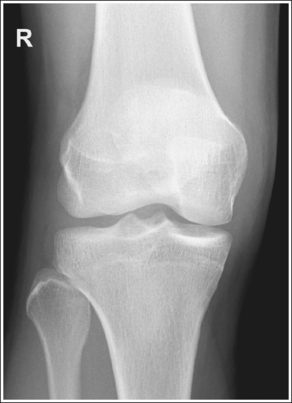
IMAGE 93
• Positioning for femoral fracture. When a patient has a fractured femur, the leg should not be internally rotated, but left as is. Forced internal rotation of a fractured femur may injure the blood vessels and nerves that surround the injured area. Because the leg is not internally rotated when a fracture is in question, the distal femur demonstrates external rotation.
The knee joint space is open but narrowed, and the anterior and posterior margins of the proximal tibia are superimposed.
• An open knee joint space is obtained when the anterior and posterior margins of the proximal tibia are superimposed. Because these margins slope distally from the anterior condylar margin to the posterior condylar margin, and the central ray is centered proximal to the knee joint, x-rays that diverge toward the proximal tibia are aligned close enough to parallel with the slope of the tibia to result in an open joint space. The joint space is narrower because the diverged x-rays project the distal femur partially into the joint space.
The distal femoral shaft is at the center of the exposure field. The distal femoral shaft and surrounding femoral soft tissue, the knee joint, and 1 inch (2.5 cm) of the lower leg are included within the collimated field. Any orthopedic apparatus located at the knee is included in its entirety.
• A perpendicular central ray is centered to the distal femoral shaft to place the shaft in the center of the image. This is accomplished by positioning the lower edge of the receptor approximately 2 inches (5 cm) below the knee joint; the knee joint is located 1 inch (2.5 cm) distal to the medial epicondyle. This lower positioning is needed to prevent the diverged x-ray beams from projecting the knee joint off the IR.
• The longitudinal collimation should be left open the full length of the IR used. Transverse collimation should be to within 0.5 inch (1.25 cm) of the lateral femoral skin line.
• A 14- × 17-inch (35- × 43-cm) screen-film or computed radiography IR placed lengthwise should be adequate to include all the required anatomic structures.
• Examination of the entire femur. If the entire femur is of interest and images are taken of the distal and proximal ends of the femur, the images should demonstrate at least 2 inches (5 cm) of femoral shaft overlap. Any orthopedic appliance, such as an intramedullary rod, should be included in its entirety.
Proximal Femur
The pelvis demonstrates an AP projection. The ischial spine is aligned with the pelvic brim, and the obturator foramen is open.
• An AP projection of the pelvis is obtained by placing the patient supine on the imaging table with the legs extended (Figure 6-107). To ensure that the pelvis is not rotated, judge the distance from the ASIS to the imaging table on both sides of the patient. The distances should be equal.
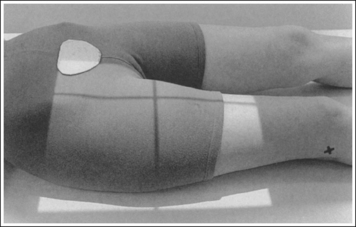
• Detecting pelvic rotation. Rotation of the pelvis on an AP femur projection is detected by evaluating the relationship of the ischial spine and the pelvic brim and visualization of the obturator foramen. When the pelvis has been rotated toward the affected femur, the ischial spine is demonstrated without pelvic brim superimposition and visualization of the obturator foramen is decreased (see Chapter 7, Image 1). When the pelvis has been rotated away from the affected femur, the ischial spine is not aligned with the pelvic brim but is demonstrated closer to the acetabulum, and demonstration of the obturator foramen is increased (see Chapter 7, Image 2).
The femoral neck is demonstrated without foreshortening, the greater trochanter is in profile laterally, and the lesser trochanter is completely superimposed by the proximal femur.
• The positions of the patient's foot and femoral epicondyle with respect to the imaging table determine how the femoral neck and trochanters appear on an AP femoral projection.
• Effect of leg and foot rotation. Generally, when a patient is relaxed, the legs and feet are externally (laterally) rotated. On external rotation, the femoral neck inclines posteriorly (toward the imaging table) and is foreshortened on an AP femoral projection. Increased external rotation increases the degree of posterior decline and foreshortening of the femoral neck on the image. If the patient's leg was externally (laterally) rotated enough to position the foot at a 45-degree angle and an imaginary line connecting the femoral epicondyles at a 60- to 65-degree angle with the imaging table, the femoral neck is demonstrated on end and the lesser trochanter is demonstrated in profile (Figure 6-108). If the patient's leg is positioned with the foot placed vertically and an imaginary line connecting the femoral epicondyles at approximately a 15- to 20-degree angle with the imaging table, the lesser trochanter is demonstrated in partial profile and the femoral neck is only partially foreshortened (see Image 94).
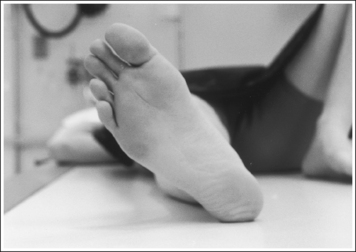
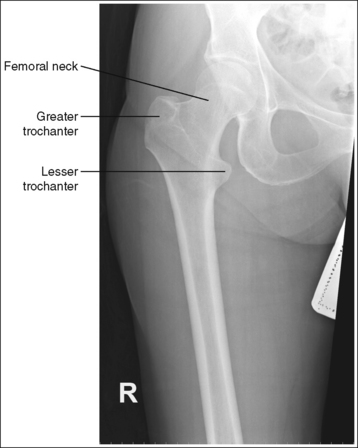
IMAGE 94
For a proximal AP femur projection, which shows the femoral neck without foreshortening and the greater trochanter in profile, the patient's leg should be internally rotated until the foot is tilted 15 to 20 degrees from vertical and the femoral epicondyles are positioned parallel with the imaging table (see Figures 6-106 and 6-107).
• Positioning for fracture. When a patient has a fractured proximal femur, the leg should not be internally rotated, but left as is. Forced internal rotation of a fractured proximal femur may injure the blood vessels and nerves that surround the injured area. Because the patient's leg is not internally rotated when a fracture is in question, such an AP femoral projection demonstrates the femoral neck with some degree of foreshortening and the lesser trochanter without femoral shaft superimposition (see Image 95).
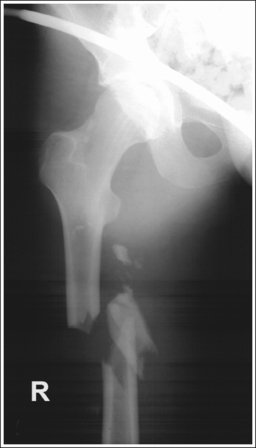
IMAGE 95
The proximal femoral shaft is at the center of the exposure field. The proximal femoral shaft, hip, and surrounding femoral soft tissue are included within the collimated field. Any orthopedic apparatus located at the hip is included in its entirety.
• A perpendicular central ray is centered to the proximal femoral shaft to place it in the center of the image. This is accomplished by positioning the upper edge of the receptor at the level of the ASIS. If the collimated head can be moved, turn it until one of its axes is aligned with the long axis of the femur.
• The longitudinal collimation should be left open the full length of the IR. Transverse collimation should be to within 0.5 inch (1.25 cm) of the lateral femoral skin line. The surrounding femoral soft tissue should be included to allow detection of subcutaneous air or hematomas.
• A 14- × 17-inch (35- × 43-cm) screen-film or computed radiography IR placed lengthwise should be adequate to include all the required anatomic structures.
Anteroposterior Femur Projection Analysis
The femoral epicondyles are not in profile, the medial femoral condyle appears larger than the lateral condyle, and the intercondylar eminence is not centered within the intercondylar fossa. The leg was externally rotated.
Correction
Internally rotate the leg until the femoral epicondyles are at equal distances from the IR.
Analysis
This is a knee image but it can be evaluated as if it were a distal femur. The femoral epicondyles are not in profile, the lateral femoral condyle appears larger than the medial condyle, and the tibia is superimposed over less than 0.25 inch (0.6 cm) of the fibular head. The leg was internally rotated.
Correction
Externally rotate the leg until the femoral epicondyles are at equal distances from the IR.
Analysis
The femoral neck is partially foreshortened, and the lesser trochanter is demonstrated in profile. The leg was in external rotation, with the femoral epicondyles positioned at approximately a 30-degree angle with the imaging table.
Correction
Internally rotate the patient's entire leg until the foot is tilted 15 to 20 degrees from vertical and the femoral epicondyles are positioned parallel with the imaging table, as shown in Figures 6-98 and 6-99.
FEMUR: LATERAL PROJECTION (MEDIOLATERAL)
See Figures 6-109, 6-110, and 6-111 and Boxes 6-23 and 6-24.
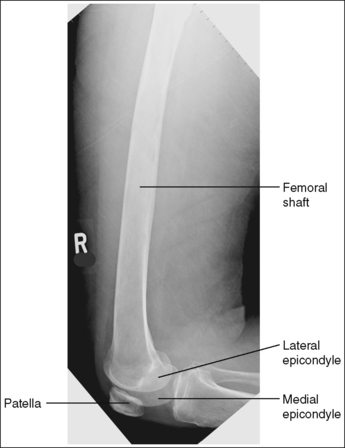
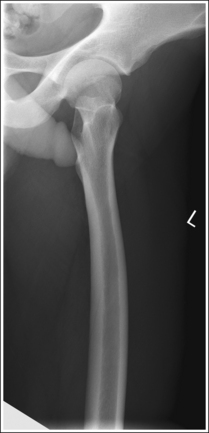
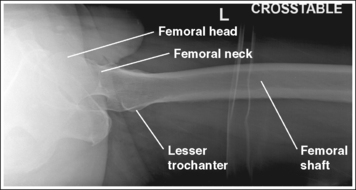
Image density is uniform across the femur.
• Position the thicker proximal femur at the cathode end of the tube and the thinner distal femur at the anode end to take advantage of the anode heel effect and obtain more uniform density across the femur.
Distal Femur
The anterior and posterior margins of the medial and lateral femoral condyles are aligned, and the tibia is partially superimposed over the fibular head.
• To obtain a lateral distal femur projection, place the patient in a supine position with the leg extended. Then rotate the patient onto the lateral aspect of the affected femur until the femoral epicondyles are aligned perpendicular to the IR, and flex affected knee approximately 45 degrees (Figure 6-112). The unaffected leg can be drawn posteriorly and supported or flexed and drawn anteriorly across the proximal femur of the affected leg and supported at hip level. This positioning aligns the anterior and posterior margins of the medial and lateral femoral condyles and places a portion of the fibular head beneath the tibia.
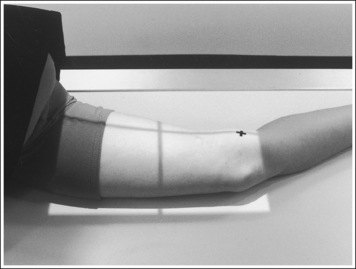
FIGURE 6-112 Proper patient positioning for lateral distal femur projection. X indicates medial femoral epicondyle.
• Effect of mispositioning. If the femoral epicondyles are not positioned perpendicular to the IR, the image demonstrates one femoral condyle anterior to the other condyle. The patient's patella must be rolled closer to or farther from the IR by adjusting patient rotation to align the condylar margins. The first step in determining which way to roll the patient's knee is to distinguish one condyle from the other. Because the central ray is centered proximal to the knee joint for a lateral femoral projection, x-ray divergence will cause the medial condyle to project distally to the lateral condyle. Consequently, the distal condyle will be the medial condyle. If a lateral distal femur projection is obtained that demonstrates the medial condyle posterior to the lateral condyle, the patient's patella was situated too far away from the IR (leg internally rotated; see Image 96). If a lateral distal knee projection is obtained that demonstrates the medial condyle anterior to the lateral condyle, the patient's patella was situated too close to the IR (leg externally rotated; see Image 97).
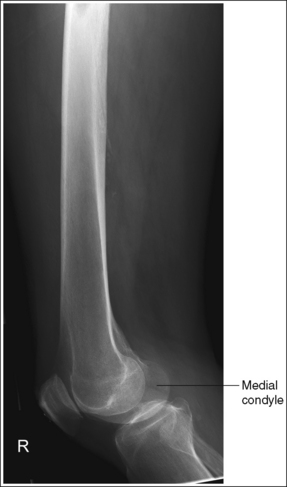
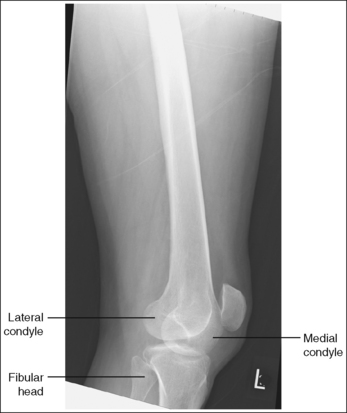
• Supine femur image. In patients with a suspected or known fracture, rolling onto the side may cause further soft tissue and bony injury. Consequently, a cross-table lateral distal femur projection should be taken (Figure 6-113). For this projection, the patient remains in a supine position, the IR is placed against the medial aspect of the femur, and a horizontal beam is directed perpendicular to the IR.
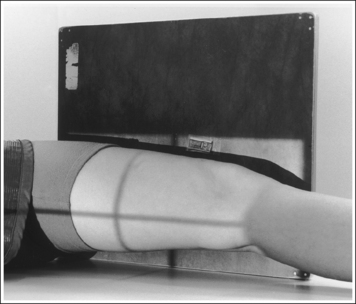
The medial femoral condyle is projected distal to the lateral femoral condyle, closing the knee joint space.
• This image appearance is a result of central ray placement and x-ray divergence. Because the central ray is centered proximal to the femoral condyles, the x-rays used to record the images of the femoral condyles are diverged just as if a caudal angle were used. The divergence projects the medial condyle more distally than the lateral condyle because the medial condyle is situated farther from the IR.
The distal femoral shaft is at the center of the exposure field. The distal femoral shaft, the surrounding femoral soft tissue, the knee joint, and 1 inch (2.5 cm) of the lower leg are included within the collimated field. Any orthopedic apparatus located at the knee is included in its entirety.
• A perpendicular central ray is centered to the distal femoral shaft to place it in the center of the image. This is accomplished by positioning the lower edge of the receptor approximately 2 inches (5 cm) below the knee joint; the knee joint is located 1 inch (2.5 cm) distal to the medial epicondyle. The lower positioning is needed to prevent the diverged x-ray beams from projecting the knee joint off the IR.
• The longitudinal collimation should be left open the full length of the IR. Transverse collimation should be to within 0.5 inch (1.25 cm) of the lateral femoral skin line.
• A 14- × 17-inch (35- × 43-cm) screen-film or computed radiography IR placed lengthwise should be adequate to include all the required anatomic structures.
• Examination of the entire femur. If the entire femur is of interest and images are taken of the distal and proximal ends of the femur, the images should demonstrate at least 2 inches (5 cm) of femoral shaft overlap. If possible, the fracture site should not be located at the overlap between the two images (Figure 6-114). Any orthopedic appliance, such as an intramedullary rod, should be included in its entirety.
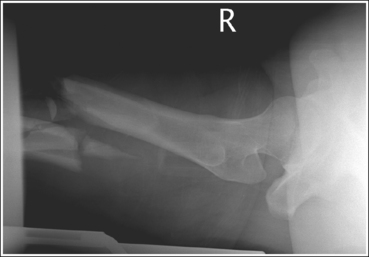
Proximal Femur
The lesser trochanter is in profile medially, and the femoral neck and head are superimposed over the greater trochanter.
• To accomplish a lateral proximal femur position, begin by placing the patient supine on the imaging table. Roll the patient's pelvis toward the affected leg until the femur rests against the imaging table and the femoral epicondyles are aligned perpendicular to the imaging table (Figure 6-115). Adjust the pelvis so that it is rolled posteriorly just enough to prevent superimposition; 15 degrees from lateral position is sufficient. This femoral position accurately places the greater trochanter beneath the femoral neck and puts the lesser trochanter in profile medially.
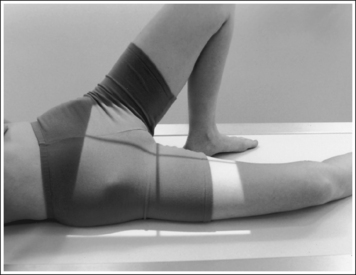
• Effect of poor pelvis and leg rotation. If the pelvis is not rotated enough to place the femoral epicondyles perpendicular, the greater trochanter is demonstrated laterally (see Image 98). If the pelvis and leg are rotated too much, positioning the medial epicondyles anterior to the lateral, the greater trochanter is demonstrated medially (see Image 99).
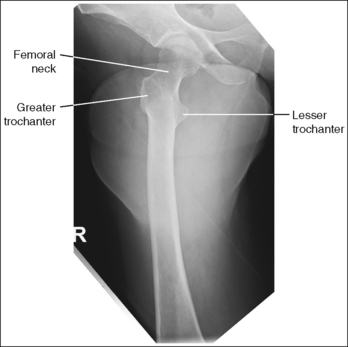
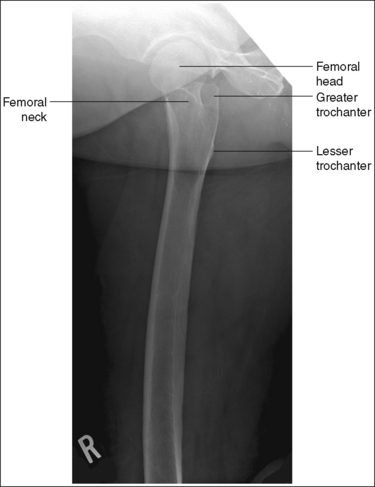
The femoral shaft is demonstrated without foreshortening, the femoral neck is demonstrated on end, and the greater trochanter is demonstrated at the same transverse level as the femoral head.
• The femoral shaft is demonstrated without foreshortening and the femoral neck is demonstrated on end when the femur is positioned flat against the imaging table.
• Effect of femur abduction. To understand the relationship between the femoral shaft and neck, study a femoral skeletal bone placed in a lateral projection. Note that when the proximal femur rests against a flat surface in a lateral projection, the femoral neck is on end. With this position, the femoral neck is completely foreshortened. Because of this foreshortening, the femoral neck cannot be evaluated on an image taken in this manner. If the femur is not positioned flat against the imaging table, the femoral neck is shown with decreased foreshortening and the femoral shaft with increased foreshortening (see Image 100).
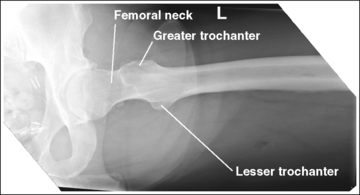
• Positioning for fracture. For a patient with a suspected or known fracture, flexing or abducting the affected leg or rolling the patient onto the affected side may cause further soft tissue and bony injury. Therefore, an axiolateral projection of the proximal femur should be used (Figure 6-116; see Figure 6-111). Consult page 406 for positioning instructions and evaluating criteria for this position.
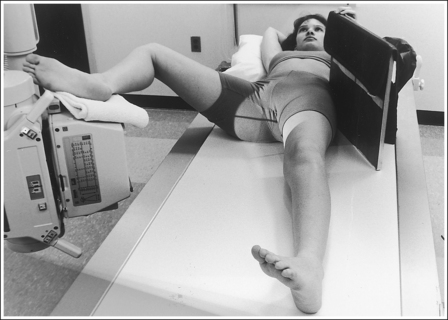
The long axis of the femoral shaft is aligned with the long axis of the collimated field.
• Aligning the long axis of the femoral shaft with the long axis of the collimated field allows tight collimation without clipping any portion of the femur or surrounding soft tissue.
• Because the femoral shaft lies across the table when it is abducted, the patient must be rotated on the imaging table until the femur is placed as close to the long axis of the collimation field as possible.
The proximal femoral shaft is at the center of the exposure field. The proximal femoral shaft, hip joint, and surrounding femoral soft tissue are included within the collimated field. Any orthopedic apparatus located at the hip is included in its entirety.
• A perpendicular central ray is centered to the proximal femoral shaft to place it in the center of the image. This is accomplished by positioning the upper edge of the receptor at the level of the ASIS (Figure 6-117). If the collimator head can be moved, turn it until one of its axes is aligned with the long axis of the femur.
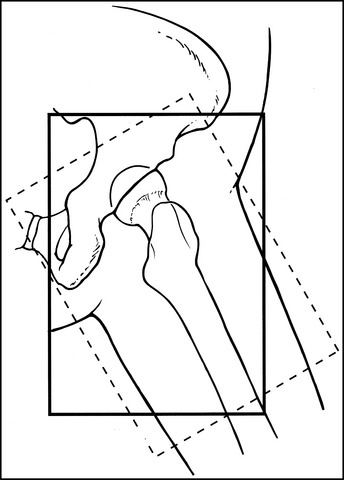
FIGURE 6-117 Central ray centering for lateral proximal femur projection. Dotted line rectangle indicates area covered if collimator head is turned.
• Leave the longitudinal collimation open the full length of the IR. Transverse collimation should be to within 0.5 inch (1.25 cm) of the lateral femoral skin line. The surrounding femoral soft tissue should be included to detect subcutaneous air or hematomas.
• A 14- × 17-inch (35- × 43-cm) screen-film or computed radiography IR placed lengthwise should be adequate to include all the required anatomic structures.
Lateral Femur Projection Analysis
The anterior and posterior margins of the medial and lateral femoral condyles are not aligned. The medial condyle is posterior to the lateral condyle. The patella was too far from the IR (leg internally rotated).
Correction
Roll the patient anteriorly, positioning the patella closer to the IR (externally rotate the leg) and the femoral epicondyles perpendicular to the IR. The amount of movement needed is half the distance demonstrated between the anterior and posterior surfaces of the femoral condyles.
Analysis
The anterior and posterior margins of the medial and lateral femoral condyles are not aligned. The medial condyle is positioned anterior to the lateral condyle. The patella was too close to the IR (leg externally rotated).
Correction
Roll the patient posteriorly, positioning the patella farther from the IR (internally rotate the leg) and the femoral epicondyles perpendicular to the IR. The amount of movement needed is half the distance demonstrated between the anterior or posterior surfaces of the femoral condyles.
Analysis
The greater trochanter is positioned laterally. The patient's leg was not rotated enough to position the femoral epicondyles perpendicular to the IR.
Correction
Increase the degree of external leg rotation until the femoral epicondyles are aligned perpendicular to the IR.
Analysis
The greater trochanter is demonstrated medially next to the ischial tuberosity and the lesser trochanter is not demonstrated in profile. The leg was rotated more than needed to position the femoral epicondyles perpendicular to the IR.
Correction
Decrease the amount of external leg rotation until the femoral epicondyles are aligned perpendicular to the IR.