chapter 27 Home evaluation and modifications
After completing this chapter, the reader will be able to accomplish the following:
1. Apply methods of assessing the home environment for barriers.
2. Understand architectural guidelines as established by the American National Standards Institute.
3. Implement methods for modifying the home environment and increase safety and mobility independence for patients recovering from stroke.
A barrier-free environment in the home and community is essential to successful independent living for individuals who are elderly or physically disabled and particularly for individuals who have suffered stroke.2 Throughout the rehabilitation process, therapists work with patients toward the goal of achieving independence in mobility and self-care. However, this process usually occurs in an institutionalized setting that is relatively free of architectural barriers.1 Architectural barriers are defined as architectural features (e.g., stairs and doors) in the home and community that make negotiating at will difficult or impossible for an individual.
Most individuals with disabilities wish to return to their own homes. For many, some type of durable medical equipment and home modifications are necessary to achieve easy access.3
Understanding the patient’s home environment is an integral part of treatment and discharge planning. A home visit with the patient should occur well before the discharge date to provide recommendations to facilitate safety and independence. The therapist uses information gained from this home visit to modify the existing treatment plan and establish appropriate therapy goals. This chapter focuses on architectural barriers commonly found in the home, ways to eliminate them, basic wheelchair information, and a general overview of methods for assessment appropriate for patients who have had a stroke. This chapter—with its bulleted, quick-reference format—is intended to be used as a resource for practical suggestions that will assist the occupational therapist’s clinical reasoning process when evaluating the homes of stroke survivors.
Basic guidelines and wheelchair information
The wheelchairs shown in Figs. 27-1 to 27-6 are based on a standard adult-size chair. Dimensions vary with the size of the patient using the chair. See Chapter 26 for information regarding specific wheelchair adaptations. The therapist must know the specific size and type of wheelchair being prescribed for the patient before making recommendations for home modifications.
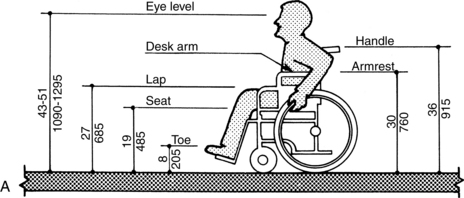
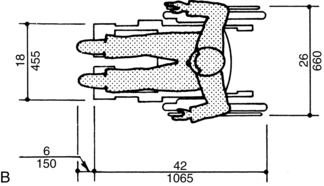
Figure 27-1 Dimensions of standard adult manual wheelchair (metric measurements are in millimeters). Width: 24 to 26 inches from rim to rim. Length: 42 to 43 inches. Height to push handles from floor: 36 inches. Height to seat from floor: 19 to 19½ inches (excluding cushion). Height to armrest from floor: 29 to 30 inches. note: Footrests may extend farther for very large persons.
(From American National Standards Institute: Accessible and usable buildings and facilities, New York, 1992, The Institute.)
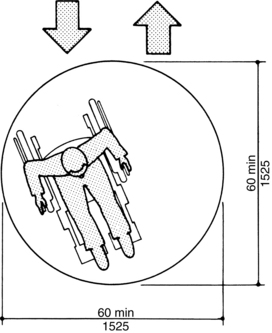
Figure 27-2 Wheelchair turning space of 360 degrees (metric measurements are in millimeters). A 360-degree turn requires a clear space of 60 by 60 inches. This space enables the individual to turn without scraping the feet or maneuvering multiple times to accomplish a full turn. min, Minimum.
(From American National Standards Institute: Accessible and usable buildings and facilities, New York, 1992, The Institute.)
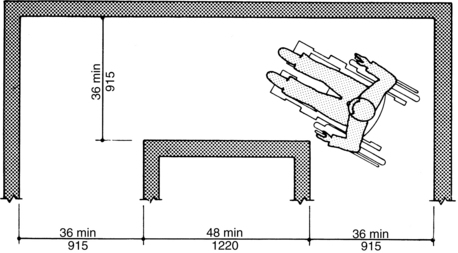
Figure 27-3 Wheelchair turning space of 90 degrees (metric measurements are in millimeters). A 90-degree turn requires a minimum of 36 inches for the wheelchair user to have clear space for the feet and prevent scraping the hands on the wall. min, Minimum.
(From American National Standards Institute: Accessible and usable buildings and facilities, New York, 1992, The Institute.)
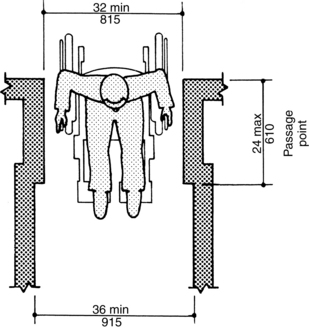
Figure 27-4 Minimum clear width for doorways and halls (metric measurements are in millimeters). A minimum of 32 inches of doorway width is required; the ideal is 36 inches. Hallways should be a minimum of 36 inches wide to provide sufficient clearance for wheelchair passage and allow the user to propel the chair without scraping the hands. max, Maximum; min, minimum.
(From American National Standards Institute: Accessible and usable buildings and facilities, New York, 1992, The Institute.)

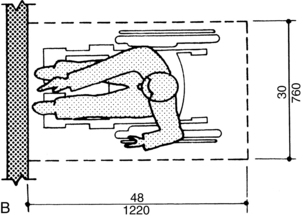
Figure 27-5 Forward reach (metric measurements are in millimeters). The maximal height an individual can reach from a seated position is 48 inches. Height should be at least 15 inches to prevent the wheelchair from tipping forward. min, Minimum.
(From American National Standards Institute: Accessible and usable buildings and facilities, New York, 1992, The Institute.)
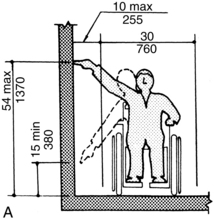
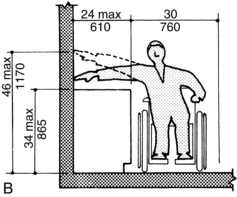
Figure 27-6 Side reach (metric measurements are in millimeters). The maximal height for reaching from the side position without an obstruction is 54 inches. If an obstruction such as a countertop or shelf is present, the maximal height for side reach is 46 inches. max, Maximum; min, minimum.
(From American National Standards Institute: Accessible and usable buildings and facilities, New York, 1992, The Institute.)
Evaluating the home
Evaluation for architectural barriers usually is organized by room. In this approach, the therapist considers the following information during a home evaluation:
Exterior
Suggestions include the following:
 Assess type of residence: Note whether dwelling is a house or apartment building; determine whether dwelling has elevator or staircase access; examine steps (their number, height, width, and depth); note walkway railings and width; and assess distance and grade between the dwelling entrance and the curb or driveway.
Note protection from the weather: Examine the condition of surfaces over which the wheelchair must travel (e.g., grass that becomes mud, concrete with cracks, shaded bricks covered with moss, and asphalt that softens in the hot summer sun).
Examine driveway: Note size and ability to accommodate a wheelchair van; assess composition (solid or boulevard style with a strip of dirt in the middle); and determine whether surface is paved or gravel.
Survey surrounding area: Look for trees that drop nuts, branches, leaves, and pine cones; note location of mailbox.
Entrances
Suggestions include the following:
Consider all entrances to evaluate accessibility; note any entrances inaccessible to the patient.
Measure steps and landings and note the presence and height of railings.
Measure all doorway widths and heights, including interior doors to closets and between rooms.
Note the direction of each door swing, the presence and height of any sills, and the height of any installed locks; determine whether screen doors open outward and solid doors open inward, and assess the weight of the doors and whether they can be moved from a wheelchair.
If the patient lives in a building with an elevator, note whether the chair can be maneuvered into the elevator; assess whether the elevator stops flush with the landing; and consider whether the patient can reach the buttons.
Interior
Suggestions include the following:
Assess the number of levels and whether the bedrooms are located upstairs or downstairs; consider relocating a bedroom downstairs for improved mobility.
Count and measure all steps (their height, width, and landing), and note whether handrails exist on both sides.
Measure the dimensions of the staircase; note the stair height, width, and depth.
Living room and hallways
Suggestions include the following:
Consider phone accessibility; height of light switches, thermostats, and electrical sockets; furniture arrangement; floor covering; and doorway width and thresholds. Note the width of the hallway and number of turns.
Determine whether the patient will be able to open and close windows; note whether the windows slide up and down or swing outward; and measure the height of the latches.
Bedroom
Suggestions include the following:
Measure doorway width, threshold height, and mattress height.
Consider space for hospital bed and bedside commode; note floor space and covering (i.e., carpet, wood, tile, or linoleum) because these may have an effect on walking and wheelchair mobility.
Note whether the bed is stable for transfer.
Assess the accessibility of dressers and closets.
If a mechanical lift is being prescribed, ensure enough room is available to maneuver it around the bed.
Bathroom
Suggestions include the following:
Measure the door width and threshold height, and note the direction of the door swing (inward or outward).
Measure the entry width and note the type of entry of the shower or bathtub; determine the inside and outside sill height and sill width; measure the length, width (inside top and bottom), and height of the faucet; and note the type of shower head.
Note whether the wall is plasterboard, tile, or fiberglass; the type of wall affects the installation of grab bars.
Measure the height of the toilet, the available space on the left and right, and the space in front of it; check whether the toilet paper roll is within easy reach; and consider the sink height and counter distances to the left and right.
Determine the presence of any nonslip treatment in the tub; note whether the patient has a shower curtain or a glass door.
Kitchen
Suggestions include the following:
Measure the height and depth of the basin of the sink, the distance to the faucet knobs, cabinet and counter heights, and refrigerator door heights.
Consider table height in relation to wheelchair fit.
Note outlet height and location, type of controls and location on the stove and microwave, and height and accessibility of light switches.
Basement
The therapist should examine the staircase, railings, windows, furnace controls, fuse box, and lighting.
Sketches of each room with notations of problematic areas are useful for the therapist attempting home simulation during treatment sessions. The therapist should provide a brief summary of findings with recommendations for modifications and safety to the family.
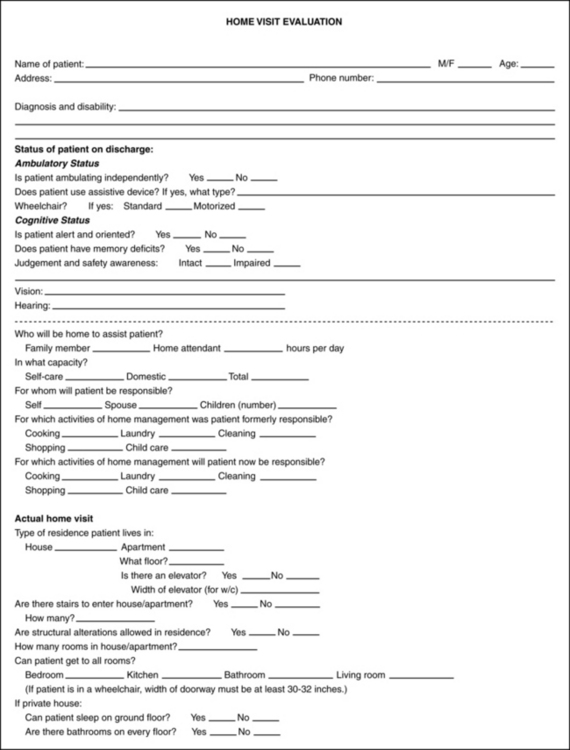
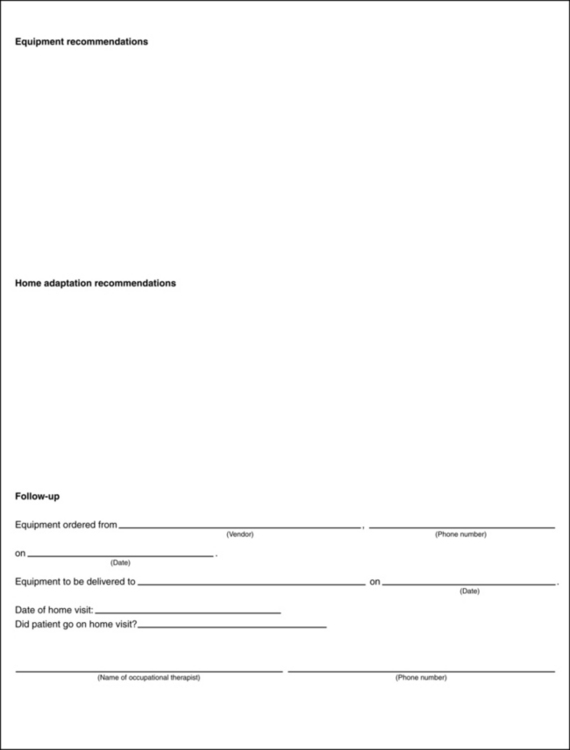
Home evaluation forms
Evaluation formats range from simple to complex, depending on the therapist’s and patient’s needs. Figs. 27-7 to 27-10 show samples of home assessments.
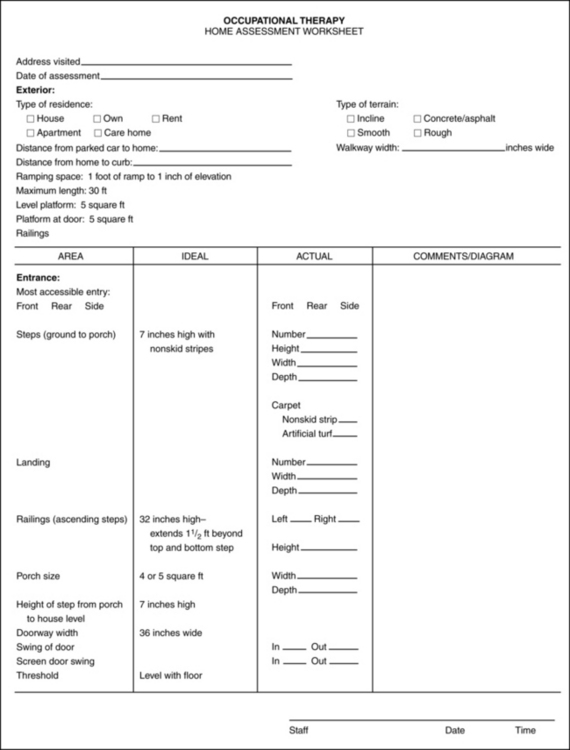
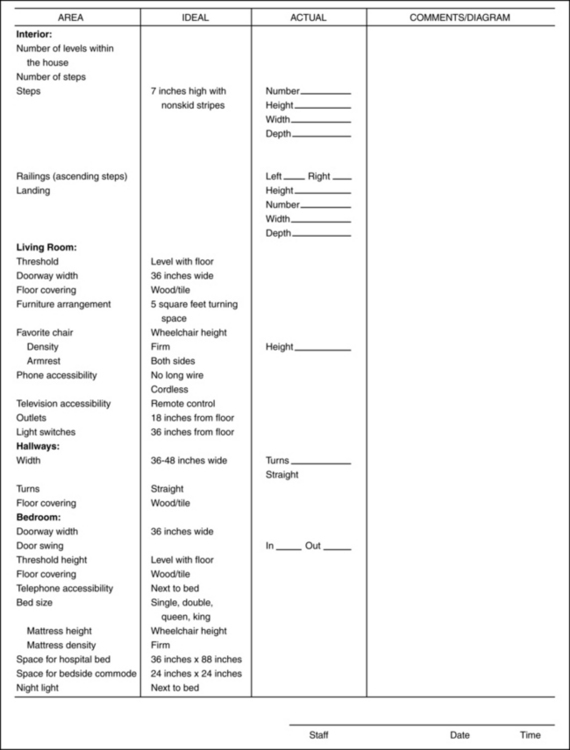

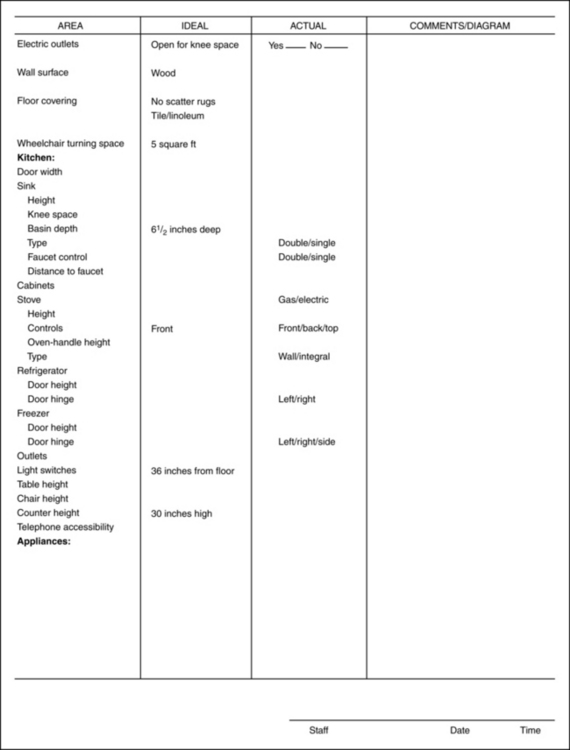
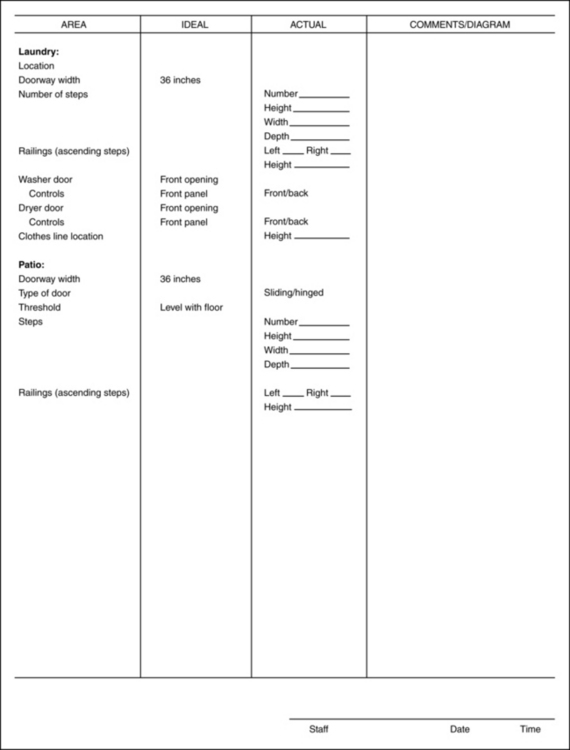
Figure 27-7 Occupational therapy home assessment worksheet.
(Courtesy K. Hatae, V. Tully, N. Wade; Honolulu, Hawaii.)

Modifications
The therapist’s recommendations should meet the patient’s need to function with the greatest level of independence and safety. The therapist must consider the patient’s budget and the extent of the structural changes necessary to attain the patient’s goals. The therapist should consult building contractors and obtain bids for extensive reconstruction needs and to assist with determining the feasibility of structural modifications. Generally, modifications should be made in accordance with the guidelines established by the American National Standards Institute.1
The American National Standards Institute publishes the document American National Standards for Buildings and Facilities,1 which provides specifications to make buildings and other facilities accessible and usable for individuals with physical disabilities. The examples provided are reprinted to increase occupational therapists’ understanding of specifications needed for patients who are recovering from a stroke and who rely on wheelchairs for independent mobility.
Exterior
A parking space with a 4-foot aisle adjacent to it allows an individual to maneuver a wheelchair alongside the car. Pathways and walkways should be a minimum of 48 inches wide and have smooth surfaces to prevent tipping and difficult wheelchair mobility. Motion-sensitive or automatically timed lighting along walkways provides safety. At least one entrance to the home should have easy access. If all entrances are reached by stairs, the number of steps influences the solution to creating a no-step entrance. Options include ramps, stair gliders, or porch lifts.
General comments on ramps
The therapist should consider the following:
Ramps should be a minimum of 36 inches wide and have nonskid surfaces.
The ideal ratio of slope to rise is 1:12—every inch of vertical rise requires 12 inches of ramp (Fig. 27-11).
Ramps should have level landings at the top and bottom of each run; the landing should be at least as wide as the ramp; and to allow unobstructed ability to open the door, a 24-inch area is needed.
Handrails should be waist high for individuals who can walk (a minimum of 34 to 38 inches) and should extend a minimum of 12 inches beyond the top and bottom runs.
Ramps require railings or curbs at least 4 inches high to prevent individuals from slipping off the ramp
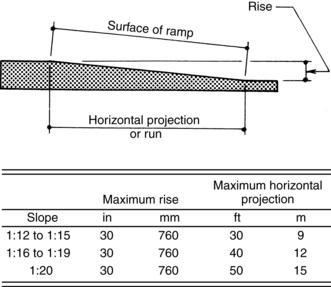
Figure 27-11 Slope and rise of ramps. This diagram provides the components of a single ramp run and a sample of ramp dimensions. The slope ratio is an important consideration when designing a ramp; slope creates hazardous wheelchair propulsion conditions if it is too steep.
(From American National Standards Institute: Accessible and usable buildings and facilities, New York, 1992, The Institute.)
General comments on stairs
The therapist should consider the following:
According to American National Standards Institute, all steps on a flight of stairs should have uniform riser heights (a maximum of 7 inches) and tread depth (a minimum of 11 inches)
All stairs should have handrails; the handrail grasping surface should be ½ inch to 2 inches in diameter and have a nonslip surface; and handrails should be mounted approximately 1½ inches away from the wall to allow for adequate grasping space.
General comments about doors and landings
Standard door width should be a minimum of 32 inches. Several solutions to narrow door problems do not require replacing the entire frame and door with a wider doorway. Existing hinges may be replaced with swing-clear hinges. Thus the clear opening of the door may be enlarged by 1½ to 2 inches. Doorstops may be removed, adding an additional ¾ inch to the clear opening width of the doorway. Removal of existing doors can provide an additional 1½ to 2 inches. Removing doors and doorstops can increase door width 2¼ to 2¾ inches.
Small landings on either side of the door present problems for a wheelchair or walker user because pulling a swinging door open is difficult if the assistive device already is occupying the landing area over which the door must swing. A minimum of 18 inches for walkers and 26 inches for wheelchairs is needed outside the door swing area (Fig. 27-12). Rather than enlarging a landing by removing walls and partitions, three options are available. The door can be removed, an automatic door opener can be installed, or a door pull loop with Velcro-type attachments can be devised. The latter can assist individuals with closing a swing-in door. The loop can be constructed from 2-inch wide webbing material and should be at least 30 inches in length. A loop sewn at one end assists patients with weak grasps. The other end can be fastened to the door lever or knob using 1-inch wide Velcro-type loops and hooks.

Figure 27-12 Door swing area. A minimum of 18 inches for walkers and 26 inches for wheelchairs is needed outside the swing area.
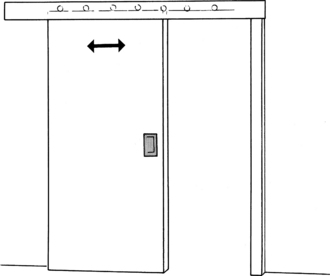
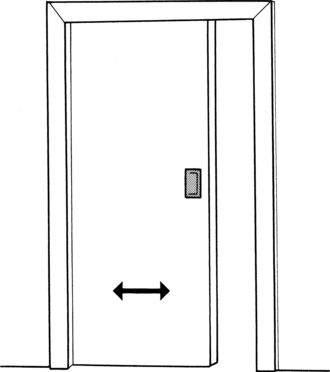
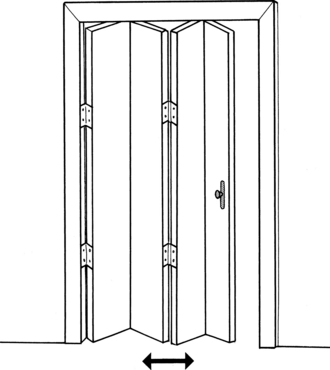
If doors are to be replaced, several options are available. If space is a limiting factor, sliding doors are useful (Fig. 27-13). However, their weight and lateral movement can make maneuvering difficult. Moreover, some sliding doors require floor tracks, which are obstacles for wheelchairs and persons who have difficulty walking. Pocket doors are effective if only occasional privacy is necessary (Fig. 27-14). Folding doors require lateral movement but are lighter in weight (Fig. 27-15). Door thresholds higher than ¼ inch should be removed or beveled to prevent tripping hazards and to remove barriers for wheelchair users.
Hardware
Lever door handles or doorknob adapters are preferable to round twist doorknobs. Slide bolts, which can be reached from a seated position, may replace dead bolt locks. Kick plates can be installed on doors to prevent gouging and scratches from wheelchairs and walking aids. They should be as thin as possible to allow clear door width opening. They should extend from the bottom of the door to a height of 10 to 16 inches.
Interior
Hallways, living room, and dining area
Hallways should be a minimum of 36 to 48 inches wide. They should be free of protruding objects such as low tables, coat racks, and planters. Thresholds should be eliminated. Nonslip and low-friction surfaces are recommended. Scatter rugs should be removed. Carpeting should be removed or tacked or taped down to eliminate trip hazards. Furniture should be rearranged to accommodate a wheelchair turning area of 5 square feet. Coffee tables, ottomans, and other trip hazards should be eliminated for patients who walk with assistive devices. A favorite chair can be increased in seat height by adding medium-density foam cushions. Telephone and appliance wires should be taped or tacked down. Easy access to light fixtures and outlets is recommended. Appropriate height for wall switches is 36 to 48 inches. Outlets should be a minimum of 18 inches above the floorboard. Rocker switches and dimmer switches can reduce the fine manipulation required for operating light switches, or automatic timer lights can be installed. Inexpensive environmental control units can aid in independent operation of television sets, radios, and other appliances.
Bedroom
The bedroom should be free of clutter and scatter rugs. A minimum of 3 feet should be available on the side of the bed to allow for wheelchair transfers. The height of the bed should be equal to the height of the wheelchair for safe transfers. If the bed is too low, it may be elevated on blocks or a platform. Raising the bed also increases ease for sit-to-stand transitions if the patient is ambulatory. A firm mattress is recommended to improve bed mobility. A trapeze can assist with mobility in bed if necessary. Side rails provide safety from falls and also can be used as assistive devices for rolling in bed. Dressers should have toe space underneath and easy-glide drawers. Stackable baskets may be a substitute for clothing storage. Closet doors should be removed or replaced with folding doors or a curtain. The height of the clothing rod should be a maximum of 48 inches.
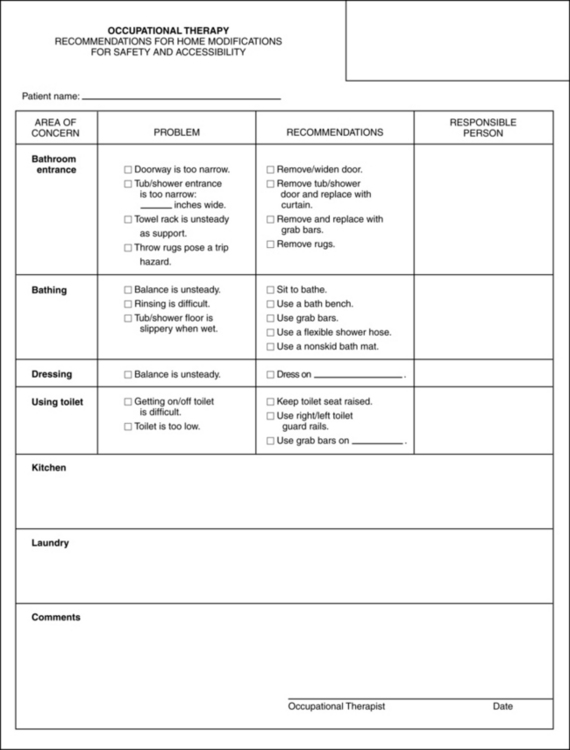
Bathroom
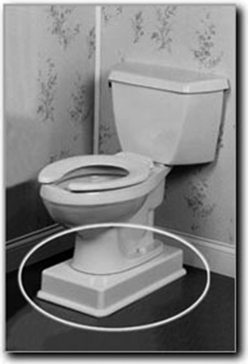
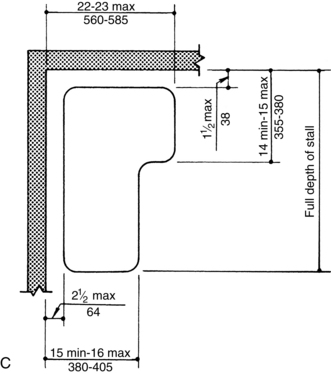
Doorway width may preclude bathroom access for the wheelchair user. Removing the door, installing a pocket or sliding door, or using a narrow rolling commode chair are options for entry to the bathroom for nonambulatory individuals. The optimal toilet seat height should be 17 to 19 inches, which allows for level transfers from a wheelchair and decreases the amount of bending required to get up and down for those who can stand. Options for raising the height of the toilet include a raised toilet seat, an over-toilet commode, a drop-arm commode, or a Toilevator (Fig. 27-16). For individuals who have greater weakness in their lower extremities than in their upper extremities, a toilet safety frame may assist with sit-to-stand transitions. Grab bars should be installed throughout the bathroom because surfaces become slippery and falls are more likely. The height of horizontal bars should range from 33 to 36 inches above the floor. The width of the bar should be 1¼ to 1½ inches to accommodate grasp efficiently. When bars are mounted adjacent to the wall, the distance between the wall and the bar should be 1½ inches so that the patient’s fingers can reach around the bar but the arm cannot slip through. Walls around the tub or shower stall should be reinforced. Bars should be mounted securely into the wall studs. Towel racks should be removed if they are likely to be used for support.
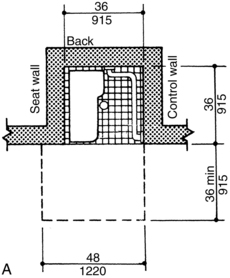
Glass doors on tub and shower stalls should be removed and replaced with a curtain. Glass doors can detach from tracks and fall on the person. This renovation increases accessibility for transfers and improves safety conditions. The recommended height for tub rims is 17 to 19 inches. Shower stall thresholds should be ½ inch high. A roll-in shower may be recommended for nonambulatory individuals and should be a minimum of 30 by 60 inches. Some tubs have rounded bottoms. This can present stability problems if a stationary leg of a tub bench is supposed to be positioned inside. A clamp-on tub bench is more suitable for such tubs. Regardless of the type of tub, the therapist should evaluate the individual’s balance and transfer method and architectural constraints carefully to determine the most appropriate and safest type of seat. A flexible shower spray unit assists with rinsing; the hose should be a minimum of 60 inches long. The handle can be adapted for individuals with limited hand dexterity. Nonskid tub strips or a rubber bath mat should be applied to the floor of the tub or shower stall and outside the tub to prevent falls. Fig. 27-17 gives samples of shower stall and shower seat dimensions.

Sink and lavatories
The height of the sink should be a maximum of 34 inches above the floor. Wheelchair users need a minimum of 29 inches of height underneath the sink to enable them to have close access to the faucets and basin. Access problems may be eliminated by removing cabinets or doors. The mirror above the sink should be angled ¼ to ½ inch for individuals who are seated. Water pipes should be insulated to prevent contact burns. Hot and cold water should mix and empty through a single faucet to mix water of variable temperatures. Water temperature controls should be set no higher than 115 degrees F. Ordinances in some cities mandate a fixed maximum temperature for hot water for safety. Single-lever faucet controls are recommended because they provide visual indication of water temperature and do not require fine motor dexterity to operate.
Kitchens
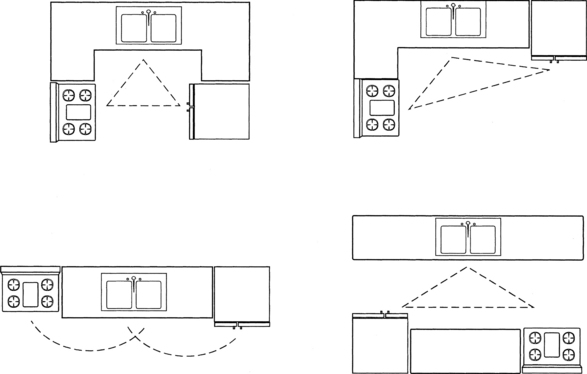
The three most common kitchen layouts are L-shaped, aisle, and U-shaped. The L- or U-shaped configuration can improve efficiency (Fig. 27-18). Work surfaces should be free of clutter, and small appliances that are used frequently should be placed within reach.
Countertops are generally 36 inches high, making accessibility difficult for wheelchair users. Alternate counter or work surfaces can be adapted by adding pullout cutting boards or placing a cutting board on top of a drawer that has been opened partially. Height-adjustable countertops and cabinets provide easy access for individuals with limited reach; however, this option is expensive. The countertop should have a maximum depth of 24 inches. The corners and edges should be rounded. Base cabinets should have enough toe space at the bottom to accommodate wheelchair footplates. Retractable doors and lazy Susans increase accessibility to stored items. Adapted knobs or D-loop handles assist individuals with decreased coordination and grasp strength. Easy-glide drawers and pullout shelves may decrease energy expenditure.
The therapist also must take appliances into account. A side-by-side refrigerator is recommended for increased access to the refrigerator and freezer. Shelves should be adjustable; lazy Susans may provide easier access to stored food items. A wall-mounted oven and range top with staggered burners are recommended for wheelchair users. A mirror placed above the stove allows seated individuals to see the cooking process. Transparent pots are another alternative. Range controls should be located at the front or side to eliminate the need to reach over hot elements. Controls can be adapted for individuals with limited hand dexterity. Tactile or audible cues can assist individuals with limited vision. For wall-mounted ovens, the controls should be no higher than 40 inches above the floor for wheelchair user access. Microwave and toaster ovens may be convenient and safe alternatives for cooking.
Sink basins should be a maximum of 6½ inches deep. A plastic or wooden rack can be used to raise the working level. A retractable hose can increase the ease of rinsing dishes. Single-lever faucet controls are recommended and should be positioned no farther than 21 inches from the edge of the counter.
Moving around the obstacles
General mobility and transfers will be difficult for the individual who has severe motor deficits. After a discussion of prognosis for motor return, it may be appropriate to recommend a safe mechanical transfer system for the primary caregiver to use within the home.
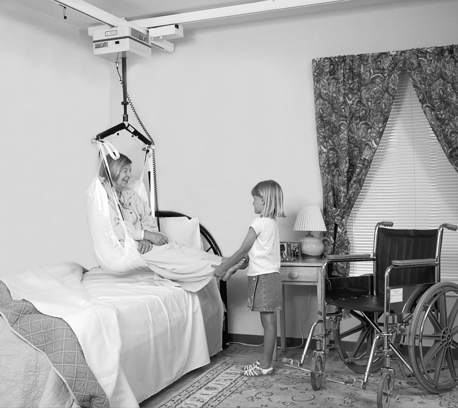
From a historical perspective, standard lift systems were difficult to use because they generally required more than one person to operate and were difficult to maneuver in limited spaces. Modern advances in technology have resulted in effective, safe, and more affordable equipment available to mobilize the more physically involved individual.
An example of one system is the Barrier Free Lift. With this system, tracks usually are custom installed on the ceilings in patients’ homes. They allow the caregiver or home attendant to stay close to the patient during the transfer process but do not require physical exertion from the caregiver. Several benefits to using a Barrier Free track system include prevention of caregiver injuries and ensuring that furniture, carpets, and other equipment do not get in the way of the lift (Fig. 27-19).
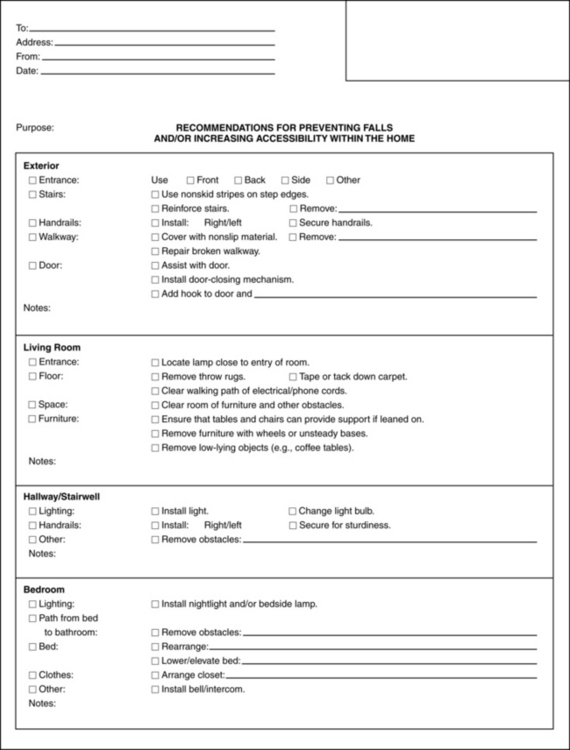
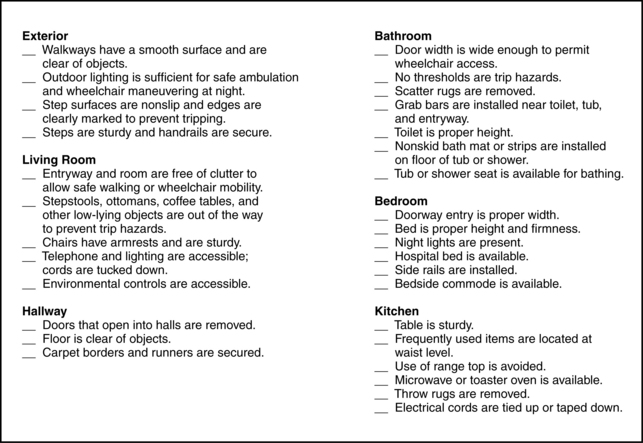
Fall prevention
The checklist in Fig. 27-20 is an adaptation from the fall prevention checklist used at the Rehabilitation Hospital of the Pacific located in Honolulu, Hawaii. This checklist originally was used as a tool to provide education to family members and caregivers after the home evaluation process. The adjustments incorporate options for durable medical equipment. See Chapter 14.
CASE STUDY Returning Home Safely and Independently after Stroke
J.J. is a 72-year-old woman who was admitted to the hospital with a diagnosis of right hemispheric stroke. Her hospital course was uncomplicated, and she was transferred to the rehabilitation unit four days later.
An occupational therapy evaluation was performed and clinical findings were reported. Passive range of motion was within functional limits throughout all joints in the upper extremities bilaterally. Strength was good in the right upper extremity. Minimal active movement was present in the left shoulder, and one-finger subluxation was noted. Sensation was intact for light touch, pain, and temperature. Functional abilities were impaired moderately because of decreased ability to bear weight on the left upper and lower extremities. Sitting balance was fair. Standing balance was poor. J.J. required moderate assistance for bed mobility. Sit-to-stand required maximal assistance of one person, and transfers required moderate to maximal assistance depending on the surface. She was unable to walk at the time of evaluation, and wheelchair mobility skills required moderate assist. In self-care, a left neglect was noted during all activities. J.J. required set-up assistance for eating and grooming. Dressing and bathing required moderate to maximal assistance.
J.J. was treated in occupational and physical therapy for six weeks. During her fourth week of treatment, a home evaluation was scheduled. The therapy team felt that having the patient present during the visit would be useful because she lived alone and still required the use of a wheelchair. She lived in a two-bedroom rental apartment in a building with a no-step entry and elevator. The apartment had large rooms, but wheelchair accessibility was limited because of excessive furniture and thick carpeting. The hallway was narrow. Her bedroom and bathroom were located off to the right of the hallway, and the second bedroom was located at the end of the hallway. She was unable to negotiate the turn into her bedroom with the wheelchair because of the hall and door width. The therapist suggested that she switch bedrooms and use the second bedroom as her own. The bed was low with a soft mattress and the closet was not accessible because of narrow paths and excessive furnishings. The bathroom was spacious and easily could accommodate a wheelchair; however, the door was only 19 inches wide, preventing wheelchair access. The bathroom had a combination tub and shower with sliding glass doors. The toilet was located behind the door. The sink had round fixtures that were difficult to turn. The kitchen was wheelchair accessible. The refrigerator door opened to the right, and the stove had controls at the back of the range top. The cabinets were high and not accessible from a seated position. The following recommendations were made:
| Living room |
| Bedroom |
| Bathroom |
| Kitchen |
| Communication |
J.J. agreed with the foregoing recommendations and requested permission from the landlord to install the grab bar. During the rest of her inpatient rehabilitation stay, the focus of treatment was placed on achieving independence in bed-to-commode transfers, short-distance walking, light meal preparation, and kitchen tasks from wheelchair level in a home-simulating environment. At the time of discharge, J.J. was independent in all self-care, transfers, and meal preparation. She required contact guard for short distance ambulation with a hemiwalker and was independent with wheelchair mobility. She was recommended for home care services for follow-up therapy and assistance from a home health aide.
Review questions
1. What options can an occupational therapist consider if existing doorways are too narrow for a wheelchair?
2. What issues does an occupational therapist need to address for a wheelchair-dependent patient recovering from stroke who is returning home?
3. What modifications should be considered to make bathrooms safe and accessible?
1. American National Standards Institute. Accessible and usable buildings and facilities. New York: The Institute; 2003.
2. AOTA. AOTA’s societal statement on livable communities. Bethesda, MD: AOTA; 2008.
3. Sabata DB, Shamber S, Williams M. Optimizing access to home, community, and in workplace. In Radomski MV, latham CAT, editors: Occupational therapy for physical dysfunction, ed 6, Baltimore: Williams & Wilkins, 2008.