Infection Prevention and Control in the Hospital and Home
Upon completing this chapter, you should be able to:
1 List the stages of an infectious process.
2 Identify five ways to decrease the occurrence of health care–associated infections (HAIs).
3 Explain how Transmission-Based Precautions are used with Standard Precautions.
4 Describe how procedures for Airborne Precautions differ from those for Droplet Precautions.
5 Discuss the special requirements for Airborne Precautions when the patient has pulmonary tuberculosis.
6 List techniques for handling of specimens; disposal of dirty linen, trash, and sharps; and the cleaning of equipment in the isolation setting.
7 Compare infection prevention and control procedures appropriate for the hospital with those used in the home.
8 Give three examples of nursing measures used to provide for the psychosocial care of a patient in isolation.
9 State the four rules of surgical asepsis.
1 Use Standard Precautions when caring for patients.
2 Utilize Transmission-Based Precautions when caring for patients.
3 Properly bag and remove soiled linens and trash from an isolation room.
4 Demonstrate performance of a surgical scrub.
5 Teach a patient or family member how to properly dispose of soiled items at home.
Airborne Precautions (p. 237)
Contact Precautions (p. 237)
convalescent (p. 235)
Droplet Precautions (p. 237)
health care–associated infections (HAIs) (p. 235)
human immunodeficiency virus (HIV) ( , p. 236)
impervious (p. 236)
incubation period ( , p. 234)
infection prevention and control (p. 235)
isolation ( , p. 235)
leukocytosis (le , p. 235)
malaise ( , p. 235)
prodromal period ( , p. 235)
Standard Precautions (p. 236)
Transmission-Based Precautions (p. 236)
This chapter will build on concepts learned in Chapter 16, including how microorganisms are spread, the body’s defense mechanisms against infection, and the use of Standard Precautions, including hand hygiene and personal protective equipment (PPE), to protect both patients and health care workers from disease-causing organisms.
INFECTION
Infection occurs when pathogenic microorganisms invade the body and multiply. There are four stages in the infectious process: the incubation period, prodromal period, illness period, and convalescent period. The length of each is influenced by many factors, including the organism itself, the overall health of the host, and the environment in which infection has occurred.
The incubation period begins when the organism firsts enters the body and lasts until the onset of symptoms. During this period the organism multi plies, and the duration of the period varies depending on the type of microorganism. In many viral diseases, the infection can be transmitted during the incubation period.
The prodromal period is the short time from the onset of vague, nonspecific symptoms to the beginning of specific symptoms of infection. The patient may be irritable and experience fatigue, malaise (not feeling “right”), and elevated temperature. This period lasts a few hours to a few days. Microorganisms are most likely to be spread during this highly infectious stage. Typically, precautions against spreading the infection are not taken because people do not realize that they are ill until the more specific symptoms of infection appear.
During the illness period, localized and systemic signs and symptoms appear. The individual may have fever, headache, and malaise. Other specific signs of infection may be detected, such as rash, swollen lymph nodes, leukocytosis (increased white blood cells), purulent wound exudate, diarrhea, and vomiting. The severity of the symptoms and the duration of the illness depend on the virulence of the pathogen and the person’s susceptibility to the causative microorganism. It is in this phase that people perceive they are ill and may seek professional care.
The convalescent (recovery) period begins when the symptoms begin to subside and extends until the patient has returned to a normal state of health. This can take days to weeks, depending on the microorganism and the overall state of health of the affected individual.
HEALTH CARE–ASSOCIATED INFECTIONS (HAIs)
Infections that are transmitted to a person while receiving health care services are called health care–associated infections A health care worker can also contract an HAI (e.g., head cold, flu, staphylococcal skin infection). The Centers for Disease Control and Prevention (CDC) estimate that HAIs just in hospitals cause at least 2 million infections, 90,000 deaths, and $4.5 billion in excess health care costs annually.
Many invasive procedures predispose patients to infection either because the integrity of the skin or mucous membrane is altered, or because an illness reduces the body’s ability to defend itself against invading microorganisms. Patients at greatest risk for HIAs include those with
• Surgical incisions with or without drains
• Artificial airways, including endotracheal tube or tracheostomy
• Intravenous (IV) lines, particularly central venous or arterial lines
• Implanted prosthetic devices (such as heart valves, vascular grafts, or orthopedic joints, rods, and screws)
• Repeated injections or venipunctures for lab specimens
• Immune compromise from such things as chemotherapy, HIV, or long-term steroid use
INFECTION PREVENTION AND CONTROL
Infection prevention and control uses medical and surgical asepsis, Standard Precautions, and Transmission-Based Precautions to prevent or control the spread of microorganisms. The strict use of aseptic technique for all diagnostic and therapeutic procedures involving the use of catheters, IV therapy, endotracheal and tracheostomy tubes, drainage tubes, and wound care reduces the incidence of HAIs. Health Promotion Points 17-1 presents some specific ways to help avoid HAIs in your patients. The current guidelines for infection precautions are delineated in Box 17-1 on p. 237. Isolation is a means of preventing contact between a patient and others to prevent the spread of infection. Emphasis is placed on containing microorganisms and preventing their spread.
Infection prevention and control involves the following:
• Monitoring diagnostic reports related to infection
• Observing patients for signs of infection
• Implementing procedures to contain microorganisms when infection is suspected
• Properly handling, sterilizing, or disposing of contaminated items and equipment
• Utilizing approved sanitation methods
• Recognizing individuals at high risk for infection and implementing appropriate protection
The infection prevention and control practitioner receives a report from the laboratory every time a culture is performed for an infectious organism. A report is also sent from the nursing unit whenever a patient is identified as having an infectious disease or local infection. Appropriate precautions are then initiated for the type of organism present. The practitioner also investigates all HAIs, looking at possible causes, including breaks in the use of approved precautions; and provides ongoing education regarding infection prevention and control for the health care staff.
Infection prevention and control techniques have undergone many changes over the past three decades. In the United States, current precautions are based on guidelines and regulations developed by the CDC and the Occupational Safety and Health Administration (OSHA). Initially, isolation techniques focused on hospitalized patients, but the evolution of human immunodeficiency virus (HIV), hepatitis strains, and a variety of drug-resistant bacteria have caused a broadened focus. Infection prevention and control practices are now focused on protecting patients, health care workers, family members, and social contacts in all settings.
There are two premises underlying the current system of isolation. One is that infection may be present before the diagnosis is made. The second is that the greatest risk of transmitting infection from most organisms comes from direct contact with the organism by the caregiver’s hands or equipment and supplies that have been soiled by blood, body fluids, and other potentially infectious materials. It is known that all body substances may harbor microorganisms and be infectious, and contact with body substances must therefore be avoided.
Current standards consist of two tiers developed by the Hospital Infection Control Practices Advisory Committee (HICPAC) of the CDC. Tier 1 is Standard Precautions, and Tier 2 is Transmission-Based Precautions. Standard Precautions delineate methods for avoiding direct contact with all body secretions except sweat, whether or not visible blood is present. This includes the mucous membranes and all nonintact skin. Standard Precautions were presented in Box 16-3. Transmission-Based Precautions are based on interrupting the mode of transmission by identifying the specific secretions, body fluids, tissues, or excretions that might be infective. Transmission-Based Precautions are used alone or in combination but are always used in addition to Standard Precautions. Box 17-1 lists Transmission-Based Precautions requirements.
CDC and OSHA guidelines have also brought about the development of needleless IV connection systems, and syringes with readily activated protective shields to cover needles immediately following use. These systems decrease opportunities for needle-stick injuries, one of the major factors in health care worker exposure to pathogenic organisms. Use of these devices has significantly reduced the number of needle-stick injuries.
Although Standard Precautions and Transmission-Based Precautions can seem overwhelming at first, the concepts are actually relatively simple. For example, never touch with bare hands anything that contains fluids from a body surface or cavity. Gloves are worn for all contact with body fluids of any sort, including blood, saliva, urine, and feces. The only time gloves are not worn is for contact with intact skin or unsoiled articles. Hand hygiene is performed well and often, paying close attention to areas around and under the fingernails and between the fingers.
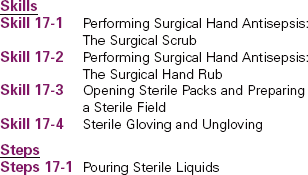
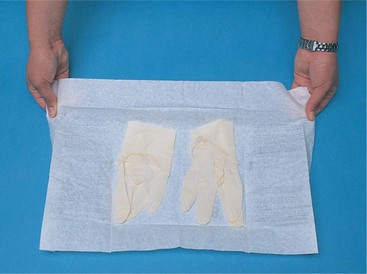
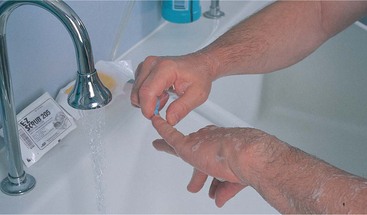
Another precaution is the wearing of impermeable gowns when clothing may become soiled with body substances while providing patient care. Masks are worn when contact with respiratory droplet secretions is anticipated, and during suctioning. Protective eyewear is added when there is the possibility of splashing body fluids. All sharps are to be disposed of in puncture-resistant containers located in the patient’s room, with the protective shield activated before disposal. Trash and used linens are placed in impervious, or moisture and particle-proof, plastic bags (Figure 17-1).
APPLICATION of the NURSING PROCESS
At the first encounter with the patient, assess for signs of infection that may require Transmission-Based Precautions. Wounds should be assessed each shift for signs of infection. Monitor the patient’s temperature. Admission lab studies may also give indications of possible infection, such as an increased white blood cell count or a urinalysis that is positive for bacteria. If cultures are ordered, check the reports to see if any microorganism has been identified. Frequent voiding of small amounts, pain on urination, or a decrease in overall output may also indicate infection.
Nursing Diagnosis
The nursing diagnosis would be Infection, risk for, related to surgical wound, open wound, or weakened condition.
Planning
Expected outcomes would include “No health care–associated infection is evident.” When using Transmission-Based Precautions that require putting on personal protective equipment, you must prepare before each entry into the patient’s room. For example, will you need more linen? Are all the dressing supplies in the room? Does the patient need pain medication? Are there routine medications due at this time? Is there ice and drinking water in the room? Speaking to the patient in advance via the intercom can help ensure you will have everything necessary when you don your protective clothing and enter the room.
Implementation
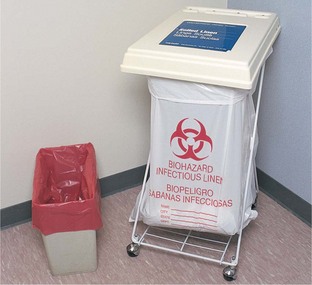
A patient with an infection will need teaching about the disease process, modes of transmission, and precautions necessary to prevent spread of the infection (Nursing Care Plan 17-1). Standard and Transmission-Based Precautions will need to be explained.
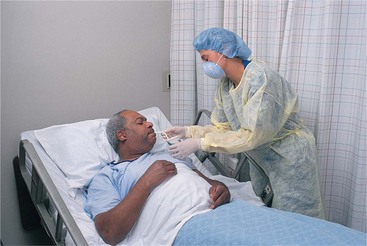
NURSING CARE PLAN 17-1 Care of the Patient Under Airborne Precautions
Doug Gamble, age 18, has pulmonary tuberculosis. He is in a private isolation room. It is his second day of hospitalization. He has just told the nurse he is feeling rejected because everybody wears a mask when they come in to see him.
Does not understand infection precautions/Knowledge, deficient related to infection and mode of transmission.
Supporting Assessment Data Subjective: States he can’t understand why he has to stay in his room and why people have to wear masks to visit. Objective: PPD skin test positive. Sputum culture positive for acid-fast bacilli. Radiologic studies: cavitations in apex of right lung. Medical diagnosis: Active pulmonary tuberculosis.
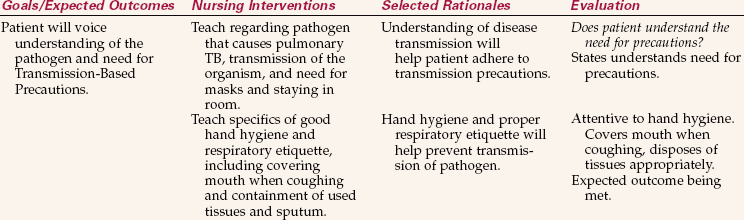
Under visitor precautions/Social interaction, impaired related to transmission precautions. Supporting Assessment Data Objective: In private isolation room for Airborne Precautions. Visitors must wear a mask when in the room. No visitors except parents since admission.

Standard Precautions are to be used for each contact with every patient, regardless of whether or not infection is known to be present. Transmission-Based Precautions are implemented based on the individual patient’s infection status.
Hand Hygiene
Hand hygiene is the most important action in preventing the transmission of infection. Guidelinesfor cleaning one’s hands were presented in Chapter 16. Hand hygiene is required before and aftercontact with a patient, wound care, or any invasive procedure.
Frequent hand hygiene is performed when caring for patients susceptible to infection. Patients with decreased immune status are often placed in protective isolation to reduce exposure to infectious organisms. People providing care for these individuals must wear gowns, gloves, and masks, and the patient needs to be in a private room. Specific guidelines vary with the facility and the degree of immune deficiency. Know and follow your agency’s policies and procedures.
Hand hygiene is to be performed before donning gloves and after removing them. Although tasks such as interviewing the patient do not require hand hygiene, if a patient is coughing or sneezing during the interview, hand hygiene should be performed before leaving the room (Safety Alert 17-1).
Personal Protective Equipment
Standard Precautions guidelines state when personal protective equipment (PPE) is to be worn (see Chapter 16). Clean disposable gloves are used for most general care, such as bathing, perineal care, IV site care, and most dressing changes. Masks are worn when working within 3 feet of a patient under Droplet Precautions. (Refer to the companion CD-ROM for Nursing Care Plan 17-2: Care of the Patient Under Droplet Precautions.) The nurse who is coughing should wear a mask when in contact with patients. CDC guidelines state that if full PPE is required, it is donned in the following order: gown, followed by the mask or respirator, then goggles or face shield, and finally gloves. The sequence for removing PPE is gloves, followed by face shield or goggles, then the gown, and finally the mask or respirator. Skill 16-2 shows the correct procedure for putting on a gown and mask. Skill 17-4 on pp. 253–255 shows the correct procedure for putting on and removing sterile gloves. Hand hygiene is always performed after removing gloves or any combination of PPE.
Skill 17-2 Performing Surgical Hand Antisepsis: The Surgical Hand Rub
The surgical hand rub is an approved alternate method for removing dirt, skin oil, and microorganisms from the hands and lower arms, and to reduce the microorganism count to as near zero as possible. Antiseptic residue remains on the skin to prevent the growth of microorganisms for several hours.
A surgical hand rub is performed before entering the operating room, the labor and delivery area, the newborn nursery, or the NICU. The rub is repeated prior to the next surgical procedure or delivery, or any time that the hands become contaminated. It uses an antimicrobial agent that is at least 60% alcohol.

Review and carry out the Standard Steps in Appendix 3
1. ACTION Determine whether all supplies needed are available before beginning.
RATIONALE Missing supplies can mean interrupting the scrub to collect them, and then having to start the scrub over.
2. ACTION Remove rings and watch.
RATIONALE These items are unsterile and cannot be worn during a sterile procedure. Fasten them with a large safety pin inside a pocket of your scrub clothes on the front of the scrub shirt or gown. Jewelry harbors microorganisms. No objects may be touched after beginning the surgical scrub.
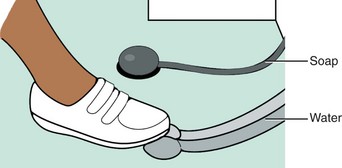
3. ACTION Adjust the water to a comfortable temperature using the foot control.
RATIONALE The water remains running during the prewash and should be comfortably warm.
4. ACTION Wash hands and forearms arms thoroughly with antimicrobial soap and running water; cleanse under nails with nail stick.
RATIONALE Removes surface soiling and dirt that might provide a barrier for microorganisms.
5. ACTION Rinse hands and arms under running water with hands held above the elbows. Dry thoroughly with paper towels.
RATIONALE Removes soil loosened in the washing process without washing the soap down over the hands and possibly carrying microorganisms from the upper arms to the hands. Excess water on the skin may interfere with the action of the rub solution.
6. ACTION Dispense the antiseptic rub onto the palms using the dispenser foot control and spread over hands and arms per manufacturer’s instructions, which may vary depending upon the product. Make sure that all surfaces are fully covered, paying particular attention to the thumbs and fingers. Rub with the hands over all surfaces until they are dry. Begin rub at the fingers and end 2 inches above the elbows. Hold hands above the elbows and the arms away from the body.
RATIONALE For the product to effectively reduce microorganisms, it must dry on the skin surfaces being disinfected. Working from the fingertips to the upper arms prevents carrying microorganisms or soil downward to the hands. Positioning the hands above the elbows and the arms away from the body prevents contamination from touching your body or the sink or countertop.
7. ACTION When the rub is dry, proceed immediately to the operating or procedure room to gown and glove. Keep the arms and hands above waist level and away from the body with the hands and fingers pointed up when moving from room to room.
RATIONALE This keeps the hands and arms visible, preventing contamination by accidentally brushing against the body, doorway, or other personnel or surfaces.
8. ACTION Ask yourself the following questions: Did the hands refrain from touching any part of the sink or counter during the washing and rub? Were the hands higher than the elbows throughout the process? Was each hand and arm rubbed until the surface was fully dry? Were the hands and arms in full view and kept away from contact during the movement from the scrub area to the procedure/operating room?
RATIONALE If the answer is yes to all of the questions, the rub is complete. If contamination occurred, the rub is done over from the beginning.
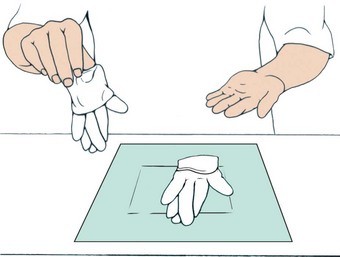
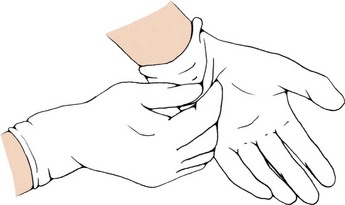
Skill 17-4 Sterile Gloving and Ungloving
Sterile gloves are used for performing sterile procedures and handling sterile equipment and supplies. Sterile gloves are to be removed and replaced any time they become contaminated when performing a sterile procedure.
Review and carry out the Standard Steps in Appendix 3.
1. ACTION Determine what size gloves are needed.
RATIONALE Gloves should fit snugly, but not be so tight that they are extremely difficult to put on.
2. ACTION Select a clean, flat, dry surface above waist level on which to open the glove package.
RATIONALE Glove package should remain stationary and easily accessible while putting on the gloves to decrease chance of contamination from contact with surface of table. A wet surface will contaminate the gloves.
3. ACTION Place the package of correctly sized gloves on the flat surface. Perform hand hygiene.
RATIONALE Hands must be clean and dry before gloving to reduce the transfer of microorganisms.
4. ACTION Peel open the outside wrapper, exposing the sterile glove package.
RATIONALE The outer package keeps the inner pack sterile until opened.
5. ACTION Position the package so that the designation of right (“R”) and left (“L”) is visible right side up if this is indicated on the package.
RATIONALE This places the gloves in correct association with the right and left hand, facilitating proper gloving. Some gloves can be used on either hand; those packages will not be marked R and L.
6. ACTION Use sterile technique, and open the glove package, handling only the outer wrapper. Handle the wrapper by the underneath part of the folded-back flaps. Pinch the corners of the flaps after pulling them open so that they remain open.
RATIONALE Handling the outside of the wrapper only prevents contamination of the inner surface and the gloves. Allowing the wrapper to fall back on the gloves contaminates them.
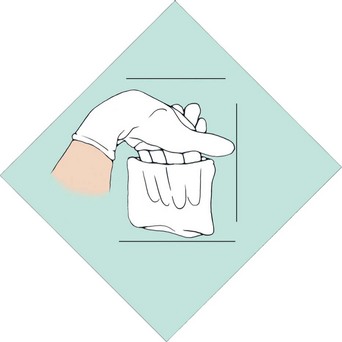
7. ACTION Pick up one glove by slipping the thumb into the opening and grasping the glove with the thumb and fingertips at the folded-over cuff edge, and lift it up at least 12 inches off the wrapper, being careful not to touch the glove to yourself or any surrounding objects.
RATIONALE Only the inside of the glove, which will be against the skin, is touched, leaving the outside sterile.
8. ACTION Insert the fingers of the other hand into the glove, and extend and hold the fingers slightly apart. Pull the cuff outward as you slip your hand into the glove.
RATIONALE Touching only the inside surface of the glove prevents contaminating the outside sterile surface.
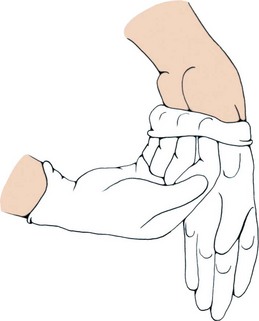
9. ACTION Pick up the second glove by placing the (sterile) gloved fingers under the cuff fold; slip the bare hand into the glove, being careful not to touch the outside of the glove or the other gloved hand with your bare skin. Once the hand is settled in the glove, slide the glove cuff up carefully over the wrist.
RATIONALE Keeping the gloved fingers under the folded-over cuff of the second glove prevents the gloved hand from being contaminated by bare skin as the second glove is pulled on. Sliding up the cuff covers the exposed skin of the wrist.
10. ACTION Adjust the fingers in the gloves as needed by pulling the glove fingers out with the opposite hand to straighten them and allow the proper finger to enter the space.
RATIONALE Fingers must be situated correctly to permit hand dexterity while performing the procedure.
11. ACTION When finished with the sterile procedure, unglove by grasping the outside surface of one glove about 2 to 3 inches below the cuff edge with the opposite gloved hand.
RATIONALE Grasping the glove in an area away from exposed skin prevents contaminating the skin with the now contaminated glove.
12. ACTION Pull the glove off the hand while turning it inside out, and rolling it into the palm of your other gloved hand.
RATIONALE This technique prevents organisms on the contaminated gloves from coming into contact with your skin.
13. ACTION Still holding the first glove in the remaining gloved hand, place the fingers of your ungloved hand under the cuff of the remaining glove next to your skin. Slide the glove off, turning it inside out as you remove it.

RATIONALE Touching only the skin of the hand with your bare hand prevents contaminating yourself with the outside of the now contaminated glove. The first glove’s contaminated surface is now encased in the second.
14. ACTION Dispose of the contaminated gloves in the proper receptacle.
RATIONALE Because the contaminated surfaces of the gloves are on the inside of the gloves, they can be discarded in the trash.
15. ACTION Perform hand hygiene.
RATIONALE This removes glove powder, if present, and removes any organisms that might have traveled through the gloves. Hand hygiene after removing gloves is required by Standard Precautions.
16. ACTION At all times during the wearing of sterile gloves, ask yourself: Have I touched a glove surface to an unsterile object? Have my gloved hands dropped below waist level? Do I need to reglove?
RATIONALE If hands drop below waist level, they are considered contaminated because they are generally out of the field of vision.
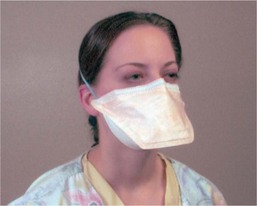
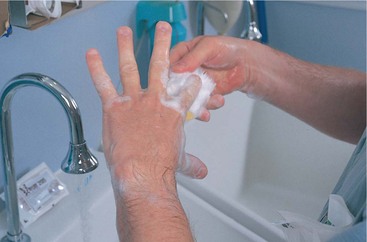
When the patient has known or suspected pulmonary tuberculosis, a special particulate filter mask called an N95 mask must be worn (see Figure 16-5, C). The same type of mask is used when caring for patients with known or suspected rubeola or varicella unless the nurse is immune to these diseases (Figure 17-2).
General Guidelines for Isolation Precautions
Specimen Preparation and Transportation.: Label the specimen container with the patient’s name and medical record number plus the type of specimen before entering the patient’s room. Place the label on the container itself, not the lid, because once the lid is removed in the lab, the specimen is unlabeled. Collect the specimen and carefully place it in the leak-proof container without contaminating the outside of the container. Be sure the lid is fully tightened. Clean or disinfect containers that are visibly contaminated before sending them to the laboratory. Both OSHA and the Clinical Laboratory Improvement Act (CLIA) require that specimens be transported to the laboratory in a plastic bag marked “Biohazard.”
Linens.: Soiled linen is handled as little as possible. Roll it up and place it inside the patient’s linen hamper in the room. When the bag is two-thirds full, tie it closed and send it to the laundry according to agency policy. Double bagging is not necessary.
Trash.: Disposable soiled equipment and supplies are placed inside the plastic bag lining the waste receptacle in the patient’s room. Red bags marked with a biohazard symbol are for biohazardous waste only. Ordinary trash is to be placed in standard trash bags and disposed of in the routine manner. Biohazardous waste requires special disposition that is very costly, and non-biohazardous trash should never be mixed in with it. The bag is sealed when it is two-thirds full, removed, and sent to waste collection. The only time double bagging is necessary is if the plastic bag is soiled on the outside. In this instance, another nurse standing just outside the room doorway holds open a second plastic bag, placing her hands under the edge of the bag, which is folded outward to cover the nurse’s gloved hands. This further protects her hands from soiling. The nurse in the patient’s room then places the first bag carefully inside the second one. The nurse outside the room ties the bag closed, being careful not to touch the inner first bag.
Sharps.: Needles are not to be recapped before disposal. All used needles, scalpel blades, IV cannulas, suture needles, and other sharp items are dropped into a puncture-resistant sharps biohazard container. Never put your fingers inside the opening of the sharps container. Shake the container gently to settle the contents and make more room if necessary. Sharps containers should be replaced when they are two-thirds full. The full sharps container is sealed and sent to the biohazard waste storage area for later removal.
Federal policy and The Environment of Care guidelines of the Joint Commission require that sharps containers be secured in patient care areas, and that holding areas for biohazards must be accessible by staff only.
Other Equipment.: Reusable equipment is cleaned if it is visibly soiled and then sent to central supply to be disinfected. A stethoscope and blood pressure cuff are issued to the isolation patient, and only these are used within the isolation room. When the patient is discharged, these items are returned to central supply for disinfection as needed. No special treatment is necessary for dishes. Some agencies use paper dishes and trays for patients under Transmission-Based Precautions but this is not a CDC requirement. Box 17-2 presents other general principles.
Natural Defenses.: You should institute measures to protect and enhance the natural body defenses of the patient. These defenses were discussed in Chapter 16. In particular, you should protect intact skin and mucous membranes, promote a balanced diet and sufficient fluids, provide opportunity for adequate sleep and rest, and decrease stress as much as possible.
Patient Placement.: A patient in need of Transmission-Based Precautions is usually placed in a private room. An exception can be made if another patient has the same type of infection. Then they can be cohorted in the same room. If the patient is under Airborne Precautions, a private room with negative air flow or a portable HEPA (high-efficiency particulate matter) filter machine is essential. The door to the room must remain closed except when someone is entering or leaving. This helps ensure the organism remains contained and does not enter the rest of the unit. Box 17-3 presents recommended isolation precautions for hospitals.
Transporting the Patient.: Transporting the isolation patient is avoided unless absolutely necessary. If transporting is unavoidable, the patient is given a standard mask to wear while out of the room. For a patient under Droplet Precautions, measures are taken to prevent soiling of the environment. The unit or department receiving the patient must be notified ahead of time that a patient under this particular type of Transmission-Based Precautions is coming to the area. Information about any additional precautions required must be shared with those receiving the patient.
Infection Prevention and Control in the Home
The patient at home has less exposure to HAIs, but can still be at risk. The emphasis in the home environment is on containing pathogens and preventing transmission to health care personnel, caregivers, and others in the household. The home health nurse must teach patients and families to dispose of dirty supplies in a safe manner.
When the patient has an infection, care should be taken that his towels, sheets, and clothes are kept away from contact by others until they can be washed. The patient’s clothing and linens can in most cases be laundered with the rest of the household wash. Washing in warm water with standard laundry detergent is usually sufficient. Items should be thoroughly dried prior to use, either in a dryer or outside in the sun.
The patient is taught to perform correct hand hygiene and to dispose of any paper towels or facial tissues in an appropriate container. Other family members must be instructed to perform hand hygiene frequently as well. The bathroom should be cleaned daily with standard household chemicals or a 1:10 solution of chlorine bleach and water. Dishes should be washed on the hot cycle of the dishwasher or soaked in scalding water after washing and allowed to air dry. The patient’s laundry should be washed separately, using hot water and bleach if possible.
Soiled dressings and wound care supplies should be disposed of in plain, unlabeled plastic bags that are tied up securely and stored in an appropriate trash receptacle for pickup with the rest of the household trash. Trash marked with the biohazard symbol cannot be placed in the household trash pickup. Handling or transporting biohazard trash requires special permits.
A heavy plastic jug with a secure top can be used to contain needles and syringes and other sharp objects used in the patient’s care. Placing a 1:10 solution of chlorine bleach and water in the container helps kill microorganisms. Disposal of the jug is subject to local regulations in the city, county, or province where the patient lives.
Clean gloves are used for wound care unless there is an order for sterile dressing changes. Patients and family members should be taught to properly remove and dispose of contaminated gloves. It should be stressed that hands are to be cleansed before putting on gloves, and again after the gloves are discarded. Reinforce that gloves should not be reused.
The patient’s room should be cleaned frequently, with dust kept to a minimum. Fresh air should be allowed to circulate in the room. Sunshine through the windows can elevate the patient’s mood and decrease the presence of some microorganisms. Trash, news-papers, and clutter should be kept to a minimum to discourage transfer of microorganisms. Clean sup-plies should be kept in one area, well away from any contaminated items or trash (Home Care Considerations 17-1).
Protective Isolation
When a patient is immunocompromised, it is very important to protect him from exposure to potential pathogens. The patient is placed in a special isolation room with its own ventilation system. No one with an active infection is allowed in the patient’s room. Until recently, the degree of isolation was as absolute as possible, extending even to sterile dishes and having anyone who entered wear full protective equipment. Recent studies in major medical centers throughout the world are indicating that environments can be less stringent without increasing the rates of HAIs, and that PPE is not required for routine entry into the room. It is important, therefore, to remain aware of your facility’s policies and procedures regarding protective isolation and to follow them at all times (Figure 17-3).
Psychological Aspects of Isolation
The patient in Transmission-Based Isolation precautions is at risk for both decreased self-esteem and sensory deprivation. This is particularly true for young children, who under normal circumstances are rarely alone, and are often used to highly stimulating and entertaining environments. The elderly, too, can find isolation particularly trying, and it may lead to confusion secondary to the lack of normal stimulation and interaction. Assessment for sensory deprivation needs to be ongoing. The signs can include boredom, slowness of thought, disorganized thoughts, excessive sleeping during the day, anxiety, hallucinations, or panic attacks.
Having visitors at intervals can be very helpful in preventing sensory deprivation. They can talk with the patient about interests they share, and a visitor at mealtime often encourages improved nutritional intake by making mealtime more enjoyable. The nurse should learn about the patient’s interests and provide appropriate activities. These can include games, books, puzzles, phone calls, radio or TV, a video, or a craft project. However, avoid overtiring the patient by also allowing periods of rest between activities.
Sensory deprivation may occur if visitors are intimidated by the isolation precautions. There may be decreased interaction with the health care team because of the need to put on personal protective equipment to enter the room. All of this can lead to a loss of self-esteem because the patient begins to feel that he is somehow unclean or unworthy of attention.
Listen to the patient’s feelings. Make positive comments on efforts at grooming or self-amusement (Cultural Cues 17-1). Try to engage the patient in conversation that is meaningful by asking about particular interests or hobbies. Assisting visitors to feel welcome and to understand that the patient benefits greatly from their presence can also help. Addressing self-esteem needs is very important for complete recovery.
Infection Prevention and Control for the Nurse
OSHA regulations protect health care workers from occupational exposure to blood-borne pathogens in the workplace. In Canada, the Occupational Health and Safety Act addresses worker safety. The three main modes of occupational exposure to blood-borne pathogens are as follows:
• Puncture wounds from contaminated needles or other sharps
• Skin contact, allowing blood, body fluids, and other potentially infectious materials to enter through damaged or broken skin
• Mucous membrane contact, allowing infectious materials to enter through the mucous membranes of the eyes, mouth, and nose
Actions that decrease the nurse’s risk for infection include good hand hygiene and other general medical asepsis techniques, the wearing of personal protective equipment, using needleless IV equipment and needles with guards, and avoiding carelessness in the clinical area.
It is also recommended that health care workers be immunized if they are not shown to have an active immune status to certain diseases. These include hepatitis B, influenza, mumps, measles, rubella, varicella (chickenpox), tetanus, diphtheria, pertussis, and meningococcal disease.
Surgical Asepsis
Surgical asepsis is another method used to prevent infection. Surgical asepsis is practiced in the operating room, obstetric areas, special diagnostic areas, andfor procedures such as administering injections, changing wound dressings, performing urinary catheterization, and administering intravenous therapy. In the operating room, strict surgical asepsis is practiced, and head coverings, sterile gowns, masks, and gloves are worn. To perform a sterile dressing change outside the operating room, sterile gloves, a mask, and a sterile field are used. Talking during the dressing change is discouraged.
The four rules of surgical asepsis are as follows:
The goal in surgical asepsis is to keep an area free of microorganisms. You must constantly be aware of which items and areas are sterile, clean, or contaminated to maintain surgical asepsis. The importance of maintaining sterility must become ingrained, and you must consistently maintain principles of surgical asepsis to protect the safety of patients (Box 17-4). By being constantly sensitive as to what is sterile, what is clean, and what becomes contaminated, breaks in sterile technique are caught and rectified before microorganisms are transferred to the patient.
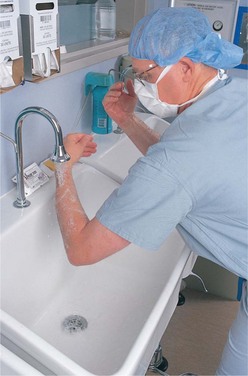
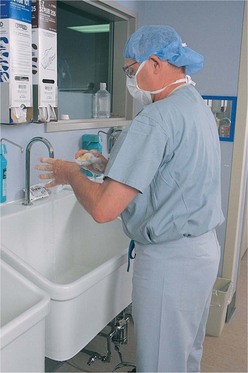
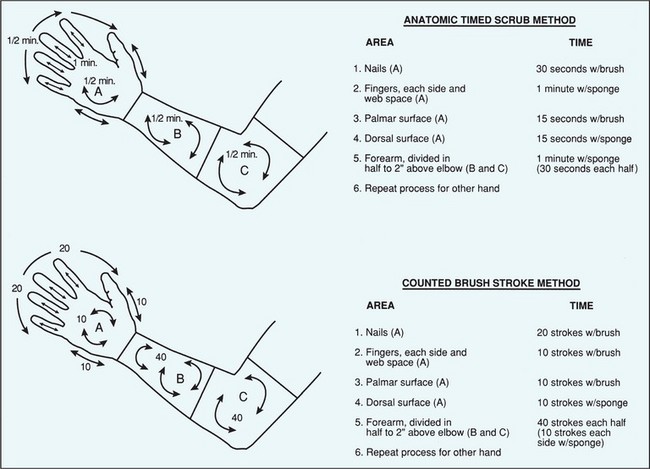
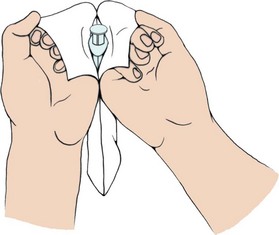
Surgical Scrub.: The surgical scrub is more lengthy and vigorous than normal handwashing. Its purpose is to remove as many microorganisms as possible without damaging the skin of the hands. Skill 17-1 presents the steps for the traditional surgical scrub. Water, a nail stick, an antiseptic agent, a scrub brush or sponge pad, and friction are used to mechanically cleanse the hands and forearms. The scrub begins at the hands and ends 2 inches above the elbows. All rinsing is done under flowing water, not in a container of water (Figure 17-4). The timing for the scrub does not include the rinsing time. Some agencies allow the use of the counted-stroke method of scrubbing rather than by-the-clock timing (Figure 17-5). Current standards regarding the time for the traditional scrub are based on the recommendations of the antiseptic agent manufacturer, and consequently the recommended time varies from one agency to another, depending on the product in use. A 2- to 4-minute scrub is average.
Skill 17-1 Performing Surgical Hand Antisepsis: The Surgical Scrub
The purpose of the surgical hand scrub is to remove dirt, skin oil, and microorganisms from the hands and lower arms and to reduce the microorganism count to as near zero as possible. The antiseptic residue remains on the skin to prevent the growth of microorganisms for several hours. A timed scrub is performed for the interval recommended by the manufacturer of the antiseptic agent used. Some agencies may allow a counted-stroke scrub.
A surgical scrub is performed before entering the operating room, the labor and delivery area, the newborn nursery, or the neonatal intensive care unit (NICU). The scrub is repeated prior to the next surgical procedure or delivery, or any time that the hands become contaminated. A 5-minute scrub is presented here.
A brushless surgical scrub using an antimicrobial agent that is at least 60% alcohol may be substituted in some hospitals for the traditional surgical hand scrub (see Skill 17-2).
Review and carry out the Standard Steps in Appendix 3.
1. ACTION Determine whether all supplies needed are available before beginning.
RATIONALE Missing supplies can mean interrupting the scrub to collect them, and then having to start the scrub over.
2. ACTION Remove rings and watch.
RATIONALE These items are unsterile and cannot be worn during a sterile procedure. Fasten them with a large safety pin inside a pocket of your scrub clothes on the front of the scrub shirt or gown. Jewelry harbors microorganisms. No objects may be touched after beginning the surgical scrub.
3. ACTION Adjust the water to a comfortable temperature using the foot control.
RATIONALE The water remains running during the scrub and should be comfortably warm.
4. ACTION Wet your hands and arms from above the elbows to the fingertips, with the hands kept higher than the elbows throughout the scrub.
RATIONALE Moisture will aid the formation of the cleansing lather. Keeping the hands higher than the elbows prevents microorganisms from draining over the cleansed hands.
5. ACTION Dispense the soaping agent onto the palms using the dispenser foot control and rub hands together to work up a lather. Clean the fingernails with a nail stick. Wash the hands and forearms to a point at least 2 inches above the elbow.
RATIONALE The soaping agent assists in cleaning dirt from under the nails.
6. ACTION When using a prepackaged scrub brush or sponge pad, open the package, remove the nail cleaner, and clean the nails. The nail stick is held until the nails have all been cleaned, and then it is discarded. Remove the brush or pad from the package and discard the package. Do not set down the brush or pad once the scrub is begun. If the brush or sponge pad is not impregnated with the cleansing agent, moisten the brush or pad and dispense the antiseptic agent onto it.
RATIONALE Putting the brush or pad down during the scrub contaminates it. It must remain in the hands until the scrub is complete, then discarded.
7. ACTION Start at the fingertips and, with a circular motion, work around each finger and between each finger, holding the scrub brush or sponge pad perpendicular to the fingers and nails. Use light to moderate friction. Scrub the back of the hand, the palm, and then the wrist with circular strokes. Scrub each hand and arm for 2½ minutes. Care should be taken to not abrade the skin.
RATIONALE Achieving the desired degree of skin asepsis requires an extended cleansing time. Excessive pressure can injure the skin and should be avoided.
8. ACTION Continue up the arm to the elbow using circular scrub strokes on all surfaces, holding the brush or sponge pad parallel to the arm.
RATIONALE Dirt and microorganisms need to be removed from portions of the arm that will be working in the surgical field even though these skin areas will be covered by a sterile gown and sterile gloves.
9. ACTION Rinse each hand and arm thoroughly, holding the hand above the level of the elbow and allowing the water to run from the fingertips down the hand to the wrist, then the forearm, and off the elbow area.
RATIONALE Maintains the hands as the cleanest area by not rinsing dirt from above over them.
10. ACTION Turn off the faucet using the foot control.
RATIO NALE Prevents contamination of the hands from the faucet handle. Maintains the sterility of the scrub.
11. ACTION Dry the hands with a sterile towel. Step away from the sterile field, lean slightly forward from the waist and unfold the towel, holding it by a corner and allowing it to unfold downward. Do not let the towel reach below waist level, or to come in contact with the body or any object in the room.
RATIONALE When the towel is taken from a sterile field, it is lifted straight up and away from the sterile field, which keeps water from dripping on the sterile field. Maintaining the arms and hands above waist level and the hands above the elbows protects the scrubbed area. The hands are dried away from the sterile field. When working in the operating room or delivery room, the hands are dried upon entering that room.
12. ACTION Keep the arms and hands above waist level and away from the body with the hands and fingers pointed up. Use the top half of the towel to blot the opposite fingers and hand dry, and move to the forearm. Use a rotary motion to move the towel from the forearm to the elbow. Do not go back over an area already dried.
RATIONALE Starting with the fingers, maintains the hands as the cleanest area. Moving back over an area previously dried contaminates it.
13. ACTION Grasp the lower end of the towel with the dried hand, and use the same procedure to dry the other hand and forearm. Discard the towel by dropping it into the proper receptacle when finished. Keep your hands and arms above waist level.
RATIONALE Touching a damp part of the towel with the dried hand will contaminate that hand. Gowning and gloving are done next.
14. ACTION Ask yourself the following questions: Did the hands refrain from touching any part of the sink during the scrub? Were the hands higher than the elbows throughout the scrub? Was each hand and arm scrubbed for a full 2½ minutes? Were the hands dried without breaking technique?
RATIONALE If the answer is yes to all of the questions, the scrub is complete. If contamination occurred, the scrub is done over from the beginning.
A newer brushless technique, which may be done with or without water, uses an antimicrobial agent that is at least 60% alcohol. This method was shown to be equally effective compared to a standard surgical scrub in a research study (Gruendemann & Bjerke, 2001). For the brushless scrub technique, 2 mL of antimicrobial agent are dispensed into the palm of one hand. With the fingertips of the opposite hand, some of the alcohol-based agent is worked under the nails. The remaining portion of the agent is spread over all surfaces of the hand and arm to just above the elbow. Another 2 mL of the antimicrobial agent is dispensed into the palm of the other hand and the procedure is repeated on the opposite hand and arm. There are variations in technique depending on the product used. Check the manufacturer’s directions for the correct technique. The hands and arms must be allowed to dry before gloving (Skill 17-2).
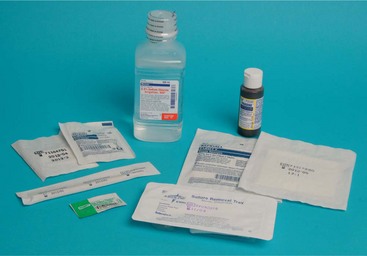
Opening Sterile Packs and Packages and Setting Up a Sterile Field.: Many sterile supplies are prepared commercially and are disposable or one-time use items. The package, set, or kit provides all the items commonly required in a variety of nursing procedures, such as catheterization, suture removal, dressing change, and irrigation. Individually wrapped items can be obtained to supplement the packs as needed.
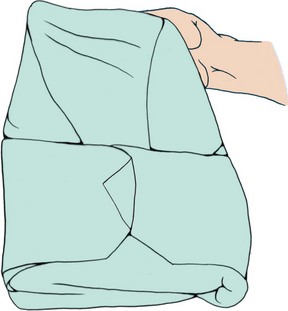
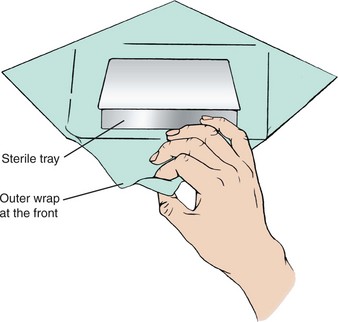
Packs and kits are opened by removing the outer plastic or paper covering, taking out the inner package, and aseptically unfolding the wrapper to form a sterile field (Figure 17-6). The principles of asepsis apply regardless of whether the package is disposable or a wrapped tray is prepared by the central supply department of the hospital. Skill 17-3 shows the steps for opening sterile packs and preparing a sterile field.
Skill 17-3 Opening Sterile Packs and Preparing a Sterile Field
When sterile procedures are to be performed, sterile equipment and supplies are set up on a sterile field. Commercial disposable sterile sets of equipment and supplies are available for most standard procedures. Hospitals also wrap reusable equipment and cloth towels in packs that are sterilized prior to use. Hospital-prepared sterile packs are dated and are returned for re-sterilization if not used by the expiration date. Check the date before using a hospital-prepared prepared sterile pack. Commercially prepared packs may also have expiration dates that need to be checked prior to use.
A sterile field is set up by using the inside of the wrapper on the sterile pack or by opening and draping a tabletop or instrument tray with sterile drapes and then placing the sterile items to be used on the field. The field is considered sterile to within 1 inch of its horizontal, or flat, border. The portion of the sterile drape that falls over the table or tray edge is always considered unsterile.
Review and carry out the Standard Steps in Appendix 3.
1. ACTION Select a dry tabletop or instrument tray that is above waist level.
RATIONALE Moisture can travel upward from the surface and contaminate the sterile field and supplies. Anything below waist level is considered contaminated according to principles of surgical asepsis.
2. ACTION Obtain the equipment tray and supplies to be used for the procedure and explain the procedure to the patient if appropriate.
RATIONALE Ensures that all needed equipment is on hand before scrubbing and gloving. Ensures patient is prepared for the procedure.
3. ACTION Perform hand hygiene.
RATIONALE Removes microorganisms.
4. ACTION Remove the plastic outer wrap, leaving the inner wrap in place. If a hospital-prepared pack does not have a plastic wrap, remove the tape holding it closed. When setting up a field at the bedside, the plastic wrapper can be used for discards. Place the pack so that the flap that opens to the back of the table is on top.
RATIONALE The outside of the sterile pack is not considered sterile and can be touched. The first flap is to be opened away from the nurse’s working area.
5. ACTION Facing the table, move to the far side and open the initial flap by lifting it upward away from the pack, then outward and down over the edge of the table. If the pack is small enough, this can be done by reaching around the pack and opening the distal flap rather than moving to the other side of the field.
RATIONALE Opening the distal flap first prevents contaminating the pack by reaching over the exposed sterile contents after the other flaps are opened.
6. ACTION With the left hand, move the flap on the left up and laterally away from the package. Pull edge down over the edge of the table. Then open the right flap with the right hand in the same manner. Be careful to touch only the outside of the wrapper and not to reach across any area of exposed sterile supplies.
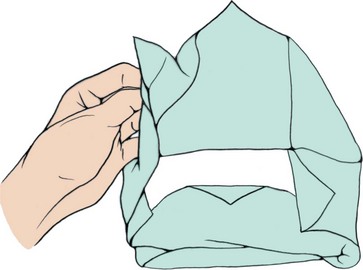
RATIONALE Maintains the sterility of the inside of the pack and its equipment and supplies. Pulling the drape edges downward over table edges ensures that the wrap does not fall back over the field and contaminate it.
7. ACTION Lift the front (proximal) flap up and toward you, handling only the outside of the wrapper or pull-tabs. If the entire pack is to be handed off to someone in sterile gown and gloves, grasp the contents firmly in one hand from the underside and pull each flap down over the hand that is grasping the contents of the package. Secure the flaps with your other hand when offering the pack contents to the sterile person who needs them. If the pack has an inner wrap, this is sterile and need not be opened before handing off the tray.
RATIONALE Maintains the sterility of the pack contents. Holding back the flaps prevents them from falling forward and touching the gloved hands of the sterile person, or the hands of the nonsterile person from touching the sterile gloves.
8. ACTION The inside of the outer wrap is used as the sterile field. Using gloves and/or sterile forceps, arrange the equipment and supplies on the sterile field in the order in which they will be used. Keep all items at least 1 inch from the edge boundary.
RATIONALE The inside of the wrapper that has not been touched is still sterile. Only sterile items may touch or move over the sterile field, or it will be contaminated. The outside 1-inch edge of the horizontal surface of the wrapper or field is considered contaminated because the edge is in contact with an unsterile surface or is hanging below waist level and subject to contact contamination. The entire field must remain dry to maintain sterility. You must continue to face the field. If your back is turned to the field or it is outside your line of vision, it is considered contaminated because it was not within your visual limits and something nonsterile could have fallen on it or touched it.
Adding Supplies or Equipment to the Sterile Field
9. ACTION Inspect the disposable package to see which edge is to be opened. Bring both hands together, and grasp the small flaps at the edge to be opened.
RATIONALE Establishes the grip to open the package at the intended point.
10. ACTION Peel the two parts of the package apart by turning the hands outward to separate the sealed edges.
RATIONALE Opens the package, exposing the sterile contents. Allows the sterile person to extract the sterile contents of the package without being contaminated, or allows you to gently toss the supply item or piece of equipment onto your sterile field without contaminating it.
11. ACTION Alternately, for supplies you will use yourself, after starting the peeling process, lay one side of the package flat on a clean, dry surface and peel the top part of the package all the way back.
RATIO NALE The bottom inside of the package serves as a sterile field until the item is used.
12. ACTION Perform the sterile procedure, maintaining the principles of surgical asepsis (see Box 17-4).
RATIONALE Any break in sterile technique contaminates the field, supplies, and equipment.
9/17 1435 Straight catheterization performed using sterile technique with 14-Fr catheter. No problems encountered; 190 mL clear, yellow urine drained; sterile specimen obtained.
 In the operating room, supplies are added to the field by being opened by the nonsterile (circulating) nurse and handed off to the sterile (scrub) nurse as described in point 10 above.
In the patient’s room, after the kit for a procedure is opened, extra supplies can be opened and positioned around the outside of the sterile field on their own wrappers, where they will be within reach.
When offering a peeled package of supplies, keep the opened flaps over your hands so that the sterile person will not touch your nonsterile skin or the nonsterile flaps
1. You have opened a sterile Foley catheter kit and are gloved. While cleansing the meatus (the hand touching the patient is now nonsterile, the hand with the swab is sterile), you accidentally contaminate the glove on your sterile hand. What do you do if you are there alone? What do you do if you have someone assisting you?
2. What do you do if a package of 4 × 4s you have opened and dropped into the field lands right at the edge of the field?
The principles to observe when opening sterile packages are as follows:
• Open the sterile package away from the body.
• Touch only the outside of the wrapper.
• Do not reach across a sterile field; go around the sterile field if necessary to reach the other side.
• Always face the sterile field, even when moving to the other side.
• Allow sufficient space (at least 6 inches) between the body and the sterile field.
Most sterile items are available as individually wrapped or separate items, such as sterile packages of cotton-tipped applicators, tongue blades, 4 × 4 gauze dressings, ABD (abdominal) dressings, alcohol swabs, syringes, needles, Foley catheters, sterile gloves, and intravenous catheters. Instructions often appear on the outside of the package directing you where to open it, indicating the direction in which to tear, or showing where to peel at a certain point. Follow these instructions to avoid contaminating the contents.
When sterile supplies have been brought to the patient’s bedside, they should never be returned to the unit stock shelves. The outsides of these items are contaminated, and returning such supplies carries organisms from the patient’s room back to the store of supplies for the unit. Do not stockpile supplies in the patient room to avoid costly waste.
The procedure for pouring sterile liquids is listed in Steps 17-1.
Sterile Gloving.: Sterile gloves must be used for sterile procedures. These gloves are made of various substances, including latex and nitrile, and are less permeable than the disposable plastic gloves. The method of donning and removing sterile gloves is presented in Skill 17-4.
Correcting Breaks in Asepsis.: Whenever it becomes apparent that a break in surgical asepsis has occurred, you must rectify the error. A scrub is begun again if the hands touch the sink, which is always considered contaminated; sterile gloves are discarded and new gloves donned when any part of a glove touches a nonsterile area or item. Sterile supplies are discarded or put aside for re-sterilization if they become contaminated, and new packs or packages are opened aseptically to replace them.
It is up to every nurse to point out breaks insterile technique that occur when others seem unaware that they have contaminated themselves or the sterile field. Surgical asepsis is used in every aspect of nursing.
Evaluation
If the patient is recovering without additional instances of infection from other organisms, or infection of other body areas with a resident organism, goals are being met. Evaluation also includes assessing whether the patient’s infection has been transmitted to any health care worker or any other patient on the unit or in the hospital. The infection prevention and control practitioner monitors for this and, if it occurs, usually works in conjunction with the unit manager to ensure that staff members are correctly implementing infection prevention and control procedures.
Infection prevention and control is the responsibility of each and every nurse. The principles and techniques learned here will protect you and your patients from harmful microorganisms.
NCLEX-PN® EXAMINATION–STYLE REVIEW QUESTIONS
Choose the best answer(s) for each question.
1. The nurse is delivering a meal tray to a patient who is under Droplet Precautions for bacterial pneumonia. Which articles of personal protective equipment (PPE) need to be worn?
2. The nurse is preparing to assist a patient with his bath. He has an infected, draining wound. What PPE would be required for these tasks? (Select all that apply.)
3. Which of the following steps are to be taken when preparing a sputum specimen to go to the laboratory? (Select all that apply.)
2. Collect the specimen and secure the lid.
3. Place the container in a sealed plastic bag marked “Biohazard.”
4. Place the biohazard bag in another plastic bag.
4. A nurse is working in a small hospital with a combined med-surg unit. The only beds available are in two-bed rooms, and each room already has a patient. The recovery room nurse is about to send a 25-year-old female who just had her tonsils removed. Who would be the most appropriate roommate?
1. A 60-year-old woman newly diagnosed with bacterial pneumonia
2. A 23-year-old woman with a draining wound
5. A home care nurse has a patient with a wound infection who is also under Airborne Precautions. The patient’s wife will be doing the dressing change on the days that the nurse does not visit. The wound must be cleansed and then dressed. The nurse must teach the wife to: (Select all that apply.)
1. maintain strict surgical asepsis.
2. cleanse her hands and be careful to touch only the corners of the dressing with her bare hands.
3. contain the used dressings and supplies in a sealed plastic bag before placing them in the trash.
4. wear a mask as well as gloves when changing the dressing.
6. A patient under Contact Precautions wants to know if he may have visitors. The nurse tells him that:
1. visitors may come but they must wear a mask and gown.
2. there are no special requirements for people visiting a patient under Contact Precautions.
3. visitors may come but should wear gloves if they touch the patient.
4. visitors may come but should wash their hands before and after socially touching the patient.
7. When performing a sterile dressing change on a patient, correct technique must be regarded as broken if: (Select all that apply.)
1. supplies are placed touching the edge of the sterile field.
2. a gloved hand touches the dressing table below tabletop surface.
3. a sterile glove touches one of the sterile dressings on the field before the procedure is begun.
4. the nurse reaches over the sterile field when placing a swab used to clean the wound in the discard bag.
8. Standard Precautions are used:
2. for all patients unless they are under Transmission-Based Precautions.
9. The correct actions when donning a pair of sterile gloves include: (Select all that apply.)
1. picking up the first glove by placing the fingers of the opposite hand under the cuff.
2. smoothing the first glove over the hand before putting on the second.
3. picking up the first glove by grasping it on the fold of the cuff.
10. When making up the bed in an isolation room, the nurse: (Select all that apply.)
CRITICAL THINKING ACTIVITIES ? Read each clinical scenario and discuss the questions with your classmates.
Scenario A
You are caring for a 43-year-old man who has an infected leg wound following a hiking accident. He is to keep his leg elevated and is under Contact Precautions. He has recently retired from the military and has just moved to the area. He is bored and restless. How would you help meet his psychosocial needs?
Scenario B
What would you do if you observed the physician’s glove become contaminated during a sterile procedure and the physician appears unaware that this has occurred? Be specific
Scenario C
Your home care patient is an older man with a large abdominal wound that needs daily dressing changes. He lives with his wife, but she has severe arthritis in her hands and is unable to perform the procedure. You are scheduled for three visits per week. How would you solve the problem of getting his daily dressing change done on the days you are not scheduled to visit?