Patient Environment and Safety
Upon completing this chapter, you should be able to:
1 Discuss nursing responsibilities for environmental management.
2 Identify common noises in health care facilities and ways to minimize their effects on patients.
3 Explain the importance of neatness and order in the patient’s environment.
4 Describe methods to prevent mechanical and thermal accidents and injury in health care facilities and the home.
5 Discuss the various forms of bioterrorism, safety measures to be taken, signs and symptoms of agents used, and measures to treat or contain the threat.
6 Demonstrate knowledge of the legal implications of using protective devices.
7 Discuss the principles for using protective devices.
1 Discuss how the health care facility’s environment affects your patient.
2 Using correct technique, make an unoccupied and an occupied bed.
3 Explain, according to your facility’s procedures, how to clean up a biohazard spill.
4 Discuss your clinical facility’s response plan to a bioterrorism threat.
5 Given an emergency scenario, practice triaging the victims.
 ,
,  ,
,  ,
, The environment is the total of all elements and conditions that surround us and influence our development. Caring for the patient’s environment is important in providing holistic care. The goal is to provide safety while making the patient as comfortable as possible. This chapter presents information on the factors that are controllable in a patient’s environment, beds and bed making, how to provide a safe environment, and when and how to apply a protective device.
FACTORS AFFECTING THE ENVIRONMENT
The same environmental factors Florence Nightingale wrote about over a century and a half ago are still important today. Temperature, ventilation, humidity, lighting, odor, and noise all are items that must be controlled.
TEMPERATURE
Infants and older adults may need their rooms warmer than usual because of their poor temperature regulation. Keep room temperature between 68° and 74° F (20° and 23° C). Operating rooms and critical careareas are kept slightly cooler to reduce the patient’s metabolic demands.
VENTILATION
Ventilation is the process or act of supplying a building or room continuously with fresh air. Most health care facilities have central air-conditioning units that regulate temperature, humidity, and air exchange. Fans are discouraged because air currents spread microorganisms. A table fan may be ordered if the patient has a respiratory condition because the patient may find it easier to breathe when air movement is felt. To maintain patient safety, do not open windows in the hospital. At home, windows may be opened at the top and bottom to encourage air circulation.
HUMIDITY
Humidity is the amount of moisture in the air. A range from 30% to 50% is normally comfortable. Very low humidity will dry respiratory passages and a person’s skin. Most hospitals maintain a low humidity setting to discourage the growth of microorganisms. Vaporizers or humidifiers may be ordered for a patient with a respiratory condition who requires more humidity.
LIGHTING
A sunny, cheerful room can improve a patient’s spirits. Areas must have adequate lighting for tasks and to prevent accidents and injury. The light should be bright enough to see without glare and to avoid eyestrain, and be soft and diffuse to prevent sharp shadows. Ideally, your patient will be able to control the lights independently. Appropriate interior and exterior lighting in the home helps protect it against crime.
ODOR CONTROL
Illness changes sensory perceptions. Odors that ordinarily are pleasant may make the patient feel nauseated. Health care facilities may have unpleasant odors from bedpans, urinals, wounds, and so forth. Good ventilation and cleanliness will effectively control odors. Box 20-1 lists odor control measures.
NOISE CONTROL
Noise is inevitable in health care facilities. The hospital should be a place for rest and quiet, yet a patient may experience sensory overload from all of the noise.
Moving equipment in the halls, visitors, and health care personnel all combine to raise the sound level. Sound-absorbing flooring and ceiling materials, carpeting, and plastic equipment are used to reduce noise. The main cause of noise is people. To reduce noise, avoid long conversations on the intercom by going to the patient’s room to talk. Encourage staff to limit conversations in the hallway and to speak in lowered voices. Tact is very important when dealing with patients, their visitors, and colleagues. Soft, pleasant background music may be played to mask other sounds and promote relaxation.
INTERIOR DESIGN
Patients’ rooms and public areas often look more like a hotel now as opposed to the stark white of the past. Rooms have draperies and colorful bedspreads. These changes are to promote comfort by providing a homelike environment for the patient.
NEATNESS
It is important to provide a neat and tidy atmosphere for your patient. Keep the unit in enough order to be safe, but not so rigid that the patient may not have possessions from home. Straighten the patient unit after making the bed. Old dishes and unused equipment should be removed promptly. The over-the-bed table should be cleared, and wiped off if needed, before meals are served. Obtain the patient’s permission before disposing of newspapers or magazines. Check and straighten the unit each time you enter and as time permits.
PRIVACY
Privacy is essential for a patient’s well-being. Always knock gently and identify yourself before entering the room. In multiple-patient rooms, close the curtain around the patient for personal tasks such as using a bedpan and bathing. Post a sign on the door informing others of such tasks to discourage them from entering the room.
PATIENT UNIT
Each patient unit contains a bed, bedside cabinet, over-the-bed table, chair, call light, and closet (Figure 20-1). The unit usually has an over-the-bed light and a television and/or radio.
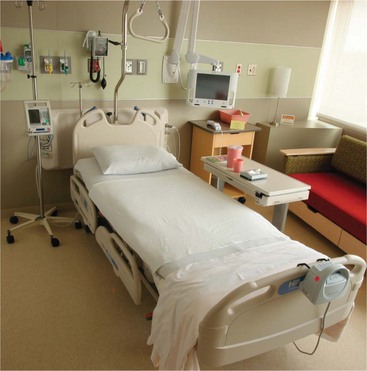
FIGURE 20-1 Common articles found in a patient unit: a hospital bed, bedside table, over-the-bed table, and chair.
BEDS
A hospital mattress is usually firm and has a covering that can be cleansed easily between patients. An overlay (air or gel filled) may be used with a mattress to reduce the risk of pressure ulcers, but newer hospital mattresses are designed to reduce pressure areas. Beds used for health care are usually on wheels and equipped with side rails. The patient may use the rails to change position or to get out of bed. Side rails can be a safety hazard. You need to make sure that the mattress fits snugly to the rails and that the rails are close enough together so that the patient’s head is not able to fit through the rails. Always check to make sure the bed wheels are locked, unless you are moving the bed.
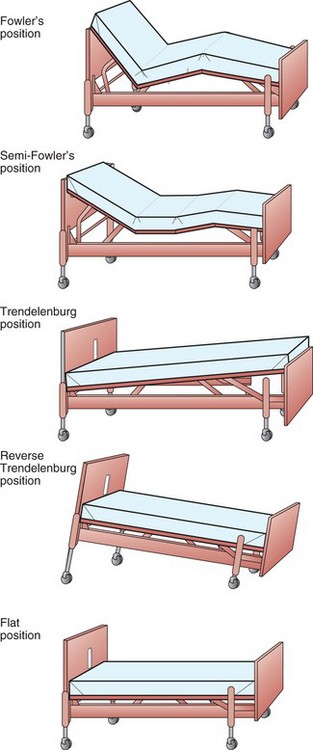
BED POSITIONS
Most hospitals have electric beds, on which the position is changed with controls on the side rails. Other facilities use manual beds, on which the position is changed by the use of a crank (Home Care Considerations 20-1). The bed is usually kept in the “low position” (i.e., close to the floor). The bed can be placed in various positions (Figure 20-2).
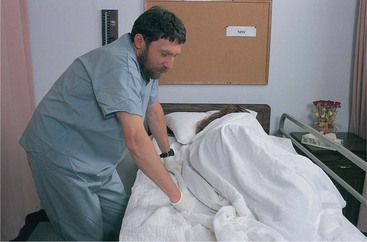
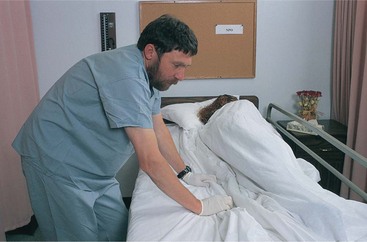
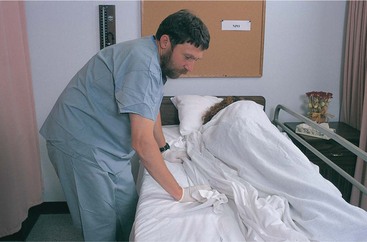
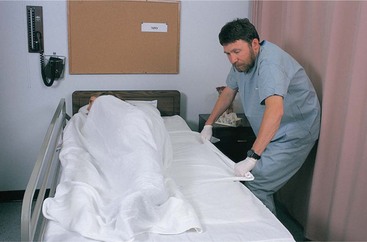
BED MAKING
Bed rest may be an important part of the treatment for your patient. Most patients may be out of bed for short periods of time as they recover. An unoccupied bed is made when the patient is out of bed in the chair or out of the room for a diagnostic procedure or therapy. An occupied bed is made only if the patient absolutely cannot be out of bed. For example, a patient whose activity order is bed rest with bathroom privileges would have the bed made while she is using the bathroom. Skill 20-1 and Skill 20-2 describe how to make an unoccupied and an occupied bed, respectively. Bed linens should be neat, orderly, and free of wrinkles. Linens that are rumpled may interfere with movement or cause the patient to fall when getting out of bed. Some important guidelines for making any bed are listed in Box 20-2 on p. 323.
Skill 20-1 Making an Unoccupied Bed
Today, most beds are made when they are unoccupied. Many patients may be out of bed for the length of time it takes to make the bed. If the patient is allowed out of bed, make the bed at that time to reduce the work for both you and the patient.

Review and carry out the Standard Steps in Appendix 3.
2. ACTION Arrange the linens in the order in which they will be used.
RATIONALE Saves time if linens are in correct order for use.
3. ACTION Lower the side rail on your side of the bed. Raise bed to an appropriate working height for you.
RATIONALE Provides easy access to materials. Prevents back strain and injury.
4. ACTION Perform hand hygiene and don clean gloves if there is a chance of contact with blood or body fluids while removing used linen.
RATIONALE Prevents spread of microorganisms.
5. ACTION Loosen all linens on your side of the bed. Go to other side, lower that rail, and loosen the linens from the head to the foot of the bed. Fold bedspread if not soiled; place over the back of patient’s chair. Remove sheets and pillowcases, removing each separately. Place pillows on a clean surface, roll linens together, and put them in the pillowcase, linen hamper, or bag. Avoid shaking or fanning the linens or placing them on the floor.
RATIONALE Loosening permits linens to be removed easily; bedspread and pillows are ready to be replaced. If a linen hamper or bag is not available, place the soiled linen in the pillowcase. Place on the foot of the bed or over-the-bed table to prevent spread of microorganisms.
6. ACTION Check the mattress. Clean if soiled. Move mattress to the head of the bed if needed by grasping it in the center and at the bottom edge while facing the head of the bed and slide it up.
RATIONALE Mattress is cleaned before making the bed. Mattresses tend to move to the foot of the bed when the head of the bed is raised.
7. ACTION Make the bed on one side at a time. Place all center folds in the linens at the center of the bed.
RATIONALE Decreases the number of steps for the nurse. Centering linens puts the same amount of sheet on both sides of the bed.
8. ACTION Place and center the bottom sheet on the mattress. Unfold the sheet right side out so that the wide hem end is at the top of the mattress and the narrow hem end is at the foot of the bed. Tuck about 12 inches of the sheet smoothly over the top of the mattress. If a fitted sheet is used, fit the top and bottom corners of the mattress into it on your side.
RATIONALE Secures sheet snugly to the head of the bed and evenly distributes linens.
9. ACTION Miter the corner at the head of the bed by picking up the side edge of the sheet so that it forms a triangle with the head of the bed, with the side edge perpendicular to the bed. Using the palm of your hand, hold the sheet against the side of the mattress and tuck excess under mattress. Drop the sheet over your hand; then withdraw your hand and tuck the flap of the sheet under the mattress.
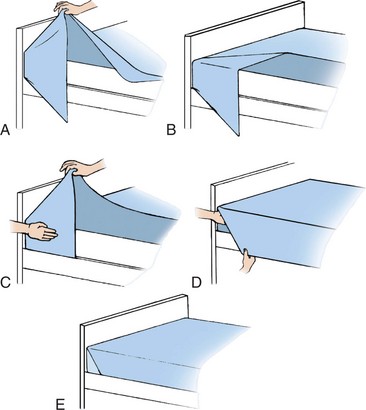
RATIONALE Holds the corners in place.
10. ACTION Position the drawsheet or lift sheet (if used) over the middle of the bed. Unfold and tuck both sheets in, on this side, from head to foot. If a lift sheet is used, do not tuck it under the mattress.
RATIONALE Protects the bottom linens from soiling by placing the drawsheet from the patient’s shoulders to below the hips. A lift sheet aids in repositioning the patient.
11. ACTION Place upper edge of the top sheet at the top of the mattress, seam (bottom) side up, and unfold it toward the foot of the bed.
RATIONALE Placing top sheet seam side up avoids irritation from the seam when a cuff is formed over the spread.
12. ACTION Position the blanket or spread 4 inches from the top of the mattress, and unfold it toward the foot. Repeat for extra blankets.
RATIONALE Allows sheet to be cuffed over top covers.
13. ACTION Tuck the sheet, blankets, and spread under the bottom of the mattress as one unit if a toe pleat is not needed. Miter the corner by lifting the top linens away from the mattress and up onto the bed about 18 inches from the bottom of the bed. A triangle should be formed. Tuck excess linens hanging below mattress level under it, bring down the upper portion of the linens, and smooth them into a neat diagonal line.
RATIONALE Secures the linens under mattress. Top covers are not tucked under down the sides of the mattress to allow the patient to get in and out of bed easily.
Make the Bed on the Other Side
14. ACTION Fan-fold the top linen back toward the center of the bed while tucking in the bottom sheet and drawsheet. Miter the corner.
RATIONALE Folding the top linen back allows you to see any wrinkles and remedy them. Mitering holds bottom sheet in place.
15. ACTION Grasp the edges of the bottom sheet tightly in both hands with the knuckles on top. Pull tightly down over the side; tuck under the mattress along the side, working down the side from head to foot. Pull the sheet diagonally at the bottom corner of the mattress to remove wrinkles.
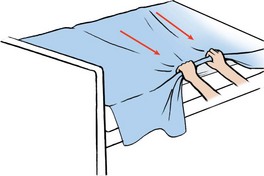
RATIONALE Provides a smooth bottom sheet without wrinkles that may cause pressure areas.
16. ACTION Grasp drawsheet (if used); pull tightly and tuck it in over the side of the mattress. If this is to be used as a lift sheet, do not tuck it under the mattress.
RATIONALE Saves time because a lift sheet is used often.
17. ACTION Smooth top linens from the head to the foot of the bed if a toe pleat is not needed. Fold sheet, blanket, and spread under the mattress at the foot of the bed as one unit. Miter the corner of the top linens.
RATIONALE Provides patient with a wrinkle-free bed.
18. ACTION Make toe pleats as indicated. Two examples of toe pleats:
a. At the center of the top linens, at the foot of the bed, make a 6-inch lengthwise pleat in the top linens before tucking the covers under the mattress.
b. Fold a 2-inch horizontal pleat, 6 to 8 inches from the foot of the bed, across the top linens before tucking the covers under the mattress.
RATIONALE Allows room for the patient’s feet to move and prevents formation of pressure ulcers from the weight of the linens on the toes.
19. ACTION Move to the head of the bed and fold back the top sheet, forming a cuff 4 to 6 inches over the edge of the blanket and spread.
RATIONALE Provides a smooth edge under patient’s chin and prevents soiling of blanket and spread.
20. ACTION Apply the pillowcase by grasping the closed end of the pillowcase and, with the other hand, gather one side of the open pillowcase up over the hand at the closed end. Grasp the pillow at the center of one end through the pillowcase while holding the pillow away from your body. With the other hand on the open edge of the pillowcase, pull the open edge down over the pillow. Do this until the pillow is completely covered. Adjust the pillow inside the case, keeping it from being contaminated by contact with your uniform.

RATIONALE Provides a method for placing a pillow smoothly in the case without contaminating it.
21. ACTION Place the pillow(s) at the head of the bed with the open ends away from the door.
RATIONALE Fitting the pillowcase evenly over the pillow with the corners at the correct locations provides a neater appearance.
22. ACTION Follow agency policy, or open the bed by folding the top linens back.
RATIONALE Allows patient to enter the bed easily.
23. ACTION Place the bed in its lowest position, lock the brakes on the bed, raise the far top side rail, and attach the call light to the bed where the patient can easily reach it. Remove soiled linens and place in appropriate area.
RATIONALE Promotes safety in getting in and out of bed. Attaching call light to bed allows patient to call the nurse easily. Promptly disposing of soiled linens prevents the spread of microorganisms.
1. Why is it inadvisable to gather linen needed for two or three rooms and then carry it all around to deliver to the rooms at the beginning of the shift?
2. Why is it a good idea to pull the old linens apart and separate them if they are bunched up, before rolling them together to take off the bed and put into the linen hamper?
Skill 20-2 Making an Occupied Bed
Linens are changed with the patient in bed if bed rest has been ordered. The procedure is easier and quicker when carried out by two people. Nursing research has shown that many patients experience greater benefit from getting out of bed than remaining on total bed rest. Hence, fewer beds are now made as occupied beds.
Review and carry out the Standard Steps in Appendix 3.
4. ACTION Perform hand hygiene and don clean gloves if there is a chance of contact with blood or body fluids during procedure.
RATIONALE Prevents spread of microorganisms.
5. ACTION Loosen the blanket and spread from the foot of the bed, and remove each piece separately. If unsoiled, fold and place item over the back of patient’s chair. Place any soiled linens in the soiled linen or hamper bag.
RATIONALE Placing unsoiled items over back chair saves time by readying linens to be replaced.
6. ACTION Place a bath blanket over the patient and the top sheet, unfold it, and ask the patient to hold the top, or tuck under the patient’s shoulders. Remove the top sheet from beneath the bath blanket, and place in linen hamper or bag.
RATIONALE Provides warmth and privacy.
7. ACTION Move the mattress to the head of the bed. Patient may help by grasping the headboard and pulling if able, or have another staff member help you.
RATIONALE Allows more room for the feet at the end of the bed.
8. ACTION Move the patient into a side-lying position at the far side of the bed, facing away from you. Assist the patient into proper alignment. Place a pillow under the head and at the patient’s back to keep the patient in place if necessary.
RATIONALE Provides safety. Allows near side of bed to be made.
9. ACTION Loosen the bottom linens from the top and side of the bed; roll each piece of linen as close to the patient as possible.
a. Smooth the mattress cover (if present), and put the bottom sheet on the bed with the center fold at the center of the mattress. Fan-fold the portion of the sheet that is for the other side of the bed with the center fold at the center of the mattress.
b. Push the folded linen under the rolled, soiled bottom sheets that are being removed. Tuck the near side of the bottom sheet under the head of the mattress, and miter the corner. Tuck the sheet under the mattress from the head to the foot of the bed.
RATIONALE Allows soiled linens to be removed and clean linens to be placed when the patient rolls to the other side of the bed.
10. ACTION Place the drawsheet on the bed (optional), centering it on the mattress so that it reaches from the patient’s shoulders to below the hips. Fan-fold the far side of the sheet, and push it under the rolled bottom sheets. Tuck the near side under the mattress. Raise the side rail.
RATIONALE Allows removal of a soiled drawsheet when the patient is turned.
11. ACTION Go to the other side of the bed, lower that rail, and move the patient to the far side of the bed. If the patient can turn easily, ask the patient to roll to the opposite side. Adjust the patient’s alignment, and reposition the bath blanket. Ask the patient to grab the raised side rail for support.
RATIONALE Allows removal of soiled linens and placement of clean linens. Raised rail provides safety.
12. ACTION Loosen the bottom linens and roll them up. Place in the linen hamper or bag, or in the used pillowcase.
RATIONALE Prevents the spread of microorganisms.
13. ACTION If a mattress cover is used, smooth out any wrinkles. Pull the bottom sheet across the mattress, fold over the top of the mattress and smooth, tighten, tuck the excess sheet under the mattress, and miter the corner.
RATIONALE Prevents wrinkles that may cause pressure ulcers.
14. ACTION Pull the drawsheet from the center of the bed; to pull tightly, place your knee against the mattress while pulling. Tighten, smooth, and tuck sheets under the side of the mattress from head to foot.
RATIONALE Protects the bottom sheet from soiling.
15. ACTION Allow the patient to roll onto back. Place the top sheet over the patient and the bath blanket with the top edge folded down a few inches beneath the chin. Have the patient hold the top of the sheet and remove the bath blanket. Position the blanket (if used) and spread in the same manner. Smooth the top linens and tuck the excess at the foot under the bottom of the mattress if a toe pleat is not needed. Miter the corner on the near side, then far side. Fold the top edge of the sheet over the blanket, and spread to form a cuff.
RATIONALE Keeps the patient warm and protects privacy while the top linens are placed.
16. ACTION Make a toe pleat in the top sheet and blanket if desired as described in Skill 20-1, Step 18.
RATIONALE Provides extra room for the feet.
17. ACTION Remove the used pillowcase and place in the linen hamper or bag. Apply the clean pillowcase by grasping the closed end of the case in one hand and gathering one side from the open end up over the other hand. Grasp the pillow at the center of one end through the pillowcase while holding the pillow away from your body. Smooth the pillowcase down over the pillow. Place beneath the patient’s head with the open end away from the door.
RATIONALE Places pillow in the case without contaminating it. Fitting the pillowcase evenly over the pillow with the corners at the correct locations provides a neater appearance.
18. ACTION Lower the bed, lock the brakes on the bed, replace call light, and restore the unit. Remove the linen hamper or bag and place in appropriate area.
RATIONALE Provides safety for the patient and a method to call the nurse. Promptly disposing of soiled linens helps prevent the spread of microorganisms.
 If the patient is in traction, the bed may have to be made from the top to the bottom (head of bed to foot of bed), instead of side to side. The same principles are applied from top to bottom. The patient may use the trapeze bar if able to help lift as you work the sheets down the bed.
Linens should be smoothed, with wrinkles removed, whenever the patient is turned.
SAFETY
Safety is a primary concern when caring for your patients. Safety is needed to prevent accidents and possible injuries to patients, visitors, and health carepersonnel. Methods of meeting the following 2009 National Patient Safety Goals from The Joint Commission are presented in the appropriate chapters of this text:
• Improve the accuracy of patient identification
• Improve the effectiveness of communication among caregivers.
• Standardize a list of abbreviations, acronyms, symbols and dose designations that are not to be used throughout the organization.
• Measure and assess, and if appropriate, take action to improve the timeline of reporting, and the timeliness of receipt by the responsible licensed caregiver, of critical test results and values.
• Reduce the risk of health care–associated infections.
• Accurately and completely reconcile medications across the continuum of care.
• Reduce the risk of patient harm resulting from falls Encourage patients’ active involvement in their own care as a patient safety strategy.
• The organization identifies safety risks inherent in its patient population.
The most common accidents among patients are falls, burns, cuts, and bruises. Fights with others, loss of personal possessions, choking, and electrical shock also occur. Home safety is another issue you will need to discuss with your patients. You must be aware of possible safety hazards and correct them to prevent accidents. Box 20-3 describes nursing actions to promote patient safety.
HAZARDS
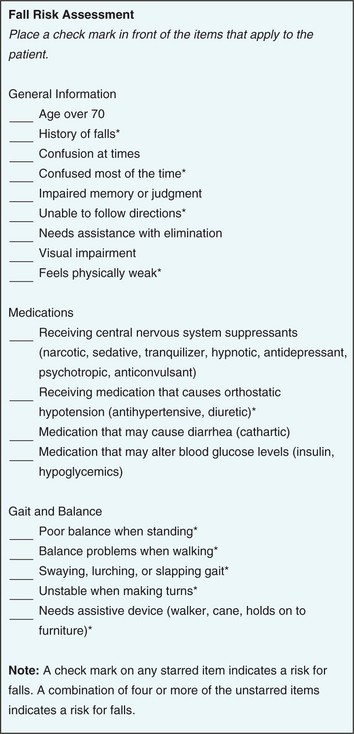
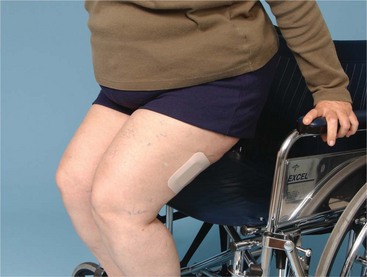
Falls are a safety hazard. The three most common factors that predispose a person to falls are impaired physical mobility, altered mental status, and sensory and/or motor deficits. The Joint Commission 2008 safety goals require that every patient be assessed and periodically reassessed for risk for falling, particularly correlating the patient’s medications with increased risk for falls. Action must be taken to mitigate any identified risk. An example of a fall risk assessment tool is presented in Figure 20-3. Chapter 40 provides safety tips to prevent the elderly from falling in the home. Patients at risk for falls may have a leg or bed alarm placed. These alarms sense a change in position or pressure and sound an alarm to alert health care workers or family members that patients are attempting to get out of bed or a chair (Figure 20-4) (Resnick, 2004).
Burns
Burn prevention includes protecting the patient from accidental thermal injury and the threat of fire. Thermal injuries may be caused by either hot or cold materials. A person with diabetes or impaired circulation, or who is paralyzed or on drugs that alter mental awareness, is more easily burned than a person in good health. To prevent these injuries, use a barrier between the patient’s skin and the thermal application. Check the temperature of oral liquids before giving them to the patient. Warn the patient if a food or drink is hot. Caution the patient to avoid lying on, or sleeping with, heating pads or ice packs. Inspect electrical cords for frayed or broken areas that may cause sparks or fires. The engineering staff must check all electrical appliances brought into the hospital from home before use to ensure safety.
Smoking
Smoking is banned in most health care facilities; however, some long-term care agencies allow smoking in designated areas. Carefully supervise the patient who wants to smoke and is sedated, confused, or irrational. Warn your patient not to smoke in bed. Smoking is never allowed when oxygen is in use because a spark could cause a fire. Any equipment that might cause a spark is also prohibited near oxygen. Inform your patient who uses oxygen at home, and the family, of this risk.
Reducing tobacco use is one of the leading health indicators of Healthy People 2010. Second-hand smoke relates to another goal of Healthy People 2010, that of environmental air quality. Encourage your patients not to smoke (Health Promotion Points 20-1) (Duke Center for Nicotine and Smoking Cessation Research, 2007).
Fire
Fire is a possibility in any setting. You must know and be familiar with your institution’s fire regulations. This includes knowing the location of the fire extinguishers, fire alarms, and escape routes, and how to notify the telephone operator of a fire in your area.
There are three basic types of fire extinguishers: A, B, and C. Type A is a water-under-pressure extinguisher that is used for paper, wood, or cloth fires. Type B contains carbon dioxide and is used for gasoline, oil, paint, fat, and flammable liquid fires. Type C is used for electrical fires and contains carbon dioxide. The most commonly seen extinguisher is an ABC combination extinguisher that can be used on any kind of fire.
Most agencies use the RACE acronym to respond to a fire because it is easy to remember. Should a fire occur, you must
• Rescue any patients in immediate danger by removing them from the area.
• Activate the fire alarm system.
Use proper body mechanics to evacuate patients to prevent injury. Protect against possible smoke inhalation by placing wet towels across the bottom of closed doors and have people hold wet washcloths over their noses and mouths. This traps most of the smoke in the washcloth during breathing. Box 20-4 lists home fire safety precautions.
HAZARDOUS MATERIALS
A biohazard is a biologic agent, chemical, or condition that can be harmful to a person’s health. The Occupational Safety and Health Administration (OSHA) classifies materials in the work environment according to the degree of hazard to health that they impose. OSHA publishes specific guidelines for labeling, handling, cleaning spills, and disposing of these materials. Mercury is an example of a biohazard, as are blood and most body fluids. There should be a material safety data sheet (MSDS) for each biohazard substance stored or used on the nursing unit. These sheets are consulted for recommended methods of storage, labeling, handling spills, and disposal. Everyone must comply with these guidelines.
Bioterrorism and Other Terrorism Agents
Terrorist activities are designed to cause panic, fear, and chaos and disrupt an area’s rescue and medical systems. Bioterrorism is the release of pathogenic microorganisms into a community to achieve political and/or military goals. Common diseases, symptoms, and incubation periods for agents used in bioterrorism are listed in Table 20-1. It is important to know the early signs and symptoms of these agents because many of them initially present as vague or flulike symptoms.
Table 20-1
Common Diseases Spread Through Bioterrorism
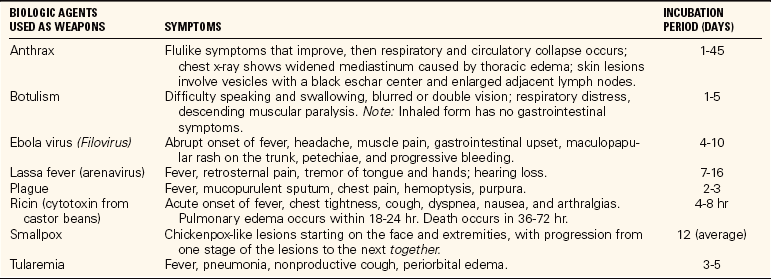
Modified from Leifer, G. (2007). Introduction to Maternity & Pediatric Nursing (5th ed., p. 723). Philadelphia: Elsevier Saunders, and Medical Management of Biological Casualities Handbook (2001). U.S. Army Medical Research Institute of Infectious Diseases.
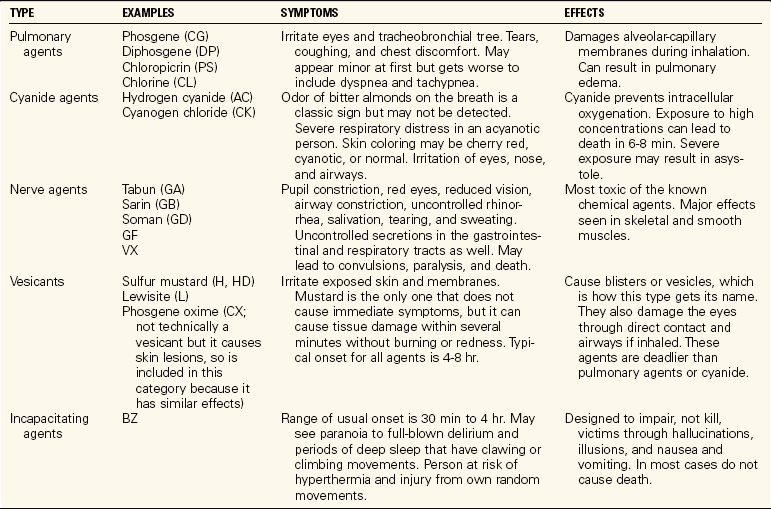
Chemical terrorism is the use of certain compounds to cause destruction to achieve political and/or military goals. Health care agencies and institutions have developed plans and methods to handle these threats to safety. Chemical agents come in liquid, gas, and solid forms. Temperature and pressure can affect the form of the chemical agents. There are several types of chemical threats, including pulmonary agents, cyanide agents, nerve agents, vesicants, and incapacitating agents. Table 20-2 lists the agents used in the different kinds of chemical threats and the symptoms associated with each type.
Radiation is a form of energy that can come from man-made sources as well as the sun and outer space. Some elements that release radiation exist naturally in the soil, such as uranium. Plutonium, which is used in nuclear power plants, is also used to make nuclear bombs. Terrorists may use radioactive substances attached to an explosive device (a “dirty bomb”) to disperse radiation. There are three basic ways to protect the body from radiation: time (decrease the amount of time near a source), distance (increase your distance from a source), and shielding (increase the barrier or shield between you and the source). Acute radiation sickness (ARS) develops when most or all of the body is exposed to a high dose of radiation usually over a short period of time. Initial symptoms of ARS are nausea, vomiting, and diarrhea. Loss of appetite, fatigue, fever, skin damage, hair loss, and potentially seizures, coma, and death are possible later effects.
You must be familiar with your institution’s policies and procedures for handling victims of a terrorist attack. Knowing how to respond to terrorist attacks with various agents will help prepare you should a crisis happen in your area. Being prepared will help to alleviate your anxiety and increase your confidence in dealing with such unpredictable instances. In turn, this will help you manage your patients’ fears and give more effective care.
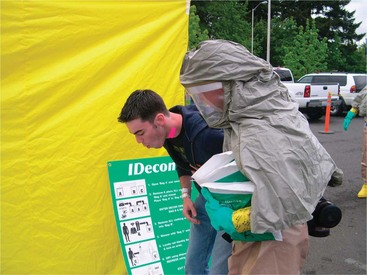
Decontamination.: When a terrorist attack has occurred, such as the one with Sarin gas in the Tokyo subway, a portable decontamination unit with a specially trained staff is set up outside the emergency room (ER). The staff must wear masks and protective clothing that are impervious to chemicals and cover all skin surfaces (Figure 20-5). Military Mission-Oriented Protective Posture (MOPP) suits may be used that have a hooded pullover top, drawstring trousers, rubber boots, and gloves. A chemical mask with filtered respirator must be worn with the suit. There is an emergency protocol from the local health department’s disaster response plan that is followed to decontaminate victims before they enter the hospital building. Thorough scrubbing of the all of the person’s skin is often part of the protocol.
Triage and Treatment.: Patients are triaged as they enter the ER. They are assessed and labeled according to the priority of care as “immediate,” “delayed,” “minimal,” or “expectant.” Patients who require lifesaving care are labeled “immediate”; care for those in need of major or prolonged care can be “delayed” briefly; those with minor injuries to be attended are labeled “minimal”; and “expectant” indicates those with severe life-threatening injuries who probably will not survive in spite of medical care. Triage priorities are based on the premise that limited medical resources should be used on those patients who will most likely live if they receive treatment.
Treatment is based on the type of agent to which the patient was exposed and the degree of exposure. Antibiotics are used for some of the biologic agents, and antidotes may be used for some of the chemicals and poisonous gases (Center for the Study of Bioterrorism & Emerging Infections, 2001). Otherwise, treatment is directed at supporting organ function while the body tries to recover. Life support measures using drugs, ventilators, and dialysis, if needed, are used.
Poison
A poison is a substance that when ingested, inhaled, absorbed, applied, injected, or developed within the body, may cause functional or structural disturbances. This is possible even if only a very small amount of the poison is encountered. Agents used in chemical terrorism fit into this category. Treatments and antidotes for poisoning can be obtained from a poison control center or are listed on some containers. Some poisons do not have antidotes or treatments. When reporting a known or suspected poisoning, have the label handy. Report the following:
Patient Teaching 20-1 lists information for patient teaching about poisons.
PROTECTIVE DEVICES
Protective devices, formerly called restraints, were overused in the past. Restricting movement on a long-term basis caused problems such as muscle weakness, atrophy, loss of bone mass, joint contractures, constipation, incontinence, pressure ulcers, depression, and cognitive impairment. The patient’s self-concept and mood were negatively affected, and both the patient and family were affected emotionally. Some staff used these devices as a way to punish or discipline a patient. This is an illegal and totally unacceptable practice that constitutes malpractice.
Restraints are used in two types of situations, for behavioral or nonbehavioral indications. A protective device is used for a behavioral health reason if the patient is in a psychiatric setting or has demonstrated a sudden change in mental status/behavior. Nonbehavioral usage is for the continuation of medical treatments. An instance of a nonbehavioral use would be an elderly person with a history of dementia who needs to have her IV site protected from attempts to dislodge the catheter. Health care workers must check patients in a behavioral health protective device more frequently. The array and use of physical and chemical protective devices (i.e., medication) in psychiatric/behavioral health settings are not covered in this text. It is your responsibility to be aware of and follow the regulations in your facility and area.
LEGAL IMPLICATIONS OF USING PROTECTIVE DEVICES
Federal and local laws have been passed that protect the patient from physical and mental abuse and from physical and chemical restraints except those that are authorized by a physician, in writing, for a specified and limited period of time, or that are needed in an emergency situation. The devices must be applied by licensed, qualified personnel.
The Joint Commission supports the use of protective devices if clinically necessary, but only as a last resort. This text has described the use of side rails of a bed as a way to increase a patient’s independence in changing position or getting in or out of bed. However, in some situations and facilities, especially long-term care, full side rails are considered restraints because they limit a patient’s ability to move, whereas half-rails are not.
ALTERNATIVES TO PROTECTIVE DEVICES
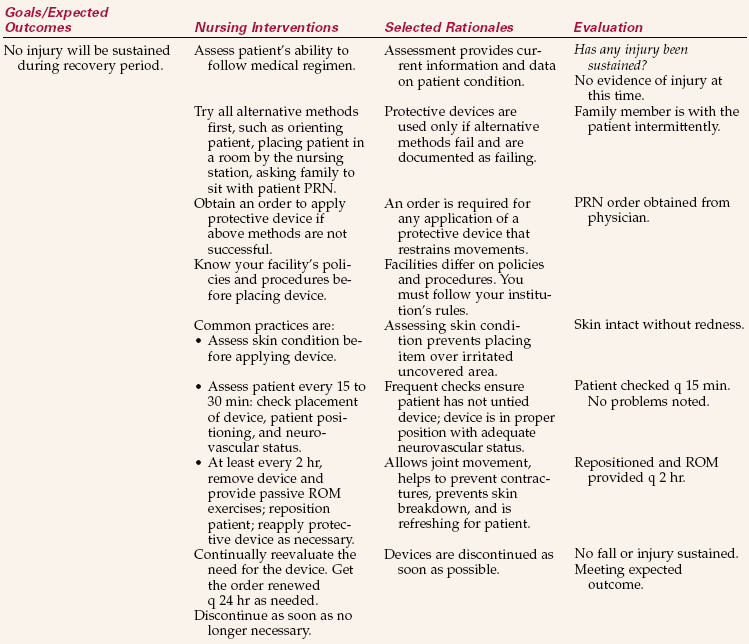
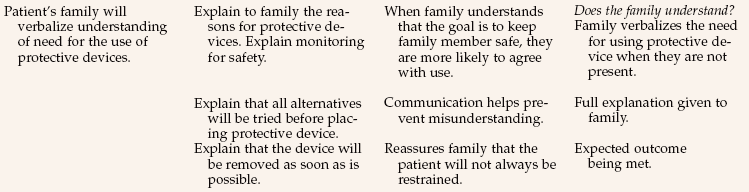
The goal is to move to a less restrictive environment. Health care workers are encouraged to find alternatives to the use of protective devices (University of Iowa College of Nursing, 1996). Many of the actions described in Box 20-3 involve frequent observations of the patient, which helps prevent patient injury and decrease the use of the devices. Family and friends of a patient who is confused can be encouraged to sit with the patient to promote safety.
PRINCIPLES RELATED TO THE USE OF PROTECTIVE DEVICES
Box 20-5 lists five principles related to the use of protective devices. In general, the device must be of direct benefit to the patient.
For example, a patient who is confused may try to pull out a nasogastric tube. In order to continue medical treatment, it may be decided to place the patient’s hand in a hand mitten. If this does not prevent the patient from pulling out the nasogastric tube, then a wrist or extremity device may be ordered. This situation illustrates the second principle. This patient did not require a vest or jacket device to prevent the dislodgement of the nasogastric tube.
Usually, the order must be written before applying a device. In an emergency, some agencies permit a device to be applied without a written order. You must obtain a written order as soon as possible (Communication Cues 20-1). When the protective device is no longer needed, obtain an order to discontinue it. The order usually specifies the type of device and how long it may be used (usually time-limited to no more than 24 hours depending on the patient’s age).
When applying the protective device, make certain that the patient’s movements or tugging will not impair circulation or nerve function. Padding the device with a soft washcloth or gauze pads will prevent skin irritation. The device should fit snugly when applied, but should not compromise the patient’s neurovascular status. You should be able to easily fit your index and middle fingers between the patient and the device. A device that is secured too tightly may cause injury. Skill 20-3 describes how to apply different protective devices.
Skill 20-3 Applying a Protective Device
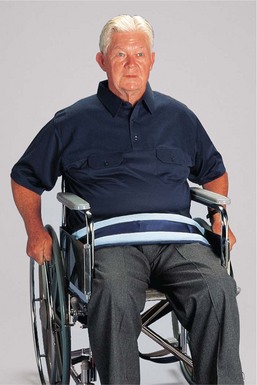
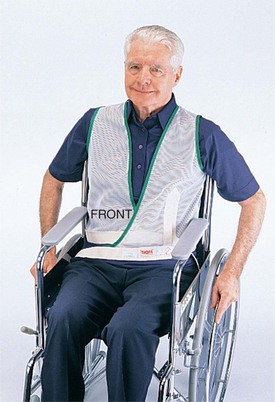
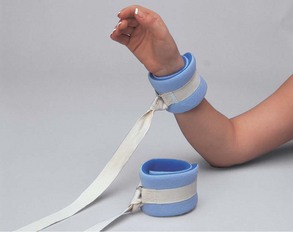
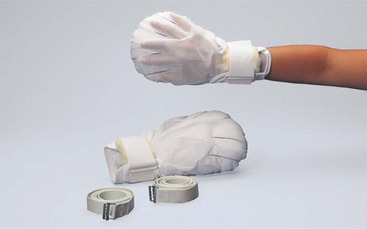
A protective device is used only after all alternative methods have been tried. Each type of device has its own purpose or main uses. A security or safety belt is used for the patient who is at a high risk for falls, or to secure a patient to a stretcher. A vest or jacket is used to assist a patient in maintaining proper body alignment when in a sitting position or to remind the patient not to get out of bed. An extremity immobilizer is used to prevent disruption to dressings, skin grafts, intravenous (IV) lines, urinary catheters, nasogastric tubes, and so forth. A mitten or hand mitt is used to keep the patient from scratching, to limit the ability to grasp tubes and catheters, or to prevent the patient from grasping the ties on a limb immobilizer.
1. ACTION Assess whether all other possible measures have been used to resolve the safety problem and whether they have been effective.
RATIONALE Ensures all possible methods of ensuring patient safety have been tried before using a protective device.
2. ACTION Check to see if there is an order for a protective device; if not, obtain one.
RATIONALE Use of a protective device requires a written order.
3. ACTION Review your agency’s policy and procedure for use.
RATIONALE Keeps your practice within legal parameters.
4. ACTION Assess the skin and circulation in the area where the device will be applied.
RATIONALE Provides baseline data prior to the application of the device.
6. ACTION Explain the purpose and need for the device to the patient and family.
RATIONALE Decreases anxiety of patient and family.
7. ACTION Lock brakes on wheelchair or bed before proceeding.
RATIONALE Promotes safe application.
8. ACTION Apply the device and tie with a half-bow knot.
RATIONALE A half-bow knot fastens the device, yet can be easily and quickly untied by you in an emergency.
9. ACTION With the patient sitting in a wheelchair, place the security belt around the waist or upper legs and slip one end of the tie through the slit on the opposite side.
RATIONALE Secures belt to patient before it is attached to chair.
10. ACTION Bring both ends under the armrests and behind the chair (one on each side) and tie to the frame or fasten the buckle, if present.
RATIONALE Prevents patient from untying the protective device.
11. ACTION Place the vest on the patient, putting arms through the armholes, with the opening in the front (most are labeled for front and back).
RATIONALE Decreases the chance of choking if the patient slumps while wearing the vest. Promotes lung expansion.
12. ACTION Cross the straps in the front, slipping strap of underlapping side through the slit in the opposite overlapping side of the vest. Tie outside of the patient’s reach, to the bed frame or the back of the chair.
RATIONALE Promotes safety and prevents choking if patient slips down in bed or chair.
13. ACTION Wash and dry the patient’s wrist(s) or ankle(s); apply lotion and massage areas.
RATIONALE Prepares patient for the application.
14. ACTION Apply immobilizer to the extremity needed’wrap the padded end around the wrist or ankle; pull the tie through the slit or buckle, or fasten with Velcro and attach to the bed frame.
RATIONALE Promotes safety and decreases chance of impeding circulation of extremity.
15. ACTION Wash and dry the patient’s hand thoroughly; apply lotion and massage hands.
RATIONALE Prepares patient for the application.
16. ACTION Slip hand into mitt, and slip tie around wrist and secure. It is usually better to apply mitts to both hands so that the devices are not easily removed by patient. If patient is partially paralyzed, use only one mitt on the nonparalyzed hand.
RATIONALE Promotes safety and prevents using fingers to pull out tubes and IV lines.
17. ACTION Check on the patient at least every 15 to 30 minutes or as directed by your agency and observe neurovascular function and patient’s position and needs.
RATIONALE Monitors patient for problems with the device and positioning and prevents patient’s needs from going unmet.
18. ACTION At least every 2 hours (or according to agency policy), release the ties, change the patient’s position, supervise active or provide passive range-of-motion (ROM) exercise, and assess the condition of the skin under the device. Remove only one device at a time.
RATIONALE Provides safety while preventing joint stiffness and muscle aches.
19. ACTION Provide access to a call bell or other method to summon the nurse.
RATIONALE Provides safety and makes patient feel less isolated.
20. ACTION Assess for the continued need for the device.
RATIONALE Prevents patient from being in a device longer than necessary.
21. ACTION Note the patient’s behavior, alternative methods tried, explanation to patient and family, and condition of skin before applying device. Ongoing documentation includes periodic reevaluation of need for device, skin condition, pulses, patient’s tolerance of device, times the restraints are removed and then reapplied, and the time when the device is removed and discontinued.
RATIONALE Validates the need for the use of a device and that the device is being used correctly.
10/15 1400 Oriented to person only, thrashing in bed, and unable to understand directions to prevent dislodgement of IV line. Physician notified, order obtained for right wrist protective device, and device applied. Skin intact; fingers warm, dry, and with quick capillary refill. Call bell within reach.
10/15 1600 Right wrist immobilizer removed and reapplied. Skin remains intact; passive ROM to R arm, wrist, and fingers. Sensation intact; no evidence of circulation impairment.
Secure the ties of a protective device to an immovable part of the bed frame. Do not tie to the side rails because lowering the rails may cause the device to be pulled too tightly around the patient or cause strain on a joint of an immobilized extremity. Place the ties under the armrests of a chair and secure at the back to prevent the patient from sliding. This also prevents the patient from being able to slide the tie up and off the back of the chair.
Use a half-bow knot to secure the device to the bed frame or chair. It is a secure knot that will not slip, even if the patient tugs on the tie; however, it is easily undone by health care workers. A half-bow knot is similar to that used when tying shoes except only one loop is made (Figure 20-6).

Remove the device at least every 2 hours and perform active or passive range-of-motion exercises for immobilized joints and muscles. Moving joints, exercising muscles, and changing positions frequently help prevent complications. Use supportive pillows and pads to maintain position. Check the area distal to the device every 15 to 30 minutes. Observe for signs of adequate circulation, including pulsesdistal to the device. Signs that the circulation or nerve function has been impaired include coolness of the skin, change in color (particularly pallor or a bluish hue), numbness, pain, edema, and loss of sensation or movement. Remove the device immediately and contact the physician if any of these signs occurs.
DOCUMENTATION OF THE USE OF PROTECTIVE DEVICES
Objectively describe the behaviors you observed (i.e., the reason) that led you to believe there was a risk for injury. All alternative actions and methods that were tried before placing the device need to be documented. Document the time and from whom the order for the device was obtained, the type of device applied, the time of application, the name of the person applying the device, and the location of the device on the patient’s body. Include the teaching done for the patient and family prior to the placement of the device. Obtain an informed consent as necessary. Document the periodic observations you make of the patient, including skin color, distal pulses, and so forth. Lastly, record the time when the device was discontinued and your name or the name of the person discontinuing the device. See Nursing Care Plan 20-1 for the care of a patient needing a protective device.
NURSING CARE PLAN 20-1 Care of the Patient Wearing a Protective Device
Hirosha Kumoto has Alzheimer’s disease. She is in a room by the nurses’ station. While her family was at dinner, you checked on her every 15 minutes. You tried to orient Ms. Kumoto to her surroundings. She is oriented X1 only. Because Ms. Kumoto’s family was not able to spend the night with her, it was decided to apply a safety vest.
Patient is pulling out tubes and trying to get out of bed/Risk for injury related to confusion and disorientation.
Supporting Assessment Data: Subjective: Asks over and over again: “Where am I?Why am I here?” Objective: Observed patient trying to get out of bed and climb over the side rails. Pt. removed postop dressing, drain, and IV.
NCLEX-PN® EXAMINATION–STYLE REVIEW QUESTIONS
Choose the best answer(s) for each question.
1. Humidity in the hospital is kept between 30% and 50% for the purpose of:
2. In making a bed, it is important to remember: (Select all that apply.)
1. to place soiled linens on the floor to avoid contaminating the bed.
2. to unfold linens on the bed to avoid stirring up air currents.
3. to return unused linens to the floor’s clean linen area to prevent waste.
4. to raise the bed during the linen change to prevent back strain.
3. Which of the following patients might be most likely to suffer a burn if left to tub bathe alone?
1. An adult female who is to have abdominal surgery tomorrow
2. An adult male who has been having back pain after a cystoscopy
4. Which of the following would help prevent the most frequent cause of injury to the elderly patient? (Select all that apply.)
1. Keeping pathways clear of papers and objects
2. Grounding all electrical apparatuses in use
5. If a biohazard spill occurs in the dirty utility room on your unit and you are unfamiliar with the product involved, you would first:
6. The correct sequence of action in a fire is:
1. call for help, activate the alarm, rescue a patient in danger, and extinguish the fire.
2. rescue a patient in danger, activate the alarm, contain the fire, and extinguish the fire.
3. call the hospital operator, race to close the fire doors, activate the alarm, and evacuate all patients.
4. race to close the fire doors, activate the alarm, call the hospital operator, and evacuate all patients.
7. Which of the following findings by itself would indicate that a patient is at risk for falls?
8. Your patient has a wrist restraint. Which of the following findings would you be concerned about?
9. Terrorist attacks can occur from release of biologic or chemical agents or radiation. Bioterrorism is the release of ________________________ into a community to achieve political and/or military goals. (Fill in the blank.)
10. A patient immobilized by a protective device is at risk for:
CRITICAL THINKING ACTIVITIES ? Read each clinical scenario and discuss the questions with your classmates.
Two of your friends and fellow nursing students are talking and laughing rather loudly at the nursing station. What would you do?