Diagnostic Tests and Specimen Collection
Upon completing this chapter, you should be able to:
1 Describe each of the seven categories of tests that are commonly performed.
2 Discuss appropriate psychosocial care and teaching for patients undergoing diagnostic tests or procedures.
3 Prepare to perform a capillary hemoglobin test, a venipuncture, a throat culture, an electrocardiogram, a urine dipstick test, and a stool for occult blood test.
4 Explain factors to be considered when an older adult is to undergo diagnostic testing.
1 Provide pre- and post-test nursing care, including appropriate teaching, for patients undergoing diagnostic tests and procedures.
2 Attend to psychosocial concerns of patients undergoing various diagnostic tests.
3 Perform a random blood glucose test using capillary blood and a glucometer.
4 Perform patient teaching for a magnetic resonance imaging (MRI) test.
5 Describe how to prepare a patient for and assist with aspiration procedures such as lumbar puncture, thoracentesis, paracentesis, bone marrow aspiration, and liver biopsy.
6 Correctly use Standard Precautions whenever obtaining or handling specimens for diagnostic tests.
7 List the steps for assisting with a pelvic exam and Pap test.
anemias (p. 406)
aspiration (p. 415)
biopsy (p. 415)
colonoscopy ( , p. 423)
culture (p. 405)
cystoscopy ( , p. 424)
electroencephalogram (EEG) ( , p. 425)
endoscope ( , p. 423)
gastroscopy ( , p. 423)
hematoma ( , p. 422)
jaundice ( , p. 425)
panel (p. 410)
polyps ( , p. 423)
smears (p. 425)
transducer ( , p. 418)
venipuncture ( , p. 407)
Diagnostic tests and procedures provide important information about complex chemical reactions that affect physiologic functioning of the body. Laboratory examinations of blood, urine, and other body fluids and tissues provide accurate information about the function of various organs and physiologic mechanisms. The information is helpful in making or confirming a diagnosis or in evaluating the effectiveness of a treatment. This chapter introduces basic information about common diagnostic tests and procedures. It is necessary to check the instructions from the particular department of the facility in which the test is to be performed for the specifics of patient preparation because this may vary somewhat from facility to facility. Box 24-1 provides terms with definitions specific to diagnostic testing.
APPLICATION of the NURSING PROCESS
When a diagnostic test or procedure is ordered, assess what the patient knows about the test. This will establish what teaching is needed. Inquire about concerns the patient may have about the test. Determine if there will be any special nursing measures needed to protect the safety of the patient. Assess wounds each shift for signs of infection so that the physician can be alerted to the need for a culture (the growing of microorganisms in or on a medium designed for their growth). Assess the patient for allergies to medication and to iodine and other procedure skin prep solutions used for diagnostic testing.
Nursing Diagnosis
Nursing diagnoses will be those pertinent to the problems for which a diagnostic test or procedure is ordered. “Deficient knowledge” related to the type of diagnostic test is appropriate if the patient is unfamiliar with the test. A few examples of nursing diagnoses for which diagnostic tests might be part of the treatment plan include the following:
Planning
Verify that any items needed for patient preparation for the ordered test are on hand. Check to see that pretest medications have arrived on the unit 1 to 2 hours before the scheduled test time. Plan when to do any teaching about the test or procedure. Review information about the procedure to prepare for teaching. Include the pre- and post-test care in your work schedule. A test involving the colon will require the administration of enemas, which can be time consuming. Many diagnostic tests require measuring vital signs frequently when the patient returns to the nursing unit. Expected outcomes are written for the particular nursing diagnosis associated with the problem for which the test is being performed.
Implementation
One of the most important nursing measures is to make certain that the patient has received adequate teaching about the test or procedure to be performed and that concerns have been addressed (Patient Teaching 24-1). Carry out the pre- and post-test actions for the particular test or procedure ordered (Assignment Considerations 24-1). Obtain a signed consent for any invasive procedure requiring one.
Laboratory Tests: Tests can be performed on any body fluid or tissue to detect changes from the normal state. Because blood bathes and nourishes all body tissues and collects waste products to be eliminated, chemical changes in the blood can be signs of disease. Analysis of urine also provides a rich source of information about cellular activity.
Hematology Tests.: Hematology is the study of blood and its components. The complete blood count (CBC) provides information about the state of health or presence of illness (Table 24-1). Changes in the number, size, or appearance of red blood cells (erythrocytes) occur in diseases associated with types of anemia. The hematocrit refers to the separation of blood and is the amount of blood cells in relation to the amount of plasma. It is decreased in severe anemias (low red blood cell count) and massive blood losses but is higher than normal in dehydration and shock.
Table 24-1
Example of a Complete Blood Count (CBC) (Adult)
| COMPONENT | TEST VALUE | NORMAL RANGE |
| WBC | 6.8 K/μL | 4.5-11.0 mm3 |
| RBC | 4.59 M/μL | 4.6-5.4 mm3 |
| Hgb | 14.0 g/dL | 12.0-18.0 g/dL |
| HCT | 40.8 mL/dL | 37.0-54.0 mL/dL |
| MCV | 89.0 μm3 | 80.0-96.0 μm3 |
| MCH | 30.6 pg/cell | 26.0-34.0 pg/cell |
| RDW | 11.3% | 11.4%-16.2% |
| PLT | 252,000/mm3 | 150,000-400,000/mm3 |
| Neutrophil (band) | 50% | 54%-62% |
| Lymphocyte | 36% | 25%-33% |
| Monocyte | 12% | 3%-13% |
| Eosinophil | 2% | 1%-3% |
| Basophil | 0% | 0%-1% |
| RBC morphology | Normal | Normal |
Key: HCT, Hematocrit; Hgb, hemoglobin; MCH, mean corpuscular hemoglobin; MCV, mean corpuscular volume; μL, microliter; μm, micrometer; PLT, platelets; RBC, red blood cell; RDW, red cell distribution width; WBC, white blood cell.
During infections, the type and number of white blood cells (leukocytes) increase (leukocytosis). The neutrophil count, in particular, can be significant. When infection is severe, the bone marrow releases more granulocytes as a compensatory measure. Many young, immature polymorphonuclear neutrophils called “bands” are released into the bloodstream.
Certain drugs may cause such a sharp fall in leukocytes (leukopenia) that the individual is unable to fight off infection. Hemoglobin testing shows the capacity of the blood to transport oxygen from the lungs to the tissues. Hemoglobin levels drop when there is bleeding within the body. A normal platelet count is 150 to 400/mm3 of blood. Platelet activity is essential to blood clotting (Safety Alert 24-1).
In addition to the CBC, tests of bleeding and clotting time of the blood may be done. Knowledge about the length of bleeding time is essential before most surgeries or extensive dental extractions are performed. Common tests for clotting time are the prothrombin time (PT) and activated partial thromboplastin time (APTT). The prothrombin time is prolonged in certain diseases of the liver and in certain blood disorders. Prothrombin time is widely used to adjust dosages of anticoagulant drugs such as sodium warfarin (Coumadin). This test is reported using International Normalized Ratio (INR) numbers. The partial thromboplastin time is used for monitoring clotting time during heparin therapy.
The erythrocyte sedimentation rate (ESR) measures the rate at which the red blood cells settle out of unclotted blood in 1 hour. Inflammatory conditions cause the cells to settle more rapidly. The more rapid the settling, the higher the ESR.
Blood Chemistry Tests.: Chemical laboratory tests are performed on whole blood, plasma, serum, and other body fluids such as urine, spinal fluid, and gastric contents. Blood chemistries are commonly obtained to detect changes in biochemical reactions in the body and to determine a diagnosis. They provide information about the electrolyte balance, the ability of the body to metabolize nutrients, the function of organs, and the presence or accumulation of toxic substances. Most laboratory forms list the normal values for each test with the results of the test.
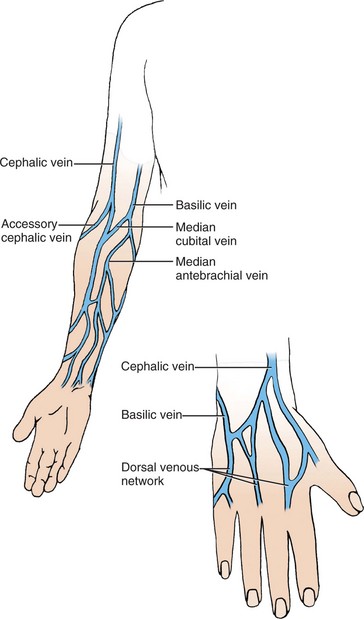
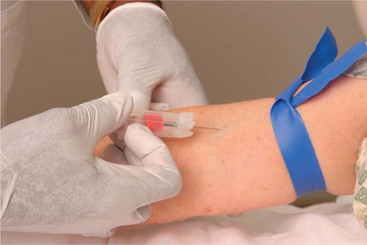
Food and drink are usually withheld for 8 to 12 hours prior to blood chemistry tests. The blood specimen for a complete blood count, chemistry, or serology test is obtained by venipuncture (puncture of the vein with a needle). Hemoglobin may be determined from a fingerstick for capillary blood. Gloves must be worn and Standard Precautions are required, as are steps to prevent continued bleeding from the puncture site. The blood specimens are collected in tubes with color-coded stoppers, which indicate the type of anticoagulant, if any, the tubes contain (Skill 24-1).
Skill 24-1 Phlebotomy and Obtaining Blood Samples with a Vacutainer System
Blood tests are the most commonly ordered diagnostic procedure. Every time a venipuncture is performed for blood sampling, two patient identifiers must be used to verify that the procedure is being performed on the correct patient. The room number cannot be one of the identifiers. Patient name and patient number or birth date are valid identifiers. When there is not a laboratory with a phlebotomist on the premises, the nurse is usually responsible for obtaining the needed blood samples. The Vacutainer system is the most common method used to obtain blood samples. Blood can be drawn using a syringe and needle with the same venipuncture technique. The correct tube, indicated by the color of its top, must be used for the test ordered.
Review and carry out the Standard Steps in Appendix 3.
4. ACTION Fill out a label for each tube.
RATIONALE Ensures that tubes will be correctly labeled.
5. ACTION Explain the procedure to the patient and have her sit with the arm on a table or lie down with the arm stretched out at the side.
RATIONALE Explaining procedure decreases fear of the unknown. Positioning provides stable access to the venipuncture site.
6. ACTION Perform hand hygiene and put on latex gloves.
RATIONALE Reduces transfer of microorganisms.
7. ACTION Select an appropriate venipuncture site, avoiding scars, lesions, or a vessel in which IV fluids are infusing.
RATIONALE Scar tissue is difficult to puncture; a puncture over a lesion may introduce microorganisms into the blood; IV fluids may alter the test results.
8. ACTION Place the Vacutainer tube inside the holder, but do not push it onto the needle; position the Vacutainer holder and tubes within easy reach.
RATIONALE Preparing the system for use allows you to pick up the equipment with one hand after you have stabilized the vessel.
9. ACTION Lower the extremity so the site is below the heart.
RATIONALE A dependent position enhances blood flow to the site.
10. ACTION Apply a tourniquet to the extremity 2 to 4 inches above the venipuncture site. It should be moderately tight. Ask the patient to make a fist (unless a potassium level specimen is being drawn).
RATIONALE The tourniquet obstructs blood flow out of the vessel and causes the vein to fill with blood. A distended vein is easier to palpate and puncture. Making a fist aids in vein distention, but will elevate the reading for potassium by forcing potassium out of cells.
11. ACTION Cleanse the site with 70% alcohol in a circular motion outward; allow the area to dry.
RATIONALE Alcohol decreases the number of microorganisms on the skin, preventing their transfer to the blood.
12. ACTION Pick up the Vacutainer holder and tube in your dominant hand and remove the needle cover.
RATIONALE Prepares the unit for venipuncture.
13. ACTION Anchor the vein with the thumb of your nondominant hand far enough below the site so that the needle will not touch the thumb as it enters the vessel.
RATIONALE Stabilizes the vein so that it does not roll when venipuncture is performed.
14. ACTION Hold the Vacutainer unit with the needle bevel facing up and position it at a 30-degree angle over the desired venipuncture site.
RATIONALE Positions needle for entry into the vessel.
15. ACTION Puncture the site, and, while stabilizing the Vacutainer unit, press the tube stopper onto the needle; blood running into the tube indicates successful venipuncture.
RATIONALE Stabilizing the unit prevents pushing the needle through the vein when pressing the tube stopper onto the Vacutainer needle.
16. ACTION Allow the tube to fill completely.
RATIONALE Ensures a sufficient quantity of blood to perform the test.
17. ACTION If further specimens are needed, stabilize holder and remove filled tube and set safely aside. Place next tube carefully on needle and allow to fill. Repeat until all required tubes are filled. Remove final tube.
RATIONALE Obtains sufficient blood for all ordered tests. Stabilized holder prevents pushing needle through vessel wall. Removing last tube before removing needle prevents introducing air into the tube.
18. ACTION Loosen the tourniquet, and withdraw the needle from the vein and secure the needle guard.
RATIONALE Loosening the tourniquet before withdrawing the needle will decrease the amount of bleeding that occurs.
19. ACTION Immediately apply a dry gauze pad with pressure to the vein to stop the bleeding.
RATIONALE A dry pad aids coagulation of the blood, and pressure constricts the vessel, decreasing bleeding.
20. ACTION Apply a small adhesive bandage over the puncture site.
RATIONALE Decreases entrance of microorganisms at the site and helps prevent further bleeding.
21. ACTION Carefully remove and dispose of the Vacutainer needle in a biohazard sharps container.
RATIONALE Prevents accidental needlesticks.
22. ACTION Remove and label the tube(s) of blood, and place in a biohazard bag.
RATIONALE Labeling the tube(s) correctly identifies the patient’s blood. A biohazard bag prevents blood contamination should the tube(s) become broken.
23. ACTION Fill out the laboratory requisition slip, and attach it to the blood samples; send it to the laboratory.
RATIONALE Identifies the correct test to be done for the right patient.
24. ACTION Remove gloves and perform hand hygiene.
RATIONALE Reduces transfer of microorganisms and removes powder from hands.
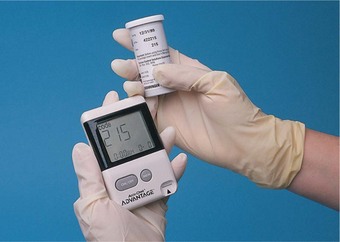
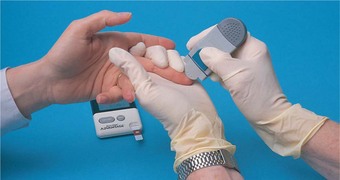
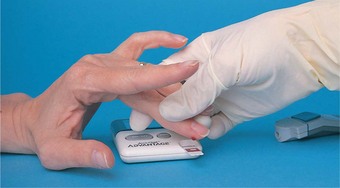
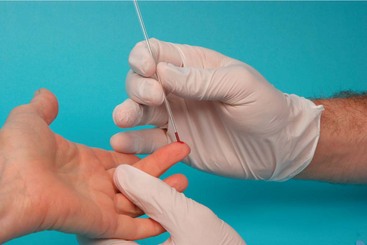
Blood glucose tests are essential in the diagnosis and control of diabetes. Testing the amount of blood glucose can be done outside the laboratory using capillary blood from a fingerstick, test strips, and a machine called a glucometer (Skill 24-2). The tests of bilirubin, alanine aminotransferase (ALT), and alkaline phosphatase (ALP) are used to measure liver function. Blood urea nitrogen (BUN) and creatinine levels are important indicators of kidney dysfunction. Damage to striated and heart muscle can be detected by testing for blood levels of lactate dehydrogenase (LDH), creatine kinase (CK), and aspartate aminotransferase (AST). Other tests are used to determine toxic levels of substances such as barbiturates, lead, arsenic, and medications. Most laboratories are equipped with automated and computerized instruments that carry out multiple tests on a single specimen. One model is the sequential multiple assay (SMA, SMAC) unit, which can be programmed to run a battery of screening tests on one blood sample. Table 24-2 shows a typical SMA-12 panel (group of tests) with normal values for each component.
Skill 24-2 Performing a Capillary Blood Test: Blood Glucose or Hemoglobin
Random blood sugar tests are performed for known diabetic patients and for patients who are showing signs and symptoms of hyperglycemia or hypoglycemia. A quick screening test for anemia is done by measuring hemoglobin. Both of these tests are done with capillary blood taken from a fingertip and are frequently done by the nurse in the physician’s office or clinic.
Review and carry out the Standard Steps in Appendix 3.
4. ACTION Perform hand hygiene and put on gloves. Cleanse the chosen fingertip thoroughly with an alcohol swab. Ask the patient to hold the finger separated from the others and not to touch anything as the alcohol dries.
RATIONALE Removes bacteria from the finger, preparing it for the puncture. Alcohol will dry while machine is set up, saving time.
5. ACTION Turn on the machine, place the lancet in the holder, and remove the lancet cover. Cock the lancet device. Check the control number that appears on the screen with the control number on the bottle of test strips.
RATIONALE Prepares the equipment to puncture the skin. Checking control number ensures that the correct setting is used for the machine because it must match the strip number.
6. ACTION Remove a test strip from the bottle and insert the end with the metal strips into the machine. (For machines that have intervening steps, check the manufacturer’s directions. Some machines require that the specimen be obtained and a certain time period elapse before the strip is placed in the machine.)
RATIONALE Prepares the machine to read the amount of glucose in the blood.
7. ACTION Place the fingerstick device firmly on the skin and push the release button, causing the lancet to pierce the skin.
RATIONALE With the device at a right angle to the fingerprint lines, the needle should pierce the skin deeply enough to provide free blood flow with little pressure.
8. ACTION If machine directions indicate need, wipe away the first drop of blood with a clean cotton ball.
RATIONALE First drop often contains a large portion of serous fluid that dilutes the specimen, causing false result.
9. ACTION Lightly squeeze the finger, gently milking down the finger toward the tip until a large drop of blood has formed on the tip.
RATIONALE Provides an adequate amount of blood for the specimen.
10. ACTION Lightly apply the drop of blood to the pad on the test strip and apply a clean cotton ball to the puncture wound with pressure. Ask patient to hold the cotton ball tightly in place.
RATIONALE Applying blood to test strip begins the test. Pad must be completely covered with blood for accurate result. Pressure and dry cotton ball stop bleeding.
11. ACTION For alternate type of glucometer, start the timer and place the test strip on a paper towel beside the timer. At 60 seconds, place the test strip into the machine. See the manufacturer’s directions.
RATIONALE Some machines require different procedures for an accurate result.
 Evaluation: Blood Glucose Test
12. ACTION Note the reading on the screen of the machine and record it. Turn the machine off. Share the result with the patient.
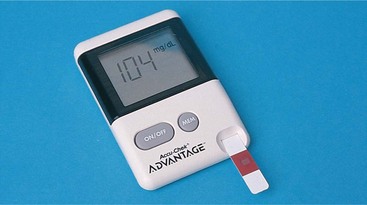
RATIONALE Machine will provide a reading. If “error” appears, turn off the machine and start the procedure over from the beginning. Too much or too little blood on the test strip may cause an error. It is necessary for the patient to know the reading in order to participate in care.
13. ACTION Assess whether the patient’s finger is still bleeding. Stop the bleeding and apply an adhesive bandage if patient desires one.
RATIONALE Prevents blood continuing to flow; prevents transmission of possible blood-borne pathogens.
14. ACTION Dispose of the test strip, lancet, and blood-tinged supplies in the appropriate hazardous materials waste receptacles. Remove the gloves and perform hand hygiene.
RATIONALE Prevents the transmission of blood-borne pathogens.
15. ACTION Document the procedure and the reading on the patient’s medical record. In the inpatient facility, record the reading on the appropriate flow sheets.
RATIONALE Provides a record of the reading; patients on insulin have a place on the medication administration record (MAR) for the recording of the blood glucose reading.
After Step 4:
5. ACTION Perform the fingerstick as in Step 7 for Blood Glucose Test. Wipe away the first drop of blood and obtain a large drop of blood. Hold the capillary collection device with the point in the drop of blood to draw up the blood.
RATIONALE Blood will flow into the test stick.
6. ACTION Gently wipe the flat back side of the test stick on the clean gauze pad.
RATIONALE Removes excess blood.
7. ACTION Place a clean cotton ball tightly against the puncture wound.
8. ACTION Remove used supplies from the area. Turn on the hemoglobin machine and place the test stick into the proper slot according to the manufacturer’s directions.
RATIONALE Disposes of used supplies. Prepares machine to take the reading.
9. ACTION Note the reading and write it down.
RATIONALE Obtains the result and prevents forgetting the number read.
10. ACTION Turn off the machine and dispose of the used capillary blood stick in the sharps container. Remove the gloves and perform hand hygiene.
RATIONALE Reduces chance of transfer of blood-borne pathogens.
11. ACTION Share the result with the patient; apply an adhesive bandage to the puncture wound if desired.
RATIONALE Sharing result keeps patient informed. Bandaging prevents further bleeding and protects wound.
 Warming the hand before attempting the fingerstick provides a greater chance of a successful specimen on the first attempt.
Small children will need to be held by the parent or another nurse.
Children should be told that it will “be a tiny sting” and that they will see blood. Do not lie to the child.
Having children use a finger puppet on the other hand sometimes will distract them sufficiently from the procedure that they will hold still.
The elderly bleed more easily than younger persons and may not need as deep a puncture.
The puncture depth of the lancet needle can be adjusted by pushing the lancet further in or pulling it out a little from the holder.
This procedure should never be performed without the use of gloves due to the risk of contamination with blood.
Table 24-2
Sequential Multiple Assay (SMA) Panel (SMA-12)
| TESTS INCLUDED | NORMAL RANGE* |
| Albumin | 3.5-5.2 g/dL |
| Alkaline phosphatase (ALT) | 35-150 Units/L |
| Aspartate aminotransferase (AST) | 1-36 Units/L |
| Bilirubin, total | 8.4-10.4 mg/dL |
| Calcium, serum | 8.4-10.6 mg/dL |
| Cholesterol | 60-180 mg/dL |
| Glucose | 70-100 mg/dL |
| Lactate dehydrogenase (LDH) | 110-220 Units/L |
| Phosphate | 3.0-4.5 mg/dL |
| Total protein | 6.0-8.0 g/dL |
| Urea nitrogen (BUN) | 11-23 mg/dL |
| Uric acid | 2.2-8.0 mg/dL |
*Normal range may vary among laboratories depending on the type of test performed and the reagents used. (The SMA-6, SMA-7, and SMA-20 are different panels containing tests for 6, 7, and 20 substances.)
Serology Tests.: Serology tests are based on the analysis of blood serum. They are important in diagnosing many diseases stemming from bacterial and viral infections. Diseases such as dysentery, rheumatic fever, typhoid, influenza, rubella, and syphilis produce positive reactions related to antigen antibodies. Radioimmunoassays, which are based on principles of immunity, use radionuclides (radioactive material; formerly called radioisotopes), such as iodine-125 and iodine-131, to detect minute particles of protein in the blood. Blood typing and identification of blood factors may also be carried out in the serology section of the laboratory. Examples of common serology tests are listed in Box 24-2. Most serology tests can be done without restricting the patient’s food or fluid intake. However, some of the radioimmunoassays may require the administration of the radionuclide drug at a certain time before drawing blood for the test. For viral infections, two separate specimens are needed to show a rise in titer during the illness.
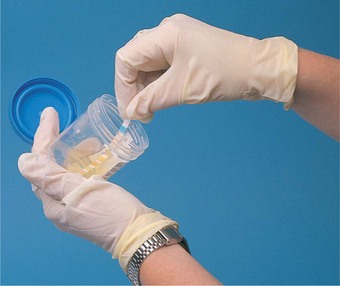
Urinalysis.: Analysis of urine provides valuable information about the function of the kidneys and other biologic processes within the body. Organic compounds found in the urine include urea, uric acid, creatinine, and hippuric acid. Inorganic substances found are sodium, chloride, phosphate, potassium, and ammonia. Urine composition varies according to fluid intake and diet; therefore, the time the specimen is obtained may influence the results.
Urine specimens can be classified as
• Single, catheterized, or random specimens that can be collected at any time, with no special preparation required (a specimen of the first voiding in the morning is preferred because it is more concentrated)
• Midstream specimens, in which the external genitalia are cleansed, a small amount of urine is passed, and then a midportion of the voiding is collected in a sterile container and used for a culture. The procedure for obtaining a midstream specimen is located in Chapter 29.
• Timed, long-period specimens, in which all urine is collected over a 12- or 24-hour period and placed in a container containing some type of preservative.
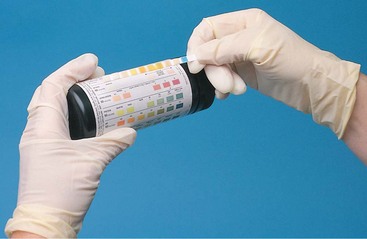
Generally, no special instructions are required for the single, random specimen. Often a urine dipstick test is performed to screen the specimen for abnormalities. Urine dips are performed using test strips or sticks that have various chemicals impregnated in them (Skill 24-3). Patient Teaching 29-1 in Chapter 29 provides instructions for the midstream specimen. The method for obtaining a specimen from an indwelling urinary catheter is listed in Steps 29-1 in Chapter 29. A laboratory manual must be consulted for instructions on carrying out special types of urine tests. Some tests require restriction of fluid intake; others require that set amounts of fluids be given and urine specimens be obtained at specified times (Patient Teaching 24-2). A normal urinalysis is presented in Table 24-3.
Skill 24-3 Performing a Urine Dipstick Test
Urine dipsticks are manufactured to test for several substances in the urine. They provide a quick and easy way to screen for abnormalities in the urine in the physician’s office, at home, in the clinic, in the long-term care facility, or on the hospital nursing unit. A random or midstream urine specimen is used for the test.
Review and carry out the Standard Steps in Appendix 3.
3. ACTION Fill in a lab report form with the patient’s name, physician’s name, date, and your initials.
RATIONALE Sheet is ready for recording of the test results.
4. ACTION Obtain the specimen, put on gloves, and wet the dipstick with urine, making certain that each colored square is moistened. Remove the stick from the urine quickly and gently tap it on the side of the container to remove excess urine.
RATIONALE The stick can be dipped into the urine or a small amount of urine can be poured down the stick while holding it over the toilet or a workroom sink.
5. ACTION Start timing the tests immediately after wetting the stick.
RATIONALE Exact timing is necessary for accuracy of the test results. Some portions of the test require 30 seconds before reading; others are read at 40 seconds, 45 seconds, or 60 seconds.
6. ACTION Hold the stick horizontally and compare the color chart on the side of the Multistix bottle with the color on the strip at the correct time interval.
RATIONALE Allows for close comparison of the colors for each square on the stick with the color chart on the bottle.
7. ACTION Write down the result for each component of the test on the lab report form.
RATIONALE Records the test results.
8. ACTION Dispose of urine, container, and used Multistix correctly in biohazard waste receptacle. Remove gloves and perform hand hygiene.
RATIONALE Reduces transfer of microorganisms.
9. ACTION Share results with patient or give the report to the physician.
RATIONALE Participation of patient in testing and care improves understanding of treatment. Documentation is the completed laboratory slip.
Certain medications and vitamins may discolor the urine and interfere with accurate reading of the test results.
Urine specimens must be tested while they are fresh for the result to be accurate.
If the patient produces the specimen at home, ask that it be refrigerated until it can be brought in for testing.
Table 24-3
| CHARACTERISTIC | NORMAL VALUE |
| Color | Yellow, straw, dark yellow, amber |
| Character | Clear |
| Specific gravity (sp gr) | 1.010-1.030 |
| Acetone, ketones | Negative |
| Glucose (gluc) | Negative |
| Protein (Alb) | Negative |
| Nitrite | Negative |
| Occult blood | Negative |
| pH | 4.6-8.0 |
| Odor | Faint (not fruity, musty, fishy, or fetid) |
| Urobilinogen | Negative or 0.1-1 Ehrlich Units/dL |
| Cells | |
| Erythrocytes | 2 or fewer per high-power field |
| Leukocytes | 4 or fewer per high-power field |
| Casts | None |
| Crystals | Small amount |
| Bacteria or fungi | None |
| Parasites | None |
| Epithelium | 10 or fewer cells per high-power field |
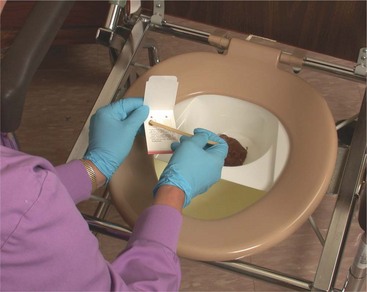
Other Laboratory Tests.: Among the other laboratory tests performed are bacteriology, histology, and cytology tests. Specimens of blood, urine, feces, and wound drainage, and samples of other body fluids or tissues, may be cultured to identify the disease-causing organism. To obtain a stool specimen, ask the patient to catch some stool in a container suspended in the toilet bowl, in a bedpan, or in plastic wrap draped on the rim of the toilet bowl. A small amount of stool is transferred to the appropriate container for a culture or a test for ova and parasites (O & P), or onto cards for the occult blood test (Skill 24-4). Aseptic technique must be maintained when collecting specimens for culture and sensitivity. In sensitivity tests, the identified organism is subjected to various antibiotic drugs to see which ones are most effective in killing it. With new culture media that contain chromogens that interact with bacterial and fungal enzymes, organisms can be identified after only 24 hours of incubation.
Skill 24-4 Obtaining a Stool Specimen for Occult Blood, Culture, or Ova and Parasites
Nurses frequently need to obtain a stool specimen from a patient and test it for occult blood. Specimens may also be sent for culture or for tests for ova and parasites or other substances. Stool for ova and parasites must be sent to the laboratory immediately. In some states, stool testing is only permitted in the laboratory.
“Hat” collection container to place in the toilet
Container with culture preservative
Specimen container for ova and parasites
Review and carry out the Standard Steps in Appendix 3.
5. ACTION Place collection container by toilet or position patient on bedpan. Ask patient to use call button when specimen is ready.
RATIONALE Container will be at hand when needed. Alerts nurse to collect specimen.
6. ACTION Instruct patient to void and use tissue before placing stool collection container in toilet to catch stool specimen; or clean and replace bedpan after voiding.
RATIONALE Stool specimen should be free of urine or tissue.
7. ACTION Assist patient with cleansing of rectal area as needed. Assist to perform hand hygiene.
RATIONALE Keeps patient clean and prevents spread of microorganisms.
8. ACTION Perform hand hygiene and put on gloves.
RATIONALE Protects hands from fecal contamination.
9. ACTION Take specimen in covered bedpan to bathroom or utility room if bedpan was used.
RATIONALE Provides private area in which to transfer the specimen to the lab container or onto the stool cards.
10. ACTION Open specimen jar containing culture medium, placing lid upside down on counter. Withdraw sterile swab from culture tube or package and place it into stool to obtain stool sample the size of a bean. Place stool into the stool culture container with the culture medium. Taking care not to contaminate the inside of the jar lid, replace it on the container.
RATIONALE Placing lid upside down prevents contamination of the lid. Prepares stool for laboratory culture.
11. ACTION Using wooden tongue blades, transfer a portion (1 inch or 2.5 cm) from the middle of the stool to the container for the ova and parasite specimen. If the stool is liquid, transfer about 15 mL of liquid stool to the container.
RATIONALE Readies the specimen for the lab.
12. ACTION Send to the laboratory immediately with a filled-out requisition slip. Be certain specimen container is properly labeled with the patient’s name, date, and room number, and physician’s name.
RATIONALE Identifies specimen as belonging to the patient; routes laboratory result to the correct physician.
13. ACTION Open the front window(s) of the specimen card.
RATIONALE Readies the card for receipt of the specimen.
14. ACTION With wooden stick, obtain a small amount of stool from the middle, interior portion of the specimen. Smear it on the area within the window of the stool card. Repeat if more than one window is to be filled for the test.
RATIONALE Places specimen within the testing area of the card. Only a very small amount of stool is required.
15. ACTION Open occult blood specimen card back window.
RATIONALE Provides access to the specimen for testing.
16. ACTION Place two drops of the occult blood specimen reagent on the stool smear and one drop on the control; repeat for each window on the card. (Check test instructions for number of drops of the reagent; some test instructions differ.)

17. ACTION Wait 30 seconds. Read the test, looking for blue discoloration in or around the stool smear. Check that the control turned blue.
RATIONALE Blue color within 30 seconds indicates that blood is present in the stool. Careful timing is essential to accuracy of the test.
18. ACTION Dispose of the test card in a biohazard waste container. Cleanse the bedpan or “hat” stool collection container. Remove gloves and perform hand hygiene.
False-positive and false-negative results for occult blood tests are prevented by the patient following the recommendations for diet and medication cessation for several days prior to the test. See particular test manufacturer’s recommendation sheet.
Stool cultures are often done in a series of three on specimens taken from different bowel movements.
Histology and cytology tests involve the study of tissues and cells. Confirmation of a diagnosis often depends on viewing tissues under a microscope to see the effects of the disease. Organs and tissues removedat biopsy (surgical excision of a small amount of tissue) are studied closely and a pathology report is prepared. Studies of tissues and cells are performed to detect carcinogenic, metabolic, vascular, and other changes.
A variety of procedures may be used to obtain specimens for bacteriologic or cytologic examinations. Venipuncture and bone marrow aspiration (withdrawal of fluid or cells) yield specimens for culture or cytologic studies; urine specimens can be obtained from catheters and by clean-catch procedures. Lumbar puncture is used to obtain spinal fluid for culture. Standard Precautions must be employed and aseptic technique followed to guard against infection or contamination of specimens.
Ultrasonography: Ultrasonography (sonography) is a noninvasive method of visualizing soft tissue structures of the body. The sonogram is a recording of the reflection of the ultrasonic waves directed into the tissues. The procedure is used to diagnose many pathologic conditions of the female reproductive organs, prostate, heart, kidney, pancreas, gallbladder, lymph nodes, liver, spleen, thyroid, eye, and peripheral blood vessels. It is often used in conjunction with radiography or nuclear medicine scans. The procedure is quick and does not usually produce much discomfort. Sonograms are produced with high-frequency sound waves that pass through the body. Echoes vary with tissue density, and the tracing produced is an echo-reflection map.
Patient preparation depends on the type of sonogram desired. For an abdominal sonogram, the patient is asked to drink a liter of water before the procedure. A gel or lubricant is applied to the skin over the area to be examined. The technician moves the transducer (wand emitting the sound waves) over the area with slight pressure. The echo-reflection pattern is displayed on a monitor, and pictures may be recorded or printed. The test takes approximately 35 to 45 minutes. There is no particular aftercare needed.
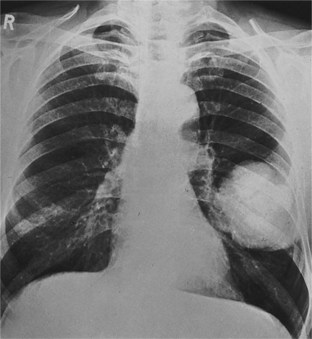
X-Rays, Fluoroscopy, and Cineradiography.: The radiology department uses radiography, fluoroscopy, and cineradiography to produce data to be used in diagnosis. Different types of radiation are used for diagnosis and treatment of disease: alpha rays, beta rays, gamma rays, and x-rays. The most widely used radiologic diagnostic technique, irradiation by x-ray, produces an image of the denser tissues of the body by passing rays through the part to expose a film. The denser tissues block the x-rays and prevent them from exposing the film; therefore, tissues appear as black, gray, or white images depending on the degree of density. X-rays of the bony skeleton are examples of this process. Radiopaque solutions and materials can be used in various organs to form shadows on the film that show size, location, and structure of less dense tissues (Figure 24-1).
Fluoroscopy is used to examine movement. X-rays are passed through the body part and are projected on a fluorescent screen. The dense tissues produce dark shadows on the film, whereas soft tissues appear whiter. To examine movement through organs or soft tissues, the room is made dark and a radiopaque substance is introduced into the body. For example, to observe movement and structure of the throat, esophagus, and stomach, barium is swallowed. Cineradiography is the method of adding a video camera to the fluoroscope equipment and making a photographic record of the procedure. It produces a videotape; therefore, the results can be viewed and examined in more detail.
The low intensities of diagnostic x-rays make them quite safe to use, because the exposure is of short duration and the rays do not penetrate deeply into the tissues. Higher intensity doses of radiation are harmful to the cells and are used therapeutically to bombardand kill cancer cells in the body. Commonly performed radiologic procedures include the following:
Radionuclide Scans.: Radionuclide scans are based on the fact that various organs and soft tissues of the body attract and concentrate certain radionuclides. These studies are carried out in the nuclear medicine department, which is often a division of the radiology department. A radioactive substance is injected into a vein and then, after a period of time to allow the organ being scanned to absorb the substance, a radioactivity scanner (scintillator) is passed over the area where the organ is located. Serial pictures are produced at intervals. The radioactive substance is passed in the urine fairly quickly. The patient is not considered radioactive. Radionuclides are used in scanning the thyroid gland, kidneys, brain, liver, lungs, bones, and pericardium and in determining blood volume. The time required for the scan depends on the organ being scanned (Safety Alert 24-2).
Nursing care involves proper disposal of linens, waste materials, and body secretions that have been made radioactive. The patient is asked to empty the bladder when imaging is complete to reduce radiation exposure time. Assure patients that they are not radioactive or a danger to others in the vicinity.
Computed Tomography.: Computed tomography (CT) x-rays of various organs and parts of the body are used to confirm a diagnosis, plan treatment, evaluate the effects of treatment, and guide needle placement in biopsy or aspiration. A computer enhances x-rays and allows examination of horizontal sections of the body at various angles to define tissue density.
Blood flow is assessed with CT angiography. A contrast medium in used for the procedure. The test is used for suspected pulmonary embolism and arteriovenous malformation, to determine patency of coronary arteries, and to detect blood flow patterns to tumors.
Most CT scans are noninvasive, but consent may be required for scans using a contrast medium. The preparation of the patient depends on the organ or part to be examined. The CT scan requires that the patient be in one position for 10 to 45 minutes. The patient is positioned on a table inside the scanner. The scanning machinery revolves around the body part being scanned. Data are fed into the computer, which produces images in shades of gray that indicate the different densities of the organ.
Magnetic Resonance Imaging.: Magnetic resonance imaging (MRI) is a noninvasive method of differentiating normal from abnormal tissue in the body. MRI is commonlyused for the brain, knee joint, spine and spinal cord, and abdominal organs. The patient must lie flat and very still. The patient is placed on a table and then slid inside the large cylinder-shaped machine; the cylinder may be of open or closed design (Figure 24-2). As scanning takes place, loud clicks can be heard. The procedure takes up to 1½ hours. The patient can talk through an intercom system to the MRI staff. This may help relieve feelings of claustrophobia. Patients with metal devices implanted in the body, such as cardiac pacemakers, automatic implantable cardiac defibrillators, metal hip prostheses, artificial cardiac valves, vascular clips, or staples from recent surgery, cannot undergo this procedure because the machine emits a strong magnetic field.
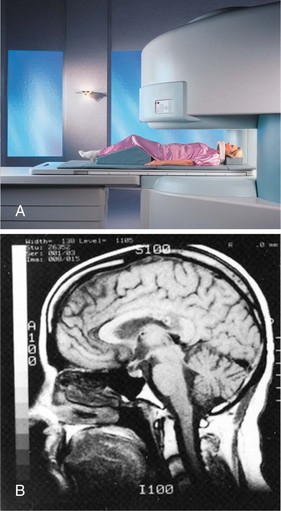
FIGURE 24-2 A, Magnetic resonance imaging (MRI) machine. B, Midline sagittal view of the brain using MRI.
Describe the machine and procedure to the patient. The underlying concept is one of changing magnetic fields, and information is translated into images of different densities of tissue in the body.
Nursing care involves obtaining consent and making certain that all surface metal (e.g., rings, watch) is removed from the patient’s body. Instruct the patient to lie very still during the procedure and to keep the eyes closed to decrease feelings of claustrophobia. Music of the patient’s choice may be provided. Teach the patient deep-breathing and rhythmic-breathing relaxation techniques.
Cardiopulmonary Studies and Procedures: A battery of tests that range from simple to complex is used to diagnose heart or lung disease (Box 24-3).
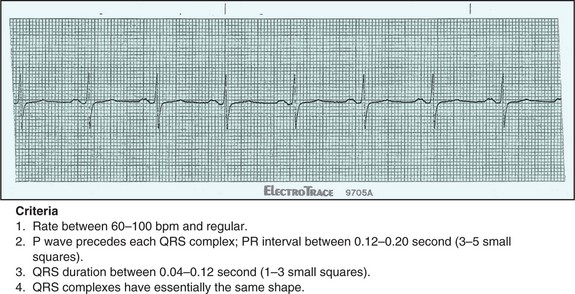
Electrocardiogram.: The electrocardiogram (ECG, EKG) was one of the first diagnostic tests of heart activity and is still important because it is quick and easy and provides an immediate visual record. The ECG consists of waves and lines that represent the electrical activity during the cardiac cycle (Figure 24-3). There are P waves, the QRS complex, and the T wave. Sometimes a U wave is present. The person trained in interpreting the tracing can determine if the waves are normal or abnormal. Nurses in medical offices or clinics often are responsible for obtaining the ECG tracing. Clothing is removed from the upper body in order to apply the electrodes to the skin (Figure 24-4). Female patients are given a gown positioned with the ties in the front. Necklaces, bracelets, and watches are removed because they sometimes interfere with the electrical tracing (Steps 24-1).
Cardiac Catheterization.: Cardiac catheterization is a procedure used to determine the function of the heart, valves, and coronary circulation. During catheterization, readings can be taken of oxygen concentration at different sites, of pressure in the different heart chambers, and of cardiac output. Abnormal blood flow through the heart and the coronary vessels can be detected. Cardiac catheterization is of great value in diagnosing coronary artery disease and valvular dysfunction.
The patient signs a consent form and must have a complete history and physical examination before the procedure. Nothing is given by mouth for at least 6 hours, and a sedative-narcotic may be given to allay apprehension and anxiety.
Cardiac catheterization is a surgical procedure using surgical aseptic techniques. It is carried out in a special cardiac catheterization laboratory, radiology department, or surgical suite. A catheter is inserted into a vein or artery and threaded into the heart for injection of contrast media and pressure readings. Heart action is observed by fluoroscopy and is continuously monitored by ECG until the tests are completed. A videotape is made to provide records of heart function. Postcatheterization nursing care includes ensuring the patient has bed rest for 2 to 12 hours, frequent checking of the pressure dressing over the insertion point, and measuring vital signs and the distal pulse every 10 to 15 minutes for the first hour and the temperature every 6 hours. When the femoral approach has been used, the patient’s leg may be immobilized for several hours. This lessens the chance of bleeding. Unless a new self-sealing type of catheter was used, immobilization is often done by the placement of a special pressure device or by small sandbags. Observe closely for chest pain, dyspnea, bleeding from the wound, quality of pulses distal to the catheter entry point, abnormal neurologic signs, and any signs of infection (Legal & Ethical Considerations 24-1).
When a noninvasive procedure is desired and advisable, an electron beam tomography test may be performed on the heart. This will show the percentage of calcification present in the coronary arteries. Calcium deposits are part of the atherosclerosis process and can help predict the degree of risk for coronary occlusion or myocardial infarction.
Angiography and Arteriography.: Angiography and arteriography are used to locate lesions, occluded vessels, tumors, and malformed blood vessels. A contrast medium is injected into an artery and x-rays are takenof the dye spreading through the vessels. The procedure may be used to diagnose problems in arteries anywhere in the body: heart, neck, brain, orextremities.
A consent form is signed and baseline vital signs are obtained. Usually the patient is given nothing by mouth for at least 6 hours, and a mild sedative or tranquilizer is given before the procedure. After the procedure, the patient is kept on bed rest for a number of hours, an ice pack is applied to the insertion point, and vital signs are measured periodically. The contrast medium insertion point is also checked for bleeding or formation of a hematoma (collection of clotted blood). Be alert for any reaction to the dye.
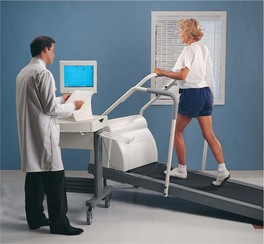
Treadmill Stress Test.: The treadmill stress test measures the cardiac heart rate and blood pressure response to clinically controlled active exercise. It is used to diagnose heart capacity, to guide convalescence from a myocardial infarction (heart attack), and to determine response to medical treatment. While having heart action continuously monitored by ECG, the patient walks on a treadmill, pedals a stationary bicycle, or climbs a set of stairs (Figure 24-5). The speed and degree of the incline of the treadmill can be changed to increase the amount of work or stress on the heart. The speed and resistance of the exercise bicycle can also be changed to meet the established standards for the test. The test is terminated when the desired heart rate is reached, the patient shows signs of fatigue, or the ECG shows signs of cardiac ischemia. Often thallium-201, a radioisotope, is used to show myocardial perfusion while exercising during the stress test. A consent form is signed, and the patient may have a light meal 4 to 6 hours before the test and must avoid caffeine and smoking for 4 hours prior to the test. The patient is told to discontinue taking medications when the test is for diagnostic purposes; medications may be taken when the test is to determine response to treatment. After a period of rest, the patient is able to resume usual activities.
Pulmonary Function Tests.: Pulmonary function tests provide information about respiratory function, lung capacity, and diffusion of gases. Appointments are made for the tests to be performed in the pulmonary laboratory. Spirometers and other breathing devices may be used. No special preparation is required.
Endoscopic Examinations: There are many procedures based on the use of an endoscope (an instrument used to view inside a body cavity). Endoscopes are small metal or plastic devices or flexible tubes equipped with fiberoptics that provide direct light to the tissues being examined. Preparation of the patient depends on the test to be performed.
Gastroscopy.: Gastroscopy is the visual inspection of the upper digestive tract and the stomach to obtain specimens of gastric contents and perform a biopsy on the stomach tissues. A signed consent form is required. The patient is instructed to take nothing by mouth for 8 hours before the examination. About 30 minutes before the procedure, an injection of an atropine-like drug and a sedative is given.
The test is conducted in the GI laboratory. A local anesthetic is sprayed on the pharynx, and a gastroscope is passed to the stomach. The scope has a fiberoptic system for its lens. The gastroscope may be equipped with a camera to take color photographs. Washings are done to obtain specimens for cytology studies or a biopsy specimen is taken.
The patient should take nothing by mouth until the effects of the local anesthetic have worn off and the gag reflex has returned. After resting for a period of time, the patient can resume usual activities. Observe for signs of bleeding or unexplained pain, which might be due to perforation of an ulcer.
Proctosigmoidoscopy.: Proctosigmoidoscopy is the visual inspection of the lower bowel and is used to check the lining for ulceration, polyps (growths protruding from a mucous membrane), tumors, inflammation, and other abnormalities. Consent is required for the procedure. The bowel should be clear of fecal material; therefore, a cathartic is given the night before the procedure and an enema may be ordered. The patient may be restricted to a liquid diet the day before the test. The patient should empty the bladder before the test and then assume a side-lying or Sims’ position on a table. The sigmoidoscope is inserted. The fiberoptic lens enables the examiner to see the structures, and suction can be used to remove secretions. Air may be introduced to inflate the lower bowel to better view the wall, and biopsy forceps may be used to remove a specimen of tissue. Some abdominal cramping is usually experienced. No special aftercare is required. The nurse assists the physician with this procedure (Steps 24-2).
Colonoscopy.: Colonoscopy is the inspection of the entire large intestine for polyps, areas of inflammation, and malignant lesions. It confirms suspicious findings of x-rays and is used to take biopsy specimens or remove polyps found on other studies or in patients with a known history of polyps.
The patient is placed on a clear liquid diet for 24 to 48 hours before the procedure, avoiding liquids that contain red or purple dye, and given nothing by mouth for at least 8 hours. Sometimes a particular diet is ordered for the 3 days before the test. Bowel cleansing with laxatives, cathartics, and enemas is performed in the 24 hours before the test. Bowel fluid must return clear before colonoscopy can be successfully performed. Sedation is given to promote relaxation and decrease awareness. The procedure takes 30 to 90 minutes.
A long, flexible fiberoptic endoscope is inserted anally and slowly advanced through the large intestine. The patient is generally well sedated throughout the procedure. A signed consent is required. Check the patient’s laboratory values for CBC and clotting times to see that they are within normal limits. Any iron medication, aspirin, and most anti-inflammatory drugs must be withheld for 3 days. See that the patient is instructed in the clear liquid diet regimen and bowel-cleansing program. Administer the bowel preparation components as ordered. Give any ordered pretest medications. Teach the patient about the procedure and what to expect. Colonoscopy should not be done sooner than 10 to 14 days after barium GI studies. Obtain baseline vital signs. After the test, monitor the vital signs every half-hour for 2 hours and then according to facility protocol. Monitor rectal bleeding. Slight bleeding is expected if polyps were biopsied or removed. Keep the patient on bed rest for the timeordered. Someone must drive the patient home.
Cystoscopy.: Cystoscopy is the visual inspection of the interior of the bladder for the collection of biopsy specimens, collection of urine separately from each ureter, and treatment of various conditions. It is valuable in diagnosing urologic ailments. Aseptic technique is used throughout the procedure to avoid in-troducing microorganisms and causing infections in the urinary tract. With the patient in the lithotomy position, the cystoscope is passed through the urethra and the bladder is visually inspected. Cystoscopy is often carried out in conjunction with the intrave-nous pyelogram (IVP) and is used for surgical procedures involved in transurethral resection of the prostate, removal of bladder tumors or polyps, and various other bladder treatments. Local or general anesthetics are used when cystoscopy will cause discomfort or pain.
A signed consent form is needed, and the patient is to be given nothing by mouth after midnight. Usually a cathartic is given the evening before the test to empty the colon of feces. Afterward the patient should be on bed rest for 3 to 4 hours or until recovered from the effects of anesthesia. Fluid intake should be increased, and it is common for the urine to be pink tinged after the procedure, but red urine and clots should be reported to the physician. Mild analgesics may be given for complaints of backache. Vital signs are checked, and temperature should be taken every 6 hours because some patients experience a fever a day or so after the procedure resulting from the spread of an infection already present in the urinary tract.
Endoscopic Retrograde Cholangiopancreatography.: Endoscopic retrograde cholangiopancreatography (ERCP) is used to identify a cause of biliary obstruction such as stricture, cyst, stones, or tumor. The procedure is usually done because jaundice (yellowness of the skin, mucous membranes, and sclera caused by presence of bile pigments) is present. The patient is placed on the x-ray or endoscopy table, and a local anesthetic is sprayed on the pharynx to help prevent gagging during insertion of the endoscope. The endoscope is inserted through the mouth and down into the duodenum after intravenous sedation, usually diazepam (Valium) or midazolam (Versed), is given. Atropine may be given to decrease secretions in the oropharynx. Secretin may also be given when the duodenum is reached to stop peristalsis. A catheter is inserted into the pancreatic duct via the endoscope and a contrast medium is injected. X-rays are taken. The procedure takes about an hour. The patient is monitored during the procedure for complications from medications or from perforation by the endoscope.
The patient is given nothing by mouth for 8 hours before the test. A sedative-narcotic and atropine are given in preparation for the insertion of the endoscope (Safety Alert 24-3). The patient must be in a fasting state, and a signed consent is required.
After the test, vital signs are monitored every half-hour for 2 hours and then hourly for 4 hours or until stable. The gag reflex must return before foods and fluid are offered.
Observe skin color for increasing jaundice after the test because irritation from the endoscope may make a stricture worse until inflammation subsides.
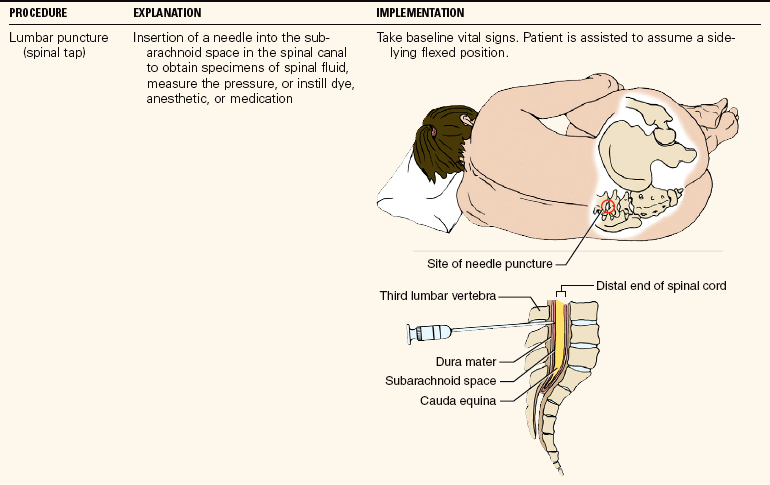
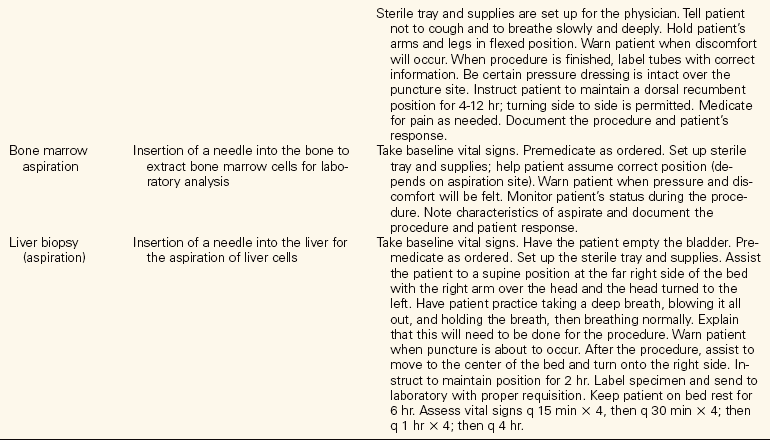
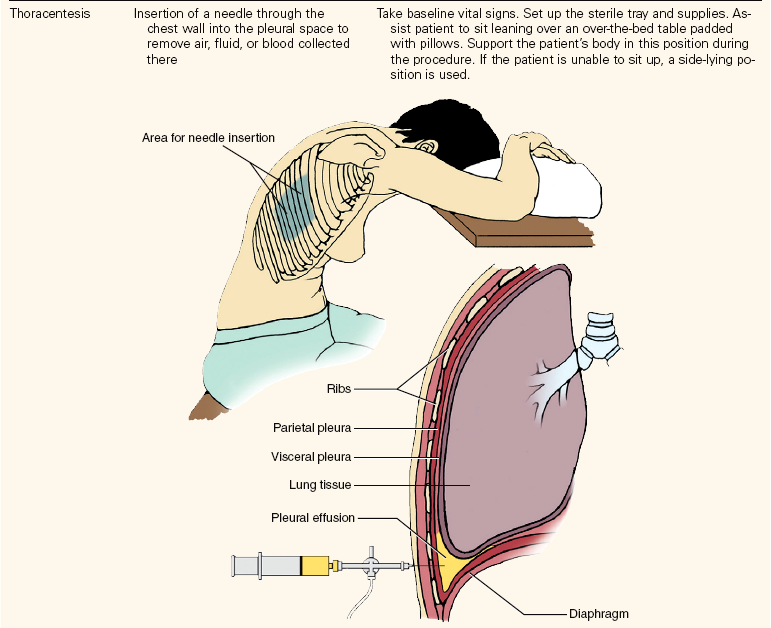
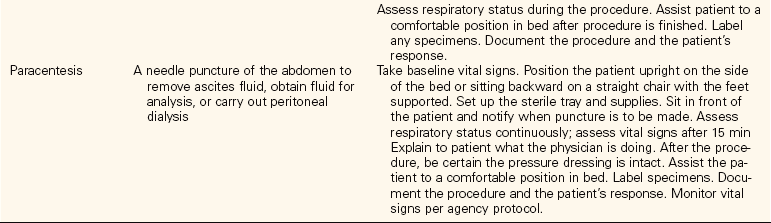
Aspirations: Aspirations are performed to obtain bone marrow, liver cells, spinal fluid, abdominal fluid, or fluid in the chest cavity. These procedures are usually performed at the bedside or in a procedure room by the physician, who is attended by a nurse. Most of these procedures are uncomfortable for the patient. Generally the nurse obtains the equipment needed, opens sterile supplies as requested, positions and drapes the patient, and assists the physician. Pretest analgesia or sedation is administered if ordered. It is essential that the patient remain still during the procedure. Baseline vital signs are taken before the procedure begins. Table 24-4 provides information on positioning and care of patients undergoing an aspiration.
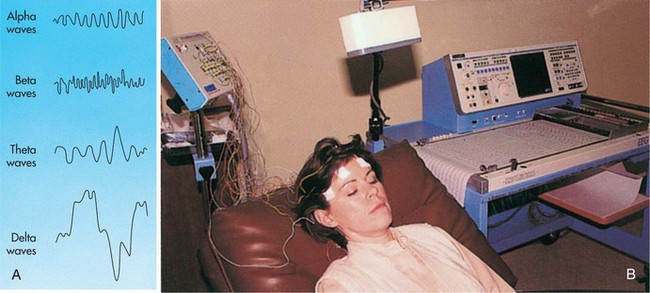
Electroencephalography: The neurologic and physiologic activity of the brain produces electrical charges that can be measured as brain waves. The tracing of the brain waves is an electroencephalogram (EEG). The EEG is done to localize and diagnose brain lesions, scars, epilepsy, infections, blood clots, and abscesses. It is also performed to determine brain death in comatose patients on life support systems.
Patients scheduled for an EEG are to have no stimulants, no sedatives, and no anticonvulsant drugs, such as phenytoin (Dilantin), for 48 hours before the test unless necessary to control seizures. It is not necessary to shave any hair, and generally there is no special preparation. Some electroencephalography laboratories require that the hair be shampooed and dried before the test.
The patient sits in a chair, or remains on a stretcher, in a quiet room, and electrodes are attached to the scalp with skin glue or paste, or a mesh cap containing the 19 to 25 electrodes is placed on the head (Figure 24-6, p. 428). The equipment detects the electrical energy generated by the brain and produces a graphic record of the brain waves. The patient should close the eyes and relax. A request to hyperventilate for some of the tracings may be made because abnormalities may then be more noticeable. Rapid shallow breathing causes alkalosis, which in turn produces vasoconstriction in the brain and may activate seizure activity. A flashing light may be held over the face in order to induce abnormal activity. The patient may be sleep deprived before the test or a sedative may be given when a sleeping electroencephalogram is desired. Sleep is helpful in producing abnormal brain activity, particularly that associated with epilepsy. The test may take up to 1 hour and 15 minutes. Any paste or gel used is washed away after the test.
Other Diagnostic Tests: Many other diagnostic tests are performed each day. They will be encountered in the units of study for the medical-surgical and obstetric nursing courses.
Nurses employed in physicians’ offices, medical clinics, and in the hospital are required to obtain blood specimens and to perform certain diagnostic tests such as wound or throat culture (Skill 24-5), random blood sugars, hemoglobin levels, and urine dips. They also assist with Papanicolaou smears (application of secretions and cells on a slide) (Skill 24-6,p. 430) and sigmoidoscopies. It should be noted that there are many models of glucometers and hemoglobin machines. If the machine to be used is different than the one indicated in Skill 24-2, the procedure may vary slightly. The correct steps for the procedure will be in the instruction manual accompanying the machine.
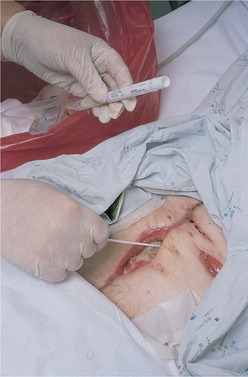
Skill 24-5 Obtaining Culture Specimens: Throat and Wound
Nurses frequently must obtain specimens for throat cultures when working in physicians’ offices or clinics. Wound cultures are frequently obtained by the hospital, long-term care, and home care nurse. Careful technique is essential in order not to contaminate the sample to be cultured.
Review and carry out the Standard Steps in Appendix 3.
4. ACTION Explain the procedure to the patient and label the culture tube.
RATIONALE Prepares the patient and identifies the specimen.
6. ACTION Position a light so that the pharynx may be viewed. Withdraw the sterile swab from the tube or package.
RATIONALE The light from an otoscope works well; otherwise use an examining light. Pharynx must be visible to obtain the specimen.
7. ACTION Ask the patient to tip the head back slightly and open the mouth wide. Instruct the patient to sing a low note (“ah”).
RATIONALE Allows visualization of the pharynx and keeps the tongue out of the way.
8. ACTION Depressing the tongue with a tongue blade and, without touching the teeth, tongue, cheek, or gums, insert the sterile swab into the throat and rotate it slightly around the tonsil area and the back wall, only touching areas of exudate (fluid with cellular debris from inflammation) or areas of inflammation. Withdraw the swab without touching other structures.
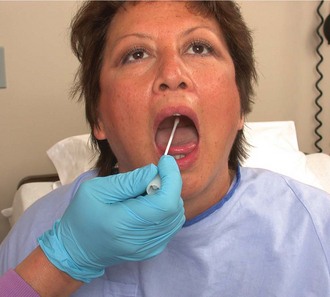
RATIONALE Obtains secretions that may contain microorganisms from the throat area only.
9. ACTION Place the swab into the culture tube without touching any other surface.
6. ACTION Remove dressing, folding soiled side together, and dispose of it in a biohazard waste container.
RATIONALE Prevents spread of microorganisms.
7. ACTION Cleanse the area around the wound edges with an antiseptic swab.
RATIONALE Removes old exudate and skin bacteria.
8. ACTION Remove and dispose of gloves properly.
RATIONALE Prevents transfer of microorganisms.
9. ACTION Open sterile gloves and dressing supplies.
RATIONALE Prepares equipment to take specimen and redress the wound.
10. ACTION Put on the gloves. Take the sterile swab(s) from the culture tube and insert the tip(s) into the wound where drainage is occurring; rotate the swab gently. Remove the swab(s) and replace them carefully in the culture tube without touching any other surface.
RATIONALE Obtains specimen from area most likely to contain microorganisms. Prevents contamination of the specimen.
For Both Throat and Wound Cultures
12. ACTION Squeeze the ampule in the bottom of the culture tube to release the preservative solution. Press the swab into the solution to wet it thoroughly.
RATIONALE Preserves the specimen.
13. ACTION Remove the gloves and perform hand hygiene.
RATIONALE Reduces transfer of microorganisms.
14. ACTION Label the tube and fill out the laboratory requisition; send the culture to the lab.
RATIONALE Prevents the culture from being lost or mislabeled.
15. ACTION Review report when returned from lab to see what organism(s) have grown.
RATIONALE Type of organism will dictate the correct therapy.
16. ACTION Check orders to see if physician has ordered the appropriate therapy to treat the infection according to the laboratory sensitivity report. If not, call the physician.
RATIONALE Provides a check to see that treatment has been ordered for the infection.
Skill 24-6 Assisting with a Pelvic Examination and Pap Test (Smear)
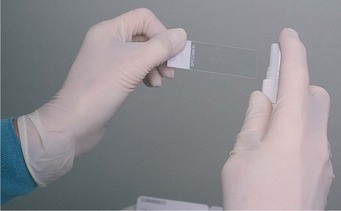
Papanicolaou (Pap) smears are a frequent diagnostic test for cervical, vaginal, or endometrial cancer ordered in a medical office or a clinic. Occasionally a Pap smear may be obtained in the procedure room at the hospital. The Pap smear is done in conjunction with a pelvic exam on the female patient. Patients should not douche for 24 hours prior to the test. The specimens are either placed on slides or swished into a special solution in a container (ThinPrep type of Pap smear).
Examination table with stirrups
Cotton-tipped applicator or cytology brush
Glass slide with a frosted edge or ThinPrep specimen container
Review and carry out the Standard Steps in Appendix 3.
3. ACTION Plan ahead and label the frosted end of the slide with the patient’s name and date or label the ThinPrep container.
RATIONALE Identifies the slide as belonging to the patient; prevents report error.
4. ACTION Fill out the requisition slip with the required information.
RATIONALE Ensures that requisition is ready after smear is taken.
5. ACTION Explain the procedure if patient is unfamiliar with it; answer questions.
RATIONALE Decreases fear of the unknown and helps patient relax.
6. ACTION Set up the table and equipment as the examiner prefers.
RATIONALE Prepares the equipment for the patient and the examiner.
7. ACTION Give the patient a gown, and ask that all clothing below the waist be removed and the gown put on so that it ties in the back; provide privacy.
RATIONALE Allows the examiner to access the perineal area. If the examiner wishes to do a breast check, ask the patient to remove all clothing.
8. ACTION When patient is ready, assist onto the table with the lower half of the body covered with a drape. Assist into a lithotomy position with the feet in the stirrups and the buttocks right at the end of the table. The knees should be apart. The drape can be left free or positioned so that the corners can be wrapped around the lower legs and feet with the third corner hanging over the perineum.
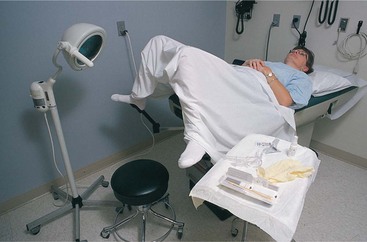
RATIONALE The lithotomy position allows the examiner to visualize the vagina and cervix with the speculum. The drape protects the patient’s modesty and provides privacy. The third corner of the drape can be folded back when the examiner is ready to begin.
9. ACTION Reassure the patient and help her relax during the procedure by telling her to take deep, slow breaths through the mouth and to try to relax the abdominal muscles.
RATIONALE The procedure will go more smoothly if the patient is relaxed. The examiner will perform the pelvic examination after the smear has been taken.
10. ACTION Assist the examiner by passing equipment as requested.
RATIONALE Helps the procedure go quickly and smoothly.
11. ACTION Apply gloves and fix the slide(s) by flooding them with 95% ethyl alcohol or spraying them with cytology fixative according to the directions on the spray container. If ThinPrep container and solution was used, just close the container.
RATIONALE Smears on slides must be fixed within 10 seconds after collection to maintain the normal appearance of the cells and to prevent the smears from being exposed to contaminants in the air. Spray lightly from left to right and then from right to left.
12. ACTION When the procedure is finished, assist the patient to slide back, pull out the table extension and remove the feet simultaneously from the stirrups and lay them straight on the table. Ask patient to slide back slightly onto table. When the patient is ready to sit up, assist to a sitting position as you slide the table extension into the table.
RATIONALE Shows consideration for the patient. Positions patient to sit up.
13. ACTION Allow the slide(s), if used, to dry for at least 5 minutes before packaging them in a slide container to send to the laboratory.
RATIONALE Prevents contamination or disruption of the smear.
14. ACTION Send the labeled container and the requisition slip to the laboratory.
An important step is to fill out the laboratory or test requisition slip properly. Information generally required is the patient’s name, physician’s name, date, and type of test requested. For some tests, names of medications that the patient is taking will be requested. All specimens should be labeled on the container (not lid) with the patient’s name, the date, and the physician’s name.
Evaluation
Evaluation involves determining whether the expected outcomes written for each nursing diagnosis have been met. The patient is assessed for potential adverse effects of the diagnostic procedure. One way to continually improve patient preparation is to ask patients after the procedure if there was anything they wish they had known in advance that had not been told to them. Information obtained in this way is often helpful for future patient teaching regarding a particular procedure.
Evaluation is also performed by comparing the results of tests performed from one day to another. For example, the WBC reading on a CBC indicates whether an infection is improving or worsening. If the treatment is effective against the infection, the WBC should be falling. When a serum potassium is low, the nurse checks the laboratory values to determine if the administration of extra potassium has corrected the problem (Safety Alert 24-4). The nurse is usually responsible for giving the home care patient appropriate instructions and patient teaching before scheduled tests and procedures. After the test is scheduled, a visit or telephone call allows for assessment of what the patient knows about the test. The nurse can provide explanation and teaching, explain the pretest preparation, and determine that the patient can carry out the necessary preparation. If the patient needs assistance, then a family member may be enlisted to help or the nurse must schedule a visit at the appropriate time to help the patient with the preparation for the procedure. It should also be determined ahead of time that the patient has transportation available to the facility where the procedure is to be performed. When samples of blood or urine are needed for laboratory testing, the nurse can obtain the samples and deliver them to the laboratory. Check to see that the consent form is signed if one is required.
NCLEX-PN® EXAMINATION–STYLE REVIEW QUESTIONS
Choose the best answer(s) for each question.
1. A culture is obtained when a patient has a bladder infection for the purpose of:
1. selecting the correct dose of medication.
2. determining the prognosis of the disease.
2. The sensitivity part of a culture and sensitivity test is for the purpose of:
1. identifying the causative organism of the infection.
2. determining which medications are ineffective against the causative organism.
3. testing anti-infectives to see which ones are most effective against the causative organism.
4. growing colonies of the causative organism on a culture medium.
3. Tests for syphilis are considered ___________________ tests. (Which type of test?) (Fill in the blank.)
4. When taking a culture sample from an infected wound, the nurse should: (Select all that apply.)
1. don sterile gloves to obtain the sample.
2. swab the skin around the wound.
5. Correct technique for obtaining a specimen for a throat culture is to use a sterile applicator and swab: (Select all that apply.)
6. When instructing a patient about a magnetic resonance imaging test, you would explain that: (Select all that apply.)
1. it is necessary to hold very still during the test.
2. heavy sedation is usually provided prior to the test.
7. When instructing the patient about a colonoscopy, you would include that: (Select all that apply.)
1. the prep for the procedure begins 24 to 48 hours beforehand.
2. sedation will be given prior to the procedure.
8. A lumbar puncture is a(n) __________________________ procedure. (What type of procedure?) (Fill in the blank.)
9. When caring for the patient who has just undergone a liver biopsy, you must:
1. keep the patient positioned on the right side for 2 hours.
2. apply pressure to the aspiration site by hand for 30 minutes.
10. When collecting a blood sample with a Vacutainer system, it is very important to: