Promoting Urinary Elimination
Upon completing this chapter, you should be able to:
1 Describe the structure and functions of the urinary system.
2 Identify abnormal appearance of a urine specimen.
3 Describe three nursing measures to assist patients to urinate normally.
4 List the purposes and principles of indwelling and intermittent catheterization.
5 Explain the rationale for using a continuous bladder irrigation system.
6 Discuss ways to manage urinary incontinence.
1 Assess a patient’s urinary status.
2 Teach a patient how to obtain a “clean-catch” (midstream) specimen.
3 Perform a urine dipstick test accurately.
4 Assist patients with toileting.
anuria ( , p. 544)
catheterization ( , p. 554)
commode chair ( , p. 549)
condom catheter ( , p. 556)
Credé’s maneuver ( , p. 554)
cystitis ( , p. 545)
dysuria ( , p. 545)
glycosuria (p. 546)
hematuria ( , p. 546)
instillation (p. 545)
ketonuria ( , p. 546)
micturition ( , p. 543)
nocturia ( , p. 544)
oliguria ( , p. 545)
polyuria ( , p. 545)
proteinuria ( , p. 546)
pyuria ( , p. 546)
residual urine ( , p. 544)
stricture ( , p. 554)
suprapubic ( , p. 555)
urinary incontinence ( , p. 544)
urinary retention ( , p. 544)
urination ( , p. 544)
urinometer ( , p. 545)
urostomy ( , p. 572)
void ( , p. 542)
NORMAL URINARY ELIMINATION
The frequency of urination varies. Infants will void (excrete urine) from 5 to 40 times a day. The preschool child may void every 2 hours. The adult voids from 5 to 10 times a day. On average, the adult male voids 300 to 500 mL and the adult female voids 250 mL. There should be at least an hourly urine output of 30 mL. This reflects adequate kidney perfusion. This amounts to 720 mL per 24 hours.
People usually have the urge to void on awakening in the morning, after each meal, at bedtime, and after drinking extra fluid. Urine production is decreased during sleep, and many people can sleep through the night without voiding. Urine is normally sterile, but provides a good medium for the growth of infectious organisms if they are introduced into the bladder.
FACTORS AFFECTING NORMAL URINATION
Urinary elimination is affected by neurologic and muscle development; alterations in spinal cord integrity; the volume of fluid intake; the amount of fluid lost by perspiration, vomiting, or diarrhea; and the amount of antidiuretic hormone (ADH) secreted by the pituitary gland. Anxiety may increase muscle tension and cause a more frequent urge to void. Most people need privacy for urination (expelling urine) to occur freely. Males urinate more easily when standing and females find voiding easier when sitting.
OVERVIEW OF STRUCTURE AND FUNCTION OF THE URINARY SYSTEM
Which structures are involved in urinary elimination
 The kidneys are bean shaped, approximately 6 cm wide, 12 cm long, and 3 cm thick, and are located at the level of L1 on the sides of the spine (Figure 29-1).
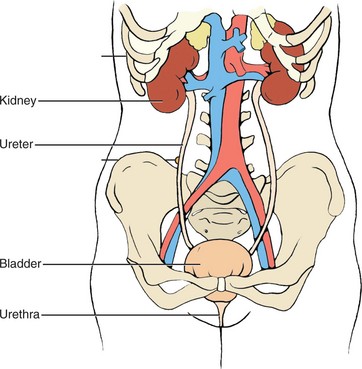
Each kidney contains approximately 1 million nephrons, which are the working units.
Within each nephron is a glomerulus consisting of a cluster of capillaries surrounded by Bowman’s capsule, and a system of tubules.
The ureters are hollow tubes about 25 to 30 cm long in the adult and connect each kidney to the bladder.
The bladder is a hollow, muscular organ located in the lower pelvis.
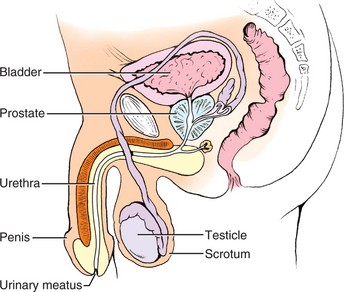
The urethra is a tube attached to the base of the bladder extending to the outside of the body. In the male it is about 8 inches (20 cm) long and goes through the penis, ending at its tip. This exit point is the urinary meatus (Figure 29-2). In the female, the urethra is from 1½ to 2½ inches (3 to 5 cm) in length and goes to the urinary meatus located beneath the clitoris, between the folds of the labia.
The internal and external urinary sphincters control the flow of urine out of the body.
What are the functions of the urinary structures for elimination
The kidneys filter blood through the nephrons, and metabolic wastes and excess water are extracted. The kidney regulates electrolytes in the body by excreting excess amounts, and assists in acid–base balance by retaining or excreting hydrogen ions (H+) and bicarbonate ions (HCO3−). The waste products are diluted with water and excreted as urine. The tubules secrete, excrete, or reabsorb electrolytes, water, and other substances.
The kidneys manufacture 1 to 1½ L of urine on average in 24 hours. Urine output is related to the amount of fluid intake and can vary considerably.
The ureters carry urine from the kidneys to the bladder.
The bladder stores urine and sends a signal to the spinal cord when it becomes full to signal the need for emptying. The signal usually occurs when the bladder contains between 250 and 400 mL of urine.
The bladder can hold 1000 to 1800 mL of urine. Average urine output is 1000 to 1500 mL/day.
The urethra carries urine from the bladder to the outside of the body.
The urinary meatus is the exit point for urination and the entrance point for a catheter.
The internal sphincter relaxes in response to the micturition (urinating) reflex.
Voluntary contraction of the external sphincter stops the expulsion of urine. Relaxing the external sphincter starts the flow of urine for excretion.
What factors can interfere with urinary elimination
Total loss of the kidney’s ability to manufacture urine (kidney failure) may result in anuria (absence of urine). At least 600 mL of urine must be excreted by an adult per day to remove the waste products of the body.
Decreased kidney perfusion (e.g., shock or severe dehydration) can lead to kidney damage.
Blockage of the ureters prevents the urine from traveling to the bladder. Blockage may occur due to the presence of a stone in the ureter, pressure from a tumor in the abdominal cavity, or trauma to the lower abdomen.
Disruption of the bladder by tumor or trauma may impede the flow of urine out of the bladder or decrease its holding capacity.
Pressure on the urethra from an enlarged prostate can make emptying the bladder difficult. Trauma to the urethra from any cause can impede the elimination of urine. Childbirth sometimes alters the position of the bladder and urethra and predisposes to incidences of urinary incontinence (inability to prevent passing urine).
Infection in any part of the urinary system causes inflammation and may alter the flow of urine.
Neurologic damage to the nerves that control the internal and external sphincters or the muscular wall of the bladder may cause alteration in urinary patterns.
Prostate surgery may damage the external urinary sphincter and cause temporary or permanent urinary incontinence in the male.
What changes in the system occur with aging
There is a decrease in the number of functioning nephrons and a reduction in the rate of renal filtration with aging. Because of these changes, even minor body stress can cause a decrease in renal function.
The bladder muscle tone decreases and its capacity lessens, causing nocturia (voiding during the night). Decreased muscle tone may interfere with the external urinary sphincter and predispose to incontinence. Incontinence is not a normal part of aging.
Decreased bladder and muscle tone may cause incomplete bladder emptying and residual urine (urine left in the bladder after urination). Residual urine becomes stagnant and predisposes to infection.
Lower estrogen levels in women can result in tissue atrophy in the urethra, vagina, and bladder, which predisposes to infection and incontinence.
CHARACTERISTICS OF NORMAL URINE
Urine is normally some shade of yellow, with the average being straw colored or amber. The color may darken when the urine is more concentrated. Smoky red or dark brown urine may indicate the presence of blood. Very dark amber urine may be due to the presence of bilirubin. Other color variations may occur from medications the patient is taking or from water-soluble dyes that the patient has consumed in food.
Clarity
Urine should be transparent or only slightly cloudy. Cloudy urine may contain bacteria or large amounts of protein.
Odor
Normal urine smells faintly like ammonia. If the odor is foul, infection may be present. If the odor resembles acetone, ketones are probably present. Other odors may occur depending on what foods the person has eaten or what vitamins have been taken.
Specific Gravity
Specific gravity is the thinness or thickness of the urine. It may be measured by an instrument called the urinometer, an instrument that reads the amount of light the urine absorbs, or by the use of a chemical dipstick. The normal range is 1.010 to 1.030, but conditions such as dehydration and fluid excess may extend the range slightly in either direction.
ALTERATIONS IN URINARY ELIMINATION
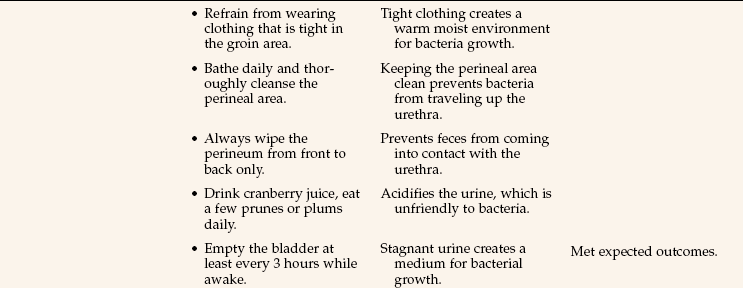
Alterations in urinary elimination patterns are listed in Box 29-1. A common urinary tract infection is cystitis (inflammation of the bladder). Cystitis may be caused by irritation of highly concentrated urine, pathogenic bacteria, injury, or instillation (putting in a solution) of an irritating substance. A break in aseptic technique when inserting or caring for an indwelling catheter is a frequent cause of cystitis. Escherichia coli is often the bacterium responsible for cystitis, especially in females. Symptoms of cystitis are frequency, urgency, dysuria, (painful urination), burning, malaise, foul-smelling urine, and a slight temperature elevation. Health Promotion Points 29-1 and Complementary & Alternative Therapies 29-1 include useful information to help your patients prevent cystitis.
APPLICATION of the NURSING PROCESS
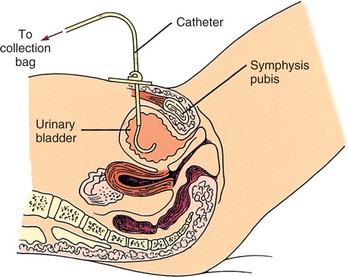
Obtain a history of the patient’s usual pattern of urinary elimination. Inquire if there are ever incidences of incontinence. Ask if there is a need to urinate frequently, burning when urinating, or a sense of urgency in finding a toilet quickly. Does the patient need to get up to urinate at night frequently? Have there been changes in the appearance of the urine? At what times of the day does the patient usually void? Is the bladder usually completely emptied or is there a need to void again in less than 2 hours? How much fluid is taken in a 24-hour period? Does the patient have a urinary catheter in place? Is there a history of previous urinary problems? What is the patient’s total 24-hour intake and output? Is it normal? Assess the patient’s mobility to determine if it is safe to allow ambulation to the bathroom unassisted. Note when the patient last voided. Each patient should void at least every 8 hours unless an indwelling catheter is in place. If voided amounts are small and intake is normal, gently palpate the bladder to see if it is distended. To do this, feel with the palm of the hand for a bulge indicating a full bladder above the symphysis pubis.
Voided Specimen for Urinalysis.: Inspection of the urine is the next step in the assessment. Various types of specimens may be collected depending on the patient’s symptoms. For a simple voided specimen for urinalysis, ask the patient to void into a clean bedpan, urinal, collection bottle, or plastic “hat” collection device placed inside the front of the toilet (Figure 29-3). Provide privacy for the patient. Explain to the female how to hold the urine bottle or cup so that it surrounds the urethra. She should stand in a slightly squatting position, or sit over the toilet and hold the collection container steady to catch the urine as she voids. Explain to both men and women that only about 1½ inches of urine is needed. It is not necessary to fill the container. If the specimen is to go to the laboratory, transfer it to the specimen container, label it properly, and send it to the laboratory within 5 to 10 minutes. Urine that stands for 15 minutes or more changes characteristics, and the urinalysis will not be accurate. Box 29-2 shows some common abnormalities found by urinalysis.
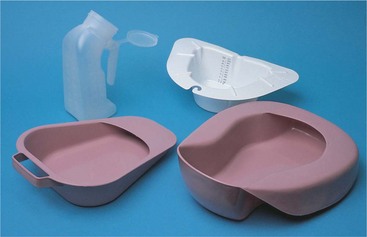
FIGURE 29-3 Urine collection devices: fracture pan (left front), standard bedpan (right front), urinal (left rear), and in-toilet “hat” (right rear).
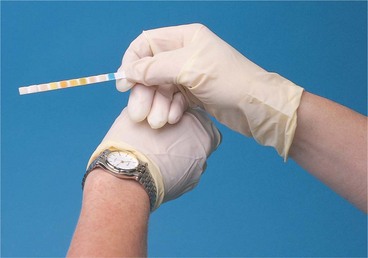
Dipstick tests, containing chemical reagents, are routinely performed in most physicians’ offices and outpatient clinics. They may test for a variety of components, including glucose, ketones, protein, blood, specific gravity, pH, nitrate, bilirubin, and leukocytes. If a dipstick test is to be performed, follow the directions on the side of the bottle of test strips. Exact timing for checking each component is essential for accuracy of the result (Figure 29-4).
Midstream (Clean-Catch) Urine Specimen.: This procedure is used to obtain a specimen for a culture and sensitivity test when a urinary tract infection is suspected. The purpose is to obtain a specimen that is relatively free from external contamination (Patient Teaching 29-1).
Specimen from an Indwelling Catheter.: A specimen may be obtained from the self-sealing port of an indwelling catheter system or from the lumen of a latex catheter (Steps 29-1, Figure 29-5).
Sterile Catheterized Specimen.: When a sterile specimen is ordered and the patient does not have an indwelling catheter in place, the patient is catheterized with a straight catheter (no balloon) that may be attached to a small collection bag, or the urine may be collected by placing the distal end of the catheter into a sterile specimen container.
24-Hour Urine Specimen.: All urine voided during the 24-hour period is collected in the designated container and stored on ice if necessary. The laboratory analysis is done to determine the amount of a specified chemical that is excreted through the urine in a 24-hour period. If some urine is accidentally thrown out, the test is invalid and must be started over. A sign should be posted over the bed and over the toilet indicating that all urine is to be saved. The patient’s bladder should be empty at the beginning and at the conclusion of the test. The patient empties the bladder just before beginning the collection and the urine is discarded. At the ending time, the patient voids and the urine is added to the collection container. Check with the laboratory before beginning the test to be certain the right container with preservative is on hand and to see whether the specimen must be kept cold during the 24-hour period (see Chapter 24).
Urinary Collection Bag.: This device is used to obtain a urine specimen from an infant or toddler. It attaches to the skin by an adhesive backing and is placed so that it surrounds the genitals. When sufficient urine has collected in the bag for a specimen, the bag is carefully removed and the urine is poured into a specimen container.
Nursing Diagnosis
Nursing diagnoses for patients with problems of urinary elimination are as follows:
• Urinary elimination, impaired
• Urinary incontinence (urge, stress, total, reflex, overflow, or functional)
• Injury, risk for (to kidney from urine blockage)
• Self-care deficit, toileting
The specific defining characteristics are added to the diagnosis stem for the individual patient.
Planning
The data gathered during assessment will give you the information needed to plan time to assist the patient needing help with toileting. If a patient has been prone to urinary tract infections (UTIs), you can specifically plan to increase fluids, unless they are contraindicated, at set intervals and to reinforce patient teaching regarding ways to prevent further UTIs. You should plan for time to collect any needed urine specimens, and should tell the patient that one will be needed sufficiently ahead of time for the patient to be able to produce the urine. When you are planning care for your patient, remember to be culturally sensitive in helping your patient to achieve toileting needs (Cultural Cues 29-1).
For the patient prone to urinary retention, you can plan to note the amount of each voiding and to palpate the bladder for distention if output falls below normal.
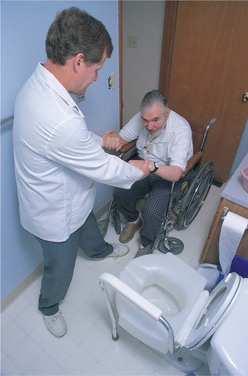
If the patient is in need of assistive devices for toileting, place a bedpan and/or urinal in the bedside stand or obtain an order for the device needed. Discharge planning includes ensuring that arrangements are made before the patient goes home for devices such as grab bars by the toilet, a commode chair (chair with a container inserted to catch urine or feces), or a raised toilet seat (Figure 29-6).
Keep in mind that urinary elimination is usually an independent function and it is embarrassing to most people to have assistance. The insertion of a catheter causes a disturbance in body image even if the catheteris temporary. Plan to show extra sensitivity when caring for these patients. Some examples of expected outcomes can be found in Nursing Care Plan 29-1.
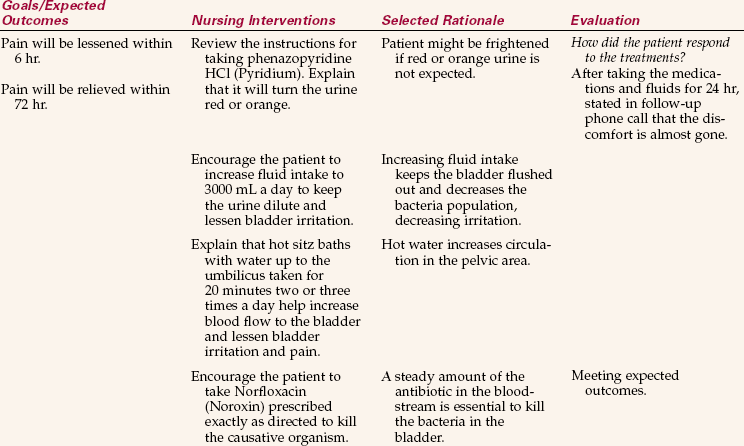
NURSING CARE PLAN 29-1
Care of the Patient with Cystitis
Ms. Juarez, age 33, comes to the outpatient clinic. She states that she has been experiencing burning, urgency, and lower pelvic discomfort for 3 days. She needs to urinate several times an hour. She has had a bladder infection before and is afraid that she has one again. “How do I get these infections? What should I do?” Her blood pressure and pulse are normal, but her temperature is 100.8° F (38.2° C). You ask her to obtain a midstream urine specimen and provide the instructions for this. You check her urine with a dipstick and it shows that she has leukocytes in the urine. The physician examines the patient and concludes that she does have cystitis. Norfloxacin (Noroxin) and phenazopyridine HCl (Pyridium) are prescribed.
Burning and lower pelvic discomfort/Pain related to burning with urination and lower pelvic discomfort.
Supporting Assessment Data: Subjective: Discomfort in lower pelvic area × 3 days; states, “It burns.” Objective: Urine is cloudy and malodorous.
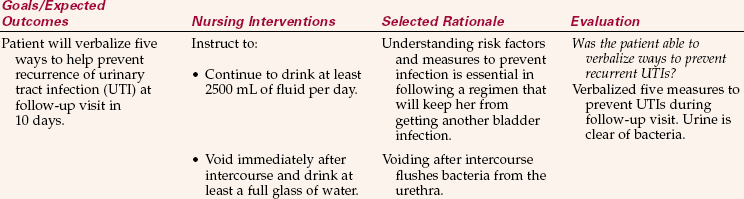
Does not know how to prevent infection/Deficient knowledge related to factors that predispose to urinary tract infection.
Supporting Assessment Data: Subjective: Asks, “How do I get these infections? What should I do?” Objective: Unable to state how much fluid she should drink in a day. Unable to identify any factors that predispose to urinary tract infection when asked.
Implementation
Assisting patients with urinary elimination is a basic nursing function. Patients who can ambulate can be assisted to the bathroom to use the toilet. Others may use a commode chair. This is a chair with an opening in the seat and a large receptacle beneath it. It is usually placed by the bedside or a short distance away. The patient is transferred from the bed to the commode and then back again. The receptacle is emptied after each use. The commode chair is used for bowel movements as well as urination. Another assistive device is a raised toilet seat. This is usually a frame device that fits over the toilet bowl and has a toilet seat attached to it at a higher point than is usual. Patients who have difficulty with hip flexion or who have had a hip replacement need to use such a device.
Patients on bed rest are provided with a bedpan for elimination. It is made of metal or plastic (see Figure 29-3). Each patient has an individual bedpan stored in the bedside stand during the hospital stay. The female uses it for both urine and bowel elimination, whereas the male uses it for bowel elimination only. The bedpan should be covered if it must be carried outside the patient’s room. Paper towels or a small hand towel may be used.
The fracture pan (see Figure 29-3) is used when patients are unable to sit on a regular-sized bedpan. It is smaller in surface area and height than the regular bedpan. It is used for patients with musculoskeletal problems. The flat end with the wide rim is placed under the patient’s buttocks. It is placed under the patient by separating the patient’s legs and slipping the pan under the buttocks. A little powder on the flat rim helps when the patient is unable to raise the hips to assist. The greater depth at the front of the pan helps keep the urine from spilling on the bed. Remove the pan carefully so that urine is not spilled on the bed. Skill 29-1 presents instructions on how to place and remove a bedpan.
Skill 29-1 Placing and Removing a Bedpan
The female patient who is very weak or who has bed rest ordered uses a bedpan to void or to have a bowel movement. The male uses a urinal to void, but uses the bedpan to evacuate the bowel. If the patient is in traction or cannot raise the hips or turn for placement of the normal bedpan, a fracture pan may be used.
Review and carry out the Standard Steps in Appendix 3.
1. ACTION Inquire if the patient needs to void.
RATIONALE Checks for bladder distention and establishes need to void.
2. ACTION Determine mobility to see if the patient can use a full-size bedpan or if a fracture pan is needed.
RATIONALE Fracture pan use prevents further injury from turning or raising the hips.
3. ACTION Gather equipment; warm the metal bedpan with warm water and dry it. Raise the bed to proper working height.
RATIONALE Displays good time management and work organization. A warm bedpan is more comfortable for the patient. Raising the bed prevents back strain.
4. ACTION Provide privacy by closing the door and/or the privacy curtains.
RATIONALE Protects the patient’s right to privacy and reduces embarrassment.
5. ACTION Perform hand hygiene and don gloves.
RATIONALE Reduces transfer of microorganisms.
6. ACTION Lower the side rail if up, and raise the top linen enough to determine location of the hips and buttocks.
RATIONALE Provides access to place for bedpan.
7. ACTION Ask patient to bend the knees and press down with the feet while you slip one hand under the lower back for assistance; place an absorbent pad under the hips and buttocks. Ask patient to repeat this maneuver and place bedpan under the patient with the back rim at the end of the sacrum.
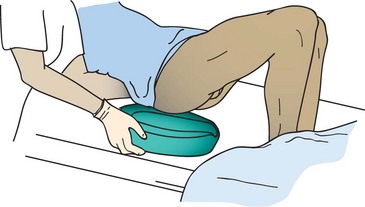
Step 7
RATIONALE Helps raise the patient’s hips for placement of the bedpan. Placing your hand palm up under the small of the back and your elbow on the mattress helps lift the patient onto the bedpan. The buttocks will form a seal along the rim of the pan.
8. ACTION Raise the head of the bed to 30 degrees if not contraindicated. Place the toilet tissue and call light within reach.
RATIONALE A sitting position makes voiding easier. Patient can signal when finished or in need of assistance.
9. ACTION Ask the patient to flex the knees, place the feet on the mattress, and raise the hips. Remove the bedpan. Place it on the chair or the floor.
RATIONALE Maneuver allows for removal of the bedpan. If urine is to be measured, provide another receptacle for the used toilet tissue so it is not placed in the bedpan.
10. ACTION Turn the patient on one side; face the patient’s back and lightly powder the buttocks and lower back area; place the bedpan firmly against the buttocks with the top of the bedpan at the top of the fold of the buttocks. Place one hand on the hip and hold the bedpan in place with the other hand. Roll the patient onto the bedpan and check its position for comfort.
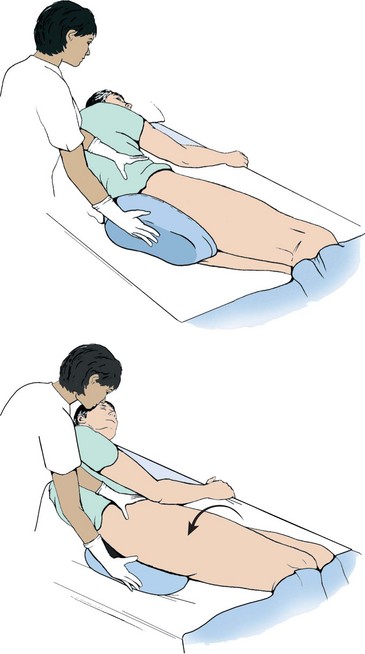
Step 10
RATIONALE Allows bedpan placement for the weak patient who cannot assist. The powder keeps the bedpan from sticking to the patient’s skin and aids in removal of the pan.
11. ACTION Raise the head of the bed.
RATIONALE Sitting is an easier position for voiding.
12. ACTION When the patient is finished, lower the head of the bed and assist the patient to turn to the far side of the bed. Hold the bedpan to prevent spilling. Remove the bedpan and set it on the floor or chair.
RATIONALE Aids removal of the bedpan without spilling urine.
13. ACTION Wipe the perineal area dry with toilet tissue, stroking from the front of the vulva to the anus. Reposition patient for comfort.
RATIONALE Cleansing from front to back prevents contamination of the urinary meatus and vaginal area.
14. ACTION Measure the urine, note unusual characteristics, and record the amount on the intake and output record as needed. Discard the urine and clean and dry the bedpan and store it in its proper place.
RATIONALE Notation documents output accurately. Unclean bedpans are odorous and provide a place for growth of bacteria.
15. ACTION Have the patient perform hand hygiene. Remove your gloves and perform hand hygiene.
RATIONALE Reduces transfer of microorganisms.
16. ACTION Lower the bed and restore the unit. Place the call light within reach; raise side rails.
RATIONALE Makes the patient comfortable and institutes safety measures.
 When the patient cannot raise the hips or turn to the side, a fracture pan is used. It can be slid into place from between the patient’s legs. The rim of the pan fits under the buttocks. A trapeze bar is of great assistance in helping patients position themselves on a bedpan. Using the trapeze bar does require some upper arm strength.
For the ambulatory patient who needs urinary output recorded, place a plastic “hat” device toward the front of the toilet bowel between the bowl and the seat. The inside is graduated so that you can record the amount of output after each voiding and then empty, rinse, and replace the container so that it is ready for the next voiding.
Whatever method is used for urinary elimination, provide an opportunity for hand hygiene (Cultural Cues 29-2). The patient is made comfortable with side rails replaced and the call bell within reach.
Assisting with Use of a Urinal: When a male is unable to use a urinal unassisted, the nurse helps. If the patient can stand by the side of the bed, this is the most desirable position. The male urinal is a plastic or metal bottle with a round neck, a handle, rectangular sides, and a flat base (see Figure 29-3). It may or may not have a lid. The urinal can be used by the patient who is confined to bed, in any one of four positions: lying supine, lying on either the right or the left side, or in Fowler’s position. Provide privacy by closing the door or the privacy curtain, don gloves, lower the side rail, and ask the patient to spread his legs. Hold the urinal by the handle and direct it at an angle between the legs so that the flat side rests on the bed. Lift the penis and place it well within the urinal. After urination, carefully remove the urinal and empty it immediately, measuring and recording the urine voided. Be sure the penis is dry. Clean the urinal and return it to the proper place.
Assisting a Patient to Urinate: Patients often have difficulty urinating after surgery and anesthesia, childbirth, or other trauma to the perineum. All efforts are made to help the patient void naturally before resorting to catheterization (insertion of a tube into the bladder). Some methods of helping patients initiate the voiding reflex are as follows:
• Run water in a nearby sink so the patient hears the sound.
• Have the patient deep breathe, relax, and visualize a peaceful place with a bubbling brook.
• Assist the male to stand by the side of the bed (with a physician’s order).
• Have the female blow through a straw in a glass of water, causing bubbling, while sitting on the toilet or bedpan.
• Pour warm water over the perineum while the patient attempts to void. Measure the water volume so you can subtract it from the total volume to determine how much the patient voided.
• With a physician’s order, gently but firmly use Cred é’s maneuver over the bladder (massage from top of bladder to bottom by starting above the pubic bone and rocking the palm of the hand steadily downward).
• Obtain an order for a sitz bath and have the patient sit in the warm water. Encourage the patient to void while in the bath. Cleanse the perineum afterward.
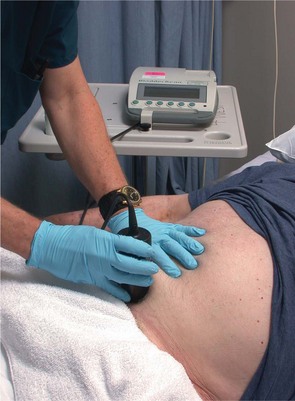
When a patient cannot empty the bladder naturally for a period longer than 8 hours, a bladder scan may be performed using an ultrasound machine designed for that purpose (Figure 29-7). If the bladder contains a large amount of urine, an order is obtained for catheterization. The bladder scan can also disclose the amount of residual urine in the bladder after a patient voids. This tells the physician whether the bladder is emptying sufficiently. If needed, the physician orders either a straight “in-and-out” catheterization or the insertion of an indwelling (Foley) catheter. Other reasons for catheterization include
• Preparing a patient for a surgical procedure or obstetric delivery
• Keeping the genitalia and perineum clean after obstetric or surgical procedures
• Dilating a urethral stricture (narrowed lumen)
• Splinting the urethra following surgery on the urethra
• Measuring the amount of residual urine in the bladder (this is also accomplished by a using a portable ultrasound bladder scanner)
• Monitoring hourly urine output or to obtain exact measurements of total output
• Performing irrigation or instillation and drainage of chemotherapeutic solutions into the bladder
• Assisting with the re-toning of the bladder muscle after surgery on the bladder
Types of Urinary Catheters: Catheters come in several sizes and shapes and are either rubber or plastic. Some are Teflon coated. They are sized by the French system, with the average size used for an adult female being 14 to 16 Fr. and for the male 18 to 20 Fr. (Figure 29-8). A straight catheter (e.g., the Robinson) is used to relieve retention when a patient is temporarily unable to void, or to obtain a sterile specimen. The Foley is the most common indwelling catheter, the type that remains in the bladder for an extended period. It is sometimes referred to as a “retention” catheter because it is retained in the bladder. A Foley catheter has two lumens, one to drain urine and one for inflation of the balloon that holds the catheter in the bladder to prevent it from slipping out the urethra. The balloon usually holds 5 to 10 mL of sterile water. This catheter is used for continuous drainage, particularly postoperatively, and can also be used for suprapubic (above the pubic bone) drainage.
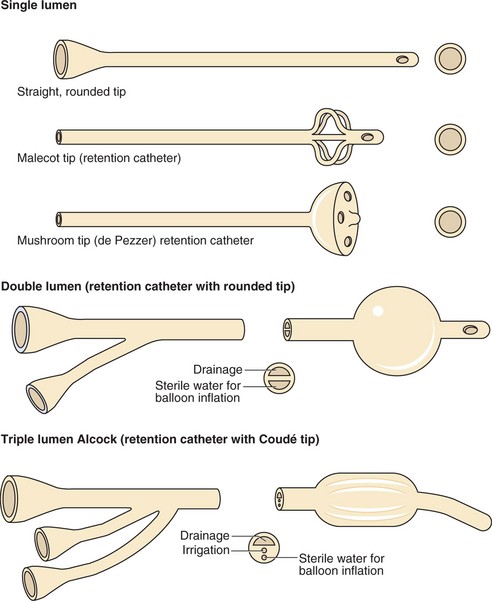
The Coudé catheter, a variation of the Robinson catheter, is curved and has a rounded or bulbous tip that is easier to insert into the male urethra when the prostate is enlarged.
The Alcock catheter, used for continuous bladder irrigation following prostate or bladder surgery, is a Foley-type catheter with two eyes. It has three lumens, one for urine drainage, one for inflation of the balloon, and one for the instillation of the irrigation fluid.
The de Pezzer catheter, which has a tip shaped like a mushroom, is used for suprapubic drainage. The Malecot catheter, which has a large single tube with a tip shaped like wings, is often used as a nephrostomy tube; it is placed into the pelvis of the kidney.
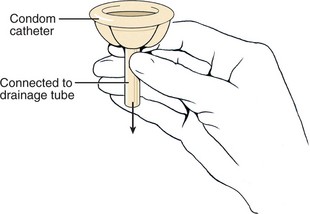
A condom catheter consists of a condom with a tube attached to the distal end that is attached to a drainage bag. It is used to provide continuous urine drainage for the male in a noninvasive manner. It is applied to the penis and, since it is noninvasive, it is less likely to predispose to urinary tract infection.
When applying a condom catheter, care must be taken not to apply the sheath too tightly. This can cause a decreased blood flow to the penis. The sheath must be checked frequently for signs of moisture accumulation as this can lead to skin breakdown. Unless applied carefully and correctly, a condom catheter will leak. Read the directions that come with the specific catheter and follow the steps in Skill 29-2.
Skill 29-2 Applying a Condom Catheter
A condom catheter is used for the male who is incontinent but can void on his own. It is preferable to use a condom catheter rather than an indwelling catheter because bladder infection is less likely to occur. There are different methods of attaching this type of catheter; read the directions on the package.
Basin, warm water, soap, washcloth, and towel
Clippers for hair removal if needed
Urine collection bag with drainage tubing or leg bag and straps
Review and carry out the Standard Steps in Appendix 3.
3. ACTION Gather equipment and prepare the working space by raising the bed to proper height.
RATIONALE Promotes work efficiency and prevents back strain.
4. ACTION Close the door and/or draw the privacy curtains.
RATIONALE Protects the patient’s privacy.
5. ACTION Explain the procedure.
RATIONALE Promotes cooperation and reduces anxiety.
6. ACTION Lower the side rail if up. Place the patient in a supine position, drape the upper torso with a bath blanket, and then fold the sheet down so it covers the legs and can be lowered to expose the genitalia.
RATIONALE Provides comfort, conserves body heat, and prevents unnecessary exposure.
7. ACTION Prepare the urinary drainage collection system, clamping the exit port and positioning the bag for easy attachment to the condom catheter. Roll the wider tip of the condom sheath toward the narrower tip.
Step 7
8. ACTION Perform hand hygiene and don gloves.
RATIONALE Prevents transfer of microorganisms.
9. ACTION Wash and dry the penis and surrounding skin, clip the hair at the base of the penis, apply the skin prep, and allow to dry.
RATIONALE Washing cleanses the skin before application of the condom device. The skin prep helps protect the skin against urine and provides an adherent surface on which to apply the condom catheter.
10. ACTION Apply the double-sided elastic tape in a spiral fashion from the base of the penis downward.
RATIONALE Provides a surface on which the condom catheter can be attached without impeding circulation in the penis. Some condom catheters attach with a Velcro strip over the sheath.
11. ACTION Grasp the penis along the shaft with the nondominant hand. Hold the condom sheath at the tip of the penis and smoothly roll the sheath onto the penis, leaving 1 to 2 inches of space between the tip of the penis and the drainage tube of the condom sheath.
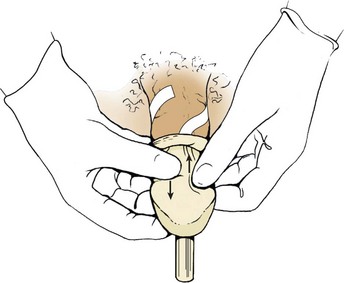
Step 11
RATIONALE Positions the condom catheter on the penis. Allows free passage of urine into the collecting tube and drainage bag. Keeps penis away from collecting urine. Secures the condom sheath to the penis.
12. ACTION Gently press the sheath to the underlying adhesive strip with the palm of the hand in a grasp, being careful not to wrinkle the rubber sheath. Hold for 1 minute. Explain the rationale for holding x 1 minute to the patient.
RATIONALE Wrinkles in the sheath may cause urine leakage. The warmth of the hand over 1 minute activates the adhesive.
13. ACTION Position the penis downward and connect the drainage tube to the collection bag.
RATIONALE Allows urine to flow into the collection bag.
14. ACTION Return bed to low position and make patient comfortable; place call light within reach. Raise side rails.
RATIONALE Prevents accidents and provides comfort and security.
15. ACTION Check the penis after 30 minutes and then every 2 hours and ensure that the catheter is not twisted so that urine can drain freely.
RATIONALE Ensures that the catheter is not too tight and impairing circulation; twisting of catheter impedes urine flow.
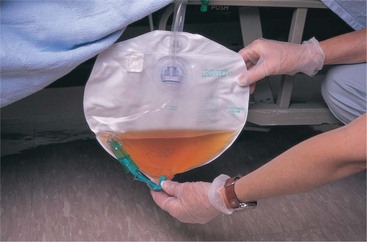
16. ACTION If a leg bag is used, empty it when it is partially filled with urine.
RATIONALE Prevents the weight of the collected urine from dislodging the catheter from the penis.
19. ACTION Note date, condition of genital area, size and type of catheter applied, type of skin prep used, type of drainage collection attached to catheter, amount of urine obtained in bag and its color and character, and patient’s tolerance of the procedure.
If the condom catheter is the newer self-adhesive type, apply catheter as in Step 11 and apply gentle pressure around the penile shaft for 10 to 15 seconds to secure the catheter.
The catheter must be checked frequently because the end of the sheath is prone to twist, preventing the urine from flowing into the drainage tube. Care must be taken not to allow pulling on the drainage tubing when repositioning or ambulating the patient because this may dislodge the condom catheter.
Remove and change the catheter daily or more often if it fits improperly.
Wash the used catheter and collection bag with mild soap and water, rinse with a 1:7 strength vinegar solution, and allow to completely dry.
If the rolled-over portion at the base of the penis seems too tight, clip the roll a tiny bit to loosen it. It should not constrict the penis and interfere with blood flow.
Indications that the catheter is too tight are swelling or discoloration of the penis and complaints of discomfort.
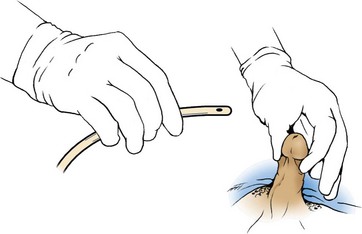
Performing Catheterization: Explain the procedure and elicit the patient’s cooperation (Communication Cues 29-1). Sterile equipment and strict aseptic technique must be used to catheterize a patient. Any break in aseptic technique causing contamination must be corrected before continuing with the procedure. Each catheter kit is suitable for catheterizing a male or female. The procedure for male and female catheterization is similar except for variations in the positioning, draping, and cleansing of the urinary meatus. In the male, the catheter is inserted farther (about 7 to 8 inches). When inserting a catheter, gently insert until you see the urine flow and then insert 1 to 2 more inches. This will ensure the balloon will not damage the urethra during inflation. Skill 29-3 and Skill 29-4 (p. 563) give the steps for catheterization of the female patient and the male patient, respectively. The Foley catheter system should be maintained as a closed system to lessen the risk of infection. The procedure for inserting a straight or Foley catheter is similar. The difference is that with the Foley, the balloon must be inflated and there is a connecting tube to a drainage bag. Information on straight catheterization is presented in the Special Considerations at the end of Skills 29-3 and 29-4.
Skill 29-3 Catheterizing the Female Patient
An indwelling or retention catheter is used when continuous drainage of urine is desirable because the patient cannot void or cannot stay dry because of constant incontinence. This type of catheter is also used when it is necessary to track urinary output closely hour by hour. The catheter is held in the bladder by a small inflated balloon. Catheter insertion is a sterile procedure, and the student must be supervised when performing catheterization.
Review and carry out the Standard Steps in Appendix 3.
1. ACTION Check the physician’s order for type and size of catheter.
RATIONALE Catheterization is only done by medical order.
2. ACTION Assess patient’s knowledge of catheterization and use of a catheter.
RATIONALE Considers the patient’s knowledge level before beginning needed teaching.
3. ACTION Assess whether patient is allergic to iodine or tape.
RATIONALE Povidone-iodine is often used to cleanse the perineum before catheterization.
4. ACTION Assess female patient’s ability to assume the dorsal recumbent (lithotomy) position.
RATIONALE If the female cannot assume the dorsal recumbent position, a side-lying position may be used.
5. ACTION Check the patient’s identification band, gather equipment, and prepare the working space by raising the bed to proper height and positioning the over-the-bed table for use.
RATIONALE Ensures that the procedure is performed on the correct patient; promotes work efficiency and prevents back strain.
6. ACTION Close the door and/or privacy curtains.
RATIONALE Protects the patient’s right to privacy; helps prevent embarrassment.
7. ACTION Explain the procedure.
RATIONALE Decreases fear of the unknown; prepares the patient for what will occur.
8. ACTION Perform hand hygiene and don disposable gloves.
RATIONALE Reduces transfer of microorganisms.
9. ACTION Assist patient to assume the dorsal recumbent position, with thighs relaxed so that hips can externally rotate, and drape with a bath blanket or sheet.
RATIONALE Positions patient for ease of viewing the meatus and inserting the catheter into the bladder.
10. ACTION With the use of good lighting, inspect the perineum. Wash the area if needed. Spread the labia with your nondominant hand and locate the urinary meatus.
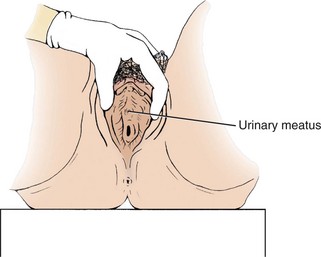
Step 10
RATIONALE An assistant may be needed to hold a flashlight with the beam directed at the perineum. This step ensures greater success in placing the catheter into the bladder on the first attempt.
11. ACTION Remove gloves and perform hand hygiene.
RATIONALE Reduces transfer of microorganisms.
12. ACTION Open the plastic covering of the catheter kit by tearing along the lined perforated edge. Use the plastic cover as a discard bag and place it to the side of the field or toward the foot of the bed for waste disposal.
RATIONALE Provides a receptacle for used supplies.
13. ACTION Remove the paper-wrapped catheter tray and place it on the bed between the patient’s legs, near the perineum (8 to 12 inches away).
RATIONALE Provides a workspace.
14. ACTION Fold back the corner of the bath blanket drape to expose the perineum. With clean hands, using sterile technique, open the wrapper and use it as a sterile field.
RATIONALE Provides a sterile field within which to work.
15. ACTION Pick up the sterile absorbent underpad by one corner and, while holding two corners turned over your fingers, slip it under the patient’s buttocks, plastic side down, while asking her to lift the buttocks. Touch only the corners and underside of the sterile underpad.
RATIONALE Keeps solution from soiling the bedding. Keeps the center of the pad sterile.
16. ACTION Put on the sterile gloves and separate the two containers in the kit, placing the tray with the cotton balls in front of the box containing the catheter and drainage bag.
RATIONALE Catheterization is a sterile procedure. Places supplies in order of use.
17. ACTION Place the drape with the opening over the genital area, exposing the labia. Continue reassuring the patient.
RATIONALE Sterile drape helps prevent catheter from touching the skin on the thighs as the meatus is approached.
18. ACTION Loosen the cotton balls one from another, open the antiseptic solution pack, and drizzle antiseptic solution evenly over the cotton balls. Discard the empty package. Be careful not to splatter the solution.
RATIONALE Prepares the cotton balls to be picked up individually with the forceps.
19. ACTION Open the package of lubricant, or remove the stopper from the syringe containing it, and squirt it into an open area of the tray.
RATIONALE Lubricant may be squirted into the tray and the catheter tip then rotated in it to lubricate.
20. ACTION Place the sterile specimen bottle on the side of the tray or discard it.
RATIONALE Bottle may be discarded if no specimen is required.
21. ACTION Remove the plastic sleeve on the catheter by tearing it down the perforated side while carefully controlling the catheter. Place the catheter within the sterile tray where it can be easily reached.
RATIONALE Prepares the catheter for use. An uncontrolled catheter may strike a nonsterile surface, contaminating it. Wrapping the catheter around a gloved hand while tearing the sleeve helps prevent a break in sterile technique.
22. ACTION Attach the sterile water-filled syringe to the balloon port on the catheter and gently insert the water to test the patency of the balloon. Omit pretesting if the balloon is prefilled or if contraindicated by the manufacturer.
RATIONALE Ensures balloon patency before the catheter is introduced into the bladder.
23. ACTION After the test, draw the water back into the syringe, leaving the syringe attached to the catheter balloon port.
RATIONALE Makes it easier to inject the water into the balloon at the right moment.
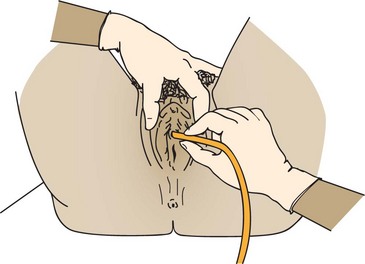
24. ACTION With the forefinger and thumb of the nondominant hand, separate the labia minora, exposing the meatus. Pull slightly upward (see figure with Step 10). Leave this hand in place, holding the labia open until the catheter is inserted.
RATIONALE Exposes the urinary meatus so that the catheter can be introduced. Using a sterile 4 × 4 gauze between the fingers and the inner labia helps prevent the fingers from slipping. Remember: The hand holding open the labia is now contaminated and must not be used to handle sterile objects.
25. ACTION Using the forceps, pick up one saturated cotton ball at a time and cleanse down one side of the labia majora and then the other, discarding each used cotton ball after one stroke. Cleanse one side of the labia minora and then the other. Cleanse last over the meatus with a slow downward stroke. Do not allow the labia to close over the meatus after cleansing.
RATIONALE Removes microorganisms from the perineal area and urinary meatus. Take care not to pass over the sterile field with used cotton balls when discarding them because this contaminates the sterile field.
a. ACTION If solution is obscuring the meatus, a dry sterile cotton ball can be used to sponge up the excess solution.
RATIONALE This allows better visualization of the meatus.
26. ACTION Pick up the catheter about 3 inches from the tip, lubricate it well, and gently insert it into the meatus while pointing the catheter slightly toward the umbilicus. Insert it about 2 to 3 inches or until you visualize urine flow. After you see the urine flow, insert the catheter an additional 1 to 2 inches. There may be slight resistance as the catheter passes the internal urethral sphincter. If urine does not flow, rotate the catheter gently and carefully insert it another inch farther. Do not use force. If resistance is encountered, ask the patient to take a deep breath, and twist and advance the catheter as the patient does so; this relaxes the sphincter. If the catheter has been inserted into the vagina by mistake, leave it there as a marker for the vaginal opening, rescrub, and begin the procedure again with a sterile kit.
Step 26
RATIONALE Technique eases insertion into the bladder. Leaving marker catheter in place ensures vaginal opening is not mistaken for urinary meatus.
27. ACTION Hold the catheter in place with the dominant hand while instilling the water into the balloon with the nondominant hand. Remove the syringe from the port after inflation and discard it. A prefilled balloon is filled by unclamping the port. Gently pull on the catheter to see if it is anchored securely, and then gently push it into the bladder about 1½ inches. Watch the patient’s face for an expression of discomfort while inflating the balloon to be certain that the balloon is not in the urethra.
RATIONALE Inflated balloon keeps the catheter from slipping back into the urethra. If the balloon sits at the neck of the bladder after inflation, it causes pressure and a greater urge to urinate.
28. ACTION Cleanse the antiseptic solution from the perineum and remove the underpad.
RATIONALE Prevents the antiseptic solution from irritating the skin and makes the patient more comfortable.
29. ACTION Attach the drainage bag to the stationary part of the bed frame along the side of the bed close to the middle. Remove the drapes, dry the genital area, dispose of used supplies, remove gloves, and perform hand hygiene.
Step 29
RATIONALE Attaching bag to bed frame keeps bag from coming into contact with the floor. Use the plastic or metal hook to attach the bag to the bed.
30. ACTION Attach the catheter to the thigh with tape or a catheter holder.
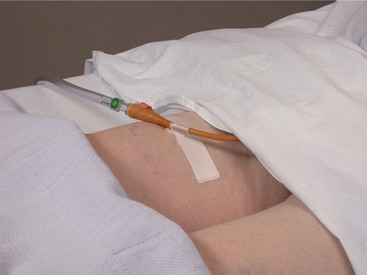
Step 30
RATIONALE Secures the catheter so that there is no tension on the internal urethral sphincter. Tension on the catheter causes pressure on the internal urethral sphincter and may damage it.
31. ACTION Coil the excess drainage tubing on the bed so that the last portion hangs straight to the drainage bag and secure it.
RATIONALE The catheter will drain better if no tubing is hanging below the level of entry into the drainage bag.
32. ACTION Restore the unit, lower the bed, and place the call light within reach.
RATIONALE Protects the patient; call light provides a sense of security.
Was sterile technique maintained?
Is urine draining, indicating proper placement in the bladder?
Is the patient having any pain associated with the procedure?
Is there anything you would do differently next time?
RATIONALE Determines whether the procedure was done correctly and whether the catheter system is patent. Helps improve technique.
34. ACTION Note date, time, size and type of catheter, amount of water instilled into balloon, type of technique used, and color and characteristics of the urine.
2/23 1030 No. 16 Fr. Foley with 10 mL water into balloon inserted with sterile technique. Closed drainage system attached. Pt expressing slight discomfort with catheter in place. Approximately 230 mL of dark yellow, clear urine obtained in bag. Catheter taped to inner right thigh. Bed into lowest position, call light within reach.
Some physicians may order lubricant with local anesthetic.
Once the catheter has touched the patient’s skin, it should not be introduced into the urinary meatus because it is contaminated. Anytime the catheter becomes contaminated, the procedure is stopped and begun again with a sterile catheter and kit.
For Straight Catheterization: There is no balloon to inflate and no drainage bag. The distal end of the catheter is left in the tray so that urine will drain into it. If a specimen is required, prepare the specimen bottle by labeling and opening it; place the lid upside down on a clean surface. After urine has started to flow, pinch off the catheter with the nondominant hand and place the end of the catheter above the specimen container. Allow 1 to 2 oz of urine to flow into the container. Pinch off the flow, replace the catheter in the tray, and drain the remaining urine from the bladder. Pinch off, remove, and discard the catheter. Measure and record the amount of urine on the intake and output record. Place lid on container, label, and send to laboratory.
Skill 29-4 Catheterizing the Male Patient
An indwelling or retention catheter is used when the patient cannot void or when it is desirable to track urinary output closely. A small inflated balloon holds the catheter in the bladder. Supervision of the student is required for this sterile invasive procedure.
Review and carry out the Standard Steps in Appendix 3.
1. ACTION Check the physician’s order for type and size of catheter.
RATIONALE Ensures that the right patient is catheterized.
2. ACTION Assess patient’s knowledge of catheterization and use of a catheter. Assess whether patient is allergic to iodine or tape.
RATIONALE Povidone-iodine is often used to cleanse around the meatus. It must not be used on allergic individuals.
3. ACTION Check the patient’s identi-band, gather equipment, and prepare the working space by raising the bed to proper height and positioning the over-the-bed table for use.
RATIONALE Ensures that the procedure is performed on the correct patient. Promotes work efficiency and prevents back strain.
4. ACTION Close the door and/or privacy curtains.
RATIONALE Protects the patient’s right to privacy; helps prevent embarrassment.
5. ACTION Explain the procedure.
RATIONALE Decreases fear of the unknown; prepares the patient for what will occur.
6. ACTION Perform hand hygiene.
RATIONALE Reduces transfer of microorganisms.
7. ACTION With the patient supine and knees slightly apart, drape by fan-folding the bedcovers down to cover the lower legs, exposing the perineal area. Use a bath blanket to cover the trunk.
RATIONALE Draping keeps the patient warm and reduces embarrassment. Bunching the bath blanket a bit over the abdomen obstructs the patient’s view and may decrease his embarrassment. It is not unusual for an erection to occur when the penis is handled.
a. ACTION Open the catheter tray by tearing open the plastic cover at the perforated line. Place the kit on the bed between the legs.
RATIONALE Supplies must be within reach.
b. ACTION Use the plastic cover as a discard bag by placing it to the side of the field or toward the foot of the bed.
9. ACTION Place the absorbent pad under the penis; place the opening of the sterile drape over the penis and onto the perineum, touching only the outer corners.
RATIONALE Provides a sterile field within which to work.
10. ACTION Separate the two parts of the kit and remove the plastic sleeve from the catheter by tearing it down the perforated side while controlling the catheter. Test the balloon unless it is prefilled or testing is contraindicated by the manufacturer.
RATIONALE Prepares the catheter for use. Controlling the catheter prevents it from touching contaminated surfaces and ensures sterility. Testing is done to detect leaks in the balloon.
11. ACTION Lubricate around the first 3 to 4 inches (5 to 7 cm) of the catheter if the lubricant comes in a foil package. If it is in a syringe, squirt it directly into the urethra.
RATIONALE Lubricant prevents undue trauma when inserting the catheter into the urethra. It is recommended practice to place the lubricant into the urethra of the male. When difficulty is encountered with insertion of the catheter, obtain an order for Xylocaine gel. Squirting this into the urethra immediately relaxes muscle spasm and allows easier entry for the catheter.
12. ACTION Retract the foreskin if necessary to expose the head of the penis.
RATIONALE Foreskin interferes with adequate cleansing.
13. ACTION Using forceps and a saturated cotton ball, grasp the glans below the tip with the nondominant hand, hold the penis erect, and cleanse the glans in a circular motion moving outward from the meatus.
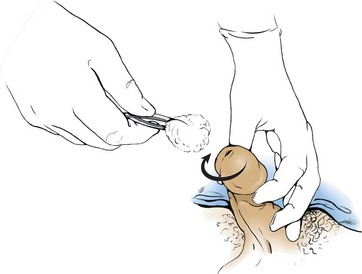
Step 13
RATIONALE Reduces the number of microorganisms around the meatus.
14. ACTION Discard the used cotton ball and cleanse again with two more cotton balls. Continue to hold the shaft of the penis.
RATIONALE Be careful not to cross the sterile field when discarding the used cotton ball because this contaminates the field.
15. ACTION Pick up the catheter with the dominant hand 3 to 4 inches (8 to 10 cm) below the tip. With the penis perpendicular to the body, pull it slightly upward, ask the patient to bear down as if trying to urinate, and insert the catheter into the meatus until you reach the catheter bifurcation using a rotating motion. Urine should flow.
Step 15
RATIONALE Elevating and putting slight traction on the penis straightens the urethra and makes it easier to insert the catheter into the bladder.
16. ACTION If resistance is met, twist the catheter and ask the patient to take a deep breath, and or to turn feet soles inward and wiggle the toes to relax the muscles. If resistance persists and the catheter will not advance without difficulty, remove it and notify the physician.
RATIONALE The internal sphincter relaxes when a deep breath is taken. Forcing the catheter to advance when continued resistance is met may cause trauma.
17. ACTION After urine starts to flow, insert the catheter an additional 1 to 2 inches and then hold the catheter in place, inject the contents of the prefilled syringe into the balloon, and detach the syringe while holding the plunger all the way down. If the catheter has a prefilled balloon clamp at the drainage end, release it.
RATIONALE Holding the catheter in place guides the balloon away from the sphincter, preventing pressure on the neck of the bladder. Filling the balloon ensures that the catheter will remain in the bladder. Holding down the plunger of the syringe that is used to fill the balloon keeps the water from flowing back into the syringe.
18. ACTION Pull gently on the catheter to check that the balloon is inflated. Then push it back in slightly.
RATIONALE Ensures that the catheter will not fall out. Relieves pressure on the internal sphincter.
19. ACTION Clean the antiseptic solution from the penis and remove the drape by tearing it toward the penis on one side.
RATIONALE Prevents irritation of the skin and makes the patient comfortable.
20. ACTION Reposition the foreskin if it was retracted.
RATIONALE If not repositioned, the foreskin can constrict the penis, causing circulation difficulties and swelling.
21. ACTION Tape the catheter to the abdomen if it is to remain in place for an extended period. Alternatively, it may be taped to the top of the thigh for short-term use.
RATIONALE Secures the catheter so there is no tension on the internal urinary sphincter. Taping the catheter to the abdomen helps prevent pressure on the penoscrotal angle.
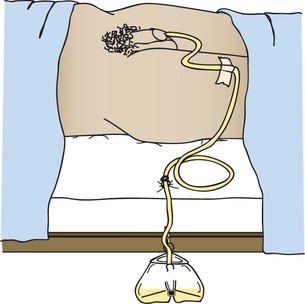
Step 21
22. ACTION Attach the drainage bag to the bed frame (not the side rail). Coil the excess drainage tubing on the mattress and secure it.
RATIONALE The drainage bag must be kept below the level of the bladder for drainage to occur. Tubing should not hang below the level of entry into the bag.
23. ACTION Remove the drape, make the patient comfortable, lower the bed, and restore the unit, placing the call light within reach.
RATIONALE Provides for patient comfort and safety.
24. ACTION Dispose of used supplies in the appropriate waste container.
RATIONALE Patient’s unit wastebasket should not be overfilled with used supplies.
25. ACTION Note the initial amount and character of urine in the bag.
RATIONALE Provides output data and a baseline for further assessments of urine character and output.
28. ACTION Note date, time, size and type of catheter inserted, amount of water in balloon, any problems encountered, and amount and character of urine obtained initially.
RATIONALE Documents procedure, catheter size, and amount of water in balloon for future reference.
The ambulatory patient who needs an indwelling catheter may use a leg bag for urine drainage. This needs to be emptied when partially full so that the weight does not become burdensome.
For Straight Catheterization: There is no balloon to inflate and no drainage bag. The distal end of the catheter is left in the tray so that the urine will flow into the tray. All urine is drained unless there is an agency policy to clamp the catheter for a time after 800 to 1000 mL has drained. If a specimen is needed, the urine flow is started, and the catheter pinched off with the nondominant hand and then held over the opened sterile specimen container. As soon as an ounce or two of urine is in the specimen container, the catheter is replaced in the tray and the urine is completely drained from the bladder. The catheter is pinched off, removed, and discarded. The urine is measured and the amount entered on the intake and output record. The specimen is labeled and sent to the laboratory.
Catheterization in the home may be a clean technique rather than a sterile one. The patient’s bladder should be resistant to the organisms normally found in the home. The drainage bag can be washed in mild soap and water, rinsed, and rinsed again with a solution of 1 part vinegar to 7 parts water to deodorize it. It should be allowed to dry before reuse. Catheters should be washed with mild soap, rinsed well, and allowed to dry before boiling for 20 minutes. Store them in a closed container when dry.
It is a good idea to identify the urethral meatus in the female before beginning the procedure. This may be done before gathering the equipment or just before opening the sterile catheterization kit. When the patient is in the dorsal recumbent position and draped, put on exam gloves, use adequate light, and spread the labia minora to reveal the inner anatomy. The urethral meatus is usually slightly above the vaginal opening and often looks like a dimple or fold in the mucous membrane.
The catheter is taped to the thigh of the female, preferably the inner thigh, and to the top of the thigh or the abdomen of the male. Allow a little slack in the catheter before taping it to the skin so that there is not constant tension on the internal sphincter by the balloon. All patients with an indwelling catheter are placed on intake and output recording.
The perineum is cleaned during the daily bath, and the external portion of the catheter is washed at that time if it is soiled. No special cleansing of the urinary meatus is recommended. Box 29-3 provides suggestions for caring for the patient with an indwelling catheter.
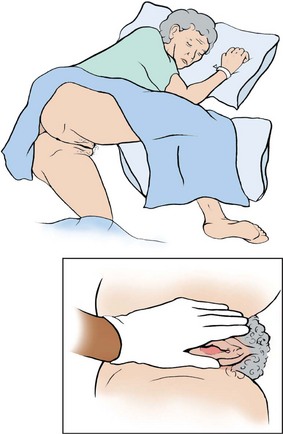
In the elderly female, the urinary meatus is sometimes found just inside the opening of the vagina. If the patient has difficulty with the dorsal recumbent position, place her on her side with the knees flexed and the upper leg supported by pillows, then approach the meatus from the rear (Figure 29-9).
Removal of an Indwelling (Foley) Catheter: Removal of an indwelling catheter requires a physician’s order. The patient is kept on intake and output recording for 12 to 24 hours after catheter removal to ensure that the bladder is draining adequately. Steps 29-2 give the steps and rationale for this removal.
The Suprapubic Catheter: A suprapubic catheter may be used for urine drainage following gynecologic and bladder surgery. It is inserted through the abdominal wall by the surgeon. The suprapubic catheter is sutured to the skin at the time of insertion (Figure 29-10).
Intermittent Self-Catheterization: Intermittent self-catheterization is used for patients who regularly experience incontinence or urinary retention. In accordance with 2009 National Patient Safety Goals, patients should be taught and encouraged to participate in their own care (Patient Teaching 29-2). Often these patients have a spinal cord problem that prevents proper function of the nerves that control the bladder and urinary sphincters. This procedure, most often performed outside of the hospital, is a “clean” rather than a “sterile” procedure and does not require the use of a sterile catheter.
Bladder Irrigation or Instillation: Irrigation or instillation is performed on patients with indwelling catheters to
• Wash out residual urine or sediment from the bladder
• Remove clots and stop oozing of blood after prostate or bladder surgery
• Soothe irritated bladder tissues and promote healing
• Ensure that the lumen of the indwelling catheter is open and draining
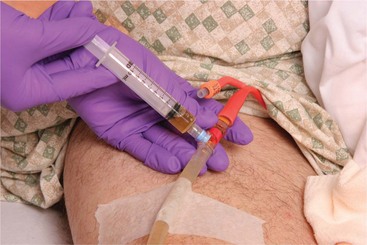
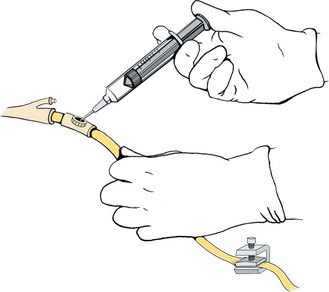
Bladder irrigation or instillation is best done via the injection port on the drainage tubing. The tubing is clamped distal to the port and the medication or solution is introduced via a needle placed in the port. The solution is then allowed to drain. If medication is instilled, the catheter is clamped for a designated period of time before unclamping it so drainage can occur. For irrigation, continue instilling 30 to 50 mL of solution, depending on the medical order, and allow it to drain until the return is clear (Skill 29-5).
Skill 29-5 Performing Intermittent Bladder Irrigation and Instillation
Bladder or catheter irrigation is performed when the system is clogged and urine will not drain through the catheter. A bladder instillation is performed to place a medicated solution in the bladder. The catheter and drainage system should not be opened for irrigation unless closed irrigation has not corrected the problem.
For open irrigation: Sterile tubing cap
Sterile normal saline or ordered irrigation solution
Review and carry out the Standard Steps in Appendix 3.
3. ACTION Check the patient’s identi-band.
RATIONALE Verifies that correct patient is to receive the irrigation.
4. ACTION Gather the equipment and set up the workspace, raising the bed to working height.
RATIONALE Promotes work efficiency and prevents back strain.
5. ACTION Plan sufficient time to perform the irrigation without neglecting other patients.
RATIONALE Demonstrates good work organization.
6. ACTION Explain the procedure to the patient.
RATIONALE Decreases fear of the unknown and enlists the patient’s cooperation.
7. ACTION Provide privacy by closing the door and/or privacy curtains.
8. ACTION Perform hand hygiene and lower the side rail if up.
RATIONALE Reduces transfer of microorganisms. Eliminates obstacle to reaching work area.
9. ACTION Have patient assume a dorsal recumbent position and fan-fold the linen to expose the catheter without exposing the patient. Use a bath blanket to cover the trunk of the body.
RATIONALE Exposes work area and protects patient’s dignity. Keeps the patient from becoming chilled.
10. ACTION Check the bladder for distention by palpation.
RATIONALE Ensures that fluid will not overdistend the bladder.
11. ACTION Open the sterile irrigation set and place beside the patient’s thigh or between the legs. Maintain sterility.
RATIONALE Keeps supplies within reach.
12. ACTION Place the absorbent pad under the catheter drainage tubing connection, handling only the corners of the pad.
RATIONALE Provides a field within which to work. Protects the bedding.
RATIONALE Reduces transfer of microorganisms.
14. ACTION For a bladder irrigation or instillation, clamp the drainage tubing distal to the catheter connection.
RATIONALE Clamping directs the solution toward the bladder and prevents the solution from draining into the collection bag.
15. ACTION Determine the amount of urine in the drainage bag before beginning the irrigation.
RATIONALE The amount of urine must be subtracted from the total drainage at the end of the procedure to determine if all the irrigation solution is returned.
16. ACTION Pour 100 to 200 mL of irrigating solution into the sterile container using aseptic technique.
RATIONALE Amount depends on medical order.
17. ACTION Remove the cap from the syringe and draw up 30 to 40 mL of solution while maintaining sterility. Expel any air and attach the sterile needle.
RATIONALE Thirty to 40 mL of solution at a time is normal for irrigation of the adult bladder. Air in the bladder causes discomfort.
18. ACTION With an antiseptic swab, wipe the port on the drainage tubing or the place on the lumen of the catheter for instilling solution.
RATIONALE Reduces contamination of the system by microorganisms.
19. ACTION Insert the needle into the port and gently instill the solution.
Step 19
RATIONALE Gentle instillation prevents injury to the lining of the bladder and helps prevent bladder spasms.
20. ACTION Remove the needle from the port and cleanse the port with an antiseptic swab. Place the needle and syringe where it will remain sterile.
RATIONALE Keeps the needle sterile so that the procedure can be repeated until the full amount of irrigant has been instilled.
a. ACTION For irrigation, immediately unclamp the tubing and lower the catheter so that the fluid runs into the drainage tubing.
RATIONALE Allows return of the irrigating fluid and any debris that was clogging the catheter.
b. ACTION For a bladder instillation, leave the tubing clamped for the ordered amount of time, then unclamp it and allow the fluid to run into the drainage container.
RATIONALE Allows medicine to remain in contact with the bladder wall before draining.
22. ACTION Repeat the process until all of the ordered solution has been used or until the catheter is clear and the bladder is draining clear urine.
RATIONALE Accomplishes purpose of the irrigation or instillation.
23. ACTION Empty the urine drainage bag and measure the output. Note the color and characteristics of the drainage. Enter the amount on the intake and output record.
RATIONALE Irrigation solution must be deducted from the total output to determine actual urine output. Amount of irrigant is entered as input on the input and output sheet. The total amount of drainage is entered as output. Changes in urine color or clarity must be documented.
24. ACTION Dispose of used equipment, remove gloves, and perform hand hygiene.
RATIONALE Reduces transfer of microorganisms. Equipment is no longer sterile and cannot be reused.
25. ACTION Make the patient comfortable, lower the bed, raise side rails, and place the call light within reach. Double check to make sure that the clamp is open at the end of the treatment.
RATIONALE Demonstrates caring and concern for the patient and institutes safety measures. Allows urine to freely flow into drainage bag; prevents blockage that could damage kidneys.
27. ACTION Note date, time, how irrigated, amount of solution used each time, appearance of return fluid, how patient tolerated the procedure, whether catheter is now patent.
2/24 0930 Foley tubing clamped and catheter irrigated × 4 per orders with 40 mL sterile saline using sterile syringe and needle. Unclamped between irrigations. Return cloudy with debris × 2, then cleared. Draining adequate urine; no bladder distention. Voiced only mild discomfort with first irrigation. Resting comfortably; bed into lowest position, call light in reach.
Variation: Open System Irrigation
28. ACTION After patient and workspace are prepared (Steps 1 through 16 on pp. 568 and 569), perform hand hygiene and don sterile gloves. Be certain there is an order or valid reason for performing an open irrigation.
RATIONALE Performing hand hygiene and gloving reduces transfer of microorganisms. Catheter drainage system should not be opened unnecessarily.
29. ACTION With an antiseptic swab, disinfect the junction of the catheter and drainage tubing.
RATIONALE Reduces chance of contamination of the lumen of the catheter or drainage tubing.
30. ACTION Placing your fingers at least 1 inch from the junction, separate the catheter and tubing and place a sterile tube cap over the end of the drainage tubing.
RATIONALE Keeps the end of the drainage tubing sterile.
31. ACTION Draw the 30- to 40-mL solution into the sterile irrigation syringe (could be a bulb syringe) and carefully fit the irrigation tip into the end of the catheter.
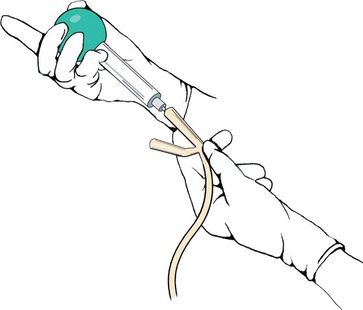
Step 31
RATIONALE Prepares the solution for instillation.
32. ACTION Gently instill the solution into the catheter by squeezing the bulb of the syringe or pressing on the plunger.
RATIONALE Too much force may damage the bladder lining or cause bladder spasms.
33. ACTION Remove the syringe and allow the fluid to run from the catheter into the sterile drainage receptacle. Repeat until the fluid is running freely or the purpose of the irrigation is accomplished.
RATIONALE Provides avenue for drainage of fluid. A clogged catheter may take several irrigations before it is unclogged.
34. ACTION Carefully remove the cap on the drainage tubing and reattach it to the catheter, keeping both ends sterile. Swab the connection with an antiseptic swab.
RATIONALE Restores the closed drainage system without contaminating either the catheter or the tubing. Removes any leakage of urine.
35. ACTION Remove gloves, perform hand hygiene, and follow the remaining steps as for closed irrigation.
When there is no specific solution or amount of solution ordered for the irrigation, check the agency’s policy and procedure manual for the accepted protocol.
Although it is always preferable to use a closed irrigation technique, using the open irrigation method in the home is less likely to lead to an infection than if done in the hospital because there are fewer resident microorganisms in the average home.
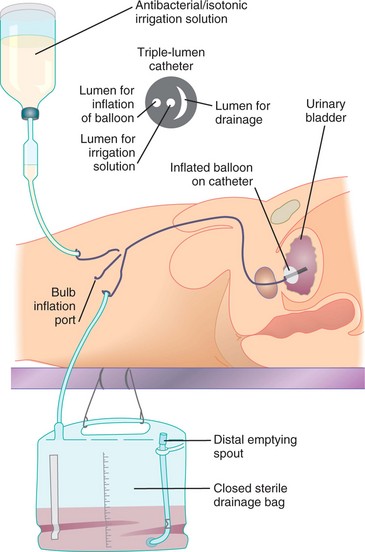
Continuous irrigation is performed after prostate or bladder surgery via the “three-way” indwelling (Foley) catheter system where the irrigation solution is hooked up to the irrigation port of the catheter. The solution container is positioned on an intravenous (IV) pole. Using sterile technique, solution is run through the tubing to remove air and then the tubing is connected to the irrigation port of the catheter. When using a three-way catheter consult the package instructions to determine which port should be attached to the irrigating solution and which port is designated for the drainage bag connection. (Note: The inner lumen with the largest diameter should be used for the drainage because of the potential for clots or debris that are washed from the bladder.) The third port is for inflating the “balloon” and will appear similar to a standard Foley catheter port. The order is checked for the flow rate. Generally, the irrigation solution is set to flow just fast enough to prevent clots from forming in the bladder (Figure 29-11). The return should be pink to light red. The irrigation solution container is changed at least every 24 hours.
When the drainage system must be opened for irrigation, strict asepsis must be maintained. Take special care not to contaminate the end of the drainage tubing or the end of the catheter.
The amount of solution to be introduced is ordered by the physician. If there is no specific amount ordered, follow agency procedure. All irrigation fluid is subtracted from the amount of output.
Assisting the Patient Who Is Incontinent: There are at least six types of incontinence: urge, stress, total, overflow, functional, and reflex (Box 29-4). The effect on the patient is much the same. The incontinent patient suffers a body image disturbance over the loss of a normal function. There is risk of skin breakdown from moisture and waste products in the urine, as well as worry over being wet and smelling of urine. There is also the risk of infection because urine is a good medium for bacterial growth. Urinary incontinence may be temporary or it may be permanent.
Management and treatment of incontinence is complex; some patients may have more than one form of incontinence. For example, stress incontinence is often accompanied by urge incontinence. For some patients, better and quicker assistance to the toilet will resolve the problem. For others, continence training may help(Steps 29-3) (Assignment Considerations 29-1). Regularly performing Kegel exercises may greatly reduce or stop incontinence in patients (Patient Teaching 29-3). Several surgical procedures can be used for patients who choose to correct a specific physiologic problem. For those incontinent patients for whom there is no cure, such as people with neurologic damage that prevents sphincter control, you must help the patient stay dry and clean and preserve his dignity (Legal & Ethical Considerations 29-1). Condom catheters are often used for the incontinent male. Adult briefs containing material similar to diapers are used for females. Absorbent pads similar to sanitary napkins may be used for either sex.
Urinary Diversion Care: Urinary diversion is necessary when the bladder must be removed or bypassed for some reason. When urinary diversion is performed, one or both ureters are implanted into the abdominal wall, the bowel, or a portion of bowel that forms a pouch. When the ureter exits on the abdominal wall, discharging urine through the opening, it is called a urostomy (opening through which urine drains). The nurse is concerned with collection of the draining urine and care of the skin around the urostomy. Unless the urostomy is constructed with an internal pouch and valve, urine drains constantly. This presents a challenge when changing the urostomy bag. Place a tampon in the opening while you clean the skin and prepare the clean urostomy bag. The urostomy with an internal pouch is emptied by the insertion of a catheter. Urine contains ammonia, which is very irritating to the skin, and a skin barrier is applied before attaching the collection appliance. Because bowel ostomies are more common than urostomies, particulars of skin care and changing the ostomy bag (appliance) are presented in Chapter 30.
Evaluation
Review the expected outcomes written during the planning phase in order to properly evaluate the effectiveness of interventions for the patient’s problems. Determining whether the patient can urinate normally without urgency, dysuria, or frequency, plus a urinalysis performed after treatment is complete or when a Foley catheter is removed, indicates whether infection has been eliminated or avoided. Noting intake and output records and comparing them from day to day indicates whether fluid intake is sufficient and output is adequate. Noting the condition of skin in the perineal area of the patient who has been incontinent provides information as to whether measures to protect the skin are sufficient. Evidence that the patient has had fewer episodes of incontinence over a period of days indicates that the continence training program is helpful. Checking the appearance of the urine for normal characteristics is another evaluation tool.
Obtain feedback for all patient teaching performed. Can the patient tell you measures to take to prevent urinary tract infection? Can the patient needing intermittent catheterization self-catheterize successfully? Does the patient, or the family member of the patient at home, know how to care for the catheter and empty the collection bag properly? Is the patient in the long-term care facility who has functional incontinence now receiving the needed assistance? Nursing Care Plan 29-1 provides some specific examples of evaluative statements for expected outcomes on the plan.
Documentation: When a patient voids normally and without problems in adequate amounts, include a short note of “voiding quantity sufficient.” If a patient has been having a problem with some aspect of urinary elimination, the number of voidings per day is charted along with the urinary output and the appearance of the urine. When a patient is catheterized, a note is made regarding the appearance of the urine returned from the catheter and any problems encountered during the procedure. The size and type of catheter are charted and the amount of water instilled in the Foley balloon is noted. A description of the urine should be documented on the computer or chart flow sheet or nurse’s notes at least once a day when a patient has an indwelling catheter, along with assessment data that indicate no urinary tract infection is present (unless one was present before the catheter was inserted).
For the incontinent patient, a note regarding the number of times the patient voided normally is made along with a description of the time and circumstances of any incontinent voidings. The assessment of the skin in the perineal area is charted at least once a shift.
Documentation of all patient teaching is done in the nurse’s notes or on a patient education flow sheet. All diagnostic tests and specimens obtained and sent to the lab are noted on the daily activity flow sheet. Urostomy care is documented on the flow sheet as well. A note regarding the condition of the stoma and the surrounding skin should be placed in the nurse’s notes.
If a bladder irrigation or instillation is performed, it is documented in the nurse’s notes stating the amount of solution instilled, whether aseptic technique was maintained, the time the fluid remained in the bladder, the amount and description of the outflow, and any problems encountered. When an indwelling catheter is removed, document the time, date, and amount of urine in the drainage bag. Add a note as to the time by which the patient should void (within 8 hours). Document any problems the patient has voiding after catheter removal.
NCLEX-PN® EXAMINATION–STYLE REVIEW QUESTIONS
Choose the best answer(s) for each question.
1. A patient underwent a hernia repair in the same-day surgery department. He is awake and alert, but has not been able to void since he returned from surgery 4 hours ago. He cannot be discharged until he voids. He has had 1000 mL of IV fluid. Which intervention would be the most likely to help this patient to urinate?
1. Give more liquids by mouth.
3. Assist him to stand by the side of the bed to void.
4. Call the physician and obtain an order for a Foley catheter.
2. The physician prescribes phenazopyridine HCl (Pyridium) for a patient with cystitis. What is a correct teaching point for this medication?
1. The medication helps to flush the bladder.
2. The medication acidifies the urine.
3. The nurse is obtaining a urine specimen for a patient who has an existing Foley catheter. Below are the steps for the procedure. Place these steps (1 though 6) in the correct order.
_______1. Wipe the aspiration port of the drainage tubing with an alcohol pad.
_______2. Aspirate 3 mL of urine by gently pulling back on the plunger.
_______3. Clamp the catheter below the aspiration port.
_______4. Empty the syringe into the sterile container; needle should not touch the container.
_______5. Close and label the container. Unclamp the catheter.
_______6. Insert a 25-gauge needle attached to a syringe into the aspiration port.
4. Which statement by the patient indicates a need for additional patient teaching about cystitis?
1. “I should increase fluids, including orange and grapefruit juice.”
2. “I should avoid use of bubble bath and feminine hygiene sprays.”
5. The nurse has just collected a midstream urine specimen from a patient. Which urine characteristic would be of the greatest concern?
6. A patient in a long-term facility has a retention catheter in place. The nurse identifies Risk for infection as a nursing diagnosis. Which urine abnormality supports the choice of this diagnosis?
7. A patient is admitted with urinary retention. There is an order to insert a Foley catheter into his bladder. He attempts to void and passes 100 mL of urine. Before catheterization, the nurse should:
1. use a condom catheter with a leg bag.
2. wait 2 hours and have him try to void again.
3. have him drink 2 to 3 glasses of water.
4. perform a bladder scan to determine amount of urine retained.
8. The nurse is catheterizing a male patient, who is confused. He moves several times during the procedure despite repeated verbal instructions to remain calm, quiet, and still. Which nursing diagnosis is the priority related to the presence of the catheter for this patient?
9. The nurse is catheterizing a male patient. Resistance is met. The nurse should:
1. apply more pressure with a twisting motion to insert the catheter.
2. obtain a new sterile kit and try again with a sterile Coudé catheter.
3. ask him to take a deep breath and slowly exhale as the catheter is inserted.
4. discontinue the procedure and try again after the patient relaxes.
10. A fracture pan is generally used for a patient who has:
11. Which urine characteristic suggests that the patient might be dehydrated?
12. The patient complains of urinary frequency, urgency, and burning. Which nursing action should be done first?
1. Obtain an order for a urinalysis.
2. Check the patient’s temperature.
13. The purpose of clamping the catheter tubing when irrigating the bladder is to:
1. prevent urine from draining into the bag.
2. hold the solution in the bladder.
14. Which of the following statements by the patient indicates that she understands how to perform the clean-catch method for a urine specimen?
1. “I should clean my genital area first, pee into the cup, and then re-clean myself.”
2. “I should fill the cup completely and save it in the refrigerator.”
3. “I should keep the contents of the kit sterile at all times.”
4. “I should clean myself first, pee a little into the toilet, and then pee into the cup.”
15. The patient had a resection of the prostate gland yesterday and has a three-way catheter for continuous irrigation. The draining urine is very red. This means that the nurse needs to:
1. notify the physician immediately.
2. increase the rate of flow of the irrigation solution.
16. A 24-hour urine specimen is ordered for a patient. The UAP discards some of the urine that should have been saved. Which is the most appropriate nursing action?
1. Verbally reprimand the nursing assistant.
2. Make a note to extend the urine collection period.
17. A nurse is caring for a patient who is incontinent. What is the priority action?