Principles of More Complex Exodontia
PRINCIPLES OF FLAP DESIGN, DEVELOPMENT, AND MANAGEMENT
The removal of most erupted teeth can be achieved by closed delivery, but occasionally these techniques do not suffice. The open or surgical extraction technique is the method used for removing roots that were fractured during routine extraction of teeth and cannot be extracted by the routine closed methods for a variety of reasons. In addition, removal of multiple teeth during one surgical session requires more than the routine removal of teeth as described in Chapter 7. Flaps are commonly required for recontouring and smoothing bone.
This chapter discusses techniques for surgical tooth extraction. The principles of flap design, development, management, and suturing are explained, as are the principles of open extraction of single-rooted and multirooted teeth. Also discussed are the principles involved in multiple extractions and concomitant alveoloplasty.
PRINCIPLES OF FLAP DESIGN, DEVELOPMENT, AND MANAGEMENT
The term flap used in this chapter indicates a section of soft tissue that (1) is outlined by a surgical incision, (2) carries its own blood supply, (3) allows surgical access to underlying tissues, (4) can be replaced in the original position, and (5) can be maintained with sutures and is expected to heal. Soft tissue flaps are frequently used in oral surgical, periodontal, and endodontic procedures to gain access to underlying tooth and bone structures. To perform a tooth extraction properly, the dental surgeon must have a clear understanding of the principles of design, development, and management of soft tissue flaps.
Design Parameters for Soft Tissue Flaps
To provide adequate exposure and promote proper healing, the flap must be correctly designed. The surgeon must remember that several parameters exist when designing a flap for a specific situation.
When the flap is outlined, the base of the flap must usually be broader than the free margin to preserve an adequate blood supply. This means that all areas of the flap must have a source of uninterrupted vasculature to prevent ischemic necrosis of the entire flap or portions of it (Fig. 8-1).
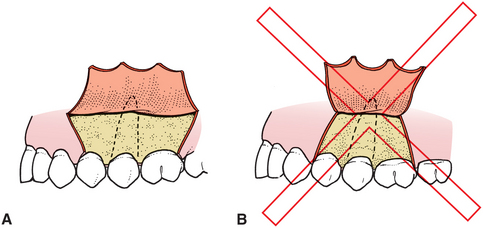
FIGURE 8-1 A, Flap must have base that is broader than free gingival margin. B, If flap is too narrow at its base, the blood supply may be inadequate, which can lead to flap necrosis.
The flap must be of adequate size for several reasons. Sufficient soft tissue reflection is required to provide necessary visualization of the area. Adequate access also must exist for the insertion of instruments required to perform the surgery. In addition, the flap must be held out of the operative field by a retractor that must rest on intact bone. There must be enough flap reflection to permit the retractor to hold the flap without tension. Furthermore, soft tissue heals across the incision, not along the length of the incision, and sharp incisions heal more rapidly than torn tissue. Therefore a long, straight incision with adequate flap reflection heals more rapidly than a short, torn incision, which heals slowly by secondary intention. For an envelope flap to be of adequate size, the length of the flap in the anteroposterior dimension usually extends two teeth anterior and one tooth posterior to the area of surgery (Fig. 8-2, A). If a relaxing incision is to be made, the incision should extend one tooth anterior and one tooth posterior to the area of surgery (Fig. 8-2, B).
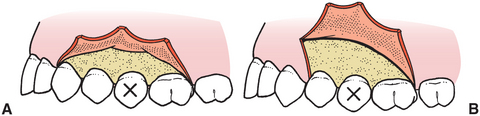
FIGURE 8-2 A, To have sufficient access to root of second premolar, envelope flap should extend anteriorly, mesial to canine, and posteriorly, distal to first molar. B, If releasing incision (i.e., three-cornered flap) is used, flap extends mesial to first premolar.
Flaps for tooth removal should be full-thickness mucoperiosteal flaps. This means that the flap includes the surface mucosa, submucosa, and periosteum. Because the goal of the surgery is to remove or reshape the bone, all overlying tissue must be reflected from it. In addition, full-thickness flaps are necessary because the periosteum is the primary tissue responsible for bone healing, and replacement of the periosteum in its original position hastens that healing process. In addition, torn, split, and macerated tissue heals more slowly than a cleanly reflected, full-thickness flap. And the tissue plane between bone and periosteum is relatively avascular, so less bleeding is produced when a full-thickness flap is elevated.
The incisions that outline the flap must be made over intact bone that will be present after the surgical procedure is complete. If the pathologic condition has eroded the buccocortical plate, the incision must be at least 6 or 8 mm away from it. In addition, if bone is to be removed over a particular tooth, the incision must be sufficiently distant from it so that after the bone is removed, the incision is 6 to 8 mm away from the bony defect created by surgery. If the incision line is unsupported by sound bone, it tends to collapse into the bony defect, which results in wound dehiscence and delayed healing (Fig. 8-3).
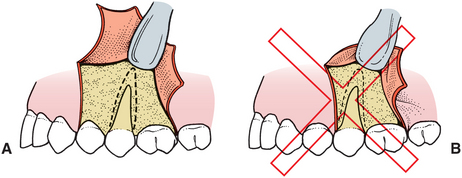
FIGURE 8-3 A, When designing flap, it is necessary to anticipate how much bone will be removed so that after surgery is complete, the incision rests over sound bone. In this situation, the vertical release was one tooth anterior to bone removal and left an adequate margin of sound bone. B, When releasing incision is made too close to bone removal, delayed healing results.
The flap should be designed to avoid injury to local vital structures in the area of the surgery. The two most important structures that can be damaged are located in the mandible; these are the lingual nerve and the mental nerve. When making incisions in the posterior mandible, especially in the region of the third molar, incisions should be well away from the lingual aspect of the mandible. In this area the lingual nerve may closely adhere to the lingual aspect of the mandible, and incisions in this area may result in damaging or even severing that nerve, with consequent prolonged temporary or permanent anesthesia of the tongue. In the same way, surgery in the apical area of the mandibular premolar teeth should be carefully planned and executed to avoid injury to the mental nerve. Envelope incisions should be used if at all possible, and releasing incisions should be well anterior or posterior to the area of the exit of the mental nerve from the mandible.
Flaps in the maxilla rarely endanger any vital structures. On the facial aspect of the maxillary alveolar process, no nerves or arteries exist that are likely to be damaged. When reflecting a palatal flap, the surgeon must remember that the major blood supply to the palatal soft tissue comes through the greater palatine artery, which emerges from the greater palatine foramen at the posterior lateral aspect of the hard palate. This artery courses forward and has an anastomosis with the nasopalatine artery. The nasopalatine nerves and arteries exit the incisive foramen to supply the anterior palatal gingiva. If the anterior palatal tissue must be reflected, the artery and the nerve can be incised at the level of the foramen without much risk. The likelihood of bothersome bleeding is small, and the nerve regenerates quickly. The temporary numbness usually does not bother the patient. However, vertical-releasing incisions in the posterior aspect of the palate should be avoided because they usually sever the greater palatine artery within the tissue, which results in bleeding that may be difficult to control.
Releasing incisions are used only when necessary and not routinely. Envelope incisions usually provide the adequate visualization required for tooth extraction in most areas. When vertical-releasing incisions are necessary, only a single vertical incision is used, which is usually at the anterior end of the envelope component. The vertical-releasing incision is not a straight vertical incision but is oblique, to allow the base of the flap to be broader than the free gingival margin. A vertical-releasing incision is made so that it does not cross bony prominences, such as the canine eminence; to do so would increase the likelihood of tension in the suture line, which would result in wound dehiscence.
Vertical-releasing incisions should cross the free gingival margin at the line angle of a tooth and should not be directly on the facial aspect of the tooth nor directly in the papilla (Fig. 8-4). Incisions that cross the free margin of the gingiva directly over the facial aspect of the tooth do not heal properly because of tension; the result is a defect in the attached gingiva. Because the facial bone is frequently thin, such incisions also result in vertical clefting of the bone. Incisions that cross the gingival papilla damage the papilla unnecessarily and increase the chances for localized periodontal problems; such incisions should be avoided.
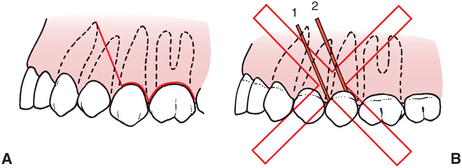
FIGURE 8-4 A, Correct position for end of vertical-releasing incision is at line angle (mesiobuccal angle in this figure) of tooth. Likewise, incision does not cross canine eminence. Crossing such bony prominences results in increased chance for wound dehiscence. B, These two incisions are made incorrectly: (1) incision crosses prominence over canine tooth, which increases risk of delayed healing; incision through papilla results in unnecessary damage; (2) incision crosses attached gingiva directly over facial aspect of tooth, which is likely to result in soft tissue defect and periodontal and aesthetic deformities.
Types of Mucoperiosteal Flaps
A variety of intraoral tissue flaps can be used. The most common incision is the sulcular incision which, when not combined with a releasing incision, produces the envelope flap. In the dentulous patient the incision is made in the gingival sulcus to the crestal bone, through the periosteum, and the full-thickness mucoperiosteal flap is reflected apically (Fig. 8-2, A). This flap usually provides sufficient access to perform the necessary surgery.
If the patient is edentulous, the envelope incision is usually made along the scar at the crest of the ridge. No vital structures are found in this area, and the envelope incision can be as long as is required to provide adequate access. The only exception occurs in extremely atrophic mandibles where the inferior alveolar nerve may rest on top of the residual alveolar ridge. Once the incision is made tissue can be reflected buccally or lingually as necessary for recontouring of the ridge or the removal of a mandibular torus.
If the sulcular incision has a vertical-releasing incision, it is a three-cornered flap, with corners at the posterior end of the envelope incision, at the inferior aspect of the vertical incision, and at the superior aspect of the vertical-releasing incision (Fig. 8-5). This incision provides for greater access with a shorter sulcular incision. When greater access is necessary in an apical direction, especially in the posterior aspect of the mouth, this incision is frequently necessary. The vertical component is more difficult to close and may cause some mildly prolonged healing, but if care is taken when suturing, the healing period is not noticeably lengthened.
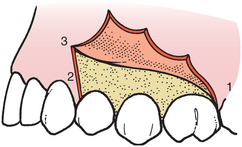
FIGURE 8-5 Vertical-releasing incision converts envelope incision into three-cornered flap (corners numbered).
The four-cornered flap is an envelope incision with two releasing incisions. Two corners are at the superior aspect of the releasing incision, and two corners are at either end of the envelope component of the incision (Fig. 8-6). Although this flap provides substantial access in areas that have limited anteroposterior dimension, it is rarely indicated. When releasing incisions are necessary, a three-cornered flap usually suffices.
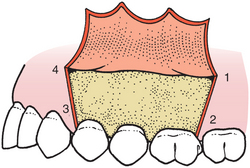
FIGURE 8-6 Vertical-releasing incisions at other end of envelope incision converts envelope incision into four-cornered flap (corners numbered).
An incision that is used occasionally to approach the root apex is a semilunar incision (Fig. 8-7). This incision avoids trauma to the papillae and gingival margin but provides limited access because the entire root of the tooth is not visible. This incision is most useful for periapical surgery of a limited extent.
FIGURE 8-7 Semilunar incision, designed to avoid marginal attached gingiva when working on a root apex. Incision is most useful when only a limited amount of access is necessary.
An incision useful on the palate is the Y incision, which is named for its shape. This incision is useful for surgical access to the bony palate for removal of a palatal torus. The tissue overlying a torus is usually thin and must be carefully reflected. The anterolateral extensions of the midline incision are anterior to the region of the canine tooth. The extensions are anterior enough in this position that they do not sever major branches of the greater palatine artery; therefore, bleeding is not usually a problem (Fig. 8-8).
Developing a Mucoperiosteal Flap
Several specific considerations are involved in developing flaps for surgical tooth extraction. The first step is to incise the soft tissue to allow reflection of the flap. The No. 15 blade is used on a No. 3 scalpel handle, and it is held in the pen grasp (Fig. 8-9). The blade is held at a slight angle to the teeth, and the incision is made posteriorly to anteriorly in the gingival sulcus by drawing the knife toward the operator. One smooth continuous stroke is used while keeping the knife blade in contact with bone throughout the entire incision (Figs. 8-10 and 8-11).
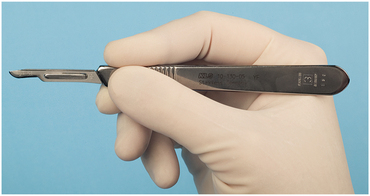
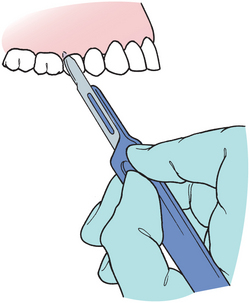
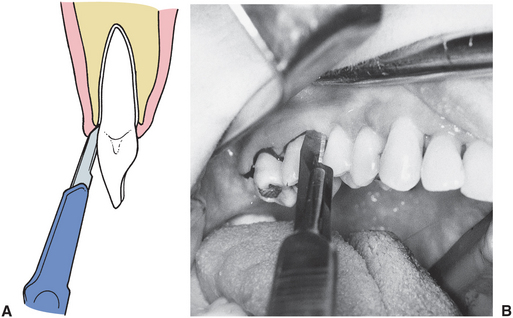
FIGURE 8-11 A, Knife is angled slightly away from tooth and incises soft tissue, including periosteum, at crestal bone. B, Incision is started posteriorly and is carried anteriorly, with care taken to incise completely through interdental papilla.
The scalpel blade is an extremely sharp instrument, but it dulls rapidly when it is pressed against bone, such as when making a mucoperiosteal incision. If more than one flap is to be reflected, the surgeon should change blades between incisions.
If a vertical-releasing incision is made, the tissue is apically reflected, with the opposite hand tensing the alveolar mucosa so that the incision can be made cleanly through it. If the alveolar mucosa is not tensed, the knife will not incise cleanly through the mucosa, and a jagged incision will result.
Reflection of the flap begins at a papilla. The sharp end of the No. 9 periosteal elevator begins a reflection (Fig. 8-12). The sharp end is slipped underneath the papilla in the area of the incision and is turned laterally to pry the papilla away from the underlying bone. This technique is used along the entire extent of the free gingival incision. If it is difficult to elevate the tissue at any one spot, the incision is probably incomplete, and that area should be reincised. Once the entire free edge of the flap has been reflected with the sharp end of the elevator, the broad end is used to reflect the mucoperiosteal flap to the extent desired.
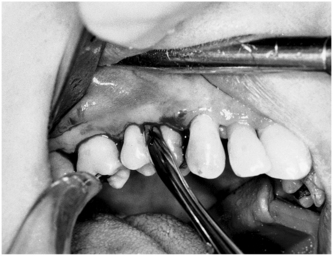
FIGURE 8-12 Reflection of flap is begun by using sharp end of periosteal elevator to pry away interdental papilla.
If a three-cornered flap is used, the initial reflection is accomplished with the sharp end of the No. 9 elevator on the first papilla only. Once the flap reflection is started, the broad end of the periosteal elevator is inserted at the middle corner of the flap, and the dissection is carried out with a pushing stroke, posteriorly and apically. This facilitates the rapid and atraumatic reflection of the soft tissue flap (Fig. 8-13).
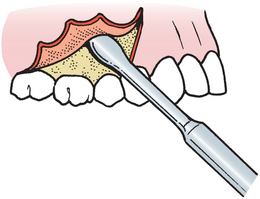
FIGURE 8-13 When three-cornered flap is used, only anterior papilla is reflected with sharp end of elevator. Broad end is then used with push stroke to elevate posterosuperiorly.
Once the flap has been reflected the desired amount, the periosteal elevator can be used as a retractor to hold the flap in its proper reflected position. To accomplish this effectively, the retractor is held perpendicular to the bone tissue while resting on sound bone and not trapping soft tissue between the retractor and bone. The periosteal elevator therefore is maintained in its proper position, and the soft tissue flap is held without tension (Fig. 8-14). The Seldin elevator or the Minnesota or Austin retractors can be used similarly when broader exposure is necessary. The retractor should not be forced against the soft tissue in an attempt to pull the tissue out of the field. Instead, the retractor is positioned in the proper place and held firmly against the bone. By retracting in this fashion, the surgeon primarily focuses on the surgical field rather than on the retractor; thereby the chance of inadvertently tearing the flap is lessened.
Principles of Suturing
Once the surgical procedure is completed and the wound is properly irrigated and débrided, the surgeon must return the flap to its original position or, if necessary, arrange it in a new position; the flap should be held in place with sutures. Sutures perform multiple functions. The most obvious and important function that sutures perform is to coapt wound margins; that is, to hold the flap in position and approximate the two wound edges. The sharper the incision and the less trauma inflicted on the wound margin, the more probable is healing by primary intention. If the space between the two wound edges is minimal, wound healing will be rapid and complete. If tears or excessive trauma to the wound edges occur, wound healing will be by secondary intention.
Sutures also aid in hemostasis. If the underlying tissue is bleeding, the surface mucosa or skin should not be closed, because the bleeding in the underlying tissues may continue and result in the formation of a hematoma. Surface sutures aid in hemostasis but only as a tamponade in a generally oozing area, such as a tooth socket. Overlying tissue should never be sutured tightly in an attempt to gain hemostasis in a bleeding tooth socket.
Sutures help hold a soft tissue flap over bone. This is an important function because bone that is not covered with soft tissue becomes nonvital and requires an excessively long time to heal. When mucoperiosteal flaps are reflected from alveolar bone, it is important that the extent of the bone be recovered with the soft tissue flaps. Unless appropriate suture techniques are used, the flap may retract away from the bone, which exposes it and results in delayed healing.
Sutures may aid in maintaining a blood clot in the alveolar socket. A special suture, such as a figure-of-eight suture, can provide a barrier to clot displacement (Fig. 8-15). However, it should be emphasized that suturing across an open wound socket plays a minor role in maintaining the blood clot in the tooth socket.

FIGURE 8-15 A, Figure-of-eight suture, occasionally placed over top of socket to aid in hemostasis. B, This suture is usually performed to help maintain piece of oxidized cellulose in tooth socket.
The armamentarium includes a needle holder, a suture needle, and suture material. The needle holder of choice is 15 cm (about 6 inches) in length and has a locking handle. The needle holder is held with the thumb and ring finger through the rings and with the index finger along the length of the needle holder to provide stability and control (Fig. 8-16).
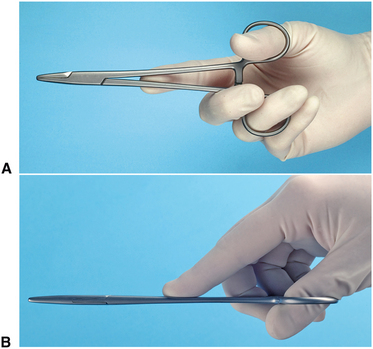
FIGURE 8-16 Needle holder is held with thumb and ring finger (A). Index finger extends along instrument for stability and control (B).
The suture needle usually used in the mouth is a small three-eighths to one-half circle with a reverse cutting edge. The cutting edge helps the needle pass through the tough mucoperiosteal flap tissue. Needle sizes and shapes have been assigned numbers. The most common needle shapes used for oral surgery are the three-eighths and half-circle cutting needles (Fig. 8-17).
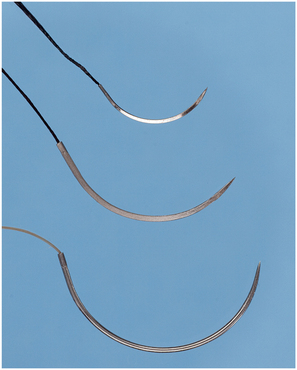
FIGURE 8-17 The shapes and types of needles most commonly used in oral surgery are the three-eighths-circle and half-circle cutting needles shown here. Top is PS-2, middle is FS-2, and lower is X-1.
The technique used for suturing is deceptively difficult. The use of the needle holder and the technique that is necessary to pass the curved needle through the tissue are difficult to learn. The following discussion presents the technique used in suturing; practice is necessary before suturing can be performed with skill and finesse.
When the envelope flap is repositioned into its correct location, it is held in place with sutures that are placed through the papillae only. Sutures are not placed across the empty tooth socket because the edges of the wound would not be supported over sound bone (Fig. 8-18). When reapproximating the flap, the suture is passed first through the mobile (usually facial) tissue; the needle is regrasped with the needle holder and is passed through the attached tissue of the lingual papilla. If the two margins of the wound are close together, the experienced surgeon may be able to insert the needle through both sides of the wound in a single pass. However, for better precision it is best to use two passes in most situations (Fig. 8-19).
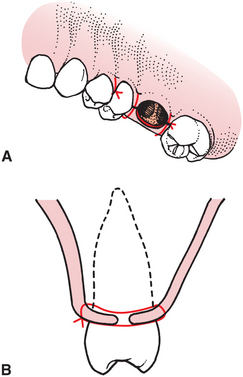
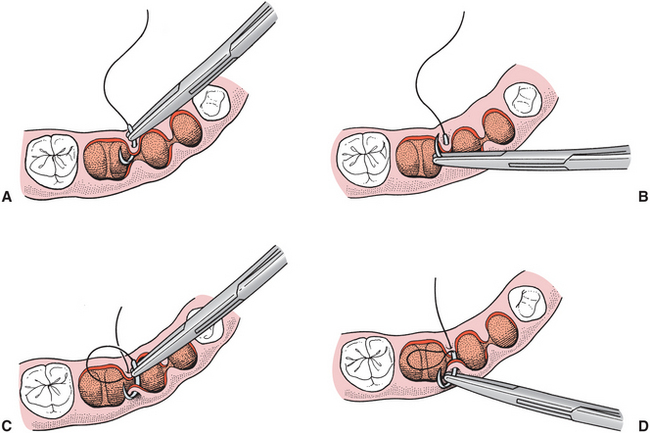
FIGURE 8-19 When mucosal flap is back in position, suture is passed through two sides of socket in separate passes of needle. A, Needle is held by needle holder and passed through papilla, usually of mobile tissue first. B, Needle holder is then released from needle; it regrasps needle on underside of tissue and is turned through flap. C, Needle is then passed through opposite side of soft tissue papilla in similar fashion. D, Finally, needle holder grasps needle on opposite side to complete passing of suture through both sides of mucosa.
When passing the needle through the tissue, the needle should enter the surface of the mucosa at a right angle, to make the smallest possible hole in the mucosal flap (Fig. 8-20). If the needle passes through the tissue obliquely, the suture will tear through the surface layers of the flap when the suture knot is tied, which results in greater injury to the soft tissue.
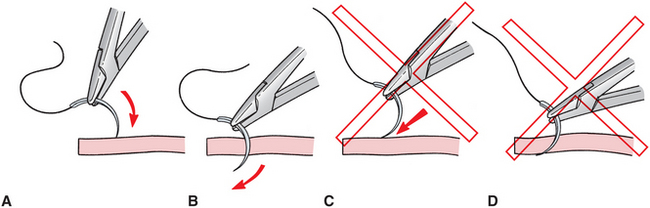
FIGURE 8-20 A, When passing through soft tissue of mucosa, needle should enter surface of tissue at right angle. B, Needle holder should be turned so that needle passes easily through tissue at right angles. C, If needle enters soft tissue at acute angle and is pushed (rather than turned) through tissue, tearing of mucosa with needle or with suture is likely to occur (D).
When passing the needle through the flap, the surgeon must ensure that an adequate amount of tissue is taken, to prevent the needle or suture from pulling through the soft tissue flap. Because the flap that is being sutured is a mucoperiosteal flap and should not be tied tightly, a small amount of tissue is necessary. The minimal amount of tissue between the suture and the edge of the flap should be 3 mm. Once the sutures are passed through the mobile flap and the immobile lingual tissue, they are tied with an instrument tie (Fig. 8-21).
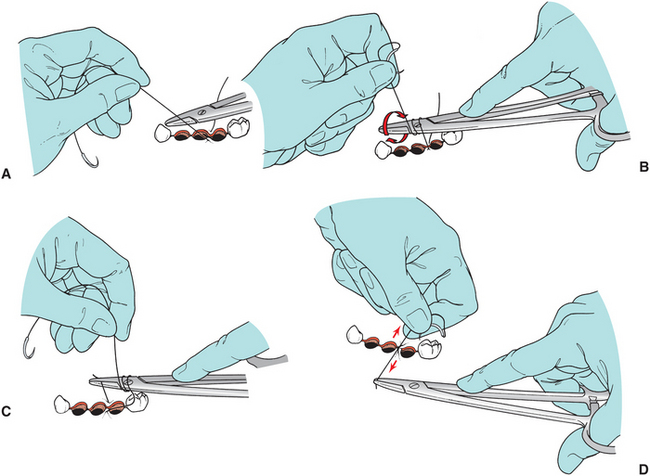
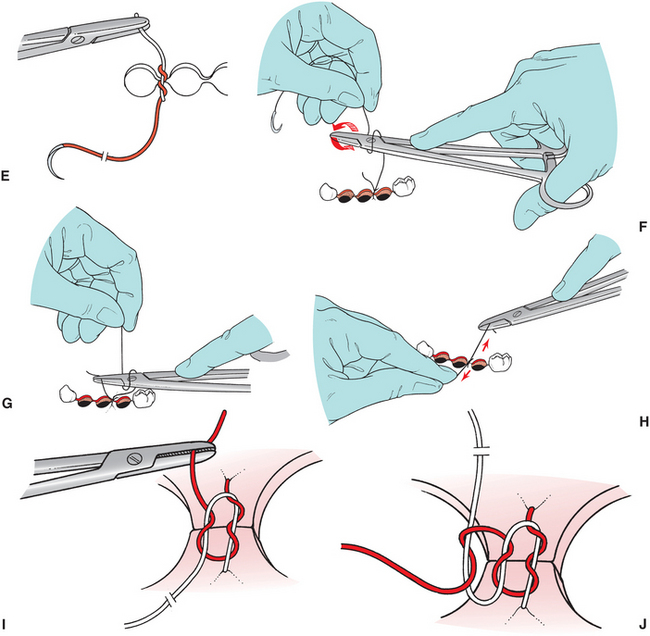
FIGURE 8-21 Most intraoral sutures are tied with an instrument tie. A, Suture is pulled through tissue until short tail of suture (approximately 15 to 20 mm long) remains. Needle holder is held horizontally by right hand in preparation for knot-tying procedure. B, Left hand then wraps long end of suture around needle holder twice in clockwise direction to make two loops of suture around needle holder. C, Surgeon then opens needle holder and grasps short end of suture near its end. D, Ends of suture are then pulled to tighten knot. Needle holder should not pull suture at all until knot is nearly tied, to avoid lengthening that portion of suture. E, End of first step of surgeon’s knot. The double wrap has resulted in double overhand knot. This increases friction in knot and will keep wound edges together until second portion of knot is tied. F, Needle holder is then released from short end of suture and held in same position as when knot-tying procedure began. Left hand then makes single wrap in counterclockwise direction. G, Needle holder then grasps short end of suture at its end. H, This portion of knot is completed by pulling this loop firmly down against previous portion of knot. I, This completes surgeon’s knot. Double loop of first pass holds tissue together until second portion of square knot can be tied. J, Most surgeons add third throw to their instrument tie when using a resorbable material. Needle holder is repositioned in original position, and one wrap is placed around needle holder in original clockwise direction. Short end of suture is grasped and tightened down firmly to form second square knot. Final throw of three knots is tightened firmly. (Note: for demonstration purposes, first knot left loose here, but in actual knot tying, first knot is tightened before creating second knot.)
The surgeon must remember that the purpose of the suture is merely to reapproximate the tissue, and therefore the suture should not be tied too tightly. Sutures that are too tight cause ischemia of the flap margin and result in tissue necrosis, with eventual tearing of the suture through the tissue. Thus sutures that are too tightly tied result in wound dehiscence more frequently than sutures that are loosely tied. As a clinical guideline, there should be no blanching or obvious ischemia of the wound edges. If this occurs the suture should be removed and replaced. The knot should be positioned so that it does not fall directly over the incision line, because this causes additional pressure on the incision. Therefore the knot should be positioned to the side of the incision.
If a three-cornered flap is used, the vertical end of the incision must be closed separately. Two sutures usually are required to close the vertical end properly. Before the sutures are inserted, the No. 9 periosteal elevator should be used to slightly elevate the nonflap side of the incision, freeing the margin to facilitate passage of the needle through the tissue (Fig. 8-22). The first suture is placed across the papilla, where the vertical release incision was made. This is a known, easily identifiable landmark that is most important when repositioning a three-cornered flap. The remainder of the envelope portion of the incision is then closed, after which the vertical component is closed. The slight reflection of the nonflap side of the incision greatly eases the placing of sutures.
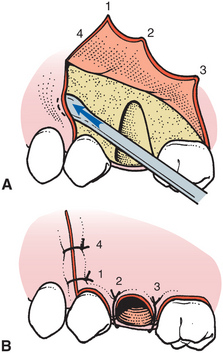
FIGURE 8-22 A, To make the suturing of three-cornered flap easier, periosteal elevator is used to elevate small amount of fixed tissue so that suture can be passed through entire thickness of mucoperiosteum. B, When three-cornered flap is repositioned, first suture is placed at occlusal end of vertical-releasing incision (1). Papillae are then sutured sequentially (2, 3), and finally, if necessary, superior aspect of releasing incision is sutured (4).
Sutures may be configured in several different ways. The simple interrupted suture is the one most commonly used in the oral cavity. This suture simply goes through one side of the wound, comes up through the other side of the wound, and is tied in a knot at the top. These sutures can be placed quickly, and the tension on each suture can be adjusted individually. If one suture is lost, the remaining sutures stay in position.
A suture technique that is useful for suturing two adjacent papillae with a single suture is the horizontal mattress suture (Fig. 8-23). A slight variation of that suture is the figure-of-eight suture, which holds the two papilla in position and puts a cross over the top of the socket that may help hold the blood clot in position (Fig. 8-15).
FIGURE 8-23 A, Horizontal mattress suture is sometimes used to close soft tissue wounds. Use of this suture decreases number of individual sutures that have to be placed; however, more importantly, it compresses wound together slightly and everts wound edges. B, Single horizontal mattress suture can be placed across both papillae of tooth socket and serves in similar way as do two individual sutures.
If the incision is long, continuous sutures can be used efficiently. When using this technique, a knot does not have to be made for each suture, which makes it quicker to suture a long-span incision and leaves fewer knots to collect debris. The continuous simple suture can be locking or nonlocking (Fig. 8-24). The horizontal mattress suture also can be used in a running fashion. A disadvantage of the continuous suture is that if one suture pulls through, the entire suture line becomes loose.
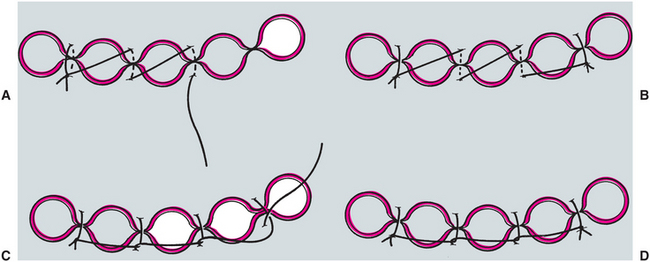
FIGURE 8-24 When multiple sutures are to be placed, incision can be closed with running or continuous suture. A, First papilla is closed and knot tied in usual way. Long end of suture is held, and adjacent papilla is sutured, without knot being tied but just with suture being pulled firmly through tissue. B, Succeeding papillae are then sutured until final one is sutured and final knot is tied. Final appearance is with suture going across each empty socket. C, Continuous locking suture can be made by passing long end of suture underneath loop before it is pulled through tissue. D, This puts suture on deep periosteal and mucosal surfaces directly across papilla and may aid in more direct apposition of tissues.
Nonresorbable sutures are left in place for approximately 5 to 7 days. After this time, sutures play no useful role and probably increase the contamination of the underlying submucosa. The suture is cut using the tips of a sharp, pointed pair of suture scissors and is removed by pulling it toward the incision line (not away from the suture line).
PRINCIPLES AND TECHNIQUES FOR OPEN EXTRACTIONS
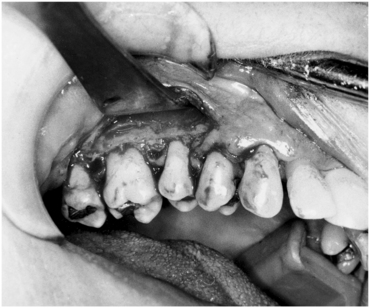
Surgical or open extraction of an erupted tooth is a technique that should not be reserved for the extreme situation. A prudently used open extraction technique may be more conservative and cause less operative morbidity than a closed extraction. Forceps extraction techniques that require great force may result not only in removal of the tooth but also of large amounts of associated bone and occasionally the floor of the maxillary sinus (Fig. 8-25). The bone loss may be less if a soft tissue flap is reflected and a proper amount of bone is removed; it may also be less if the tooth is sectioned. The morbidity of fragments of bone that may be literally torn from the jaw by the “conservative” closed technique greatly exceeds the morbidity of controlled surgical extraction.

FIGURE 8-25 Forceps extraction of these teeth resulted in removal of bone and tooth, instead of just the tooth.
Indications for Open Extraction
It is prudent for the surgeon to evaluate carefully each patient and each tooth to be removed for the possibility of an open extraction. Although the vast majority of decisions are to perform a closed extraction, the surgeon must be aware continually that open extraction may be the less traumatic of the two.
As a general guideline, surgeons should consider performing an elective surgical extraction when they perceive a possible need for excessive force to extract a tooth. The term excessive means that the force will probably result in a fracture of bone, a tooth root, or both. In any case, the excessive bone loss, the need for additional surgery to retrieve the root, or both can cause undue morbidity. The following are examples of situations in which closed extraction may require excessive force.
The surgeon should strongly consider performing an open extraction after initial attempts at forceps extraction have failed. Instead of applying greater amounts of force that may not be controlled, the surgeon should simply reflect a soft tissue flap, section the tooth, remove some bone, and extract the tooth in sections. In these situations the philosophy of “divide and conquer” results in the most efficient extraction.
If the preoperative assessment reveals that the patient has thick or especially dense bone, particularly on the buccocortical plate, surgical extraction should be considered. The extraction of most teeth depends on the expansion of the buccocortical plate. If this bone is especially thick, then adequate expansion is less likely to occur and fracture of the root is more likely. Whereas young patients have bone that is more elastic and more likely to expand with controlled force, older patients usually have denser, more highly calcified bone that is less likely to provide adequate expansion during luxation of the tooth. Dense bone in the older patient warrants even more caution.
Occasionally, the dentist treats a patient who has very short clinical crowns with evidence of severe attrition. If such attrition is the result of bruxism, it is likely that the teeth are surrounded by dense, thick bone with strong periodontal ligament attachments (Fig. 8-26). The surgeon should exercise extreme caution if removal of such teeth is attempted with a closed technique. An open technique usually results in a quicker, more straightforward extraction.
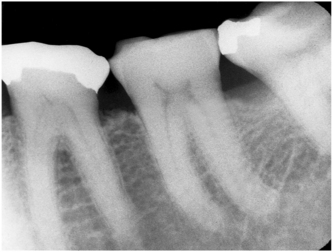
FIGURE 8-26 Teeth that exhibit evidence of bruxism may have denser bone and stronger periodontal ligament attachment, which make them more difficult to extract.
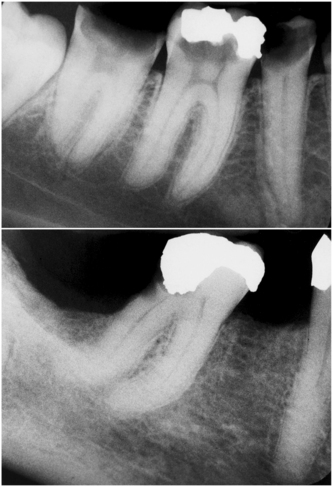
Careful review of the preoperative radiographs may reveal tooth roots that are likely to cause difficulty if the tooth is extracted by the standard forceps technique. One condition commonly seen among older patients is hypercementosis. In this situation, cementum has continued to be deposited on the tooth and has formed a large bulbous root that is difficult to remove through the available tooth socket opening. Great force used to expand the bone may result in fracture of the root or buccocortical bone (Fig. 8-27).
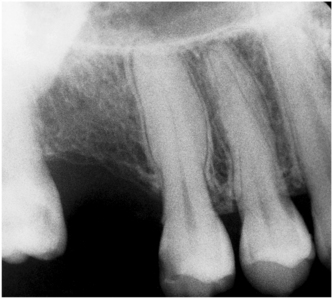
Roots that are widely divergent, especially the maxillary first molar roots (Fig. 8-28) or roots that have severe dilaceration or hooks, are also difficult to remove without fracturing one or more of the roots (Fig. 8-29). By reflecting a soft tissue flap and dividing the roots prospectively with a bur, a more controlled and planned extraction can be performed and will result in less damage overall.
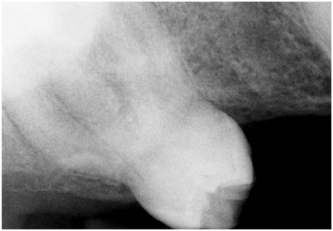
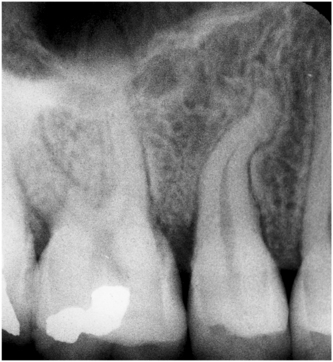
FIGURE 8-29 Severe dilaceration of roots may result in fracture of root unless surgical extraction is performed.
If the maxillary sinus has expanded to include the roots of the maxillary molars, extraction may result in removal of a portion of the sinus floor along with the tooth. If the roots are divergent, then such a situation is even more likely to occur (Fig. 8-30).
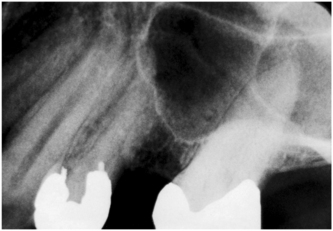
FIGURE 8-30 Maxillary molar teeth “in” the floor of maxillary sinus increase chance of fracture of sinus floor, with resulting sinus perforation.
Teeth that have crowns with extensive caries, especially root caries, or that have large amalgam restorations are candidates for open extraction (Fig. 8-31). Although forceps should primarily grasp the tooth root, a portion of the force is applied to the crown. Such pressures can crush and shatter the crowns of teeth with extensive caries or large restorations. Open extraction can circumvent the need for extensive force and result in a quicker, less traumatic extraction. Teeth with crowns that have already been lost to caries and that present as retained roots should also be considered for open extraction. If extensive periodontal disease is found around such teeth, it may be possible to deliver them easily with straight elevators or Cryer elevators. However, if the bone is firm around the tooth and no periodontal disease exists, the surgeon should consider an open extraction.
Technique for Open Extraction of Single-Rooted Tooth
The technique for open extraction of a single-rooted tooth is straightforward but requires attention to detail because several decisions must be made during the operation. Single-rooted teeth are those that have resisted attempts at closed extraction or that have fractured at the cervical line and therefore exist only as a root. The technique is essentially the same for both.
The first step is to provide adequate visualization and access by reflecting a sufficiently large mucoperiosteal flap. In most situations an envelope flap that is extended two teeth anterior and one tooth posterior to the tooth to be removed is sufficient. If a releasing incision is necessary, it should be placed at least one tooth anterior to the extraction site (Fig. 8-2).
Once an adequate flap has been reflected and is held in its proper position by a periosteal elevator, the surgeon must determine the need for bone removal. Several options are available: First, the surgeon may attempt to reseat the extraction forceps under direct visualization and therefore achieve a better mechanical advantage and remove the tooth with no bone removal at all (Fig. 8-32).
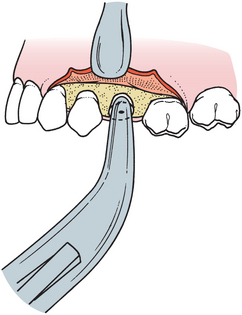
FIGURE 8-32 Small envelope flap can be reflected to expose fractured root. Under direct visualization, forceps can be seated more apically into periodontal ligament space, which eliminates need for bone removal.
The second option is to grasp a bit of buccal bone under the buccal beak of the forceps to obtain a better mechanical advantage and grasp of the tooth root. This may allow the surgeon to luxate the tooth sufficiently to remove it without any additional bone removal (Fig. 8-33). A small amount of buccal bone is pinched off and removed with the tooth.
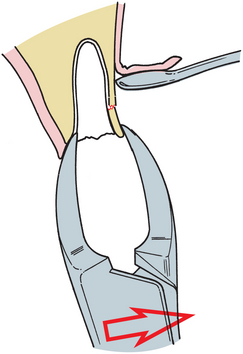
FIGURE 8-33 If root is fractured at level of bone, buccal beak of forceps can be used to remove small portion of bone at same time that root is grasped.
The third option is to use the straight elevator, pushing it down the periodontal ligament space of the tooth (Fig. 8-34). The index finger of the surgeon’s hand must support the force of the elevator so that the total movement is controlled and no slippage of the elevator occurs. A small wiggling motion should be used to help expand the periodontal ligament space, which allows the small straight elevator to enter the space and act as a wedge to displace the root occlusally. This approach continues with the use of larger straight elevators until the tooth is successfully luxated.
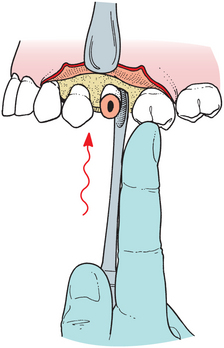
FIGURE 8-34 Small straight elevator can be used as shoehorn to luxate broken root. When straight elevator is used in this position, hand must be securely supported on adjacent teeth to prevent inadvertent slippage of instrument from tooth and subsequent injury to adjacent tissue.
The fourth and final option is to proceed with bone removal over the area of the tooth. Most surgeons currently prefer a bur to remove the bone. The width of buccal bone that is removed is essentially the same width as the tooth in a mesiodistal direction (Fig. 8-35). In a vertical dimension, bone should be removed approximately one half to two thirds the length of the tooth root (Fig. 8-36). This amount of bone removal sufficiently reduces the amount of force necessary to displace the tooth and makes removal relatively easy. A small straight elevator (Fig. 8-37) or forceps can be used to remove the tooth (Fig. 8-38).
FIGURE 8-35 When removing bone from buccal surface of tooth or tooth root to facilitate removal of that root, mesiodistal width of bone removal should be approximately same as mesiodistal dimension of tooth root itself. This allows unimpeded path for removal of root in buccal direction.
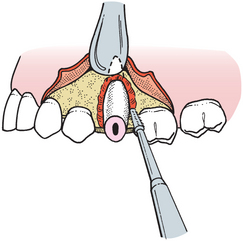
FIGURE 8-36 Bone is removed with bone-cutting bur after reflection of standard envelope flap. Bone should be removed approximately one half to two thirds the length of tooth root.
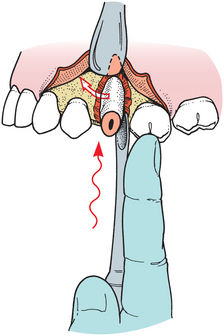
FIGURE 8-37 Once appropriate amount of buccal bone has been removed, straight elevator can be used down palatal aspect of tooth to displace tooth root in buccal direction. One must remember that when elevator is used in this direction, surgeon’s hand must be firmly supported on adjacent teeth to prevent slippage of instrument and injury to adjacent soft tissues.
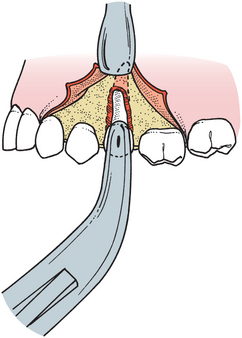
FIGURE 8-38 After bone has been removed and tooth root luxated with straight elevator, forceps can be used to remove root.
If the tooth is still difficult to extract after removal of bone, a purchase point can be made in the root with the bur at the most apical portion of the area of bone removal (Fig. 8-39). Care should be taken to limit bone removal to only that needed to remove the root to preserve bone for possible implant placement. This hole should be about 3 mm in diameter and deep enough to allow the insertion of an instrument. A heavy elevator, such as a Crane pick, can be used to elevate or lever the tooth from its socket (Fig. 8-40, A). The soft tissue is repositioned and sutured (Fig. 8-40, B).
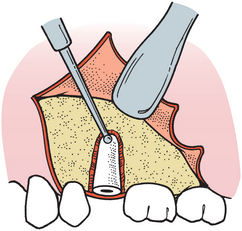
FIGURE 8-39 If tooth root is solid in bone, buccal bone can be removed and purchase point can be made for insertion of elevator.
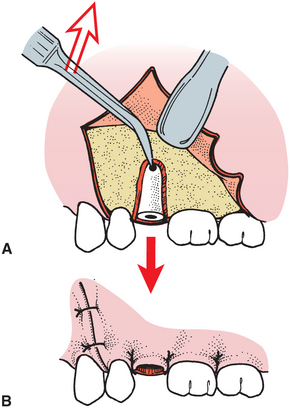
FIGURE 8-40 A, Triangular elevator, such as Crane pick, is then inserted into purchase point, and tooth is elevated from its socket. B, The flap is repositioned and sutured over intact bone.
The bone edges should be checked; if sharp, they should be smoothed with a bone file. By replacing the soft tissue flap and gently palpating it with a finger, the clinician can check edge sharpness. Removal of bone with a rongeur is rarely indicated because the rongeur tends to remove too much bone.
Once the tooth is delivered, the entire surgical field should be thoroughly irrigated with copious amounts of saline. Special attention should be directed toward the most inferior portion of the flap (where it joins the bone), because this is a common place for debris to settle, especially in mandibular extractions. If the debris is not removed carefully by curettage or irrigation, it can cause delayed healing or even a small subperiosteal abscess in the ensuing 3 to 4 weeks. The flap is then set in its original position and sutured into place with 3-0 black silk or chromic sutures. If the incision were properly planned and executed, the suture line will be supported on sound, intact bone.
Technique for Open Extraction of Multirooted Teeth
If the decision is made to perform an open extraction of a multirooted tooth, such as a mandibular or maxillary molar, the same surgical technique used for the single-rooted tooth is generally used. The major difference is that the tooth may be divided with a bur to convert a multirooted tooth into two or three single-rooted teeth. If the crown of the tooth remains intact, the crown portion is sectioned in such a way as to facilitate removal of roots. However, if the crown portion of the tooth is missing and only the roots remain, the goal is to separate the roots to make them easier to remove with elevators.
Removal of the lower first molar with an intact crown is usually done by sectioning the tooth buccolingually and thereby dividing the tooth into a mesial half (with mesial root and half of the crown) and a distal half. An envelope incision is also made, and a small amount of crestal bone is removed. Once the tooth is sectioned, it is luxated with straight elevators to begin the mobilization process. The sectioned tooth is treated as a lower premolar tooth and is removed with a lower universal forceps (Fig. 8-41). The flap is repositioned and sutured.
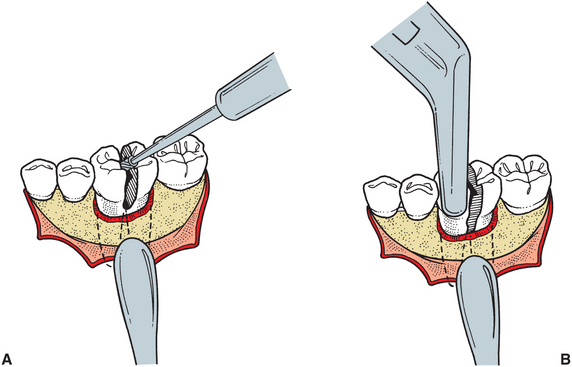
FIGURE 8-41 If lower molar is difficult to extract, it can be sectioned into single-rooted teeth. A, Envelope incision is reflected, and small amount of crestal bone is removed to expose bifurcation. Drill is then used to section the tooth into mesial and distal halves. B, Lower universal forceps are used to remove two crown and root portions separately.
The surgical technique begins with the reflection of an adequate flap (Fig. 8-42, A and B). The surgeon selects an envelope or three-cornered flap as the requirement for access and personal preference dictate. Evaluation of the need for sectioning roots and removing bone is made at this stage, as it was with the single-rooted tooth. Occasionally, forceps, elevators, or both are positioned with direct visualization to achieve better mechanical advantage and to remove the tooth without removing the bone.
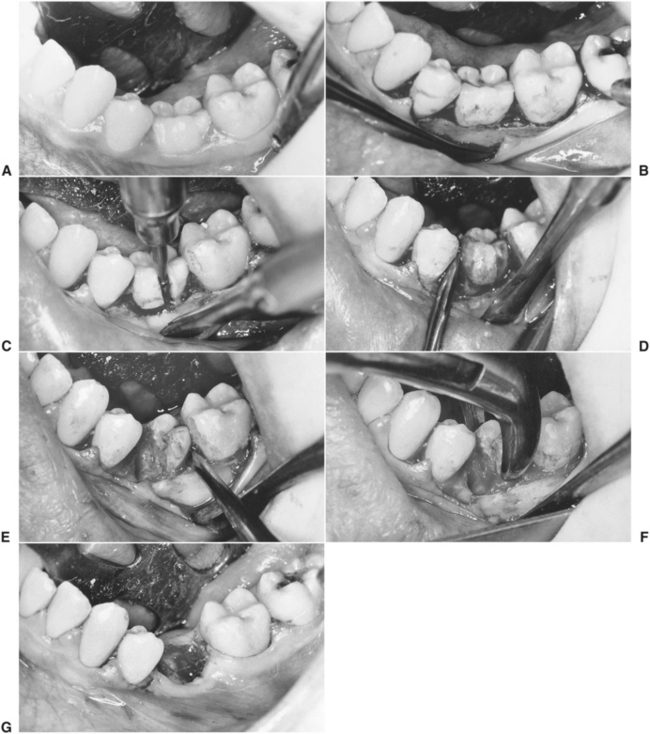
FIGURE 8-42 A, This primary second molar cannot be removed by closed technique because of tipping of adjacent teeth into occlusal path of withdrawal and of high likelihood of ankylosis. B, Envelope incision is made, extending two teeth anteriorly and one tooth posteriorly. C, Small amount of crestal bone is removed, and tooth is sectioned into two portions with bur. D, Small straight elevator is used to luxate and deliver mesial portion of crown and mesial root. E, Distal portion is luxated with small straight elevator. F, No. 151 forceps are used to deliver remaining portion of tooth. G, Wound is irrigated and flap is approximated with gut sutures in papillae.
However, in most situations a small amount of crestal bone should be removed, and the tooth should be divided. Tooth sectioning is usually accomplished with a straight handpiece with a straight bur, such as the No. 8 round bur, or with a fissure bur, such as the No. 557 or No. 703 bur (Fig. 8-42, C).
Once the tooth is sectioned, the small straight elevator is used to luxate and mobilize the sectioned roots (Fig. 8-42, D). The straight elevator may be used to deliver the mobilized sectioned tooth (Fig. 8-42, E). If the crown of the tooth is sectioned, upper or lower universal forceps are used to remove the individual portions of the sectioned tooth (Fig. 8-42, F). If the crown is missing, then straight and triangular elevators are used to elevate the tooth roots from the sockets.
Sometimes, a remaining root may be difficult to remove, and additional bone removal (as is described for a single-rooted tooth) may be necessary. Occasionally, it is necessary to prepare a purchase point with the bur and to use an elevator, such as the Crane pick, to elevate the remaining root.
After the tooth and all the root fragments have been removed, the flap is repositioned and the surgical area is palpated for sharp bony edges. If any sharp edges are present, they are smoothed with a bone file. The wound is thoroughly irrigated and débrided of loose fragments of tooth, bone, calculus, and other debris. The flap is repositioned again and sutured in the usual fashion (Fig. 8-42, G).
An alternative method for removing the lower first molar is to reflect the soft tissue flap and remove sufficient buccal bone to expose the bifurcation. Then the bur is used to section the mesial root from the tooth and convert the molar into a single-rooted tooth (Fig. 8-43). The crown with the mesial root intact is extracted with No. 17 lower molar forceps. The remaining mesial root is elevated from the socket with a Cryer elevator. The elevator is inserted into the empty tooth socket and rotated, using the wheel-and-axle principle. The sharp tip of the elevator engages the cementum of the remaining root, which is elevated occlusally from the socket. If the interradicular bone is heavy, the first rotation or two of the Cryer elevator removes the bone, which allows the elevator to engage the cementum of the tooth on the second or third rotation.
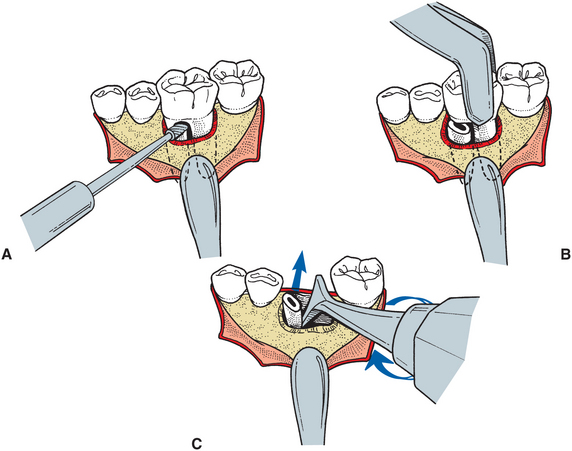
FIGURE 8-43 A, Alternative method of sectioning is to use bur to remove mesial root from first molar. B, No. 178 forceps are then used to grasp crown of tooth and remove the crown and distal root. C, Cryer elevator is then used to remove mesial root. Point of Cryer elevator is inserted into empty socket of distal root and turned in wheel-and-axle fashion, with sharp point engaging interseptal bone and root and elevating mesial root from its socket.
If the crown of the mandibular molar has been lost, the procedure again begins with the reflection of an envelope flap and removal of a small amount of crestal bone. The bur is used to section the two roots into mesial and distal components (Fig. 8-44, A). The small straight elevator is used to mobilize and luxate the mesial root, which is delivered from its socket by insertion of the Cryer elevator into the slot prepared by the dental bur (Fig. 8-44, B). The Cryer elevator is rotated in the wheel-and-axle manner, and the mesial root is delivered occlusally from the tooth socket. The opposite member of the paired Cryer instruments is inserted into the empty root socket and rotated through the interradicular bone to engage and deliver the remaining root (Fig. 8-44, C).
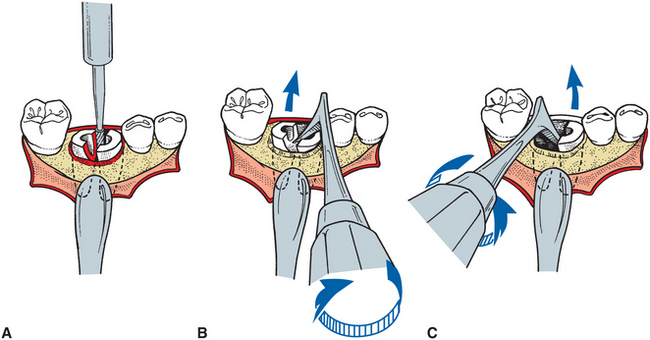
FIGURE 8-44 A, When crown of lower molar is lost because of fracture or caries, small envelope flap is reflected and small amount of crestal bone is removed. Bur is then used to section tooth into two individual roots. B, After small straight elevator has been used to mobilize roots, Cryer elevator is used to elevate distal root. Tip of elevator is placed into slot prepared by bur, and elevator is turned to deliver the root. C, Opposite member of paired Cryer elevators is then used to deliver remaining tooth root with same type of rotational movement.
Extraction of maxillary molars with widely divergent buccal and palatal roots that require excessive force to extract can be done more prudently by dividing the root into several sections. This three-rooted tooth must be divided in a pattern different from that of the two-rooted mandibular molar. If the crown of the tooth is intact, the two buccal roots are sectioned from the tooth and the crown is removed along with the palatal root.
The standard envelope flap is reflected, and a small portion of crestal bone is removed to expose the trifurcation area. The bur is used to section off the mesiobuccal and distobuccal roots (Fig. 8-45, A). With gentle but firm buccoocclusal pressure, the upper molar forceps deliver the crown and palatal root along the long axis of the root (Fig. 8-45, B). No palatal force should be delivered with the forceps to the crown portion because this results in fracture of the palatal root. The entire delivery force should be in the buccal direction. A small straight elevator is then used to luxate the buccal roots (Fig. 8-45, C), which can then be delivered with a Cryer elevator used in the usual fashion (Fig. 8-45, D) or with a straight elevator. If straight elevators are used, the surgeon should remember that the maxillary sinus might be close to these roots, so apically directed forces must be kept to a minimum and carefully controlled. The entire force of the straight elevator should be in a mesiodistal direction or toward the palate, and only slight pressure should be applied apically.
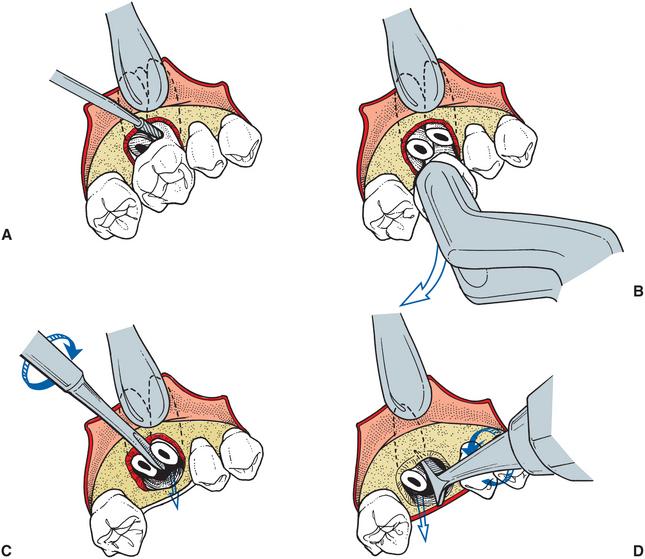
FIGURE 8-45 A, When intact maxillary molar must be divided for judicious removal (as when extreme divergence of roots is found), small envelope incision is made and small amount of crestal bone is removed. This allows bur to be used to section buccal roots from crown portion of tooth. B, Upper molar forceps are then used to remove crown portion of tooth along with palatal root. Tooth is delivered in buccoocclusal direction, and no palatal pressure is used, because it would probably cause fracture of palatal root from crown portion. C, Straight elevator is then used to mobilize buccal roots and can occasionally be used to deliver these roots. D, Cryer elevator can be used in usual fashion by placing tip of elevator into empty socket and rotating it to deliver remaining root.
If the crown of the maxillary molar is missing or fractured, the roots should be divided into two buccal roots and a palatal root. The same general approach as before is used. An envelope flap is reflected and retracted with a periosteal elevator. A moderate amount of buccal bone is removed to expose the tooth for sectioning (Fig. 8-46, A). The roots are sectioned into the two buccal roots and a single palatal root. Next, the roots are luxated with a straight elevator and delivered with Cryer elevators, according to the preference of the surgeon (Fig. 8-46, B and C). Occasionally, enough access to the roots exists so that a maxillary root forceps or upper universal forceps can be used to deliver the roots independently (Fig. 8-46, D). Finally, the palatal root is delivered after the two buccal roots have been removed. Often much of the interradicular bone is lost by this time; therefore the small straight elevator can be used efficiently. The elevator is forced down the periodontal ligament space on the palatal aspect with gentle, controlled wiggling motions, which causes displacement of the tooth in the buccoocclusal direction (Fig. 8-46, E).
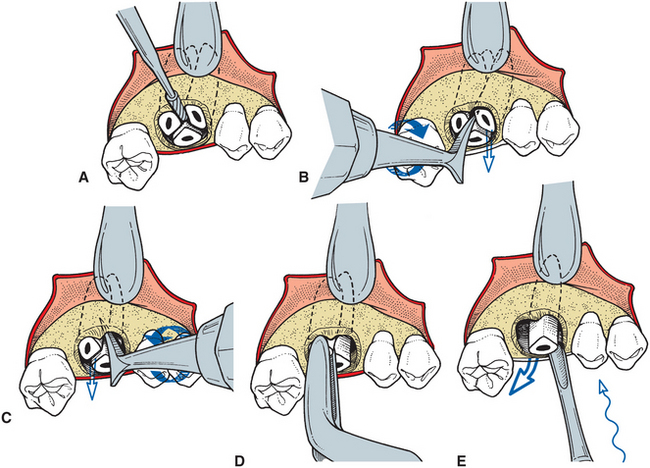
FIGURE 8-46 A, If crown of upper molar has been lost to caries or has been fractured from roots, small envelope incision is reflected and small amount of crestal bone is removed. Bur is then used to section three roots into independent portions. B, After roots have been luxated with small straight elevator, mesiobuccal root is delivered with Cryer elevator placed into slot prepared by bur. C, Once mesiobuccal root has been removed, Cryer elevator is again used to deliver distal buccal root. Tip of Cryer elevator is placed into empty socket of mesiobuccal root and turned in usual fashion to deliver tooth root. D, Maxillary root forceps occasionally can be used to grasp and deliver remaining root. Palatal root can then be delivered with straight elevator or with Cryer elevator. If straight elevator is used, it is placed between root and palatal bone and gently wiggled in effort to displace palatal root in buccoocclusal direction. E, Small straight elevator can be used to elevate and displace remaining root of maxillary third molar in buccoocclusal direction with gentle wiggling pressures.
Removal of Root Fragments and Tips
If fracture of the apical one third (3 to 4 mm) of the root occurs during a closed extraction, an orderly procedure should be used to remove the root tip from the socket. Initial attempts should be made to extract the root fragment by a closed technique, but the surgeon should begin a surgical technique if the closed technique is not immediately successful. Whichever technique is chosen, two requirements for extraction are critically important: excellent light and excellent suction, preferably with a suction tip of small diameter. Removal of a small root tip fragment is difficult unless the surgeon can clearly visualize it. Also important is that an irrigation syringe be available to flush blood and debris from around the root tip so that it can be clearly seen.
The closed technique for root tip retrieval is defined as any technique that does not require reflection of soft tissue flaps and removal of bone. Closed techniques are most useful when the tooth was well luxated and mobile before the root tip fractured. If sufficient luxation occurred before the fracture, the root tip often is mobile and can be removed with the closed technique. However, if the tooth was not well mobilized before the fracture, the closed technique is less likely to be successful. The closed technique is also less likely to be successful if the clinician finds a bulbous hypercementosed root with bony interferences that prevent extraction of the root tip fragment. In addition, severe dilaceration of the root end may prevent the use of the closed technique.
Once the fracture has occurred, the patient should be repositioned so that adequate visualization (with proper lighting), irrigation, and suction are achieved. The tooth socket should be irrigated vigorously and suctioned with a small suction tip because the loose tooth fragment occasionally can be irrigated from the socket. Once irrigation and suction are completed, the surgeon should inspect the tooth socket carefully to assess whether the root has been removed from the socket. The extracted tooth can also be examined to see whether and how much of a root remains.
If the irrigation-suction technique is unsuccessful, the next step is to tease the root apex from the socket with a root tip pick. A root tip pick is a delicate instrument and cannot be used as the Cryer elevator can to remove bone and elevate entire roots. The root tip pick is inserted into the periodontal ligament space, and the root is teased out of the socket (Fig. 8-47). Neither excessive apical or lateral force should be applied to the root tip pick. Excessive apical force could result in displacement of the root tip into other anatomic locations, such as the maxillary sinus. Excessive lateral force could result in the bending or fracture of the end of the root tip pick.
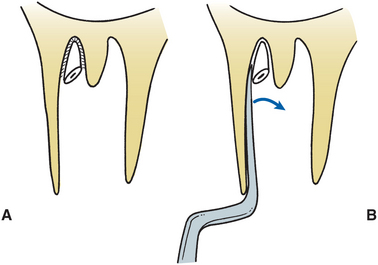
FIGURE 8-47 A, When small (2 to 4 mm) portion of root apex is fractured from tooth, root tip pick can be used to retrieve it. B, Root tip pick is teased into periodontal ligament space and used to luxate root tip gently from its socket.
The root tip also can be removed with the small straight elevator. This technique is indicated more often for the removal of larger root fragments. The technique is similar to that of the root tip pick because the small straight elevator is wedged into the periodontal ligament space, where it acts like a wedge to deliver the tooth fragment toward the occlusal plane (Fig. 8-48). Strong apical pressure should be avoided because it may force the root into the underlying tissues.

FIGURE 8-48 A, When larger portion of tooth root is left behind after extraction of tooth, small straight elevator can sometimes be used as wedge to displace tooth in occlusal direction. One must remember that pressure applied in such fashion should be in gentle wiggling motions; excessive pressure should not be applied. B, Excessive pressure in apical direction results in displacement of tooth root into undesirable places, such as maxillary sinus.
Displacement of root tips into the maxillary sinus can occur in the maxillary premolar and molar areas. When the straight elevator is used to remove small root tips in this fashion, the surgeon’s hand must always be supported on an adjacent tooth or a solid bony prominence. This support allows the surgeon to deliver carefully controlled force and to decrease the possibility of displacing tooth fragments or the instrument into an unwanted place. The surgeon must be able to visualize the top of the fractured root clearly to see the periodontal ligament space. The straight elevator must be inserted into this space and not blindly pushed down into the socket.
If the closed technique is unsuccessful, the surgeon should switch without delay to the open technique. It is important for the surgeon to recognize that a smooth, efficient, properly performed open retrieval of a root fragment is less traumatic than a prolonged, time-consuming, frustrating attempt at closed retrieval.
Two main open techniques are used to remove root tips. The first is simply an extension of the technique described for surgical removal of single-rooted teeth. A soft tissue flap with a releasing incision is reflected and retracted with a periosteal elevator. Bone is removed with a bur to expose the buccal surface of the tooth root. The root is buccally delivered through the opening with a small straight elevator. The wound is irrigated and the flap is repositioned and sutured (Fig. 8-49).
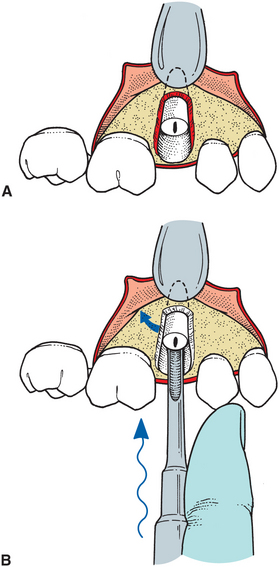
FIGURE 8-49 A, If root cannot be retrieved by closed techniques, soft tissue flap is reflected and bone overlying root is removed with bur. B, Small straight elevator is then used to luxate root buccally by wedging straight elevator into palatal periodontal ligament space.
A modification of the open technique just described can be performed to deliver the root fragment without removal of too much of the buccal plate overlying the tooth. This technique is known as the open-window technique. A soft tissue flap is reflected in the same fashion as for the approach just covered, and the apex area of the tooth fragment is located. A dental bur is used to remove the bone overlying the apex of the tooth, exposing the root fragment. A root tip pick or small elevator is then inserted into the window, and the tooth is displaced out of the socket (Fig. 8-50).
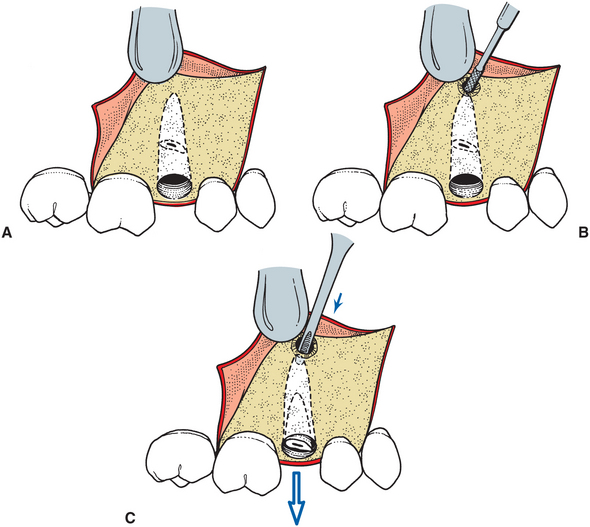
FIGURE 8-50 A, Open-window approach for retrieving root is indicated when buccocrestal bone must be maintained. Three-cornered flap is reflected to expose area overlying apex of root fragment being recovered. B, Bur is used to uncover apex of root and allow sufficient access for insertion of straight elevator. C, Small straight elevator is then used to displace tooth out of tooth socket.
The preferred flap technique is the three-cornered flap because of a need for more extensive exposure of the apical areas. The open-window approach is especially indicated when the buccocrestal bone must be left intact such as in the removal of maxillary premolars for orthodontic purposes, especially in adults.
Justification for Leaving Root Fragments
When a root tip has fractured and closed approaches of removal have been unsuccessful, and when the open approach may be excessively traumatic, the surgeon may consider leaving the root in place. As with any surgical approach, the surgeon must balance the benefits of surgery against the risks of surgery. In some situations the risks of removing a small root tip may outweigh the benefits.
Three conditions must exist for a tooth root to be left in the alveolar process. First, the root fragment must be small, usually no more than 4 to 5 mm in length. Second, the root must be deeply embedded in bone and not superficial, to prevent subsequent bone resorption from exposing the tooth root and interfering with any prosthesis that will be constructed over the edentulous area. Third, the tooth involved must not be infected, and there must be no radiolucency around the root apex. This lessens the likelihood that subsequent infections will result from leaving the root in position. If these three conditions exist, then consideration can be given to leaving the root.
For the surgeon to leave a small, deeply embedded, noninfected root tip in place, the risk of surgery must be greater than the benefit. This risk is considered to be greater if one of the following three conditions exists: First, the risk is too great if removal of the root will cause excessive destruction of surrounding tissue, that is, if excessive amounts of bony tissue must be removed to retrieve the root. For example, reaching a small palatal root tip of a maxillary first molar may require the removal of large amounts of bone.
Second, the risk is too great if removal of the root endangers important structures, most commonly the inferior alveolar nerve, at the mental foramen or along the course of the inferior alveolar canal. If surgical retrieval of a root runs a high risk of permanent or even a prolonged temporary anesthesia of the inferior alveolar nerve, the surgeon should seriously consider leaving the root tip in place.
Finally, the risks outweigh the benefits if attempts at recovering the root tip are at high risk of displacing the root tip into tissue spaces or into the maxillary sinus. The roots most often displaced into the maxillary sinus are those of the maxillary molars. If the preoperative radiograph shows that the bone is thin over the roots of the teeth and that the separation between the teeth and maxillary sinus is small, the prudent surgeon may choose to leave a small root fragment rather than risk displacing it into the maxillary sinus. Likewise, roots of the mandibular second and third molars can be displaced into the submandibular space during attempts to remove them. During retrieval of any root tip, apical pressure by an elevator may displace teeth into tissue spaces or into the sinus.
If the surgeon elects to leave a root tip in place, a strict protocol should be observed. The patient must be informed that, in the surgeon’s judgment, leaving the root in its position will do less harm than surgery. In addition, radiographic documentation of the presence and position of the root tip must be obtained and retained in the patient’s record. The fact that the patient was informed of the decision to leave the root tip in position must be recorded in the patient’s chart. In addition, the patient should be recalled for several routine periodic follow-ups over the ensuing year to track the fate of this root. The patient should be instructed to contact the surgeon immediately should any problems develop in the area of the retained root.
MULTIPLE EXTRACTIONS
If multiple adjacent teeth are to be extracted at a single sitting, slight modifications of the routine extraction procedure must be made to facilitate a smooth transition from a dentulous to an edentulous state that allows for proper rehabilitation with a fixed or removable prosthesis. This section discusses those modifications.
Treatment Planning
In most situations where multiple teeth are to be removed, preextraction planning regarding replacement of the teeth to be removed is necessary. This may be a full or removable partial denture or placement of a single or multiple implants. Before the teeth are extracted, the surgeon and restorative dentist should communicate and make a determination of the need for items such as interim partial immediate dentures. The discussion should also include a consideration of the need for any other type of soft tissue surgery, such as tuberosity reduction or the removal of undercuts or tori in critical areas. If dental implants are to be placed at a later time, it may also be desirable to limit bone trimming and socket compression. In some situations, dental implants may be placed at the same time as the teeth are removed, which would require the preparation of a surgical guide stent to assist in aligning the implants appropriately.
Extraction Sequencing
The order in which multiple teeth are extracted deserves some discussion. Maxillary teeth should usually be removed first for several reasons. First, an infiltration anesthetic has a more rapid onset and also disappears more rapidly. This means that the surgeon can begin the surgical procedure sooner after the injections have been given; in addition, surgery should not be delayed because profound anesthesia is lost more quickly in the maxilla. In addition, maxillary teeth should be removed first because during the extraction process, debris such as portions of amalgams, fractured crowns, and bone chips may fall into the empty sockets of the lower teeth if the lower surgery is performed first. In addition, maxillary teeth are removed with a major component of buccal force. Little or no vertical traction force is used in removal of these teeth, as is commonly required with mandibular teeth. A single minor disadvantage for extracting maxillary teeth first is that if hemorrhage is not controlled in the maxilla before mandibular teeth are extracted, the hemorrhage may interfere with visualization during mandibular surgery. Hemorrhage is usually not a major problem because hemostasis should be achieved in one area before the surgeon turns attention to another area of surgery, and the surgical assistant should be able to keep the surgical field free from blood with adequate suction.
Tooth removal usually begins with extraction of the most posterior teeth first. This allows for the more effective use of dental elevators to luxate and mobilize teeth before the forceps are used to extract the tooth. The two teeth that are the most difficult to remove, the first molar and canine, should be extracted last. Removal of the teeth on either side weakens the bony socket on the mesial and distal side of these teeth, and their subsequent extraction is made more straightforward.
Thus, for example, if teeth in the maxillary and mandibular left quadrants are to be extracted, the following order is recommended: (1) maxillary posterior teeth, leaving the first molar; (2) maxillary anterior teeth, leaving the canine; (3) maxillary first molar; (4) maxillary canine; (5) mandibular posterior teeth, leaving the first molar; (6) mandibular anterior teeth, leaving the canine; (7) mandibular first molar; and (8) mandibular canine.
Technique for Multiple Extractions
The surgical procedure for removing multiple adjacent teeth is modified slightly. The first step in removing a single tooth is to loosen the soft tissue attachment from around the tooth. When performing multiple extractions, the soft tissue reflection is extended slightly to form a small envelope flap to expose the crestal bone only (Fig. 8-51, A to C). The teeth are luxated with the straight elevator (Fig. 8-51, D) and are delivered with forceps in the usual fashion. If removing any of the teeth is likely to require excessive force, the surgeon should remove a small amount of buccal bone to prevent fracture and excessive bone loss.
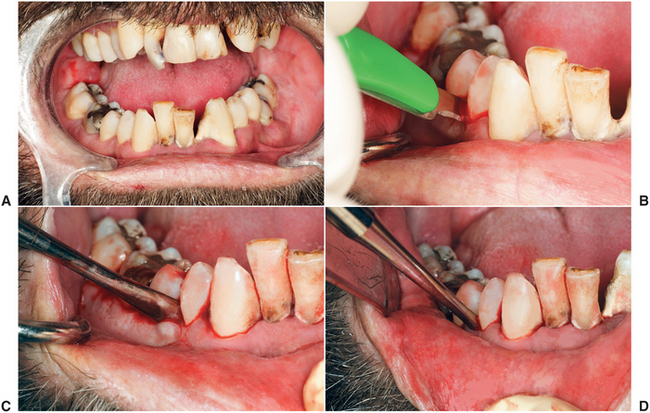
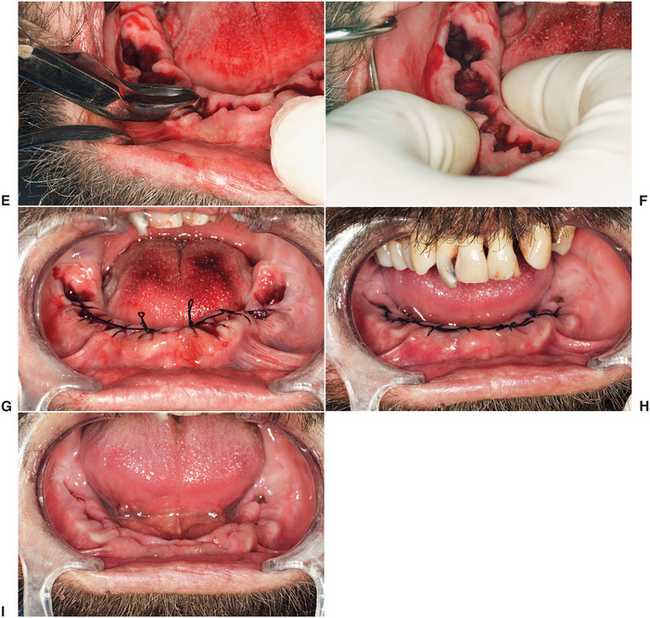
FIGURE 8-51 A, This patient’s remaining mandibular teeth are to be extracted. The broad zone of attached gingiva is demonstrated in adequate vestibular depth. B, After adequate anesthesia is achieved, soft tissue attachment to teeth is incised with No. 15 blade. Incision is carried around necks of teeth and through interdental papilla. C, Periosteal elevator is used to reflect labial soft tissue just to crest of labioalveolar bone. D, Small straight elevator is used to luxate teeth before forceps are used. Surgeon’s opposite hand is reflecting soft tissue and stabilizing mandible. Teeth adjacent to mandibular canine are extracted first, which makes extraction of remaining canine tooth easier to accomplish. E, Rongeur forceps are used to remove only bone that is sharp and protrudes above reapproximated soft tissue. F, Alveolar plates are compressed firmly together to reestablish presurgical buccolingual width of alveolar process. Because implant may be placed in the future, be careful to not overly reduce the alveolar width with compression. Because of mild periodontal disease, excess soft tissue is found, which will be trimmed to prevent excess redundant tissue on crest of ridge. G, After soft tissue has been trimmed and sharp bony projections removed, tissue is checked one final time for completeness of soft tissue surgery. Tissue is closed with interrupted black silk sutures across papilla. This approximates soft tissue at papilla but leaves tooth socket open. Soft tissue is not mobilized to achieve primary closure because this would tend to reduce vestibular height. H and I, Patient returns for suture removal 1 week later. Normal healing has occurred, and sutures are ready for removal. The broad band of attached tissue remains on ridge, similar to what existed in preoperative situation (see A).
After the extractions are completed, the buccolingual plates are pressed into their preexisting position with firm pressure unless implants are planned. The soft tissue is repositioned, and the surgeon palpates the ridge to determine whether any areas of sharp bony spicules can be found. If a removable partial or complete denture is planned, undercuts should be identified. If any sharp spicules or undercuts exist, the bone rongeur is used to remove the larger areas of interference, and a bone file used to smooth any sharp spicules (Fig. 8-51, E and F). The area is irrigated thoroughly with sterile saline. The soft tissue is inspected for the presence of excess granulation tissue. If any granulation tissue is present, it should be removed because it may prolong postoperative hemorrhage. The soft tissue is then reapproximated and inspected for excess gingiva. If the teeth are being removed because of severe periodontitis with bone loss, it is common for the soft tissue flaps to overlap and cause redundant tissue. If this is the situation, the gingiva should be trimmed so that no overlap occurs when the soft tissue is apposed. However, if no redundant tissue exists, the surgeon must not try to gain primary closure over the extraction sockets. If this is done, the depth of the vestibule decreases, which may interfere with denture construction and wear. Finally, the papillae are sutured into position (Fig. 8-51, G). Interrupted or continuous sutures are used, depending on the preference of the surgeon, planning removal in about a week (Fig. 8-51, H and I).
In some patients a more extensive alveoloplasty after multiple extractions is necessary. Chapter 13 has an in-depth discussion of this technique.