Radiographic Quality Assurance and Infection Control
A quality assurance program in radiology is a series of procedures designed to ensure optimal and consistent operation of each component in the imaging chain. When all components are functioning properly, the result is consistently high-quality radiographs made with low exposure to patients and office personnel.
The goal of an infection control program in radiology is a series of procedures designed to avoid cross-contamination among patients and between patients and operators.
Radiographic Quality Assurance
Because radiographs are indispensable for patient diagnosis, the dentist must ensure that optimal exposure and film processing conditions are maintained. To reach this goal, a quality assurance program includes evaluation of the performance of x-ray machines, manual and automatic processing procedures, image receptors, and viewing conditions. Optimization of these components results in the most diagnostic images and the lowest exposure for patients. It is best if one individual is given the responsibility for implementing the quality assurance program and to take corrective action when indicated. Most of these steps are quickly accomplished yet can have a significant influence on radiographic quality (Box 8-1).
DAILY TASKS
Several tasks should be performed daily to ensure excellent radiographs.
Compare Radiographs with Reference Film
One of the most common causes of poor radiographs is poor film processing in the darkroom, in particular the use of depleted solutions. A simple and effective means for constant monitoring of the quality of images produced in an office is to check daily films against a reference film. Soon after film-processing solutions are replaced, mount a patient film that has been properly exposed and processed with exact time-temperature technique on a corner of the viewbox. This image, with optimal density and contrast, serves as a reference for the radiographs made in the following days and weeks (Fig. 8-1). All subsequent images should be compared with this reference film.
FIG. 8-1 Radiographs should be checked daily against a reference film made with fresh solutions. As processing solutions become exhausted, the daily images become increasingly light and lose contrast. When these changes are clear, both the developer and the fixer should be changed. (Courtesy C.L. Crabtree, DDS, Bureau of Radiological Health, Rockville, Md.)
Comparison of daily images with the reference film may reveal problems before they interfere with the diagnostic quality of the images. When a problem is identified, it is important to determine the probable source and to take corrective action. For instance, if the processing solutions have become depleted, the resultant radiographs are light and have reduced contrast. Both developer and fixer should be changed when degradation of the image quality is evident. Light images may also result from cold solutions or insufficient developing time. Dark images may be caused by excessive developing time, developer that is too warm, or light leaks.
There are two methods that are more accurate than a reference film but require additional equipment and more time to perform. These are sensitometry/densitometry and the use of a step wedge.
Make Step-Wedge Test of Processing System
The most accurate and rigorous method of testing film-processing solutions is to use a sensitometer and densitometer. A sensitometer exposes film to a calibrated light pattern. After processing, a densitometer is used to measure the optical density of each step in the test pattern of the film exposed by the sensitometer. A change in the density readings from day to day indicates a problem in the darkroom.
For most dental offices a variation of this method using a step-wedge test provides accurate monitoring of day-to-day processing conditions. This information is used to measure the speed of the imaging system and image contrast. Both are sensitive measures of the processing environment. A step wedge is readily made with the lead foil from film packets. Stack five sheets together and staple at one end (Fig. 8-2). Cut off four fifths of the top layer, three fifths of the second layer, two fifths of the third layer, and one fifth of the fourth layer to create a five-step wedge. Lay the wedge on top of a film packet and expose with the usual setting for an adult bitewing view. The resultant image should show five steps from dark to light. Save the first film after changing to fresh processing solution for comparison with images made on subsequent days. Monitor the processing solutions at the beginning of each day with a step-wedge image to ensure that the processing system is operational for patient care.
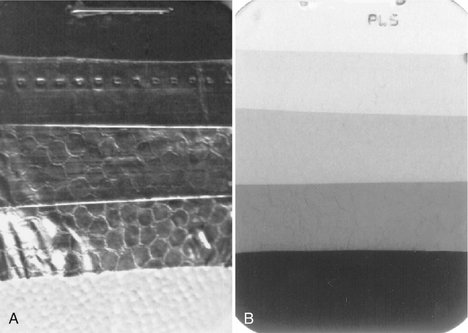
FIG. 8-2 A, Step wedge made of strips of lead foil from film packets. This step wedge is positioned over a film, and an exposure is made. B, Processed radiograph showing each step. Such an image should be made daily after replenishing processing solutions and compared with an image made with fresh solutions. When the step wedge has become one full step lighter, it is time to change both the developer and the fixer.
Enter Findings in Retake Log
Another simple and effective means of reducing the number of faulty radiographs is to keep a retake log. Record all errors for images that must be re-exposed.
Replenish Processing Solutions
At the beginning of each work day, check the levels of the processing solutions and replenish if necessary. Replenish the developer with fresh developing solution and the fixer with fresh fixing solution.
Check Temperature of Processing Solutions
At the beginning of each work day, check the temperature of the processing solutions. The solutions must reach the optimal temperature before use—68° F (20° C) for manual processing and 82° F (28° C) for heated automatic processors. The instructions accompanying the film and processor verify the optimal temperature. Unheated automatic processors should be located away from windows or heaters that may cause their temperature to vary during the day. Proper temperature regulation is required for accurate time-temperature processing.
WEEKLY TASKS
The replacement frequency of processing solutions depends primarily on the rate of use of the solutions but also on the size of tanks, whether a cover is used, and the temperature of the solutions. In most offices the solutions should be changed weekly or every other week. The results of the step-wedge test will help determine the proper frequency.
Clean Processing Equipment
Regular cleaning of the processing equipment is necessary for optimal operation. Clean the solution tanks of manual and automatic processing equipment when the solutions are changed. Clean the rollers of automatic film processors weekly according to the manufacturer’s instructions. After cleaning, rinse the tanks and rollers twice as long as the manufacturer recommends to prevent the cleaner from interfering with the action of the film-processing solutions.
MONTHLY TASKS
Film becomes fogged in the darkroom because of inappropriate safelight filters, excessive exposure to safelights, and stray light from other sources. Such films are dark, show low contrast, and have a muddy gray appearance. Inspect the darkroom monthly to assess the integrity of the safelights (preferably GBX-2 filters with 15-watt bulbs). The glass filter should be intact, with no cracks. To check for light leaks in a darkroom, turn off all lights, allow vision to accommodate to the dark, and check for light leaks, especially around doors and vents. Mark light leaks with chalk or masking tape. Weather stripping is useful for sealing light leaks under doors.
The following simple penny test can be used monthly to evaluate for fogging caused by inappropriate safelighting conditions (Fig. 8-3):
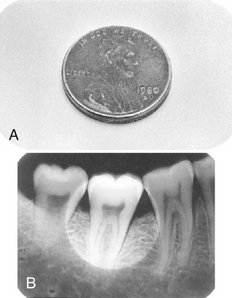
FIG. 8-3 Penny test for unsafe illumination. A, A penny is left on the exposed duplicate film from the double-film pack on the working surface during the time that any film would be opened (usually about 5 minutes). B, If the processed radiograph shows an outline of the penny, the film is being fogged by inappropriate safelighting conditions.
1. Open the packet of an exposed film and place the test film in the area where the films are usually unwrapped and clipped on the film hanger.
2. Place a penny on the film and leave it in this position for the approximate time required to unwrap and mount a full-mouth set of films, usually about 5 minutes.
3. Develop the test film as usual. If the image of the penny is visible on the resultant film, the room is not light-safe for the particular film tested. Each type of film used in the office should be tested to measure the integrity of the darkroom.
Clean Intensifying Screens
Clean all intensifying screens in panoramic and cephalometric film cassettes monthly. The presence of scratches or debris results in recurring light areas on the resultant images. The foam supporting the screens must be intact and capable of holding both screens closely against the film. If close contact between the film and screens is not maintained, the image loses sharpness.
Rotate Film Stock
Dental x-ray film is quite stable when it is properly handled. Store it in a cool, dry facility away from a radiation source. Rotate stock when new film is received so that old film does not accumulate in storage. Always use the oldest film first, but never after its expiration date.
Check Exposure Charts
Each month inspect exposure tables listing the proper peak kilovoltage (kVp), milliamperes (mA), and exposure times for making radiographs of each region of the oral cavity that are posted by each x-ray machine (Fig. 8-4). Verify that the information is legible and accurate. These tables help ensure that all operators use the appropriate exposure factors. Typically the mA is fixed at its highest setting; the kVp is fixed, usually at 70 kVp; and the exposure time is varied to account for patient size and location of the area of interest in the mouth. Exposure times are initially determined empirically. Careful time-temperature processing (described in Chapter 6) must be used with fresh solutions during this initial determination of exposure times.
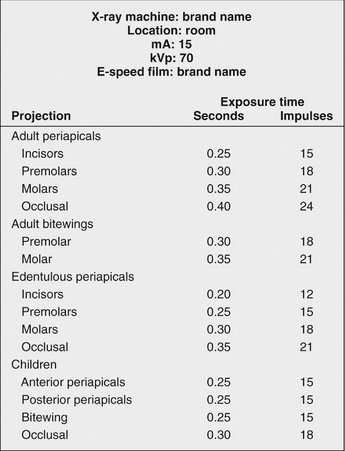
FIG. 8-4 Sample wall chart showing identification information for x-ray machine, film type, mA and kVp settings, and appropriate exposure times for various anatomic locations and patient sizes. The optimal exposure times must be determined empirically in each office because they vary with the machine settings used, source-to-skin distance, and other factors.
Check Leaded Aprons and Collars
Visually inspect leaded aprons and collars for evidence of cracking. A fluoroscopic examination performed by a qualified individual can confirm any cracks in the lead shielding. Replace as necessary. Such cracking is usually caused by folding the shields when not in use. It can be minimized by hanging the aprons from a hook or draping them over a handrail.
YEARLY TASKS: CALIBRATE X-RAY MACHINE
X-ray machines are generally quite stable, and only rarely is a malfunction of the machine the cause of poor radiographs. Accordingly, machines need to be calibrated only annually unless a specific problem is identified or substantive repair is necessary that may affect operation. Usually dental service companies or health physicists should make these machine measurements because of the specialized equipment and knowledge required. The following parameters should be measured:
1. X-ray output. Use a radiation dosimeter to measure the intensity and reproducibility of radiation output (Fig. 8-5). Acceptable values are shown in Figure 3-3.
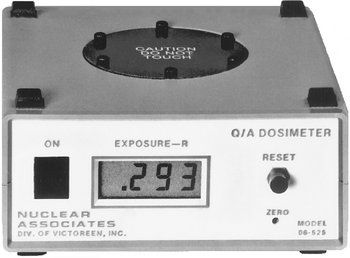
FIG. 8-5 Device for measuring exposure output of an x-ray machine. The aiming cylinder of the x-ray machine is positioned on the center of the top and an exposure made. The display on the front gives the output in roentgens.
2. Collimation and beam alignment. The field diameter for dental intraoral x-ray machines should be no greater than 2¾ inches. The tip of the position-indicating device (PID), or aiming cylinder, should be closely aligned with the x-ray beam.
For panoramic machines, the beam exiting the patient should not be larger than the film slit holding the film cassette. This may be tested by taping dental films in front of and behind the slit. A pin stick should be made through both films to allow subsequent realignment. Expose, process, and realign both films. The exposure to the film in front of the slit should be comparable in size to the film exposure behind the slit. Service is required if the front film exposure is larger than or not well oriented with the film exposure behind the slit.
3. Beam energy. The kVp or half-value layer (HVL) of the beam should be measured to ensure that the beam has sufficient energy for film exposure without excessive soft tissue dosage. Measurement of kVp requires specialized equipment. It should be accurate within 5 kVp. Measurement of HVL requires a dosimeter. The HVL should be at least 1.5 mm aluminum (Al) at 70 kVp and 2.5 mm Al at 90 kVp.
4. Timer. Electric pulse counters count the number of pulses generated by an x-ray machine during a preset time interval. The timer should be accurate and reproducible.
5. mA. Verify the linearity of the mA control if two or more mA settings are available on the machine. Make an exposure using the usual adult bitewing setting. Then reduce the mA to the lower value and select another exposure time, ensuring that the product of the mA and time in seconds (impulses) is the same as for the adult bitewing. For example, if the machine has 10- and 15-mA settings, and 15 mA and 24 impulses are used for adult bitewings, select 15 mA and 24 impulses for the first exposure and measure the dose. Make a second exposure at 10 mA and 36 impulses and measure the dose. The dose at each exposure combination should be the same (15 × 24 = 10 × 36). A discrepancy implies nonlinearity in the mA control or a fault in the timer. The step wedge described previously may also be used in place of the dosimeter. In this case the density of each step of each image should be the same.
6. Tube head stability. The tube head should be stable when placed around the patient’s head, and it should not drift during the exposure. When the tube head is not stable, service is necessary to adjust the suspension mechanism.
7. Focal spot size. Measure the size of the focal spot because it may become enlarged with excessive heat buildup within an x-ray machine. An enlarged focal spot contributes to geometric fuzziness in the resultant image. A specialized piece of equipment is required for this test.
Infection Control
Dental personnel and patients are at increased risk for acquiring tuberculosis, herpes viruses, upper respiratory infections, and hepatitis strains A through E. After the recognition of acquired immunodeficiency syndrome (AIDS) in the 1980s, rigorous hygienic procedures were introduced in dental offices. The primary goal of infection control procedures is to prevent cross-contamination between patients and between patients and health care providers. The potential for cross-contamination in dental radiography is great. An operator’s hands may become contaminated by contact with a patient’s mouth and saliva-contaminated films and film holders. The operator then must adjust the x-ray tube head and x-ray machine control panel settings to make the exposure. Cross-contamination also may occur when operators open film packets to process the films in the darkroom. The procedures described in the following sections minimize or eliminate cross-contamination (Box 8-2). Each dental office or practice should have a written policy describing its infection control practices. It is best if one individual in a practice, usually the dentist, assumes responsibility for implementing these procedures. This person also educates other members of the practice.
APPLY UNIVERSAL PRECAUTIONS
Universal precautions are infection control guidelines designed to protect workers from exposure to diseases spread by blood and certain body fluids. Under universal precautions, all human blood and saliva are treated as if known to be infectious for human immunodeficiency virus (HIV) and hepatitis B virus. Accordingly, the means used to protect against cross-contamination are used universally, that is, for all individuals. The American Dental Association and the Centers for Disease Control and Prevention stress the use of universal precautions because many patients are unaware that they are carriers of infectious disease or choose not to reveal this information.
Wear Gloves During All Radiographic Procedures
The practitioner should always wear gloves when making radiographs or handling contaminated film packets or associated materials such as cotton rolls and film-holding instruments or when removing barrier protections from surfaces and radiographic equipment. After the patient is seated, the practitioner should wash his or her hands and put on disposable gloves in sight of the patient if the operatory arrangement permits. Dental assistants should wear eyewear or a mask or faceshield if exposure to bodily fluids is anticipated.
Charts should be kept away from sources of contamination and not handled during the radiographic examination. Chair adjustments should be made in advance, or adjustments should be made on control surfaces that are covered, such as the headrest control.
Disinfect and Cover X-Ray Machine, Working Surfaces, Chair, and Apron
The goal of preventing cross-contamination is addressed in part by disinfecting all surfaces and by using barriers to isolate equipment from direct contact. Although barriers greatly aid infection control, they do not replace the need for effective surface cleaning and disinfection. Experience has demonstrated that, during the daily activity of treatment, failure of mechanical barriers is common. It is advantageous and reassuring to the operator to know that whenever this happens, the surfaces that may become accidentally exposed are clean and disinfected. Any surface that may be contaminated should be surface disinfected. This includes the x-ray machine control panel, tube head, and beam alignment device, dental chair and headrest, surfaces on which film is placed, leaded apron and thyroid collar, and the doorknob of the operatory. Operators should avoid touching walls and other surfaces with contaminated gloves. Good surface disinfectants include iodophors, chlorines, and synthetic phenolic compounds. Although the American Dental Association does not recommend specific chemical disinfectants and sterilants, it does suggest that when dentists use a chemical agent for disinfection or sterilization, the agent should be an Environmental Protection Agency (EPA) registered hospital disinfectant of low to intermediate activity. The agent should also be tuberculocidal—an effective killer of tuberculosis—and capable of preventing other infectious diseases, including hepatitis B and HIV.
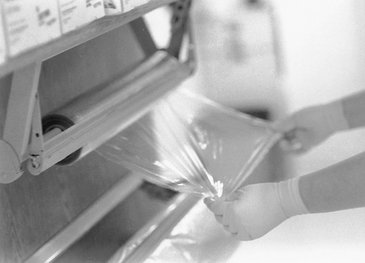
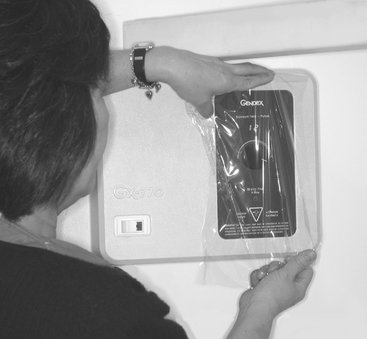
Barriers should cover working surfaces that were previously cleaned and disinfected. Barriers protect the underlying surface from becoming contaminated. An effective barrier for the countertops and x-ray control console is plastic wrap, which may be conveniently stored in a butcher’s paper dispenser mounted on a wall (Fig. 8-6). When covering the x-ray control console, the operator should be sure to include the exposure switch and the exposure time control if they are integral parts of the unit (Fig. 8-7). An x-ray exposure switch that is independent of the console should be covered with a sandwich bag or food storage bag or wrapped with plastic wrap.
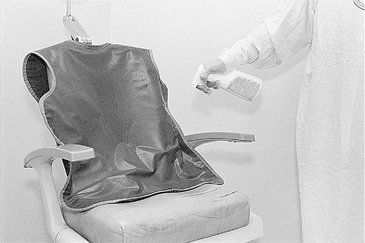
The dental chair headrest, headrest adjustments, and chair back may be easily covered with a plastic bag (Fig. 8-8). The x-ray tube head, PID, and yoke should be covered while they are still wet with disinfectant with a barrier to stop any dripping (Fig. 8-9). The bag should be secured by tying a knot in the open end or by placing a heavy rubber band over the x-ray tube head just proximal to the swivel. Also, the leaded apron should be cleaned, disinfected, and covered between patients because it is frequently contaminated with saliva as the result of handling (readjusting its position) during a radiographic procedure. The apron should be suspended on a heavy coat hanger to permit turning front to back. It should be sprayed with a detergent-containing disinfectant and then wiped and covered with the same type of plastic garment bag used for the x-ray head and chair back (Fig. 8-10). The operatory is now prepared for radiography.
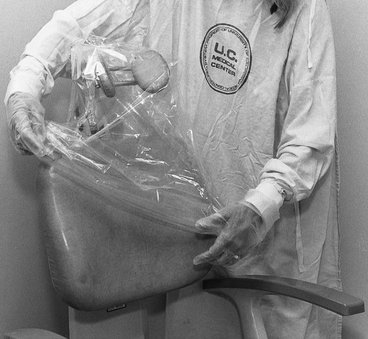
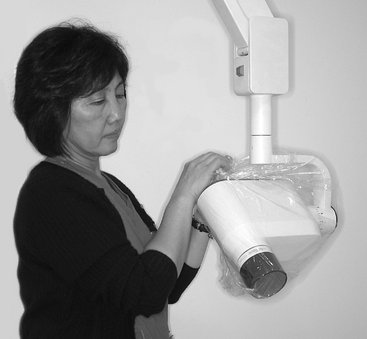
FIG. 8-9 A plastic bag is slipped over the x-ray tube head with a large rubber band just proximal to the swivel or tie ends, as shown here. The plastic is pulled tight over the PID and secured with a light rubber band slipped over the PID and placed next to the head.
Panoramic and cephalometric equipment should receive the same maintenance for decontamination and disinfection as other equipment. Panoramic bite blocks, chin rest, and patient handgrips should be cleaned with detergent-iodine disinfectant and covered with a plastic bag. Disposable bite blocks may be used. The head-positioning guides, control panel, and exposure switch should be carefully wiped with a paper towel that is well moistened with disinfectant. The radiographer should wear disposable gloves while positioning and exposing the patient. The gloves should be removed before the cassette is removed from the machine for processing because the cassette and film remain extraoral and should not be handled with contaminated disposable gloves. Cephalostat ear posts, ear post brackets, and forehead support or nasion pointer should be cleaned and disinfected with iodine-detergent disinfectant. These may then also be covered in plastic.
After patient exposures are completed, the barriers should be removed, contaminated working surfaces (including those in the darkroom) and the apron sprayed with disinfectant and wiped as described previously. Then the barriers should be replaced in preparation for the next patient.
Sterilize Nondisposable Instruments
It is best to use film-holding instruments that are heat sterilizable. After sterilization, the instruments should be kept in bags for storage and subsequent transport to the radiography area. When the instruments are taken to the radiography area, it is good technique to remove them from the bag immediately before use. After use, instruments should be replaced in the bag to reinforce cleanliness in the area. The same sterilization bag should be used to transport the contaminated instruments back to the cleaning and sterilizing room.
Use Barrier-Protected Film (Sensor) or Disposable Container
Film should be obtained in advance from a central source. To prevent contamination of bulk supplies of film, they should be dispensed in procedure quantities. The required number of films for a full-mouth or interproximal series should be prepackaged in coin envelopes or paper cups in the central preparation room. These envelopes of films should be dispensed with the film-holding instruments. For unanticipated occasions in which an unusual number of films are required, a small container of films can be on hand in the central preparation and sterilizing room. No one wearing contaminated gloves should retrieve a film from this supply. Films should be dispensed only by staff members with clean hands or wearing clean gloves.
Film packets may be packaged in a plastic envelope (Fig. 8-11), which protects the film from contact with saliva and blood during exposure. Barrier-protected film fits in most film-holding instruments. An attractive feature of the protective envelopes is the ease with which they may be opened and the film extracted. For best results, the packet should be immersed in a disinfectant after the films have been exposed in the patient’s mouth. Then the packet should be dried and opened, allowing the film to drop out. The barrier envelopes can be conveniently opened in a lighted area, the film dropped onto a clean work area or into a clean paper or plastic cup, and the film transferred to the daylight loader or darkroom for processing.
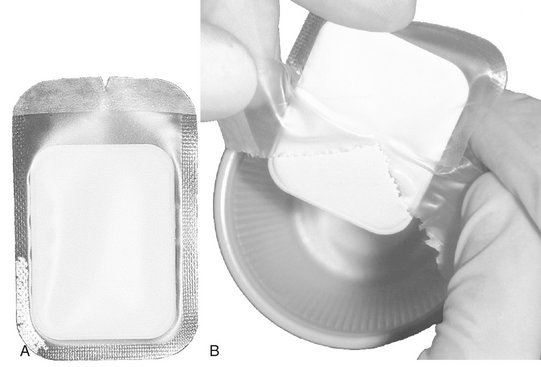
FIG. 8-11 Dental film with a plastic barrier to protect film from contact with saliva. A, Note notch on side of plastic envelope for opening. B, During opening, the plastic is removed and the clean film allowed to drop into a container.
If barrier-protected film is not used, the exposed film should be placed in a disposable container for later transport to the darkroom for processing. Paper film packets are exposed to saliva and possibly blood during exposure in the patient’s mouth. To prevent saliva from seeping into a paper film packet, a paper towel should be placed beside the container for exposed films. The practitioner should use this towel to wipe each film as it is removed from the patient’s mouth and before it is placed with the other exposed films. This problem may also be avoided by using film packaged in vinyl.
Sensors for digital imaging are not able to be sterilized; thus it is important to use a barrier to protect them from contamination when placed in the patient’s mouth (Fig. 8-12). Typically the manufacturers of these sensors recommend the use of plastic barrier sheaths. The supplemental use of latex finger cots provides significant added protection and is recommended for routine use when using digital sensors. Because such barriers may fail, the sensors should be cleaned and disinfected with an EPA-registered intermediate-level hospital disinfectant after every patient. The manufacturer of such equipment should be consulted for proper disinfectant.
Prevent Contamination of Processing Equipment
After all exposures are made, the operator should remove his or her gloves and take the container of contaminated films to the darkroom. The goal in the darkroom is to break the infection chain so that only clean films are placed into processing solutions. Two towels should be placed on the darkroom working surface. The container of contaminated films should be placed on one of these towels. After the exposed film is removed from its packet, it should be placed on the second towel. The film packaging is discarded on the first towel with the container.
Removing film from a packet without touching (contaminating) it is a relatively simple procedure. Figure 8-13 illustrates the method for opening a contaminated film packet while wearing contaminated gloves without touching the film. The practitioner dons a clean pair of gloves, picks up the film packet by the color-coded end, and pulls the tab upward and away from the packet to reveal the black paper tab wrapped over the end of the film. Now, holding the film over the second towel, he or she carefully grasps the black paper tab that wraps the film and pulls the film from the packet. When the film is pulled from the packet, it will fall from the paper wrapping onto the clean towel. The paper wrapper may need to be shaken lightly to cause the film to fall free. The packaging materials should be placed on the first paper towel. After all films are opened, the practitioner gathers the contaminated packaging and container and discards them along with the contaminated gloves. The clean films are processed in the usual manner. It is not necessary to wear gloves when handling processed films, film mounts, or patient charts.
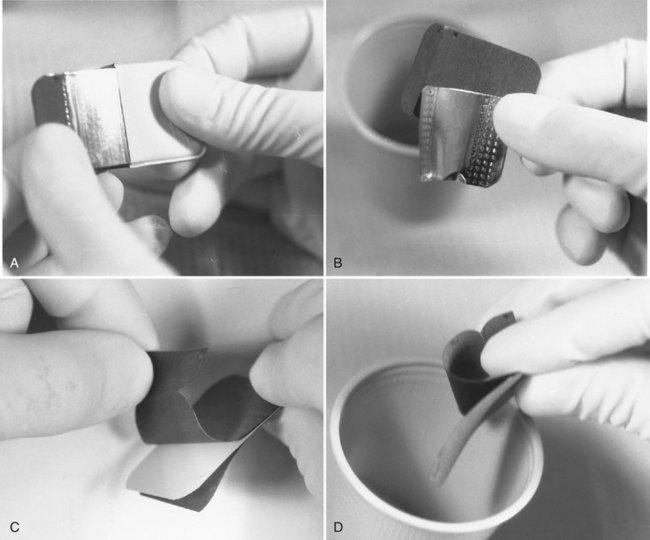
FIG. 8-13 Method for removing films from packet without touching them with contaminated gloves. A, Packet tab is opened and lead foil and black interleaf paper are slid from wrapping. B, Foil is rotated away from black paper and discarded. C, Paper wrapping is opened. D, Film falls into a clean cup.
An alternate procedure when exposing films in vinyl packaging is to place the exposed film, still in the protective plastic envelope, in an approved disinfecting solution when it is removed from the mouth and after wiping it with a paper towel. It should remain in the disinfectant after the exposure of the last film for the recommended time. Immersion for 30 seconds in a 5.25% solution of sodium hypochlorite is effective.
Automatic film processors with daylight loaders offer a special problem because of the risk for contaminating the sleeves with contaminated gloves or film packets. One approach is to clean the films by immersion in a disinfectant, with or without a plastic envelope, as previously described. With this method the operator cleans the films, puts on clean gloves, and then takes only cleaned film packets into the daylight loader. An alternate approach is to open the top of the loader, place a clean barrier on the bottom, and insert the cup of exposed film packets and a clean cup. The operator then closes the top, puts on clean gloves, pushes his or her hands through the sleeve, and opens the film packets, allowing the film to drop into the clean cup. After all film packets have been opened, the contaminated gloves are removed, the films are loaded into the developer, and hands are removed. Then the top of the loader may be removed and the contaminated materials removed.
American Dental Association Council on Scientific Affairs. The use of dental radiographs: update and recommendations. J Am Dent Assoc. 2006;137:1304–1312.
Goren, AD, Lundeen, RC, Deahl, ST, II., et al. Updated quality assurance self-assessment exercise in intraoral and panoramic radiography, American Academy of Oral and Maxillofacial Radiology, Radiology Practice Committee. Oral Surg Oral Med Oral Pathol Oral Radiol Endod. 2000;89:369–374.
Kodak Dental Radiography Series, Quality assurance in dental radiography. N-416. Rochester, NY: Eastman Kodak; 1995.
Michel, R, Zimmerman, TL. Basic radiation protection considerations in dental practice. Health Phys. 1999;77:S81–S83.
National Radiological Protection Board. Guidance notes for dental practitioners on the safe use of x-ray equipment. www.nrpb.org.uk, 2001.
American Academy of Oral and Maxillofacial. Radiology infection control guidelines for dental radiographic procedures. Oral Surg Oral Med Oral Pathol. 1992;73:248–249.
American Dental Association Council on Scientific Affairs and American Dental Association Council on Dental Practice. Infection control recommendations for the dental office and the dental laboratory. J Am Dent Assoc. 1996;127:672–680.
Hubar, JS, Gardiner, DM. Infection control procedures used in conjunction with computed dental radiography. Int J Comput Dent. 2000;3:259–267.
Kohn, WG, Collins, AS, Cleveland, JL, et al. Centers for Disease Control and Prevention: Guidelines for infection control in dental health-care settings—2003. MMWR Morb Mortal Wkly Rep. 2003;52(RR-17):1–61.
Miller CH, Palenik CJ: Infection control and management of hazardous materials for the dental team, ed 4, St. Louis, Mosby (in press)
U.S. Department of Labor. Occupational Safety and Health Administration: Occupational exposure to bloodborne pathogens, needlestick and other sharp injuries, final rule. Fed Reg. 2001;66:5317–5325.