Chapter 8 Surgical intervention
Introduction
This chapter provides an overview of the principles of surgical intervention. A laparotomy (exploration of the abdominal cavity) is used as an example to relate the sequence of surgery. Surgical instruments, suture materials and surgical needles are presented. Some of the innovations associated with minimally invasive surgery are also examined. The perioperative nurse plays an important role in the surgical intervention of a patient. Underpinning this role is a sound knowledge of anatomy, the physiological response to surgery, aseptic technique, safety, and legal and ethical aspects.
Surgical–historical perspective
Surgery is as old as human beings, with archaeologists finding skulls with evidence of having had a surgical procedure performed dating back to 350,000 BC. Prior to anaesthesia and anaesthetic technique, surgery was performed only if absolutely necessary. Surgery developed along with knowledge in microbiology, disinfection and anaesthetics.
Modern surgery is the branch of medicine that comprises perioperative patient care encompassing such activities as preoperative preparation, intraoperative judgement and management, and postoperative care of patients (Phillips, 2007). Surgery as a discipline combines physiological management with an interventional aspect of treatment, which may be restorative, corrective, diagnostic or palliative (Table 8-1).
Table 8-1 Common indications for surgical procedures
| Indication for surgical procedure | Example |
| Incision | Open tissue or structure by sharp dissection |
| Excision | Remove tissue or structure by sharp dissection |
| Diagnostics | Biopsy tissue sample |
| Repair | Closing of a hernia |
| Removal | Foreign body |
| Reconstruction | Creation of a new breast |
| Palliation | Relief of obstruction |
| Aesthetics | Facelift |
| Harvest | Autologous skin graft |
| Procurement | Donor organ |
| Transplant | Placement of donor organ |
| Bypass/shunt | Vascular rerouting |
| Drainage/evacuation | Incision of abscess |
| Stabilisation | Repair of a fracture |
| Parturition | Caesarean section |
| Termination | Abortion of a pregnancy |
| Staging | Checking cancer progression |
| Extraction | Removal of a tooth |
| Exploration | Invasive examination |
| Diversion | Creation of a stoma for urine |
Surgical procedures are carried out in hospitals, day surgery units or surgeons’ rooms. A surgical procedure may be invasive, minimally invasive, minimal access or non-invasive in nature. Any invasive or minimal access procedures involve entry into the body through an opening in the tissues or a body orifice (Phillips, 2007). Non-invasive procedures are frequently diagnostic and do not enter the body. Advances in diagnostic methodologies and drug therapies enable more individuals to be considered for surgery; however, each patient and each procedure is unique. Surgery cannot be considered always completely safe, patient outcomes are not constantly predictable and the surgical team must, at all times, be prepared for the unexpected.
Surgery and surgical techniques continue to evolve along with technology; the result is increasingly less invasive procedures and more rapid patient recovery. Improvements in technology in perioperative patient care are attributed to:
All surgery has clearly defined principles of the operative technique (Phillips, 2007).
Sequence of surgery
Every surgical procedure, no matter how simple or complex, will follow a defined surgical sequence. This generalised sequence is then adapted to the specific surgical procedure being performed. Knowledge of the stages of surgical intervention, instrumentation and suture material assists the perioperative nurse in ensuring safe patient outcomes. A working knowledge is required of the sequential steps for a specific surgical procedure based on four concepts that should be considered for any surgical event:
Additional knowledge required by the surgical team includes:
Stages of the surgical procedure
Every surgical procedure, whether invasive or minimally invasive, and regardless of the rocedure undertaken, will follow a set sequence that can be broken down into five stages, as shown in Table 8-2 (Richardson-Tench & Martens, 2005).
Table 8-2 Five stages of the surgical procedure
| Stage | Procedure |
| I | Open |
| II | Dissection and exposure |
| III | Exploration and isolation |
| IV | Repair—revise, excise or replace |
| V | Close |
The instrument nurse must have an in-depth knowledge of each stage of the surgical sequence in order to anticipate the surgeon’s requirements. The focus for the circulating nurse is the provision of support to the surgical team, and management and coordination of the operating room. A laparotomy procedure is used below to outline the five stages in the operative procedure.
Stage I—Open
Stage II—Dissection and exposure
A clean scalpel blade, curved dissecting scissors or electrosurgery/cautery is used to incise the deep fascia and peritoneum. Toothed forceps are used to elevate the peritoneum prior to incising it as this will prevent inadvertent damage to the underlying structures.
Stage III—Exploration and isolation
Before definitive surgery, the entire abdomen is explored and the pathology isolated for further action. A self-retracting abdominal retractor, such as a Balfour-Doyen retractor, may be inserted to provide maximum exposure.
Stage IV—Repair: excision, revision or replacement
Surgery frequently focuses on the removal, reconstruction or resection of any given structure. Scissors, non-toothed tissue forceps and sponges/packs are required. Specialised instruments may be required to accomplish this task (e.g. a linear stapler for reanastomosis of the bowel). Depending on the purpose of the surgery and local anatomy, each surgical procedure will require a certain amount of dissection of surrounding tissue. As the depth increases, the length of the instrument should also increase.
Haemostasis and irrigation
In preparation for closure, the surgeon will examine the operative site, controlling any bleeding with ligation and/or electrosurgery. To assist in the examination for bleeding, some surgeons will fill the abdominal cavity with a warm solution, such as normal saline. If an anastomosis has been performed, this is examined to ensure that it is secure. The surgeon carries out a final check to ensure that no items are left behind. Oozing from the operative site may require a drain to be inserted, such as a closed wound suction system.
Stage V—Close
The closing stage comprises wound closure (including surgical counts) and the application of a dressing. The principles related to the division of tissue (Table 8-3) must be understood by all members of the surgical team. This knowledge is of particular importance for the instrument nurse and the nurse assisting the surgeon.
Table 8-3 Principles of division of tissue
| Procedure | Rationale |
| Providing exposure | |
| Stabilisation of anatomical structures | |
| Use of retractors, grasping instruments and other devices | |
| Clamping tissue | |
| Grasping tissue |
The division of tissues is explained below in relation to a laparotomy.
Wound closure
The body is made of many different tissue layers, each having individual characteristics and roles. Historically, every layer was sutured closed. However, with research and the advent of synthetic materials, this practice has been deemed unnecessary in the majority of patients (Phillips, 2007).
Abdominal and visceral peritoneum
The first layer to be closed is that of the abdominal and visceral peritoneum. This is the serous membrane that lines the abdominopelvic cavity. The abdominal peritoneum divides at the posterior midline and surrounds the abdominal organs, creating the visceral peritoneum. The closure of either the visceral or abdominal peritoneum is dependent on the surgeon and the surgery being undertaken. The majority of surgeons will close either the abdominal peritoneum or fascia using either a continuous absorbable suture or interrupted non-absorbable sutures. However, occasionally, depending on their past experience, a surgeon may choose to close both these layers.
The second surgical count commences upon closure of the peritoneal cavity. In anticipation of this closure, the instrument nurse ensures that the surgeon has all the necessary instruments and equipment to continue surgery without interrupting the second surgical count. Clamps can be used to grasp the edges of the peritoneum during closure.
Muscle
The next layer of tissue encountered is muscle. Three layers of muscles—the rectus abdominis, internal and external obliques, and the transverse abdominis—cover the abdominal cavity. The layering effect provides greater strength. The muscle may or may not be sutured upon closure (Phillips, 2007).
Fascia
The external oblique fascia lies directly below the subcutaneous layer and is considered extremely important upon closure as the suture material must hold the wound together while resisting intra-abdominal pressure. An absorbable, monofilament suture that provides long-term wound support is the suture material of choice.
Subcutaneous layer
Closure of the subcutaneous layer will be dependent on the surgeon and the patient’s physical characteristics. One of the objectives of wound closure is to remove dead space and, in doing so, achieve better wound closure, as discussed in Chapter 7. The subcutaneous layer is one layer that, if left unsutured, will provide dead space, the presence of which allows tissue fluids to accumulate, which can delay wound healing. Absorbable suture material that is broken down by hydrolytic action is preferred for suturing of the subcutaneous or subcuticular tissues.
Skin
The final surgical count commences upon closure of the skin. As before, the instrument nurse ensures that the surgeon has access to all the necessary instruments, including suture scissors, tissue forceps, moistened sponges to clean the wound, dry sponges to dry the wound area and a dressing.
An absorbable monofilament suture material with a cutting needle using a subcuticular suturing technique is the preferred option for skin closure as the sutures do not require removal and there is less associated tissue reaction. The skin may also be closed by interrupted sutures using an absorbable or non-absorbable suture material. Skin staples or skin glue can also be used, despite not belonging to the absorbable, monofilament group. In conjunction with these skin closure materials, sterile adhesive strips may be added to provide extra support to the skin edges. Tension sutures may be required to provide additional support and relieve undue strain on the wound for patients in whom wound healing may be compromised; for example, in elderly or obese patients or those on chemotherapy (see Ch 7) (Dunscombe, 2007).
Application of dressing/tape
The skin around the operative site is cleansed prior to the application of the wound dressing. The choice of dressing is dependent upon the area to be dressed and the preference of the surgeon. After its application, the instrument nurse assists with the removal of the drapes from around the surgical site. Finally, tape or other fixative is applied to the dressing by the instrument nurse, the surgeon or surgeon’s assistant.
Instruments
Surgical instruments are critical to the surgical procedure. There are many elements to learn regarding instrumentation, such as names, handling, function, intended use, cleaning and sterilisation. All are very important; however, for many new nurses the most important element is to follow the progression of an operation and, through observation, learn which instruments are required for the various steps in the procedure, their names and function. This knowledge enhances the performance of the instrument nurse and leads to the ability to anticipate the requirements of the surgeon throughout the operative procedure. In preparing instrumentation for an operation, the instrument nurse should check sterility, working condition and completeness of the instruments being used.
Instrument categories
Some basic manoeuvres are common to all surgical procedures. The surgeon dissects, resects or alters tissue and/or organs to restore or repair body functions or body parts (Phillips, 2007). Surgical instruments are designed to act as the tools that the surgeon needs for each manoeuvre and are commonly categorised into five major groups. Although different labels may be attributed to these groups, they are generally categorised as:
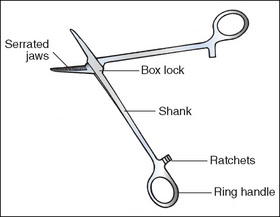
Anatomy of a ring-handled clamp
The features of a ring-handled clamp are outlined below as an example of a surgical instrument (Fig 8-1).
Cutting and dissecting instruments
Cutting and dissecting instruments have sharp edges and are used to dissect, incise, separate or excise tissues.
Scalpels
Various scalpel blades are available with configurations for different uses. The Bard Parker and Beaver scalpel handles hold disposable scalpel or knife blades. The Fischer tonsil, Smillie cartilage and Myringotome scalpel handles incorporate the blade into the handle.
Scalpel blades are a potential sharps hazard and, therefore, scalpels are passed in a receptacle (AORN, 2005a). In certain surgical specialties, such as cardiac, vascular and neurosurgery, it is not possible to pass the scalpel blade in this manner. In these circumstances, the instrument nurse should grasp the top of the handle, passing the handle towards the surgeon with the actual blade pointing downwards.
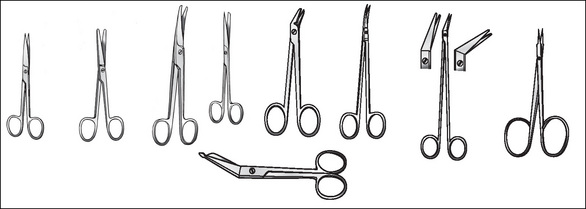
Scissors
Scissors may open and close or have a spring action. The spring action provides better control and more precision, which is important when dissecting delicate tissues, such as those within the eye. Handles can be short or long, with blades straight or angled. Four types of scissors (Fig 8-2) are available:
When holding suture scissors, the ring finger and thumb are placed into the ringed handles, and the index finger is placed along the outside of the blade to stabilise the scissors. For added stability when cutting sutures, the fingers of the opposite hand are placed under the box joint.
Some other instruments that also belong under this heading include bone-cutting instruments, such as chisels, gouges, rasps, osteomes, files, drills, saws, rongeurs and bone nibblers. Curettes, biopsy forceps, punches, snares and dermatomes are also included in this category.
Blunt dissection
Friable tissue or tissue planes can be separated by blunt dissection. Periosteal elevators, the scalpel handle, the blunt sides of scissors, a sponge on a stick and the surgeon’s fingers may be used to achieve blunt dissection (Dunscombe, 2007).
Grasping and holding
Grasping and holding instruments are used to, as the names suggest, grasp or hold onto tissue, sutures, swabs or drapes. They include:
Dissecting/tissue forceps
Dissecting/tissue forceps (Fig 8-3) hold tissue so that the surgeon can perform a manoeuvre, such as dissecting or suturing, without injuring the surrounding tissues. One group have a tweezer-like action; they vary in length and are available as toothed or non-toothed. Toothed dissecting forceps have opposing ‘spurs’ or ‘teeth’ on either side of the jaws, which interlock to provide extra grip. Toothed dissectors are most commonly used on thick, strong tissues, such as skin, muscle, cartilage and fascia. The size of the ‘spurs’ or ‘teeth’ indicates the type of tissue each would be used on. For example, the Gillies forceps has finer teeth and is more likely to be used on the skin, whereas the thick heavy teeth of Bonny’s forceps means that it is likely to be used for the fascia, cartilage or muscle. Finer versions, such as the DeBakey forceps, have small serrated teeth and are commonly used on delicate tissues, such as blood vessels, bowel, nerves and ureters. Non-toothed forceps, as the name suggests, have no teeth and are considered atraumatic.
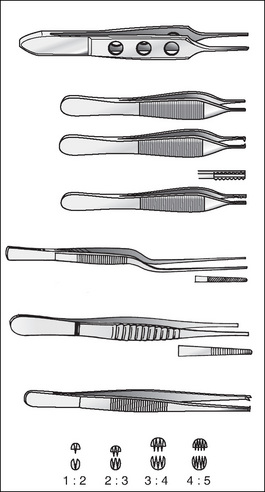
When preparing instrumentation, the points of forceps should be checked to ensure that they are of equal length, and that the teeth or serrations mesh smoothly and evenly and remain closed, even with added pressure.
The second group of forceps are ring-handled and have a scissor action. The Allis forceps has a row of teeth at the end to hold tissue gently but securely. The Babcock forceps has a jaw with a rounded end that is designed to fit around a structure or to grasp tissue without injury. Other ring-handled forceps may be straight or curved (e.g. stone forceps), have sharp points (e.g. Lahey forceps) or have curved or angled points on the ends of the jaws (e.g. tenaculums).
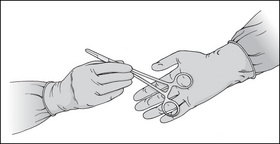
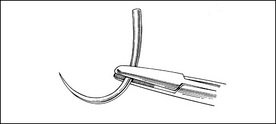
Dissecting forceps should be gripped like a pencil, with the tip pointing down. When passing forceps to a surgeon, the forceps should be grasped in the middle of the handle, with the tips pointing down, and the top of the forceps should be placed into the surgeon’s hand (Fig 8-4).
Towel clips
Towel clips are used to secure drapes, diathermy quivers or other items to prevent them falling off or below the level of the sterile field.
The majority of towel clips available today are blunt tipped or have a ball and socket tip; however, some sharp-tipped towel clips are still available. Care should be taken when using sharp-tipped towel clips. Once an item has been secured to the sterile field, it cannot be moved. The sharp tips can penetrate the sterile drapes, leaving small holes for microorganisms to enter the sterile field. Also, the sharp tips can pierce a patient’s skin, or perforate gloves or other equipment, such as the diathermy lead.
Needle holders
Needle holders grasp the needle securely so that it can be passed through tissues without moving. The pattern is cross-thatched rather than grooved, like an artery clamp/forceps, and provides a smoother surface and a good grip on the needle. This pattern also prevents rotation and flattening of the needle, which prevents damage to the needle. Needle holders can be straight or curved. Most have a ratchet; however, in some surgical specialties (e.g. cardiac, ophthalmology, vascular surgery) they have spring-action handles. The spring-action handle on a needle holder provides a much smoother, gentler motion for the surgeon. The general rule of thumb is that the size of the needle indicates the size of the needle holder required.
Sponge-holding forceps
Sponge-holding forceps have several functions. Their most common use is to pick up swabs for skin preparation. Gauze squares can be wrapped around the tips to make what is referred to as a ‘swab on a stick’, which can be used to soak up fluid in a small space or to dissect tissues bluntly.
Clamps
Clamps occlude, manipulate, crush or hold tissues and other materials. Between the ringed handles is a ratchet that is designed to lock the jaws onto tissue or other material. Within this category are artery clamps/forceps, and crushing and non-crushing clamps.
Artery clamps
Artery clamps/forceps occlude or clamp blood vessels and other tissue with minimal trauma because of the deep transverse serrations within the jaws. They come in different sizes and styles—straight, curved, short and long. The serrations should be cleanly cut and mesh together evenly as these serrations hold the tissues within the jaws of the clamp.
Artery clamps can be damaged easily, so attention must be paid to the thickness of the tissue or blood vessel in relation to the size of the artery clamp. Artery clamps/forceps must not be used for any reason other than what they are designed for. This rule applies to all instruments.
Crushing clamps
Many variations of haemostatic forceps/clamps are used to crush tissues or clamp blood vessels. The jaws may be straight, curved or angled, and the serrations may be horizontal, diagonal or longitudinal. The tip may be pointed or rounded or have a tooth along the jaw, such as on a hysterectomy clamp. Some clamps are designed for use on specific organs, such as bowel clamps, which are used on bowel tissue that is diseased and requiring dissection.
Non-crushing clamps
Non-crushing clamps are used to occlude peripheral or major blood vessels temporarily (e.g. non-crushing vascular clamps), which minimises tissue trauma. The jaws of these clamps have opposing rows of finely serrated teeth and may be straight, curve, angled or S-shaped. Non-crushing bowel clamps are atraumatic and hold healthy bowel tissue without causing damage. This enables the bowel tissue to be reanastomosed.
Retractors
Retractors hold back wound layers and anatomical structures to allow visualisation of the operative site; they can be hand-held or self-retaining. There are two types of self-retaining retractors: those that attach to a frame, such as the Bookwalter (Fig 8-6) or Omni-Tract retractors, and those that are held in place by a ratchet, such as the Weitlaner or Gelpi retractors.
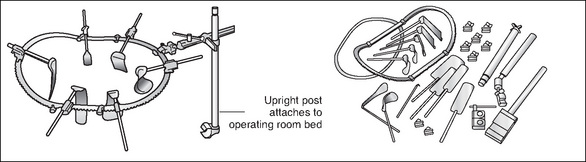
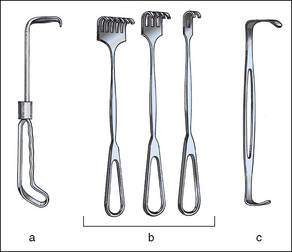
Figure 8-5 Manual retractors. (a) Solid blade appendiceal retractor. (b) Volkmann rake retractors (tips can be sharp or blunt). (c) Double-ended Army-Navy retractor
Phillips, 2007, p 335
At the beginning and end of the surgical counts, any retractor with screws must be checked to ensure that the screws are present. Self-retaining retractors should be handed to the surgeon in the closed position. Hand-held retractors usually come in pairs and can be single or double ended, with a variety of shapes and sizes (e.g. Langenbeck retractors, Deaver’s retractors, cats paws, skin hooks or rakes).
Care of instrumentation
Instruments are very expensive but they can last a long time if they are properly cared for and maintained. Here are some general rules for good instrument care.
Sutures and needles
Documented evidence regarding the use of sutures dates as far back as 2000 BC (Dunscombe, 2007); however, it was not until the mid 1800s, as a result of increased infection rates, pain and haemorrhage, that a wider variety of suture materials and their uses developed. Suture material and needles were not sterilised until Joseph Lister began to experiment with carbolic acid as a form of sterilisation during the 19th century (Pieknik, 2006).
Traditionally, the word suture referred to a strand of material used to close wounds, or ligate tissues or blood vessels. These strands were passed through the eye of a needle that resembled an ordinary household sewing needle. Today, needle and suture material are joined together as a continuous unit referred to as an atraumatic needle, which is eyeless and presterilised. The ‘eyed’ needle meant that two strands of suture material were being pulled through the tissues, causing a lot of trauma. However, the newer ‘atraumatic’ needles cause less tissue trauma because only one strand of suture material is pulled through the tissues.
The evolution of surgery has witnessed the use of numerous materials, ranging over the years from gold, silver, silkworm gut, cotton, silk, linen, tendon and intestinal tissue to the highly fashionable synthetic fibres of today. These include, but are not limited to, nylon, polyester, polypropylene and polymer combinations.
Properties of suture materials
The properties that are taken into consideration when choosing and evaluating the effectiveness of a suture material include:
Physical characteristics
There are three physical characteristics:
Physical configuration
Configuration refers to the number of fibres that are contained within one strand of suture material and they way those fibres are rendered to make one strand of suture material. There are two types of configurations:
Monofilament sutures are made of a single strand of suture material. This structure is less prone to harbouring microorganisms. Monofilament sutures also provide less resistance when passing through tissue. However, crushing the strand weakens monofilament sutures, which can lead to premature suture failure.
Multistranded or multifilament sutures are composed of multiple strands that are either braided or twisted together. These materials are more pliable than monofilament sutures and are easier to handle and tie, but generate more friction when passing through tissue.
Natural and synthetic materials
Natural suture material is derived from sources such as collagen, silk and cotton. Synthetic sutures are artificial and are made from various materials, such as nylon, polypropylene, polyethylene, polyester, polyglactin or surgical steel.
Diameter
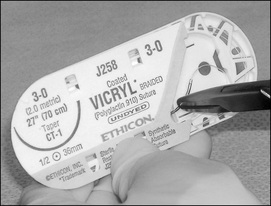
In Australia, the diameter of a suture is determined in millimetres. The base numeral is 0, with the sizing scale ranging from 7, which is the largest, down to 11/0, which is the smallest (Fig 8-7). Sizes 0–7 have a progressively larger diameter, whereas sizes 0–11/0 are progressively smaller sizes. Once the scale falls below 0, the numbers would normally be referred to as –1, –2; however, they are referred to as 00 (2/0), 000 (3/0) and so on. Sizes 0–4/0 are the most commonly used sizes. The diameter of the suture material and the size of the atraumatic needle attached are chosen depending on the type and thickness of tissue being approximated.

Handling characteristics
The handling characteristics of a suture focus on the ease of use and include:
Pliability and coefficient friction
The pliability of the suture material is the ease in which it bends; the coefficient friction is the drag caused by the pulling of the material through the tissue and the security of the knot. Suture material may be coated to reduce tissue drag, thereby making it easier to remove; however, this, in turn, makes the knots less secure. Sutures made from nylon are not as pliable, have some elasticity, memory and a low coefficient friction, create knots that are less secure and are prone to unravelling (Dunscombe, 2007).
Elasticity and memory
Elasticity or memory is the ability of the suture strand to return to its original ‘packet’ shape after being stretched. Once removed from its packaging, plain gut, nylon or catgut suture material remains coiled. After the suture material has been stretched, although it appears straight, it still has small curves from where it was coiled in the original packet.To remove the elasticity of the suture material, the atraumatic needle is loaded within the jaws of a needle holder while grasping the free end of the suture material with the thumb and forefinger. Both hands are gently extended and, in doing so, the suture material is stretched, removing the elasticity. The suture material is not ‘tugged’ or ‘snapped’ as this can damage the fibres within the strand of suture material (Dunscombe, 2007).
Capillarity
The capillarity of the suture material refers to its ability to transmit fluid along its length. Multifilament sutures have more capillarity, drawing fluid into the space along and between filaments. This increased absorption of fluid along its length may act as a tract to introduce pathogens into deep tissue (Dunscombe, 2007).
Tensile strength and knot strength
The amount of force exerted on the suture material in order to make it break, is known as its tensile strength. Tensile strength also takes into consideration the time in which the suture retains its integrity before breaking down. The force necessary to cause a knot to slip or break is known as its knot strength. Sutures with a high memory and low coefficiency have poor knot strength (Dunscombe, 2007).
Tissue reaction characteristics
All suture material causes some tissue reaction. The tissue reaction begins when the suture material passes through the tissue. The inflammatory response causes the area to be infiltrated with white blood cells, macrophages and fibroblasts—the very process that initiates healing in the wound also causes the breakdown or encapsulation of the suture material. The time frame in which the suture maintains its strength is significant to the choice of suture material and is referred to as its tensile strength. Suture materials such as silk have a higher prevalence of tissue reaction compared to nylon, which is much less reactive. Other factors that influence suture material selection are tissue type, patient’s nutritional status and the presence or absence of infection (Lai & Becker, 2006).
Non-absorbable suture materials
Non-absorbable suture materials are not affected by hydrolysis or enzymatic activity and can be synthetic or natural material. Non-absorbable sutures become encapsulated during the healing process and the term non-absorbable suggests that this group will remain within the body indefinitely. However, this does not equate to the suture maintaining its original strength. The strength of any suture material will slowly lessen over time. Non-absorbable sutures generally retain their suture strength for a longer period of time than do absorbable suture materials (Dunscombe, 2007). For example, Monosof, Dermalon and Surgilon (non-absorbable suture materials) lose approximately 15–20% of strength per year, with essentially no strength left after 5 years (Tyco Healthcare Australia, 2005).
Absorbable
Absorbable suture material is capable of being absorbed by living tissue, yet may be treated to modify its rate of absorption. The source may be natural or synthetic. Absorbable sutures break down by hydrolysis or are digested by the body’s enzymes, initially losing strength and gradually being absorbed by the body. Accelerated absorbability of the suture may occur if the material is moistened before the suture is used or by fluid in a body cavity (Dunscombe, 2007). Table 8-4 presents the variety of suture materials available.


Ties
A tie is a piece of suture material without a needle attached to it. Ties are used to ligate a bleeding vessel, as discussed in Chapter 7 (Phillips, 2007).
Needles
The atraumatic needles of today are processed in large factories, and are prepackaged and presterilised with the suture material attached. Needles are manufactured in different shapes and sizes, and most are described in degrees of circles; however, they can also be straight.
Except for free ties, surgical needles are necessary to carry suture material through the tissue with minimal trauma. The best surgical needles are made of high-quality surgical steel that is strong enough to pass through tissue without breaking, and rigid enough to prevent excessive bending but flexible enough to prevent breaking after bending. Needles need to be approximately the same diameter as the suture material and sharp enough to pass through tissue. The needle needs to be the correct size and shape to accommodate the type of tissue, the location and accessibility of the repair (Lai & Becker, 2006).
Atraumatic needles can be single or double armed; single armed means one needle is attached and double armed means two needles are attached to both ends of the suture material. Some needles have been specially designed to release quickly and easily from the suture material without the use of scissors; these are called control release.
Anatomy of a needle
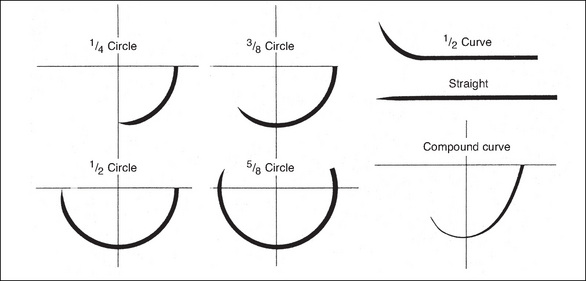
Needles vary greatly depending on the type and location of tissue being sutured. They can vary in shape, size, point design and wire diameter. Curved needles represent the majority of all atraumatic needles and are described in degrees of a circle (e.g. ½, ¾, ¼, ⅝). The size of the circle depends on how wide or large a ‘bite’ is required and how much room there is to insert the needle. The components of a needle are listed below.
Types of needle points
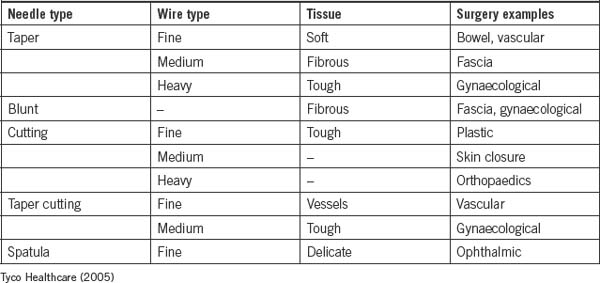
Both the ‘body’ and the ‘point’ of a needle determine which tissues the needle will penetrate. For simplicity, needles are classified into two main groups: cutting and taper needles. Within each classification, numerous types of each needle are available. Figure 8-8 shows the different needle points.
Cutting point
Cutting-edge needles have two or more opposing edges, which slice through the tissues. They can be divided into two main types—conventional and reverse needles—which are determined by the location of the cutting edge. A conventional cutting-edge needle has its cutting edge on the concave (inside) side of the needle, whereas the cutting edge of the reverse cutting-edge needle lies on the convex (outside) side of the needle. Cutting-edge needles are predominantly used on skin; however, special types have been designed specifically for individual surgical specialties, such as ophthalmology and plastic surgery (Phillips, 2007).
Taper point
Typically, the body of a taper needle is flattened or rounded, which is described as either oval or rectangular. The point of a taper needle pierces the tissue while the flattened/rounded body of the needle spreads tissue without cutting. The taper point is used in softer tissue that offers less resistance to the needle as it passes through. A taper needle is considered less traumatic due to the way in which it separates the tissues and causes less bleeding. Taper needles can be used on all tissues except skin (i.e. blood vessels, muscle, viscera, peritoneum and fat) (Phillips, 2007).
Blunt point taper needles are tapered needles with a blunt point that is rounded; they are designed to pass through friable tissue, such as liver or kidney. Blunt point taper needles have also been recommended as a safety measure to prevent needlestick injuries for operating room staff and are commonly seen in hepatobiliary and gynaecological surgery (Phillips, 2007).
The taper cut needle is another type of taper needle. The taper cut needle was designed for vascular/cardiothoracic surgery, particularly for use with calcified, fibrotic blood vessels or prosthetic grafts. The cutting edges only extend a very short distance from the needle tip and blend into a rounded, tapered body. Hence, the cutting edges pass through the hard, calcified portion of the blood vessel, while the remaining rounded taper body passes through the friable section of the blood vessel.
Table 8-5 shows the different types of needles and their uses.
Body of the needle
The gauge of the wire, length, shape and finish determine the body or shaft of the needle. Factors to consider when choosing a needle body include:
Swaged needles
The most common needle is the swaged or atraumatic needle. In this type of needle, one end of the suture material is enclosed inside the needle itself. The needle and suture material are almost the same diameter, causing less trauma to the tissues when passed through. A modified form of permanently swaged needle is the controlled-release suture, which is commonly known as a ‘pop off ’. The needle and suture begin as one unit; however, a light pull on the suture material will separate the two components, leaving the tie behind (Phillips, 2007).
Ordinary needles
An ordinary or eyed needle is a needle that must be threaded with the suture material. Two strands of suture material are pulled through the tissue, which is much more traumatic to tissues (Phillips, 2007).
Loading needles
Needles are loaded onto an appropriate needle holder. A needle holder has specifically designed jaws to grasp the needle securely. The gauge of the needle determines the appropriate-sized jaws. Fine, small needles are loaded onto fine-tipped needle holders. The length of the needle holder will depend on the depth of the wound closure, intra-abdominally, for example. The needle holder will be longer when working in deep cavities than that required for skin closure (Phillips, 2007).
As a general rule of thumb, load the needle one-third of the distance from the swaged/attachment end, with the needle gripped at the tip or one-third of the distance into the jaw of the needle holder and at a 90° angle. The needle should never be clamped over the swaged area as this weakens the attachment. The needle should be clamped as near to the tip of the needle holder as possible, on the first or second ratchet. The point of the needle faces in towards the body of the surgeon, unless it has been requested to load it backwards. In some specialty surgery (e.g. vascular surgery), surgeons will change the angle of the needle to suit the location/area they are suturing (Fig 8-9).
Endoscopic minimally invasive surgery
The development of endoscopic minimally invasive surgery has been one of the most dramatic advancements in surgery over the past few decades and has evolved from a diagnostic modality to a widespread surgical technique. Minimally invasive surgery can be referred to as endoscopic, telescopic, laparoscopic, keyhole or minimal access surgery and incorporates all fields of endoscopic surgery. Minimally invasive surgery, or endoscopic techniques, are prevalent in all fields of surgery, including bariatric, general, gynaecological, ear, nose and throat, urological, cardiovascular/thoracic, plastic, orthopaedic and neurosurgery on almost all anatomical areas (AORNb, 2005; Bragg et al., 2005). Minimally invasive surgery uses small incisions or no incisions, rather than the traditional open methods, and telescopes, cameras and fibreoptic light leads are used to assist with this field of surgery. The incisions are so small that they are typically closed with one or two sutures.
Box 8-1 presents an abbreviated review of the historical development of MIS. The work of a few surgeon’s listed here are still recognised today (e.g. Veress needle, and Hasson cannula and trocar).
Box 8-1 History of minimally invasive surgery
1901 Dimitri Ott, German gynaecologist, performed a ventroscopy, where a speculum was introduced through an incision in the posterior vaginal fornix. Dr Ott wore a head mirror to reflect light and aid visualisation.
1901 George Kelling, also a German surgeon, reported using a cystoscope to examine the intra-abdominal viscera of a dog.
1938 Veress developed a needle with a spring-loaded obturator that allowed safe insertion and insufflation of the peritoneal cavity.
1966 Kurt Semm introduced an automatic insufflation device capable of monitoring intra-abdominal pressures. Semm also designed a high-volume irrigation/aspiration system, perfected the Endo Loop applicator, as well as intra- and extracorporeal knot-tying techniques, and developed thermocoagulation, which revolutionised laparoscopic surgery by virtually eliminating thermal injuries.
1966 Hopkins, a British optical physician, introduced the rod lens system, which improved brightness and clarity. The fibreoptic (cold) light source was also developed, which reduced the incidence of burns to bowel and viscera.
1970s Gynaecological surgeons had embraced laparoscopy and thoroughly incorporated the technique into their practice.
1970 Orthopaedic surgeons began utilising arthroscopy.
1977 DeKok performed the first laparoscopic appendicectomy.
1978 Hasson introduced an alternative method of trocar placement, which permitted direct visualisation of the trocar entrance into the peritoneal cavity.
Minimally invasive surgery has progressed immensely over the past decade and will continue to change as more surgical procedures are performed in this manner.
The advantages of minimally invasive surgery for patients are considered to outweigh those of open surgery and include:
Such advantages for patients heightened surgeons’ interest in minimally invasive surgery and, in consultation with medical companies, equipment and instrumentation were developed and modified. This, in turn, has allowed surgeons to perform more complex cases (e.g. hysterectomy, nephrectomy and hemi-colectomy) either completely laparoscopically or laparoscopically assisted.
However, minimally invasive surgical procedures are not without their risks to the patient. The length of operating time frequently is longer than the equivalent ‘open’ surgical procedure, thereby increasing anaesthesia time, which may have an impact on patient outcomes. Serious complications of endoscopy include perforation of a major vessel or organ, bleeding from a biopsy site or any area where tissue has been cut or when endoscopic sutures or clips have become dislodged, and moderate or severe hypothermia (Phillips, 2007).
There are also some important disadvantages for the surgeon, which, on occasions, can lead to the procedure becoming an open surgical procedure. These include:
All patients should be prepped and draped for conversion to an open surgical procedure when warranted because of recognised or potential complications. Instrumentation and supplies for an open surgical procedure should be precounted and readily available (Phillips, 2007).
Equipment
Although the types of endoscopic instruments available are similar to those used for open surgery and can be classified according to the five instrument categories, adaptations have been made to allow their use via a laparoscope. Figure 8-11 shows a variety of endoscopic instruments.

All instrumentation is available in reusable and disposable items. The following items are available to provide haemostasis:
Laparoscopic procedure
As with open surgery, minimally invasive surgery follows a generalised sequence of surgery. The three broad sequences involved when performing minimally invasive surgery and the instrumentation required are:
Exposure
The two types of insertion techniques—open technique and closed or blind technique—indicate the type of trocar and cannula that are suitable. These two separate techniques were developed based on the experiences of both general and gynaecological surgeons.
General surgeons developed the open technique, which involves a small incision into the peritoneum under direct vision, through which a blunt trocar can be passed. The cannula can also be sutured in place to reduce gas leakage, if desired. The gas tubing is attached to the cannula and the abdominal cavity is filled with carbon dioxide before the remaining cannulas are inserted, if required. Most general surgeons utilise a Hasson-like trocar and cannula that is blunt tipped. The majority of general surgical cases will begin in the supine position; however, once the initial cannula is inserted the patient will be placed in the reverse Trendelenburg position.
The closed or blind technique, which was developed by gynaecologists, involves the insertion of an insufflation needle, filling the abdominal cavity with carbon dioxide and then the insertion of the first trocar and cannula. Sharp (self-piercing) trocars are used in this technique as they puncture the skin on the way through the peritoneum. All gynaecological cases are performed in the lithotomy position as the uterus will be manipulated during the procedure. The patient is placed into the reverse Trendelenburg position prior to the insertion of the insufflation needle.
In both techniques, the initial cannula is inserted at the inferior aspect of the umbilicus; however, alternative sites may be chosen if the patient has had previous abdominal surgery as there can be the risk that loops of bowel or adhesions have adhered to the previous incision site. The peritoneal cavity is filled with carbon dioxide to prevent damage to the abdominal structures and provide good visualisation; this is called pneumoperitoneum. Pneumoperitoneum can be achieved by the insertion of an insufflation needle (commonly referred to as a Veress needle) or via the first cannula introduced. Sterile tubing is attached to either the insufflation needle or a three-way tap on the cannula; the end of the tubing is passed off the sterile field and connected to the gas insufflator.
Trocar tips come in a range of shapes, such as triangular, conical, pyramidal or bladeless. Depending on the manufacturer, the trocar tips can also be retractable or provide a shield that covers the sharp tip once entry has been achieved. The bladeless trocar separates tissue without cutting or stretching the tissue, and provides the option of visualising the insertion of this type of trocar. Recent advancements relating to the design of cannulas have resulted in a newer version of cannula with a better grip, thus preventing accidental removal or movement of the cannula during surgery (Phillips, 2007).
Visualisation
Many types of endoscopes are available, and their size (diameter) and length depend on the access required to visualise the area. Flexible endoscopes provide a panoramic view, whereas rigid endoscopes provide either a direct (0° scope) or angled (30°, 70° or 120°) view. Table 8-6 lists the types of endoscopes that are available, and Figure 8-12 shows the set-up for a laparoscopic procedure.
| Flexible scopes | Rigid scopes |
| Angioscope | Cystoscope |
| Bronchoscope | Laparoscope |
| Choledochoscope | Sinuscope |
| Colonoscope | Arthroscope |
| Cystonephroscope | Bronchoscope |
| Hysteroscope | Laryngoscope |
| Mediastinoscope | Hysteroscope |
| Ureteroscope | |
| Ureteropyeloscope | |
| Gastroscope | |
| Sigmoidoscope |
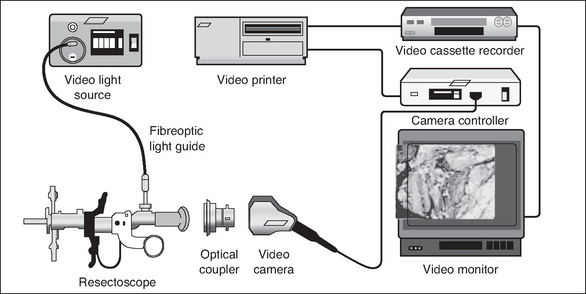
Fibreoptic light, or cold light, was developed in 1966. The heat from the light source is not transmitted down the length of the endoscope, which prevents tissue from being inadvertently damaged. However, it should be noted that the end of the fibreoptic cable is very hot. Once disconnected from the endoscope, the light source should be switched to standby or off to prevent accidental burning of the drapes and/or patient.
In order to perform an operative procedure using the minimally invasive technique, a surgeon’s hands must be free to manipulate the instrumentation, and the assistant and instrument nurses must also be able to see the operative field. This has been achieved by the introduction of the video camera. The video camera enlarges the images from the endoscope and projects them onto a television screen, which means that all members of the surgical team can observe the procedure.
When tissues such as the appendix, ovary and gall bladder are removed, a specially designed endoscopic specimen bag can be used to prevent spillage of their contents. In the case of laparoscopic bowel resection, once the segment of bowel has been resected, a slightly larger incision is made through which the segment of bowel will be removed. A wound edge protector can be used to protect the wound from contamination from the diseased bowel.
Advances continue to be made in minimally invasive surgery, with different surgical specialisations developing new techniques.
Conclusion
The focus of this chapter has been on assisting perioperative nurses to understand the process of surgical intervention and their role in this process. Every surgical procedure, including minimally invasive surgery, follows a generalised sequence of steps. By understanding this concept and adopting the protocol of organising instrumentation, sutures and needles, and other equipment according to the sequence of surgery, the perioperative nurse can make versatile judgements based on the needs of the patient and the surgical team.
Critical thinking exercises
1 Instrumentation
Identify a Frazier, Yankauer and Poole sucker, and compare the number of suction holes in the tip of each device.
AORN. Recommended practices for perioperative nursing. Standard and transmission-based precautions. Denver, CO: Association of Perioperative Registered Nurses; 2005.
AORN. Recommended practices for endoscopic minimally invasive surgery. AORN Journal. 2005;81(3):643-660.
Ballantyne, G. H. (2000). Minimally invasive surgery for diseases of colon and rectum: the legacy of an ancient tradition. Retrieved January 11, 2008, from http://www.lapsurgery.com/history.htm.
Bragg K., VanBalen N., Cook N. Future tends in minimally invasive surgery. AORN Journal. 2005;82(6):1006-1020.
Dunscombe. Sutures, needles and instruments. In Rothrock J.C., McEwen D.R., editors: Alexander’s care of the patient in surgery, 13th ed., St Louis: Mosby, 2007. pp. 170–178
Lai, S. Y., & Becker, D. G. (2006). Sutures and needles. eMedicine. Retrieved April 29, 2007, from http://www.emedicine.com/ent/topic38.htm.
Phillips N. Berry & Kohn’s operating room technique, 11th ed. St Louis: Mosby; 2007.
Pieknik. Sutures and hemostasis. A pocket book guide. St Louis: Saunders; 2006.
Richardson-Tench M., Martens E.. From systems to tissues: a revolution in learning in perioperative education. Education for Health: Change in Learning and Practice, 2005;18(1):22-31.
Rothrock J.C., editor. Alexander’s care of the patient in surgery, 13th ed., St Louis: Mosby, 2007.
Tyco Healthcare. Suture and needle guide. Sydney: Tyco Healthcare; 2005.
Al-Abdullah T., Plint A.C., Fergusson D. Absorbable versus non-absorbable sutures in the management of traumatic lacerations and surgical wounds: a meta-analysis. Pediatric Emergency Care. 2007;23(5):339-344.
Anderson E.R., Gates S. Techniques and materials for closure of the abdominal wall in caesarean section. Cochrane Database of Systematic Reviews. 4, 2004. CD004663
AORN. AORN guidance statement. Sharps injury prevention in the perioperative setting. AORN Journal. 2005;81(3):662-671.
Heniford B.T., Park A., Ramshaw B.J., Voeller G. Laparoscopic repair of ventral hernias: nine years’ experience with 850 consecutive hernias. Annals of Surgery. 2003;238(3):391-399.
McLeod R.S., Stern H. Canadian Association of General Surgeons Evidence Based Reviews in Surgery. 10. Laparoscopy-assisted colectomy versus open colectomy for treatment of non-metastatic colon cancer: a randomized trial. Canadian Journal of Surgery. 2004;47(3):209-211.
Nelson H., Sargent D.J., Wieand H.S., et al. A comparison of laparoscopically assisted and open colectomy for colon cancer. The Clinical Outcomes of Surgical Therapy Study Group. New England Journal of Medicine. 2004;350:2050-2059.
Senagore A.J., Madbouly K.M., Fazio V.W., et al. Advantages of laparoscopic colectomy in older patients. Archives of Surgery. 2003;138(3):252-256.
Schindler O. Minimally invasive surgery of the knee. Journal of Perioperative Practice. 2007;17(11):535-542.
Upton A., Roberts C., Ryan M., et al. A randomised trial, conducted by midwives, of perineal repairs comparing a polylycolic suture material and chromic catgut. Midwifery. 2002;18:223-229.