Management of thoracic spine disorders
 Key words
Sympathetic nervous system, recurrent meningeal (sinu-vertebral) nerves, neurodynamics, costovertebral, costotransverse, hypogastric nerve, ilio-inguinal nerve, genitofemoral nerve, SLR, neck pain, shoulder pain
Introduction: thoracic spine and the Maitland Concept
The ‘open’, non-dogmatic principles of the Maitland Concept and the emphasis on believing the patient have been invaluable in helping manipulative physiotherapists to treat patients with complex, multi-area, multi-symptomatic presentations.
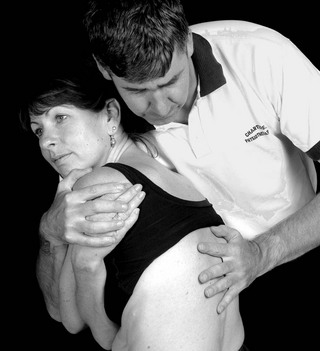
An example is the case of Mrs B, presenting with thoracic and chest pain; neck and scapula pain; headache and facial pain; and low back pain and sciatica (Fig. 5.1). The physiotherapist who regards these as separate problems presenting concurrently would, in the opinion of this author, do better to regard each of them as a part of one problem, with separate and discrete structural and neurological inputs.
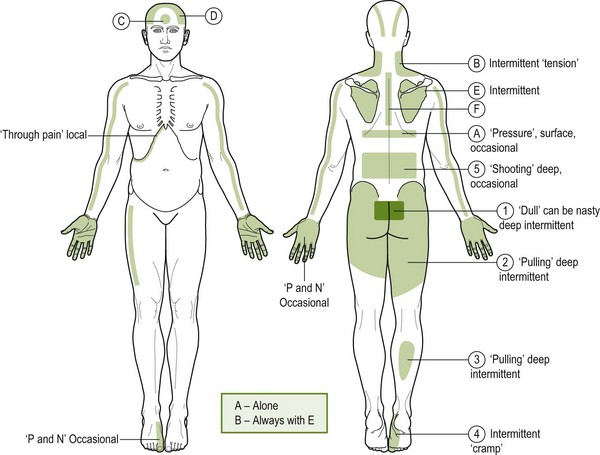
Figure 5.1 Thoracic and chest pain, neck and scapula pain, headache and facial pain and low back pain and sciatica.
To reach this conclusion, it is firstly necessary, as Maitland et al. (2005) stated, to believe the patient. As obvious as this seems, this view is frequently bypassed in favour of the belief that anyone with as many areas of pain but no medically diagnosable disease must, at the least, be exaggerating or worse, are neurotic or making it up.
The following scenario is all too common:
The likelihood is that, yes, it has become increasingly a psychological problem, because the individual has carried it for so long and no one has really helped and now the patient has the creeping suspicion that no one believes them. Whilst the bio-psychosocial model is an essential concept in understanding and managing complex, ongoing pain problems, the bio aspect is often underplayed in attributing these sorts of problems to mainly psychological factors. The therapist who believes the patient and shows they believe them, sympathizes and then discusses the possible underlying mechanisms driving their problem (including wayward sympathetic nervous system activity) in words the patient can understand, initiates a therapeutic approach, which is likely to succeed.
Finally, this enjoinder to ‘believe the patient’ places a heavy yet appropriate demand on the therapist. It is, firstly, that they will develop the knowledge, skills and experience to make a diagnosis which fits all the known aspects of the patient's often complex problems, as Maitland et al. (2005) stated, ‘Make the features fit’. Secondly, it is vital to offer the patient a broad range of passive techniques to both assess and treat the appropriate areas of the spine, with constant ongoing re-assessment. In these cases it is important to include the thoracic spine, recognizing the fundamental role the thoracic region has in so many benign musculoskeletal problems.
It goes without saying, of course, that teaching the patient coping strategies, as well as an appropriate exercise programme for strength, stability and flexibility, is an intrinsic part of any physiotherapeutic and pain management programme.
The literature also supports this notion that the thoracic region can be a source of many complex and non-specific, debilitating pain conditions, as in the case of Mrs B (Fig. 5.1).
Briggs et al. (2009a, 2009b) have carried out systematic reviews of reports of thoracic spine pain prevalence, incidence and associated factors for thoracic spine pain in adult working populations and in general populations (including children and adolescents). In a systematic review (Briggs et al. 2009a) of 52 reports on adult populations meeting appropriate inclusion criteria, most show an average of 30% prevalence of thoracic spine pain reported in most occupational groups ranging from manual labourers to drivers to performing artists.
In another systematic review of 33 reports meeting inclusion criteria (Briggs et al. 2009b), the 1-year incidence of thoracic spine pain in the general population was reported as being between 15 and 27.5% and was associated with concurrent musculoskeletal pain, growth, lifestyle, backpack use and posture, as well as with psychological and environmental factors.
In a case study design, Cleland & McRae (2002) reported on a 50-year-old patient with chronic regional pain syndrome (CRPS 1); effective management was achieved with 10 treatment sessions over a 3-month period directed towards thoracolumbar segmental and neurodynamic impairment. The key inclusions in management, as well as activity and exercise, included thoracolumbar mobilization techniques (see Figs 5.28, 5.30 and 5.31) and neural mobilization using slump long sitting with a sympathetic emphasis (see Fig. 5.60).
Cleland et al. (2002) in a randomized controlled trial using 12 healthy subjects, further explored the effects of the slump long sitting technique with sympathetic emphasis (SLSSE) and costovertebral joint mobilization (see Fig. 5.61) on sympathetic activity to try to explain how such a therapeutic technique may be effective in the management of sympathetically maintained pain. Cleland et al. (2002) were encouraged by the greater changes in foot skin temperature and conductance in the experimental group compared with the control group. The results suggest a link between the SLSSE technique and sympathetic activity in the lower extremity, despite the changes attributable to the technique alone not being statistically significant.
Clues in the subjective examination to thoracic spine involvement
Symptoms at and around thoracic spine levels, and in areas neurally related to T1–12
These areas include those which, because of the location and even perhaps the type and behaviour of the symptoms, are sometimes thought to be visceral, as opposed to a somatic musculoskeletal, in origin. Examples include:
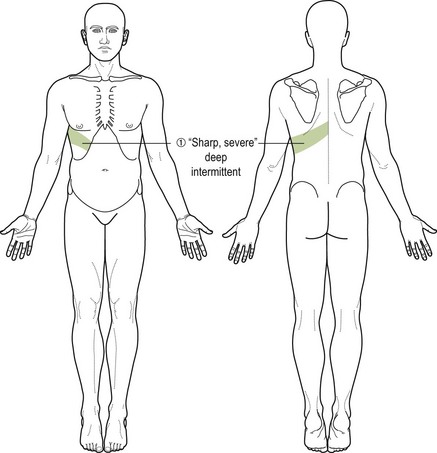
• Left-sided chest pain of approximately 4th–8th thoracic spine level referral, suggesting cardiac origin (Fig. 5.2)
Figure 5.2 Left-sided chest pain of approximately 4th to 8th thoracic spine level referral, suggesting cardiac origin.
• Right-sided infracostal pain from approximately 9th thoracic level, suggesting gall bladder disease (Fig. 5.3)
Figure 5.3 Right-sided infra-costal pain from approximately 9th thoracic level, suggesting gall bladder disease.
• Right-sided hypogastric and groin pain originating from the T12 /L1 levels, the hypogastric nerve and the ilio-inguinal nerve suggesting appendicitis
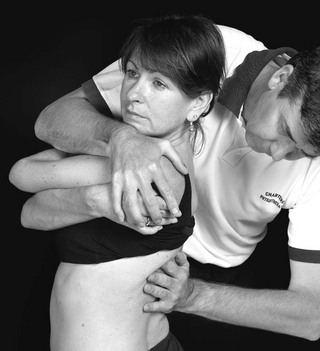
• Similarly, patients presenting, either by self-referral or who have been referred by a medical practitioner or, for example, a sports coach, with diagnosis such as ‘groin strain’ (of T12/L1 origin?) or ‘pulled muscle’ (costovertebral joint sprain) (Figs 5.4–5.6)
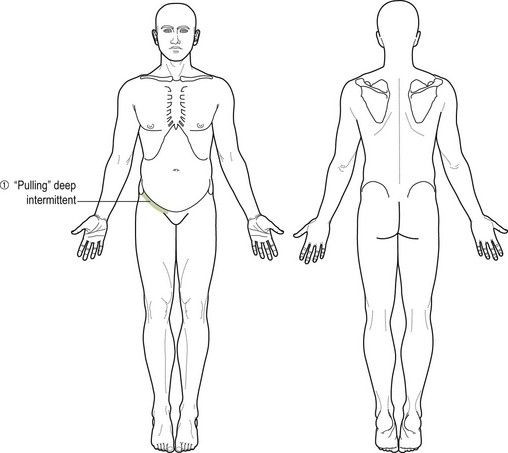
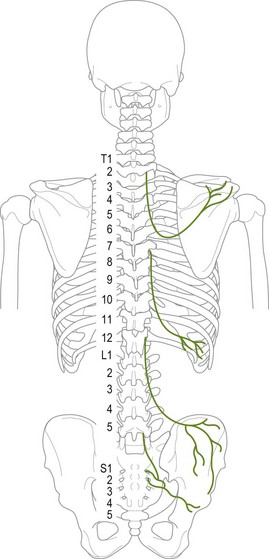
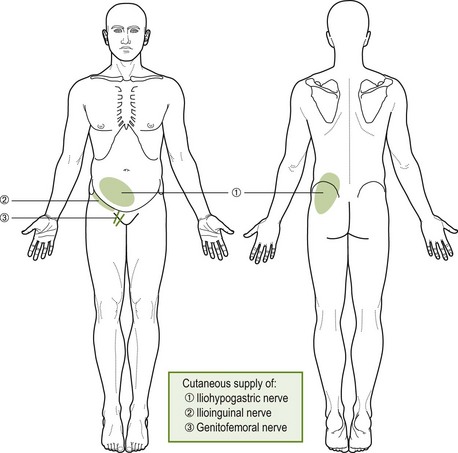
Figure 5.6 Further example showing ‘groin strain’ (of T12/L1 origin?) or ‘pulled muscle’ (costovertebral joint sprain).
• Left-sided chest upper chest pain with some radiation down into the inner aspect of the left upper arm and axilla, from T1, T2 levels suggesting cardiac involvement, such as angina pectoris (Fig. 5.7)
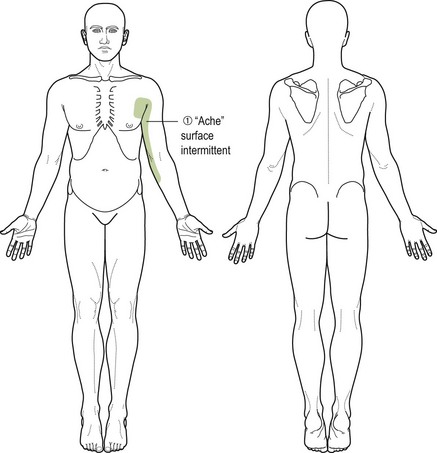
Figure 5.7 Left-sided chest upper chest pain with some radiation down into the inner aspect of the left upper arm and axilla from T1, T2 levels, suggesting cardiac involvement.
• Acute radiating chest pain at any thoracic level, related to chest movement as in breathing and especially severe when coughing and sneezing, suggesting a pleural origin (Fig. 5.8).
Just as the somatic may simulate the visceral, so the visceral may simulate the somatic, or the two may co-exist. An example of the latter was a woman who, for a few years, had suffered occasional bouts of severe anterior upper abdominal pain (Fig. 5.9). Thorough medical screening had detected no visceral pathology and she was referred for physiotherapy.
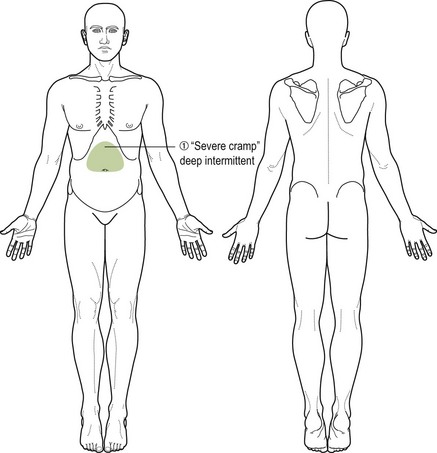
Her condition was totally relieved on two separate occasions by thoracic mobilization (see Figs 5.28–5.31). A year later, she was re-referred by a medical practitioner with similar pain. Two treatments, the second being on a Friday, did not follow the previous pattern of response – that of marked relief of symptoms – and she was told that if after the weekend she was no better, then she should return to the referring physician for further investigation. That weekend she became very ill, collapsed and on admittance to her local hospital underwent emergency surgery for acute peritonitis. She made a full recovery.
Chronic conditions, which are not resolving with treatment
Pain in areas of the body and benign pain conditions that do not suggest direct thoracic neural referral, which have become chronic and have not responded to reasonable treatment, frequently have an association with the thoracic spine. Wherever the site of the problem is, there will usually be a report of stiffness, aching, discomfort or frank pain in the vertebral areas of thoracic 4–7. A re-assessment of progress can be made after appropriate mobilization of the area of the thoracic spine has been added to the treatment plan.
Patient example
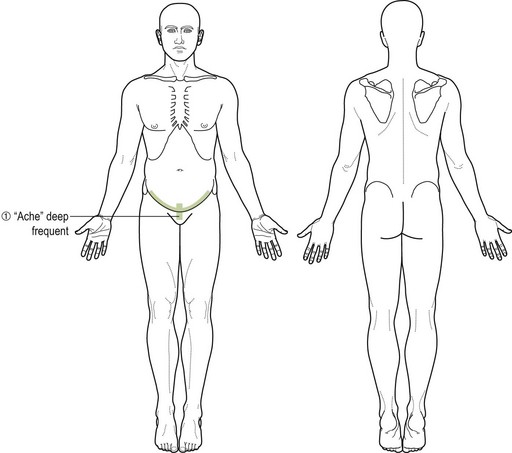
A 40-year-old lady who had undergone repeated gynaecological procedures for groin and pubic pain (Fig. 5.10) with no lasting relief of her symptoms became symptom-free following a short course of mobilization and manipulation at the thoracolumbar junctions (T12/L1), mid-thoracic manipulation and neurodynamic mobilization techniques in side-lying targeting the ilio-inguinal and genitofemoral nerves (see Figs 5.28-5.31, 5.45, 5.62).
Evidence from the literature also supports the narrative that conditions which are amenable to thoracic spine mobilization can be identified from their symptom presentation, symptom history and behaviour.
Conroy & Schneider (2005) presented a case report of a 28-year-old patient with pain across both shoulders and bilaterally down both arms. These main symptoms were associated with bilateral hand tingling, headache and stiffness in the thoracic spine, along with long-standing back and left leg pain and anxiety. Symptoms were associated with prolonged sitting in lectures, with little relief on movement or position change. Symptom onset was associated with an intense study period. Visceral and serious pathology were excluded. Needless to say, comparable movement impairments were found in and around the thoracic and cervical spine on physical examination (see Figs 5.16–5.21, 5.26 & 5.27; Chapter 4) and mobilization techniques (see Figs 5.28–5.31) of the mid-thoracic spine along with postural alignment and muscle balance activities ensured symptom relief and restoration of cervical and thoracic spine movement.
Jowsey & Perry (2009), in an original article, reviewed the suggested mechanisms of ‘T4 syndrome’ as described by Conroy and Schneiders (2005). They also carried out a double blind controlled trial to establish the effects of a grade III posteroanterior rotatory joint mobilization technique (see Fig. 5.29), applied to T4, on sympathetic activity in the hand of a sample of healthy subjects.
T4 syndrome is characterized by upper extremity paraesthesia and pain with or without symptoms into the neck and/or head (Conroy & Schneiders 2005). The typical presentation is glove distribution of paraesthesia in one or both hands (Fig. 5.11). The suggestion has always been that the sympathetic nervous system provides the mechanism which links the thoracic spine to the referred symptom pattern associated with T4 syndrome, and that the sympathetic nervous system mediates the hypoalgesic effects of spinal manipulative therapy through the dorsal periaqueductal grey in the mid-brain.
The study by Jowsey & Perry (2009) demonstrated a significant difference in skin conductance in the right hand of the sample subjects (and less so in the left) after T4 mobilization compared with a sample of individuals in a placebo group. This indirect measure of a sympathoexcitatory effect may explain the mechanisms by which passive mobilization techniques localized to the T4 spinal segment result in a relief of typical glove distribution symptoms and associated movement restrictions in some patients.
Cleland & McRae (2002), in their case report, describe the management of a 50-year-old woman who presented 8 weeks after an internal fixation of a tibia/fibula fracture with lower extremity complex region pain syndrome 1 (CRPS 1), as mentioned earlier. Her symptoms comprised an intense burning pain throughout the right lower extremity with an inability to weight bear because of severe allodynia. Other features of CRPS were also evident, such as swelling, sweating and redness. The body chart also showed evidence of a band of pain across her lower thoracic spine at the level of T12/L1. Intervention during 10 sessions over 4 months included desensitization and graded exposure to weight bearing along with thoracolumbar mobilization and a neural mobilization technique of SLSSE (see Figs 5.60 & 5.61). A follow-up after treatment was discontinued and later, after a year, revealed a sustained improvement in pain and function.
Fruth (2006) reported on the case of a patient with posterior upper thoracic pain and limited cervical and trunk and shoulder active range of movement. Symptom relief, cervical, thoracic and shoulder mobility restoration and a return to pre-injury activities were effected by seven sessions of mobilization techniques of the costovertebral and costotransverse joints of ribs 3–6 and periscapular trigger point release (see Figs 5.32, 5.40 and 5.64) along with postural correction and a stabilization home exercise programme.
Knowledge of presentation of visceral pathology (Fig. 5.9) can also help the therapist in determining the visceral or somatic origins of symptoms associated with the chest, rib cage, thoracic region, abdomen, loin, groin and both upper and lower extremities (Table 5.1; Fig. 5.12).
Table 5.1
Comparison of systemic/visceral and neuromusculoskeletal (NMSK)/somatic pain (Goodman & Snyder 1995, Evans 1997)
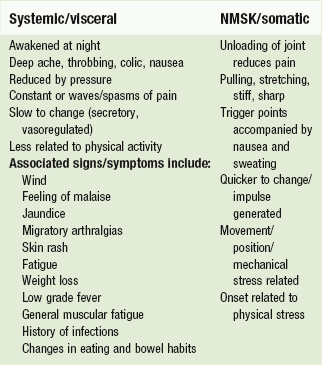
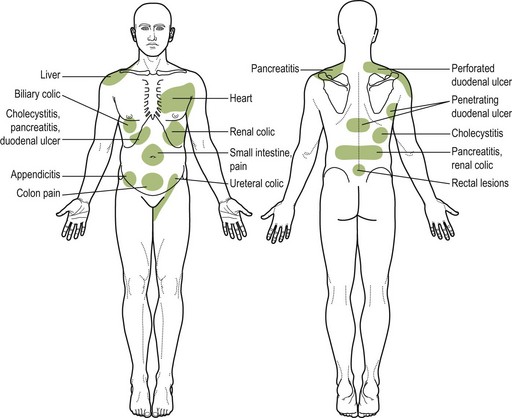
Figure 5.12 Common sites of referred pain. Reproduced with kind permission from Goodman & Snyder (1995).
Michael et al. (2009), in an orthopaedic overview of thoracic pain, emphasize the need to explore thoracic spine pain as a ‘red flag’ and to ensure thorough screening for other red flags indicating serious pathology (Box 5.1).
 Box 5.1
Red flag signs
• Age of onset < 20 years or > 55 years
• Constant progressive, non-mechanical pain [no relief or worsening with bed rest]
• Past medical history of malignant tumour
• Prolonged use of corticosteroids
• Drug abuse, immunosuppression, HIV
• Widespread neurological symptoms [including cauda equina syndrome]
Signs and symptoms of serious spinal pathology requiring emergency referral (Greene 2001)
The importance of differential diagnosis of thoracic pain is also stressed by Michael et al. (2009) so as not to miss:
• Deformity due to Scheuermann's disease or idiopathic scoliosis, especially in children and young adults
• Infections such as vertebral osteomyelitis presenting with pain, pyrexia and local tenderness
• Tumours (primary – benign or malignant and secondary metastatic). Patients with known tumours should be treated as suspicious for metastases, especially if the pain is predominantly constant, unremitting and felt at night
• High velocity injury or osteoporotic fractures
• Degenerative conditions associated with neurogenic claudication and stenotic impairments.
Box 5.2 shows the format for the subjective examination of the thoracic spine.
Box 5.2 Thoracic spine: subjective examination
Recent and previous (see ‘History’ below)
1. When are they present or when do they fluctuate and why (associate/dissociate with day's activities, bed/pillow, inflammation)?
2. Effect of rest on the local and referred symptoms (associate/dissociate with day's activities, bed/pillow, size/content, inflammation). (Compare symptoms on rising in the morning with end of day.)
3. Pain and stiffness on rising: duration of.
4. Effect of activities. (Beginning of day compared with end of day.)
1. Does the patient have bilateral tingling in the feet, or any disturbance of gait (cord signs).
2. General health and relevant weight loss. (Medical history.)
3. Have recent X-rays been taken?
4. What tablets are being taken for this and other conditions (osteoporosis from extensive steroid therapy)?
Improvement of signs and symptoms in areas remote from the thoracic spine after passive mobilization of the mid-thoracic spine region
It is a common, clinically observed experience that where a benign painful musculoskeletal condition, such as headache, chronic sciatica or persistent paraesthesia in the upper limb, has not responded to treatment as expected, or where progress has stalled, the introduction of passive mobilization applied to the thoracic region between T4 and T8 (and especially T5/6) has an immediate and marked effect in improving symptoms and comparable signs.
For example, in some cases of cervicogenic headache where movement testing and palpation at the O–C1,C1–2 and C2–3 levels have revealed marked movement restriction, both physiological and accessory, the palpation findings including resistance to movement change markedly immediately following passive mid-thoracic mobilization. In turn, the pain related to these movements and the headache is reduced. This would seem to show that the factor seeming to limit movement, initially assessed as inert tissue resistance, was in fact intense, localized muscle spasm and that the locking effect of this spasm had been reduced by passive thoracic mobilization. These findings are supported by the results of the randomized controlled trial where thoracic manipulation (see Fig. 5.45) was shown to be effective in reducing neck pain, improving dysfunction and neck posture and neck range of motion of patients with chronic mechanical neck pain up to 6 months' post treatment (Lau et al. 2011).
Lau et al. (2011) support Cleland et al. (2005), who established that thoracic manipulation reduces perceived neck pain. In a randomized clinical trial, results suggested that thoracic manipulation (see Fig. 5.45) has an immediate analgesic effect on patients with mechanical neck pain.
Similar effects have been observed and reported in relation to other common musculoskeletal dysfunctions and features.
Boyles et al. (2009) found a statistically significant decrease in self-reported pain measures and disability in a sample of patients with sub-acromial impingement syndrome after being treated with thoracic spine thrust manipulation (see Figs 5.45 and 5.46). This effect was noted at 48 hours follow-up. The explanation given for this effect is the possibility that biomechanical changes in thoracic posture brought about by the manipulation may affect range of shoulder motion.
Strunce et al. (2009) also reports the use of thoracic spine or upper ribs high velocity thrust manipulation techniques (see Fig. 5.44) in a sample of patients whose main complaint was shoulder pain. The results of this study suggest that such an intervention has an immediate effect on shoulder pain and range of movement of the shoulder, therefore suggesting that physiotherapists should be aware of the regional interdependence of the thoracic spine, ribs and shoulder.
Berglund et al. (2008), in a survey of examination findings in samples of patients with and without elbow pain, found that there was a significant presence of cervical and thoracic spine pain, on examination, in the group with lateral elbow pain compared with the group without (70% and 16% respectively). The results indicate that there is a significant prevalence of pain and dysfunction in the cervical and thoracic spine in patients with lateral elbow pain. As a consequence, it is essential that physiotherapists include the cervical and thoracic spine in the assessment of patients with lateral elbow pain.
The author of this chapter has experience of many instances whereby chronic groin pain has been attributed to musculotendinous injury whereas, in fact, symptoms have been relieved by passive mobilization of the thoracolumbar spine (see Fig. 5.31) and neurodynamic mobilization of the ilio-inguinal and genitofemoral nerves (Fig. 5.6). Gilmore (1995) presented a paper on ‘Gilmore’s groin’ a musculotendinous lesion that is successfully treated surgically. The author recalls a colleague, however, who differentially diagnosed a patient problem as ‘Gilmore’s groin’ rather than thoracolumbar referral through careful assessment and recognition that features did not fit a pain referral situation. The need for referral for a surgical opinion was concluded because the patient had:
• Previous incidents of ‘groin strain’
• No comparable signs in the thoracolumbar region
• Local deep ‘soreness’ on moderate resistance to hip abduction
• Pain on gentle lower abdominal hollowing (transverse abdominal activation producing strain at the fascial attachments)
• No comparable signs on sacroiliac joint (SIJ) pain provocation testing
Therefore it is as important for physiotherapists to be able to identify where there is no evidence of comparable signs in regions of possible referred pain as well as to be able to recognize when comparable signs are, in fact, present.
Patient examples: manipulative procedures applied to the thoracic spine
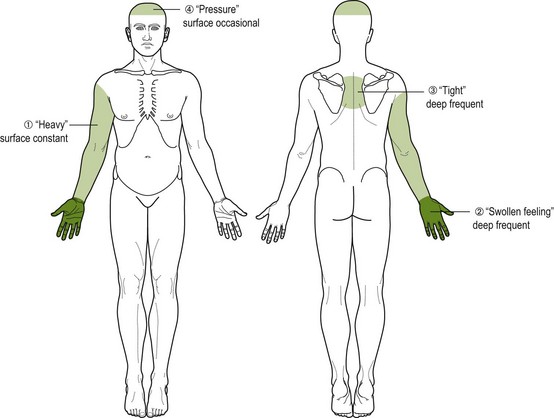
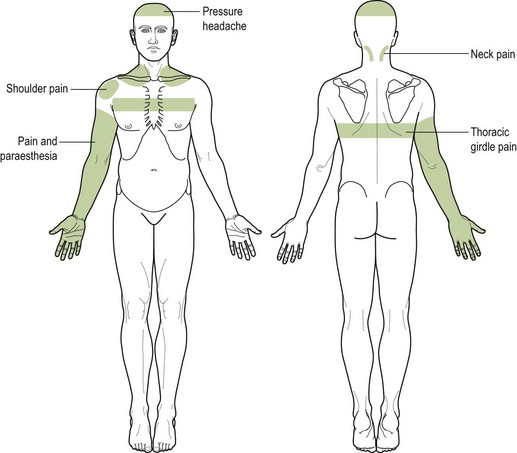
A middle-aged woman had undergone a sympathectomy with the aim of reducing her excessive (axillary) perspiration. Following the operation she had developed upper and mid-thoracic girdle pain, varying in intensity but frequently severe. This was accompanied by neck pain, headache, shoulder and arm pain and paraesthesia (Fig. 5.13).
Previous treatment of her cervical spine and shoulder by a therapist had not improved her symptoms. The problem had been with her for more than a year. By chance, she had read a chapter in a book on neurodynamics (Butler 2000) and she said, ‘some of the descriptions in the book of patients’ problems sounded like mine'.
On examination, she appeared to have a complex pain problem driven by disordered sympathetic activity. Amongst other things, she was extremely hypersensitive to touch and pressure, exhibiting hyperaesthesia, hyperalgesia and allodynia, especially in the upper thoracic spinal area, the associated chest and ribs and anteriorly at the cervical spine.
Cervical and thoracic movements were painfully limited (see Fig. 5.6 and Chapter 4) and neurodynamic tests as well as the sitting slump test and sympathetic slump test were comparable in their partial symptom reproduction and limitation in range of movement (see Figs 5.49–5.61).
Following a detailed examination (Box 5.2; see also Box 5.4) and a discussion of the possible mechanisms underlying her pain and other symptoms, a treatment plan was devised and explained to the patient. As well as advice and a home programme of self-mobilization exercises (see examples in Box 5.3), which were gradually introduced, treatment centred mainly on graduated passive mobilization and eventually some manipulation of the thoracic spine and the ribs, posteriorly, laterally and anteriorly (see Figs 5.28–5.32 & 5.45–5.47).
Box 5.3 Examples of self-mobilization exercises
A Cervicothoracic: upright sitting, rotation left with opposite hand on right side of face giving gentle overpressure at end of range. Repeat for right rotation
B Mid and low thoracic: sitting, rotation left, holding chair-back with right hand to pull further left for end of range stretch. Repeat for right rotation.
Crook lying, with small firm polystyrene roll under thoracic spine-varying levels, extending over the roll (chin tucked in to protect cervical spine).
Sitting on chair, stretching down to one side, fingers toward floor, stretching opposite side at mid and low thoracic. Repeat to opposite side.
Additionally, mobilization of her cervical spine particularly with the patient lying supine with initially gentle mobilization of the cervical spine and neural tissues from the anterior aspect (see Fig. 5.48, and Chapter 4, lateral glide) proved not only very potent but also effective in reducing her symptoms and freeing up active movement. Furthermore, neural mobilization techniques including those for the upper limb (see Chapter 4) and intermittent or ‘slider’ slump mobilization in sitting and long sitting (see Figs 5.49–5.60) were added with ongoing re-assessment to determine the most comparable movement directions and combinations (see Figs 5.17–5.21).
There was a steady improvement in all her symptoms, with occasional fallbacks. When her symptoms appeared ‘stirred up’, recovery was restored with a ‘settling down’ treatment, in which the same technique with perhaps one or two exceptions were used with a lower grade to calm and ease the situation. Following this we would press on with variations of a group of techniques, all the time aiming to free up movements and combinations of comparable movements to achieve symptom-free mobility in all functional directions (for example: side flexion with rotation towards and then away; flexion with rotation).
Treatment had been spread over many months, never more frequently than once each week because the patient lived some distance away. Contact was maintained by telephone for advice and support. She dealt with minor exacerbations using self-mobilizing stretches (for example: using the back of a chair in sitting to lever over for flexion and extension and then rotation; lying supine, stretching over a roll at and below mid-thoracic region; cervical side flexion in median nerve bias upper limb neurodynamic position with the palm of the hand against a wall). A final retrospective re-assessment after 2 months without treatment saw her leading a normal life, virtually symptom free.
Miss A
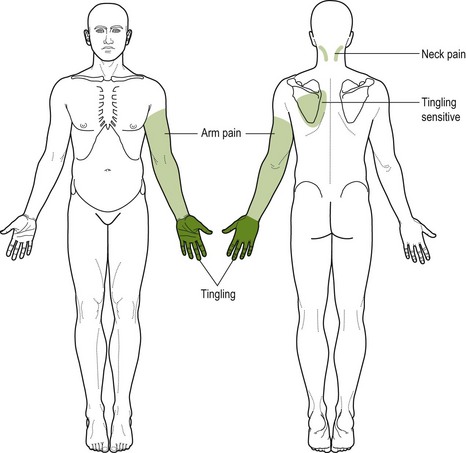
A young woman was being treated for neck and circumferential arm pain and tingling in one hand, of glove distribution (Fig. 5.14). Passive mobilization and a self-help programme, including active movement of the cervical spine, designed to restore joint and neural tissue mobility and to activate stabilizing control of muscles in the region, had led to some improvement in the condition but that had ‘plateaued’. The author of this chapter was asked to review her condition and treatment. Three things struck a chord, especially when going over her examination. Firstly, she reported feeling frequent itching over her back to one side at a level of approximately the 4th, 5th and 6th ribs. Secondly, her hand on that side, compared to the other hand, was a faint dusky blue colour. Thirdly, comparing her hands side by side, the affected hand had lost its skin creases with an overall mild puffy swelling. On palpation her thoracic spine between thoracic 4 and 6 was extremely tender on light and moderate palpation and the three ribs at the same side at those levels were prominent posteriorly and extremely sensitive to pressure (p. 207). The treatment emphasis was shifted to passive mobilization of the mid-thoracic region including the ribs (see Figs 5.28–32), at approximately the thoracic 4th–6th level. Immediately following the first treatment to this area, the itching feeling across her back disappeared, her hand resumed its normal colour and the puffy swelling reduced. A few further treatments resolved the problem.
Interestingly, a few weeks following her discharge she telephoned to say she had experienced a mild recurrence of her pain and her hand swelling and discolouration. She had been at a party and a friend had approached her and slapped her on the back. She said she immediately felt arm and upper back discomfort, and the discolouration of her hand recurred. One further treatment directed at her thoracic spine and ribs resolved the problem, and she remained symptom free.
The features of this patient's disorder and her management are not uncommon. The correct approach when using passive mobilization techniques is firstly to build up a group of techniques (anything up to a dozen; see Figs 5.28–5.40 & 5.48) which enable the patient to gradually tolerate more and varied movement inputs to the thoracic spine, almost like a conscious graded exposure to movement. Secondly, to ensure that detailed examination and analysis of movements, including palpation and segmental mobility testing where required (see Figs 5.16–5.32), identify all relevant impairments which the therapist should then aim to clear. Thirdly, that the movement capacity of the thoracic spine is sufficient to ensure full functional activity as required by the individual. So, comparable signs should be cleared using techniques which incorporate combinations of movement in the thoracic spine, passive segmental mobilization in functional or combined positions, inclinations and angulations of accessory movement, neural mobility in stressed positions such as long sitting slump, and active postural alignment correction and muscle activated stability in order that the positional health of the thoracic spine tissues is sustained.
Thoracic mobilization/manipulation: when to incorporate techniques to directly address neurodynamic signs/symptoms in the healing process of a lumbar disc lesion
In other words, in the timescale of treatment of, for example, sciatic pain, when should techniques such as passive straight leg raise (SLR) and slump test (see Figs 5.63, 5.49–5.59) components be carefully introduced?
Initially, with moderate to severe lumbar disc lesions, the behaviour of symptoms and signs is often erratic. For example, pain distribution and severity vary markedly from hour to hour, depending on the individual's posture and activities. Frequently sciatic pain (or that of, for example, the femoral nerve) persists, often with disabling severity, beyond the time when the disc healing is advancing well. At such a point, decided by the therapist aware of a typical time-scale of progress, passive mobilization of the mid-thoracic region (T5–7) will afford further insight into the clinical picture and some indication of when neurodynamic treatment techniques might, with careful ongoing re-assessment, be added.
To take an example, it is 4 weeks after the onset of a typical low lumbar disc trauma, resulting in sciatica and paraesthesia down the leg. The passive SLR manoeuvre has been used only to assess/reassess the result of the passive and active lumbar manoeuvres being employed (see Chapter 6). The slump test has not yet been attempted. The therapist feels that symptoms and their behaviour and signs have plateaued.
At this point if passive mobilization is carried out, with the patient in prone lying, typically posteroanterior central mobilization techniques and transverse movements around thoracic 5,6,7 levels (see Figs 5.28 and 5.30), the resultant change (or lack of it) in passive SLR will provide useful information. Firstly, if the SLR in terms of range of pain-free movement or reduced pain with movement remains unaltered, this will indicate that mechanically and neurologically the pain sensitive structures of the spinal canal, intervertebral foraminae and beyond are not yet amenable to direct neural mobilization. In other words, given that the treatment itself is not the cause of the stalemate, then it would be wise to stick to the present regime, assuming this already involves both active and passive movement manoeuvres and detailed advice/explanation. Should, however – and this is the most likely outcome at this stage – the range of passive movement of the SLR be increased with less pain immediately following the thoracic procedures, then some judicious exploratory variations of the passive SLR with the following may be added or substituted in the treatment: knee flexion/extension, foot plantarflexion/dorsiflexion and with less or more hip flexion/adduction.
Keer (1993), in an abstract of a research paper, provided evidence of significant changes in SLR in patients with low back pain after the administration of passive joint mobilization to the mid-thoracic spine. The message here is that if a patient with low back pain and reduced SLR is not responding to treatment as expected, an exploratory treatment of thoracic mobilization my effect a change in SLR.
In addition, if the sitting slump test (see Fig. 5.60) has not been carried out, it may be the time to explore this, both for the added assessment information it provides but also as an eventual additional treatment modality to help restore pain-free functional movement.
Analysis of role of detailed examination in determining when to use thoracic passive mobilization techniques and associated interventions
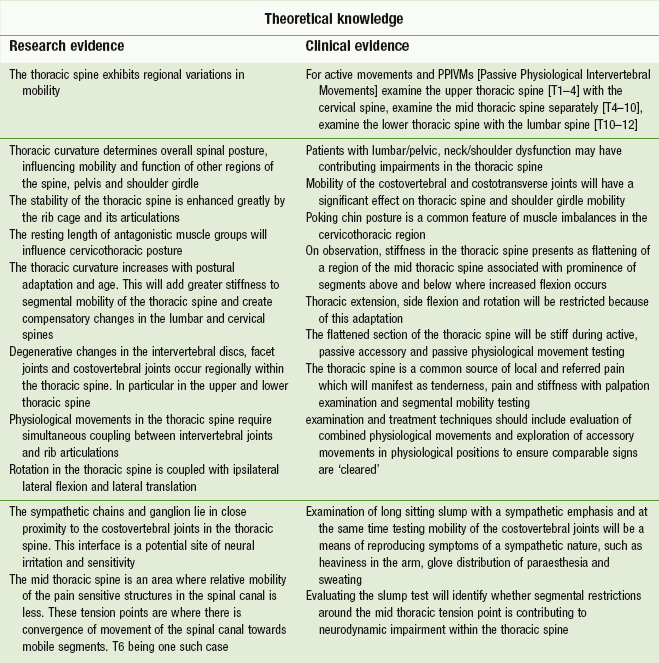
Edmondston & Singer (1997) reviewed the anatomical and biomechanical features of the thoracic spine as a knowledge support for manual therapists during patient physical examination. The evidence from the biological and clinical sciences and other evidence (Cleland et al. 2002, Butler 2000) are presented in the form of the symbolic permeable brick wall to highlight how decisions can be made by linking theoretical knowledge to clinical practice and vice versa (Table 5.2).
Table 5.2
The ‘brick wall model’ of clinical reasoning applied – knowledge of the thoracic spine supporting clinical practice
Physical examination
Box 5.4 lists the physical examination tests that are used, although not every listed movement is required for every patient.
Box 5.4 Thoracic spine: physical examination
Neck movements should be tested for upper thoracic pain. Cervical rotation may need to be superimposed onto thoracic rotation for testing upper thoracic joints.
Sustained E, LF towards pain, Rotn towards pain (when necessary to reproduce referred pain)
Tap test (when F, E, LF and Rotn & tap are negative)
Compression and distraction (when F, E, LF & Rotn & tap are negative)
‘Palpation’
Soft-tissue palpation (muscle & interspinous space)
Position of vertebrae and ribs especially 1st rib
Passive accessory intervertebral movement, costovertebral and intercostal movement ( ,
,  ,
,  ,
,  spine and ribs)
Observation
Observation of the thoracic spine is often unremarkable. Postural adaptations such as rounded shoulders, pseudowinging of the scapulae, poking chin, flat thorax, kyphosis and scoliosis of the thoracic spine may be evident. However, these observations need to be related to the patient's signs and symptoms to be of significance.
Present pain
Before starting examination of active functional movements of the thoracic spine the patient should always be asked whether he has any symptoms at present, and if so what and where they are. It is important that the assessment of the pain (symptoms) responsive to movement starts here.
Functional demonstration (and differentiation where appropriate)
Although the patient may not be able to perform a specific functional demonstration reproducing his symptoms, there may be a few cases when a functional demonstration or an ‘injuring movement’ will be useful to the manipulative physiotherapist.
One example is the patient who is able to reproduce his chest pain by taking a deep breath, as mentioned earlier. In other cases it may be possible to differentiate the vertebral level responsible for the patient's symptoms using the functional demonstration. For example, when a patient has symptoms in the upper thorax area posteriorly, it is often difficult to determine whether the symptoms are arising from the cervicothoracic junction (or even C5/6 or C6/7) or the upper thoracic intervertebral joints. The procedure to differentiate between them if pain is reproduced by rotation is detailed below.
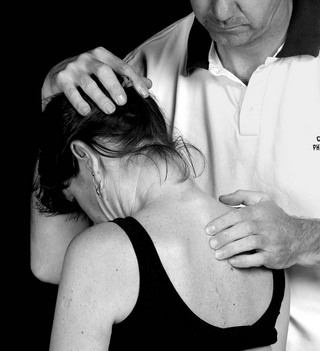
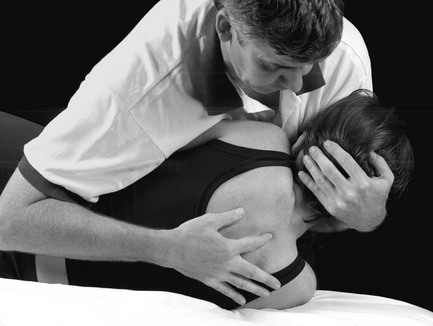
1. With the patient seated and facing straight ahead towards the physiotherapist, he is asked if he has any symptoms (Fig. 5.15A).
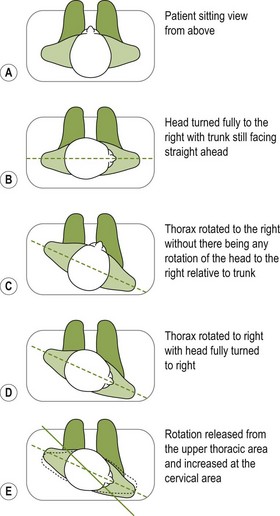
2. Assuming that his symptoms can only be provoked at the end of the range of rotation, he is asked to turn his head fully to the right with his trunk still facing straight ahead. If he feels no change in symptoms, the physiotherapist applies over-pressure to the cervical rotation by pressing her right forearm behind his right shoulder and her right hand behind the back of his head on the right side, while also placing her left hand against his left zygomatic arch. In this position she is able to apply over-pressure to the cervical area without movement of his shoulders. This is not testing cervical rotation to the exclusion of any thoracic rotation, as the upper thoracic spine does also rotate somewhat. Nevertheless, it is a useful attempt at differentiating (Fig. 5.15B).
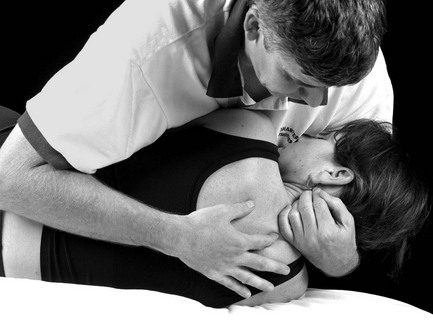
3. Once the pain response with over-pressure to cervical rotation is assessed, the patient is asked to rotate his thorax to the right without there being any rotation of the head to the right. The physiotherapist applies over-pressure to the thoracic rotation by applying further rotary pressure through his shoulders (Fig. 5.15C).
4. With the pain response noted when over-pressure is applied to the thoracic rotation, the patient is then asked to turn his head fully to the right and any further change in symptoms is noted. If there is a change of symptoms when the cervical spine is rotated to the right, then movement of the cervical spine must be involved in the patient's symptoms (Fig. 5.15D).
5. While in the position described above, the physiotherapist changes her application of over-pressure from the upper thoracic area to cervical rotation to the right while at the same time allowing the patient to release the upper thoracic rotation slightly, and the change in symptoms is assessed. With this change of over-pressure, the emphasis of the rotation is released from the upper thoracic area and increased at the cervical area (see Fig. 5.15E).
Brief appraisal
When the functional demonstration provides valuable information about the sources of the patient's symptoms, the manipulative physiotherapist should briefly appraise the areas involved to give clues to further examination. From the example above, if the thoracic spine appears to be involved more, detailed examination of this area can commence. The cervical spine should also be tested quickly so that it can be excluded or cleared of involvement.
Thoracic rotation
Thoracic rotation can be assessed in many different positions, but the first position chosen should be that indicated by the patient in response to the question, ‘Is there any turning or twisting movement which you find provokes your symptoms?. It may be that he responds by demonstrating his golf swing. Under these circumstances it is necessary to determine at what point in the movement is the pain provoked, so that the passive movement can be assessed more specifically.
Rotation can also be assessed in the standing position, with or without the help of outstretched arms or folded arms. Such rotation is more likely to detect movement of the lower thoracic spine.
With the patient in the sitting position and with his arms folded, ask him to ‘hug’ himself; rotation can be tested in the erect or extended position of the thoracic spine, and this can be compared with the same rotation but performed in the flexed position. Over-pressure to the movement can be performed by continuing the rotation via pressure against the scapula and pectoral areas (Fig. 5.16A).
Upper thoracic rotation can be performed in the sitting position, with the patient clasping his hands behind his occiput and the physiotherapist stabilizing his lower thoracic area. In this position, if the patient turns his head and shoulders to the left with his head kept in a static position in relation to his shoulders, the main movement will occur in the upper and middle thoracic spine.
Thoracic flexion, extension
Upper thoracic flexion and extension are included in the examination of neck movements, and lower thoracic flexion and extension are included in the examination of lumbar spine movements. Mid-thoracic flexion and extension are examined by asking the patient to clasp his hands behind his head whilst in the sitting position, and point his elbows forwards so that they come together.
Flexion: Having adopted the above position, the patient is then instructed to curl his elbows into his groin to produce thoracic flexion. The therapist notes the range of movement, symptom response and quality of movement. If necessary, over-pressure can be added via the supraclavicular and suprascapular areas. The therapist stands in front of the patient and places her hands over the top of his shoulders with her fingers posteriorly and her thumbs anteriorly. Over-pressure is applied in the direction of the continuing arc of flexion. Over-pressure directed cranially, horizontally or caudally can put emphasis on the upper, middle and lower parts of the thoracic spine respectively (Fig. 5.16B).
Extension: The same starting position as for flexion is adopted, with one exception: the patient places one or both feet on a chair in order to flex the lumbar spine. The patient is instructed to direct his elbows upwards. The therapist notes the range, symptom response and quality of movement. If necessary, over-pressure can be added by the therapist, who stands by the side of the patient and places an arm under both his axillae and across his sternum. She places the other hand on his thoracic spine to localize the over-pressure, at the same time side-flexing her trunk in the direction of the thoracic extension (Fig. 5.16C).
Thoracic lateral flexion
Lateral flexion of the upper and lower thoracic spine is included in the examination of the cervical and lumbar spines, respectively. To localize lateral flexion to the mid-thoracic spine in sitting, the patient is asked to place his hands behind his head and direct his elbows away from his body. He is then instructed to curl his elbows into his side. The range, symptom response and quality of movement are noted. Over-pressure can be applied locally at each intervertebral level by the manipulative physiotherapist standing by the right side of the patient. Taking right lateral flexion as an example, she places her right axilla on his right shoulder and holds under his left axilla with her right hand. Her left thumb is then placed against the side of each spinous process of the thoracic spine in turn, and she bends her knees to increase the thoracic lateral flexion (Fig. 5.16D).

When applicable tests
If, at this stage of examination, the patient's symptoms have not been reproduced or comparable signs have not been found, then applicable tests such as combined movements can be used. The sequence of combined movements should reflect the patient's functional limitations.
The following example is but one of many sequences of combined movements that can be used in the examination of the thoracic spine. In the example, thoracic rotation to the left is the starting position, to which is added in turn lateral flexion to the left, lateral flexion to the right, extension and flexion.
1. With the patient sitting he is asked to turn fully to the left, and when the physiotherapist has added over-pressure to this movement his symptoms are assessed (Fig. 5.17).
2. While over-pressure is maintained for rotation to the left, the physiotherapist laterally flexes the patient's trunk to the left while at the same time assessing changes in symptoms. It is important, during the movement of lateral flexion to the left, that the same strength of pressure to the rotation is maintained. This is not as easy as it may seem; with her right axilla stabilizing his right shoulder she must follow his lateral flexion (Fig. 5.18).
3. The physiotherapist then laterally flexes his trunk to the right, again using her right axilla to stabilize and control the lateral flexion, while noting changes in symptoms. Once more, it is necessary to retain the same strength to the rotary over-pressure (Fig. 5.19).
4. To the sustained over-pressure of the thoracic rotation to the left, the physiotherapist then adds flexing at the appropriate level of the thoracic spine and assesses the changes in symptoms (Fig. 5.20).
5. To the sustained over-pressure to the thoracic rotation to the left, the physiotherapist then adds thoracic extension at the appropriate level while noting changes in symptoms. To produce the extension, the physiotherapist uses her right forearm as a fulcrum while using her two hands to extend the patient's thoracic spine (Fig. 5.21).
Compression movement tests
All of the physiological movements can be performed both with and without compression. The patient sits with his arms folded, and the physiotherapist stands behind him and stabilizes his thorax with her body, applying the compression by putting her forearms around in front of his shoulders and grasping over his supraspinous fossa area with her hands. She then uses her hands in conjunction with her upper sternum (at approximately his T3 level) to increase her body weight gradually, thus pushing through his thoracic spine towards the floor.
Localized oscillatory movements of flexion, extension, lateral flexion and rotation can then be performed while the compression is maintained. It is uncommon in the thoracic spine that the addition of compression makes any difference to the pain response found when the same movement or movements were performed without compression.
Tap test
If active movements are full and symptom free, the patient sits on the plinth with the spine flexed and each spinous process of the thoracic spine and the rib angle are tapped with a reflex hammer. One spinous process or rib angle may exhibit exquisite tenderness over and above any of the others. In some cases, this resonance effect may be a way of detecting bone demineralization, stress fracture or bone tumour.
Slump test
This test should form part of the examination of the thoracic spine. However, it is essential to remember that this test causes pain at approximately the T8/T9 area in at least 90% of all subjects. If the patient does experience pain at T8 or T9 and it is for this pain that he seeks treatment, and if the pain is increased during the slump test, then the only way in which a decision implicating the canal structures as a component of the cause of his disorder can be made is to balance it against the physiotherapist's knowledge and experience of what is within the considered norms for this test.
The long sitting slump can be used as an adaptation of the slump test to emphasize the testing of the mobility of the canal structures of the thoracic spine. In this position and with the addition of trunk side flexion to the left, for example, the ribs can be examined and treated on the right. This is a means of influencing the sympathetic chains via the slump position and movement of the costovertebral joints.
Other neurodynamic tests such as the upper limb neural tests (ULNTs), SLR, prone knee bend (PKB) and passive neck flexion (PNF) may also be considered as part of the thoracic spine examination.
Palpation
The patient lies prone with his arms by his side or over the edge of the couch to widen the interscapular space.
Areas of sweating and temperature changes
It is not uncommon to find areas of increased temperature situated centrally in the thoracic spine. These areas do not indicate information of either mechanical or pathological origin.
The presence of any localized areas of sweating is determined first. Temperature changes are assessed by wiping the backs of the fingers or hands over the thoracic area, particularly in the area between the angles of the ribs or the left and right sides. It is not uncommon to find 9 cm areas situated centrally which do not indicate inflammation of either mechanical or pathological disorders.
Soft-tissue changes
Thickening of the interspinous tissue and the tissues in the interlaminar trough area is extremely informative. The thickening can be totally lateral, and can be expected to be found on the same side and at the appropriate intervertebral level as unilateral pain. The thickening can extend over more than one level on the same side, or it can be on the left side of, say, T5/6 and the right side of T4/5 and T6/7. The texture of the thickenings can clearly sort them into new and old changes. This sorting is far more difficult in the low lumbar area.
Quite often thoracic physiological combined movements and movements under compression are pain free. However, palpation anomalies can always be found. At a first consultation, if a patient has upper abdominal pain of skeletal origin it is common for all physiological movements to be pain free even when combined movements and movements under compression are tested. However, palpation anomalies can always be found, provided the examination is perceptively performed and related to the history of progression of the disorder. This reliability makes palpation a skill that should be learned by all general surgeons.
Bony changes and position tests
The two most common findings when examining the position of the spinous processes in relation to each other in the thoracic spine are:
1. A spinous process that feels more deeply set than its abnormally prominent adjacent spinous process above. This is the most informative finding, indicating either that it is the source of a patient's symptoms or that it is a disadvantaged intervertebral area which has the potential to cause symptoms if placed under excessive stress.
2. One spinous process displaced to one side in relation to the spinous process above and below.
This only indicates rotation of the vertebra when it is confirmed by establishing that one transverse process is more posteriorly positioned in comparison with the vertebra's transverse process on the opposite side. That is to say, if the spinous process of T6 is displaced to the right, this displacement only indicates rotation of the vertebra if the transverse process of T6 on the left is more prominent (or posteriorly positioned) than the transverse process of T6 on the right. This is rarely the case, and it is surprising to find how often a patient's symptoms, when related to this malalignment, are found to be on the same side as that to which the spinous process is deviated.
When one spinous process is deeply set and the adjacent spinous process above is prominent, pressure over the prominent spinous process usually provokes a superficial sharp pain while pressure over the sore deeply set spinous process, if firm and sustained, produces a very deeply felt pain. These findings indicate that the joint between them is abnormal and is the possible site of origin of symptoms.
Passive accessory intervertebral movements (PAIVMs)
The two main movements to be tested in the thoracic spine are posteroanterior central vertebral pressure and transverse vertebral pressure, and these are described on pages 201–202 and 204. As has been stated before, these movements can be varied both in the point of contact that produces them and in the inclination of movement. The other movement that is important for examination purposes by palpation is posteroanterior unilateral vertebral pressure, which is described on pages 206–207. It is also essential that costovertebral and intercostal movements are assessed for their range and pain response. These are described, respectively, on pages 207–208.
In earlier editions of this book, in the chapter regarding selection of techniques, the suggestion was made that the direction of transverse pressures should be performed initially towards the side of pain. This statement is based on the fact that the technique opens the intervertebral space on the side of pain, thus avoiding provoking pain. This is not to say that the technique should never be performed in the opposite direction, and nor should provoking the pain be the aim, as will now be explained.
It is sometimes very useful to assess responses one day after the examination and treatment and use of the ‘D-plus-1’ response should be made in chronic disorders when other test movements are uninformative. Therefore, when a patient with a chronic skeletal disorder causing unilateral referred pain is examined at the first consultation, part of the palpation examination that should be emphasized is the use of transverse pressure from the side of the referred pain against the spinous process of three or four adjacent vertebrae at the appropriate level. The aim is to endeavour to provoke the referred pain. If this is not achieved at the first consultation, its repetition may sensitize the joint at fault and thus make the same transverse pressure provoke the referred pain at the second consultation – i.e. on ‘D-plus-1’ (D+1).
Differentiation test by palpation
When transverse pressure on, say, T7 to the right provokes the patient's pain, it may be necessary to determine whether the symptoms are arising from the T7/8 intervertebral joint or the T7/6 intervertebral joint. The technique for doing this has been described fully on page 205.
Passive range of physiological movements of single vertebral joints (PPIVMs)
As has been stated before, the oscillatory testing movement is performed more slowly (as a general rule) than it is when used as a treatment technique. This is only because sometimes the through-range quality of movement is less easily appreciated with quicker movements. The end-of-range feel can sometimes be determined by applying an over-pressure component to the testing oscillatory movement.
The movements are described below for the selected intervertebral levels.
C7–T4 (flexion)
Starting position: With the patient sitting, the physiotherapist stands in front of him and slightly to the patient's right. She rests her left hand over his right shoulder with the middle finger positioned between two spinous processes, while the index finger palpates the upper margin of the spinous process of the upper vertebra and the ring finger palpates the lower margin of the lower spinous process. To produce a firm yet comfortable grasp with the left hand, the pad of the thumb is placed in the supraclavicular fossa. The right hand and forearm are placed over the top of the patient's head so that they lie in the sagittal plane. The fingers and thumb grasp the occiput near the nuchal lines, and the wrist is flexed to permit firm pressure on the front of the head by the forearm (Fig. 5.22).
Method: Movement of the patient's head is controlled by the physiotherapist's right hand and forearm. All scalp looseness must be taken up by the grasp between the fingers and forearm to permit complete control of the patient's head and make him feel that support of his head can be left to the physiotherapist.
As the amount of movement that can be felt at this level is much less than elsewhere in the vertebral column, two complementary actions are necessary to produce the maximum intervertebral movement. First, the oscillation of the head and neck needs to be through a range at least of 30° performed near the limit of forward flexion. Secondly, because the lever producing movement is long, pressure by the three palpating fingers over the spine will help to localize movement as the head is moved back through a range of 30°.
The intervertebral movement is felt by the ring, middle and index fingers as the spinous processes move away from and towards each other during the back and forth movements of the head and neck.
C7–T4 (flexion/extension)
An alternative method for testing flexion, which is more convenient if rotation and lateral flexion are also to be tested, is performed with the patient lying on his side.
Starting position: The patient lies comfortably on his right side, near the forward edge of the couch, with his head resting on pillows. The physiotherapist stands in front of the patient, cradling his head in her left arm with her fingers covering the posterior surface of his neck, her little finger reaching down to the vertebral level being examined. She stabilizes his head between her left forearm and the front of her left shoulder. Next she leans across the patient, placing her right forearm along his back to stabilize his thorax, and palpates the under-surface of the interspinous space with the pad of her index or middle finger facing upwards (Fig. 5.23).
Method: With her left arm, the physiotherapist flexes and extends the patient's lower neck as much as possible. The spine above C6 and the head are not flexed or extended, because movement in this area makes movement in the test area less controlled and less isolated. The patient's head and neck are moved only until the particular joint tested has come to the limit of its range.
C7–T4 (lateral flexion)
Method: The starting position is identical with that described for flexion/extension. The purpose of this method is to achieve lateral flexion at the particular joint being tested, and therefore the head does not laterally flex but rather is displaced upwards. Lateral flexion is produced by the physiotherapist lifting the patient's head with a hugging grip of his head, the majority of the lift being achieved by the ulnar border of her left hand against the underside of his cervicothoracic junction (Fig. 5.24). To test lateral flexion in the opposite direction, the patient must lie on his other side. The palpating finger feels for movement between the two adjacent spinous processes. The upper process moves first, and when the lower process starts to move this will signal the extent of the lateral flexion at this particular intervertebral level.
C7–T4 (rotation)
Method: The starting position is again the same as for flexion/ extension. To produce the rotation properly, it is necessary to concentrate on moving the joint being examined without causing any tilting or flexing of the head and neck. Movement of the upper spinous process in relation to its distal neighbour is palpated through the pad of the physiotherapist's index or middle finger, which is facing upwards against the underside of the interspinous space.
With the patient's head cradled between the physiotherapist's left forearm and shoulder, and his lower neck firmly gripped in the ulnar border of her hand between the little finger and the hypothenar eminence, she rotates his lower cervical spine towards her. This is achieved by elevating her scapula to its highest point while maintaining a stable thorax (Fig. 5.25). As the movement is difficult to achieve accurately, more care is needed than with the other movements tested in this area.
T4–11 (flexion/extension)
Starting position: The patient sits with his hands clasped behind his neck while the physiotherapist, standing by his left side, places her left arm under his left upper arm and grasps his right upper arm in her supinated hand. She places her right hand across his spine just below the level being tested, and the pad of the tip of the middle finger in the far side of the interspinous space to feel adjacent spinous processes.
Method: While the patient relaxes to allow his thorax to be flexed and extended, the physiotherapist takes the weight of his upper trunk on her left arm.
To test flexion, she lowers his trunk from the neutral position until movement can be felt to have taken place at her right middle finger; the patient is then returned to the neutral position by lifting under his arms. The oscillatory movement through an arc of approximately 20° of trunk movement is facilitated if the patient is held firmly and if the physiotherapist laterally flexes her trunk to the left as she lowers the trunk into flexion. This makes the return movement one of laterally flexing her trunk to the right rather than lifting with her left arm.
The extension part of the test is carried out in much the same way, except that the physiotherapist assists the trunk extension with the heel and ulnar border of her right hand. In doing this she must be careful to keep the pad of her middle finger in a constant position between the adjacent spinous processes. Movement of the patient's trunk is from the neutral position into extension. It is important to remember that it is movement at only one joint that is being examined, and therefore large trunk movements are not necessary; in fact they detract from the examination.
T4–11 (lateral flexion)
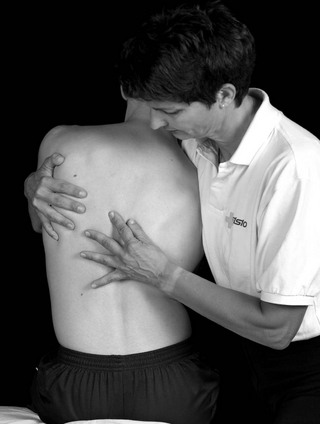
Starting position: The patient sits and holds his hands behind his neck or crosses his arms across his chest while the physiotherapist stands side-on behind his right side reaching with her right arm to hold high around and behind his left shoulder. She grips his trunk firmly between her right arm and her right side in her left axilla. This high grasp with the right hand is necessary for examination of the higher levels; as the examination extends below T8, so the grasp needs to be taken down to the lower scapular area. She places the heel of her left hand on the right side of his back at the level being examined, spreads her fingers for stability, and places the tip of the pad of her flexed middle finger in the far side of the interspinous space of the joint to be tested (Fig. 5.26).
Method
The physiotherapist laterally flexes the patient's trunk towards her by displacing his trunk away from her with the heel of her left hand and her costal margin, and laterally flexing his upper trunk by lifting her right arm and pressing downwards with her right axilla. She palpates for the interspinous movement through the pad of her middle finger, ensuring that during the lateral flexion her finger moves with the spine, maintaining even contact against the spinous processes. The palpating finger feels the space between the spinous processes open and close as the patient's trunk is laterally flexed and returned to the neutral position.
Lateral flexion in the opposite direction can be palpated without a change of position simply by laterally flexing the patient's trunk the other way. However, it is more accurate to change sides and reproduce the technique on the opposite side.
T4–11 (rotation)
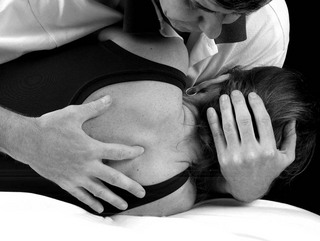
Starting position: Although rotation can be tested in the sitting position, it is more easily and more successfully tested when the patient is lying down. The patient lies on his left side with his hips and knees comfortably flexed while the physiotherapist, standing in front of the patient, leans over his trunk to cradle his pelvis between her left side and her left upper arm. This position stabilizes the patient's pelvis. The physiotherapist's forearm is then in line with the patient's spine, and her hand reaches the level where movement is to be examined. She then places her left hand on his spine with the pad of her middle finger facing upwards against the under-surface of the interspinous space to feel the bony margins of the adjacent spinous processes. With her right hand, she grasps as far medially as possible over the patient's suprascapular area and places her forearm over his sternum or grasps the patients elbow over his sternum (Fig. 5.27).
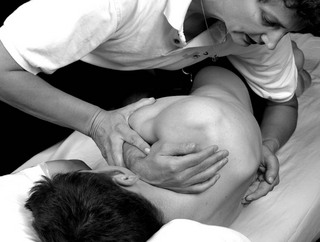
Method: The patient's trunk is repeatedly rotated back and forth by the physiotherapist's right forearm and hand through an arc of approximately 25°. Care must be taken to ensure that the movement does not include scapulothoracic movement. To examine movement in the upper thoracic intervertebral joints, the arc of movement should be performed just behind the frontal plane. As lower intervertebral joints are examined, the arc of rotation used to assess movement moves backwards until an arc of rotation between 40 and 60° from the frontal plane is used to examine the movement between T10 and T11. The palpating finger must follow the patient's trunk movement, and when movement occurs at the joint being examined, the upper spinous process will be felt to press into the pad of the middle finger, which is facing upwards. When the lower spinous process starts to move, this is the extent of rotation at the intervertebral level.
Examination and treatment techniques
Passive mobilization techniques can be used for the treatment of disorders associated with thoracic and related pain and also in examination to establish the direction and dosage of treatment technique.
Mobilization
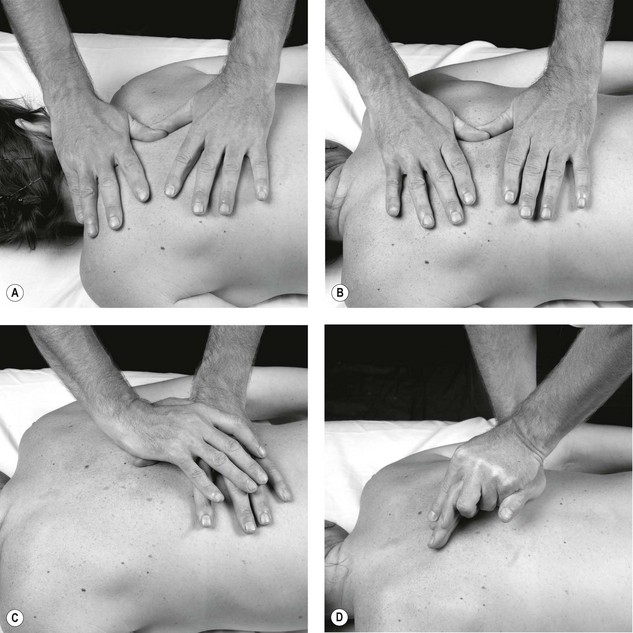
Posteroanterior central vertebral pressure ()
Starting position: The patient lies prone, either with his forehead resting on the backs of his hands or with his head comfortably turned to one side and his arms lying by his sides on the couch. The position depends on the amount of chest tightness created by the ‘arms up’ position, which is usually reserved for upper thoracic mobilization.
If the patient is on a low couch, the physiotherapist's position for mobilizing the upper thoracic spine (approximately T1–5) needs to be at the head of the patient with her shoulders over the area to be mobilized to enable the direction of the pressure to be at right angles to the surface of the body. The pads of the thumbs are placed on the spinous process, pointing transversely across the vertebral column, and the fingers of each hand are spread out over the posterior chest wall to give stability to the thumbs. As the spinous processes are large, the thumbs may be positioned tip to tip or with the tips side by side in contact with the upper and lower margins of the same spinous process. To gain the best control and feel of movement with the least discomfort to the patient, the pressure should be transmitted through the thumbs so that the interphalangeal joints are hyperextended. This enables the softest part of the pad to be flat over the spinous processes, with a slight degree of flexion in the metacarpophalangeal joints. Not only is this more comfortable for the patient, but it hinders the physiotherapist's intrinsic muscles from producing the pressure.
To mobilize the mid-thoracic spine (T5–9), the physiotherapist should stand at the patient's side with her thumbs placed longitudinally along the vertebral column so that they point towards each other. The fingers can then spread out over the posterior chest wall, to each side of the vertebral column above and below the thumbs.
It may be more comfortable (and this is far easier to do if the patient is lying on a low couch) for the physiotherapist to stand to one side of the patient, approximately at waist level and facing his head, and place the pads of the thumbs on the spinous process pointing across the vertebral column. The fingers of each hand can then spread over opposite sides of the posterior chest wall for stability.
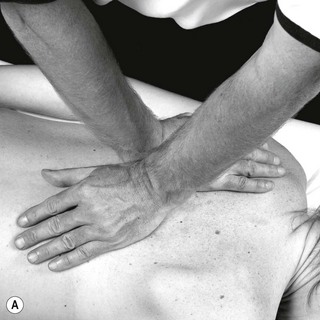
For the lower thoracic spine (T10–12), the physiotherapist's position depends upon the shape of the patient's chest. Either of the latter two positions described above may be used, but the essential factor is that the direction of the pressure must be at right angles to the body surface at the level. This means that the shoulders may need to be anywhere between vertically above the lower thoracic spine and vertically above the sacrum (Fig. 5.28). If the patient has difficulty lying prone because extension is painful, a small pillow under the chest will assist. The physiotherapist's position must also allow pressure to be applied to the spinous process using the anteromedial aspect of the fifth metacarpal, similar to that described in Chapter 6, for the lumbar spine. However, it may be essential to avoid direct contact between the pisiform and the spinous process for the sake of comfort (Fig. 5.28).

Method: The mobilizing is carried out by an oscillating pressure on the spinous processes, produced by the body and transmitted through the arms to the thumbs. It is important that this pressure is applied by the body weight over the hands and not by a squeezing action with the thumbs themselves. The fingers, which are spread out over the patient's back, should not exert any pressure but act only as stabilizers for the thumbs. It is easy to dissipate the pressure and lose the effectiveness of the thumbs by faulty use of the fingers.
If the physiotherapist's elbows are kept slightly flexed and the thumbs maintained in the position of hyperextension of interphalangeal joints and slight flexion of metacarpophalangeal joints, the pressure can be transmitted to the pads of the thumbs through this series of strong springs. This springing action at the joints can readily be seen as the body weight is applied during the mobilizing.
Local variations: The degree of pressure required in the upper thoracic spine to produce movement is far greater than that required in the cervical spine, and slightly stronger than that required for the remainder of the thoracic spine.
The degree of movement possible in the middle and lower thoracic spine is considerable, and it is here that it is easiest to learn a feeling of movement. The degree of movement possible in the upper thoracic spine is considerably limited, and this is particularly so between T1 and T2.
Uses: Posteroanterior central vertebral pressure is as useful for the thoracic spine as rotation is for the cervical spine. In all symptoms arising from the thoracic vertebrae, it is worth trying this procedure first.
‘Central pressure’ is more likely to be successful with symptoms that are situated in the midline or evenly distributed to each side of the body, but it should also be tried for unilateral symptoms, particularly if they are ill-defined or widespread in their distribution.
Examples of treatment include: glove distribution symptoms, page 186 and Figure 5.14; thoracic backache, page 174 and Figure 5.1; and traumatic girdle pain, pages 185–186.
Rotary posteroanterior intervertebral pressures
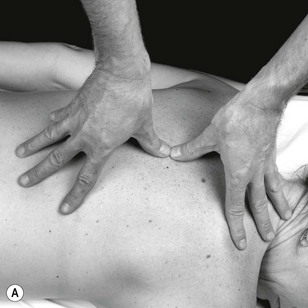
Starting position: The patient lies prone with his arms by his side while the manipulative physiotherapist stands alongside the patient (in this case by his right side). She places her right hand between the spine and his right scapula, and her left hand between the spine and his left scapula, and transmits pressure through the lateral surface of the hypothenar eminence near the pisiform bone. To reach the final position, the first step is to place the ulnar border of each hand in a line across the patient's back in parallel lines, the right hand being slightly caudad to the joint to be mobilized and the left hand slightly distal to the joint to be mobilized. At this preliminary stage the physiotherapist's forearms are also directed across the patient's back at right angles to the vertebral column, and her pisiform bone is tucked into the space between the paravertebral muscles and the spinous processes. The next step entails taking up the slack in the soft tissues. This is achieved by applying both posteroanterior and rotary pressures; the rotary pressure is achieved by changing the direction of the forearms, in a swinging or twisting fashion, from across the body to somewhat caudad (the right arm) and cephalad (the left arm) as well as laterally. The final stage is that of being certain that all of the slack has been taken up and that the pisiform bones are now opposite each other at the same intervertebral level (T6/7; Fig. 5.29A).
Method: When used as a mobilization, the technique consists of an oscillatory movement with three directions; posteroanterior, cephalad and caudad, and lateral. It can be performed as a very localized movement by using the pisiform as the main contact point through which the pressure is transmitted, or it can be performed much more comfortably over a wider area by utilizing the base of the palm of the hand together with the thenar and hypothenar eminences.
The technique can be performed rhythmically with increasing and decreasing posteroanterior pressure in time with the patient's breathing rhythm.
It can also be used as a manipulative thrust, usually at the end of the patient's expiration. There are times when the technique can be usefully employed in the lumbar spine.
Uses: The technique can be selected when movement is desired in a posteroanterior direction but the spinous processes are too tender for direct contact.
The ranges of movement of single costovertebral, costotransverse and intervertebral joints are quite small, and yet if this technique is performed through the palm of the hand as described above, quite considerable movement between three or four contiguous levels can be achieved. This can produce immediate comfort and improvement in movement (Fig. 5.29B).
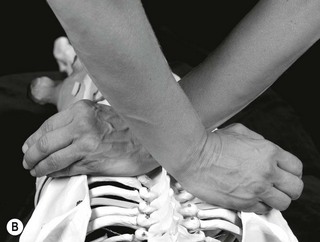
Transverse vertebral pressure ()
Starting position: When the middle and lower thoracic vertebrae are to be mobilized with transverse pressures, the patient lies prone with his arms hanging over the sides of the couch or by his side to aid relaxation of the vertebral column. The head should be allowed to rest comfortably by being turned to one side, preferably towards the side where the physiotherapist stands. However, as this head position tends to produce some degree of rotation in the upper thoracic vertebrae, it is better for the patient to adopt the ‘forehead rest’ position when these vertebrae are to be mobilized in order to eliminate any rotation. Alternatively, some couches have a hole to allow the head to remain centrally placed. In some cases it may be useful to rotate or derotate the spine using the head position to produce the movement. If the mobilization technique needs to be performed strongly as a Grade IV1, it may help to ask the patient to face towards the manipulative physiotherapist.
The physiotherapist stands at the patient's right side at the level of the vertebrae to be mobilized, and places her hands on the patient's back so that the pads of the thumbs are adjacent to the right side of the spinous processes while the fingers are spread over the patient's left ribs. The left thumb acts as the point of contact and is fitted down into the groove between the spinous process and the paravertebral muscles, so that part of the pad of the thumb is pressed against the lateral aspect of the spinous process on its right-hand side. It is essential to have as much of the pad in contact with the spinous process as is possible. To prevent the thumb sliding off the spinous process, the palmar surface of the metacarpophalangeal joint of the index finger must be firmly brought down on top of the interphalangeal joint of the thumb. This is a valuable position to learn to adopt, as its stability is of value in other techniques. The right thumb, acting as reinforcement, is placed so that its pad lies over the nail of the left thumb. This thumb relationship is chosen because considerable effort is required to keep a single thumb comfortably against the spinous process.
The fingers of both hands should be well spread out over the chest wall to stabilize the thumbs, and the wrists need to be slightly extended to permit the pressure to be transmitted through the thumbs in the horizontal plane. Because of the slightly different functions required of the left and right thumbs, the left forearm is not as horizontal as the right forearm (Fig. 5.30).
Method: The pressure is applied to the spinous process through the thumbs by the movement of the trunk; alternate pressure and relaxation is repeated continuously to produce an oscillating type of movement of the intervertebral joint. For the gentler grades of mobilizing, very little pressure is needed. When stronger mobilizing is used, movement of the patient's trunk is involved and timing of pressures should coincide either with the patient's rolling or, in order to make the technique stronger, to go against the rolling.
Local variations: The upper thoracic spinous processes (T1–3/4) are readily accessible but have a limited amount of movement, T1 being almost immovable. The lower thoracic vertebrae (T8/9–12) are more easily moved and do not require great pressure. Local tenderness in these two areas is comparatively negligible. Mobilization of the mid-thoracic spine is made difficult by the relative inaccessibility of the spinous processes and natural tenderness, and when a painful condition is superimposed on this natural tenderness, adequate mobilization may be very difficult. Where stronger techniques are required to be performed for longer periods, better effect may be gained by reinforcing the contact thumb with the pisiform of the opposite hand rather than with the opposite thumb pad. In this way, the fingers can be spread over the chest wall and the movement can be produced through the thumb and hand via the therapist's trunk.
Uses: This technique is particularly useful for pain of unilateral distribution in the thoracic area. In such cases the pressure is best applied against the side of the spinous process that is away from the pain, applying the pressure towards the patient's painful side. When using this technique it is frequently necessary to mobilize the ribcage by a posteroanterior pressure directed through the angle of the rib. If progression is needed, the manipulative physiotherapist may need to clear the joint signs by using pressure on the spinous process on the painful side and towards the pain-free side.
Examples of treatment include pain simulating cardiac disease, page 175; scapula pain, page 176; thoracic backache; traumatic girdle pain, page 185; and abdominal pain and vague pains, page 175.
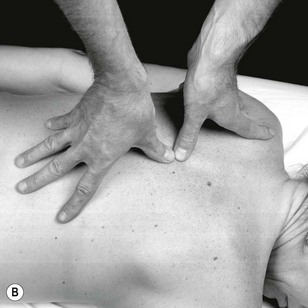
Posteroanterior unilateral vertebral pressure ( )
)
Starting position: The patient lies prone with his head turned to the left and his arms hanging loosely over the sides of the couch or by his side.
To mobilize the left side of the middle or lower thoracic spine (approximately T5–12), the physiotherapist stands on the left side of the patient and places her hands on the patient's back so that the pads of the thumbs, pointing towards each other, lie over the transverse processes. The fingers of the left hand spread over the chest wall pointing towards the patient's head, while the fingers of the right hand point towards his feet and the thumbs are held in opposition. By applying a little pressure through the pads of the thumbs, they will sink into the muscle tissue adjacent to the spinous processes until the transverse process is reached. The metacarpophalangeal joint of the thumb needs to be slightly flexed and the interphalangeal joint must be hyperextended to enable the pad of the thumb to transmit the pressure comfortably. When a much finer degree of localization of the pressure is required, the thumbnails should be brought together so that the tips of the thumbs make a very small but comfortable point of contact. In this position, the metacarpophalangeal joints of the thumbs are brought much closer together to lie directly above the thumb tips. The physiotherapist's shoulders and arms, with slightly flexed elbows, should be in the direct line through which the pressure is to be applied, and this is at right angles to the plane of the body surface.
Because of the curve of the thoracic spine, it is necessary when mobilizing the upper levels (T1–4) to stand either at the patient's head or towards the shoulder of the side being mobilized to accommodate the necessarily altered angle of the physiotherapist's arms. It is advisable to use the largest amount of the pad of the thumb that can be brought into contact with the transverse process, to enable the pressure to be administered as comfortably as possible (Fig. 5.31).

Method: A very steady application of pressure is necessary to be able to move some of the muscle belly out of the way and make bone-to-bone contact. As this procedure can be quite uncomfortable for the patient, care must be given to the position of the arms and hands to enable a spring-like action to take place at the elbows and the thumbs. This reduces the feeling of hardness and soreness between the physiotherapist's thumbs and the patient's transverse process that is present if the pressure is applied by intrinsic muscle action.
Once the required depth has been reached, the oscillating movement at the intervertebral joint is produced by increasing and then decreasing the pressure produced by trunk movement.
Local variations: Because of the structure and attachments of the ribcage, it is not possible to produce very much movement with this mobilization.
Some people may find it easier to carry out the mobilization using the hands (as described for the lumbar spine) instead of the thumbs, but this should be discouraged as the thumbs have a greater degree of ‘feel’ and can localize the mobilization more accurately. They also cause much less discomfort to the patient – a factor of considerable importance. When the hands are used, the technique is frequently more vigorous than is required.
Uses: Posteroanterior unilateral vertebral pressure is used, almost entirely, for unilateral distributed pain arising from the thoracic spine, and the technique is done on the painful side. Unless the patient's pain is severe, it is less likely to produce a favourable change in the patient's signs and symptoms if it is done on the side away from the pain. When this technique is used in the presence of spasm the pressure must be steadily applied and not hurried, in order to allow time for the spasm to relax.
Posteroanterior unilateral costovertebral pressure ()
Starting position: The patient lies prone with his arms by his side or hanging over the sides of the couch, and the physiotherapist stands at the side of the patient where the mobilization is to be effected. The physiotherapist's thumbs are placed along the line of the rib at its angle so that the maximum area of contact can be made between the thumbs and the rib (Fig. 5.32A). Alternatively, the whole ulnar border of the hand and little finger may be used to produce the movement (Fig. 5.32B).
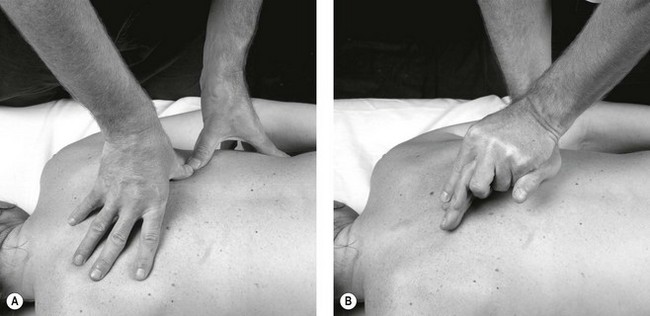
Method: An oscillatory movement is transmitted to the rib by the thumbs or hands, and the range of movement produced at one rib angle is compared with that produced at the rib angles above and below. The pain produced by the movement of the faulty rib is also compared with the pain (if any) produced at the rib above and the rib below. Similarly, both the range of the movement and the pain should also be compared with the ribs on the opposite side of the body.
Local variations: First rib. Examination of the first rib is somewhat different from that of the other ribs as the technique can be applied in three ways due to a greater area of the rib being palpable.
1. The pressure can be applied against the rib posteriorly through the trapezius muscle, and the direction of the pressure is not only posteroanteriorly but is also inclined towards the feet (Fig. 5.33).
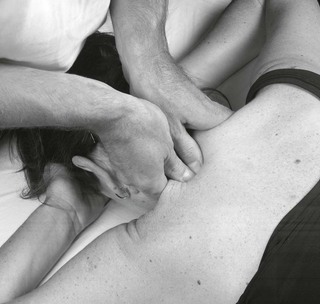
2. Alternatively, the physiotherapist can place her thumbs underneath (anterior to) the muscle belly of the trapezius and the direction of the pressure can be inclined a little more towards the feet as well as being posteroanteriorly directed (Fig. 5.34).
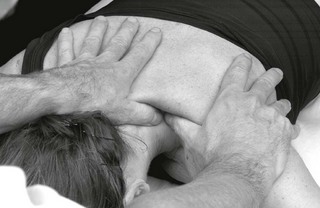
3. For the next technique that mobilizes the first rib, the patient lies supine while the physiotherapist, standing at the patient's shoulder level of the side to be treated, applies the pressure to produce the oscillatory anteroposterior and caudad movement on all parts of the first rib that are palpable (Fig. 5.35). The symbol for this technique is  R1.
R1.
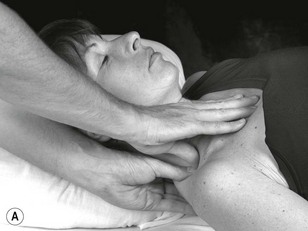
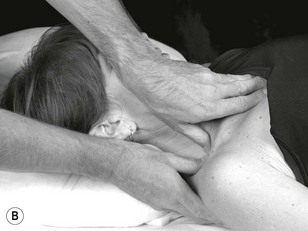
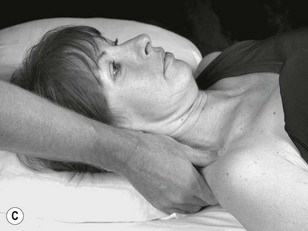
Other ribs. All of the ribs can be examined throughout their entire length by thumb palpation, including the costochondral junctions and the junction with the sternum. The freedom of movement between adjacent ribs can also be tested, but as these are not part of the vertebral column they are not described in this book. They are, however, described in Peripheral manipulation (Maitland 1970).
A technique performed with the patient supine is described below.
Uses: Whenever treatment is applied to the thoracic intervertebral joints, the inclusion of mobilization of the ribs should be considered for two reasons:
1. It is frequently difficult to assess whether a patient's pain arises from the intervertebral joint, the costovertebral joint or the costotransverse joint. Therefore, if mobilization of the thoracic intervertebral joint is not producing adequate improvement when used on a patient, mobilization of the rib at its angle should be added to the intervertebral mobilization.
2. If the rib is moved as a treatment technique, it must also create some movement at the intervertebral joint. This combination may hasten the rate of progress.
If pain is in a referred area of the ribcage, the symptoms may be arising from some abnormality between adjacent ribs. Palpation will reveal abnormalities of position and of movement between adjacent ribs. This aspect of treating costal pain is described in Peripheral manipulation (Maitland 1970).
Thoracic spine: rotation to the right (T2–12)
Starting position: The patient lies supine with his arms folded across his chest, resting his hands on the opposite shoulders (Fig. 5.36). The physiotherapist stands on the right-hand side of the patient, taking hold of the left shoulder with the left hand and the left iliac crest with the right hand (Fig. 5.37). The trunk is then rolled towards the therapist so that the left shoulder comes off the couch, exposing the thoracic spine. The right hand is then placed so that the flexed interphalangeal joint of the thumb is placed over the transverse process of the thoracic vertebrae to be rotated, allowing the fingers to lie across the thoracic spinous process.
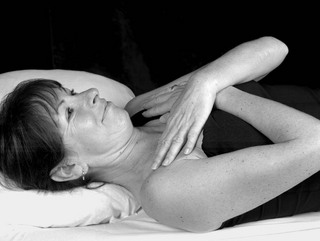
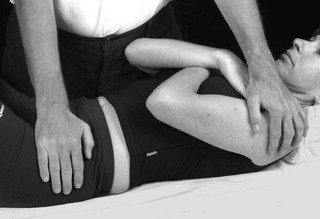
The contact hand is positioned in such a way as to allow the thumb to be flexed at the interphalangeal joint and adducted and slightly opposed at the metacarpo-interphalangeal joint so that it lies in contact with the palm of the hand, the proximal phalanx being in line with the index finger.
The index finger of the right hand is placed over the spinous process of the vertebrae being rotated (Fig. 5.38). The patient's trunk is then rolled backwards over the right hand, and the therapist leans over the patient so that the patient's flexed forearms are tucked into the physiotherapist's chest (Fig. 5.39).
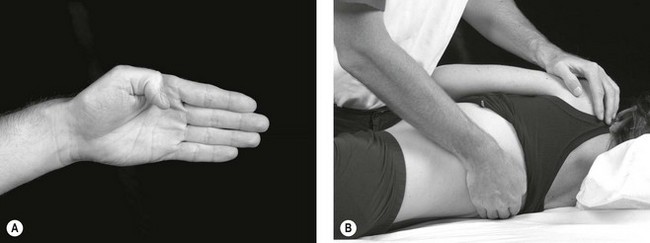
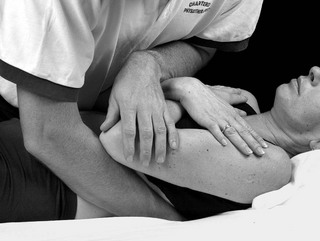
Mobilization of the ribs (R2–12)
The same position is adopted as above, with the exception that the right hand is placed so that the right flexed thumb is over the angle of the rib, allowing the fingers to be directed towards the thoracic spinous processes. The index finger is in contact with the spinous process of the vertebrae, to whose transverse process the rib is attached (Fig. 5.40).
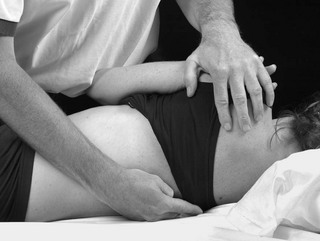
Thoracic traction
An example of treatment is thoracic backache, page 176.
Traction can be administered to the thoracic spine just as readily as it can to the cervical and lumbar areas, and the guiding principles are exactly the same. However, it is true to say that it is less frequently successful than it is in either of the other two areas, and this may be due, at least in part, to the presence of the thoracic cage.
The principle is to position the vertebral column so that the particular joint to be treated is in a relaxed position midway between all ranges. The amount of pressure to be used is guided first by movement of the joint, with further changes in tension made in response to changes in the patient's symptoms as outlined for cervical traction. Further treatments are guided by changes in symptoms and signs.
Upper thoracic spine (TT  )
)
Starting position: The patient lies on his back with one or two pillows under his head to flex the neck until the intervertebral level to the treated is positioned midway between flexion and extension. A cervical halter is then applied in the same way as has been described for cervical traction in flexion. If a lower level is to be treated and if the strength of the traction needs to be very firm, it may become necessary to apply some form of counter-traction. A belt is fitted around the pelvis and is attached to the foot end of the couch to stabilize the distal end of the vertebral column. The halter is then attached to its fixed point so that the angle of the pull on the neck will be approximately 45° to the horizontal. The actual angle used varies with the amount of kyphosis present in the upper thoracic spine, and it should be an angle that will allow the thoracic intervertebral joint to be moved longitudinally while in a position midway between its limits of flexion and extension. To relieve strain on the patient's lower back during the period when the traction is being applied, his hips and knees may be flexed (Fig. 5.41).
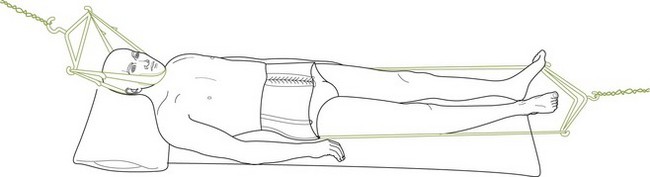
Method: The traction can be adjusted from either end or from both ends, but whichever method is used, care must be taken to ensure that friction between the patient's trunk and the couch is reduced to a minimum. This can be done while the traction is being applied by gently lifting the weight of the patient's thorax or pelvis off the couch and allowing it to relax back into a new position. Friction is almost completely eliminated by a couch whose surface is in two halves that are free to roll longitudinally. Releasing the traction does not present any problem, but it is advisable to release slowly.
Lower thoracic spine (TT )
Starting position: For the lower thoracic spine, a thoracic belt similar to that used for lumbar traction is used in place of the cervical halter. Traction is usually more effective if it is carried out with the patient supine, but it can be done with him prone.
The thoracic belt is applied to hold the chest above the level of the spine to be treated, and it is then attached to its fixed point. After this the pelvic belt is applied and attached to its fixed point. The direction of the pull is then longitudinal in the line of the patient's trunk, but pillows may be needed to adjust the position of the spine so that the joint being moved is relaxed midway between flexion and extension (Fig. 5.42).
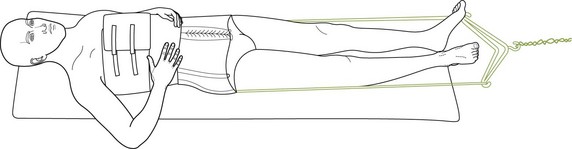
Method: Traction is applied from either end or from both ends, but again care is required to reduce friction to a minimum both at thoracic and at pelvic levels. As mentioned previously, a roll-top couch eliminates friction. A simple, cheap and extremely effective roll-top couch is described below.
Releasing the traction should be done steadily, and the patient should rest for a short time before standing.
Intermittent variable traction can also be used in this area of the spine, and the details of times for ‘rest’ and ‘hold’ periods are the same as have been discussed for the cervical spine.
Local variations: The thoracic kyphosis varies considerably from person to person, and the positioning of the patient is controlled by this curve. Theoretically, the direction of the pull may be thought of as being at right angles to the upper and lower surfaces of the intervertebral disc at the level that is being moved. The kyphosis usually influences the position for upper thoracic traction more than for the lower thoracic spine.
Precautions: A check must be kept on the patient to ensure that the traction does not cause any low-back pain.
As with the cervical traction in flexion, it is possible for the head halter in upper thoracic traction to cause occipital headache, but this can be eliminated by the means already described.
Uses: Traction is of greatest value in patients who have widely distributed areas of thoracic pain, particularly if they are associated with radiological degenerative changes in the thoracic spine. It is also of value for patients whose thoracic symptoms do not appear to be aggravated by active movements of the spine or when neurological changes are present. Similarly, it is the treatment of choice for patients with severe nerve-root pain. Whenever mobilizing techniques have been used in treatment without achieving the desired result, traction should be tried.
Sometimes a patient is able to guide the therapist as to what to do because his body tells him what it wants (and what it doesn't want). Figure 5.43 is a perfect example of such a case. The patient's disorder had been very difficult to help in that progress gained at a treatment session was not retained well enough. The disorder was at the level of T6/7, and had been responding to extremely gentle traction. One day the patient said that he needed the traction, but he also needed to have the vertebra pushed backwards and towards the left while having the levels above twisted to the right. Figure 5.44 shows how the position was obtained while the mobilizing was produced through the patient's sternum. He claimed that he was 60% better after the first of these treatments, and 80% better after the second. At his suggestion, treatment was discontinued, and on review 12 months later he showed no signs of recurrence.

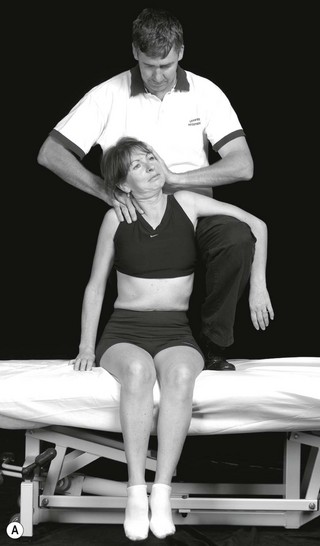
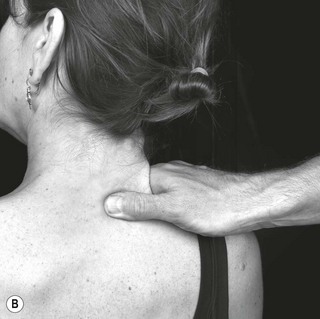
Grade V manipulation overview
Evans & Lucas (2010) reviewed the definitions of manipulation in its specific sense as:
High velocity, low amplitude passive movements that are applied directly to the joint or through leverage.
(CSP 2006)
A manual procedure that involves a direct thrust to move a joint past the physiological range of motion, without exceeding the anatomical limit.
The key features of a grade V manipulation technique are:
Action (by the therapist to the patient)
• A force is applied to the patient at a specific joint or spinal segment.
• The direction of force is perpendicular to the surface of the joint.
• The magnitude of this force increases to a peak over a finite period of time (100–200 ms; Herzog 2000).
Mechanical response (occurring within the patient)
• The force applied (100–150N in the cervical spine; Herzog 2000) produces motion at the joint.
• The joint motion always included articular surface separation.
• The velocity of joint motion is variable.
• The sum displacement of the articulating bones is usually zero.
• Cavitations occur within the affected joint (the formation and activity of bubbles or cavities within synovial fluid, formed when tension is applied to the fluid as a result of local reduction in pressure; Evans & Breen 2006).
The clinical prediction rules to identify patients with neck pain likely to respond to thoracic manipulation (Cleland et al. 2007) include:
• Duration of symptoms less than 30 days
• No symptoms distal to the shoulder
• Looking up does not aggravate symptoms
• Fear-avoidance beliefs questionnaire (FABQPA) score less than 12
Proposed mechanisms of effect of spinal manipulation (Evans & Breen 2006):
• Mechanical release of entrapped and painful intraarticular material
• Relaxation of hypertonic muscle
• Disruption of restrictive articular and periarticular adhesions
Clinical reasoning considerations for thoracic spinal manipulation:
Precautions (Maitland 1986)
Contraindications (Gibbons & Tehan 2001)
 any pathology that has led to significant bone weakening
tumour, e.g. metastatic deposits
iatrogenic, e.g. long-term steroids
• Patient positioning cannot be achieved because of pain, resistance, or protective spasm.
Relative contraindications (at risk for adverse reactions):
• Adverse reactions to previous manual therapy
• Spondylosis with osteophytes potentially causing nerve root or vascular compromise
• Spondylolisthesis/instability in the direction of the manipulation
• Anticoagulant or long-term corticosteroid use
• Advanced degenerative joint disease
• Psychological dependency upon high velocity low amplitude (HVLA) thrust techniques
Best practice involves the receiving of informed consent to carry out the intervention and should include information to the patient that clearly explains:
The manipulation procedure should include:
• An attention to detail in per-manipulation screening to establish relevant impairments and limitations.
• Support the decision to manipulate with evidence from the literature on clinical prediction rules, conditions known to respond to manipulation, and features of the clinical presentation which indicate that manipulation will achieve the desired outcome.
• Carry out a risk benefit analysis to ensure there are no structural, pathological or patient consent issues, which may put the patient in danger of adverse response or damage.
• Choose the most appropriate manipulation for the patient and therapist with attention to patient and therapist positioning and localization of forces.
• Carry out any pre-manipulation checks in the pre-manipulation, ‘set up’ position (that is any evidence of vascular, neurological or other structural compromise and/or patient distress/choice to go no further.
• Perform the action of the thrust to effect localized cavitations wherever possible.
• Re-assess immediately the effects of the manipulation on subjective and objective asterisks.
Principles and guidelines for manipulative thrust of the thoracic spine
As in other areas of the spine, the mobilization techniques described can be performed as very rapid small-amplitude thrusts. These may be general in distribution, covering more than one intervertebral level (as in rotary PAs described on p. 204), or they can be performed in a much more localized manner so that the emphasis of the movement is focused, as much as is possible, on a single intervertebral level. These more localized manipulative techniques are now described for the thoracic spine.
Intervertebral joints C7–T3 (lateral flexion  )
)
Starting position: The patient sits well back on a medium-height couch while the physiotherapist stands behind. To provide the patient with comfortable support, the physiotherapist places her left foot on the couch next to the patient's left buttock, rests the patient's left arm over her left thigh, and asks the patient to relax back against her. Localization of the manipulation is achieved by firmly placing the tip of the right thumb against the right side of the spinous process of the lower vertebra of the intervertebral joint. Pressure is applied horizontally in the frontal plane by this thumb, while the fingers spread forward over the patient's right clavicular area. These fingers also stabilize the vertebra. The next step is to flex laterally the patient's head to the right until the tension can be felt at the thumb. While maintaining the lateral flexion tension, the middle position between flexion and extension is found by rocking the neck back and forth on the trunk. After determining this position, rotation (face upwards) is added in small oscillatory movements until the limit of the rotary range is found. The therapist then positions both forearms to work opposite each other (Fig. 5.44).
Intervertebral joints T3–10 (PAs )
Starting position: The patient lies supine without a pillow and links his hands behind his neck while the physiotherapist stands by his right side. By grasping the patient's left shoulder in her right hand and both elbows in her left hand, the physiotherapist holds the patient in this position; she releases her hold on the shoulder and leans over the patient to palpate for the spinous process of the lower vertebra forming the intervertebral joint being manipulated. Still holding the patient in this position, the physiotherapist makes a fist with the right hand by flexing the middle, ring and little fingers into the palm but leaving the thumb and index finger extended. A small pad of material grasped in the fingers will give added support. This fist is then applied to the patient's spine (the thumb points towards the head) so that the lower spinous process is grasped between the terminal phalanx of the middle finger and the palmar surface of the head of the opposed first metacarpal. The patient is then lowered back until the physiotherapist's right hand is wedged between the patient and the couch. The weight of the patient's trunk is taken on the flat of the dorsum of the hand (not on the knuckles), and the forearm should project laterally to avoid interference with movement of the patient's trunk. If the surface of the couch is too hard, it will be difficult for the physiotherapist to maintain her grip on the spinous process. To achieve firm control of the patient's trunk, his elbows should be held firmly and pressed against the physiotherapist's sternum. However, when a patient has excessively mobile joints it may be necessary for him to grasp his shoulders with opposite hands while keeping the elbows in close apposition rather than clasping the hands behind the neck. The patient's upper trunk is then gently moved back and forth from flexion to extension in decreasing ranges until the stage is reached where the only movement taking place is felt by the underneath hand to be at the intervertebral joint to be manipulated (Fig. 5.45).
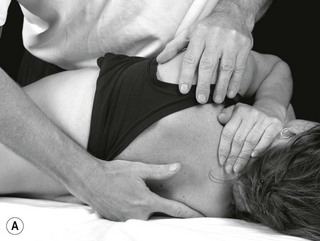
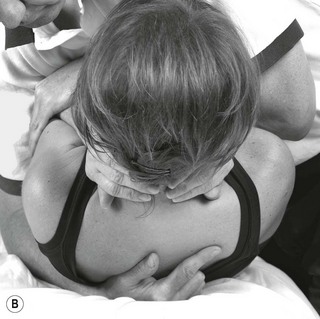
Method: Pressure is increased through the patient's elbows, causing stretch at the intervertebral joint, and the manipulation is then carried out by a downward thrust through his elbows in the direction of his upper arms. This thrust is transmitted to the patient's trunk above the underneath hand. The thrust may be given as the patient fully exhales.
Intervertebral joints T3–10 (longitudinal movement  )
)
Starting position: The patient sits well back on the couch and grasps his hands behind his neck, allowing his elbows to drop forwards. The physiotherapist stands behind the patient and threads her arms in front of his axillae to grasp over the dorsum of his wrists. When grasping his wrists, she encourages his elbows to drop forwards while at the same time holding his ribs firmly from each side with her forearms. She then turns her trunk slightly to one side to place her lower ribs against his spine at the level requiring manipulation. While feeling for movement with her ribcage, she flexes and extends his thoracic spine above the level to be manipulated until the neutral position between flexion and extension is found for the joint to be treated (Fig. 5.46).
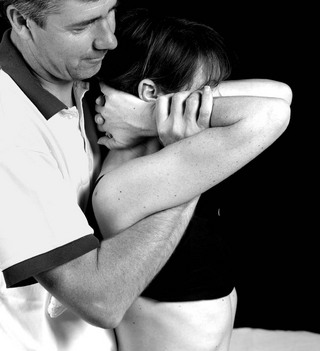
Method: The physiotherapist lifts the patient's trunk in the direction of the long axis of the joint being treated, and makes a final adjustment of the flexion/extension position to ensure that the mid-position has been retained. The manipulation then consists of a short-amplitude sharp lift.
Some degree of extension may be added into this technique. This extra movement is achieved by a very small movement with the therapist's ribs against the patient's spine, performed at the same time as the lift is executed through the arms.
Intervertebral joints T3–10 (rotation  )
)
Starting position: If rotation to the left is to be performed, the patient sits on the edge of the couch near the right-hand end while the physiotherapist stands behind his right side. The patient hugs his chest with his arms and turns his trunk to the left. For the mid-thoracic area, the physiotherapist reaches with her left arm around his arms to grasp his right shoulder while placing the heel of her right hand along the line of the right rib above the joint to be manipulated. She cradles his left shoulder in her left axilla (Fig. 5.47A). For the lower thoracic levels, she grasps around his chest under his arms to reach his scapula. This time she places the ulnar border of her right hand along the line of the ribs (Fig. 5.47B). With both techniques she then takes the movement to the limit of the range, taking up all slack.
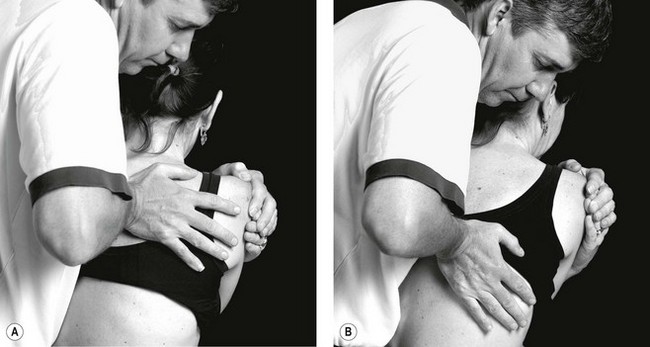
Method: The manipulation consists of a synchronous movement of the physiotherapist's trunk and an extra pressure through her right hand. With her trunk she carries out an oscillatory rotation back and forth at the limit of the rotary range. At the same time she maintains constant pressure with either the heel of her right hand or its ulnar border exerting an extra rotary push at the limit of the rotation. The manipulation consists of an over-pressure at the limit of the range, being done in a very small amplitude and very sharply.
Additional examination and treatment techniques for thoracic disorders
Cervical anteroposterior unilateral vertebral pressure ()
Starting position: The patient lies supine. A pillow is not used unless the patient has a ‘poking-chin’ postural abnormality. The physiotherapist stands by his head and makes a broad contact medial to the transverse process of the vertebra to be mobilized with both thumbs. The thumbs should be used with care, as direct bone-to-bone contact can be uncomfortable. She spreads her fingers around the adjacent neck area for stability while positioning her shoulders above the joint being treated (Fig. 5.48A).
Method: The oscillatory anteroposterior pressures are performed very gently, and the movement must be produced by the physiotherapist's arms and trunk. Any effort to produce the movement with intrinsic thenar muscle action will produce discomfort immediately.
This technique is not a comfortable one to use unless great care is taken. Also, the muscles lying over the area make direct contact rather difficult, and care should be taken to see that the thumbs are positioned medial to the transverse process. This means that at some levels the muscle belly needs to be moved to one side.
Local variations: This technique can be performed either unilaterally or bilaterally, as is shown in the diagrams (Fig. 5.48A and 5.48B). The intervertebral level to which one can reach varies enormously from patient to patient. In the stocky, heavily built patient with a short, thick neck, extending down into the thoracic area is almost impossible. Conversely, in the long-necked, slim person enough space is allowed to reach down to approximately T3 (Fig. 5.48C). With all patients, the technique can be used as high as C1.
Anteroposterior movement can be produced with the patient lying prone. The patient rests his forehead in his palms, and the physiotherapist grasps around the sides of the neck to hook the palmar surface of the pads of her fingers medial to the transverse process area. It is easy to localize the joint to be mobilized by the accurate placement of the fingers (Fig. 5.48D).
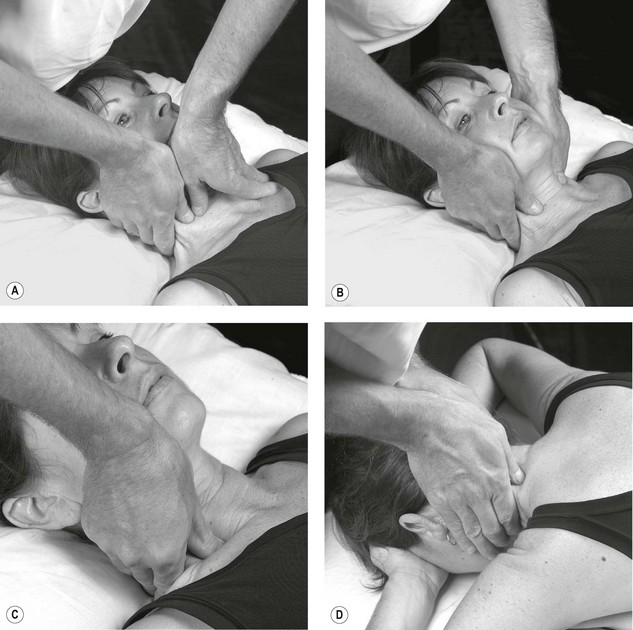
Uses: Application of this technique is reserved for patients whose symptoms, felt anterolaterally, can be reproduced by anteroposterior pressure on the side of the pain. Pain referred to the ear or throat can often be reproduced by this technique. Anterior shoulder pain, scapula pain (Cloward 1959) and headache associated with irritation of the stellate ganglia of the sympathetic chain may also be reproduced by this technique. Under all these circumstances, the described technique could be the treatment of choice.
Slump test
The test is called the slump test for two reasons. The first is that when the patient is sitting and the examiner wants him to adopt the position described below (point 2), most patients respond accurately and quickly to the instruction to slump. The second reason is that the action of adopting the test position parallels a test used by architects and engineers for assessing the consistency of wet concrete, which is also called the slump test.
With the patient sitting on the examination couch, the therapist proceeds as follows:
1. The patient is asked to sit well back until the posterior knee area is wedged against the edge of the examination couch so that uniformity of the test position is maintained. In this erect sitting position, he is asked to report any pain or discomfort (Fig. 5.49).
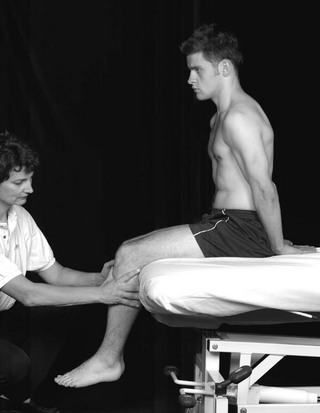
2. He is then asked to let his back slump through its full range of thoracic and lumbar flexion, while at the same time preventing his head and neck from flexing. Once he is in this position, gentle over-pressure is applied to the shoulder area to stretch the thoracic and lumbar spines into full flexion. The direction of pressure is a straight line from T1 to the ischial tuberosities, as though increasing the convexity of a bow by shortening its string (Fig. 5.50). Any hip extension that might take place, as would be the case if the convexity increased markedly, must be prevented by bringing the patient's shoulders closer to his knees. Any pain response in this position is noted (Fig. 5.51).
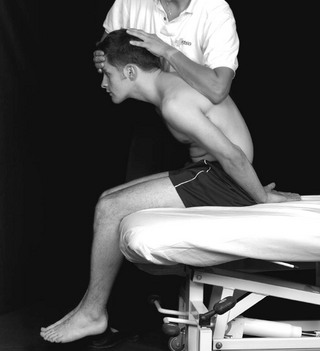
3. Having established a 90° hip flexion angle he is asked to flex his head and neck fully, approximating his chin to his sternum. Sufficient over-pressure is applied to the neck flexion position to ensure that the whole spine from head to ischial tuberosities is on equal stretch. The range with pain response is recorded (Fig. 5.52). Next, the over-pressure maintaining the head and neck flexion is maintained by the physiotherapist's chin (Fig. 5.53) and then her left hand is free to palpate his spine (Fig. 5.54).

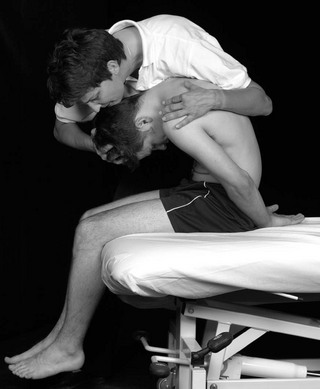
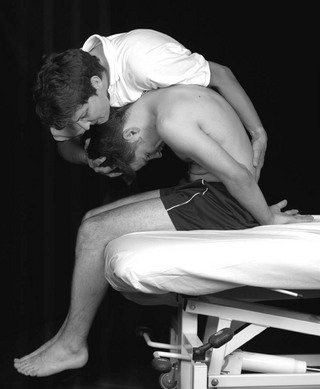
4. With the whole spine maintained in flexion with over-pressure, he is asked to extend his left knee as far as possible, and while he is holding it in this position the range and pain response is noted (Fig. 5.55).
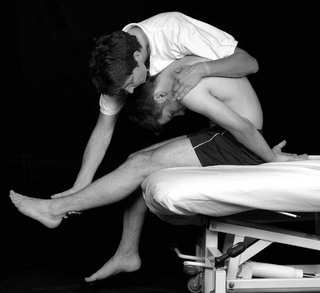
5. The next step is to add active dorsiflexion of the ankle to the knee extension and note the pain response (Fig. 5.56).
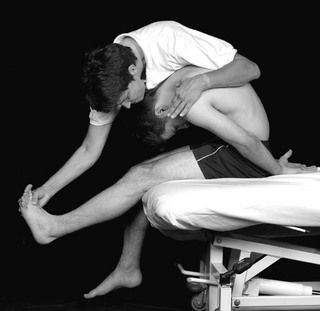
6. While the neck flexion to knee extension position is maintained, and being sure that the symptoms are stable and consistent, the physiotherapist retains the same over-pressure to thoracic and lumbar flexion while at the same time releasing some of the neck flexion, allowing the patient's head to be raised to the neutral position (Fig. 5.57) or extended (Fig. 5.58). He is asked to state clearly what happens to the symptoms. In the fully slumped position he may not have a full range of knee extension. If he is unable to extend his knee fully he is then asked, when neck flexion has been released, if he can extend his knee further. In this new position the range is noted and any pain response recorded (Fig. 5.59).
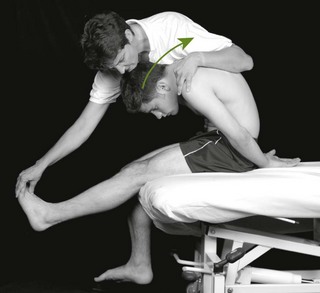
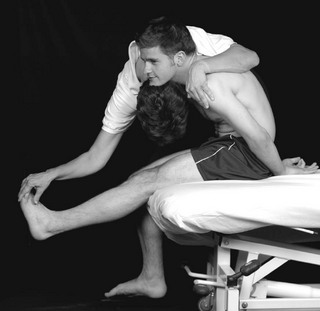
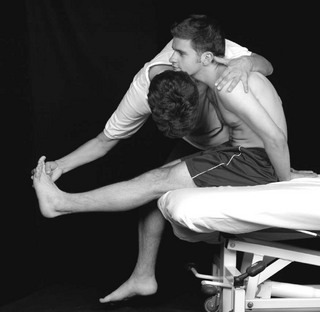
This test is effective for all levels of the spine, and should form part of the examination for cervical disorders just as much as for lumbar disorders. When firmer over-pressure is required for the assessment, the procedure can be carried out in the long-sitting position – that is, with the patient sitting on the couch with his legs stretched straight in front of him (Fig. 5.60).

In making a judgement as to the findings of the test, the pain responses, particularly in relation to releasing the neck flexion component, are the most important. A pain-free lack of 30° of knee extension can be normal, as can pain felt centrally at the T9, T10 level (Maitland 1980).
An immediate relief of the symptoms on releasing neck flexion indicates involvement of the canal's pain-sensitive structures and, although there may be some restriction of knee extension due to hamstring tightness, this range would be unaffected by releasing the neck flexion. Having extended the cervical spine, which slackens the canal structures, the patient may then be able to gain further extension of the knees. Again, this clarifies the extent to which hamstring tightness is restricting knee extension. There may be some hamstring restriction as well as a canal component to a patient's symptoms. With a patient who is generally very mobile, it is necessary to reach full flexion by getting his head down between his knees. If he is very stiff, this will not be possible and one can expect the canal structures also to be tight. This is seen in people who can, on flexion in standing, hardly reach their knees (they may even comment that at junior school they had difficulty touching their toes), and this stiffness will remain regardless of their exercising. If the source of this restriction is neural, cervical flexion and extension will change the symptomatic response, while in the flexed position. Although some people cannot fully straighten their knees in the slumped position, it does not mean that the range is abnormal; it may be normal for them. It is the pain response and the change in knee extension with the release of neck flexion that is important.
The long sitting slump technique can be adapted further to include a sympathetic emphasis. Sympathetic chain emphasis is produced by the addition of contralateral trunk lateral flexion with the patient in the long sitting slump position. The therapist can help the patient to maintain this position as they actively bend and straighten their knee or flex and extend their cervical spine to effect reproduction of symptoms or neural mobilization. Additionally, with the patient in the SLSSE, as described above, the therapists hand can be placed against offending rib(s). The rib(s) can then be mobilized using direct pressure against them and to reproduce symptoms (see Figs 5.60 & 5.61).
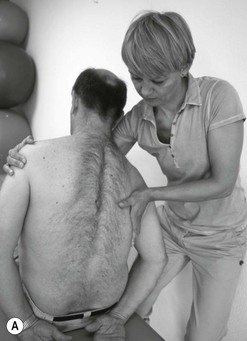
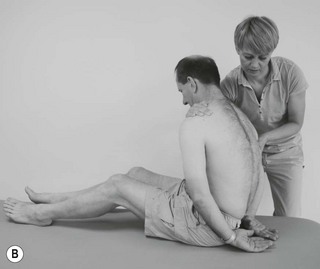
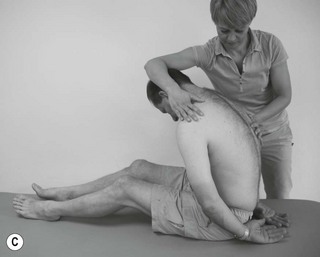
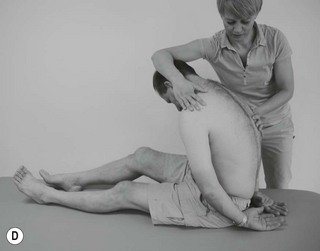
PKB/Slump
Starting position: The patient is positioned in side lying, trunk parallel to the edge of the bed, the leg to be tested in hip extension and knee flexion, the other leg being held by the patient in 90° of hip and knee flexion.
The therapist stands behind the patient level with the pelvis. With one hand the therapist stabilizes the patient's pelvis to prevent lumbar extension. The therapists other hand supports the patient's knee and lower leg (Fig. 5.62).
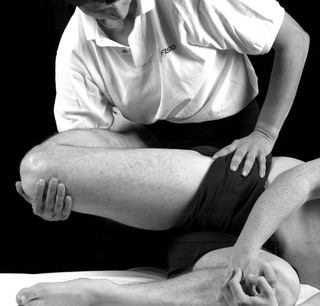
Figure 5.62 Slump in side lying. Reproduced from Banks & Hengeveld (2010) with permission from Elsevier.
Method: Whilst stabilizing the patient's pelvis, the therapist extends the patient's hip to pain or limit and then adds medial rotation of the hip to pain or limit to tension the ilio-inguinal (and genitofemoral) nerve(s).
A change in the patient's symptoms and range of hip medial rotation with the addition and subtraction of cervical flexion will indicate involvement of the ilio-inguinal (genitofemoral) nerve (s) in the symptom response.
Straight leg raising (SLR)
Starting position: The patient lies supine towards the side of the bed to be tested.
The therapist stands by the side of the patient at the level of the patient's knee, facing the patient's head. One of the therapist's hands keeps the knee in full extension whilst the other supports under the patient's heel.
Method: The therapist then lifts the patient's straight leg with the hip in neutral adduction/abduction and neutral rotation with the foot relaxed. On reaching the point of onset of back or thoracic pain or the limit of SLR, the patient's leg is then rested on the therapist's shoulder. The therapist then dorsiflexes the patient's ankle. A change in back or thoracic pain with this manoeuvre of the foot will support the hypothesis that neural tissue is involved in the symptom response (Fig. 5.63).
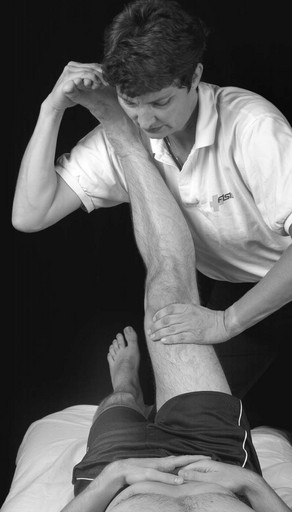
Figure 5.63 Straight leg raising (SLR). Reproduced from Banks & Hengeveld (2010) with permission from Elsevier.
Anteroposterior sternochondral/costochondral joint mobilization
Starting position: The patient lies supine near the edge of the bed on the side to be treated. The therapist stands by the side of the bed at the level of the sternochondral/costochondral joint to be mobilized. The therapist's thumbs are placed adjacent to each other across the line of the sternochondral/costochondral joint. The therapist's fingers spread out over the chest for added stability.
Method: The therapist leans over the patient. The therapist's elbows are slightly bent and tucked in. The therapist's body produces the movement through the therapist's thumbs to the joint (Fig. 5.64).
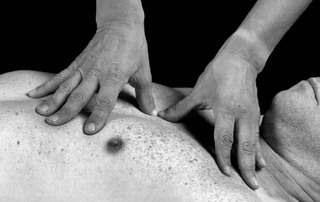
Figure 5.64 Anteroposterior costal movement. Reproduced from Banks & Hengeveld (2010) with permission from Elsevier.
References
Banks, K, Hengeveld, E. Maitland's Clinical companion: an essential guide for students. Edinburgh: Churchill Livingstone; 2010.
Berglund, KM, Persson, B, Denison, E. Prevalence of pain and dysfunction in the cervical and thoracic spine in persons with and without lateral elbow pain. Man Ther. 2008;13:285–299.
Boyles, R, Ritland, B, Miracle, B, et al. The short term effects of thoracic spine thrust manipulation on patients with shoulder impingement syndrome. Man Ther. 2009;14:375–380.
Briggs, A, Smith, A, Straker, L, et al. Thoracic spine pain in the general population: prevalence, incidence and associated factors in children, adolescents and adults. A systematic review. BMC Musculoskelet Disord. 2009;10(77):1–12.
Briggs, A, Bragge, P, Smith, A, et al. Prevalence and associated factors for thoracic spine pain in the working population: a literature review. J Occup Health. 2009;51:177–192.
Butler, D. The sensitive nervous system. Adelaide: NOI Group; 2000.
Cleland, J, Childs, J, McRae, M, et al. Immediate effects of thoracic manipulation in patients with neck pain: a randomized clinical trial. Man Ther. 2005;10:127–135.
Cleland, J, Childs, J, Fritz, J, et al. Development of a clinical prediction rule for guiding treatment of a subgroup of patients with neck pain: use of thoracic manipulation, exercise and patient education. Phys Ther. 2007;87(1):9–23.
Cleland, J, Durall, C, Scott, S. Effects of slump long sitting on peripheral sudomotor and vasomotor function: a pilot study. J Man Manip Ther. 2002;10(2):67–75.
Cleland, J, McRae, M. Complex regional pain syndrome 1: management through the use of vertebral and sympathetic trunk mobilisation. J Man Manip Ther. 2002;10(4):188–199.
Cloward, R. ‘Cervical discography: a contribution to the etiology and mechanism of neck, shoulder and arm pain’. Ann Surg. 1959;150:1052.
Conroy, J, Schneider, A. Case report: the T4 syndrome. Man Ther. 2005;10(4):292–296.
CSP. Definition of manipulation. Chartered Society of Physiotherapy. 2006.
Edmondston, S, Singer, K. Thoracic spine: anatomical and biomechanical considerations for manual therapy. Man Ther. 1997;2(3):132–143.
Evans, P. The T4 Syndrome. Some basic science aspects. Physiotherapy. 1997;83(4):186–189.
Evans, D, Breen, A. A biomechanical model for mechanically efficient cavitation produced during spinal manipulation: pre-thrust position and neutral zone. J Manipulative Physiol Ther. 2006;29(1):72–82.
Evans, D, Lucas, N. What is ‘manipulation’? A reappraisal. Man Ther. 2010;15:286–291.
Fruth, S. Differential diagnosis and treatment in a patient with posterior upper thoracic pain. Phys Ther. 2006;86(2):254–268.
Gatterman, M, Hansen, D. The development of chiropractic nomenclature through consensus. J Manipulative Physiol Ther. 1994;17(5):302–309.
Gibbons, T, Tehan, P. Patient positioning and spinal locking for lumbar spine rotation manipulation. Man Ther. 2001;6(3):130–138.
Gilmore, O. Gilmore's groin. Physiotherapy in Sport. 1995;XVIII(1):14–15.
Goodman, C, Snyder, T. Differential diagnosis in physical therapy, ed 2. Philadelphia: WB Saunders; 1995.
Greene, G. Red flags: essential factors in recognizing serious spinal pathology. Man Ther. 2001;6(4):253–255.
Herzog, W. Clinical biomechanics of spinal manipulation. New York: Churchill Livingstone; 2000.
Jowsey, P, Perry, J. Sympathetic nervous system effects in the hand following a grade III posteroanterior rotatory mobilisation technique applied to T4: a randomised, placebo-controlled trial. Man Ther. 2009;15:248–253.
Keer, R. Abstract: Effects of passive joint mobilisation in the mid-thoracic spine on straight leg raising in patients with low back pain. Physiotherapy. 1993;79(2):86.
Lau, H, Chui, T, Lam, T. The effectiveness of thoracic manipulation on patients with chronic mechanical neck pain – A randomised controlled trial. Man Ther. 2011;16:141–147.
Maitland, G. Peripheral manipulation. Upper Saddle River, NJ: Prentice Hall; 1970.
Maitland, G. Movements of the pain-sensitive structures in the vertebral canal in a group of physiotherapy students. S Afr J Physiother. 1980;36:4–12.
Maitland, G. Vertebral manipulation, ed 5. Oxford: Butterworth Heinemann; 1986.
Maitland, G, Hengeveld, E, Banks, K, et al. Maitland's Vertebral manipulation, ed 7. Edinburgh: Butterworth Heinemann Elsevier; 2005.
Michael, A, Newman, J, Rao, A. The assessment of thoracic pain. Orthopaedics and Trauma. 2009;24(1):63–73.
Strunce, J, Walker, M, Boyles, R, et al. The immediate effects of thoracic spine and rib manipulation on subjects with primary complaints of shoulder pain. J Man Manip Ther. 2009;17(4):230–236.