Stretching
After completing this chapter, the student will be able to perform the following:
2 Explain stretching as an intervention.
3 List assessments used to determine whether stretching would be beneficial.
4 Define active and passive stretching.
6 Use joint movement methods to assess for reduced or excessive range of motion.
7 Describe symptoms related to hypomobility or hypermobility.
8 Describe anatomic, physiologic, and pathologic barriers.
9 Use stretching methods effectively and safely.
10 Define muscle energy techniques.
11 Explain why muscle energy techniques complement stretching methods.
12 Define and demonstrate three types of muscle contractions used during muscle energy techniques.
13 Explain and demonstrate the use of breath and eye movement during muscle energy techniques.
14 Explain and demonstrate seven variations of muscle energy techniques.
15 Define direct tissue stretching.
16 Demonstrate longitudinal and cross-directional direct tissue stretching.
17 Combine stretching methods for increased effect.
18 Define and demonstrate active release and pin and stretch.
There is confusion about what is meant by stretching. The typical dictionary definition describes stretching as the process of extending, expanding, and lengthening. Stretching for the purposes of this textbook is a method used to increase flexibility. Flexibility is the ability of soft tissues to yield to tension forces without tissue damage during joint range of motion.
Stretching
2. Explain stretching as an intervention.
3. List assessments used to determine if stretching would be beneficial.
Stretching is an intervention that is used purposefully to cause an adaptation in the soft tissues, including tissue around joints of the body. Joint movement and palpation are the assessments used to determine whether stretching should be used to address areas of tissue shortening and increased density involved in lack of flexibility. See Chapter 10 for more assessment information.
Stretching methods are often included in the athlete’s training program. Stretching methods used by athletes can be passive or active. Passive stretching occurs when a second person applies the force to stretch the tissue. Active is seen when individuals stretch themselves. Stretching of both types can also be included in the massage session. During massage, each jointed area should be moved actively, passively, or both ways as part of an assessment to determine the available range of motion. It is important to not confuse joint movement with stretching. Joint movement assesses the limits of movement as indicated by palpation of the resistance barrier, often called bind. Stretching begins at the bind and moves into it to change the amount of movement available (Box 12-1).
Because stretching is an intervention that requires adaptation, it is important to determine whether:
• The current condition is resourceful compensation that is productive and should not be changed.
• The client has sufficient adaptive capacity and time to respond to the change.
Stretching as an intervention method needs to be used carefully to avoid adverse outcomes (McHugh and Cosgrave, 2010). Refer back to Chapter 3 to read about the research on stretching.
Flexibility
6. Use joint movement methods to assess for reduced or excessive range of motion.
7. Describe symptoms related to hypomobility or hypermobility.
As described, flexibility refers to the ability of joints to move through a full range of motion. Range of motion (ROM) is the distance and direction of movement of a joint. As described in Chapter 10, each specific joint has a normal range of motion that is expressed in degrees. Gender, age, and genetics are important when determining appropriate levels of flexibility.
Reduced Range of Motion
Limited range of motion is a reduction in the normal distance and direction through which a joint can move. Loss of flexibility can be a predisposing factor for physical issues such as pain syndromes or balance disorders. Motion may be limited by a mechanical problem within the joint, by swelling of tissue around the joint, by stiffness of soft tissues, or by pain. When a joint does not move fully and easily in its normal manner, it is considered to have a limited range of motion. Motion may be limited by a mechanical problem within the joint, swelling of tissue around the joint, spasticity of the muscles, altered connective tissue pliability, pain, or disease. Diseases that prevent a joint from fully extending may, over time, produce contracture deformities, causing permanent inability to extend the joint beyond a certain fixed position.
When range of motion is found to be limited through joint movement assessment, stretching methods may be indicated to increase flexibility. Stretching should be directed at the muscle’s fascia, because fascial tissue has the most elastic tissue, and because ligaments and tendons (because they have less elastic tissue) are not intended to stretch very much at all (Morse et al, 2008). Overstretching of ligaments may weaken the joint’s integrity, causing destabilization (which increases the risk of injury). Once the fascia associated with the muscle has reached its maximum length, attempting to stretch further only serves to stretch the ligaments and put undue stress upon the tendons (two parts of the body that you do not want to stretch). Through proper stretching techniques, we can safely elongate the myofascia (the connective tissues surrounding a muscle). This is important because our fascial network allows muscles, bones, and blood vessels to communicate down to a cellular level, continuously coordinating and restoring the body’s proper physiologic functions.
Excessive Joint Range of Motion
It is possible for a joint to become too flexible. Excessive flexibility can be just as bad as not enough flexibility because both increase the risk of injury. Joint hypermobility means that some or all of the joints have an unusually large range of movement. Joint hypermobility can cause symptoms such as
• Dislocated joints, when the joint comes out of its correct position
• Soft tissue injuries, such as tenosynovitis (inflammation of the protective sheath around a tendon)
Excessive joint range of motion affects women more than men because female hormones increase flexibility. Joint hypermobility is treated with an exercise program to improve fitness and muscle strength resulting in increased stability. Do not overstretch hypermobile joints.
Stretching Principles
During stretching, the client should experience a pulling sensation in the short soft tissue and never a pain or strain in the joint or any other part of the body that is not being stretched. Anatomic barriers are determined by the shape and fit of bones at the joint. Do not stretch any jointed area beyond anatomic barriers, to prevent serious joint injury. Physiologic barriers are caused by the limits of the range of motion imposed by nerve and sensory function. When the physiologic barrier is reached, the client experiences appropriate stiffness and a pulling sensation into the area being stretched; this acts as a protective mechanism and prevents movement to the anatomic limits and potential injury. The pathologic barrier is of two types:
• Where pain and stiffness occur when joint movement assessment identifies reduced ROM, or hypomobility. Stretching may be indicated.
• Where lack of resistance is experienced when normal ROM is reached during assessment, indicating hypermobility. Do not stretch—strengthening is required.
When moving a joint during assessment, it is important to stay within the normal physiologic barriers, and if limits of ROM are identified, to gently and slowly encourage the joint to increase the range of motion only if hypomobility exists. It may take multiple sessions supported by client self-stretching for sustained results to become evident. Expect flexibility to increase gradually.
Stretching Procedures
• Stretch tissues only when they are warm and pliable.
• Begin the stretch sequence by using massage to prepare the tissues.
• Stabilize the body so that only the target area moves during stretching.
• Move the area to the pathologic barrier, and back off a bit.
• Instruct the client to breathe in (inhale) right before the stretch, and then to breathe out (exhale) slowly as you move him or her into the stretch.
• Stretching should always be done within comfortable limits of ROM of the client.
• Stretching should be controlled and performed at a slow pace.
• A stretch does not need to be held longer than 20 seconds and is performed in sets of 2 to 5 repetitions, with a 15- to 30-second rest between stretches.
• Static stretches are done so that the joints are placed in the outer limits of the available range of motion and held (considered passive).
• Dynamic stretching occurs when opposing muscles are used to produce the force needed to stretch the short tissues (considered active).
• An increase of 10% in ROM is sufficient during a massage session. Do not attempt to increase the ROM by more than 25% during a massage session.
Muscle Energy Techniques
10. Define muscle energy techniques.
11. Explain why muscle energy techniques complement stretching methods.
12. Define and demonstrate three types of muscle contractions used during muscle energy techniques.
13. Explain and demonstrate the use of breath and eye movement during muscle energy techniques.
14. Explain and demonstrate seven variations of muscle energy techniques.
Muscle energy techniques (MET) involve voluntary contraction of the client’s muscles in a specific and controlled direction, at varying levels of intensity, against a specific counterforce applied by the massage therapist. Muscle energy procedures have a variety of applications and are considered active techniques in which the client contributes the corrective force. The amount of effort may vary from a small muscle twitch to a maximal muscle contraction. The duration may be a fraction of a second to several seconds. All contractions begin and end slowly, gradually building to the desired intensity.
Research (see Chapter 3) indicates that use of proprioceptive neuromuscular facilitation (PNF)/muscle energy techniques (MET) to facilitate stretching is more efficient than static passive stretching. Our understanding of the mechanism of benefit of MET has changed over the past few years; most notable is the realization that post-isometric and reciprocal inhibition effects do not account for the ability to increase tissue length. Instead, increased tolerance to stretch that results from MET application is now considered to be the mechanism of benefit (Fryer, 2006). Theories as to why stretch sensation tolerance increases include the following:
• Nociceptive inhibition of the dorsal horn of the spinal cord via mechanoreceptor stimulation during MET
• Localized activation of the periaqueductal grey, producing descending pain modulation
• Increased activity of analgesic endocannabinoids (Fryer and Fossum, 2009)
• Altered fluid content of connective tissue due to sponge-like behavior during contractions (and compression) associated with MET-isometric contractions (Klingler et al, 2004)
• Viscoelastic changes in connective tissue pliability (Lederman, 1997), and/or
Regardless, using controlled contraction before stretching is more effective than stretching alone.
As has been mentioned, the focus of muscle energy techniques is to increase tolerance to stretch. Muscle energy techniques are focused on dysfunctional movement patterns, primarily where hypomobility exists. To effectively perform MET methods, it is important for the practitioner to be able to position muscles so that the muscle attachments are close together or in a lengthening phase with the attachments separated. Study muscle charts until you understand the configuration of the muscle patterns, and practice isolating as many functional movements as possible, keeping in mind that proper positioning is important. When practicing, make sure that the muscle structures can be isolated, regardless of whether the client is in a supine, prone, side-lying, or seated position.
The massage practitioner uses three types of muscle contraction to activate muscle energy techniques.
Counterpressure is the force applied to an area that is contracting that is designed to match the effort or force exactly (isometric contraction) or partially (isotonic contraction) and multiple isotonic contractions. In an isometric contraction, the distance between the proximal and distal (origin and insertion) attachments of the target muscle(s) is maintained at a constant length. A fixed tension develops in the target muscle(s) as the client contracts the muscle against an equal counterforce applied by the massage therapist, preventing shortening of the muscle. In this contraction; the effort of the muscle, or group of muscles, is matched exactly by a counterpressure, so that no movement occurs, only effort.
An isotonic contraction is one in which the effort of the target muscle or muscles is not matched by the counterpressure, allowing a degree of resisted movement to occur. With a concentric isotonic contraction, the massage practitioner applies a counterforce but allows the client to move the proximal and distal (origin and insertion) attachments of the target muscle(s) together against the pressure. In an eccentric isotonic movement, the massage practitioner applies a counterforce but allows the client to move the jointed area so that the proximal and distal (origin and insertion) attachments of the target muscle separate as the muscle lengthens against the pressure.
Multiple isotonic contractions require the client to move the joint through a full range of motion against partial resistance applied by the massage practitioner.
Muscle energy techniques usually do not use the full contraction strength of the client. With most isometric work, the contraction should start at about 25% of the strength of the muscle. Subsequent contractions can involve progressively greater degrees of effort, but never more than 50% of available strength. Many experts such as Dr. Leon Chaitow use only about 10% of available strength in muscles being treated in this way, and find that they can increase effectiveness by using longer periods of contraction. Pulsed contractions (a rapid series of repetitions) using minimal strength are also effective.
Breathing and Eye Movement
Use of coordinated breathing to enhance particular directions of muscular effort is helpful. During muscle energy applications, all muscular effort is enhanced by inhaling as the effort is made and exhaling on the lengthening phase. Eye position is also effective. Looking toward the direction of the contraction causes or facilitates contraction of the target muscles. Looking away from the direction of contraction inhibits the target muscles. Use of eye movement is valuable with athletes who are prone to cramping or are having difficulty using only a small contraction force. It is recommended that eye movement be used first before active target muscle contraction. The following are common examples:
• To increase tension in neck flexors (tense and then relax), have clients look toward their belly, while rolling eyes down.
• To decrease tension in neck flexion, have clients look up over their head, while rolling the eyes up.
• To increase tension in left neck rotation or lateral flexors, have the client look left.
• To decrease tension in left neck rotators or lateral flexors, have the client look right.
• Reverse for right rotation or lateral flexor patterns (Figure 12-1).
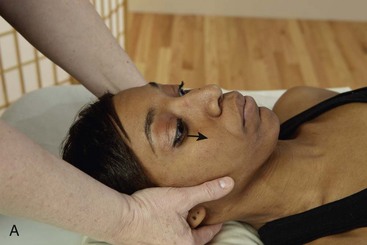
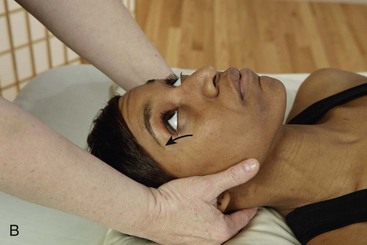
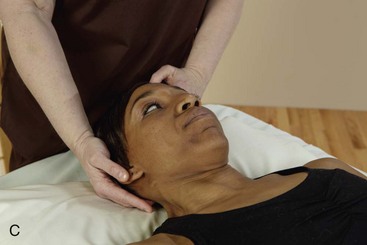
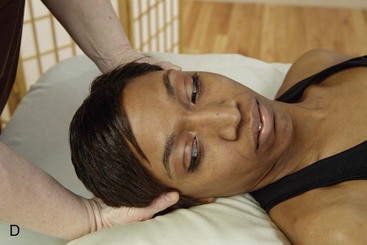
FIGURE 12-1 Use of eyes during muscle energy technique. A, Eyes looking down. Facilitates flexors, adductors, and internal rotators. Inhibits extensors, abductors, and external rotators. B, Eyes looking up. Facilitates extensors, abductors, and external rotators. Inhibits flexors, adductors, and internal rotators. C, Eyes looking left facilitates all muscle movement to the left. Inhibits all muscle movement to the right. D, Eyes looking right. Facilitates all muscle movement to the right. Inhibits all muscle movement to the left.
Almost all flexor patterns—trunk, hip, knee, ankle, shoulder, arm, and wrist—are increased in tension (facilitated) when the client looks toward the abdomen and are inhibited when the eyes roll up.
Extensor patterns—for example, trunk, hip, knee, and ankle—are facilitated when the client looks up and are inhibited when the client rolls eyes down.
When in doubt about the position, just instruct clients to roll their eyes in big circles slowly and deliberately. The result will be a contract/relax antagonist contract pattern.
The eye movement replaces contraction of the target muscles, or it can enhance the contraction being used with muscle energy techniques.
A successful application is to lengthen the target area to bind and hold it there. Then begin the eye movement (usually big circles) as facilitation (contraction) and inhibition (relaxation) take place, slowly increasing the lengthening force on the target muscles until a more normal resting length is achieved (Figure 12-2).
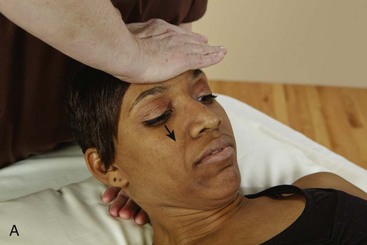
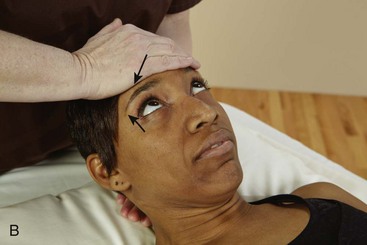
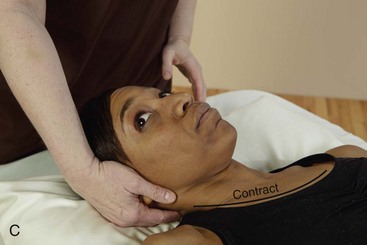
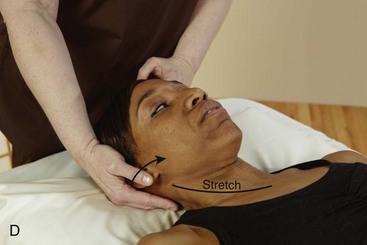
FIGURE 12-2 Examples of using eye movement as part of MET. A, Instruct client to look down. Apply gentle pressure. Flexors hold strong. B, Instruct client to move eyes up. Apply gentle pressure. Flexors will inhibit and will be more tolerant of stretch. C, Eyes look right. Muscles on the right contract. D, Instruct client to look left to increase tolerance to stretching of the right neck flexors.
Muscle Energy Techniques Methods
Different methods can be classified as muscle energy techniques. Each method involves a series of controlled contractions of the muscles in the area to be stretched or the antagonists to those muscles. Methods begin at the comfort barrier. The comfort barrier is the first point of resistance short of the client perceiving any discomfort at the physiologic or pathologic barrier. The isometric contraction involves minimal effort lasting 7 to 10 seconds. Then the target area is stretched. Repetitions continue until no further gain is noted.
 Log on to your Evolve website to watch Video 12-1: Muscle Energy Techniques.
Contract and Stretch
Following is the procedure for contract and stretch (Figure 12-3):

Contract Antagonist and Stretch
The following is the procedure for contract antagonist and stretch (Figure 12-4):
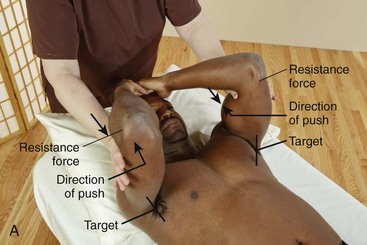
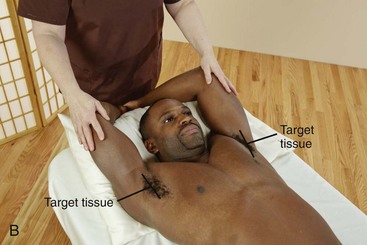
FIGURE 12-4 Example of contract antagonist and stretch sequence. A, Place target tissues at comfort barrier. Apply counterforce on antagonist, and instruct client to push gently into the hands. B, Client stops contracting, and the therapist stretches tissues into and just through the bind to affect tissue length.
1. Lengthen the target tissues to comfort barrier and back off slightly.
2. Contract the antagonist muscle group, or activate eye movement, or do both (the muscle in extension).
3. Stop the contraction and slowly bring the target tissues into a lengthened state, stopping at resistance.
4. Repeat steps 1 through 3 three or four times until 10% to 25% improvement occurs.
These two methods can be combined to enhance lengthening effects. This combined approach can be called contract-relax-antagonist-contract (CRAC).
The following is the procedure for contract-relax-antagonist-contract (Figure 12-5):

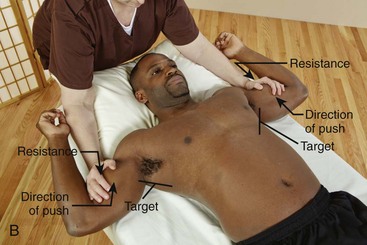
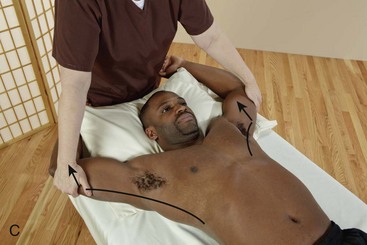
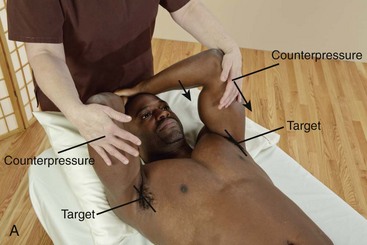
FIGURE 12-5 Contract-relax-antagonist-contract and then stretch shoulder adductors (quadriceps): A, Contract target tissue against applied counterforce. B, Move hands to antagonist muscles, and instruct client to push into the applied counterforce, contracting the antagonist muscle group. C, Instruct the client to stop pushing, and then stretch the target tissues.
1. Position the target tissues at the comfort barrier.
3. Tense the target tissue for 7 to 10 seconds, or have the client roll his or her eyes in a big circle, or do both.
4. Contract the antagonist muscles, or have the client roll his or her eyes in a big circle, or do both.
5. Stop the contraction of the antagonist.
6. Stretch the target tissues to a more normal resting length.
Pulsed Muscle Energy
Pulsed muscle energy procedures involve engaging the comfort barrier and using small, resisted contractions (usually 20 in 10 seconds). This method can be used to increase stretch tolerance in short tissues or to stimulate weak long tissue, to increase tone.
The following is the procedure for pulsed muscle energy (Figure 12-6):
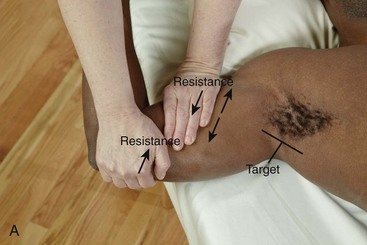
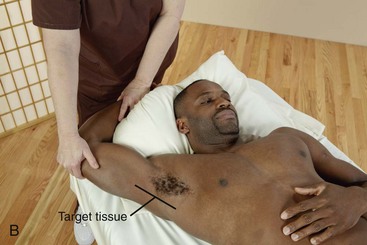
FIGURE 12-6 Example of a pulsed muscle energy sequence. A, Isolate target muscle and position for counterpressure. Pulse muscle back and forth using controlled tiny movements. B, Tell client to stop movement and to stretch the short tissues. Pulsed muscle energy methods can be difficult for the client to perform. The pulsing contractions are small and precise. The eyes can move back and forth to facilitate the pulsing movement.
1. Isolate the target tissue by placing attachments as close together as possible.
2. Apply counterpressure for the contraction.
3. Instruct the client to contract the target tissues rapidly in small movements for about 20 repetitions. Go to step 4, or use this variation: maintain the position, but switch the counterpressure location to the opposite side, and have the client contract the antagonist muscles for 20 repetitions. Rapid eye movement can replace the pulses or enhance the action.
4. Slowly lengthen the target tissues.
5. Repeat steps 2 to 4 until a more normal full resting length is obtained (10% to 25% improvement).
Use pulsed muscle energy to stimulate weak inhibited muscles by doing the following (Figure 12-7):
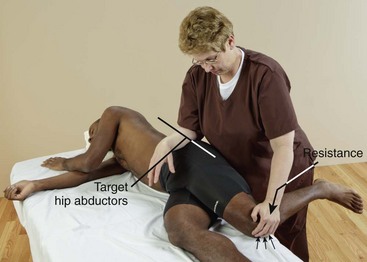
FIGURE 12-7 Example of pulsed muscle energy to stimulate weak inhibited muscles. Target hip abductors. Isolate target area and instruct client to pulse up into the resistance force 20 times. Do not stretch. Repeat if necessary.
1. Isolate the target tissue by placing attachments as close together as possible.
2. Apply counterpressure for the contraction.
3. Instruct the client to contract the target tissues rapidly in small movements for about 20 repetitions. Rapid eye movement can replace the pulses or enhance the action.
4. Slowly return the area to normal position. Do not stretch.
Note: All contracting and resisting efforts should start and finish gently.
Positional Release/Strain-Counterstrain
According to Dr. Chaitow, during positional release, techniques for various proprioceptors are influenced by methods that take them into an “ease” state, and that theoretically allow them an opportunity to “reset,” reducing hypertonic status. Strain-counterstrain and other positional release methods use the slow, controlled return of distressed tissues to the position of strain as a means of normalizing function.
Positional release is a more generic term used to describe these methods. Positional release methods are used in painful areas, especially areas of recent strain, before, after, or instead of muscle energy methods. The tender points often are located in the antagonist of the tight muscle because of the diagonal balancing process the body uses to maintain an upright posture in gravity.
Repositioning of the body into the original strain (often the position of a prior injury) allows proprioceptors to reset and stop firing protective signals. By moving the body into the direction of ease (i.e., the way the body wants to go and out of the position that causes pain), the proprioception is taken into a state of safety. Remaining in this state for a time allows the neuromuscular mechanism to reset itself. The massage practitioner then gently and slowly repositions the area into neutral.
The positioning used during positional release is a full-body process. Remember that an injury or loss of balance is a full-body experience. For this reason, the practitioner must consider areas distant to the tender point during the positioning process. Very possibly, the position of the feet will have an effect on a tender point in the neck. Eye position is almost always a factor. Often the ease position can be found just with eye movement.
The following is the procedure for positional release (Figure 12-8):
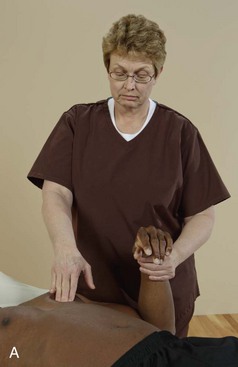
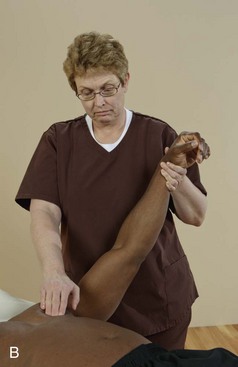
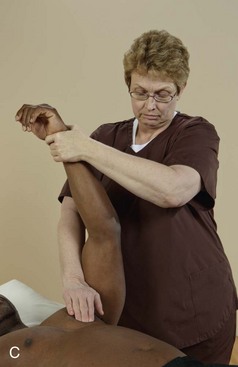
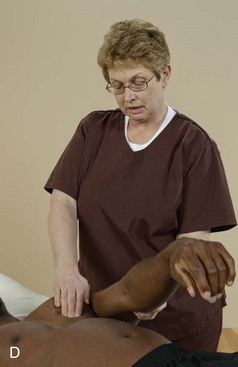
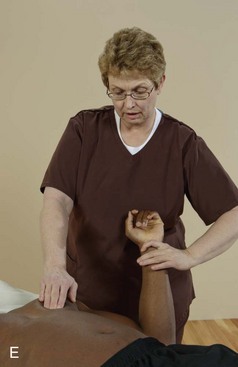
FIGURE 12-8 Example of a positional release sequence—pectoralis major: A, Locate tender point and apply only enough pressure to activate sensation. B, Maintain pressure on point and begin moving body into pain-free ease position. C, Continue modifying position as needed until pain-free (or significantly decreased) ease position is found. D, When the pain sensation is gone or is significantly decreased, maintain in ease position for approximately 30 seconds. E, Slowly move body back to neutral position or until tissues containing the tender point are at bind, and then gently increase bind to the stretch area.
2. Gently initiate the pain response with direct pressure. Remember that the sensation of pain is a guide.
3. Slowly position the body until the pain subsides. Include eye position.
4. Wait at least 30 seconds until the client feels the release, lightly monitoring the tender point.
5. Slowly move the body back to a neutral position, or gently stretch the tissue.
6. Repeat steps 1 to 5 until a more normal resting length is attained.
Positional release techniques are important because they gently allow the body to reposition and restore balance. They are also highly effective ways of dealing with tender areas, regardless of the pathologic cause. Sometimes it is impossible to know why the point is tender to the touch. However, if tenderness is present, a protective muscle spasm surrounds it. Positional release is an excellent way to release these small areas of muscle spasm without inducing additional pain.
Integrated Approach
Muscle energy methods can be used together or in sequence to enhance their effects. Muscle tension in one area of the body often indicates imbalance and compensation patterns in other areas of the body. Tension patterns can be self-perpetuating. Often, using an integrated approach introduces the type of information the nervous system needs to self-correct. The procedure outlined next relies on the innate knowledge of the body of what is out of balance and how a more normal functioning pattern can be restored.
The following is the procedure for an integrated approach. (Use the position from Option A, steps 1 and 2, or Option B, steps 1 and 2, as the starting point for the rest of the process that begins at step 3.)
Option A (Figure 12-9):
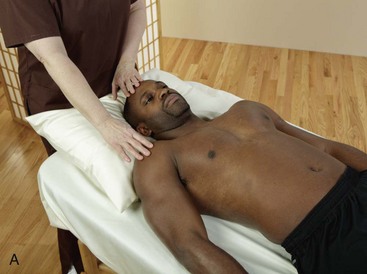
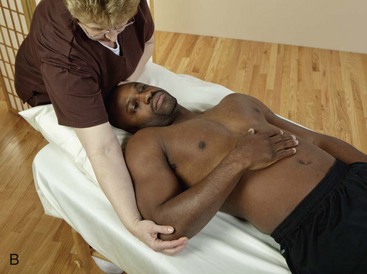

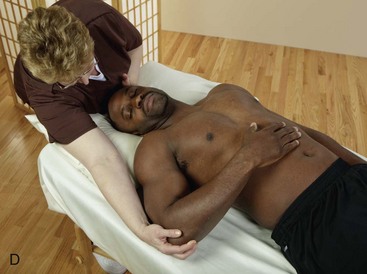


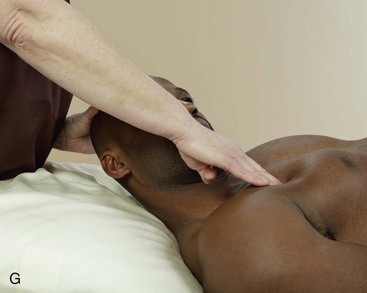
FIGURE 12-9 Integrated approach combining MET methods. A, Part 1: locate target area. Option A: Identify the pattern of distortion. B, Increase distortion in ease position. C, Part 1: locate target area. Option B: Use tender point, and then move body into positional release to identify distortion pattern. D, Part 2: Treatment. Stabilize client in multiple areas, and instruct client to gently push out (about 10 seconds) while attempting to return to neutral position. E, After completely resisting client movement for about 10 seconds, allow the client to move through the resistance. F, At the end of the movement range achieved as the client moves against partial counter pressure, the massage therapist moves the area into bind to stretch the short tissues. G, If a tender point and positional release were used in part 1, again contact the tender point and refine the stretch position as necessary, so the tissues containing the tender point are stretched.
1. Identify the most obvious of the postural distortion symptoms.
2. Exaggerate the pattern by increasing the distortion, moving the body into ease. This position becomes the pattern of isolation of various muscles and associated tissues to be addressed in the next part of the procedure. Continue with step 3.
2. Use positional release to move the body into ease until the point is substantially less tender to pressure. The position of ease found becomes the pattern of isolation of various muscles to be addressed in the next part of the procedure. Continue with step 3.
After choosing from Option A or Option B, continue the procedure as follows:
3. Stabilize the client in as many different directions as possible.
4. Instruct the client to move out of the pattern. Be as vague as possible and do not guide the client, because it is important for the client to identify the resistance pattern.
5. Provide resistance for the client to push or pull against.
6. Modify the resistance angle as necessary to achieve the most solid resistance pattern for the client.
7. Spend a few moments noticing when the client’s breathing changes; then, while still providing modified resistance, allow the client to move through the pattern slowly.
8. When the client has achieved as much extension as he or she can, recognize that what the client has achieved is the lengthening pattern.
9. Gently increase lengthening to perform the stretch.
10. Pay attention to what body areas become involved besides the one addressed. This is your guide to the next position.
Active Assisted Stretching
The following procedure is used for active assisted stretching (Figure 12-10):
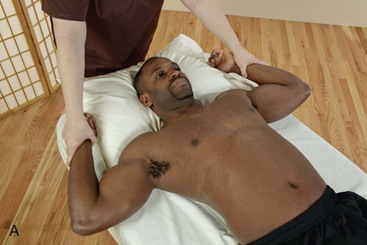
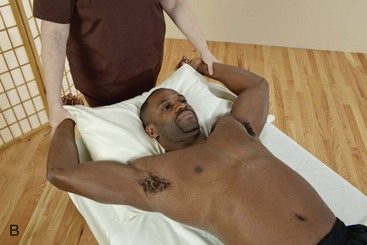
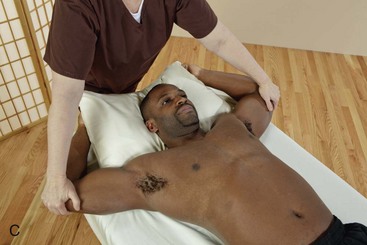
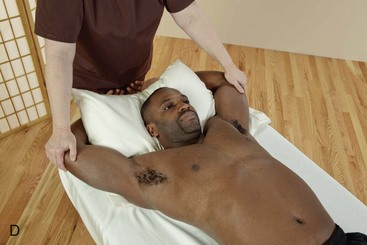
FIGURE 12-10 Active assisted stretching. A, Identify target area. B, Lengthen to and just into pathologic barrier with client assistance. C, Return to start position with client assistance. D, Stretch to and just through the barrier. Repeat multiple times until a more normal ROM is achieved.
1. Identify and isolate the muscle, making sure it is not working against gravity in this position. Remind the client to exhale during the stretching phase of this technique.
2. Lengthen the muscle to its pathologic barrier, move slightly beyond this point, and stretch gently for 1 to 2 seconds.
3. Return the muscle to its starting position. Repeat this action in a rhythmic, pulse-like fashion for 5 to 20 repetitions.
4. The client can benefit from contracting the antagonist while the target muscle is lengthened and stretched. As in all proper lengthening and stretching movements, attention must be paid to the stretch reflex; bouncing is never done because it initiates this reflex.
Direct Tissue Stretching
15. Define direct tissue stretching.
16. Demonstrate longitudinal and cross-directional direct tissue stretching.
Direct tissue stretching targets tissues in a local area that have been assessed as short and binding. If only a small section of muscle needs to be stretched, if the muscle does not lend itself to stretching with joint movement, or if the joints are so flexible that not enough pull is put on the structures to achieve an effective stretch to the tissues, direct tissue stretching is the method of choice (Box 12-2).
This approach to stretching does not involve joint movement as part of the stretch application. Palpation and joint movements are the assessments that identify areas of short tissue; the tissue is directly stretched using the various mechanical forces applied by the massage therapist. Longitudinal tissue stretching pulls tissue in the direction of the fiber configuration. Cross-directional stretching pulls the tissue against the fiber direction.
Longitudinal tissue stretching uses tension force to separate the ends of the tissue to lengthen it. The procedure for longitudinal tissue stretching is as follows (Figure 12-11):
1. Locate the tissues to be stretched.
2. Place the hands, fingers, or forearms directly over the area to be stretched.
3. Separate the fingers, hands, or forearms (tension force) or lift the tissue with pressure sufficient to stretch the tissue (bending or torsion force). Take up all slack from lengthening, then increase the intensity for up to 20 seconds.
Cross-directional tissue stretching uses a pull and twist component, introducing torsion and bend forces. The procedure for cross-directional stretching is as follows (Figure 12-12):
1. Access the area to be stretched by moving against the fiber direction using compression.
2. Lift or deform the area slightly and hold for 30 to 60 seconds until the area gets warm or seems to soften.
Use the following procedure for skin and superficial connective tissue:
Combined Stretching—active Release and Pin and Stretch
17. Combine stretching methods for increased effect.
18. Define and demonstrate active release and pin and stretch.
Effective stretching methods can combine the approaches described in this chapter. These combined approaches have been called active release and pin and stretch and involve the application of compression into the short binding tissue to hold it, followed by active or passive movement.
Muscle energy techniques can be implemented into combined methods (active release, Figure 12-13; pin and stretch, Figure 12-14):
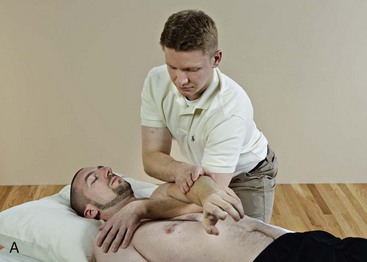
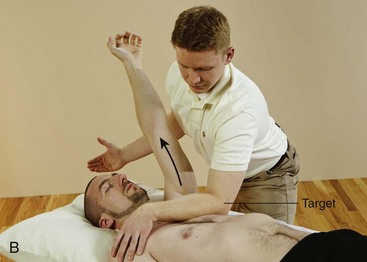
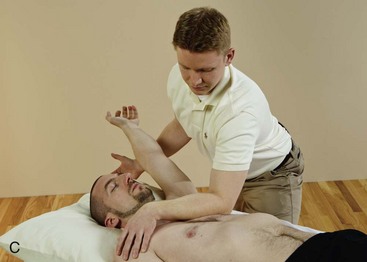
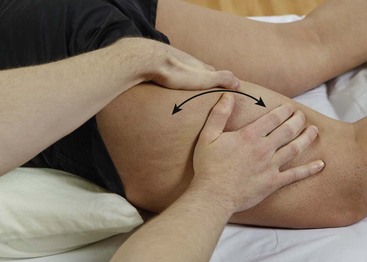
FIGURE 12-13 Example: active release method. A, Target tissues—pectoralis major and associated fascia. Fix (to hold steady) target tissues. Passively move target tissue into ease. Identify the area of increased tone or bind, and use compression and tension forces to hold in place. B, Maintain target tissue in while client moves arm away to stretch the tissue. C, Repeat 2 or 3 times, each time taking up any slack in the tissues.
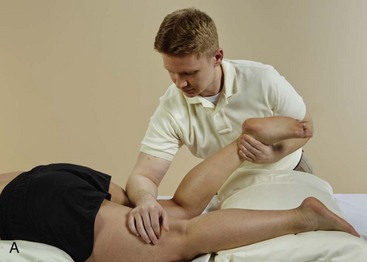
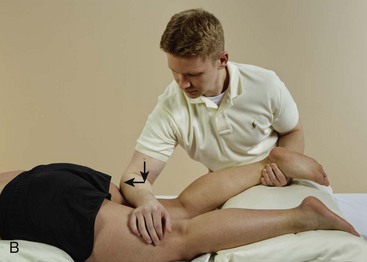
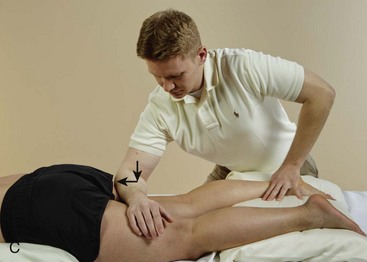
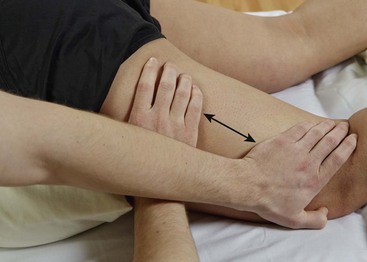
FIGURE 12-14 Example of pin and stretch—target: hamstrings. A, Place tissue into passive ease, and pin (fix, hold steady) target tissues with compression and tension. B, Maintain target tissues at bind, and move the distal joint (knee) into extension. C, Maintain target tissues at bind while stretching the area. Repeat multiple times until a more normal resting length is achieved.
1. Locate the area to be stretched.
2. Apply compression to the short tissue and hold it in a fixed position.
3. Instruct the client to tense the tissue identified as short, and then relax.
4. Instruct the client to move adjacent joints and lengthen the tissue, and/or the massage practitioner may use the other hand or forearm to move the tissue or joint into a stretched position.
Stretching Atlas
The sequence of photos in Figure 12-15 provides an example of stretching position and methods by body area. Additional examples are provided on the Evolve website. These methods can be incorporated into the general massage protocol as indicated by assessment. Recall that stretching is considered an intervention. This means that it is applied only when tissue and/or joint movement is hypomobile.
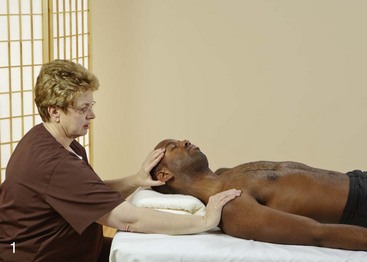
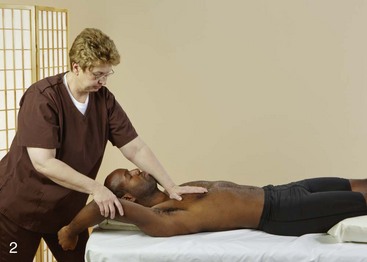
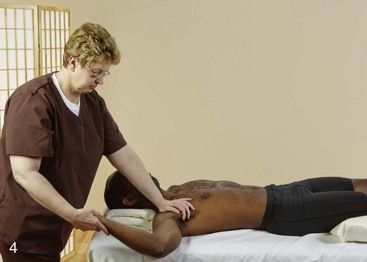
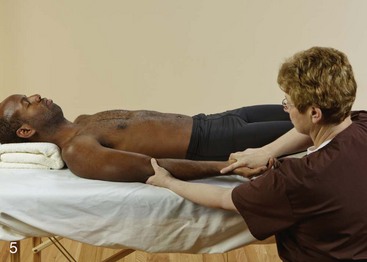

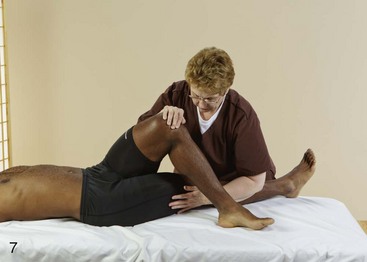
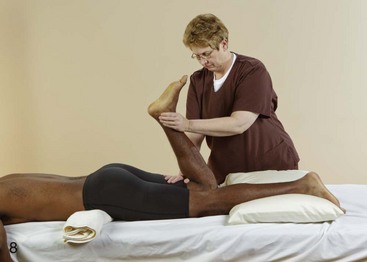
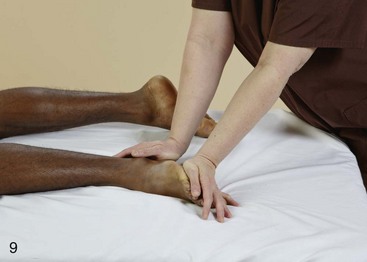
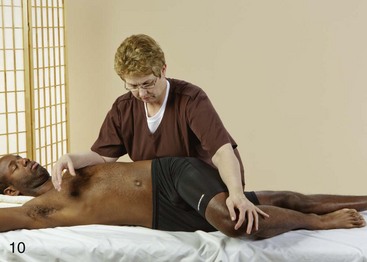
FIGURE 12-15 Examples of stretching.
1. Position head at end range of movement (bind) and stabilize. This is the point of resistance for MET. Move shoulder down/away toward feet to provide tension force to stretch target tissues.
2. Using hand or forearm, apply compression and tension force to drag tissue into bind. With the other hand, begin to move adjacent joint (shoulder) away (toward head) when resistance (bind) is felt. It is appropriate to introduce MET methods.
3. The side-lying position is the most efficient position for stretching the tissue of the lateral torso.
4. To address reduced external rotation ROM, the shoulder is in abduction 90%, and the arm remains on the table. Stabilize just medial to the glenohumeral joint. Move into external rotation with or without client assistance. Stop at bind.
5. To address shortening tissue involved in supination and pronation, position the elbow just short of full extension, and stabilize. Then turn palm up to bind, and just into bind to stretch. Various applications of MET can be used to increase tolerance to the stretch.
6. The hip flexors are more easily stretched with the client side-lying (see example 3). Stabilize at the gluteus muscles on the top leg while grasping above the knee of the leg on the table, and slide the leg along the table into the stretch position.
7. To stretch hip abductors, cross one leg over the other slightly, and internally rotate and stabilize. Using entire forearm, place hand on lateral side of thigh about midway between hip and knee. The therapist forearm lies firmly along lateral tissues to midcalf and pulls entire limb medially to stretch abductor tissue.
8. To stretch tissue of the anterior knee in the prone position, stabilize mid posterior thigh and flex knee to 90 degrees, and then no more than an additional 45 degrees. Do not attempt to bring heel to gluteal muscles.
9. In the prone or side-lying position, the tissues of the sole of the foot can be stretched by pushing heel down toward table and stabilizing. Use palm of hand to extend toes.
10. In side-lying position with therapist in back of client and with client hip flexed to 45 degrees, push knee down to table, and stabilize lateral side of thigh just above knee. Use forearm to cross the chest just under the clavicle, and roll the client back to stretch the tissues.
Log on to your Evolve website to view the complete stretching atlas.
Summary
In this chapter, stretching was defined and explained as an intervention that causes short binding tissues to change, by increasing flexibility. Various assessment procedures may be used to determine whether stretching would be beneficial. Stretching methods can be considered active and passive and serve as targets to areas of limited range of motion when a pathologic barrier exists.
Muscle energy techniques complement stretching methods by increasing tolerance to stretch sensation. Use of breath and eye movement during muscle energy techniques also supports stretching outcomes. Direct tissue stretching is an approach that easily blends with massage application. Combined stretching methods, such as active release, or pin and stretch, can also increase the response to stretching.
References
Fryer, G. MET—efficacy and research (Chapter 4). In Chaitow L, ed.: Muscle energy techniques, ed 3, Philadelphia: Churchill Livingstone, 2006.
Fryer, G, Fossum, C. Therapeutic mechanisms underlying muscle energy approaches. In: Fernández de las Peñas C, Arendt-Nielsen L, Gerwin R, eds. Physical therapy for tension type and cervicogenic headache: physical examination, muscle and joint management. Boston: Jones & Bartlett, 2009.
Klingler W, Schleip R, Zorn A: 2004 European Fascia Research Project Report, 5th World Congress Low Back and Pelvic Pain, Melbourne, November 2004.
Lederman, E. Fundamentals of manual therapy. London: Churchill Livingstone; 1997.
McHugh, MP, Cosgrave, CH. To stretch or not to stretch: the role of stretching in injury prevention and performance. Scand J Med Sci Sports. 2010;20:169. [Epub 2009 Dec 18].
Morse, CI, Degens, H, Seynnes, OR, et al. The acute effect of stretching on the passive stiffness of the human gastrocnemius muscle tendon unit. J Physiol. 2008;586:97.
 Workbook
Visit the Evolve website to download and complete the following exercises.
1. Describe how the stretching atlas can be used as an assessment tool.
2. How might you explain proper stretching methods to a client who is overstretching?
3. In what ways can stretching methods be incorporated into the massage session?
4. How could you use the stretching atlas as a self-help tool?