Basic consulting room techniques
Procedure: Squeezing the anal sacs
Procedure: Clipping a dog’s claws
Procedure: Clipping a bird’s beak
Procedure: Fluorescein test for the diagnosis of corneal ulcers or for assessing the patency of the tear duct
Procedure: Schirmer tear test to measure the amount of aqueous tear production
The first time you find yourself alone in the consulting room with worried clients and their beloved animal can be terrifying. Knowing that you know how to do all the most common and most basic procedures that are likely to be presented will give you confidence. Appearing confident and competent in front of the client is the art of veterinary medicine as opposed to the science of veterinary medicine. If you are confident, the client will trust you and the animal will also respond positively.
Procedure: Basic clinical examination
When carrying out a clinical examination you must develop a logical, methodical, systematic approach and always stick to it. Always remember that ‘common things are common’ – the dog that walks into the surgery salivating is probably suffering from car sickness or dental problems not rabies!
Remember that your consultation should take about 10 minutes (depends on practice protocols) so time is of the essence – you have a lot to achieve in a short time!
1. History – This must be taken early on in the consultation process and should be as detailed as possible.
a. When taking the history, remember to listen to the answers. Sometimes your brain is ‘talking’ to you, especially if you are nervous, and you do not hear what is actually being said to you.
b. Avoid asking leading questions, that is, those that suggest something to the client; e.g. ‘Is your cat drinking a lot?’ suggests to the client that it is, even if it is not.
c. Avoid asking closed questions, that is, those that can only be answered by Yes or No; e.g. ‘Is your cat drinking a lot? It is better to ask an open question such as ‘How much is your cat drinking?’
d. Take notes – either directly on to the computer, or use a note pad for later transcription – it may be difficult to write a full history within the allotted time.
• Client’s details – name, address and telephone number. Some practices may also take the email address. These details may have been taken by the receptionist and will appear on your computer screen in the consulting room. Find out the animal’s name and use it! Get the sex of the animal right – if you consistently refer to him rather than to her, this is what the client will pick up on not on whether you have made the diagnosis of the century!
• Patient details – species, breed, age, vaccination status, any previous medical history, how long they have had him / her. Weigh the animal – this will be useful for calculating dose rates, but is also a useful measure of health. In any animal on a diet this is a useful measure of progress. All these details may already be on the computer screen in front of you, but checking the facts is a good way of getting into a conversation.
• Presenting sign – this is the symptom that has made the client get off the sofa and bring the dog to the surgery. It will be the most obvious sign to them (e.g. the dog is drinking a lot, diarrhoea, vomiting, scratching, etc.) although not necessarily the most significant diagnostically. Ask questions to develop your understanding of this presenting sign (Box 2.1), then ask questions about other relevant symptoms as you begin to extract the facts and widen your knowledge of the patient, e.g. diet, how much, when was it last wormed or defleaed.
2. Initial examination – First stand back and observe. Delay your thorough clinical examination for a short time. As soon as you start to touch the animal you destroy some of the evidence; for example, the heart rate and respiratory rate may rise if the animal is nervous. Observe the animal’s behaviour, including such things as the respiratory rate, as it stands on your table. Look at the animal’s general demeanour. This may be done at the same time as you are taking the client’s details – as you become more experienced you will find that you can multitask!
3. Clinical examination – This must be done in a logical order to avoid missing a piece of evidence (Fig 2.1). Develop your own system and follow it every time. For example, you could start by examining all structures on the head, then progress to the trunk, then the legs and finally the perineum; or you could examine the respiratory system, the digestive system, etc.; or you could examine the parts of the animal alphabetically. It does not matter how you do it, but you must develop your own system and stick to it. In this way you should not miss anything significant. Always make notes and record your findings, both normal and abnormal.
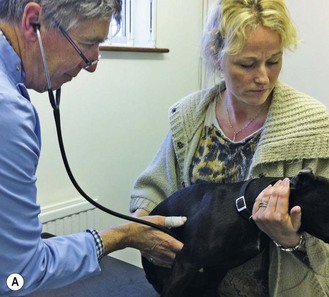
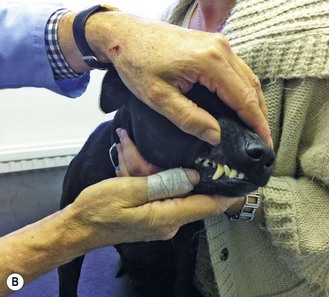
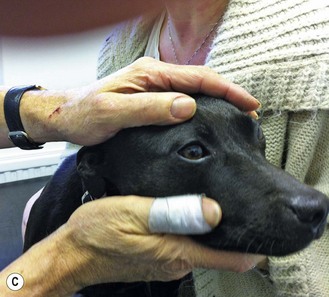

Figure 2.1 Carrying out a routine clinical examination: (A) auscultation of the heart; (B) examining the teeth and gums; (C) checking the eyes; (D) checking the ears.
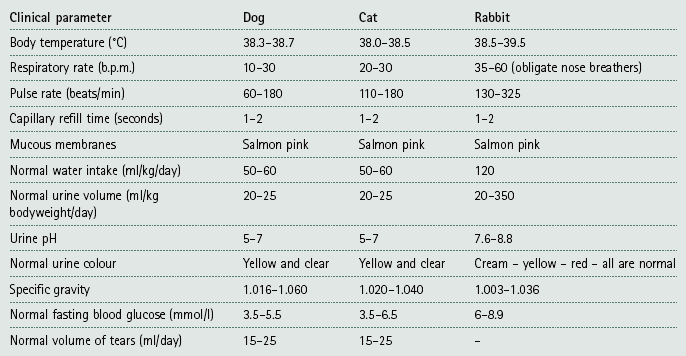
It is a good idea to start with the basic assessment of temperature, pulse and respiration, check the mucous membranes and the palpable lymph nodes (Table 2.1). This provides essential clinical information and extra thinking time. (Note how clients always start to talk when you are listening to the chest!)
Suggested format for a clinical examination – in a routine 10-minute consultation you will not be able to complete as much detail as is suggested below. Listen to the history and from this you will get an idea of which area to focus on; for example, if the owner says the dog has diarrhoea then look at the digestive system. However, keep an open mind and do not completely rule out the other systems.
Examine the following systems making notes about the indicated parameters.
• Palpable lymph nodes – these are indicators of local infection and inflammation:
1. Action: Submandibular and parotid.
Rationale: Around the angle of the jaw and the base of the ear.
Rationale: In front of the shoulder.
Rationale: Caudal to the stifle joint within the gastrocnemius muscle.
1. Action: Auscultate the heart using a stethoscope.
Rationale: Listen to the rate and rhythm and make a note of any murmurs.
2. Action: Feel the pulse – use the femoral artery.
Rationale: Count the rate for 15 seconds then multiply by 4. Notice the character.
3. Action: Check the colour of the mucous membranes.
Rationale: Take note of any change from the normal salmon-pink colour.
Rationale: To check for the level of hydration.
5. Action: Feel the extremities.
Rationale: Note the temperature – are they cold or excessively hot?
6. Action: Look for signs of oedema.
Rationale: Check the paws, legs, ventral abdomen and prepuce.
1. Action: Note the respiratory rate.
Rationale: Identify one area and watch it move over a period of 15 seconds then multiply by 4.
2. Action: Auscultate the chest using a stethoscope.
Rationale: Listen to several areas to locate specific problems.
3. Action: Percussion of the chest.
Rationale: To identify areas of consolidation.
4. Action: Check the colour of the mucous membranes.
Rationale: To check for levels of oxygenation.
5. Action: Listen to the patient breathing.
Rationale: Note whether any noise occurs during inspiration or expiration.
6. Action: Note any evidence of dyspnoea.
Rationale: Inspiration or expiration?
Rationale: By gently squeezing the larynx, note the type – dry and hacking or moist and productive.
Rationale: Unilateral or bilateral?
1. Action: Note any faeces on thermometer or around the anus.
Rationale: Look at colour and smell. Note the presence of blood.
2. Action: Examine lips, inside of the mouth and teeth.
Rationale: Check for colour, ulceration, injury and presence of gum or dental disease.
3. Action: Check tongue and smell the breath.
Rationale: Look for injury, ulceration, etc. A smell of pear drops indicates ketosis; foul smell may indicate gingivitis.
4. Action: Check pharyngeal lymph nodes.
Rationale: For signs of infection.
5. Action: Check salivary glands.
Rationale: For signs of mucocoele.
6. Action: Palpate the abdomen.
Rationale: Take note of any pain, very hard or soft areas, guarding.
7. Action: Observe the patient’s stance.
Rationale: Arched back, praying stance, guarding.
8. Action: Obtain a faecal sample.
Rationale: Note colour, form and frequency. Faecal egg count will identify worm infestations.
9. Action: Ask owner or obtain a sample of vomit.
Rationale: Note colour, smell and contents. Note timing in relation to eating.
1. Action: Palpate the bladder.
Rationale: Note whether full or empty; presence of bladder stones.
2. Action: Palpate the kidneys.
Rationale: Size and consistency; painful or not.
• Reproductive system – female:
Rationale: For patency and injury.
2. Action: Palpate vagina digitally.
Rationale: To assess patency and potential damage.
3. Action: Examine vagina with a speculum.
Rationale: To assess mucous membranes for damage.
4. Action: Check mammary glands.
Rationale: Look for mammary tumours or evidence of false pregnancy.
5. Action: Check inguinal lymph nodes.
Rationale: For evidence of metastases or infection.
1. Action: Check scrotum and testes.
Rationale: Only relevant in an uncastrated patient. There should be two testes, which should move freely within the scrotum.
Rationale: The penis should move easily within the prepuce, with no evidence of infection or trauma.
Rationale: For damage or infection.
Rationale: In larger dogs this may just be palpated per rectum.
1. Action: Look at coat quality.
Rationale: Provides a good indicator of general health.
2. Action: Look for areas of alopecia.
Rationale: Note the site and whether the areas are symmetrical.
3. Action: Identify whether skin is pruritic.
Rationale: May indicate parasite infestation.
4. Action: Look for areas of scurf.
Rationale: May indicate poor nutrition or parasite infestation.
5. Action: Check for even pigmentation.
Rationale: May indicate hormonal problems.
6. Action: Variation in skin thickness.
Rationale: May indicate trauma due to scratching or hormonal problems.
Rationale: For damage or infection.
2. Action: Examine external ear canal visually and with an auroscope.
Rationale: For infection or parasite infestation. Also check for hairs, which may impede aeration. Check for smell.
3. Action: Examine the tympanic membrane.
Rationale: Using an auroscope. Look for damage due to infection or trauma.
• Eyes – always examine in a darkened room:
1. Action: Note any evidence of photophobia, chemosis, blepharospasm and epiphora.
Rationale: These clinical signs may indicate eye problems that require further investigation.
Rationale: Look for inflammation and infection. Slight dullness could indicate ‘dry eye’. Look for ulcers – use fluorescein stain.
3. Action: Check eyelids – remember to evert them as well.
Rationale: Look for injury and foreign bodies.
Rationale: Look for bruising, haemorrhage.
5. Action: Look at both eyes together and compare them.
Rationale: Both eyes should look the same and function together.
Rationale: Should be the same.
7. Action: Check pupillary light response.
Rationale: Pupil constricts in response to bright light.
8. Action: Check menace reflex.
Rationale: Eyeball should pull back into orbit in response to a fast approaching object such as a hand.
Rationale: Using an ophthalmoscope – look for evidence of cataracts.
4. Formulate a differential diagnosis – This is based on the history and the clinical examination (Box 2.2). This will give you an idea as to how to proceed with the case.
5. Treatment – If you are certain of your diagnosis then you can proceed to the treatment. If you are unable to make a diagnosis then consider further tests which may include:
a. Laboratory tests – e.g. haematology, blood biochemistry and electrolyte analysis, urinalysis
b. Diagnostic imaging – e.g. radiology, ultrasonography, endoscopy, CT and MRI scans
c. Hormonal tests – e.g. ACTH stimulation, dexamethasone suppression, water deprivation test
Finally remember that in some cases you may never reach a diagnosis and in other cases there is no treatment. Many patients recover well on symptomatic treatments such as analgesics, antidiarrhoeal agents, antimicrobials, antiemetics, fluid therapy and dietary management.
6. Euthanasia – In some cases this may be best for the animal and it may be used:
a. If the condition is going to progress to a painful end (e.g. neoplasia)
b. To alleviate immediate and severe suffering from which there is unlikely to be recovery
c. To prevent the spread of an infectious disease (e.g. FeLV), and often used in large animal / herd management
d. If the cost of the treatment is above that which the client can afford or is willing to pay.
Other procedures
Procedure: Squeezing the anal sacs
1. Action: Place the dog in a standing position on a stable examination table covered in a non-slip mat.
Rationale: This position provides the best access to the anal sacs. If the dog feels secure on the table it will be less likely to try and escape.
2. Action: Ask the owner or an assistant to restrain the dog’s head.
Rationale: This will prevent the dog from turning around to bite you. It is always preferable for the owner to be bitten rather than you!
3. Action: Put on a pair of disposable rubber gloves.
Rationale: These will protect you from contamination by faeces and by the anal sac discharge.
4. Action: Insert a well-lubricated index finger through the anal ring and have a small pad of cottonwool in the palm of your hand (Fig 2.2).
Rationale: The anal sacs sit inside the anal ring.
5. Action: Angle the finger downwards to lie on the inside of the anal ring, while your thumb is on the outside. You should be able to feel the sac between the two.
Rationale: The anal sacs lie in the ‘twenty to four’ position within the anal ring. Placing a finger on one side and the thumb on the other side enables you to feel the swollen gland between the two.
6. Action: Gently squeeze the anal sac, absorbing the discharge in the cottonwool pad.
Rationale: The discharge will be expelled from the sac and come out of through the anal ring. It will have an offensive smell and must be collected in the pad.
7. Action: Keeping your finger in the anal ring, angle your hand so that the finger and thumb can pick up the other anal sac.
Rationale: There are two anal sacs.
8. Action: Gently squeeze this sac and collect the discharge.
9. Action: Remove your finger from the anal ring and dispose of the gloves and the cottonwool pad in the clinical waste bin.
Rationale: It is not necessary to show the owner the discharge, but they may want to see it. It also helps to prove that something came out and you have done your job.
1. Action: Place the dog in a standing position on a stable examination table covered in a non-slip mat.
Rationale: This position provides the best access to the anal sacs. If the dog feels secure on the table it will be less likely to try and escape.
2. Action: Ask the owner or an assistant to restrain the dog’s head.
Rationale: This will prevent the dog from turning around to bite you. It is always preferable for the owner to be bitten rather than you!
3. Action: Put on a pair of disposable rubber gloves.
Rationale: These will protect you from contamination by faeces and by the anal sac discharge.
4. Action: Place a pad of cottonwool in the palm of your hand.
Rationale: To absorb the discharge.
5. Action: Place your index finger on one side of the anal ring over the area of one of the anal sacs and your thumb on the other side over the other anal sac.
Rationale: There are two anal sacs, lying in the ‘twenty to four’ position within the tissue of the anal ring.
6. Action: Gently squeeze the anal ring.
Rationale: The anal sacs will be under pressure and should discharge their contents.
7. Action: Remove your gloves and dispose of them and the cottonwool pad in the clinical waste bin.
Rationale: It is not necessary to show the owner the discharge but they may want to see it. It also helps to prove that something came out and you have done your job.
NB This method is more difficult to do successfully, but many people prefer it.
Procedure: Clipping a dog’s claws
1. Action: Place the dog in a sitting position on a stable examination table covered in a non-slip mat.
Rationale: If the dog feels secure on the table it will be less likely to try and escape.
2. Action: Ask the owner or an assistant to restrain the dog by placing one arm under the dog’s neck to restrain the head and using the other to steady the trunk.
Rationale: It is important that the dog does not wriggle as it may hurt itself or you.
3. Action: If you think that it is necessary, put a muzzle on the dog. This may be a tape muzzle as shown in Figure 1.1 or a commercial muzzle of an appropriate size.
Rationale: Some dogs object to the procedure and may try to bite.
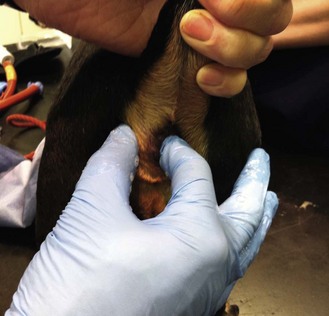
4. Action: Pick up one of the forefeet.
Rationale: You can start with the hindfeet, but I prefer the forefeet.
5. Action: With your left hand (or right hand if you are left handed) separate out one toe and gently extend the claw by pressing on the distal interphalangeal joint.
Rationale: This gives you the maximum chance of identifying the quick.
6. Action: Identify the ‘quick’, which is easy in white nails, but quite difficult in dark nails (Fig. 2.3).
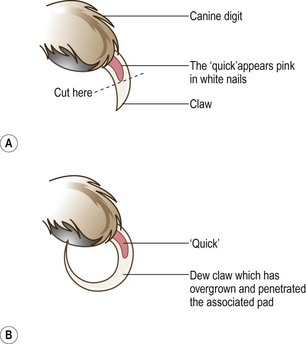
Figure 2.3 Diagram to show the position of the ‘quick’ within the claw: (A) a normal claw; (B) an overgrown dew claw.
Rationale: The ‘quick’, which appears pale pink, comprises the blood supply to the growing nail tissue and its nerve supply. Cutting into it causes pain and bleeding.
7. Action: Place the clippers at the distal end of the ‘quick’ and cut quickly and firmly.
Rationale: If you take too much time to do this the dog may move and this could result in you cutting into the quick.
8. Action: Repeat with all the other nails in the forefeet.
Rationale: You may have difficulty with the two dew claws as they may have grown around and even have pierced the dew-claw pad (Fig. 2.3B). This makes it very difficult to slip some clippers over the end. You may have to nibble away at the end of the nail or even resort to doing it under a general anaesthetic or deep sedation.
9. Action: With the dog still restrained in a sitting position extend one of the hindfeet and repeat the procedure claw by claw.
Rationale: Some dogs may prefer to stand when you do the hindfeet. There are usually no dew claws on the hindfeet, but make sure that you check.
NB Clipping the claws of any other species of animal or bird is more or less the same, but always check for the position of the ‘quick’. Restraint for a bird is the same as for clipping the beak – see below.
Procedure: Clipping a bird’s beak
This is most often done in small cage and aviary birds such as budgerigars, canaries, lovebirds cockatiels and finches.
1. Action: Make sure that all the doors and windows are closed and that extractor fans are switched off.
Rationale: If the bird escapes from its cage or from your grasp it will not be able to get out of the room or be injured in the extractor fan.
2. Action: Remove all moveable objects from the cage such as perches, toys and feeding bowls.
Rationale: This makes capture easier and quicker and therefore less stressful to the bird.
3. Action: Turn the lights off or if possible dim them.
Rationale: Most common species of cage or aviary bird are diurnal. A dim light will simulate night and induce quiet behaviour.
4. Action: Tip the cage on its side.
Rationale: This enables you to approach from the bottom of the cage and gives you more room for manoeuvre.
5. Action: Approach the bird slowly.
Rationale: This avoids causing air movement, which will startle the bird.
6. Action: Quickly grab the bird around its neck or close your hand around its wings and body.
Rationale: It is important to catch the bird quickly, firmly and gently to avoid causing distress. Closing your hands around the wings creates a ‘net’ that prevents the wings from flapping and possibly breaking.
7. Action: Using your left hand, hold the bird so that the head is sticking out between your thumb and index finger and the rest of your hand holds the wings close to the body (Fig. 2.4).
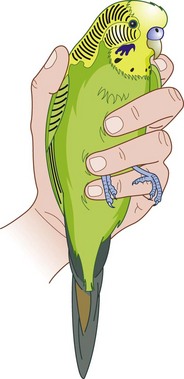
Rationale: It is important to prevent the wings from flapping and thus being injured.
8. Action: Tilt the bird slightly so that you can clearly see and assess the beak.
Rationale: Avoid tilting the bird horizontally as it is said to promote heart failure. Always be aware of the pressure you are applying to the chest with your fingers – it is easy to squeeze the chest because you are concentrating so hard on what you are doing. Some beaks may be excessively overgrown whereas others may be much less so.
9. Action: Identify the ‘quick’.
Rationale: The quick is the blood and nerve supply to the beak. It is often difficult to identify but, as it is usually fairly high up in the beak, in my experience it is rarely cut.
10. Action: Using sharp clippers, remove the bottom of the upper beak.
Rationale: There is no need to trim the lower beak.
11. Action: Return the bird to its cage.
Rationale: Always observe the bird for a few moments to make sure that it is all right.
NB If you are asked to cut the beak of a bigger bird such as a parrot, always wear clean strong gloves as these birds have vicious beaks. The use of gloves when handling smaller birds reduces your sense of touch and there is a risk that you will hold them too tightly.
Procedure: Clipping the wings
This is performed in large domestic fowl, e.g. hens, ducks, geese and guinea fowl, to prevent them from escaping. It may also be used in free-flying parrots.
1. Action: Ask an assistant to restrain the bird by placing the body under his or her arm and extending one of the wings.
Rationale: Clipping is only done on one wing so that when the bird tries to fly, it is aerodynamically unstable and is forced to land.
2. Action: Using large sharp scissors cut through the main part of the primary feathers (Fig. 2.5).
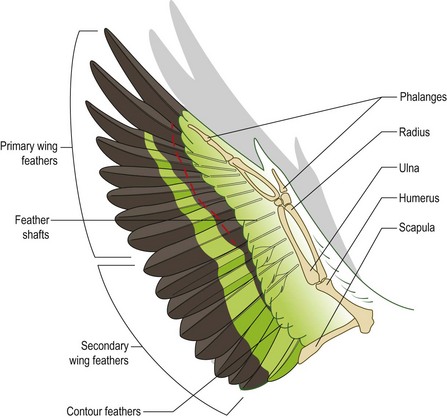
Rationale: Cutting through the main part of the feathers does not cause any pain. Avoid cutting into the shaft at the point where it inserts into the skin as this will be painful and will cause bleeding. Wing clipping correctly done is no more painful than cutting hair.
3. Action: Leave the first one or two primary feathers uncut.
Rationale: When the bird is at rest and its wings are folded you can hardly see that the rest of the primaries have been clipped – this is entirely cosmetic.
4. Action: Inform the owner that this procedure must be repeated annually.
Rationale: Birds moult once a year so the clipped primaries will regrow allowing the bird to fly properly.
NB This procedure should not be confused with the technique of pinioning in which newly hatched birds have the bony tip of the wing removed. This is usually done in captive bird collections and is not recommended unless it is really necessary as it causes permanent disfigurement.
Procedure: Fluorescein test for the diagnosis of corneal ulcers or for assessing the patency of the tear duct
1. Action: The animal should be restrained by your assistant in a sitting or standing position on a stable examination table covered in a non-slip mat.
Rationale: If the animal feels comfortable and secure it will be less likely to wriggle and try to escape.
2. Action: Remove a fluorescein strip from its wrapping and wet with a little sterile saline or distilled water.
Rationale: Each strip is individually wrapped. Wetting the strip may not be necessary if there is ample tear production.
3. Action: Touch the test strip to the dorsal or ventral conjunctiva and if necessary irrigate the eye with a little more saline.
Rationale: Irrigation will wash the excess fluorescein away.
4. Action: Examine the eye using a blue light.
Rationale: If there is a defect in the conjunctival epithelium, the fluorescein will stick to it indicating the presence of an ulcer.
5. Action: Examine the entrance to the nasal chambers at the point where the tear duct drains out. (Try to stop the animal licking its nose as it may remove all traces!)
Rationale: If the tear duct is patent fluorescein will appear at the base of the duct having drained from the eye; if the duct is blocked fluorescein will spill over the edge of the eye and stain the cheek.
Procedure: Schirmer tear test to measure the amount of aqueous tear production
This simple test is a useful method of assessing tear production, aiding in the diagnosis of keratoconjunctivitis sicca (KCS) or ‘dry eye’. This is a distressing problem in certain breeds such as the King Charles Spaniel and the test can also be used to monitor the effectiveness of treatment.
1. Action: The animal should be restrained by your assistant in sitting position or in sternal recumbency on a stable examination table covered in a non-slip mat.
Rationale: You need to be able to reach the eye so if you are short the animal should be in sternal recumbency.
2. Action: Remove two Schirmer test strips from their sterile plastic envelope.
Rationale: The strips are packaged to keep them sterile and dry.
3. Action: Fold the end of one strip at the notch close to the end. Try not to touch the strip with your fingers.
Rationale: Touching the strip may cause lipids from the skin on your fingers to be absorbed and interfere with the absorption of aqueous tears.
4. Action: Gently roll out the lower eyelid and hook the short end of the strip so that it rests against the junction of the cornea and the conjunctiva (Fig. 2.6).
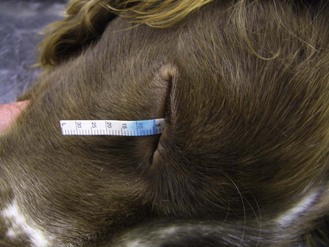
Rationale: This ensures that the strip makes good contact with the area of tear production.
5. Action: Gently close the eyelids.
Rationale: To hold the strip in place.
6. Action: Hold the strip in place for one 1 minute – use your watch or a timer to do this accurately.
Rationale: This is the standard time for the test.
7. Action: Remove the strip gently from the eye and measure the length of the blue-stained area of paper using the scale marked on the strip.
Rationale: The longer the length of the stain the greater the volume of tears produced.
8. Action: Repeat with the other eye using the second strip.
NB Average reference range: dogs = 20 mm/min, cats = 17 mm/min; in KCS it is less than 5 mm/min.
Intraocular pressure
This rises if the eye starts to develop glaucoma. The increase in pressure can eventually destroy the internal structures causing severe pain, blindness and eventual collapse of the eye. Tonometry readings are a useful method of quantifying the rise in pressure and serial readings are a means of assessing the efficacy of your treatment.
There are two methods available:
• Mechanical Schiotz tonometer – less accurate and really only useful as a guide to the pressure
• Tono-Pen® – much more accurate and reliable but expensive.
Procedure: Measurement of intraocular pressure using a Schiotz tonometer
1. Action: The animal is restrained in lateral recumbency on the table.
Rationale: The animal must be comfortable and restrained securely so that it does not hurt itself when the procedure is being carried out.
2. Action: Put local anaesthetic drops in both eyes.
Rationale: These desensitize the cornea so that the animal does not blink or move when the cornea is touched.
3. Action: Calibrate the Schiotz tonometer by pressing it gently on to the metal test block. Different weights can be added to the plunger.
Rationale: This sets the zero pressure level.
4. Action: Ask the assistant to hold the animal’s head up so that the cornea is horizontal.
Rationale: Readings depend on gravity so the instrument must be held as vertically as possible.
5. Action: Gently rest the instrument on the cornea and take a reading from the needle.
Rationale: A soft eyeball will deflect the probe only a little thus producing a reading closer to the zero baseline. Conversely a harder eyeball will deflect the probe much more thus producing a higher reading.
6. Action: Take at least two readings from both eyes.
Rationale: This allows comparison of the pressure in both eyes and by repetition checks the accuracy of the instrument. Each reading should be the same as the previous measurement.
7. Action: Record the readings in the clinical records.
Rationale: To allow comparison with later measurements and to monitor the efficacy of treatment.
Procedure: Measurement of intraocular pressure using a Tono-Pen®
1. Action: The animal is restrained in lateral recumbency on the table.
Rationale: The animal must be comfortable and restrained securely so that it does not hurt itself when the procedure is being carried out.
2. Action: Put local anaesthetic drops in both eyes.
Rationale: These desensitize the cornea so that the animal does not blink or move when the cornea is touched.
3. Action: Place a fresh latex sheath over the end of the Tono-Pen® using the cardboard applicator supplied by the manufacturer.
Rationale: This protects the sensitive end of the instrument and prevents cross-infection.
4. Action: Calibrate the pen by pushing the button near to the tip with the Tono-Pen® held downwards. When it ‘beeps’ point the head vertically upwards. The machine should read ‘good’ on the display bar and readings can now be taken. If the display says ‘bad’ repeat the process until the correct response is obtained.
Rationale: To calibrate and ensure the accuracy of the actual readings.
5. Action: Gently touch the latex tip onto the anaesthetized cornea. This should be done several times until a ‘beep’ is heard (Fig. 2.7).
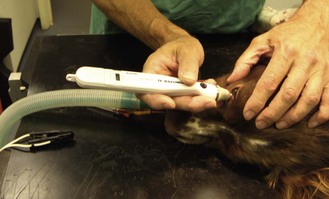
Rationale: The machine works by gentle corneal contact not by deforming the surface by pressure.
6. Action: Repeat the readings more than once and take them from both eyes.
Rationale: This allows comparison of the pressure in both eyes and by repetition checks the accuracy. Each reading should be the same as the previous measurement.
7. Action: Discard the latex sleeve in clinical waste.
Rationale: To prevent cross-infection.
8. Action: Record the readings in the clinical records.
Rationale: To allow comparison with later measurements and to monitor the efficacy of treatment.
Procedure: Collection of samples for ectoparasite identification
It is important to have an idea of which type of ectoparasite you think is the cause of the infestation.
Ectoparasites can be classified according to the depth of skin that they inhabit:
1. Surface dwellers e.g. Cheyletiella, Otodectes, Neotrombicula (harvest mites), lice and fleas; infestations usually cause pruritus
Coat brushings – used for Cheyletiella, Neotrombicula, fleas and lice:
1. Action: Place the animal in a standing position on a stable examination table covered in a non-slip mat.
Rationale: If the animal feels secure on the table it will be less likely to try and escape. The position may be varied according to the site being sampled.
2. Action: Ask the owner to restrain the head of the animal to keep it still.
Rationale: This is not a painful process so the animal should stand calmly.
3. Action: Comb through the coat thoroughly and collect the brushings in a Petri dish.
Rationale: Make sure that you select an area that is obviously affected. When looking for fleas check under the chin, around the ears and base of the tail and in the axilla – fleas often select areas that are warm and dark.
4. Action: Examine under a low power or dissecting microscope (Fig. 2.8).
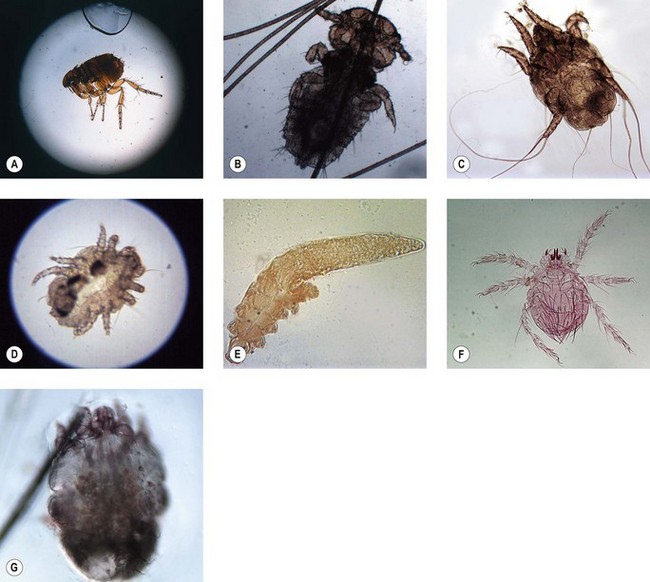
Figure 2.8 Ectoparasites that can be identified by skin scrapings or coat brushings: (A) Lateral view of an adult ‘cat’ flea, Ctenocephalides felis. Adult measures 1–2.5 mm in length. (B) Trichodectes canis, a biting louse of dogs. Adult is 1–2 mm in length. (C) The ear mite Otodectes cynotis can be recognized by the unjointed stalks or pedicels with suckers on the end that occur on the front two pairs of legs in all developmental stages. Adult mite is approx. 300 µm. (D) Cheyletiella spp. mites are large surface mites with long legs. They have a characteristic waist, large palps at the anterior end each carrying a heavy claw and ‘combs’ on the ends of their legs. (E) Demodex spp. mites are often described as cigar shaped. The legs are arranged in pairs at the front of the body. The mite measures approx. 0.2 mm. (F) The larvae of Neotrombicula or Trombicula autumnalis mites are hairy and have six legs. Measures approx. 200 µm. (G) Sarcoptes spp. mites are rotund with short legs. The back is covered in pegs and spines and the anus is terminal. The mite measures approx. 360 µm.
Rationale: Fleas are less than 4.00 mm in length, which means they can be seen with the naked eye. You may also see flea faeces – this will turn reddish-brown if you add a drop of water to it. Cheyletiella is 0.4–0.8 mm in length so requires low magnification to be seen. You may find lice clinging to the hairs or louse eggs, known as ‘nits’, attached firmly to the hairs.
NB For Otodectes (ear mites) there is no need to brush the hair. These mites live within the external ear canal and can be identified by collecting a small sample of earwax, placing it on a glass slide and examining it under the microscope. Make sure that the sample is not too thick as this makes visualization of the mites quite difficult (Fig. 2.8C).
Sellotape® method: This is used for Cheyletiella and is also a useful means of collecting samples of the yeast Malassezia pachydermatis.
1. Action: Place the animal in a standing position on a stable examination table covered in a non-slip mat.
Rationale: If the animal feels secure on the table it will be less likely to try and escape. The position may be varied according to the site being sampled.
2. Action: Ask the owner to restrain the head of the animal to keep it still.
Rationale: This is not a painful process so the animal should stand calmly.
3. Action: Tear off a strip of Sellotape® about 2 inches (5 cm) long.
Rationale: You need a long enough length of tape to cover a glass microscope slide.
4. Action: Part the coat and apply the tape sticky side down to an area that is obviously affected.
Rationale: The sticky side should pick up skin flakes and debris, which may contain the parasites.
5. Action: Either place the Sellotape® sticky side down directly on to a clean glass slide or apply a drop of mineral oil to the slide before applying the Sellotape®.
Rationale: The mineral oil increases the visibility of the parasites.
6. Action: If looking for Malassezia, the tape should be stained with the basophilic solution of Diff-Quik® (the 3rd one) before applying it to the slide.
Rationale: Yeasts are too small and transparent to be easily seen without staining.
7. Action: Examine the slide under a microscope (Fig. 2.8).
Rationale: You can easily see Cheyletiella under low power, but you may need to increase the magnification to see Malassezia.
Skin scraping: This is used for burrowing mites such as Sarcoptes and Demodex.
1. Action: Place the animal in a standing position on a stable examination table covered in a non-slip mat.
Rationale: If the animal feels secure on the table it will be less likely to try and escape. The position may be varied according to the site being sampled.
2. Action: Ask the owner to restrain the head of the animal to keep it still.
Rationale: This procedure may cause slight discomfort and the owner should be asked to hold the animal firmly.
3. Action: Select an appropriate area to be sampled.
Rationale: Demodex is most likely to affect the head, neck and feet although it can affect the whole body. Sarcoptes is most likely to affect the elbows, hocks and ears – the infestation is usually extremely pruritic.
4. Action: Use a fresh (sharp and sterile) scalpel blade.
Rationale: To prevent the introduction of additional infection to the area.
5. Action: Pick up a small piece of skin and hold the blade at right angles to the skin. Draw the blade across the area repeatedly until it bleeds.
Rationale: The presence of blood indicates that the deeper layers of the epidermis have been reached. For Demodex it is vital that the hair follicles are breached releasing the parasites.
6. Action: Place the scraped material on to a glass microscope slide with a drop of 10% potassium hydroxide and put a cover slip on top.
Rationale: Potassium hydroxide helps to break down any hair and skin cells in the debris and makes the parasites easier to see. Liquid paraffin is widely used but visibility of the parasites is less good and the slide can become very greasy.
7. Action: Examine under the microscope (Fig. 2.8). For more detail on slide preparation see Chapter 4.
Rationale: Use ×4 objective for Sarcoptes; use ×10 objective for Demodex.
8. Action: On the patient, dress the area of the skin scraping with antiseptic powder.
Rationale: To reduce the pain and prevent subsequent infection.
Exfoliative vaginal cytology
This technique is based on the fact that the vaginal epithelium of the bitch changes in response to the hormones circulating during the oestrous cycle. Microscopic examination of cells shed from the epithelium will provide a guide to the stage of the cycle and will indicate when mating is likely to result in successful conception.
Procedure: Collecting and preparing a vaginal smear for microscopic examination
1. Action: Place the bitch in a standing position on a stable examination table and ask the owner to restrain her head.
Rationale: A bitch in season is likely to tolerate this procedure as it is not painful.
2. Action: The first smear should be taken about 5 days after the first signs of pro-oestrus, i.e. vaginal bleeding.
Rationale: Some bitches may be close to ovulation at this time.
3. Action: Using a sterile bacteriological swab, insert it into the vestibule and caudal vagina.
Rationale: The swab will absorb the exudate.
4. Action: Remove it from the vestibule and roll it onto a clean microscope slide.
Rationale: Rolling the exudate onto the slide should ensure that the cells are minimally damaged and remain as intact as possible.
The disadvantage of this method is that mucus will also be collected, particularly in metoestrus and anoestrus, and this makes drying the slide rather slow.
5. Action: If preferred scrape material from the vaginal wall using a metal spatula and place it on a clean microscope slide.
Rationale: This may cause more discomfort to the bitch.
It is difficult to collect significant amounts of material by this method and the material is difficult to spread.
6. Action: If preferred, aspirate material from the caudal vagina using a catheter or a pipette and spread it on a clean microscope slide as you would a blood smear (see Ch. 5).
Rationale: In metoestrus and anoestrus you may add a small amount of saline to collect a suspension of cells.
This method produces a clear undistorted smear.
7. Action: Whichever method is used air dry the slide immediately.
Rationale: To prevent distortion of the cells.
8. Action: Stain the slide using DiffQuik® by dipping into each of the three solutions six times, washing with water and allowing the slide to dry (see Ch. 5).
Rationale: This stain gives rapid and consistent results although the solutions are expensive. You can also use Shorr’s method, methylene blue and Leishman’s stain (see Ch. 5).
9. Action: Examine under a microscope.
Rationale: Interpretation is quick to do and you can provide an answer to the owner of the bitch while he / she waits.
10. Action: Repeat the procedure every 2–3 days.
Rationale: If you repeat it every day the bitch may start to resent it and may then refuse to mate.
Interpretation of vaginal smears: Look for the presence of erythrocytes, neutrophils and keratinized epithelial cells sloughed from the vaginal lining. The relative proportions of these vary according to the stage of the oestrous cycle (Fig. 2. 9) and they can be used to identify:
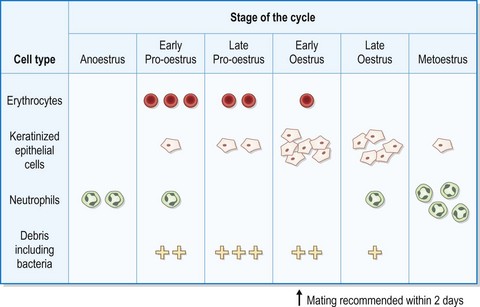
Figure 2.9 Changes in the vaginal epithelium of the bitch used in the technique of vaginal cytology to assess the stages of the oestrous cycle.
• Recommended time of mating – this is not particularly important as the ova and sperm are long lived. Declining amounts of erythrocytes, keratinization of most of the epithelial cells and an absence of neutrophils will indicate that mating should occur within 2 days.
• Artificial insemination – may be carried out on the first day of returning neutrophils, which coincides with the last day of oestrus. The bitch may not allow normal mating at this time.
Vaginal smears can also be used to diagnose vaginitis, but not for pregnancy diagnosis.