Laboratory techniques
Laboratory tests are used as an aid to diagnosis following taking a history and making a clinical examination. This evidence leads to a differential diagnosis and laboratory tests will then help to eliminate some possibilities and confirm others.
Some results will come back as normal; these are used to rule out some of the possible diagnoses and you can then pay more attention to the abnormal findings. Never discount an abnormal or unexpected result. It is easy to have a fixed idea of the diagnosis in your mind and to fit all the evidence to support it; however, if you think a result contradicts your diagnosis, repeat the test – it may have been an error due to inaccuracy, but it may be that the result is indicating something other than your original theory.
Many laboratory tests are carried out within the practice, although some will be sent away to a commercial laboratory; the proportion varies between practices, but most practices have a small ‘in-house’ lab. Some larger practices have designated lab technicians who do all the work, but it is important for the veterinary surgeon to know how to carry out the basic techniques, as there will be times, such as weekends or at night, when the support staff are not available.
As with all aspects of veterinary practice, the laboratory is subject to health and safety legislation. It is not the brief of this chapter to go into any detail except to say that precautions must be taken to ensure the safety of yourself and everyone around you. Make sure that you take steps to prevent yourself becoming infected by the samples; for example, wear protective clothing and eye protection, always wash your hands, avoid mouth pipetting and do not eat in the lab. Make sure that the lab itself is kept clean and tidy and that used equipment is cleaned immediately or disposed of in the correct manner (e.g. sharps bins or clinical waste bags).
Laboratory tests must be carried out correctly and accurately. Remember that the quality of your result reflects the quality of your sample – correct methods of collection, preservation and storage play a significant part. There are some rules that should be observed for all tests:
• Collect samples before you begin treatment unless doing follow-up tests to assess progress.
• Collect the appropriate samples and preserve them correctly.
• Perform the test as soon as possible after collection.
• Know how to perform the test correctly and accurately.
• If dispatching to a commercial laboratory, separate plasma or serum, enclose all the relevant details of the case, use the correct types of packaging and post as soon as possible by a traceable route.
Laboratory equipment
A routine practice laboratory will have the following pieces of equipment.
The microscope
The type of microscope found in a practice laboratory is the light microscope, which will have an inbuilt light source, although older ones may use a mirror and an external light source. Microscopes are expensive precision instruments and should be handled with care. They may be monocular or binocular, but both types are equally effective.
General rules for the care of microscopes are shown in Box 5.1.
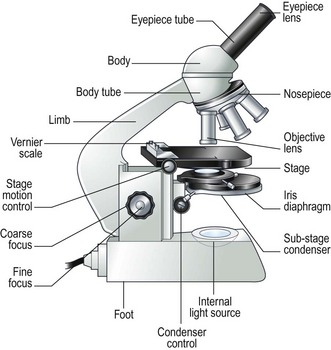
Procedure: Care and use of the microscope (Fig. 5.1)
1. Action: Place the microscope on an even, stable surface.
Rationale: The slightest vibration will be magnified when looking down the eyepiece making viewing an object very difficult.
2. Action: Before use, clean the eyepieces (Fig. 5.1), objective lens and the condenser with special lens tissue.
Rationale: Lens tissue is lint free so that bits are not left on the surfaces. Other types of tissue or cloth may cause scratches. Cleaning should be done after you finish using the microscope, but you may need to do it again.
3. Action: Clean the oil immersion lens with the proper cleaning fluid.
Rationale: This lens should be cleaned after every use with isopropanol. Oil left on the lens may damage the lens and cause it to consolidate.
4. Action: Turn the light control to a minimum and turn on the instrument.
Rationale: This prevents the sudden power surge breaking the microscope bulb.
5. Action: Adjust the eyepieces.
Rationale: If using a binocular microscope arrange the eyepieces so that both fields converge as one. If you normally wear glasses remove them – you can alter the focus of the microscope to suit your eyes. Make sure that you are comfortable.
6. Action: Rotate the nosepiece in a clockwise direction so that the ×10 objective lens clicks into the viewing position.
Rationale: Always start viewing a slide through the lowest magnification.
7. Action: Rack up the sub-stage condenser until its top surface is as high as possible.
Rationale: This condenses the light source onto the specimen to make it bright and sharper.
8. Action: Looking from the side of the microscope, adjust the iris diaphragm control lever so that it is in its middle position.
Rationale: This regulates the amount of light passing through the condenser. As the lens magnification is increased the aperture of the iris diaphragm should be increased.
9. Action: Place the slide on the stage over the hole in the centre.
Rationale: The stage is made of black vulcanite with a hole in the centre through which light from the condenser illuminates the slide. There may be clips on the stage to hold the slide firmly in place.
10. Action: Position the area to be viewed over the light source by using the control knobs on the mechanical stage.
Rationale: This allows the slide to be examined smoothly and accurately without touching the slide with your fingers.
11. Action: Focus using the coarse adjustment knob and then with the fine adjustment knob.
Rationale: Always focus up from the slide to prevent the objective lens descending on to the slide and cracking it. Avoid using the fine focus to excess – if you have to do this it means you are not near enough to focus with the coarse focus.
12. Action: To increase magnification, turn the nosepiece clockwise until the next objective lens clicks into place.
Rationale: There will usually be three objective lenses screwed into the nosepiece and one oil immersion lens. These provide different levels of magnification:
» Blood and bacterial smears should be examined under ×10, ×50, then ×100 with oil immersion.
» Urine sediments and faeces should be examined under ×10, then ×50.
» Parasite slides should be examined with the naked eye followed by ×5, ×10, and if necessary ×50.
13. Action: After you have finished, remove the slide from the stage.
Rationale: Slides should be stored in an appropriate box or, if not needed, should be disposed of in the sharps bin.
14. Action: After use, wipe the objective lenses with lens tissue and turn the nosepiece so that the lowest-powered lens is in position. Reduce the light and switch off and cover the microscope with its cover.
Rationale: The microscope is now clean and ready to use the next time.
Procedure: Use of the oil immersion lens
When used correctly, this technique increases the magnification to the maximum achievable with a light microscope. This is required for the examination of bacteria and blood smears.
1. Action: Set up the microscope as described above and place the slide on the stage.
Rationale: You are now ready to use oil immersion.
2. Action: Rotate the nosepiece so that neither the ×50 or ×100 lens is in position.
Rationale: You need to have clear access to the slide when you place the drop of oil.
3. Action: Place a drop of oil on the slide (Fig. 5.2).
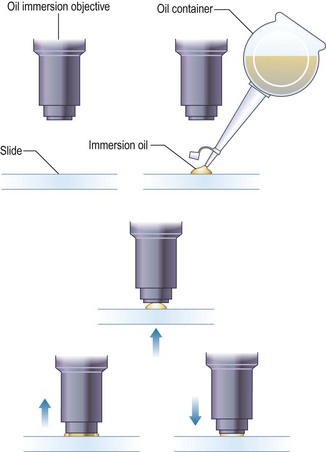
Rationale: This oil is specifically designed for this purpose. Do not use any other type of oil.
4. Action: Rotate the nosepiece until the ×100 lens is above the slide and click into position.
Rationale: This technique can only be done using the ×100 lens.
5. Action: Gently adjust the focus so that the lens descends to touch the drop of oil.
Rationale: Always watch what you are doing. Do not look at the slide through the eyepiece as you will find it impossible to judge the distance and may smash through the slide. The lens must be lying in the oil to avoid distortion of the image and to achieve magnification.
6. Action: Looking through the eyepiece, adjust the focus using the fine control. At this point the oil may be seen to spread out (Fig. 5.2).
Rationale: You may need to adjust the light to improve the view.
7. Action: When you have finished, remove the slide and clean the microscope as described above.
Rationale: The microscope is now clean and ready to use the next time.
Procedure: Use of the Vernier scales
On most microscopes these scales are located on both sides of the stage, arranged at right angles to each other – known as the vertical and horizontal axes. Their function is to allow location of a particular point on the slide so that you can find it again (Fig. 5.3).
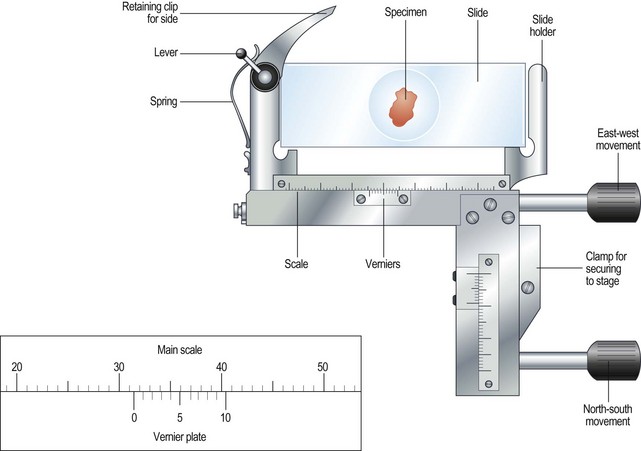
Figure 5.3 The Vernier scale. The zero on the Vernier plate is between 31 and 32 on the main scale, and it is mark number 6 on the Vernier plate that is exactly opposite a division on the main scale. The reading is therefore 31.6.
1. Action: Place the slide on the microscope stage and fix it with the clips.
Rationale: It is important that the slide does not move around as this will invalidate your scale references.
2. Action: Locate the object you wish to identify.
3. Action: Look at the scale on the vertical axis of the stage.
Rationale: See Figure 5.3.
4. Action: Record the number where the zero mark on the Vernier plate meets the main scale.
Rationale: In Figure 5.3 the zero mark falls between 31 and 32. If it falls between two divisions, record the lower number.
5. Action: Make a note of which of the marks on the Vernier plate is exactly opposite a division on the main scale.
Rationale: In Figure 5.3, mark number 6 is exactly opposite a division on the main scale.
6. Action: Record this reading, placing it after the decimal point.
Rationale: In Figure 5.3 this will give a reading of 31.6.
7. Action: Repeat steps 3–6 using the horizontal scale.
Rationale: You will now have two readings – always write the horizontal scale first, e.g. 90.1 × 31.6.
8. Action: You now have a grid reference for that object on that slide provided that the slide is placed in the same position on the stage.
Rationale: By tradition, slides are placed on the stage with the label to the right.
9. Action: You may now remove the slide, but can return to the same location using the grid reference.
Rationale: This is useful if you wish to show someone else what you have found. You can locate it quickly and easily.
The centrifuge
Centrifuges are an essential piece of laboratory equipment and, although they may vary, they all work on the principle of centrifugal force. Samples enclosed in special containers are spun around at speed, which results in the heavier particles settling at the bottom while the lighter ones go to the top. This would occur naturally in response to gravity if the container was left alone for some time, but the centrifuge accelerates the process.
The use of a centrifuge is required in many tests including:
1. Angle head – the specimen tubes are held in a fixed position, usually at 25–50° to the vertical. Higher rotational speeds can be achieved because of the aerodynamic shape of the rotor; however, because of the angulation of the tubes, the sediment settles at this angle making it difficult to remove.
2. Swing-out head – the specimen tubes are placed in buckets that swing out from the vertical to the horizontal as the speed of rotation increases. As the machine stops the buckets return to the vertical position. The surface of the sediment is level, which means that the supernatant can be more easily removed with a pipette.
A microhaematocrit centrifuge, which is required to spin down blood samples prior to doing a packed cell volume estimation (PCV), consists of a metal plate on which fixed horizontal grooves carry the microhaematocrit capillary tubes.
Procedure: Care and use of the centrifuge
1. Action: Always ensure that the centrifuge is placed on an even, stable surface.
Rationale: Slight vibration may occur when the centrifuge is switched on, and an uneven or unstable surface may cause the machine to move around and even fall to the ground.
2. Action: Use only the tubes recommended by the manufacturer.
Rationale: These tubes, apart from microhaematocrit tubes, have conical bottoms and are designed to withstand centrifugal force.
3. Action: When placing the tubes in the machine, make sure that the top is not protruding above the top of the bucket.
Rationale: This may affect the way that the machine works and make it unbalanced.
4. Action: Make sure that the sample tubes are balanced by placing in diametrically opposite buckets assessed by weight not volume.
Rationale: If you do not do this then the machine will be unbalanced and may vibrate excessively. Stop the machine and check the tubes – this is the most common cause of vibration and instability.
5. Action: When using microhaematocrit tubes, ensure that the Plasticine® end is placed against the outer ring of the instrument.
Rationale: This prevents the blood inside from escaping as it is subjected to centrifugal force.
6. Action: Vacutainer® tubes may be spun with their stoppers in place.
Rationale: If the tube is opened or broken then aerosol contamination of the environment might occur.
7. Action: Lock the lid of the centrifuge securely.
Rationale: If you do not the lid will fly open; however, most machines will not switch on if the lid is not secured properly.
8. Action: Set the spin speed as appropriate.
Rationale: Different procedures require different speeds; for example, urine requires a lower speed than heparinized blood for biochemistry.
9. Action: Never attempt to open the centrifuge until the head has stopped rotating.
Rationale: If you do this you may damage the machine and yourself.
10. Action: After use, turn off the power supply and clean the machine thoroughly using a mild disinfectant and a soft cloth.
Rationale: To prevent contamination of the next samples.
11. Action: Wear disposable gloves to remove any spillages or broken glass.
Electronic analysers
Many veterinary practices now use various types of electronic analyser to assist in the diagnosis of their clinical cases. These include those designed to analyse biochemistry, haematology, electrolytes and hormones. The variety of design makes it impossible to accurately describe their use within this book; however, you should take note of the following:
• Always refer to the manufacturer’s instructions when first using the machine or if you encounter any problems.
• Site the machine away from chemicals and centrifuges, which may cause damaging vibrations.
• Run quality control tests at regular intervals to ensure accuracy and validity of the machine. These should be in addition to external quality control tests.
Practical techniques
This is the study of the cellular elements of the blood and its associated clotting factors. Many haematology tests are nowadays done using a haematology analyser which automatically determines red and white cell counts, differential white cell counts, packed cell volume, haemoglobin levels and platelet counts; however, it is important to be able to know how to perform some of the more basic tests.
Blood collection
The sites and methods of restraint for the collection of blood from dogs, cats and rabbits have been described in Chapter 1, but once the sample has been collected it must be put into some form of container to preserve it and, if required, to prevent it from clotting. There are several forms of container:
1. Screw-topped tubes – these are usually made of plastic and have lids whose colour conforms to a standard colour code indicating the type of anticoagulant or preservative that they contain. This is shown in Table 5.1. Some brands may have push-on tops.
Table 5.1
Standard colour coding for blood sample tubes
| Colour of lid | Contents and uses |
| Pink | EDTA – for routine haematology |
| Mauve | Citrate – for coagulation tests |
| Orange | Heparin – plasma can be used for general biochemistry |
| Yellow | Fluoride – for glucose measurement |
| White | No additive – these allow the blood to clot so that serum can be extracted; these tubes must be made of glass |
These tubes are cheap and require only a small amount of blood to fill them. Remove the needle from the syringe and quickly transfer the blood into the tube. Immediately replace the cap and then mix the contents by repeated inversion unless you require a clotted sample. If you forcefully squirt the blood through a small gauge needle or shake the tube to mix it up you run the risk of breaking the blood cells resulting in a haemolysed sample.
2. Evacuated glass tubes (Vacutainers®) – these consist of an evacuated glass tube sealed with a colour-coded rubber bung. They require the use of a double-pointed needle, which fits into a special needle holder. One end of the needle is used to penetrate the vein while the other end penetrates the rubber bung. The vacuum within the tube draws blood out of the vein into the tube. These are expensive and are more widely used in large animal practice.
3. Plastic blood-collecting syringes (Monovette®) – these are syringes that are designed for aspirating blood and contain anticoagulant. Once blood has been collected the needle is replaced with a cap and the plunger is unscrewed creating a leak-proof container.
Plasma vs serum
Blood consists of the cellular fraction consisting of erythrocytes (red cells), leucocytes (white cells) and thrombocytes (platelets) and the fluid part – the plasma or serum.
• Plasma – obtained by centrifugation of a blood sample collected in anticoagulant, for example (e.g. ethylenediaminetetraacetic acid (EDTA) or heparin. Store at 5°C. Contains all the clotting factors. May be used for some biochemical tests, but anticoagulant can interfere in some tests.
• Serum – collect blood in glass tubes without anticoagulant and allow to clot. Serum is released as the blood clots; alternatively, it may be separated by serum separator tubes, which contain a layer of gel that separates the cells from the serum. Store at 5°C. Serum does not contain clotting factors V and VIII or fibrinogen and is used for biochemistry.
Procedure: Packed cell volume
Packed cell volume (PCV) is used to measure the volume of the erythrocytes in whole blood when packed tightly together. It is used to assess the degree of anaemia and of dehydration in a patient.
Equipment list: Blood sample collected in an EDTA tube, plain capillary tubes, microhaematocrit centrifuge and reader, soft Plasticine® or Cristaseal®.
1. Action: Collect sample in an EDTA tube and rotate gently to mix the contents.
Rationale: EDTA is an anticoagulant. Heparin tubes may also be used. Do not shake the tube as you may damage the blood cells.
2. Action: Remove the cap and tilt the sample so that a clear surface free of air bubbles can be seen.
Rationale: If bubbles get into the capillary tube, they may cause an air-lock and slow the rate of filling.
3. Action: Place the end of a capillary tube into the blood sample, tilting the sample to at least 55°, and allow blood to run in until the tube is about  full.
full.
Rationale: Blood will run into the capillary tube by capillary action. The microhaematocrit reader requires at least 5–7 cm of blood.
4. Action: Wipe the blood from the outside of the tube with a piece of tissue.
Rationale: This reduces the risk of spread of infection to you.
5. Action: Holding the tube between your finger and thumb, insert the opposite end (from the blood) into the Plasticine® or Cristaseal® block. Twist two or three times and take it out of the Plasticine®.
Rationale: This creates a plug, which prevents the blood from coming out of the end of the tube. If you use the wrong end of the tube you will contaminate the Plasticine®. The tube can be heat sealed in the flame of a Bunsen burner.
6. Action: Hold the tube vertically, sealed end down, and allow the blood column to run down.
Rationale: Make sure that there is no evidence of a leak.
7. Action: Place the tube into one of the grooves of the microhaematocrit with the Plasticine® plug facing outwards towards the rim.
Rationale: Centrifugal forces will cause the cells and fluid to spin outwards. The sealed end will prevent blood escaping.
8. Action: Place a similar tube on the opposite side of the centrifuge.
Rationale: This balances the centrifuge and reduces vibration, although it is not essential in this type. If you are doing several tubes from a variety of patients then make a note of the number of each groove.
9. Action: Screw the safety plate over the tubes and close the lid.
Rationale: The safety plate holds the tubes in place while they are spun. If you do not do this you will regret it!
10. Action: Set the timer for 6 minutes.
Rationale: A microhaematocrit centrifuge spins at 10 000 r.p.m. and it takes 6 minutes to pack the erythrocytes properly.
11. Action: After 6 minutes allow the machine to stop naturally.
Rationale: Avoid using the brake as this can damage the machine. Never attempt to open the machine while it is still running.
12. Action: Remove the capillary tube and check the colour and the thickness of the buffy coat. Write down your observations.
Rationale: Check the plasma for evidence of haemolysis, jaundice and lipaemia. The buffy coat is made up of the leucocytes.
13. Action: Place the tube into the groove on the microhaematocrit reader (Fig. 5.4).
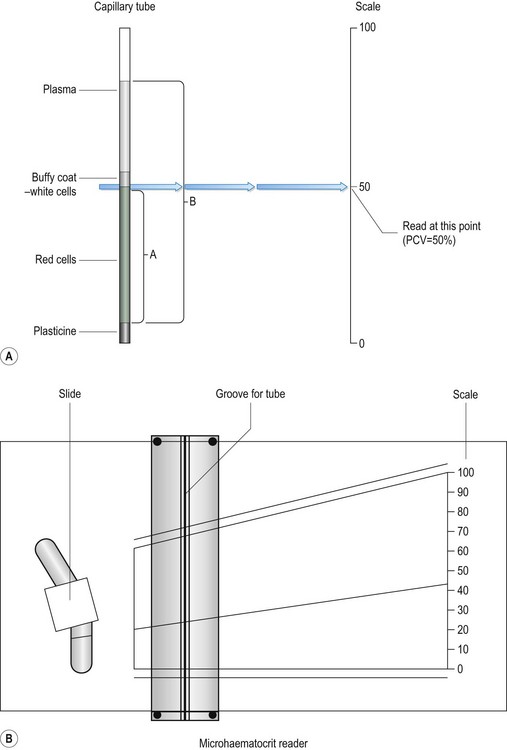
Figure 5.4 Measuring packed cell volume (PCV): (A) Capillary tube; A is the length of the tube occupied by red cells; B is the total length of the column of blood. (B) Microhaematocrit reader.
Rationale: The blood will have separated into three layers (Fig. 5.4A):
14. Action: Adjust the tube vertically so that the bottom of the red cell layer is aligned with the 0%.
Rationale: Make sure that you do not include the Plasticine® plug in your measurement.
15. Action: Slide the perspex plate so that the top of the plasma aligns with the 100% mark (Fig. 5.4B).
Rationale: Use the bottom of the plasma meniscus as your measuring point.
16. Action: Adjust the reader handle on the left so that the line passes through the buffy coat / red cell junction.
Rationale: This can be quite thick and pinpoint accuracy may be difficult.
17. Action: Read the measurement from the scale on the right hand side.
Rationale: The scale on the reader runs from 0 to 100 and this is expressed as a percentage.
18. Action: PCV can also be calculated without the use of the reader by measuring the total length of the blood column (B) and the length occupied by the red blood cells (A) (Fig. 5.4A).
NB PCV ranges for the dog, cat and rabbit are shown in Table 5.2, and normal PCV values are shown in Table 5.3.
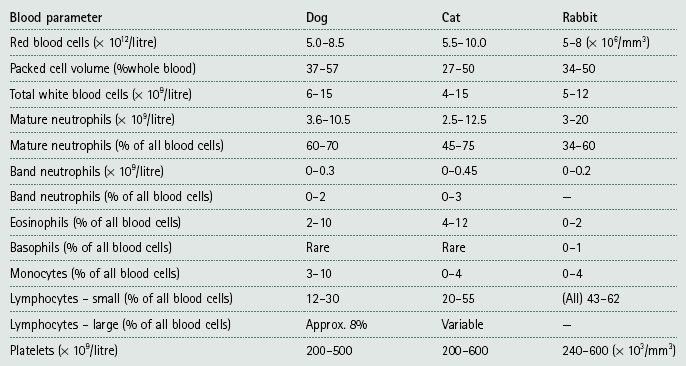
Table 5.3
Red blood cell indices in the dog, cat and rabbit*
| Name / definition | Measurement | Normal values |
| Packed cell volume (PCV): percentage of packed red cells in a sample | Centrifuge capillary tube containing blood | Dog: 37–57% Cat: 27–50% Rabbit: 34–50% |
| Haematocrit (HCT): percentage of blood composed of red cells (often interchanged with PCV) | HCT = MCV × total RBC (1012/l) Less accurate than PCV |
— |
| Haemoglobin (Hb): amount of Hb within red cells – estimation of O2-carrying capacity | Estimated using haematology analyser | Dog: 12–18 g/dl Cat: 8–15 g/dl Rabbit: 10–17.5 g/dl |
| Mean corpuscular volume (MCV): measure of red cell size | MCV (fl) = (PCV × 1000)/total RBC (1012/l) Measured directly by analysers |
Dog: 70 fl Cat: 45 fl Rabbit: 69 fl |
| Mean corpuscular haemoglobin concentration (MCHC): average concentration per red blood cell | MCHC (g/dl) = total haemoglobin (g/dl) /PCV | 35 g/dl for all species |
*Taken from a range of sources. fl = femtolitre: 1 fl = 10−15l.
Total white blood cell count (TWBC) and total red blood cell count (TRBC) are useful diagnostic parameters (Table 5.2), but are nowadays usually done by an electronic haematology analyser. They used to be done using a Neubauer haemocytometer, but this takes time and experience. Commercial labs can get the result back to the practice within 12 hours so manual analysis is rarely done.
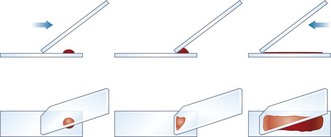
Procedure: Preparation of a blood smear
Blood samples can be examined and preserved by smearing a drop of blood onto a glass slide. The skill of preparing a blood smear can be achieved by practice, and it is worth the effort as a smear can provide a great deal of diagnostic information. They may be used to evaluate the relative proportions of the cellular components of blood and even to check the cell counts done by a machine. They may also be used to indicate the presence of cellular abnormalities, provide a rough estimation of platelet numbers and identify the presence of blood parasites.
Blood smears may be fixed by air drying or, if examination is to be delayed, by immersing in 100% methyl alcohol for 1 minute. If the smear is to be sent to an external laboratory, it should be carefully packaged to prevent damage.
Equipment list: blood sample in an EDTA tube, glass microscope slides previously soaked in methanol and dried, glass cutter and marker pen.
1. Action: Select a new clean glass microscope slide and wipe it with lint-free tissue. If it has been soaked in methanol, rinse and dry it.
Rationale: The slide must be as clean as possible to avoid the inclusion of dirt in the smear. Methanol removes grease and stops gaps appearing in the smear.
2. Action: Prepare a spreader by chipping the corner off another glass slide (Fig. 5.5). You may use a glass cutter to do this.
Rationale: The use of the spreader prevents the smear overlapping the sides of the slide.
3. Action: Using a chinagraph pencil or an indelible felt pen, label the slide on the underside.
Rationale: This identifies the slide. Marking it on the underside prevents the label being removed during staining.
4. Action: Take the EDTA tube containing the blood sample and gently rotate it between your finger and thumb. The tube must be at room temperature.
Rationale: This resuspends the cells evenly within the plasma. Do not be overvigorous as this will damage the cells.
5. Action: Place the slide flat on the bench, preferably on a white background, with the long edges parallel to the edge of the bench.
Rationale: The white background will help to show up the blood smear.
6. Action: Dip a capillary tube into the blood sample and allow it to collect a small amount of blood.
Rationale: Blood will move up the capillary tube by capillary action.
7. Action: Place a small drop of blood on the right-hand end of the slide about 1 cm from its edge.
Rationale: If you are left handed place the drop on the left-hand end. Too large a drop of blood will make the smear too thick; too small a drop gives too short a smear and / or ‘hesitation lines’.
8. Action: Place the spreader to the left of the blood at an angle of 45° to the horizontal and draw backwards to ‘pick up’ the blood (Fig. 5.5).
Rationale: The blood will run along the edge of the spreader as soon as it makes contact with the blood. The angle of the spreader helps to determine the thickness of the smear.
9. Action: Move the spreader forwards towards the left-hand end of the slide in a single smooth movement so that the blood is smeared along the slide.
Rationale: The blood is drawn along behind the spreader. If you were to push the blood along the slide without drawing back, as in step 6, you would damage the blood cells. The sides of the smear should be parallel and there should be a feathery ‘tail’. It should take up about  of the slide.
10. Action: Dry the slide in the air by holding the sides between your finger and thumb and waving it gently.
Rationale: The use of heat to dry the slide will damage the cells. Instant drying will preserve cell morphology.
11. Action: Make another blood smear.
Rationale: It is always a good idea to make more than one smear in case one is unsatisfactory.
12. Action: Assess the quality of your smears.
Rationale: The quality of the smear affects its use in diagnosis:
» Thickness – if it is too thick it may be difficult to see the cells and it may take longer to dry, which may damage the cells.
» Uneven – due to jerky movements during spreading known as ‘hesitation marks’ – some areas may be unusable.
» Streaks, gaps and spots – may be caused by dirt or grease on the slide – discard the slide.
» Narrow smear – smear has been made before the blood has run the full width of the spreader. Limits the use of the smear.
13. Action: Stain the most satisfactory smears.
Rationale: Use an appropriate stain depending on what you need to know from the slide.
Staining blood smears
In order to see and accurately identify blood cells, the smear must be stained with the appropriate stain. Haematological stains can be used to:
• Perform a differential white cell count.
• Identify the presence of blood parasites such as Mycoplasma haemofelis and Babesia spp.
• Detect changes in shape, size and staining of the blood cells.
The most commonly used stains are known as the Romanowsky stains. These employ the combination of two different dyes to achieve their effect. Diff-Quik® is the most popular as it is quick and easy to use. The manufacturer’s instructions should always be followed when using it, but there is a tendency for the slides to fade during storage and it gives poor cellular definition. Leishman’s stain is better for differential white cell counts and Giemsa’s stain is used to demonstrate blood parasites. Supravital staining, which is used to stain cells before their chemical life ceases (e.g. fresh unclotted blood), is not routinely used in practice, but the use of methylene blue is recommended for reticulocyte counts.
Always wear gloves when staining blood smears as the process is messy and some stains are toxic when inhaled, ingested or when they come into contact with the skin.
Procedure: Leishman’s stain
This stain uses a combination of haematoxylin and eosin and is used for differential white cell counts.
Equipment list: Leishman’s stain, buffered water pH 6.8, Coplin jar (not essential), tissues or blotting paper, staining rack, filter paper, forceps.
1. Action: Place a prepared blood smear with the smear uppermost, on a staining rack across a sink or staining bath.
Rationale: This is a messy process and you must allow the stain to drain off into a sink or staining bath.
2. Action: Pour neat Leishman’s stain through a piece of filter paper on to the slide. Leave for 2 minutes.
Rationale: There must be enough stain to cover the entire slide. Filtering the stain removes sediment, which could be mistaken for blood parasites.
3. Action: Do not wash off the stain, but add twice the volume of buffered distilled water (pH 6.8) and mix well. Leave for 15 minutes. A gold film may be seen within a few minutes.
Rationale: This indicates that the pH is correct. The slide may be placed, using forceps, in a vertical position, in a Coplin jar – this prevents the build-up of sediment.
4. Action: Tip the stain off the slide and wash well, both front and back, with buffered water.
Rationale: Do not use tap water as the changed pH will alter the staining characteristics of the cells.
5. Action: Wipe the underside of the slide with tissue and air dry.
Rationale: Avoid touching the smear as you will wipe it off.
6. Action: Examine under the microscope using ×100 oil immersion.
Rationale: This stain is useful for differential white cell counts as it provides good cellular definition.
Procedure: Giemsa stain
This stain uses a combination of methylene blue and eosin and is used to demonstrate the presence of blood parasites.
Equipment list: Giemsa stain – both neat and diluted 1 : 3 with buffered water (pH 6.8), Coplin jar, filter paper, buffered distilled water (pH 6.8), pipette, staining rack, methanol, forceps.
1. Action: Place a prepared blood smear with the smear uppermost, on a staining rack across a sink or staining bath.
Rationale: This is a messy process and you must allow the stain to drain off into a sink or staining bath.
2. Action: Using a pipette, flood the smear with methanol. Leave for 3–5 minutes.
Rationale: This fixes the smear.
3. Action: Drain off the methanol and allow the slide to air dry.
Rationale: This is essential before using the stain.
4. Action: Flood the slide with neat Giemsa stain pouring it through a piece of filter paper. Leave for 30 seconds.
Rationale: Filtering the stain removes sediment, which may be mistaken for blood parasites.
5. Action: Using forceps transfer the slide to a Coplin jar containing Giemsa stain diluted 1 : 3 with buffered distilled water pH 6.8. Leave for 15–20 minutes.
Rationale: The slide is held in a vertical position in the Coplin jar, which prevents the build-up of sediment on the slide.
6. Action: Remove the slide from the Coplin jar and rinse on both sides with buffered distilled water.
Rationale: Do not use tap water as the changed pH will alter the staining characteristics of the cells.
7. Action: Wipe the underside of the slide and allow to air dry. Do not touch the top of the slide.
Rationale: You may remove the stained smear.
8. Action: Examine under the microscope using ×100 oil immersion.
Rationale: This stain is used to identify blood parasites and can also be used for differential white cell counts.
Procedure: Differential white cell count
1. Action: Place a prepared blood smear stained in either Leishman’s or Giemsa under a light microscope.
Rationale: Both Leishman’s and Giemsa provide good cellular definition for this procedure.
2. Action: Examine under ×10 objective lens.
Rationale: This enables you to select an area that is one-third of the way from the tail end of the smear on the side edge.
3. Action: Scan over the slide and assess the distribution of the white cells.
Rationale: If the distribution is uneven or clumped then it may be better to make another smear.
4. Action: Select an area near to the tail of the smear and apply a drop of immersion oil and move the ×100 objective into the oil.
Rationale: See Figure 5.2. This increases the magnification.
5. Action: Adjust the condenser as described previously.
Rationale: This provides maximum illumination.
6. Action: When focusing use the fine focus knob.
Rationale: If you use the coarse focus knob the incremental movements mean your view moves out of focus very quickly.
7. Action: Move the slide so that it follows the line of a ‘battlement’ (Fig. 5.6) as follows: scan two fields along the edge of the smear, two fields down into the smear, two fields along, two fields back up towards the edge and so on.
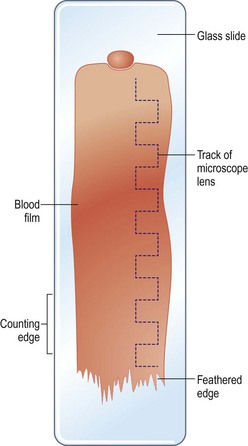
Rationale: This movement describes the battlement of a castle. By doing this you cover a wide area of the smear and it prevents biased cell distribution on the slide.
8. Action: While you are examining the fields count 200 white blood cells.
Rationale: White blood cells have nuclei, which are stained in varying shades of pink or purple depending on their type (Fig. 5.7).
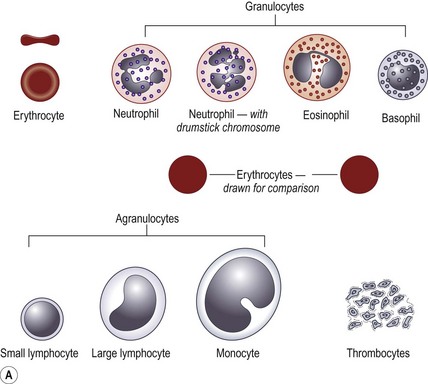
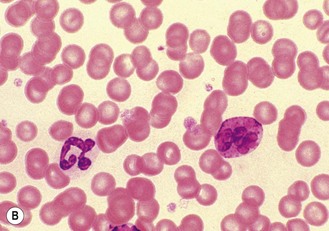
Figure 5.7 (A) The range of blood cells visible in a blood smear. (B) Light micrograph of canine basophil (left) and nearby neutrophil (right).
9. Action: Identify each type of white blood cell and record it (Fig. 5.7).
Rationale: This will form the basis of your blood count. You may record your results manually on paper or by using some form of commercial counter.
10. Action: You can also scan the slide by travelling in a straight line along the length of the smear starting at the tail.
Rationale: The tail is the thinnest part of the smear and the cells may be more clearly seen in this area. This method achieves the same final result as the battlement method.
11. Action: Using the records of each type of white blood cell, calculate the percentage of each type. The more cells you count in total the more accurate your results will be.
Rationale: For example if you have 144 neutrophils in a sample of 200 then the percentage is
12. Action: Compare your results with the normal ranges shown in Table 5.2.
NB If you have trouble finding 200 cells then move to the other side of the smear; in cases of leucopaenia you may have difficulty finding 100 cells, but you should make a note of this. Do not record any unrecognizable or damaged cells, but if they occur in large numbers make a note of the fact. Normoblasts (i.e. immature red cells) should also be noted as if they were among the other nucleated cells.
Procedure: Reticulocyte count
Reticulocytes are immature erythrocytes (red cells) and they are derived from normoblasts. During the production of blood by haemopoietic tissue within the bone marrow, reticulocytes are released into the circulation. Their presence indicates a healthy regeneration of erythrocytes and, in cases of anaemia, blood loss and old age, depending on their numbers, is a good prognostic sign. The final maturation of reticulocytes into erythrocytes takes place in the liver and spleen. Table 5.3 shows a range of indices relating to normal mature erythrocytes.
1. Action: Using a pipette, dispense 2 ml of methylene blue stain into a centrifuge tube.
Rationale: Ensure that the stain is new methylene blue. McFadyean’s methylene blue is used to stain and identify Bacillus anthracis, the causal organism of anthrax.
2. Action: Using a pipette, add 4–5 drops from a well-mixed sample of blood in an EDTA tube.
Rationale: Do not use heparin for this procedure.
3. Action: Mix the two components gently in the tube and place in an incubator at 37°C for 30 minutes.
Rationale: If no incubator is available, the sample can be incubated at room temperature.
4. Action: Remove from the incubator and place in a centrifuge.
Rationale: Make sure that you balance the centrifuge with a tube of similar weight as described previously.
5. Action: Spin at 1000 r.p.m. for 1 minute.
Rationale: If you spin for longer or faster you will damage the cells.
6. Action: Remove and discard the supernatant.
Rationale: This is not needed for the procedure.
7. Action: Gently flick the tube with your fingers and use this remaining liquid to make a smear as previously described; allow to air dry.
Rationale: This resuspends the cells in any remaining liquid.
8. Action: Place the slide under the microscope and examine under ×10 and ×40 objective lenses. Look for red blood cells with dark-blue-stained strands in them (Fig. 5.8).
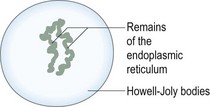
Figure 5.8 A reticulocyte. An immature circulating red cell, it can be stained with a supravital stain, e.g. new methylene blue.
Rationale: The dark-blue strands are the remnants of the endoplasmic reticulum within the cell and they are known as Howell-Joly bodies (Fig. 5.8).
9. Action: Select an area where individual cells can be easily seen and count a total of 500 cells within the smear. Make a note of how many reticulocytes you see.
Rationale: If individual cells can be seen clearly this indicates that the smear is one cell thick.
10. Action: Using this information, calculate the percentage of reticulocytes.

11. Action: A correction factor is now applied.
Rationale: To measure accurately the responsiveness of the bone marrow, the PCV of the patient is used.
12. Action: The final figure provides an indication of how the bone marrow is responding to the clinical situation.
(See Table 5.3.)
Procedure: Measuring clotting time
This procedure can be carried out in the presence of an owner and is not strictly a laboratory procedure. It may be used in animals prior to surgery to assess the risk of coagulopathy (e.g. infection with Angiostrongylus vasorum).
1. Action: Place the dog in a sitting position or in sternal recumbency on an examination table covered in a non-slip mat.
Rationale: If the dog feels secure and comfortable it will be less inclined to move or to try and escape.
2. Action: Ask the owner to restrain the dog appropriately.
Rationale: This is not really painful, but the dog should be prevented from jumping off the table during the procedure. Local anaesthetic must not be used.
3. Action: Clip the hair from the area of skin to be used. Include a reasonable area around the site.
Rationale: In dogs the most common site is the ear pinna.
4. Action: Gently clean the area with surgical spirit and allow to dry.
Rationale: Take care to avoid causing hyperaemia of the area by overvigorous rubbing.
5. Action: Using a sterile scalpel blade, make an incision about 1 cm long and 2 mm deep and start the stopwatch.
Rationale: This provides a base from which to measure the clotting time.
6. Action: After 15 seconds, touch a piece of filter paper to the blood so that it absorbs into the paper.
Rationale: Avoid touching the skin.
7. Action: Repeat 15 seconds later using a fresh area of filter paper.
Rationale: If using a circular piece of filter paper, move it around 1 cm at a time every time you touch the blood.
8. Action: Repeat the action until no more blood oozes from the incision. Stop the stopwatch.
Rationale: The time on the stopwatch is the bleeding time and it is normally less than 5 minutes.
Cytology
Cytology is the study of cells. It includes where they have originated from, their structure and their function and also, in clinical cases, their pathology. The techniques are generally non-invasive, quick and easy to perform and have minimal risk to the patient. Cytology may provide a diagnosis or, at least, an indication as to how to proceed with the case. The disadvantage is the limitations of the collector’s experience. He / she must know how to harvest the cells correctly, prepare the slides appropriately, and then interpret what is seen under the microscope.
Sample collection
The equipment required for collecting samples is relatively simple and consists mainly of needles, syringes, sterile scalpel blades, clean glass microscope slides, sterile swabs or cottonwool buds, and blood collection tubes, both EDTA and serum tubes.
The technique used to collect the sample depends on the location of the sampling site and the type of tissue to be collected. Samples from inside the body may be collected during endoscopy (see Ch. 6). Always prepare several samples and use different methods of preparation; for example, if collecting fluid use both EDTA and serum tubes. These must be fixed by adding a couple of drops of formalin if sending to an external lab; if preparing slides, stain some and leave others unstained to use for specialized staining techniques or for sending off to an external lab. It is better to have too many samples than to have to go back and collect more.
The techniques are mainly used to diagnose tumours and can be divided into four main types:
If the technique results in the collection of tumour cells this means that a tumour is present; however, if none are found it simply means that tumour cells were not collected in that sample, and not that there is no tumour.
Procedure: Collection of a sample by an imprint
This is used for assessing the cut surface of deep tissue (e.g. from a tumour or for superficial lesions such as an ulcer or a mast cell tumour).
1. Action: The patient will normally be under a general anaesthetic.
Rationale: This depends on the site and on the degree of pain – if the lesion is superficial the patient may be sedated, or fully conscious and well restrained.
2. Action: Preparation of the area must be as aseptic as possible.
Rationale: To prevent the spread of infection.
3. Action: Make a cut across the surface of the tissue.
Rationale: This will expose fresh uncontaminated cells from deep within the lesion.
4. Action: Blot until dry with a piece of paper towel.
Rationale: If the tissue is too wet the cells may not stick and may run off the glass slide.
5. Action: Take a precleaned glass slide and roll the tissue against it.
Rationale: All equipment must be clean and / or sterile to prevent the spread of infection. Rolling the tissue against the slide preserves the shape of the cells.
6. Action: Make several imprints on each slide.
Rationale: This ensures that you obtain the maximum chance of understanding what is happening within the lesion.
NB If the tissue is hard or very fibrous the yield of cells may be low. This can be overcome by scraping the surface with a scalpel blade and spreading the material on to a glass slide.
Procedure: Collection of a sample by fine needle aspiration
Fine needle aspiration (FNA) is used for fluid-filled (e.g. abdominal viscera) or solid soft tissue masses.
1. Action: Place the patient in a comfortable position on the table with the area to be sampled uppermost and accessible.
Rationale: If the technique is to be performed on a superficial mass then the patient may be either conscious or sedated and firmly restrained. If the area to be sampled is an abdominal mass then the patient may need to be sedated or under general anaesthesia.
2. Action: Clip the hair from the selected site and prepare the area aseptically.
Rationale: To reduce the chance of introducing infection.
3. Action: For superficial masses, fix the mass firmly with one hand and insert the needle with the other hand.
Rationale: Use 21–23G ( –3″) needles depending on the depth of tissue to be sampled.
4. Action: If internal organs such as the liver, spleen and kidney or intra-thoracic or intra-abdominal organs are to be sampled, guidance of the needle by ultrasound may be necessary
Rationale: It is impossible to fix these organs with one hand and there is a risk of penetrating another organ. Use 21–23G ( –3″) needles as appropriate.
5. Action: If an internal organ such as the liver, spleen or kidney is to be sampled, haemorrhage may be a problem. In such cases use a Tru-cut® needle (Fig. 5.9).
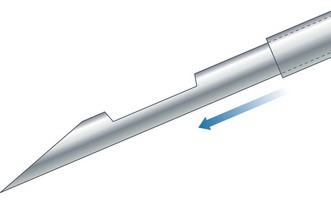
Rationale: A Tru-cut® needle is used to collect tiny samples. The needle has a small notch cut out of its barrel and a cover that slides down trapping the sample. This can then be removed, fixed and examined by cytology or histopathology.
6. Action: For a true FNA, when the needle is inserted attach a 5–10 ml syringe and pull back on the plunger several times while moving the needle to and fro within the lesion. Do not withdraw the needle.
Rationale: This action helps to exfoliate cells from around the needle so that they can be drawn up into the needle. There is a risk of damaging fragile cells and increasing the amount of blood in the sample.
7. Action: When you are satisfied that you have collected enough cells, withdraw the needle and syringe from the site.
Rationale: This keeps the harvested cells within the needle. Creating too much negative pressure by withdrawing the needle and syringe with the plunger half-way up would cause the cells to rush into the barrel of the syringe as the needle was withdrawn from the lesion. If there were relatively few cells in the sample, you might then lose them within the syringe.
8. Action: Detach the syringe from the needle and attach a clean air-filled syringe.
Rationale: This will ensure that only the contents of the needle are expelled.
9. Action: Depress the plunger and expel the contents of the needle onto one or more clean microscope slides.
Rationale: Ensure that all the cells are expelled.
10. Action: Prepare smears as described below and examine under a microscope.
Procedure: Collection of a sample for cytology of the ear
1. Action: Place the animal in a sitting position on a stable examination table covered in a non-slip mat.
Rationale: If the animal feels secure it will be less likely to try and escape.
2. Action: Ask the owner or an assistant to restrain the animal so that you have access to the ear.
Rationale: See Chapter 1. This technique is not painful, but if an animal has an inflamed ear it may resent the procedure.
3. Action: Using a clean cotton bud soaked in a little sterile saline, insert it into the external ear canal and move it gently over the surface of the canal.
Rationale: The aim is to pick up lining cells without further traumatizing the delicate epithelium.
4. Action: Roll the cotton bud over the surface of a clean microscope slide.
Rationale: This deposits the cells harvested from the ear canal on the slide.
5. Action: If you have picked up a great deal of material you may have to spread or tease it out.
Rationale: See the starfish technique below. The aim is to produce a thin layer of cells that can be easily stained and identified.
6. Action: Allow the slide to air dry and stain using Diff-Quik®.
Rationale: Read the manufacturer’s instructions.
7. Action: Place a drop of microscope oil on the slide and then place a cover slip on top.
Rationale: This helps to protect and spread the layer of cells.
8. Action: Place the slide under the microscope and examine under ×100 oil immersion lens.
This technique can be used to diagnose the presence of Malassezia pachydermatis, although you may also find bacteria and Otodectes mites, which will more easily be seen under ×4 or ×10 magnification. Gram stain is used to differentiate between Gram negative and Gram positive bacteria.
Other types of sample used for cytology are shown in Table 5.4.
Table 5.4
Types of sample used for cytology
| Type of sample | Uses |
| Skin masses | Lipoma, mast cell tumour, histiocytoma, epidermal cysts; examine samples for characteristic and changed cells. |
| Lymph nodes | Lymphosarcoma and hyperplasia. |
| Transtracheal washes and bronchoalveolar lavage | Used to assess the airways; may be low in cells – look for evidence of inflammation and bacteria, fungi and parasites. |
| Joint fluid | Low numbers of cells – look for evidence of inflammation or sepsis. |
| Effusions | Collected from the abdomen or pleural cavities into EDTA for cytology and total protein – look for neutrophils and other inflammatory cells. |
Smear preparation
The samples that have been collected must now be stained and examined under the microscope. The cells may be very fragile and the technique employed to make the smears must take this into account.
Procedure: Squash preparation – used where there are few cells in the sample
1. Action: Expel the cells within the needle onto the centre of a clean glass microscope slide.
Rationale: Ensure that all the cells are expelled.
2. Action: Place another clean glass slide (the spreader) at right angles to the first and apply gentle pressure (Fig. 5.10).
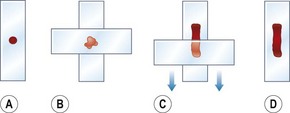
Figure 5.10 (A–D) Preparation of a smear of tissue cells using the squash technique. (After Lane & Cooper 2007, with permission from BSAVA.)
Rationale: This aids spreading, but too much pressure may rupture the cells.
3. Action: Draw the spreader quickly and smoothly across the bottom slide.
Rationale: The underside of this slide will pick up the cells making a useable smear.
4. Action: Allow the smear on the spreader to air dry.
Rationale: Do not use heat because the cells will be damaged.
5. Action: Stain appropriately.
Rationale: Choice of stain depends on what you are looking for.
Procedure: Line smear technique
This technique is used for fluid aspirates (e.g. synovial fluid).
1. Action: Expel the aspirate at one end of a clean glass microscope slide.
Rationale: This gives maximum space on the slide to make the smear.
2. Action: Using another glass slide, break off one corner using a glass cutter – this creates a spreader.
Rationale: The use of this shaped spreader to prepare the smear avoids spreading the cells over the edge of the slide.
3. Action: Place the spreader in front of the aspirate at an angle of approx. 30° and draw it backwards until the spreader picks up the aspirate (see Fig. 5.5).
Rationale: This is the same technique as has been described for preparing a blood smear. The aspirate will flow along the spreader.
4. Action: Push the spreader quickly and smoothly along  of the slide.
Rationale: The spreader will draw the aspirate, smearing the cells along the slide.
5. Action: At this point, abruptly lift the spreader upwards.
Rationale: This creates a line in which the cells within the smear are concentrated. This is different to the true blood smear technique.
6. Action: Allow to air dry and stain appropriately.
Rationale: Choice of stain depends on what you are looking for.
Procedure: Starfish preparation
1. Action: Expel the aspirate onto a clean glass microscope slide.
Rationale: Ensure that all the cells are expelled.
2. Action: Using the point of the needle, drag the aspirate in several directions.
Rationale: This method tends not to damage the cells. The aim is to draw out the cells to create a thin layer.
3. Action: Continue until the shape resembles that of a starfish with many projections (Fig. 5.11).
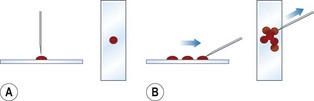
Figure 5.11 (A, B) Preparation of a smear of tissue cells using the starfish technique. (After Lane & Cooper 2007, with permission from BSAVA.)
Rationale: The thick layer of fluid around the cells may prevent evaluation of the cellular detail.
4. Action: Allow to air dry and stain appropriately.
Rationale: Choice of stain depends on what you are looking for.
Cytology stains
Most cytology samples can be stained using Romanowsky stains, which are generally easy to do and do not require special fixatives. They are useful for evaluating both nuclear and cytoplasmic features and can be used to stain fungi and parasites. They will stain bacteria, but they do not differentiate between Gram negative and Gram positive; this requires the use of Gram stain.
• Diff-Quik® – useful, quick and easy to use, but cellular definition may be impaired. Follow the manufacturer’s instructions.
• Leishman’s – used for blood cells. See previous notes.
• Giemsa – see previous notes.
• New methylene blue – does not stain the cytoplasm, but is good for nuclei. See previous notes.
Procedure: Staining with Sudan 3
1. Action: Prepare slide as described above and allow to air dry.
Rationale: Use of heat may damage the cells.
2. Action: Place the slide on a draining rack over a sink or over a staining bath.
Rationale: This allows the stain to drain away without causing a mess.
3. Action: Flood the slide with Sudan 3 stain and leave for 3 minutes.
Rationale: Sudan 3 binds with the fat in the sample.
4. Action: Wash gently with tap water.
Rationale: This stops the action of the stain and removes any surplus.
5. Action: Place a coverslip over the smear.
Rationale: This prevents the objective lens from being contaminated.
When performing cytology in practice, you would be most likely to take several slides from your patient, look at one or two of them and then, if you are still not confident of your diagnosis, you would send them to an external laboratory for confirmation of your diagnosis.
Bacteriology
Unlike viruses, bacteria do not require living cells on which to grow and as result they can be easily cultivated within the lab. Some practice laboratories have the facilities to cultivate bacteria from samples collected from patients to identify the cause of an infection or to perform an antibiotic sensitivity test. Many other practices rely on external labs to provide this service.
Procedure: Bacterial cultivation
Bacteria can only be cultivated in the lab if they are provided with the appropriate growing conditions, i.e. an incubator, to control the temperature and a suitable type of growing medium that supplies the correct nutrients, water and pH. There are two main types of media: liquids or broths and solid media based on agar gel poured into a Petri dish. Basic or simple media may then be enriched, e.g. by the addition of blood, egg or bile lactose, resulting in selective media designed to differentiate between different species. Although the different types of media can be made up in the practice lab, it is easier to buy them already prepared and sterilized.
Equipment list: Petri dish containing the appropriate agar gel, platinum loop, Bunsen burner, incubator, marker pen, sample from patient.
1. Action: Label the Petri dish on the underside with a marker pen using the client’s name and the animal’s name or the case number.
Rationale: All agar plates look the same and it is important not to mix up the samples.
2. Action: Unwrap a single-use disposable loop and dip it into the sample.
Rationale: These are ready sterilized. The use of platinum loops is discouraged as sterilizing, them by passing them through a Bunsen burner flame may cause aerosol spread of bacteria.
3. Action: Pick up the half of the Petri dish containing the agar gel and turn it over so that the surface of the gel is uppermost.
Rationale: Petri dishes have a base containing the set agar gel and a lid that looks very similar.
4. Action: Smear the material on the loop over a small area on the left of the agar (Fig. 5.12).
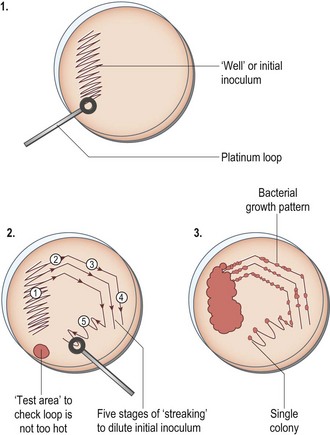
Rationale: This ‘well’ is the start of your inoculation area.
5. Action: Replace the lid of the Petri dish.
Rationale: It is not a good idea to leave the dish uncovered for too long as organisms in the air may contaminate it.
6. Action: Unwrap another loop.
Rationale: To make sure that the only bacteria on the plate are from the original sample.
7. Action: Pick up the Petri dish as before and using the loop, make 3–4 streaks, all in the same direction from the edge of the well. Take care not to tear the agar (Fig. 5.12).
Rationale: This technique helps to spread the contents of the sample evenly over the plate.
8. Action: Continue to spread the sample over the agar as shown in Figure 5.12.
Rationale: The aim is to spread the sample ever more thinly so that single colonies will grow in the area of the final stroke.
9. Action: Place the lid back on the dish and put it in the incubator upside down (i.e. with the agar side on top).
Rationale: If the lid is uppermost then water droplets, formed by condensation during incubation, will drip onto the agar causing the bacterial colonies to spread.
10. Action: Do not stack the agar plates more than two or three high in the incubator.
Rationale: Overcrowding will prevent free circulation of air within the incubator.
11. Action: Incubate at 37°C for 18–24 hours.
Rationale: Most pathogenic bacteria grow at normal body temperature (i.e. 37°C).
12. Action: Remove from the incubator and examine for bacterial colonies.
Rationale: Colonies of bacteria appear as raised ‘bumps’ along the streak lines. Take note of their colour and any change in the agar around them as this may help in their identification.
13. Action: If there is no visible growth, incubate the plate for another 18–24 hours.
NB After use, Petri dishes containing bacterial cultures and the used loops must be placed in clinical waste and incinerated.
Procedure: Antibiotic sensitivity testing
This is a method of testing the susceptibility of bacteria to antibiotic therapy. Not all bacteria necessarily succumb to all antibiotics. A sensitivity test is part of a commercial laboratory’s routine testing regimen, but in a practice lab, where it may be less common, it may be used in cases where a condition proves intractable (e.g. long-standing osteomyelitis or some bacterial skin conditions). It may also be used to identify the most effective antibiotic in cases of antibiotic resistance.
1. Action: Prepare a bacterial culture from the patient’s sample as described previously.
Rationale: This test cannot be done straight from the sample.
2. Action: Take a single-use disposable loop from its packaging.
Rationale: These loops are designed to be used once and are presterilized.
3. Action: Holding the Petri dish as described above, use the loop to pick up an isolated colony and transfer it to a buffered peptone broth.
Rationale: If there appears to be more than one type of colony growing on the plate you will have to test each one separately, but start with the predominant type.
4. Action: Incubate the peptone broth at 37°C for 4 hours.
Rationale: Buffered peptone broth is available commercially and enhances bacterial growth, particularly of more fastidious organisms such as Pasteurella and Corynebacterium.
5. Action: Immerse a sterile swab in the broth and use it to completely cover a Mueller Hinton blood agar plate.
Rationale: Using a swab ensures good coverage of the agar. Mueller Hinton blood agar contains sheep’s blood and is available commercially. It is the standard agar for sensitivity tests.
6. Action: Pick up the antibiotic assay ring with forceps or tweezers and place it in the centre of the agar (Fig. 5.13).

Figure 5.13 Antibiotic sensitivity testing on a bacterial culture. (Adapted with permission from www.Biology.ed.ac.uk The Microbial World – Penicillin and other antibiotics by James Deacon, University of Edinburgh.)
Rationale: The ring will have several antibiotic impregnated discs attached to it. Each disc is impregnated with a specific antibiotic (e.g. erythromycin, methicillin, tetracycline, etc.) and is printed with an identifying code. Some tests use individual antibiotic discs that are dropped onto the agar. Avoid handling the ring or discs with your fingers as this may contaminate them.
7. Action: Place the lid back on the dish and put it in the incubator upside down (i.e. with the agar side on top).
Rationale: If the lid is uppermost then water droplets, formed by condensation during incubation, will drip onto the agar causing the bacterial colonies to spread.
8. Action: Do not stack the agar plates more than two or three high in the incubator.
Rationale: Overcrowding will prevent free circulation of air within the incubator.
9. Action: Incubate at 37°C for 18–24 hours.
Rationale: Most pathogenic bacteria grow at normal body temperature (i.e. 37°C).
10. Action: Remove from the incubator and examine for bacterial growth.
Rationale: If the bacteria are sensitive to a particular antibiotic, growth will be suppressed, which appears as a clear zone around the relevant disc (Fig. 5.13).
11. Action: Record your results.
Rationale: This information will allow you to prescribe the antibiotic to which the causal organism is most sensitive, thus promoting a rapid recovery.
NB Antibiotic sensitivity testing is more widely used in large animal practice.
Procedure: Preparation of bacterial smears
Equipment list: Petri dish containing bacterial growth, platinum loop, Bunsen burner, glass microscope slide, sterile normal saline.
1. Action: Prepare a glass microscope slide by cleaning it with alcohol and allowing it to dry.
Rationale: This removes any residues or grease that may be sticking to the slide.
2. Action: Unwrap a single-use disposable loop and dip it into the saline.
Rationale: These are ready sterilized. The use of platinum loops is discouraged as sterilizing them by passing them through a Bunsen burner flame may cause aerosol spread of bacteria.
3. Action: Use the loop to place 2–3 drops of sterile normal saline near to the centre of the slide.
Rationale: This will dilute the bacterial colony and make it easier to spread.
4. Action: Unwrap another loop.
Rationale: To ensure that it is sterile.
5. Action: Using the loop, select an isolated bacterial colony and carefully remove it from the agar plate.
Rationale: If there appears to be more than one type of colony growing on the plate you will have to make a smear for each type.
6. Action: Place the colony on the slide close to the saline and mix the two together using the loop.
Rationale: Mixing with saline results in a single layer of cells, allowing easier identification.
7. Action: Spread the mixture out over the slide to cover 1–2 cm.
Rationale: A thin layer of cells enables you to see the shape of the cells.
8. Action: Dry the bacterial smear by passing the slide with the smear side uppermost through a Bunsen burner flame two or three times.
Rationale: This fixes the slide. If the slide is stained while it is still wet then some of the bacteria will float off. Be careful not to overheat the slide.
9. Action: Stain the smear using Gram’s stain or methylene blue.
Procedure: Staining a bacterial smear using Gram’s stain
Gram’s stain is used to identify the shape of the bacteria and to differentiate between the pink Gram negative bacteria (e.g. Escherichia coli, Salmonella) and the deep purple Gram positive bacteria (e.g. Staphylococcus, Streptococcus, Clostridium). The difference in colour is brought about by the bacterial cell wall’s reaction to the stain and is the first step towards specific identification.
Equipment list: Prepared bacterial smear, crystal violet stain, Gram’s or Lugol’s iodine, acetone, carbol fuchsin (dilute) or safranine, staining rack, wash bottle containing tap water, blotting paper or tissue, timer, Pasteur pipettes.
1. Action: Place the prepared slide with the smear facing uppermost on a staining rack over a sink or staining bath.
Rationale: Staining is a messy process and the surplus stain must be able to drain away. You can also stain using upright Coplin jars.
2. Action: Using a pipette, flood the slide with crystal violet for 30 seconds.
Rationale: At this point, both types of bacteria absorb the stain and become purple.
3. Action: Wash the slide with tap water.
Rationale: To remove the crystal violet stain.
4. Action: Flood the slide with iodine for 60 seconds.
Rationale: This acts as a mordant, fixing the stain. Gram’s iodine is stronger than Lugol’s iodine and is the stain of choice.
5. Action: Flood the slide with acetone for 2–3 seconds.
Rationale: This decolourizes the smear and is very rapid. Gram negative bacteria lose their colour.
6. Action: Wash the slide with water.
Rationale: To remove the acetone.
7. Action: Flood the slide with carbol fuchsin for 30 seconds.
Rationale: This counter-stains the bacteria and Gram negative bacteria become pink.
8. Action: Wash the slide with tap water.
Rationale: To remove the stain.
9. Action: Wipe the back of the slide.
Rationale: Do not wipe the smear off the front of the slide.
10. Action: Pass the slide rapidly over the flame of the Bunsen burner.
Rationale: To dry the slide. Do not overheat the slide as it will shatter.
11. Action: Place the slide under the microscope and examine under high power.
Rationale: Bacteria range in size from 0.5 µm to 5.0 µm so use ×100 oil immersion lens.
NB Never allow a slide to dry between stains. Dispose of all used slides in disinfectant prior to disposal in the sharps bin.
Procedure: Staining a bacterial smear using methylene blue stain
Methylene blue stains all bacteria blue and is used to identify the size and shape of the bacteria (i.e. coccus, bacillus, vibrio, etc.).
Equipment list: Prepared bacterial smear, staining rack, Löffler’s methylene blue, tissue or blotting paper, Pasteur pipette, wash bottle containing tap water.
1. Action: Place the prepared slide with the smear facing uppermost on a staining rack over a sink or staining bath.
Rationale: Staining is a messy process and the surplus stain must be able to drain away. You can also stain using upright Coplin jars.
2. Action: Using a pipette flood the slide with methylene blue stain and leave for 3 minutes.
Rationale: This stains the bacterial cells.
3. Action: Wash the slide with tap water from the water bottle.
Rationale: This removes the excess stain from the slide.
4. Action: Wipe the back of the slide.
Rationale: Do not wipe off the smear from the front of the slide.
5. Action: Pass the slide rapidly over the flame of the Bunsen burner.
Rationale: To dry the slide. Do not overheat the slide as it will shatter.
6. Action: Place the slide under the microscope and examine under high power.
Rationale: Bacteria range in size from 0.5 µm to 5.0 µm so use ×100 oil immersion lens.
Urinalysis
The kidney is responsible for filtering the blood to remove toxic substances from the body and for osmoregulation; 20% of cardiac output flows through the healthy kidney at any one time so it follows that analysis of the resulting urine will provide information about the patient’s current health status. Urine tests are easy to perform and it is rarely necessary for urine to be sent to a commercial laboratory for analysis. Table 5.5 shows normal urine values.
Table 5.5
Normal urine values*
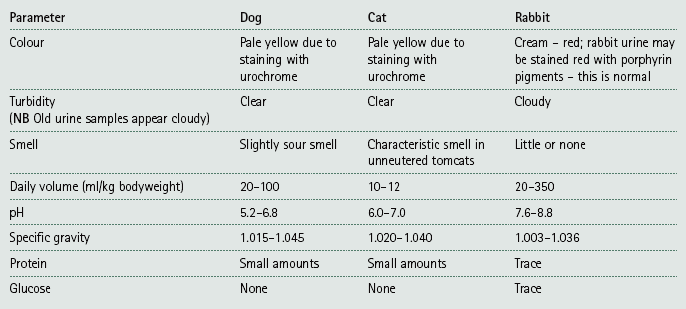
NB Normal urine contains only water, salts and urea. It should not contain any bilirubin, haemoglobin or glucose.
*Taken from a range of sources.
Urine collection – urine may be collected by a normally voided mid-stream sample, by catheterization or, if a sterile sample is required, by cystocentesis. If an owner is required to collect a sample from a dog he / she may require instruction about suitable containers; emphasize that these must be clean – a partially cleaned jam jar may affect the results! Impermeable cat litter is useful for obtaining a voided sample from a cat.
Urine preservation – it is always better to examine the urine sample as soon as possible as any crystals present may dissolve, the pH increases with age, bacteria may overgrow and colour changes on dipstick tests may be abnormal.
If a sample cannot be tested immediately it should be stored in the fridge and tested within 24 hours. Collect urine in boric acid tubes for bacteriology and in plain tubes for all other tests. Plain tubes may be used for bacteriology provided that the urine is tested within 20 minutes.
Procedure: Urinalysis using dipstick tests
Dipsticks, consisting of strips of chemical reagents in the form of small pads and designed to test a variety of parameters, are produced by several manufacturers; however, none of them are specifically designed for the veterinary market. They are calibrated for human urine and you should be aware of their inaccuracies for certain parameters in animals (e.g. specific gravity).
1. Action: Select the correct type of dipstick test.
Rationale: Reagent pads vary in number and type according to manufacturer.
2. Action: Check the expiry date.
Rationale: Out of date sticks may give unreliable results.
3. Action: Remove the lid of the container, remove one stick and replace the lid.
Rationale: Avoid contaminating the rest of the sticks with urine.
4. Action: Dip the stick in the fresh urine sample until all the pads are wet.
Rationale: Never perform this test on stale urine as the results may be affected.
5. Action: Remove the stick from the sample and gently tap it on the side of the sample pot.
Rationale: To remove any surplus urine.
6. Action: Using a timer or the second hand on your watch, keep to the time specified on the side of the dipstick bottle to take your reading.
Rationale: Each test pad requires a specific time in contact with the urine before it reacts appropriately.
7. Action: Hold the dipstick bottle in one hand and the dipstick in the other and compare the colour of each pad with the correct one on the side of the container.
Rationale: Each reagent pad will change colour. The range of colour changes is illustrated on the side of the bottle along with the appropriate result.
8. Action: Check that you read the results from the correct end of the stick.
Rationale: If you read from the wrong end you will get results that are incorrect for each test pad.
9. Action: Write down your results.
Rationale: Do not rely on your memory – the results may need to be kept for some time before you use them to assist your diagnosis.
NB Some people recommend placing the dipstick flat on the lab bench and putting a drop of urine onto each pad with a pipette. While this is not completely incorrect it is not the method recommended by the manufacturers – hence they are called dipsticks!
Procedure: Measuring specific gravity of urine using a refractometer
The reagent pad for specific gravity on a dipstick is calibrated for human urine and should not be relied upon. Always measure the specific gravity of animal urine using a refractometer (Fig. 5.14).
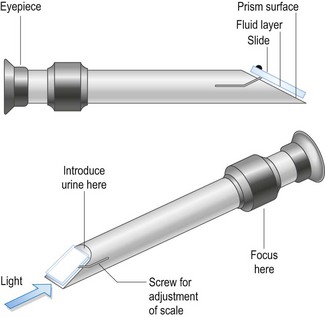
1. Action: To calibrate the refractometer, wipe the glass prism (Fig. 5.14) with a piece of lint free tissue. Using a pipette place approximately 2 drops of distilled water onto the prism and close the lid.
Rationale: The refractometer must be calibrated every time you use it to ensure that it measures the specific gravity accurately.
2. Action: Hold the refractometer up to the light and look through the eyepiece. Read the scale visible through the eyepiece.
Rationale: The reading is taken at the point where there is a boundary between light and dark. As the liquid is pure water it should read 1.000.
3. Action: If the reading is not 1.000 then adjust the refractometer using the screw on the top of the instrument and the screwdriver provided. Adjust until the reading is 1.000.
Rationale: Some instruments have different ways of making the adjustment – read the instruction leaflet.
4. Action: Wipe the water off the glass with lint free tissue.
Rationale: Lint free tissue should not leave any fibres on the glass.
5. Action: Using a clean pipette, place 2 drops of the urine sample on to the glass and close the lid.
Rationale: Using the same pipette may dilute the urine sample. The instrument is now set up to read the specific gravity of urine.
6. Action: Hold the refractometer up to the light, look through the eyepiece and read the scale. Record your result.
Rationale: Normal specific gravity for dog, cat and rabbit urine is shown in Table 5.5.
7. Action: Rinse off the urine with distilled water and wipe with lint free tissue and replace the instrument in its case.
Rationale: Do not leave urine to dry on the glass. Refractometers are expensive precision instruments and should be cleaned and stored correctly.
Procedure: Urine sedimentation examination
This examination is more accurate for the identification of erythrocytes and leucocytes and is better than relying on the dipstick test to identify the presence of blood or haemoglobin. It is also used for the identification of various types of crystal, some of which are shown in Figure 5.15. A sedimentation test can be easily done in a practice lab, but a fresh sample is essential.
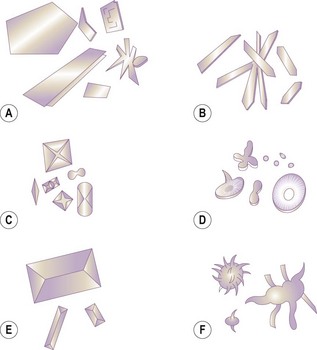
Figure 5.15 Urine crystals: (A) urates; (B) hippuric acid; (C) calcium oxalate; (D) calcium carbonate; (E) struvite; (F) ammonium urate.
1. Action: Using a pipette, place 3–5 ml of fresh urine in a centrifuge tube.
Rationale: A conical centrifuge tube helps to separate the sediment from the supernatant.
2. Action: Place the tube in the centrifuge and balance it with a similar tube on the other side.
Rationale: The machine must be balanced to prevent vibration.
3. Action: Set the centrifuge to spin at 1000–2000 r.p.m. for 2–3 minutes.
Rationale: If you spin for longer you may damage any cells in the urine.
4. Action: Use a pipette to remove and discard most of the supernatant. Be careful not to disturb the sediment.
Rationale: Only the sediment is needed for the examination.
5. Action: Flick the test tube with your fingers.
Rationale: This resuspends the sediment in any remaining liquid and makes a more even smear.
6. Action: Add 1–2 drops of Sedistain® to the sediment in the tube.
Rationale: This is optional, but it helps to make the contents of the sediment more visible and easier to identify. The test can be performed unstained.
7. Action: Use a pipette to remove 1–2 drops of the sediment and place them onto the centre of a clean glass slide. Cover with a coverslip.
Rationale: This makes a uniform layer for examination.
8. Action: Place the slide under the microscope and examine using ×10 and ×40 objective lenses.
Rationale: Look for evidence of blood cells, epithelial cells, crystals (Fig. 5.15), casts, sperm, mucin threads and bacteria.
Parasitology
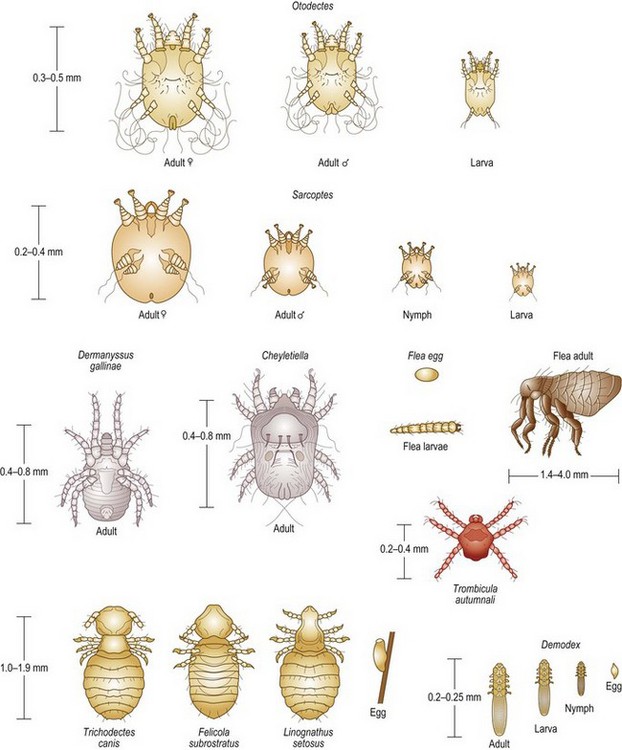
• Ectoparasites – i.e. those living on the surface of the patient (e.g. fleas, lice and the burrowing mites such as Sarcoptes and Demodex (Fig. 5.16)). Samples are gathered by coat brushings and skin scrapings. For details of the procedure see Chapter 2.
• Endoparasites – i.e. those living inside the patient (e.g. roundworms and tapeworms). Samples may be obtained from the faeces or from tracheal washings.
Procedure: Preparation of a smear to identify mites in a skin scraping
Equipment list: scraped sample, glass slide and coverslip, 10% potassium hydroxide, Bunsen burner, pipette, forceps, microscope.
1. Action: Place some of the skin scraping on to the centre of a clean glass microscope slide.
Rationale: Do not use too much as the debris may mask the parasites.
2. Action: Use a pipette to add 2–3 drops of 10% potassium hydroxide to the debris.
Rationale: Be careful – this is caustic!
3. Action: Place a coverslip over the sample.
Rationale: This prevents the microscope lens from becoming contaminated and makes a uniform layer to examine.
4. Action: Holding the slide with forceps, warm it gently over the Bunsen burner flame – do not let it boil!
Rationale: Warming the debris breaks it down so that it becomes clear, making the parasites easier to see.
5. Action: Allow the slide to cool and place it under the microscope. Examine using the ×4 and ×10 objective lenses.
Rationale: Larger parasites such as Sarcoptes may be seen with low magnification whereas smaller species such as Demodex require higher magnification (Fig. 5.16).
6. Action: It is a good idea to prepare several slides for examination.
Rationale: Numbers of parasites are likely to be low and they may be missed if you examine only one smear.
Ringworm
This is caused by a group of fungi known as the dermatophytes that attack keratin. The most significant species in dogs, cats and rabbits are:
• Microsporum canis – most common species; 50% of cases will fluoresce under Wood’s lamp.
• Microsporum gypseum – occasionally seen in dogs and cats.
• Trichophyton mentagrophytes – less common in dogs and rare in cats.
Be careful when handling patients suspected of having ringworm as the disease is zoonotic. Always wear gloves when handling samples and warn the owners.
Procedure: Culture for ringworm fungus
1. Action: Wearing disposable gloves, collect a sample from the patient by plucking hair from the edge of the lesion.
Rationale: Ringworm fungi cause circular lesions that spread outwards. The centre of the lesion is dead and scaly but the outer ring should contain live fungus.
2. Action: Place a pair of forceps in the flame of the Bunsen burner for a few seconds and then allow to cool to room temperature.
Rationale: The forceps must be sterilized to reduce the risk of bacterial contamination.
3. Action: Remove the lid of a Petri dish containing Sabouraud’s agar or a commercial medium such as Dermatofyt®.
Rationale: Avoid contaminating the agar with your fingers.
4. Action: Use the forceps to take 6–8 hairs from the sample and place them in the centre of the agar. Replace the lid.
Rationale: Avoid contamination from micro-organisms, including fungal spores, floating in the atmosphere. Sabouraud’s medium is selective for ringworm fungi.
5. Action: Incubate at room temperature for 28 days.
Rationale: Ringworm fungi grow very slowly, although you may see some evidence of growth from the 4th day.
6. Action: When fungal growth is visible, examine and identify.
Rationale: Growth appears as a fluffy white colony on Sabouraud’s medium. On commercial media such as Dermatofyt®, an indicator within the agar changes from yellow to red. However, there are some contaminants that may also cause this colour change so it is important to identify the fungus under the microscope.
NB The colony of each species has different identifying characteristics:
• Microsporum canis – flat with white silky centre and a bright yellow edge. Underside is yellow.
• Microsporum gypseum – flat brown with a powdery yellow fringe. Underside is yellow / brown.
• Trichophyton mentagrophytes – flat, granular and tan coloured, or heaped with a white cottony appearance. Underside is yellow / red.
Procedure: Preparation of a slide to identify ringworm fungus
1. Action: Culture a colony of fungus from the patient’s sample as described.
Rationale: Infected hairs can be used to make a direct slide, but identification is more difficult and requires experience.
2. Action: Take a clean glass microscope slide and, using a pipette, place 2–3 drops of lactophenol cotton blue stain in the centre.
Rationale: The stain helps to spread the fungal colonies over the slide. The phenol in the stain inactivates the fungal spores and the blue stain aids visualization of the spores and the mycelia. You can use Quink® ink instead of the stain.
3. Action: Using a single-use loop, pick up a small amount of fungal colony and mix it with the stain on the slide. Discard the loop in the clinical waste.
Rationale: To prevent contamination by the fungus on the loop.
4. Action: Place a coverslip over the material on the slide.
Rationale: This provides a layer of uniform thickness for examination.
5. Action: Place the slide under the microscope and examine under the ×10 and ×40 objective lenses.
Rationale: Microscopic examination will confirm the identification of the species.
NB The arthroconidia or spores of the fungus differ according to the species (Fig. 5.17):
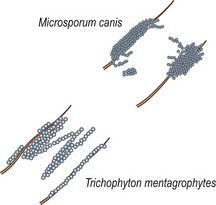
Procedure: Use of Wood’s lamp to identify ringworm infection
Wood’s lamps emit ultraviolet (UV) light at a wavelength of 365–366 nm. When this light is directed onto infected hair or claws, the tissue will fluoresce bright apple green. Only 60% of cases infected with M. canis will fluoresce. The remaining 40% and ringworm caused by other species will not fluoresce, so a negative result does not mean that the animal does not have ringworm.
1. Action: Place the animal on a stable examination table in a darkened room.
Rationale: The darkened room will enhance the fluorescent effect.
2. Action: Put on some form of eye protection.
Rationale: UV light can cause damage to the conjunctiva and the retina.
3. Action: Switch on the Wood’s lamp and allow it to warm up for 5–10 minutes.
Rationale: To ensure that it is emitting the correct wavelength of light.
4. Action: Ask the owner or an assistant (who should be wearing eye protection) to restrain the animal appropriately.
Rationale: This is not a painful procedure, but the animal may try to escape.
5. Action: Hold the lamp over the suspect area and then screen the rest of the body thoroughly looking for signs of apple-green fluorescence.
Rationale: Other particles in the coat (e.g. skin flakes, dirt and detergent) may fluoresce and petroleum jelly will fluoresce blue-white.
6. Action: When the examination is complete turn off the lamp.
Rationale: Prolonged exposure to UV light can burn the skin.
NB Diagnosis of ringworm by this method requires experience and for this reason Wood’s lamps are rarely used nowadays.
Faecal analysis
The faeces of a dog or cat may contain worm eggs (e.g. Toxocara canis, Uncinaria stenocephala), larvae (e.g. Oslerus osleri, Angiostrongylus vasorum) or coccidial oocysts (e.g. Isospora or Eimeria species). A faecal sample may be collected direct from the animal’s rectum using a gloved finger or a swab, or by picking it up from the floor of the kennel or the ground. Make sure that the sample has come from the animal in question and that it is not contaminated by grass, soil or cat litter. The sample should be placed in a clean wide-mouthed container filled as full as possible to prevent it drying out.
Storage – faeces should be analysed as soon as possible after collection as any eggs present may hatch, larvae may crawl away and bacterial growth may overrun the sample. If analysis cannot be done quickly then place the sample in a fridge.
Procedure: Direct faecal smear
This may be used to confirm the presence of eggs in the sample (Fig. 5.18), but as only a small amount of faeces is examined the absence of eggs in the smear does not confirm the absence of parasites in the patient. Prepare and examine several smears to be sure of your diagnosis. This is a qualitative analysis that indicates parasites are present but does not indicate the severity of the infection.
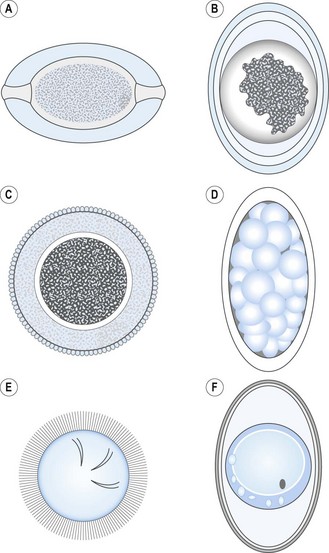
Figure 5.18 Worm eggs and oocysts: (A) Trichuris spp.; (B) Toxascaris spp.; (C) Toxocara spp.; (D) Uncinaria spp.; (E) Taenia spp.; (F) Isospora spp.
1. Action: Take a small amount of faeces and place it in the centre of a clean glass microscope slide.
Rationale: If the smear is too thick then it is difficult to see the eggs. The ideal smear should appear almost clear to the naked eye.
2. Action: Place 2–3 drops of water on the slide and mix with the faeces using a glass rod or a mounted needle. Keep the material as close to the centre of the slide as possible.
Rationale: The water helps to dilute the faeces and makes a thinner solution.
3. Action: Remove any large pieces of material from the mixture.
Rationale: These are likely to be undigested fibrous material, which will interfere with the coverslip.
4. Action: Carefully place a coverslip over the area of the sample. Try to avoid trapping bubbles under the slip.
Rationale: Bubbles may be mistaken for eggs. Use a mounted needle to lower the edge of the slip onto the faeces.
5. Action: Make sure that the coverslip lies as flat as possible.
Rationale: This forms a uniform layer to examine under the microscope. Any large pieces of debris will prevent the slip lying flat.
6. Action: Place the slide under the microscope and examine systematically under ×10 and ×40 objective lenses.
Rationale: Systematic examination of the slide will ensure that you examine the whole slide. Air bubbles appear as black circles.
Procedure: Quantitative analysis of a faecal sample using the modified McMaster method
This method is used to evaluate the severity of the infection.
1. Action: Weigh 3 g of faeces into a glass beaker.
Rationale: The faeces should be fresh and moist.
2. Action: Measure 45 ml of saturated sugar solution into a measuring cylinder, pour into the beaker and mix with a spatula.
Rationale: Saturated sugar solution helps the eggs to float out of the faeces. The addition of several glass beads may help to break up the faecal matter – cat faeces are particularly hard to break up.
3. Action: Pour the solution through a sieve into a second beaker. Discard the debris in the sieve.
Rationale: This removes any large particles but allows the eggs to go through.
4. Action: Mix the solution gently and allow to stand at room temperature for 5–10 minutes.
Rationale: This enables the worm eggs to float to the top of the saturated sugar solution.
5. Action: If using a single chamber McMaster slide, prepare it by placing the coverslip grid side down on the slide.
Rationale: Some chambers have a single chamber and use a coverslip grid whereas others have two chambers and an integral grid (Fig. 5.19).
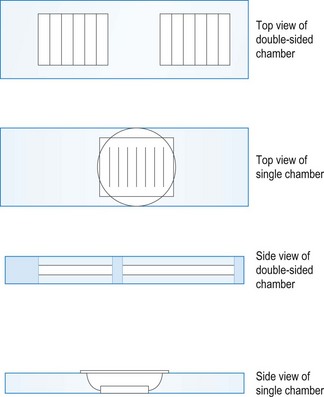
6. Action: Using a pipette, withdraw approximately 2 ml of the solution and fill the counting chamber.
Rationale: Make sure that you have enough fluid to completely fill the chamber. If there is insufficient fluid then bubbles may form over the grid.
7. Action: Apply the coverslip.
Rationale: To avoid the inclusion of bubbles, which may distort the image, make sure that the coverslip makes contact with the chamber.
8. Leave the counting chamber on the bench for 5–10 minutes.
Rationale: This allows any worm eggs or coccidial oocysts to float to the top, making them visible.
9. Action: Place the chamber under the microscope and examine using the ×10 objective. Focus on the grid and count all the eggs seen over the grid area.
Rationale: Count eggs that lie over the lines and between the lines. If there is more than one type of egg then repeat the count for each type separately (Fig. 5.18). Air bubbles will appear as black circles.
10. Action: Calculate the number of eggs as follows:
• For a single counting chamber, multiply the number of eggs by 100.
• For a double-sided chamber, count the eggs in both chambers, add them together and multiply the total by 50.
Rationale: This gives you the number of eggs per gram of faeces.
NB This technique is not suitable for tapeworm segments as they do not float – use direct smear.
Procedure: Baermann technique
This technique is used to confirm a diagnosis of lungworm in the dog and the cat, i.e. Oslerus osleri, Aleurostrongylus abstrusus and Angiostrongylus vasorum, all of which are transmitted by larvae in the faeces.
1. Action: Attach a short length of tubing to a funnel and clamp the funnel into a stand.
Rationale: This should be as stable as possible so that it does not tip over when liquid is poured through.
2. Action: Place a clip across the end of the tubing so that it forms a watertight seal.
Rationale: To prevent the faecal solution dripping out.
3. Action: Fill the funnel with lukewarm water to within about 1 cm of the rim.
Rationale: This will soften the faeces and allow the larvae to run down to the bottom.
4. Action: Take a small piece of muslin and thread a strong wire through each side.
Rationale: The loops will suspend the muslin across the top of the water.
5. Action: Place the muslin across the top of the funnel so that the wires lie across the top to suspend it.
Rationale: The muslin forms a ‘lid’ that is held in place by the wires.
6. Action: Place about 10 g of faeces onto the muslin, which will now dip down into the water.
Rationale: Make sure that the faeces sample is completely covered by the water.
7. Action: Leave the apparatus overnight.
Rationale: This gives enough time for the larvae to migrate to the bottom of the funnel and enter the tubing.
8. Action: In the morning draw off a centrifuge tube of liquid by releasing the clip on the tubing.
Rationale: If larvae are present they should accumulate in the tubing.
9. Action: Allow the tube to stand for 4 hours, or centrifuge at 1500 r.p.m. for 1 minute.
Rationale: As the larvae are heavier than water, gravity or centrifugal force will pull them down to the bottom of the tube.
10. Action: Using a pipette, remove the supernatant fluid from the tube.
Rationale: This should not contain anything significant.
11. Action: Place the sediment on a clean glass microscope slide, add a drop of Lugol’s iodine and cover with a coverslip.
Rationale: Lugol’s iodine will kill the larvae and stop them moving. It also stains them brown, which increases visibility.
12. Action: Place the slide under the microscope and examine under ×10 and ×40 objective lenses.