15 INTERIM FIXED RESTORATIONS
Interim crowns or partial fixed dental prostheses (FDPs) are essential in prosthodontic therapy. The word interim means established for the time being, pending a permanent arrangement. Even though a definitive restoration may be placed as quickly as 2 weeks after tooth preparation, the interim fixed restoration must satisfy important needs of the patient and dentist. Unfortunately, temporary usually connotes laxity, and this may imply that requirements pertaining to the more permanent condition are ignored. If this connotation becomes a philosophy governing the interim phase of treatment, the clinical efficiency and treatment quality will be needlessly reduced. Experience has repeatedly shown that time and efforts expended in fulfilling the requisites of interim fixed restorations are well spent.
Because of unforeseen events (e.g., laboratory delays or patient unavailability), an interim fixed restoration may have to function for an extended period. On the other hand, a delay in placing the definitive restoration may be deliberate (e.g., because the etiologic factors of a temporomandibular disorder or periodontal disease must be corrected). Whatever the intended length of time of treatment, an interim restoration must be adequate to maintain patient health. Thus, it should not be casually fabricated on the basis of an expected short term of use.
Interim procedures also must be efficiently performed, because they are done while the patient is in the operatory and during the same appointment that the teeth are prepared. Costly chairside time must not be wasted, but the dentist must produce an acceptable restoration. Failure to do so results in the eventual loss of more time than was initially thought saved. For example, an inadequate restoration may lead to unnecessary repairs or to the need to treat gingival inflammation and remake the impression. Such problems can be avoided if the dentist thoroughly understands what is required of the interim restoration and makes the effort to meet these requirements.
REQUIREMENTS
An optimum interim fixed restoration must satisfy many interrelated factors, which can be classified as biologic, mechanical, and esthetic (Fig. 15-1).
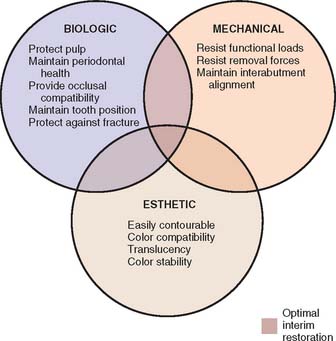
Fig. 15-1 Factors to be considered in making an interim restoration. The central area represents the optimum, in which biologic, mechanical, and esthetic requirements are adequately met.
Biologic Requirements
Pulpal protection
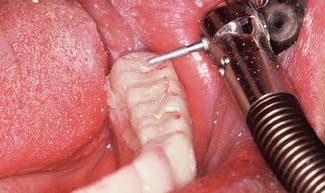
An interim fixed restoration must seal and insulate the prepared tooth surface from the oral environment to prevent sensitivity and further irritation to the pulp. A certain degree of pulp trauma is inevitable during tooth preparation because of the sectioning of dentinal tubules (Fig. 15-2). In health, each tubule contains the cytoplasmic process of a cell body (the odontoblast), whose nucleus is in the pulp cavity. Unless the environment around the exposed dentin is carefully controlled, adverse pulp effects can be expected.1 In addition, the pulp health of a tooth requiring a cast restoration is likely to be compromised before and after preparation (Table 15-1). In severe situations, leakage can cause irreversible pulpitis, with the consequent need for root canal treatment.2
Table 15-1 FACTORS CONTRIBUTING TO PULP DEATH
| Past | Present (during fixed prosthodontic therapy) |
|---|---|
| Caries | Preparation trauma |
| Operative dentistry | Microbial exposure |
| Bruxism | Desiccation |
| Periodontal surgery | Chemical exposure |
| Prosthodontic therapy | Thermal exposure |
Periodontal health
To facilitate plaque removal, an interim fixed restoration must have good marginal fit, proper contour, and a smooth surface. This is particularly important when the crown margin is placed apical to the free gingival margin.3 If the interim fixed restoration is inadequate and plaque control is impaired, gingival health deteriorates.4
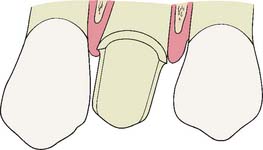
The maintenance of good gingival health is always desirable, but it has special practical significance when fixed prosthodontics is undertaken. Inflamed or hemorrhagic gingival tissues make subsequent procedures (e.g., impression making and cementation) very difficult. The longer the interim fixed restoration must serve, the more significant any deficiencies in its fit and contour become (Fig. 15-3). When gingival tissue is impinged upon, ischemia is likely to develop. This can be detected initially as tissue blanching. If it is not corrected, a localized inflammation or necrosis develops.
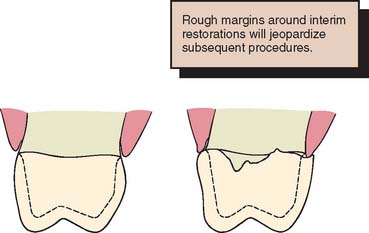
Fig. 15-3 An interim restoration should have good marginal fit, proper contour, and a smooth surface finish. A, The properly contoured interim restoration. Smoothly continuous with the external surface of the tooth. B, Overcontouring. Irregular transition from the restoration to the root surface and inadequate marginal adaptation. These contribute to plaque accumulation and an unhealthy periodontium.
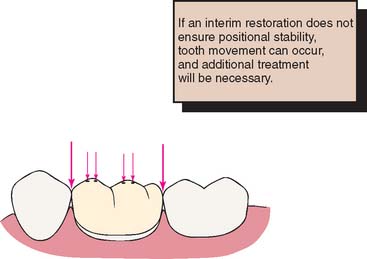
Occlusal compatibility and tooth position
The interim fixed restoration should establish or maintain proper contacts with adjacent and opposing teeth (Fig. 15-4). Inadequate contacts allow supraeruption and horizontal movement. Supraeruption is detected at the evaluation appointment, when the definitive restoration makes premature contact. It is possible to correct this in the operatory, but the effort is time consuming and often leads to a restoration with poor occlusal form and function. Horizontal movement results in excessive or deficient proximal contacts. The former require tedious chairside adjustment; the latter involve a laboratory procedure to add metal or ceramic to the deficient site. In spite of these efforts, proximal crown contours are distorted. This, along with a resulting root proximity (Fig. 15-5), impairs oral hygiene measures.
Prevention of enamel fracture
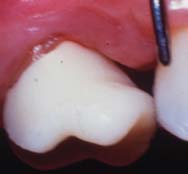
The interim fixed restoration should protect teeth weakened by crown preparation (Fig. 15-6). This is particularly true with partial coverage designs in which the margin of the preparation is close to the occlusal surface of the tooth and could be damaged during chewing. Even a small chip of enamel makes the definitive restoration unsatisfactory and necessitates a time-consuming remake.
Mechanical Requirements
Function
The greatest stresses in an interim fixed restoration are likely to occur during chewing. Unless the patient avoids contacting the prosthesis when eating, internal stresses are similar to those occurring in the definitive restoration. The strength of polymethyl methacrylate resin is about one-twentieth that of metal-ceramic alloys,5 which makes fracture of the interim fixed restoration much more likely. Fracture is not usually a problem with a complete crown as long as the tooth has been adequately reduced. More frequently, breakage occurs with partial-coverage restorations and partial FDPs. Partial-coverage restorations are inherently weaker because they do not completely encircle the tooth.
A partial FDP must function as a beam in which substantial occlusal forces are transmitted to the abutments. This creates high stresses in the connectors,6 which are often the site of failure. To reduce the risk of failure, connector size must be increased in the interim restoration in comparison with the definitive restoration (Fig. 15-7). Greater strength is achieved by reducing the depth and sharpness of the embrasures. This increases the cross-sectional area of the connector while reducing the stress concentration associated with sharp internal line angles. The biologic and sometimes the esthetic requirements place limits on just how much larger connectors can be made. To avoid jeopardizing periodontal health, they should not be overcontoured near the gingiva (Fig. 15-8). Good access for plaque control must have high priority.
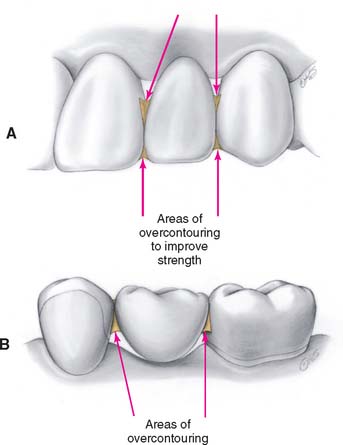
Fig. 15-7 The connectors of an interim fixed dental prosthesis are often purposely overcontoured. A, In the anterior region, the degree of overcontouring is substantially limited by esthetic requirements. B, In the posterior region, esthetics is less restrictive, but overcontouring still must not jeopardize the maintenance of periodontal health.
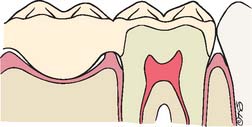
Fig. 15-8 In this mesiodistal section, an overcontoured connector impinges on the gingiva. Pressure ischemia and poor access for plaque removal promote gingivitis.
In some instances, cast metal or heat-processed resin interim restorations can spare the practitioner and the patient inconvenience, lost time, and the expense of remaking a restoration (Box 15-1).
Displacement
If irritation to the pulp and tooth movement are to be avoided, a displaced interim restoration must be recemented promptly. An additional office visit is usually required, which results in considerable inconvenience for both patient and dentist. Displacement is best prevented through proper tooth preparation and an interim restoration with a closely adapted internal surface. Excessive space between the restoration and the tooth places greater demands on the luting agent, which has lower strength than regular cement and thus cannot tolerate the added force. For this and for biologic reasons, unlined preformed crowns should be avoided.
Esthetic Requirements
The appearance of an interim fixed restoration is particularly important for incisors, canines, and sometimes premolars. Although it may not be possible to duplicate exactly the appearance of an unrestored natural tooth, the tooth contour, color, translucency, and texture are essential attributes. When necessary, esthetic enhancement procedures are available to create personalized details; however, because these are not routinely called for, they are addressed on page 500, after the discussion of cementation and repair.
How well a material matches the color of adjacent teeth initially is easily recognized as an essential requirement of prosthodontics. However, some resins discolor with time intraorally,7 and thus color stability (along with the propensity for stain accumulation) governs the selection of materials when a long period of service is anticipated.
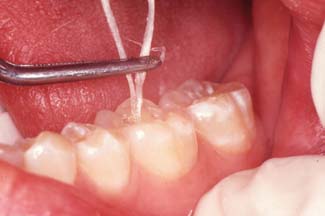
The interim restoration is often used as a guide to achieve optimum esthetics in the definitive restoration. In complete denture prosthodontics, it is customary to have a wax evaluation so that the patient can respond to the dentist’s esthetic interpretation before the denture is processed. Many dentists consider this essential because of the frequency of patients’ requests for changes and the ease with which such changes can be made. When fixed prosthodontics is performed in the anterior oral cavity, it greatly influences appearance, and the patient should be given an opportunity to voice an opinion. Beauty and personal appearance are highly subjective and difficult to communicate verbally, and a facsimile prosthesis can play a vital role in the patient’s consideration of esthetics and the effect that the prosthesis has on his or her self-image. Obtaining the opinions of others whose judgment is valued is also important. An accurate interim restoration is a practical way of obtaining specific feedback for the design of a definitive restoration. Word descriptions alone are often too vague and frequently cause overcorrections, which are difficult to reverse in the definitive restoration. The interim restoration is shaped and modified until its appearance is mutually acceptable to dentist and patient. When this is achieved, an impression is made of the interim restoration (Fig. 15-9) and a cast is poured. This cast accompanies the fixed prosthodontic definitive cast to the laboratory, where the contours are duplicated. This process is more efficient when it begins with diagnostic waxing procedures. Involving the patient in decision making results in greater patient satisfaction.
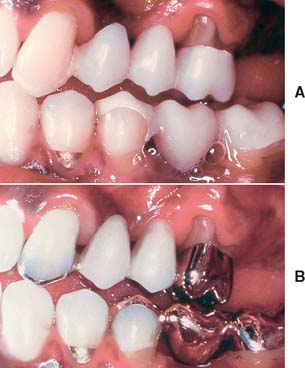
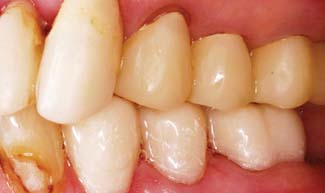
Fig. 15-9 A, This interim fixed dental prosthesis established anterior guidance and pontic form before work on the definitive restoration was begun. (Note the facial cavosurface margin of the mandibular second premolar covered by the interim restoration to protect it from damage.) B, The definitive restoration closely matches its predecessor in form and function.
MATERIALS AND PROCEDURES
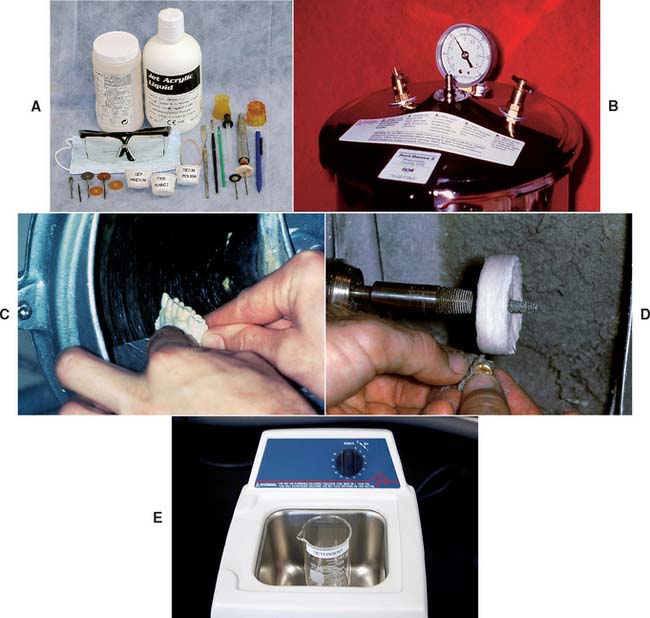
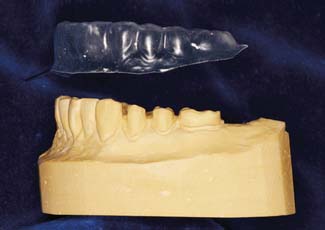
Many procedures involving a wide variety of materials are available to make satisfactory interim restorations (Fig. 15-10). As new materials are introduced, associated techniques are reported, and thus there is even more variety. It is a helpful principle that all the procedures have in common the formation of a mold cavity into which a plastic material is poured or packed. Furthermore, the mold cavity is created by two correlated parts: one forming the external contour of the crown or FDP, the other forming the prepared tooth surfaces and (when present) the edentulous ridge contact area. The terms external surface form (ESF) and tissue surface form (TSF) are suggested for these mold parts. This terminology is used in the ensuing discussions.
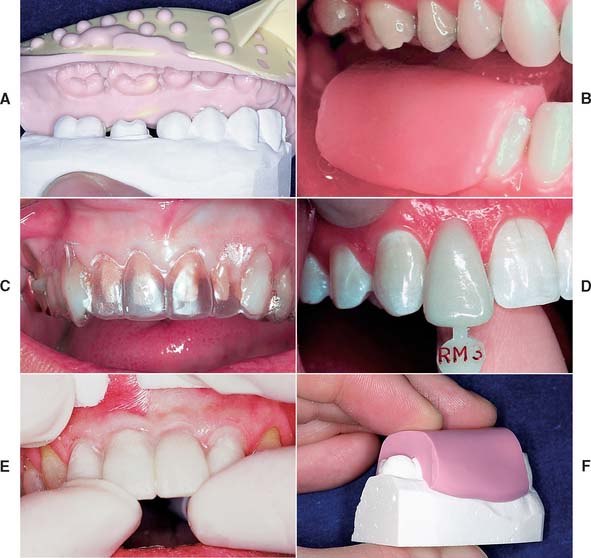
Fig. 15-10 Although there are many variations, molds used in making interim restorations consist of an external surface form (ESF) and a tissue surface form (TSF). Direct techniques entail use of the patient’s mouth directly as the TSF. A, Indirect technique: ESF, an alginate impression; TSF, a quick-set plaster cast. B, Direct technique: ESF, a baseplate wax impression; TSF, the patient. C, Direct technique: ESF, a vacuum-formed acetate sheet; TSF, the patient. D, Direct technique: ESF, a polycarbonate preformed shell; TSF, the patient. E, Indirect-direct technique: ESF, a custom preformed three-unit fixed dental prosthesis shell (maxillary right central incisor to canine) made indirectly; TSF, the patient. F, Indirect technique: ESF, a silicone putty impression; TSF, a quick-set plaster cast of the preparations.
External Surface Form
There are two general categories of ESFs: custom and preformed.
Custom
A custom ESF is a negative reproduction of either the patient’s teeth before preparation or a modified diagnostic cast. It may be obtained directly with any impression material. Impressions made in a quadrant tray with irreversible hydrocolloid or silicone are convenient. The higher cost of addition silicone may be offset by its ability to be retained for possible reuse at any future appointment. Accurate reseating of the ESF is easier and the mold cavity produces better results if thin areas of impression material (as may be found interproximally or around the gingival margin) are trimmed away (Fig. 15-11). The moldable putty materials are popular because they can be used without a tray and are easily trimmed to minimum size with a sharp knife. Also, their flexibility facilitates subsequent removal of the polymerized resin (Fig. 15-12).
Fig. 15-11 Shortening proximal projections of the impression material facilitates complete reseating of the ESF. Note that excess impression material palatally and facially has been trimmed away with a sharp knife for this reason. The anterior sextant tray shown was selected because it adequately captures the teeth adjacent to the proposed interim restoration.
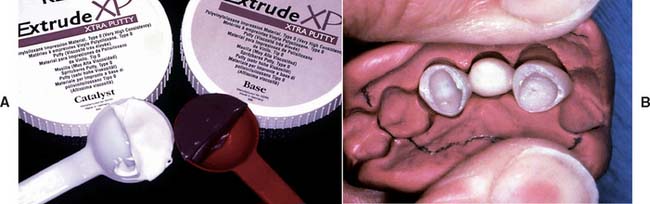
Fig. 15-12 A, One of the flexible silicone putties suitable for making external surface forms. B, The putty form has been spread apart. Note the completed resin interim restoration in place, to demonstrate the degree of putty flexibility.
A custom ESF can be produced from thermoplastic sheets, which are heated and adapted to a stone cast with vacuum or air pressure while the material is still pliable (Fig. 15-13). This produces a transparent form with thin walls, which makes it advantageous in the direct technique because of its minimum interference with the occlusion. It is filled with resin, placed in the mouth, and fully seated as the patient closes into maximum intercuspation. Little additional effort is required to adjust the occlusal contacts. The thinness of the material may also be a disadvantage in the direct technique, however. The material is a poor dissipater of the heat released during resin polymerization, and so care must be taken to remove it from the mouth before injury can occur. A thermoplastic ESF has other uses in fixed prosthodontic treatment, in both the clinical and the laboratory phase; for example, it can be helpful in evaluating the adequacy of tooth reduction8,9 (Fig. 15-14).
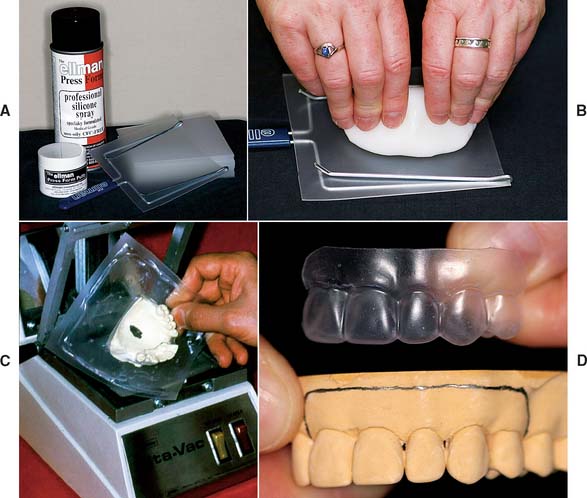
Fig. 15-13 A, Inexpensive system for producing external surface forms from thermoplastic sheets. B, After heating, the sheet is formed with reusable putty and finger pressure applied over a stone cast. C, More expensive system incorporating an electric heating element and a vacuum source. D, Trimmed polypropylene external surface form. Note the detail that can be captured with this material.
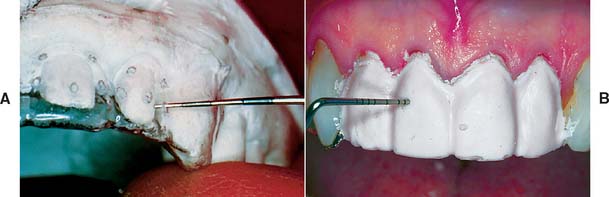
Fig. 15-14 A, The thinness and transparency of these external surface forms (ESFs) allow their use directly as tooth-reduction guides both in and out of the mouth. B, Tooth reduction may be assessed by using the ESF to mold alginate over the prepared tooth. When the alginate is set, the ESF is removed, and a periodontal probe is pushed through the alginate for measurements at desired locations.
(B, Courtesy Dr. T. Roongruangphol.)
Transparent sheets are available in cellulose acetate or polypropylene of various sizes and thicknesses; a 125 × 125 mm sheet of 0.5-mm (0.020-inch) thickness is recommended for making interim restorations. Polypropylene is preferred because it produces better surface detail and is more tear resistant. Better tear resistance makes initial removal from the forming cast less tedious and enables the ESF to be used more than once.
Although thermoplastic sheets have a number of advantages, a wide variety of other materials and methods can be used successfully. For example, some practitioners favor baseplate wax because it is convenient and economical (see Fig. 15-10B).
Preformed
Various preformed “crowns” are available commercially. On their own, they rarely satisfy the requirements of a interim restoration, but they can be thought of as ESFs rather than as finished restorations and thus must be lined with autopolymerizing resin. Most crown forms need some modification (internal relief, axial recontouring, occlusal adjustment) in addition to the lining procedure (Fig. 15-15). When extensive modification is required, a custom ESF is superior because it is less time consuming. Preformed crowns are generally limited to use as single restorations, because it is not feasible to use them as pontics for partial FDPs.
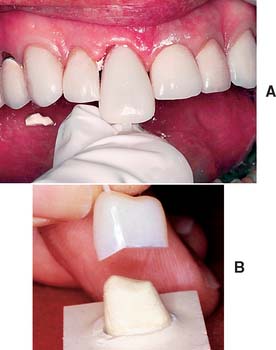
Fig. 15-15 A, The time necessary to modify this particular preformed crown outweighs the advantages it might provide. Were a custom external surface form available, it would be more efficient and more economical. B, The excessively tapered internal lingual wall of this preformed crown requires grinding in order to accommodate a properly prepared tooth. The stone cast in the lower portion of the illustration duplicates the internal surface of the preformed crown.
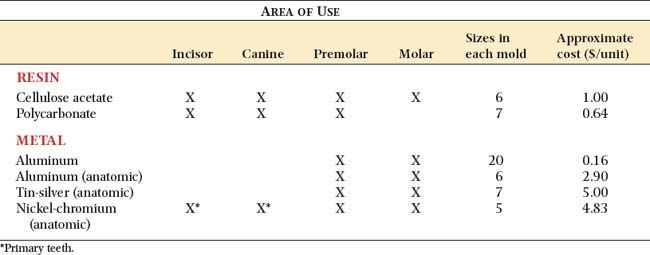
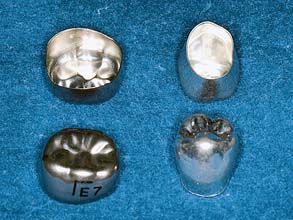
Materials from which preformed ESFs are made (Fig. 15-16) include polycarbonate, cellulose acetate, aluminum, tin-silver, and nickel-chromium. These are available in a variety of tooth types and sizes (Table 15-2).
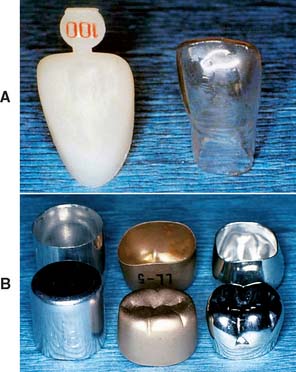
Fig. 15-16 A, Preformed anterior crown forms: polycarbonate (left) and cellulose acetate (right). B, Preformed posterior crown forms: aluminum shell (left), aluminum anatomic (center), and tin-silver anatomic (right).
Polycarbonate
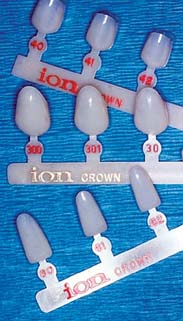
Polycarbonate (Fig. 15-17) has the most natural appearance of all the preformed materials. When properly selected and modified, it rivals in appearance a well-executed porcelain restoration. Although available in only a single shade, this can be modified to a limited extent by the shade of the lining resin. Polycarbonate ESFs are supplied in incisor, canine, and premolar tooth types.
Cellulose acetate
Cellulose acetate is a thin (0.2- to 0.3-mm) transparent material available in all tooth types and a range of sizes (see Fig. 15-16A). Shades are entirely dependent on the autopolymerizing resin. The resin does not chemically or mechanically bond to the inside surface of the shell; therefore, after polymerization, the shell is peeled off and discarded to prevent staining at the interface. Removing the shell has the disadvantage of necessitating the addition of resin to reestablish proximal contacts.
Aluminum and tin-silver
Aluminum (Fig. 15-18) and tin-silver are suitable for posterior teeth. The most elaborate crown forms have anatomically shaped occlusal and axial surfaces. The most basic and least expensive forms are merely cylindrical shells resembling a tin can (see Fig. 15-16B).
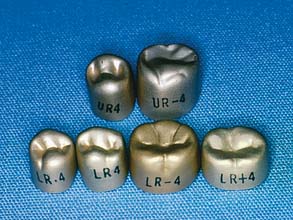
Fig. 15-18 Aluminum anatomic crowns. Available in a variety of sizes and shapes. The manufacturer has produced two maxillary and four mandibular shapes for the left and right side of the mouth, each in six sizes.
The nonanatomic cylindrical shells are inexpensive but require modification to achieve acceptable occlusal and axial surfaces. It is more efficient to use crowns that have been preformed as individual maxillary and mandibular posterior teeth. Care must also be taken to avoid fracturing the delicate cavosurface margin of the tooth preparation when a metal crown form is fitted. This is a greater risk if adaptation is carried out directly by having the patient forcefully occlude on the crown shell. The edge of the shell can engage the margin and fracture it under biting pressure. An even greater risk occurs when the crown has a constricted cervical contour. Tin-silver crowns are deliberately so designed (see Fig. 15-16B). This highly ductile alloy allows the crown cervix to be stretched to fit the tooth closely. Direct stretching on the tooth is practical only where feather edge margins are used. For other margin designs, cervical enlargement should be performed indirectly on a swaging block, which should be supplied with the crown kit.
Nickel-chromium
Nickel-chromium shells (Fig. 15-19) are used primarily for children with extensively damaged primary teeth. In that application, they are not lined with resin but are trimmed, adapted with contouring pliers, and luted with a high-strength cement. They may be applied to secondary teeth but are more suitable for primary teeth, where longevity is less critical. Nickel-chromium alloy is very hard and thus can be used for longer-term interim restorations.
Tissue Surface Form
There are two primary categories of TSFs: indirect and direct. A third category, indirect-direct, is the sequential application of these.
Indirect procedure
An impression is made of the prepared teeth and ridge tissue and is poured in quick-setting gypsum or polyvinyl siloxane.10 The interim restorations are fabricated outside the mouth. This technique has several advantages over the direct procedures:
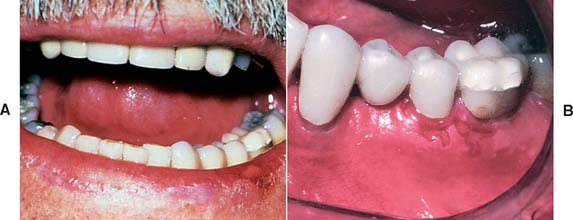
Fig. 15-20 Labial (A) and gingival (B) ulcerations after brief polymethyl methacrylate monomer exposure.
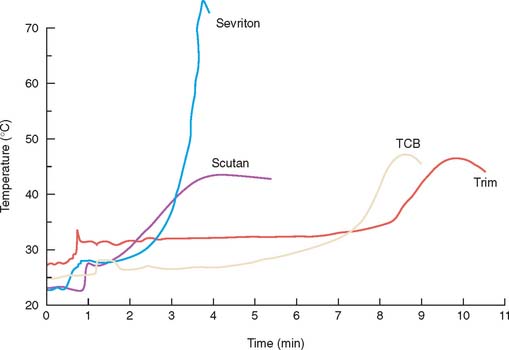
Fig. 15-21 Heat generated during resin polymerization. Under nonclinical experimental conditions, the temperature rises are severe. Sevriton (a polymethyl methacrylate resin) produced significantly higher temperatures than did the others represented. This is useful information for selecting resins to be used intraorally, although under clinical conditions the differences may be insignificant.
(Redrawn from Braden M, et al: A new temporary crown and bridge resin. Br Dent J 141:269, 1976.)
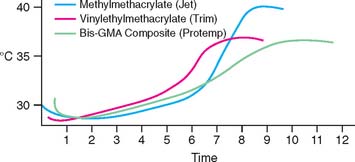
Fig. 15-22 These exotherms (time in minutes) are derived from a simulated clinical procedure for making a single crown with silicone putty as the ESF. A thermocouple probe in the pulp chamber of an extracted tooth was used to measure temperature changes. Initial readings reflect the cooling effect of room-temperature resin mixtures. For all three classes of resins tested, the temperatures did not exceed 35°C until more than 6 minutes had elapsed.
(Redrawn from Tjan AHL, et al: Temperature rise in the pulp chamber during fabrication of provisional crowns. J Prosthet Dent 62:622, 1989.)
Direct procedure
The patient’s prepared teeth and gingival tissues (in the case of a partial FDP) directly provide the TSF, and so the intermediate steps of the indirect technique are eliminated. This is convenient when assistant training and office laboratory facilities are inadequate for efficiently producing an indirect restoration. However, the direct technique has significant disadvantages: potential tissue trauma from the polymerizing resin and inherently poorer marginal fit. Therefore, the routine use of directly formed interim restorations is not recommended when indirect techniques are feasible.
Indirect-direct procedure
In this technique the indirect component produces a “custom-made preformed ESF” similar to a preformed polycarbonate crown. In most cases, the practitioner uses a custom ESF with an underprepared diagnostic cast as the TSF. The resulting mold forms a shell that, after tooth preparation, is lined with additional resin (the patient serving as the TSF). This last step is the direct component of the procedure. Another method of creating the shell eliminates the need for an indirect TSF. It is accomplished by painting monomer liquid into the ESF and carefully sprinkling or blowing resin powder on it. The thickness of the resin shell is difficult to control with this technique, however, and may result in the need for time-consuming corrective grinding.
The indirect-direct approach has these advantages:
However, even with the diagnostic cast method, adjustments are frequently needed to seat the shell completely on the prepared tooth. This is the chief disadvantage of the indirect-direct procedure.
Materials for Interim Fixed Restorations
While in a fluid state, the interim restorative materials fill the cavity formed by the external and TSFs; they then solidify, producing a rigid restoration.
Currently available materials
As yet, an ideal interim material has not been developed. A major problem still to be solved is dimensional change during solidification. These materials (Fig. 15-23) shrink and cause marginal discrepancy,20-22 especially when the direct technique is used (Fig. 15-24). Also, the resins currently employed are exothermic and not entirely biocompatible.
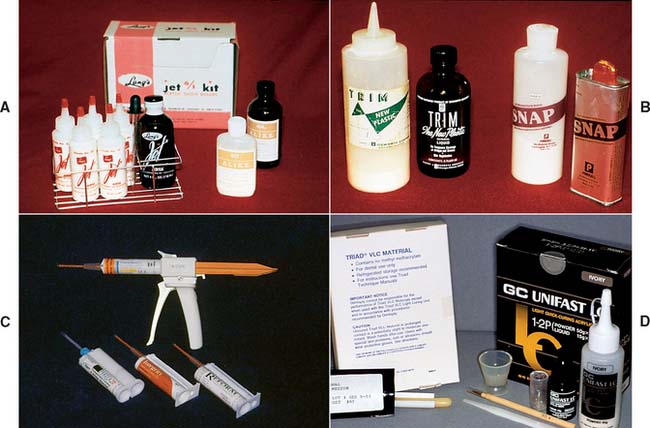
Fig. 15-23 Currently available interim materials. A, A poly(methyl methacrylate) resin. B, A poly(R′ methacrylate) resin. C, Microfilled composite resins with AutoMix delivery system. D, Light-cured resins: a microfilled urethane-dimethacrylate (left) and a light-cured polyethyl methacrylate.
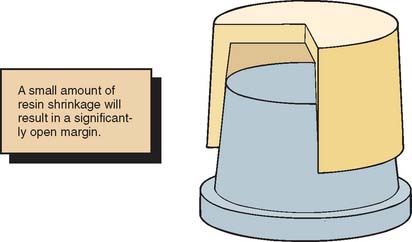
Fig. 15-24 With ideal axial wall convergence, a 2% reduction in crown diameter results in a comparatively high marginal discrepancy.
The materials can be divided into four resin groups:
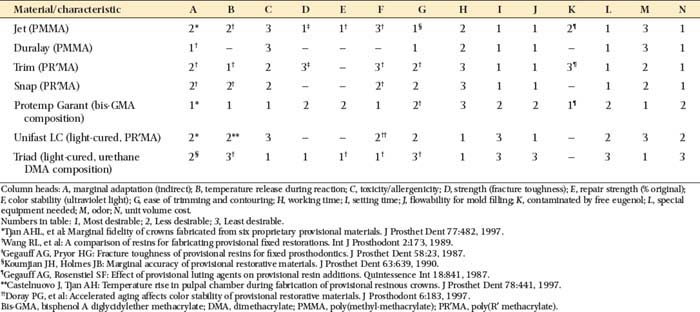
The properties of these resins are compared in Table 15-3. The overall performances of the groups are similar, with no material being superior in all categories. Choosing a material should be based on optimally satisfying the requirements or conditions crucial for the success of the treatment. For example, materials with the least toxicity and least polymerization shrinkage should be chosen for a direct technique. Alternatively, when a long-span prosthesis is being fabricated, high strength is an important selection criterion.
MATERIALS SCIENCE
The material used for fabrication of an interim restoration consists of pigments, monomers, filler, and an initiator, all combining to form an esthetic restorative substance. The pigments are incorporated by the manufacturer so that the set material appears as much like natural tooth structure as possible, with a variety of shades available. Although each of the other ingredients plays a role in the handling, setting, and final properties of the interim restoration, many important characteristics of the material are determined by the primary monomer. The ability of this monomer to convert to a polymer allows the material, after it has been formed as desired, to set into a solid that is durable enough to withstand the oral environment for the necessary interim period.
Depending on the brand, the most commonly used monomers are methyl methacrylate, ethyl methacrylate, isobutyl methacrylate, bisphenol A diglycidylether methacrylate (bis-GMA), and urethane dimethacrylate. Each of these, or combinations thereof, may be converted to a polymer by free radical polymerization, although the conversion process is never perfectly complete.
Free Radical Polymerization
The polymerization process invokes chemical, mechanical, dimensional, and thermal changes that affect the successful use of these materials in dentistry. Because monomers may be unpleasant or even harmful biologically, the chemical conversion of monomer to a biologically inert polymer is desirable. Also, if the polymerization process is not properly initiated or if it is prematurely terminated, the resultant restoration may not have adequate mechanical properties and may fail easily or quickly. However, because the density of the polymer is inherently and often substantially greater than that of the monomer, a dimensional contraction occurs during polymerization. The polymerization reaction is exothermic, which causes the material to become hot before it loses its fluidity, and so an additional contraction occurs on cooling of the restoration. If a direct technique is being used, the heat of reaction can cause irreversible damage to nearby pulpal tissues, which may already have been thermally insulted during cavity preparation.
Initiation
Free radical polymerization begins with the formation of a free radical, a process called activation, and the subsequent combination of this free radical with a monomer. Free radicals are formed by the decomposition of a chemical (the initiator), with the method of decomposition dependent on the nature of the initiator. Possible initiators include benzoyl peroxide and camphoroquinone.
Benzoyl peroxide decomposes to free radicals at approximately 50°C or higher in a process called thermal activation. Because the heating of some monomers to temperatures near 100°C can cause them to vaporize, with subsequent formation of porosity in the resultant polymer, excessive temperatures should be avoided during the early stages of thermal activation. Thermal activation results in greater contraction on cooling than is obtained with other activation methods and therefore is usually avoided for interim restorations.
Benzoyl peroxide also decomposes to free radicals when catalyzed by a tertiary amine, and this process is called chemical activation. Chemical activation occurs when the activator, initiator, and monomer are mixed together, and so these materials are usually supplied separately, the monomer and activator in one container and the initiator and filler in another. Proper mixing is necessary to prevent voids. Because chemical activation requires intimate contact of the chemical activator with the initiator, this activation method is not as efficient as thermal activation. Inefficient activation of the initiator results in more residual monomer and less color stability of the restoration, inasmuch as unreacted benzoyl peroxide can cause color changes. However, because benzoyl peroxide is decomposed by both thermal and chemical activation, increased temperature can enhance its decomposition in a chemically cured system and does not increase contraction if the restoration initially undergoes chemical setting. Heating a recently set restoration in 100°C water promotes greater polymerization efficiency and removes any unconverted monomer, which might cause a sensitivity reaction in a patient susceptible to monomer irritation.
Camphoroquinone decomposes to free radicals in the presence of both an aliphatic amine and blue light energy, and this process is called visible-light activation. Light-activated materials have two advantages: (1) the ingredients can be mixed by the manufacturer with little porosity, and (2) working time is infinitely long because no setting occurs if the material is kept in a dark environment. The limitation of this method is the depth to which visible light can penetrate (less for darker materials). Whenever possible, the activation illumination should be directed toward the center of the restoration from all surfaces. Also, for darker materials, the exposure time should be longer.
Propagation
After its onset, the polymerization process continues by including more monomer molecules in the growing molecular chain. It is important that the material be allowed to set undisturbed because, during this phase, defects can easily result if the material is jostled. During propagation, (1) the setting material undergoes an increase in density, causing contraction, (2) the exothermic heat of reaction may cause a substantial increase in temperature, with subsequent increased contraction, and (3) other physical properties (e.g., rigidity, strength, and resistance to dissolution) increase.
Termination
Because of the randomness of position of the growing chains, it is possible that some of them might combine and thereby terminate the growth process. This type of termination cannot be avoided, although it is desirable to have termination only after polymerization of all the monomer has occurred. Termination may also result from the reaction with eugenol, hydroquinone, or oxygen; therefore, contact with these substances must be avoided or at least minimized when possible.
Properties Associated with the Monomer
The various monomers exhibit different initial and setting characteristics and result in polymers with significantly different properties (i.e., viscosity before setting, exothermic heat of reaction, dimensional change on setting, and strength). In general, the greater the size of the monomer molecule, the less is the exothermic heat of reaction on setting and the lower the physical strength of the set mass. Properties of available materials are presented in Table 15-3.
Filler
Although the primary properties of an interim restorative material are determined by the monomer or monomers involved, a decrease in the less desirable setting and mechanical properties is accomplished mainly through the filler. An increase in filler content reduces the relative amounts of exothermic heat and contraction while increasing the strength of the set material. However, too much filler can lead to insufficient handling characteristics before setting, and this impedes mixing and shaping, as well as introduces porosity in the set restoration. For light-activated systems, the amount of filler is determined by the manufacturer; for the other systems, it is desirable to incorporate as much filler as possible without interfering in the handling or manipulation characteristics of the material.
PROCEDURES
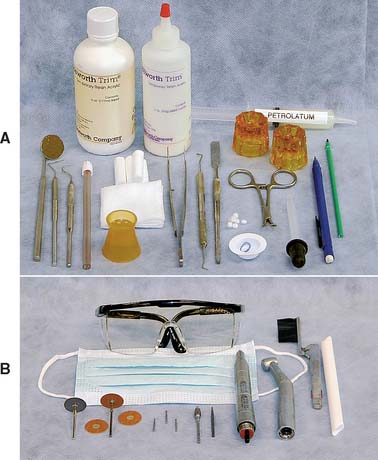
To minimize duplication, a basic clinical and a basic laboratory armamentarium are listed just once; they may be referred to as needed. As each procedure is discussed, only items necessary to augment the basic armamentarium are listed.
Custom Indirect Interim Partial Fixed Dental Prostheses
The custom indirect procedure is probably the best overall technique for partial FDPs and should provide the most predictable results with the least risk to patient health.
Step-by-step procedure
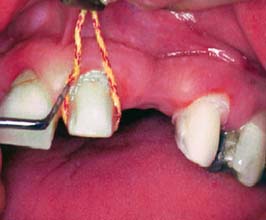
Fig. 15-27 Subgingival margins often require tissue displacement before an adequate impression can be made. Alginate in a disposable tray produces an economical and satisfactory impression. After treatment for infection control, the impression is poured in quick-set plaster to create the tissue surface form (TSF).
Step-by-step procedure
The setting of plaster can be accelerated by shaking dry powder with the water before mixing (1 tsp of powder in 30 mL water23). Alternatively, a commercially available quick-setting plaster may be used.
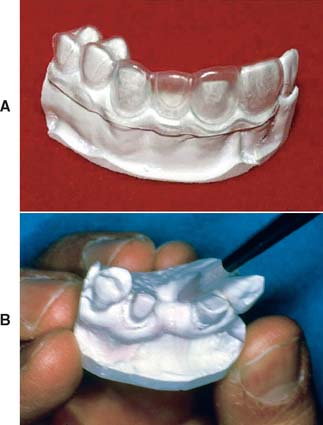
Fig. 15-28 A, After trimming, the indirect tissue surface form (TSF) is mated with the external surface form (ESF) to verify accurate passive indexing. B, With this accomplished, the forms are separated, and the TSF is completely coated with a resin-gypsum separating medium (brushed on).
Fig. 15-29 A polymer syringe with a widened orifice (2 mm diameter) is useful for filling the external surface form (ESF). To avoid entrapping air, it is best to begin at one end and progress slowly to the other, keeping the syringe tip in contact with the expressed resin.
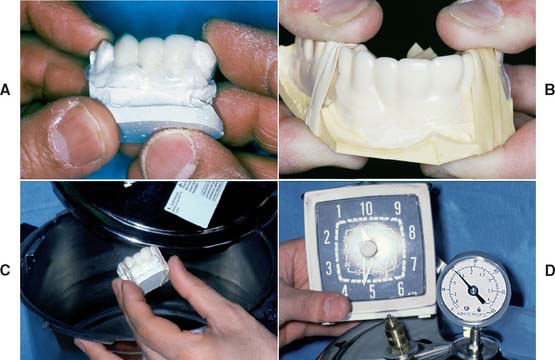
Fig. 15-30 A, The resin-filled external surface form placed on the tissue surface form. B, Rubber bands around the mold assembly and located over adjacent unprepared teeth. This avoids distorting the external surface form. C, The assembly being placed into a pressure vessel filled with warm water. D, The resin cures for 5 minutes under 0.15 MPa (20 psi) pressure.
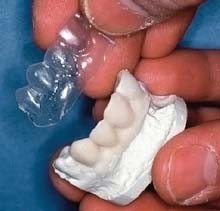
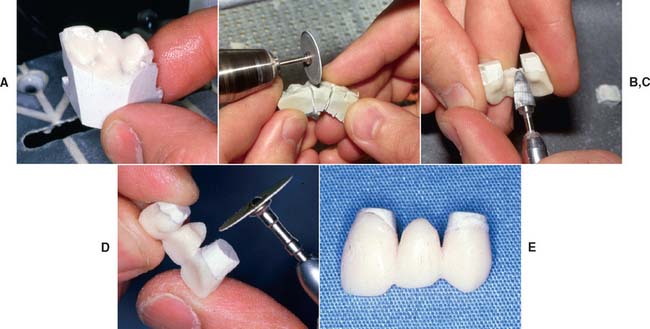
Fig. 15-32 Tissue surface form reduced to attain the final shape of the restoration. A, Bulk reduction on a cast trimmer. B, Sectioning and removal of pontic-contact areas with a carborundum disk. C, Linguogingival surface of the pontic shaped with a tapered bur. D, An abrasive disk (7/8-inch diameter, garnet) is excellent for creating proper embrasure form. It must be carefully oriented parallel to the desired contour so that overtrimming at the margins is avoided. E, The contoured restoration.
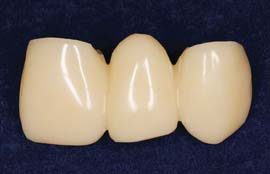
Evaluation
The interim partial FDP should be evaluated in the patient’s mouth for proximal contacts, contour, surface defects, marginal fit, and occlusion. Deficient proximal contacts, imperfections in contour, or surface defects can be corrected by adding resin through the bead-brush technique (Fig. 15-34; see Fig. 15-70).
Fig. 15-34 Proximal contact added by the bead-brush technique. When the resin reaches the doughy stage, the restoration is set on the prepared tooth to form the contact.

Fig. 15-70 Bead-brush technique for repairs. A, Monomer liquid is painted on the surface of the thoroughly cleaned restoration to which resin will be added. B, The brush is dipped in monomer and briefly touched to the powder, forming a small bead on the tip. C, The bead is touched to the repair site, and the brush handle is rolled to deposit it. Bead placement continues in this manner until the desired contour is achieved. To prevent excessive porosity, the unset resin should be painted lightly with monomer until hard.
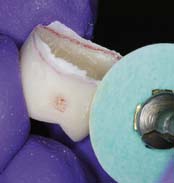
Unacceptable marginal fit can be corrected as for custom indirect-direct partial FDPs (p. 487, steps 3 to 9), provided that the patient has no history of allergy to monomer. If occlusal correction is needed, the restoration is marked with articulating ribbon and adjusted with a 12-fluted tungsten carbide finishing bur rotating at high speed with copious air-water spray to prevent the resin from melting (Fig. 15-35). Adequate intraoral evacuation and eye protection are essential.
Custom Indirect-Direct Interim Partial Fixed Dental Prostheses
The custom indirect-direct procedure may be a good compromise when laboratory support is not immediately available and chair time must be minimized.
Additions to laboratory armamentarium (Fig. 15-36)
Step-by-step procedure
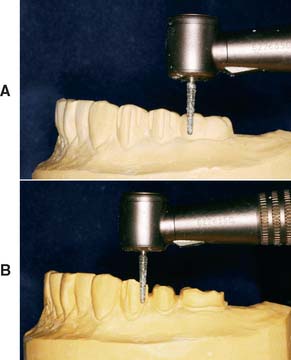
Fig. 15-37 Preparations involved in making the articulator-mounted diagnostic cast. A, Conservative depth-orientation grooves. B, Placement of supragingival cavosurface margins.
Fig. 15-38 The prepared cast is duplicated by means of an alginate impression. This creates the indirect tissue surface form. Quick-set plaster is used.
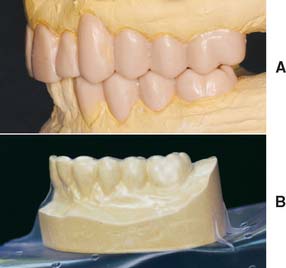
Fig. 15-39 Creating a custom external surface form (ESF) from a diagnostic waxing. A, The diagnostically waxed articulated casts. Patterns should satisfy biologic, mechanical, and esthetic requirements. B, If a thermoplastic ESF is desired, the completed waxing must be duplicated in stone.

Step-by-step procedure
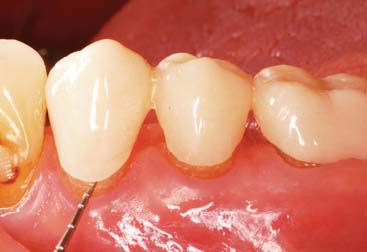
Fig. 15-42 The custom-preformed external surface form (ESF) fully seated over the prepared teeth. Note the marginal discrepancy on each abutment. The tip of the periodontal probe easily fits into the space, which will be filled by a direct lining procedure.
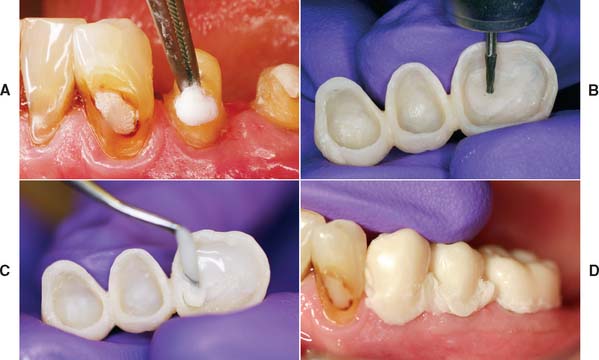
Fig. 15-43 Lining the custom-preformed external surface form (ESF). This is the direct component of the indirect-direct technique. A, Oral tissues are protected with petrolatum. B, Vent holes help to eliminate trapped air. C, Abutment retainers filled with lining resin. D, The restoration completely seated. (The amount of resin at the margins is controlled by covering or uncovering the vent holes.)
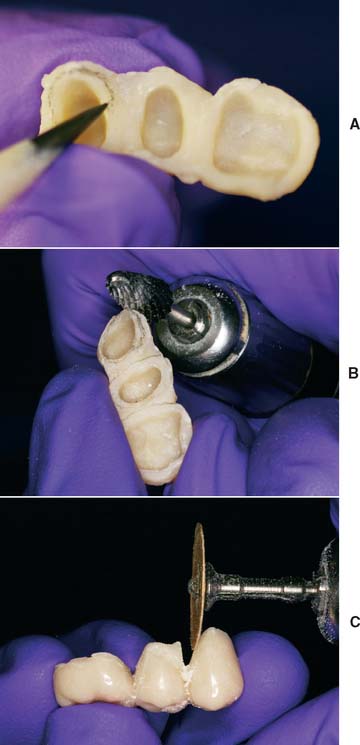
Fig. 15-44 Removal of excess after the lining resin hardens. A, Margins marked with a sharp soft lead pencil. B, Gross resin excess is quickly removed. (Margins must be avoided.) C, The final axial contours, connectors, and marginal fit are perfected with an abrasive disk rotating toward the margin to prevent debris from obscuring the pencil line. Note the orientation of the disk, parallel to the desired final contour.
Accurate trimming to the margins can be simplified by holding the disk parallel to the desired final contour. A paper-thin extension remaining beyond the marked margin is an indication that the contour is correct and the cavosurface margin fully covered. Often this flash can be easily peeled away from the margin with the fingers (Fig. 15-45).
Custom Single-Unit Interim Restorations
Complete crowns
Single-unit complete crowns or splinted crowns may be made directly or indirectly in accordance with the basic procedures described for partial FPDs. Because pontics are not involved, creating an ESF is simpler. Diagnostic procedures are not required unless extensive coronal changes are planned. For example, extensive changes are usually required when the occlusal vertical dimension is increased. If diagnostic procedures are not needed, an alginate impression of the crown or crowns before tooth preparation should be adequate to serve directly as the ESF or indirectly when a cast has been poured in another impression material.
Onlays and partial veneer crowns
The technique for making onlay and partial veneer interim restorations is similar to that for making custom single crowns. However, the interim restorations are more easily distorted during handling because of the conservative tooth preparations that interrupt the continuity of the axial walls. Thus, the direct method mandates extra care in separating the resin from the tooth. Significantly better results can be expected with the indirect procedure.
Two other points merit mention. When the polymerized resin is trimmed to the margin, it is advisable to leave an excess of resin at the occlusal cavosurface margin (see Fig. 15-9). This helps prevent fracture of enamel, which is likely to result from the lesser strength of resin in comparison with metal. Second, if lining is needed, an occlusal vent hole is not necessary because the shape of these restorations provides an adequate escape way for trapped air and excess resin.
Inlays
Inlays present the problem of being small and difficult to handle, especially during trimming. Making interim restorations requires a number of modifications.
Step-by-step procedure
Laminate Veneers
Step-by-step procedure
If the material is difficult to control, placement and curing may be accomplished in stages.
It is also possible to form the veneers indirectly by creating a TSF and an ESF, as was recommended for the partial FDP interim restoration. The indirect method may be more efficient if multiple veneers are being made.
Mass-Produced ESF Interim Crowns
Under most circumstances, a custom ESF yields the best results in the shortest time. However, there are instances when a custom ESF is not readily available: for example, a first-visit emergency in which a crown is missing and must be replaced. If by coincidence a crown form closely matches the size and shape of the desired interim restoration, the mass-produced form is more convenient than initiating custom procedures (generating a diagnostic cast and waxing the missing crown contours). Such coincidences, however, are not routine and should not be relied upon. Whatever the situation, the dentist should think of mass-produced interim crowns as ESFs; they need to be lined with resin to meet the basic requirements of a interim restoration.
Polycarbonate Crown Forms
Polycarbonate crown forms are useful for making interim restorations on single anterior teeth and premolars.
Step-by-step procedure
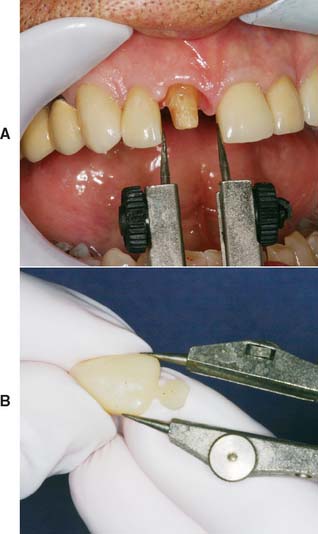
Fig. 15-48 Crown selection. A, Measuring the mesiodistal width of the space with dividers. B, Appropriate crown size for the measured space.
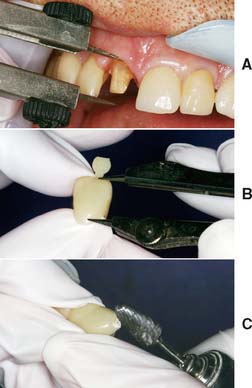
Fig. 15-49 Crown length adjustment. A, Incisocervical height required for the completed restoration. B, Measurement transferred to the crown. C, Cervical portion of the crown adjusted to duplicate the curvature of the cavosurface margin.
Fig. 15-50 A, Cervical portion of the crown trimmed until the length and axial inclination are correct. B, If necessary, internal surfaces are adjusted for proper orientation of the crown.

Fig. 15-51 Lining the adjusted shell. A, Protection with petrolatum. The shell is filled with resin (B) and is seated (C) when the resin does not slump after a peak is formed with the tip of an explorer. D, Excess resin is immediately removed after the crown has been positioned.
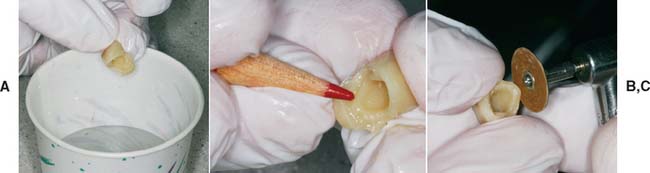
Fig. 15-52 A, When the resin has reached the rubbery stage, the crown is removed and placed in warm water (37°C). Hot water must not be used, because it increases resin shrinkage. However, warm water is not recommended for polymethyl methacrylate resin, because excessive shrinkage makes the marginal fit unacceptable. B, After about 5 minutes in warm water, the resin should be rigid enough for marking the margins. C, Initial removal of the excess lining resin is accomplished with a coarse garnet disk.
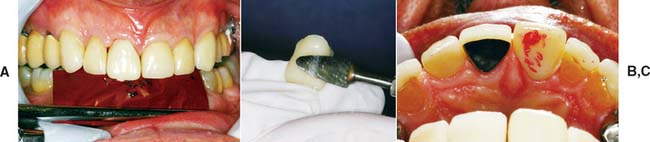
Fig. 15-53 A, A considerable amount of lingual reduction may be called for. If it is only minor, it can be accomplished intraorally. B, To increase efficiency and ensure patient comfort, any bulk reduction should be accomplished extraorally. C, Finalized lingual contour that promotes gingival health and allows access for oral hygiene. Note the more natural contour of the left central incisor than that of the interim crown on the right central incisor.
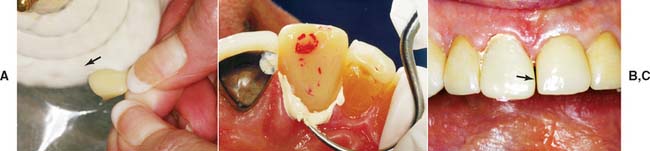
Fig. 15-54 A, A rag wheel and pumice are used before polishing with compound. Note the parallel orientation of the wheel to the crown’s axial surface at the point of contact (arrow). The crown should be positioned so that the wheel rotates from the surface toward the margin. B, An explorer and dental floss are used to carefully remove all excess luting agent. C, Overpolishing results in a deficient mesial contact (arrow). The bead-brush technique is recommended for correcting a small inadequacy.
Aluminum Crown Forms
Aluminum shells are useful for restoring single posterior teeth, where their unnatural appearance is not a disadvantage.
Additions to clinical armamentarium (Fig. 15-55)
Step-by-step procedure
Fig. 15-56 Aluminum crown selection and modification. A, Mesiodistal dimension of the space. B, Appropriate crown size, nearest this measurement. C, Contouring pliers to make small size modifications. This is frequently unnecessary.
Fig. 15-57 A, Cervical portion of the crown trimmed to proper length. B, Smoothing the cut edge to prevent gingival injury.
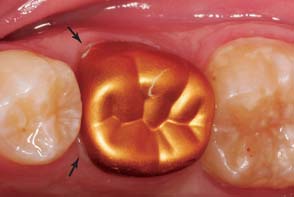
Fig. 15-58 The patient is instructed to bite on the shell after the length has been adjusted. Note the occlusal indentation and gingival blanching (arrows). Additional shortening should be done where the blanching occurs.
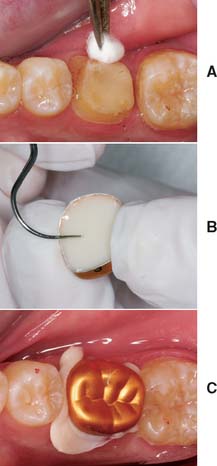
Fig. 15-59 A, Protection with petrolatum. B, The adjusted shell is filled with lining resin and seated to just short of its final position after the resin has lost its sheen. C, The final position is determined by the patient’s closing into maximum intercuspation. Excess resin is immediately removed.
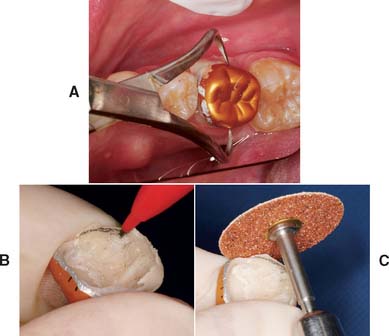
Fig. 15-60 A, Backhaus forceps provides definite purchase of the shell for controlled removal. B, After 5 minutes in warm water, the margin is marked with a pencil. C, A coarse garnet disk is recommended for initial contouring of the axial surfaces. This usually necessitates partially removing the aluminum. After the overcontoured aluminum has been ground away, a fine garnet disk is used to finalize the axial contours (including the marginal areas). Again, disk orientation is important to establishing a straight emergence profile and well-adapted margins.
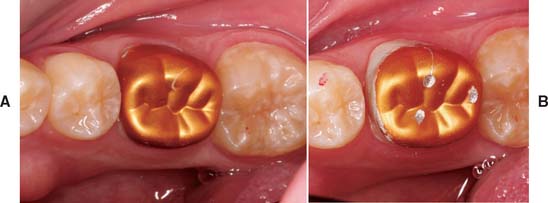
Fig. 15-61 A, Proper contouring of the axial walls exposes lining resin in the cervical area. Note the indentations in the shell from the Backhaus forceps. B, Final occlusal adjustment removes the anodized gold finish, but this is of no concern.
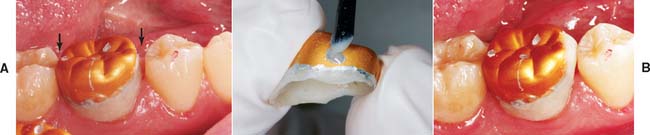
Fig. 15-62 Adding proximal contacts to aluminum crowns. A, Contacts absent in this lined crown (arrows). B, The metal in the contact area is ground away to expose the underlying resin. The bead-brush technique is then used for correcting the deficiency. C, Crown after resin addition to the mesial surface. Further contouring with a disk is recommended to improve the gingival embrasure form.
Post and Core Interim Restorations
Intraradicular retention and support are often obtained from a cast metal post and core (see Chapter 12). A interim restoration is needed while the casting is being made.
Step-by-step procedure
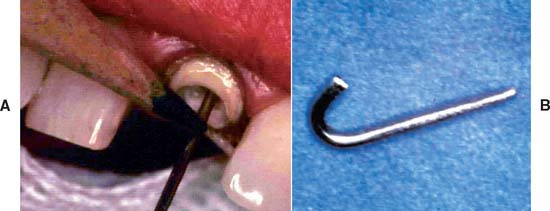
Fig. 15-63 Interim post preparation. A, Wire marked so that the bend is made at the correct level. When in position, the wire must not interfere with the external surface form. B, A 180-degree or greater bend in the wire to resist displacement in the lining resin.
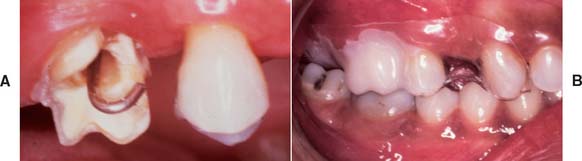
Fig. 15-64 A, Wire in the post space just before placement of the filled external surface form (ESF). A gauze throat pack is recommended to protect the patient from aspirating or swallowing the wire. B, Filled ESF seated.
Precautions must be taken to protect the patient from swallowing or aspirating the wire.
Cementation
The primary function of the interim luting agent is to provide a seal, preventing marginal leakage and hence pulp irritation. The luting agent should not be relied upon to resist occlusal forces, inasmuch as it is purposely formulated to have low strength. Unintentional displacement of an interim restoration is frequently caused by a nonretentive tooth preparation or excessive cement space rather than the choice of luting agent.
Available materials
Of the currently available materials (Fig. 15-66), zinc oxide–eugenol (ZOE) cements appear to be the most satisfactory. Zinc phosphate, zinc polycarboxylate, and glass ionomer cements are not recommended because their comparatively high strength makes intentional removal difficult. Using high-strength cements frequently damages the restoration or even the tooth when removal is attempted and can make seating of the definitive restoration difficult. Weaker ZOE cements provide for easy removal, allowing the restoration to be reused when additional service is needed. ZOE also has an obtundent effect on the pulp in addition to its acceptable sealing properties.24 Unfortunately, however, free eugenol acts as a plasticizer of methacrylate resins. It has been shown to reduce surface hardness25 and presumably strength. New resin applied over polymerized resin previously in contact with free eugenol results in softening26 of the added resin, making linings or repairs unsuccessful. The R′ methacrylates are severely affected by free eugenol. Methyl methacrylates are affected moderately, and the composites are only slightly softened. These adverse effects have stimulated the marketing of interim luting agents without eugenol, but in the studies cited, the mere presence of eugenol in a cement was not enough to cause adverse effects. It appears that unreacted or free eugenol must be present to cause problems. Therefore, when using products that contain eugenol, the dentist must be sure that the correct proportions are blended. Whether free eugenol is necessary to provide an obtundent effect on the pulp remains a question.
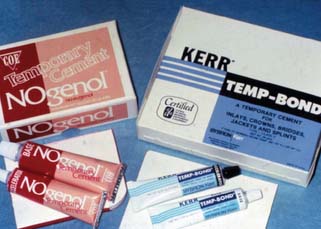
In situations in which the tooth preparation lacks retention, a span is great or long-term use is anticipated, or parafunction exists, it may be desirable to use a higher strength cement. A good compromise would be reinforced ZOE; another might be eugenol-free zinc oxide, which has slightly greater strength than cements containing eugenol.27 Conversely, sometimes minimum strength is desired, as with temporary placement of the definitive restoration. (Its removal may be needed to refire the porcelain.) Petrolatum can be mixed with equal parts of the interim cement base and catalyst to reduce the cement’s strength by more than half. When the definitive cement planned is a resin luting agent, non-eugenol cements are recommended for the interim restoration because of the adverse effect of eugenol on bond strength.
Armamentarium (Fig. 15-67)
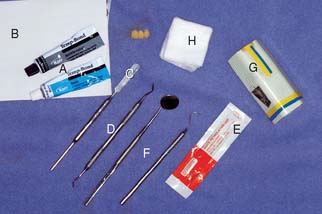
Step-by-step procedure
Most interim luting agents are supplied as a two-part system (Fig. 15-68).
Fig. 15-68 Luting procedure. A, The external surface is lightly coated with petrolatum to aid removal of the set luting agent. B, Careful placement of the luting agent seals the margins and reduces the clean-up effort. C, The restoration is seated with firm finger pressure, or (for posterior restorations) the patient may bite on a cotton roll. D and E, An explorer is used to remove excess and to probe the sulcus gently for remnants. F, The proximal contact areas and sulcus are cleaned with dental floss (a knot will help remove excess cement), followed by copious irrigation with the air-water syringe.
Cement remnants left in the sulcus have an irritating effect on the gingiva and may cause severe periodontal inflammation with possible bone loss. Therefore, the sulcus must be carefully checked and irrigated with the air-water syringe.
Removal, Recementation, and Repair
Armamentarium
The interim restoration is removed when the patient returns for placement of the definitive restoration or for continued preparation. Fracture of the prepared tooth or foundation must be avoided. Risk of this can be minimized if removal forces are directed parallel to the long axis of the preparation. The Backhaus or a hemostatic forceps is effective for obtaining sound purchase on a single unit (Fig. 15-69). A slight buccolingual rocking motion helps break the cement seal.
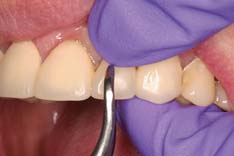
Fig. 15-69 Backhaus towel clamp forceps provide positive purchase on interim restorations. For maximum control, occlusal finger pressure is applied directly to the tines.
Damage can occur when an FDP is being removed. If one abutment retainer suddenly breaks loose, the other can be subjected to severe flexure stresses when the FDP acts as a lever arm. Care must be exercised to remove the prosthesis along the path of placement. Sometimes it is helpful to loop dental floss under the connector at each end of the FDP.
Step-by-step procedure
A fractured or damaged interim restoration can be easily repaired with resin, added directly by using the bead-brush technique (Fig. 15-70).
Esthetic Enhancement
Contour, color, translucency, and texture are the key elements of coronal appearance. Contour and color are fundamental and more important than the other two elements. The indirect partial FDP procedure just described includes methods for controlling contour and color.
Contour
Diagnostic waxing provides the ultimate control of contour, and using a shade guide before tooth preparation gives the operator some control of color. If contour and color are well controlled, most interim restorations are very acceptable to excellent in appearance. Routinely achieving this requires attention to detail and skill. Although listed third, translucency can be a significant appearance element for patients with unabraded teeth.
Color
Whereas some resin manufacturers use only general color descriptors (light, medium, dark) for their products, most cross-reference their colors to popular shade guides for porcelain or denture teeth. However, even when cross-referenced, manufacturer and material differences make shade matching inaccurate. Better control of color is obtained by using a custom shade guide. This can be easily made by casting the resins into an elastomeric putty mold of an extracted incisor crown. Combining two or more existing hues in known proportions can create a wider selection of shades, or resin-coloring tints are an option.
Custom color effects that simulate intrinsic and extrinsic stains, cracks, or hypocalcification of adjacent teeth may be added to interim restorations with the help of paint-on stain kits (Fig. 15-71). These are best applied quickly, and overmanipulation should be avoided because it causes streaking and surface roughness. Under optimum conditions, the surface should have a glazed appearance similar to that of porcelain. Thickening of stains as a result of the evaporation of solvent is a common problem hampering manipulation. Another problem with the paint-on colorants is their poor resistance to abrasion. Loss of the pigments in high-abrasion areas produces an unattractive mottled effect.
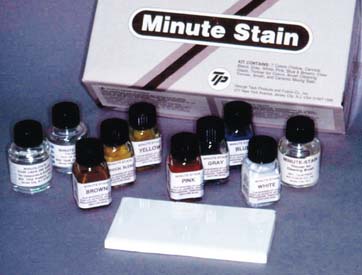
Fig. 15-71 This interim stain kit contains violet, blue, yellow, orange, brown, white, and gray paint-on colorants to create custom effects and a clear material used to form a glazed translucent surface. The liquids are formulated to dry quickly, which requires that they be kept covered until immediately before use. A thinner and brush cleaner are provided.
Translucency
Coronal translucency is determined by the type and amount of enamel present. At the incisal edge of an unworn anterior tooth where there is no dentin in the light path, that region often takes on a blue or gray hue, which comes about from the dark oral cavity. This effect is most pronounced with enamel that scatters very little light as a result of the absence of pigments or opacifying mineralization (e.g., fluorosis). Although less obvious, the translucent appearance of enamel is observable over the entire incisal or occlusal third of the crown. Thus, when it is readily visible in adjacent teeth or when a more realistic appearance is desired, translucency can be simulated in the interim. The procedure requires two resins, one colored to match the body and one to match the enamel of the tooth. Some manufacturers produce enamel or incisal shades that may be used without modification. When these are not available or when variation is needed, clear resin powder may be mixed with a smaller fraction of the “body” powder to produce the desired translucency.
Two procedures can be followed to create a translucent effect. In the first, which is more difficult to control, the enamel color resin is carefully bead-brushed onto the occlusal or incisal surface of the ESF and tapered to end at the middle or cervical third. The tendency to flow where it is not wanted is controlled in part by the orientation of the ESF with regard to gravity and in part by manipulation with the brush tip. When the desired distribution of enamel color resin is achieved, a disposable syringe is loaded with body color resin and the ESF is immediately filled, to avoid disruption of the enamel color resin. The TSF is then positioned in the ESF, and normal procedures are followed (Fig. 15-72).
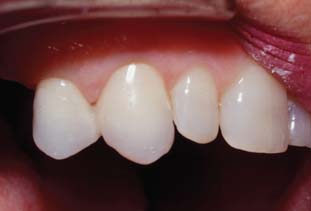
Fig. 15-72 The layering of translucent resin and dentin-shaded resin allows a more realistic appearance of the premolar and canine interim restorations. They serve as removable dental prosthesis (RDP) abutments and are splinted together to help resist dislodgment.
In the second procedure, the enamel color resin is allowed to polymerize on the ESF without adding body color resin or the TSF. The rigid enamel veneer is removed from the ESF and trimmed to occupy only the space intended for enamel. It is important to check that the ESF and TSF can be mated without interference from the in-place veneer. With the veneer in place, monomer liquid is painted on it and the body color resin is added. The TSF is then inserted, and standard procedures are followed for the remainder of the restoration. The timing for this procedure is less crucial than for the first one described and may be better suited to practitioners with less experience. A disadvantage is that sometimes there is a more obvious demarcation between the enamel and the body resins.
Texture
With practice, texture effects require only a small amount of time, but in some cases they contribute significantly to the overall appearance of the interim restoration. These effects are most important for maxillary anterior teeth adjacent to teeth with well-defined lobes, imbrication lines, or developmental defects.
Developmental lobes are best simulated in wax during the final stage of the diagnostic waxing. To produce a natural effect, it is crucial to avoid making grooves that are straight or sharp edged or have uniform cross-sections. Rather, the simulation should have a gentle crescent shape, with softening of the edges and slight varying of the cross-section by burnishing with the largest diameter waxing wire. If a polypropylene sheet is used to form the ESF, these subtle details can be reproduced in the resin.
Placement of developmental defects is best accomplished in the resin just before pumice and rag wheel finishing. Depending on their size and definition, these features may be made with a sharp-edged inverted-cone green stone rotating parallel to the occlusal plane and touched briefly to the resin. Often the defects are most noticeable in the cervical third of the tooth, but an adjacent tooth is the best guide for determining their distribution.
Imbrication lines may be simulated with a coarse diamond rotary instrument rotating slowly and moved across the facial surface from proximal to proximal. This reduces the surface reflectance of the resin after it is finished and polished. However, as with all texture effects, overfinishing obliterates these lines. Care must be taken to monitor the finishing by rinsing pumice from the surface and drying it. A completely smooth and highly polished interim restoration may be excellent for plaque control but not esthetically compatible with the adjacent teeth. The debate as to which is more important can probably best be settled by consulting with the patient to determine his or her needs.
SUMMARY
Although interim restorations are usually intended for short-term use and then discarded, they can be made to provide pleasing esthetics, adequate support, and good protection for teeth while maintaining periodontal health. They may be fabricated in the dental office from any of several commercially available materials and by a number of practical methods. The success of fixed prosthodontics often depends on the care with which the interim restoration is designed and fabricated.
 GLOSSARY*
ac·cel·er·a·tor \ăk-s l′a-rā′ter\ n (1611): 1: a substance that speeds a chemical reaction 2: in physiology, a nerve, muscle, or substance that quickens movement or response
acrylic resin \a-kr l′k rz′n\: 1: pertaining to polymers of acrylic acid, methacrylic acid, or acrylonitrile; for example, acrylic fibers or acrylic resins 2: any of a group of thermoplastic resins made by polymerizing esters of acrylic or methylmethacrylate acids
ac·ti·va·tor \ăk′t-vā′ tôr\ n: a removable orthodontic device intended to stimulate perioral muscles
au·to·poly·mer \ô′toō-p l′a-mer\ n: a material that polymerizes by chemical reaction without external heat as a result of the addition of an activator and a catalyst—au·to·poly·mer·i·za·tion \ô′toō-pl′a-mr-zā′shun\ vb
autopolymerizing resin \ô′toō-pl-a-mr-ıō′zing rz′n\: a resin whose polymerization is initiated by a chemical activator
bench set \bnch st\: a stage of resin processing that allows a chemical reaction to occur under the conditions present in the ambient environment; also used to describe the continuing polymerization of impression materials beyond the manufacture’s stated set time
1fes·toon \f-stoōoōn\ n (1630): 1: any decorative chain or strip hanging between two points 2: in dentistry, carvings in the base material of a denture that simulate the contours of the natural tissues that are being replaced by the denture
2fes·toon\ f-stoōoōn\vt (1800): to shape into festoons
hy·per·tro·phy \hıō-pûr′tra-feō\ n (1834): an enlargement or overgrowth of an organ or tissue beyond that considered normal as a result of an increase in the size of its constituent cells and in the absence of tumor formation
methyl methacrylate resin \mth′al mth-ăk′ra-lāt rz′n\: a transparent, thermoplastic acrylic resin that is used in dentistry by mixing liquid methyl methacrylate monomer with the polymer powder. The resultant mixture forms a pliable plastic termed a dough, which is packed into a mold prior to initiation of polymerization
ob·tun·dent \b-tŭn′dant\ n: an agent or remedy that lessens or relieves pain or sensibility
pho·to·ac·tive \foō′toō-ăk′tv\ adj: reacting chemically to visible light or ultraviolet radiation—pho·to·ac·ti·va·tion
1pum·ice \pŭm′s\ n (15th cent.): 1: a type of volcanic glass used as an abrasive. It is prepared in various grits and used for finishing and polishing 2: a polishing agent, in powdered form, used for natural teeth and fixed and removable restorations
res·in \rz′n\ n (14c): 1: any of various solid or semisolid amorphous natural organic substances that usually are transparent or translucent and brown to yellow; usually formed in plant secretions; are soluble in organic solvents but not water; are used chiefly in varnishes, inks, plastics, and medicine; and are found in many dental impression materials 2: a broad term used to describe natural or synthetic substances that form plastic materials after polymerization. They are named according to their chemical composition, physical structure, and means for activation of polymerization—see AUTOPOLYMERIZING R., COPOLYMER R.
resin crown \rz′n kroun\: a resin restoration that restores a clinical crown without a metal substructure
1spat·u·late \spăch′a-lt\ adj (1760): shaped like a spatula
2spat·u·late \spăch′a-lt\ vt -ed/-ing/-s: to work or treat with a spatula
ther·mo·plas·tic \thûr′ma-plăs′tk\ adj (1883): a characteristic or property of a material that allows it to be softened by the application of heat and return to the hardened state on cooling—ther·mo·plas·tic·i·ty n
tin·foil \tn′foil′\ n (15c): 1: paper thin metal sheeting usually of a tin-lead alloy or aluminum (a misnomer) 2: a base-metal foil used as a separating material between the cast and denture base material during flasking and polymerizing
STUDY QUESTIONS
1 Seltzer S, Bender IB. The Dental Pulp; Biologic Considerations in Dental Procedures, ed 3, Philadelphia: Lippincott; 1984:191.
2 Seltzer S, Bender IB. The Dental Pulp; Biologic Considerations in Dental Procedures, ed 3, Philadelphia: Lippincott; 1984:267-272.
3 Larato DC. The effect of crown margin extension on gingival inflammation. J South Calif Dent Assoc. 1969;37:476.
4 Waerhaug J. Tissue reactions around artificial crowns. J Periodontol. 1953;24:172.
5 Phillips RW. Skinner’s Science of Dental Materials, 8th ed., Philadelphia: WB Saunders; 1982:221. 376
6 El-Ebrashi MK, et al. Experimental stress analysis of dental restorations. VII. Structural design and stress analysis of fixed partial dentures. J Prosthet Dent. 1970;23:177.
7 Koumjian JH, et al. Color stability of provisional materials in vivo. J Prosthet Dent. 1991;65:740.
8 Preston JD. A systematic approach to the control of esthetic form. J Prosthet Dent. 1976;35:393.
9 Moskowitz ME, et al. Using irreversible hydrocolloid to evaluate preparations and fabricate temporary immediate provisional restorations. J Prosthet Dent. 1984;51:330.
10 Roberts DB. Flexible casts used in making indirect interim restorations. J Prosthet Dent. 1992;68:372.
11 Hensten-Pettersen A, Helgeland K. Sensitivity of different human cell lines in the biologic evaluation of dental resin-based restorative materials. Scand J Dent Res. 1981;89:102.
12 Munksgaard EC. Toxicology versus allergy in restorative dentistry. Adv Dent Res. 1992;6:17.
13 Dahl BL. Tissue hypersensitivity to dental materials. J Oral Rehabil. 1978;5:117.
14 Weaver RE, Goebel WM. Reactions to acrylic resin dental prostheses. J Prosthet Dent. 1980;43:138.
15 Giunta J, Zablotsky N. Allergic stomatitis caused by self-polymerizing resin. Oral Surg. 1976;41:631.
16 Spealman CR, et al. Monomeric methyl methacrylate: studies on toxicity. Industrial Med. 1945;14:292.
17 Moulding MB, Teplitsky PE. Intrapulpal temperature during direct fabrication of provisional restorations. Int J Prosthodont. 1990;3:299.
18 Tjan AHL, et al. Temperature rise in the pulp chamber during fabrication of provisional crowns. J Prosthet Dent. 1989;62:622.
19 Zach L, Cohen G. Pulpal response to externally applied heat. Oral Surg. 1965;19:515.
20 Crispin BJ, et al. The marginal accuracy of treatment restorations: a comparative analysis. J Prosthet Dent. 1980;44:283.
21 Monday JJL, Blais D. Marginal adaptation of provisional acrylic resin crowns. J Prosthet Dent. 1985;54:194.
22 Robinson FB, Hovijitra S. Marginal fit of direct temporary crowns. J Prosthet Dent. 1982;47:390.
23 Von Fraunhofer JA, Spiers RR. Accelerated setting of dental stone. J Prosthet Dent. 1983;49:859.
24 Pashley EL, et al. The sealing properties of temporary filling materials. J Prosthet Dent. 1988;60:292.
25 Rosenstiel SF, Gegauff AG. Effect of provisional cementing agents on provisional resins. J Prosthet Dent. 1988;59:29.
26 Gegauff AG, Rosenstiel SF. Effect of provisional luting agents on provisional resin additions. Quintessence Int. 1987;18:841.
27 Olin PS, et al. Retentive strength of six temporary dental cements. Quintessence Int. 1990;21:197.