CHAPTER 9 Ergonomics
PRINCIPLES OF ERGONOMICS
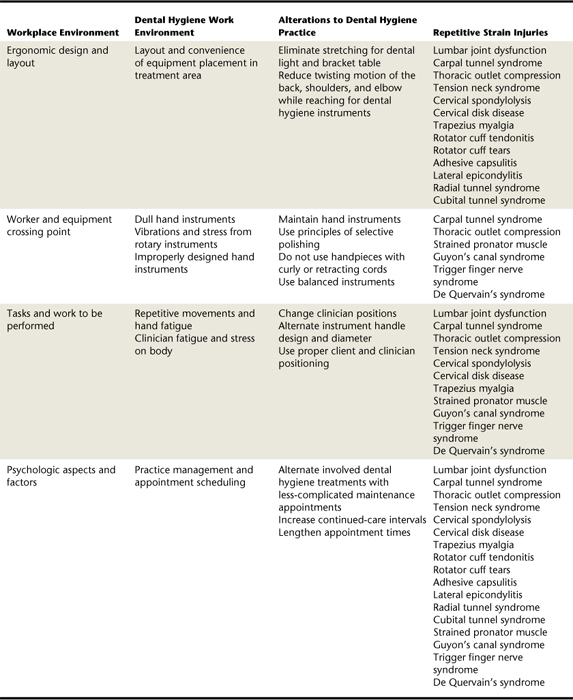
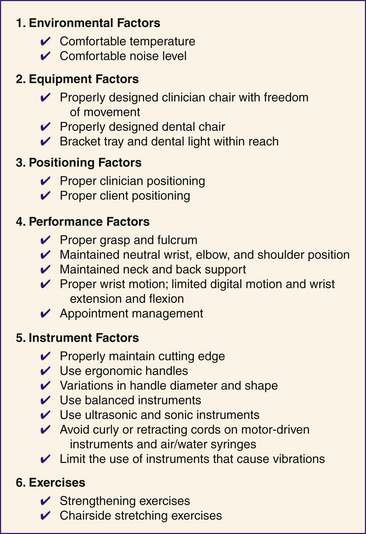
Ergonomics is the study of human performance and workplace design (Figure 9-1). Ergonomists focus on a wide spectrum of workplace situations ranging from physical aspects of the environment to psychologic threats to health (Table 9-1). Dental hygienists are at risk for repetitive strain injuries (RSIs), musculoskeletal disorders involving the tendons, tendons sheaths, muscles, and nerves of hands, wrists, arms, elbows, shoulders, neck, and back. When ergonomic principles are applied, a dental hygienist can practice comfortably and avert disability.1,2 When ergonomic principles are ignored, RSIs may occur. Minimizing occupational risks increases the likelihood of long-range health and wellness for the practitioner (Figure 9-2).

Environmental Factors
Flexibility of muscles and tendons, important for reducing the occurrence of RSI, is accomplished through physical exercise (discussed later in the chapter) and comfortable room temperatures. Cold room temperature is related to less relaxed, less flexible muscles and tendons. Stress and strain of stiff muscles and tendons lead to RSI. Relaxed atmospheres with minimal background noise contribute to a positive psychologic state for clinician and clients.3
Equipment Factors (see Chapter 6)
Dental Unit
The treatment area consists of the dental unit and chair, the dental light, and the clinician’s chair. The dental chair, a contoured chair for the client during dental care, supports the client’s head, torso, and feet. The dental chair also provides for easy maneuvering of the client via an articulating headrest and foot and side power controls (Table 9-2). The dental light transmits illumination to maximize the clinician’s view of the client’s oral cavity. The dental unit contains essential treatment equipment such as the handpiece lines, water lines, self-contained water source, air and water syringe, evacuation lines, and instrument tray(s). A cuspidor, cup filler, and liquid crystal display (LCD) monitor also may be part of the dental unit (Table 9-3).
| Equipment | Description and Use |
|---|---|
| Contoured seat | The seat should provide comfort to a variety of clients (e.g., children, elderly) during treatment. |
| Lumbar support | A contoured design gives additional support to the torso and lumbar region. |
| Arm rests | These should support the client’s arms comfortably and pivot for easy entering or leaving the dental chair. |
| Foot or side power controls | |
| 360-degree rotation lever or foot control | Allows the dental chair to be rotated 360 degrees. This is beneficial when the dental chair must be moved to provide access for wheelchair-bound clients. This equipment also benefits the left-handed clinician, allowing adjustment of the dental chair for proper clinician and client positioning. |
| Low base | This allows the dental chair to be placed closer to the floor, enabling the clinician to extend his or her arms when upper arm and body strength are needed during dental care. |
TABLE 9-3 Dental Unit: A-dec 500 Dental Unit and Client Chair
| Equipment | Description and Use | |
|---|---|---|
| Dental chair (A) | Chair to support client during professional care | |
| Hand piece lines (B) | Attach the motor-driven handpiece from the power source to the dental unit; lines are electrical and air compressed | |
| Water lines (hidden in diagram) | Lines bring water to various parts of the dental unit including high-speed handpiece, three-way syringe, and cup filler |
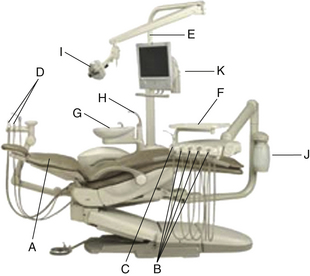 |
| Three-way syringe (C) | Hand-held instrument attached to the dental unit provides air, water, or a combination of air and water; inserted in three-way syringe is an autoclavable or disposable tip | |
| Evacuation lines (D) | High-speed and/or low-speed suction with autoclavable or disposable attachment tips | |
| Pole (E) | For mounting dental light and LCD screen | |
| Instrument tray (F) | Movable stainless steel instrument tray usually attached to the dental light post | |
| Cuspidor (G) | Movable cup used for expectoration by the client; many are equipped with a timed water flush system and may have a disposable paper lining | |
| Cup filler (H) | Automatic water cup filler is activated by sensors when the disposable cup is empty | |
| Dental light (I) | Overhead light transmitting illumination into the client’s oral cavity for increased clinician visibility during dental care | |
| Self-contained water system (J) | Minimizes biofilm growth in water lines | |
| LCD screen (K) | For client education and case presentation |
Clinician’s Chair
The chair is one of the most important pieces of equipment for the delivery of care (Figure 9-3). It should have a broad, heavy base and be readily mobile, with a minimum of five free-rolling casters to maneuver around the client’s head during care. The chair seat should allow for adequate body support and be adjusted easily for proper height so the clinician’s feet are flat on the floor with thighs parallel with the floor. New ergonomically designed chairs put the clinician in the proper position and lend total body support to reduce strain on the spine, lower back, shoulders, and arms (Figure 9-4). Too high a chair position causes the body weight to be supported by the spine, back, and shoulders. Too low a position causes the clinician to slump and sit with a curved spine (Figure 9-5).
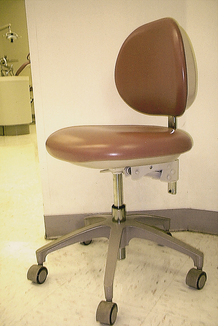
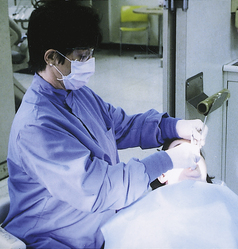
Figure 9-4 Neutral position of clinician. Note shoulders level and held in most relaxed position, elbows close to body, and forearms in same plane as wrists, hands, and client’s mouth.
(Courtesy Nordent Manufacturing, Inc, Elk Grove Village, Illinois.)
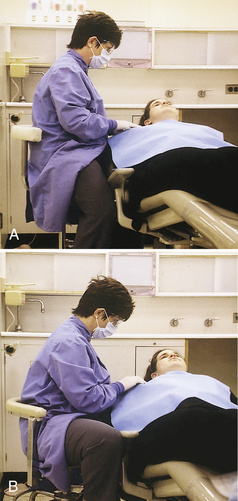
Figure 9-5 A, Clinician’s stool positioned too high. B, Clinician’s stool positioned too low.
(Courtesy Nordent Manufacturing, Inc, Elk Grove Village, Illinois.)
Cords on Powered Instruments2
Dental units are equipped with power-driven instruments and air and water syringes. These may be attached to the dental unit via:
The retractable and curly power cords are encumbering and require constant pulling by the clinician. This repetitive pulling motion increases fatigue and hand, arm, and shoulder muscle strain. A straight cord creates no tension while the clinician is using the motor-driven instrument.
Performance Factors
Five Categories of Motion
Motions and movements can be stressful to the physical well-being of dental clinicians. Stresses caused by movement can harm the back, neck, arms, and wrists. There are five categories of motion3 based on the amount of movement and the bone and muscle support needed to carry out the movement (Table 9-4). Dental clinicians should limit their movements to categories I, II, and III.
TABLE 9-4 Five Categories of Motion
| Classification | Motion |
|---|---|
| Class I | Using fingers only |
| Class II | Using fingers and wrist |
| Class III | Movement of fingers, wrist, and arm |
| Class IV | Movement of the entire arm and shoulder |
| Class V | Movement of arm and twisting of body |
Grasp and Fulcrum
Fundamentals of grasp include holding the instrument firmly, maintaining a secure grip, and maintaining control of the instrument without causing undue strain or fatigue to the clinician’s hand, arms, and shoulders. The modified pen grasp is a three-finger grasp using the thumb, index finger, and middle finger. The pad of the thumb is placed on the instrument handle, and the joint is bent slightly. The pad of the index finger should also be placed on the instrument handle, slightly superior to the thumb. The side of the middle finger is placed adjacent to the thumb below the index finger near the junction of the instrument handle and the functional shank of the instrument (Table 9-5). A space must be maintained between the index finger and thumb to facilitate freedom of movement when rolling the instrument into interproximal spaces and around line angles of the teeth during instrumentation. Rolling the instrument between the index finger, middle finger, and thumb eliminates turning and twisting of the wrist, which will lead to an RSI such as carpal tunnel syndrome (CTS).
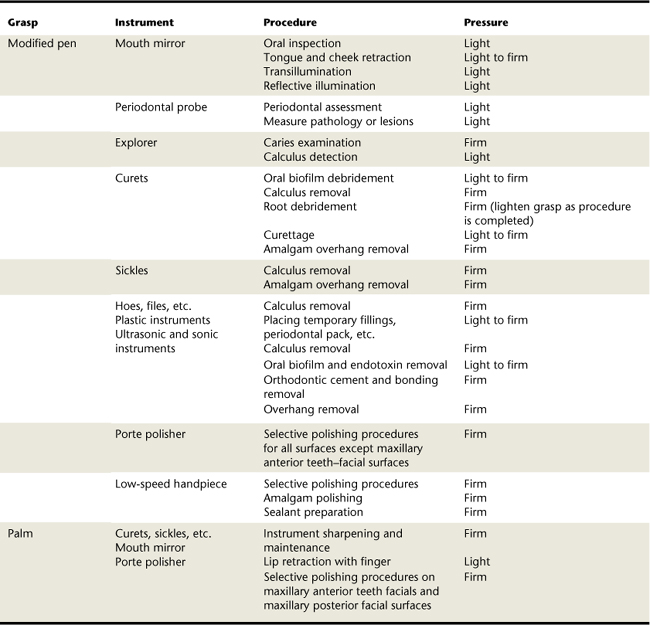
Holding the instrument with all four fingers wrapped securely around the handle is the palm grasp. The thumb is placed on the handle pointed in the direction of the working end of the instrument. The modified pen grasp and palm grasp may be firm or light depending on the procedure being performed. Table 9-5 compares the procedure and instrument with the appropriate grasp. See Chapter 24 for a thorough discussion of instrument grasp.
Fulcrum and Hand Stabilization
The fulcrum is the area on which the finger rests and against which it pushes while instrumentation is performed. The fulcrum provides a basis for steadiness and control during stroke activation. Proper fulcrum and hand stabilization reduces RSIs.
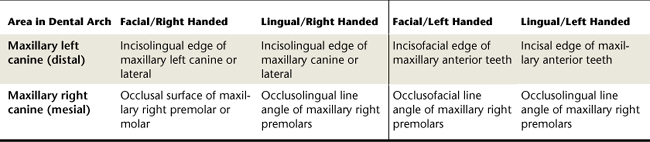
The intraoral fulcrum is established by resting the pad of the ring finger (fulcrum finger) inside the mouth against a tooth surface. The fulcrum finger usually is positioned on occlusal, incisal, or facial tooth surfaces close to the working area or tooth being instrumented (Table 9-6 and see Chapter 24, Figure 24-8). The fulcrum finger must remain locked during instrument activation. A locked fulcrum allows the clinician to pivot on and gain strength from the fulcrum finger. Pivoting on the fulcrum finger helps to maintain a firm grasp, stability, and proper wrist motion. Middle and fulcrum fingers work together to add support during instrument activation. Splitting of the middle and fulcrum fingers decreases instrument control, strength, and stability. With less control, strength, and stability, the clinician will automatically tighten the grasp, contributing to RSI. Placing the fulcrum close to the working area is not always possible owing to space limitations in the mouth, teeth alignment, pocket depth, or the angle of access. A variety of intraoral fulcrums may be necessary. See Chapter 24, section on the fulcrum, for a detailed explanation.
The extraoral fulcrum is used when using instruments on deep periodontal pockets. It is accomplished by placing the broad side of the clinician’s palm or back of the hand against an outside structure of the client’s face such as the chin or cheek (see Chapter 24Figure 24-51Figure 24-52Figure 24-53 ). Benefits of an extraoral fulcrum are as follows:
 Decreased chance of RSI to the nerves, tendons, and ligaments in the clinician’s wrist and elbow (e.g., action of the activation or pulling stroke is transmitted to the arm and shoulder and away from the wrist)
When no fulcrum is used, lateral pressure on the instrument during activation causes the instrument to slip in the hand. To stabilize and control the instrument, the clinician will automatically tighten the grasp. Tightening the grasp places stress on hand and arm muscles, tendons, and ligaments, leading to an increased occurrence of RSI.
Wrist Motion during Instrument Activation1,2,4
Wrist motion and the fulcrum are related. Safe wrist motion is vital to the health of the clinician’s hand, wrist, and forearm muscles, tendons, and ligaments. Pivoting on the fulcrum causes the hand, wrist, and forearm to move in one unified motion, often called “wrist rock.” Failing to handle instruments using the unified motion causes the clinician to extend or flex the wrist (Figure 9-6). Continued flexion or extension of the wrist contributes to a variety of RSIs.
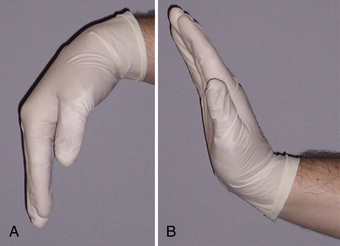
Figure 9-6 A, Flexion of the wrist. B, Extension of the wrist. Both movements can cause repetitive strain injuries.
Digital motion during instrument activation is also a factor contributing to RSI. Digital motion is the push-and-pull motion of the instrument using fingers only. Muscle fatigue results quickly with digital motion, and a decrease in instrument power and stability occurs.
Appointment Management2
Control of appointment procedures and time greatly reduces possible RSI. The dental hygienist should:
Client-Clinician Positioning Factors2,4
Commonly used client positions are:
In the supine position the client’s mouth should be at about the height of the seated clinician’s elbow. Distance from the client’s mouth to the clinician’s eyes should be about 14 to 16 inches. The headrest can be adjusted for maxillary or mandibular arch visibility. When treating maxillary teeth, the maxilla should be perpendicular to the floor; when treating the mandibular teeth, the mandible should be parallel to the floor.
Clinician-client positioning is best explained using the face of a clock (Figure 9-7):
Clinician moves around face of clock, positioning between the 8 o’clock and the 4 o’clock positions. Right-handed clinician uses the 8 o’clock to 2 o’clock range. When teeth are out of alignment, the right-handed clinician may work in the 4 o’clock position. Left-handed clinicians work predominantly in the 10 o’clock to 4 o’clock range, with variations necessary at times to the 8 o’clock position.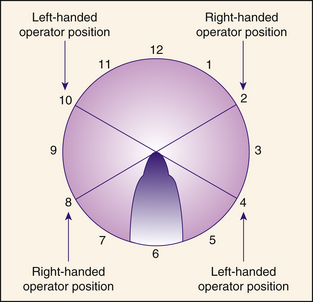
Figure 9-7 Possible clinician positions around the client. Right-handed clinician: 8 to 2 o’clock. Left-handed clinician: 4 to 10 o’clock.
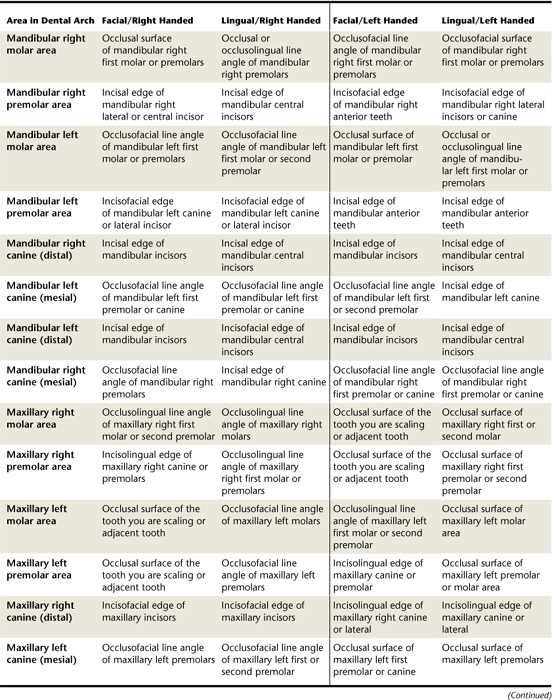
Table 9-7 provides a reference for accessing areas of the client’s mouth. Figure 9-8 presents a variety of client positions used during dental hygiene care.
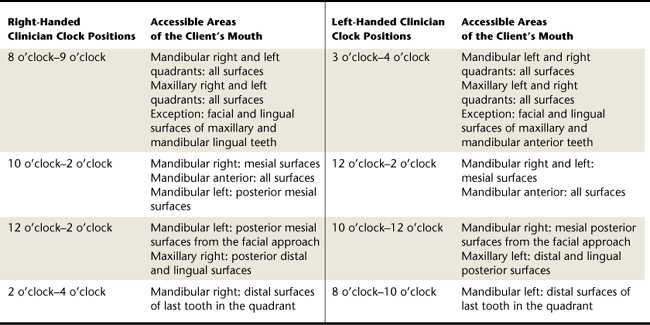
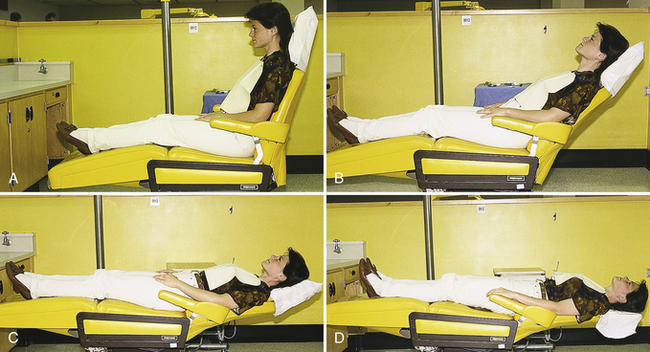
Figure 9-8 Basic client body positions used during the dental hygiene process of care. A, Basic upright position; client is seated in an 80- to 90-degree angle. B, Semiupright position; client is seated in a 45-degree angle. C, Supine position that has been modified for mandibular instrumentation. D, Supine position that has been modified for maxillary insertion.
Position of the Clinician
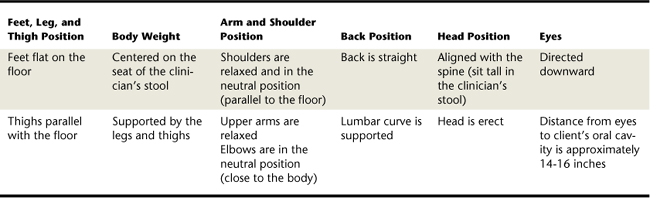
Clinician comfort and safety cannot be sacrificed for the client. Repetitively using incorrect clinician positioning causes stress and fatigue. Therefore client positioning should allow the operator to perform intraoral procedures without increasing RSI. Table 9-8 lists the correct positioning of the clinician’s arms, shoulders, legs, feet, back, head, and eyes during care.
Wrist, Arm, Elbow, and Shoulder Position
Maintaining a neutral position of the wrist, arm, elbow, and shoulder reduces clinician fatigue and injury during care.5 Neutral positions are basic to the prevention of occupational pain and risks related to RSI.
Neutral positions include (see Figure 9-4):
Back and Neck Support
Adequate back and neck support reduces the occurrence of musculoskeletal injuries to the spine. Intervertebral disks in the spine resemble a jelly donut. When uneven pressure is put on an intervertebral disk, the effect is the same as if you pushed down on one side of a jelly donut: the contents of the disk (jelly donut) are pushed out. Poor posture of the clinician results in uneven support of the spine and rupture of an intervertebral disk (see Figure 9-5). Maintaining a straight back, straight neck, and erect head, with feet flat on the floor and thighs parallel to the floor, properly supports the spine.
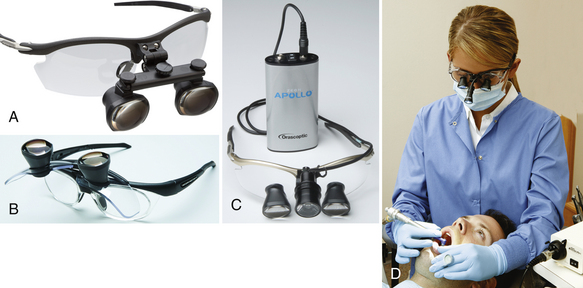
Eye loupes (telescopes) are magnification devices worn instead of traditional eyeglasses to improve the clinician’s operative field of vision, visual accuracy, and posture during client care6 (Figure 9-9). Use of multilens telescopic loupes in the 2× to 2.5× magnification range offers the necessary depth of field and ensures a specific physical distance between the dental hygienist and client, keeping the dental hygienist’s back and spine straight and preventing occupational pain caused by cumulative trauma. If the clinician is too close to or too far away from the client, the visual field seen through the magnification device will be blurred. Once back into the proper position, the clinician’s field of vision will be clear.
Instrument Factors
Hand Instrument Cutting Edge Sharpness2
Sharp instruments are essential to the elimination of fatigue and stress on the clinician’s hand, wrist, arm, and shoulders that cause RSI. Therefore any instrument with a cutting edge should be kept sharp during the entire procedure. Dull instruments that deviate from their original design cause the clinician to apply additional force, resulting in increased lateral pressure applied, excess stroke repetitions, and a tightened grasp. Fatigue and RSI can ensue.
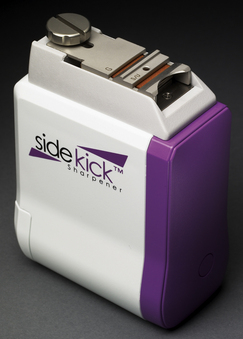
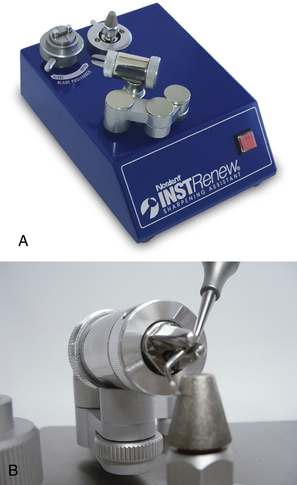
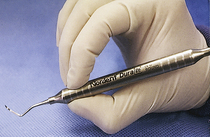
Maintaining the original design of scaling instruments is accomplished by manual sharpening using a hand-held sharpening stone or powered sharpening devices that assist in maintaining the original design of the working end of the instrument as well as producing an even, sharp, cutting edge (Figures 9-10 and 9-11). New dental instrument materials have been developed that require no sharpening or reduce the need for sharpening (see Chapter 24, section on instrument sharpening).
Ergonomic Instrument Handles2
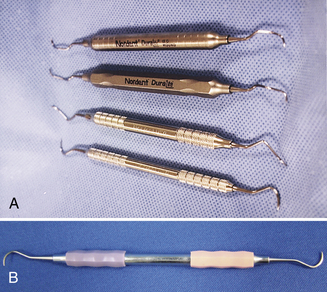
Ergonomic instrument handles are large in diameter and light in weight. Table 9-9 and Figure 9-12, A compare instruments with standard versus ergonomic handles. Larger-diameter handles open the grasp just enough to dissipate the mechanical forces over a larger area of muscles. Instrument setups containing several styles of handles give the clinician the opportunity to rest different muscle groups while completing care, decreasing the occurrence of RSI. Another ergonomic design feature to consider is the use of instruments with padded handles (Figure 9-12, B). Padded instrument handles cushion the fingertips while the handle is grasped (see Chapter 24, section on parts and characteristics of dental instruments).
TABLE 9-9 Ergonomic and Standard Instrument Handles
| Parameters | Ergonomic Design | Standard Design |
|---|---|---|
| Diameter (inches) | ⅜- |
¼ |
| Diameter (mm) | 9.53-11.11 | 6.35 |
| Shape | Round or hexagonal | Round or hexagonal |
| Construction | Hollow | Solid |
| Weight | Approximately 13.2 g | Approximately 26.0 g |
Balanced Instruments
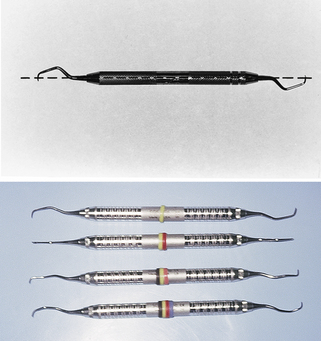
Instruments, both single- and double-ended, should be balanced. This means that the working end is centered over the long axis of the instrument handle. When the instrument is balanced, the lateral pressure placed on the instrument handle and shank during instrument activation will be aimed toward the working end (Figure 9-13). When an instrument is not balanced, the lateral pressure placed on the instrument when activated causes the instrument to turn slightly in the clinician’s fingers. To compensate, the clinician grasps the instrument handle more tightly. Use of balanced instruments decreases occurrence of RSI.
Mechanized Instruments
Use of ultrasonic and sonic instruments significantly reduces repetitive hand-wrist-forearm motions (see Chapter 25). Oral debridement requires numerous repetitive strokes and significant lateral pressure when using hand-activated instrumentation techniques.
Vibrating Instruments
Instruments causing vibrations, such as the motor-driven handpiece, cause fatigue and hand, arm, and shoulder muscle strain. Application of the principles of selective polishing limits the time during which the clinician uses a vibrating instrument. A common RSI caused by vibratory instruments is Raynaud’s syndrome, which results in blanching (often painful) fingers.
Dental Mirrors
The mouth mirror is held in the nondominant hand. Practitioners focus on the hand, wrist, and arm position of the dominant hand during instrumentation with limited regard for the nondominant hand. Ergonomic adaptations in mouth mirror handles were associated with increases and decreases in muscle activity. The clinical impact of this increase or decrease in muscle activity amplifies as force is exerted.7 When comparing the function of the dominant and nondominant hands during dental hygiene procedures, there is a significant difference between the techniques of the scaling hand and the hand holding the mirror. The nondominant hand holding the mirror functions to increase access and visualization by retracting the tongue and cheeks. Unlike the multitasking dominant hand, the static nondominant hand often requires a forceful grip, retracting the tongue and cheek throughout care.8 This continuous static position of the nondominant hand decreases blood flow to the hand and fingers, increasing risk of RSI. Ergonomic adaptations to instrument handles (weight, diameter, and padding) vary muscle activity throughout the day to reduce RSIs for dental hygienists.7
PHYSICAL EXERCISE
Strengthening Exercises
No one would consider performing strenuous exercise without stretching and doing strengthening maneuvers first. However, oral care providers subject their muscles to strenuous activity daily without properly preparing their bodies for the workplace. Maintaining a healthy musculoskeletal system through daily exercise has the following effects:
Strengthening exercises can be performed regularly to repair and maintain a healthy musculoskeletal system (Box 9-1 and Table 9-10).
BOX 9-1 Strengthening Exercises
Knee-to-Chest: Stretches Lumbar Spine
Bring both knees to your chest
Doorway Stretch: Reverses Poor Posture
Stand in front of an open doorway
Place hands on either side of doorframe
Neck Isometric: Stretches Cervical Spine and Relieves Neck Muscle Strain
TABLE 9-10 Strengthening Exercises
| Strengthening Exercise | Improvements to the Body |
|---|---|
| Pelvic tilt | Lumbar spine |
| Hyperextension | Lumbar spine |
| Knee-to-chest | Lumbar spine |
| Sit-ups | Abdominal muscles and lumbar spine |
| Suspend from a bar | Lower back |
| Doorway stretch | Upper and lower back |
| Neck isometric | Cervical spine and neck |
| Rubber ball squeeze | Hand and fingers |
Chairside Stretching Exercises6
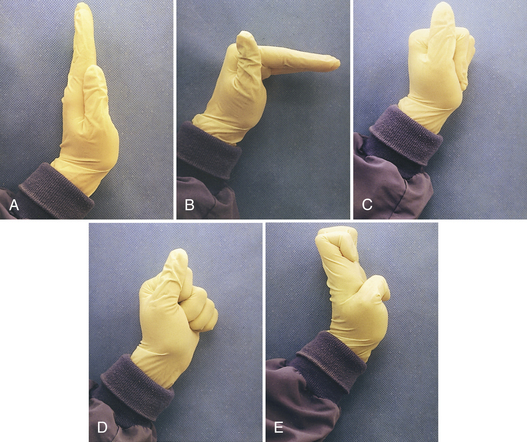
Stretching and warm-up exercises reduce muscle and joint soreness and injury and prepare the individual psychologically for activities requiring skill and dexterity. Before work and throughout the day, dental hygienists should perform the following tendon gliding exercise (TGE) (Figure 9-14), which diffuses synovial fluid, the lubricant around the hand and finger tendons:
REPETITIVE STRAIN INJURIES
See Table 9-11.
TABLE 9-11 Effects of Repetitive Strain Injuries
| Common Repetitive Strain Injuries in Dental Hygiene | Area of the Body Affected |
|---|---|
| Carpal tunnel syndrome | Wrist, forearm, hand, fingers (index finger, middle finger, and half of ring finger and thumb) |
| Thoracic outlet compression | Shoulder, arm, hand |
| Surgical glove–induced injury | Hand, fingers, wrist |
| Guyon’s canal syndrome | Lower arm, wrist, fingers (half of ring finger and little finger) |
| Strained pronator muscle | Elbow |
| Trigger finger nerve syndrome | Tendons in the fingers |
| De Quervain’s syndrome | Base of the thumb |
| Tension neck syndrome | Neck, between shoulder blades, arm |
| Cervical spondylolysis | Neck, scapula, and shoulders |
| Cervical disk disease | Neck and arm |
| Trapezius myalgia | Shoulders |
| Rotator cuff tendonitis | Shoulders |
| Rotator cuff tears | Shoulders |
| Adhesive capsulitis | Shoulders |
| Lumbar joint dysfunction | Spine |
| Lateral epicondylitis | Elbow and forearm |
| Radial tunnel syndrome | Elbow and forearm |
| Cubital tunnel syndrome | Elbow and forearm |
Hand, Wrist, and Finger Injuries
Carpal Tunnel Syndrome2,4,9
CTS, the most common RSI reported by dental hygienists, has the following causes:
About one third of dental hygienists report symptoms of CTS, which occurs when the median nerve becomes compressed within the carpal tunnel (Figure 9-15). Function of the median nerve is sensory and motor:
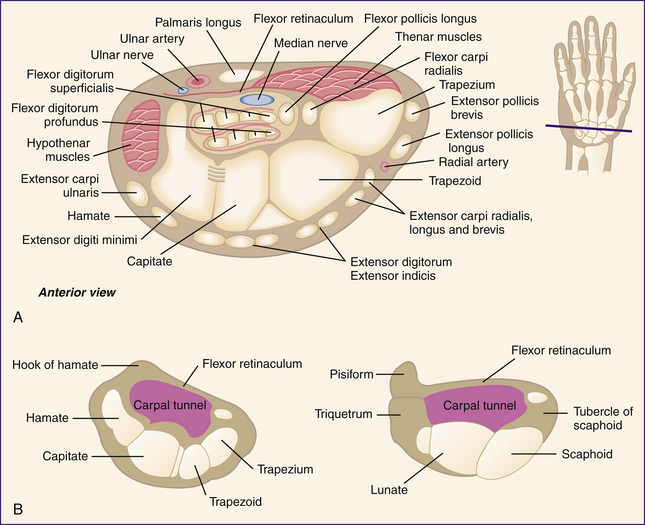
Figure 9-15 Carpal bones. The carpal bones form a trough through which the flexor tendons and median nerve traverse into the hand. A, Transverse section of the wrist and carpal tunnel. B, Diagram of transverse section through the carpal tunnel.
(Redrawn from Agur A: Grant’s atlas of anatomy, ed 9, Baltimore, 1991, Williams and Wilkins.)
The carpal bones of the wrist and the transverse carpal ligament form the carpal tunnel. The carpal bones and transverse carpal tunnel ligament form a furrow, allowing the flexor tendons and the median nerve to pass through to the hand. Repetitive force and motion to the wrist cause tendon inflammation and swelling within the carpal tunnel. The enlarged tendons and lack of space in the carpal tunnel place undue pressure on the median nerve, causing pain. Once the nerve is compressed, CTS begins. Repeated wrist flexion and hyperextension during instrumentation aggravate tendons and cause further swelling.
Risk Factors
Repetition is the foremost risk factor causing CTS. Holding the instruments tightly places too much force on the wrist and hand. Vibrating instruments, including low-speed handpieces and ultrasonic scalers, have been identified as risk factors for CTS.1 Cold temperatures in the dental treatment area decrease flexibility of the clinician’s finger, hand, arm, shoulder, neck, and back muscles. This inflexibility causes stiffness, making workplace performance stressful. Also, wearing gloves that are too tight can pinch the median nerve at the wrist.
Chairside Preventive Measures
Maintain good operator posture: the client’s mouth should be even with clinician’s elbow; the elbow should be held in the neutral position (90-degree angle created by the upper arm and forearm). Maintain proper position to support clinician’s body, with thighs parallel to floor and feet flat on floor.Assessing Symptoms
CTS affects the median nerve, which supplies the thumb, index finger, middle finger, and half of the ring finger. If the symptoms are felt in the little finger and right half of the ring finger, CTS may not be the problem or the operator may have CTS along with another RSI. Two simple tests can be performed to indicate symptoms of CTS:
Phalen’s test: Place the back of hands against each other. Hold flexed wrists together at a 90-degree angle for one minute. Subjective sensory changes will be felt within 1 minute. These sensory changes indicate a positive test result (Figure 9-16, A). Tinel’s sign: Tap the median nerve at the ventral side of wrist. If nerve compression is present, sensation is felt in the fingers. The sensation could range from a tingling feeling to an electrical type shooting pain (Figure 9-16, B).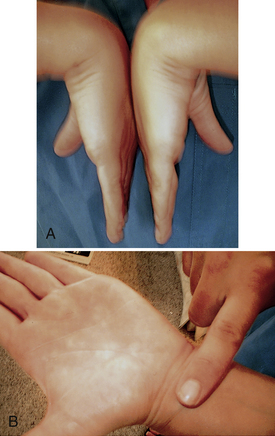
Treatment
Conservative treatment includes corticosteroid injections to reduce tendon inflammation. Iontophoresis, delivery of corticosteroid via an electrical current delivery system, can also be used. The electrical current increases penetration of the corticosteroid through skin and into the carpal tunnel. This method is less painful but is not as effective as the injection of corticosteroid. CTS can also be treated with anti-inflammatory medications and vitamins (Box 9-2).
Wearing a wrist brace during the early stages of CTS decreases symptoms by minimizing inflammation. The wrist is simply kept in the neutral position by the brace holding the carpal tunnel in the most open position, allowing nerves and tendons to relax and heal.
Surgical treatment may be performed if conservative therapies fail. In surgery the transverse carpal ligament is cut to relieve pressure on the median nerve. Some surgical procedures for CTS use an endoscope or small fiberoptic camera plus a traditional surgical procedure except that no incision is made in the palm. With only a small incision made in the wrist to access the carpel tunnel, healing time is decreased.
Thoracic Outlet Compression
Thoracic outlet compression (TOC) is an RSI resulting in compression of the brachial artery and plexus nerve trunk at the thoracic outlet. TOC affects the hand, wrist, arm, and shoulder. Compression of the neurovascular bundle (brachial plexus, subclavian artery, and subclavian vein) results in decreased blood flow to the nerve functions of the arm. The compression occurs at the neck, where the scalene muscles create an outlet or tunnel. The nerves and blood vessels run from the neck into the arm and hand.
Risk Factors
Poor posture is the main cause. Tilting the head too much, hunching the shoulders, and positioning the dental chair too high are risk factors for TOC.
Assessing Symptoms
Signs relate to both decreased motor function (nerve compression) and arterial symptoms (decreased blood flow).
Treatment
Initially, physical therapy, strengthening of posterior trunk and shoulder muscles, and posture retraining exercises are recommended. If the recommended treatment fails, surgery aimed at reducing the source of compression may be required. Scar tissue or, in some cases, a congenital extra rib may be the cause of compression. An incision is made under the arm where the nerves and brachial plexus are located.
Surgical Glove Injury2
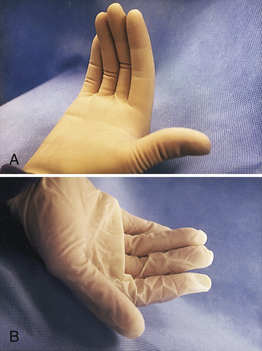
Ill-fitting gloves can contribute to surgical glove injury (SGI). The glove should fit the hand and fingers snuggly but be neither too tight nor too loose from fingers to forearm (Figure 9-17).
Symptoms
SGI is commonly mistaken for CTS and TOC because so many of the signs and symptoms, as follows, are similar:
Risk Factors
Wearing properly fitting gloves during dental care reduces RSI. When gloves are too tight, proper circulation to the clinician’s hands and fingers is compromised, and pressure is placed on the carpal tunnel across the wrist. Wearing gloves that are too loose causes the clinician to grasp the instrument handle more tightly to compensate for the feeling of lack of control. Excess glove material at the fingertips hinders the clinician’s ability to adequately roll the instrument in the fingers to adapt around line angles. The clinician compensates by twisting the wrist or by flexing and hyperextending the wrist.
Chairside Preventive Measures
Guyon’s Canal Syndrome2
Guyon’s canal syndrome (GCS), caused by ulnar nerve entrapment at the wrist, differs from CTS in that the ulnar nerve does not pass through the carpal tunnel. Rather the ulnar nerve passes through a tunnel formed by the pisiform and hamate bones and the ligaments that connect them.
Risk Factors
During instrumentation it is important to hold the little finger close to the fulcrum finger for stability and control. Maintaining this position of the two fingers avoids RSI. Holding the little finger a full span away from the hand and fulcrum finger causes nerve entrapment and symptoms of GCS.
Chairside Preventive Measures
Attention placed on hand and finger position during instrumentation reduces GCS and includes:
Assessing Symptoms
During instrument adaptation and activation, symptoms will affect the little finger and half of the ring finger. If all digits are affected, GCS may not be problem or may be one of several problems.
Treatment
Conservative treatment includes performing hand strengthening exercises; wearing a hand and wrist splint at night to decrease pinching of ulnar nerve and allow a decrease in inflammation; and taking prescribed anti-inflammatory medications. If these therapies fail, surgery may be indicated to relieve ulnar nerve entrapment. During the surgical procedure, cutting of the roof of the Guyon’s canal is completed.
Trigger Finger Nerve Syndrome2
Trigger finger nerve syndrome (TFNS, or triggering) affects movement of the tendons as the fingers and thumb are bent (flexion) and moved. The tendons are held in place on the bones by a series of ligaments called pulleys. Friction is reduced by a slippery coating called tenosynovium, allowing the tendons to glide easily through the tendon sheaths. When the tendons and tendon sheaths are inflamed and tenosynovium thickens, a nodule forms from the constant irritation of the tendon being pulled through the pulley. As the finger is flexed, the nodule passes under the ligament and becomes stuck. The finger cannot be extended back to its original position.
Risk Factors
Repetitive use of fingers and hands causes overuse of finger and thumb tendons. Overuse often results from fingers and thumb being flexed against resistance. Digital motion during instrumentation results in overuse of finger and thumb tendons. Also, pinching the instrument handle causes fingers and thumb to flex against resistance (Figure 9-18).
Chairside Preventive Measures
Minimizing finger motion and using proper grasp, fulcrum, and unified motion of the hand, wrist, and forearm decrease risk of TFNS.
Assessing Symptoms
When a nodule forms on the fingers or thumb tendons, a palpable click will be felt as the nodule snaps under the finger pulley.
Treatment
Initial treatment with corticosteroids may reduce inflammation and shrink the nodule to relieve the triggering. In most cases a small surgical incision is made in the palm of the hand to locate the pulley in question. Once the pulley is located, it is cut, eliminating the triggering and nodule involvement.
De Quervain’s Syndrome2
De Quervain’s syndrome is an inflammation of the tendons and tendon sheaths at the base of the thumb (the “anatomic snuff box”). This condition occurs from repetitive motion combining hand twisting and forceful gripping along with prolonged work with the wrist held in ulnar deviation (Figure 9-19). Symptoms will occur when the pollicis longus and extensor pollicis longus tendons are unable to glide through the tunnel on the side of the wrist.
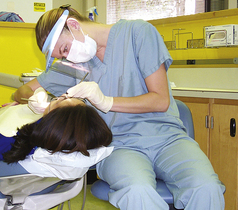
Figure 9-19 Wrist in ulnar deviation. Spine and neck out of alignment.
(Courtesy Sarah Talamantes Carter, University of California at San Francisco.)
Risk Factors
Repetitive ulnar deviation of the wrist while reaching for instruments or during instrumentation is the biggest risk factor causing De Quervain’s syndrome. Twisting and bending the wrist in an ulnar direction (toward little finger) and using a forceful grip on instrument handles are also risk factors.
Assessing Symptoms
Finkelstein’s test is a simple way to assess symptoms (Figure 9-20):

Pain over tendons and tendon sheaths at base of thumb indicates possible De Quervain’s syndrome.
Treatment
Milder cases may simply require rest, prescribed anti-inflammatory medication, immobilization of wrist with a splint, and/or ergonomic adjustments to work environment. If the simple measures fail, corticosteroid injections and progressive physical and occupational therapy may be recommended. In severe or chronic cases, surgery to relieve pressure on the tendon, allowing more space for that tendon, may be in order.
Elbow and Forearm Injuries10
Strained Pronator Muscle
The muscle involved in a strained pronator muscle (SPM) injury is an elongated, narrow pronator muscle in the forearm and flexor of the elbow joint. The pronator muscle wraps around the anterior aspect of the elbow. SPM is caused by compression of the median nerve as it passes under the pronator muscle.
Symptoms
Compression of the median nerve causes symptoms similar to those experienced by clinicians with CTS.
Risk Factors
Repetitive and constant holding of the arms away from the body with the palm and thumb-side of the hand rotated downward during instrumentation is a risk factor. This position commonly occurs during instrumentation of the maxillary right posterior sextant. With the palm in a downward position, the clinician’s arm must rotate and twist. Hyperextension of wrist also occurs (see Figure 9-6, B).
Assessing Symptoms
Symptoms are similar to those of CTS, but performing Phalen’s and Tinel’s tests would rule out compression of median nerve at the wrist (true CTS) because with this condition, compression occurs at the elbow. If the clinician is experiencing CTS symptoms but the tests rule out true CTS, SPM may be the cause.
Lateral Epicondylitis11
Lateral epicondylitis (LE) is a degenerative elbow disorder. In spite of its common name (tennis elbow), the majority of cases are not from sports injuries. Rather it results from inflammation of the wrist extensor tendons on the lateral epicondyle of the elbow.
Risk Factors
Repetitive and constant use of a forceful grip or grasp, forceful wrist and elbow movement, and extension of wrist during dental care increase risk.
Radial Tunnel Syndrome12
Radial tunnel syndrome (RTS) is a condition affecting the radial nerve entrapped in the radial tunnel. The radial nerve starts at the side of the neck and travels through the armpit and down the arm to the hands and fingers; the nerve passes in front of the elbow through the radial tunnel and allows the hand to turn in a clockwise direction.
Symptoms
Increased tenderness and pain at the lateral side of the elbow when arm and elbow are used may indicate RTS.
Chairside Preventive Measures
As with LE, maintaining proper wrist position and motion during care must be considered.
Cubital Tunnel Syndrome12
Cubital tunnel syndrome is a condition affecting the ulnar nerve as it crosses behind the elbow. The ulnar nerve controls the muscles in the right half of the ring finger and little finger of the hand. The ulnar nerve starts at the neck and runs through the armpit and down the arm to the hand and fingers. At the elbow the nerve crosses through a tunnel of muscle, ligament, and bone (cubital tunnel). When elbow is bent, the nerve is pulled up between bones, causing compression and entrapment of the ulnar nerve. When nerve compression occurs, impulses are slowed.
Risk Factors
The clinician should avoid all prolonged gripping or grasping of instruments in palm of hand and holding the elbow in a flexed position during procedures.
Shoulder Injuries1,5
Trapezius Myalgia2,10
Trapezius myalgia (TM) is caused by static loading in the shoulder or stabilizing muscles over a long period of time. This condition is commonly found in workers in repetitive action occupations.
Risk Factors
Long dental procedures cause the clinician to remain in one position, resulting in static loading on muscles supporting the clinician’s body weight.
Rotator Cuff Injuries
Rotator cuff injuries (RCIs) include rotator cuff tendonitis and rotator cuff tears. Both affect the connective tissue in the shoulder and cause common shoulder pain. Most often affected is the supraspinatus tendon. RCIs are associated with repetitive motion and excessive, forceful exertion of shoulder and arm.
Adhesive Capsulitis
Adhesive capsulitis (AC), also known as frozen shoulder, results from immobility of the shoulder due to severe shoulder injury or repeated occurrences of rotator cuff tendonitis.
Risk Factors
Static loading and improper strain placed on shoulder joint owing to static loading increase risk for AC.
Neck and Back Injuries
Lumbar Joint Dysfunction2
Lumbar joint dysfunction (LJD) occurs from repetitive and continued twisting and rotating of spine. With improper spine support during dental care delivery, the intervertebral disks experience tremendous pressure, possibly resulting in rupture or injury.
Risk Factors
Right-handed clinicians sitting in the 8 o’clock position (4 o’clock for left-handed clinicians) find accessing specific areas of the client’s mouth easier. However, too much rotation of the midsection of the clinician’s body while in this position strains the lumbar curve. Care must be taken to avoid RSI while sitting in the 8 o’clock (4 o’clock) position.
Tension Neck Syndrome
Also called tension myalgia, tension neck syndrome (TNS) involves the cervical muscles of the trapezius muscle.
Risk Factors
Risks include improper positioning of clinician’s head and neck during dental care. The head must be held erect because bending the neck puts tremendous pressure and stress on cervical spine.
Cervical Spondylolysis and Cervical Disk Disease1
Cervical spondylolysis (CS) and cervical disk disease (CDD) lead to degeneration of the cervical spine. These RSIs affect the neck, scapula, shoulders, and arms, causing osteoarthritis of the cervical spine, disk degeneration, and herniation.
TO CHANGE OR NOT TO CHANGE
Recognition of RSIs in dentistry was reported as early as 1946. Sixty-six percent of dentists complained of back pain after as little as 1 to 5 years of practice, and overall 78% felt they would eventually develop posture problems.13 However, current literature documents that pain and discomfort continue among oral healthcare providers. Recognition of unsound ergonomic practices helps to stop the cycle of occupational pain for dental workers.
About 78% of practicing hygienists in Washington reported pain or discomfort in the neck, shoulders, arm, wrist, or hand.14 Compliance with ergonomic principles is the foundation for a long, successful career in practice.
KEY CONCEPTS
Ergonomically designed equipment and proper positioning of both clinician and client decrease risk of RSI to the dental hygienist. Instrument maintenance, handle design, instrument manufacturing, and instrument choice affect clinician comfort and health.CRITICAL THINKING EXERCISES
Practice positioning a client in the dental chair. The clinician must be positioned for access to and visibility of the client’s mouth without compromising personal health and comfort.
1. Michalak-Turcotte C. Controlling dental hygiene work–related musculoskeletal disorders: the ergonomics process. J Dent Hyg. 2000;74:41.
2. Michalak-Turcotte C., Atwood-Sanders M. Ergonomic strategies for the dental hygienist. J Pract Hyg. 2000;9:39.
3. Bird D.L., Robinson D.S. Torres and Ehrlich modern dental assisting, ed 9. St Louis: Saunders; 2008.
4. Sanders M., Turcotte C. Ergonomic strategies for dental professionals. Am J Prev Assess Rehabil. 1997;5:55.
5. Valachi B., Valachi K. Preventing musculoskeletal disorders in clinical dentistry: strategies to address the mechanisms leading to musculoskeletal disorders. J Am Dent Assoc. 2003;134:1604.
6. Pencek L. Vision and magnification for clinical dental hygiene practice. RDH Mag. 2007;27:50.
7. Slimmer-Beck M., Bray K., Branson B., et al. Comparison of muscle activity associated with structural differences in dental hygiene mirrors. J Dent Hyg. 2006;80:8.
8. Horstman S., Horstman B., Horstman F. Ergonomic risk factors associated with the practice of dental hygiene: a preliminary study. Prof Saf. 1997;42:49.
9. Mahoney J. Cumulative trauma disorders and carpal tunnel syndrome: sorting out the confusion. Can J Plast Surg. 1995;3:185.
10. Novak C.B., Mackinnon S.E. Repetitive use and static postures: a source of nerve compression and pain. J Hand Ther. 1997;10:151.
11. American College of Sports Medicine. The American College of Sports Medicine fitness book, ed 3. Champaign, Ill: Human Kinetics Publishers, Inc; 2003.
12. Tishler-Liskiewicz S., Kerschbaum W. Cumulative trauma disorders: an ergonomic approach for prevention. J Dent Hyg. 1997;7:162.
13. Dylia J., Forrest J. Fit to sit: strategies to maximize function and minimize occupational pain. Access. 2006;20:16.
14. Guignon A.N. Comfort zone: turning the prevention spotlight on ourselves. RDH Mag. 2007;27:72.
Visit the  website at http://evolve.elsevier.com/Darby/Hygiene for competency forms, suggested readings, glossary, and related websites..