CHAPTER 25 Ultrasonic and Sonic Instrumentation
MECHANIZED PERIODONTAL DEBRIDEMENT
Ultrasonic and sonic instrumentation is collectively referred to as power-driven or mechanized instrumentation. The original, larger, traditional working end of the power-driven insert is described as a conventional or standard design. Thinner working ends of inserts for subgingival access are called microultrasonic, periodontal, slim, or precision thin designs.
Ultrasonic and sonic instruments have the following three modes of action:
 Mechanical action, or vibration of the tip, results in deposit removal. Mechanized instruments are said to have clinical power, referring to the ability to remove calculus deposits under load. Tip action that provides clinical power is dependent on the stroke, frequency, type of tip motion, and angulation of the motion against the tooth surface. Load is the resistance on an instrument tip when placed against the calculus deposit or tooth surface. Cavitation is the action created by the formation and collapse of bubbles in the water by high-frequency sound waves surrounding an ultrasonic tip. Cavitation results in lavage, which is the therapeutic washing of the pockets and root surface to remove endotoxins and loose debris. Irrigation occurs via the water or the antimicrobial used to replace the water. Acoustic microstreaming occurs because agitation in the fluids surrounding a rapidly vibrating ultrasonic tip has the potential to destroy or disrupt bacteria.
Ultrasonic Instruments
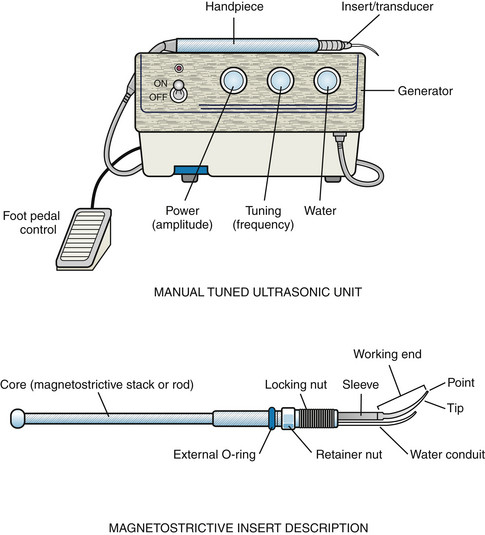
Ultrasonic instruments convert electrical energy into mechanical energy in the range of 18,000 to 50,000 vibrations per second. The term ultrasonic describes a nonaudible range of acoustic vibrations that are a unit of frequency referred to in cycles per second (CPS) or hertz (Hz). There are two types of ultrasonic units: magnetostrictive and piezoelectric. Both units have four similar components: the electric generator, the handpiece, the insert, and the foot pedal control (Figure 25-1, A). When the ultrasonic unit receives electrical energy and the foot pedal is activated, an electrical current is sent through the generator, or base of the unit, to the handpiece. The handpiece holds the transducer or insert. The transducer converts the electrical energy to mechanical energy, causing the tip to vibrate. The mechanical action of the tip removes calculus, oral biofilm, and root surface constituents that are directly contacted by the tip.
Manual and Autotuned Units
Ultrasonic units are either manual-tuned or autotuned. Manual-tuned units are magnetostrictive ultrasonic devices only. An example of this type of unit is the USI series (Ultrasonic Services Incorporated, Houston, Texas).
The manual-tuned unit permits the clinician to adjust the frequency via the tuning knob (see Figure 25-1, A). Frequency is the number of times per second that the tip moves back and forth in one cycle (speed of movement of the tip). A cycle is one complete linear or elliptic stroke path of the tip. The clinician’s ability to control the frequency might assist in deposit removal or debridement. For example, low frequency is used for debridement of light calculus deposits when minimal gingival inflammation is present and might be more comfortable to the client than a high speed of movement. However, frequent readjustments of the tuning knob to ensure optimal unit efficiency unit increase treatment time.
The autotuned unit has a preset frequency within the instrument that automatically tunes the cycles per second to maximum efficiency for each insert used. Therefore there is no tuning knob to adjust the speed (frequency) of the tip. The majority of magnetostrictive units and all piezoelectric units are autotuned.
Both manual-tuned and autotuned units have power and water control knobs. Power (also known as amplitude) is the energy in the handpiece that creates movement of the working end. Increasing the power setting increases the distance the working end moves. This is the length of the stroke (Figure 25-2). The distance the working end travels in the single vibration is called tip displacement. For example, one manufacturer reports that a particular unit has an amplitude of 0.001 to 0.008 inch (USI, Houston, Texas). As amplitude increases, the output of power increases, enhancing the efficiency of the action of the tip.

Figure 25-2 Tip displacement or amplitude.
(From Hodges KO: Concepts in nonsurgical periodontal therapy, Albany, NY, 1998, Delmar.)
The water control knob adjusts the volume and temperature of the flow from the handpiece. Water flow does the following:
Cools the transducer and tip (Note: Although a piezoelectric transducer can run without water, the tip generates frictional heat that requires water to keep it cool and flush debris. Also, piezoelectric transducers will create heat and lose efficiency without water flow. In clinical practice a piezoelectric unit is always operated with water.)Proper water spray is critical to prevent root surface damage. The greater the water flow, the lower the water temperature; a decreased water flow creates a higher water temperature. This is why the water temperature should be adjusted if clients experience sensitivity. Water flow is independent of the energy generated from the tip (i.e., increased water flow does not affect the mechanized energy produced). Although a piezoelectric unit does not require water for cooling of the transducer; water flow provides other advantages and is necessary to cool the tip.
Magnetostrictive Units (Procedure 25-1)
The insert in a magnetostrictive unit is a core attached to the working end (see Figure 25-1, B). The core is either a stack of metal (Permanickel) strips or a ferrite rod, depending on the type of unit. The Cavitron Jet Plus and Cavitron Select SPS with 30-kHz (DENTSPLY Professional) are examples of magnetostrictive technology with a handpiece that houses an insert with metal strips for the core (Figure 25-3).
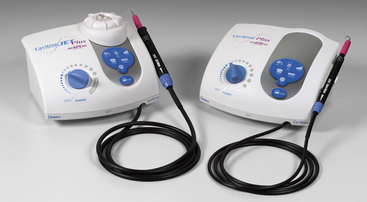
Figure 25-3 Magnetostrictive units. Left, Cavitron Jet Plus with SPS Technology with 30-kHz insert. Right, Cavitron Plus SPS with 30-kHz insert that has a wireless foot control.
(Courtesy DENTSPLY International, York, Pennsylvania.)
In contrast, the Odontoson-M (Odonto-Wave) is an example of a magnetostrictive unit that uses a ferric rod (Figure 25-4). Some magnetostrictive units are available with an autoclavable handpiece and/or an autoclavable handpiece line.
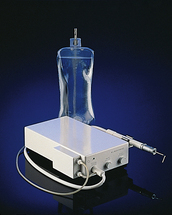
Figure 25-4 Magnetostrictive unit: Odontoson-M. Insert core is a ferrite rod.
(Courtesy Odonto-Wave, Fort Collins, Colorado.)
Inside the handpiece is a copper wire coil that exposes the core to a varying magnetic field when it receives an electrical current. When magnetized, the core contracts; when demagnetized, the core returns to its original size. The alternating electromagnetic field causes the tip of the insert to vibrate in an elliptical or orbital (360 degrees) motion when the transducer is a metal stack. Similarly, when the transducer is a ferrite rod, the tip can also be used on all sides, enhancing its adaptability to tooth surfaces. The active tip area is the portion of the working end that performs the instrumentation, and it is affected by the frequency. In the 25,000- to 30,000-Hz unit the active tip area is approximately the last 4.3 mm of the working end (see Procedure 25-1).
Procedure 25-1 INSTRUMENTATION WITH THE MAGNETOSTRICTIVE ULTRASONIC UNIT
STEPS
Preparation
Adaptation
Heat is a byproduct of the dimensional change of the transducer and oscillating tip in magnetostrictive units; therefore water is needed to control the heat to prevent pulp tissue damage. When water flows to the end of the insert and contacts the moving tip, tiny droplets and a fine spray result. This phenomenon is called atomization.
Insert Selection
When selecting inserts for mechanized instrumentation, the dental hygienist considers the following:
There are two types of magnetostrictive inserts based on the frequency requirements of the unit: either 25 kHz or 30 kHz. The stack of the 30-kHz insert is shorter than that of the 25-kHz insert (Figure 25-5, A). Insert designs are selected in either type based on the frequency of the equipment being used. Most magnetostrictive units accept most manufacturers’ 25-kHz or 30-kHz inserts. For example, inserts manufactured by DENTSPLY Professional or Hu-Friedy can be used in USI units. Inserts for the Odontoson-M (Odonto-Wave) unit are not interchangeable with other magnetostrictive units. Some units accept both 25-kHz and 30-kHz inserts (e.g., Model 2530, Tony Riso Company).
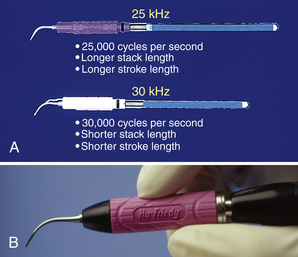
Figure 25-5 A, Magnetostrictive inserts: 25-kHz and 30-kHz. B, Satin Swivel Ultrasonic inserts with soft silicone grip. Slight swivel increases maneuverability and adaptability.
(Courtesy Hu-Friedy Manufacturing, Chicago, Illinois.)
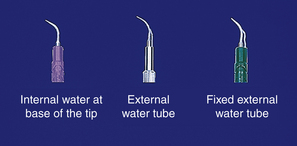
An internal or external fluid hose (conduit) is available in most designs (Figure 25-6). An advantage is that the internal hose does not bend as the external tube does. The external hose is available in two types: a tube that is long and not fixed, and a shorter external tube that is fixed. There are many choices in internal design water flow from various manufacturers. One choice in internal hose design is an insert manufactured with the port close to the insert tip (Focused Spray Inserts, DENTSPLY Professional). No evidence supports use of a particular type of water delivery; therefore operator preference influences choice.
Current Concepts in Insert Design
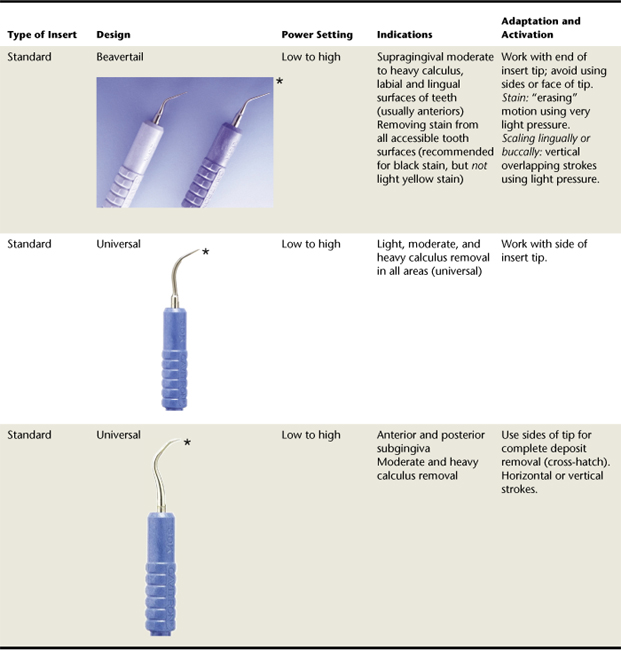
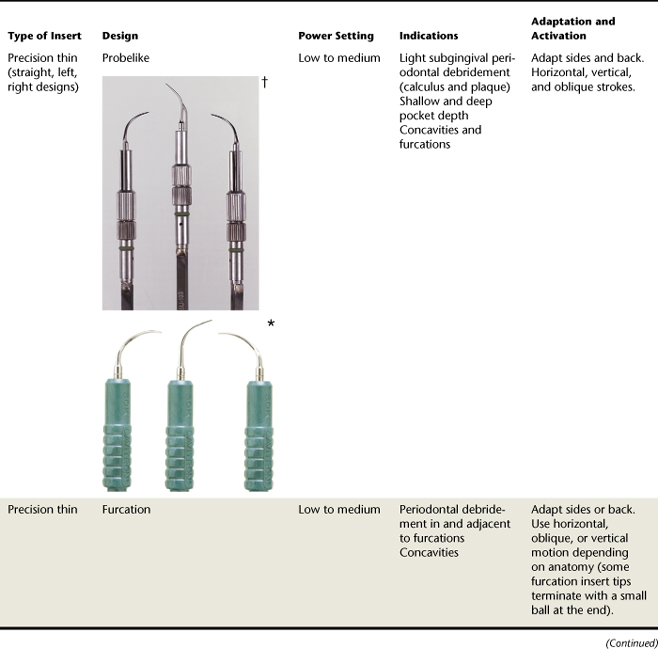
Design affects the efficiency and quality of the periodontal instrumentation. Refer to Table 25-1 for a review of insert tips manufactured by DENTSPLY Professional, Hu-Friedy, and Tony Riso. Other companies make similar inserts (USI). Some inserts have a grip with a built-in light-emitting diode (LED) to illuminate the working surface (Protégé, Discus Dental).
Diamond-coated inserts (DENTSPLY Professional) are available for furcations, fine scaling, and root planing. They can be used with endoscopic therapy. Standard inserts are used for supragingival or subgingival (1 to 3 mm) debridement of the following:
Universal inserts (FSI-1000 or FSI-100, DENTSPLY Professional) can be used supragingivally, primarily for initial debridement of moderate to heavy nontenacious deposits. Depending on access and gingival contour and consistency, these inserts can also be used subgingivally. Precision thin inserts have probelike slim working-end designs (from 0.3 to 0.6 mm wide) indicated for light-deposit periodontal debridement in shallow and deep pockets (Focused Spray Slimline by DENTSPLY Professional or After Five Design by Hu-Friedy). Although they were developed for subgingival use, some supragingival applications include light deposits and debridement at the gingival margin, or root surfaces exposed after gingival recession. Precision thin inserts are about 40% narrower in diameter than standard inserts, facilitating subgingival access, client comfort, and tactile sense. The narrow width of the precision thin inserts should be considered when treating deep, narrow pockets in nonsurgical periodontal therapy (NSPT). The thinner the instrument, the greater chance of negotiating the pocket topography.

Pocket penetration with an unmodified, standard (P-10 DENTSPLY Professional) and precision thin insert (Focused Spray Slimline right and left) was compared.1 Trends indicate that the precision thin inserts were able to debride the apical oral biofilm border in deep pockets, and the standard insert was more effective in shallow pockets.
Furcation inserts (also considered precision thin inserts) have a 0.8-mm ball-end feature, providing more tip surface area for periodontal debridement of furcations and root concavities.
Reduced width of precision thin inserts and the ball-end insert could enhance efficiency and effectiveness of NSPT in furcations and deep narrow pockets.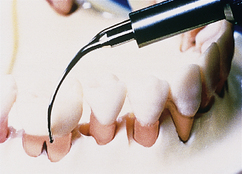
Insert Function
Inserts for magnetostrictive units deliver energy from all four surfaces: the point, the concave surface, the convex surface, and the sides or lateral surfaces. The point generates the greatest amount of energy and is not used to prevent undue surface alterations to the root and sensitivity. The lateral surfaces generate the least amount of energy. (Refer to Figure 25-8 to evaluate the order of energy generated by these inserts.) The lateral surfaces (sides) and convex back of the working end are adapted to the tooth.
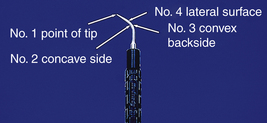
Figure 25-8 Power dispersion of a magnetostrictive insert tip. (1) Point of tip generates the greatest amount of energy. (2) Concave side generates the second greatest amount of energy. (3) Convex backside generates less energy than the point or concave surface. (4) Lateral surface generates the least amount of energy.
(Courtesy Hu-Friedy Manufacturing, Chicago, Illinois.)
In addition to the energy generated from the power and the frequency settings of a unit, the following other factors influence the energy emitted from the working end:
Time of exposure: The longer the time spent on the tooth structure, the greater the amount of energy. Pressure: Pressure will increase the effects of the tip of the working end. When too much pressure is applied, the tip will stop or dampen and the clinician must reevaluate the pressure used.Insert Care and Maintenance
Inserts must be sterilized according to the manufacturer’s instructions, which vary. Before autoclaving, most manufacturers recommend that used inserts be rinsed with water and dried. For sterilization, inserts should be placed in an all-paper or combination paper and plastic autoclave bag or preferably a cassette to decrease risk of damage and enhance insert longevity. All-plastic autoclave bags are not recommended, because the bag can build up too much heat during autoclaving and shorten the lifespan of the insert. For sterilization, bagged inserts should be placed on top of other instruments in the autoclave or processed separately to prevent damage. Inserts should not be placed in disinfectants because the chemicals may disintegrate the plastic grips and alter the metal components, resulting in a shorter insert lifespan.
Magnetostrictive inserts require maintenance of the O-ring. To aid in inserting the tip into the handpiece, the ring is lubricated with water and gently twisted into place. O-rings are replaced when worn or cracked to prevent leakage of water at the junction of the handpiece and working end.
Inserts wear out with regular use and should be examined often to ensure that the metal tips are not bent and that the stacks are not damaged. The length of the insert tip should also be evaluated because wear over time will shorten the tip. Worn insert tips reduce efficiency, resulting in extended instrumentation time, need for increased power settings, and risk of tip fracture. An insert tip wear in the following amounts has the following effects:
The Efficiency Indicator guide (DENTSPLY Professional) is used to assess tip loss. Some manufacturers will retip inserts, but the stack is still subject to aging.
Piezoelectric Units
A piezoelectric unit (Figure 25-9) differs from a magnetostrictive unit in the following characteristics:
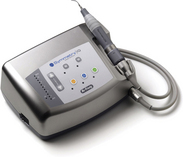
Figure 25-9 The Symmetry IQ 3000 is a piezoelectric unit.
(Courtesy Hu-Friedy Manufacturing, Chicago, Illinois.)
A piezoelectric unit uses a transducer that consists of ceramic crystals. Vibration occurs when alternating electrical currents are applied to the transducer, creating a dimensional change that is transmitted to the tip as follows:
Only two lateral sides of the tip are activated and adapted to the tooth surface (Figure 25-10); lateral surfaces emit the least amount of energy.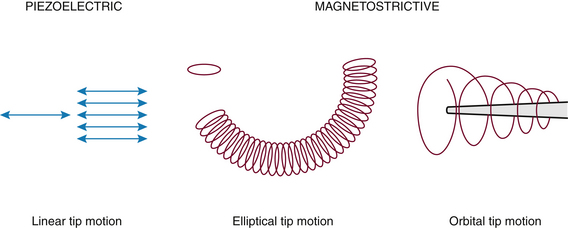
Figure 25-10 Tip motion of the piezoelectric and magnetostrictive units.
(From Hodges KO: Concepts in nonsurgical periodontal therapy, Albany, NY, 1998, Delmar.)
The transducer is contained within the permanently sealed handpiece of the piezoelectric unit. The working end is threaded or screwed into the handpiece with a specialized wrench and is not connected to the transducer as is the insert used with a magnetostrictive unit. Therefore working ends for piezoelectric units are not transferable to magnetostrictive units, nor are they interchangeable among piezoelectric units. Each piezoelectric unit comes with working ends designed for that particular unit; additional working ends can be purchased. Most manufacturers sell standard and precision thin designs such as the universal, beavertail, and periodontal slim tips. If selecting this type of unit, consider the available designs for NSPT. Some piezoelectric units have removable, autoclavable handpieces.
Although water is not needed to cool the transducer of the piezoelectric unit because it generates less heat than a magnetostrictive unit, water is still required to cool the friction produced between the working end and the tooth (see section on manual and autotuned units). Cavitation is also a byproduct of piezoelectric technology. Examples of this type of unit are the Symmetry IQ 3000 (Hu-Friedy) (see Figure 25-9), Piezon Master 400 (Electro Medical Systems), and Amdent US30 (Biotrol International). The active tip area for the 25- to 30-kHz piezoelectric units is from 2.2 to 3.5 mm, depending on tip design. Frequencies of the units vary from 25,000 to 50,000 kHz. Piezoelectric and magnetostrictive technologies are similarly efficacious for ultrasonic instrumentation.
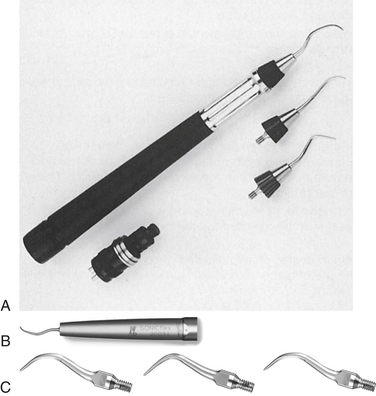
Sonic Instruments
Sonic instruments (Figure 25-11), driven by compressed air instead of electricity, range in frequency from 2500 kHz to 8000 kHz. Slower vibrations result in less-efficient calculus removal as compared with ultrasonic instruments, although clinical parameters are equal to ultrasonic and hand instrumentation. The sonic handpiece, connected to the compressed air line, is activated by the dental unit’s rheostat. Internally, the handpiece is composed of a hollow rod, a rotor, and several rubber O-rings. Instrument tips screw onto the handpiece and move in an elliptic motion. Although the unit itself does not generate heat, water is used in this system to cool the tip and for lavage. Sonic instruments do not offer the array of tip designs available with ultrasonic technology, although a rubber-coated sonic tip is available for debridement of implants (see Table 25-1 for Quixonic SofTip Prophy Tips, DENTSPLY Professional; Table 25-2 provides a summary of the three types of mechanized instruments).
HEALTH-RELATED OUTCOMES OF MECHANIZED INSTRUMENTS
Little difference exists between the long-term clinical response achieved with sonic, ultrasonic, and hand instrumentation.3 A combination of ultrasonic-sonic instrumentation and hand-activated instrumentation probably provides the best results for NSPT. Interproximal areas, furcations, the cementoenamel junction, and multirooted teeth are most likely to exhibit residual calculus regardless of instrument method.
Bleeding on probing and probing depths are both reduced to equivalent levels when sonic and ultrasonic methods are compared with one another and with manual scaling. In some cases instrumentation takes less time with mechanized instrumentation than with hand instrumentation.4
As probing depth increases, effectiveness of standard-design power-driven instruments declines owing to design limitations; therefore precision thin insert designs should be used.
The Gracey curet is more efficient than ultrasonic instruments with standard inserts; however, the Gracey curet requires more effort, time, and expertise.5
Longitudinal studies measuring clinical attachment level are needed to evaluate clinical parameters after mechanized instrumentation.
Subgingival Microbial Flora3,5
Equal reductions in microbial flora are found with the following:
Limited studies have determined that spirochetes in particular, as well as gram-negative microbes, are destroyed at ultrasonic frequencies.
Endotoxin Removal3,5
Ultrasonic instrumentation is effective in removing weakly adherent endotoxin. Endotoxin removal is achieved with less time, effort, and root surface removal because of the powered action versus the manual instrumentation that could ultimately result in overinstrumentation. About 16 strokes with ultrasonic instruments, rather than intentional cementum removal, resulted in fibroblast reattachment to previously diseased roots.5
Acoustic Microstreaming6
Acoustic microstreaming is caused by shear force surrounding an oscillation tip. The effects of acoustic microstreaming depend on tip geometry and tip orientation. It is hypothesized that acoustic microstreaming affects the microbial composition of bacterial plaque biofilm because the force generated by the streaming should shear the plaque away from the bacterial colony and tooth. This force accompanies the mechanical and cavitational activity that occurs during ultrasonic instrumentation. More evidence is needed about its therapeutic effect.
Oral Biofilm and Calculus Removal3,5
Hand-activated and mechanized instrumentation are equally effective in removing subgingival oral biofilm and calculus.5 When hand and mechanized instruments have been compared with diamond burrs, diamond-coated ultrasonic tips, plastic-coated tips, and reciprocating systems, oral biofilm and calculus removal have been equal to removal by manual instrumentation.
Antimicrobial Irrigation See Chapters 22 and 29.
Aerosols and Spatter7-9
During mechanized periodontal debridement a large amount of contaminated aerosols and spatter are produced. Dental aerosols are fine, airborne particles that are liquid, solid, or a combination of both and are 50 μm or less in size. Spatter includes particles greater than 50 μm that travel a considerable distance from the source and splash on environmental surfaces, masks, and the operator’s skin and clothes. Source of the contamination is the client’s blood, saliva, and bacteria, and the water spray coolant provides the means for the aerosols. When particles are ≤50 μm in size, they are more likely to remain airborne and to be pulled into the nasal passages and respiratory system. Even large liquid particles eventually evaporate and leave smaller particles called droplet nuclei that carry respiratory bacteria such as Mycobacterium tuberculosis. Both large and small particles contain blood elements with attached viral particles such as human immunodeficiency virus (HIV) or hepatitis B virus (HBV).
The number of potentially pathogenic organisms in aerosol and spatter produced by mechanized instrumentation remains unknown. No epidemiologic studies link dental aerosols to disease transmission; however, the dental hygienist should be concerned about this potential.
One study revealed that magnetostrictive, piezoelectric, and sonic instruments produced an equal amount of contamination that contained bacteria as small as 0.65 μm. Despite different volumes of coolant water, there is no difference in the amount of aerosols emitted.9 However, another study found that the piezoelectric unit produced the greatest amount of contamination because of the linear motion of the tip as compared with magnetostrictive units.8 A greater production of aerosols and spatter also was observed in some of the precision thin inserts when compared with standard inserts. This finding probably is related to the ultrasonic energy being applied to thinner metal, causing more movement than the same amount of energy applied to a standard insert tip. More movement enhances greater aerosol production at a given power setting. One study evaluated the focused-spray insert design (FSI-10, DENTSPLY Professional), which produced fewer aerosols and thus less contamination then a traditional insert (Thru Flow Insert [TFI–10], DENTSPLY Professional).7 Both inserts produced equal amounts of aerosol contamination.
Root Surface Roughness10,11
Studies reveal conflicting conclusions regarding instrumentation and root surface roughness. In studies where ultrasonic instrumentation left a rougher surface than hand instrumentation, roughness was not shown to be significant in terms of gain in clinical attachment. Tip angulation, exposure time, lateral pressure, and intensity of settings are all critical factors to consider to avoid overinstrumentation. When root smoothness with sonic and ultrasonic methods were compared with each another, results revealed either equal outcomes or that the ultrasonic method produced smoother surfaces.
Root Substance Removal12,13
To prevent root surface damage, the piezoelectric tip must be angulated as close to 0 degrees to the root as possible. Lateral force has the greatest influence on the amount of tooth surface removed (defect volume), as follows:
Lateral force and tip angulation had similar effects on defect depth with the magnetostrictive method. Power setting does not influence the volume or depth of the defect as much as lateral force or tip angulation.Removal of calculus during initial therapy requires multiple instrument designs and increased instrumentation time compared with periodontal maintenance (PM); however, PM requires frequent visits over the life of the tooth. Preventing root structure damage during PM is a consideration; therefore it might be advantageous to employ power-driven instruments.
MECHANIZED INSTRUMENTS IN PRACTICE
Advantages (Box 25-1)
There is increased efficiency of removal for large calculus deposits when compared with hand instrumentation. This advantage must be considered in clinical treatment because moderate to large calculus deposits can be tenacious. Burnished calculus often results if ultrasonic instruments alone are used for tenacious deposit. In this case, the clinical power of the unit is increased and hand-activated instruments, such as the periodontal file, are incorporated into debridement therapy. Also, in general, it takes less time to debride with ultrasonic instrumentation when compared with hand-activated instrumentation. Overall the increased efficiency is a benefit for both hygienist and client.
BOX 25-1 Advantages and Disadvantages of Mechanized Instruments as Compared with Manual Instruments
| Advantages | Disadvantages |
|---|---|
Multiple surfaces of the tip can be used to remove deposits rather than the single-surface cutting edge of a curet. A single precise curet blade must be adapted at a precise tooth-to-blade angle to remove dental calculus and extrinsic stain in a channeling fashion—one reason why manual debridement is technically demanding.
Ultrasonic tips never need sharpening as hand instruments do, saving time and effort for the operator and client. Also, inserts or working ends are replaced less often than curets.
A large-diameter handpiece is an advantage for the clinician because it does not require much pinching motion to hold it as compared with a smaller-diameter manual instrument handle. In addition, lateral pressure is not needed to enhance activation of the working end; therefore the chance of developing repetitive strain injuries could be reduced (see Chapter 9).
It is possible that less tissue distention occurs with precision thin designs than with manual curets because of the greater width of a new curet blade.
Water lavage and irrigation might enhance healing and client comfort when compared with manual instrumentation. Enhanced comfort could be a result of the warm lavage and/or the fact that less lateral pressure is needed to remove the deposit. The acoustic microstreaming effect on bacteria is another byproduct of the water coolant.
Disadvantages (see Box 25-1)
Water flow can interfere with client comfort because of unavoidable spray on the cheeks and chin. Aerosol production is a concern, although further evidence is needed to study its effects on the clinician and client.
Temporary hearing shifts have been observed from airborne subharmonics of the ultrasonic instrument. Tinnitus, an early sign of hearing loss, might occur. For the client, ultrasound travels through the tooth to the inner ear via bones in the skull. This is possible via instrumentation on molar teeth. At times the noise produced may also be uncomfortable for the client.14 Further research on hearing loss in both clinician and client is needed.
Reduced tactile sensation as compared with curets has been experienced by dental hygienists. Limited tactile sense is developed over time with precision thin designs, and an explorer is always employed to determine progress and clinical endpoint.
Water spray interferes with the operator’s visibility. Continued oral evacuation is a must, and commercially prepared solutions to prevent mirror fog might be useful (see section on instrumentation technique for mechanized instruments).
Indications
With precision thin designs, the clinician can remove lighter deposits supragingivally and subgingivally without changing inserts or working ends. Subgingival instrumentation for calculus, oral biofilm (loosely attached and attached), root surface constituents, and periodontal pathogens is accomplished primarily with precision thin designs. Standard inserts, however, probably extend subgingivally about 1 to 3 mm depending on the tissue, access to the area, insert selection, and client sensitivity.
Mechanized instruments can also assist in the removal of excess cement and bonding agents around orthodontic appliances and after appliance removal. In these cases, manual instrumentation is usually not as effective. Other indications include dental hygiene care for necrotizing periodontal diseases, pericoronitis, or treatment during surgical interventions (removal of residual deposits and granulation tissue).
Precautions
Caution should be exercised when a client reports having a pacemaker.14 Unshielded pacemakers may be disrupted by external electric fields. The demand pacemaker is the most sensitive to external electromagnetic forces. Older models were unipolar and less insulated, causing interference from dental equipment. Newer shielded models are bipolar and well insulated, so the small amount of electromagnetic radiation generated by dental equipment does not pose as much threat to their function. Consultation with the cardiologist of record will provide information on the client’s pacemaker type and recommendations for use of magnetostrictive ultrasonic instrumentation. Communicable diseases such as hepatitis, tuberculosis, strep throat, and respiratory infections could all be transmitted via aerosols. Clients with communicable disease should not receive NSPT until the disease has been treated for an appropriate period of time. When it is appropriate for NSPT to take place based on health status, standard precautions are employed to protect the client and clinician. Presence of demineralized tooth structure, dentinal hypersensitivity, restorative materials, and restorations such as veneers, cast crowns, and titanium implants do not prevent the clinician from using mechanized instruments; however, these localized areas should be avoided. Tip placement should occur adjacent to these conditions and not on or within these entities. The periodontal and dental chart guides decisions about surfaces to treat or avoid with various instruments. If restorative material is on the clinical crown, and the tip of the mechanized instrument can be placed apical to the restoration, then the insert can be used. Restorative materials can be adversely affected by creating roughness or striations (e.g., on composite restorations, black-colored striations can result because the composite material will abrade the metal tip). Also, undue wear to the working end can occur when it is placed against metal restorations. Specially designed implant inserts and tips are available for titanium implants (SoftTip, DENTSPLY Professional) (see Table 25-1). Use with children is a concern because vibrations might negatively affect young growing tissue. Primary and newly erupted teeth have large pulp chambers that are more susceptible to heat generated by dental instruments. Water flow and temperature of the instrument must be appropriate at all times, especially with children. The lowest possible power setting is recommended. Special precautions are indicated when a client is immunosuppressed from a disease or from chemotherapy; for example, HIV infection, organ transplants, cancer, systemic lupus erythematous, Crohn’s disease, or corticosteroid therapy may increase risk of opportunistic infection from breathing contaminated aerosols and from ingesting contaminated dental unit water. Clients with uncontrolled diabetes should be referred to the physician to achieve control before providing NSPT. Mechanized instruments will be indicated for most people with diabetes who receive initial NSPT or PM (see Chapter 43).All clients should be provided with a 30-second rinse of 0.12% chlorhexidine gluconate to reduce the number of organisms before care. In general, dental hygienists might prefer to used mechanized instruments because of treatment efficiency.
Contraindications
Mechanized instrumentation should not be used with clients who report any of the following conditions:
Chronic pulmonary disease—Chronic pulmonary disease includes asthma, emphysema, cystic fibrosis, and pneumonia. The risk for infection probably would increase if microorganisms in oral biofilm were aspirated into the lungs (see Chapter 49). Cardiovascular disease with secondary pulmonary disease—The risk of aspiration of oral biofilm microorganisms into the lungs could adversely affect the cardiovascular system (see Chapter 42). Dysphagia or swallowing difficulty caused by water flow—Muscular dystrophy, multiple sclerosis, paralysis, or a psychologic disorder might affect the client’s swallowing.A summary of the indications, precautions, and contraindications is found in Box 25-2. Box 25-3 provides recommendations for discussion and demonstration of mechanized instruments with a client.
BOX 25-2 Indications, Precautions, and Contraindications for Use of Mechanized Instruments
Indications
BOX 25-3 Recommendations for Discussion and Demonstration of Mechanized Instruments with a Client
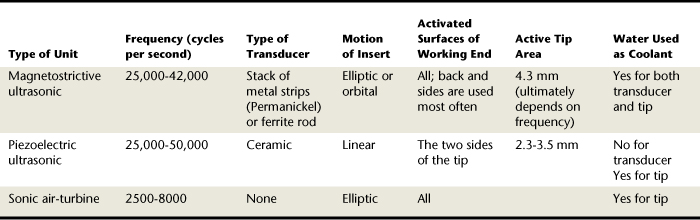
Unit Tuning
Autotuned Units (Magnetostrictive and Piezoelectric)
Frequency is already preset; the clinician controls only energy output by adjusting the power knob. The lowest power setting that is effective should be selected. For most procedures and insert or working-end designs, a low to medium power setting is usually adequate. Water flow must be adjusted with the water knob to achieve a fine mist or spray.
Manual-Tuned Units
Frequency, power, and water are controlled by the clinician. The option to tune frequency is available only in manual-tuned units; this increases the clinician’s control over insert performance. The tuning procedure is repeated for each new insert as follows:
Power is adjusted to the lowest setting and the frequency knob is adjusted so that no vibration is emitted from the tip. External water conduit (if using one) is positioned 1 mm from the back of the tip and not contacting the insert. With desired insert in place, the handpiece is held in a horizontal position in relation to the floor. Insert tip is pointed upward toward the ceiling; the water is adjusted until an arch from 1 to 1½ inches occurs over the tip. This arch of water ensures adequate water flow. Insert tip is pointed downward toward the floor; the frequency knob is adjusted so that a light aerosol of water is emitted from the tip, accompanied by a fluent stream of water.In phase and out of phase are terms used to describe the frequency adjustment of an insert:
In phase means that the insert is adjusted to resonance frequency for maximum energy output. This level of tuning puts the insert at peak efficiency suitable for light to heavy deposit removal. Usually the in-phase adjustment is used with traditional inserts and a fine mist of water. Out of phase means that the insert is detuned from resonance frequency. The out-of-phase adjustment is usually used with the precision thin inserts and a fine mist with a water drip (Figure 25-12). Out-of-phase adjustment is thought to enhance client comfort and results in less vibration for debridement procedures.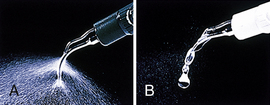
INSTRUMENTATION TECHNIQUE FOR MECHANIZED INSTRUMENTS
Positioning
Client is placed in a normal supine position appropriate for the maxillary or mandibular arch (e.g., if applying an instrument to the mandibular right lingual surface, have client turn to the right). Water will pool in the right posterior of the oral cavity, where suction can remove it efficiently, reducing the potential for gagging. Client turns to the right for the right side of the mouth to be treated and to the left for treatment on the left side.
Suction and Retraction
High-volume suction that requires assistance from another individual is recommended for the following reasons:
If assistance is not available, a low-speed saliva ejector with either a straight saliva ejector or a curved circular ejector is used (Hygoformic, Pulp Dent) as follows:
For a straight device: Client participates by holding and placing the ejector intraorally as needed. For a curved circular ejector: Suction hose is extended behind the dental chair to place the ejector in the mouth. The weight of the hose stabilizes the ejector. This ejector can retract the buccal mucosa when placed between the buccal plane of the teeth and the cheek mucosa. The circular end is twisted to adapt to the contour of the cheek and to expose the holes where the water exits to the suction hose.Retracting the client’s lips helps control the water. In the anterior the lips can form a cuplike space between the facial tooth surfaces and mucosa. In the posterior the lips can be retracted away from the teeth to form a space for the water to pool.
Grasp
A light grasp, similar to that used with exploration, is mandatory because it increases tactile sensitivity and reduces the likelihood of excessive lateral pressure. The light grasp is all that is necessary because tip activation removes the calculus deposit, not pressure. At times the grasp will occur next to the junction of the handpiece and insert, or the grasp might be placed further up the handpiece to enhance access.
The handpiece cord should be straight and not twisted to prevent undue stress on the operator’s shoulder, arm, and hand. The cord can be draped over the clinician’s shoulder, draped over the light handle, or held between the ring and little fingers. When the clinician is adapting the tip to the tooth and rolling the handpiece within the grasp, strain is also placed on the clinician’s arm. The insert itself should therefore be rotated (using the nondominant hand) within the handpiece of the magnetostrictive unit to minimize this strain. Rotation of the insert within the handpiece occurs when the operator is attempting to achieve adaptation of the tip between the distal and buccal or lingual surfaces, as well as the buccal or lingual surfaces and the mesial surfaces. If the handpiece alone is rotated, the cord could get twisted, causing ergonomic problems.
Ergonomics can be enhanced by using a handpiece capable of rotating to eliminate twisting of the cord, reduce cable drag, and minimize stress on internal tubings. The Satin Swivel by Hu-Friedy (see Figure 25-5, B) and the Cavitron Steri-Mate handpiece with swivel by DENTSPLY Professional have been designed to address this ergonomic issue.
Fulcrum
An intraoral fulcrum is used most of the time with standard inserts, whereas an extraoral fulcrum is recommended with precision thin designs because only an extremely light stroke is needed to debride. The extraoral fulcrum enhances the tactile sensitivity clinicians develop with experience. The dental hygienist does not need a firm fulcrum on tooth surface as with manual instrumentation because strength to exert lateral pressure is not indicated for mechanized instrumentation. Fulcrum placement is either conventional, opposite arch, or cross-arch, depending on the surface being treated. Grasp relates to the fulcrum placement just as with manual instrumentation. In other words, a cross-arch fulcrum requires the clinician to place the grasp further back on the handpiece.
Dental Mirror Use
The mirror is still used, but visibility is impaired. Operators tend to use direct vision as much as possible while striving to attain ergonomically correct client and operator positioning.
Adaptation
For adapting the working end, use the correct part of the active tip. Cover all tooth surfaces when periodontal debridement is indicated.
For supragingival debridement the clinician focuses on visible dental deposit (Figure 25-13). For general periodontal debridement the easiest way to adapt any universal insert or working end to the tooth surface is to think of the application in relation to a universal curet, that is, the tip is directed toward the distal surface when the clinician is inserting the tip at the distal line angle (Figure 25-14). The clinician then activates the tip toward the distal surface while adapting the lateral surface of the tip. To keep the tip adapted, the clinician will roll and pivot while advancing the tip to extend to the midline of the distal proximal surface.
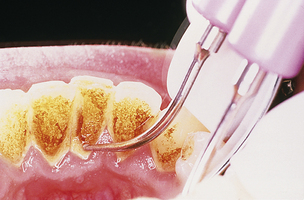
Figure 25-14 Precision thin insert adapted to distal surface covered with dental calculus.
(Courtesy Hu-Friedy, Chicago, Illinois.)
Next the clinician will reinsert, adapting the tip parallel to the long axis at the distal line angle, will advance across the buccal or lingual surface, and will roll and pivot (or turn the insert in the handpiece) at the mesial line angle to keep the side of the tip adapted to the tooth surface (Figure 25-15, A and B). The clinician ensures that the tip reaches the midline of the mesial proximal surface. The tip is applied somewhat perpendicularly or diagonally to the long axis of proximal surfaces (Figure 25-15, C). Another approach to the buccal or lingual area of a sextant or quadrant is to complete the distal surface of each tooth first, then to approach the buccal and lingual surfaces, then the mesial surfaces one by one. This method involves less rolling and pivoting and allows the clinician to move the insert in the handpiece less often.
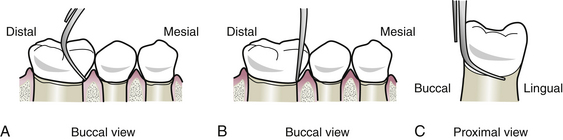
Figure 25-15 Right precision thin insert used to debride the buccal surfaces. A, Select insert based on its curvature toward the mesial surface. Adapt tip below contact area. B, Roll tip onto the proximal surface. Keep tip against tooth. C, Extend tip toward the lingual surface to negotiate the cementoenamel junction and proximal surfaces.
(From Hodges KO: Concepts in nonsurgical periodontal therapy, Albany, NY, 1998, Delmar.)
With magnetostrictive units the convex surface of the working end can be used. Adapting the convex surface to the enamel and cementum is indicated for loss of clinical attachment, periodontal pockets, root concavities, and furca (Figure 25-16). At all times the tip to tooth angle is ≤15 degrees. The point of the insert or tip is never placed on the tooth surface because it could cause iatrogenic damage (clinician-caused damage). With standard-size inserts, extension to the epithelial attachment is not an objective.

Figure 25-16 Pocket negotiation. A, Enter pocket using the back surface. Keep tip in contact with root and parallel to the long axis of the root. B, Negotiate tip to the apical extent of the pocket using minute overlapping strokes. Note: Weight of the instrument and the oscillations generated by the tip will guide the tip subgingivally. C, To move the tip along the epithelial attachment, use the back of the tip and a pushlike stroke to avoid trauma and client discomfort. D, Avoid using a pull stroke with front or concave surface when tip is against the epithelial attachment. Place current periodontal charting and radiographs within view for reference during instrumentation.
(From Hodges KO: Concepts in nonsurgical periodontal therapy, Albany, NY, 1998, Delmar.)
Activation
Tip activation is initiated by wrist movement or rocking from the fulcrum as with hand instrumentation. The tip must be moving at all times to prevent iatrogenic damage to the root or crown of the tooth, excessive heat, or a “shock” effect felt by the client. Strokes are overlapping and multidirectional: oblique and vertical strokes are used primarily; however, horizontal and combination strokes on a surface also are employed. Movement in different directions helps break up heavy calculus deposits and aids in treating all root surfaces in periodontal pockets.
Different designs of standard inserts require different instrumentation. (See Table 25-1 to review the designs, indications, and applications.) Instrumentation with precision thin designs parallels instrumentation with standard designs, keeping in mind differences in purpose of therapy. Right and left inserts are used successfully in the posterior regions and adapted like a universal curet, as previously described. A straight design is used in deep periodontal pockets and furcations and adapts well in anterior regions of the mouth. Tip activation is essentially the same as for standard designs; however, the clinician will not work from the margin toward the epithelial attachment. Instead the tip is extended to the epithelial attachment before activation, and then activation is initiated. Strokes are slow and methodic, ensuring that the subgingival pocket environment is covered with the mechanized instrument. When smoothing of a tooth surface is indicated, a faster motion (vibrato stroke) can be applied. Manual instruments are always considered as adjuncts to mechanized instruments, and an explorer is always used to evaluate the clinical endpoint.
Instrumentation of furcations is achieved with multiple precision thin designs. They are adapted using the sides or back into the concavities adjacent to the furcation and on the mesial and distal surfaces of the furcation itself. The tooth is mentally divided into two teeth—one tooth being the distal root and the other tooth being the mesial root. Both distal surfaces are treated first, then the buccal and lingual surfaces of the roots are treated, and finally the mesial surfaces of each root are debrided (see Figure 28-7). Complete coverage of the roof and lateral walls of the furcation is the objective of periodontal debridement therapy. The right, left, or straight furcation designs with the 0.8-mm ball end might aid in instrumenting concavities adjacent to and within exposed furca.
CLIENT EDUCATION Tips
A combination of hand-activated and mechanized instrumentation is recommended to obtain optimal results from periodontal debridement.LEGAL, ETHICAL, AND SAFETY ISSUES
The client needs to be informed of the nonsurgical periodontal therapy and periodontal maintenance care plan, including mode of periodontal debridement, and must participate in decision making. There is no significant difference in long-term healing between hand-activated and mechanized instrumentation. Client must receive information about the similarities and differences of hand-activated and mechanized instrumentation to make an informed decision about the care plan.KEY CONCEPTS
Mechanical pocket therapy is periodontal debridement using hand-activated and/or mechanized instrumentation; both methods are efficacious. Three modes of mechanized periodontal debridement are magnetostrictive ultrasonic, piezoelectric ultrasonic, and sonic instrumentation. Manual-tuned ultrasonic units allow the clinician to adjust the frequency, but autotuned units do not. Both types require the clinician to control power and water.CRITICAL THINKING EXERCISES
Refer to the Procedures Manual where rationales are provided for the steps outlined in the procedure presented in this chapter.
1. Clifford L.R., Needleman I.G., Chan Y.K. Comparison of periodontal pocket penetration by conventional and microultrasonic inserts. J Clin Periodontol. 1999;26:124.
2. Hou G.L., Chen S.F., Wu Y.M., Tsai C.C. The topography of the furcation entrance in Chinese molars: furcations entrance dimensions. J Clin Periodontol. 1994;21:451.
3. Cobb C.M. Clinical significance of nonsurgical periodontal therapy: an evidence-based perspective of scaling and root planing. J Clin Periodontol. 2002;29:22.
4. Matthews D. Conclusive support for mechanical nonsurgical pocket therapy in treatment of periodontal disease. How effective is mechanical nonsurgical pocket therapy. Evid Based Dent. 2005;6:68.
5. Drisko C.H. Root instrumentation: power-driven versus manual scalers—which one? Dent Clin North Am. 1998;42:229.
6. Khambray B.S., Walmsley A.D. Acoustic microstreaming: detection and measurement around ultrasonic scalers. J Periodontol. 1999;70:626.
7. Rivera-Hidalgo F., Barnes J.B., Harrel S.K. Aerosol and splatter production by focused spray and standard ultrasonic insets. J Periodontol. 1999;70:473.
8. Harrel S.K., Barnes I.B., Rivera-Hidalgo F. Aerosol and splatter contamination from the operative site during ultrasonic scaling. J Am Dent Assoc. 1998;129:1241.
9. Gross K.B., Overman P.R., Cobb C., Brockmann S. Aerosol generation by two ultrasonic scalers and one sonic scaler: a comparative study. J Dent Hyg. 1992;66:314.
10. Schlageter L., Rateitschak-Pluss E.M., Schwarz I.P. Root surface smoothness or roughness following open debridement: an in vitro study. J Clin Periodontol. 1996;25:460.
11. Sandhu H.S., Salloum I.A., Stakiw J.E. Scaling and root planing: hand versus power-driven instruments. J Can Dent Assoc. 1998;64:269.
12. Flemmig T.F., Petersilka G.J., Mehl A., et al. Working parameters of a magnetostrictive ultrasonic scaler influencing root substance in vitro. J Periodontol. 1998;69:547.
13. Flemmig T.F., Petersilka G.J., Mehl A., et al. The effect of working parameters on root substance removal using a piezoelectric ultrasonic scaler in vitro. J Clin Periodontol. 1998;25:158.
14. Trenter S.C., Walmsley A.D. Ultrasonic dental scaler: associated hazards. J Clin Periodontol. 2003;30:95.
Visit the  website at http://evolve.elsevier.com/Darby/Hygiene for competency forms, suggested readings, glossary, and related websites..