Dental X-Ray Film Processing
After completion of this chapter, the student will be able to do the following:
• Define the key words associated with processing of dental x-ray film
• Describe in detail how a latent image becomes a visible image
• List and discuss the five steps of manual film processing
• List and describe the four basic ingredients of the developer solution
• List and describe the four basic ingredients of the fixer solution
• Discuss the parts of the processing tank: insert tanks, master tank, and lid
• List and describe the equipment needed for manual film processing
• List and discuss the procedural steps for manual film processing
• Describe the care and maintenance of the processing solutions, equipment, and equipment accessories used in manual film processing
• Discuss the advantages of automatic film processing
• List and identify the component parts of the automatic film processor
• Describe the mechanism of automatic film processing
• List and discuss the four procedural steps for automatic film processing
• Describe the care and maintenance of the automatic film processor and automatic processing solutions
• Discuss the location, size, lighting, and equipment requirements necessary for the darkroom
• Discuss the equipment requirements and procedural steps for film duplication
• Describe film processing problems that result from time and temperature errors
• Describe film processing problems that result from chemical contamination errors
• Describe film processing problems that result from film handling errors
• Describe film processing problems that result from lighting errors
To produce high-quality diagnostic dental radiographs, the dental x-ray film must be properly exposed and processed. Film processing procedures directly affect the quality of a dental radiograph. The dental radiographer must have a working knowledge of film processing procedures, problems, and solutions.
The purpose of this chapter is to detail film processing procedures, to discuss manual and automatic film processing, to describe darkroom requirements, and to explain film duplication procedures. In addition, this chapter discusses common processing problems and provides solutions.
Film Processing
Film processing refers to a series of steps that produce a visible permanent image on a dental radiograph. The purpose of film processing is twofold, as follows:
• To convert the latent (invisible) image on the film into a visible image
• To preserve the visible image so that it is permanent and does not disappear from the dental radiograph
Film Processing Fundamentals
As detailed in Chapter 7, the silver halide crystals in the film emulsion absorb x-radiation during x-ray exposure and store the energy from the radiation. The stored energy within the silver halide crystals forms a pattern and creates an invisible image within the emulsion on the exposed film. This pattern of stored energy on the exposed film cannot be seen and is referred to as the latent image. The latent image remains invisible within the film emulsion until it undergoes chemical processing procedures.
From Latent Image to Visible Image
How does the latent image become a visible image? Under special darkroom conditions, a chemical reaction takes place when a film with a latent image is immersed in a series of special chemical solutions. During processing, a chemical reaction occurs, and the halide portion of the exposed, energized silver halide crystal is removed; chemically, this is referred to as a reduction. Reduction of the exposed silver halide crystals results in precipitated black metallic silver.
During film processing, selective reduction of the exposed silver halide crystals occurs. Selective reduction refers to the reduction of the energized, exposed silver halide crystals into black metallic silver, while the unenergized, unexposed silver halide crystals are removed from the film. The latent image is made visible through processing procedures (Figure 9-1), as follows:
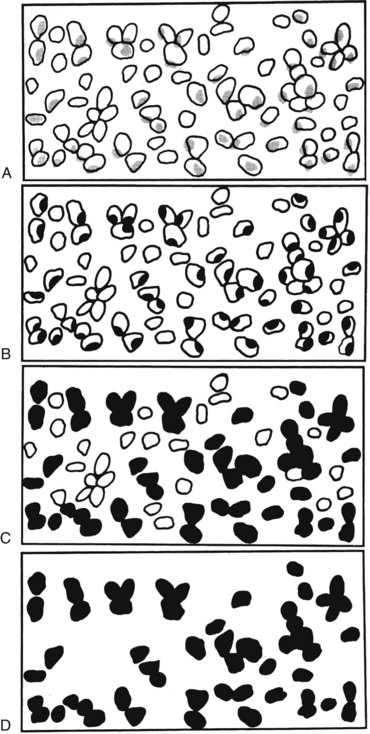
FIGURE 9-1 A, Schematic distribution of silver halide grains. The gray areas indicate a latent image produced by exposure. B, Partial development begins to produce metallic silver (black) in exposed grains. C, Development completed. D, Unexposed silver grains have been removed by fixation. (Courtesy Carestream Health, Inc., Rochester, NY.)
1. The film is placed in a chemical known as the developer solution for a specific amount of time and at a specific temperature. The developer distinguishes between the exposed and unexposed silver halide crystals. The developer initiates a chemical reaction that reduces the exposed silver halide crystals into black metallic silver and creates dark or black areas on a dental radiograph. At the same time, the unexposed silver halide crystals remain virtually unaffected by the developer.
2. Following the development process, the film is rinsed in water to remove any remaining developer solution.
3. Next, the film is placed in a special chemical known as the fixer solution for a specific amount of time. The fixer solution removes the unexposed silver halide crystals and creates white or clear areas on the dental radiograph. Meanwhile, the black metallic silver is not removed and remains on the film. After the fixing process, the film is washed in water to remove any remaining traces of the chemical solutions and then dried.
The Visible Image
The visible image that results on a dental radiograph is made up of black, white, and gray areas. The black areas seen on a dental radiograph are created by deposits of black metallic silver. The amount of deposited black metallic silver seen on a dental radiograph varies depending on the structures being radiographed. The white areas on a dental radiograph result from the removal of the unexposed silver halide crystals. The amount of unexposed silver halide crystals removed depends on the structures being radiographed. As discussed in Chapter 8, structures that permit the passage of the x-ray beam appear black, or radiolucent (see Figure 8-1), as follows:
As discussed in Chapter 8, structures that resist the passage of the x-ray beam appear white or radiopaque (see Figure 8-2), as follows:
Manual Film Processing
Manual film processing (also known as hand processing or tank processing) is a simple method of developing, rinsing, fixing, and washing dental x-ray films. To process films manually, the dental radiographer must be knowledgeable about specific equipment requirements, step-by-step processing procedures, and care and maintenance of the equipment and supplies.
Film Processing Steps
Manual film processing consists of the following five steps:
Development
The first step in film processing is development. A chemical solution known as the developer is used in the development process. The purpose of the developer is to reduce the exposed, energized silver halide crystals chemically into black metallic silver. The developer solution softens the film emulsion during this process.
Rinsing
After development, a water bath is used to wash or rinse the film. Rinsing is necessary to remove the developer from the film and stop the development process.
Fixing
After rinsing, fixing takes place. A chemical solution known as the fixer is used in the fixing process. The purpose of the fixer is to remove the unexposed, unenergized silver halide crystals from the film emulsion. The fixer hardens the film emulsion during this process.
Film Processing Solutions
Film processing solutions may be obtained in the following forms:
Both the powder and the liquid concentrate forms must be mixed with distilled water. The liquid concentrate form is popular and is used in most dental offices; it is easy to mix and occupies little storage space (Figure 9-2). It is important to follow the manufacturer’s recommendations for the preparation of such solutions.
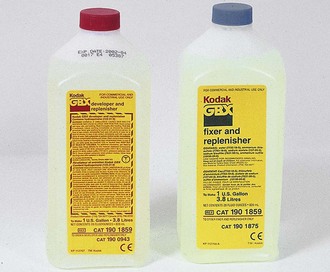
FIGURE 9-2 Liquid concentrates of developer and fixer. (From Bird DL, Robinson DS: Modern dental assisting, ed 10, St Louis, 2012, Saunders.)
Fresh chemicals produce the best radiographs. To maintain freshness, film processing solutions must be replenished daily and changed every 3 to 4 weeks; more frequent changing of solutions may be necessary when large numbers of films are processed. “Normal” use is defined as 30 intraoral films per day.
As described under Film Processing Steps, two special chemical solutions are necessary for film processing: developer and fixer.
Developer Solution
The developer solution contains four basic ingredients: (1) developing agent, (2) preservative, (3) accelerator, and (4) restrainer (Table 9-1).
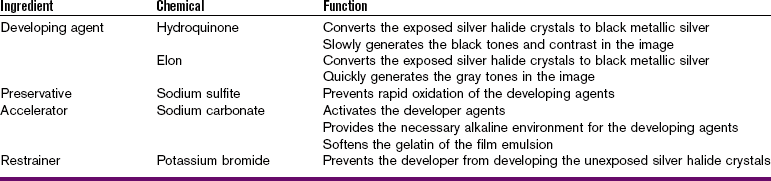
Developing Agent: The developing agent (also known as the reducing agent) contains two chemicals, hydroquinone (paradihydroxybenzene) and Elon (monomethyl-para-aminophenol sulfate). The purpose of the developing agent is to reduce the exposed silver halide crystals chemically to black metallic silver.
Hydroquinone generates the black tones and the sharp contrast of the radiographic image. Hydroquinone is temperature sensitive; it is inactive below 60° F and very active above 80° F. Because this chemical is sensitive to temperature, the temperature of the developing solution is critical. The optimal temperature for the developer solution is 68° F.
Elon, also known as metol, acts quickly to produce a visible radiographic image. Elon generates the many shades of gray seen on a dental radiograph. This chemical is not temperature sensitive. If hydroquinone and Elon were used individually and not in combination, Elon would produce a film that appeared gray with indistinct contrast, whereas hydroquinone would produce a film that appeared black and white. By using a combination of these chemicals, a film with black, white, and shades of gray is produced.
Preservative: The antioxidant sodium sulfite is the preservative used in the developer solution. The purpose of the preservative is to prevent the developer solution from oxidizing in the presence of air. The reducing agents hydroquinone and Elon are not stable in the presence of oxygen and readily absorb oxygen from the air. If these agents react with oxygen, the action of the developer solution is weakened. The preservative helps to prevent this weakening and to extend the useful life of hydroquinone and Elon.
Accelerator: The alkali sodium carbonate is used in the developer solution as an accelerator. The purpose of the accelerator (also called the activator) is to activate the developing agents. The developing agents are active only in an alkaline (high-pH) environment. For example, hydroquinone and Elon do not develop when used alone; the presence of an alkaline accelerator is required. The accelerator not only provides the necessary alkaline environment for the developing agents but also softens the gelatin of the film emulsion so that the developing agents can reach the silver halide crystals more effectively.
Restrainer: The restrainer used in the developing solution is potassium bromide. The purpose of the restrainer is to control the developer and to prevent it from developing the exposed and unexposed silver halide crystals. Although the restrainer stops the development of both exposed and unexposed crystals, it is most effective in stopping development of the unexposed crystals. As a result, the restrainer prevents the radiographic image from appearing fogged; a fogged film appears dull gray, lacks contrast, and is nondiagnostic.
Fixer Solution
The fixer solution contains four basic ingredients: (1) fixing agent, (2) preservative, (3) hardening agent, and (4) acidifier (Table 9-2).
TABLE 9-2
| Ingredient | Chemical | Function |
| Fixing agent | Sodium thiosulfate; ammonium thiosulfate | Removes all the unexposed undeveloped silver halide crystals from the emulsion |
| Preservative | Sodium sulfite | Prevents the deterioration of the fixing agent |
| Hardening agent | Potassium alum | Shrinks and hardens the gelatin in the emulsion |
| Acidifier | Acetic acid; sulfuric acid | Neutralizes the alkaline developer and stops further development |
Fixing Agent: The fixing agent (also known as the clearing agent) is made up of sodium thiosulfate or ammonium thiosulfate and is commonly called hypo. The purpose of the fixing agent is to remove or clear all unexposed and undeveloped silver halide crystals from the film emulsion. This chemical “clears” the film so that the black image produced by the developer becomes readily distinguished.
Preservative: The same preservative used in the developer solution, sodium sulfite, is also used in the fixer solution. The purpose of the preservative is to prevent the chemical deterioration of the fixing agent.
Hardening Agent: The hardening agent used in the fixer solution is potassium alum. The purpose of the hardening agent is to harden and shrink the gelatin in the film emulsion after it has been softened by the accelerator in the developer solution.
Acidifier: The acidifier used in the fixer solution is acetic acid or sulfuric acid. The purpose of the acidifier is to neutralize the alkaline developer. Any unneutralized alkali may cause the unexposed crystals to continue to develop in the fixer. The acidifier also produces the necessary acidic environment required by the fixing agent.
Equipment Requirements
Dental x-ray film is processed in the darkroom using manual processing techniques or an automatic film processor. Special equipment is required for both manual film processing and automatic film processing.
Processing Tank
The essential piece of equipment required for manual processing is a processing tank. A processing tank is a container divided into compartments to hold the developer solution, water bath, and fixer solution. A processing tank has two insert tanks and one master tank (Figure 9-3), as follows:
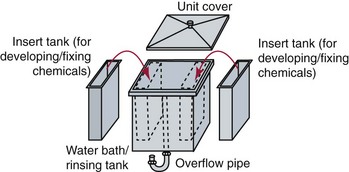
FIGURE 9-3 Processing tanks showing developing and fixing tank inserts in bath of running water with overflow drain. (Modified from White SC, Pharoah MJ: Oral radiology: principles and interpretation, ed 6, St. Louis, 2009, Mosby.)
• Insert tanks. Two removable 1-gallon insert tanks hold the developer and fixer solutions. Both are placed in the master tank. The developer solution is typically placed in the insert tank on the left, and the fixer solution is placed in the insert tank on the right. The water in the master tank separates the two insert tanks.
• Master tank. The master tank suspends both insert tanks and is filled with circulating water. The water surrounds both insert tanks. An overflow pipe is used to control the water level in the master tank.
Ideally, the processing tank should be constructed of stainless steel, which does not react with processing solutions and is easy to clean. The processing tank should be equipped with a light-tight lid that is used to cover the solutions at all times. The cover protects the solutions from oxidation and evaporation, and during processing, it protects the developing films from exposure to light.
The temperatures of the developer and fixer solutions are controlled by the temperature of the circulating water in the master tank. A processing tank must be supplied with both hot and cold running water and a mixing valve. The water temperature is controlled through a mixing valve, which mixes the incoming hot and cold water (as in bathroom showers) to produce a water bath that maintains an optimum temperature of 68° F.
Equipment Accessories
In addition to a processing tank, a few accessory equipment items, including a thermometer, timer, and film hangers, are necessary for manual film processing.
Thermometer
A nonmercury thermometer is necessary for manual processing and is used to determine the temperature of the developer solution. A floating thermometer or one that is clipped to the side of the developer tank may be used (Figure 9-4). A thermometer containing metal or alcohol solution is recommended over one that contains mercury. Mercury is a toxic substance and spills must be handled according to Environmental Protection Agency (EPA) standards.
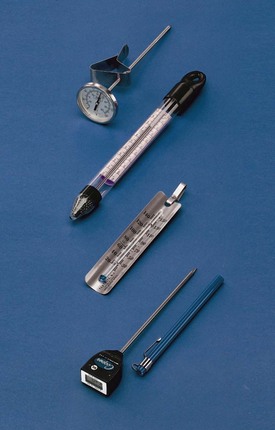
FIGURE 9-4 Examples of various thermometers used in manual film processing. (Courtesy Flow Dental, Deer Park, NY.)
A thermometer must be placed directly in the developer solution and not in the water bath. Why? As previously stated, the temperature of the water in the master tank controls the temperature of the developer and fixer solutions in the insert tanks. The water in the master tank reaches the desired temperature almost as soon as it is turned on. The water, however, must circulate in the master tank for some time to equalize the temperatures of the processing solutions. Depending on the size of the insert tanks and the temperature of the solutions, the developer and fixer solutions may take up to 1 hour to reach the temperature of the water bath.
Using a thermometer, the developer temperature must be checked before processing. The optimum temperature for development is 68° F. Below 60° F, the chemicals work too slowly and result in underdevelopment. Over 80° F, the chemicals work too rapidly and produce film fog. The temperature of the developer determines development time. A time–temperature chart can be used to determine development time (Table 9-3). It is important to note that these temperatures refer to manual processing only. For automatic processor temperatures, refer to the section on automatic processing later in this chapter.

Timer
An accurate timer is also necessary for manual processing. X-ray film is processed in chemical solutions for specific intervals indicated by the manufacturer of the processing solutions. A timer is used to indicate such intervals (e.g., how long films have been placed in the developer solution, rinse water, fixer solution, and wash water). A timer is used to signal the radiographer that the films must be removed from the current processing solution. Development time depends on the temperature of the developer solution and must be adjusted based on time–temperature guidelines (see Table 9-3).
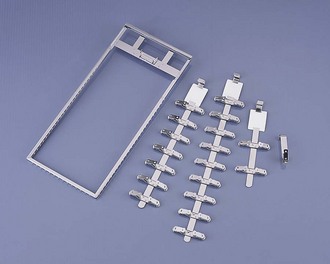
Film Hangers
Film hangers (also known as film racks or processing hangers) are necessary for manual processing. A film hanger is a device equipped with clips used to hold films during processing (Figure 9-5). Film hangers are made of stainless steel and include an identification tab or label. Film hangers are available in various sizes and can hold up to 20 intraoral films.
Miscellaneous Equipment
A stirring rod or stirring paddle is a necessary piece of equipment for manual processing. A stirring rod is used to agitate the developer and fixer solutions before processing. The stirring action mixes the chemicals and equalizes the temperature of the solutions. The stirring rod or paddle may be plastic or glass. Another useful item for manual processing is a plastic apron, which is used to protect clothing during the processing of films and the mixing of chemicals.
Step-by-Step Procedures
Before manual film processing, the exposed dental x-ray film and necessary equipment must be present in the darkroom. Specific infection control procedures that pertain to manual film processing are detailed in Chapter 15. For procedural steps, see Procedure 9-1.
PROCEDURE 9-1 Manual Film Processing
• Typically, the insert tank on the left is used for the developer, and the insert tank on the right is used for the fixer.
• The fixer solution is easily identified by its vinegar-like odor.
• If the developer level is low, add fresh developer.
• If the fixer level is low, add fresh fixer solution.
• Never add water to raise the level of the solutions; it dilutes the strength of the chemicals.
• To avoid chemical contamination, use different paddles to stir the developer and the fixer.
• Stirring the solutions mixes the chemicals and equalizes the temperature of the solutions.
• Check the temperature of the developer solution.
• The optimum temperature for the developer is between 68° F and 70° F; however, temperatures between 65° F and 75° F may be used.
• If the temperature of the developer solution is outside this range, the circulating water temperature must be adjusted accordingly. Sufficient time must then be allowed for the developer to reach the correct temperature.
• Close and lock the door of the darkroom.
• Turn off the overhead white light, and turn on the safelights.
• For intraoral films, carefully unwrap each exposed film over a clean work surface (Figure 9-6, A to C), using proper infection control procedures (see Chapter 15).
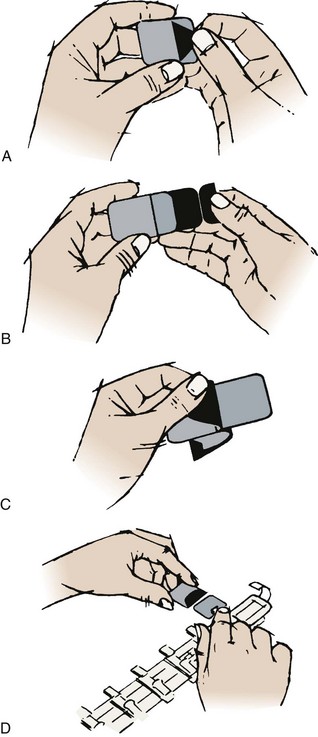
FIGURE 9-6 This figure illustrates uncontaminated films ready for processing. See Chapter 15, Figure 15-2, for removal of film barriers using proper infection control protocol. A, Pull the color-coded tab up and out to tear open the top of the packet. B, Pull on the black paper tab until about half of the black paper is out of the packet. C, Fold the black paper away from the film, put the clip on the film, and carefully remove the film from the packet. D, Clip film on hanger, one film to a clip. (Courtesy Carestream Health, Inc., Rochester, NY.)
• Dispose of all film packet wrappings.
• For extraoral films, carefully remove the film from the cassette.
• Clip each unwrapped film to the labeled film hanger, one film to a clip (Figure 9-6, D).
• Verify that each film is securely attached by running a finger along the film edge.
• On the basis of the temperature of the developer solution and the manufacturer’s instructions, set the timer.
• A time–temperature chart is used to determine such time intervals (see Table 9-3).
• If the optimal temperature of 68° F is used, the recommended development time is 4.5 to 5 minutes.
10. Immerse the films, and activate the timer.
• Immerse the film hanger with films into the developer solution.
• Films must not contact other films or the side of the processing tank during development.
• Gently agitate the film hanger up and down several times to prevent air bubbles from clinging to the film.
• Hang the film rack on the edge of the insert tank, and make certain that all films are immersed in the developer.
11. Remove the films from the developer, and rinse them.
• When the timer goes off, uncover the processing tank.
• Remove the film hanger with films from the developer solution, and place it in the circulating water of the master tank.
• On the basis of the development time, determine the fixation time and set the timer. A time–temperature chart is used to determine such time intervals (see Table 9-3).
• Fixation time is approximately double the development time.
13. Immerse the films, and activate the timer.
• Immerse the film hanger with films in the fixer solution.
• Gently agitate it up and down several times.
• Hang the film rack on the edge of the insert tank, and make certain that all films are immersed in the fixer.
14. Remove the films, and wash them.
• When the timer goes off, uncover the processing tank, remove the film hanger with films from the fixer, and allow the excess fixer to drain back into the fixer tank.
• Place the film hanger with films in the circulating water.
• Remove the film hanger with films from the wash water and gently shake off excess water.
• To air-dry the films, suspend the film hanger with films from a rod or drying rack in a dust-free area over a drip pan.
• If a heated drying cabinet is used, the temperature should not exceed 120° F.
Care and Maintenance
The processing solutions, equipment, and equipment accessories used in manual processing must be carefully maintained.
Processing Solutions
The manufacturer’s instructions for the storage, mixing, and use of processing solutions must be carefully followed. Processing solutions deteriorate with exposure to air, continued use, and chemical contamination. Exhausted processing solutions result in nondiagnostic radiographs and therefore must be replaced. Processing solutions should be changed every 3 to 4 weeks; more frequent replacement of solutions may be necessary when large numbers of films are processed. Both the developer and the fixer solution should be changed at the same time. The processing solutions that require care and maintenance include the developer, fixer, and replenisher solutions.
Developer Solution: The developer solution becomes depleted from evaporation and the removal of small amounts from the tank on the film hanger and films. With time and use, the developer solution decreases not only in volume but in strength as well. A weakened or exhausted developer solution does not fully develop the latent image and produces a nondiagnostic radiograph with reduced density and contrast.
Six ounces of developer solution should be added to the developer tank at the beginning of each day. When the tank is holding its maximum capacity (e.g., 1 gallon), 6 ounces must be removed before adding the replenisher.
Fixer Solution: Fixer solution also decreases because of evaporation and the removal of small amounts from the tank on the film hanger and films. In addition, the fixer solution is diluted with water each time films are transferred from the rinse water to the fixer; this gradual dilution weakens the solution.
With time and use, the fixer solution decreases not only in volume but in strength as well. A full-strength fixer ensures adequate “clearing” of the film and hardening of the film emulsion. An exhausted or depleted fixer does not stop the chemical reaction sufficiently to maintain film clarity; the films will turn a yellow-brown color, transmit less light, and lose their diagnostic quality.
Three ounces of fixer solution should be added to the fixer tank at the beginning of each day. When the tank is holding its maximum capacity (e.g., 1 gallon), 3 ounces must be removed before adding the replenisher.
Replenisher Solutions: To maintain adequate freshness, strength, and solution levels, both the developer and the fixer solution must be replenished daily. A replenisher is a superconcentrated solution that is added to the processing solutions to compensate for the loss of volume and strength that results from oxidation. Oxidation, or the process that occurs when developer and fixer solutions combine with oxygen and lose strength, takes place when the processing solutions are exposed to air. A breakdown of the chemicals in the processing solutions results, shortening the length of time the solutions can be used to produce diagnostic radiographs. Replenishment maintains adequate concentrations of chemicals, which ensures uniform results between solution changes.
Processing Tank
The interaction between the mineral salts in water and the carbonate in the processing solutions produces deposits on the inside walls of the insert tanks. Such deposits contaminate the processing solutions. To produce diagnostic radiographs, the processing tank must be maintained in a clean state.
The master and insert tanks must be cleaned each time the solutions are changed. A commercial stainless steel tank cleaner or a solution of hydrochloric acid and water (1.5 ounces hydrochloric acid to 128 ounces of water) can be used to remove the mineral salts and carbonate deposits. Abrasive-type cleansers are not recommended for cleaning processing tanks; the cleansers may react unfavorably with the processing solutions. For procedural steps, see Procedure 9-2.
Automatic Film Processing
Automatic processing is another simple way of processing dental x-ray films.
Film Processing Steps
Automatic film processing consists of the following four steps:
The essential piece of equipment required for automatic processing is the automatic film processing machine, or automatic processor. A variety of automatic film processors are commercially available (Figure 9-7). Some automatic processors are limited to certain sizes of x-ray film, whereas others are capable of processing several different sizes of x-ray film. Some automatic film processors are restricted to use under safelight conditions, whereas others, with daylight loaders, or light-shielded compartments, can be used in a room with white light (Figure 9-8). Automatic processors also vary in plumbing requirements and replenishment systems.
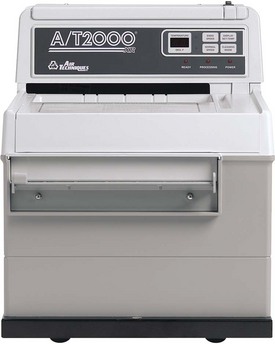
FIGURE 9-7 A typical automatic film processor used in the dental office. (Courtesy Air Techniques Inc., Melville, NY.)
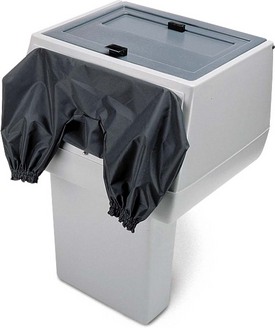
FIGURE 9-8 A daylight loader, which may be attached to the top of an automatic processor. (Courtesy Air Techniques Inc., Melville, NY.)
Automatic processing is often preferred over manual film processing for the following reasons:
Automatic film processing has a number of advantages. The major advantage is the time saved; an automatic processor requires only 4 to 6 minutes to develop, fix, wash, and dry a film, whereas manual film processing techniques require approximately 1 hour. Another advantage is the automatic control of time and temperature; the automatic processor maintains the correct temperature of solutions and controls the processing time, thus contributing to the uniformity of film processing.
Although digital imaging is becoming more commonplace, many offices using digital imaging maintain automatic processing equipment in the event of a computer failure. When the automatic processor and special processing solutions are properly maintained, this equipment consistently produces high-quality radiographs, and operator error is less likely to occur.
Equipment Requirements
The automatic processor uses a roller transport system to move the unwrapped dental x-ray film through the developer, fixer, water, and drying compartments. Each component of the automatic processor contributes to the mechanism of automatic film processing and has a specific function (Figure 9-9), as follows:
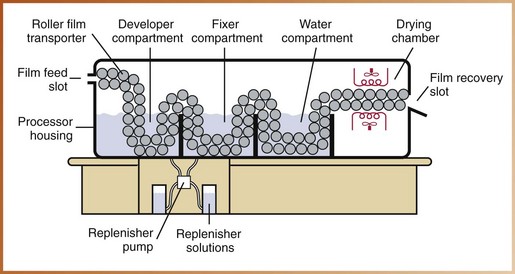
• The processor housing encases all the component parts of the automatic processor.
• The film feed slot is an opening on the outside of the processor housing used to insert unwrapped films into the automatic processor.
• The roller film transporter is a system of rollers used to move the film rapidly through the developer, fixer, water, and drying compartments. The rollers are propelled by motor-driven gears or belts. The primary function of the rollers is to move the film through the automatic processor. In addition to moving the film, the rollers produce a wringing action that removes the excess solution from the emulsion as the film moves from compartment to compartment. This “wringing action” eliminates the need for an additional rinse step between the developer and fixer solutions. The motion of the rollers also gently agitates the processing solutions, contributing to the uniformity of the processing.
• The developer compartment holds the developer solution. The developer solution used in an automatic processor is a specially formulated, highly concentrated chemical solution designed to react at temperatures between 80° F and 95° F. As a result of the high temperatures, development occurs rapidly. The developer solution used in manual film processing is not the same as the developer used in automatic film processing and should never be used in an automatic processor.
• The fixer compartment holds the fixer solution. The film is transported directly from the developer solution into the fixer without a rinsing step. The fixer solution used in an automatic processor is a specially formulated, highly concentrated chemical solution that contains additional hardening agents. In the fixer solution, the film is rapidly fixed or “cleared” and then hardened. The fixer solution used in manual film processing is not the same as the fixer used in automatic film processing and should never be used in an automatic processor.
• The water compartment holds circulating water. Water is used to wash the films after fixation. After washing, the wet film is transported from the water compartment to a drying chamber.
• The drying chamber holds heated air and is used to dry the wet film.
• A replenisher pump and replenisher solutions are used to maintain proper solution concentration and levels automatically in some automatic processors, whereas other processors require the operator to add the necessary replenishing solutions.
• The film recovery slot is an opening on the outside of the processor housing where the dry, processed radiograph emerges from the automatic processor.
Step-by-Step Procedures
Before processing, the exposed dental x-ray film and automatic processor (without daylight loader) must be present in the darkroom. Specific infection control procedures that pertain to automatic film processing are detailed in Chapter 15. For procedural steps, see Procedure 9-3.
Care and Maintenance
The automatic processor and automatic processing solutions must be carefully maintained. The manufacturer’s recommendations for care and maintenance must be followed meticulously.
Automatic Processor
The automatic processor requires routine preventive maintenance. Without proper cleaning and replenishment, the automatic processor will malfunction. A cleaning and replenishment schedule must be established and followed strictly to ensure optimum automatic processor performance.
Depending on the volume of films processed, the automatic processor requires daily or weekly cleaning. An extraoral-size cleaning film used to clean the rollers of the automatic processor must be run through the processor at the beginning of each day. A cleaning film removes any residual gelatin or dirt from the rollers. Each week the rollers must be removed from the automatic processor, cleaned in warm running water, and then soaked for 10 to 20 minutes. The manufacturer’s recommendations for daily and monthly cleaning of the automatic processor must be carefully followed.
Processing Solutions
Processing solution levels in the automatic processor must be checked at the beginning of each day and replenished as necessary. Failure to add replenisher results in exhausted solutions and nondiagnostic radiographs. Processing solutions in the automatic processor must be replaced every 2 to 6 weeks, depending on the number of films processed and the replenishment schedule. The manufacturer’s recommendations for the changing of solutions must be carefully followed.
The Darkroom
The primary function of a darkroom is to provide a completely darkened environment in which x-ray film can be handled and processed to produce diagnostic radiographs. The darkroom must be properly designed and well equipped.
Room Requirements
A well-planned darkroom makes processing easier. The ideal darkroom is the result of careful planning and must have the following characteristics:
Location and Size
The location of the darkroom must be convenient; ideally, it should be located near the area where x-ray units are installed. The darkroom must be large enough to accommodate film processing equipment and to allow ample work space. A darkroom should measure at least 16 to 20 square feet and provide enough space for one person to work comfortably. The size of the darkroom is determined by the following factors:
Lighting
As the term “darkroom” suggests, this room must be completely dark and must exclude all visible white light. The term light-tight is often used to describe the darkroom. To be considered light-tight, no light leaks can be present. Any white light that “leaks” into the darkroom (e.g., from around a door or through a vent) is termed a light leak. In a darkroom, when all the lights are turned off and the door is closed, no white light should be seen. Any white light coming around the door, through a vent or keyhole, or through a wall or ceiling seam is a light leak and must be corrected with weather stripping or black tape. As previously discussed, x-ray film is extremely sensitive to visible white light. Any leaks of white light in the darkroom cause film “fogging.” A fogged film appears dull gray, lacks contrast, and is nondiagnostic.
Two types of lighting are essential in a darkroom, as follows:
• Room lighting. Incandescent room lighting is required for procedures not associated with the act of processing films. An overhead white light that provides adequate illumination for the size of the room is necessary to perform tasks such as cleaning, stocking materials, and mixing chemicals.
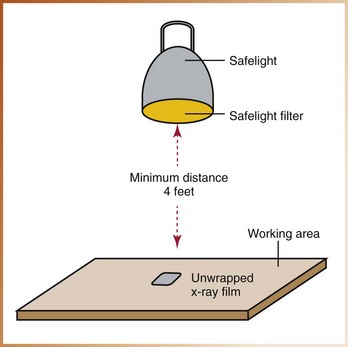
• Safelighting. The special type of lighting used to provide illumination in the darkroom is termed safelighting. It is a low-intensity light composed of long wavelengths in the red-orange portion of the visible light spectrum. Safelighting provides sufficient illumination in the darkroom to carry out processing activities safely without exposing or damaging the film. Safelighting does not rapidly affect unwrapped x-ray film and does not cause film fogging.
A safelight typically consists of a lamp equipped with a low-wattage bulb (7.5 or 15 watts) and a safelight filter. A safelight filter removes the short wavelengths in the blue-green portion of the visible light spectrum that are responsible for exposing and damaging x-ray film. At the same time, a safelight filter permits the passage of light in the red-orange range; consequently, the illumination in a darkroom is red. Most x-ray films have a reduced sensitivity to this red-orange range and are not affected by minimal exposure to the safelight.
Under safelight conditions, it is necessary to maintain an adequate safelight illumination distance and to keep film handling times to a minimum. Films that are unwrapped too close to the safelight or exposed to safelight illumination for more than 2 to 3 minutes appear fogged. A safelight must be placed a minimum of 4 feet (1.2 meters) away from the film and work area (Figure 9-10), and unwrapped films must be processed immediately under safelight conditions.
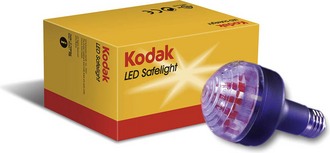
A number of safelights with different types of filters are available for use in the darkroom. Some safelights are used exclusively with intraoral films, some are used exclusively with extraoral films, and others are designed for use with both (Figure 9-11). For example, a good universal safelight filter recommended for use in a darkroom in which both extraoral screen films and intraoral films are processed is the GBX-2 safelight filter by Kodak. Recommendations for specific safelights and filters depend on the type of film (intraoral or extraoral) and are provided by the film manufacturer; such information is indicated on the outside of the film package.
Miscellaneous Requirements
The darkroom work space must include an adequate counter area where films can be unwrapped before processing. A clean, organized work area is essential; the work area must be kept absolutely clean, dry, and free of processing chemicals, water, dust, and debris. If an unwrapped film comes into contact with any such substance before processing, an “artifact” results, and the quality of the dental radiograph is compromised.
The darkroom storage space must include ample room for chemical processing solutions, film cassettes, and other miscellaneous radiographic supplies. Storage of unopened boxes of film in the darkroom is not recommended; a reaction between the fumes from chemical processing solutions and the film emulsion may occur that will result in film fogging. Boxes of opened extraoral film, however, must be stored in the darkroom. A light-tight storage drawer is necessary to protect opened boxes of unexposed extraoral film.
The temperature and humidity level of the darkroom must be controlled to prevent film damage. A room temperature of 70° F is recommended; if the room temperature exceeds 90°F, film fogging results. A relative humidity level of between 50% and 70% should be maintained. When humidity levels are too high, the film emulsion does not dry. When humidity levels are too low, static electricity becomes a problem and causes film artifacts.
The darkroom plumbing must include both hot and cold running water along with mixing valves to adjust the water temperature in the processing tanks. A utility sink with running water is also useful in the darkroom. Other miscellaneous darkroom requirements include boxed gloves, a wastebasket for the disposal of all film wrappings and contaminated gloves, and an x-ray viewbox that is used to examine radiographs.
Waste Management
Used developer is not typically a hazardous waste. It can be discharged to a sanitary sewer system. Unused developer may be hazardous because of a high pH. Check the material safety data sheet (MSDS) for the pH of the solution. If it is >12.5, it is considered hazardous. It is important to remember that developer is caustic and should be handled with care. If any question remains, the local sewer authority should be contacted prior to discharging. Never discharge used or unused developer to a septic system.
Fixer
Fixer solutions and rinse waters following fixer baths generally contain silver at concentrations of >5.0 ppm making them hazardous. Solutions should be run through a silver recovery unit to remove silver. After the silver is removed, the solutions may be discharged to the sanitary sewer system. Recovered silver must be disposed of via an approved waste carrier for recycling or disposal. If a silver recovery unit is not available, a company may be contacted to pick up the untreated fixer solutions. Store such solutions in labeled containers. Never discharge the fixer solution into a septic system.
Film
Developed films do not require special handling and may be disposed of along with normal office trash. Undeveloped film packets contain silver and lead; such packets should be collected in an approved waste container. When the container is full, an approved waste carrier or supplier should be contacted for removal. Lead foils may be collected separately in recycling containers that are located in the darkroom. When full, the container should be sent for recycling.
Film Duplication
An identical copy of an intraoral or an extraoral radiograph is made through the process of film duplication. Duplicate radiographs may be used when referring patients to specialists, for insurance claims, and as teaching aids (see Chapter 7). The dental radiographer must be familiar with the equipment requirements for film duplication and with the procedural steps for film duplication.
Equipment Requirements
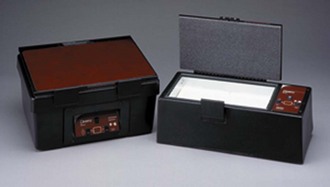
The duplication of film requires the use of a film duplicator and duplicating film. A film duplicator is a light source that is commercially available from manufacturers, such as the Dentsply Rinn Corporation (Figure 9-12). A film duplicator provides a diffused light source that evenly exposes the special duplicating film.
Step-by-Step Procedures
Before film duplication, the films to be duplicated, the duplicating film, and the film duplicator must be present in the darkroom. Film duplication must take place in a light-tight darkroom. For procedural steps, see Procedure 9-4.
PROCEDURE 9-4 Film Duplication
• Place the dental radiographs to be duplicated on the light screen of the film duplicator.
• Use manufacturer-supplied film organizers to arrange the films and block out extraneous light (Figure 9-13).

2. Place the duplicating film.
• Place the duplicating film on top of the arranged radiographs.
• Place the emulsion side down. Note: The emulsion side will appear dull and gray or lavender in color.
• Close the lid of the film duplicator, and fasten it securely to ensure adequate contact between the radiographs and the duplicating film. Note: To prevent blurring of the image, good contact must be maintained between the duplicating film and the films that are being duplicated.
• Without good contact, the duplicate film appears fuzzy and shows less detail than the original film.
• Select the exposure time, set the adjustable timer, and activate the light source to expose the duplicating film. Note: The exposure time is controlled by an adjustable timer on the film duplicator.
• The adjustable timer controls the amount of light emitted from the film duplicator; the light passes through the radiographs and exposes the duplicating film. The longer the duplicating film is exposed to light, the lighter it appears. This is the opposite of x-ray film; x-ray film appears darker with longer exposure to light.
• Exposure time depends on the type of duplicator used and the density of the radiographs being duplicated.
Processing Problems and Solutions
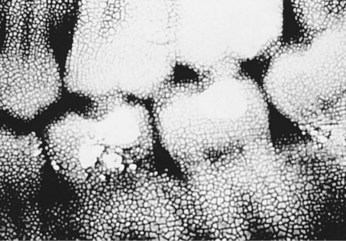
Processing problems may result in nondiagnostic radiographs. As described in Chapter 8, a diagnostic radiograph provides a great deal of information. Diagnostic images have proper density and contrast, have sharp outlines, and are of the same shape and size as the object radiographed (Figure 9-14).
Processing problems may occur for a number of reasons, including the following:
• Time and temperature errors (Table 9-4)
• Chemical contamination errors (Table 9-5)
• Film handling errors (Table 9-6)
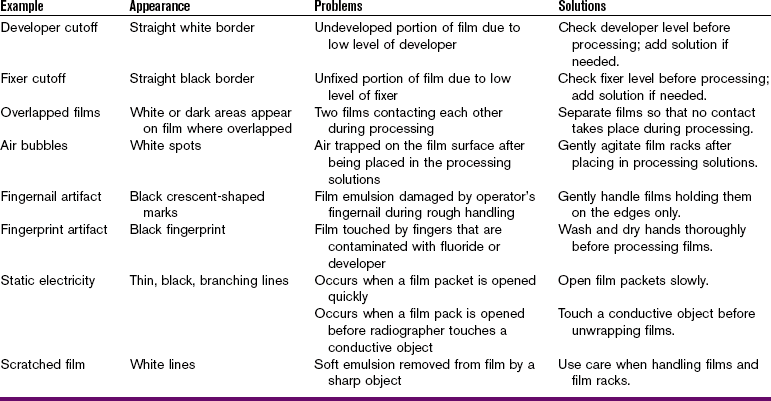
• Lighting errors (Table 9-7)
Processing errors may cause a partial or total absence of images or obscure images that are present. Films that appear light, dark, yellow-brown, or fogged are the result of processing errors. Films that appear scratched or contaminated with dirt, saliva, or fingerprints are the result of faulty film handling during processing. Reticulation and fingernail and static artifacts may also result from poor processing and film handling techniques.
Many processing errors can be attributed to one or more causes. The dental radiographer must be able to recognize the appearance of common processing errors, identify potential causes of such errors, and know what steps are necessary to correct such problems.
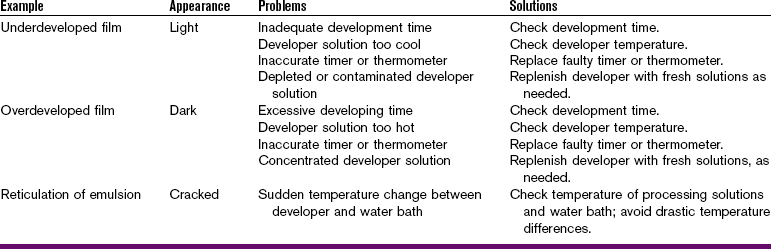
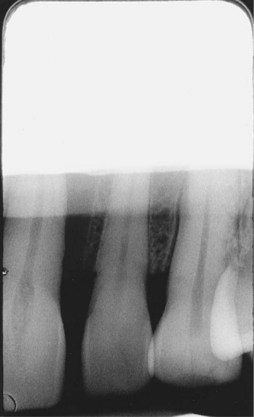
Time and Temperature
• Appearance. The film appears light (Figure 9-15).
• Problems. Underdeveloped films may result from the following:
• Solution. To prevent underdeveloped films, do the following:
• Check the temperature of the developer as well as the time the film must remain in the developer solution.
• Increase the time the film remains in the developer, as needed.
• Replace faulty and inaccurate thermometers and timers.
• When the developer solution is depleted or contaminated, replace it.
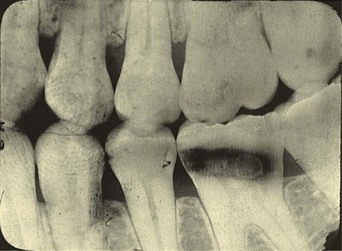
Overdeveloped Film
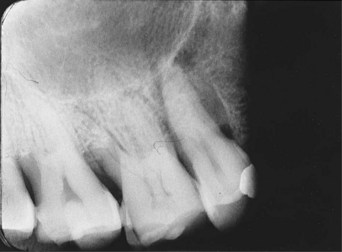
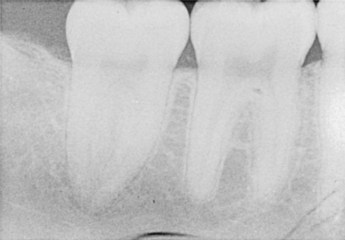
• Appearance. The film appears dark (Figure 9-16).
• Problems. Overdeveloped films may result from the following:
• Solution. To prevent overdeveloped films, do the following:
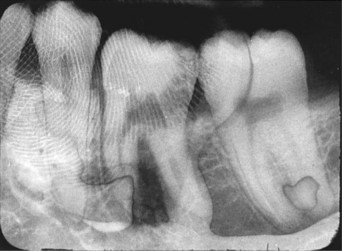
Reticulation of Emulsion
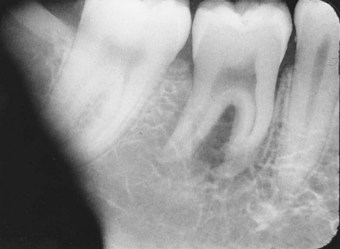
• Appearance. The film appears cracked (Figure 9-17).
• Problem. Reticulation of emulsion results when a film is subjected to a sudden temperature change between the developer solution and the water bath.
• Solution. To prevent the reticulation of emulsion, do the following:
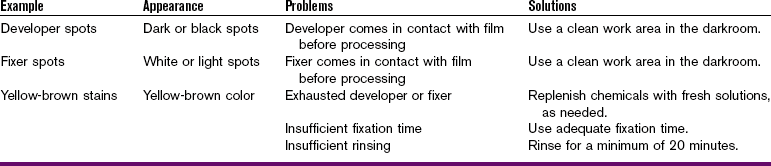
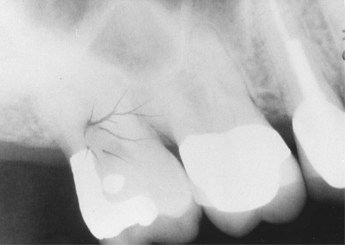
Chemical Contamination
• Appearance. Dark spots appear on the film (Figure 9-18).

• Problem. Developer spots are seen when the developer solution comes in contact with the film before processing.
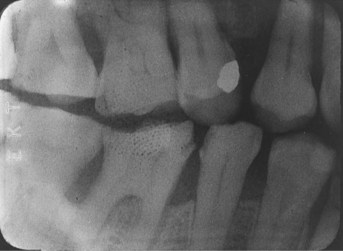
Fixer Spots
• Appearance. White spots appear on the film (Figure 9-19).
• Problem. Fixer spots are the result of fixer solution coming in contact with the film before processing.
Yellow-Brown Stains
• Appearance. The film appears yellowish brown (Figure 9-20).
• Problems. Yellow-brown films result from the following:
• Solution. To prevent yellow-brown films, do the following:
Film Handling
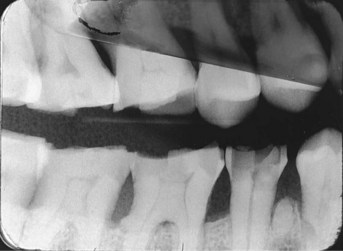
• Appearance. A straight white border appears on the film (Figure 9-21).
• Problem. Developer cutoff results from a low level of developer solution and represents an undeveloped portion of the film. If the developer solution level is low, the films clipped at the very top of the film rack may not be completely immersed in the developer solution.
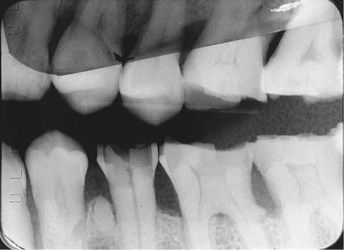
Fixer Cutoff
• Appearance. A straight black border appears on the film (Figure 9-22).
• Problem. Fixer cutoff results from a low level of fixer solution and represents an unfixed portion of the film. If the fixer solution is low, the films clipped at the very top of the film rack may not be completely immersed in the fixer solution.
Overlapped Films
• Appearance. White or dark areas appear on films where overlap has occurred (Figures 9-23 and 9-24).
• Problem. Overlapped films occur when two films come into contact with each other during manual or automatic processing techniques. Films that overlap in the developer have white areas that represent an undeveloped portion of the film. Films that overlap in the fixer have black areas that represent an unfixed portion of the film.
• Solution. To avoid overlapped films, care should be taken to ensure that no film is permitted to come into contact with another film during processing.
Air Bubbles
• Appearance. White spots appear on the film (Figure 9-25).
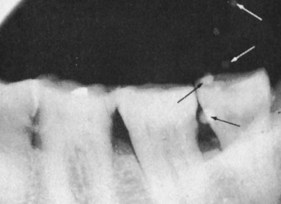
FIGURE 9-25 Air bubbles appear as tiny white spots (arrows). (From Langlais RP: Exercises in oral radiology and interpretation, ed 4, St. Louis, 2004, Saunders.)
• Problem. Air bubbles are seen when air is trapped on the film surface after the film is placed in the processing solution. Air bubbles prevent the chemicals from affecting the emulsion in that area.
• Solution. To avoid air bubbles, gently agitate and stir film racks after placing them in the processing solution.
Fingernail Artifact
• Appearance. Black, crescent-shaped marks appear on the film (Figure 9-26).
• Problem. A fingernail artifact is seen when the film emulsion is damaged by the operator’s fingernail during rough handling of the film.
• Solution. To prevent a fingernail artifact, handle the film gently, holding it on the edges only.
Fingerprint Artifact
• Appearance. A black fingerprint appears on the film (Figure 9-27).
• Problem. A fingerprint artifact is seen when the film has been touched by fingers contaminated with fluoride or the developer.
• Solution. To prevent fingerprint artifacts, do the following:
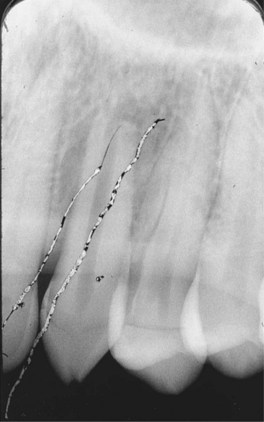
Static Electricity
• Appearance. Thin, black branching lines appear on the film (Figure 9-28).
• Problem. Static electricity may result from the following:
Static electricity occurs most frequently during periods of low humidity.
Scratched Film
• Appearance. White lines appear on the film (Figure 9-29).
• Problem. A scratched film results when the soft film emulsion is removed from the film base by a sharp object, such as a film clip or film hanger.
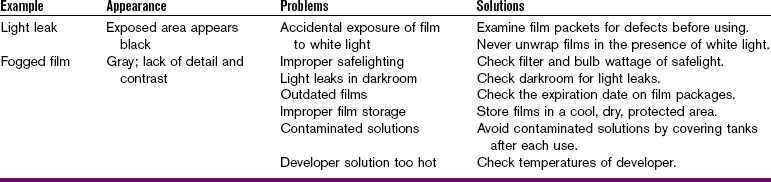
Lighting
• Appearance. The exposed area appears black (Figure 9-30).
Fogged Film
• Appearance. The film appears gray and lacks image detail and contrast (Figure 9-31).
• Problems. Fogged films result from the following:
• Solution. To prevent fogged films, do the following:
• Check the filter and bulb wattage of the safelight.
• Minimize film exposure to the safelight, and check the darkroom for light leaks.
• Check the expiration date on film packages, and store films in a cool, dry, protected area.
• Avoid contamination of processing solutions by replacing tank covers after each use.
• Always check the temperature of the developer before processing films.
Summary
• Film processing refers to a series of steps that produce a visible permanent image on a dental radiograph.
• The pattern of stored energy on an exposed film is termed the latent image; this image remains invisible until it undergoes processing.
• The visible image that results on a dental radiograph is made up of black, white, and gray areas.
• Manual film processing includes five steps: (1) development, (2) rinsing, (3) fixation, (4) washing, and (5) drying.
• A chemical solution known as the developer is used in the development process to reduce the exposed, energized silver halide crystals to chemically black metallic silver.
• The developer solution contains four basic ingredients: (1) developing agent, (2) preservative, (3) accelerator, and (4) restrainer.
• After development, a water bath is used to wash or rinse the film.
• After rinsing, fixation takes place.
• The fixer solution contains four basic ingredients: (1) fixing agent, (2) preservative, (3) hardening agent, and (4) acidifier.
• After fixation, a water bath is used to wash the film and remove all excess chemicals from the emulsion.
• The final step in film processing is drying the film. Films must be completely dried before they can be handled for mounting and viewing.
• Manual processing is a simple method used to develop, rinse, fix, and wash dental x-ray films. The essential equipment is a processing tank, which is divided into compartments for the developer solution, water bath, and fixer solution.
• Automatic processing is another simple way to process dental x-ray film. The essential equipment required is the automatic processor, which automates all film-processing steps.
• A darkroom is a completely darkened room, where x-ray film can be handled and processed to produce diagnostic radiographs. The ideal darkroom should be conveniently located, of adequate size, equipped with correct lighting and ventilation, and arranged with ample work space and storage.
• The darkroom must be light-tight and must include proper safelighting. Safelighting provides illumination in the darkroom to perform processing activities safely without exposing or damaging the film.
• An identical copy of an intraoral or extraoral radiograph is made through the process of film duplication. Duplication of film requires the use of a film duplicator and a duplicating film.
• A number of processing problems may result in nondiagnostic films. Processing problems may result from time and temperature errors (see Table 9-4), chemical contamination errors (see Table 9-5), film handling errors (see Table 9-6), and lighting errors (see Table 9-7).
• The dental radiographer must be able to recognize the appearance of common processing errors, identify the potential causes of such errors, and know what steps are necessary to correct such problems.
Frommer, HH, Savage-Stabulas, JJ, Film processing: the darkroom. Radiology for the dental professional, ed 9, St Louis, Mosby, 2011.
Haring, JI, Lind, LJ. Film exposure, processing, and technique errors. In: Radiographic interpretation for the dental hygienist. Philadelphia: Saunders; 1993.
Johnson, ON, Thomson, EM, Dental x-ray film processing. Essentials of dental radiography for dental assistants and hygienists, ed 8, Upper Saddle River, NJ, Pearson, 2007.
Miles, DA, Van Dis, ML, Jensen, CW, Ferretti, A, Film processing and quality assurance. Radiographic imaging for the dental team, ed 4, St. Louis, Saunders, 2009.
White, SC, Pharoah, MJ, Processing x-ray film. Oral radiology: principles of interpretation, ed 6, St Louis, Mosby, 2009.
Multiple Choice
1. The first step in manual film processing is:
2. In manual film processing, the rinsing step is necessary because:
a. rinsing removes the silver halide crystals from the emulsion
b. rinsing slows down the fixation process
c. rinsing removes the developer from the film and stops the development process
d. rinsing thoroughly removes all excess chemicals from the emulsion
e. rinsing reduces the energized silver halide crystals to black metallic silver
3. The film emulsion is hardened during:
4. The hydroquinone in the developer brings out the _________ tones, whereas the Elon in the developer brings out the _________ tones on a dental radiograph.
5. In manual film processing, the optimal temperature for the developer solution is:
6. The size of a darkroom is determined by all the following factors except:
a. volume of radiographs processed
b. type of processing equipment used
7. Any leaks of white light into the darkroom will cause:
8. The safelight must be placed a minimum of what distance from the film and the work area?
9. The GBX-2 safelight filter by Kodak is recommended for:
10. Unopened boxes of radiographic film should not be stored in the darkroom because:
a. chemical fumes from processing solutions may fog the film
b. continued exposure to the safelight is not recommended
c. the box may have a tear that may expose the film
11. The thermometer for manual processing should be placed in the:
12. At 68° F, what is the optimal development time for manual film processing?
13. All the following factors affect the life of the processing solutions except:
14. A replenisher is added to the processing solution to:
a. compensate for the loss of solution strength
b. ensure uniform results between solution changes
15. How often should the processing tank be cleaned?
16. Which of the following can be used to clean the processing tank?
17. A breakdown of chemicals in the processing solution that results from exposure to air is termed:
18. The superconcentrated solution that is added to the processing solution to compensate for the effects of oxidation is termed the:
Matching
For questions 19 to 28, match each component part of the automatic processor with its function.
a. Opening used to insert films
b. Opening where processed films emerge
d. Heated air is used to dry wet films
f. Solutions used to maintain proper concentration and levels of developer and fixer
g. Moves the film through the automatic processor
h. Encases component parts of automatic processor
Fill In The Blank
Matching
For questions 31 to 36, describe the appearance of the processing error using one of the following words:
Identification
For questions 37 to 45, describe or identify the processing error that causes the following:
True Or False
For questions 46 to 50, identify each statement as true or false.
46. Film fogging results from improper safelighting.
47. Yellow-brown stains result from insufficient development time.
48. Developer cutoff appears as a straight black border across the film.
49. To avoid static electricity, touch a conductive object before unwrapping a film.
50. Torn or defective film packets may allow a portion of the film to be exposed to light.