Quality Assurance in the Dental Office
After completion of this chapter, the student will be able to do the following:
• Define the key words associated with quality assurance in the dental office
• List quality control tests and quality administration procedures that should be included in the quality assurance plan
• Discuss the purpose and frequency of testing dental x-ray machines
• Describe the tests used to check for fresh film and adequate film-screen contact; discuss the frequency of testing and the interpretation of test results
• Describe the test used to check for darkroom light leaks and proper safelighting. Discuss the frequency of testing and the interpretation of test results
• Describe the test used to check the automatic processor; discuss the frequency of testing and the interpretation of test results
• List the three tests used to check the strength of the developer solution
• Describe the preparation of the reference radiograph and the standard stepwedge radiograph; discuss the use of these radiographs to compare densities and to monitor the strength of the developer solution
• Describe the test used to check the strength of the fixer; discuss the frequency of testing and the interpretation of test results
• Discuss the basic elements of a quality administration plan
• Detail the importance of operator competence in dental radiographic procedures
Quality assurance refers to special procedures that are used to assure (i.e., ensure) the production of high-quality diagnostic radiographs. A quality assurance plan includes both quality control tests and quality administration procedures (Box 10-1). Although the dentist is ultimately responsible for the overall quality assurance plan, the dental radiographer can play an important role in the implementation and administration of such a plan. The dental radiographer must be knowledgeable about the quality assurance program used in the dental office.
The purpose of this chapter is to introduce the dental radiographer to quality control tests that are used to monitor dental x-ray equipment, supplies, and film processing. Quality administration procedures and operator competence for the dental office are also discussed.
Quality Control Tests
Quality control tests are specific tests that are used to maintain and monitor dental x-ray equipment, supplies, and film processing. To avoid excess exposure of patients and personnel to x-radiation, the dental radiographer must have a clear understanding of the quality control procedures used to test specific equipment, supplies, and film processing in the dental office.
Equipment and Supplies
Quality control tests are necessary to monitor dental x-ray machines, dental x-ray film, screens and cassettes, and viewing equipment. To produce diagnostic-quality radiographs consistently, dental x-ray equipment and supplies must always function properly and be kept in good repair.
Dental X-Ray Machines
All dental x-ray machines must be inspected and monitored periodically. Some state and local regulatory agencies provide dental x-ray equipment inspection services as part of their registration and licensing procedures. Dental x-ray machines must also be calibrated—or adjusted for accuracy—at regular intervals. A qualified technician must calibrate dental x-ray equipment to ensure consistent x-ray machine performance and the production of diagnostic radiographs.
The American Academy of Dental Radiology recommends a number of annual tests for dental x-ray machines. These tests are designed to identify minor malfunctions, including machine output variations, inadequate collimation, tubehead drift, timing errors, and inaccurate kilovoltage and milliamperage readings (Box 10-2).
Annual tests for dental x-ray machines can be performed by the dentist, dental hygienist, dental assistant, or manufacturer’s service representative. Most of the tests require some basic testing materials, film, and test logs to record the results.
Dental X-Ray Film
As discussed in Chapter 7, the dental x-ray film must be properly stored, protected, and used before the expiration date. For quality control purposes, when each box of film is opened, it should be tested for freshness.
The following fresh film test is recommended to check a newly opened box of film:
1. Prepare the film. Unwrap one unexposed film from a newly opened box.
2. Process the film. Use fresh chemicals to process the unexposed film.
The results of the fresh film test can be interpreted as follows:
• Fresh film. If the processed film appears clear with a slight blue tint, the film is fresh and has been properly stored and protected. Proceed with the use of this film.
• Fogged film. Film that has expired, has been improperly stored, or has been exposed to radiation appears fogged. If the film is fogged, it should not be used.
Screens and Cassettes
Extraoral intensifying screens used within a cassette holder should be periodically examined for the presence of any dirt and scratches. Screens should be cleaned on a monthly basis with commercially available cleaners recommended by the screen manufacturer. After cleaning the screen, an antistatic solution should be applied to it. Screens that have scratches should be replaced.
Cassette holders must be examined every month for worn closures, light leaks, and warping, all of which may result in fogged and blurred radiographs; these cassettes must be repaired or replaced. Cassettes must also be checked for adequate film-to-screen contact.
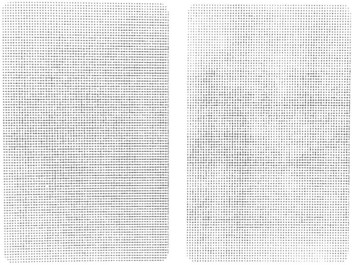
The following film-to-screen contact test is recommended:
1. Insert one film between the screens in the cassette holder.
2. Place a wire mesh test object on top of the loaded cassette.
3. Position the position-indicating device (PID) using a 40-inch target-film distance while directing the central ray perpendicular to the cassette.
4. Expose the film using 10 mA, 70 kVp, and 15 impulses.
6. Check the film on a viewbox in a dimly lit room at a distance of 6 ft.
The results of the film-screen contact test can be interpreted as follows:
• Adequate contact. If the “wire mesh” image seen on the film exhibits a uniform density, good film-to-screen contact has taken place. Proceed with cassette and screen use.
• Inadequate contact. If the wire mesh image seen on the film exhibits varying densities, poor film-to-screen contact has taken place. Areas of poor film-to-screen contact appear darker than good contact areas (Figure 10-1). Cassettes that provide inadequate film-to-screen contact and exhibit areas of poor contact in the central position must be repaired or replaced.
Viewing Equipment
The viewbox, or illuminator, is a light source that is used to view dental radiographs (Figure 10-2). A working viewbox is a necessary piece or equipment for the interpretation of dental radiographs. The viewbox contains fluorescent light bulbs that emit light through an opaque plastic or plexiglass front. The viewbox should emit a uniform and subdued light when it is functioning properly. A photographic light meter can be used to determine proper viewing brightness.
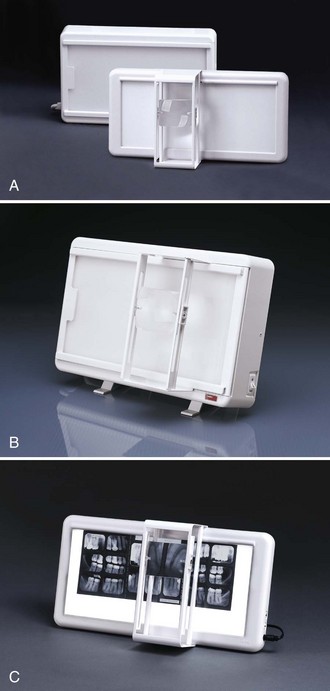
FIGURE 10-2 Examples of viewboxes in sizes to accommodate most dental viewing needs. (Courtesy Dentsply Rinn, Elgin, IL.)
The viewbox should be periodically examined for the presence of dirt on the plexiglass surface and any discoloration. The surface of the viewbox should be wiped clean every week. Permanently discolored plexiglass surfaces must be replaced. Any blackened fluorescent light bulbs must also be replaced.
Film Processing
Film processing is one of the most critical areas in quality control and requires daily monitoring. Processing problems have the potential to result in a large number of nondiagnostic radiographs. Quality control tests must be performed routinely to determine whether the conditions for film processing are acceptable.
Darkroom Lighting
The darkroom must be checked for light-tightness every month and proper safelighting every 6 months. The following light leak test is recommended for the darkroom:
1. Prepare the darkroom. Close the darkroom door, and turn off all lights, including the safelight.
2. Examine the darkroom. Once your eyes become accustomed to the darkness, observe the areas around the door, the seams of the walls and ceiling, the vent areas, and the keyhole for light leaks.
The results of the light leak test can be interpreted as follows:
• No light leaks. If the darkroom is light-tight, no visible light is seen. Proceed with film processing.
• Light leaks. Light leaks, if present, are seen around the door, through the seams of the walls or ceiling, or through a vent or keyhole. Light leaks must be eliminated by using weather stripping or black tape before proceeding with film processing.
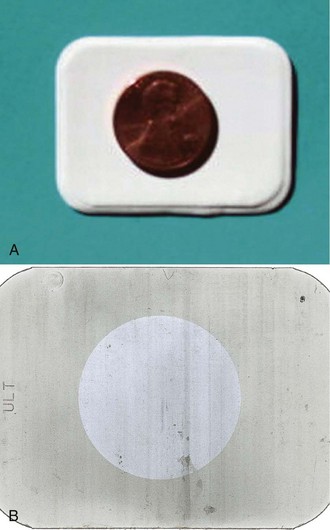
Only after the light-tightness of the darkroom has been established can the safelighting be checked. The following safelighting test, often referred to as the coin test, is recommended:
1. Prepare the darkroom. Turn off all the lights in the darkroom, including the safelight.
2. Prepare the film. Unwrap one unexposed film. Place it on a flat surface at least 4 ft from the safelight. Place a coin on top of the film.
3. Turn on the safelight. Allow the film and the coin to be exposed to the safelight for 3 to 4 minutes.
The results of the safelighting test can be interpreted as follows:
• Proper safelighting. If no visible image is seen on the processed radiograph, the safelighting is correct. Proceed with film processing.
• Improper safelighting. If the image of the coin and a fogged background appear on the processed radiograph, the safelight is not safe to use with that type of film (Figure 10-3). As discussed in Chapter 9, to avoid safelighting problems, the dental radiographer must use the film manufacturer’s recommended safelight filters and bulb wattages. In addition, the film must be unwrapped at least 4 ft away from the safelight. Safelighting problems must be corrected before proceeding with film processing.
Processing Equipment
Processing equipment must be meticulously maintained and monitored daily. As discussed in Chapter 9, the thermometer and timer must be checked for accuracy with manual processing techniques. The temperature and level of the water bath, the developer, and the fixer solutions must also be monitored when manual processing techniques are used. The processing time and temperature recommendations of the film manufacturer must be strictly followed.
If automatic processing equipment is used, the water circulation system must be checked, and the solution level, the replenishment system, and the temperatures must be monitored. The manufacturer’s procedure and maintenance directions must be followed carefully. Each day, two test films should be processed in the automatic processor. The following automatic processor test films are recommended:
The results of the automatic processor test films can be interpreted as follows:
• Functioning processor. If the unexposed film appears clear and dry, and if the film exposed to light appears black and dry, the automatic processor is functioning properly. Proceed with processing.
• Nonfunctioning processor. If the unexposed film does not appear clear and dry, and if the exposed film does not appear completely black and dry, the processing solutions and dryer temperature must be checked. Corrections must be made before proceeding with processing.
Processing Solutions
The most critical component of film processing quality control is the monitoring of the processing solutions. As discussed in Chapter 9, the processing solutions must be replenished daily and changed every 3 to 4 weeks as recommended by the manufacturer. As an alternative to using the calendar to determine the freshness of solutions, quality control tests can be used to monitor the strength of the developer and fixer solutions. Processing solutions must be evaluated each day before any patient films are processed.
Developer Strength: When the developer solution loses strength, the time–temperature recommendations of the manufacturer can no longer be used as the standard of measurement. An easy way to check the strength of the developer solution is to compare film densities to a standard. One of the following tests can be used (Table 10-1):
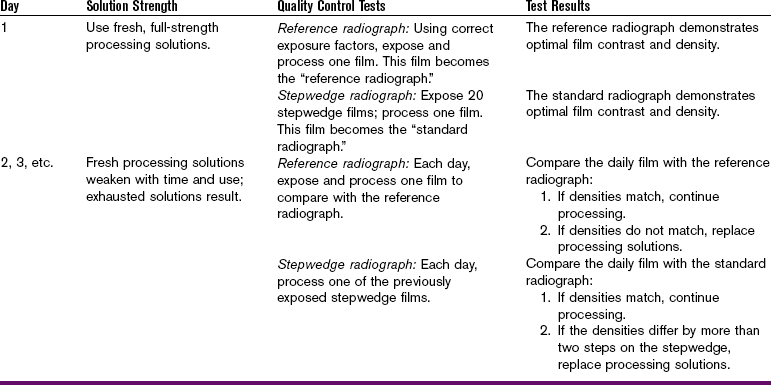
Reference Radiograph: A reference radiograph is one that is processed under ideal conditions and then used to compare the film densities of radiographs that are processed daily. The following steps can be taken to create a reference radiograph:
1. Prepare the film. Use fresh film to make a reference radiograph.
2. Expose the film, using correct exposure factors.
3. Process the film, using fresh chemicals at the recommended time and temperature.
4. View the reference radiograph and the daily radiographs side by side on a viewbox. Compare the densities on the reference radiograph with the densities on the daily radiographs.
Comparison of daily radiographs with the reference radiograph can be interpreted as follows:
• Matched densities. If the densities seen on the reference radiograph match the densities seen on the daily radiographs, the developer solution strength is adequate. Proceed with processing.
• Unmatched densities. If the densities seen on the daily radiographs appear lighter than those seen on the reference radiograph, the developer solution is either weak or cold. If the densities seen on the daily radiographs appear darker than those seen on the reference radiograph, the developer solution is either too concentrated or too warm. Weakened or concentrated developer solution must be replaced. If the developer solution is too cool or too warm, the temperature must be adjusted.
Stepwedge Radiographs: As described in Chapter 8, a stepwedge is a device constructed of layered aluminum steps. Aluminum stepwedges are commercially available and may be purchased from a number of sources, including Margraf Dental Manufacturing Inc. (www.margrafcorp.com). When a stepwedge is placed on top of a film and then exposed to x-rays, the different steps absorb varying amounts of x-rays. When processed, different film densities are seen on the dental radiograph as a result of the stepwedge (see Figure 8-6). The following steps can be taken to create stepwedge radiographs:
1. Prepare the film. Use a total of 20 fresh films to create a supply of films for daily testing. Place an aluminum stepwedge on top of one film.
2. Expose the film. Repeat with the remaining films using the same stepwedge and exposure factors.
3. Using fresh chemicals, process only one of the exposed films. This processed radiograph will exhibit different densities as a result of the stepwedge and is known as the standard stepwedge radiograph.
4. Store the remaining 19 exposed films in a cool, dry area protected from x-radiation.
5. Each day, after the chemicals have been replenished, process one of the exposed stepwedge films.
6. View the standard radiograph and the daily radiograph side by side on a viewbox. Compare the densities seen on the daily radiograph with the densities seen on the standard radiograph.
Comparison of the daily stepwedge radiograph with the standard stepwedge radiograph can be interpreted as follows:
• Matched densities. Use the middle density seen on the standard stepwedge radiograph for comparison. If the density seen on the standard radiograph matches the density seen on the daily radiograph, the developer solution strength is adequate (Figure 10-4). Proceed with processing.
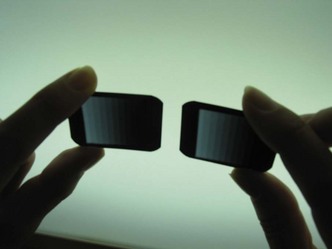
FIGURE 10-4 The daily stepwedge film should appear identical to the control (standard) film. (From Miles DA, Van Dis ML, Razmus TF: Basic principles of oral and maxillofacial radiology, Philadelphia, 1992, Saunders.)
• Unmatched densities. If the density on the daily radiograph differs from that on the standard radiograph by more than two steps on the stepwedge, the developer solution is depleted (Figure 10-5). The developer solution must be changed before proceeding with processing.
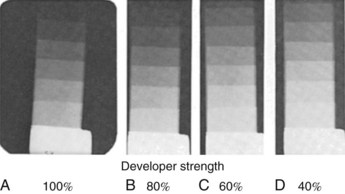
FIGURE 10-5 Four radiographs of stepwedges that were exposed at the same time and processed at different times. A, Radiograph processed when the processing chemicals were changed and complete development of image was obtained. B, Radiograph processed 2 weeks later, when developer solution was weaker by 20%. A 20% increase in developing time is needed to obtain full development of latent image. C, Radiograph processed 4 weeks later, when the developer was 60% of original strength. Full development requires a 40% increase in developing time. D, Radiograph processed in developer of 40% strength showing obvious underdevelopment of latent image. (From Manson-Hing LR: Fundamentals of dental radiography, ed 3, Philadelphia, 1990, Lea & Febiger.)
Normalizing Device: A dental radiographic normalizing and monitoring device can be used to monitor developer strength and film density. The normalizing device is commercially available. A current source for the dental radiographic normalizing and monitoring device is Xray Quality Control in Vail, Colorado (www.xrayqc.com).
Fixer Strength: As discussed in Chapter 9, the fixer solution removes the unexposed silver halide crystals on the film that result in “clear” areas on the processed dental radiograph. When the fixer solution loses strength, the film takes a longer time to clear or becomes transparent in the unexposed areas. When the fixer is at full strength, a film should clear within 2 minutes, without agitation. To monitor fixer strength, the following clearing test can be used:
1. Prepare the film. Unwrap one film and immediately place it in the fixer solution.
2. Check the film for clearing. Measure the amount of time the film takes to clear.
The results of the clearing test can be interpreted as follows:
• Fast clearing. If the film clears in 2 minutes, the fixer is of adequate strength. Proceed with processing.
• Slow clearing. If the film is not completely clear after 2 minutes, re-immerse it in the fixer solution. If the film does not completely clear in 3 to 4 minutes, the fixer solution is depleted. The fixer solution must be replaced before proceeding with processing.
Digital Imaging
Just as quality assurance procedures for conventional x-ray film and processing solutions are necessary, quality assurance protocols for offices that use digital imaging are also required. Along with annual tests for the calibration of the imaging equipment, the receptors (whether for direct or indirect imaging) also require periodic examination for scratching, bending, and general wear-and-tear. Since the traditional x-ray film is used one time and the digital sensors and imaging plates are re-used multiple times, greater care in handling and cleaning of the sensors is necessary. Imaging sensors that are damaged by debris or bending show the same artifacts repeatedly when the sensors are re-exposed to radiation. Dental professionals who use direct digital imaging must also inspect the wired connection for any signs of separation from the sensor or deterioration. (See Chapter 25 for more information on digital imaging.)
Performance testing and monitoring of digital radiography equipment must be done in accordance with equipment manufacturer specifications. Commercial kits that are available include a set of test objects, which can be used quickly and easily on an ongoing basis to check imaging performance, particulary those aspects that are subject to deterioration. Such kits allow for the following checks: erasure cycle efficiency, image retention, sensitivity, uniformity, scaling errors, blurring artifacts, and resolution and may be obtained from CSP Medical (www.cspmedicalstore.com).
Quality Administration Procedures
Quality administration refers to the management of the quality assurance plan in the dental office. Although many of the technical aspects of the quality assurance plan (e.g., quality control tests) may be delegated to the dental radiographer, the dentist is ultimately responsible for overall quality assurance. The basic elements of a quality administration program include the following:
A detailed, written description of the quality assurance plan used in the dental office should be on file and made available to all participating staff members. The standards of quality must be outlined by the dentist. Each staff member involved in the quality assurance plan must understand the standards of quality as well as the purpose and importance of maintaining quality control of radiographic procedures. A detailed, written assignment of quality assurance duties should also be on file and made available to all participating staff members. Each staff member assigned to perform a duty must understand the purpose and importance of that specific duty. Although the dentist may serve as the administrator of the quality assurance program, an assigned staff member may oversee the daily quality control testing and results.
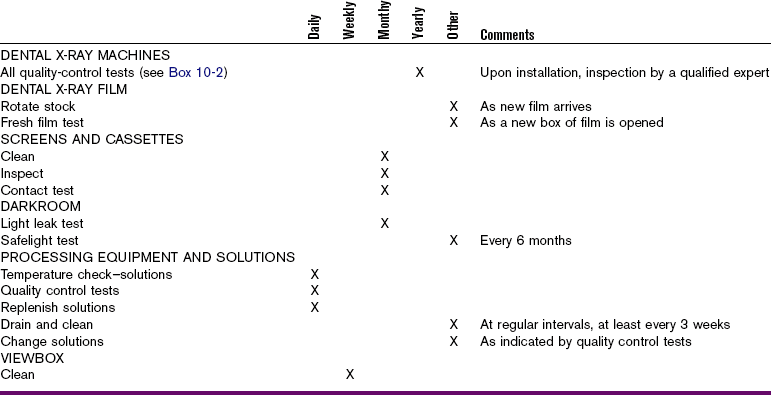
A written monitoring schedule detailing all quality control tests and the frequency of testing for all dental x-ray equipment, supplies, and film processing should be posted in the office. A written maintenance schedule for the routine service and inspection of dental x-ray machines and processing equipment should also be posted in the office.
A record-keeping log of all quality control tests, including the specific test performed, the date performed, and the test results, should be carefully maintained and kept on file in the dental office. In addition, a log for processing solutions, which lists the dates of solution replacement, replenishment, and processor or tank cleaning, should be maintained. Examples of record-keeping logs can be found in a pamphlet titled Quality Control Tests for Dental Radiography.
A written plan for the periodic evaluation and revision of the existing quality assurance program should also be part of the quality administration plan. Finally, periodic in-service training of staff members to upgrade and improve x-ray exposure techniques and film processing procedures is recommended.
Operator Competence
The dentist is ultimately responsible for the diagnostic quality of all dental radiographs exposed in his or her office, regardless of who actually exposes and processes the film. Therefore, the dentist relies on the competence of the dental radiographers. Each dental radiographer must be competent in both exposure and processing techniques.
If the operator (dental radiographer) produces a nondiagnostic image, the radiograph must be retaken. All retakes expose the patient to additional x-radiation, so the number of retakes must be kept to an absolute minimum. Operator errors that require retakes should all be recorded. The use of a log to record retakes aids in identifying recurring problems that require attention. Continuing education courses or individualized instruction are useful to upgrade and improve the competence of the dental radiographer.
Summary
• A quality assurance plan ensures the production of high-quality radiographs and includes both quality control tests and quality administration procedures.
• Quality control tests are used to monitor dental x-ray equipment, supplies, and film processing. The following quality control tests are recommended:
1. X-ray machines. Dental x-ray machines should be tested for minor malfunctions, output variations, collimation problems, tubehead drift, timing errors, and inaccurate kilovoltage and milliamperage readings (see Box 10-2). These tests should be performed once a year.
2. X-ray film. The fresh film test can be used to determine whether dental x-ray film is fresh and has been properly stored and protected. This test should be performed each time a new box of film is opened.
3. Screens and cassettes. Cassettes should be examined every month for adequate closure, light leaks, and warping. The film-to-screen contact test can be used to determine the adequacy of contact. This test should be performed periodically. More frequent testing is required if the screens and cassettes are used often.
4. Darkroom lighting. The light leak test can be used to evaluate the darkroom for light leaks every month. The safelighting test can be used to check for proper safelighting conditions and should be performed every 6 months.
5. Processing equipment. Manual and automatic processing equipment must be carefully maintained and monitored daily for potential problems. With manual processing techniques, thermometer and timer must be accurate, and temperature and level of the water bath, developer, and fixer solutions must be checked. Automatic processor test films can be used to check the functioning of the automatic processor. These tests and checks must be performed daily.
6. Processing solutions. The developer strength can be monitored by a reference radiograph, stepwedge radiographs, or a normalizing device. The fixer solution can be checked by performing a clearing test. These tests must be performed daily.
• Quality administration procedures include a description of the quality assurance plan, the assignment of duties, a monitoring schedule (Table 10-2), a maintenance schedule, record-keeping logs, a plan for evaluation and revision, and in-service training.
• The dentist is ultimately responsible for the overall quality assurance plan. In addition, the dentist is responsible for the diagnostic quality of all radiographs, regardless of who exposes and processes the films.
• To ensure the production of diagnostic radiographs, the dentist depends on the skill of competent dental radiographers who are competent in both exposure and processing techniques.
American Dental Association Council on Scientific Affairs. The use of dental radiographs: update and recommendations. JADA. 2006;137(9):1304–1312.
Frommer, HH, Savage-Stabulas, JJ, Film processing: The darkroom. Radiology for the dental professional, ed 8, St Louis, Mosby, 2005.
Frommer, HH, Savage-Stabulas, JJ, Patient protection. Radiology for the dental professional, ed 8, St. Louis, Mosby, 2005.
Johnson, ON, Thomson, EM, Identifying and correcting faulty radiographs. Essentials of dental radiography for dental assistants and hygienists, ed 8, Upper Saddle River, NJ, Pearson, 2007.
Johnson, ON, Thomson, EM, Radiation protection. Essentials of dental radiography for dental assistants and hygienists, ed 8, Upper saddle River, NJ, Pearson, 2007.
Johnson, ON, Thomson, EM, Quality assurance in dental radiography. Essentials of dental radiography for dental assistants and hygienists, ed 8, Upper Saddle River, NJ, Pearson, 2007.
Lusk, LT. Peak performance. RDH Natl Mag Dent Hygiene Professionals. 1994;14(3):32. 37–38
Miles, DA, Van Dis, ML, Jensen, CW, Ferretti, A, Film processing and quality assurance. Radiographic imaging for the dental team, ed 4, St. Louis, Saunders, 2009.
White, SC, Pharoah, MJ, Health physics. Oral radiology: principles and interpretation, ed 6, St. Louis, Mosby, 2009.
Multiple Choice
________ 1. Calibration of dental x-ray equipment can be performed by a dentist, dental hygienist, or dental assistant.
________ 2. Annual tests for dental x-ray machines can be performed by a dentist, dental hygienist, or dental assistant.
________ 3. For quality control purposes, each new box of unopened film should be tested for film freshness and fogging before it is used.
________ 4. After processing, fresh film that has been properly stored and protected will appear ________.
________ 5. After performing the film-screen contact test, a wire mesh image of uniform density appears. These results indicate ________.
________ 6. When functioning properly, a viewbox should emit a uniform and brilliant light.
________ 7. One of the most critical areas of quality control that requires daily monitoring is ________.
a. examination of the fluorescent bulbs inside the viewbox
b. cleaning the extraoral intensifying screens
________ 8. The coin test is used to check ________.
________ 9. The following must be closely monitored with manual processing techniques:
a. temperature of the water bath
b. levels of the processing solutions
________ 10. On the average, processing solutions should be changed ________.
________ 11. On the average, processing solutions should be replenished ________.
________ 12. Fresh films and fresh chemicals must be used when preparing reference radiographs.
________ 13. A reference radiograph is used to check ________.
b. light-tightness of the darkroom
c. strength of the fixer solution
________ 14. The densities seen on the daily radiograph appear lighter than the densities seen on the reference radiograph; this result indicates that ________.
a. the developer solution is too weak
b. the developer solution is too concentrated
________ 15. The clearing test is used to monitor ________.
________ 16. Regardless of who actually exposes and processes radiographs, the dentist is ultimately responsible for the diagnostic quality of all dental radiographs.