CHAPTER 20 Exodontia
Introduction
A tooth should be removed only when it is proven to be diseased and only after other more conservative treatments to salvage the tooth have failed or are likely to fail. Because of technical limitations of preserving a hypsodont tooth by endodontic treatment, removing a severely diseased cheek tooth often remains the only effective treatment for horses with a diseased tooth. Extraction of a cheek tooth from horses was described early in the veterinary literature1 and, after the advent of anesthesia, was one of the first surgical procedures to be performed with the horse anesthetized. It remains the most frequently performed oral surgery of the horse.
Indications for dental extraction
The most common indication for removing a tooth is apical dentoalveolar infection, which results most commonly from periodontal disease, infundibular caries of a maxillary cheek tooth, or hematogenous deposition of bacteria into the pulp (i.e., anachoretic infection). Other indications for removing a tooth include: a retained deciduous incisor or premolar; a tooth affected by severe, irreversible periodontal disease; a loose tooth; a tooth whose clinical crown has fractured; a supernumerary, displaced, or misaligned tooth causing clinical signs of disease; an impacted tooth; a tooth that has become non-vital because of fracture of the jaw; a tooth with an overgrowth so severe that it has caused severe, soft-tissue trauma; a tooth that interferes with orthodontic surgery; and a tooth that has become neoplastic.
Evidence that a tooth is diseased is usually obtained from clinical signs and oral and radiographic examination, but other imaging techniques, such as computed tomography, magnetic resonance imaging, or nuclear scintigraphy, must sometimes be used to determine if a tooth is diseased. Dental extraction to resolve signs of dental disease is contraindicated when the identity of the tooth causing these signs is not firmly established.2
The technique used to remove a tooth depends on the tooth involved, the nature of the disease affecting that tooth, and the preference of the veterinary surgeon performing the procedure. Regardless of the technique used, the principle rule of removing a tooth, summarized by Lane,3 ‘to remove the tooth, the whole tooth and nothing but the tooth,’ remains valid in all situations, excluding those where extensively diseased bone surrounds the tooth. The principles of dental extraction in human beings, summarized by Shira, are valid for the horse.4 These principles are:
1. to obtain adequate access to the periodontium
When a diseased cheek tooth can be removed by an intra-oral approach, using a dental extractor, complications are few and the horse requires little aftercare, but despite its advantages, extraction per os of a diseased tooth along its natural path of eruption is often not feasible, and other methods of removal must be considered. Removing a tooth using an intra-oral approach is difficult or impossible when the tooth’s clinical crown cannot be grasped with a dental extractor (e.g., when a portion of the clinical crown is missing), when its reserve crown is fractured, when its clinical crown is brittle because of extensive dental caries, or when the reserve crown of the tooth is so large from hyperplasia of the cementum or a dental tumor that it cannot traverse the alveolus. When the tooth cannot be removed using an intra-oral approach, the tooth must be removed by an extra-oral approach, which entails either repulsing the tooth into the oral cavity, using a mallet and a punch, or prying the tooth from the alveolus through a buccotomy after removing the lateral plate of alveolar bone.
Removal of a tooth, regardless of the technique used, has historically been thought of as a straightforward, unsophisticated procedure, but the high incidence of complications reported, particularly that associated with repulsion, shows that removing a tooth can be a technically difficult procedure that demands careful preparation, specialized equipment, and meticulous attention to technique to avoid complications. Before embarking on this potentially complicated procedure, the veterinarian should discuss the potential costs and complications with the owner.
Removal of incisors
Deciduous incisors, especially the middle (Triadan 02) and corner (Triadan 03) incisors, are often involved in an avulsion fracture of the mandible or an incisive bone (premaxilla). Whenever possible, and whenever soft-tissue attachments remain, the teeth should be salvaged by incorporating them into the fracture repair. Many incisors that may initially appear to be devitalized can be salvaged, provided that they can be immobilized and that they remain at least partially attached to their alveolus. Removing a completely devitalized deciduous incisor has minimal effect on eruption of its permanent counterpart.
Failure of one or more deciduous incisors to shed when their permanent counterparts erupt can result in misalignment of the permanent teeth as they erupt (Fig. 20.1). These retained incisors, which usually reside rostral to the permanent incisors, rarely interfere with prehension of food, and usually present a problem only with cosmesis. A deciduous incisor can easily be removed with the horse sedated after infiltrating the surrounding gingiva with local anesthetic solution, such as mepivacaine or lidocaine. A deciduous incisor has a short reserve crown, and its periodontal attachments are easily loosened using a small, periodontal elevator (Fig. 20.2). Once loosened, the tooth can be extracted using a pair of small, wolf tooth extracting forceps (Fig. 20.3). The alveolus fills rapidly with a blood clot, which is soon replaced by granulation tissue, then by fibrous tissue, and finally by bone.
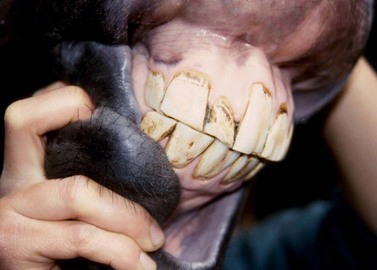
Fig. 20.1 Retained middle upper deciduous incisor. A retained incisor usually resides rostral to the permanent incisors. These shallow-rooted teeth can usually be removed without difficulty with the horse sedated, using local analgesia.
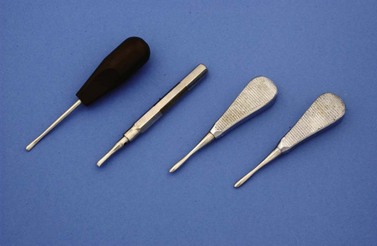
Fig. 20.2 Small periodontal elevators, such as these, are suitable for elevating incisors and ‘wolf teeth.’
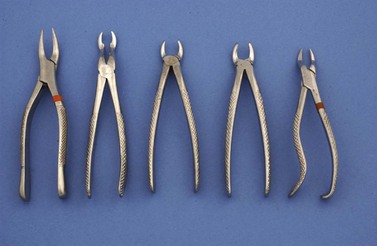
Fig. 20.3 Small dental extractors, such as these, are suitable for removing retained deciduous incisors.
Removal of supernumerary, permanent incisors
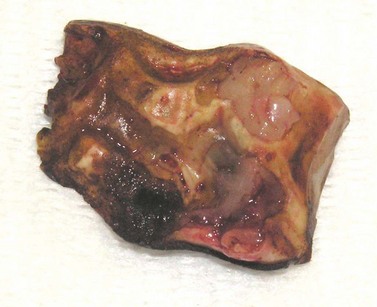
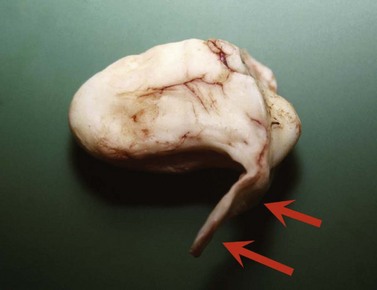
Supernumerary, permanent incisors occur frequently and vary in number from one to several. The supernumerary permanent incisor usually has an occlusal surface that appears similar to that of a normal incisor and has a reserve crown that is often equal in length and shape to that of a normal incisor (Figs 20.4 & 20.5). Supernumerary teeth that resemble teeth of the normal series in crown and root morphology are sometimes referred to as supplemental teeth. Radiographic examination is often useful to detect non-erupted permanent incisors, but despite careful physical and radiographic examination of the incisors, distinguishing a supernumerary tooth from the usually identical surrounding normal teeth can often be impossible. A supernumerary permanent incisor imparts an asymmetric appearance to the incisor arcade but usually causes minimal signs of disease, and affected horses rarely suffer any difficulty in prehending feed. Removing a supernumerary incisor is usually unnecessary and serves only to improve the cosmetic appearance of the horse. Although removing a supernumerary incisor leaves a large gap between the remaining teeth, this gap disappears as the teeth realign (Fig. 20.6).
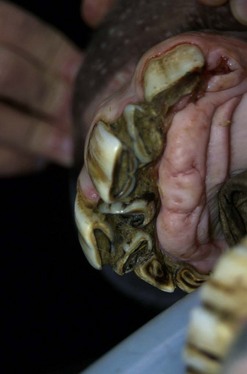
Fig. 20.4 Supernumerary incisors are difficult to distinguish from the normal incisors by their occlusal appearance and are usually of no clinical significance.
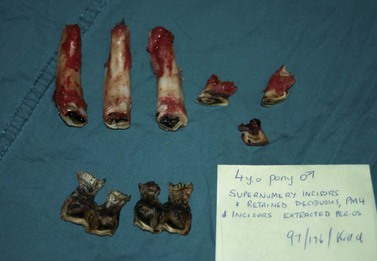
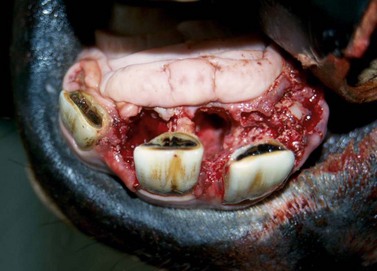
Fig. 20.6 Their deep reserve crowns and their close proximity to each other make supernumerary incisors difficult to extract. The remaining teeth align to provide a normal or near normal appearance to the incisors. The benefit of removing supernumerary incisors is usually only cosmetic. This picture shows an incisor arcade after permanent supernumerary incisors were removed.
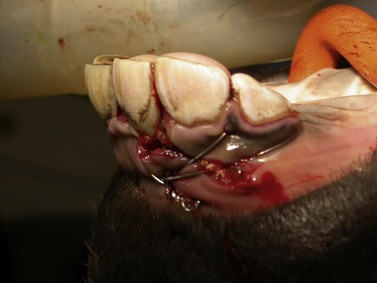
Removing a supernumerary incisor can be difficult because these incisors have an extensive reserve crown and are in close proximity to other teeth. Removing a supernumerary permanent incisor may necessitate that the horse be anesthetized, especially if more than one tooth is to be removed, because most horses are more sensitive to concussion of the incisors than to concussion of the cheek teeth. If the horse is compliant, however, a single, supernumerary, permanent incisor can usually be removed with the horse sedated after providing analgesia with an alpha-2 agonist and an opiate and desensitizing the tooth and associated structures with a maxillary or mandibular nerve block. (See Ch. 15).
A supernumerary, permanent incisor can be removed by gradually elevating its periodontal attachment around the entire circumference of the tooth until the tooth is loose enough that it can be extracted with minimal force. Teeth that are difficult to loosen can be extracted after raising a gingival flap by making two parallel, gingival incisions along the peripheral margins of the reserve crown to expose the labial alveolar plate, which is removed using a narrow (e.g., 1 cm wide) osteotome. The periodontal ligament is gradually severed using a periodontal elevator until the incisor is loose enough to be extracted with a small incisor extraction forceps.
Removal of incisors after trauma
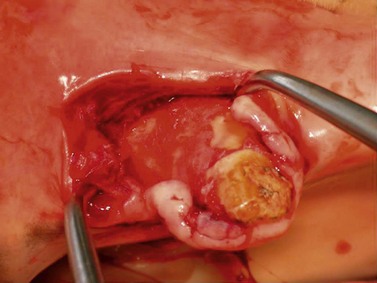
Incisors that have separated totally from their gingival attachments as a result of avulsion of a portion of the incisive bone or rostral aspect of the mandible should be removed. Avulsed incisors that retain some gingival attachments may remain vital and can often be salvaged by debriding the wound and reducing and immobilizing the fracture (Fig. 20.7).
Removing canine teeth
The few indications for removing canine teeth include severe periostitis, often associated with bit injuries, and pulpitis, often resulting from fracture of the tooth or its alveolus. Canine teeth severely affected by the odontoclastic resorption and hypercementosis syndrome may also require extraction. Pulpitis can result in a painful, focal, apical abscess, which in some cases discharges through a gingival tract. Removing the entire canine to prevent injury to other horses or to facilitate dental examination is contraindicated and may result in spillage of the tongue from the mouth, which may affect the horse’s performance, if the horse is a show horse. Excessively sharp canines can be reduced slightly and profiled using a rotating diamond burr.
Loose canines can be extracted using an incisor forceps or a small animal dental forceps after elevating the periodontium. The long, curved alveolus in which the apical portion of the canine is embedded makes removing a canine with an intact periodontium difficult. Removing a canine is facilitated by desensitizing the surrounding gingiva with local anesthetic solution and raising a gingival flap to expose the labial aspect of the alveolar bone, which is removed with an osteotome (Fig. 20.8). The periodontal ligament surrounding the reserve crown can then be severed with a periodontal elevator until the tooth is loose enough to be extracted. When extracting a mandibular canine, care must be taken to avoid damaging the mandibular alveolar nerve when elevating the gingival flap. An apically infected canine can sometimes be salvaged using endodontic treatment.
Extracting wolf teeth
The first premolar (Triadan 05), commonly referred to as the ‘wolf tooth’, is highly variable in position, shape, and size. Wolf teeth are commonly present in the maxillae but are present far less frequently in the mandible. The size of the clinical crown of a wolf tooth is a poor indicator of the size of the embedded portion of the tooth. Maxillary wolf teeth are present in 40–80 % of horses, but often only one wolf tooth is present.5 The time at which the wolf teeth erupt is variable, but most erupt when the horse is between 6 and 18 months old.
Most wolf teeth are located immediately rostral to the maxillary 2nd premolar (Triadan 106, 206), but they are not infrequently displaced toward the buccal or palatal aspect of that tooth and may erupt far rostrally, close to the canine. Some remain subgingival and are often detected as a hard, subgingival nodule in the interdental space. An unerupted wolf tooth may occasionally be associated with gingival ulceration and may cause the horse to show signs of discomfort when it is contacted by the bit. Radiographic examination of the tooth is useful to demonstrate the size and direction of the embedded portion of the tooth before attempting to extract the tooth. An erupting canine in the interdental space of a young horse (i.e., 2- to 4-year-old) should not be mistaken for a displaced wolf tooth.
Extracting the wolf teeth to resolve bitting problems was described in the 18th century,6 and wolf teeth are still removed today for this same reason, and sometimes because they are perceived to interfere with other dental procedures, even though scientific evidence of the benefit of extracting them is lacking. Pain or sensitivity associated with the wolf teeth, especially those that are extremely large, molarized or aberrantly placed, may result in a problem with bitting or performance. Entrapment of the buccal, mucosal fold of the commissure of the lips between the bit and the wolf tooth or the rostrolateral aspect of the 2nd premolar has been cited as a cause of discomfort and, consequently, a lack of responsiveness to the bit. Reducing the rostral and buccal aspect of the 2nd premolar (i.e., 1st cheek tooth, Triadan 06) with a rasp can be hindered by the presence of a large wolf tooth. Because of these problems associated with the wolf teeth, real or imagined, wolf teeth have traditionally been removed from young horses. This tradition may eventually slide into obsolescence.
Wolf teeth can usually be extracted in toto with the horse sedated and standing; administrating local anesthetic solution subgingivally may ease extraction. A wolf tooth with a normal configuration can be extracted easily by circumferentially elevating its gingival and periodontal attachments using a traditional, circular ‘Burgess-type’ extractor, but a small, curved periodontal elevator can be used with much more precision and effectiveness (Fig. 20.9).
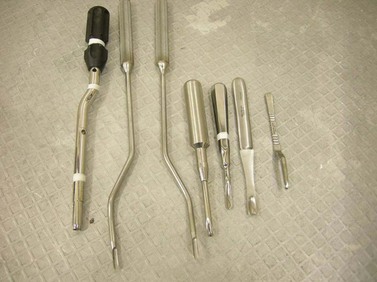
Fig. 20.9 This picture shows a range of equipment used to elevate gingival and periodontal attachments to a wolf tooth before the tooth is extracted with small forceps.
The size and position of the apical portion of an aberrant or a very large wolf tooth should be assessed radiographically before attempting to extract the tooth. After its periodontium has been elevated, the loosened tooth can be extracted using a small incisor extractor or a specialized wolf tooth extractor. A wolf tooth located subgingivally can be exposed through a small incision in the overlying gingival mucosa (Fig. 20.10). The apex of an unerupted, rostrally located, wolf tooth often extends caudally, and an osteotome or gouge placed between the tooth and palate can be used to separate the periodontium from its underlying bone (Fig. 20.11).
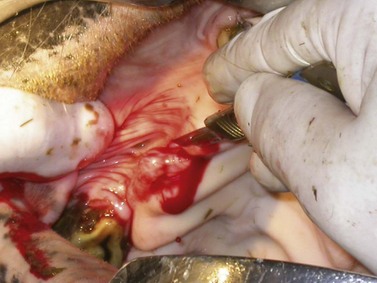
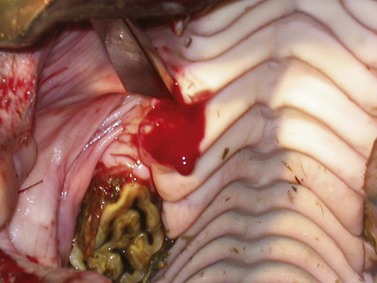
Fig. 20.11 Large, subgingival wolf tooth being extracted using a narrow osteotome placed between the tooth and the hard palate and directed caudally.
Failure to sufficiently loosen the periodontium surrounding a wolf tooth can result in fracture of the tooth. The retained dental fragment should be elevated and removed to assure healing of the alveolus, but an apical fragment located subgingivally rarely causes a clinical problem. After several days, a loose fragment may migrate to a more superficial position where it can be more easily removed. Mandibular wolf teeth (Triadan 305, 405) occur rarely, but if present they can usually be palpated rostral to the first cheek tooth. They vary in size and position, but commonly they are quite small. They may be responsible for discomfort with the bit and are a noteworthy observation during a pre-purchase examination. The technique for their removal is similar to that described for removing maxillary wolf teeth.
Extracting deciduous premolars
The permanent premolars erupt, displacing the remnants of their temporary counterparts, when the horse is between approximately 2.5 and 4 years old. The age at which each permanent tooth erupts varies among breeds and among individuals within a breed. For instance, the permanent teeth of miniature horses often erupt later than those of horses of other breeds. A deciduous premolar can become retained if it becomes impacted between adjacent teeth, and if impacted, it can occasionally contribute to impaction or maleruption of the emerging permanent tooth.
Young horses sometimes develop a transient periodontitis caused by retention of feed between the exfoliating temporary tooth and the erupting permanent tooth. Periodontitis and entrapment of food around a deciduous tooth are indications that the temporary tooth should be removed. Occasionally, a remnant of a deciduous tooth becomes retained at an interproximal space, causing pain.
If the gingival attachments of a deciduous premolar are intact, the deciduous premolar should not be removed because development of the underlying permanent tooth may be incomplete. An exfoliating, deciduous premolar, or ‘cap’, is easily extracted using a shallow-jawed, cap extractor (Figs 20.12 & 20.13).
Extracting a permanent cheek tooth per os
Extraction of a tooth per os, performed with the horse conscious, has been practiced since the turn of the 20th century, but the technical difficulties encountered when extracting a tooth from a poorly restrained horse and the development of improved anesthetic agents during the past century brought about the development of surgical techniques of extraction, and consequently, dental repulsion became widely practiced. The technical problems and the high incidence of complications associated with dental repulsion, such as dental or osseous sequestra and oro-antral fistula, reported in major studies,7,8 stimulated development of an alternative surgical technique of extraction, namely extraction through a buccotomy, which was reported to be associated with a lower incidence of complications than was extraction by repulsion.9,10 The technique of extraction by buccotomy was found by many to be technically complicated, necessitated that the horse be anesthetized, and not without complication, such as iatrogenic damage to branches of the dorsal buccal nerve or to the parotid salivary duct.11 Because of complications associated with extraction by repulsion and by buccotomy, extraction per os again became the technique of extraction preferred by most practitioners and remains so today.
Extraction per os, originally described by Merillat (1906),12 is associated with a low incidence of complications and is more economical than is extraction by repulsion or by buccotomy.7,13 The ease of the technique has been enhanced by the evolution of better instruments, development of more effective sedatives and analgesic drugs, and more wide-spread use of regional analgesia of dental structures.
Restraining a horse for extracting a cheek tooth per os
Although a small proportion of nervous or fractious horses must be anesthetized for extraction of a tooth per os, the procedure can usually be performed with the horse sedated. Extracting a cheek tooth with the horse sedated, rather than anesthetized, offers considerable advantages because of the costs and risks associated with anesthetizing a horse. Extraction per os should not be attempted, however, with the horse conscious if the horse’s temperament puts the horse or personnel at risk of injury.
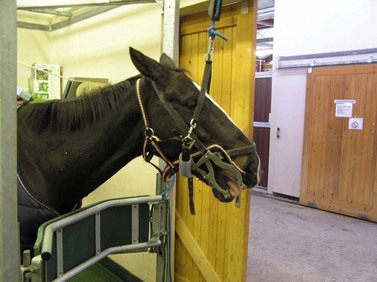
Extracting a tooth per os with the horse standing is best performed with the horse restrained in stocks, with its head supported in a rigid halter or head-stand (Fig. 20.14). Extracting a cheek tooth constitutes a major surgical procedure, especially when the horse is young, and effective sedation and good analgesia are prerequisites for a successful outcome. (See Ch. 15.) A tooth can be extracted successfully without the use of regional analgesia,7 but administering the appropriate regional nerve block greatly improves the ease of the extraction per os and reduces the time required to perform the procedure and the quantity of sedation that must be administered.14 Administering a nerve block, even when extraction is performed with the horse anesthetized, allows the procedure to be performed with the horse in a lighter plane of anesthesia.
Selecting a horse for extracting a cheek tooth per os
Teeth with a short reserve crown and those with weakened periodontal attachments caused by advanced periodontal disease can be extracted per os without difficulty, but extracting a tooth with a long reserve crown and little periodontal destruction presents a challenge. O’Connor (1942) observed that ‘to extract a molar tooth from a sound alveolus in a young horse is almost an impossible task.’15 However, by using modern techniques, sedatives and analgesic drugs, the appropriate regional nerve block, and appropriate instrumentation, difficulties of extraction per os are no longer insurmountable.
Extracting the most caudal cheek teeth (i.e., Triadan 010s and 011s) is technically more difficult because the caudal aspect of the mouth cannot be opened wide, impairing accurate placement of instruments on these teeth. Extraction of teeth with long reserve crowns is hindered by the narrow confines of the caudal aspect of the mouth and interference from the opposing dental arcade.
A fractured cheek tooth can sometimes be extracted orally if the parent fragment is sufficiently large that it can be grasped with an instrument, but many fractured teeth need not be extracted if apical infection is not clinically evident. A fractured tooth, most commonly the maxillary 1st molar (Triadan 09),7 is commonly composed of a parasagittal, lateral slab fragment, which nearly always can be removed without difficulty, and a larger, non-displaced, stable, parent fragment, that need not be removed, provided that the two exposed pulps have been sealed off, and clinical signs of apical infection are not present.
Although a diseased maxillary tooth responsible for causing secondary bacterial sinusitis can be extracted per os, lavage of the affected sinuses is often necessary after the tooth has been extracted, and if the sinuses contain inspissated exudate, an osteoplastic flap must be created to remove the exudate. (See Ch. 19.)
Technique of extracting a cheek tooth per os
The techniques of oral extraction described below are slight modifications of those first described by O’Connor (1942)15 and Guard (1951).16 The horse is sedated, and the appropriate regional nerve block is administered using mepivacaine or bupivacaine. Which of these two local anesthetic agents is used depends on the anticipated duration of the procedure. The horse should receive a broad-spectrum, antimicrobial drug and a non-steroidal, anti-inflammatory drug before the procedure. The speculum is inserted into the mouth and opened sufficiently to allow visualization and digital palpation of the dental arcades so that the tooth to be removed can be identified. The veterinary surgeon must have good access to the oral cavity so that the bulky instrumentation required to extract a tooth can be manipulated. A bright head-light is necessary to illuminate the mouth so that instruments can be placed accurately.
The gingiva on the buccal and palatal or lingual aspects of the affected tooth is elevated from the tooth using a right-angled, flat-bladed, dental pick or a small periodontal elevator (Fig. 20.15). The jaws of a molar separator (Fig. 20.16) are placed into the interproximal space rostral and then caudal to the affected tooth to strain the tooth’s rostral and caudal periodontal attachments (Fig. 20.17). The jaws are held in place for approximately 5 minutes at each site. When extracting a 3rd premolar (Triadan 07), the molar separator should not be applied with great force between the 2nd and 3rd premolars (Triadan 06 and 07) to avoid inadvertent damage to the periodontal attachment of the 2nd premolar (Triadan 06). Similarly, when removing the 2nd molar (Triadan 010), the molar separator should not be applied with great force between the 2nd and 3rd molars (Triadan 010 and 011). Aggressive use of the molar separator is unnecessary and increases the risk of inadvertently loosening a healthy tooth or fracturing the crown of the affected tooth or that of an adjacent tooth.
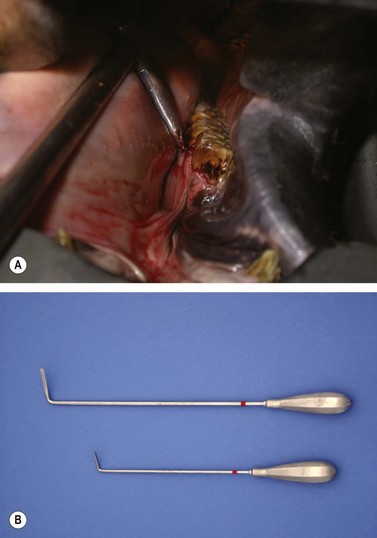
Fig. 20.15 Flat-bladed periodontal elevators are used to elevate the gingival and periodontal attachments from the buccal and lingual aspects of the tooth.
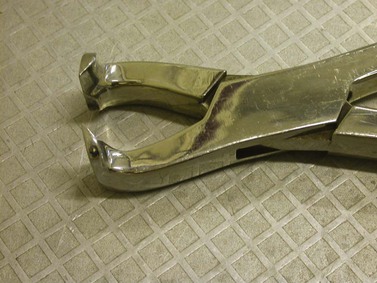
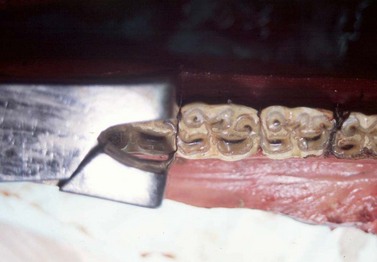
Fig. 20.17 Molar separators are used to strain the periodontium on the rostral and caudal aspects of the tooth, as shown in this cadaver specimen.
After the gingiva has been elevated and the molar separator used, the molar extractor is placed on the tooth to be extracted (Fig. 20.18). Because cheek teeth vary in size and configuration between horses and according to their location within the oral cavity, a variety of molar extractors of different sizes should be available to ensure that the extractor fits the tooth to which it is applied (Fig. 20.19). Mandibular cheek teeth are narrower than their maxillary counterparts, and therefore require an extractor with a narrower space between the jaws when the handles are closed. Good instrument–tooth contact is essential, and to achieve this contact, the extractor should have a high-quality, box hinge and finely machined, toothed jaws. After the extractor is applied, the oral cavity should be inspected visually to ensure that the correct tooth has been grasped and that the jaws of the extractor do not overlap onto an adjacent tooth. The handles of the extractor are fixed using the locking mechanism found on some extractors, a rubber bandage, or adhesive tape (Figs 20.20 & 20.21).
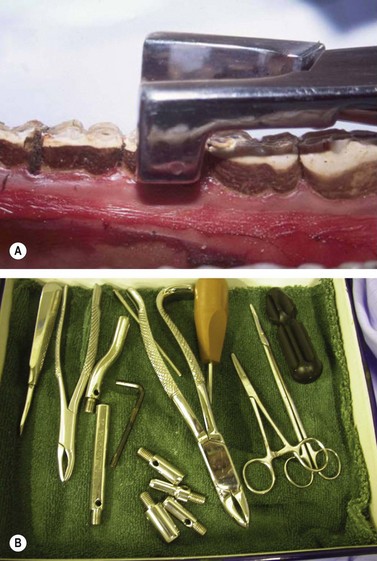
Fig. 20.18 The molar extractor selected to best contact the clinical crown is applied to the tooth, ensuring that it does not overlap onto an adjacent tooth.
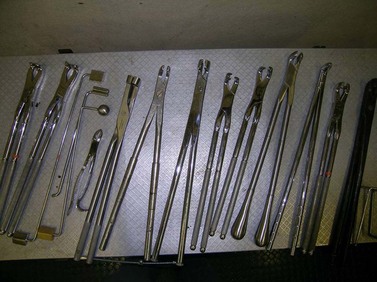
Fig. 20.19 A variety of molar extractors of different sizes should be available to ensure that the extractor fits the tooth to which it is applied.
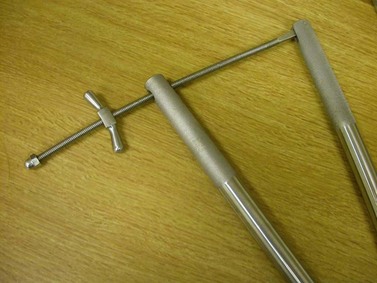
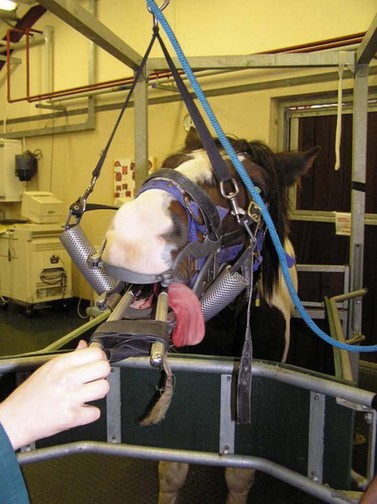
Fig. 20.21 The handles of an extractor can be fixed, after the extractor is correctly positioned, using a rubber band or adhesive tape.
The handles of the extractors are moved with slow, low-amplitude, horizontal, to-and-fro oscillations along the longitudinal axis of the cheek tooth. The tooth should be inspected visually during the first few oscillations to ensure that the extractor has maintained its grip on the tooth and that the tooth is moving slightly. Incorrect or loose placement of the extractor can result in attrition of the clinical crown, causing the crown to become rounded and impossible to grip. Torsional movement along the axis of the extractor’s handles early in the procedure can result in fracture of the clinical crown and should be avoided. The amplitude of the oscillations is increased, but only slightly, as the tooth loosens. Excessive force or attempts to oscillate the extractors in a wide arc can result in shearing of the clinical crown before periodontal attachments of the reserve crown are disrupted. The elasticity of the bony alveolus is slight, and so the arc of movement must also remain slight.
When the periodontal attachments are loosened, a distinctive ‘squelching’ sound can be heard, and the resistance to movement of the extractor decreases. The squelching sound is frequently accompanied by foamy hemorrhage around the gingival margin (Fig. 20.22). In addition to disrupting the periodontal ligament, the repetitive movement of the tooth may stretch the alveolus, facilitating extraction of the tooth (J. Easley, personal communication). Hundreds of oscillations, sometimes taking an hour or more to perform, may be required before the periodontium is disrupted sufficiently to allow the tooth to be extracted.
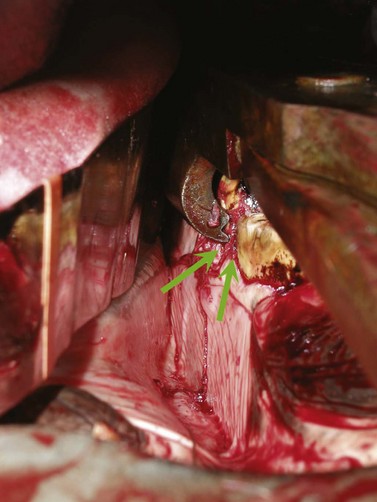
Fig. 20.22 Foamy hemorrhage can be seen around the gingival margin of the tooth when the tooth loosens. This hemorrhage is accompanied by a squelching sound.
After the tooth feels loose enough to be extracted, a dental fulcrum (Fig. 20.23A) appropriate to the size of the extractors is advanced along the occlusal surface of the arcade until it lies between the box hinge of the extractor and the occlusal surface of the cheek tooth rostral to the tooth being extracted (Fig. 20.23B). The mechanical advantage provided by the fulcrum is maximized by advancing the fulcrum as far caudally as possible along the row of cheek teeth. While keeping the molar extractors firmly gripped on the affected tooth, steady, firm pressure is applied to the handles so that the tooth is levered from the alveolus over the fulcrum in a straight line, along its natural pathway of eruption (Fig. 20.24). After the tooth has been partially extracted, re-grasping a more apical portion of the tooth with the extractors may be necessary to extract the rest of the tooth. Axial twisting of the extracting forceps should be avoided until the tooth has been totally freed from periodontal attachments. Re-directing the clinical crown axially, after the tooth has been partially extracted, may be necessary to avoid impingement of the tooth by the opposing arcade (Fig. 20.25). Loosening a 2nd or 3rd molar (Triadan 010 or 011) of a young horse (i.e., <7 years old) can be particularly frustrating, due, at least in part, to the tooth’s oblique, caudally angled reserve crown. The crown of such a tooth may need to be reduced with a burr, while partially extracted, so that it can be manipulated from the alveolus without it being impinged by the opposite arcade. Sectioning a cheek tooth so that it can be extracted is rarely necessary, and sectioning a mandibular cheek tooth risks the loss of the apical portion of the sectioned tooth into the alveolus from where its removal, without surgery, is difficult or impossible.
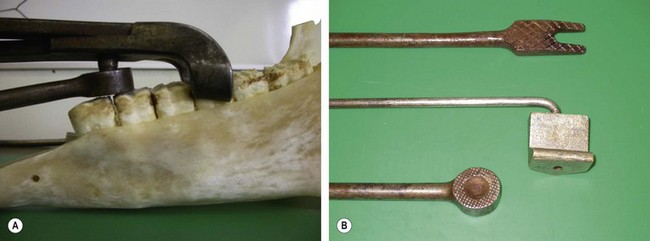
Fig. 20.23 (A) The dental fulcrum enables the extractor to elevate the tooth from the alveolus. (B) Fulcrums of different thickness may be required so that the force of extraction can be directed appropriately.
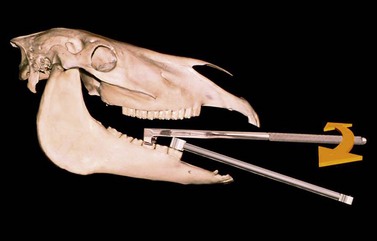
Fig. 20.24 After the fulcrum is optimally positioned, the handles of the forceps are pressed on the fulcrum, extracting the tooth from its alveolus.
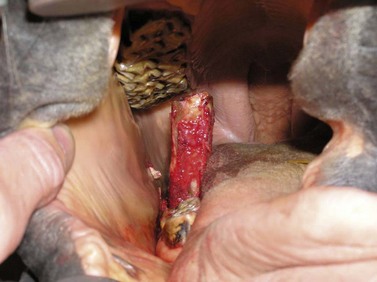
Fig. 20.25 A caudal cheek tooth of a young horse often has a reserve crown so long that the crown must be directed axially, so that its movement is not impinged by the opposing arcade.
After the tooth is extracted from the alveolus, it is withdrawn from the mouth and inspected, paying close attention to its apical aspect, to ensure that it has been removed in its entirety, which is usually the case. The alveolus should then be carefully palpated for the presence of dental or osseous fragments. If fragments are palpated, the alveolus should be carefully curetted, using an angled curette, until the alveolus feels smooth and no osseous or dental fragment remains.
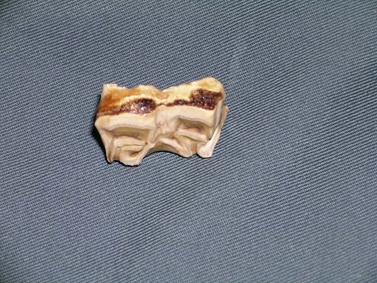
Removing dental fragments can be difficult because often no portion of the tooth is visible supra-gingivally, and because access to the apical aspect of the alveolus, especially one of a young horse, is poor using an oral approach. The dental fragments should be clearly identified on radiographs (Figs 20.26 & 20.27) and then, if possible, elevated per os using long, right-angled elevators (Fig. 20.28). After the fragments are loosened, they can be extracted with right-angled forceps; endoscopic guidance greatly facilitates their removal. When dental fragments or fractured teeth cannot be extracted orally, they can be repulsed using a special root fragment punch or Steinmann pin (Figs 20.29–20.31). Radiographic or fluoroscopic guidance may aid the approach to the retained fragments. A 4-mm osteotomy is created over the retained fragment using a Steinmann pin or drill bit, and the Steinmann pin or a root fragment punch is inserted into the osteotomy so that it contacts the fragment. If the pin or punch is positioned properly, the fragment can usually be repulsed into the oral cavity with little force. The alveolus is cleaned of debris, using a spoon curette, and irrigated. The skin incision over the osteotomy is left unsutured to heal by second intention.

Fig. 20.26 The reserve crown of the 1st maxillary molar (Triadan 09) was fractured during attempted extraction per os. The fragments were elevated and retrieved using an oral approach.
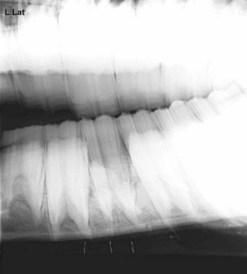
Fig. 20.27 Radiograph showing dental fragment in the apex of a mandibular alveolus. The tooth was fractured during an attempt at extraction per os. Dental fragments in the alveolus of a young horse can be difficult to remove, but with careful perioperative imaging to ensure accuracy of the placement of the punch, the fragment can be repulsed into the oral cavity with the horse sedated after desensitizing the affected region with a regional nerve block.
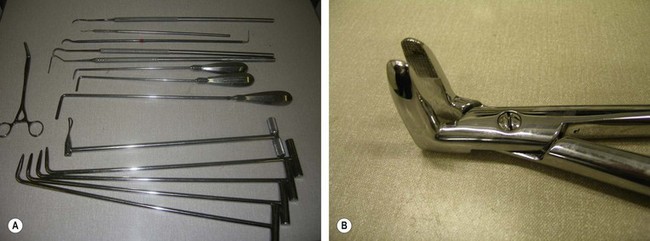
Fig. 20.28 (A) Root elevators and picks of various sizes and shapes are required to elevate root fragments. (B) Dental fragment forceps with long jaws to facilitate extraction of dental fragments.
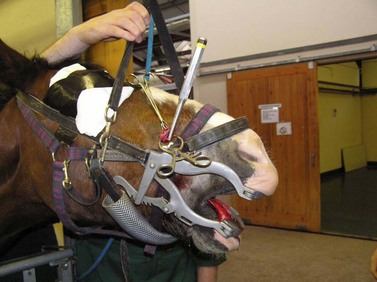
Fig. 20.29 If a fractured root cannot be retrieved using a root elevator, it can be repulsed into the mouth using a Steinmann pin or small punch inserted through a small osteotomy created over the apex of the alveolus.
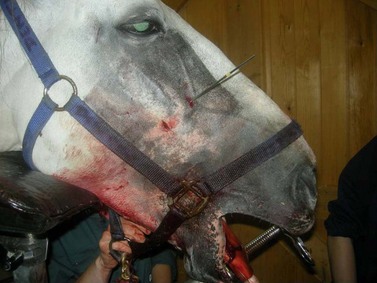
Fig. 20.30 A small Steinmann pin is in position to repulse a dental fragment into the oral cavity. The pin was positioned using radiographic guidance.
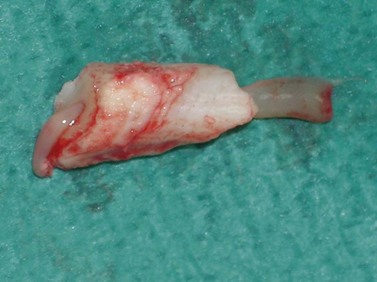
Fig. 20.31 Fragment of a tooth retained at the apex of the alveolus. The tooth was fractured during an attempt at extraction per os and was extracted retrograde using a Steinmann pin.
A dental fragment can also be extracted with the aid of an elevator inserted through a small buccotomy (Fig. 20.32). The surgical site is identified, a stab incision is created in the cheek at the level of the affected alveolus, and a narrow elevator is inserted into the coronal aspect of the alveolus through the incision to elevate the fragment. After the fragment is elevated, it can be retrieved per os. The stab incision is left to heal by second intention. This technique facilitates periodontal elevation of the fragment, allowing it to be extracted without the destructive forces sometimes required when repulsing a dental fragment. Branches of the facial nerve and parotid salivary duct can be damaged using this technique, and the subcutaneous tissues can be inoculated with oral bacteria, resulting in painful cellulitis.
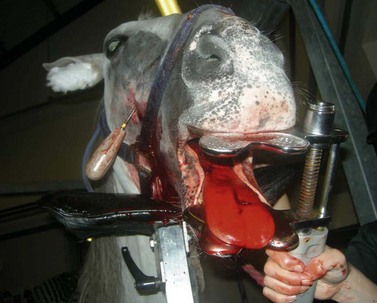
Fig. 20.32 A dental fragment can be extracted by inserting an elevator into the alveolus through a small buccotomy.
After extracting a cheek tooth, the alveolus can be temporarily loosely packed with polysiloxane putty, dental wax, or a gauze swab impregnated with an antibacterial drug, such as metronidazole paste, but care must be taken to avoid sealing dental or osseous fragments within the alveolus. If dental infection has produced a draining tract, the tract should be irrigated with isotonic saline solution, after removing its epithelial lining with a curette, before the alveolus is packed. The packing is gradually extruded as the alveolus fills with organizing granulation tissue. Infected paranasal sinuses may need to be debrided through an osteoplastic, maxillary or frontonasal flap or through a large trephine hole or lavaged through a catheter inserted into the sinuses through a small trephine hole. If the alveolus communicates with paranasal sinuses, it should be sealed from the sinuses with a material likely to be retained until the communication no longer exists, such as polysiloxane putty or polymethylmethacrylate bone cement.17
The alveolus should be cleaned and dried with gauze swabs before the plug is inserted. The plug is pressed into the coronal third of the alveolus, while still malleable. The surface of the plug should lie flush with the gingival margins of the alveolus (Fig. 20.33), and formation of a large flange that protrudes from the gingival margin should be avoided (Fig. 20.34). Creating a slight flare on the plug at the gingival margin facilitates removal of the plug when a seal is no longer needed, but an excessively large flare may facilitate early loosening of the plug by the horse’s tongue. Filling more than the distal third of the alveolus with the seal may result in delayed healing of the alveolus, and filling the entire alveolus of a maxillary molar is likely to result in formation of an oro-antral fistula.
Care of the horse after extracting a cheek tooth per os
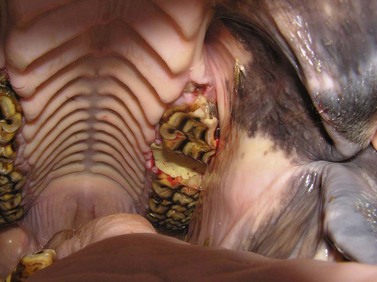
Horses require only minimal aftercare after a tooth has been successfully extracted per os. The horse should receive a non-steroidal, anti-inflammatory drug for 24–72 hours to provide analgesia, and feeding a soft or soaked feed for a few days postoperatively may be indicated. Lavaging the paranasal sinuses daily or twice daily may be necessary if the horse suffers from dental sinusitis. The alveolus should be inspected digitally, after the seal is removed, usually at 12–14 days, to detect if alveolar sequestra have formed. After a tooth has been removed, that portion of the arcade that opposes the empty alveolus erupts faster and without attrition from mastication (Fig. 20.35). Consequently, the opposing arcade should be rasped frequently (e.g., biannually) to avoid development of ‘step-mouth’. Teeth caudal and rostral to the empty alveolus drift toward that alveolus, but development of diastemata caudal to the empty alveolus is apparently rare.18
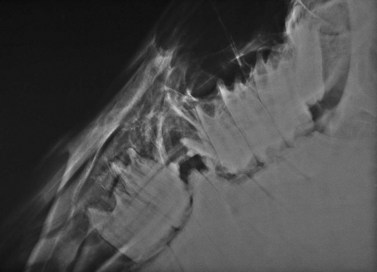
Fig. 20.35 A portion of the right mandibular 4th premolar (Triadan 408) and a portion of the right mandibular 1st molar (Triadan 409) have erupted into the vacant alveolus of the 4th premolar (Triadan 208). After a tooth has been removed, that portion of the arcade that opposes the vacant alveolus erupts faster and without attrition. The opposing arcade should be rasped biannually to avoid this complication. Note the unerupted supernumery maxillary molar (Triadan 12).
Complications of extracting a cheek tooth per os
Complications from dental extraction per os are rare.7 In one survey, 93 % of horses that underwent dental extraction per os had no complications. Nevertheless, serious problems can occur. Fracture of the tooth may result in retention of the tooth’s apical portion, necessitating its removal by repulsion. A tooth can easily be fractured during its extraction if incorrect technique is used or if the tooth is fragile because of advanced caries, and incorrect placement of instruments can result in damage to a healthy, adjacent tooth.7 Applying excessive forces while loosening a tooth can result in fracture of the jaw, especially when extracting a caudal mandibular tooth from a young horse. An ill-fitting alveolar seal can be lost prematurely, resulting in impaction of feed within the alveolus or, if the alveolus communicates with a maxillary sinus (i.e., Triadan 108–111, 208–211), an oro-antral fistula. A loose alveolar seal may allow feed to become trapped between the seal and the alveolus, causing discomfort.
Dental fragments may prevent the alveolus from healing and should be removed at the time of extraction. Occasionally, a portion of the alveolar bone becomes devitalized and subsequently sequestered after extraction, possibly as a result of microfracture that occurred during extraction. These sequestra develop after the tooth has been extracted and are not visible during intra-operative radiographic examination of the alveolus. The sequestered bone results in failure of the alveolus to heal and often causes pain and swelling of soft tissue surrounding the alveolus. The sequestered bone is best removed by curetting the alveolus, which is performed most easily between 2 and 6 weeks after the tooth was extracted. Sequestra may be less likely to form if the alveolus is allowed to fill with clotted blood after the tooth has been extracted.
Persistent, purulent nasal discharge after one or more of the ipsilateral caudal four maxillary cheek teeth have been removed could indicate the presence of an oro-antral fistula, usually the result of osseous or dental sequestra within the alveolus that cause failure of the alveolus to heal. The affected horse commonly has inspissated exudate or feed trapped within the paranasal sinuses. Persistent discharge of purulent exudate and feed from a naris after one or more of the ipsilateral maxillary premolars has been extracted could indicate the present of an oro-nasal fistula. A horse with an oro-antral or oro-nasal fistula is treated by sealing the oral aspect of the affected alveolus with an acrylic plug (Fig. 20.36), a mucoperiosteal flap, or a transposed muscle belly after dental or osseous fragments are removed from the alveolus by curettage and irrigation, and after feed and exudate have been removed from the paranasal sinuses. (See Ch. 19.)
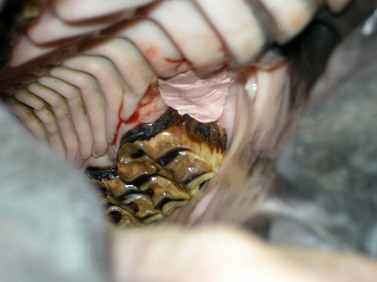
Fig. 20.36 Persistent discharge of feed and purulent exudate from a naris after one or more of the ipsilateral maxillary premolars has been extracted could indicate the presence of an oro-nasal fistula. This horse was treated for an oro-nasal fistula by occluding the oral aspect of the fistula with an acrylic plug.
Extracting a tooth per os is preferred to surgical techniques of removing a tooth because it can usually be accomplished with the horse standing, has a low incidence of complications, and the horse recovers rapidly. When extraction per os is unsuccessful, subsequent removal of the tooth by repulsion or by buccotomy is greatly facilitated because attempts at extraction per os weaken the periodontal attachments, thus reducing the enormous forces needed to remove the tooth.
Extracting a cheek tooth using a surgical approach
Surgical removal of teeth usually involves either a retrograde (i.e., via the apex) approach or creation of a mucoperiosteal flap with a partial alveolar osteotomy to expose the reserve crown of the tooth. Retrograde removal of a tooth by repulsion became fashionable during the late 19th and early 20th centuries, when general anesthesia of the horse became possible, and the technique has changed little since this time. Complications associated with retrograde removal of a tooth by repulsion resulted in the development of an alternative surgical technique for removal, the buccotomy approach, which entails exposing the reserve crown of the tooth by removing its lateral alveolar wall through an incision into the oral cavity and then removing the tooth after dividing it into segments.
Technique of extracting a cheek tooth by repulsion
Repulsion of diseased teeth remains a commonly performed surgical procedure in equine practice despite the widely reported, high incidence of complications associated with it and its mechanical inefficiency. Regardless of what surgical technique of exodontia is used (i.e., repulsion or extraction via buccotomy), the tooth’s periodontium must be disrupted to avoid damage to surrounding alveolar bone, and therefore, attempting to disrupt some of the periodontium, using extraction forceps per os, before embarking on a surgical course of dental extraction is prudent. Disrupting some of the periodontal ligament greatly reduces the time of surgery and the likelihood of collateral tissue damage that can occur when the tooth is repulsed.
To repulse a tooth, the tooth’s apex must be exposed to allow correct alignment of the dental punch on the apex of the tooth so that force can be delivered along the natural eruption pathway of the tooth. The apex of a cheek tooth is exposed by creating an osteotomy in the overlying mandible or maxillary bone, created using a trephine, drill bit, oscillating bone saw, or chisel (or osteotome). The apex of the tooth can also be exposed through a frontonasal or maxillary osteoplastic flap if it resides completely within the maxillary sinuses (i.e., the maxillary molars, Triadan 209–211 and 309–311). The osteotomy must be created precisely over the tooth’s apex to avoid damage to an adjacent, healthy tooth. The location of the apex varies according to the tooth involved and the age of the horse.
The optimum site of exposure can be identified using several techniques, one of which is to first locate the clinical crown of the diseased tooth and then, by knowing the inclination and length of the tooth, to estimate the location of the tooth’s apex. Using this technique, the clinical crown of the diseased tooth, including its mesial and distal contact surfaces, is identified by sight during oral examination. The contact surface of two contiguous teeth is recognized by a palpable depression at the gingival sulcus. (N.B. The clinical crown of the first cheek tooth, i.e., 2nd premolar, Triadan 06, is about one-third longer in a rostral to caudal plane than is the clinical crown of the other five cheek teeth in that row; Fig. 20.37). After the clinical crown has been identified, the location of the apex of the tooth to be removed must be estimated. Its location can be estimated by placing one of two identical dental picks, held in contact at the handles, into the mouth so that its tip rests buccal to the center of the diseased tooth. The other pick is placed adjacent and parallel to the first pick but on the outside of the cheek to demarcate the site of the center of the clinical crown of the affected tooth on the buccal skin.19
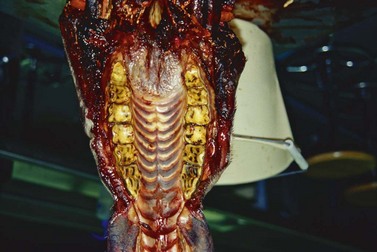
Fig. 20.37 The clinical crown of the first cheek tooth (i.e., 2nd premolar; Triadan 06) is about one-third longer in a rostral to caudal plane than is the clinical crown of the other five cheek teeth in that arcade.
To expose the apex of a mandibular or maxillary 2nd (i.e., Triadan 06 ) or 3rd (i.e., Triadan 07) premolar, the center of the osteotomy should be on a line perpendicular to the occlusal surface of the arcade at the center of the clinical crown, regardless of the age of the horse (Fig. 20.38).20 The reserve crowns of the mandibular and maxillary 4th premolars (i.e., Triadan 08) and that of all the mandibular and maxillary molars (i.e., Triadan 09–11) curve caudally, in a coronal to apical direction until the horse is about 8 or 9 years old,21 and so, to expose the apex of one of these teeth in horses less than 8 or 9 years old, the center of the osteotomy should be approximately level with the caudal contact surface of that tooth, on a plane perpendicular to the occlusal surface of the dental arcade.20,21 For horses older than 9 years, the center of the osteotomy created to expose the apex of any cheek tooth should be approximately level with the center of that tooth, on a plane perpendicular to the occlusal surface of the dental arcade.
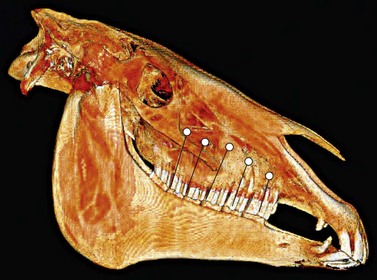
Fig. 20.38 The center of the osteotomy to expose the apex of a mandibular or maxillary 2nd (Triadan 06) or 3rd (Triadan 07) premolar should be on a line perpendicular to the occlusal surface of the arcade at the center of the clinical crown, regardless of the age of the horse. To expose the apex of a mandibular and maxillary 4th premolar (Triadan 08) or that of a mandibular and maxillary molar (Triadan 09–11) of a horse less than 8 or 9 years old, the center of the osteotomy should be approximately level with the caudal contact surface of that tooth, on a plane perpendicular to the occlusal surface of the dental arcade.
(Image is courtesy of Luis Velazquez, University of Mexico.)
Rather than approximating the location of the tooth’s apex, using the guidelines described above, the exact site of the apex of the diseased tooth can be identified radiographically by placing radio-opaque markers, such as skin staples, in the region estimated to be near the tooth’s apex (Fig. 20.39) or by placing a blunt metallic probe into a discharging tract at the tooth’s apex.22 The primary X-ray beam must be approximately perpendicular to the longitudinal and transverse axes of the head because even slight deviation of the beam from a plane perpendicular to these axes markedly distorts the image, which could result in parallax distortion and inaccurate identification of the site for osteotomy. To see the interproximal dental spaces, the X-ray beam can be deviated slightly rostrally or caudally from perpendicular to the longitudinal axis of the head so that the beam is aligned perpendicular to arcades. Multiple views should be taken until the precise position for the surgical approach is identified with confidence. (See Ch. 13, Dental imaging, for more detail.)
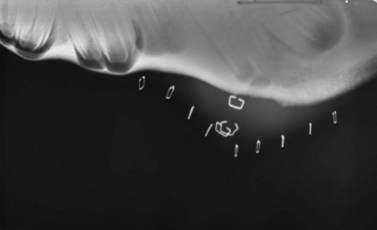
Fig. 20.39 The proper site for osteotomy can be identified radiographically by placing radio-opaque markers, such as skin staples, in the region estimated to be near the tooth’s apex.
Although a tooth can be repelled with the horse sedated and the surgical site desensitized using regional anesthesia, a cheek tooth is usually repulsed with the horse anesthetized. When extraction is to be performed with the horse anesthetized, a cuffed endotracheal or nasotracheal tube should be inserted into the trachea to prevent inhalation of fluid. The tube should be large enough to permit adequate ventilation, but small enough to provide sufficient space to allow extraction of the tooth. The horse is placed in lateral recumbency with the affected side of the head uppermost. The horse is administered a broad-spectrum antimicrobial drug and a non-steroidal, anti-inflammatory drug before surgery. Anesthetizing the arcade of the affected tooth with a regional nerve block after the horse is anesthetized allows surgery to be performed with the horse in a lighter plane of anesthesia and provides analgesia during the immediate postoperative period (see Ch. 15). A full-mouth speculum (e.g., a Guenther or Bodamer oral speculum) is inserted to provide safe access to the oral cavity. After the horse is anesthetized, but before it is prepared for surgery, the gingiva should be separated from the buccal and lingual or palatine aspects of the tooth to the cortex of the alveolar rim of the tooth to be removed using a long-handled, right-angled periodontal elevator, so that as the tooth is repulsed, the gingiva is not avulsed (Fig. 20.15).
The maxillary or mandibular bone overlying the apex of the tooth can be exposed for osteotomy through a straight, longitudinal skin incision, approximately 5–7 cm long, or through a dorsally or ventrally directed cutaneous flap. A cutaneous flap must be sutured after the tooth is repulsed, but a straight incision can be left unsutured to heal by second intention. Because of the contaminated nature of the surgery, one of us (WHT) prefers to leave the incision unsutured. A straight skin incision extends through the periosteum, which is reflected, using a periosteal elevator, to expose bone for trephination. The curvilinear or rectangular incision of a cutaneous flap extends through the subcutaneous tissue, and after elevating the cutaneous flap, a straight, longitudinal incision is created in the subcutaneous tissue and periosteum, which are then reflected. Reflecting periosteum, rather than removing it, avoids damage to nerves and vessels that overly it, and because the periosteum is spared, healing of the osteotomy proceeds more rapidly.
When exposing bone overlying the apex of the mandibular 1st molar (i.e., Triadan 309 or 409), care should be taken to avoid damaging the facial artery and vein and the parotid salivary duct, which cross the lateral surface of the mandible along the rostral border of the masseter muscle close to the site of osteotomy (Fig. 20.40). Reflecting these structures away from the site of trephination may be necessary. When exposing bone overlying the apex of a maxillary premolar (i.e., Triadan 106–108 or 206–208), care should be taken to avoid damaging the infraorbital nerve and facial artery and vein, which lie in close proximity to the site of osteotomy. The apex of any one of the three maxillary premolars is exposed by removing the external lamina of the maxilla overlying it, usually with a trephine. The apices of the maxillary molars (i.e., Triadan 109–111 or 209–211) reside within the paranasal sinuses (Fig. 20.41) and can be exposed through a trephine hole or through an osteoplastic flap into the paranasal sinuses.
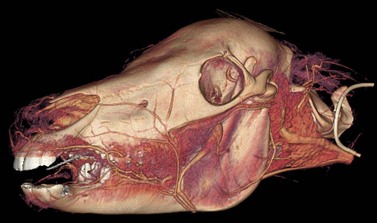
Fig. 20.40 Computed tomographic image of a head showing the facial artery and vein and salivary duct that course along the rostral border of the masseter muscle.
(Image is courtesy of Luis Velazquez, University of Mexico.)
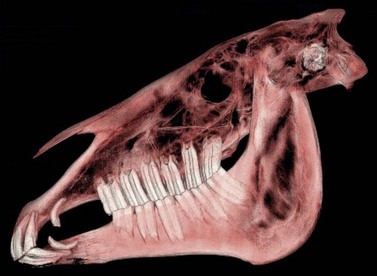
Fig. 20.41 Computed tomographic image of a head showing the relationship between the paranasal sinuses and the maxillary molars (Triadan 109–111 and 209–211).
(Image is courtesy of Luis Velazquez, University of Mexico.)
Regardless of where the apex of the tooth is determined to reside, the osteotomy created to expose the apex of a maxillary cheek tooth should be ventral to an imaginary line that marks the course of the nasolacrimal duct. This duct courses between the medial canthus of the eye and a point slightly dorsal and rostral to the infraorbital foramen.23 The dorsal aspect of the osteotomy should be close to this line if the horse is less than 8 years old because the cheek teeth of horses less than 8 years old have undergone little attrition of length.24 To avoid damaging the infraorbital nerve when removing a maxillary 3rd (Triadan 107 or 207) or 4th (Triadan 108 or 208) premolar, the dorsal aspect of the osteotomy should be ventral to the infraorbital foramen. The ventral aspect of the osteotomy should be close to the facial crest if the horse is old. The mandibular cheek teeth of young horses often extend to the ventral border of the mandible, and so, if the horse is young, the ventral aspect of the osteotomy should also extend to the ventral border of the mandible.
After incising and reflecting the periosteum, the apex of the tooth is exposed through an osteotomy, which is commonly created using a 1.5- to 2-cm ( - to
- to  -inch) diameter Galt trephine or a 0.95-cm to 2.7-cm (
 - to
- to  -in) drill bit rotated in a hand drill or by hand (Figs 20.42 & Fig. 20.43). To create a hole in the external lamina of a maxilla or the mandible with a trephine, the center-pin of the trephine is extended and seated perpendicular to the exposed bone and the trephine is rotated to and fro until the center-pin penetrates the bone and the barrel of the trephine cuts a circular groove in the bone. The center-pin is retracted or removed, and the circular osteotomy is continued until the disc of bone is completely transected. If the transected disc of bone is not removed with the barrel of the trephine, it can be pried from its attachments with a bone gouge.
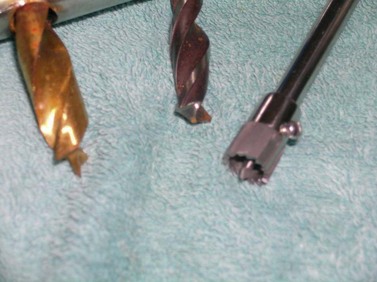
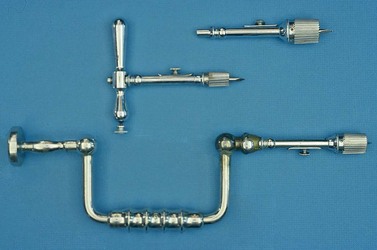
Fig. 20.43 Galt trephine. The brace attached to one of these trephines decreases the amount of effort required to create the osteotomy.
The apex of the tooth is completely exposed by removing overlying cancellous alveolar bone with a bone curette. To avoid damaging an adjacent, healthy tooth, the entire apex of the tooth should be exposed, and both contact surfaces of the diseased tooth identified before the tooth is repulsed into the oral cavity. Suction is helpful at this point in the procedure to aid visibility, which is usually obscured by constant capillary bleeding. If the trephine hole has not adequately exposed the apex of the tooth, the hole can be enlarged using a bone rongeur or a bone gouge and mallet (Fig. 20.44). The apical end of the tooth can be transected perpendicular to the long axis of the tooth, using a chisel (or osteotome) and a mallet or a diamond cutting wheel, and removed to provide a flat platform for a punch to be seated and aligned properly along the long axis of the tooth. Transecting and removing the apex of the tooth may also provide space to maneuver the punch into proper alignment.

The maxillary 1st or 2nd molar (i.e., Triadan 09 or 010) can be removed through a trephine hole created into the paranasal sinuses over the apex of the tooth. To repulse the maxillary 1st molar (i.e., Triadan 109 or 209), which is the most commonly diseased maxillary tooth, the trephine hole is usually centered at a point midway between the rostral end of the facial crest and a point on the facial crest at the level of the medial canthus of the eye, 1 cm ventral to an imaginary line drawn between the infraorbital foramen and the medial canthus of the eye.
To remove the 2nd maxillary molar (i.e., Triadan 110 or 210), the trephine hole is centered more caudally over the caudal maxillary sinus, rostroventral to the ventral orbital rim; but the site varies between horses and is affected by the age of the horse. Selection of the optimal site for trephination should be guided by radiographic examination. One author has suggested an approach to the 2nd maxillary molar that involves creating three trephine holes (i.e., the triple trephine technique).3 Using this approach, one hole is created dorsomedial to the medial canthus of eye for placement of the punch on the apex of the tooth. A second hole, created ventrorostral to the medial canthus, allows the punch to be guided onto the apex of the tooth and allows the alveolus to be inspected postoperatively. The third hole, created at the angle formed by the orbit and the facial crest provides a portal for placing a catheter into the caudal maxillary sinus for postoperative lavage of the paranasal sinuses. Alternatively, reasonable access to the 2nd maxillary molar of mature horses (i.e., >8 years old) can be gained through either a maxillary or frontonasal, osteoplastic flap.
To create a dorsally hinged, osteoplastic maxillary flap, a three-sided incision through the skin, subcutis, and periosteum is created within the confines of the boundaries of the rostral and caudal maxillary sinus (Fig. 20.45). A technique to create and close a maxillary osteoplastic flap is described in detail in Chapter 19, Basic equine orthodontics and maxillofacial surgery. The osteoplastic, maxillary flap provides the operator opportunity to visually examine a large extent of the paranasal sinuses and permits manipulation of dental instruments within the sinuses.
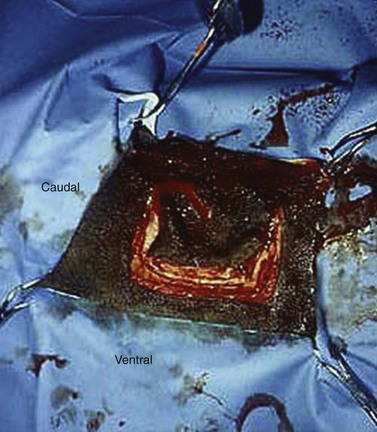
Fig. 20.45 This figure shows the creation of an osteoplastic maxillary flap, using an oscillating saw, to expose the rostral and caudal maxillary sinuses. The apices of maxillary molars can be exposed through this flap. The 1st or 2nd maxillary molars (i.e., Triadan 109 or 110 or 209 or 210) or sometimes the 3rd maxillary molar (Triadan 111 or 211) are repulsed into the oral cavity using this approach.
A disadvantage to creating an osteoplastic maxillary flap, rather than a trephine hole, to repulse a maxillary molar, is that unless the flap is reopened, access to the apical aspect of the alveolus is no longer accessible to monitor healing of the alveolus or to curette the alveolus, should the need arise. Access to the apical aspect of the alveolus after surgery is easier if the apex of the tooth was accessed through a trephine hole, provided that the skin over the hole is left unsutured to heal by second intention. If the cutaneous incision over the trephine hole was sutured or stapled, the incision can be re-opened to inspect the apical end of the alveolus and then re-sutured or stapled when access is no longer required. If the apex of the tooth was accessed through an osteoplastic flap into the sinuses, the apical end of the alveolus can be inspected endoscopically through the trephine hole created to provide a port for lavage of the sinuses.
Because the apex of the maxillary 3rd molar (i.e., Triadan 111 or 211) lies beneath the eye, it must be exposed either through a trephine hole in the frontal bone or through a frontonasal, osteoplastic flap. The punch is inserted through the frontomaxillary aperture into the caudal maxillary sinus to engage the apex of this tooth, which lies ventral to the infraorbital canal. Aligning a dental punch along the eruption path of a maxillary 3rd molar is difficult because of the tooth’s position below the orbit and its caudal curvature. Using an off-set (i.e., a double-curved) punch (Fig. 20.46) to repel the maxillary 3rd molar may be helpful because obtaining proper alignment between the punch and tooth without damaging the infraorbital canal is often difficult using a straight or curved punch.
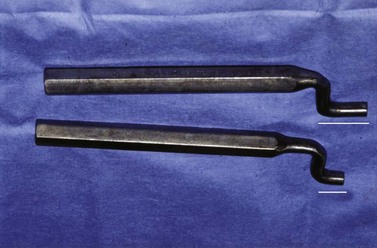
Fig. 20.46 Aligning a dental punch along the eruption path of a tooth is made much easier using an off-set, or double-curved, punch. Note that the shanks are different in length. Two or three off-set punches, each with a different length of shaft, may be required to completely repulse a tooth.
Removing a mandibular 2nd (Triadan 310 or 410) or 3rd (Triadan 311 or 411) molar is particularly difficult because the bone over the apices of these teeth is covered by the masseter muscle and because the apices of these teeth are distant from the ventral border of the mandible, even in young horses. To remove one of these teeth, and sometimes the mandibular 1st molar (i.e., Triadan 309 or 409), the ventral aponeurosis of the masseter muscle is incised so that the muscle can be reflected dorsally to expose the underlying thin lateral lamina of the mandible overlying the apex of the tooth (Fig. 20.47).
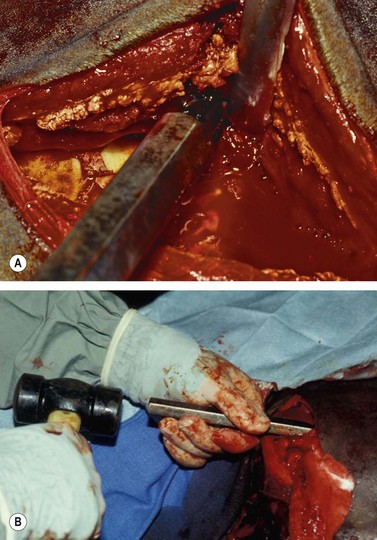
Fig. 20.47 To remove the 2nd and 3rd mandibular molar (Triadan 310, 311, 410, or 411) and sometimes the mandibular 1st molar (i.e., Triadan 309 or 409), the masseter muscle is reflected dorsally to expose the underlying lateral lamina of the mandible overlying the apex of the tooth. (A) The ventral aponeurosis of the masseter muscle has been incised. (B) After creating a trephine hole over the apex of the tooth to be removed, the punch is aligned along the long axis of that tooth.
To elevate the masseter muscle, skin is incised along the ventrocaudal border of the mandible, ventral to the masseter muscle, from the angle of the mandible rostrally, taking care to avoid the parotid salivary duct and facial artery and vein where they cross the mandible at the rostral aspect of the masseter muscle. The incision is extended through the insertion of the muscle, and the muscle and the periosteum to which the muscle is attached are elevated to expose the external lamina of the mandible. The site for osteotomy to expose the apex of the diseased tooth is then located using one of the methods described above.
The lateral plate of bone overlying the apex of the 3rd mandibular molar (i.e., Triadan 311 or 411) can also be exposed through an incision in the masseter muscle. Using this approach, the skin is incised obliquely in a plane that extends from the occlusal surface of the tooth to the angle of the mandible.25 This incision exposes the fibers of the masseter muscle, which traverse the lateral lamina of the mandible in the same dorsorostral to ventrocaudal direction as the skin incision. The masseter muscle is split bluntly, along the course of its fibers, being careful not to damage the dorsal and ventral buccal branches of the facial nerve that lie superficial to the muscle. The thin bone over the apex of the 2nd molar (i.e., Triadan 210 or 410) can be exposed through a similar but more rostral incision. Aligning the punch along the long axis of the tooth, so that the tooth can be repulsed efficiently, is difficult using this approach, especially if the masseter muscle is thick.
After the apex of a diseased cheek tooth has been exposed using techniques described above, the tooth is repulsed into the oral cavity by striking a dental punch applied to the apex of the tooth and aligned in the direction of the tooth’s path of eruption. Confirming the position of the punch radiographically ensures that the punch is properly aligned (Fig. 20.48). Failure to align the punch correctly may result in damage to a neighboring tooth, the palatine bone, if the tooth is maxillary, or to the internal or external lamina of the mandible, if the tooth is mandibular. When the punch is aligned obliquely to the long axis of the tooth, more force is required to repulse the tooth because the periodontium is not disrupted as efficiently as when the punch is properly aligned. The extra force required is more likely to result in bony or dental sequestra. Because the reserve crowns of the cheek teeth curve axially in a coronal to apical direction, and because the mandibular and infraorbital nerves lie slightly medial to the center of the teeth, applying the punch slightly lateral to the central axis of the tooth reduces the risk of damaging these nerves.
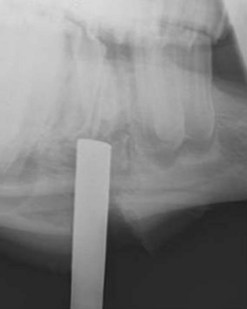
Fig. 20.48 When repulsing a tooth into the oral cavity, the punch should be aligned in the direction of the tooth’s path of eruption. Confirming the position of the punch radiographically ensures that the punch is properly aligned. The punch seen in this radiographic projection is in close alignment with the longitudinal axis of the tooth.
An off-set punch is often easier to properly align than is a straight or angled punch, but two or three off-set punches, each with a different length of shaft, may be required to completely repulse the tooth (Fig. 20.46). Continuing to strike to the punch with the mallet after the horizontal arm of the off-set punch has contacted bone at the margin of the trephine hole results in damage to the bone and is ineffective in repulsing the tooth. Off-set punches with shafts of various lengths can be made by a farrier for little expense.
By inserting a hand in the horse’s mouth and palpating the clinical crown of the affected tooth, the operator or a non-scrubbed assistant can determine if the punch is properly aligned and seated on the tooth intended to be removed. The operator or assistant can detect percussion transmitted through the tooth and movement of the tooth. Striking the punch when it is in contact with the tooth produces a higher pitched sound than when the punch is struck when in contact with bone. A better feel for proper alignment of the punch can be appreciated if the operator with the hand in the mouth also controls the alignment of the punch with his or her other hand while a trustworthy, second operator wields the mallet. Numerous, vigorous blows with the mallet are usually required to dislodge the tooth from its alveolar and gingival attachments, but when movement of the tooth can be felt with the hand in the mouth, the force of the blows to the punch is decreased. A long tooth of a young horse, especially a tooth located caudally on the arcade, must often be deviated axially with an extractor as the tooth is repulsed so that the tooth does not become impinged by the opposing arcade. Transverse sectioning of a partially repulsed tooth to facilitate its repulsion is awkward to perform, risks creating subgingival dental fragments, and despite being widely advocated by others, is seldom or never necessary. Wedged teeth can usually be maneuvered after minor profiling using a rotary burr. After the tooth has been repulsed, the operator whose hand was in the mouth must re-glove before proceeding with the surgery.
Because the tooth is usually fragmented while being repulsed, it should be examined to determine if pieces are missing, and the alveolus should be inspected visually and digitally for osseous and dental fragments. Dental fragments still attached to the alveolus may be difficult to detect. The tooth of a young horse is more brittle than that of an old horse, and therefore, is more likely to be fragmented. After the alveolus is curetted, irrigated, suctioned, and dried, it should be examined radiographically to detect osseous or dental fragments that may remain within it. A ventrodorsal radiographic projection of the alveolus, obtained with the cassette in a sterile sleeve, provides a good view of the vacated alveolus (Fig. 20.49). Pulling the mandible laterally may allow a view of the entire vacated alveolus unobstructed by superimposition of teeth in the opposing arcade.
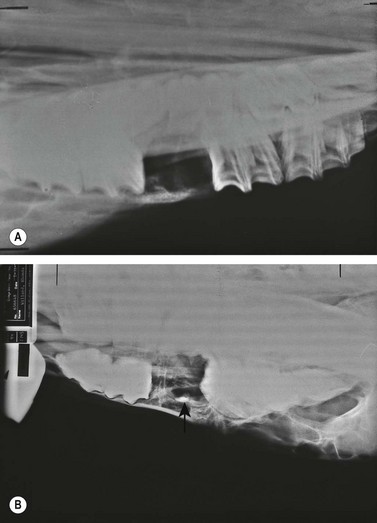
Fig. 20.49 (A) A ventrodorsal radiographic projection of the alveolus provides a good view of the alveolus. Pulling the mandible laterally may allow a view of the entire vacated alveolus unobstructed by superimposition of teeth in the opposing arcade. (B) A dorsoventral radiographic projection showing a dental fragment within an alveolus (arrow points to fragment).
The alveolus is sealed from the oral side using polysiloxane putty (President Putty, Henry Schein, UK), bone wax, polymethacrylate (PMMA) bone cement (Palacos R, GlaxoSmithKline), gutta percha,3 or plaster of Paris,26 to prevent feed and saliva from contaminating the alveolus. Plugs of PMMA provide the best long-term security against alveolar contamination, but PMMA has the disadvantage of generating considerable heat as it sets.
The plug should fill no more than the coronal third of the alveolus so that the bulk of the alveolus is able to fill first with a blood clot and then with granulation tissue. The plug should not extend past the gingiva. A plug that protrudes past the gingiva is prone to loosening by the tongue or from mastication. Care should be taken when molding a plug to the alveolus to avoid forming sharp projections that can cause discomfort to the horse by traumatizing the tongue or gingiva. Care should be taken to ensure that the plug’s apical end is narrower than its coronal end and that the plug fits tightly within the alveolus. The plug should be examined after the horse recovers from anesthesia, using digital palpation, to ensure that it is seated tightly within the alveolus. A loose plug should be removed with extraction forceps and replaced after irrigating debris from the alveolus; this can usually be accomplished with the horse sedated and its mouth held open with an oral speculum.
Because the alveoli of old horses are shallow, care must be taken to avoid over-packing the alveolus. The pack placed into the alveolus of an old horse should be shallow so that granulation tissue can form unimpeded through most of the alveolus. An alveolar plug that extends into a maxillary sinus results in a persistent, oro-antral fistula (see Ch.19). Over-packing the alveolus can be avoided by packing gauze swabs into the apical end of the alveolus, and then removing them after the alveolar plug, placed orally into the coronal aspect of the alveolus, has set. If the skin incision is to be sutured, it should be sutured only after the plug has been inserted, so that the depth to which the plug has been packed in the alveolus can be determined accurately. If the incision is to be left open, rolled gauze impregnated with a dilute solution of povidone-iodine can be packed concertina fashion into the apical aspect of the alveolus, prior to inserting the plug orally into the coronal aspect of the alveolus. The gauze can then be gradually removed over the next 4–5 days.
If maintaining the implant in the alveolus is likely to be difficult, such as when the tooth removed was the 1st cheek tooth (2nd premolar, Triadan 06), the plug can be molded around a small section of screen to which a loop of stainless steel wire has been attached (Fig. 20.50).20 The ends of the wire loop are inserted through the oral entrance to the alveolus and exited through the osteotomy and a cutaneous stab incision created adjacent to the site of osteotomy. The plug and screen embedded within it are pulled into the oral aspect of the alveolus, and the ends of the wire loop are secured under tension over a gauze roll. The gauze roll is changed when it becomes soiled.
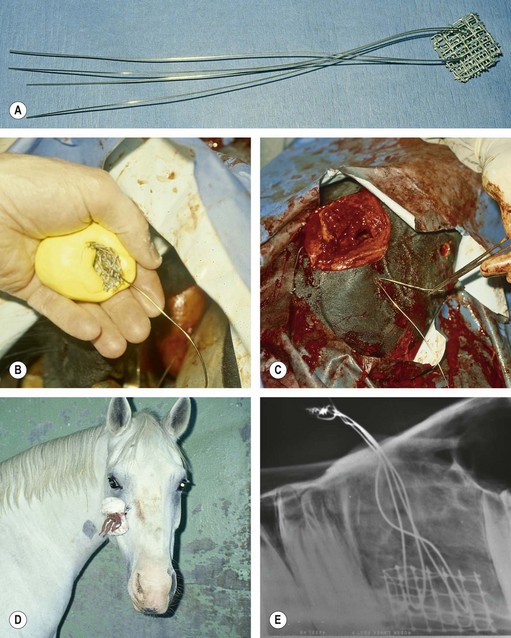
Fig. 20.50 Maintaining the plug in the alveolus is sometimes difficult if the alveolus is that of a 2nd premolar or if 2 teeth adjacent to each other were removed. (A & B) To keep a plug secure in the alveolus, it can be molded around a small section of screen to which a loop of stainless steel wire has been attached. (C) The ends of the wire loop are inserted through the oral entrance to the alveolus, exited through the osteotomy and a cutaneous stab incision, and the acrylic and embedded screen are pulled into the oral aspect of the alveolus. (D) The ends of the wire loop are secured under tension over a gauze roll. (E) Radiograph of a dental arcade showing the implant sealing two alveoli from which the teeth were repulsed.
A straight skin incision over the site of osteotomy is often left open to heal by second intention because contamination of the surgical site with oral pathogens is inevitable. Leaving the incision unsutured allows the alveolus to be inspected and loose, osseous or dental debris retained within the alveolus to be easily retrieved. The alveolus can be irrigated and monitored daily, visually and by palpation, for healing through the open incision. The leakage of saliva contaminated with ingesta from the incision or escape of fluid into the mouth during irrigation of the alveolus indicates that the alveolar plug should be replaced. Packing gauze swabs into the skin incision until the alveolus has filled with granulation tissue, usually at 2–3 weeks, prevents gross contamination of the surgery site from the environment.
If the skin incision at the osteotomy is to be sutured, the surgical site should be irrigated vigorously. If the likelihood of infection at the surgical site is high, a drain can be placed into the depths of the wound and exited through another small incision. The subcutaneous tissue is sutured with absorbable monofilament suture, and the skin incision is apposed with non-absorbable suture or staples (Fig. 20.51). The inelastic periosteum holds sutures poorly and need not be sutured. Gauze swabs are placed over the incision and held in place with sutures or with adhesive, elastic tape applied to the head in a figure-of-eight fashion to minimize swelling at the surgical site and to prevent the horse from mutilating the site. The head is generally left bandaged for at least 5 days. If the incision was sutured, it should be inspected periodically for signs of subcutaneous infection. The incision should be opened if signs of infection, such as drainage through the incision, are observed.
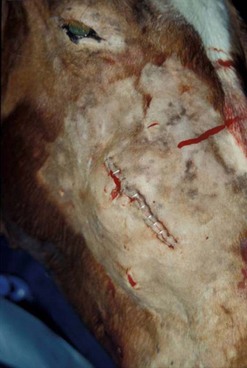
Fig. 20.51 The apex of a diseased premolar of this horse was approached through a straight skin incision for repulsion of the tooth into the oral cavity. Because the likelihood of infection at the surgical site is high, the stapled incision should be inspected periodically for signs of subcutaneous infection. The incision should be opened if signs of infection are observed.
Granulation tissue surrounding the plug epithelializes within several weeks. The plug may eventually be lost spontaneously, but if not, it can be removed, usually at about 2 weeks after surgery, with the horse sedated (Fig. 20.52). The portion of alveolus occupied by the plug fills completely with granulation tissue after the plug is removed. Permanent retention of a plug is desirable only when the horse is at increased risk of developing an oro-antral fistula. If the plug is attached to a wire loop, both the plug and the wire must be removed.
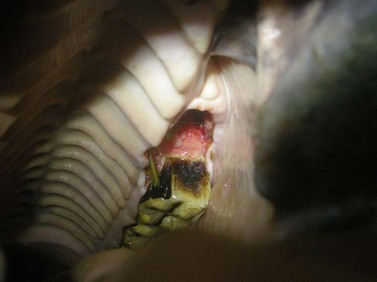
Fig. 20.52 The alveolus can be carefully inspected visually and digitally after removing the implant to ensure that it has commenced to granulate. Bone not covered with granulation tissue may be devitalized and sequestered.
If the paranasal sinuses are to be lavaged after a maxillary molar has been repulsed, a 0.95-cm ( -inch) trephine hole, which is large enough to accommodate a 26- or 24-Fr Foley catheter, is created, through a straight cutaneous incision into the conchofrontal or caudal maxillary sinus through a small incision. A trephine hole into the conchofrontal sinus is created 2–3 cm medial to the medial canthus of the eye, and a trephine hole into the caudal maxillary sinus is created, through a straight incision, 1.5 cm ventral to the ventral rim of the eye. Warm, isotonic saline solution or a solution of povidone-iodine instilled into the sinuses through the Foley catheter exits the sinuses into the nasal cavity through the nasomaxillary aperture. The sinuses are lavaged for 1–7 days; the frequency and duration for which the sinuses are lavaged depends on the degree to which the sinuses were contaminated. The cutaneous incision over the osseous portal can be sutured or stapled after the catheter is removed, or the incision can be allowed to heal by second intention.
Complications associated with extracting a cheek tooth by repulsion
The owner should be advised that a horse that has lost a cheek tooth requires life-long, prophylactic dental care and should be forewarned that serious complications of dental extraction by repulsion are common and often result in the need for additional surgery. In a report of 220 horses that had undergone surgical removal of a cheek tooth, 165 had undergone extraction by repulsion, and of these, 65 had complications serious enough to necessitate a second surgery.10
The most serious complication associated with extracting a cheek tooth by repulsion is unintended damage to other structures, such as adjacent, healthy teeth, the infraorbital or mandibular nerve (Fig. 20.53), and palatine bone (Fig. 20.54) or medial or lateral lamina of the mandible or maxilla (Fig. 20.55). Other complications associated with dental repulsion include early loss of the alveolar plug causing contamination of the alveolus and paranasal sinuses with feed; formation of an oro-antral fistula; damage to the nasolacrimal duct, parotid salivary duct, infraorbital nerve, or palatine artery; and most commonly, a chronic draining tract caused by sequestration of alveolar bone or dental fragments.8 The more caudal the tooth, the more likely is the horse to suffer one or more of these serious postoperative complications.10
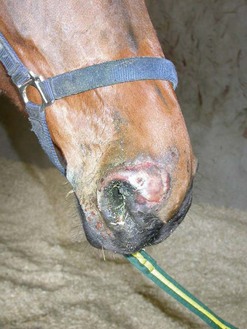
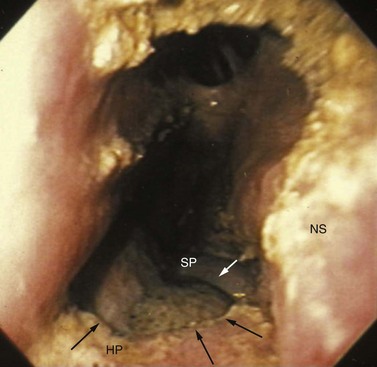
Fig. 20.54 Endoscopic view of the right nasal cavity of a horse after repulsion of a maxillary molar showing a large hole (arrows) in the hard (HP) and soft palates (SP) from injury from the dental punch. The nasal septum (NS) is on the right.
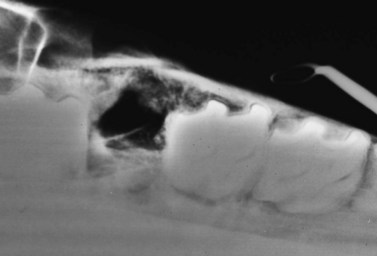
Fig. 20.55 A fracture of the lateral alveolar wall after repulsion of a maxillary tooth is evident on this ventrodorsal radiographic projection.
The owner should be forewarned that even when the alveolus is determined to be free of bony fragments at the time of surgery, the severe trauma to which the alveolus was subjected when the tooth was repulsed can result in the formation of osseous sequestra within the alveolus, causing failure of the alveolus to heal. The large concussive forces required to repulse a tooth may create minute alveolar fractures that are not visible during postoperative radiographic examination of the alveolus. These fractures may result in formation of alveolar sequestra in subsequent weeks, leading to resumption of clinical signs of apical dental infection and an alveolus that fails to heal. Bone not covered by granulation tissue encountered when palpating the alveolus 2 to 3 weeks after surgery should be suspected of being devitalized and sequestered. Partially disrupting the periodontium before embarking on repulsion greatly reduces the concussive forces required to repulse the tooth and, therefore, reduces the likelihood of creating osseous sequestra.
Contamination of the alveolus from premature loosening or loss of the implant usually results in nothing more serious than delayed granulation of the alveolus, but if the alveolus is one that communicates with the paranasal sinuses, loss of the implant can result in formation of an epithelialized oro-antral fistula, signs of which include chronic, purulent, nasal discharge.
If clinical signs of apical dental infection fail to resolve after the infected tooth has been repulsed, the alveolus should be examined carefully, radiographically and using a mirror or an endoscope, for the presence of dental or osseous sequestra or an oro-antral fistula. The relationship between a draining tract, the nasal cavity, and the alveolus can sometimes be elucidated by infusing fluorescein dye into the tract and observing for the presence of dye in the nasal or oral cavity. Radiographic examination of the alveolus with a fine radio-opaque probe inserted into a draining tract over the alveolus may help demonstrate the relationship between a discharging tract and a sequestrum. Small sequestra can be removed by curettage using an oral approach or a retrograde approach through the osteotomy.
Extracting a cheek tooth using a horizontal or vertical buccotomy approach
A transalveolar approach to the infected tooth through a horizontal or vertical buccotomy has been used successfully to remove any one of the mandibular or maxillary cheek teeth except the 3rd molar (Triadan 011).9,10 The horizontal or vertical buccotomy approach to dental extraction offers the advantages of precision and accuracy and good visualization of the tooth to be removed, which precludes the possibility of iatrogenic damage to unaffected teeth. Exposing the buccal aspect of the tooth permits a more controlled disruption of the periodontal ligament than does repulsion of the tooth, but the procedure must be performed with the horse anesthetized. The lateral aspect of the alveolus of maxillary or mandibular premolars (Triadan 06–08) is accessed through a horizontal incision, and that of the 1st or 2nd mandibular or maxillary molar (Triadan 09 and 010) is accessed through a vertical incision created parallel to the long axis of the tooth.3
The tooth to be removed, using the buccotomy approach, is identified with the assistance of radiography or fluoroscopy, using skin markers, and by locating the interproximal space on either side of the tooth to be removed from within the oral cavity. The incision should not be made until the interproximal margins of the tooth to be removed have been positively identified by an unscrubbed assistant whose hand is within the mouth. Placing a small-gauge, hypodermic needle through the skin at each interproximal space helps define the site of incision. For the horizontal buccotomy approach, a curvilinear skin incision, centered over the diseased tooth, is made at the level of the tooth’s gingival reflection in the buccal cleft. For the vertical buccotomy approach, the incision is made parallel to the linguofacial artery and vein (Fig. 20.56). By using a vertical incision to extract the 1st or 2nd mandibular molar (Triadan 309, 310, 409 or 410), rather than a horizontal incision, trauma to the linguofacial artery and vein and the parotid salivary duct is avoided. To extract the first mandibular molar (Triadan 309 or 409), the incision lies rostral to the linguofacial artery and vein, and to extract the second mandibular molar (Triadan 310 or 410) the incision lies caudal to the linguofacial artery and vein at the rostral border of the masseter muscle. Retracting the masseter muscle caudally provides a good view of the lateral mandibular cortex overlying the 1st and 2nd mandibular molars (Triadan 309 and 310 or 409 and 410).
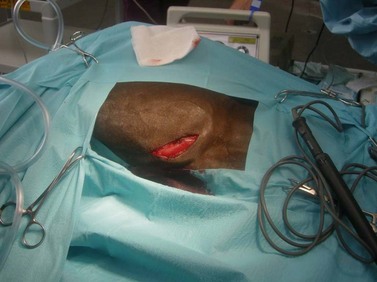
Fig. 20.56 Vertical buccotomy approach for extracting the right 2nd mandibular molar (Triadan 410). The vertical incision is created caudal to the facial vein and artery and the parotid salivary duct.
During the buccotomy approach, extreme care is taken to avoid damage to the dorsal buccal branch of the facial nerve when removing a maxillary tooth, and to the ventral buccal branch of the facial nerve when removing a mandibular tooth. These branches lie superficial to the musculature. These nerves can be identified and reflected atraumatically from the surgical site (Fig. 20.57). The incision for a maxillary buccotomy is made dorsal to the parotid papilla located at the rostral aspect of the 4th maxillary premolar (Triadan 108 or 208), and the incision for a mandibular buccotomy is made ventral to it. As the dissection to the lateral dental alveolus deepens, the ventral buccal glands and the buccal venous plexus, which is composed of the labialis communis, labialis maxillaris, and labialis mandibularis veins, are encountered. After dissecting through these structures, paying extreme attention to detail and hemostasis, which is assisted by suction, the tough, oral mucous membrane is encountered. By incising it, the clinical crown of the tooth to be removed is exposed (Fig. 20.58).
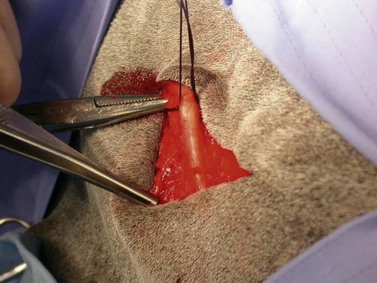
Fig. 20.57 For the buccal approach to dental extraction, vital structures, such as the dorsal or ventral buccal branch of the facial nerve, must be identified and retracted carefully. The suture surrounds the ventral buccal branch of the facial nerve.
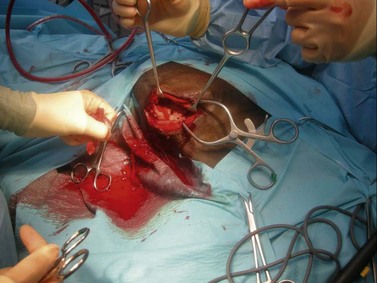
Fig. 20.58 Extraction through a buccotomy. The oral mucosa is incised to expose the buccal alveolar bone.
A gingival flap is raised on the lateral aspect of the alveolus of the tooth with a periosteal elevator to expose the lateral alveolar cortex of the maxilla or mandible. The periosteum is incised at the center of the tooth, parallel to the long axis of the tooth, and reflected to either side. The buccal alveolar bone that spans the rostral and caudal contact surfaces of the tooth is incised parallel to the long axis of the tooth at the rostral and caudal interproximal margins of the tooth using an oscillating saw, a surgical fissure burr, or a sharp chisel (Fig. 20.59). This plate is elevated and removed using an osteotome or periodontal elevator to expose the buccal aspect of the reserve crown of the tooth. At least two-thirds of the lateral alveolar wall is removed to completely expose the apical end of the tooth.
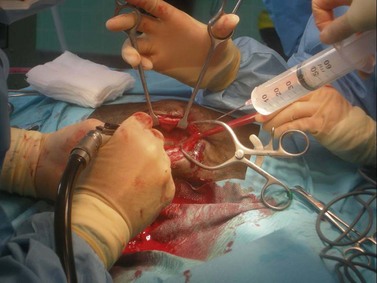
Fig. 20.59 Extraction through a buccotomy. The alveolar bone over the buccal aspect of the cheek tooth is being removed with a burr.
The periodontium on the rostral and caudal surfaces of the tooth is disrupted using a fine elevator or curved gouge (Fig. 20.60). Space for extraction can be created by splitting the tooth longitudinally, using a burr. The tooth can also be removed by transecting it transversely with a chisel, in which case, the occlusal fragment is advanced into the oral cavity, where it is removed, to provide access to the apical portion of the tooth, which can then be elevated intact or piecemeal from the alveolus using a gouge or curved periodontal elevator (Fig. 20.61). Radiographic examination at this point in the procedure is necessary only when the surgeon has doubt as to whether the entire tooth has been removed.
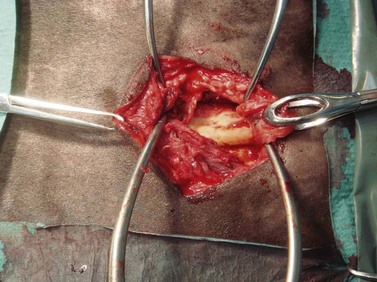
Fig. 20.60 Extraction through a buccotomy. The buccal aspect of the alveolus has been removed, allowing sectioning of the periodontium.
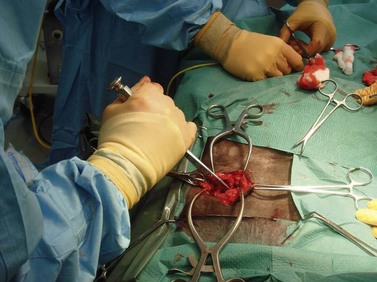
Fig. 20.61 Extraction through a buccotomy. The tooth is being sectioned with a chisel before it is removed.
After the tooth has been removed, the empty alveolus is packed concertina fashion with rolled gauze impregnated with a dilute solution of povidone-iodine (Fig. 20.62). One end of the gauze exits through a stab incision created adjacent to the original incision so that the gauze can be withdrawn a few inches at a time during the next 5–10 days. A plug of acrylic, such as polysiloxane, is placed into the oral aspect of the alveolus over the gauze packing (Fig. 20.63), but because the buccal portion of the alveolus has been removed, this implant often soon loosens. The gingival flap can be sutured but, because of inevitable contamination of the surgery site, is often left to heal by second intention. The buccotomy incision is closed in three layers, using monofilament absorbable suture to close the incision in the oral mucosa and subcutaneous tissue, and non-absorbable suture or staples to close the skin incision (Fig. 20.64).
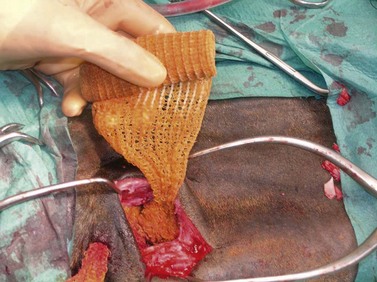
Fig. 20.62 Extraction through a buccotomy. The empty space at the apical aspect of the alveolus is packed with rolled gauze impregnated with a dilute solution of povidone-iodine.
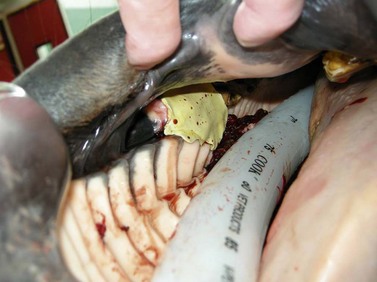
Fig. 20.63 Extraction through a buccotomy. The oral aspect of the alveolus is sealed with a plug of polysiloxane.
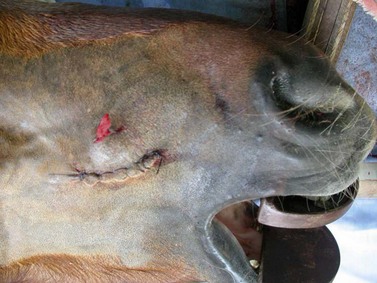
Fig. 20.64 The incision is sutured in three layers, and the end of the rolled gauze is exited through a separate incision.
Complications associated with extracting a cheek tooth using a horizontal or vertical buccotomy approach
The most serious complications associated with extracting a cheek tooth by buccotomy are irreversible, iatrogenic damage to the ventral or dorsal buccal nerve and parotid salivary duct. In one study, only 1 of 44 horses that had undergone removal of a cheek tooth by buccotomy had a complication that necessitated a second surgery.10 Complications arising from extraction by buccotomy included temporary facial paralysis from trauma to the dorsal buccal branch of the facial nerve (2 horses) and partial wound dehiscence (6 horses). Transection and subsequent anastomosis of the parotid salivary duct was required to access the diseased tooth of 2 horses.
1 Blundeville T, The fower chiefyst offices belonging to horsemanshippe. London, 1566,
2 Lane JG. A review of dental disorders of the horse, their treatment and possible fresh approaches to management. Equine Veterinary Education. 1994;6:13–21.
3 Lane JG. Exodontia: Part 2: surgical extraction of equine molars and premolars (cheek teeth. In: Baker GJ, Easley J. Equine dentistry. 2nd ed. Edinburgh: Elsevier; 2005:279–294.
4 Shira RB. Principles of exodontia. In: Guralnick WC, ed. Textbook of Oral Surgery. Boston: Little, Brown and Co; 1968:79.
5 Nickel R, Schummer A, Seifarle E. The anatomy of domestic animals, 2nd edn. Berlin and Hamburg: Verlag Paul Parey; 1979.
6 Markham G. Markham’s masterpiece. London: G Conyers; 1723.
7 Dixon PM, Tremaine WH, Pickles K, et al. Equine dental disease Part 4. A long-term study of 400 cases: apical infections of cheek teeth. Equine Vet J. 2000;32:182–194.
8 Prichard M, Hackett R, Erb H. Long-term outcome of tooth repulsion in horses: a retrospective study of 61 cases. Vety Surg. 1992;21:145–149.
9 Evans LH, Tate LP, LaDow CS. Extraction of the equine 4th upper premolar and 1st and 2nd upper molars through a lateral buccotomy. Proceedings AAEP. 1981;28:249–252.
10 Lane GJ. Equine dental extraction-Repulsion vs Buccotomy: Techniques and results. Proceedings World Veterinary Dental Congress, Birmingham, 1987, pp 135–138
11 Easley J. Equine tooth removal. In: Baker G, Easley J. Equine dentistry. London: WB Saunders; 1999:228–229.
12 Merillat MA. Equine dentistry and diseases of the mouth. In: Veterinary Surgery. Chicago: Alex Eber; 1906.
13 Tremaine WH. Oral extraction of equine cheek teeth: a Victorian technique revisited. Proceedings World Veterinary Dental Congress, Birmingham, 1987, pp 139–143
14 Tremaine WH. Local analgesic techniques for the equine head. Equine Veterinary Education. 2007;19:495–503.
15 O’Connor JJ. Operations. In Dollar’s Veterinary surgery, 3rd edn, London: Baillière, Tindall and Cox; 1942:250–261.
16 Guard WF. Equine operations. In: Surgical principles and techniques. Ohio: WF Guard, Columbus; 1951:78–89.
17 Dixon PM. Dental extraction and endodontic techniques in horses. Compendium of Continuing Education for the Practicing Veterinarian. 1997;19:628–637.
18 Townsend N, Barakzai S. Abstracts of the 17th scientific meeting of the ECVS, Veterinary Surgery 2008, 95–98
19 MacDonald MH, Basile T, Wilson WD, et al. Removal of maxillary tooth fragments and root remnants in standing horses. Proceedings AAEP-Focus on Dentistry 2006, 148–155
20 Wheat J. Sinus drainage and tooth repulsion in the horse. Proceedings AAEP. 1973;19:171.
21 Frank E. Veterinary surgery, 7th edn. Minneapolis: Burgess; 1964. pp 156–159
22 Lane J, Gibbs C, Meynink S, et al. Radiographic examination of the facial, nasal and paranasal sinus regions of the horse: I. Indications and procedures in 235 cases. Equine Vet J. 1987;19:466–473.
23 Sissons S, Grossman J. The anatomy of the domestic animals, 4th edn. Philadelphia: WB Saunders; 1953. pp 387, 882
24 Mueller P. Equine dental disorders: Cause, diagnosis, and treatment. Compendium of Continuing Education for the Practicing Veterinarian. 1991;13:1451.
25 McIlwraith C, Turner A. Equine surgery: advanced techniques, 2nd edn. Philadelphia: Williams and Wilkins; 1987. pp 289–292
26 Trostle S, Juzwiak J, Santschi E. How to use antibiotic impregnated plaster of Paris for alveolar packing after tooth removal. Proceeding AAEP. 2000;46:180–181.