
History and Physical Examination
When you have completed this chapter, you will be able to:
1 Explain the role of the veterinary technician in obtaining the patient’s medical history.
2 List questions commonly used to obtain a patient’s medical history for small and large animals.
3 List the sections of information found in a medical history for small animal patients.
4 Describe the type of information contained in each section of the patient’s medical history for small animals.
5 List the sections of information found in a medical history for large animal patients.
6 Describe the type of information contained in each section of the patient’s medical history for large animals.
7 Describe the general procedures used to obtain a physical examination in dogs and cats.
8 Describe the general procedures used to obtain a physical examination in horses and cattle.
9 Discuss the methods for performing a comprehensive evaluation of each of the body systems.
10 List and describe unique procedures used in the examination of horses and cattle.
HISTORY AND PHYSICAL EXAMINATION OF SMALL ANIMALS
Obtaining a complete history is the first step toward creating a diagnostic and therapeutic plan for most veterinary patients. Pertinent historical information is an important part of a complete and accurate assessment of the patient. The veterinary technician should be sure to ask questions that clarify the nature of current and previous clinical problems and that confirm the accuracy of the information. This may require asking the same question more than once and repeating responses back to the owner asking, “Do I have this correct?” Despite its importance, obtaining a thorough history is often overlooked by both veterinarians and veterinary technicians.
Obtaining a thorough history in a clear and organized manner is the foundation of a comprehensive patient’s evaluation, but it can be challenging to do. For example, there are owners from whom it is difficult to extract information because they either say too little or talk incessantly about unrelated issues. In addition, the person presenting the patient to the practice may not be the patient’s owner and may not know the answers to the questions you are asking. Finally, certain problems or disease states may require specifically tailored questions. The goal of this discussion is to present an organized approach for obtaining a complete and accurate history for each and every patient. This method serves as a foundation upon which questions, based on the owner’s knowledge and the patient’s specific complaints and preexisting diseases, can be added.
 TECHNICIAN NOTE
Using a consistent, organized system for obtaining historical information about each and every patient is important to ensure that nothing is overlooked.
THE ROLE OF THE VETERINARY TECHNICIAN
The veterinary technician who is capable of obtaining a complete and accurate history can play a critical role in a busy veterinary practice. Obtaining information from clients is often time consuming, and veterinary technicians who can do this well free veterinarians to complete other work. The information that is obtained, however, is only useful if it is complete and accurate. Acquiring inaccurate information could be worse than obtaining no historical information at all. Faulty information might result in unnecessary diagnostic tests, treatments, and lost client trust. To optimize the likelihood that the information obtained is complete and accurate, technicians must gain the trust of the client.
Developing Rapport With the Client: When obtaining a medical history, the first step is to introduce yourself to the client and explain what you are doing so the client feels comfortable and is willing to share information with you. Always be certain to know the client’s name and the pet’s name and sex to prevent embarrassing mistakes when referring to the client or patient. In situations where the pet has been taken away from the client before obtaining the history (e.g., taken to the treatment area for cardiovascular stabilization following trauma), it is essential that you reassure the owner about the pet’s status before asking questions. If the client is worried that his pet is in danger, he will not be able to focus on you and give you the information you need. Once you have established a rapport with the client, obtaining complete and accurate information will be easier. The next challenge is to ask questions in an effective manner.
Asking the Questions: The most important aspect of taking a history is to understand and respect the pet owner. Some owners have medical training and can be spoken to using medical jargon; however, the majority of owners do not understand medical terminology, and the veterinary technician must be careful to use simple language without belittling the client. For example, if the technician is doing a follow-up examination of a diabetic cat, whose owner is checking the urine daily for glucose, it would be inappropriate to ask, “Have you noted glucosuria since your previous visit?” It would be equally inappropriate to ask, “Is the little square pad on your dipstick changing color when you dip it in Fluffy’s pee pee?” Finding words that are appropriate for the client is important so that he feels neither confused nor insulted. Technicians are safest asking “Has the urine strip been positive for sugar since your previous visit?” It is important to strike an appropriate balance and tailor your questions to the individual client to avoid losing trust.
It is also important to ask open-ended questions, rather than leading questions. An open-ended question is one that requires the client to fill in the information themselves, whereas a leading question is one that potentially guides her to an answer. For example, if you are trying to determine whether a pet is polydipsic it is best to ask the open-ended question, “Have you noticed any changes in his water intake during this illness?” rather than “Has he been drinking more water than usual?” When leading questions are asked, clients sense which response the interviewer prefers and are likely to give it; pet owners are anxious to help resolve their animal’s problems. Needless to say, asking leading questions can generate inaccurate historical information.
When questioning clients, try to avoid being judgmental of their care and management of their pet because this may make them feel uncomfortable about giving truthful answers. The questions you ask should not show your biases or personal beliefs. For example, when questioning an owner about his dog that has acute vomiting and diarrhea, it would be unhelpful to ask, “You don’t feed her table scraps, do you?” Faced with that question, an owner is likely to say, “No, of course not,” even if she really does feed her pet table scraps. It would be better to ask, “What is her normal diet?” or “Did she eat anything outside of her normal diet recently?” or “What human food does she typically eat?” Making the client feel comfortable with their decisions will improve the chances that you receive accurate information.
Documenting the Information: Historical information is useless unless it is written carefully, neatly, and accurately in a structured medical record form. All veterinary hospitals should have a standardized history form as part of the medical record, which allows efficient recording of the information presented (see Figure 5-7, A in Chapter 5). This form should also provide prompts to remind you to obtain certain pieces of information. The information should be recorded in the medical record as it is obtained to prevent any subsequent misunderstanding. In addition, it should be written legibly or typed using appropriate medical terminology, and it should be clearly organized. Keep in mind that the medical record is a legal document, and, as such, should be written with the utmost care and precision. The medical history will provide a reference for the veterinary health care team as it implements and revises its diagnostic and treatment plans for the patient.
THE INFORMATION
The following sections provide a general listing of important information that should be obtained in most medical histories. Some additions or deletions may be appropriate in specific cases. This is meant to serve as a guideline to ensure that complete and accurate historical information is obtained in an efficient manner.
TECHNICIAN NOTE
The major focus of any medical history is the presenting complaint; however, it is equally important to obtain general background information.
Signalment: Every patient record should contain the pet’s signalment, which includes age, breed (or dominant breed if mixed), sex, and reproductive status (spayed or neutered). It is important to confirm the signalment during the first meeting with the client because this information often provides important clues about the case. Certain diseases appear more commonly in animals of certain signalments. For example, congenital diseases are more likely to be diagnosed in very young patients than in very old patients.
General Management: The background information should begin with a discussion of how long the pet has been owned and where and when it was obtained. Any previous medical problems should be recorded. If it was obtained from a breeder, it may be useful to note whether the client still has contact with the breeder and if she knows of any diseases present in related dogs. When discussing the pet’s origins, ask if there has been any recent travel away from the pet’s normal living areas. This information is most important when there is a suspicion of a disease that is endemic to a region where the pet has visited within the past 6 months.
This is also a good time to find out where the pet is kept during the day and what its normal routine is. If it is kept indoors, is it in a crate or restricted to a certain part of the home? If it is kept outdoors, is it in a fenced yard or allowed to run free? You should always get a thorough diet history at this time. This should include the type of food eaten, the amount, and the frequency. It is also important to note if there have been any recent changes in the diet or if the animal was fed anything unusual (or if it got into something it should not have) just before the onset of illness.
Preventive Medicine: Complete information regarding vaccination history should be obtained if the pet is not a previous patient. Note which vaccines were given, when they were given, and the expiration date of the vaccine. This is the time to also ask about other preventative medications, such as heartworm and flea and tick prevention. Information regarding the consistency with which these medications are given is important as is whether they are given year round or only during warmer months. When discussing flea and tick medication, it is also a good idea to ask whether the owner has seen fleas or ticks on the pet.
Behavioral Information: Ascertain what the pet’s normal behavior is on a day-to-day basis and, more importantly, note any changes in the behavior relative to the illness. This is helpful in several ways. First, it lets you know if the pet is aggressive toward people or other animals, which may affect how you handle the animal when it comes time for a physical examination or hospitalization. Second, it allows you to determine if any behavior changes may explain the underlying illness, such as increased aggression, disorientation, unusual elimination habits, and so on.
Household Information: The health status of the other members of the patient’s household can be important in determining the cause of the pet’s illness, especially in cases of infectious disease. Determine to what extent the pet is exposed to other animals: what species, how many, and for what duration. You should also determine whether any of those animals are ill, regardless of whether the symptoms are similar to those of the presenting patient. Remember to ask questions about illnesses among the humans in the family. This is especially important in some cases of infectious dermatologic disease, such as sarcoptic mange, and may also provide information regarding the patient’s exposure to toxins, such as medication belonging to family members.
Allergy History: Before instituting any medical therapy, it is important to note any known allergies or other adverse reactions to medications or food that the pet may have experienced. Even if these reactions have not been confirmed to be related to the exposure in question, they are important to note. Avoidance of medications to which there is even a suspicion of an allergy is sensible. At this time, also inquire about prior blood product transfusions and reactions. You should ask whether the pet has ever received a blood product transfusion. If they have, attempt to determine what product, when it was administered, if there was any adverse reaction, and if the pet’s blood type is known. This information will help guide any subsequent blood product therapy.
Reproductive History: Although the current reproductive status of the patient will be noted in the signalment as discussed earlier, it is important to ask for historical information regarding the patient’s prior reproductive history. If an animal is neutered, it is important to note at what age the procedure was performed. This information may pertain to disease prevalence. For example, mammary tumors are much more common in female dogs after they have gone through a single heat than if they are spayed before their first heat. If an animal is not neutered, you should ask if it is currently being bred and if it has previously been bred. The timing of the most recent heat cycle should be noted for all intact female dogs because pyometra occurs most commonly 2 weeks to 2 months following a heat cycle.
Past Pertinent Medical History: Identify any prior medical problems that the pet has experienced. Recurrent bouts of similar problems may represent a serious chronic disease. Some previous historical problems may be of no significance to the current presentation. Those problems can be ignored. However, if a problem sounds like it may be relevant to the current complaint, you will have the opportunity to question the owner more thoroughly about it.
Presenting Complaint: The presenting or chief complaint is the most important information to be addressed in the medical history. Every patient will have a presenting complaint, and owners are often anxious to discuss this. During emergencies, it is important to quickly obtain information regarding the presenting complaint before obtaining any background information because time is of the essence in treating life-threatening problems. The presenting complaint can be obtained simply by asking, “What brings you to the practice today?” A patient may have more than one presenting complaint. In this case it is best to record and discuss each complaint separately. Do not assume that all of the symptoms can be tied to one medical disorder.
Last Normal: A good way to get a sense of the duration of a problem is to ask the client, “When would you say your pet was last normal?” This often helps the client recall a pleasant time when the pet was acting normally, which is easier than trying to remember how long the pet has been sick. The duration of each presenting complaint varies. Constructing a chronologic timeline is helpful to finding a diagnosis.
Progression: Once you have established a problem list, determine the order in which each problem appeared and how long each one lasted. Also ascertain how each problem has progressed. In other words, are the problems better, worse, or the same? This information may be helpful when constructing a diagnostic and therapeutic plan. A problem that is rapidly worsening may warrant a more aggressive course of therapy than a problem that is stable or improving.
Systems Review: The client should be asked a series of questions that reviews each of the pet’s basic body systems. Some of these questions may have already been answered when discussing the presenting complaint, in which case they should not be repeated. However, some of the questions may provide information that would otherwise be overlooked by the owner because they are so focused on the presenting complaint. All clients should be asked about the presence of coughing, sneezing, vomiting, diarrhea, polyuria, and polydipsia. Current appetite and energy level should be addressed. Any perceived weight loss or weight gain should be noted.
Medications: Every client must be asked what medications, if any, they are currently giving their pet. This information should be as complete as possible. The goal should be to find out the following: type, dose and frequency for each medication, the duration for which it has been given, the reason it is being given, and whether it has provided benefit to the pet. In situations where all of this information is not known by the owner, you should obtain as much of the information as possible. In addition to conventional medication, you must always ask about any vitamins or dietary supplements that are given to the pet. Ask specifically about the use of topical eye and ear preparations and of medicated shampoos; some owners do not think of these as medications. Finally, be sure to review any preventative medications that are being given, such as heartworm and flea and tick products.
PHYSICAL EXAMINATION
A thorough physical examination is often the first and most important diagnostic test performed on a patient. Because we must rely on an owner’s interpretation of their pet’s illness and because the symptoms pets show are often vague, the physical examination may be more important than the medical history in determining the source of illness. The key to a good physical examination is to carefully complete all parts of the examination every time you perform it. You should perform all aspects of the physical examination in the same order in every patient. Developing this sort of routine will prevent you from forgetting to evaluate one area because you are overly focused on another. The routine you develop may need to vary slightly from patient to patient. You will find that certain areas of the examination will be covered more carefully in some patients than in others. For example, a complete neurologic examination may be unnecessary on a patient that is seen for coughing and is ambulating normally with no historical complaints about the nervous system. Similarly, in a patient that has hind limb paralysis, you may limit your respiratory examination to a brief auscultation and spend more time performing a complete neurologic examination, including reflex testing. The key is to perform some evaluation of every system during every examination. The guidelines in the following paragraphs provide one example of the method by which a physical examination could be performed, but you can develop your own routine as you become more experienced. As long as you follow the same routine every time you perform a physical examination, you can be sure that your examination will be thorough.
TECHNICIAN NOTE
As with the patient’s history, following a consistent routine for every physical examination will prevent you from overlooking an important finding.
DOCUMENTING THE INFORMATION
As discussed for the medical history, the physical examination must be documented appropriately. All veterinary hospitals should have a standardized physical examination form as part of the medical record (see Figure 5-7, B in Chapter 5). This form should have areas for recording body weight, temperature, pulse rate, and respiratory rate. It should also provide prompts to remind you to examine each of the body systems discussed later and specified areas to record that information. As with any part of a medical record, the recorded information should be typed or legibly written, medical terminology should be used, and the content should always remain professional. Information should be documented in as much detail as possible so that the findings can be compared with those of future physical examinations.
SURROUNDINGS
Every physical examination should begin with a subjective assessment of the patient in its surroundings. Several pieces of useful information can be obtained just with a quick visual inspection of the animal from a distance as it behaves in the waiting room, examination room, or kennel. You can determine a general sense for the animal’s mentation. Is the patient bright, alert, and responsive? Is the patient quiet but alert and responsive? These states may suggest a less emergent condition. Is the patient dull, depressed, or even unresponsive? These states could indicate more serious disease or neurologic dysfunction. In addition to the mentation, you can visually inspect the animal as it rests for increases in respiratory rate or effort. While the animal walks, quickly look for evidence of lameness, ataxia, or visual deficits. You may be able to identify any asymmetry or swelling of the patient. This is a good time to evaluate the body condition of the patient and assign a body condition score. The list of things that you can identify with a careful visual inspection is extensive. All of this information is important to determine before moving forward with the remainder of your physical examination.
TEMPERATURE, PULSE, AND RESPIRATION
The measurement of body temperature, pulse rate, and respiratory rate will be a part of every physical examination. Even if the veterinary technician will not be performing a complete physical examination, he or she will often be asked to obtain this information before the veterinarian’s examination. For the veterinarian and veterinary technician, these values provide a quick reference to a substantial amount of information regarding the status of the patient. As mentioned previously, these values should be recorded in a dedicated area on the standard physical examination form.
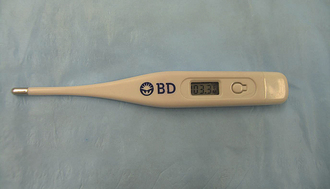
The body temperature is optimally measured rectally using a rectal probe thermometer. Most rectal thermometers in current use report the temperature through a digital display window (Figure 8-1). These thermometers work quickly and are safe and accurate. Still available but less commonly used are the liquid-capillary thermometers, which rely on a column of liquid (usually alcohol or mercury) to rise inside the thermometer and be compared with a scale on the thermometer for temperature determination. Always use a protective cover with the thermometer to minimize disease transmission. Lubricating the probe will make insertion much easier. When using the liquid-capillary type of thermometer, remember to shake the thermometer with the insertion tip down so that the liquid level falls from where it was left following its most recent use. Forgetting this step could result in an inaccurate measurement. Whereas a rectal temperature measurement is optimal, an axillary or aural temperature measurement may be used in cases where the rectum or nearby anatomy is swollen or painful, such as severe colitis or a perineal hernia. These methods are less accurate than a rectal measurement and should only be used when necessary.
Variations from normal body temperature can be useful in determining the nature or severity of a patient’s illness. An elevated body temperature (fever or hyperthermia) usually signifies the presence of infection, inflammation, or neoplasia. However, mild elevations may be noted secondary to the stress or anxiety associated with a visit to the practice. Significant true hyperthermia may occur when heat-dissipating mechanisms cannot overcome excessive ambient temperatures (heat stroke) or secondary to certain drugs. Severe elevations (>107° F) can lead to organ dysfunction and warrant initiation of gradual cooling mechanisms. Decreased body temperature (hypothermia) is seen less commonly and usually results from impaired thermoregulation in any sick animal, especially cats. Inability to maintain body temperature is more common in patients that are young, old, or thin. Conditions that commonly result in impaired thermoregulation include chronic renal failure, hypothyroidism, and CNS disease. Severe hypothermia (<90° F) can be life threatening and requires immediate attention. Normal body temperature ranges for dogs and cats are noted in Table 8-1.

Peripheral arterial pulses should be palpated to determine pulse rate and pulse quality in every patient. Pulses are generally palpated by way of the femoral artery, which is located high on the medial thigh of the animal. Digital pressure should be applied over the femoral artery using the tips of the fingers. Some degree of pressure will be required to feel the pulse, but excessive pressure could compress the vessel making the pulse difficult to feel. The degree of pressure needed will vary from patient to patient. The pulse rate (per minute) is calculated by counting the number of pulses palpated for 15 seconds and multiplying by 4. Normal pulse rates for the dog and cat are listed in Table 8-1. It is essential to auscult the heart while palpating pulses. The heart rate and pulse rate should be identical, and there should be a pulse of approximately equal quality produced by each heartbeat. The absence of a palpable pulse (or significant change in pulse quality) with an audible heartbeat is called a pulse deficit. Pulse deficits usually indicate an abnormal heart rhythm and warrant further evaluation, such as electrocardiography.
It is also important to determine the pulse quality when palpating peripheral arterial pulses. The pressure you feel when palpating a pulse is called the pulse pressure. Pulse pressure represents the difference between the systolic and diastolic arterial pressure. The intensity of the palpated pulse will vary depending on the body condition of the animal, appearing stronger in thin animals and weaker in obese or heavily muscled animals. Pulse quality is a subjective measurement and is likely to vary from technician to technician, given the level of experience and comfort in palpating peripheral pulses. An attempt should be made to describe the intensity of the pulse using terms such as weak, moderate, or strong. In general, a weak peripheral pulse is indicative of poor perfusion and may be caused by decreased cardiac output (as in congestive heart failure or hypovolemia) or increased peripheral resistance (as in shock). Pulses may also be described as slow to rise if the peak of intensity comes late in the pulse wave. This can be seen with obstruction to cardiac output, as is seen with aortic stenosis. A pulse that feels stronger than normal may also indicate a problem. These pulses may be described as bounding, tall, or hyperkinetic. Bounding pulses may be palpated in hyperdynamic states (early septic shock, anemia) or when there is a rapid drop-off in diastolic pressure (patent ductus arteriosus). Whenever pulse quality is abnormal, an evaluation of blood pressure using direct or indirect means is warranted.
The respiratory rate and effort should be noted in all patients. An initial notation of respiratory rate and effort should be performed before any stressful manipulation of the patient because stress will commonly cause an increase in those parameters. Respiratory rates are generally done visually first and then by auscultation to actually hear lung sounds. To calculate the respiratory rate (per minute), count the number of breaths for 15 seconds and multiply by 4. Normal respiration rates for the dog and cat are listed in Table 8-1. The determination of respiratory effort is more subjective. Animals respiring with normal effort should appear comfortable and lack any abdominal effort. If abnormal effort is detected, you should attempt to determine the phase of respiration during which effort is increased. Increased inspiratory effort may indicate an upper airway problem, especially if there is an associated noise, as with laryngeal paralysis. Increased expiratory effort may indicate a small airway obstructive disease, such as asthma. However, many patients will have an increased effort throughout respiration, which is less useful in determining the source of the problem and will be discussed in more detail later in the chapter.
SYSTEMS REVIEW
Following a visual inspection of the animal in its surroundings and the notation of temperature, pulse, and respiration, a more thorough examination of individual body systems is in order. As discussed earlier, the body systems examinations should be done in the same order in every patient to prevent overlooking any aspect of the physical exam. A consistent routine will ensure thorough physical examinations. However, the degree of detail with which you examine each system will vary from patient to patient based on their presenting complaint.
TECHNICIAN NOTE
Every major body system should be examined briefly in every patient. Special attention may be paid to specific systems depending on the individual patient.
Oropharyngeal System
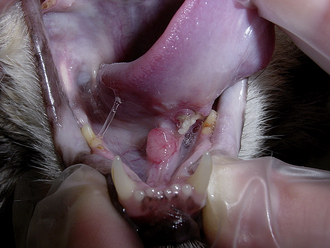
Diseases of the oral cavity may cause loss of appetite, difficulty chewing, or halitosis. Dental disease (such as periodontal disease) is common in small animal patients. As such, a good oropharyngeal examination is an important part of the physical examination. An oral examination can be easily performed in most patients by lifting the lips with the mouth closed and by opening the mouth. However, caution should be taken during an oral examination, especially in uncooperative patients. Teeth should be examined visually for any evidence of discoloration, fracture, or excessive tartar formation. Abnormal teeth should be gently palpated to assess for pain and to determine if the tooth is loose (suggesting periodontal disease). Any missing teeth should be noted and recorded in the medical record. The gums should be examined for redness, which could indicate gingivitis, the precursor to periodontal disease. Any gingival swelling should be noted. Focal swellings could represent neoplastic masses or tooth root abscesses. More diffuse swelling can be seen with gingival hyperplasia. Gingival ulcers may be seen with renal disease, feline viral upper respiratory disease (herpesvirus, calicivirus), or ingestion of caustic substances. An examination with the mouth open will allow an inspection of the lingual surface of teeth and gums. This also allows an examination of the tongue for swelling, discoloration, or ulceration. You should always look under the tongue by pushing upward from under the jaw between the two rami of the mandible. An inspection under the tongue may reveal abnormalities, such as masses (sublingual squamous cell carcinoma [Figure 8-2]), swelling (a ranula or salivary mucocele), or foreign material (string around the base of a cat’s tongue with a linear foreign body). An open-mouth examination also allows the inspection of the roof of the oral cavity (soft and hard palate) and the back of the oral cavity (pharynx, larynx). These areas should similarly be visually inspected for any swelling or mass, discoloration, or foreign material. Some pharyngeal masses may be large enough that they can be palpated externally by feeling the area just caudal to the mandible and cranial to the tracheal cartilage. More detail regarding an oropharyngeal examination and dental disease can be found in Chapter 32.
Eyes
A good initial ocular examination can be performed without any specialized equipment and should include an examination of the eyelids and external and internal structures of the eyes. It should also include an assessment of the patient’s visual status. An examination of the eyelids should strive to identify any redness or swelling. The eyelid margins should be evaluated for evidence of masses or abnormal hairs (especially if they appear to be growing in toward the eye and causing irritation of the eye). Finally the position of the lower eyelid should be examined to see if the lower lid is rolling in toward the eye (entropion) or out away from the eye (ectropion) because both of these conditions can lead to ocular problems. Any ocular discharge should be noted and described in regard to symmetry (unilateral, bilateral) and character (serous, mucoid, purulent, hemorrhagic). Excessive tearing or squinting of the eye may indicate irritation and should be noted. A general visual inspection of the globes should be performed to determine whether they are symmetrical and whether they are enlarged and/or protruding (as can be seen with glaucoma or lesions behind the eye) or sunken. The globes can be gently pressed with the thumbs over the eyelids. They may feel extremely firm when the intraocular pressure is high (such as with glaucoma) or soft when the intraocular pressure is low (such as with uveitis). If the eyes cannot be pushed backward (retropulsed) slightly, there may be a lesion (such as a mass) behind one or both eyes.
TECHNICIAN NOTE
Although a complete ocular examination requires specialized ophthalmologic equipment, a significant amount of information can be obtained with no equipment.
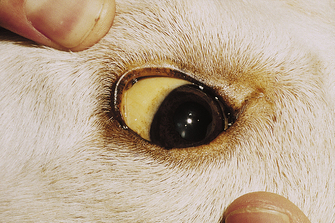
The external parts of the eye that can be evaluated include the conjunctiva, sclera, nictitating membrane, and cornea. The conjunctiva is the pink membrane that can be seen by pulling back the upper or lower eyelids and covers the outer part of the eye up to where the cornea begins. Redness of the conjunctiva (conjunctival hyperemia) is seen with many diseases of the external part of the eye, such as conjunctivitis. The sclera is the normally white part of the eye. It is an easy place to examine for the yellow discoloration seen with icterus (Figure 8-3). Redness seen in the sclera may be caused by conjunctival hyperemia (usually diffuse with small moveable blood vessels), episcleral injection (large straight blood vessels, often indicative of internal ocular disease), or subconjunctival hemorrhage (usually large, round to irregular blotches). Any eye redness should be recorded and reported to the veterinarian for further evaluation. The nictitating membrane (third eyelid) is usually not visible or only partially visible, and it rests beneath the lower eyelid on the medial aspect of the orbit. If the nictitating membranes are visible, that is abnormal and should be noted. If not, they can be briefly examined by pressing inward on the eye, causing the nictitating membrane to rise. They should be evaluated for swelling, redness, masses, or foreign material. The cornea is the transparent covering of the front of the eye, and it should be clear. It should be examined for cloudiness or other precipitates (such as pigment). Corneal ulcers are fairly common, and although fluorescein staining is usually required to recognize a corneal ulcer, deeper ulcers may be identifiable with only a visual inspection. A diseased cornea may have blood vessels growing into it (especially toward an area of ulceration to help with healing), and these should be noted.
The internal structures of the eye that can be evaluated without specialized equipment include the iris, lens, and anterior chamber. The iris is the colored part of the eye. It should be evaluated for swelling, discoloration, irregularity, or masses. The pupil is the opening of the iris. The pupils should always be evaluated for the degree of constriction or dilation and for symmetry of size. If the pupils are of differing sizes, this is referred to as anisocoria. The pupillary light response should be examined in all patients. When a light of sufficient strength is shone into one pupil, both that pupil and the opposite pupil should constrict. Anisocoria and abnormal pupillary light responses can indicate various ocular and neurologic diseases. The lens is the part of the eye responsible for focusing images onto the retina, and it is located inside the pupillary opening. In a normal patient, the lens is not visible without specialized equipment. However, increased lens opacity may be seen with nuclear sclerosis (a normal aging change seen commonly in dogs) or cataract formation. The anterior chamber is the part of the eye behind the cornea, but in front of the iris. This area should normally be clear, and there should be no difficulty in seeing the structures behind it. Cloudiness, pus, or blood may be present in the anterior chamber in association with severe ocular inflammation. Rarely, masses may be seen in the anterior chamber.
A simple evaluation of the patient’s visual ability can be made as they are walking in or around the examination room. Most blind patients will have difficulty getting around in the unfamiliar setting of the veterinary hospital, even if they have accommodated for their blindness well at home. Another way to assess a patient’s ability to see is to test their menace reflex by covering one eye (so you are testing only one eye at a time) and making a menacing gesture toward the other eye with your hand (being sure not to touch the patient or create excessive air movement that they could feel). A visual patient will close the eye in response to this gesture (assuming they are old enough to recognize that your gesture is menacing and that they have an intact facial nerve and are capable of blinking). You may also assess vision by dropping cotton balls in front of the patient from above their head and noting whether they visually follow the cotton balls as they pass by.
Ears
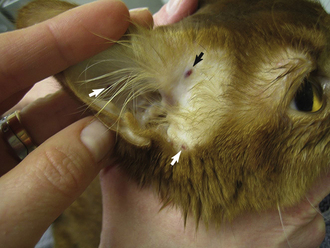
The examination of the ears should begin with the visualization and palpation of the pinnae. During visualization, the pinnae should be evaluated for symmetry (though in some patients asymmetry may be normal) and inspected inside and outside for swelling, redness, alopecia, crusting, or evidence of excoriation. Inside the pinnae is a common place to recognize petechiation, indicative of a primary hemostatic defect (such as thrombocytopenia) (Figure 8-4). Palpation of the pinnae will allow for recognition of focal swelling (such as with aural hematoma) or diffuse thickening (as might be seen with chronic otitis). Lifting and/or pulling back the pinnae will allow for a visual inspection of the external ear canal. The canine and feline ear canals consist of a vertical canal that opens to the external environment and runs inward parallel to the skull and a horizontal canal that is a short section between the vertical canal and eardrum, which runs more perpendicular to the skull. Only the vertical canal may be visualized without specialized equipment. This area should be evaluated for discharge, thickening and/or swelling, or masses. Aural discharge should be described in terms of amount (mild, moderate, severe) and appearance (waxy, black, hemorrhagic, purulent). The evaluation of the horizontal canal and eardrum requires the use of an otoscope.
TECHNICIAN NOTE
An otoscopic examination is required to perform a thorough ear examination by visualizing both the vertical and horizontal canals.
Most otoscopes found in veterinary practice will be wall mounted or portable. They typically consist of a handle, which allows the examiner to hold the instrument, and a head, through which the examiner visualizes the structures. For otoscopy, a cone is attached to the head. The cone is a gradually tapering tube, which fits nicely into the ear canal, through which the otoscope light shines to allow visualization. The majority of otoscopes can also be used as ophthalmoscopes by changing the head. Wall-mounted otoscopes usually have a base that plugs into an electrical outlet and hangs on the wall. The handle is attached to the base via a cord that supplies the power to light the otoscope. The handle is permanently attached to the base. The only assembly that is needed for use is to change the cone to match the size of the patient undergoing an examination. The cone should be large enough to allow a clear visualization of the structures inside the ear canal, but small enough so as not to cause the patient discomfort. The wall-mounted otoscopes have the advantage of always being ready for use and requiring little assembly, but they lack the flexibility of the portable units in terms of where the patient is positioned. For the wall-mounted units, the patient must be fairly close to the wall-mounted base, but for the portable units, the patient can be anywhere. The portable unit consists of a handle that contains a rechargeable battery to power the light source, a connecting piece that attaches the handle to the head, and the head (Figure 8-5). As with the wall-mounted unit, a cone must be attached to the head for an examination. The disadvantages of the portable otoscope are that the battery requires recharging and may not always be ready when needed and that the otoscope needs to be assembled before use.
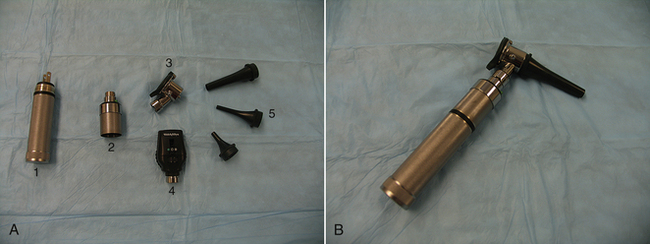
FIGURE 8-5 A, Components of a portable otoscope/ophthalmoscope. 1, Handle. 2, Connecting piece. 3, Otoscope head. 4, Ophthalmoscope head. 5, Otoscope cones of varying size. B, Assembled portable otoscope.
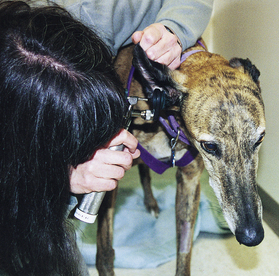
To examine the horizontal canal and eardrum using an otoscope, the pinnae is first gently pulled upward (opposite the direction of the patient’s legs) to lessen the angle between the vertical and horizontal canals. At this point, the otoscope cone is gently passed into the vertical canal while the examiner is looking through the head. The cone is gently advanced into the horizontal canal until the eardrum is visualized or until the patient shows evidence of discomfort (Figure 8-6). During passage of the otoscope through the vertical and horizontal canals, those areas should be examined for evidence of redness, swelling, masses, discharge, excess hair, or foreign material. The eardrum should appear as a grey to white, slightly transparent, round membrane separating the inner ear from the external ear canal. Abnormalities of the eardrum that should be noted include tears or perforation of the eardrum, increased thickness (or decreased transparency), or evidence of discharge behind the eardrum. It should be noted that an otoscopic examination is technically challenging and resisted by many patients. The visualization of the eardrum may be difficult for the novice technician, and only through frequent practice will the technique of otoscopy become comfortable.
Respiratory
The initial examination of a patient’s respiratory status involves a visual determination of respiratory rate and effort as discussed previously. Patients in significant respiratory distress should be provided with supplemental oxygen and minimally stressed. The remainder of the physical examination should be brief or potentially postponed until the patient is more stable.
TECHNICIAN NOTE
Patients in significant respiratory distress should be placed in oxygen and stabilized before a complete respiratory examination is performed.
In a stable patient, an examination of the respiratory system should begin with the evaluation of the upper respiratory tract. The nares should be visually inspected to ensure symmetry and patency. Patency can be evaluated by holding a glass slide in front of the nares and looking for condensation to form from each nostril as the animal exhales. The nares should also be evaluated for normal opening size, especially in brachycephalic breeds of dogs, in which stenotic nares are common. Nasal discharge should be described in terms of symmetry (unilateral, bilateral), severity (mild, moderate, severe), and character (serous, mucoid, purulent, hemorrhagic). Opening the mouth and briefly visualizing the hard and soft palate at the roof of the mouth will allow a crude inspection of the nasopharynx for masses, which may appear as a bulging downward of the palate. Any clinical signs of upper airway disease noted during an examination should be recorded, such as sneezing, stertor, or stridor.
Auscultation using a stethoscope comprises the remainder of the respiratory examination. Most stethoscopes used in veterinary medicine are acoustic stethoscopes, which consist of a chest piece that contacts the patient and transmits sounds via hollow tubes to the examiner’s ears (Figure 8-7). Electronic stethoscopes are less common. A stethoscope should be used such that the earpieces are pointing toward the examiner’s nose when they are placed into the ears. The chest piece on most stethoscopes consists of two sides: a flat side called the diaphragm and a cup-shaped side called the bell. The diaphragm, which transmits high frequency sounds, is used most commonly and is appropriate for lung auscultation. The bell, which transmits low frequency sounds, is used less frequently and may enhance the ability to hear certain cardiac sounds, such as those associated with a gallop rhythm. Twisting the chest piece 180° within the tubing will change whether the bell or diaphragm is active. Some stethoscopes do not have a separate bell and diaphragm, but can function as both if the pressure with which the chest piece is applied to the patient is varied.
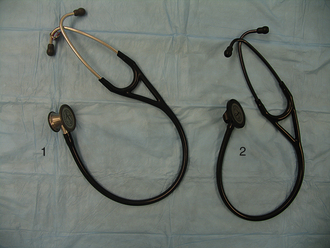
FIGURE 8-7 Stethoscopes. 1, Chest piece with separate bell and diaphragm 2, Chest piece with integrated bell and diaphragm.
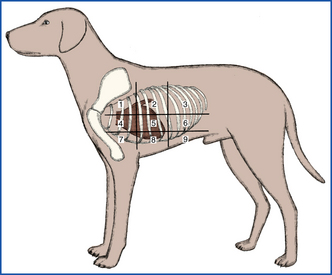
When performing respiratory auscultation, the patient should be in a quiet room. Many things can hamper your ability to effectively auscultate a patient, including ambient noise, the patient’s movement (causing hair rubbing to be heard through the ear pieces), panting, or purring. The mouth should be held gently closed in a panting dog to improve auscultation. Attempts should be made to quiet a cat’s purring, such as temporarily covering the nares, running water near the cat, or holding alcohol-soaked cotton to the nares. Once the conditions are optimal, respiratory auscultation should begin with the chest piece over the trachea. Normal tracheal airflow is turbulent, and the respiratory sounds should be loud and harsh. Abnormal sounds heard over the trachea suggest a problem in the upper airway (trachea or more cranial). For example, a high-pitched inspiratory sound may indicate partial upper airway obstruction, as can be seen with laryngeal paralysis. Although these abnormal upper airway sounds will likely be transmitted to the lungs and audible during lung auscultation, they do not indicate lung disease. The lungs should be auscultated on both sides of the patient, generally dividing the lung fields into nine quadrants on each side (Figure 8-8). Each quadrant should be auscultated through at least two to three respiratory cycles of inspiration and expiration. In a normal patient, air movement will be audible during both inspiration and expiration, but should be of minimal intensity. The intensity of normal lung sounds will vary with the body condition of the patient; the sounds are more intense in thin patients and less intense in obese or well-muscled patients. The most commonly identified abnormal lung sounds are crackles and wheezes. Inspiratory crackles usually indicate the presence of fluid within alveoli, as can be seen with pulmonary edema. Wheezes may occur during inspiration and/or expiration when air is moving through a narrowed airway, as can be seen with feline asthma. Failure to hear any air movement is also a sign of a problem. A lack of lung sounds occurring in the ventral lung fields in the standing animal usually indicates pleural effusion because the fluid tends to settle in the ventral areas. Conversely a lack of sounds in the dorsal lung fields often indicates a pneumothorax because the air will rise to the dorsal areas. Space-occupying masses and lung consolidation can also result in the absence of lung sounds. When abnormal lung sounds are auscultated (or lung sounds are absent), the technician should note whether they are occurring during inspiration or expiration and in which lung fields they were identified.
Cardiovascular System
The examination of the cardiovascular system begins with a look in the mouth. Rather than looking for specific oral pathologic conditions, we are looking at the gingival mucous membranes to gain an assessment of perfusion status. The gingival mucous membranes should be pink and moist, though some animals will have normally pigmented gingivae. Pallor of the mucous membranes usually indicates anemia or poor perfusion. Hyperemia of the mucous membranes can occur in stressed animals or can be seen in hyperdynamic states, such as the early phase of septic shock. If the mucous membranes are not moist but are dry or tacky, this is usually an early sign of dehydration. However, in a patient that is panting excessively, the mucous membranes will be dried by the air movement associated with panting, and mucous membranes will not be a good indicator of hydration status. The gingival mucous membranes are also used for measuring the capillary refill time, which serves as another indicator of perfusion. With the lip raised, the gingival surface is gently pressed with a finger to occlude blood flow until the color fades from the mucous membrane beneath the finger. The finger is removed, and the time it takes for the mucous membrane color to return to normal is measured (Figure 8-9). In a normal animal, this capillary refill time will be less than 2 seconds. Refill times longer than 2 seconds are indicative of poor perfusion, as can be seen with hypotensive states. Extremely rapid refill (<1 second) may be seen in stressed patients or in hyperdynamic states, such as the early phase of septic shock. The peripheral arterial pulse quality will also provide information regarding perfusion as discussed previously.

FIGURE 8-9 Assessing capillary refill time. A, Visualize the gingival mucous membranes by lifting the lip. B, Apply gentle pressure with the thumb onto the mucous membranes. C, Resultant area of pallor when the thumb is removed. D, Note time to return of normal mucous membrane color.
TECHNICIAN NOTE
A complete cardiac examination includes assessment of perfusion status, heart rate, heart rhythm, and heart sounds.
Cardiac auscultation will allow evaluation for abnormal heart rate, rhythm, and sounds. In dogs, the heart should be auscultated on each side of the chest around the level of the costochondral junction (just behind the level of the elbow when the patient is standing). By moving the chest piece around slightly, you will be able to auscultate in the vicinity of each heart valve. The pulmonic, aortic, and mitral valves can be auscultated best on the left side, whereas the tricuspid valve is auscultated best on the right side (Figure 8-10). Normal heart rates have been discussed previously. In cats, it is best to auscultate directly over the sternum initially and move the chest piece gradually up to the left side and back over to the right side. The valve positions are similar to the dog, but in cats, abnormal heart sounds are more commonly auscultated in the sternal area. The heart rhythm should be regular, meaning that each heartbeat is separated from the following one by an identical time interval. Dogs may normally have a slight variation in heart rhythm, such that the heart rate increases slightly during inspiration and decreases slightly during expiration. This is called respiratory sinus arrhythmia, and it is a sign that a dog has normal cardiac function. To best evaluate the cardiac rhythm, the pulses must be palpated during auscultation. As discussed previously, there should be a pulse of approximately equal intensity generated with each heartbeat. In a patient with an abnormal heart rhythm or with pulse deficits, electrocardiography should be performed to determine the exact nature of the abnormality.
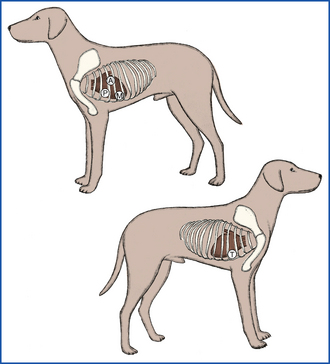
FIGURE 8-10 Location of heart valves as an aid in the determination of the origin of a heart murmur. A, aortic; M, mitral; P, pulmonic; T, tricuspid. (From McCurnin DM, Poffenbarger EM: Small animal physical diagnosis and clinical procedures, St Louis, 1991, WB Saunders.)
The heart sounds typically audible during auscultation in a normal patient are S1 (the first heart sound), which is created by closure of the mitral and tricuspid valves at the start of systole, and S2 (the second heart sound), which is created by closure of the aortic and pulmonic valves at the end of systole. These two short heart sounds result in the typical “lub-dub” sound of the normal heartbeat. The presence of a third heart sound is termed a gallop rhythm because the resulting heart rhythm sounds like the galloping of a horse. A gallop rhythm is not actually an abnormal rhythm in the sense of electrical activity, but is caused by an extra heart sound termed either S3 or S4. S3 is usually associated with ventricular dilation, such as with dilated cardiomyopathy, whereas S4 is usually associated with decreased ventricular compliance and hypertrophy, such as with hypertrophic cardiomyopathy. S3 and S4 cannot be differentiated via auscultation. Rarely the second heart sound (S2) may be split and sound like a third heart sound. This phenomenon is uncommon.
A heart murmur is an abnormal sound caused by turbulent blood flow which typically sounds like a “swishing” noise. Identification of heart murmurs can indicate cardiac disease, though they can occur with noncardiac disease (such as with anemia) or can be normal in some young animals. Heart murmurs should be described by their intensity, when they occur in the cardiac cycle, and where they are heard loudest. The intensity of a heart murmur is typically graded on a scale from I to VI, as shown in Table 8-2. Systolic murmurs occur between S1 and S2 (i.e., during systole) or may mask those two sounds. Diastolic murmurs occur after S2 and before the next S1 (i.e., during diastole). A continuous murmur occurs throughout the cardiac cycle. The area on the chest where a murmur is loudest is termed the point of maximal intensity. For dogs, this point is usually identified in relation to the location of heart valves, as shown in Figure 8-10. For cats, this point may more easily be described in relation to the sternum (such as midsternum or left parasternum) since many feline murmurs are best auscultated in this area.
TABLE 8-2
Grading of Heart Murmurs in Small Animals
| Grade | Description |
| I | Very low intensity murmur that can only be heard in a quiet area |
| II | Murmur of soft intensity that can be heard immediately |
| III | Murmur of moderate intensity |
| IV | Loud murmur |
| V | Loud murmur with a palpable thrill on the body wall |
| VI | Loud murmur that can be heard with the stethoscope held some distance from the thoracic wall |
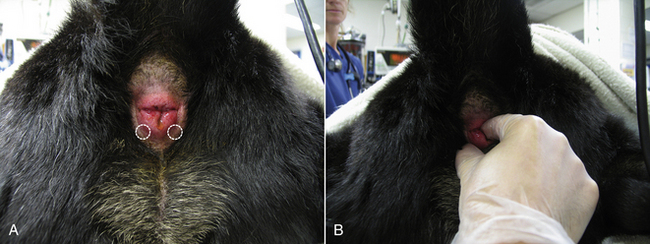
The final part of a thorough cardiovascular exam is evaluation of jugular veins. In a short-haired patient, the jugular veins can be visualized on either side of the trachea with the patient’s muzzle lifted dorsally in a standing or sitting position. In animals with thicker or longer coats, the hair may need to be clipped or wet down to allow an evaluation. Normal patients should have jugular pulsations that do not extend more than one third up the neck. The jugular veins drain blood into the right atrium, and their pulsations and distension give a direct indication of right atrial pressure. Distended jugular veins extending farther up the neck can be seen in any disease causing elevated central venous pressure, especially those causing increased right atrial pressure, such as a pericardial effusion or pulmonic stenosis.
Gastrointestinal System
This section of the physical examination would more appropriately be called “abdominal palpation” because it actually involves the assessment of more than just the gastrointestinal (GI) tract. During abdominal palpation, other abdominal organs will be examined, including liver, spleen, kidneys, and urinary bladder. The technique of abdominal palpation can be difficult for the novice technician, but with practice, one can become quite proficient. As with the physical examination as a whole, following a consistent routine every time abdominal palpation is performed will ensure that nothing is missed. A thorough understanding of the anatomic location of the abdominal organs within the abdominal cavity is essential for effective palpation. Figure 8-11 shows the location of the abdominal organs within the abdomen. For the purposes of description, the abdomen can be divided into six sections (cranial-dorsal, cranial-ventral, middorsal, midventral, caudal-dorsal, caudal-ventral). For most dogs, the two-handed technique is the best method (Figure 8-12). For small dogs and cats, a one-handed technique (Figure 8-13) may be easier, using the general principles discussed later for the two-handed technique. With the patient in the standing position, the examiner should stand just behind the patient or stand straddling the caudal end of the patient. This will allow the placement of one hand on either side of the abdomen. The hands should be in a flat, relaxed position. Palpation should begin in one section (such as cranial-dorsal). The hands should be moved gently toward each other in a smooth, fluid motion. The hands and fingers should remain relaxed, and excessive pressure should not be exerted so the patient does not tense its abdominal muscles (as this makes delineation of organs difficult). The palpation should move slowly and methodically through all the other sections of the abdomen. The progression should be the same each time you palpate a patient. Within each section, you should be noting any pain, swelling, firmness, or fluid. These findings should be recorded as to their severity and location (which section, left or right side). Be as specific as possible in your descriptions.
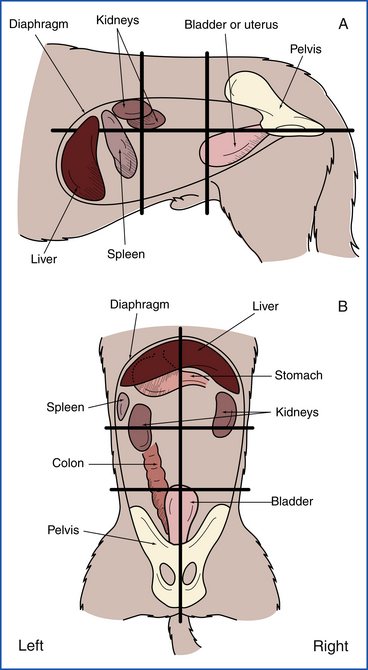
FIGURE 8-11 Location of internal organs within the abdominal quadrants. A, Lateral projection. B, Dorsoventral projection.

TECHNICIAN NOTE
Abdominal palpation should be performed using a consistent routine in every patient to avoid failure to evaluate any area.
Specific organs should be palpated in their respective regions. The liver should not be palpable in the normal animal, but if it is enlarged or contains a mass, it may be palpated in the cranial-ventral abdomen just caudal to the rib margin. The spleen is usually palpable in the cranial-ventral or midventral abdomen more on the left side. It should be gently palpated for enlargement or masses. The kidneys reside in the cranial-dorsal or middorsal abdomen and cannot be palpated in most dogs because they are encased in quite a bit of fat and are not moveable. However, they may be palpated in thin dogs or when there is renomegaly. Pain in those sections of the abdomen may represent renal pain. In cats, the kidneys are much more moveable and much more easily palpable. They are usually just caudal to the ribs in the dorsal abdomen and can be freely moved in most cats. They should be palpated for irregularities in size or shape and for evidence of pain. The urinary bladder can be easily palpated in the caudal-ventral abdomen, assuming it is not empty and that the patient is cooperative. Identification of the urinary bladder makes cystocentesis possible. The urinary bladder should also be palpated for distension or thickness. On rare occasions, bladder stones may be palpable on a physical examination. In male dogs, the prostate gland may be palpable in the caudal-dorsal abdomen, especially if it is significantly enlarged. However, the prostate is usually best examined via a rectal examination.
The GI tract can be examined during abdominal palpation to some extent. The stomach is usually not palpable if it is empty, but if there is gastric distension or a mass, it may be palpable in the cranial-dorsal abdomen (or farther caudal with severe distension). The small intestines are generally palpable as loops passing through your fingers in much of the midabdomen. It is not possible to delineate the different sections of small intestine by palpation. Small intestinal masses should be easily palpable, but other intestinal changes, such as wall thickening, are usually subtle and difficult to appreciate. The large intestine can usually be palpated in the middorsal and caudal-dorsal abdomen as it courses toward the rectum, assuming that it contains formed feces. If it is empty, it may not be as easily palpable. Good palpation may allow for identification of large intestinal masses or of constipation or obstipation. Remember that a complete GI examination includes an examination of the oral cavity, pharynx, rectum, and anus. The examination of these areas is discussed in other sections.
Rectal Examination
A rectal examination should be performed in almost every canine patient. In cats and small dogs, a rectal examination may be prohibitively painful and should only be performed in patients with a presenting complaint that may bereferable to that area. A thorough rectal examination can be quick and provide a significant amount of useful information. The examination is typically performed using a well-lubricated, gloved index finger (though the pinkie finger can be used in smaller patients). Before examining the rectum, the perineal area and anus should be examined for redness,
CASE PRESENTATION 8-1 SMALL ANIMAL HISTORY
Signalment: 6-year-old intact male Boston terrier
Presenting complaint: Vomiting
Progression: The dog was normal when the owners left for work 3 days ago, but was vomiting when they returned home. They took him to another veterinary hospital where abdominal radiographs were taken. Based on the normal radiographs and the lack of abdominal pain, the dog was given subcutaneous fluids and discharged with the instructions to withhold food and water for 24 hours and then introduce a bland diet. Since discharge he has continued to vomit and become progressively more lethargic.
Systems: No coughing, sneezing, diarrhea, polyuria or polydipsia noted. No recent weight loss.
As the admitting technician, you are responsible for obtaining the patient’s history. As you discuss the case with the owner, they mention that the dog was chewing a “cow trachea” when they left for work the day he was last normal. As you question them more carefully, it becomes clear that the dog is bringing up white foamy material in the absence of abdominal wretching. You ask specific questions with the goal of determining whether the dog is truly vomiting or actually displaying regurgitation (Table 8-1). You suspect that regurgitation is the actual presenting complaint.
TABLE 8-1
Historical Differentiation Between Regurgitation and Vomiting
| Regurgitation | Vomiting | |
| Bile | Rarely to never | Often |
| Digested food | Sometimes | Often |
| Active abdominal retch | Rarely to never | Always |
| Hypersalivation | Sometimes | Sometimes |
| Gagging | Sometimes | Rarely |
| Odynophagia | Often | Never |
The most useful pieces of information are the presence or absence of bile in the expelled material and the presence or absence of active abdominal retching during expulsion.
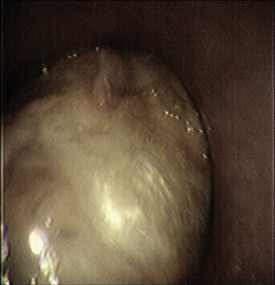
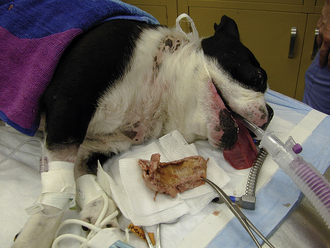
Agreeing with your assessment that regurgitation may be the problem in this patient, the veterinarian orders cervical and thoracic radiographs (Figure 1). These reveal a radiopaque foreign body in the cervical esophagus with esophageal dilation proximal to the foreign body. An emergency endoscopy is performed and the presence of the foreign body is confirmed (Figure 2). The foreign body (a “cow trachea”) is removed with endoscopic guidance (Figure 3), and the dog goes on to make a full recovery. The owners are grateful that you took the time to obtain an accurate and complete history.
FIGURE 1 Lateral cervical and thoracic radiograph showing circular radiopaque foreign body in cervical esophagus with dilated esophagus proximal to it.
Summary: This is an example of how important good history-taking skills are. At the dog’s initial visit, the individual obtaining the history was not able to discern that the dog was regurgitating. The erroneous historical diagnosis of vomiting resulted in the ordering of abdominal radiographs. This resulted in a missed diagnosis followed by inappropriate treatment. By taking the time to obtain a complete and accurate history, you will optimize the chances that the diagnostic and therapeutic plans will be appropriate.
swelling, masses, discharge, or other abnormalities. The finger is passed gently through the anal sphincter with the knuckles aimed dorsally. The finger is placed in as far as is comfortable for the patient, and structures are examined moving caudally. In the male dog, the prostate gland may be palpated ventral to the rectum cranial to the pelvic brim. It should be palpable in most intact dogs and in any dog with prostatomegaly. The normal gland is bilobed with a median raphe and should be smooth, symmetrical, and nonpainful. Enlargement or pain on palpation may be indicative of prostatic infection or neoplasia. Moving caudally, the urethra can be palpated ventral to the rectum as it courses caudally from the urinary bladder. Feel carefully for any irregularities (such as stones or masses). Dorsal to the rectum, the medial iliac lymph nodes are present to either side of the midline and may be palpated if they are enlarged. The inner mucosa of the rectum should be palpated during the examination by running the finger 360 degrees around the wall at various levels. The rectal wall should be evaluated for irregularity, thickness, or masses. The character of the stool within the rectum (if present) should be noted. If possible, a sample of stool should be removed with the gloved finger and examined. Finally the anal sacs can be palpated. The anal sacs lie just behind the anal mucosa with one on either side, located at approximately 5 and 7 o’clock (Figure 8-14, A). The anal sacs can be palpated by moving the finger within the rectum laterally and caudally while gently pressing with the thumb on the outside of the anus. Normal anal sacs should be small (<1 cm) and firm but slightly fluctuant. Distended anal sacs likely contain normal anal sac fluid, but could contain a mass. The sacs must both be fully expressed to confirm whether or not there is a mass present. This should be done in any patient with a palpably distended anal sac. Each sac opens at the rectal-anal junction adjacent to the location of the sac. The anal sacs are expressed by gently applying pressure with the thumb and finger during palpation (Figure 8-14, B). The anal sac fluid can vary in appearance from whitish to dark brown and can vary in consistency from watery to fairly thick. Evidence of blood or pus may indicate anal sac infection. Thick material can result in an anal sac impaction, which can be uncomfortable to the patient and lead to scooting of the rear end. Anal sac expression can be difficult in patients with an impaction and may require sedation.
Urogenital
Much of the urinary system is evaluated during abdominal palpation and a rectal examination as discussed previously. The kidneys, urinary bladder, and proximal urethra have already been examined. The only part of the urinary system left to be evaluated is the distal urethra, which opens at the tip of the penis in the male and into the vestibule in the female. In male dogs, the penis should be gently extruded by pulling back the skin of the prepuce. Any discharge within the prepuce should be noted. The penis should be evaluated to ensure that the urethral opening is normal and appears patent. Any masses or wounds on the penis should be noted. Penile examination is not typically performed in the male cat except when the patient is sedated, such as would occur during urethral obstruction. Examination of the vagina and vestibule is not routinely performed in dogs and cats. In cases with a presenting complaint referable to the lower urinary tract, a vaginal examination may be indicated. A digital vaginal examination may be performed in the awake dog, but often sedation will be necessary. Sedation will always be required in the cat. In either case, the examiner should wear sterile gloves and use copious lubrication to prevent trauma and discomfort to the patient.
In the United States, the vast majority of dogs and cats are neutered. As such, an examination of reproductive organs is not commonly performed. In the intact male dog or cat, the testicles should be examined. The scrotum should be gently palpated to ensure that both testicles are present. Testicles should descend into the scrotum by 8 weeks of age in most patients and by 6 months in all patients. The testicles should be gently palpated to assess for any asymmetry in size, masses, heat, or pain. The penis should be extruded and examined as described earlier. In the intact female dog or cat, the reproductive organs are not as easily examined. A vaginal examination may be performed as described previously, but is not part of a routine examination. The uterus cannot be palpated during abdominal palpation unless it is enlarged, such as with pregnancy or pyometra. The ovaries cannot be palpated. It is good practice to palpate the mammary chains in all female dogs and cats, but it is especially important in sexually intact patients because they have a much higher risk of mammary cancer. Most dogs and cats will have five mammary glands on each side of the ventral abdomen. They should be gently palpated for heat, swelling, masses, or discharge. In lactating animals, milk should be expressed and examined.
Integument
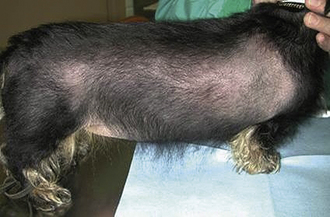
A complete evaluation of the integumentary system will include an examination of the hair, skin (including footpads and nails), and subcutaneous tissues. The character of the normal hair coat can vary greatly between breeds and between individual patients, but in general, it should be thick and shiny. Abnormal hair coats may be dull or greasy. They may contain scale (flakes of shed epidermis). The coat should be visually evaluated for areas of thinning or alopecia (Figure 8-15). If alopecia is noted, it should be described in terms of location (focal versus diffuse versus patchy, unilateral versus bilateral, symmetric versus asymmetric) and degree (partial versus complete). The coat should be inspected closely in alopecic areas. The examiner should look for evidence of broken hairs, which may indicate that the alopecia is caused by scratching or barbering. The skin should also be examined in the alopecic area for evidence of excoriation or underlying disease. The hair should be gently parted in several areas to look for evidence of ectoparasites, such as fleas. In highly suspicious cases, such as extremely pruritic animals, a flea comb can be used to improve the chances of identifying live fleas or their excrement.
TECHNICIAN NOTE
Dermatologic diseases are common in small animal patients. A familiarity with the skin examination and terminology of skin lesions will be useful.
The extent to which the skin is directly examined will depend on the presenting complaint of the patient. A patient with no complaints referable to the skin (such as pruritus, flaking, or odor) need only have a cursory skin exam. Patients with complaints referable to the skin warrant a more thorough evaluation. In any patient lacking alopecia, the hair must be parted to allow an evaluation of the skin. The ventral caudal abdomen has a light covering of hair in many patients and is a good place to visualize the skin. Common abnormalities that can be identified on the skin include papules and pustules, which are seen commonly with a bacterial skin infection. A papule is a small pink or red elevated skin lesion smaller than 0.5 cm in diameter. A pustule is similar in size to a papule, but is a raised area containing pus, which usually has a pink or red base with a white tip. Scale and crusts are caused by any inflammatory process affecting the outer layers of skin. Both appear as flakes and contain shed epidermal cells, but crusts also contain inflammatory cells. They can be difficult to differentiate based on a visual inspection alone. Excoriations are areas of self-trauma caused by scratching in a pruritic animal. The skin is a good area to see petechiae and ecchymoses, which usually indicate a primary hemostatic defect. Erythema (redness) of the skin may be noted focally or diffusely. Nail beds and footpads should be examined, especially in patients with diseased skin, to evaluate for redness, discharge, or ulceration.
Masses are commonly found on the skin and within the subcutaneous tissues in veterinary patients. Most masses will be caused by benign neoplastic processes, though palpable masses may represent malignancy, vaccine reactions, abscesses, or swelling caused by trauma. It is important that any masses be noted in the medical record with great detail so that any changes in their size or appearance can be noted. Masses should be described based on their location, including whether they are on the surface of the skin (cutaneous) or under the skin (subcutaneous). Their exact location can be recorded in the medical record by using a body map. Such a map will allow for the precise marking of the location of the mass and is much more effective than written descriptions for comparisons with future examinations. The size and shape of the mass should be noted. The size is most precisely recorded using measuring calipers, though it can be estimated if calipers are not available. The mass should also be described as soft, fluctuant, or firm. Its adherence to underlying structures should be noted by recording whether it is moveable or fixed. Careful monitoring of cutaneous and subcutaneous masses is important in determining a diagnostic and therapeutic plan.
Lymph Nodes
In the normal patient, the peripheral lymph nodes that can be palpated are the mandibular, prescapular, and popliteal lymph nodes. Axillary and inguinal lymph nodes are typically only palpable when they are significantly enlarged. Similarly, enlarged medial iliac lymph nodes may be palpable via a rectal examination as discussed earlier. The mandibular lymph nodes are located on either side of the neck just caudal-dorsal to the ramus of the mandible and cranial-ventral to the mandibular salivary glands. They can be differentiated from the salivary gland because they tend to be more moveable, slightly firmer, and smaller (in the normal patient). The prescapular lymph nodes are located in the subcutaneous tissue just medial to the scapular-humeral joint on either side of the patient. These nodes are often encased in fat and may feel slightly softer than other normal nodes. The popliteal lymph nodes are located on the caudal aspect of each hind limb at the level of the stifle joint. The axillary lymph nodes, if palpable, will be located in the subcutaneous space on the lateral aspect of the ventral thorax under the arm. The inguinal lymph nodes are located in the most caudal part of the ventral abdomen, just medial to the thighs, on either side of the midline.
Lymph nodes should be palpated by gently isolating them between the thumb and index finger. Ideally the left and right lymph nodes are palpated simultaneously at each location to determine whether they are identical in size and shape. Normal lymph nodes are round to oval in shape, slightly moveable, and firm, but slightly compressible. Abnormal lymph nodes may be enlarged, firm, warm, or painful. The most common abnormality palpated is an enlarged lymph node. It should be noted that lymph nodes in young animals (less than 6 months of age) are normally mildly enlarged as compared with the size that they will be during adulthood. Lymph node enlargement may indicate that the node is infected, reacting to local inflammation, or neoplastic. Enlargement should be noted as focal (single node or single region) or generalized (all palpable nodes enlarged). The specific nodes that are enlarged should be noted and their size measured with calipers or estimated.
Musculoskeletal System
The examination of the musculoskeletal system will vary greatly depending on the patient’s presenting complaint. In a patient without symptoms referable to the musculoskeletal system (such as lameness, swelling, difficulty rising, or pain), the examination will be fairly cursory. Every patient should be observed as they walk around the examination room or waiting area for signs of lameness that the owner may not have perceived. In patients lacking lameness, the musculoskeletal examination should include a visual inspection of the standing animal for asymmetry of the limbs. This is followed by gentle palpation of each limb and the vertebral column over the neck and back. Initial palpation of limbs should be performed such that opposite sides are examined simultaneously (i.e., left and right forelimb, left and right hind limb). This will allow for a comparison with the opposite leg when evaluating swelling or pain.
In a patient that is seen with a complaint referable to the musculoskeletal system, such as lameness, or one in which the cursory musculoskeletal examination revealed an abnormality, a more thorough examination is indicated. This should start with observation of the animal walking or jogging on a lead for identification of lameness. Animals will put less weight on a painful limb when walking, shifting the weight to the good limb. This results in the patient putting their head down when stepping on the good limb and pulling the head up when stepping on the painful limb. Once the affected limb has been identified, the patient should be placed in lateral recumbency and each limb thoroughly examined one at a time. The soft tissues and long bones of the limb should be palpated with gradually increasing levels of pressure to identify swelling or pain. Then, starting at the toes, every joint should be put through a range of flexion and extension trying to isolate the examined joint and not move any other joints. It is important to examine all the limbs so that perceived discomfort in one limb can be compared with the opposite limb. If you identify pain in one limb and the patient does not show a similar response in the other limbs, you have likely identified a problem. The bones of the vertebral column should be palpated one at a time by pressing down on their dorsal surface on the animal’s back. The neck should be put through a full range of motion and any pain noted.
Nervous System
Similar to the musculoskeletal examination, the time allotted to the neurologic examination will vary greatly depending on the patient. The examination of every patient will include a subjective visual evaluation of mentation, visual acuity, and gait as it enters the examination room, as described in the section on observing patients in their surroundings. Most patients will have menace and pupillary light reflex testing performed as part of the eye examination. If these parameters are considered normal and the patient does not have any complaints that could be referable to the nervous system, the neurologic examination need not be any more extensive.
A patient with an abnormality noted on the cursory examination or one with a complaint that could be referable to the nervous system should have a more complete neurologic examination. Presenting complaints that could be referable to the nervous system include, but are not limited to, behavior changes, depression, lethargy, blindness, head tilt, circling, lameness, weakness, or paralysis. A complete neurologic examination includes an evaluation of mentation, gait and posture, muscle tone, cranial nerves, postural reactions, and reflexes. Mentation is assessed subjectively during visual observation of the patient and may be described as bright and alert, quiet, dull or obtunded (not interested in surroundings), stuporous (responsive only to noxious stimuli), or comatose (unresponsive to stimuli). The gait and posture are also observed. The patient should be walked or jogged on a lead and made to turn when assessing a gait. Although animals with neurologic disease can have a normal gait and posture, ataxia is a common gait abnormality in these patients. Ataxia is a term used to describe uncoordinated muscle movements when walking. When evaluating a patient’s gait, ataxia is identified when you are unable to predict where the foot will fall on the patient’s next step. Ataxia can vary in type and severity, and it is often confused with lameness by owners. Muscle tone is subjectively assessed by a visual inspection and palpation. The evaluation of muscle tone should include determination of anal sphincter tone. During a rectal examination, the anal sphincter muscles should tighten around your finger. Muscle atrophy or decreased tone may occur in denervated muscle.
A cranial nerve examination is an essential part of every complete neurologic examination. Cranial nerve reflex tests are summarized in Table 8-3. The olfactory nerve (cranial nerve I) is not routinely tested because a patient’s response to scent is difficult to evaluate. The spinal accessory nerve (cranial nerve XI) is not evaluated. Lesions in this nerve cause atrophy of the trapezius muscle, which can be difficult to identify. As discussed in the section on the eye examination, the pupils should be evaluated for size and symmetry, and the menace and pupillary light reflex tests should be performed. These will evaluate the optic (cranial nerve II) and oculomotor nerves (cranial nerve III). The position of the eyes at rest and the doll’s eye reflex (physiologic nystagmus) will evaluate the oculomotor, trochlear (cranial nerve IV), and abducens nerves (cranial nerve VI). The doll’s eye reflex is performed by turning the patient’s muzzle and head from left to right. As the head moves in one direction, the eyes should initially move to the opposite direction and then snap back to the center. The palpebral reflex is tested by tapping the medial and lateral canthus of the eye to induce a blink. The corneal reflex is tested by holding the eyelids open and gently touching the cornea with a wet cotton swab. Gently pinching the lips with a hemostat or placing the hemostat inside either nostril should cause the patient to move away and will evaluate the sensory portion of the trigeminal nerve (cranial nerve V). Facial symmetry should be assessed because a droop to one side compared with the other can indicate a lesion of the facial nerve (cranial nerve VII). The eyes should be examined for nystagmus, which can indicate a lesion in the vestibulocochlear nerve (cranial nerve VIII). The gag reflex is performed by pressing with a finger on the back of the patient’s tongue; this should elicit contraction of the pharyngeal muscles. This evaluates the glossopharyngeal nerve (cranial nerve IX) and branches of the vagus nerve (cranial nerve X). A visual examination of the tongue for determination of deviation to one side or another can identify lesions of the hypoglossal nerve (cranial nerve XII).
TABLE 8-3
Examination of the Cranial Nerves
From McCurnin DM, Poffenbarger EM: Small animal and physical diagnosis and clinical procedures, Philadelphia, 1991, WB Saunders.
TECHNICIAN NOTE
A complete neurologic examination should include the evaluation of mentation, gait and posture, muscle tone, cranial nerves, postural reactions, and reflexes.
A neurologic examination of the limbs involves assessment of postural reactions, reflexes, and sensation. Conscious proprioception is tested in the standing patient by picking up one paw and placing its dorsal surface onto the floor. The normal patient will quickly lift and turn the foot so that the palmar or plantar surface is touching the floor. This test should be performed on each leg. Note that patients with significant muscle weakness may not have the strength to lift the limb to turn it, so you should help to support the patient’s weight. Limb strength can be assessed by forcing the patient to hop on one limb at a time and comparing their strength to do so between limbs. In small patients, this can be easily done by supporting the weight of the other three limbs while the patient is moved from side to side on one limb. In larger dogs, it may be necessary to hold up only one forelimb and move the patient from side to side on the opposite forelimb while keeping the hind limbs fairly still. A similar technique can be used to evaluate the hind limbs. Reflex testing should be performed with the patient in lateral recumbency and relaxed. The forelimb reflexes to be tested include the withdrawal reflex, the biceps reflex, and the triceps reflex. Forelimb reflexes can be difficult to obtain, and the withdrawal reflex is the most reliable. It is performed by pinching the patient’s toe, which should result in strong flexion of the limb. Hind limb reflexes are more reliable and include the withdrawal reflex, patellar reflex, and cranial tibial reflex. Reflex responses should be scored from 0 to 4, as described in Table 8-4. Although not a limb reflex, the cutaneous trunci reflex can provide information regarding the integrity of spinal segments. It is performed by gently pinching the skin on either side of the lateral thorax, which should cause a twitching of superficial muscles. Pinching the anal mucosa should result in a reflex contraction of the anal sphincter muscles (the perineal reflex). Sensation should be tested in paralyzed limbs by aggressively pinching the bones of the toes with a hemostat. The animal with intact sensation will vocalize or try to bite. Note that pulling the leg back in flexion does not indicate normal sensation, but rather indicates an intact withdrawal reflex. The absence of sensation suggests a more severe lesion. The results of the complete neurologic examination should allow for an anatomic localization of the source of neurologic symptoms.
HISTORY AND PHYSICAL EXAMINATION OF LARGE ANIMALS
When a large animal patient is presented for an evaluation, a database that will become part of the medical record is generated. The history and physical examination are the most important part of the database and serve as the starting point for identifying the patient’s problems. After this initial information is collected, the database may be expanded to include laboratory tests, diagnostic imaging, and special examinations of body systems, depending on the purpose of the examination and the condition of the patient.
HISTORY
The husbandry practices, animal environments, and economic factors affecting large animals differ significantly from those of small animals; however, the basic approach to effective history taking is the same for both large and small animal patients. Experienced clients can provide an excellent history with little coaching, but most clients do not know how to give a concise, useful summary of their animal’s condition. The technician will need to ask specific questions to obtain relevant information and keep the information on an organized timeline. Once the history is obtained, the accuracy of the information must be evaluated since owners may unknowingly give inaccurate information, believing it to be true. Occasionally, owners provide false information to spare embarrassment, not wanting to appear ignorant or admit that they may have made a mistake in management of their animals.
Even though the history will focus on the chief clinical problem of an animal or group of animals, it is essential for the technician to keep the bigger picture of herd health and husbandry in mind when taking a history of large animal patients.
TECHNICIAN NOTE
The history of an individual animal is not complete without herd health information.
OWNER/AGENT INFORMATION
It is common for large animals to be attended by a person (or persons) other than the owner, such as a trainer, groomer, farmhand, stable owner, or lessee (animal lease agreements are not uncommon). It is important to determine the identity of the person presenting the animal and establish his or her relationship to the animal. If the owner is not present, it is necessary to obtain appropriate contact information so that the veterinarian can communicate with the owner. It is also important to determine who has the decision-making responsibility for the animal since owners may entrust the trainer or agent to make decisions about their animal’s treatment and care.
The insurance status of the animal should be determined. Although small animal insurance is becoming more commonplace, the economic value of certain large animals created a need many years ago for an insurance industry to protect owners’ investments. In particular, equine insurance is widespread in the United States, and valuable ruminant breeding stock is also often insured. Mortality insurance covers the value of the animal in case of death. Surgical insurance covers specific costs of surgery and hospitalization with some limitations—similar to human health insurance policies. Loss of use insurance states specifically the intended use of the animal (breeding, racing, etc.), and if the animal cannot perform its intended use because of illness or injury, the owner may be reimbursed for lost potential income. The insurance company’s and/or insurance agent’s contact numbers should be noted in the medical record since they may be involved in the decision-making process for the affected animal. The type of insurance policy and estimated economic value of the animal should also be recorded since these factors often play an important role in the diagnostic and treatment options provided for the animal.
SIGNALMENT OF THE ANIMAL
The signalment of the animal typically includes age, sex, breed, color, and reproductive status. This information helps to formulate the patient’s rule-out list of potential diagnoses since certain disease conditions have known predilections for subsets of the population according to signalment. For example, gray coat color in horses is associated with a higher incidence of melanomas than other coat colors; obstructive urolithiasis in ruminants is almost always associated with males; and β-mannosidase deficiency has only been reported in the Nubian breed of goats.
Another important part of the large animal signalment is the intended use of the animal; most large animals are kept for specific purposes, such as breeding, athletic performance, and commercial production of meat, milk, hair, or other products. The animal’s occupation may predispose it to certain diseases or injuries, such as the increased occurrence of osteochondral “chip” fractures in race horses versus pleasure horses and the higher incidence of mastitis in dairy cattle than beef cattle.
The terminology used by clients with large animals to describe their animals is species specific, and the technician should be familiar with the commonly used terms for the sex, age, and reproductive status of large animal species (Tables 8-5 and 8-6).
TABLE 8-5
Age/Sex Terminology for the Horse
| Foal | Young horse, from birth to weaning (weaning usually at 4-7 mo old) |
| Weanling | Young horse, from weaning to first birthday |
| Yearling | 1 yr-1½ yr |
| Long Yearling | 1½ yr to second birthday |
| Colt | Intact male between 2-3 yr old |
| Filly | Female between 2-3 yr old |
| Stallion | Intact male after third birthday |
| Mare | Female after third birthday |
| Gelding | Castrated male, of any age |
INDIVIDUAL HISTORY AND CHIEF COMPLAINT
The history is usually obtained before beginning the physical examination since it may contain helpful information for the examiner. However, in emergency situations, it may be necessary to evaluate and stabilize the animal before proceeding with details about the animal’s past. For example, an animal’s vaccination and deworming history have little immediate value for an animal in need of treatment for severe shock.
TECHNICIAN NOTE
In an emergency situation, it may be necessary to perform the physical examination before taking a detailed history.
The individual history includes two major components: the history of the current problem and a general history of the animal. The history of the current problem is usually taken first and includes the client’s chief complaint. The chief complaint is the primary reason for requesting an examination, though it is not always the animal’s primary problem. It is important to listen to the client and avoid any perception of discounting or disregarding their concerns. Once the chief complaint has been determined, the technician can then begin a more directed line of questioning to accurately characterize the problem in terms of duration, progression, severity, frequency, and response to therapy (if attempted). Further questioning will focus on the specific body systems affected by the current problem; in an animal with respiratory disease, the presence and character of a cough, nasal discharge, or respiratory noise are important to determine. Information on appetite, dental care, abdominal pain, and fecal volume and consistency is important in assessing an animal with GI disease.
The general history includes information on the animal before the development of the current problem. Typically, this includes information on diet, exercise, preventative health maintenance, reproductive status, and previous medical problems and surgical procedures. Large animal clients are more likely than small animal owners to purchase and administer vaccines and deworming medications. Food animal producers commonly perform minor surgical procedures on their animals, such as dehorning, tail docking, and castration.
MEDICATION AND TREATMENT HISTORY
Most large animal facilities keep first-aid kits and pharmaceuticals on the premises, and animals are often treated before calling the veterinarian. This situation is fairly common in large animal practice, especially with production animals where economics often dictate whether or not the owner calls the vet immediately or attempts to solve the problem themselves. Owners may be reluctant to admit this information and may need to be asked specifically whether they have treated the animal and what they have attempted for treatment.
HERD HEALTH HISTORY
Large animals are seldom kept as isolated individuals and commonly share resources with other large animals. Similarly, animals often receive preventative health maintenance, such as vaccination, deworming, and external parasite control as a group. Therefore after obtaining the individual history, it may be important to gain information on the size and nature of the group or herd and the resources that they share. Resources include not only food and water, but also shelter facilities and common land areas, such as pastures and pens.
TECHNICIAN NOTE
Large animals often share resources, such as food, water, shelter, and turnout areas, with other animals.
Animals may be grouped randomly, but, more commonly, large animals are grouped by age, sex, reproductive status, or other common attributes. If other animals are affected, the signalment of those animals can hold vital clues to the nature of the problem. Shared food, water, and grazing sources allow ready transmission of infectious agents and the widespread distribution of parasites and toxins. Even horses that are housed in individual stalls are usually placed in common turnout areas for daily exercise, where they may contact other animals and/or their fecal material. Herd conditions may also create competition for food and water that prevents some individuals from getting adequate nutrition.
The source of feed, hay, bedding, and water may not always be the farm on which the animals are kept. Under pasture conditions, stream, creek, or pond water may provide water for the animals’ use. The purity of such water sources may be affected by “upstream” agricultural activities and runoff. Commonly, feed, hay, and bedding are purchased and shipped to the farm from outside vendors, and their quality and content may not be guaranteed. For example, poisonous plants may be inadvertently harvested when hay is cut and baled, producing toxicity when animals consume it. In certain areas of the country, black walnut trees may be included in the production of wood shavings, but there are no labeling requirements for packaging; black walnut shavings may cause severe laminitis in horses when it is used for bedding.
A summary of basic large animals’ history information is presented in Box 8-1.
PHYSICAL EXAMINATION OF LARGE ANIMALS
Combined with a thorough history, the physical examination forms the basis for identifying a patient’s true problems. Most clinicians use a problem-oriented approach to diagnosis and treatment; this provides a logical method to work through the simplest to most complicated medical and surgical cases. Regardless of the size or species of animal, developing a consistent and systematic approach to a physical examination will increase the proficiency of the examiner and decrease the likelihood of overlooking important findings.
PHYSICAL EXAMINATION OF THE EQUINE
When an animal is presented for veterinary evaluation of medical or surgical problems, a physical examination is performed for diagnostic purposes. The diagnostic physical exam may range from a basic “TPR” examination to a thorough multisystem or system-specific evaluation, depending on the patient’s problems. In addition to the diagnostic type of physical examination, there are other types of “routine” physical examinations that horse owners may request for their horses. The insurance examination is required by the insurance company before a horse can receive insurance coverage. It may range from a basic physical exam to a thorough, in-depth examination of all body systems; the type of insurance and value of the animal will dictate the depth of exam required by the insurance company. The prepurchase examination is conducted before completing the sale of an animal and is a common procedure in equine practice. A seller and a buyer are identified, and the veterinarian performing the exam is presumed to be working in the buyer’s best interest (the veterinarian is paid by the buyer). Like the insurance examination, the scope of the prepurchase examination is dictated by the intended use of the horse and its estimated value; it may be a simple physical examination or an in-depth exam, including biopsies, blood samples, endoscopy, EKG and/or echocardiogram, and diagnostic imaging. Prepurchase examinations are often a source of lawsuits against the veterinarian; therefore veterinarians go to great lengths to document the findings of prepurchase examinations and not to overstate their findings as predictions of future performance. The technician should understand the potentially sensitive nature of insurance and prepurchase examinations and help ensure the accuracy and privacy of the results.
Getting Started
The basic physical examination always begins with observation of the animal from a distance. Good diagnosticians will take advantage of this opportunity to observe the animal before applying restraint and will consider the total picture of the horse and its environment. The attitude, alertness, and general body condition of the horse are noted. The movements of the horse provide an opportunity to observe lameness. If food and water are available, appetite, mastication, and swallowing reflexes can be observed. Interactions with other animals can also provide useful information.
After observing the horse and gauging its temperament, presence or absence of pain, and possible body systems that will need to be evaluated, the most appropriate method of physical restraint can be selected. All physical examinations begin with appropriate physical restraint. Physical restraint is necessary for the safety of personnel and the horse and facilitates the physical examination procedures. Depending on the body system (or systems) to be evaluated, the method of physical restraint may need to be changed during the examination. Chemical restraint may also need to be applied to supplement physical restraint of painful or uncooperative patients (refer to Chapter 7 for more information about restraint and handling of animals).
After proper restraint has been applied, the hands-on physical examination can begin. A basic physical examination typically includes temperature, pulse, and respiration (“TPR”); heart and lung auscultation; abdominal auscultation; hydration status; examination of mucous membranes; and height and weight measurement.
Body Temperature
A temperature is almost always taken rectally, using a standard mercury or digital thermometer. Rarely, a vaginal temperature may be used.
Although any thermometer may be used on large animals, thermometers designed strictly for large animals are commercially available. Large animal thermometers are typically 5 inches long and have a thicker glass casing than regular thermometers. In addition, they often include a “ring top”, which allows the user to attach a short (<12 inches) string. Strings are helpful for managing two commonly encountered situations: aspiration of the thermometer into the rectum and pushing the thermometer out of the rectum. Some horses may pull the anus inward while the thermometer is in place; occasionally, this results in aspiration of the entire thermometer into the rectum. This is potentially serious if the thermometer breaks inside the rectum or if the horse strains to defecate; perforation of the rectum may occur and can be life threatening. The presence of the thermometer in the anus may also stimulate defecation; if this occurs, the thermometer will be passed out of the rectum, fall to the ground, and break. Broken thermometer glass can puncture hooves or skin or may be eaten as the horse browses for food. Because of these complications, it is common either to maintain a firm grip on the thermometer for the entire procedure or tie a string to the ring top and secure the string to the horse’s tail hairs or hair coat (not the skin) with a clothespin or small alligator clamp. If the horse aspirates the thermometer, the string can be used to gently retrieve it or to follow the string manually into the rectum to retrieve it. If the horse pushes the thermometer out of the rectum, the secured string should prevent it from falling on the ground. Strings longer than 12 inches should be avoided; long strings allow the thermometer to dangle against the legs, which causes some horses to kick.
Inserting the rectal thermometer requires some tact. The thermometer should be lubricated with petroleum jelly, mineral oil, or water, but avoid dipping the thermometer in the horse’s water bucket; this practice gives the impression of disregard for sanitary procedure. Even if the thermometer has been properly disinfected, it is viewed by owners as a piece of equipment that has been in other horses’ rectums and has no place in their horse’s water bucket.
To insert the thermometer, stand next to the horse’s hindquarters, facing caudally (Figure 8-16). Never stand directly behind the horse. If the horse resists by kicking or appears agitated by manipulations of the tail and hindquarters, the technician can stand behind a stall door or a stack of hay bales for protection. Grasp the tail near the base and elevate it or push it to the opposite side of the horse; it is not necessary to force the tail into an extreme position, which will only be met with resistance by the horse. Move the tail only enough to get clear entrance to the anus (Figure 8-17). Some horses respond best to gentle rubbing of the perianal area before touching the anus with the thermometer, rather than thrusting the thermometer in the anus with no warning. The anal opening is identified either visually or by feel and the thermometer gently inserted with a twisting motion. If the thermometer does not easily advance, never force it; the rectal wall may be perforated with little effort. If the horse strains in resistance, try distracting it by offering feed or having someone tap on the horse’s forehead while the thermometer is being inserted. The thermometer usually enters horizontally, but some horses require tipping the thermometer slightly upward (dorsally) to enter the rectum.
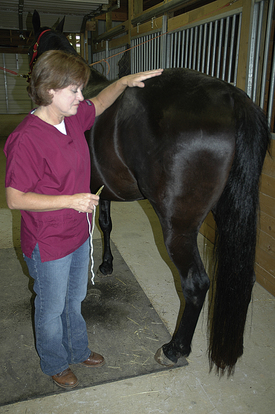
FIGURE 8-16 When taking rectal temperature, stand facing caudally, and maintain contact with the horse.
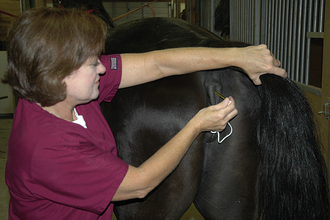
FIGURE 8-17 Grasp the tail at the base and move it gently to the side; the thermometer can then be inserted through the anus into the rectum.
TECHNICIAN NOTE
Rectal thermometers should be inserted and advanced into the rectum without using force.
The thermometer should be advanced several inches into the rectum, then either handheld or clipped to the tail hairs or coat hairs. It should be left in place for at least 60 seconds (mercury type) or until the audible or visual signal is heard or seen (digital type).
Normal rectal temperature varies by the age, breed, and environment of the animal. Body temperature is typically lowest in the morning. Normal rectal temperature of the adult horse at rest is 99.0° F to 101.5° F. From 101.5° F to 102.0° F is a “gray zone” and may be normal for some individuals, especially in hot weather. A temperature above 102.0° F is always suspicious, except following physical exercise, which can readily temporarily elevate temperature to this level and above. Normal values for TPR are given in Table 8-7.

Other factors may influence temperature. Large breeds and draft horses tend to have rectal temperatures at the lower end of the temperature range. Neonatal foals may lack the ability to generate body heat and often have low body temperatures immediately after birth. As heat-generating mechanisms develop, older foals may average approximately 1° higher than adults for the first few days to weeks after birth. Rectal procedures, such as a manual or endoscopic rectal examination, may allow air to enter the rectum, falsely lowering the rectal temperature; the temperature should be taken before any rectal procedure is performed.
If the rectum contains feces, the thermometer tip may sometimes be inadvertently inserted into a fecal ball. This is the most common cause of unexpectedly low readings. If this occurs, the procedure should be repeated.
Pulse Rate/Heart Rate
Strictly speaking, heart rate and pulse rate are not the same; heart rate refers to the number of heartbeats/min (beats/min [bpm]); pulse rate refers to the number of palpable arterial pulse waves/min. In normal animals, the heart rate and pulse rate are equal.
The pulse rate is taken by palpation of arteries. As blood passes from arteries through capillary beds, there is a dampening effect on arterial blood pressure fluctuations (waves); therefore veins do not have palpable pulses.
Auscultation of the heart is properly used for taking heart rate, not pulse rate. This is because some heart abnormalities may produce audible heart sounds that are not necessarily accompanied by an arterial pulse. For accuracy, when the heart is auscultated, the arterial pulse should be simultaneously palpated to be sure that every audible heartbeat is accompanied by a palpable pulse wave (Figure 8-18). If each audible heartbeat is not accompanied by a pulse wave, a condition called pulse deficit, the clinician should be notified.
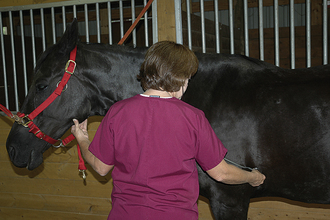
FIGURE 8-18 Simultaneous palpation of arterial pulse on the facial artery and auscultation of the heart for possible pulse deficit.
Arterial pulses may be palpated at several locations. The most convenient location is over the facial artery where it courses across the ventral aspect of the mandible, rostral to the origin of the masseter muscle (Figure 8-19). Two or three fingers are lightly rolled back and forth across the ventromedial aspect of the mandible just rostral to the masseter muscle to identify the facial artery and facial vein; these vessels lie side by side and form a tubular, compressible type of structure. Once identified, the vascular bundle is firmly pressed against the mandible to feel the arterial pulse (Figure 8-20). If the bundle is pressed too tightly, the artery may be occluded and the pulse not easily felt. Large animal heart rates are much lower than their small animal counterparts, often requiring more patience to identify a palpable pulse.
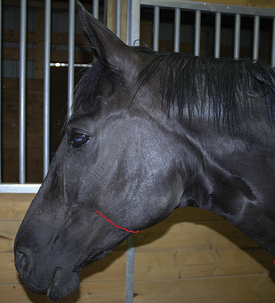
FIGURE 8-19 The facial artery courses along the rostral aspect of the masseter muscle and crosses the ventromedial aspect of the mandible.
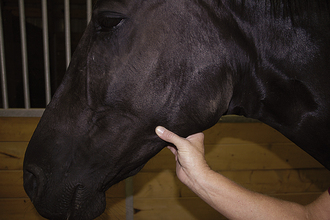
TECHNICIAN NOTE
The facial artery where it crosses the ventromedial aspect of the mandible is the most convenient location for obtaining the pulse rate.
Other arteries are available for obtaining pulse rates. The transverse facial artery is located in a horizontal depression about 1 inch caudal to the lateral canthus of the eye, just below the zygomatic arch (Figure 8-21). The coccygeal artery supplies the tail and is located along the ventral midline of the tail. The dorsal metatarsal artery is located between metatarsals 3 and 4 (cannon bone and lateral splint bone) on the hind limbs. The lateral and medial digital arteries can be palpated where they course over the abaxial aspect of the proximal sesamoid bones of each leg or just proximal to the collateral cartilages of each hoof (Figure 8-22). The carotid artery has a pulse wave, but it is difficult to accurately palpate in large animals because of its deep position and is seldom useful for palpation.
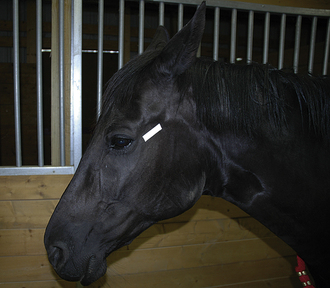
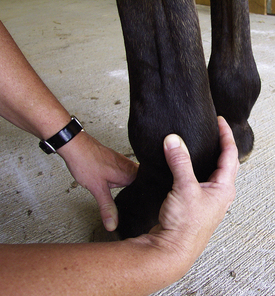
The main features of the pulse are rate and rhythm. The rate is recorded as number of beats/min (bpm). The pulse rate is normally 28 to 44 bpm in adult horses at rest. Foals have a rate of 60 to 80 bpm immediately after birth; this climbs to 75 to 100 bpm for the first week or 2 of life, then gradually declines toward the adult rate over the next several weeks to months. Athletically fit horses may normally have rates less than 28 bpm; 24 bpm is not uncommon in fit race horses.
The pulse rhythm is recorded as regular or irregular. Irregular rhythm likely indicates an arrhythmia of the heart. The most common cause of pulse irregularity in horses is second degree AV (atrioventricular) block, a heart arrhythmia caused by failure of the electrical current generated by the atria to reach the ventricles. There is an intermittent blockage of current at the AV node, resulting in “dropped” pulse beats. The dropped beats usually occur in a regular pattern; typically the dropped beat occurs every third or fourth heartbeat. Second degree AV block is readily identified by palpating the pulse. The regular rhythm is interrupted by a single “lost” (dropped) beat, with the “lost” beats occurring at regular intervals (beat-beat-beat-no beat-beat-beat-beat-no beat, etc.). Even though second degree AV block is usually considered to be a normal finding in horses, its presence should be noted in the medical record. Horses with this arrhythmia may have low resting heart rates, less than 28 bpm. Second degree AV block is more common in athletically fit horses and should disappear in any horse when the horse is exercised. It is believed to be caused by increased tone from the vagus nerve, part of the parasympathetic nervous system.
The pulse quality is often described as strong, bounding, weak, thready, or other nonspecific terms. The pulse quality is subjective; its usefulness depends on the experience of the person assessing the pulse and should not be overinterpreted.
Respiratory Rate
The number of respirations per minute can be counted several ways: (1) a stethoscope can be used to listen to air movements in and out of the trachea or chest; (2) a hand can be used to feel the movement of air in and out of a nostril; and (3) most commonly, visually counting chest excursions (rise and fall of the thoracic wall) per minute.
Respirations should be characterized by their effort and depth. Respirations may be described as shallow, deep, labored, gasping, and other nonspecific terms. Horses normally use a combination of thoracic and abdominal muscles to breathe; this is called costoabdominal breathing. Some painful conditions of the chest may lead to an increased use of the abdominal muscles to breathe, referred to as an increased abdominal effort in the respiratory pattern.
Normal horses cannot breathe through the mouth. If mouth breathing is observed, it should be noted and brought to the attention of the clinician.
Respiratory noises are not uncommon in horses and are often significant findings. Noises may be characterized as wheezing, whistling, honking, snoring, fluttering, etc. Noises may be heard only at rest or only during exercise. It is important to note the horse’s activity at the time the noise is heard. Equally important is to note whether the noise occurs during inspiration, expiration, or both.
The normal respiratory rate of an adult horse at rest is 6 to 12 breaths per minute. The rate is higher during hot weather or following physical activity. Foals have a high respiratory rate at birth as a result of the residual fluid in the lower airways. Newborn foals may have a respiratory rate from 80 to 90; this will slow to 60 to 80 in the first 5 to 10 minutes after birth and gradually decrease to 20 to 40 for the first week or 2 of life.
Heart Auscultation
Auscultation may be done on the left or right side of the chest, though most of the heart valves and sounds are heard best from the left side. However, the right side should not be overlooked; some murmurs are audible only on the right side and will be missed if the horse is auscultated only from the left.
Horses are athletes; the heart of the average horse may be as large as a basketball. The landmarks for basic auscultation of the heart are the same on either side of the chest. The landmarks for the dorsoventral position of the heart are the level of the shoulder joint for the heart base and the point of the elbow (olecranon) for the heart apex (Figure 8-23). The craniocaudal position is defined by the caudal border of the triceps muscle, which roughly divides the heart into cranial and caudal halves. Using these landmarks, the position of the heart can be estimated.
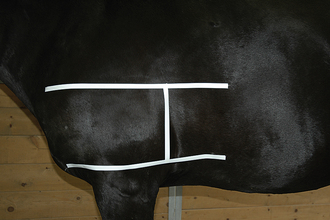
FIGURE 8-23 Landmarks for the heart: the horizontal marks indicate the level of the shoulder and elbow joints; the vertical mark indicates the caudal border of the triceps muscle.
Usually, heart sounds are easier to hear when auscultation is performed cranial to the caudal border of the triceps muscle. However, the triceps muscle is too thick to allow any heart sounds to be heard through it; the head of the stethoscope must be placed directly against the chest wall. To expose the chest wall at this location, the triceps muscle can be gently elevated away from the chest wall before the stethoscope is positioned (Figure 8-24). Another approach is to advance the forelimb to a more forward position, as if the horse were taking a step forward, which moves the triceps cranially. However, many horses are reluctant to hold this position for any length of time.
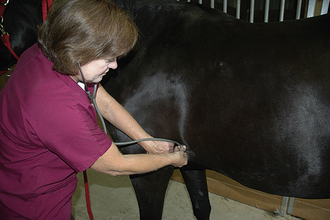
FIGURE 8-24 The triceps muscle is gently lifted away from the chest wall to provide access for the stethoscope.
The heart rate is counted as beats per minute. The cardiac sounds S1 (lub) and S2 (dub) are components of one heartbeat. A common error, especially for those accustomed to small animal auscultation, is to count S1 and S2 as separate beats, essentially doubling the actual heart rate. The heart rate in large animals is slow, and the heart sounds are usually loud and distinct, leading to the possible confusion.
Auscultation is also used to detect abnormal heart sounds. Murmurs are not uncommon in horses, though most murmurs in the horse are actually normal heart sounds and are simply the result of large volumes of blood moving at high speeds through the heart valves. Because of the large heart size, these sounds are amplified and are referred to as ejection murmurs. Ejection murmurs are commonly heard in horses and should disappear when the horse is exercised. True cardiac disease is unusual in horses, but will usually be accompanied by murmurs or other abnormal sounds.
Heart murmurs are assessed for loudness, character, and the timing of the murmur in the cardiac cycle (systolic, diastolic, or continuous). The horse may be exercised to see if the abnormal sound disappears, stays the same, or gets louder with exercise. Using these initial criteria, the veterinarian decides whether further evaluation of the cardiovascular system is warranted.
Lung Auscultation
Despite the large size of equine lungs, breath sounds may be difficult to hear. A quiet environment is important for an accurate evaluation. Lung auscultation should always be performed on both sides of the chest. Respiratory diseases do not necessarily affect both lungs and pleural cavities equally and can result in markedly different auscultation findings over the right and left lung fields of a single individual. Because of the large size of the lungs and possible uneven distribution of disease, auscultation findings may even vary over different areas of the same lung.
The borders of the lung fields are the same for the right and left sides of the chest and are outlined in Figure 8-25. The lung field basically consists of a cranioventral area and a caudodorsal area; a part of the cranioventral field is obscured by the shoulder musculature and cannot be heard. The stethoscope is placed in several locations within the lung field, listening to several breaths at each location (Figure 8-26). Normally, air movement in and out of the airways should be heard with each chest excursion; sounds may be amplified in foals, thin animals, and in any animal after exercise. Occasionally, it is desirable to induce deep breathing to accentuate lung sounds; this is easily accomplished by occluding the nostrils temporarily until the horse begins to object to the lack of air; at the first sign of discomfort, the examiner releases the nostrils and immediately moves to auscultate the chest. Abnormal respiratory sounds include wheezes, crackles, and gurgling, moist sounds; the absence of breath sounds may also be significant. The veterinarian should be alerted when abnormal sounds are detected.
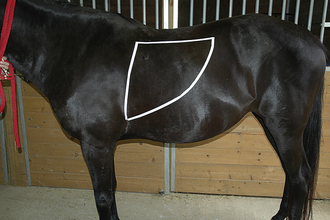
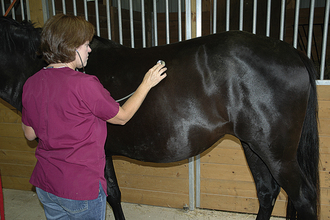
Abdominal Auscultation
A stethoscope is used to listen to abdominal sounds, which are created by movements of the intestines. This is commonly referred to as gastrointestinal motility or GI motility. In reality, this term is a misnomer because some sounds are generated by the passive movement of gas and liquids in the intestines without actually being propelled by the intestinal musculature. It is not completely accurate to assume that all intestinal sounds are due to functional intestines. This becomes important in the patient with GI disease; diseased portions of intestine may have little or no purposeful motility, yet passive fluid and gas sounds may be heard. Experience is required to distinguish active motility from passive sounds.
Abdominal auscultation should be performed on both sides of the horse. Although auscultation can be performed at any location on the abdominal wall, the common sites for auscultation are in the areas known as the right and left “flanks.” The flank is the slightly depressed area between the pelvis and the caudal margin of the rib cage. The point of the hip (tuber coxae) identifies the dorsal extent of the flank area (Figure 8-27). Horses may be sensitive in the flank and abdominal regions, so these areas should be approached slowly and gently. A good approach is to place the hand with the stethoscope on the horse’s back and slowly slide it to the flank or lower abdominal area.
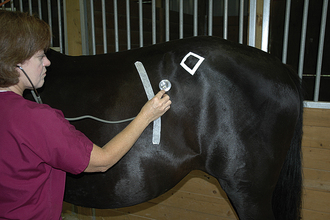
FIGURE 8-27 Landmarks for abdominal auscultation in the flank area are the point of the hip (tuber coxae) and the last rib.
A standard four-point auscultation is sufficient for most patients. A stethoscope is used to auscultate the upper flank and the lower flank on both sides of the abdomen. The four points of auscultation are referred to as upper left, upper right, lower left, and lower right abdominal quadrants (Figure 8-28). Intestinal motility sounds, also called borborygmi, have been described as sounding like thunder rumbling or an approaching freight train. These sounds are usually associated with coordinated, normal patterns of large intestinal motility. The number of borborygmi per minute is counted in each abdominal quadrant; the stethoscope should be left in place for at least 1 minute at each of the four auscultation points to get an accurate count. “Normal” motility is considered to be one to three borborygmi per minute in each abdominal quadrant. More than this is considered to be hypermotility, and less than this rate is considered to be hypomotility. The complete absence of borborygmus is equated with “intestinal standstill,” properly termed ileus. Ileus often indicates serious intestinal disease and is associated with increased morbidity and mortality in horses with colic. Auscultation in colic patients may be confusing because gas and fluid “tinkling” sounds may still be heard in horses with complete ileus. These are passive sounds and should not be confused with the motility of normally functioning intestines.
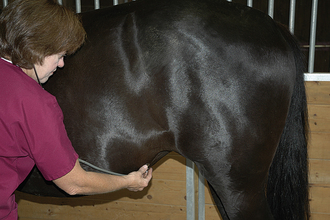
The findings of four-point abdominal auscultation are recorded in the medical record using the grid system in Box 8-2.
BOX 8-2 Four-Point Abdominal Auscultation
Findings from the four-point auscultation are recorded in the medical record using a grid that identifies each abdominal quadrant.
Results of auscultation at each location are recorded as follows:
For example, a horse with hypomotility in the lower right quadrant and a normal number of borborygmi in all other quadrants would be recorded as follows:

Mucous Membranes
Mucous membranes are tissues that have the ability to produce and secrete mucus. The mucous membrane color is helpful for disease diagnosis. There are several mucous membranes that are readily visible to the examiner: the gums (gingiva), conjunctiva of the eye, lining of the nostrils, and inner surfaces of the vulva in females (Figures 8-29 and 8-30). The inner surface of the ear pinna is not a mucous membrane, though it may be useful for detecting icterus and clotting disorders.
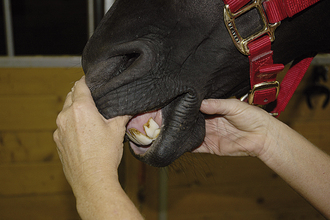
FIGURE 8-29 Examination of the gums. The upper lip is gently elevated to the extent necessary to see the gum tissue.

FIGURE 8-30 Examination of the conjunctiva. The upper lid is gently elevated upward, without pinching or pressing.
The mucous membrane color is usually light to dark pink. The color may change with abnormalities of blood perfusion and the oxygen content of the blood and other diseases. Cyanosis is a bluish tint that usually indicates extremely low oxygen content in the tissue. Brick red coloration indicates bacterial septicemia and/or septic shock. Endotoxic shock in the horse has the unique characteristic of producing a purple gum color that appears along the margin of the teeth and gums; this is commonly referred to as a toxic line. Yellowish coloring of the gums indicates icterus, usually resulting from liver dysfunction or abnormal hemolysis of red blood cells. Pale mucous membranes may indicate anemia or poor perfusion, though many normal horses have naturally pale pink gum color. Clotting disorders may produce visible hemorrhage in mucous membranes. Small pinpoint hemorrhages less than 1 mm in diameter are called petechial hemorrhages or petechiae; ecchymotic hemorrhage produces slightly larger hemorrhages 1 mm to 1 cm in diameter.
Mucous membranes are often assessed for moisture and are commonly described as moist, dry, tacky, or other subjective terms. This information is less useful than the membrane color.
Hydration Status
The hydration status of an animal is important information. It may be measured with laboratory tests or estimated from the physical exam. Two common methods of assessing the hydration of an animal on a physical examination are the skin turgor test and the capillary refill time.
The skin turgor is assessed by the skin pinch or skin snap test. The loose skin over the lateral aspect of the neck is briefly and firmly pinched with the fingers and allowed to retract back to its original position. In normally hydrated animals, the skin should return (“snap”) promptly back to its original position in approximately 1 second or less. Dehydration (>5% dehydration) prolongs the response to greater than 1 second. Severely dehydrated animals may take 8 seconds or longer for the skin to retract. The skin turgor is less reliable in obese animals; fat in the cervical area may falsely improve the skin snap. Conversely, thin horses and horses older than 15 years may have delayed skin snap response, regardless of hydration status.
The capillary refill time (CRT) is a reflection of cardiac output, which is directly affected by hydration status. Prolonged CRT is usually associated with low cardiac output, which is most commonly caused by inadequate hydration of the animal. Low cardiac output can also result from decreased heart function. The CRT is assessed by pressing briefly but firmly on the gums with a fingertip to produce a “blanched” white spot. The time for the original gum color to return to the blanched spot is counted in seconds. The original color should return in less than 2.5 seconds. A CRT greater than 2.5 seconds is considered abnormally delayed. Dehydration and shock are the most common causes of a prolonged CRT in the horse. Severe dehydration and severe shock may produce a greatly prolonged CRT, from 5 to 8 seconds.
Height/Weight Measurement
Height and weight measurements are needed for a variety of purposes. A height measurement may be required as part of an insurance or prepurchase examination, for breed registration, or for entry into certain horse show classes. The weight measurement is usually obtained for calculating the proper dose of drugs and therapeutic substances and for formulating the diet of the animal.
Height may be estimated or measured precisely. Rough estimates may be made with a height-weight tape. This instrument is essentially a tape measure, marked on one side for height measurement in hands (1 hand = 4 inches) and for weight measurement on the other side. Ideally the horse should stand on a firm, level surface with its weight distributed evenly on all four legs. The horse’s head should not be elevated or lowered, but should be in a horizontal position with the neck parallel to the ground. One end of the measuring tape is held on the ground just behind the horse’s forelimb. The tape is then stretched vertically to the withers and the height read at the level of the highest point of the withers. The tape gives an approximation of the animal’s height.
For precise determination of height, commercially-made rigid measuring rulers are available. These rulers are made of metal and include bubble-style levels to ensure that the ruler is not tilted when the measurement is taken. The animal should stand squarely on a firm, level surface with the head and neck held parallel to the ground. The measurement is taken at the last mane hair or highest point of the withers, depending on the breed registry or rules of competition.
Weight may be roughly estimated with the height-weight tape or taken more precisely with a livestock scale. The height-weight tape has one side that is calibrated for weight measurement; the weight tick marks are based on measurements around the girth of the horse. The tape is applied to encircle the horse at its girth, which is the area caudal to the withers and just behind the forelimb (Figure 8-31). The weight tape is formulated from logarithms of “normal” animals and may be inaccurate for excessively thin or obese animals. The build of an animal may also affect the results. Height-weight tapes designed for cattle are not accurate for horses.
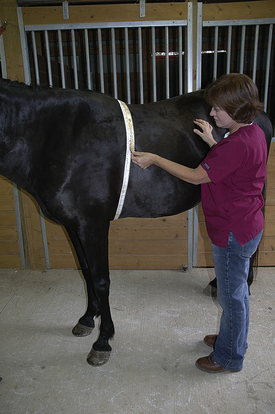
FIGURE 8-31 The weight tape is positioned around the thorax at the girth, just caudal to the withers.
Precise weights for large animals may be obtained with livestock scales. Digital livestock scales have a walk-over design and are popular at many hospitals and practices. Traditional livestock scales are somewhat cumbersome to use and have largely been replaced by digital walk-over scales.
PHYSICAL EXAMINATION OF RUMINANTS
The physical examination begins with an initial visual observation of the animal from a distance. The animal’s posture, behavior, body condition, and alertness are easily observed. More specific signs, such as breathing pattern, respiratory noise, lameness, skin wounds, and muscle atrophy, may also be noted. When working with any species, some understanding of basic instincts and typical behaviors is essential to interpreting what is seen through observation. Although ruminants share many physiologic traits, they do not share a common “mentality,” and the behavioral differences among the various ruminant species must be appreciated. This is especially important when observing an individual’s interactions with the herd.
TECHNICIAN NOTE
Valuable information can be obtained by observing an animal from a distance before the physical examination.
The direct “hands-on” physical examination typically includes the “TPR,” heart and lung auscultation, abdominal auscultation and assessment of rumen function, hydration status, and examination of mucous membranes. Animals must be adequately restrained for this portion of the physical examination, and the methods of restraint used for cattle, sheep, and goats are quite different. Cattle are typically restrained in a chute, whereas sheep and goats are usually restrained manually (see Chapter 7 for more information on restraint of large animals).
A temperature is taken rectally, similar to the procedure in horses. When taking the rectal temperature of the goat, a dark brown, waxy material may be seen near the anus; this is a normal secretion produced by sebaceous glands under the tail head. The pulse can be palpated readily at the facial artery; the coccygeal, median (forelimb), and great metatarsal (hind limb) arteries are also available (Figure 8-32). The femoral artery is useful in sheep and goats. The respiratory rate is best taken by counting chest excursions from a distance before herding or handling; the excitement and fear of herding and restraint can cause dramatic increases in respiratory rate, especially in hot environmental temperatures, that will not reflect the true respiratory rate of the animal at rest. Ruminants, unlike horses, are capable of open-mouth breathing; when observed, it is usually considered to be a sign of distress or heat stress (usually when environmental temperature exceeds 85° F). Abdominal breathing is normal in ruminants. Normal values for TPR are given in Table 8-7.
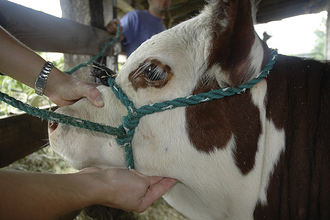
FIGURE 8-32 Palpation of the arterial pulse at the facial artery where it crosses the ventromedial aspect of the mandible.
Heart auscultation is performed using the same anatomic landmarks as in the horse. The shoulder joint and the olecranon indicate the dorsal-ventral position of the heart. The caudal border of the triceps muscle indicates the cranial-caudal position, generally corresponding to the fourth to fifth intercostal space. Auscultated cardiac sounds are normally only S1 and S2 in cattle (unlike the horse where any combination of S3 and S4 may accompany S1 and S2). The borders for lung auscultation in the ruminant are between the fifth rib cranially and the eleventh rib caudally. If it is necessary to induce deep breathing for lung auscultation, the nostrils and mouth (since ruminants can mouth breathe) can be held closed for about a minute to stimulate deeper breathing and a higher respiratory rate.
The mucous membranes should be pink and moist, with a CRT of 1 to 2 seconds (Figure 8-33). If it is necessary to fully open the mouth for an examination, placing the fingers into the interdental space and pressing on the hard palate encourages opening of the mouth; the tongue can be quickly grasped and brought to the side at the commissure of the lips, where it encourages the animal to keep the mouth open. Alternatively a mouth speculum may be used. The tongue of cattle has a single deep transverse groove across its dorsal surface; this groove is often mistaken for a laceration. The molars of ruminants may be sharp and jagged, and caution must be used whenever the hands are placed into the mouth. When examining the head and mouth area, be aware of the possibility of being struck with the head if it is not properly restrained. Adult cattle especially can cause serious injury from striking with the head.
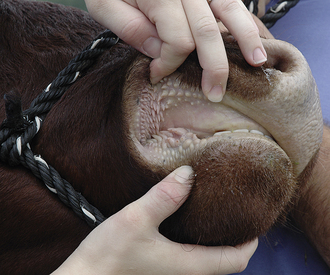
When standing near a ruminant or when auscultating the thorax or trachea, occasional low-pitched fluttering sounds may be heard; this is eructation (burping), which is normal in ruminants. Eructation rates are approximately 18/hr in cattle, and 10/hr in sheep and goats.
The evaluation of the ruminant abdomen includes an assessment of rumen contractions. The rumen occupies most of the left side of the abdominal cavity. The number of rumen contractions per minute may be counted by auscultation directly over the caudolateral rib cage or paralumbar fossa on the left side. Rumen contractions sound like a deep-pitched rumbling or “thunderstorm” noise, which gets gradually louder as the contraction wave approaches the stethoscope. Rumen contractions can also be counted by ballottement (palpation) by pressing both fists firmly into the left paralumbar fossa (use one fist in the sheep and goat). The fists are allowed to remain against the body wall for 1 minute. Each rumen contraction will be felt as a wave passing under the hands, pushing the hands slightly outward. The normal animal will have 1 to 2 contractions/min. Hypomotility and the absence of motility (ileus) are abnormal findings; hypermotility of the rumen is uncommon. Auscultation of the right side of the abdomen usually reveals few sounds; this is normal in ruminants.
The shape of the abdomen is observed by standing behind the animal, facing the head, and comparing the right and left abdominal outlines or “silhouettes.” The overall shape of the right and left abdominal outlines should be similar, with the overall outline of the cow resembling a pear (wider at the lower flanks than at the paralumbar fossae) (Figure 8-34). The paralumbar fossae should be normally flat or slightly sunken. The accumulation of gas within certain portions of the GI tract (tympany or “bloat”) can produce asymmetry and enlargement of the abdominal wall. The most common location for bloat, the rumen, appears as an enlargement of the left paralumbar fossa; this has been referred to as a “papple”-shaped abdomen, where the left side resembles an apple and the right side a pear. Severe abdominal gas accumulation can cause protrusion of the paralumbar fossa on both sides of the animal, changing the normal pear shape to one that resembles an apple.
FIGURE 8-34 Normal “pear” abdominal shape of the cow as viewed from behind. As a result of the anatomic location of the rumen, the left side may appear slightly fuller than the right.
TECHNICIAN NOTE
The abdominal “silhouette,” viewed from behind the animal, provides useful diagnostic information for possible GI diseases.
Gas accumulations can also be detected by simultaneous percussion and auscultation, a technique commonly known as abdominal pinging. The stethoscope is held in place with one hand, while the other hand is used to snap a finger against the abdominal wall at several locations around the stethoscope head (Figure 8-35). Gas accumulations make a resonant tympanic “ping” sound, like a high-pitched drum. Pings are significant findings and generally indicate abnormal position or contents of one or more GI tract organs. Note that solid organs and non-GI organs cannot accumulate gas (with the exception of the uterus, which is extremely rare) and do not create pings. Pinging should be performed on both sides of the abdomen and may detect abnormalities before they are visible as external enlargement of the abdomen.
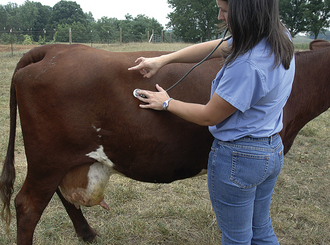
FIGURE 8-35 Proper technique for abdominal “pinging.” The stethoscope is held in place while snapping a finger sharply against the abdominal wall in the vicinity of the stethoscope head.
The character of feces and urine, if available for observation, should be evaluated. Fecal character varies among the ruminants. Cattle defecate 12 to 18 times/day; the feces have a semisolid “cow-plop” or “cow-pie” consistency, without distinct form. Goats produce well-formed feces in the shape of small, solid pellets. Sheep feces are also pelleted. The color of the feces depends on the diet, ranging from green to dark brown. Undigested roughage fibers in the fecal material are an abnormal finding and may indicate dysfunction of the rumen and/or reticulum.
Fubini, S.L., Ducharme, N.G. Farm animal surgery. Philadelphia: WB Saunders; 2004.
Hanie, E.A. Large animal clinical procedures for veterinary technicians. St Louis: Mosby; 2006.
McCurnin, D.M., Poffenbarger, E.M. Small animal physical diagnosis and clinical procedures. Philadelphia: WB Saunders; 1991.
Pugh, D.G. Sheep and goat medicine. Philadelphia: WB Saunders; 2002.
Smith, M.C., Sherman, D.M. Goat medicine. Baltimore: Williams & Wilkins; 1994.
Speirs, V.C. Clinical examination of horses. Philadelphia: WB Saunders; 1997.