Joint Range of Motion
Principles and procedures in joint measurement
Results of assessment as the basis for planning intervention
Procedure for measuring passive range of motion
After studying this chapter, the student or practitioner will be able to do the following:
1 Define active, passive, and functional range of motion (ROM).
2 List the purposes of measuring ROM.
3 Name two methods used to screen for ROM limitations.
4 Name disabilities for which joint measurement is often an assessment tool.
5 Describe how ROM measurements are used to select intervention goals and methods.
6 Describe how to establish ROM norms for clients with unilateral involvement.
7 Describe what the therapist should do before actually measuring the joints with the goniometer.
8 Describe proper positioning of the therapist and methods to support limbs.
9 List precautions for and contraindications to joint measurement.
10 List and describe the steps in the joint measurement procedure in correct order.
11 Describe how to record results of the joint measurement.
12 Measure all the joints of a typical practice subject by using the 180-degree method and correct procedure.
13 Describe at least three intervention strategies that can be used to increase ROM.
 Threaded Case Study
Evelyn, Part 1
Evelyn is an 83-year-old woman who sustained a Colles fracture when she fell on her outstretched, nondominant left hand in an attempt to break her fall after tripping on a doorstop as she exited a building. The fracture was reduced, and Evelyn was placed in a hand-to-below-elbow cast for 6 weeks. On removal of the cast, Evelyn’s wrist and hand appeared swollen. She complained of pain and stiffness in the carpometacarpal and metacarpal joints of her thumb and the metacarpophalangeal and proximal interphalangeal joints of her fingers. She was unable to make a fist or oppose her thumb to her fingers.
Evelyn is a widow; her two grown children live nearby. Before her injury she was independent in all activities of daily living and the majority of instrumental activities of daily living. She used public transportation to move around her community, although her children and friends usually drove her to appointments. Evelyn volunteered at the local hospital weekly in its telecare program and called elderly, home-bound persons. She is an accomplished seamstress, makes all of her own clothing, and attends a weekly sewing class, primarily for the camaraderie of the other students, although she states, “There is always something new to learn.” She also enjoys baking for her family, gardening, and generally engaging in tasks that contribute to the upkeep of her home. She attends church regularly and enjoys dining out with friends and family members.
Since her injury, her ability to participate in occupations that are meaningful to her has been curtailed. She requires moderate to maximal assistance to hold a eating utensil in her left hand while cutting food with her right, wash and groom her hair, put on jewelry, bathe the right side of her body, transfer out of the bathtub, and engage in home maintenance tasks (e.g., changing bed linen). At her volunteer work site, she is unable to hold the telephone with her left hand while writing with her right hand. When cooking, she has difficulty stabilizing bowls, pots, and pans with her left hand while manipulating a cooking utensil with her right. Evelyn is experiencing a great deal of frustration with her loss of independence and inability to fully engage in occupations that got her out in the community and facilitated interaction with others.
In reviewing Evelyn’s occupational profile, the occupational therapist must focus on client factors that are interfering with function. Loss of range of motion (ROM) in her left upper extremity, especially the inability to flex the fingers to make a fist and oppose the thumb to the fingers, which is required for fine motor activities, is prohibiting the client from fully engaging in the physical, social, personal, cultural, and spiritual contexts that bring meaning to her life. Before determining intervention goals and strategies, the therapist must assess her ROM limitations to establish a baseline for treatment. While reading and studying this chapter, keep in mind Evelyn’s ROM limitations and the restrictions that they impose on her engagement in occupation.
1. Why should the occupational therapist proceed with caution when assessing the ROM limitations of this client?
2. What is the appropriate sequencing of joint measurement assessment for this client? What methods should be applied first?
3. What is the advantage of joint measurement in evidence-based practice?
Joint ROM is the amount of movement that is possible at a joint.3 It is the arc of motion through which a joint passes when moving within a specific plane. When the joint is moved by the muscles that act on the joint, it is called active range of motion (AROM). When the joint is moved by an outside force such as the therapist, it is called passive range of motion (PROM).3 In normal individuals, PROM is slightly greater than AROM because of the slight elasticity of soft tissue.3,10 The additional PROM that is available at the end of normal AROM helps protect joint structures because it allows the joint to give and absorb extrinsic forces. If PROM is significantly greater than AROM for the same joint motion, it is likely that muscle weakness is present.13
Decreased ROM can cause limited function and interfere with performance in areas of occupation. Limitations in ROM may occur as a result of injury to or disease in the joint itself or the surrounding joint tissue structures, joint trauma, or joint immobilization. These limitations may restrict the client’s ability to perform successfully in chosen day-to-day occupations. Inflexibility at a joint may adversely affect both speed and strength of movement. A client who constantly has to work to overcome the resistance of an inflexible joint will probably demonstrate decreased endurance and fatigue during activity. The functional motion test (see Chapter 20), screening tests, and measurement of joint ROM with a goniometer can all be used to assess ROM.
 OT Practice Notes
The primary concern of the occupational therapist is whether ROM is adequate for the client to engage in meaningful occupations.
Methods used to screen limitations in ROM involve the observation of AROM and PROM. To screen for AROM, the therapist asks the client to perform all the active movements that occur at the joint.3 To screen for PROM, the therapist moves the joint passively through all of its motions. The purpose of this is to estimate ROM, detect limitations, and observe the quality of movement, end-feel, and the presence of pain.3 The therapist can then decide at which joints precise ROM measurement is indicated.
Joint Measurement
Body function is a client factor that the occupational therapist must consider when classifying the client’s underlying abilities. The therapist will be concerned with the client’s ability to retrieve dishes from a cupboard, reach above shoulder level to shampoo hair, or depress the gas and brake pedals in an automobile. Joint measurement is an assessment tool often used for physical disabilities that cause limited joint motion. Such disabilities include skin contracture caused by adhesions or scar tissue; arthritis, fractures, burns, and hand trauma; displacement of fibrocartilage or the presence of other foreign bodies in the joint; bony obstruction or destruction; and soft tissue contractures, such as tendon, muscle, or ligament shortening. Limited ROM can also be secondary to spasticity, muscle weakness, pain, and edema.8,13
ROM measurements help the therapist select intervention goals, appropriate intervention modalities, positioning techniques, and other strategies to reduce limitations. Specific purposes for measuring ROM are to determine limitations that interfere with function or may produce deformity, determine additional range needed to increase functional capacity or reduce deformity, determine the need for splints and assistive devices, measure progress objectively, and record progression or regression. The use of formal joint measurement will assist in determining the efficacy of intervention modalities and may also serve as evidence in assisting the client to see the outcome of the intervention through quantifiable data.
Normal ROM varies from one person to another. The occupational therapist can establish norms for each individual by measuring the analogous uninvolved part if possible.3,4 Otherwise, the therapist uses average ranges listed in the literature as a guide.3 The therapist should check records and interview the client to detect the presence of fused joints and other limitations caused by old injuries. Joints should not be forced when resistance is met on PROM. Pain may limit ROM, and crepitation may be heard with movement in some conditions. Therefore, before beginning joint measurement procedures, the therapist must explain what will be done and ask the client if he or she is experiencing any joint pain and, if so, where it is located and how severe it is. To not cause undue pain, the occupational therapist further explains to the client the importance of indicating any changes in pain throughout the procedure.
Principles and Procedures in Joint Measurement
Before measuring ROM, the therapist should be familiar with average normal ROM ranges, joint structure and function, normal end-feel, recommended positioning for self and the client, and bony landmarks related to each joint and joint axis.3,4,10 The therapist should be skilled in correct positioning and stabilization for measurements, palpation, alignment and reading of the goniometer, and accurate recording of measurements.10 For the most reliable measurements, the same therapist should assess and reassess the client at the same time of day with the same instrument and the same measurement protocol.3
Visual Observation
The joint to be measured should be exposed, and the therapist should observe the joint and adjacent areas.3 The therapist asks the client to move the part through the available ROM, if muscle strength is adequate, and observes the movement.4 The therapist should look for compensatory motions, posture, muscle contours, skin color and condition, and skin creases and compare the joint with the noninjured part, if possible.3 The therapist should then move the part through its range to see and feel how the joint moves and to estimate ROM.
Palpation
Feeling the bony landmarks and soft tissue around the joint is an essential skill gained with practice and experience. The pads of the index and middle fingers are used for palpation. The thumb is sometimes used. The therapist’s fingernails should not make contact with the client’s skin. Pressure is applied gently but firmly enough to detect underlying muscle, tendons, or bony structures. For joint measurement, the therapist must palpate to locate bony landmarks for placement of the goniometer.3
Positioning of Therapist and Support of Limbs
The therapist’s position varies, depending on the joints being measured. When measuring finger or wrist joints, the therapist may sit next to or opposite the client. If sitting next to the client, the therapist should measure the wrist and finger joints on that side and then move to the other side to measure the joints on the client’s opposite side. This procedure makes the client more comfortable (eliminating the need to stretch across the midline) and ensures more accurate placement of the goniometer. When measuring the larger joints of the upper or lower extremity, the therapist may stand next to the client on the side being measured. The client may be seated or lying down. The therapist needs to use good body mechanics in posture and in lifting and moving heavy limbs. The therapist should use a broad base of support and stand with the head upright while keeping the back straight. The feet should be shoulder width apart, with the knees slightly flexed. The therapist’s stance should be in line with the direction of movement. The limb should be supported at the level of its center of gravity, approximately where the upper and middle thirds of the segment meet. The therapist’s hands should be in a relaxed grasp that conforms to the contours of the part. The therapist can provide additional support by resting the part on his or her forearm.3
Precautions and Contraindications
In some instances, measuring joint ROM is contraindicated or should be undertaken with extreme caution. It is contraindicated if there is a joint dislocation or unhealed fracture, immediately after surgery on any soft tissue structures surrounding joints, in the presence of myositis ossificans, or when ectopic ossification is a possibility.3
Joint measurement must always be done carefully. The following situations call for extreme caution:
1. The client has joint inflammation or an infection.
2. The client is taking either medication for pain or muscle relaxants.
3. The client has osteoporosis, hypermobility, or subluxation of a joint.
6. The client has just sustained an injury to soft tissue.
7. The client has a newly united fracture.
8. The client has undergone prolonged immobilization.
9. Bony ankylosis is suspected.
10. The client has carcinoma of the bone or any fragile bone condition.3,9
End-Feel
PROM is normally limited by the structure of the joint and surrounding soft tissues. Thus, ligaments, the joint capsule, muscle and tendon tension, contact of joint surfaces, and soft tissue approximation may limit the end of a particular ROM. Each of these structures has a different end-feel as the therapist moves the joint passively through its ROM. End-feel is the normal resistance to further joint motion because of stretching of soft tissue, stretching of ligaments and joint capsule, approximation of soft tissue, and contact of bone on bone. End-feel is normal when full ROM is achieved and the motion is limited by normal anatomic structures. Abnormal end-feel occurs when ROM is increased or decreased or when ROM is normal but structures other than normal anatomy stop the ROM.3 Practice and sensitivity are required for the therapist to detect different end-feels and to distinguish normal from abnormal.3,10
End-feel is normally hard, soft, or firm. An example of hard end-feel is bone contacting bone when the elbow is passively extended and the olecranon process comes into contact with the olecranon fossa. Soft end-feel can be detected on knee flexion when there is soft tissue apposition of the posterior aspects of the thigh and calf. A firm end-feel has a firm or springy sensation that has some give, as when the ankle is dorsiflexed with the knee in extension and ROM is limited by tension in the gastrocnemius muscle.3
In pathologic states, end-feel is abnormal when PROM is increased or decreased or when PROM is normal but movement is stopped by structures other than normal anatomy.3 Practice and experience are required to detect end-feel accurately. Normal end-feel for each joint is noted along with the directions for joint measurement that are listed in the following sections.
Two-Joint Muscles
When the ROM of a joint that is crossed by a two-joint muscle is measured, the ROM of the joint being measured may be affected by the position of the other joint because of passive insufficiency.3 In other words, joint motion is limited by the length of the muscle. A two-joint muscle feels taut when it is at its full length over both joints that it crosses and before it reaches the limits of the normal ROM of both joints.7 For example, when the wrist is in full extension, passive finger extension is normally limited because of passive insufficiency of the finger flexors that cross the wrist and finger joints. When joints crossed by two-joint muscles are being measured, it is necessary to place the joint not being measured in a neutral or relaxed position to place the two-joint muscle on slack. For example, when finger extension is being measured, the wrist should be placed in neutral position to avoid full stretch of the finger flexors over all of the joints that they cross. Similarly, when hip flexion is being measured, the knee should also be flexed to place the hamstrings in the slackened position.3
Methods of Joint Measurement
In the 180-degree system of joint measurement, 0 degree is the starting position for all joint motions. For most motions, the anatomic position is the starting position. The body of the measuring instrument, the goniometer, is a half-circle protractor with an axis and two arms. It is superimposed on the body in the plane in which the motion is to occur. The axis of the instrument is aligned with the axis of the joint. All joint motions begin at 0 degree and increase toward 180 degrees.3,5,10 The 180-degree system is used most often and is the one used later in this chapter to describe procedures for joint measurement.
The 360-Degree System
The 360-degree system of joint measurement is used less frequently than the 180-degree system. The goniometer is a full-circle, 360-degree protractor with two arms. Movements occurring in the coronal and sagittal planes are related to the full circle. When the body is in the anatomic position, the circle is superimposed on it in the same plane in which the motion is to occur, with the joint axis being the pivotal point. “The 0-degree (360-degree) position will be overhead and the 180-degree position will be toward the feet.”5 Thus, for example, shoulder flexion and abduction are movements that proceed toward 0 degree, and shoulder adduction and extension proceed toward 360 degrees. The average normal ROM for shoulder flexion is 170 degrees. Therefore, in the 360-degree system, the movement would start at 180 degrees and progress toward 0 to 10 degrees. The ROM recorded would be 10 degrees. On the other hand, shoulder extension that has a normal ROM of 60 degrees would begin at 180 degrees and progress toward 360 to 240 degrees, and 240 degrees would be the ROM recorded.5 The total ROM of extension to flexion would be 240 to 10 degrees—that is, 230 degrees.5,6
Some motions cannot be related to the full circle. In these instances, a 0-degree starting position is designated, and the movements are measured as increases from 0 degree. These motions occur in a horizontal plane around a vertical axis. They are forearm pronation and supination, hip internal and external rotation, wrist radial and ulnar deviation, and thumb palmar and radial abduction (carpometacarpal flexion and extension).5
Goniometers
Usually made of metal or plastic, goniometers come in several sizes and types and are available from medical and rehabilitation equipment companies.5,10,12 The word goniometer is derived from the Greek gonia, which means angle, and metron, which means measure.9,14 Thus, goniometer literally means “to measure angles.”
The universal goniometer (Figure 21-1) consists of a body, a stationary (proximal) bar, and a movable (distal) bar.3,10 The stationary bar is attached to the body of the goniometer. The body is a half-circle or a full-circle protractor printed with a scale of degrees from 0 to 180 for the half-circle and 0 to 360 for the full-circle goniometer.3,4 The movable bar is attached at the center, or axis, of the protractor and acts as a dial. As the movable bar rotates around the protractor, the dial points to the number of degrees on the scale.
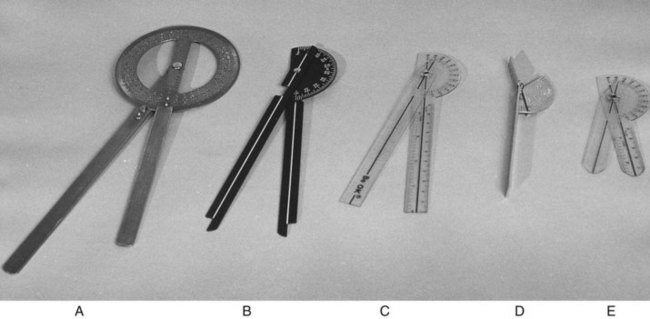
Two scales of figures are printed on the half circle. Each starts at 0 degree and progresses toward 180 degrees, but in opposite directions. Because the starting position in the 180-degree system is always 0 degree and increases toward 180 degrees, the outer row of figures is read if the bony segments being measured are end to end, as in elbow flexion. The inner row of figures is read if the bony segments being measured are alongside one another, as in shoulder flexion.
Figure 21-1 shows five styles of goniometers. The first (Figure 21-1, A) is a full-circle goniometer that has calibrations for both the 360-degree and the 180-degree systems printed on its face. This goniometer has longer arms and is convenient for use on the large joints of the body. Figure 21-1, B, shows a half-circle instrument used for the 180-degree system. This goniometer is radiopaque and could be used during radiographic examinations if necessary. Its dial is notched at two places for accurate motion reading, regardless of whether the convexity of the half circle is directed toward or away from the direction of motion. Thus, the evaluator does not have to reverse the goniometer and thereby obscure the scale. A special finger goniometer is shown in Figure 21-1, D. Its arms are short and flattened. It is designed to be used over the finger joint surfaces rather than on their lateral aspects, as is done for most of the larger joint motions. Small plastic goniometers are shown in Figure 21-1, C and E. These are inexpensive and easy to carry. The longer one can be used with both large and small joints. The smaller is simply a larger one that has been cut for use as a finger goniometer. The dials of transparent goniometers are marked or notched in two places.
One important feature of the goniometer is the fulcrum. The nut or rivet that acts as the fulcrum must move freely yet be tight enough to remain where it was set when the goniometer is removed after measurement of the joint.4 For easy, accurate readings, some goniometers have a locking nut that is tightened just before the goniometer is removed.5
Other types of goniometers are available. Some have a fluid indicator that provides the reading after the motion is completed.5 Others can be attached to a body segment and have dials that register ROM. There are special goniometers for cervical and spine ROM measurements and for forearm rotation.12 A tape measure or metric scale may also be used on some joints by measuring the distance between two segments—for example, the distance between the chin and chest when measuring cervical flexion and extension, the distance between the center of the tips of two fingers for finger abduction, and the distance between the tip of the thumb and the tip of the little finger for opposition.3
Recording Measurements
When using the 180-degree system, the evaluator should record the number of degrees at the starting position and the number of degrees at the final position after the joint has passed through the maximally possible arc of motion.10 Normal ROM always starts at 0 degree and increases toward 180 degrees. When it is not possible to start the motion at 0 degree because of limitation of motion, ROM is recorded by writing the number of degrees at the starting position followed by the number of degrees at the final position.3 For example, elbow ROM limitations can be noted as follows:
Abnormal hyperextension of the elbow may be recorded by indicating the number of degrees of hyperextension below the 0-degree starting position with a minus sign, followed by the 0-degree position and then the number of degrees at the final position.10 This may be noted as follows:
There are alternative methods of recording ROM. The evaluator is advised to learn and adopt the particular method required by the health care facility.
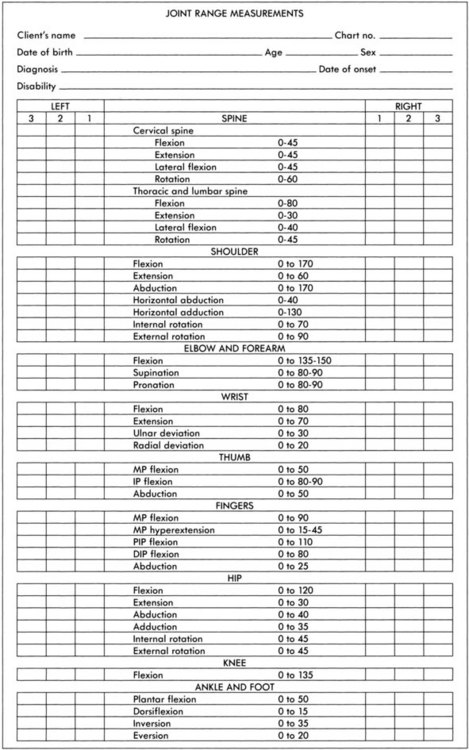
A sample form for recording ROM measurements is shown in Figure 21-2. Average normal ROM for each joint motion is listed on the form and in Table 21-1. When measurements are being recorded, every space on the form should be filled in. If the joint was not tested, “NT” should be entered in the space.3
TABLE 21-1
Average Normal Range of Motion (180-Degree Method)
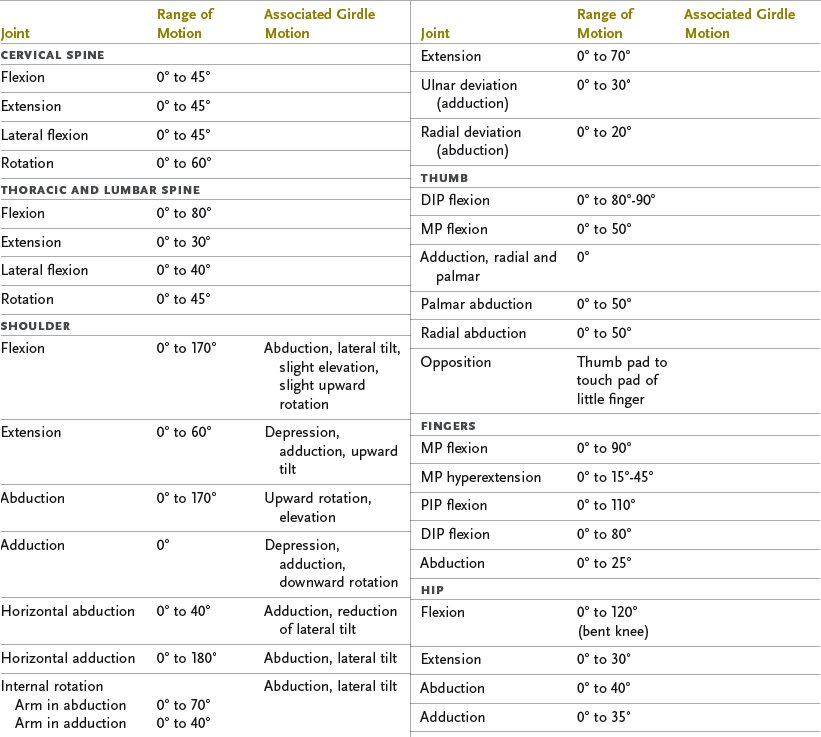

DIP, Distal interphalangeal; MP, metacarpophalangeal; PIP, proximal interphalangeal.
Data adapted from American Academy of Orthopaedic Surgeons: Joint motion: method of measuring and recording, Chicago, Ill, 1965, The Academy; Esch D, Lepley M: Evaluation of joint motion: methods of measurement and recording, Minneapolis, Minn, 1974, University of Minnesota Press.
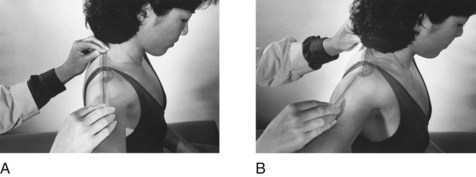
It should be noted that scapula movement accompanies movements of the shoulder (glenohumeral) joint, as outlined. The range of glenohumeral joint motion is highly dependent on scapula mobility, which gives the shoulder its flexibility and wide ranges of motion. Although it is not possible to measure scapula movement with the goniometer, the evaluator should assess scapula mobility by observation of active motion or passive movement before proceeding with shoulder joint measurements. Scapular ROM is noted as full or restricted.3 If scapular motion is restricted, as when the musculature is in a state of spasticity or contracture, and the shoulder joint is moved into extreme ranges of motion (for example, above 90 degrees of flexion or abduction), glenohumeral joint damage can result.
When joint measurements may be performed in more than one position (e.g., as in shoulder internal and external rotation), the evaluating occupational therapist should note on the record the position in which the measurement was taken. The therapist should also note any pain or discomfort experienced by the client, the appearance of protective muscle spasm, whether AROM or PROM was measured, and any deviations from recommended testing procedures or positions.10
Results of Assessment As the Basis for Planning Intervention
After joint measurement, the therapist should analyze the results in relation to the client’s life role requirements. The therapist’s first concern should be to correct ROM that is below functional limits. Many ordinary activities of daily living (ADLs) do not require full ROM. Functional ROM refers to the amount of joint range necessary to perform essential ADLs and instrumental activities of daily living (IADLs) without the use of special equipment. The first concern of intervention is to attempt to increase to functional levels any ROM that is limiting performance of self-care and home maintenance tasks.8 For example, severe limitation of elbow flexion affects eating and oral hygiene. Therefore, it is important to increase elbow flexion to nearly full ROM for function. Likewise, severe limitation of forearm pronation affects eating, washing the body, telephoning, caring for children, and dressing. Because sitting comfortably requires hip ROM of at least 0 to 100 degrees, a first goal might be to increase flexion to 100 degrees if it is limited. Of course, if additional ROM can be gained, the therapist should plan the progression of intervention to increase ROM to the normal range.
Some limitations in ROM may be permanent. The role of the therapist in such cases is to work out methods to compensate for the loss of ROM. Possibilities include assistive devices, such as a long-handled comb, brush, shoehorn, and device to apply stockings, or adapted methods of performing a particular skill. (See Chapter 10 for further suggestions for ADL techniques in those with limited ROM.)
In many conditions, such as burns and arthritis, loss of ROM can be anticipated. The goal of intervention is to prevent joint limitation with splints, positioning, exercise, activity, and application of the principles of joint protection.
Limited ROM, its causes, and the prognosis for increasing ROM will suggest intervention approaches. Some of the specific methods used to increase ROM are discussed elsewhere in this text (see Chapters 29 and 39). Such methods include stretching exercise, resistive activity and exercise, strengthening of antagonistic muscle groups, activities that require active motion of the affected joints through the full available ROM, splints, and positioning. To increase ROM, the physician may perform surgery or manipulate the part while the client is under anesthesia. The physical therapist or certified hand therapist may use joint mobilization techniques such as manual stretching with heat and massage.8
Procedure for Measuring Passive Range of Motion
Average normal ROM for each joint motion is listed in Table 21-1, in Figure 21-2, and before each of the following procedures used for measurement. The reader should keep in mind that these are averages; ROM may vary considerably among individuals. Normal ROM is affected by age, gender, and other factors, such as lifestyle and occupation.10 Therefore, the client (C) in the illustrations may not always demonstrate the average ROM listed for the particular motion.
In the illustrations, the goniometer is shown in such a way that the reader can most easily see its positioning. However, the occupational therapist may not always be in the best position for the particular measurement. For the purposes of clear illustration, the therapist is necessarily shown off to one side and may have one hand, rather than two, on the instrument. Many of the motions require that the therapist actually be in front of the client or that the therapist’s hands obscure the goniometer. How the therapist holds the goniometer and supports the part being measured is determined by factors such as the position of the client, amount of muscle weakness, presence or absence of joint pain, and whether AROM or PROM is being measured. Both the therapist and the client should be positioned for the greatest comfort, correct placement of the instrument, and adequate stabilization of the part being tested to ensure the desired motion in the correct plane.
General Procedure—180-Degree Method of Measurement3,10
1. The client should be comfortable and relaxed in the appropriate position (described later) for the joint measurement.
2. Uncover the joint to be measured.
3. Explain and demonstrate to the client what you are going to do, why, and how you expect him or her to cooperate.
4. If there is unilateral involvement, assess PROM on the analogous limb to establish normal ROM for the client.
5. Establish and palpate bony landmarks for the measurement.
6. Stabilize joints proximal to the joint being measured.
7. Move the part passively through ROM to assess joint mobility and end-feel.
8. Return the part to the starting position.
9. To measure the starting position, place the goniometer just over the surface of and lateral to the joint. Place the axis of the goniometer over the axis of the joint by using the designated bony prominence or anatomic landmark. Place the stationary bar on or parallel to the longitudinal axis of the proximal or stationary bone and the movable bar on or parallel to the longitudinal axis of the distal or moving bone. To prevent the indicator on the movable bar from going off the protractor dial, always face the curved side away from the direction of motion, unless the goniometer can be read after movement in either direction.
10. Record the number of degrees at the starting position and remove (or back off) the goniometer. Do not attempt to hold the goniometer in place while moving the joint through ROM.
11. To measure PROM, hold the part securely above and below the joint being measured and gently move the joint through ROM. Do not force the joint. Watch for signs of pain and discomfort. (Note: PROM may also be measured by asking the client to move actively through ROM and hold the position. The therapist then moves the joint through the final few degrees of PROM.)
12. Reposition the goniometer and record the number of degrees at the final position.
13. Remove the goniometer and gently place the part in the resting position.
14. Record the reading at the final position and any notations on the evaluation form.
Directions for Joint Measurement—180-Degree System
Cervical Spine
Measurements of neck movements are the least accurate because the neck has few bony landmarks and much soft tissue overlying the bony segments.4 Radiographic examination is the best means to make an accurate measurement of the specific joints.11 Measurements may be taken with a tape measure to record the distance between the chin and chest for flexion and extension, between the chin and shoulder for neck rotation, and between the mastoid process and shoulder for lateral flexion.3
Approximate estimates of cervical flexion, extension, rotation, and lateral flexion may be made with the goniometer or by estimating the number of degrees of motion by using a fixed axis and estimating the arc of motion from that point (see Figures 21-3 to 21-10).1,4
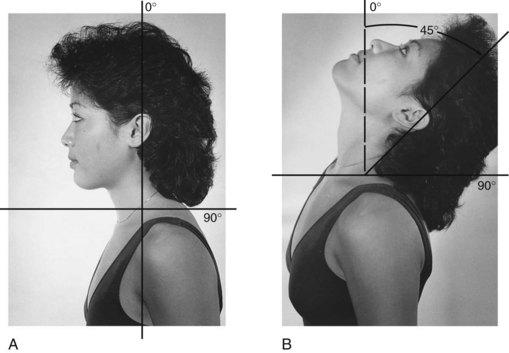
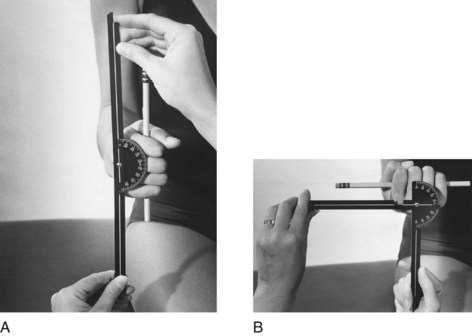
Cervical Flexion: 0 to 45 degrees (Figure 21-3).
Measurement: The client is asked to flex the neck so that the chin moves toward the chest. The number of degrees of motion may be estimated, or the therapist may measure the number of inches or centimeters from the chin to the sternal notch.1,3,10 If a goniometer is used, the axis is placed over the angle of the jaw. The therapist grasps the corner of the protractor, which is positioned with the arc upward, and steadies his or her arm by resting it against the client’s shoulder. The arms of the goniometer are aligned with a tongue depressor, which the client is holding between the teeth. As the client performs neck flexion, the movable bar of the goniometer is adjusted downward to align with the new position of the tongue depressor.4,10
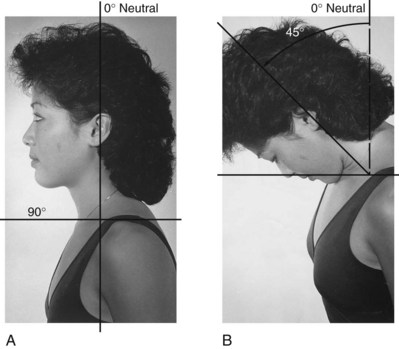
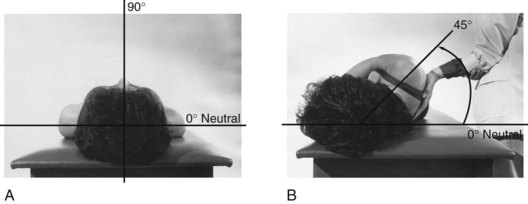
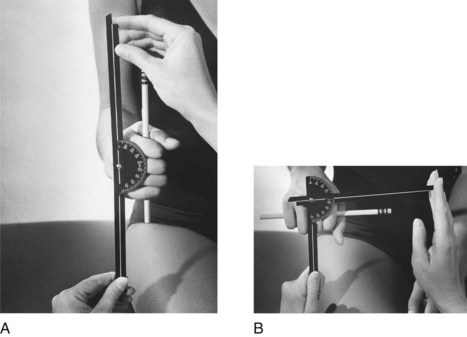
Cervical Extension: 0 to 45 degrees (Figure 21-4).
Measurement: The client is asked to extend the neck as though looking at the ceiling so that the back of the head approaches the thoracic spine. The number of degrees of motion may be estimated, or the number of inches or centimeters from the chin to the sternal notch may be measured.3 If a goniometer is used, the axis is placed over the angle of the jaw. The therapist grasps the corner of the protractor, which is now positioned with the arc downward, and steadies his or her arm against the client’s shoulder. The movable bar of the goniometer is moved upward to align with the tongue depressor as the client extends the neck.4,10
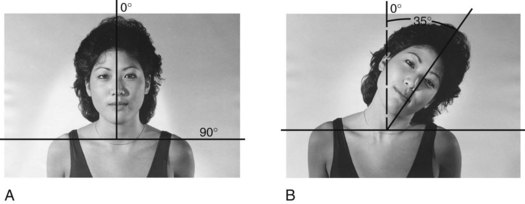
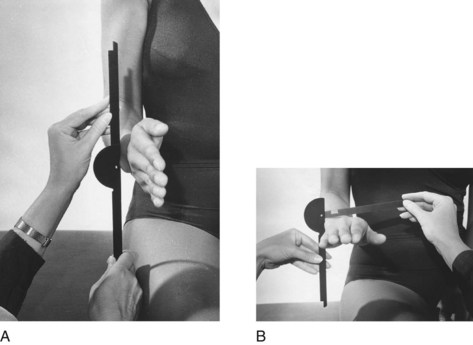
Cervical Lateral Flexion: 0 to 45 degrees (Figure 21-5).
Measurement: The client is asked to flex the neck laterally without rotation by moving the ear toward the shoulder. The number of degrees of motion may be estimated, or the therapist may measure the number of inches or centimeters between the mastoid process and the acromion process of the shoulder.1,3 If a goniometer is used, the axis is placed over the spinous process of the seventh cervical vertebra. The stationary bar may be over the shoulder and parallel to the floor so that the motion begins at 90 degrees, or it may be aligned with the thoracic vertebra for a starting position of 0 degree. The movable bar is aligned with the external occipital protuberance.1,10
Cervical Rotation: 0 to 60 degrees (Figure 21-6).
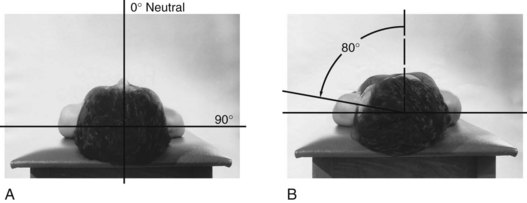
Measurement: The client is asked to rotate the head right or left without rotating the trunk. The amount of rotation may be estimated in degrees from the neutral position,1 or a tape measure may be used to measure the distance from the tip of the chin to the acromion process of the shoulder. The measure is taken first in the anatomic position and then again after the neck has been rotated.3 In the supine position, if a goniometer is used, it is set at 90 degrees and the axis is placed over the vertex of the head. The stationary bar is held steady, parallel to the floor or to the acromion process on the side being tested. The movable bar is aligned with the tip of the nose.4,10
Thoracic and Lumbar Spine
Cervical Flexion: 0 to 80 degrees and 4 inches (Figure 21-7).
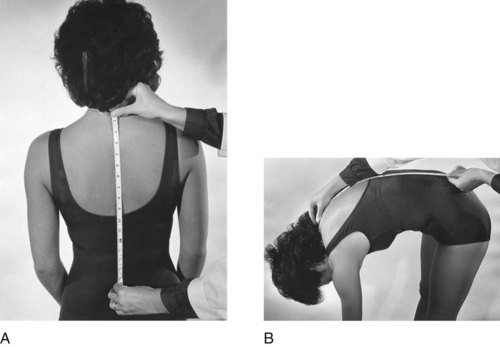
Measurement: Four methods of estimating the range of spinal flexion are as follows: measuring trunk forward flexion in relation to the longitudinal axis of the body (the therapist must hold the pelvis stable with the hands and observe any change in the client’s normal lordosis), recording the level of the fingertips along the front of the client’s leg, measuring the number of inches or centimeters between the client’s fingertips and the floor, and measuring the length of the spine from the seventh cervical vertebra to the first sacral vertebra when the client is erect and again after the client has flexed the spine (see Figure 21-7).3,10 The fourth is probably the most accurate of these clinical methods.1 In a normal adult, the average increase in length in forward flexion of the spine is 4 inches (10 cm).3 If the client bends forward at the hips with the back straight, no difference in length will occur.
Cervical Lateral Flexion: 0 to 40 degrees (Figure 21-8).
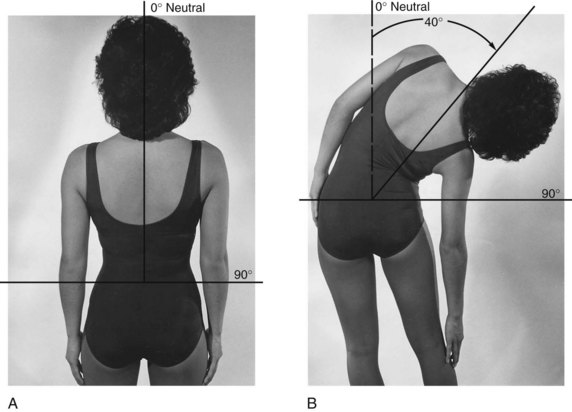
Measurement: Several methods may be used to estimate the range of lateral flexion of the trunk. A steel tape measure may be held in place during the motion and be used to estimate the number of degrees of lateral inclination of the trunk with respect to the vertical position. Other methods include estimating the position of the spinous process of C7 in relation to the pelvis (Figure 21-8); measuring the distance of the fingertips from the knee joint in lateral flexion; measuring the distance between the tip of the third finger and the floor3; and with a long-arm goniometer, placing the axis on S1, the stationary bar perpendicular to the floor, and the movable bar aligned with C7.1,10
Cervical Extension: 0 to 30 degrees (Figure 21-9).
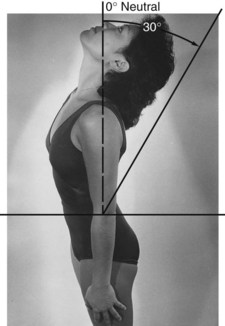
Measurement: The client is asked to bend backward while maintaining stability of the pelvis. If necessary, the therapist stabilizes the pelvis from the anterior when the measurement is taken in the standing position. The range of extension is estimated in degrees from the vertical by using the superior iliac crest as the pivotal point in relation to the spinous process of C7. With the client in the supine position, a pillow is placed under the abdomen and the client’s hands are placed at shoulder level on the treatment table. The pelvis is stabilized with a strap or by an assistant, and the client extends the elbows to raise the trunk from the table. A perpendicular measurement is taken of the distance between the suprasternal notch and the supporting surface at the end of the ROM.3
Cervical Rotation: 0 to 45 degrees (Figure 21-10).
Measurement: The client is asked to rotate the upper part of the trunk while maintaining a neutral position of the pelvis. The therapist may fix the pelvis firmly to maintain the neutral position. This step is especially important if the client is in the standing position. This motion is recorded in degrees by using the center of the crown of the head as a pivotal point and measuring the arc of motion made by the shoulder as it moves upward or forward.
Upper Extremity1–3,5,10,11
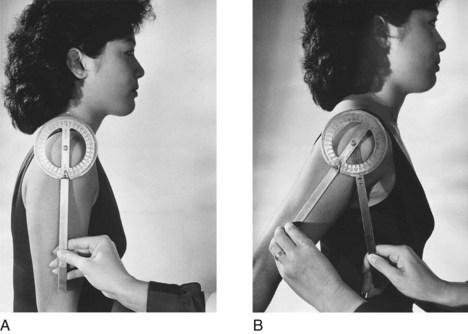
Shoulder Flexion: 0 to 170 degrees (Figure 21-11).
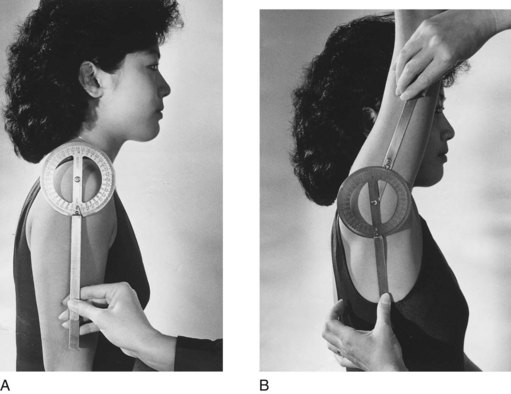
Position of the Goniometer: The axis is in the center of the humeral head, just distal to the acromion process on the lateral aspect of the humerus. The stationary bar is parallel to the trunk, and the movable bar is parallel to the humerus. Note that when the shoulder is flexed, the axis point moves upward and backward to the posterior surface of the shoulder. Thus, to take a measurement of the final position, the therapist should place the goniometer on the lateral surface of the shoulder, aligned with the imaginary axis through the center of the humeral head, which is just slightly superior to the crease formed by the deltoid mass.
End-feel: Firm.3
Shoulder Extension: 0 to 60 degrees (Figure 21-12).
Position of the Client: Seated or prone, with no obstruction behind the humerus and the humerus in neutral rotation.
Position of the Goniometer: Same as for flexion, but the axis point remains the same for the starting and final positions. Movement should be accompanied by a slight upward tilt of the scapula. Excessive scapular motion should be avoided.
End-feel: Firm.3
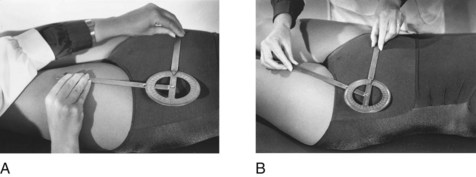
Shoulder Abduction: 0 to 170 degrees (Figure 21-13).
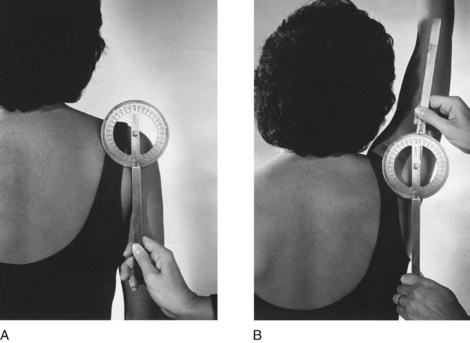
Position of the Client: Seated or lying prone, with the humerus in adduction and external rotation. Measure on the posterior surface.
Position of the Goniometer: The axis is on the acromion process on the posterior surface of the shoulder. The stationary bar is parallel to the trunk, and the movable bar is parallel to the humerus.
End-feel: Firm.3
Shoulder Internal Rotation: 0 to 60 degrees (Figure 21-14).
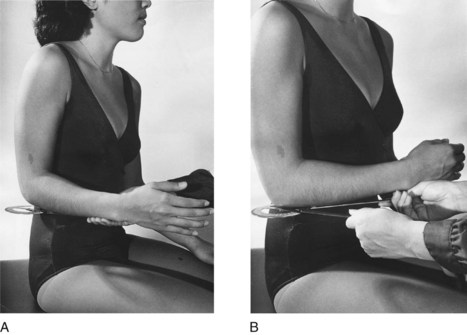
FIGURE 21-14 Shoulder internal rotation, shoulder adducted. A, Starting position. B, Final position.
Position of the Client: The following position is used if abduction cannot be achieved: seated with the humerus adducted against the trunk, the elbow at 90 degrees, and the forearm at the midposition and perpendicular to the body.3
Shoulder Internal Rotation (Alternative Position): 0 to 70 degrees (Figure 21-15).

FIGURE 21-15 Shoulder internal rotation, shoulder abducted (alternative position). A, Starting position. B, Final position.
Position of the Client: The following position is used if there is no danger of posterior dislocation and if abduction is possible: prone or supine with the humerus abducted to 90 degrees, the elbow flexed to 90 degrees, and the forearm in pronation, perpendicular to the floor.
Position of the Goniometer: The axis is on the olecranon process of the elbow, and the stationary bar and movable bar are parallel to the forearm.
End-feel: Firm.3
Shoulder External Rotation: 0 to 80 degrees (Figure 21-16).
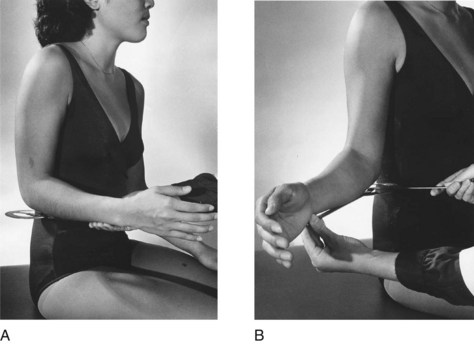
FIGURE 21-16 Shoulder external rotation, shoulder adducted. A, Starting position. B, Final position.
Position of the Client: The following position is used if abduction is not possible: seated, the humerus adducted, the elbow at 90 degrees, and the forearm in midposition, perpendicular to the body.
Position of the Goniometer: The axis is on the olecranon process of the elbow. The stationary bar and movable bar are parallel to the forearm.3
Shoulder External Rotation (Alternative Position): 0 to 90 degrees (Figure 21-17).
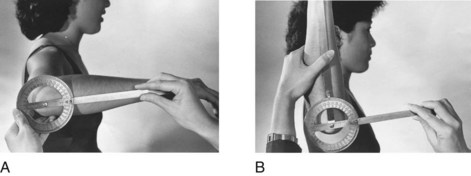
FIGURE 21-17 Shoulder external rotation, shoulder abducted (alternative position). A, Starting position. B, Final position.
Position of the Client: The following position is used if there is no danger of anterior dislocation of the humerus3: seated or supine with the humerus abducted to 90 degrees, the elbow flexed to 90 degrees, and the forearm pronated.
Position of the Goniometer: The axis is on the olecranon process of the elbow, and the stationary bar and movable bar are parallel to the forearm.
End-feel: Firm.3
Shoulder Horizontal Abduction: 0 to 40 degrees (Figure 21-18).
Position of the Client: Seated erect with the shoulder to be tested abducted to 90 degrees, the elbow extended, and the palm facing down. The therapist may support the arm in abduction.3
Position of the Goniometer: The axis is over the acromion process. The stationary bar is parallel over the shoulder toward the neck, and the movable bar is parallel to the humerus on the superior aspect.
End-feel: Firm.3
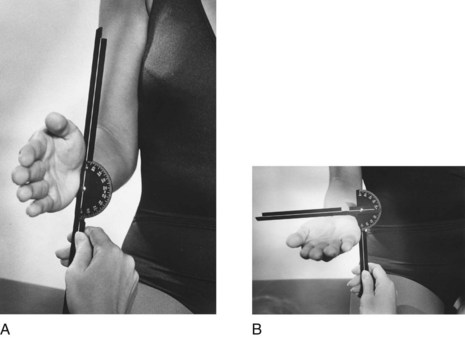
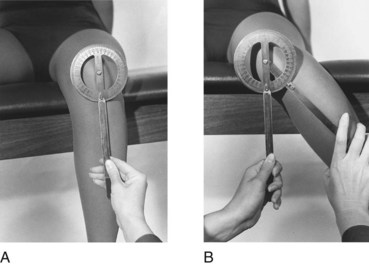
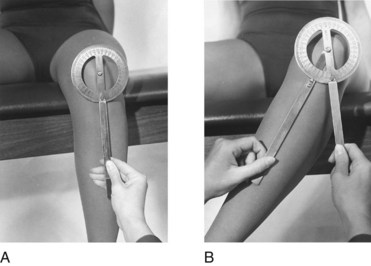
Elbow
Extension to Flexion: 0 to 135 degrees to 150 degrees (Figure 21-20).

Position of the Client: Standing, sitting, or supine with the humerus adducted and externally rotated and the forearm supinated.
Position of the Goniometer: The axis is placed over the lateral epicondyle of the humerus at the end of the elbow crease. The stationary bar is parallel to the midline of the humerus, and the movable bar is parallel to the radius. After the movement has been completed, the position of the elbow crease changes in relation to the lateral epicondyle because of the rise of the muscle bulk during the motion. The axis of the goniometer should be repositioned so that it is over, although it will not be directly on, the lateral epicondyle.
End-feel: Soft, hard, and firm: flexion. Hard or firm: extension and hyperextension.3
Forearm
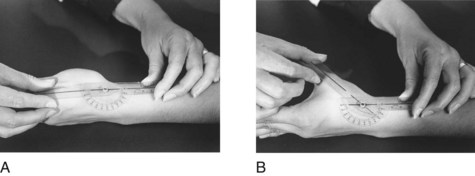
Forearm Supination: 0 to 80 degrees or 90 degrees (Figure 21-21).
Position of the Client: Seated or standing with the humerus adducted, the elbow at 90 degrees, and the forearm in midposition.
Position of the Goniometer: The axis is at the ulnar border of the volar aspect of the wrist, just proximal to the ulnar styloid. The movable bar is resting against the volar aspect of the wrist, and the stationary bar is perpendicular to the floor. After the forearm is supinated, the goniometer should be repositioned so that the movable bar rests squarely across the center of the distal end of the forearm.
Forearm Supination (Alternative Method): 0 to 80 degrees or 90 degrees (Figure 21-22).
Position of the Client: Seated or standing with the humerus adducted, the elbow at 90 degrees, and the forearm in midposition. Place a pencil in the client’s hand so that it is held perpendicular to the floor.
Position of the Goniometer: The axis is over the head of the third metacarpal, and the stationary bar is perpendicular to the floor. The movable bar is parallel to the pencil.
End-feel: Firm.3
Forearm Pronation: 0 to 80 degrees or 90 degrees (Figure 21-23).
Position of the Client: Seated or standing with the humerus adducted, the elbow at 90 degrees, and the forearm in midposition.
Position of the Goniometer: The axis is at the ulnar border of the dorsal aspect of the wrist, just proximal to the ulnar styloid. The movable bar is resting against the dorsal aspect of the wrist, and the stationary bar is perpendicular to the floor. After the forearm is pronated, reposition the goniometer so that the movable bar rests squarely across the center of the dorsum of the distal end of the forearm.
Forearm Pronation (Alternative Method): 0 to 80 degrees or 90 degrees (Figure 21-24).
Position of the Client: Seated or standing with the humerus adducted, the elbow at 90 degrees, and the forearm in midposition. A pencil is placed in the hand so that it is held perpendicular to the floor.
Position of the Goniometer: The axis is over the head of the third metacarpal, the stationary bar is perpendicular to the floor, and the movable bar is parallel to the pencil.
End-feel: Hard to firm.3
Wrist
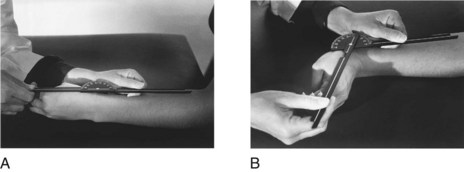
Wrist Flexion: 0 to 80 degrees (Figure 21-25).
Position of the Client: Seated with the forearm in midposition and the hand and forearm resting on a table on the ulnar border. The fingers are relaxed or extended. This measurement may also be taken with the forearm pronated and resting on a table.3
Position of the Goniometer: The wrist is measured with the forearm in midposition, and the axis is on the lateral aspect of the wrist just distal to the radial styloid in the anatomic snuffbox. The stationary bar is parallel to the radius, and the movable bar is parallel to the metacarpal of the index finger.
End-feel: Firm.3
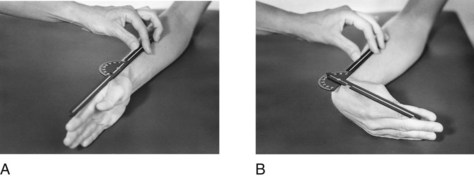
Wrist Extension: 0 to 70 degrees (Figure 21-26).
Position of the Client and Goniometer: The same as for wrist flexion, except that the fingers should be flexed.
End-feel: Firm or hard.3
Wrist Ulnar Deviation: 0 to 30 degrees (Figure 21-27).
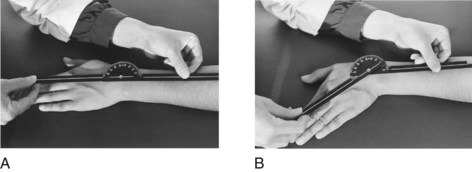
Position of the Client: Seated with the forearm pronated, the wrist at neutral, the fingers relaxed in extension, and the palm of the hand resting flat on the table surface.
Position of the Goniometer: The axis is on the dorsum of the wrist at the base of the third metacarpal, over the capitate bone. The movable bar is parallel to the third metacarpal, and the stationary bar is over the midline of the dorsal aspect of the forearm.
End-feel: Firm.3

Fingers
Metacarpophalangeal Flexion: 0 to 90 degrees (Figure 21-29).
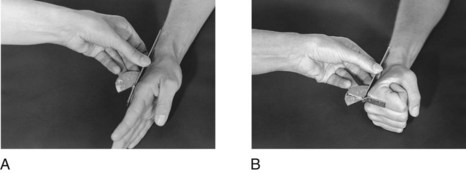
Position of the Client: Seated with the elbow flexed, the forearm in midposition, the wrist at 0-degree neutral position, and the forearm and hand supported on a firm surface on the ulnar border.
Position of the Goniometer: The axis is centered on the dorsal aspect of the metacarpophalangeal (MP) joint. The stationary bar is on top of the metacarpal, and the movable bar is on top of the proximal phalanx.
End-feel: Hard or firm.3
Metacarpophalangeal Joint Hyperextension: 0 to 45 degrees (Figure 21-30).
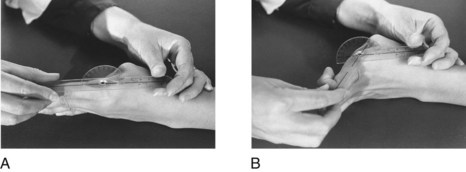
Position of the Client: Seated with the forearm in midposition, the wrist at 0-degree neutral position, the interphalangeal joints relaxed or in flexion, and the forearm and hand supported on a firm surface on the ulnar border.
Position of the Goniometer: The axis is over the lateral aspect of the MP joint of the index finger. The stationary bar is parallel to the metacarpal, and the movable bar is parallel to the proximal phalanx. The little finger’s MP joint may be measured similarly. ROM of the long and ring fingers can be estimated by comparison.
An alternative is to place the goniometer on the volar aspect of the hand. With use of the edge of the goniometer, the axis is aligned over the MP joint being measured, the stationary bar is parallel to the metacarpal, and the movable bar is parallel to the proximal phalanx.
End-feel: Firm.3
Metacarpophalangeal Abduction: 0 to 25 degrees (Figure 21-31).
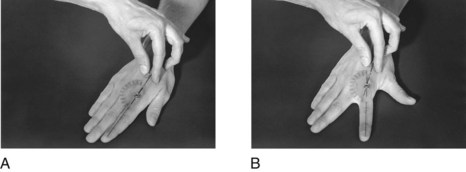
Position of the Client: Seated with the forearm pronated, the wrist at 0-degree neutral deviation, the fingers straight, and the hand resting on a firm surface.
Position of the Goniometer: The axis is centered over the MP joint being measured. The stationary bar is over the corresponding metacarpal, and the movable bar is over the proximal phalanx.
End-feel: Firm.3
Proximal Interphalangeal Flexion: 0 to 110 degrees (Figure 21-32).
Alternative Method: The joint can also be measured with a ruler. The interphalangeal and MP joints of the fingers are flexed toward the palm. A ruler is used to measure from the pulp of the middle finger to the proximal palmar crease.3
End-feel: Usually hard; may be soft or firm.3
Distal Interphalangeal Flexion: 0 to 80 degrees (Figure 21-33).
Thumb
Metacarpophalangeal Flexion: 0 to 50 degrees (Figure 21-34).
Position of the Client: Seated with the elbow flexed, the forearm in 45 degrees of supination, the wrist at 0-degree neutral deviation, the MP and interphalangeal joints in extension, and the hand and forearm supported on a firm surface.
Position of the Goniometer: The axis is on the dorsal surface of the MP joint. The stationary bar is over the thumb metacarpal, and the movable bar is over the proximal phalanx.
End-feel: Hard or firm.3
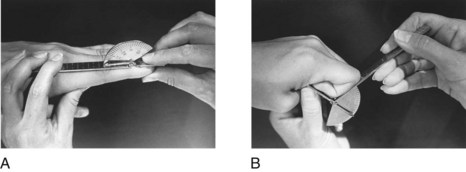
Interphalangeal Flexion: 0 to 90 degrees (Figure 21-35).
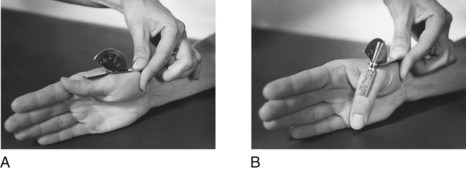
Radial Abduction (Carpometacarpal Extension): 0 to 50 degrees (Figure 21-36).
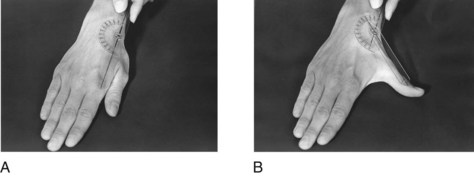
Radial Abduction (Alternative Method): 0 to 50 degrees (Figure 21-37).
Position of the Client and Goniometer: The client is positioned the same as described in the first method. The axis is over the CMC joint at the base of the thumb metacarpal. The stationary and movable bars are together and parallel to the thumb and the first metacarpals. Neither will be directly over these bones.
End-feel: Firm.3
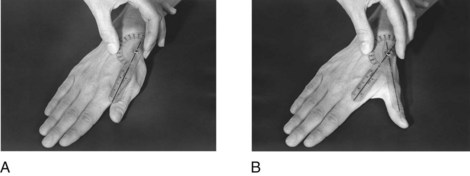
Palmar Abduction (Carpometacarpal Flexion): 0 to 50 degrees (Figure 21-38).
Palmar Abduction (Alternative Method): 0 to 50 degrees (Figure 21-39).

Position of the Client and Goniometer: The client is positioned in the same way described in the first method. The axis is at the junction of the thumb and index finger metacarpals. The stationary and movable bars are lined up together, parallel to the thumb and the index finger metacarpals.
End-feel: Firm.3
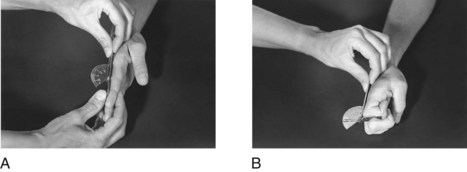
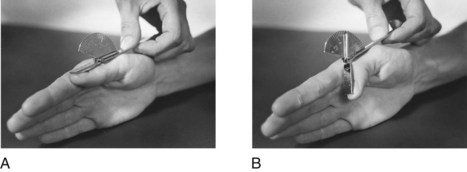
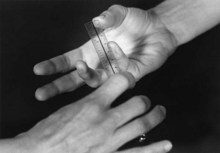
Opposition: Deficits in opposition may be recorded by measuring the distance between the centers of the pads of the thumb and the fifth finger with a centimeter ruler (Figure 21-40).
End-feel: Soft or firm.3
Lower Extremity3,5,6,10
Hip Flexion: 0 to 120 degrees (Figure 21-41).
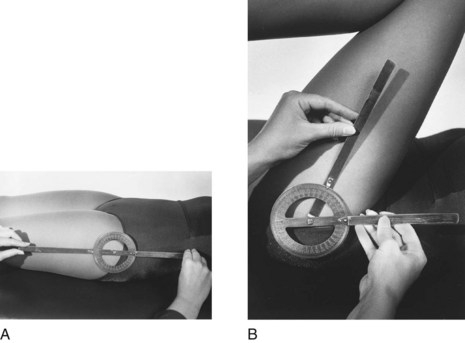
Position of the Client: Supine, lying with the hip and knee in 0-degree neutral extension and rotation.
Position of the Goniometer: The axis is on the lateral aspect of the hip, over the greater trochanter of the femur. The stationary bar is centered over the middle of the lateral aspect of the pelvis, and the movable bar is parallel to the long axis of the femur on the lateral aspect of the thigh. The knee is bent during the motion.
End-feel: Soft.3
Hip Extension (Hyperextension): 0 to 30 degrees (Figure 21-42).
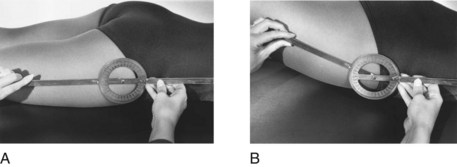
Position of the Client: The client is prone, lying with the hip and knee at 0-degree neutral extension and rotation and the feet over the end of the table.
End-feel: Firm.3
Hip Abduction: 0 to 40 degrees (Figure 21-43).
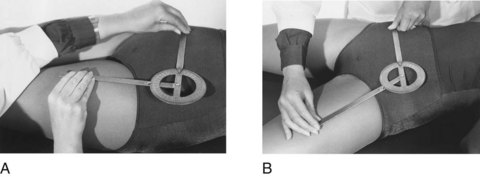
Position of the Client: The client is supine, lying with the legs extended and the hip in 0-degree neutral rotation. The pelvis is level.
Position of the Goniometer: The axis is placed on the anterior superior iliac spine. The stationary bar is placed on a line between two anterior superior iliac spines, and the movable bar is parallel to the longitudinal axis of the femur over the anterior aspect of the thigh. Note that the starting position is at 90 degrees for this measurement and that the recording of the measurement should be adjusted by subtracting 90 degrees from the total number of degrees obtained in the arc of joint motion.
End-feel: Firm.3
Hip Adduction: 0 to 35 degrees (Figure 21-44).
Position of the Client and Goniometer: The client is supine, lying with the hip and knee of the leg to be tested in extension and neutral rotation. The leg not being tested should be abducted. The goniometer is positioned the same as for hip abduction.
End-feel: Firm or soft.3
Hip Internal Rotation: 0 degree to 45 degrees (Figure 21-45).
Position of the Client: The client is seated with the hip in 0-degree neutral rotation and the hip and knee flexed to 90 degrees. The knee is flexed over the end of the treatment table. A small roll or towel may be placed under the distal end of the femur to maintain it in a horizontal plane. The contralateral hip is abducted, and the foot may be supported on a stool.
Position of the Goniometer: The axis is on the center of the patella. The stationary and movable bars are parallel to the longitudinal axis of the tibia on the anterior aspect of the lower part of the leg. The stationary bar remains in this position, perpendicular to the floor, whereas the movable bar follows the tibia as the hip is rotated.
End-feel: Firm.3
Hip External Rotation: 0 to 45 degrees (Figure 21-46).
Position of the Client and Goniometer: The client is seated with the hip in 0-degree neutral rotation and the hip and knee of the leg to be tested flexed to 90 degrees. The other leg should be (1) flexed at the knee so that the lower part of the leg is back under the table or (2) flexed at the hip and knee so that the foot is resting on the table. These positions allow the motion to take place without obstruction. The trunk should remain erect during performance of the motion. The goniometer is positioned as for internal rotation.
End-feel: Firm.3
Knee
Knee Extension-Flexion: 0 to 135 degrees (Figure 21-47).

Position of the Client: The client should be prone or supine, lying with the knees and hips extended and the hip in 0-degree neutral rotation.
Position of the Goniometer: With the client in the prone position, the axis is centered on the lateral aspect of the knee joint at the lateral epicondyle of the femur. The stationary bar is on the lateral aspect of the thigh, parallel to the longitudinal axis of the femur. The movable bar is parallel to the longitudinal axis of the fibula, aligned with the lateral malleolus, on the lateral aspect of the leg.
End-feel: Soft.3
Ankle
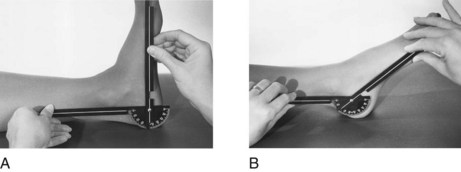
Ankle Dorsiflexion: 0 to 15 degrees (Figure 21-48).
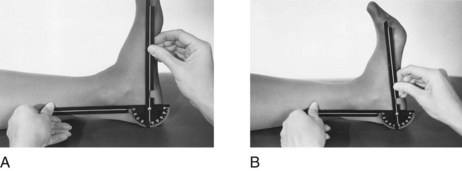
Position of the Client: The client should be supine or seated with the knee flexed at least 30 degrees. The ankle is at 90-degree neutral position and the foot is in 0 degree of inversion and eversion.
Position of the Goniometer: The axis is placed below the medial malleolus.3 The stationary bar is parallel to the longitudinal axis of the tibia, and the movable bar is parallel to the first metatarsal. (This measurement may also be taken on the lateral side of the foot.) Note that measurement begins at 90 degrees, so 90 degrees must be subtracted when recording the joint measurement.
End-feel: Firm or hard.3
Ankle Inversion: 0 to 35 degrees (Figure 21-50).
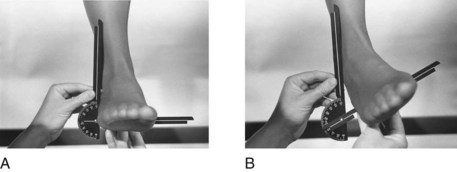
Position of the Client: The client is supine with the knee and hip extended and in 0-degree neutral rotation, the ankle in the 90-degree neutral position, and the foot extended over the edge of the table. A small roll is placed under the knee to maintain slight flexion. The alternative position is sitting with the knee flexed to 90 degrees, the leg over the edge of the supporting surface, and the ankle in 90-degree neutral position.
Position of the Goniometer: The axis is placed at the lateral border of the foot near the heel. The stationary bar is parallel to the longitudinal axis of the fibula on the lateral aspect of the leg. The movable bar is parallel to the plantar surface of the heel.
End-feel: Firm.3
Ankle Eversion: 0 to 20 degrees (Figure 21-51).

Position of the Goniometer: The axis is on the medial border of the foot, just proximal to the metatarsophalangeal joint. The stationary bar is parallel to the longitudinal aspect of the fibula on the medial aspect of the lower part of the leg. The movable bar is parallel to the plantar surface of the sole. Note that measurements for inversion and eversion both begin at 90 degrees. Therefore, this amount must be subtracted from the total when measurements are recorded.
End-feel: Hard or firm.3
Threaded Case Study
Evelyn, Part 2
At the beginning of the chapter, Evelyn’s case study was introduced. She is an active 83-year-old woman with a rich occupational life who sustained a Colles fracture in her left nondominant upper extremity, had recently had her cast removed, and was experiencing residual problems (including joint ROM deficits). Readers were asked to consider three questions while studying the chapter:
Why should the therapist proceed with caution when assessing the ROM limitations of this client?
The therapist should proceed with caution with all clients; in the case of Evelyn, heightened caution is necessary during joint measurement because of the edema, pain, and stiffness that she is experiencing in the thumb and fingers of her recently injured left wrist. Failure to proceed with caution during measurement of ROM could exacerbate each of these symptoms.
What is the appropriate sequencing of joint measurement assessment for this client? What methods should be applied first?
It is important for the therapist to first have Evelyn actively move her joints through all available pain-free (or with tolerable pain) ROM throughout both her left affected upper extremity and her unaffected right upper extremity (for comparison purposes). Next, the therapist should passively move Evelyn’s affected joints through the available pain-free (tolerable) ROM, note the end-feel, and estimate the ROM in those joints. Finally, the therapist measures the affected joints with a goniometer by following the specific sequential directions for measuring each of the joints.
What is the advantage of joint measurement in evidence-based practice?
An advantage of joint measurement in evidence-based practice is that the client’s ROM baselines are recorded and the effectiveness of interventions can be determined or substantiated on the basis of the results of follow-up joint measurements. Once these outcome data are collected by the therapist (along with similar data from other clients), a body of evidence regarding effectiveness of intervention is compiled, which in turn can be used to select effective treatment of future clients with similar problems.
Summary
Joint measurement is used to evaluate ROM in persons whose physical dysfunction affects joint mobility. Measurements of ROM are used in setting intervention goals, selecting intervention methods, and making objective assessments of progress that allow the therapist to select the intervention methods most likely to target the affected joints.
Before measuring ROM, the therapist should know any precautions or contraindications concerning the client’s condition that may determine how extensive the joint measurement procedure can be. The therapist should also know the principles of joint measurement. The procedure for measuring joint ROM involves correct positioning of the client and therapist, exposure of the joints to be measured, palpation, appropriate stabilization and handling of parts, and correct placement of the goniometer at the beginning and end of the ROM. To support the efficacy of intervention strategies and modalities, the therapist must also consider which method of reporting will best serve as evidence of effective intervention.
Directions and illustrations for measuring all of the major joint motions in the neck, trunk, and upper and lower extremities are included in this chapter. The content is designed for development of the fundamental techniques of joint measurement. The reader is referred to the references for more comprehensive treatment of the topic.3,9,10
1. Describe general rules for positioning the goniometer when measuring joint ROM.
2. With which conditions is joint measurement likely to be used?
3. List and discuss four purposes of joint measurement.
4. Is formal joint measurement necessary for every client? If not, how may ROM be assessed?
5. What is the benefit of conducting precise joint measurement with a goniometer?
6. What is meant by palpation? How is palpation done?
7. What should the therapist look for when observing joints and joint motions?
8. List at least five precautions during or contraindications to joint measurement.
10. When measuring a joint crossed by a two-joint muscle, how should the occupational therapy practitioner position the joint not being measured?
11. List the steps in the procedure for joint measurement.
12. How is joint ROM measurement recorded on the evaluation form?
13. List the average normal ROM for elbow flexion, shoulder flexion, finger MP flexion, hip flexion, knee flexion, and ankle dorsiflexion.
14. Describe how to read the goniometer when using the 180-degree system of joint measurement.
15. What is meant by functional ROM?
16. List three intervention methods that could be used to increase ROM.
Exercises
1. Measure all of the upper extremity joint motions of a normal client. Record the findings on the form in Figure 21-2.
2. Repeat the first exercise, but the client should play the role of someone with several joint limitations.
3. Observe the joint motions used in ordinary ADLs/IADLs (e.g., self-care and home management). Estimate the functional ranges of motion for the following joint motions: shoulder flexion, external rotation, internal rotation, and abduction; elbow flexion; wrist extension; hip flexion and extension; knee flexion; and ankle plantar flexion.
References
1. American Academy of Orthopaedic Surgeons. Joint motion: method of measuring and recording. Chicago, Ill: The Academy; 1965.
2. Baruch Center of Physical Medicine: The technique of goniometry (unpublished manuscript), Richmond, Va, Medical College of Virginia.
3. Clarkson, HM. Musculoskeletal assessment, joint range of motion and manual muscle strength, ed 2. Philadelphia, Pa: Lippincott, Williams & Wilkins; 2000.
4. Cole, T. Measurement of musculoskeletal function: goniometry. In Kottke FJ, Stillwell GK, Lehmann JF, eds.: Krusen’s handbook of physical medicine and rehabilitation, ed 3, Philadelphia, Pa: Saunders, 1982.
5. Esch, D, Lepley, M. Evaluation of joint motion: methods of measurement and recording. Minneapolis, Minn: University of Minnesota Press; 1974.
6. Hurt, SP. Considerations of muscle function and their application to disability evaluation and treatment: joint measurement, reprinted from. Am J Occup Ther. 1947;1:69. [2:13, 1948].
7. Kendall, FP, et al. Muscles, testing and function, ed 5. Baltimore, Md: Williams & Wilkins; 2005.
8. Killingsworth, A. Basic physical disability procedures. San Jose, Calif: Maple Press; 1987.
9. Latella, D, Meriano, C. Occupational therapy manual for evaluation of range of motion and muscle strength. Clifton, NY: Delmar Thomson Learning; 2003.
10. Norkin, CC, White, DJ. Measurement of joint motion: a guide to goniometry, ed 3. Philadelphia, Pa: FA Davis; 2003.
11. Rancho Los Amigos Hospital: How to measure range of motion of the upper extremities (unpublished manuscript), Rancho Los Amigos, Calif, The Hospital.
12. Patterson Medical Sammons Preston: Professional Rehabilitation Catalog, 2011.
13. Smith, HD. Assessment and evaluation: an overview. In Hopkins HL, Smith HD, eds.: Willard and Spackman’s occupational therapy, ed 8, Philadelphia, Pa: JB Lippincott, 1993.
14. Venes D, Thomas CL, eds. Taber’s cyclopedic medical dictionary, ed 21, Philadelphia, Pa: FA Davis, 2011.