Hand and Upper Extremity Injuries
After studying this chapter, the student or practitioner will be able to do the following:
1 Discuss the incidence and effect of upper extremity (UE) injuries in the United States and their effects on occupational performance.
2 Identify three upper quarter screening tests, and explain their significance in developing an intervention plan.
3 Discuss the importance of joint mobility in regaining the motor performance skill of hand function.
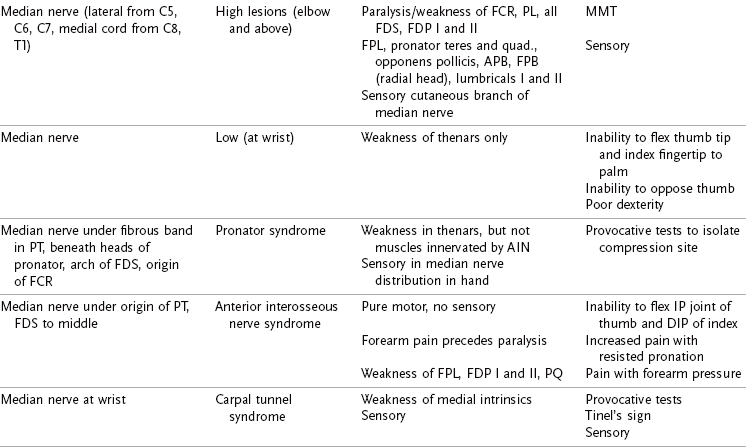
4 Describe the four categories of tests used to evaluate peripheral nerve function, and explain how the results would be used in developing an intervention plan.
5 Compare the standardized tests used to assess the motor performance skill of hand function.
6 Describe the sensory and motor innervation patterns of the three major nerves, and differentiate between the effects of proximal and distal lesions in each of the nerves and how they might affect occupational performance.
7 Discuss complex regional pain syndrome and the intervention approaches that should be included in the occupational therapy (OT) intervention plan for that disorder.
8 Compare techniques used in the rehabilitation of tendon injuries.
9 Describe the significance of edema with regard to wound healing and joint mobility.
10 Discuss the role of the occupational therapist in the evaluation and rehabilitation of injured workers.
 Threaded Case Study
Gerry, Part 1
Gerry is a 32-year-old man who is self-employed as a cabinetmaker. He sustained a table saw injury to his nondominant left hand while working. The thumb, index, and middle fingers of Gerry’s left hand were amputated at the level of the proximal phalanges as a result of the saw injury and were subsequently replanted by a hand surgeon using microsurgical techniques. Gerry is single, lives with a roommate, and is in business with his father in a small but busy cabinet shop. Gerry is extremely active at work and during his free time. He is very social and has an extensive network of supportive friends and family.
Gerry was referred to hand therapy as an inpatient 5 days after the replantation surgeries, as soon as he was discontinued from the anticoagulation medications. The initial interview with Gerry was performed at bedside. He was to be discharged from the hospital the following day with instructions to return for outpatient hand therapy. A protective splint was fabricated on the first therapy session, and Gerry was taught about postsurgical precautions, wound care, and dressing changes. During the initial evaluation, Gerry said that he was very distressed about the potential loss of function of his left hand and that he wanted to accomplish three of his most valued occupations in the months to come. The first occupation was to return to work with his father making cabinets in the family business, the second was to resume playing softball with his league, and the third was to play golf again. The first occupation was one he valued not only as a source of livelihood but also as a profession in which he demonstrated great skill and derived joy. The second two occupations were important to him not only as a source of relaxation but, more important, as a primary venue for social interaction with friends and family.
Gerry initiated hand therapy in the hospital during the acute phase of his recovery. He was followed in hand therapy for 15 months from the date of his injury and through several additional surgeries and throughout all phases of his rehabilitative process: the acute or immobilization phase, the intermediate or mobilization phase, and the late or strengthening phase.23 During the initial evaluation, Gerry clearly expressed a desire to return to three specific occupations of value to him: working as a cabinetmaker, playing golf, and playing softball.
1. How will the intervention plan change over the course of Gerry’s recovery? What specific intervention approaches will be used during the three phases of his recovery?
2. What specific tools or instruments will be used to assess Gerry’s performance skills during the different phases of his recovery?
3. What are some of the specific preparatory methods and purposeful activities that may be used in preparation for Gerry’s occupation-based performance activity of golf?
Treatment of the upper extremity (UE) is important to all occupational therapists who work with persons with physical disabilities. The incidence of UE injuries is significant and accounts for about one third of acute injuries overall56 and 26% of work-related injuries.101 In addition, disease and congenital anomalies contribute to UE dysfunction, and it is estimated that only about 15% of those who experience severe cerebrovascular accident recover hand function.56
The hand is vital to human function and appearance. It flexes, extends, opposes, and grasps thousands of times daily, allowing the performance of necessary daily activities. The hand’s sensibility allows feeling without looking and provides protection from injury. The hand touches, gives comfort, and expresses emotions. Loss of hand function through injury or disease thus affects much more than the mechanical tasks that the hand performs. Hand injury may jeopardize a family’s livelihood and, at the least, affects every daily activity. The occupational therapist with training in physical and psychological assessment, prosthetic evaluation, fabrication of orthoses, assessment and training in the activities of daily living (ADLs), and functional restoration is uniquely qualified to treat UE disorders.
Hand rehabilitation, or hand therapy, has grown as a specialty area of occupational therapy (OT) and physical therapy (PT). Many of the intervention techniques used with hand-injured clients have evolved from the application of therapy and knowledge of both specialties to be used by the hand therapist. It is not the purpose of this chapter to instruct the OT student in physical agent modalities. Rather, intervention techniques that have been found to be beneficial to clients with hand injuries are presented. It is assumed that therapists best trained to provide them will provide these techniques.
As used in this chapter, hand therapy is a term that includes intervention of the entire upper quadrant, which includes the scapula, shoulder, and arm. Upper quadrant and UE are used interchangeably. UE rehabilitation requires advanced and specialized training by both occupational and physical therapists. A practice analysis study of the theory and knowledge that serves as the underpinning for hand therapy has been reported.36 Intervention techniques, whether thermal modalities or specifically designed exercises, are used as a bridge to reach a further goal of restoring functional performance. Thus, some modalities may be used as adjunctive or enabling modalities in preparation for functional use. It is within this context that intervention techniques are presented in this chapter.
Intervention for the injured UE is a matter of timing and judgment. After trauma or surgery, a healing phase must occur in which the body performs its physiologic function of wound healing. After the initial healing phase, when cellular restoration has been accomplished, the wound enters its restorative phase. It is in this phase that hand therapy is most beneficial. Early intervention that occurs in this restorative phase is ideal and in some cases essential for optimal results.
Although sample timetables may be presented, the therapist should always coordinate the application of any intervention with the referring physician. Surgical techniques may vary, and inappropriate treatment of the client with hand injury can result in failure of a surgical procedure.
Communication among the surgeon, therapist, and client is especially vital in this setting. A comfortable environment that allows group interaction may increase client motivation and cooperation. The presence of the therapist as an instructor and evaluator is essential, but without the client’s cooperation limited gains will be achieved. Treating the psychological loss suffered by the client with a hand injury is also an integral part of the rehabilitative therapy.
 OT Practice Notes
Hand therapy is provided in a number of intervention settings, ranging from private therapy offices to outpatient rehabilitation clinics and hospitals or even in the workplace. Reimbursement for services may come directly from the client or through private medical insurance, workers’ compensation insurance, or a variety of managed care programs. Changes in reimbursement have driven changes in the marketplace and employment patterns. In the future, OT will be provided in a variety of new settings and OT intervention will continue to evolve.
In UE rehabilitation, changes have been manifested as changes in delivery of services. In some cases, therapists are not members of the approved provider panel and are no longer able to treat clients who are members of a health maintenance organization. Reimbursement patterns have altered the provision of services by limiting the number of visits authorized. Therapists are also being asked to provide outcome data that support the need for services. They also need high-quality information on which to base clinical decisions, which points to the need for evidence-based practice.61 Evidence-based practice uses the best evidence in conjunction with clinical expertise and patient values to make clinical decisions.20 It is likely that outcome-based or evidence-based intervention plans with functional goals and analysis of goal achievement will become the standard for the reimbursement of OT services. In addition, client satisfaction and perception of health status have become crucial in the delivery of medical care in a consumer-based economy. Continuous quality improvement documentation is often required for participation in managed care programs. With fewer authorized visits, the therapist must be more adept in instructing the client in self-management of the condition being treated. Hand therapists and rehabilitation providers are also subject to intense scrutiny and review by multiple regulatory agencies. Insurance companies and government agencies also review patient records and billing documentation. In addition, reimbursement for therapy services relies on detailed documentation of services provided. The best way to assure compliance with all of these agencies is to perform frequent reviews of patients’ medical records in the form of chart reviews.42 In the future, occupational therapists should anticipate a greater need to justify intervention as part of the national challenge to control medical costs. Aides, certified assistants, and other support personnel will be used increasingly, but the quality of services provided must continue to meet all professional and ethical standards. This climate of change will present unique opportunities for the occupational therapist. Clinical specialists may find new roles as consultants and trainers. Just as OT teaches the client to adapt to changes in health status, the OT profession will need to adapt to social and economic changes to remain a leader in health management.
Examination and Evaluation
When approaching a client who has a hand injury, the occupational therapist must gather information about the client’s occupational history, including a detailed description, from the client’s perspective, regarding how the hand injury may interfere with the resumption of daily rounds of meaningful occupation. Armed with this occupational profile, the therapist and client continue the evaluation process. The therapist must be able to evaluate the nature of the injury and the limitations it has produced. First, the injured structures must be identified by consulting with the hand surgeon, reviewing operative reports and x-ray films, and discussing the injury with the client. Assessment of bone, tendon, and nerve function must be ascertained, using standardized assessment techniques whenever possible.
The client’s age, occupation, and hand dominance should be taken into account in the initial evaluation. The type and extent of medical and surgical treatment that has been received and the length of time since such intervention are important in determining an intervention plan. Any further surgery or conservative intervention that is planned should also be noted. A written intervention plan should have the approval of the referring physician. Most physicians welcome observations and evaluation-based recommendations from the therapist regarding the client’s care.
The purposes of hand evaluation are to identify physical limitations, such as loss of range of motion (ROM); functional limitations, such as an inability to perform daily tasks;3 substitution patterns to compensate for loss of sensibility or motor function;4 and abnormalities, such as joint contracture.
The movement of the arm and hand must be coordinated for maximal function. Shoulder motion is essential for positioning the hand and elbow for daily activities.22 The wrist is the key joint in the position of function.12 Skilled hand performance depends on wrist stability. Although a mobile wrist is preferable, function is possible as long as the wrist is positioned to maximize movement of the fingers. Function also depends on arm and shoulder stability and mobility for fixing or positioning the hand for activity. The thumb is of greater importance than any other digit. Effective pinch is almost impossible without a thumb, and attempts will be made to salvage or reconstruct an injured thumb whenever possible. Within the hand the proximal interphalangeal (PIP) joint is critical for grasp and is considered to be the most important small joint.12 Limitations in flexion or extension will result in significant functional impairment.
The hand therapy evaluation should, therefore, consist of two concurrent stages. One stage consists of assessing the client’s occupational profile to help the therapist select an effective intervention that addresses the client’s occupational priorities. The other stage of the hand therapy evaluation consists of assessing specific performance skills, such as coordination and strength, and client factors, such as sensory functions, neuromusculoskeletal and movement-related functions, and the functions of the hand and related structures. Evaluating both the client’s occupational profile and the client’s performance skills ensures that the client’s priorities are addressed and makes the intervention more meaningful.
Observation and Topographic Assessment
The occupational therapist should observe the appearance of the entire UE. The position of the hand and arm at rest, and the carrying posture can yield valuable information about the dysfunction. The therapist should observe the way that the client treats the disease or injury. The therapist should note if the hand and arm are overprotected and carefully guarded or ignored and if the client carries the arm close to the body, in an awkward posture, or even covered.
The cervical and shoulder area posture should be observed for evidence of abnormalities in cervical and thoracic curvature that may reduce the potential for shoulder movement. Muscle atrophy may be evident in the scapular area if there has been significant long-term weakness or if the rotator cuff is torn. The scapula may appear asymmetrical or altered if muscle imbalances of length or strength are present.
The skin condition of the hand and arm should be noted. In particular, the therapist should note any lacerations, sutures, or evidence of recent surgery; whether the skin is dry or moist; whether scales or crusts are present; and whether the hand appears swollen or has an odor. Palmar skin is less mobile than dorsal skin normally. The therapist should determine the degree of mobility and elasticity and the adherence of scars. The therapist should also observe trophic changes in the skin. To assess the vascular system, the therapist should observe the skin color and temperature of the hand and evaluate for the presence of edema (swelling). Any contractures of the web spaces should be noted. The therapist should observe the relationship between hand and arm function as the client moves about and performs test items or tasks.
The therapist should ask the client to perform some simple bilateral ADLs, such as buttoning a button, putting on a shirt, opening a jar, and threading a needle, and observe the amount of spontaneous movement and use of the affected hand and arm. Similar screening tests can be used to determine shoulder mobility, such as reaching overhead, as well as placing the hand behind the back and behind the head.
Assessment of Performance Skills and Client Factors
A number of standardized tests can be used to determine physical limitations in the UE. Joint measurement and manual muscle testing are crucial and are described in other chapters (see Chapters 21 and 22). Special tests used by the hand therapist are described here in a general sense, but the student should consult other textbooks for detailed instructions in such areas as assessment of adverse neural tension.16
Screening the Cervical Neck and Shoulder
Screening examination of the cervical neck and shoulder regions should be included in evaluation of hand conditions to determine whether these areas are contributing to the client’s symptoms or limitations in function.
Active movements of the neck should be conducted, with attention paid to complaints of UE symptoms during cervical extension or lateral flexion to the same side. Complaints during these movements may suggest nerve root irritation. Hand symptoms with opposite side bending may be a sign of adverse neural tension. Few occupational therapists are knowledgeable in the intervention of cervical conditions, and care must be taken not to aggravate an existing condition. The therapist should return the client to the referring physician with recommendations for referral to an appropriate practitioner if the results of this testing are positive.
Assessment of Movement
The effect of trauma or dysfunction on anatomic structures is the first consideration in evaluating hand function. The joints must be assessed for active and passive mobility, fixed deformities, and any tendency to assume a position of deformity. The ligaments must be assessed for laxity or contracture and their ability to maintain joint stability. Tendons must be examined for integrity, contracture, or overstretching; muscles are tested for strength and function.
Limited Movement in the Shoulder
Examples of conditions in the shoulder region leading to reduced strength, reduced ROM, or pain in the shoulder are outlined in Table 39-1. Comparing initial responses with the results of follow-up evaluation will help document a positive response to intervention. Patterns of impairments in UE ROM and strength, as well as a positive response to provocative testing, should be reported to the referring physician if they would affect the client’s planned intervention or outcome. Therapists must not attempt to treat conditions that are beyond their scope of knowledge. Referral to an appropriate practitioner should be discussed with the physician if indicated.
TABLE 39-1
Clinical Tests for Specific Dysfunction in the Shoulder
| Condition | Pattern of Impairment | Characteristic Findings/Special Tests |
| Adhesive capsulitis | Loss of active and passive shoulder motion with the most pronounced loss in external rotation and, to a lesser degree, abduction and internal rotation | Capsular end feel to passive motions in restricted planes of movement |
| Subacromial impingement | Painful arc of motion between approximately 80 and 100 degrees elevation or at end range of active elevation | In early stages, muscle tests may be strong and painless despite positive impingement test |
| Rotator cuff tendinitis | Painful active or resistive rotator cuff muscle use | Painful manual muscle test of scapular plane abduction or external rotation |
| Nonpainful passive motion end ranges | ||
| Tenderness at tendons of supraspinatus or infraspinatus. | ||
| Rotator cuff tear | Significant substitution of scapula with attempted arm elevation | Positive drop arm test |
| Very weak, less than three-fifths abduction or external rotation |
Impingement Tests: The examiner passively overpressures the client’s arm into end-range elevation. This movement causes a jamming of the greater tuberosity against the anterior inferior acromial surface.80 The test is positive if the client’s facial expression shows pain. An alternative test is described by Hawkins and Kennedy.46 The examiner forward flexes the arm to 90 degrees then forcibly internally rotates the arm. Pain indicates a positive test result.
Soft-Tissue Tightness
Joints may develop dysfunction after trauma, immobilization, or disuse. Mennell emphasized the importance of the small, involuntary motions of the joint, which he referred to as “joint play.”75 Others67 have described these as “accessory motions.” Both terms describe those movements that are involuntary and physiologic and can be performed only by someone else.57 Examples of accessory motions are joint rotation and joint distraction. If accessory motions are limited and painful, the active motions of that joint cannot be normal. Therefore, it is necessary to restore joint play through the use of joint mobilization techniques before attempting passive or active ROM.76
Joint mobilization may date back to the fourth century BC, when Hippocrates first described the use of spinal traction.57 In the 1930s, an English physician, James Mennell, encouraged physicians to perform manipulation without anesthesia, a practice that is advocated today by James Cyriax,30 who explored the use of manipulation of the intervertebral disks. Current theorists include Cyriax, Robert Maigne, F.M. Kaltenborn, G.D. Maitland, Stanley Paris, and John Mennell, son of the late James Mennell. Although physicians originally practiced manipulation, therapists have adapted the techniques, which are now called joint mobilization.
The techniques used to assess joint play are also used in the treatment of joint dysfunction. During assessment the evaluator determines the range of accessory motion and the presence of pain by taking up the slack only in the joint. Some practitioners advocate use of a high-velocity, low-amplitude thrust or graded oscillation to regain motion and relieve pain.67
Guidelines must be followed in applying joint mobilization techniques, and the untrained or inexperienced practitioner should not attempt to use the techniques. Postgraduate courses are offered in joint mobilization of the extremities, and the therapist must be familiar with the orthokinematics of each joint, as well as with the techniques used.
Joint mobilization is generally indicated with restriction of accessory motions or the presence of pain caused by tightness of the joint capsule, meniscus displacement, muscle guarding, ligamentous tightness, or adherence. It is contraindicated in the presence of infection, recent fracture, neoplasm, joint inflammation, rheumatoid arthritis, osteoporosis, degenerative joint disease, and many chronic diseases.57
Limitations in joint motion may also be caused by tightness of the extrinsic or intrinsic muscles and tendons. If the joint capsule is not tight and accessory motions are normal, the therapist should test for extrinsic and intrinsic tightness.
To test for extrinsic extensor tightness, the metacarpophalangeal (MP) joint is passively held in extension and the PIP joint is moved passively into flexion. Then the MP joint is flexed, and the PIP joint is again passively flexed. If the PIP joint can be flexed easily when the MP joint is extended but not when the MP joint is flexed, the extrinsic extensors are adherent.4
If there is extrinsic flexor tightness, the PIP and distal interphalangeal (DIP) joints will be positioned in flexion, with the MP joints held in extension. It will not be possible to pull the fingers into complete extension. If the wrist is then held in flexion, the IP joints will extend more easily because slack is placed on the flexor tendons.
Tightness of the intrinsic musculature is tested by passively holding the MP joint in extension and applying pressure just distal to the PIP joint. This action is repeated with the MP joint in flexion. If there is more resistance when the MP joint is extended, intrinsic tightness is indicated.4
If passive motion of the PIP joint remains the same whether the MP joint is held in extension or flexion and there is limitation of PIP joint flexion in any position, tightness of the joint capsule is indicated. The therapist should assess the joint for capsular tightness if this has not already been done.
Provocative tests that are used to assess ligament, capsule, and joint instability are summarized in Table 39-2. For more detailed and comprehensive information regarding administration of these tests, the reader is referred to textbooks dedicated solely to hand therapy or to the specific topic.66,86
TABLE 39-2
Clinical Tests for Specific Dysfunction in the Wrist
| Condition | Pattern of Impairment | Special Tests |
| Thumb ulnar collateral ligament (gamekeeper’s or skier’s thumb) | Pain and instability of the thumb MP joint | Movement greater than 35 degrees when valgus instability stress is applied to the thumb MP joint |
| Instability of the scaphoid | Pain in the area of the scaphoid bone (anatomic snuffbox) or “clunking” with movement of the wrist | Watson test |
| Pain or sound associated with subluxation of the dorsal pole of the scaphoid while performing test | ||
| Instability of the distal radioulnar joint | Pain and tenderness in the wrist | “Piano keys” test |
| Hypermobility and pain associated with pressure on the distal ulna | ||
| Lunate dislocation | Pain or instability in the central wrist | Murphy’s sign |
| Head of the third metacarpal level with the second and fourth metacarpals while making a fist | ||
| Lunotriquetral instability | Pain or instability in the central or ulnar wrist | Lunotriquetral ballottement test |
| Crepitus; laxity or pain with isolated movement of the lunate | ||
| TFCC tear | Pain and instability in the ulnar wrist | Wrist arthrogram or MRI |
Assessment of Peripheral Nerve Status
Nerve dysfunction can occur at any point from the nerve roots through the digital nerves in the fingers. A good understanding of the peripheral nervous system is essential for appropriate treatment of the UE. Determining the approximate location of nerve dysfunction can assist in intervention planning.
Categories of Tests: A variety of tests may be required to assess nerve function adequately. These tests can be divided into four categories: (1) modality tests for pain, heat, cold, and touch pressure; (2) functional tests to assess the quality of sensibility, or what Moberg79 described as “tactile gnosis”; (3) objective tests that do not require active participation by the client; (4) and provocative tests that reproduce symptoms.
Examples of functional tests are stationary and moving two-point discrimination and the Moberg pick-up test; objective tests include the wrinkle test, the Ninhydrin sweat test, and nerve-conduction studies.19 Electrodiagnostic testing is the most conclusive and widely accepted method of determining nerve dysfunction.
Provocative tests are highly suggestive of a nerve lesion if results are positive but do not rule out a problem if results are negative. Tests of nerve dysfunction are summarized in Table 39-3. Instructions for administration of the most common tests are described in the following paragraphs.
TABLE 39-3
Clinical Tests for Specific Nerve Dysfunction in the Upper Extremity
| Condition | Pattern of Impairment | Characteristic Findings/Special Tests |
| Thoracic outlet syndrome | Nonspecific paresthesias or heaviness with sustained positioning or activity above shoulder level or behind the plane of the body | Adson test |
| Roos test | ||
| Adverse neural tension | Nonspecific pain or paresthesias with reaching in positions that place tension on brachial plexus nerves | Positive upper limb screening test |
| Carpal tunnel syndrome | Pain and numbness, primarily in the thumb, index, and middle fingers | Tinel’s sign at the wrist |
| Phalen’s test | ||
| Usually worse at night and may be associated with activity | Reverse Phalen’s test | |
| Carpal compression test | ||
| Cubital tunnel syndrome | Compression of ulnar nerve at elbow | Elbow flexion test |
| Ulnar nerve paralysis | Paralysis of the adductor pollicis muscle | Froment’s sign |
| Jeanne’s sign | ||
| Wartenberg’s sign |
Adson Maneuver: The examiner palpates the radial pulse on the arm to be tested. The client then rotates the head toward the arm being tested. The client then extends the head and holds a deep breath while the arm is being laterally rotated and extended. Disappearance or slowing of pulse rate is considered a positive test result suggesting presence of thoracic outlet syndrome.1,66
Roos Test: In this test the client maintains a position of bilateral arm abduction to 90 degrees, shoulder external rotation, and elbow flexion to 90 degrees for 3 minutes while slowly alternating between an open hand and a clenched fist. Inability to maintain this position for the full 3 minutes or onset of symptoms is considered a positive test result for thoracic outlet syndrome.66,88
Upper Limb Tension Test (Brachial Plexus Tension Test): This test is designed to screen for symptoms that are produced when tension stress is placed on the brachial plexus. The maneuver described primarily stresses the median nerve and C5-C7 nerve roots. Adverse neural tension in the ulnar or radial nerves may also be tested. However, we have found that using the median nerve test as a screening device establishes a marker against which to gauge the success of intervention. Although some authors recommend using the neural tension tests for intervention as well as assessment, this has not been the practice of the authors. The occupational therapist should use this screening process to rule out or confirm the involvement of more proximal structures.
The client is positioned supine, and the examiner takes the client’s arm into abduction and external rotation behind the coronal plane at the shoulder. The shoulder girdle is fixed in depression. The elbow is then passively extended with the wrist in extension and the forearm in supination. Symptoms of stretch or ache in the cubital fossa or tingling in the thumb and first three fingers indicate tension on the median nerve. Lateral flexion of the neck to the opposite side will amplify symptoms by increasing tension on the dura mater. Elbow extension ROM should be compared with the uninvolved side to indicate the degree of restriction.16,66
Tinel’s Sign: The test is performed by tapping gently along the course of a peripheral nerve, starting distally and moving proximally to elicit a tingling sensation in the fingertip. The point at which tapping begins to elicit a tingling sensation is noted and indicates the approximate location of nerve compression. This test is also used after nerve repair to determine the extent of sensory axon growth.92
Phalen’s Test and Reverse Phalen’s Test: Phalen’s test is performed by fully flexing the wrists with the dorsum of the hands pressing against each other. Reverse Phalen’s is performed by holding the hands in the “prayer” position for 1 minute. The test results are positive if the client reports tingling in the median nerve distribution (thumb, index, middle and radial aspect of ring finger) within 1 minute.
Carpal Compression Test: The examiner places pressure over the median nerve in the carpal tunnel for up to 30 seconds. The test result is positive if tingling occurs in the median nerve distribution. The combination of wrist flexion and compression of the median nerve for 20 seconds has been found to be more sensitive than other provocative tests used alone.96
Elbow Flexion Test: The elbow flexion test is used to screen for cubital tunnel syndrome (compression of the ulnar nerve in the cubital tunnel). The client is asked to fully flex the elbows with the wrists fully extended for a period of 3 to 5 minutes. The test result is positive if tingling is reported in the ulnar nerve distribution of the forearm and hand (ulnar ring finger and small finger).66
Quick Tests for Motor Function in the Peripheral Nerves: The ulnar nerve may be tested by asking the client to pinch with the thumb and index finger and palpating the first dorsal interosseous muscle. Another test for ulnar nerve paralysis involves asking a client to grasp a piece of paper between the thumb and index finger. When the examiner pulls away the paper, the tip of the thumb flexes because of absence of the adductor pollicis muscle (Froment’s sign). If the MP joint of the thumb also extends at the same time, it is known as Jeanne’s sign. Wartenberg’s sign for ulnar nerve compression is positive if the client is unable to adduct the small finger when the hand is placed palm down on the table with the fingers passively abducted.
The radial nerve may be tested by asking the client to extend the wrist and fingers. Median nerve function is tested by asking the client to oppose the thumb to the fingers and flex the fingers.66
Sensory Mapping: Detailed sensibility testing can begin with sensory mapping of the entire volar surface of the hand.19 The hand must be supported by the examiner’s hand or be resting in a medium such as therapy putty to stabilize the hand during testing. The examiner draws a probe, usually the eraser end of a pencil, lightly over the skin from the area of normal sensibility to the area of abnormal sensibility. The client must immediately report the exact location where the sensation changes. This is done from proximal to distal and radial and ulnar to medial directions. The areas are carefully marked and transferred to a permanent record. Mapping should be repeated at monthly intervals during nerve regeneration.
Sympathetic Function: Recovery of sympathetic response such as sudomotor (sweating), vasomotor (temperature discrimination), pilomotor (gooseflesh), and trophic (skin texture, nail, and hair growth) may occur early but does not correlate with functional recovery.31 O’Riain observed that denervated skin does not wrinkle.82 Therefore, nerve function may be tested by immersing the hand in water for 5 minutes and noting the presence or absence of skin wrinkling. This test may be especially helpful in diagnosing a nerve lesion in young children. The ability to sweat is also lost with a nerve lesion. A Ninhydrin test evaluates sweating of the finger.79
The wrinkle test and the Ninhydrin test are objective tests of sympathetic function. Recovery of sweating has not been shown to correlate with the recovery of sensation, but the absence of sweating correlates with the lack of discriminatory sensation. Other signs of sympathetic dysfunction are smooth, shiny skin; nail changes; and “pencil-pointing” or tapering of the fingers.105
Nerve Compression and Nerve Regeneration: Sensibility testing is performed to assess the recovery of a nerve following laceration and repair, as well as to determine the presence of a nerve compression syndrome and the return of nerve function after surgical decompression or the efficacy of conservative intervention to reduce compression. Therefore, tests such as vibratory tests may be interpreted differently, depending on the mechanism of nerve dysfunction. In the following section, tests are described and differences drawn as appropriate to assist the therapist in selecting the correct assessment technique, as well as in planning treatment based on the evaluative measures.
During the first 2 to 4 months after nerve suture, axons regenerate and travel through the hand at a rate of about 1 mm per day, or 1 inch (2.54 cm) per month. Tinel’s sign may be used to follow this regeneration. As regeneration occurs, hypoesthesias develop. Although this hypersensitivity may be uncomfortable for the client, it is a positive sign of nerve growth. An intervention program for desensitization of hypersensitive areas can be initiated as soon as the skin is healed and can tolerate gentle rubbing and immersion in textures. Desensitization is discussed further in the intervention section.
Vibration: Dellon was an early advocate of the use of 30-cycles-per-second (30-cps) and 256-cps tuning forks for assessing the return of vibratory sensation after nerve repair, as regeneration occurs and as a guideline for initiating a sensory re-education program.30,32 However, many clinicians found that use of a tuning fork was not discrete enough to detect sensory abnormalities.
Lundborg has described the use of commercial vibrometers to detect abnormal sensation.64 This method was less subjective and thought to be more reliable. In a study of induced median nerve compression, Gelberman found that vibration and touch perception as measured by the Semmes-Weinstein monofilaments are altered before two-point discrimination because they measure a single nerve fiber innervating a group of receptor cells.44 Two-point discrimination is a test of innervation density that requires overlapping sensory units and cortical integration. Thus, two-point discrimination is altered after nerve laceration and repair but remains normal if the nerve is compressed, as long as there are links to the cortex. Bell-Krotoski has also found normal two-point values in the presence of decreased sensory function.10
Vibration and the Semmes-Weinstein test are more sensitive in picking up a gradual decrease in nerve function in the presence of nerve compression where the nerve circuitry is intact. They also correlate with decreases in the potential amplitude of sensory nerve action as measured by nerve conduction studies.95 Therefore, Semmes-Weinstein and electrical testing are reliable and sensitive tests for early detection of carpal tunnel syndrome and other nerve compression syndromes. Semmes-Weinstein can be performed in the clinic with no discomfort to the client and is an excellent screening tool when nerve compression is suspected.
Touch Pressure: Moving touch is tested using the eraser end of a pencil. The eraser is placed in an area of normal sensibility and, with application of light pressure, is moved to the distal fingertip. The client notes when the perception of the stimulus changes. Light and heavy stimuli may be applied and noted.34 Constant touch is tested by pressing with the eraser end of a pencil, first in an area with normal sensibility and then placing the eraser distally by lifting up the pencil before placement. The client responds when the stimulus is altered; again, light and heavy stimuli may be applied.34
The Semmes-Weinstein monofilaments are the most accurate instruments for assessing cutaneous pressure thresholds.10 The original testing equipment consisted of 20 nylon monofilaments housed in plastic handheld rods. Many therapists today use the smaller five-pack filaments. These five monofilaments correspond to the categories of light touch sensation described later. The diameter of the monofilaments increases, and when applied correctly, they exert a force ranging from 4.5 mg to 447 g. Markings on the probes range from 1.65 to 6.65 but do not correspond to the grams of force of each rod. Normal fingertip sensibility has been found to correspond to the 2.44 and 2.83 probes.
The monofilaments must be applied perpendicularly to the skin and are applied just until the monofilament bends. The skin should not blanch when the monofilament is applied. Probes 1.65 through 2.83 are bounced three times. Probes marked 3.22 to 4.08 are applied three times with a bend in the filament, and probes marked 4.17 to 6.65 are applied once. The larger monofilaments do not bend; therefore, skin color must be observed to determine how firmly to apply the probe.
The examiner should begin with a probe in the normal range and progress through the rods in increasing diameters to find the client’s threshold for touch throughout the volar surface.10 A grid should be used to record the responses so that varying areas of touch perception can be demonstrated. Two correct responses out of three applications are necessary for an area to be considered as having intact sensibility. It is preferable to place the monofilaments randomly rather than to concentrate on an area, to allow the nerves recovery time. When a filament is placed three times, it should be held for a second, rested for a second, and reapplied. Results can be graded from normal light touch (probes 2.83 and above) to loss of protective sensation (probes 4.56 and below). Diminished light touch and diminished protective sensation are in the range reflected by the central probes (probes 3.22 to 4.31).10
Two-Point and Moving Two-Point Discrimination: Discrimination, the second level of sensibility assessment, requires the subject to distinguish between two direct stimuli. Static or stationary two-point discrimination measures the slowly adapting fibers. The two-point discrimination test, first described by Weber in 1853, was modified and popularized by Moberg,79 who was interested in a tool that would assess the functional level of sensation. A variety of devices have been proposed to use in measuring two-point discrimination. The bent paper clip is inexpensive but often has burrs on the metal tip. Other devices include industrial calipers* and the Disk-Criminator.65† A device with parallel prongs of variable distance and blunted ends should produce replicable results.
The test is performed as follows92:
1. The client’s vision is occluded.
2. An area of normal sensation is tested as a reference, using blunt calipers or a bent paper clip.
3. The calipers are set 10 mm apart and are randomly applied, starting at the fingertip and moving proximally and longitudinally in line with the digital nerves, with one or two points touching. The caliper should not blanch the skin.
4. The distance is decreased until the client no longer feels two distinct points, and that distance is measured.
Between 3 and 4 seconds should be allowed between applications, and the client should have four correct responses out of five administrations. Because this test indicates sensory function, it is usually administered at the tips of the fingers. It may be used proximally to test nerve regeneration. Normal two-point discrimination at the fingertip is 6 mm or less.
Moving two-point discrimination measures the innervation density of the quickly adapting nerve fibers for touch. It is slightly more sensitive than stationary two-point discrimination. The test is performed as follows32:
1. The client’s vision is occluded.
2. An area of normal sensation is tested as a reference, using blunt calipers or a bent paper clip.
3. The fingertip is supported by the examining table or the examiner’s hand.
4. The caliper, separated 5 mm to 8 mm, is moved longitudinally from proximal to distal in a linear fashion along the surface of the fingertip. One and two points are randomly alternated. The client must correctly identify the stimulus in seven out of eight responses before proceeding to a smaller value. The test is repeated down to a separation of 2 mm.
Two-point values increase with age in both sexes, with the smallest values occurring between the ages of 10 and 30 years. Women tend to have smaller values than men, and there is no significant difference between dominant and nondominant hands.62 (See Chapter 23 for further information on the evaluation of sensation.)
Modified Moberg Pickup Test: Recognition of common objects is the final level of sensory function. Moberg used the phrase tactile gnosis to describe the ability of the hand to perform complex functions by feel. Moberg described the pick-up test in 1958,79 and it was later modified by Dellon.32 This test is used with either a median nerve injury or an injury to a combination of median and ulnar nerves. It takes twice as long to perform the tests with vision occluded as with vision unimpaired. The test is performed as follows:
1. Nine or 10 small objects (e.g., coins or paper clips) are placed on a table, and the client is asked to place them, one at a time, in a small container as quickly as possible, while looking at them. The client is timed.
2. The test is repeated for the opposite hand with vision.
3. The test is repeated for each hand with vision occluded.
4. The client is asked to identify each object one at a time, with and then without vision.
It is important to observe any substitution patterns that may be used when the client cannot see the objects.
Edema Assessment: Hand volume is measured to assess the presence of extracellular or intracellular edema. Volume measurement is generally used to determine the effect of intervention and activities. By measuring volume at different times of the day, the therapist can measure the effects of rest versus activity, as well as the effects of splinting or intervention designed to reduce edema.
A commercial volumeter28 may be used to assess hand edema. The volumeter has been shown to be accurate to 10 ml106 when used in the prescribed manner. Variables that have been shown to decrease the accuracy of the volumeter include the use of a faucet or hose that introduces air into the tank during filling, movement of the arm within the tank, inconsistent pressure on the stop rod, and the use of a volumeter in a variety of places. The same level surface should always be used.101 The evaluation is performed as follows (Figure 39-1):
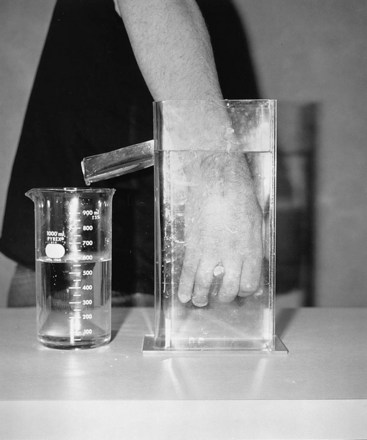
FIGURE 39-1 Volumeter is used to measure volume of both hands for comparison. Increased volume indicates the presence of edema.
1. A plastic volumeter is filled and allowed to empty into a large beaker until the water reaches spout level. The beaker is then emptied and dried thoroughly.
2. The client is instructed to immerse the hand in the plastic volumeter, being careful to keep the hand in the midposition.
3. The hand is lowered until it rests gently between the middle and ring fingers on the dowel rod. It is important that the hand not press onto the rod.
4. The hand remains still until no more water drips into the beaker.
5. The water is poured into a graduated cylinder. The cylinder is placed on a level surface, and a reading is made.
A method of assessing edema of an individual finger or joint is circumferential measurement using either a circumference tape* or jeweler’s ring-size standards. Measurements should be made before and after intervention and especially after the application of thermal modalities or splinting. Although clients often have subjective complaints relating to swelling, objective data of circumference or volume will help the therapist to assess the response of the tissues to intervention and activity. Edema control techniques are discussed later in this chapter.
Grip and Pinch Strength
UE strength is usually assessed after the healing phase of trauma. Strength testing is not indicated after recent trauma or surgery. Testing should not be performed until the client has been cleared for full-resistive activities, usually 8 to 12 weeks after injury.
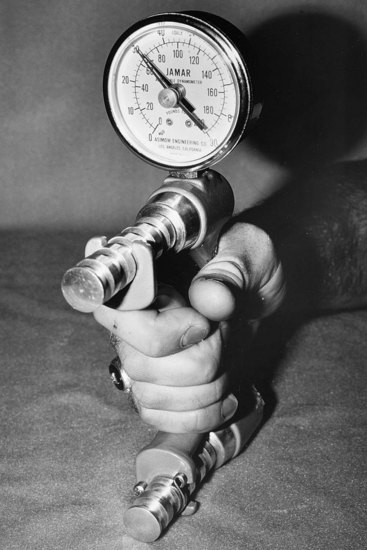
A standard adjustable-handle dynamometer is recommended for assessing grip strength (Figure 39-2). The subject should be seated with the shoulder adducted and neutrally rotated, the elbow flexed at 90 degrees,69 forearm in the neutral position, and wrist between 0 and 30 degrees extension and between 0 and 15 degrees of ulnar deviation. Three trials are taken of each hand, with the dynamometer handle set at the second position.73 The examiner should hold the dynamometer lightly to prevent accidental dropping of the instrument. A mean of the three trials should be reported. The noninjured hand is used for comparison. Normative data may be used to compare strength scores.55,72 Variables such as age will affect the strength measurements.
Pinch strength should also be tested, using a pinch gauge. The pinch gauge has been found to be the most accurate.72 Two-point pinch (thumb tip to index fingertip), lateral or key pinch (thumb pulp to lateral aspect of the middle phalanx of the index finger), and three-point pinch (thumb tip to tips of index and middle fingers) should be evaluated. As with the grip dynamometer, three successive trials should be obtained and compared bilaterally (Figure 39-3).41
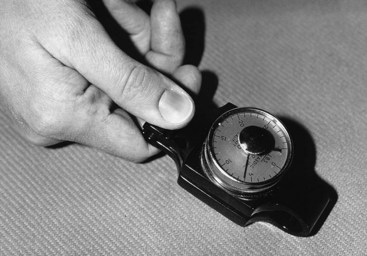
FIGURE 39-3 Pinch gauge is used to evaluate pinch strength to a variety of prehension patterns of pinch.
Manual muscle testing is also used to test UE strength. Accurate assessment is especially important when the client is being prepared for tendon transfers or other reconstructive surgery. The student who wishes to study kinesiology of the UE is referred especially to Brand’s work.14 Additionally, muscle testing is addressed in Chapter 22.
Maximal voluntary effort during grip, pinch, or muscle testing will be affected by pain in the hand or extremity, and the therapist should note if the client’s ability to exert full force is limited by subjective complaints. Localization of the pain symptoms and consistency in noting pain will help the therapist evaluate the role that pain is playing in the recovery from injury. Pain problems are discussed in more detail later in this chapter.
Functional Assessment
Assessment of hand function or performance is important because the physical assessment does not measure the client’s ingenuity and ability to compensate for loss of strength, ROM, sensation or the presence of abnormalities.22
The physical assessment should precede the functional assessment because awareness of physical dysfunction can result in a critical analysis of functional impairment and an understanding of the reasons that the client functions as he or she does.74
The occupational therapist should observe the effect of the hand dysfunction on the use of the hand during ADLs. In addition, some type of a standardized performance test, such as the Jebsen Test of Hand Function49 or the Quantitative Test of Upper Extremity Function,22 should be administered.
The Jebsen Test of Hand Function49 was developed to provide objective measurements of standardized tasks with norms for client comparison. It is a short test that is assembled by the administrator. It is easy to administer and inexpensive. The test consists of seven subtests, which test writing a short sentence, turning over 3 × 5-inch cards, picking up small objects and placing them in a container, stacking checkers, simulated eating, moving empty large cans, and moving weighted large cans. Norms are provided for dominant and nondominant hands for each subtest and further categorized by gender and age. Instructions for assembling the test, as well as specific instructions for administering it, are provided by the authors.49 This has been found to be a good test for overall hand function.
The Quantitative Test of Upper Extremity Function described by Carroll was designed to measure ability to perform general arm and hand activities used in daily living.22 It is based on the assumption that complex UE movements used to perform ordinary ADLs can be reduced to specific patterns of grasp and prehension of the hand, supination and pronation of the forearm, flexion and extension of the elbow, and elevation of the arm.
The test consists of six parts: grasping and lifting four blocks of graduated sizes to assess grasp; grasping and lifting two pipes of graduated sizes to test cylindrical grip; grasping and placing a ball to test spherical grasp; picking up and placing four marbles of graduated sizes to test fingertip prehension or pinch; putting a small washer over a nail and putting an iron on a shelf to test placing; and pouring water from pitcher to glass and glass to glass. In addition, to assess pronation, supination, and elevation of the arm, the therapist instructs the subject to place his or her hand on top of the head, behind the head, and to the mouth and write his or her name. The test uses simple, inexpensive, and easily acquired materials. Details of materials and their arrangement, test procedures, and scoring can be found in the original source.22
Other tests that are useful in the assessment of hand dexterity are the Crawford Small Parts Dexterity Test,27 the Bennett Hand Tool Dexterity Test,11 the Purdue Pegboard Test,98 and the Minnesota Manual Dexterity Test.78 The VALPAR Corporation* has developed a number of standardized tests that measure an individual’s ability to perform work-related tasks. They provide information about the test taker’s results, compared with industry performance standards. All of these tests include comparison with normal subjects working in a variety of industrial settings. This information can be used in predicting the likelihood of successful return to a specific job. The tests are especially useful when administering a work capacity evaluation. Tests may be purchased and come with instructions for administration of the test and the standardized norms. Melvin listed a variety of additional hand function tests.74 Further discussion of vocational evaluation can be found in Chapter 14.
Intervention
In treating a hand or wrist fracture, the surgeon attempts to achieve good anatomic position through either a closed (nonoperative) or open (operative) reduction. Internal fixation with Kirschner wires, metallic plates, or screws may be used to maintain the desired position. External fixation may also be used with internal fixation. The hand is usually immobilized in wrist extension and MP joint flexion, with extension of the distal joints whenever the injury allows this position. Trauma to bone may also involve trauma to tendons and nerves in the adjacent area. Intervention must be geared toward the recovery of all injured structures, and this fact may influence treatment of the fracture.
OT may be initiated during the period of immobilization, which is usually 3 to 5 weeks. Uninvolved fingers of the hand must be kept mobile through the use of active motion. Edema should be carefully monitored, and elevation is required whenever edema is present.
As soon as there is sufficient bone stability, the surgeon allows mobilization of the injured part. The surgeon should provide guidelines for the amount of resistance or force that may be applied to the fracture site. Activities that correct poor motor patterns and encourage use of the injured hand should be started as soon as the hand is pain free. Early motion will prevent the adherence of tendons and reduce edema through stimulation of the lymphatic and blood vessels.
As soon as the brace or cast is removed, the client’s hand must be evaluated. If edema remains present, edema control techniques can be initiated using techniques described later in this chapter. A baseline ROM should be established, and the application of appropriate splints may begin. A splint may be used to correct abnormal joint changes that have resulted from immobilization, or it may be used to protect the finger from additional trauma to the fracture site. An example of this type of splinting would be the application of a Velcro “buddy” splint (Figure 39-4). A dorsal block splint that limits full extension of the finger may be used after a fracture or dislocation of the PIP joint. A dynamic splint may be used to achieve full ROM or to prevent the development of further abnormal joint changes at 6 to 8 weeks after fracture.
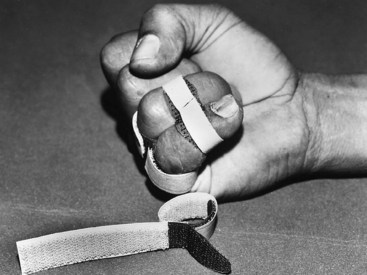
FIGURE 39-4 Velcro “buddy” splint may be used to protect the finger following fracture or to encourage movement of a stiff finger. (Splint available from Smalley and Bates, Inc.)
Intra-articular fractures may result in injury to the cartilage of the joint, causing additional pain and stiffness. An x-ray examination will indicate whether the joint surface has been damaged, which might limit the treatment of the joint. Joint pain and stiffness after fracture without the presence of joint damage should be alleviated by a combination of thermal modalities, restoration of joint play, or joint mobilization and corrective and dynamic splinting followed by active use. Resistive exercise can be started when bony healing has been achieved.
Wrist fractures are common and may present special problems for the surgeon and therapist. Colles fractures of the distal radius are the most common injury to the wrist12 and may result in limitations in wrist flexion and extension, as well as pronation and supination resulting from the involvement of the distal radioulnar joint. External fixators, which may be used with or without internal fixation, are now common in the reduction of distal radius fractures. The external fixator maintains the anatomic relationship between the radius and ulna by maintaining the length of the radius, often with excellent results. The therapist must carefully instruct the client in active ROM of the fingers and proper care of the pin sites while the fixator is in place. Use of splints, active motion that emphasizes wrist movement, and joint mobilization may be beneficial after removal of the fixator or cast. The Weight Well may be used to provide resistance to wrist motions (Figure 39-5).
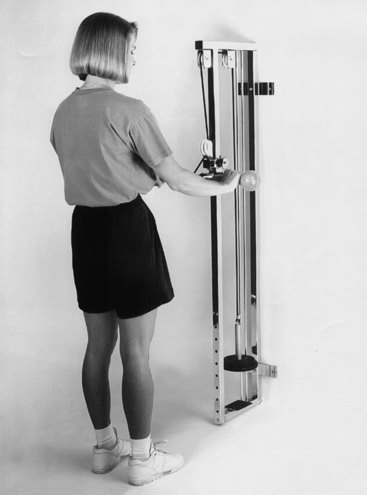
FIGURE 39-5 Weight Well is used for strengthening the upper extremity with progressive resistance applied to weakened musculature and is also useful in retraining prehension of pinch and grip. (Photo courtesy of Karen Schultz Johnson.)
The scaphoid is the second most commonly injured bone in the wrist12 and is often fractured when the hand is dorsiflexed at the time of injury. Fractures to the proximal pole of the scaphoid may result in nonunion because of poor blood supply to this area. Scaphoid fractures require a prolonged period of immobilization, sometimes up to several months in a cast, with resulting stiffness and pain. Care should be taken to mobilize uninvolved joints early.
Trauma to the lunate bone of the wrist may result in avascular necrosis of the lunate or Kienböck’s disease,12 which may result from a one-time accident or repetitive trauma. Lunate fractures are usually immobilized for 6 weeks. Kienböck’s disease may be treated with a bone graft, removal of the proximal carpal row, or partial wrist fusion.
Stiffness and pain are common complications of fractures. The control of edema coupled with early motion and good client instruction and support will minimize these complications, however.
Nerve Injuries
Nerve injury may be classified into the following three categories:
1. Neurapraxia is contusion of the nerve without wallerian degeneration. The nerve recovers function without intervention within a few days or weeks.
2. Axonotmesis is an injury in which nerve fibers distal to the site of injury degenerate, but the internal organization of the nerve remains intact. No surgical intervention is necessary, and recovery usually occurs within 6 months. The length of time may vary, depending on the level of injury.
3. Neurotmesis is a complete laceration of both nerve and fibrous tissues. Surgical intervention is required. Microsurgical repair of the fascicles is common. Nerve grafting may be necessary in situations in which there is a gap between nerve endings.92
Peripheral nerve injuries may occur as a result of disruption of the nerve by a fractured bone, laceration, or crush injury. Symptoms of nerve injuries include weakness or paralysis of muscles that are innervated by motor branches of the injured nerve and sensory loss to areas that are innervated by sensory branches of the injured nerve. Before evaluating the client for nerve loss, the therapist must be familiar with the muscles and areas that are innervated by the three major forearm nerves. A summary of UE peripheral neuropathic conditions can be found in Table 39-4.
TABLE 39-4
Nerve Injuries of the Upper Extremity

AIN, Anterior interosseus nerve; APB, abductor pollicis brevis; APL, abductor pollicis longus; ECRB, extensor carpi radialis brevis; ECRL, extensor carpi radialis longus; ECU, extensor carpi ulnaris; ED, extensor digitorum; EDM, extensor digitorum minimus; EIP, extensor indicis proprius; FDS, flexor digitorum superficialis; EPB, extensor pollicis brevis; EPL, extensor pollicis longus; FCR, flexor carpi radialis; FDP, flexor digitorum profundus; FPB, flexor pollicis brevis; FPL, flexor pollicis longus; MMT, manual muscle test; PIN, posterior interosseus nerve; PQ, pronator quadratus; PT, pronator teres; SRN, superficial radial nerve.
Radial Nerve
The radial nerve innervates the extensor-supinator group of muscles of the forearm, including the brachioradialis, extensor carpi radialis longus, extensor carpi radialis brevis, extensor digitorum communis, extensor digiti minimi, extensor indicis, extensor carpi ulnaris, supinator, abductor pollicis longus, extensor pollicis brevis, and extensor pollicis longus. The sensory distribution of the radial nerve is a strip of the posterior upper arm and the forearm, dorsum of the thumb, and index and middle fingers and radial half of the ring finger to the PIP joints. Sensory loss of the radial nerve does not usually result in dysfunction.
Clinical signs of a high-level radial nerve injury (above the supinator) are pronation of the forearm, wrist flexion, and the thumb held in palmar abduction resulting from the unopposed action of the flexor pollicis brevis and the abductor pollicis brevis.84 Injury to the posterior interosseous nerve spares the extensor carpi radialis longus and brevis. Posterior interosseous nerve syndrome includes normal sensation and wrist extension with loss of finger and thumb extension. Clinical signs of low-level radial nerve injury include incomplete extension of the MP joints of the fingers and thumb. The interossei extend the interphalangeal (IP) joints of the fingers, but the MP joints rest in about 30 degrees of flexion.
A dynamic or static splint, applied to the dorsum of the hand, that provides wrist extension, MP extension, and thumb extension should be provided to protect the extensor tendons from overstretching during the healing phase and to position the hand for functional use (Figure 39-6). A dynamic splint is commonly provided.
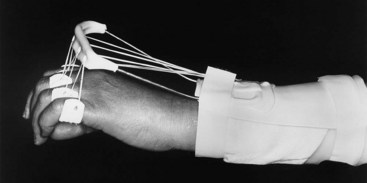
FIGURE 39-6 Low-profile radial nerve splint is carefully balanced to pull metacarpophalangeal (MP) joints into extension when the wrist is flexed and allows the MP joints to fall into slight flexion when the wrist is extended, thus preserving normal balance between two joints and preserving joint contracture. (Splint courtesy of Judy C. Colditz, Raleigh Hand Rehabilitation Center.)
Median Nerve
The median nerve innervates the flexors of the forearm and hand and is often called the “eyes” of the hands because of its importance in sensory innervation of the volar surface of the thumb, index, and middle fingers. Median nerve loss may result from lacerations, as well as from compression syndromes of the wrist, such as carpal tunnel syndrome.
Motor distribution of the median nerve is to the pronator teres, palmaris longus, flexor carpi radialis, flexor digitorum profundus of the index and middle fingers, flexor digitorum superficialis, flexor pollicis longus, pronator quadratus, abductor pollicis brevis, opponens pollicis, superficial head of the flexor pollicis brevis, and first and second lumbricals.
Sensory distribution of the median nerve is to the volar surface of the thumb, index, and middle fingers; radial half of the ring finger and dorsal surface of the index and middle fingers; and radial half of the ring finger distal to the PIP joints.
Clinical signs of a high-level median nerve injury are ulnar flexion of the wrist caused by loss of the flexor carpi radialis, loss of palmar abduction, and opposition of the thumb. Active pronation is absent, but the client may appear to pronate with the assistance of gravity. In a wrist-level median nerve injury, the thenar eminence appears flat and there is a loss of thumb flexion, palmar abduction, and opposition.84
The sensory loss associated with median nerve injury is particularly disabling because there is no sensation to the volar aspects of the thumb and index and middle fingers and the radial side of the ring finger. When blindfolded, the client substitutes pinch to the ring and small fingers to compensate for this loss. An injury in the forearm that involves the anterior interosseous nerve does not result in sensory loss. Motor loss includes paralysis of the flexor pollicis longus, the flexor digitorum profundus of the index and middle fingers, and the pronator quadratus. The pronator teres is not affected. Pinch is affected.
Splints that position the thumb in palmar abduction and slight opposition increase functional use of the hand (Figure 39-7). If clawing of the index and middle fingers is present, a splint should be fabricated to prevent hyperextension of the MP joints. Clients report that they avoid use of the hand with a median nerve injury because of lack of sensation rather than because of muscle paralysis. Nevertheless, the weakened or paralyzed muscles should be protected.

Ulnar Nerve
The ulnar nerve in the forearm innervates only the flexor carpi ulnaris and the median half of the flexor digitorum profundus. It travels down the volar forearm through the canal of Guyon, innervating the intrinsic muscles of the hand, including the palmaris brevis, abductor digiti minimi, opponens digiti minimi, flexor digiti minimi, dorsal and volar interossei, third and fourth lumbricals, and medial head of the flexor pollicis brevis. The sensory distribution of the ulnar nerve is the dorsal and volar surfaces of the small finger ray and the ulnar half of the dorsal and volar surface of the ring finger ray.
A high-level ulnar nerve injury results in hyperextension of the MP joints of the ring and small fingers (also called clawing) as a response to overaction of the extensor digitorum communis that is not held in check by the third and fourth lumbricals.86 The IP joints of the ring and small fingers do not demonstrate a great flexion deformity because of the paralysis of the flexor digitorum profundus. The hypothenar muscles and interossei are absent. The wrist assumes a position of radial extension caused by the loss of the flexor carpi ulnaris. In a low-level ulnar nerve injury, the ring and small fingers claw at the MP joints and the IP joints exhibit a greater tendency toward flexion because the flexor digitorum profundus is present. Wrist extension is normal.
Clinical signs of a high-level ulnar nerve injury may include clawhand deformity (as described above) with a loss of the hypothenar and the interosseous muscles. In a low-level ulnar nerve injury, the flexor digitorum profundus and flexor carpi ulnaris are present and unopposed by the intrinsic muscles. There is a positive Froment’s sign. Long-standing compression of the ulnar nerve in the canal of Guyon results in a flattening of the hypothenar area and conspicuous atrophy of the first dorsal interosseous muscle.12
With a low-level ulnar nerve injury a small splint may be provided to prevent hyperextension of the small and ring fingers without limiting full flexion at the MP joints. Stabilization of the MP joints will allow the extensor digitorum communis to extend the IP joints fully (Figure 39-8).
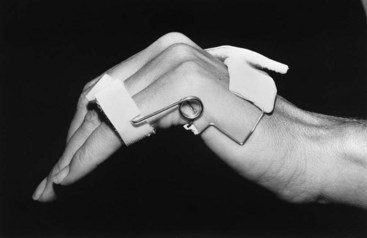
FIGURE 39-8 Dynamic ulnar nerve splint blocks hyperextension of metacarpophalangeal (MP) joints that occurs with paralysis of ulnar intrinsic muscles and allows MP flexion, which maintains normal range of motion of MP joints. (Splint courtesy of Mary Dimick, University of California–San Diego Hand Rehabilitation Center.)
Sensory loss of the ulnar nerve results in frequent injury, especially burns, to the ulnar side of the hand. Clients must be instructed in visual protection of the anesthetic area.
Postoperative Management after Nerve Repair
After nerve repair, the hand is placed in a position that minimizes tension on the nerve. For example, after repair of the median nerve, the wrist is immobilized in a flexed position. Immobilization usually lasts for 2 to 3 weeks, after which protective stretching of the joints may begin. The therapist must exercise great care not to put excessive traction on the newly repaired nerve. A repaired digital nerve will also be protected with flexion of the PIP joint.
Correction of a contracture may take 4 to 6 weeks. Active exercise is the preferred method of gaining full extension, although a light dynamic splint may be applied with the surgeon’s supervision. Splinting to assist or substitute for weakened musculature may be necessary for an extended period during nerve regeneration. Splints should be removed as soon as possible to allow active exercise of the weakened muscles. It is important to instruct the client in correct patterns of motion, however, so that substitution is minimized.
Intervention is initially directed toward the prevention of deformity and correction of poor positioning during the acute and regenerative stages. Clients must be instructed in visual protection of the anesthetic area. ADLs should be assessed, and new methods or devices may be needed for independence. Use of the hand in the client’s work should be assessed, and the client should be returned to employment with any necessary job modifications or adaptations of equipment.
Careful muscle, sensory, and functional testing should be done frequently. As the nerve regenerates, splints may be changed or eliminated. Exercises and activities should be revised to reflect the client’s new gains, and adapted equipment should be discarded as soon as possible.
As motor function begins to return to the paralyzed muscles, a careful program of specific exercises should be devised to facilitate the return. Proprioceptive neuromuscular facilitation (PNF) techniques—such as hold-relax, contract-relax, quick stretch, and icing—may assist a fair-strength muscle and increase ROM. Neuromuscular electrical stimulation (NMES) can also provide an external stimulus to help strengthen the newly innervated muscle. When the muscle has reached a good rating, functional activities should be used to complete the return to normal strength.
Sensory Re-education: Assessment of sensibility is described in some detail earlier in this chapter. This information should be used to prepare a program of sensory re-education after nerve repair.
When a nerve is repaired, regeneration is not perfect and results in fewer and smaller nerve fibers and receptors distal to the repair. The goal of sensory re-education is to maximize the functional level of sensation or tactile gnosis.
Parry first described sensory re-education in 1966,84 and Dellon reported a highly structured sensory re-education program in 1974.33 Dellon divided his program into early- and late-phase training, based on vibratory sensation for early phase and perception of moving and constant touch sensation for late-phase re-education. Both Parry and Dellon used the localization of stimuli and recognition of objects. Higher cortical integration was achieved by focusing attention on the stimuli through visual clues and by employing memory when vision was occluded. The clients were taught to compensate for sensory deficits by improving specific skills and generalizing them to other sensory stimuli. Daily repetition appears to be a necessary component of re-education.
Callahan outlined a program of protective sensory re-education and discriminative sensory re-education if protective sensation is present and touch sensation has returned to the fingertips.19 Waylett-Rendall also described a sensory re-education program using crafts and functional activities, as well as desensitization techniques.100 All programs emphasize a variety of stimuli used in a repetitive manner to bombard the sensory receptors. A sequence of eyes-closed, eyes-open, eyes-closed is used to provide feedback during the training process. Sessions are limited in length to prevent fatigue and frustration. To prevent further trauma, objects must not be potentially harmful to the insensate areas. A home program should be provided to reinforce learning that occurs in the clinical setting.
Researchers have found that sensory re-education can result in improved functional sensibility in motivated clients.19,32,105 Objective measurement of sensation after re-education must be performed and then accurately compared with initial testing to assess the success of the program.
Tendon Transfers: If a motor nerve has not reinnervated its muscle after a minimum period of 1 year after nerve repair, the surgeon may consider tendon transfers to restore a needed motion. The rules of tendon transfer are to evaluate what is absent, what is needed for function, and what is available to transfer.89
Some muscles, such as the extensor carpi radialis longus and the flexor digitorum sublimis to the ring finger, are commonly used for transfers because their motions are easily substituted by the extensor carpi radialis brevis and flexor digitorum profundus, respectively, to the ring finger. The pronator teres is often used to restore wrist extension for radial nerve paralysis. The surgeon may request assistance from the therapist in evaluating motor status to determine the best motor transfer. Therapy before tendon transfer is essential if the motor being used is not of normal strength. A muscle loses a grade of strength when transferred, and a strengthening program of progressive resistive exercises, NMES, and isolated motion will help ensure success of the transfer. There must be full passive ROM of all joints before tendon transfer can be attempted.
After transfer, many clients require instruction to perceive the correct muscle during active use of the transfer. Use of surface Electromyography (EMG)-biofeedback, careful instruction, and supervised activity to note any substitution patterns during active use usually help the client to use the transfer correctly. Therapy must be initiated before the client has time to develop incorrect use patterns. NMES may be used to isolate the muscle and strengthen it postoperatively.
Tendon Injuries
Tendon injuries may be isolated or may occur in conjunction with other injuries, especially fractures or crushes. Flexor tendons injured in the area between the distal palmar crease and the insertion of the flexor digitorum superficialis are considered the most difficult to treat because the tendons lie in their sheaths in this area beneath the fibrous pulley system and any scarring causes adhesions. This area is often referred to as zone two or “no-man’s-land.”
Primary repair of the flexor tendons within zone 2 is most frequently attempted after a clean laceration. Several methods of postoperative management have been proposed with the common goals of promoting gliding of the tendons and minimizing the formation of scar adhesions.
Controlled Mobilization of Acute Flexor Tendon Injuries: Louisville Technique: Dr. Harold Kleinert of the University of Louisville School of Medicine was an early advocate of rubber band traction after repair of flexor tendons in zone two. This technique is often referred to as the Kleinert technique. The doctor and therapist do not actively participate in moving the tendon or finger when this protocol is followed as outlined by Kutz.59
After surgical repair, rubber bands are attached to the nails of the involved fingers, using a suture through the nail or a hook held in place with cyanoacrylate glue. A dorsal blocking splint is fabricated of low-temperature thermoplastic material, with the MP joints held in about 60 degrees of flexion. The splint is constructed so that the IP joints are able to extend fully to the splint. The rubber bands are passed through a safety pin in the palm and are attached to the distal strap of the splint. The rubber bands should be placed in sufficient tension to hold the PIP joints in 40 to 60 degrees of flexion without tension on the rubber bands. The client must be able to fully extend the IP joints actively within the splint, or joint contractures will develop (Figure 39-9).

FIGURE 39-9 After flexor tendon repair, the wrist is placed in 30 degrees flexion with traction applied from the nail through a safety pin pulley in the palm and attached to the proximal strap of the splint. Metacarpophalangeal joints should be maintained in about 70 degrees flexion, allowing full passive interphalangeal joint flexion and active extension.
The client wears the splint 24 hours a day for 3 weeks and is instructed to actively extend the fingers several times a day in the splint, allowing the rubber bands to pull the fingers into flexion. This movement of the tendon through the tendon sheath and pulley system minimizes scar adhesions while enhancing tendon nutrition and blood flow.
The dorsal blocking splint is removed at 3 weeks, and the rubber band is attached to a wristband, which is worn for 1 to 5 additional weeks, depending on the judgment of the surgeon. The primary disadvantage of this technique is that contractures of the PIP joints frequently occur as a result of excessive tension on the rubber band or incomplete IP extension within the splint.
Dynamic extension splinting of the PIP joint can be started at 5 to 6 weeks if a flexion contracture is present. To be successful, this technique requires a motivated client who thoroughly understands the program.
Controlled Passive Motion: Duran and Houser Technique: Duran and Houser suggested the use of controlled passive motion to achieve optimal results after primary repair, allowing 3 to 5 mm of tendon excursion.37 They found this amount sufficient to prevent adherence of the repaired tendons. On the third postoperative day, the client begins a twice-daily exercise regimen of passive flexion and extension of six to eight motions for each tendon. Care is taken to keep the wrist flexed and the MPs in 70 degrees of flexion during passive exercise. Between exercise periods the hand is wrapped in stockinette. At 4 weeks, the protective dorsal splint is removed and the rubber band traction is attached to a wristband. Active extension and passive flexion are performed for an additional week and gradually increased over the next several weeks.
Early Active Motion: As methods of tendon suturing and the suture materials themselves have evolved, some clinicians have begun to prescribe active movement of the repaired tendon within days of surgery. This technique is usually performed only with the most experienced surgeons and therapists working closely together. The condition of the tendon and the technique of repair must be communicated to the therapist, and the client must be closely monitored. As the rate of rupture decreases with more sophisticated repairs, the results after tendon injury have improved.93
There are several well-documented early active motion protocols, but all of the protocols share in common several important factors. First, the tendon repair strength must be sufficient to be able to withstand the forces of active mobilization, and it is generally agreed that a suture four strand repair be performed to use this intervention approach. Second, the timing and the initiation of therapy must be considered. It has been suggested that early active motion be initiated between 2 and 4 days after repair to allow inflammation to subside, thus reducing the amount of force on the tendon during active flexion. Third, the client must be able to comprehend and be compliant with the exercise program for the tendon rehabilitation to be successful and to prevent rupture of the tendon by overstressing the repair site. Finally, for this technique to be successful, the therapist and surgeon must be in good communication and be skilled in the rehabilitation of flexor tendons.
Because early active mobilization of newly repaired flexor tendons involves a somewhat higher risk of rupture if managed incorrectly, it is strongly recommended that this approach be used with the full cooperation of the surgeon. Again, this approach should not be used by an inexperienced therapist or with a poorly compliant client.
Immobilization Technique: A third postoperative program involves complete immobilization for 3 to 4 weeks after tendon repair. Good results have not been consistently achieved with immobilization, and this technique may increase the risk of tendon rupture after repair because a tendon gains tensile strength when submitted to gentle tension at the repair site. It is still the preferred method when treating young children or with a noncompliant client.94
Many practitioners have modified the tendon protocols, using a combination of passive flexion and active extension techniques, on the basis of clinical experience. Protocols are suggested as guidelines, but they vary in actual practice.
Postacute Flexor Tendon Rehabilitation: When active flexion is begun out of the splint after any of the postoperative management techniques described previously, the client should be instructed in exercises to facilitate differential tendon gliding.107 Wehbe has recommended three positions—hook, straight fist, and fist—to maximize isolated gliding of the flexor digitorum superficialis and the flexor digitorum profundus tendons, as well as stretching of the intrinsic musculature and gliding of the extensor mechanism.108 Tendon gliding exercises should be done for 10 repetitions of each position, two or three times a day.
Isolated exercises to assist tendon gliding may also be performed using a blocking splint (Figure 39-10) or the opposite hand (Figure 39-11). The MP joints should be held in extension during blocking so that the intrinsic muscles that act on it cannot overcome the power of the repaired flexor tendons. Care should be taken not to hyperextend the PIP joints and overstretch the repaired tendons.
FIGURE 39-10 Blocking splint can be used to isolate tendon pull-through and joint range of motion by blocking out proximal joints. This splint is being used to facilitate motion at the distal interphalangeal joint following repair of the flexor digitorum profundus tendon.

FIGURE 39-11 Manual blocking of metacarpophalangeal joint during flexion of proximal interphalangeal joint.
After 6 to 8 weeks, passive extension may be started and splinting may be necessary to correct a flexion contracture at the PIP joint. A cylindrical plaster splint may be fabricated to apply constant static pressure on the contracture, as described by Bell-Krotoski (Figure 39-12).9 Static splinting may be especially effective with a flexion contracture greater than 25 degrees. A finger gutter splint may be made using  -inch (0.16-cm) thermoplastic material for static extension at night, which will help maintain extension gains made during the day. Gentle dynamic traction may be applied using a commercial splint such as a spring finger extension assist (Figure 39-13) or one that is fabricated by the therapist (Figure 39-14). Dynamic flexion splinting may be necessary if the client has difficulty regaining passive flexion.

FIGURE 39-12 Plaster cylindrical splint is used to apply static stretch of proximal interphalangeal joint contracture. It is not removed by client and must be replaced frequently by therapist with careful monitoring of skin condition.

FIGURE 39-13 This finger splint is used to increase the extension of the proximal interphalangeal joint. (Splint available from DeRoyal/LMB, DeRoyal Industries, Powell, TN.)
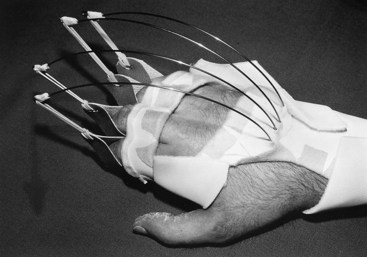
FIGURE 39-14 Dynamic outrigger splint using spring-steel outriggers with a lumbrical block can be used to assist proximal interphalangeal (PIP) joint extension, stretch against scar adhesions of extrinsic flexors, or reduce PIP joint contractures. The therapist must frequently assess proper fit and tension of rubber bands.
At about 8 weeks, the client may begin light resistive exercises and activities. The hand can now be used for light ADLs, but the client should continue to avoid heavy lifting with the affected hand or excessive resistance. Sports activities should be discouraged. Such activities as clay work, woodworking, and macramé are excellent, however. Full resistance and normal work activities can be started 3 months after surgery.
After a hand has sustained a tendon injury, passive versus active limitations of joint motion must be evaluated. Limitations in active motion may indicate joint stiffness, muscle weakness, or scar adhesions.85 If passive motion is greater than active motion, the therapist should consider that tendons may be caught in the scar tissue. The therapist should be able to determine if a tendon is adhering and causing a flexion contracture or if the tendon is free but the joint itself is stiff. Intervention should be based on this type of evaluation.
ROM, strength, function, and sensibility testing (if digital nerves were also injured) should be performed frequently, with splints and activities geared to progress. Although performance of ADLs is generally not a problem, the therapist should ask the client about any problems he or she may have or anticipate. Disuse and neglect of a finger, especially the index finger, are common and should be prevented.
Gains in flexion and extension may continue to be recorded for 6 months postoperatively. A finger with limber joints and minimal scarring preoperatively will function better after repair than one that is stiff and scarred and has trophic skin changes.13 Therefore, it is important that all joints, skin, and scars be supple and movable before reconstructive surgery is attempted. A functional to excellent result is obtained if the combined loss of extension is less than 40 degrees in the PIP and DIP joints of the index and middle fingers and less than 60 degrees in the ring and small fingers94 and if the finger can flex to the palm.13
Flexor Tendon Reconstruction: If the tendon is damaged as a result of a crush injury or if the laceration cannot be cleaned up enough to allow for a primary repair, staged flexor tendon reconstruction may be performed. At the first operation, a Silastic rod is inserted beneath the pulley system and attached to the distal phalanx. Other reconstructive procedures, such as pulley reconstruction, are performed at the same time. A mesothelial cell–lined pseudosheath is formed about the rod, and a fluid similar to synovial fluid is formed in the postoperative recovery phase.60 The second stage is performed about 4 months later, when the digit can be moved passively to the palm. A tendon graft is inserted and the Silastic rod removed. The postoperative program is carried out in the same manner as for a primary tendon repair.48
After a two-stage tendon reconstruction or primary repair, a tenolysis may be performed if there is a substantial difference between the active and passive motion. Tenolysis is usually not performed for 6 months to 1 year after tendon repair. At the time of tenolysis surgery, scar adhesions are removed from the tendon and gliding of the tendons is assessed. Clients are often asked to move their fingers in the operating room at the time of lysis to determine the extent of scar removal.90 Active motion is begun within the first 24 hours. Transcutaneous electrical nerve stimulation (TENS)21 and medications may be used to control pain.
LaSalle and Strickland have recommended a system for evaluating the results of tenolysis surgery by comparing the preoperative passive IP joint motion with the postoperative IP joint motion.60 On the basis of this comparison, LaSalle and Strickland found that in one group of clients undergoing tenolysis 40% had an improvement in motion of 50% or better, compared with their preoperative status.
Extensor Tendons
Treatment of extensor tendon injuries requires a thorough knowledge of the extensor anatomy and biomechanics of the hand. The extensor mechanism of the hand is a highly sophisticated and complicated system. It is divided into seven zones for the fingers and five for the thumb. The level of injury will dictate the intervention regimen. Timelines for immobilization, initiation of motion, and resistive exercise depend on the level of injury and the unique healing time frames for the structures in the different zones.
There are four zones distal to the MP joint and three zones starting at the MP joint and proximal. Zones I and II consist of the structures at the DIP joint and middle phalanx, and injuries to this area are treated similarly. Zones III and IV are the areas over the PIP joint and proximal phalanx; again, these zones are treated similarly depending on the structures repaired. Zone V consists of the area over the MP joint, whereas zone VI is the area over the dorsal hand and zone VII the area over the wrist. In the thumb, zone T1 consists of the area over the DIP joint, T2 the middle phalanx, T3 the MP joint, T4 the proximal phalanx, and T5 the area over the CMC joint and wrist.
Dorsal scar adherence is the most difficult problem after injury to the extensor tendons because of the tendency of the dorsal extensor hood to adhere to the underlying structures and thus limit its normal excursion during flexion and extension. Overstretching the extensor tendon is another common occurrence and can result in an extensor lag, or lack of full active extension.
Extensor tendon injuries distal to the MP joint (zones I to IV) generally require a longer period of immobilization, usually 6 weeks. As with flexor tendon injuries, controlled mobilization is being used with increasing frequency for zones III and IV. A protocol developed by Evans called the short arc motion protocol, or SAM protocol,38 allows for immediate active flexion of the PIP joint to 30 degrees followed by full passive extension. Complete immobilization for 6 weeks or longer is necessary for injuries in zones I and II.
Several abnormal finger joint changes are associated with injuries distal to the MP joints. An injury to zones I or II, when there is a traumatic disruption of the terminal extensor tendon, is called a mallet finger. This joint change is characterized by flexion of the DIP joint and the inability to actively extend this joint. A swan-neck posture is a result of the dorsal displacement of the lateral bands (part of the extensor mechanism) in zone III and results in hyperextension of the PIP joint and flexion of the DIP joint. Another abnormal joint position originating from zone III is known as the boutonnière deformity. A boutonnière deformity results when the common extensor tendon is ruptured and the lateral bands sublux volarly. This volar subluxation of the lateral bands results in flexion of the PIP joint and hyperextension of the DIP joint.
Extensor tendons in zones V, VI, and VII (proximal to the MP joints) become adherent because they are encased in paratenon and synovial sheaths and respond to injury in a way similar to flexor tendons, resulting in either incomplete extension, also known as extensor lag, or incomplete flexion caused by loss of gliding of the extensor tendon.
Evans studied the normal excursion of the extensor digitorum communis in zones V, VI, and VII to suggest guidelines for early passive motion of extensor tendons.38,39 She concluded that 5 mm of tendon glide after repair was safe and effective in limiting tendon adhesions and designed a postoperative splint that allows slight active flexion while providing passive extension.39 The splint is worn for 3 weeks, with the initiation of active motion between the third and fourth weeks. A removable volar splint is used between exercise periods to protect the tendon for 2 additional weeks. Dynamic flexion splinting may be started at 6 weeks after surgery to regain flexion if needed.
Injuries to extensor tendons proximal to the MP joint may be immobilized for 3 weeks. After this period, the finger may be placed in a removable volar splint that is worn between exercise periods for an additional 2 weeks. Progressive ROM is begun at 3 weeks, and if full flexion is not regained rapidly, dynamic flexion may be started at 6 weeks.
Dynamic splints may include a PIP-DIP splint, first described by Hollis and now available commercially (Figure 39-15), a web strap made of lamp wick or elastic, a fingernail hook with rubber band traction, a traction glove, or another splint.
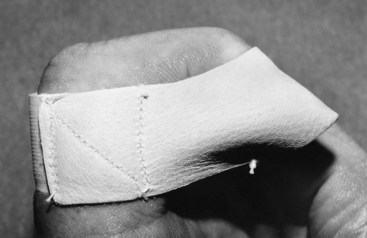
FIGURE 39-15 Proximal interphalangeal (PIP)–distal interphalangeal (DIP) splint may be used to increase flexion of both PIP and DIP joints. Tension can be adjusted with Velcro closure. The therapist should determine wearing time. (Splint available from DeRoyal/LMB, DeRoyal Industries, Powell, TN.)
The client begins exercising within the first 24 hours, and splints are applied as needed. Active exercise is essential, and the client must be carefully instructed in a home program. The client is encouraged to use the hand for all activities except those requiring heavy resistance.
Total Active Motion and Total Passive Motion
Total active motion (TAM) and total passive motion (TPM) are methods of recording joint ROM that are used to compare tendon excursion (active) and joint mobility (passive). They represent the measure of flexion minus extensor lag of three joints. The American Society for Surgery of the Hand has recommended TAM and TPM for use in reporting joint motion.4
TAM is computed by adding the sum of the angles formed by the MP, PIP, and DIP joints in flexion, minus incomplete active extension at each of the three joints. For example, MP joint flexion is 85 degrees with full extension, PIP is 100 degrees and lacks 15 degrees extension, and DIP is 65 degrees with full extension; therefore,

TAM should be measured while the client makes a fist. It is used for a single digit and should be compared with the same digit of the opposite hand or subsequent measurements of the same digit. It should not be used to compute a percentage of loss of impairment. TPM is calculated in the same manner but measures only passive motion.
Complex Injuries
Complex injuries to the hand or injuries to multiple anatomic structures of the hand are some of the most challenging injuries for the therapist to treat. Complex injuries to the hand differ from other types of hand injuries because they involve trauma to multiple anatomic systems of the hand, resulting in a varied clinical picture. Injuries to these anatomic systems include skin, nerve, tendon, skeletal, and vascular injuries. Because of the complex nature of these injuries and because each injured structure has a unique healing time frame, precaution, and treatment approach, there is no set protocol to follow in treating these injuries.
Many of the treatment precautions established for any one of the aforementioned injuries contradict one another. Therefore, the therapist’s challenge is to determine when it is safe for the client to move forward with treatment without risking injury to healing structures. “The therapist must have a thorough knowledge of anatomy, wound healing, biomechanics, and treatment guidelines of various traumatic injuries”23 as well as a “thorough understanding of the injuries and types of repairs performed. That understanding should include location and quality of repair, types of sutures used, associated injuries, and any structures that were injured but not repaired.”23 Consequently, the therapist must maintain close communication with the treating surgeon. Types of complex hand injuries include crush injuries, amputations with or without replantation, and avulsion injuries and may be caused by motor vehicle accidents, explosions, gunshots, and machinery accidents. Gerry, the client discussed in the case study at the beginning of this chapter, sustained a complex injury to his hand. All of the anatomic structures of his hand were affected by the saw injury; his intervention plan needed to take into account the unique healing time frames and precautions for each of these anatomic structures.
Generally, and in the case of Gerry, the rehabilitation process for these types of injuries is divided into three stages: early or protective stage (first 5 to 10 days), intermediate or mobilization stage (1 to 8 weeks after surgery), and late or strengthening stage (6 to 8 weeks after surgery). The therapist and surgeon must be skilled and experienced in the rehabilitation of these injuries.
 Ethical Considerations
Inexperienced therapists should not treat these clients without the supervision of a more experienced therapist or without additional training in and familiarization with treatment protocols for the various injured structures. Explore further reading for treating these types of injuries.
Edema
Although edema is a normal consequence of trauma, it must be quickly and aggressively treated to prevent permanent stiffness and disability. Within hours of trauma, vasodilatation and local edema occur, with an increase in white blood cells in the damaged area.40 The inflammatory response to the injury results in a decrease in bacteria to control infection.
Edema should be controlled early on through elevation, massage, compression, and active ROM. The client is instructed at the time of injury to keep the hand elevated, and a compressive dressing is used to reduce early swelling. Pitting edema appears early and can be recognized as a bloated swelling that creates a pitted appearance when pressed. Pitting may be more pronounced on the dorsal surface, where the venous and lymphatic systems provide return of fluid to the heart. Active motion is especially important to produce retrograde venous and lymphatic flow.
If the swelling continues, a serofibrinous exudate invades the area. Fibrin is deposited in the spaces surrounding the joints, tendons, and ligaments, resulting in reduced mobility, flattening of the arches of the hand, tissue atrophy, and further disuse.35 Normal gliding of the tissues is eliminated, and a stiff, often painful hand is the result. Scar adhesions form and further limit tissue mobility. If untreated, these losses may become permanent.
Early recognition of persistent edema through observation and volume and circumference measurement is important. It may be necessary to use several of the suggested edema control techniques.
Elevation
Early elevation with the hand above the heart is essential. Slings tend to reduce blood flow and should be avoided. Resting the hand on pillows while seated or lying down is effective. Resting the hand on top of the head or using devices that elevate the hand with the elbow in extension has been suggested.
The client should use the hand for ADLs, within the limitations of resistance prescribed by the physician. Light ADLs that can be accomplished while the hand is in the dressing are permitted.
Manual Edema Mobilization
Manual edema mobilization (MEM) is a method of edema reduction based on methods to activate the lymphatic system. These methods include the principles of manual lymph-edema treatment (MLT) massage, medical compression bandaging, exercise, and external compression adapted to meet the specific needs of subacute and chronic postsurgical and poststroke UE edema. The goals are to stimulate the initial lymphatics to absorb excessive fluid and large molecules from the interstitium and to move this lymph centrally. “MEM is not indicated for all hand clients but can be highly effective in cases of recalcitrant subacute or chronic edema. MEM is used to prevent or reduce subacute or chronic high-protein edema as seen in postsurgical, trauma, or post-cerebrovascular accident (CVA) hand edema.”6
MEM is an advanced skill that requires specialized training of the practitioner.
The following overview will acquaint the reader with the techniques involved in MEM:6
• Provide light, stroking massage of the involved area. It has been shown that more than 40 mm Hg pressure will cause collapse of the lymphatic pathways.
• Incorporate exercise before and after massage in a specific sequence, following the recommended guidelines.
• Massage, done in segments, is proximal to distal, then distal to proximal, always following movement of the therapist’s hand in the proximal direction.
• Massage follows the flow of lymphatic pathways.
• Massage reroutes around the incision area.
• Recognize that this method does not cause additional inflammation.
• Include a client home self-massage program.
• Guide intervention to avoid increased edema from other intervention techniques.
• Incorporate low stretch compression bandaging and warmth to soften hardened tissues, especially at night.
Active Range of Motion
Normal blood flow is dependent on muscle activity. Active motion does not mean wiggling the fingers; instead, it means maximal available ROM, performed firmly. Casts and splints must allow mobility of uninjured parts while protecting newly injured structures. The shoulder and elbow should be moved through full available ROM several times a day. The importance of active ROM for edema control, tendon gliding, and tissue nutrition cannot be overemphasized.
Compression
Light compression using Coban wraps* of the affected area (Figure 39-16) or light compressive garments such as those made by Aris† or Jobst50 (Figure 39-17) will help to control swelling, especially at night.

FIGURE 39-16 One-inch Coban is wrapped with minimal pressure from the distal end to the proximal crease of the digit. The client is instructed to be aware of vascular compression or tingling. Coban may be worn several hours a day to reduce edema. (Product available from Medical Products Division/3M, St. Paul, MN.)

Wound Healing and Scar Remodeling
The basis of hand therapy is the histology of wound healing. Acute intervention must be planned using the foundation of tissue healing as a guide. Bones, tendons, nerves, and skin follow a progression of healing phases. Intervention must respect healing tissue to promote recovery and prevent further damage. The therapist must take care to do no harm, and that can be accomplished only with a thorough understanding of the physiology of healing.
The first phase of wound healing, the acute inflammatory phase, is initiated within hours, when the tissues are disrupted through injury or surgery, causing vasodilatation, local edema, and migration of white blood cells and phagocytic cells to the area. The phagocytes remove tissue fragments and foreign bodies and are critical to healing. The inflammatory process can subside or persist indefinitely, depending on the degree of bacterial contamination.40
Fibroblasts, in combination with associated capillaries, begin to invade the wound within the first 72 hours and gradually replace the phagocytes, leading to the second phase: the collagen or granulation phase, between the fifth and fourteenth days. Collagen fiber formation follows the invasion by fibroblasts, so that by the end of the second week the wound is rich with fibroblasts, a capillary network, and early collagen fibers. This increased vascularization results in the erythema (redness) of the new scar.
During the third to sixth weeks, fibroblasts are slowly replaced with scar collagen fibers, and the wound becomes stronger and more able to withstand progressive stresses, leading to the last phase of scar maturation. Tissue strength continues to increase for 3 months or longer. The collagen metabolizes and synthesizes during this period, so that new collagen replaces old while the wound remains relatively stable. Covalent bonding between collagen molecules leads to dense scar adhesions and the formation of whorl-like patterns of collagen deposits, which may be altered as the scar architecture and collagen fiber organization within the wound change over time.35
Myofibroblasts, which are fibroblasts with properties similar to smooth muscle cells, are contractile and cause a shortening of the wound.
Tissues that have restored gliding have different scar architecture from those that do not develop the ability to glide. With gliding, the scar resembles the state of the tissues before injury, whereas the nongliding scar remains fixed on surrounding structures. Controlled tension on the scar has been shown to facilitate remodeling. Scar formation is also influenced by age and the quantity of scar deposited.38
Wound Care and Dressings
Wounds may be described using a “three-color concept” of red, yellow, or black wounds.40 This system simplifies wound description and intervention. Guidelines for treating the three wound types help the therapist choose the proper method of cleansing and dressing wounds. The reader is encouraged to review this material and obtain advanced education before treating wounds.
Topical intervention such as antimicrobials may be used to control bacteria. There are a variety of dressings that can be placed on a wound, including gauze that has been impregnated with petroleum, such as Xeroform gauze or Adaptic. Ointments such as Polysporin are also commonly applied. N-Terface* is a dry mesh fabric that looks and feels like the interfacing used in sewing. Because it is nonadherent, it can be used directly over wounds. Sterile dressings can be applied directly over the N-Terface without ointments or gels. The selection of materials depends on the amount of exudate and the goal of the dressing (which may include removing debris, absorbing exudate, or protecting new cells).
The wound can be cleaned with sterile saline, with dead tissue then being gently removed with sterile swabs. Sterile saline solution can be used to soak off adherent bandages rather than pulling them off the client. The therapist should pour a small amount of saline on the area that is sticking, wait a few moments, and gently pry the dressing off. Dead skin can be debrided using iris scissors and pickups. Soft surgical scrub sponges may be used for cleaning and desensitization of the wound once it is healed and the stitches have been removed. The client also can do this procedure at home. Sterile whirlpool baths may be used for debridement, especially if the wound is infected.
Pressure
A hypertrophic scar or a scar that is randomly laid down and thickened is reduced by the application of pressure, often by means of pressure garments.50* Use of an insert of neoprene† fabric or silicone gel sheets or molds made from Silastic elastomer68‡ under the pressure garment increases the conformity of the garment. Pressure should be applied for most of the 24-hour period, and with a hypertrophic burn scar this intervention should continue for 6 months to 1 year after the injury. Silicone Gel Sheets§ have been found to reduce hypertrophic scarring when worn on a regular basis for 12 to 24 hours a day.
Massage
Gentle to firm massage of the scarred area using a thick ointment rapidly softens scar tissue and should be followed immediately with active hand use so that tendons glide against the softened scar.30 Vibration to the area with a small, low-intensity vibrator will have a similar effect.30,51 Active exercise, using facilitation techniques and against resistance, or functional activity, should follow vibration. Massage and vibration may be started 4 weeks after injury.
Thermal heat in the form of paraffin dips, hot packs, or fluidotherapy, immediately followed by stretching while the tissue cools, provides stretch to the scar tissue. Wrapping the scarred or stiff digit into flexion with Coban during the application of heat often increases mobility in the area. Heat should not be used on insensate areas or if swelling persists.52
Active Range of Motion and Electrical Stimulation
Active ROM provides an internal stretch against resistant scar, and its use cannot be overemphasized. If the client is unable to achieve active motion because of scar adhesions or weakness, the use of a battery-operated NMES may augment the motion.109 Stimulation may be performed by the client for several hours at home and has been shown to increase ROM and tendon excursion.77
Some hand therapists use high-voltage direct current as an intervention to increase motor activity of denervated muscles.2 Ultrasound interventions are often prescribed but may be more effective if done within the first few months after trauma. A continuous passive motion (CPM) device may be used at home to maintain passive ROM and does not promote too much tendon gliding. It should be used for several hours a day for maximal benefit.
Pain Syndromes
Pain, the subjective manifestation of trauma transmitted by the sympathetic nervous system, may interfere with normal functioning. Because pain leads to overprotection of the affected part and disuse of the extremity, it should be treated early.
Desensitization
Stimulation of the large afferent A nerve fibers leads to a reduction of pain by decreasing summation in the slowly adapting, small, unmyelinated C fibers, which carry pain sensation. The A-axons can be stimulated mechanically with pressure, rubbing, vibration, TENS, percussion, and active motion. Desensitization techniques are based on the amplification of inhibitory mechanisms.
Yerxa has described a desensitization program that “employs short periods of contact with three sensory modalities: dowel textures, immersion or contact particles, and vibration.”111 This program allows the client to rank 10 dowel textures and 10 immersion textures on the degree of irritation produced by the stimulus. Intervention begins with a stimulus that is irritating but tolerable. The stimulus is applied for 10 minutes, three or four times a day. The vibration hierarchy is predetermined and based on cycles per second of vibration, the placement of the vibrator, and the duration of the intervention. Complete instructions for assembling the Downey Hand Center desensitization kit can be found in the literature in the references. The Downey Hand Center Hand Sensitivity Test can be used to establish a desensitization intervention program and measure progress in decreasing hypersensitivity.7,111
Neuromas
Neuromas are a complication of nerve suture or amputation. A traumatic neuroma is an unorganized mass of nerve fibers that results from accidental or surgical cutting of the nerve. A neuroma in continuity occurs on a nerve that is intact.97 Neuromas may be clinically identified by a specific, sharp pain. Stimulation of a neuroma usually causes the client to pull the hand away quickly; many clients report a burning pain that radiates up the forearm. Neuromas are disabling because any stimulation causes intense pain and the client avoids the sensitive area.
A generalized desensitization program may not work because the client never develops a tolerance for stimulation of the neuroma. Injection of cortisone acetate may help break up the neuroma, making desensitization techniques more effective. Surgically excising the neuroma or burying the nerve endings deeper may be necessary.
Complex Regional Pain Syndrome
Complex regional pain syndrome (CRPS) is the term that replaced “reflex sympathetic dystrophy (RSD)” to describe a group of disorders that “involve pain and dysfunction of severity or duration out of proportion to those expected from the initiating event.”110
Complex denotes the complex nature of the pain response, which may include inflammation and autonomic, cutaneous, motor, and dystrophic changes. Regional refers to the wide distribution of symptoms beyond the area of the original lesion. Pain is the primary characteristic of this syndrome. It includes spontaneous pain, thermal changes, and at times burning pain. CRPS, type I, corresponds to RSD. Type II corresponds to causalgia, a severe, burning pain first described during the Civil War.
Diagnostic criteria for CRPS must include spontaneous pain beyond the territory of a single peripheral nerve and disproportionate to the inciting event. There is generally edema, skin blood-flow abnormality, or abnormal sudomotor activity in the area of the pain. The diagnosis is excluded by the existence of conditions that would otherwise account for the pain. The hallmarks of CRPS are pain; edema; blotchy-looking, shiny skin; and coolness of the extremity. Sensory changes may occur. Excessive sweating or dryness may occur if there is associated sympathetic dysfunction. The degree of trauma does not correlate with the severity of the pain and may occur after any injury. CRPS, type I may be triggered by a cycle of vasospasm and vasodilatation after an injury. Abnormal edema and constrictive dressings or casts may be a factor in initiating the vasospasm. A vasospasm “causes tissue anoxia and edema and therefore more pain, which continues the abnormal cycle.”83 Circulation is decreased, which causes the extremity to become cool and pale.
Fibrosis after tissue anoxia and the presence of protein-rich exudates result in joint stiffness. The client may cradle the hand and prefer to keep it wrapped. There may be an exaggerated reaction to touch, especially light touch. Osteoporosis may be apparent on x-ray films by 8 weeks after trauma after active use of the hand. Burning pain associated with causalgia (CRPS, type II) is a symptom that may be alleviated by interruption of the sympathetic nerve pathways.
There are three stages of CRPS. Stage I (traumatic stage) may last up to 3 months; it is characterized by pain, pitting edema, and discoloration. Stage II (dystrophic stage) may last an additional 6 to 9 months. Pain, brawny edema, stiffness, redness, heat, and bony demineralization are usually found in this stage. The hand usually has a glossy appearance. Stage III (atrophic stage) may last several years or indefinitely. Pain usually peaks in stage II and decreases in stage III. Thickening around the joints occurs, and fixed contractures may be present. If swelling is present, it is hard and not responsive to techniques such as elevation. The hand may be pale, dry, and cool. There may be substantial dysfunction of the limb.
CRPS is treated by decreasing sympathetic stimulation. It is most responsive in stage I. The first goal of intervention is reduction of the pain and hypersensitivity to light touch. This goal may be accomplished with application of warm (not hot), moist heat; fluidotherapy; gentle handling of the hand; acupressure; desensitization; and TENS before active ROM. Intervention that increases pain (such as passive ROM) should be avoided. Many clients respond well to gentle manual edema mobilization,6 which reduces the edema and reintroduces touching of the hand. Stellate ganglion blocks to eliminate the pain are effective early. They should be coordinated with therapy so that the client can perform active ROM and functional activities during the pain-free period after the blocks. Active ROM is crucial. Gravity-eliminated exercise, either in water or on a tabletop, may be more easily tolerated.
A variety of drugs may be used, including sympatholytic drugs58 that reduce the vasoconstrictive action of the peripheral vessels. Neurontin is often effective in reducing pain and increasing temperature in the extremity. Calcium channel blockers are also effective. Carefully monitored use of narcotics may interrupt the pain cycle and allow active use of the hand. A stress-loading program that has been used effectively to reduce symptoms of RSD (CRPS, type I) has been described.104 It can easily be adapted for home use.
Edema control techniques should be started immediately. Elevation, manual edema mobilization, contrast baths, and high-voltage direct current in water have been found to be effective. Surface EMG-biofeedback training for relaxation may help muscle spasms and increase blood flow, in addition to reducing anxiety.
CRPS frequently triggers shoulder pain and stiffness, resulting in shoulder-hand syndrome or adhesive capsulitis of the shoulder (“frozen shoulder”). Therefore, active ROM and functional activities should include the entire upper quadrant. Skateboard exercises are helpful in the early stages for active-assisted exercise of the shoulder. Splints that reduce joint stiffness should be used as tolerated. Splints must not cause pain or increase swelling. Reliance on immobilization splinting should be avoided because clients with CRPS prefer not to move the affected part, which ultimately makes their symptoms worse.
A tendency to develop CRPS should be suspected in any client who seems to complain excessively about pain, appears anxious, and complains of profuse sweating and temperature changes in the hand. Some clients report nausea associated with touching the hand. Clients tend to overprotect the hand. Early intervention with a structured therapy program of functional activities, group interaction, and exercises that include the hand and shoulder may prevent the occurrence of a fully developed CRPS. This problem is best recognized early and treated with tempered aggressiveness and empathy.
Transcutaneous Electrical Nerve Stimulation
TENS is an intervention technique that is thought to stimulate the afferent A nerve fibers in the high-frequency mode and stimulate the release of morphine-like neural hormones, the enkephalins, in the low-frequency mode. Its efficacy as an intervention for pain control is well documented in medical literature. As with other electrical modalities that may be used by occupational therapists, TENS should be correlated with functional use of the hand.
TENS should be used for intervention periods not to exceed 60 minutes at a time to achieve pain control.54 A TENS diary should be used to record the level of pain on a scale of 1 to 10 before and after intervention, as well as activities that exacerbate the pain. To prevent overuse, TENS may be tapered as the pain-free periods increase. Intervention can be continued as long as necessary to provide pain control.
Joint Stiffness
Joint stiffness has been discussed in other sections of this chapter because it is seen after almost any hand trauma or disease. In the acute phase it may also result from “internal splinting” done unconsciously by the client to avoid pain. It may be prevented by early mobilization, pain control, reduction of edema, active and passive ROM, use of a CPM device, and appropriate splinting techniques. Grades I and II joint mobilization are especially helpful in preparing for passive and active motion and providing pain relief.
Treatment of established joint stiffness is more difficult. Thermal modalities, joint mobilization, ultrasound and electrical stimulation, dynamic splinting, serial casting, and active and passive motion in preparation for functional use should all be included in the intervention regimen.
Cumulative Trauma Disorders
A number of terms are used throughout the world to describe injuries to the musculoskeletal system, including overuse syndromes, repetitive strain injuries, cervical-brachial disorders, repetitive motion injuries, and, in the United States, cumulative trauma disorders (CTDs). There were 281,800 cases of CTDs reported in private industry in the United States in 1992.56 Women account for about two thirds of work-related repetitive motion injuries. According to statistics reported by the U.S. Department of Labor in 2008, there were 334,140 cases of injuries to the neck, shoulder, and upper extremities involving days away from work, but only 30,920 cases were attributed to repetitive motion.102 This decline in reported CTDs may be associated with recognition of the need for early prevention, ergonomic intervention, and proper work station or tool modifications.
The term cumulative trauma disorder should be viewed as a description of the mechanism of injury and not a diagnosis. Even when the presenting symptoms are confusing, attempts to define a specific diagnosis are necessary because “each disorder has a different cause, intervention, and prognosis.”87 Diagnoses associated with cumulative trauma usually fall into one of three categories: tendinitis (such as lateral epicondylitis—tennis elbow or de Quervain’s tenosynovitis), nerve compression syndromes (such as carpal tunnel syndrome or cubital tunnel syndrome), or myofascial pain.
Cumulative trauma occurs when force is applied to the same muscle or muscle group, causing an inflammatory response in the tendon or muscle.87 Muscle fatigue is an important aspect of cumulative trauma. Excessive use of the muscle or body system (overuse or overexertion) is experienced as a muscle cramp. Acute overuse is relieved by rest, but chronic fatigue is not relieved by rest. The amount of fatigue is related to the amount of force and the duration of force application.
Fatigue occurs more quickly with high force. If force is maintained, repetitions must be reduced to allow recovery. Therefore, if the force is decreased while repetitions are maintained and recovery time is adequate, harm is less likely to occur. The combination of repetitions without adequate recovery time and high force establishes an environment that is likely to lead to injury. Byl found that repetitive hand opening and closing may lead to motor control problems and the development of focal hand dystonias through a degradation of the cortical representation.18 Applying this research may help therapists develop more effective intervention programs for cumulative trauma and chronic pain.
Intervention may be divided into phases. Acute-phase intervention is geared toward decreasing the inflammation through dynamic rest. Splints are used for immobilization. Splinting alone may relieve symptoms; splinting may be combined with cortisone injections to reduce inflammation. Icing, contrast baths, ultrasound phonophoresis, iontophoresis (the movement of ions through biologic material under the influence of an electric current), and interferential and high-voltage electrical stimulation have all been found to be effective in reducing pain and decreasing inflammation. Nonsteroidal anti-inflammatory drugs are also frequently used. When splints are used, they should be removed frequently during the day for stretching of the affected musculature (e.g., the extensor group with lateral epicondylitis) to maintain or increase muscle length and to prevent joint stiffness. Painful activities should be avoided during the dynamic rest phase. Vibration is contraindicated because vibration may contribute to inflammatory problems.
As the acute symptoms decrease, the client begins the exercise phase of intervention. After slow stretching warms up the muscles, the client begins controlled progressive exercise. Resistance should be increased slowly, and the frequency, intensity, and duration of exercises should be monitored and adjusted in response to pain and fatigue levels.17
Clients are instructed to continue stretching three times a day, especially before activity, for an indefinite time. Proper body mechanics are critical in the long-term control of inflammatory problems, so clients must become aware of what triggers their symptoms and learn early intervention if symptoms reappear. Icing, splints, stretching, and modified activities combined with correct body mechanics are usually effective. The key is that the clients learn self-management techniques and take an active role in their intervention.
Work-related risk factors for CTDs include the following:5
An assessment of the job site, tools used, and hand position during work activities may be indicated with the client whose symptoms are related to job demands. Modification of the equipment used and strengthening of the dominant muscle groups and their antagonist muscles may permit continued employment and control the inflammatory problem.
Tendinitis (inflammation of the tendon) and tenosynovitis (inflammation of the tendon sheath) are frequently seen in cumulative trauma. The cycle of overuse leading to microtrauma, swelling, pain, and limitations in movement is followed by rest, disuse, and weakness. Normal activity is resumed, and the cycle begins again.
Clients usually have a combination of localized pain, swelling, pain with resisted motion of the affected musculotendinous unit, limitations in motion, weakness, and crepitation of the tendons. Symptoms are reproduced with activity or work simulation. Using functional grades to describe the associated symptoms assists in evaluation, as well as in monitoring of improvement (Table 39-5).53 Although isometric grip strength may be normal, wrist and forearm strength are often decreased and out of balance. Dynamic grip strength may be more limited because tendon gliding is more likely to increase inflammation and pain. Muscle imbalance leads to positioning and substitution patterns that may result in worsening or spreading of symptoms.
TABLE 39-5
Functional Grading of Cumulative Trauma Disorders
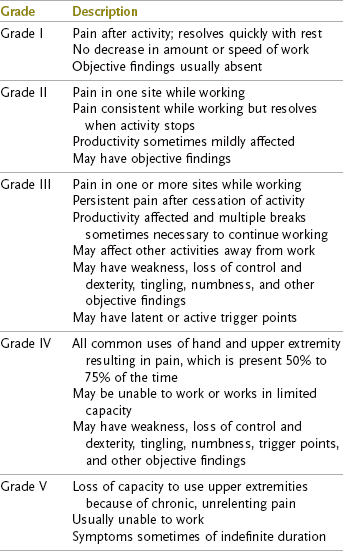
From Kasch MC: Therapist’s evaluation and treatment of upper extremity trauma disorders. In Mackin EJ, et al, editors: Rehabilitation of the hand and upper extremity, ed 5, St. Louis, 2002, Mosby.
Nerve compression syndromes, especially carpal tunnel syndrome, are frequently seen.63 Carpal tunnel syndrome is caused by pressure on the median nerve as it travels beneath the transverse carpal ligament at the volar surface of the wrist.43 The syndrome is associated with increased pressure in the carpal canal because of trauma, edema, retention of fluids as a result of pregnancy, flexor tenosynovitis, repetitive wrist motions, or static loading of the wrist.
Symptoms are night pain that is severe enough to waken the client; tingling in the thumb and index and middle fingers; and, if advanced, wasting of the thenar musculature caused by pressure on the motor branch of the nerve. Early carpal tunnel syndrome may be recognized during a thorough nerve evaluation.
Conservative intervention is usually attempted first and includes splinting of the wrist in no more than 20 degrees extension, contrast baths to reduce edema, wearing of Isotoner gloves, and activity analysis. A semiflexible or neoprene splint rather than a completely rigid splint may be used to provide support while allowing a small amount of flexion and extension for greater functional use in carpal tunnel syndrome.
Ultrasound phonophoresis and iontophoresis may be used to reduce inflammation, and icing techniques are beneficial. Specific strengthening exercises of the wrist, fingers, and thumb should be given when the pain and inflammation have been controlled.
In 1988, 35,000 carpal tunnel releases were performed in the United States. In 2002, this number climbed to more than 200,000.100 Most clients report a relief of numbness, but many have persistent pain. Therapy is often provided after surgical release and may include a combination of ultrasound to the scar, massage, manual edema mobilization, desensitization, dexterity activities, and strengthening.
Myofascial pain and fibrositis are also conditions of pain elicited by activation of trigger points within the muscles and resulting in pain referred to a distal area; these are frequently encountered conditions. Travell studied myofascial pain and mapped out the traditional trigger points and their referral patterns.99 Poor posture and positioning of the body out of normal alignment are often the mechanisms of injury in myofascial pain, so careful examination of the client and his or her normal daily activities is indicated. The therapist should observe the client performing the activity rather than rely on a verbal description.
Myofascial pain should be considered if direct intervention of the painful area does not relieve the pain. Evaluation for trigger points must be done meticulously, and mapping of the trigger points and the referral areas must be documented. Because the pain is referred, the trigger point must be treated, not the referral area. The interventions used for other inflammatory problems, such as ice and ultrasound phonophoresis, can be used. In addition, specific interventions for the trigger points, such as friction massage and TENS, may relieve the pain. Activity analysis is an essential part of intervention to relieve the stresses on the affected tissues.
Elastic Therapeutic Taping
First developed in Japan in the 1970s, Kinesio Taping* has become increasingly popular with therapists in the intervention of CTDs in the United States since its introduction here in 1994. Kinesio Taping is a taping technique that uses a special elastic tape called Kinesio Flex tape. Other elastic tapes may also be used. Unlike athletic taping, which is restrictive and is used to provide stability and restrict joint motion, Kinesio Flex tape is elastic and designed to “mimic the elastic properties of muscle, skin, and fascia.”26 When properly applied, the elasticity of the Kinesio tape does not restrict the movement of soft tissue but supports weakened muscles and allows for full movement of the joints.
There are many variations in Kinesio taping techniques. Depending on the problem being addressed, the tape is anchored at either the origin or insertion of a muscle and then gently stretched and taped over or around either a shortened or elongated muscle, after which time the muscle is placed back in a neutral position. The tape is believed to affect the peripheral somatosensory receptors located in the superficial skin, which in turn affects the skin and lymphatic system, as well as muscle and joint function, as they relate to pain, proprioception, and motor control.25
Goals and concepts of elastic taping include the following:25,26
• Decrease pain by increasing the somatosensory system.
• Reduce inflammation and edema by stimulating the lymphatic system.
• Normalize muscle tone by reducing overstretching and overcontraction of muscles.
• Reduce muscle fatigue by supporting and enhancing the contraction of weakened muscles.
• Improve ROM by relieving pain.
• Provide support and alignment to joints by supporting weakened ligaments.
• Prevent injuries during ADLs by providing support to muscles and ligaments.
Strengthening Activities
Acute care is followed by a gradual return of motion, sensibility, and preparation to return to normal ADL and IADL routines.
The client usually cannot strengthen the injured and neglected extremity at home because of the fear of further injury and pain. Because every hand clinic has its own armamentarium of strengthening exercises and media, only a few suggestions are provided here.
Computerized Evaluation and Exercise Equipment
Baltimore Therapeutic Equipment (BTE) has made available the BTE Work Simulator (Figure 39-18),29 an electromechanical device that has more than 20 interchangeable tool handles and can be used for both work evaluation and UE strengthening. Resistance can vary from no resistance to complete static resistance, with tool height and angle also adjustable. When the device is used for strengthening, the resistance is usually set low and gradually increased. Length of exercise is increased when a base level of strength has been achieved. The BTE Work Simulator allows for close simulation of real-world tasks that are easily translatable into physical demands common to manual work.
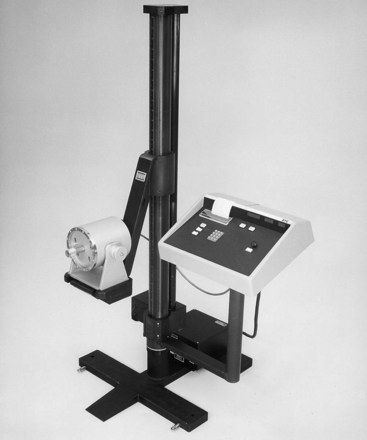
FIGURE 39-18 BTE Work Simulator is an electromechanical device used to simulate real-life tasks for upper extremity evaluation and strengthening. The client’s progress is monitored through a computerized printout, and the program can be modified to increase resistance and endurance.
Other computerized evaluation equipment allows the therapist to record the results of assessment and print a report. The percentage of impairment can also be determined electronically. Portable systems are being developed that allow the therapist to record daily intervention and download the information into a computerized network. Outcome data from many sources can then be compared. The advancement of technology in rehabilitation will allow the therapist to be more efficient and also capture important information that is not available through traditional means.
Many practitioners use real occupation-based interventions that simulate the actual work done, either in the clinic or at the work site. These methods are the most in keeping with the Occupational Therapy Practice Framework.
Weight Well
The Weight Well7 was developed at the Downey Community Hospital Hand Center in Downey, California, and is available commercially.* Rods with a variety of handle shapes are placed through holes in the box and have weights suspended. The rods are turned against resistance throughout the ROM to encourage full grasp and release of the injured hand, wrist flexion and extension, pinch, and pronation and supination patterns. The Weight Well can be graded for resistance and repetitions and is an excellent tool for progressive resistive exercise.
Theraband
Theraband* is a 6-inch (15.2-cm) wide rubber sheet that is available by the yard and is color coded by degrees of resistance. It can be cut into any length required and used for resistive exercise for the UE. Use of Theraband is limited only by the therapist’s imagination, and it can be adapted to diagonal patterns of motion, wrist exercises, follow-up intervention of tennis elbow, and other uses. The Theraband can be combined with dowel rods and other equipment to provide resistance throughout the ROM. It is inexpensive and easy to incorporate into a home intervention program.
Hand-Strengthening Equipment
Handgrips of graded resistance are available from rehabilitation supply companies and sporting goods stores. They can be purchased with various resistance levels and can be used for progressive resistive hand exercises.
The therapist is cautioned against using overly resistive spring-loaded grippers often sold in sporting goods stores. These devices may be beneficial to the seasoned athlete but are usually too resistive for the recently injured.
Therapy putty can be purchased in bulk, and the amount given to the client is geared to hand size and strength. Putty is also available in grades of resistance, and some provide chips that can be added to progressively increase resistance. It can be adapted to most finger motions and is easily incorporated into a home program.
Household items such as spring-type clothespins have been used to increase strength of grasp and pinch. Imaginative use of common objects should present a challenge to the hand therapist.
Purposeful and Occupation-Based Activity
Purposeful and occupation-based activities are an integral part of rehabilitation of the hand. Purposeful and occupation-based activities include crafts, games, dexterity activities, ADLs, and work samples. Several studies have shown that clients are more likely to choose occupationally embedded exercise and performed better using this type of exercise over rote exercise.81,111 Many of the intervention techniques described previously are used as preparatory methods for the hand in preparation for purposeful activity.
Activities should be started as soon as possible at whatever level the client can perform them with adaptations to compensate for limited ROM and strength. They should be used in conjunction with other interventions. The occupational therapist must continually assess the client’s functional capacities and initiate changes in the intervention plan to incorporate activities as soon as possible in the restorative phase.
Vocational and leisure goals should be established at the time of initial evaluation and taken into account when devising the intervention plan. The needs of a brick mason may be quite different from those of a mother with small children, and the environmental needs of the client must not be neglected.
Crafts should be graded from light resistance to heavy resistance and from gross dexterity to fine dexterity. Crafts that have been found to work extremely well with hand injuries include macramé, Turkish knot weaving, clay molding, leather tooling, and woodworking. All of these crafts can be adapted and graded to the client’s capabilities and have been found to have a high level of client acceptance. When integrated into a program of total hand rehabilitation, they are viewed as another milestone of achievement and not as a diversion to fill up empty hours. For example, the pride of accomplishment for Gerry, who was able to complete his first simple woodworking project, is evidence that the purposeful activity of crafts belongs in hand rehabilitation.
Activities that do not have an end product but provide practice in dexterity and ADL skills also fit into the category of purposeful activities. Developmental games and activities that require pinch or grasp and release may be graded and timed to increase difficulty. ADL boards that have a variety of opening and closing devices provide practice for use of the hand at home and increase self-confidence. String and finger games are challenging coordination activities that can be done in pairs and are fun to do.
A hobby can often be adapted for use in the clinic. Fly-tying is a difficult dexterity activity but one that is frequently enjoyed by an avid fisherman. Golf clubs and fishing poles can be adapted in the clinic; in the case of Gerry, therapy with these tools allowed early return to a favorite form of relaxation.
Humor and interaction with the therapists and the other clients are vital but intangible benefits of hand therapy intervention. The intervention should be planned to promote both.
Functional Capacity Evaluation
The ultimate goal of therapy for an injured worker is to return to full employment. Many weeks or months may have elapsed between the time of the injury and the point at which the physician believes that a return to work is appropriate from a medical standpoint. Despite the fact that x-ray examinations may show full healing and restored ROM, many clients do not feel that they have the strength, dexterity, or endurance to return to their former jobs. Pain may continue to be a limiting factor, especially with heavy activities. Light duty or part-time positions may not be available, and the physician, therapist, industrial insurance carrier, and especially the client are frustrated by the lack of an objective method of evaluating an individual’s physical capacity for work. Occupational therapists with training in evaluation, kinesiology, and adaptation of environmental factors coupled with a functional approach to the client may play a key role in functional capacity evaluation.
A renewed interest in evaluation of prevocational factors has brought the OT profession full circle (see Chapter 14). Although regarded as one of the cornerstones of the profession in its early years, prevocational evaluation was neglected in many centers during the 1960s and 1970s. Since the early 1980s, however, occupational therapists have rediscovered a need that the profession is in a unique position to provide. The term prevocational evaluation ambiguously implied that occupational therapists were involved in assessing the vocational needs of clients they treated. The terms functional capacity evaluation (FCE) and work tolerance screening (WTS), however, more clearly describe the process of measuring an individual’s ability to perform the physical demands of work.
The results of the FCE allow the therapist, worker, physician, and vocational counselor to establish a specific, attainable employment goal using reliable data. This approach relieves the physician of the responsibility of returning the client to work without objective information about the client’s ability to do a job. It also allows the client to test his or her own abilities and may result in increased self-confidence about returning to work.
Many techniques for performing a functional capacity evaluation have been proposed.8,46,69,70,91 Some basic steps may be followed regardless of the specific technique adopted. The client should be evaluated for grip and pinch strength, sensation, and ROM. Edema and pain must also be assessed and reassessed during the course of the evaluation.
The GULHEMP (general physique, UE, lower extremity, hearing, eyesight, mentality, and personality) Work Capacity Evaluation Worksheet69 may be used as a general method of determining functional abilities. The GULHEMP Physical Development Analysis Worksheet69 may be used to evaluate the job.
Job analysis may also be provided by a rehabilitation counselor and through information provided by the client. The therapist should consult the Dictionary of Occupational Titles (DOT)102 to obtain information about the worker traits required for the expected job. This dictionary contains 12,900 job descriptions and 20,000 job titles. If sufficient information about the job is not available through these methods, an onsite job analysis by the therapist may be necessary. Once the physical demand characteristics of work have been documented, it is possible to evaluate the client’s ability to perform them. The U.S. Department of Labor sponsors the Occupational Information Network online (http://online.onetcenter.org), which includes job titles, job accommodations, and the ability to search for job information using several criteria.
Schultz-Johnson described an FCE adapted for UE injuries based on the physical demands established by the U.S. Department of Labor.91 After evaluation, the therapist may recommend a work therapy program.91 Work therapy can include simulated job tasks to increase job performance.
Matheson has written several manuals and articles that describe work capacity evaluation (WCE).69,70 This 8- to 10-day work assessment includes evaluation of the client’s feasibility for employment (worker characteristics, such as safety and dependability), employability, work tolerances (e.g., strength, endurance, and the effect of pain on work performance), the physical demand characteristics of the job, and the worker’s ability to “dependably sustain performance in response to broadly defined work demands.”70
Tests with well-accepted reliability—such as the Purdue Pegboard Test,98 the Crawford Small Parts Dexterity Test,27 the Minnesota Manual Dexterity Test,78 and the Jebsen Hand Dexterity Test49—may be administered as a screening process. These tests will give the therapist valuable information through observation, whether the normal tables are used or the test is adapted to an individual worker.
Many assessments and job simulation devices are available and should be reviewed before a physical capacity evaluation program is established. To choose appropriate work samples, the therapist should determine the job market in a specific area. This can be done by consulting rehabilitation counselors and representatives from vocational schools and employment agencies in the area.
Work samples, available through organizations such as the Jewish Employment and Vocational Service,103 or VALPAR,* may be used to test specific skills. The therapist may also develop job samples by using information on jobs in the local area. Discarded electronic assembly boards, a lawn mower motor, an automobile engine, or other items from the local hardware store may provide valuable information about the worker’s ability.
Work simulation using job samples or the BTE Work Simulator assesses the worker’s specific physical capacities, as well as endurance and symptoms that become cumulative with prolonged use of the injured part (called symptom response to activity, or SRA). Monitoring the client’s SRA may prevent loss of time and money expended in training for an inappropriate vocational goal.
A combination of “normed” tests, job samples, job simulation, and WCE devices may provide the therapist with the best information about a worker’s physical capacity. For more information about vocational evaluation and rehabilitation, the reader is encouraged to visit the website for the University of Wisconsin-Stout at www.uwstout.edu/programs/sp/vert/sp_vert.pdf.*
Work Hardening
Work hardening is the progressive use of simulated work samples to increase endurance, strength, productivity, and often feasibility. Work hardening may be performed for a period of weeks, and the progressive ongoing nature of the work usually improves physical capacity. It is an important contribution to return to work.
Because FCE is also performed over time, it may be difficult to identify the difference between FCE and work hardening. An FCE is generally done when the client has stopped improving with traditional therapy methods and may have been released from acute medical care. The client may be unable to return to his or her former employment, or the client’s ability to do the former work may be in doubt. A physician, rehabilitation counselor, insurance adjustor, or attorney may initiate an FCE.
Work hardening or work conditioning may be initiated earlier in the rehabilitation process, perhaps by the treating physician or therapist who recognizes that an individual may have difficulty returning to the former employment. It is performed before the end of medical care and may serve as a final checkout before discontinuing intervention.
Standards for work hardening services have been developed by the Commission on Accreditation of Rehabilitation Facilities (CARF)24 to ensure that injured workers are offered high-quality programs that are maximally effective in returning them to gainful employment. Roy Matheson and Associates71 offers many publications and resources to therapists interested in establishing WCE, work tolerance screening, or work hardening services.
FCE and work hardening are adjuncts to the vocational rehabilitation process. Occupational therapists are trained to observe behavior and have the skills necessary to translate that observation into useful data. FCE and work hardening should not compete with the work of rehabilitation or vocational counselors; instead, they should provide critical information about a worker’s physical functioning and foster reentry into the job market.
Consultation with Industry
Occupational therapists may be asked to visit the job site to make recommendations for ergonomic adaptations, including tool modification, ergonomic furniture and accessories, and training of workers in proper positioning to reduce the incidence of CTDs. Because prevention substantially reduces the costs to industry, occupational therapists have a unique opportunity to apply their training in activity analysis and adaptation of the environment in a new setting. The Americans with Disabilities Act (ADA) mandates reasonable accommodations for workers with disabilities. Many occupational therapists have become active in helping companies comply with the requirements of the ADA. The American Occupational Therapy Association is an excellent resource for information about the ways in which therapists can be involved in these efforts in their communities (also see Chapter 15).3
Psychosocial Effects of Hand Injuries
After a hand injury, a number of psychosocial reactions may occur, including changed body image and self-image, depression, anxiety, and decreased self-worth (as experienced by Gerry, the cabinet maker in the case study with the amputated fingers and surgical replantation), to name but a few. For traumatic hand injuries, acute stress disorder and posttraumatic stress disorder are not uncommon and can be problematic for the client, especially if they are not addressed promptly. The hand therapist is often the primary contact for the client after injury and may see the client several times per week on a one-to-one basis. The hand therapist, therefore, plays a “very important role in helping the client return to pre-injury physical and emotional functioning.”15 Not only do occupational therapists who specialize in hand therapy provide the client with emotional support, but they are also critical in recognizing psychosocial issues that the client may be having; are educated in evaluating and providing intervention for these; and, when necessary because of the severity of the problem, are capable of facilitating referral to an appropriate mental health professional.
Summary
This chapter provides an overview of intervention of the UE. Evaluation procedures are discussed, as well as the basic intervention techniques. Management of both acute injuries and cumulative trauma is included, as well as information on strengthening and programs for industrial injuries. Most occupational therapists working in physical disabilities should be familiar with the basic intervention approaches described for the UE because they work with clients who have some limitation in the UEs. Specialization in hand therapy requires both advanced academic study and clinical experience. A therapist who specializes in this area of practice and who meets minimum requirements may choose to take the Hand Therapy Certification Examination and become a certified hand therapist (CHT). For more information on becoming a CHT, contact the Hand Therapy Certification Commission (www.htcc.org).45 Links to educational resources are also available on this website. Another valuable resource is membership in the American Society of Hand Therapists (www.asht.org).
Although much of UE rehabilitation involves the use of preparatory methods such as exercise, splinting, and physical agent modalities, these interventions should be used in preparation for purposeful or occupation-based activities. The goal is always for the client to be as independent as possible and to use these preparatory methods to achieve the client’s occupation-based performance goals. Purposeful activity is used whenever feasible in the hand clinic according to space and time constraints, and clients are encouraged to use their new skills in their own home or work contexts and bring back to the clinic information about the obstacles that they experience in achieving their performance goals.
Threaded Case Study
Gerry, Part 2
The case study presented at the beginning of this chapter described Gerry, a 32-year-old cabinetmaker with an acute, complex hand injury involving amputation and surgical replantation of three digits. Gerry progressed through all phases of rehabilitation over the course of 15 months, from the acute hospital stay to return to work and play activities. Based on the case presented, how would the intervention plan change over the course of Gerry’s recovery, and what specific intervention approaches could his occupational therapist use?
During the acute phase, one of the therapist’s goals was to promote and maintain the health of the client’s unaffected joints that were vulnerable to becoming stiff from protective posturing. Another goal during the acute phase was to prevent further injury or abnormal joint changes to the left hand. ROM exercises were administered to maintain the healthy function of the client’s unaffected joints such as the shoulder and elbow and a protective splint was fabricated, placing Gerry in a protective and functional position of mild wrist flexion, MP flexion, and IP extension. During this phase of recovery, education was an important component of the client’s intervention plan. Gerry was taught appropriate postoperative precautions and splint wear and care; his family received education on wound care, dressing changes, and signs of infection. Gerry was given written material regarding this home program.
During the intermediate phase of his recovery, the intervention approach was to restore active and passive ROM, strength, and coordination to Gerry’s hand so that he could return to his previous occupations (specifically, cabinetry, golf, and softball). The ROM activities were graded, and motion was progressively added as the tendons, nerves, and vessels healed. Strengthening exercises were added during the late phase of recovery, and at this point Gerry could safely attempt to return to his previous activities. It was at this time that purposeful and occupation-based activities were added to Gerry’s therapy regimen. In addition, Gerry’s areas of occupation had to be modified for the loss of mobility, strength, and coordination of the hand. Gerry was taught one-handed ADLs during the acute phase of recovery so that he could be self-sufficient until he regained the use of his left hand. Modifications to his activity demands were also implemented, such as enlarging the handles of his golf clubs to compensate for the lack of full finger ROM during the intermediate to late phases of recovery. Finally, Gerry was taught to prevent further injury to his hand through visual compensation techniques for loss of sensation, to monitor for signs of infection, and to undertake postsurgical precautions during the acute phase of his injury.
Throughout Gerry’s intervention, his performance skills were reviewed to identify barriers to performance using a variety of assessment tools. A grip dynamometer, pinch meter, and manual muscle tests were used to assess grip, pinch, and muscle strength. A goniometer was used to assess ROM, and Semmes-Weinstein monofilaments were used to assess sensation. A volumeter and circumferential measurements were used to assess edema, and the Jebson Test of Hand Function was used to assess the functional use of Gerry’s hand in a standardized format. The evaluation data were then interpreted and the intervention plan modified to achieve the targeted outcomes.
Once the intervention plan was established, various preparatory methods and purposeful activities were chosen to achieve Gerry’s occupational goals. For the occupational performance goal of golfing, splints were used as a preparatory method during the intermediate phase of recovery to help Gerry gain passive ROM of stiff joints and increase overall flexion of the replanted digits so that he could eventually hold a golf club. Physical agent modalities such as paraffin and ultrasound were applied before performance of purposeful activity during the intermediate and late phases of recovery. Purposeful activities such as swinging a golf club in the clinic, simulating a golf swing on the BTE work simulator, and gradually increasing the physical resistive demands of this golf swing were performed. Gerry also practiced putting in the clinic with special “flexion gloves” early on so that he could hold the golf club; later, he progressed to wearing no glove but instead enlarging the handle of the golf club to facilitate a secure grip.
To address Gerry’s occupational goal of returning to work as a cabinetmaker, a volunteer opportunity was arranged for him to participate in the purposeful activity of making “wooden sliding/transfer boards” and other assistive devices for the acute rehabilitation clients. Not only was this activity goal directed and directly related to his work occupation, but it also fulfilled Gerry’s desire to use his talents in carpentry to help other clients in the hospital; this contributed to improving his feelings of self-worth. During the late phase of Gerry’s recovery, additional occupation-based activity was initiated to address his avocational interests. During the actual performance of golfing and softball outside of the clinic, it was found that Gerry was hypersensitive in the palm over the scars. Desensitization techniques were performed as part of his home program, and he purchased gloves with gel inserts to absorb the shock of hitting the ball.
1. A client is seen for a hand problem and found to have limited or painful ROM of the shoulder. List three tests that should be performed.
2. Discuss three approaches to postoperative care of flexor tendon injuries, and describe how the differences among the methods would influence the initiation of OT.
3. To what does joint dysfunction refer? What are its causes?
4. Discuss the three classifications of nerve injury.
5. Define the area referred to as “no-man’s land.” What distinguishes injury to this area?
6. What techniques are used to evaluate the physical demand characteristics of work?
7. List three methods of applying pressure to a hypertrophic scar.
8. Which functional activities could be used for restoration of hand function following laceration and repair of the extrinsic finger flexors?
9. Which assessments should be included in a functional capacity evaluation?
10. List five tests used to assess joint integrity in the hand.
11. List three objectives of splinting as they relate to injury of the radial, median, and ulnar nerves.
12. What are the characteristics of complex regional pain syndrome, type I? What are the intervention goals?
13. Define work hardening. How can work hardening be incorporated into OT?
14. How is the presence of edema evaluated? List three methods used to reduce edema.
15. What are the primary work-related risk factors associated with cumulative trauma? How can the occupational therapist intervene to prevent the development of cumulative trauma?
References
1. Adson, A, Coffey, J. Cervical rib: a method of anterior approach for relief of symptoms by division of scalenus anticus. Ann Surg. 1927;85:834.
2. Alon, G. High voltage stimulation. Chattanooga, TN: Chattanooga; 1984.
3. American Occupational Therapy Association, ADA Network, and Practice Division: 4720 Montgomery Lane, PO Box 31220, Bethesda, MD 20824-1220.
4. American Society for Surgery of the Hand. The hand examination and diagnosis, ed 3. New York: Churchill Livingstone; 1990.
5. Armstrong, TJ. Cumulative trauma disorders of the upper limb and identification of work-related factors. In: Millender LH, Louis DS, Simmons BP, eds. Occupational disorders of the upper extremity. New York: Churchill Livingstone, 1992.
6. Atrzberger, SM. Manual edema mobilization: treatment for edema in the subacute hand. In Mackin EJ, et al, eds.: Rehabilitation of the hand and upper extremity, ed 5, St. Louis: Mosby, 2002.
7. Barber, LM. Occupational therapy for the treatment of reflex sympathetic dystrophy and post-traumatic hypersensitivity of the injured hand. In: Fredericks S, Brody G, eds. A symposium on the neurologic aspects of plastic surgery. St. Louis: Mosby, 1978.
8. Baxter-Petralia, P, Bruening, L, Blackmore, S. The work tolerance program of the Hand Rehabilitation Center in Philadelphia. In Hunter JM, et al, eds.: Rehabilitation of the hand, ed 3, St. Louis: Mosby, 1990.
9. Bell-Krotoski, JA. Plaster cylinder casting for contractures of the interphalangeal joints. In Mackin EJ, et al, eds.: Rehabilitation of the hand and upper extremity, ed 5, St. Louis: Mosby, 2002.
10. Bell-Krotoski, JA. Sensibility testing with the Semmes-Weinstein monofilaments. In Mackin EJ, et al, eds.: Rehabilitation of the hand and upper extremity, ed 5, St. Louis: Mosby, 2002.
11. Bennett, G. Hand-tool dexterity test. New York: Harcourt, Brace, Jovanovich; 1981.
12. Boyes, JH. Bunnell’s surgery of the hand, ed 5. Philadelphia: JB Lippincott; 1970.
13. Boyes, JH, Stark, HH. Flexor-tendon grafts in the fingers and thumb. J Bone Joint Surg Am. 1971;53(7):1332.
14. Brand, PW, Hollister, A. Clinical mechanics of the hand, ed 3. St. Louis: Mosby; 1999.
15. Brown, PW. Psychologically based hand disorders. In Mackin EJ, et al, eds.: Rehabilitation of the hand and upper extremity, ed 5, St. Louis: Mosby, 2002.
16. Butler, D. Mobilisation of the nervous system. New York: Churchill Livingstone; 1991.
17. Byl, N, Melnick, M. The neural consequences of repetition: clinical implications of a learning hypothesis. J Hand Ther. 1997;10(2):160.
18. Callahan, AD. Sensibility assessment for nerve lesion-in-continuity and nerve lacerations. In Mackin EJ, et al, eds.: Rehabilitation of the hand and upper extremity, ed 5, St. Louis: Mosby, 2002.
19. Cameron, M, Monroe, L. Physical rehabilitation: evidence-based examination, evaluation, and intervention. St. Louis: Saunders Elsevier; 2007.
20. Cannon, N, et al. Control of immediate postoperative pain following tenolysis and capsulectomies of the hand with TENS. J Hand Surg Am. 1983;8:625.
21. Carroll, D. A quantitative test of upper extremity function. J Chronic Dis. 1965;18:479.
22. Chan, SW, LaStayo, P. Hand therapy management following mutilating hand injuries. Hand Clin. 2003;19(1):133.
23. Commission on Accreditation of Rehabilitation Facilities (CARF): 2500 N. Pantano Road, Tucson, AZ 85715.
24. Coopee, RA. Kinesio taping. In Mackin EJ, et al, eds.: Rehabilitation of the hand and upper extremity, ed 5, St. Louis: Mosby, 2002.
25. Coopee, RA. Taping techniques. In: Jacobs A, Austin N, eds. Splinting the hand and upper extremity. Baltimore: Lippincott Williams & Wilkins, 2003.
26. Crawford, J, Crawford, D. Crawford small parts dexterity test manual. New York: Harcourt, Brace, Jovanovich; 1981.
27. Creelman G: Volumeters Unlimited, Phoenix, AZ, 1989.
28. Curtis, RM, Engalitcheff, J. A work simulator for rehabilitating the upper extremity: preliminary report. J Hand Surg. 1981;6(5):499.
29. Cyriax, J. Clinical applications of massage. In Basmajian JV, ed.: Manipulation, traction and massage, ed 3, Baltimore: Williams & Wilkins, 1985.
30. Dellon, AL. Clinical use of vibratory stimuli to evaluate peripheral nerve injury and compression neuropathy. Plast Reconstr Surg. 1980;65(4):466.
31. Dellon, AL. Evaluation of sensibility and reeducation of sensation in the hand. Baltimore: Williams & Wilkins; 1981.
32. Dellon, AL. The vibrometer. Plast Reconstr Surg. 1983;71(3):427.
33. Dellon, AL, Curtis, RM, Edgerton, MT. Reeducation of sensation in the hand after nerve injury and repair. Plast Reconstr Surg. 1974;53(3):297.
34. Donatelli, R, Owens-Burkhart, H. Effects of immobilization on the extensibility of periarticular connective tissue. J Orthop Sports Phys Ther. 1981;3:67.
35. Dimick, MP, et al. 2008 Practice Analysis Study of Hand Therapy. J Hand Ther. 2009;22(4):361.
36. Duran, R, et al. Management of flexor tendon lacerations in zone 2 using controlled passive motion postoperatively. In Hunter JM, et al, eds.: Rehabilitation of the hand, ed 3, St. Louis: Mosby, 1990.
37. Evans, RB. Clinical management of extensor tendon injuries. In Mackin EJ, et al, eds.: Rehabilitation of the hand and upper extremity, ed 5, St. Louis: Mosby, 2002.
38. Evans, RB, Burkhalter, WE. A study of the dynamic anatomy of extensor tendons and implications for treatment. J Hand Surg. 1986;11(5):774.
39. Evans, RB, McAuliffe, JA. Wound classification and management. In Mackin EJ, et al, eds.: Rehabilitation of the hand and upper extremity, ed 5, St. Louis: Mosby, 2002.
40. Fess, E, Moran, C. Clinical assessment recommendations. Indianapolis: American Society of Hand Therapists; 1981.
41. Gault, G. Preparing for a Physical Therapy Audit. G&E Therapies www.GandETherapies.com, 2008.
42. Gelberman, RH, et al. The carpal tunnel syndrome: a study of carpal canal pressures. J Bone Joint Surg. 1981;63(3):380.
43. Gelberman, RH, et al. Sensibility testing in peripheral-nerve compression syndromes: an experimental study in humans. J Bone Joint Surg. 1983;65(5):632.
44. Hand Therapy Certification Commission: 1337 Howe Avenue, Suite 230, Sacramento, CA 95825.
45. Harrand, G. The Harrand guide for developing physical capacity evaluations. Menomonie, WI: Stout Vocational Rehabilitation Institute; 1982.
46. Hawkins, R, Kennedy, J. Impingement syndrome in athletes. Am J Sports Med. 1980;8(3):151.
47. Hunter, JM. Staged flexor tendon reconstruction, Part I. In Mackin EJ, et al, eds.: Rehabilitation of the hand and upper extremity, ed 5, St. Louis: Mosby, 2002.
48. Jebsen, RH, Taylor, N, Trieschmann, RB, et al. An objective and standardized test of hand function. Arch Phys Med Rehabil. 1969;50(6):311.
49. Jobst Institute: PO Box 653, Toledo, OH 43694.
50. Kamenetz, H. Mechanical devices of massage. In Basmajian JV, ed.: Manipulation, traction and massage, ed 3, Baltimore: Williams & Wilkins, 1985.
51. Kasch, MC. Clinical management of scar tissue. OT in Health Care. 1987;4:37.
52. Kasch, MC. Therapist’s evaluation and treatment of upper extremity cumulative trauma disorders. In Mackin EJ, et al, eds.: Rehabilitation of the hand and upper extremity, ed 5, St. Louis: Mosby, 2002.
53. Kasch, MC, Hester, L. Low-frequency TENS and the release of endorphins. J Hand Surg. 1983;8:626.
54. Kellor, M, et al. Technical manual of hand strength and dexterity test. Minneapolis: Sister Kenney Rehabilitation Institute; 1971.
55. Kelsey, JL, et al. Upper extremity disorders: frequency, impact and cost. New York: Churchill Livingstone; 1997.
56. Kessler, RM, Hertling, D. Joint mobilization techniques. In: Kessler RM, Hertling D, eds. Management of common musculoskeletal disorders. New York: Harper & Row, 1983.
57. Koman, LA, Smith, BP, Smith, TL. Reflex sympathetic dystrophy (complex regional pain syndromes—types 1 and 2). In Mackin EJ, et al, eds.: Rehabilitation of the hand and upper extremity, ed 5, St. Louis: Mosby, 2002.
58. Kutz, JE. Controlled mobilization of acute flexor tendon injuries: Louisville technique. In: Hunter JM, Schneider LH, Mackin EJ, eds. Tendon surgery in the hand. St. Louis: Mosby, 1987.
59. LaSalle, WB, Strickland, JW. An evaluation of the two-stage flexor tendon reconstruction technique. J Hand Surg. 1983;8(3):263.
60. Law, M, MacDermid, J. Evidence-based rehabilitation: a guide to practice. Thorofare: SLACK Incorporated; 2008.
61. Louis, DS, et al. Evaluation of normal values for stationary and moving two-point discrimination in the hand. J Hand Surg. 1984;9(4):552.
62. Lublin, JS. Unions and firms focus on hand disorder that can be caused by repetitive tasks. The Wall Street Journal. 1983. [January 14].
63. Lundborg, G, et al. Digital vibrogram: a new diagnostic tool for sensory testing in compression neuropathy. J Hand Surg. 1986;11(5):693.
64. Mackinnon, SE, Dellon, AL. Two-point discrimination tester. J Hand Surg. 1985;19(6 pt 1):906.
65. Magee, DJ. Orthopedic physical assessment, ed 3. Philadelphia: WB Saunders; 1997.
66. Maitland, G. Peripheral manipulation. Boston: Butterworth; 1977.
67. Malick, MH, Carr, JA. Flexible elastomer molds in burn scar control. Am J Occup Ther. 1980;34(9):603.
68. Matheson, LN. Work capacity evaluation: a training manual for occupational therapists. Trabuco Canyon, CA: Rehabilitation Institute of Southern California; 1982.
69. Matheson, LN, Ogden, LD. Work tolerance screening. Trabuco Canyon, CA: Rehabilitation Institute of Southern California; 1983.
70. Matheson, Roy, The Matheson System, P.O. Box 492, Keene, New Hampshire 03431, available at, http://www.roymatheson.com/home.
71. Mathiowetz, V, et al. Grip and pinch strength: normative data for adults. Arch Phys Med Rehabil. 1985;66(2):69.
72. Mathiowetz, V, et al. Reliability and validity of grip and pinch strength evaluations. J Hand Surg. 1984;9(2):222.
73. Melvin, J. Rheumatic disease occupational therapy and rehabilitation, ed 3. Philadelphia: FA Davis; 1989.
74. Mennell, JM. Joint pain. Boston: Little, Brown; 1964.
75. Mennell, JM, Zohn, DA. Musculoskeletal pain: diagnosis and physical treatment. Boston: Little, Brown; 1976.
76. Michlovitz, SL. Ultrasound and selected physical agent modalities in upper extremity rehabilitation. In Mackin EJ, et al, eds.: Rehabilitation of the hand and upper extremity, ed 5, St. Louis: Mosby, 2002.
77. Minnesota Manual Dexterity Test: Available from Lafayette Instrument Co, PO Box 5729, Lafayette, IN 47903.
78. Moberg, E. Objective methods of determining functional value of sensibility in the hand. J Bone Joint Surg. 1958;40A:454.
79. Neer, C, Welch, R. The shoulder in sports. Orthop Clin North Am. 1977;8(3):583.
80. Nelson, DL, et al. The effects of occupationally embedded exercise on bilaterally assisted supination in persons with hemiplegia. Am J Occup Ther. 1996;50(8):639.
81. O’Riain, S. New and simple test of nerve function in the hand. Br Med J. 1973;3:615.
82. Omer, G. Management of pain syndromes in the upper extremity. In Hunter JM, et al, eds.: Rehabilitation of the hand, ed 3, St. Louis: Mosby, 1990.
83. Parry, C. Rehabilitation of the hand, ed 4. London: Butterworth; 1984.
84. Peacock, EE, Madden, JW, Trier, WC. Postoperative recovery of flexor tendon function. Am J Surg. 1971;122(5):686.
85. Post, M. Physical examination of the musculoskeletal system. Chicago: Book Medical Publisher; 1987.
86. Rempel, DM. Work-related cumulative trauma disorders of the upper extremity. JAMA. 1992;267(6):838.
87. Roos, D. Congenital anomalies associated with thoracic outlet syndrome. Am J Surg. 1976;132(6):771.
88. Schneider, LH. Tendon transfers an overview. In Mackin EJ, et al, eds.: Rehabilitation of the hand and upper extremity, ed 5, St. Louis: Mosby, 2002.
89. Schneider, L, Hunter, J. Flexor tenolysis. In: Hunter JM, et al, eds. AAOS: symposium on tendon surgery in the hand. St. Louis: Mosby, 1975.
90. Schultz-Johnson, K. Upper extremity functional capacity evaluation. In Mackin EJ, et al, eds.: Rehabilitation of the hand and upper extremity, ed 5, St. Louis: Mosby, 2002.
91. Smith, P. Lister’s the hand: diagnosis and indications, ed 4. New York: Churchill Livingstone; 2002.
92. Strickland, JW. Biologic rationale, clinical application, and results of early motion following flexor tendon repair. J Hand Ther. 1989;2:71.
93. Strickland, JW, Glogovac, SV. Digital function following flexor tendon repair in zone II: a comparison of immobilization and controlled passive motion techniques. J Hand Surg. 1980;5(6):537.
94. Szabo, RM, et al. Vibratory sensory testing in acute peripheral nerve compression. J Hand Surg. 1984;9A(1):104.
95. Tetro, A, et al. A new provocative test for carpal tunnel syndrome: assessment of wrist flexion and nerve compression. J Bone Joint Surg Br. 1998;80(3):493.
96. , Taber’s cyclopedic medical dictionary. Thomas, CL, eds., ed 14, Philadelphia, FA Davis, 1981.
97. Tiffin, J. Purdue pegboard examiner manual. Chicago: Science Research Associates; 1968.
98. Travell, J, Simons, D. Myofascial pain and dysfunction: the trigger point manual, ed 2. Baltimore: Williams & Wilkins; 1992.
99. U.S. Department of Labor, Bureau of Labor Statistics, 2002.
100. U.S. Department of Labor, Bureau of Statistics, 2008, available at, www.bls.gov/news.release/osh2.htm.
101. U.S. Department of Labor Employment and Training Administration, Dictionary of occupational titles, ed 4, Washington, DC, U.S. Government Printing Office, 1991. Also online at, www.occupationalinfo.org.
102. Vocational Research Institute, Jewish Employment and Vocational Service (JEVS): Philadelphia.
103. Watson, HK, Carlson, L. Treatment of reflex sympathetic dystrophy of the hand with an active “stress loading” program. J Hand Surg. 1987;12(5 pt 1):779.
104. Waylett-Rendall, J. Sensibility evaluation and rehabilitation. Orthop Clin North Am. 1988;19(1):43.
105. Waylett-Rendall, J, Seibly, D. A study of the accuracy of a commercially available volumeter. J Hand Ther. 1991;4:10.
106. Wehbe, MA. Tendon gliding exercises. Am J Occup Ther. 1987;41(3):164.
107. Wehbe, MA, Hunter, JM. Flexor tendon gliding in the hand. II: Differential gliding. J Hand Surg. 1985;10(4):575.
108. Wolf, SL. Electrotherapy. New York: Churchill Livingstone; 1981.
109. Wong, GY, Wilson, PR. Classification of complex regional pain syndromes. Hand Clin. 1997;13(3):319.
110. Yerxa, EJ, et al. Development of a hand sensitivity test for the hypersensitive hand. Am J Occup Ther. 1983;37(3):176.
111. Zimmerer-Branum, S, Nelson, DL. Occupationally embedded exercise versus rote exercise: a choice between occupational forms by elderly nursing home residents. Am J Occup Ther. 1995;49(5):397.
*Central Tool Company of Germany (available from Anthony Products, Indianapolis, IN).
†Disk-Criminator (available from Smith & Nephew, Germantown, WI).
*DeRoyal/LMB, DeRoyal Industries, Powell, TN.
*VALPAR Assessment Systems (available from VALPAR International, Tucson, AZ, www.valparint.com).
*Coban (available from North Coast Medical, Morgan Hill, CA).
†Aris Isotoner gloves (available from North Coast Medical, Morgan Hill, CA).
*N-Terface, made by Winfield Laboratories (available from North Coast Medical, Morgan Hill, CA).
*Bio-Concepts, Phoenix, AZ. Cica-Care Silicone Gel Sheets (available from Smith & Nephew, Milwaukee, WI).
†Neoprene (available from Benik Corp, Silverdale, WA).
‡Silicone elastomers (available from Smith & Nephew, Milwaukee, WI).
§Cica-Care Silicone Gel Sheets (available from Smith & Nephew, Milwaukee, WI).
*Kinesio Tape (available from North Coast Medical, Morgan Hill, CA).
*Upper Extremity Technology Weight Well (available from Upper Extremity Technology, Glenwood Springs, CO).
*Theraband (available from Smith & Nephew, Milwaukee, WI).
*Materials Development Center, Stout Vocational Rehabilitation Institute, University of Wisconsin-Stout, Menomonie, WI.