Activities of Daily Living
Considerations in ADL and IADL occupational analysis and training
Evaluation of areas of occupation
Instrumental activities of daily living
After studying this chapter, the student or practitioner will be able to do the following:
1 Describe activities of daily living (ADLs) and instrumental activities of daily living (IADLs), and explain how ADLs and IADLs relate to the OTPF-2.
2 Explain why it is important to consider the cultural, personal, temporal and virtual contexts when performing ADL and IADL assessments and training. Give examples of specific cultural, personal, temporal, and virtual contexts that an individual, a community, or a population may have that can affect ADLs and IADLs.
3 Describe a client-centered approach to evaluation, and explain why it is an important consideration in ADL and IADL training.
4 Explain the usual procedures for ADL and IADL assessments.
5 Explain how to record levels of independence and summarize the results of an ADL/IADL evaluation.
6 Explain the purpose of performing a home evaluation and when it may be indicated.
7 Give at least five examples of client factors that may have limitations that can impact performance in occupations and how each can affect an ADL and IADL (e.g., if someone has shoulder range of motion limitations, he or she may have difficulty donning a shirt (ADL) and reaching for object on a shelf when cooking a meal (IADL).
8 Give examples of how difficulties in performance skills (motor and praxis skills, sensory-perceptual skills, emotional regulation skills, cognitive skills, communication and social skills) can affect specific ADL and IADL abilities.
9 Discuss considerations for selecting adaptive equipment for performance of ADLs and IADLs. Describe at least five pieces of adaptive equipment that may be used to increase independence and the conditions for which it may be indicated.
10 Describe, perform, and teach specific ADL techniques for individuals with limited range of motion (ROM) and strength, incoordination, paraplegia, tetraplegia, low vision, and for the exceptionally large client.
 Threaded Case Study
Anna, Part 1
Anna is a 29-year-old woman who was diagnosed with a T4 spinal cord injury (SCI) from a car accident. She has complete sensory and motor loss below the level of injury. She is currently in an inpatient rehabilitation program. Prior to her injury, Anna lived in a recently purchased house with two bedrooms and one bathroom with her husband and 2-year-old daughter. In addition to caring for her daughter, Anna spent much of her time performing household chores such as cooking, doing laundry, and grocery shopping. Anna also took care of her family’s finances and enjoyed being in a Bible study with her friends. Anna dropped their daughter off at a daycare center while she worked part-time as a bookkeeper at her church. Her husband picked up their daughter after spending a full day at his job as an auto mechanic. The family depended on Anna’s part-time income to pay for some of the bills. Anna’s mother, Martha, has been caring for her granddaughter since Anna’s accident. Martha agreed to temporarily live with Anna and her husband and granddaughter after Anna’s discharge home until Anna can independently take care of her child.
Anna currently requires minimal assistance with basic transfers, bed mobility, and lower body dressing because of decreased endurance, pain in her back, and decreased trunk control. She requires minimal assistance with verbal cues for proper techniques for weight shifts in her wheelchair and skin checks to ensure skin integrity. Anna reports she has been overwhelmed with all the new things she has had to learn. She requires moderate assistance with bowel and bladder care and showering/bathing tasks. She is independent with wheelchair mobility on indoor flat surfaces but requires standby assistance to propel in tight areas and corners and while propelling up ramps because of fatigue, decreased trunk control, and reduced upper body strength. She is independent with seated-level activities such as hygiene and grooming at the sink and light kitchen tasks in the rehabilitation unit’s kitchen.
Anna and her husband are concerned about the amount of assistance she may require when Anna is discharged from the rehabilitation program. Their home is also not wheelchair accessible at this time. Though they appreciate Martha and her offer to live with them after Anna’s discharge home from the hospital, they have concerns about Anna’s father living alone because he is quite dependent on his wife for meals and taking care of household tasks.
Anna wants to be as independent as possible in her basic self-care and wants to be able take care of her home and her daughter. She would also like to eventually return to work and resume driving. She wants to return to her Bible study and church soon to thank all the people who have supported her through this time. She also knows at some point she should resume her part-time job to contribute to the household finances.
1. What ADL and IADL tasks will Anna need to master in order to be more independent and to return home safely with her family?
2. What is the role of occupational therapy in helping Anna to return home safely and to eventually reach her goals of independence?
3. With all the occupational performance areas that need to be addressed, how can an occupational therapist prioritize which areas to address?
The American Occupation Therapy Association (AOTA), the U.S. national professional organization of occupational therapy practitioners, recognizes the Occupational Therapy Practice Framework: Domain and Process, Second Edition (OTPF-2),3 an official document intended for internal and external audiences.3 This chapter describes both the aspects of the domain and process of occupational therapy (OT) in regard to activities of daily living (ADLs) and instrumental activities of daily living (IADLs) as well as focuses on specific intervention strategies for assisting clients to optimize occupational functioning.
According to the OTPF, ADLs and IADLs are considered two of eight broad categories of “areas of occupation” in which clients engage.3 ADLs and IADLs include, but are not limited to, routine tasks of personal care, functional mobility, communication, home management, and community mobility.3,12 Evaluation and training in the performance of these important life tasks have long been important aspects of OT programs in virtually every type of health and wellness practice area. Loss of ability to care for personal needs and to manage the environment can result in loss of self-esteem and a deep sense of dependence. Family roles are also disrupted, as partners are frequently required to assume the function of caregiver when one loses the ability to perform ADLs or IADLs independently.
In the broadest sense, service delivery in the areas of occupation begins with the OT receiving a referral for service, performing an evaluation, then forming an intervention plan and assessing the outcome of the process. The OT practitioner and client collaborate to identify which areas of occupation, such as ADLs and IADLs, the client wants or needs to participate in to optimize health and wellness. The need to learn new methods, use assistive devices to perform daily tasks, or modify the environment may be temporary or permanent, depending on the particular dysfunction, the environment, the prognosis for recovery, and a multitude of other factors.
Definitions of ADLs and IADLs
Daily living activities can be separated into two areas: activities of daily living (ADLs) (also called personal activities of daily living [PADLs] and basic activities of daily living [BADLs]) and instrumental activities of daily living (IADLs). ADLs require basic skills and focus on activities to take care of one’s own body. ADLs include self-care tasks such as bathing/showering, bowel and bladder management, dressing/undressing, eating (or swallowing), feeding, functional mobility such as transfers and bed mobility, sexual activity, toilet hygiene, and the care of personal devices such as hearing aids, orthotics, and splints.1
IADLs require more advanced level skills in all performance areas. IADLs generally require use of executive functions, social skills, and more complex environmental interactions than ADLs. IADL tasks include care of others and of pets; child rearing; communication management such as use of telephones; use of personal digital assistants and computers; community mobility such as driving and use of public transportation; and financial management, such as use of cash and check writing, most of which Anna reported as areas to be addressed. Other IADLs include the category health management and maintenance, such as Anna performing regular weight shifts while up in the wheelchair and remembering her therapy appointments. Home establishment and management, a category that includes housecleaning and meal preparation and cleanup, are two other IADLs that Anna was responsible for completing in her home. Religious observance occupations (such as Anna’s ability to participate in her Bible study), safety and emergency maintenance (such as Anna’s ability to appropriately notify authorities in case of emergencies), and shopping are other important IADLs (Box 10-1).
Considerations in ADL and IADL Occupational Analysis and Training
The overall goal of any ADL and IADL training program is for the client and family to learn to adapt to the life changes or situations and to participate as fully as possible in those occupations that are meaningful. The following are important considerations when analyzing ADLs/IADLs. A comprehensive evaluation includes assessing client factors, performance skills, performance patterns, the physical and social environment, and the client’s contextual framework. Each of these areas is defined here in relationship to an ADL/IADL evaluation and intervention plan.
Definition of “Client”
According to the OTPF-2,3 the term clients refers to persons, organizations, and populations who receive occupational therapy services. Persons include the actual person receiving services, such as Anna, her husband, her family, and her employers and other significant relations. Organizations refer to businesses, industries, or agencies, such as Anna’s church, which may receive general consultation or referral by an occupational therapist on accessibility. Populations refer to larger people groups in communities such as refugees and survivors of particular natural or manmade disasters. Most of the intervention strategies in this chapter will relate to providing such intervention to persons or individuals as clients—such as Anna—though it is acknowledged that occupational therapists also provide services to organizations and populations in the area of ADLs and IADLs.
Client Factors
The analysis of occupational performance in ADLs and IADLs includes observing the client’s performance and noting skills and patterns and the factors that support them.1 Client factors are specific abilities, characteristics, or beliefs including strength, range of motion (ROM), coordination, sensation, a belief that one has potential to improve, and balance. These client factors are important to consider for Anna’s functioning. Is her ROM and strength intact in her upper body? How is her trunk control and balance?
Client factors can be assessed to determine the potential for remediation and restoration or possible need for adaptive equipment or other modifications. In Anna’s case, it would be important to know whether the spinal cord injury is complete and whether she has potential for muscle return to determine an appropriate approach to treatment. Other client factors include cognitive functions such as memory, attention, and problem solving. These are assessed in relation to ADLs and IADLs. Emotional functioning for coping strategies and behavior management also need to be considered when assessing and treating ADLs and IADLs.1 The OT questions, “Is Anna requiring cues to perform her weight shifts and skin checks because she has a memory deficit? Or is she having difficulties learning new techniques and strategies because of issues surrounding coping with the disability?”1 How is her sleep quality? Sleep deficits can severely hamper performance in terms of memory and attention (see Chapter 13). Specific assessments to identify and measure activity demands and client factors contribute information influencing ADL and IADL performance.
Performance Skills
The OTPF describes performance skills as “abilities clients demonstrate in the actions they perform” (p. 639)3 and include motor/praxis skills, sensory/perceptual skills, emotional regulation skills, cognitive skills, communication, and social skills. Whereas client factors reside within a person, performance skills are those that are observable and demonstrable. Examples of a motor/praxis skill for IADLs may be Anna’s ability to reach and bend down to retrieve a pot from a low cupboard or maintain balance while performing the ADL of transferring to a low soft surface. A client with difficulty in sensory/perceptual skills may have difficulty with the ADL of dressing to properly orient his T-shirt. A client with difficulty with the cognitive skill of sequencing the steps of a task may have difficulty taking a shower. Should he turn on the water first or transfer into the shower first? Should he start drying himself off first or rinse the soap off first?
Performance Patterns
Habits, routines, roles, and rituals are all performance patterns according to the OTPF-2.3 All can be helpful or detrimental to occupational performance. As cited in the OTPF-2 (p. 641),3 habits are “specific, automatic behaviors that can be useful, dominating, or impoverished.”13,32 An example of an ADL habit may be automatically placing a napkin on one’s lap before starting to eat or placing the right leg into pant legs first, then the left leg. Routines are “established sequences of occupations or activities that provide a structure for daily life” (p. 641).3 An example of a routine ADL may be Anna’s routine of waking up at the same time every day and completing the sequence of toileting, showering, dressing, hygiene and grooming, and eating breakfast on a regular basis. Anna’s IADL routine may have been to help her daughter to get ready for the day by completing such activities as changing her diaper, getting her dressed and cleaned, making her breakfast, packing her lunch, and driving her to daycare. Roles are “expected by society, shaped by culture, and may be further conceptualized and defined by the client” (p. 641).3 Examples of roles might include a husband of a wife with severe rheumatoid arthritis or a college student who lives independently in an apartment with a roommate. Important roles for Anna are those of wife, mother, daughter, worker, and Bible study member. Rituals are “symbolic actions with spiritual, cultural, or social meaning that contribute to the client’s identity and reinforce the client’s values and beliefs.”17 Examples of rituals that are in the realm of ADLs and IADLs include praying or saying grace before every meal or celebrating particular holidays with foods that are only served on that date and have special cultural meanings. Understanding performance patterns including habits, routines, roles, and rituals will allow the OT practitioner to identify performance deficits, set priorities with goal setting, and help the client reestablish continuity in daily living. For example, with her new functional status, Anna may not be able to perform all of the previous morning IADL routines with her daughter. She may have to establish new routines with her daughter and learn to perform those activities differently. Or others, at least in the early stages, may have to assume responsibility for those tasks. Anna may need to redefine her role in the family, an important undertaking for an occupational therapist to help facilitate.
Environment
The environment to which the client will be discharged after treatment is an important consideration. The OTPF-2 describes the environment as the “external physical and social environments that surround the client and in which the client’s daily life occupations occur” (p. 642).3 A physical environment includes the natural and the built environment and the objects in them. A few of the external environments for Anna are her home and the contents in it, her place of work, and her church. The social environment includes relationships by persons, groups, and organizations. Anna’s social environment includes her husband, daughter, parents, coworkers, and friends. Given Anna’s circumstances, questions abound such as who will be her primary caregiver when she goes home, her mother or her husband? How long will Anna’s mother live with her family? Will Anna plan to return to work and community activities? Does Anna’s family own or rent their home? Will Anna be alone at home at times? How important are her friendships to her for social support? The answers to the questions about the physical and social environment will strongly influence the treatment priorities.
Cultural, Personal, Temporal, and Virtual Contexts
The terms context and environment have been used interchangeably in the literature but are defined separately in the OTPF-2, though they are considered to be interrelated.3 Context can refer to situations or conditions within and around the client. The OTPF-2 describes context as cultural, personal, temporal, and virtual.
A cultural context includes “customs, beliefs, activity patterns, behavior standards, and expectations accepted by the society” in which one is a member (p. 642).3 Cultures can differ vastly in terms of ADLs/IADLs. For example, one culture may view bathing as a private event, whereas another may consider it a communal event.
Cultural context is also important to consider in understanding differences in how independence is defined and valued. The AOTA Position Paper on the construct of independence supports the view that independence is “defined by the individual’s culture, values, support systems, and ability to direct his or her life.”23 A thorough evaluation will allow the OT practitioner to understand what activities are critical to each client in order to reestablish the client’s sense of directing his or her own life. An example of differing cultural values frequently occurs when an occupational therapist raised in a more Westernized culture considers it important to foster independence in ADLs and IADLs but a client from a different cultural view may not see independence in ADL tasks as highly valued. The OT practitioner may unfairly label the client as unmotivated. For the individual whose culture does not value ADL or IADL independence, the occupational therapist may focus primarily on teaching the client and family to adapt. The focus would be on family training and identifying the activities of highest value to the client and family.
The ultimate goal of any ADL and IADL training program is for the client and family to learn to adapt to the life changes that necessitated a referral to the occupational therapist. For the individual who values independence, the goal may be to achieve the maximal level of independence. It is important to note that this level is different for each client. For the client with mild muscle weakness in one arm, complete independence in ADLs may be the maximum. In contrast, for the individual with a high-level quadriplegia, self-feeding, oral hygiene, and communication activities with devices and assistance may be the maximal level of independence that can be expected. The potential for independence depends on each client’s unique personal needs, values, capabilities, limitations, and social and environmental resources.
Personal context includes a person’s demographic features, such as age, gender, and educational level, which also need to be considered in ADLs and IADLs. The ADL/IADL tasks and routines may differ based on any one of many demographic factors. For example, a young adult female may consider it important to regain the ability to shave her legs, whereas an elderly female may not. Temporal context includes contexts that refer to time, such as time of year, time of day, or stages of life. An example of how temporal context can be important in ADLs is determining when certain tasks, such as dressing and eating a meal, occur during the day. Virtual context refers to interactions in “simulated, real-time, or near-time situations, absent of physical contact” (p. 646).1 An example of virtual context for Anna is her ability to contact friends using her computer or cell phone. It would be important for an occupational therapist to recognize the significance of this virtual context in order for Anna to be connected socially and otherwise.
Finances
Financial resources available for potential expenses such as assistant care, special equipment, and home modifications are other important considerations for ADL and IADL performance. For example, consider a client who is a new full-time wheelchair user and can no longer stand to take showers, requiring significant assistance of a caregiver to perform the task. If the client has unlimited financial resources, owns his own home, has an able-bodied committed caregiver, a desire to take showers daily, and an eagerness to fully remodel his home for accessibility, an OT may recommend a fully remodeled bathroom by a licensed contractor. Anna has fewer financial resources but has reliable caregivers and owns her home. She also desires to shower regularly but an occupational therapist may make recommendations for less costly modifications such as removing the sliding glass door from the bathtub/shower and a replacing it with a shower curtain or obtaining a bath bench and other equipment.
Occupational Justice
As cited in the OTPF-2,3 the term occupational justice was coined by Townsend in 2003 to describe the occupational therapy profession’s concerns with the ability of all people to be given the opportunity to engage in occupations, including the ADLs and IADLs that are important to them. Many times occupational therapists are the first to recognize the disparity in abilities to meet occupational needs because of social, economic, and other factors. Occupational therapists can assist in supporting social policies, actions, and laws that allow all persons to engage in occupations that are important to them.3 An example of applying this principle of occupational justice to the most basic of ADLs involves Anna’s roommate in the inpatient rehabilitation unit who does not have the resources to bring in clothes to practice dressing skills. The only clothes Anna’s roommate had were destroyed in the accident that brought her into the hospital. Anna’s roommate has only her hospital-issued gown and pants to practice dressing skills. On a small scale the OT can help to equalize this disparity by working with social services to allow Anna’s roommate access to clothes she can use in order to increase her independence in this important ADL. A common situation for an OT is one where a piece of adaptive equipment such as a transfer bath bench is neither covered by insurance nor within the client’s ability to purchase. Creative, compassionate, and resourceful OTs can help to bridge this disparity to help all clients to perform ADLs and IADLs that are important to them.
Evaluation of Areas of Occupation
According to the OTPF-2, occupational therapy’s overarching goal for both the domain and the process is “supporting health and participation in life through engagement in occupation.”3 A comprehensive evaluation of occupational performance involves collaborating with the client to determine what he or she wants and needs to do to support to health and participation.3 According to the OTPF-2, areas of occupation include ADLs, IADLs, rest and sleep, education, work, play, leisure, and social participation.
The process of how occupational therapy services are delivered to a client as outlined by the OTPF-2 is via evaluation, intervention, and outcomes. The “client” in this process may be defined as a person, those in an organization, or those in a population (community). The process may seem linear but is actually dynamic, allowing the OT practitioner to continually assess the process toward reaching goals.3
In a client-centered approach, the therapist collaborates with the client or the family/caregivers, centering the occupational therapy process on the client’s priorities and fostering an active participation toward the outcome. Evaluation consists of creating an occupational profile and a performance analysis of skills and patterns and the factors that influence performance. An occupational profile describes the client’s occupational history, patterns of daily living, interests, values, and needs.3
ADL and IADL Performance
An occupational performance analysis of ADLs and IADLs may include using a checklist as a guide for questioning and the selection of specific activities to perform as identified during the interview for the occupational profile. For example, in Anna’s case the occupational therapist may select to have Anna perform lower-extremity dressing and transfer to the commode as two key activities. The OT can then determine strategies to promote independence and provide caregiver instruction regarding how to provide Anna with the appropriate level of assistance.
Many types of ADL and IADL checklists and standardized tests are available. They all cover similar categories and performance tasks.7 The use of a standardized test will ensure a more objective assessment and provide a standard means of measurement. A standardized assessment tool can be used at a later time for reevaluation, and some assessments allow for comparison to a norm group. Both Asher7 and Law26 have developed resources on assessments that can be used as a resource for selecting appropriate tools for evaluation The occupational therapist should review the literature periodically to learn about new assessments developed by occupational therapists and about those that have been developed as interdisciplinary assessments, such as the Assessment of Motor and Process Skills18 and the Functional Independence Measure (FIM).26,40
General Procedure
When data have been gathered about the client’s physical, psychosocial, and environmental resources, the feasibility of ADL assessment or ADL training should be determined by the occupational therapist in concert with the client, supervising physician, and other members of the rehabilitation team. In some instances, ADL training should be delayed because of the client’s limitations or in favor of more immediate intervention objectives that require the client’s energy and participation.
The interview may serve as a screening device to help determine the need for further assessment by observation of performance. This need is determined by the therapist based on knowledge of the client, the dysfunction, and previous assessments. A partial or complete performance analysis is invaluable in assessing ADL performance. The interview alone can lead to inaccurate assumptions. The client may recall performance before the onset of the dysfunction, may have some confusion or memory loss, and may overestimate or underestimate his or her abilities because there has been little opportunity to perform routine ADLs since the onset of the physical dysfunction.
Ideally, the occupational therapist assesses the performance of activities in the environment and context where they usually take place.5 For example, a dressing assessment could be arranged early in the morning in the treatment facility, when the client is dressed by nursing personnel, or in the client’s home. A self-feeding assessment should occur at regular meal hours. If this timing is not possible, the assessment may be conducted during regular treatment sessions in the OT clinic under simulated conditions. Requiring the client to perform routine self-maintenance tasks at irregular times in an artificial environment may contribute to a lack of carryover, especially for clients who have difficulty generalizing learning.
The therapist should select relatively simple and safe tasks from the ADL and IADL checklist and should progress to more difficult and complex items, including some that involve safety measures. For example, with Anna, transfer training would likely start with transfers from her wheelchair to her bed and then progress to commode transfers, which are more difficult. The ADL assessment should not be completed at one time because this approach would cause fatigue and create an artificial situation. Tasks that would be unsafe or that obviously cannot be performed should be omitted and the appropriate notation made on the assessment form.
During the performance analysis, the therapist should observe the methods the client is using or attempting to use to accomplish the task and try to determine causes of performance problems. Common causes include weakness, spasticity, involuntary motion, perceptual deficits, cognitive deficits, and low endurance. If problems and their causes can be identified, the therapist has a good foundation for establishing training objectives, priorities, methods, and the need for assistive devices.
Other important aspects of this analysis that should not be overlooked are the client’s need for respect and privacy and the ongoing interaction between the client and the therapist. The client’s feelings about having his or her body viewed and touched should be respected. Privacy should be maintained for toileting, grooming, bathing, and dressing tasks. The therapist with whom the client is most familiar and comfortable may be the appropriate person to conduct ADL assessment and training. As the therapist interacts with the client during the performance of daily living tasks, it may be possible to elicit the client’s attitudes and feelings about the particular tasks, priorities in training, dependence and independence, and cultural, family, and personal values and customs regarding performance of ADLs.
Recording Results of ADL Assessment
During the interview and performance analysis, the therapist makes appropriate notations on the checklists. If a standardized assessment is used, the standard terminology identified for that assessment is used to describe or measure performance. Nonstandardized tests may include separate checklists for self-care, home management, mobility, and home environment assessments. When describing levels of independence, occupational therapists often use terms like maximum, moderate, and minimal assistance. These quantitative terms have little meaning to healthcare professionals unless they are defined or unless supporting statements are included in progress summaries to give specific meanings for each. It also should be specified whether the level of independence refers to a single activity, a category of activities such as dressing, or all ADLs. In designating levels of independence, an agreed-upon performance scale should be used to mark the ADL checklist. The following general categories and their definitions are suggested:
1. Independent. Client can independently perform the activity without cuing, supervision, or assistance, with or without assistive devices, at normal or near normal speeds. Task is completed safely. If the client requires assistive devices or performs the activity at a slower than customary speed, the term modified independence may be used.
2. Supervised. Client requires general supervision (not hands-on) and may require a verbal cue for safety. The OT feels comfortable being greater than arm’s length away at all times.
3. Standby assistance (SBA)/contact guard assistance (CGA). Client requires caregiver or someone to provide hands-on guarding to perform a task safely. Note: OTs may tend to use the term SBA, whereas other disciplines may use CGA.
4. Minimal assistance. Client requires 25% physical or verbal assistance of one person to complete a task safely. (Client performs 75% or more of the task.)
5. Moderate assistance. Client requires 50% physical or verbal assistance of one person to complete a task safely. (Client performs 50% to 74% of the task.)
6. Maximal assistance. Client requires physical or verbal assistance for 51% to 75% of an activity by one person. (Client performs 25% to 49% of the task.) The helper is doing more than half the work or task, while client is performing less than half.
7. Dependent. Client requires more than 75% physical or verbal assistance. Client does less than 25% of the task. For example, she or he can perform only one or two steps of the activity or very few steps of the activity.
These definitions are broad and general. They can be modified to suit the approach of the particular treatment facility.
As stated previously, the AOTA23 published a position paper on a definition of independence that differs from the relatively narrow definition noted earlier. Hinojosa23 stated: “Independence is a self-directed state of being characterized by an individual’s ability to participate in necessary and preferred occupations in a satisfying manner, irrespective of the amount or kind of external assistance desired or required” (p. 660). This means that an individual’s independence is not related to whether an individual performs the activity or not or in a modified fashion or with assistance.
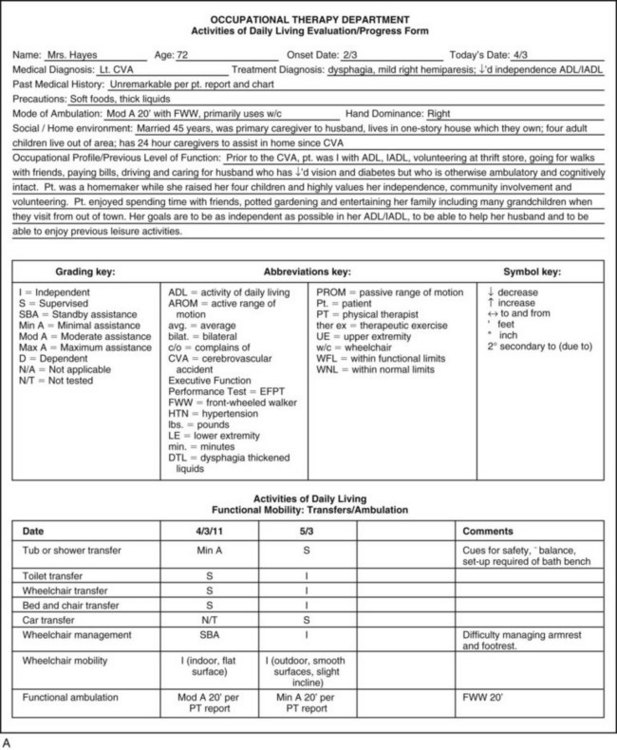
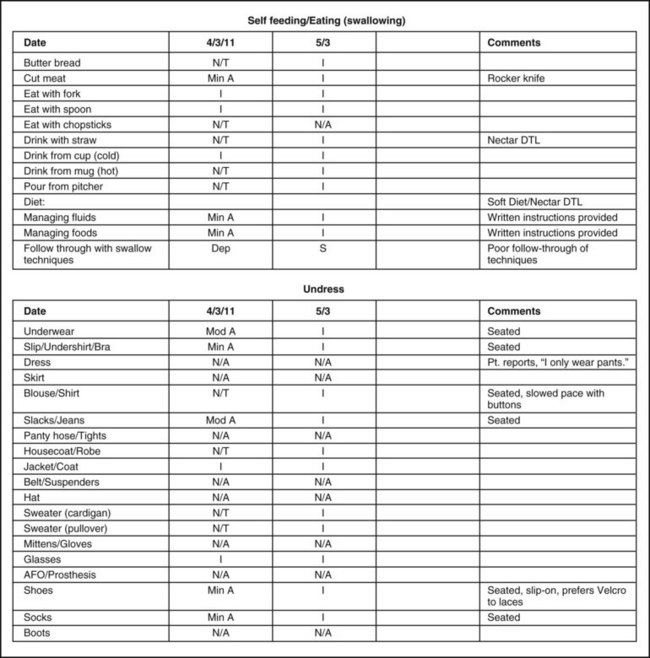
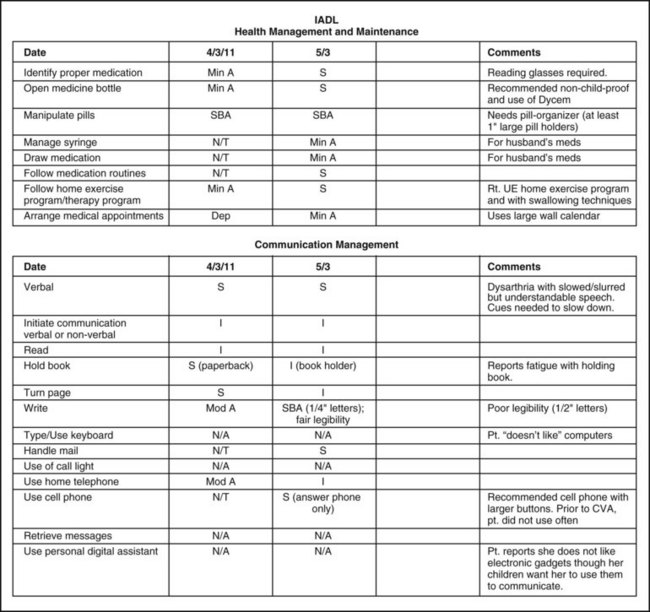
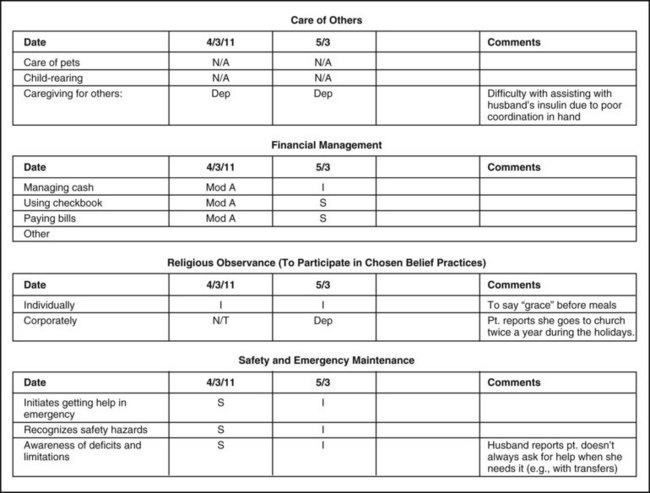
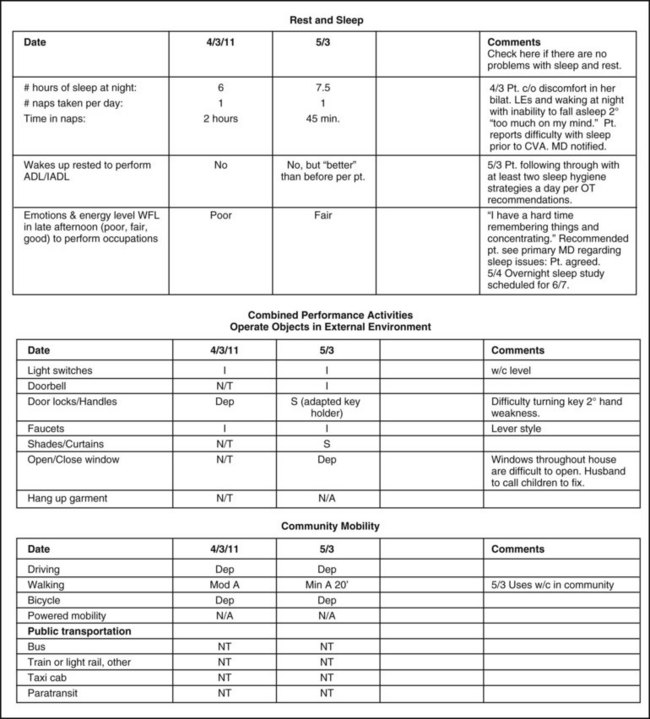
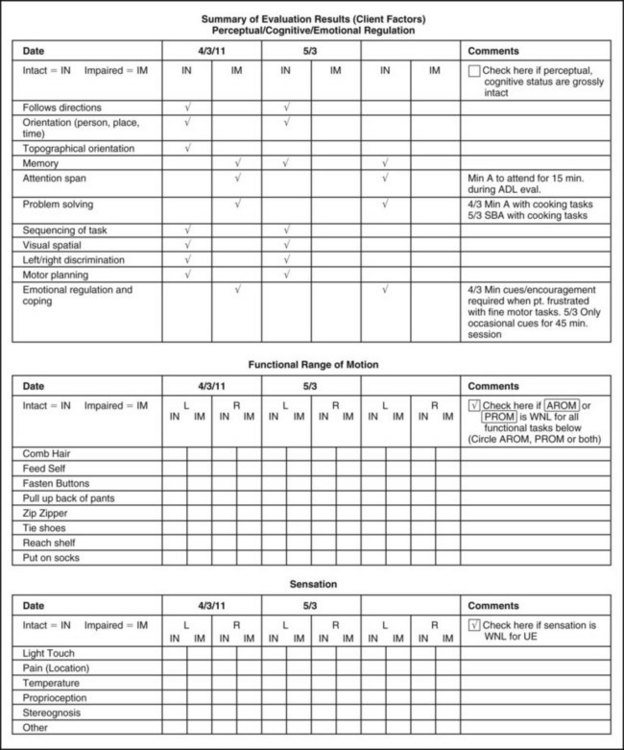
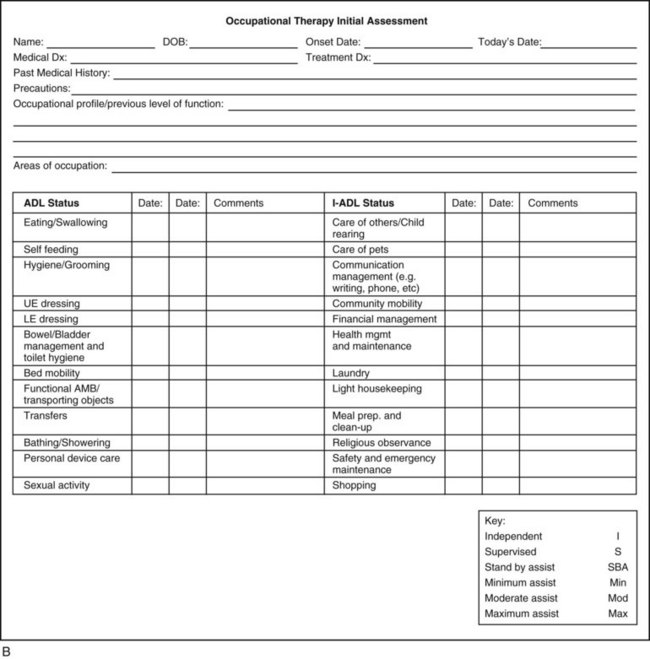
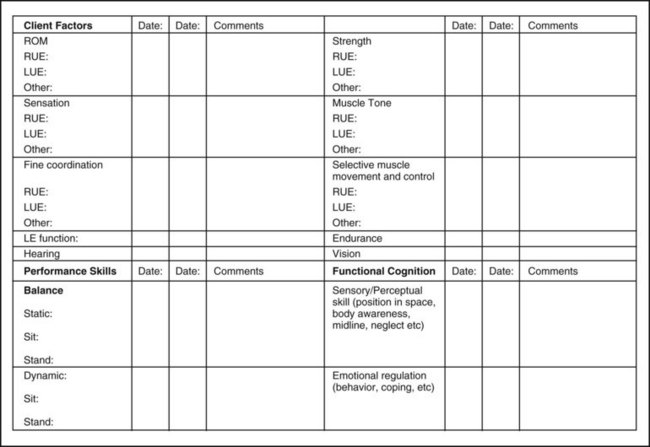
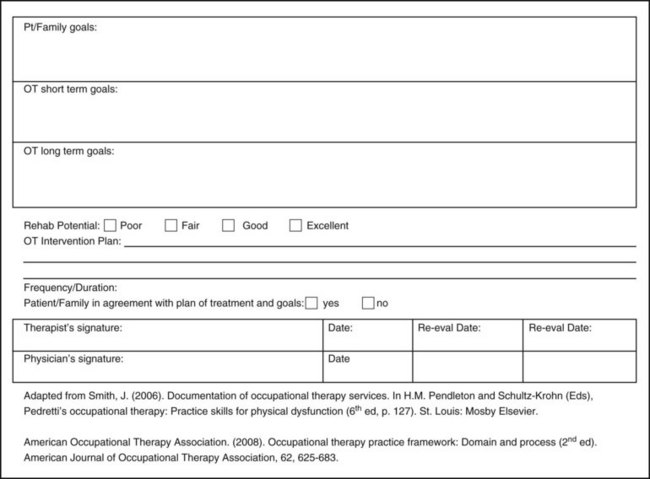
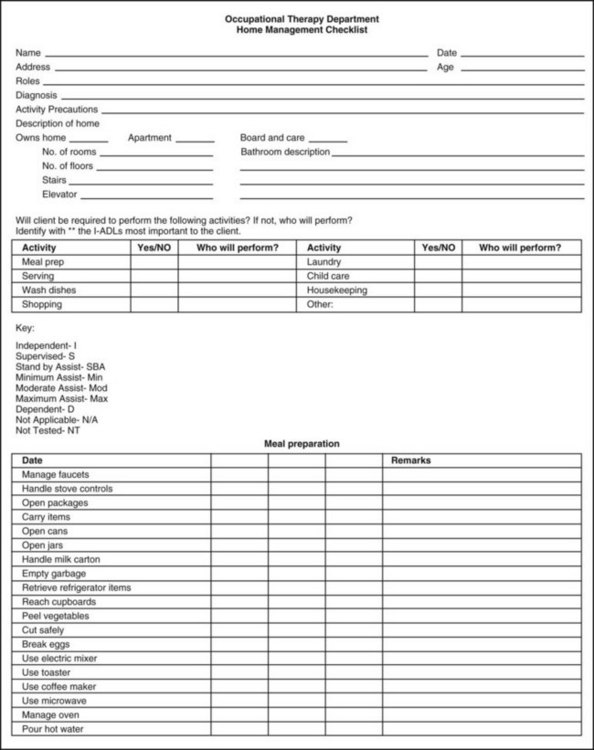
Information from the ADL assessment is summarized succinctly for inclusion in the client’s permanent record so that interested professional coworkers can refer it to. A sample case study (Mrs. Hayes) with resulting ADL evaluation summaries of an initial assessment and progress report are included in Figure 10-1, A. Two evaluation forms are being included to show Mrs. Hayes’s progress, a detailed ADL checklist (see Figure 10-1, A), and an abbreviated ADL checklist (Figure 10-1, B). The detailed form with Mrs. Hayes’s information incorporated into it will help the novice OT practitioner appreciate the details of many ADLs and IADLs that may be taken for granted by an able-bodied individual. The abbreviated form is more likely to be used in actual practice. A third form, also included, is a home management checklist (Figure 10-2). When reviewing these, the reader should keep in mind that the assessment and progress summaries relate only to the ADL and IADL portions of the intervention program.


Instrumental Activities of Daily Living
Home management tasks are assessed similarly to self-care tasks. First, the client should be interviewed to elicit a description of the home and of former and present home management responsibilities and the significance of the role. Tasks the client needs to perform when returning home, as well as those that he or she would like to perform, should be determined during the interview. If the client has a communication disorder or a cognitive deficit, aid from friends or family members may be enlisted to get the information needed. The client may also be questioned about his or her ability to perform each task on the activities list. The assessment is much more meaningful and accurate if the interview is followed by a performance assessment in the ADL kitchen or apartment of the treatment facility or, if possible, in the client’s home. An example of a standardized assessment to evaluate the executive skills required to perform IADLs is the Executive Function Performance Test.8 Examples of specific IADL tasks to evaluate for home management can be found in the home management checklist (see Figure 10-2).
The therapist should select tasks and exercise safety precautions consistent with the client’s capabilities and limitations. The initial tasks should be simple one- or two-step procedures that are not hazardous, such as wiping a dish, sponging a tabletop, and turning the water on and off. As the assessment progresses, tasks graded in complexity and involving safety precautions should be performed, such as making a sandwich and a cup of coffee and vacuuming the carpet. For example, with Anna, initial tasks may include making a sandwich and using the microwave, as using a manual wheelchair in her own home is new for her and requires working from a seated versus a standing position. As Anna performs these simple tasks using her wheelchair, the OT will be able to observe and make suggestions about modification to her kitchen, reorganization, safety techniques, or methods to transport items and simplify tasks.
Home management skills apply to women, men, and sometimes adolescents and children. Individuals may live independently or share home management responsibilities with their partners. In some homes, it is necessary for a role reversal to occur after the onset of a physical disability, and the partner who usually stays at home may seek employment outside the home, whereas the individual with a disability remains at home. In Anna’s case, she has stated she would like to participate in previous home management activities and eventually return to work. Anna’s occupational therapist will collaborate with her on home tasks to be completed by her so that interventions can be prioritized. Until Anna can perform the tasks more independently, Anna’s mother or husband may be available to perform some of these tasks with direction from Anna.
If a client will be home alone, several basic ADL and IADL skills are needed for safety and independence. The most basic IADL skills required to stay at home alone include the ability to3 prepare or retrieve a simple meal,1a employ safety precautions and exhibit good judgment,3 take medication, get emergency aid6 if needed, have a system for managing toileting, and have a method to allow for rest periods. The occupational therapist can assess the potential for remaining at home alone through the activities of home management assessment. An evaluation such as the Executive Function Performance Test can be used to assist in determining whether a person is safe to remain at home or how much assistance is required for some IADL tasks.8 A child with a permanent disability also needs to be considered for assessment and training for IADL skills as he or she develops and matures with a growing need for independence.
Case Study
Mrs. Hayes
Mrs. Hayes is a 72-year-old woman who incurred a cerebral thrombosis resulting in a left cerebrovascular accident (CVA) 2 months ago. She lives in a modest home with her husband of 45 years. Mrs. Hayes was active before her CVA, volunteering 10 hours a week at a local charity thrift store with her friends and caring for her husband who has diabetes and poor vision. Outside of needing help with his medications and with cooking, her husband is ambulatory, cognitively intact, and independent with ADLs. She was independent with all of the indoor home management activities and paid the bills for herself and her husband. She and her husband have a gardener, but Mrs. Hayes enjoyed gardening with potted plants.
Following her CVA, Mrs. Hayes spent 3 weeks in acute rehabilitation. Before Mrs. Hayes was discharged from the acute rehabilitation facility, the OT performed a home evaluation. (See the “Home Assessment” section that follows.) Following through with the OT’s recommendations, the client’s family made simple home modifications to increase safety and independence in the home.
The CVA resulted in an ataxic gait, mild dysarthria (slurred speech), dysphagia (swallowing deficit), and mild right hemiparesis (weakness). She was referred to outpatient OT for evaluation and training in ADLs and IADLs and for treatment of dysphagia.
The initial evaluation process involved an interview with the client and her husband to create an occupational profile. Mrs. Hayes expressed concern about how she and her husband will manage, as her four adult children live five hours away. Her children have hired caregivers through an agency who are with the couple in shifts for 24 hours a day. Mrs. Hayes and her husband are anxious to be on their own again and do not want to be a financial burden on their children. Based on the priorities and problems identified by the client and her husband, the occupational performance analysis included the use of the Executive Function Performance Test (EFPT)9 and an ADL performance evaluation. The initial performance evaluation was completed during the first 1-hour session, whereas the EFPT was completed on the second visit.
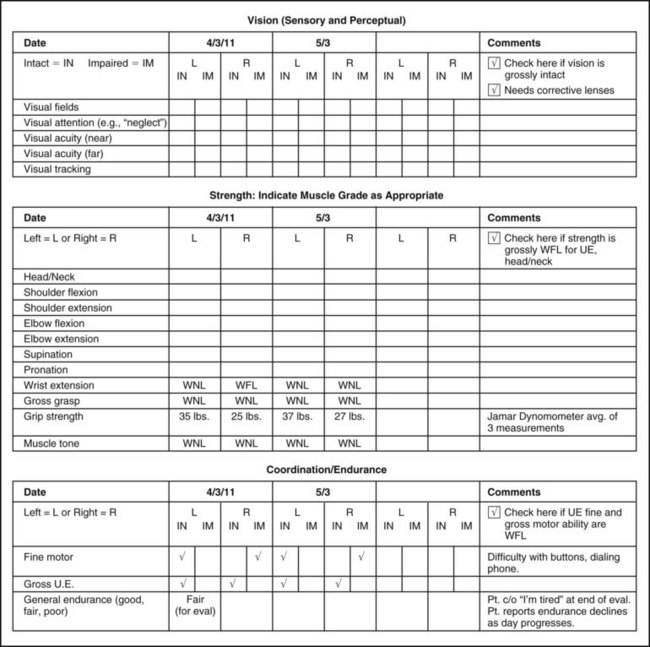
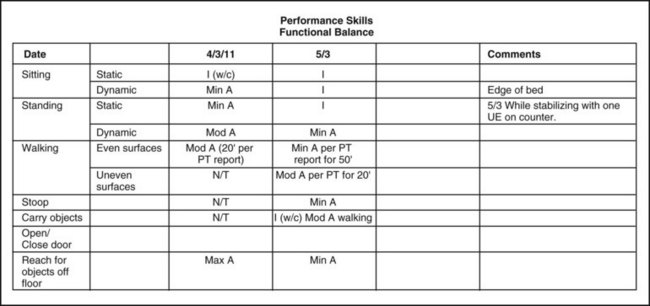
During the initial evaluation, Mrs. Hayes became restless after 15 minutes, but with minimal redirection she continued to attend to the tasks. She also demonstrated decreased frustration tolerance during the assessment and required minimal encouragement to continue with fine motor tasks, which were difficult for her. Mrs. Hayes is independent with eating (as long as she is in compliance with soft diet for swallowing problems), hygiene, and grooming while seated and with toileting tasks. Mrs. Hayes requires supervision with transfers from her wheelchair to the bed and the toilet but requires minimal assistance to transfer onto the bath bench because of occasional loss of balance, setup, and cues for safety. She requires minimal assistance with upper-body dressing and bathing and moderate assistance for lower-body dressing. She has difficulty with handwriting, use of the telephone, and handling keys. She requires moderate assistance to walk 20 feet using a front-wheeled walker (FWW) but is independent with manual wheelchair mobility on indoor flat surfaces. Her visual fields are intact and she has no visual-spatial deficit. Her left upper-extremity (UE) strength and active range of motion (AROM) are within normal limits (WNL). Her right UE strength is WNL proximally, but testing by use of a dynamometer demonstrates mild weakness in her hand. Right UE AROM is WNL. Her muscle tone in her bilateral UEs is WNL. Her right hand coordination is mildly impaired, as demonstrated with moderate difficulty pushing buttons on the phone and tying her shoes. She is able to stand while holding on to a stable surface but cannot use her hands for a task while standing because of mild balance impairments.
Results of the EFPT demonstrated significant deficits in organization of cooking and bill-paying tasks requiring moderate assistance to complete both. The EFPT results indicated that Mrs. Hayes required minimal assistance with medication management and phone management.
A swallow assessment demonstrated moderately impaired tongue coordination and minimal delay with a swallow. Mrs. Hayes has already modified her diet by selecting very soft foods and slightly thickened liquids.
Mrs. Hayes tolerated the full occupational therapy evaluation but reported, “I’m tired” at the end of the session. She reported that her endurance is diminished since the CVA, especially toward the end of the day. She admitted that in the later afternoon hours, “I have hard time remembering things and concentrating.” When queried about her sleep, Mrs. Hayes reports she has difficulty falling asleep and that she wakes up in the middle of the night and cannot fall back asleep because of “too much on my mind” and discomfort in her legs. She reports having sleep difficulties prior to the CVA. Mrs. Hayes is highly motivated and has the potential to prepare simple hot meals and perform basic self-care independently, except for showering, for which she may require supervision. Mrs. Hayes would like to be as independent as possible in her ADLs and IADLs and would like to resume caring for her husband. She acknowledges that her right hand has gotten stronger, but she reports frustration that it is taking longer than she expected. She would like to eventually resume her leisure activities.
Mrs. Hayes has attended OT two times a week for 6 weeks. She is generally cooperative and motivated, although periodically she becomes discouraged as she continues to have an ataxic gait and requires the use of the manual wheelchair for independent mobility. Treatment has focused on lower-extremity (LE) dressing, tub transfers, oral-motor exercises to improve swallowing, instruction in sleep hygiene techniques, and simple meal preparation. Because the caregiver drives Mrs. Hayes and her husband to the OT appointments, the OT has also trained the caregiver in how to assist the client to be more independent in her ADLs.
Mrs. Hayes has made significant progress in the treatment program. She has progressed from requiring moderate assistance with lower-extremity dressing to being independent while seated. She has improved from chair-level grooming to standing with one-hand stabilization while using the other to brush her hair and teeth. Progress has been made from requiring minimal assistance with bathing to requiring supervision only with bathing on a shower bench. Initially requiring supervision with bed to wheelchair transfers, she is now independent. From requiring minimal assistance with transfers onto the shower bench, she now requires supervision, mainly for setup of the environment. From moderate difficulty with use of the phone, she has progressed to using the phone independently; from requiring moderate assistance with bill-paying activities and medication management, she has progressed to the supervised level. From being dependent with oral-motor exercises, she has progressed to supervised. Mrs. Hayes is now independent in cold meal preparation after initially requiring moderate assistance. Mrs. Hayes has expressed some improvement in her sleep at night and reports following through with two sleep hygiene strategies but that she still has difficulties and does not wake up refreshed.
Mrs. Hayes continues to require a soft diet and slightly thickened liquids because of swallowing difficulties. She consistently follows through with the use of safety techniques for swallowing and is safe and independent to do so. She continues to have impaired hand function but is learning compensatory techniques to adapt her method of performing various ADLs. She is also strengthening her right hand with exercises provided by the occupational therapist to restore as much function as possible to that hand.
The occupational therapist has coordinated treatment and goals with the physical therapist and social worker. The therapist has recommended that the social worker refer the client’s husband to a low-vision center for evaluation, as he was dependent on his wife and never received instruction in low-vision training. His independence will relieve some of Mrs. Hayes’s burden of care giving. Mrs. Hayes has also been referred to the National Sleep Foundation for more information and to her primary physician who referred her to a physician specializing in sleep medicine. The sleep specialist evaluated Mrs. Hayes and scheduled her for an overnight sleep study in 4 weeks. See Chapter 13 for more information on the occupation of sleep and rest.
Mrs. Hayes and her husband are pleased with her increased independence. With input provided by the occupational therapist, the family will decrease the hours needed for a hired caregiver to 16 hours. For 8 hours a day during the day the hired caregiver will assist Mrs. Hayes with bathing, meals, driving to appointments, shopping, and housekeeping. Occupational therapy will now focus on hot meal preparation, bed making, and exploring leisure interests, along with continuing to work toward improvement of oral-motor and hand function and improving sleep hygiene techniques.8,9,24
1. What deficits is Mrs. Hayes experiencing, and what compensatory strategies can she be taught to improve her ADLs and IADLs?
2. What role does the occupational therapist have in helping Mrs. Hayes to meet her goals for ADLs and IADLs?
3. With all the areas that Mrs. Hayes needs to work on with the occupational therapist, how can the OT prioritize the goals that are most important for Mrs. Hayes to accomplish so that she can continue to live in her home safely with her husband?
Home Assessment
To help with the transition from a treatment facility to home, a home evaluation may be performed. A home evaluation can serve several functions, including assessing a home for safety and accessibility, offering a way for an OT to assess client functioning at home, and determining a time when caregiver training can occur. From the initial meeting with a client or caregivers, the occupational therapist must have an idea about the home environment to which the client will return. For example, the OT treating Anna or Mrs. Hayes should know from early on whether they live in second story apartment without an elevator or in a one-story house. When discharge from the treatment facility is imminent, a home assessment may be carried out to facilitate the client’s maximal independence in the living environment.
As will be described here, not all clients who are seen by an occupational therapist in a facility will need or receive a home evaluation. The home assessment will provide the family with a list of modifications and durable medical equipment needed to maximize safety and independence in the home and help the therapists understand the physical, cultural, and social environment the client will be returning to so that realistic treatment methods and goals related to mobility, ADLs, and IADLs are established. Insufficient or incorrect information regarding accessibility can lead to costly mistakes in ordering equipment that may lead to impairing the client’s safety and potential for greater independence.
The home evaluation should be performed when the client’s mobility status is stabilized with status close to where you anticipate it will be at discharge. Collaboration with the physical therapist regarding a client’s ambulatory status and potential is essential to determine the timing and necessity of the evaluation. For example, if the physical therapist reports that a client will be primarily walking at discharge, recommendations for home modifications may be very different than if the primary mode of mobility will be a wheelchair.
Ideally, the occupational and physical therapists could perform the home assessment together. During the home visit, the client and essential caregivers/family members or housemates should be present. However, if it is not feasible to take the client, a wheelchair and other necessary equipment may be taken. Budget, time factors, and reimbursement issues may not allow two professionals to go to the client’s home or may prohibit a home visit altogether.
If a home evaluation is not possible prior to discharge, the rehabilitation team along with the client and family members should identify the most serious concerns and develop a plan to address them. Figure 10-3 shows a home safety checklist that can be completed by the client or client’s family. Family members or housemates could take pictures and measurements of the home or draw floor plans. Figure 10-4 depicts an occupational therapy home evaluation checklist, which is completed by the OT practitioner.
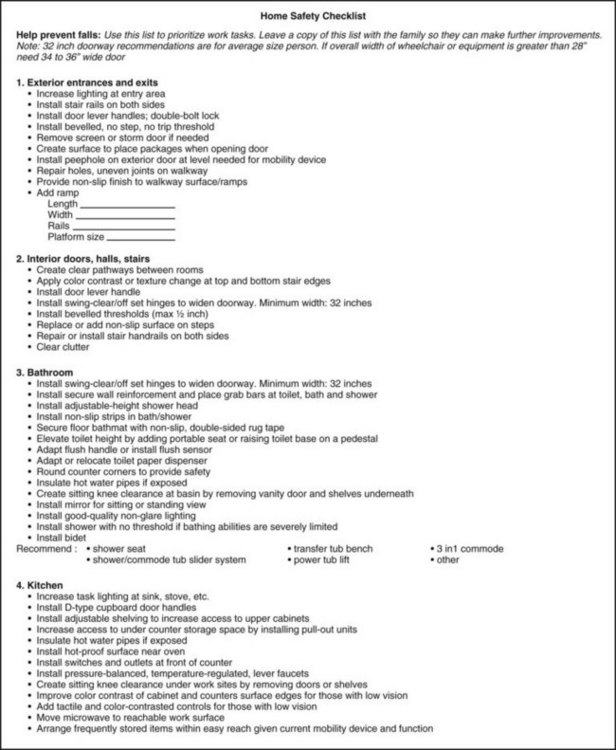
FIGURE 10-3 Home safety checklist. (Adapted from Rebuilding together, Washington, DC, www.rebuildingtogether.org/downloads/home-safety-checklist.pdf, and from Occupational/physical therapy home evaluation form, San Francisco, 1993, Ralph K. Davies Medical Center; and Occupational therapy home evaluation form, Albany, CA, 1993, Alta Bates Hospital.)
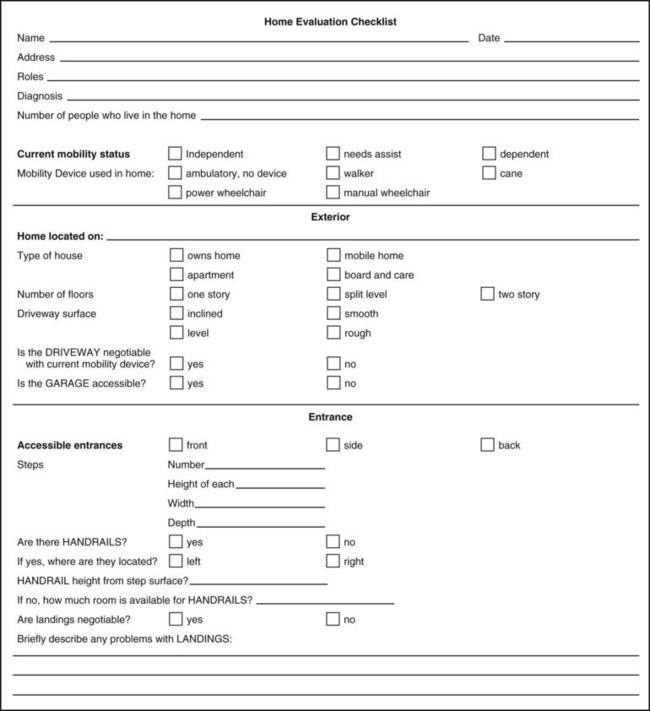
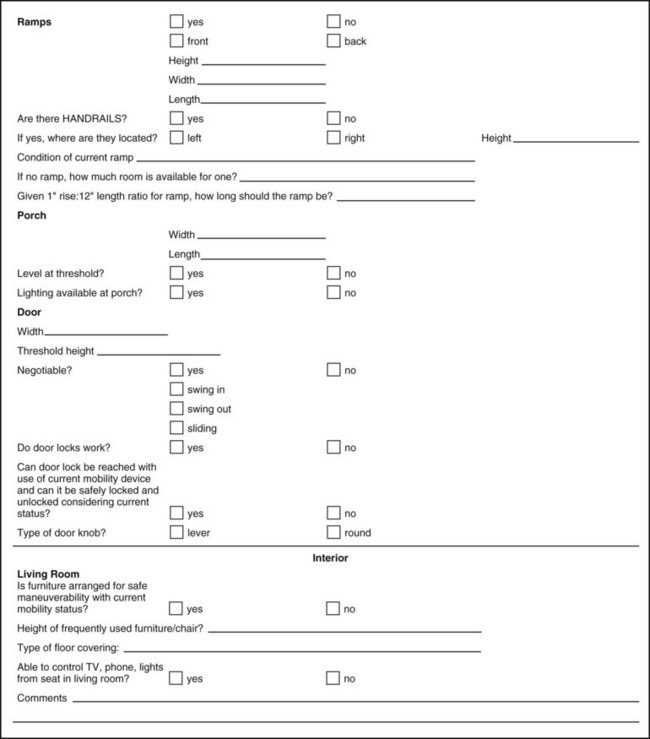
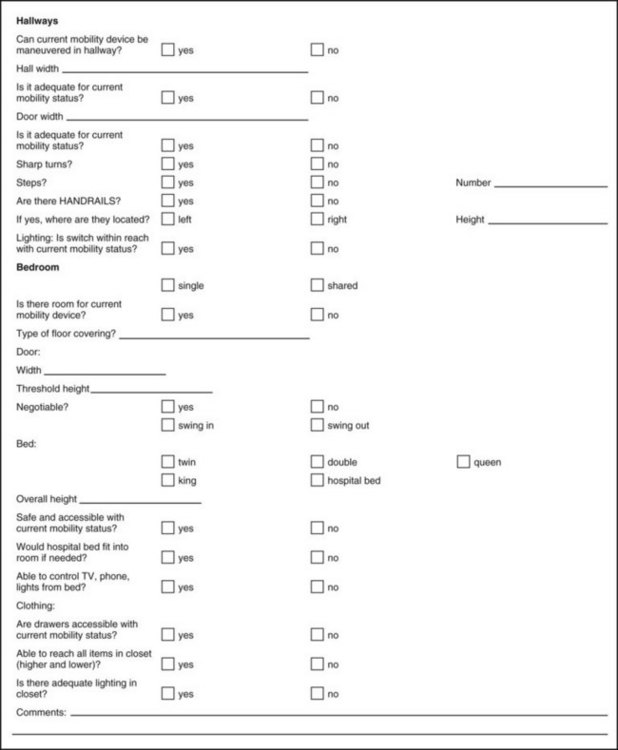
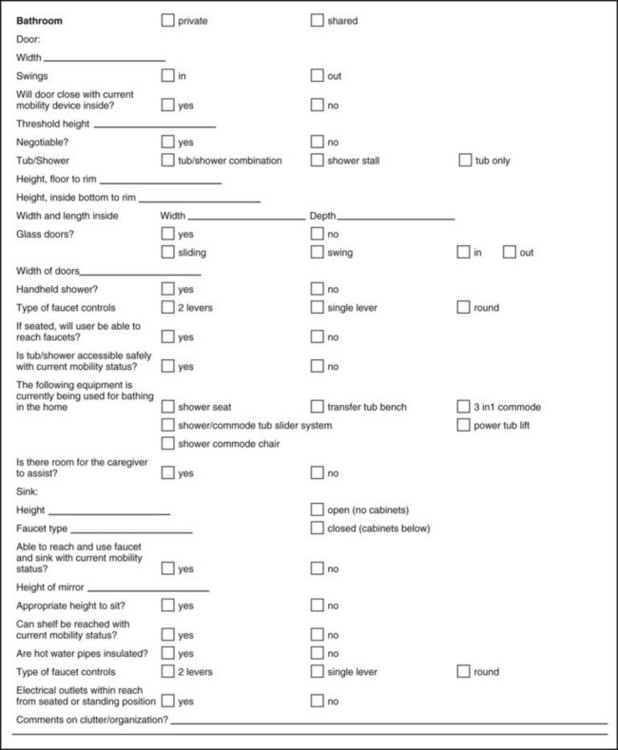
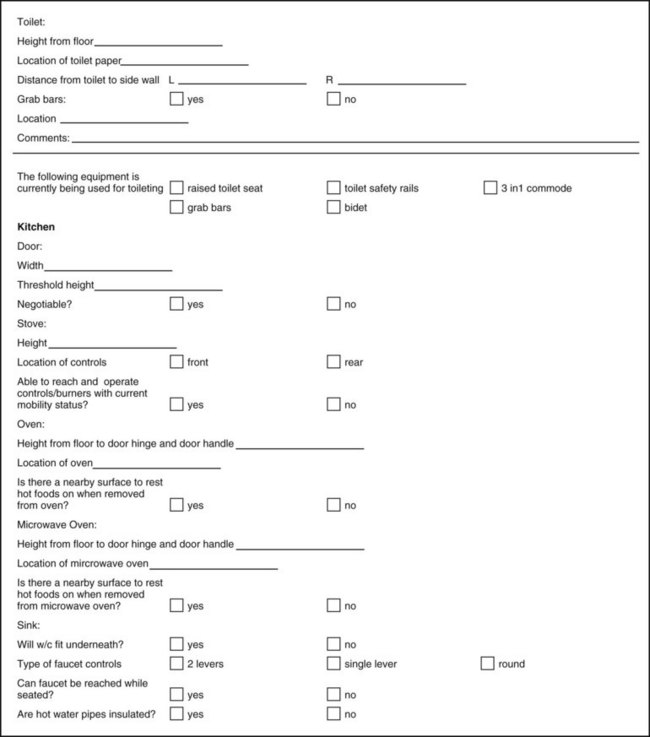
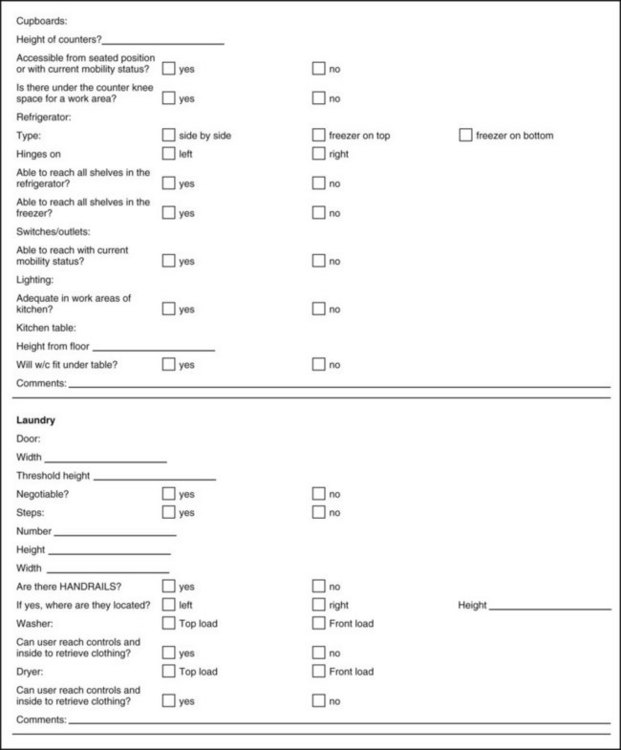

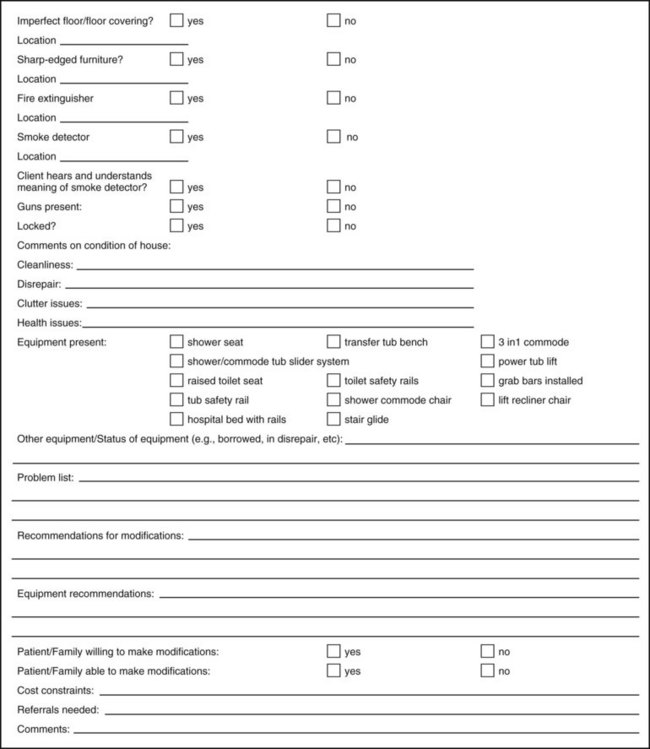
FIGURE 10-4 Home evaluation checklist. (Adapted from Occupational/physical therapy home evaluation form, San Francisco, 1993, Ralph K. Davies Medical Center; and Occupational therapy home evaluation form, Albany, CA, 1993, Alta Bates Hospital.)
Much of the information can also be gained by interviewing the client and family member(s) following a trial home visit with the client. The family member or caregiver may be instructed to complete the home visit checklist and provide photographs or sketches of the rooms and their arrangements. Problems encountered by the client during a trial home visit should be discussed and the necessary recommendations for their solution made, as described earlier. If a home evaluation is not possible while the client is in the hospital, the home assessment may also be referred to the home health agency that will provide home care services to the client.
The client and a family member should be interviewed prior to the home evaluation to determine the client and family’s expectations and the roles the client will assume in the home and community. A culture’s or family’s values regarding people with disabilities may influence role expectations and whether independence will be encouraged. Willingness and financial ability to make modifications in the home can also be determined. The purposes and procedure of the home assessment should also be clearly explained to the client and caregiver(s) prior to the actual visit.
Understandably, the first time home (which may be at the home evaluation) after an illness or injury can be potentially emotion-filled for everyone concerned, especially for the client. Before performing a home evaluation, especially with the client present, it is important for the occupational therapist to know whether the home being evaluated is new for the client or whether drastic home changes have already had to be made. For example, if Anna lived in a second-story apartment prior to her accident, her family may have had to move to a first-story home. Or if Anna’s mother was going to move into her home to help care for her daughter and granddaughter, rooms may have been switched, furniture moved, belongings displaced. Knowing this ahead of time can help the occupational therapist to be ready to provide emotional support to the client as needed.
If the client is present during the home visit, sufficient time should be scheduled so that the client can demonstrate the required functional mobility skills. The occupational therapist may have the client demonstrate selected self-care and home management tasks in the home environment. During the assessment, the client should use the mobility aid and any assistive devices that he or she is accustomed to using. For example, Anna and Mrs. Hayes would be asked to propel their manual wheelchairs throughout the home to determine what access issues they will encounter. The therapist should bring a sturdy tape measure to measure the width of doorways, the height of stairs, the height of the bed, and other dimensions. A digital camera can be useful to record arrangement of furniture, placement of bathroom fixtures, and other architectural structures/possible barriers for later reference when problem solving solutions.
The therapist can proceed to take the required measurements while surveying the general arrangement of rooms, furniture, and appliances. Figure 10-4 provides a format to document critical measurements. It may be helpful to sketch the size and arrangement of rooms for later reference and attach these sketches to the home assessment checklist (see Figure 10-4). For more information on a variety of checklists, see Letts27 and Anemaet.4 Next, the client demonstrates functional mobility skills and essential self-care and home management tasks. The client’s ability to use the entrance to the home and to transfer to and from an automobile, if it is to be used, should be included in the home assessment if time permits.
During the performance assessment, the therapist should observe safety factors, ease of mobility and performance, and limitations imposed by the environment. If the client needs assistance for transfers and other activities, the caregiver should be instructed in the methods that are appropriate. The client may also be instructed in methods to improve maneuverability and simplify the performance of tasks in a small space.
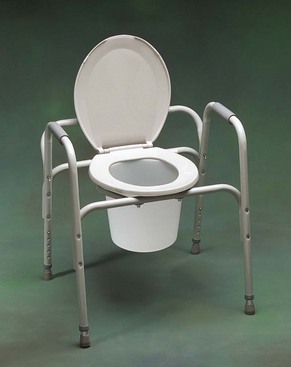
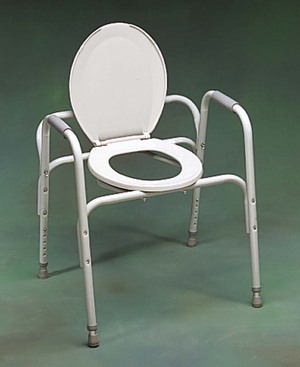
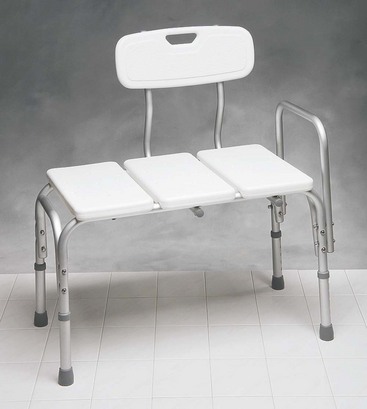
Access into the bathroom and maneuvering with a wheelchair or walker are common problems. Frequently, a bedside commode is recommended until a bathroom can be made accessible or modified to allow independence with toileting (Figure 10-5). Shower seats can be used in the tub if a client can transfer over the edge of the tub and also may be used in a shower. A transfer tub bench (Figure 10-6) is recommended for individuals who cannot safely or independently step over the edge of the tub. Installation of a handheld shower hose increases access to the water and also eliminates risky turns and standing while bathing.

The Americans with Disability Act (ADA) Accessibility Guidelines for Buildings and Facilities are available at its website.15 Not all modifications recommended will necessarily meet the ADA guidelines, as the home will be modified to suit the individual and to compensate for that specific disability. The ADA is meant to apply to public areas and to meet the needs of people with a variety of disabilities. For example, grab bar placement in ADA guidelines indicates a bar should be placed at the back of the toilet. In the case of Mrs. Hayes, who had a stroke, a grab bar placed on both sides of the toilet may be sufficient. Although this recommendation does not meet ADA guidelines, it does allow for safety and independence at the toilet for Mrs. Hayes. A generalist OT practitioner is not expected to know all of the building codes within a city but should have some familiarity with guidelines when making recommendations. The OT should recommend the family only use licensed contractors who are aware of building code requirements in their area. (See Chapter 15 for ADA Guidelines.)
When the home assessment is completed, the therapist should write a report summarizing the information on the form and describe the client’s performance in the home. The report should conclude with a summary of the environmental barriers and the functional limitations that the client encountered. Recommendations should include additional safety equipment and assistive devices that are needed. Modification recommendations should include specific details about size, building specifications, costs, and sources. Recommendations may also include further functional goals to improve independence in the individual’s home environment. Team members should be notified about the client’s performance in the home and accessibility problems so that they can practice skills or be made aware of issues prior to discharge. For example, the OT may report to the physical therapist that a client such as Mrs. Hayes will eventually need to negotiate a step down into the living room to be more independent. The OT may report to the psychologist that Anna had a difficult time emotionally handling her visit to home in her new functional status.
The therapist should carefully review all recommendations with the client and family. The family should receive a written report with recommendations clearly written. This review should be done with tact and diplomacy in a way that gives the client and family options and the freedom to decline them or consider alternative possibilities. Family finances may limit the implementation of needed changes. The social worker may be involved in working out funding for needed equipment and alterations, and the client should be made aware of this service when cost is discussed.
The therapist should include recommendations regarding the feasibility of the client’s discharge to the home environment or remaining in or managing the home alone, if applicable. If there is a question regarding the client’s ability to return home safely and independently, the home assessment summary should include the functional skills the client needs to return home.
See Box 10-2 for the most common modifications recommended and Box 10-3 for a list of supplies to take on a home evaluation.
Financial Management
If the client is to resume management of money and financial matters independently, a cognitive and perceptual assessment that accurately tests these skills should be implemented. Because some persons with physical disabilities also have concurrent involvement of cognition and perception, the level of impairment should be determined. The OT evaluates the methods and routines the client typically implements for financial management. For example, one client may pay each bill as it arrives by writing a check, whereas another client may pay bills once a month online. The skills needed for each are different and require different levels of organization. Like any other performance area, the OT will break down the activity into small tasks and focus treatment on building skills for each component of the task. Caregivers may require training if the role of financial manager is new and must be assumed. In the case of Mrs. Hayes, she is having slight cognitive deficits and handwriting difficulties. She may need to teach her husband how to manage bill paying or they may choose to work together. The client may be capable of handling only small amounts of money or may need retraining in activities that require money management, such as shopping, balancing a checkbook, or making a budget. If a physical limitation is involved, the therapist may introduce adaptive writing devices to allow the client to handle the paperwork aspects of money management.
Community Mobility
The occupational therapist also evaluates the client’s potential to participate in the community where some type of community mobility is required. Zahoransky45 identified community mobility in the following categories:
• Walking with or without the use of an ambulation aid, such as a cane or walker
• Using wheeled mobility devices (i.e., bicycle, motorcycle)
• Using a powered device, such as a power wheelchair or scooter
• Riding as a passenger, with a family, friend, or caregiver as primary transport
• Driving oneself in a vehicle that may or may not be adapted [see Chapter 11]
• Using public transportation, such as taxi, bus, van, subway, airplane, and other transit systems
The occupational therapist must assess the client’s physical, perceptual, cognitive, functional, and social capabilities to be independent and safe with community mobility. The OT should also be familiar with the environment where the client lives and accesses the community. It is not always possible to know about the client’s community or neighborhood from an inpatient or outpatient setting. In this case, the OT has the opportunity to teach the client and caregiver about how to evaluate access and environmental obstacles to help prepare for return to community participation. The OT may also inform the family of needed resources that will help the client resume or learn community access skills.
Physical capabilities to be considered are (1) whether the client has the endurance to be mobile in the community without fatigue and (2) whether the client is sufficiently independent with the walker, cane, crutch, or wheelchair skills and transfers needed to go beyond the home environment. These skills include managing uneven pavement, curbs, and inclines and crossing the street. Other functional skills to be evaluated before considering community mobility are how to (1) handle money, (2) carry objects in a wheelchair or with a walker, and (3) manage toileting in a public restroom.
Cognitive skills include the ability to be geographically and topographically oriented; if taking a bus, to know how to read a schedule and map or know how to get directions; and to have good problem-solving skills if a problem should occur in the community.
If the disability is new, the client may need to develop new social skills or relearn them. At first, these skills will be stretched to the limit once the client is out in the community—for example, learning how to be assertive to get an accessible table at a restaurant, obtaining assistance with unreachable items in the grocery store, and becoming comfortable with a new body image within the able-bodied community.
Visual spatial skills are critical to safety in judging distance stepping down from a curb, driving a car, maneuvering a wheelchair on a narrow sidewalk. The visual spatial skills are identified during an evaluation, considered in relationship to the cognitive, physical, and functional deficits the client exhibits. Some individuals have awareness of their deficits and compensate well. Others are not aware of the deficits or have difficulty with compensatory strategies and therefore will require greater supervision with community mobility than others.
The therapist should also assess the client’s community environment. For example, is the neighborhood safe enough for an individual who might be vulnerable because of physical limitations? What is the terrain like? Are there curb cutouts? Are the sidewalks smooth and even? How far away are the closest store and bus stop? Are the traffic lights long enough for the client to negotiate safely given mobility limitations?
Accessibility of community transportation should also be considered. Some communities have door-to-door cab and van service, which have certain restrictions. Some of these restrictions include the need to arrange transportation a week in advance, the ability to get out the front door and to the curb independently, and the ability to transfer independently into the vehicle. If the client is to use a public bus, he or she must learn how to use the electric lifts and how to lock a wheelchair into place. Because not all bus stops are wheelchair accessible, the neighboring bus stops should be surveyed.
Community mobility requires preplanning by the occupational therapist and the client; accurate assessment of the client’s abilities; and knowledge of potential physical, cognitive, visual perceptual, and social barriers that the client may encounter. Armstrong and Lauzen’s Community Integration Program6 is a valuable resource for providing practical treatment protocols to establish a community-living skills program. Attaining independence in community mobility allows the client to expand life tasks beyond those in the home and allows participation in the community.
Health Management and Maintenance
Health management and maintenance include the client’s ability to understand the medical condition and make decisions to maintain good health and avoid behaviors that compromise health.3 The client’s ability to handle medications, know when to call a physician, and know how to make a medical appointment are practical aspects of health management. The evaluation of the client’s ability to perform these activities may be completed solely by the occupational therapist but will probably include other team members such as the nurse and the physician. The information provided by the occupational therapist’s skilled evaluation of the client’s cognition, visual perception, and physical abilities can greatly enhance the skilled nurse’s ability to use appropriate interventions and teaching strategies when teaching medication management to the client.
Performance skills and patterns must be assessed in light of the skills required for each task. The OT assessment can be helpful in determining which aspects of the task need to be modified for the client to be independent. For example, the occupational therapist can work jointly with a nurse to ensure that a client with hemiplegia and diabetes can manage insulin shots. The OT evaluation considers the client’s cognitive and perceptual abilities to make judgments about drawing the insulin out of the bottle, measuring the insulin, and injecting the insulin. Physical concerns include how to stabilize the insulin bottle, accurately see the measurement, and handle the syringe with one hand. Other medication management may involve how the client is able to open the medication and measure it, if the medication is a liquid. The occupational therapist may also evaluate and train the client in other skills that affect health management. Examples include using the phone, finding the appropriate phone numbers, and providing the needed information to make a medical appointment.
Because she has paraplegia, Anna’s new health management and maintenance routine may be to perform regular skin checks and weight shifts to prevent decubiti (pressure sores) from developing. An occupational therapist can help Anna to obtain necessary adaptive aids and strategies to ensure good skin health.
Health maintenance is an issue for the client and entire healthcare team. The occupational therapist plays an important role because of the scope of the ADL and IADL assessments, which may identify and help resolve problems related to health maintenance.
ADL and IADL Training
If it is determined after an assessment that ADL and IADL training are to be initiated, it is important to establish appropriate short- and long-term goals, based on the assessment and on the client’s priorities and potential for independence. The following sequence of training for self-care activities is suggested: feeding, grooming, continence management, transfer skills, toileting, undressing, dressing, and bathing. This sequence is based on the normal development of self-care independence in children. It provides a good guide but may have to be modified to accommodate the specific dysfunction and the capabilities, limitations, and personal priorities of the client.
The occupational therapist should estimate which ADL and IADL tasks are possible and which are not within the client’s potential to achieve. The therapist should explore with the client the use of alternative methods of performing the activities, environmental modifications to support safety and independence, and the use of any assistive devices that may be helpful. He or she should determine for which tasks the client requires assistance and how much should be given. It may not be possible to estimate these factors until training is under way.
The ADL and IADL training program may be graded by beginning the intervention with a few simple tasks and gradually increasing the number and complexity of tasks taught. Training should progress from dependent to assisted to supervised to independent, with or without assistive devices. The rate at which grading can occur depends on the client’s potential for recovery, endurance, skills, and motivation.4
Methods of Teaching ADLs
The therapist must tailor methods of teaching the client to perform daily living tasks to suit each client’s learning style and ability. The client who is alert and grasps instructions quickly may be able to perform an entire process after a brief demonstration and oral instruction. Clients who have perceptual problems, poor memory, and difficulty following instructions of any kind need a more concrete, step-by-step approach, reducing the amount of assistance gradually as success is achieved. For these clients it is important to break down the activity into small steps and progress through them slowly, one at a time. A slow demonstration of the task or step by the therapist in the same plane and in the same manner in which the client is expected to perform is helpful. Oral instructions to accompany the demonstration may or may not be helpful, depending on the client’s receptive language skills and ability to process and integrate two modes of sensory information simultaneously. See Chapter 7 for further discussion of teaching activities in occupational therapy.
Touching body parts to be moved, dressed, bathed, or positioned; passive movement of the part through the desired pattern to achieve a step or a task; and gentle manual guidance through the task are helpful tactile and kinesthetic modes of instruction (see Chapter 7). These techniques can augment or replace demonstration and oral instruction, depending on the client’s best avenues of learning. It is necessary to perform a step or complete a task repeatedly to achieve skill, speed, and have a task that is currently declarative learning (consciously knowing what to do) become automatic/procedural learning (unconsciously knowing how to do it). Tasks may be repeated several times during the same training session if time and the client’s physical and emotional tolerance allow, or they may be repeated daily until the desired retention or level of skill is achieved.
The process of backward chaining can be used in teaching ADL skills. In this method, the therapist assists the client until the last step of the process is reached. The client then performs this step independently, which affords a sense of success and completion. When the last step is mastered, the therapist assists until the last two steps are reached and the client then completes these two steps. The process continues, with the therapist offering less and less assistance and the client performing successive steps of the task, from last to first, independently.
Before beginning training in any ADL, the occupational therapist must prepare by providing adequate space and arranging equipment, materials, and furniture for maximal convenience and safety. The occupational therapy practitioner should be thoroughly familiar with the task to be performed and any special methods or assistive devices that will be used in its performance. The occupational therapist should be able to perform (or know how to perform) the task as skillfully as he or she expects the client to perform it. After preparation, the activity is presented to the client, usually in one or more of the modes of guidance, demonstration, and oral instruction described earlier. The OT ensures appropriate environmental set up for success and safety. For example, a chair with arms or safely locked wheelchair may be provided to start. The client’s feet are placed flat on the floor or, at times if a using a wheelchair, on the footplates. Personal care items are located within safe reaching distance when initially learning an activity. The client then performs the activity either along with the occupational therapist or immediately after being shown, with the required amount of supervision and assistance. Performance is modified and corrected as needed and the process is repeated to ensure learning.
Because other staff or family members are frequently reinforcing the newly learned skills, staff and family training is critical to reinforce learning and ensure that the client carries over the skills from previous treatment sessions. In the final phase of instruction, when the client has mastered one or more tasks, he or she is asked to perform them independently. The therapist should check performance in progress and later arrange to check on the adequacy of performance and carryover of learning with the client, the nursing personnel, the caregiver, or the supervising family members.
Recording Progress in ADL Performance
The ADL checklists used to record performance on the initial assessment usually have one or more spaces for recording changes in abilities and the results of reassessment during the training process. The sample checklist given earlier in this chapter is so designed and completed for illustration purposes using Mrs. Hayes’s information (see Figure 10-1). If a standardized assessment is used during the initial evaluation, it should be used in the reevaluation process to objectively measure the level of progress the client has made.
Progress is usually summarized for inclusion in the medical record. The progress record should summarize changes in the client’s abilities and current level of independence and should also estimate the client’s potential for further independence, attitude, motivation for ADL training, and future goals for the ADL program. The information about the client’s level of assistance needed for ADLs and IADLs will help with the discharge planning. For example, if a client continues to require moderate assistance with self-care, he or she may need to hire an attendant, or the occupational therapist may justify ongoing treatment when the client has potential for further independence.
Assistive Technology and Adaptive Equipment
Assistive technology is defined as any item, piece of equipment, or product system, whether acquired commercially, off the shelf, modified, or customized, that is used to increase or improve functional capabilities of individuals with disabilities. This is a definition provided in Public Law (PL) 100-47, the Technical Assistance to the States Act.30 The terms assistive technology, adaptive equipment, and assistive devices are generally used interchangeably throughout the profession. Adaptive equipment is used to compensate for a physical limitation, to promote safety, and to prevent joint injury. Electronic aids to daily living (EADLs) provide a bridge between an individual with limited function and an electrical device such as a telephone or door operator.30 Physical limitations may include a loss of muscle strength, loss of range of motion (ROM), incoordination, or sensory loss. An example of using adaptive equipment to improve safety is the use of a bed or door alarm to alert a caregiver that a patient with impaired cognition and poor balance is wandering. The use of adaptive equipment to prevent joint injury is indicated for the person with rheumatoid arthritis, such as a built-up handled eating utensil.
Before recommending a piece of adaptive equipment, the OT practitioner must complete a thorough assessment to determine the client’s functional problems and causes of the problems. The OT practitioner may also consider practical solutions first, before settling on adaptive equipment as the solution. Some practical solutions would be to avoid the cause of the problem, use a compensatory technique or alternative method, get assistance from another person, or modify the environment. Typical of these considerations is the case example of Ms. Robins (who will be discussed in the case that follows) where the environment was adapted, wheelchair positioning/setup adapted, and a compensatory strategy of propping her elbows on the table was used instead of adaptive equipment.
Other factors to consider when selecting adaptive equipment are whether the disability is short or long term, the client’s tolerance for gadgets, the client’s feelings about the device, and the cost and upkeep of the equipment.
Case Study
Ms. Robins
Ms. Robins is 75 years old and living in a nursing home. The occupational therapist received a referral for a self-feeding assessment because she has recently lost weight and the nursing aides have reported that she needs assistance with eating. The nurse mentioned that she thought Ms. Robins needed a utensil with a built-up handle to feed herself.
The OT assessment included an interview with Ms. Robins, observation of her eating lunch in her usual location (in her room with the use of an over-bed table), physical assessment (including strength, ROM, sensation, coordination), and gross cognitive and perceptual assessments. Ms. Robins stated that she would like to be able to feed herself because she likes to eat her food when it is hot and she likes to be as independent as possible. The results indicated that Ms. Robins had problems with sitting properly in her wheelchair. The over-bed table was too high and limited her ability to reach the plate. Her strength, ROM, coordination, and sensation were within normal limits, except that bilateral shoulder flexors and abductors were F- (3-). Ms. Robins’s cognition and perception were adequate to relearn simple self-care tasks.
Treatment involved working on wheelchair positioning, lowering the over-bed table, and then teaching the client how to use a compensatory technique of elbow propping to bring her hand to her mouth during eating. The OT assessment did not indicate a need for adaptive equipment at this time; instead, the environment was adapted, wheelchair positioning modified, and a compensatory method taught.
If the results of the assessment had indicated that Ms. Robins had a weak grasp or hand incoordination, a utensil with a built-up handle and plate guard might have been used to promote independence with self-feeding.
Specific ADL and IADL Techniques
In many instances, specific techniques to solve specific ADL problems are not possible. Sometimes the occupational therapist has to explore a variety of methods or assistive devices to reach a solution. It is occasionally necessary for the therapist to design a special device, method, splint, or piece of equipment to make a particular activity possible for the client to perform. Many of the assistive devices available today through rehabilitation equipment companies were first conceived and made by occupational therapists and clients. Many of the special methods used to perform specific activities also evolved through the trial-and-error approaches of therapists and their clients. Clients often have good suggestions for therapists, because they live with the limitation and are confronted regularly with the need to adapt the performance of daily tasks.
The purpose of the following summary of techniques is to give the reader some general ideas about how to solve ADL and IADL problems for specific classifications of dysfunction. The focus is on compensatory strategies involving changing the method in which an activity is performed, changing the environment, or using an assistive device. If the client has the potential for improvement of specific deficits, treatment that includes remediation and restoration should be considered. For example, if a client has hand weakness as a result of a fracture of his hand, the therapist may offer alternative methods and adaptive equipment to manage until strength improves, but hand strengthening should also be a component of the treatment program. The references at the end of this chapter provide more specific instruction in ADL and IADL methods. The following categories of physical deficits are addressed in this chapter for the person with the following conditions:
The following ADLs and IADLs are addressed with each of the physical deficits previously listed:
• Feeding activities (eating and swallowing are addressed in Chapter 27)
• Personal hygiene and grooming activities
• Communication management and environmental adaptations
• Functional mobility (transfers and wheelchair mobility are addressed in Chapter 11)
ADLs for the Person with Limited ROM or Strength
The major problem for persons with limited joint ROM is compensating for the lack of reach and joint excursion through such means as environmental adaptation and assistive devices. Individuals who lack muscle strength may require some of the same devices or techniques to compensate and to conserve energy. Some adaptations and devices are outlined here.22,36
Lower-Extremity Dressing Activities
1. Use dressing sticks with a neoprene-covered coat hook on one end and a small hook on the other (Figure 10-7) for pushing and pulling garments off and on feet and legs.

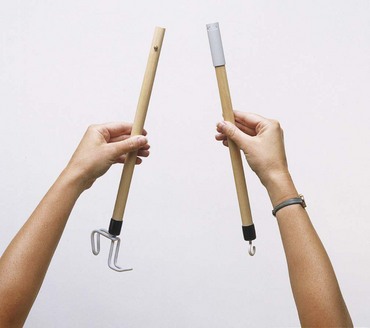
2. For socks, use a commercially available sock aid (Figure 10-8).

3. Eliminate the need to bend to tie shoelaces or to use finger joints in this fine motor activity by using elastic shoelaces or other adapted shoe fasteners such as Velcro-fastened shoes or secure slip-on shoes.
4. Use reachers (Figure 10-9) for picking up socks and shoes, arranging clothes, removing clothes from hangers, picking up objects on the floor, and donning pants.
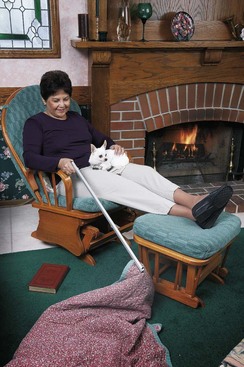
Upper-Extremity Dressing Activities
1. Use front-opening garments that are one size larger than needed and made of fabrics that have some stretch.
2. Use dressing sticks (see Figure 10-7) to push a shirt or blouse over the head.
3. Use larger buttons or zippers with a loop on the pull-tab.
4. Replace buttons, snaps, hooks, and eyes with Velcro or zippers (for those clients who cannot manage traditional fastenings).
5. Use one of several types of commercially available buttonhooks (Figure 10-10) if finger ROM is limited.
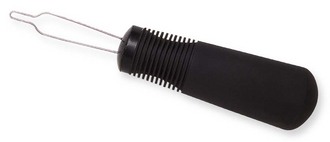

Feeding Activities
1. Use built-up handles on eating utensils that can accommodate limited grasp or prehension (grip or pinch pattern) (Figure 10-11).

2. Elongated or specially curved handles on spoons and forks may be needed to reach the mouth. A swivel spoon or spoon-fork combination can compensate for limited supination (see Figure 10-11).
3. Long plastic straws and straw clips on glasses or cups can be used if neck, elbow, or shoulder ROM limits hand-to-mouth motion or if grasp is inadequate to hold the cup or glass.
4. Universal cuffs or utensil holders can be used if grasp is very limited and built-up handles are not sufficient (Figure 10-12).


5. Plate guards or scoop dishes may be useful to prevent food from slipping off the plate.
Personal Hygiene and Grooming Activities
1. A handheld flexible shower hose for bathing and shampooing hair can eliminate the need to stand in the shower and offers the user control of the direction of the spray. The handle can be built up or adapted for limited grasp.
2. A long-handled bath brush or sponge with a soap holder (Figure 10-13) or long cloth scrubber can allow the user to reach legs, feet, and back. A wash mitt (Figure 10-14) and soap on a rope can aid limited grasp. If reach is limited to wash hair, a soft rubber brush with extended handle or specially designed long-handled adaptive aid can be used to shampoo hair.
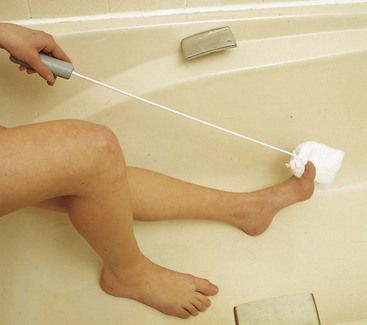

3. A wall-mounted hair dryer may be helpful. This device is useful for clients with limited ROM, upper-extremity weakness, incoordination, or use of just one upper extremity. The dryer is mounted (wall or stand) to allow the user to manage his or her hair with one arm or position himself or herself to compensate for limited ROM.
4. Long handles on a comb, brush, toothbrush, lipstick, mascara brush, and safety or electric razor may be useful for clients with limited hand-to-head or hand-to-face movements. Extensions may be constructed from inexpensive wooden dowels or pieces of PVC pipe found in hardware stores. The handles can be built up or adapted for limited grasp.
5. Spray deodorant, hair spray, and spray powder or perfume can extend the reach by the distance the material sprays.
6. Electric toothbrushes and a Water-Pik may be easier to manage than a standard toothbrush; each may need to be adapted for limited grasp.
7. A short reacher can extend reach for using toilet paper. Several types of toilet aids are available in catalogs that sell assistive devices.
8. Dressing sticks can be used to pull garments up after using the toilet. An alternative is the use of a long piece of elastic or webbing with clips on each end that can be hung around the neck and fastened to pants or panties, preventing them from slipping to the floor during use of the toilet.
9. Safety rails (Figure 10-15) can be used for bathtub transfers, and safety mats or strips can be placed in the bathtub bottom to prevent slipping.

10. A transfer tub bench (see Figure 10-6), shower stool, or regular chair set in the bathtub or shower stall can eliminate the need to sit on the bathtub bottom or stand to shower, thus increasing safety.
11. Grab bars can be installed to prevent falls and ease transfers.
12. Pump dispensers for shampoo, conditioners, and lotions are easier to manage than containers that require lifting and pouring contents. If using containers that require lifting and pouring, use smaller containers and transfer contents from larger containers to smaller ones.
Communication and Environmental Hardware Adaptations
1. Extended built-up or lever handles on faucets can accommodate limited grasp.
2. Telephones should be placed within easy reach, or portable phones can be used and kept with the client. A speakerphone or headset may be necessary. A dialing stick is or use of phones with large push buttons may be helpful if individual finger movements are difficult or not possible.
3. Built-up pens and pencils can be used to accommodate limited grasp and prehension. A Wanchik writer and several other commercially available or custom-fabricated writing aids are available (Figure 10-16).

4. Personal computers, word processors, voice recognition computer software, book holders, and electronic books can facilitate communication for those with limited or painful joints.
5. Lever-type doorknob extensions (Figure 10-17), commercially available lever-style doorknobs, car door openers, and adapted key holders can compensate for hand limitations.

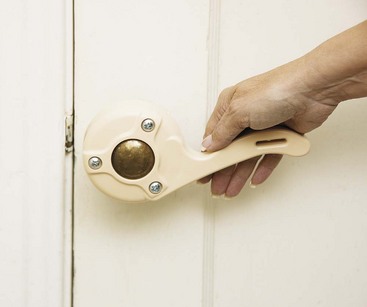
Functional Mobility
The individual who has limited ROM without significant muscle weakness may benefit from the following assistive devices:
1. A glider chair that is operated by the feet can facilitate transportation if hip, hand, and arm motion is limited.
2. Platform crutches can prevent stress on hand or finger joints and can accommodate limited grasp. Confer with the physical therapist about this option as platform crutches may increase the weight and size of the walking aid and may actually be a detriment to the client’s gait or may increase pressure on the shoulder.
3. Enlarged grips on crutches, canes, and walkers can accommodate limited grasp. Confer with the physical therapist about this option.
4. A raised toilet seat can be used if hip and knee motion is limited.
5. A walker with padded grips and forearm troughs can be used if marked hand, forearm, or elbow joint limitations are present. Confer with the physical therapist about this option.
6. A walker or crutch bag, tray, or basket can facilitate the carrying of objects.
Home Management, Meal Preparation, and Cleanup Activities
Home management activities can be facilitated by a wide variety of environmental adaptations, assistive devices, energy conservation methods, and work simplification techniques.8,36 The principles of joint protection are essential for those with rheumatoid arthritis. These principles are discussed in Chapter 38. The following are suggestions to facilitate home management for persons with limited ROM:
1. Store frequently used items on the first shelves of cabinets, just above and below counters or on counters where possible. Eliminate unnecessary items.
2. Use a high stable stool to work comfortably at counter height with feet firmly placed on the ground, or attach a drop-leaf table to the wall for planning and meal preparation area if a wheelchair is used. Pull out breadboards can also serve as a wheelchair accessible countertop workspace.
3. Use a utility cart of comfortable height to transport several items at once.
4. Use reachers to get lightweight items (e.g., a cereal box) from high shelves. Place frequently used items on shelves in cabinets and refrigerator where items are easily accessible and reachable.
5. Stabilize mixing bowls and dishes with nonslip mats.
6. Use lightweight utensils, such as plastic or aluminum bowls and aluminum pots. Use lightweight plates, cups, and other serving containers.
7. Use an electric can opener and an electric mixer.
8. Use electric scissors or adapted loop scissors to open packages (Figure 10-18). Avoid using teeth to rip open packages, as this may wear down, weaken, or break teeth.


9. Eliminate bending by using extended and flexible plastic handles on dust mops, brooms, and dustpans.
10. Use adapted knives for cutting (Figure 10-19), or consider using precut vegetables and meat for cooking.
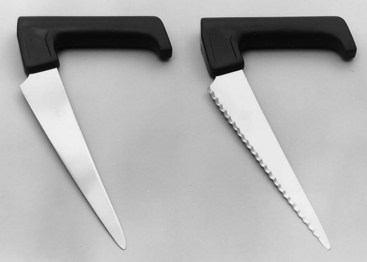
11. Use pullout shelves or lazy Susans to organize cupboards or refrigerator to eliminate bending and to ease access to items.
12. Eliminate bending by using a wall oven, countertop broiler, microwave oven, and convection oven. When remodeling the kitchen, consider elevating the dishwasher to a convenient height for wheelchair use or for those who have difficulty bending.
13. Use pump dispensers for dish soap instead of dish soap containers with pour spouts, which require lifting and pouring of contents. Single-use, premeasured water-soluble dishwasher detergent packets eliminate numerous steps.
14. Use piece of Dycem or other nonslip materials such as piece of puffy shelf liner or thick rubber band around jar lid or jar openers to open containers. Keep these handy in multiple locations.
15. Eliminate leaning and bending by using a top-loading automatic washer and elevated dryer. Wheelchair users or people of shorter stature can benefit from front-loading appliances. Use a reacher or other extended tool to reach to obtain clothes from the washer or dryer.
16. Use an adjustable ironing board to make it possible to sit while ironing, or eliminate ironing with the use of permanent press clothing.
17. Elevate the playpen and diaper table and use a bathinette (portable folding baby bath tub) or a plastic tub on the kitchen counter for bathing to reduce the amount of bending and reaching by the ambulatory parent during child care. The crib mattress can be in a raised position until the child is 3 or 4 months of age.
18. Use slightly larger and looser fitting garments with Velcro fastenings on children.
19. Use a reacher to pick up items from floor.
20. Use a comforter instead of a top sheet and blanket to increase the ease of making the bed.
ADLs for the Person with Incoordination
Incoordination in the form of tremors, ataxia, athetoid, or choreiform movements can be caused by a variety of central nervous system (CNS) disorders, such as Parkinson’s disease, multiple sclerosis, cerebral palsy, Freidrich’s ataxia, and head injuries. The major problems encountered in ADL performance are safety and adequate stability of gait, body parts, and objects to complete the tasks.22,31
Fatigue, stress, emotional factors, and fear may influence the severity of incoordinated movement.22 The client must be taught appropriate energy conservation and work simplification techniques along with appropriate work pacing and safety methods to prevent the fatigue and apprehension that could increase incoordination and affect performance.
Stabilizing the arm reduces some of the incoordination and may allow the individual to accomplish gross and fine motor movements without assistive devices. A technique that can be used throughout all ADL tasks is the stabilization of the involved upper extremity. This technique is accomplished by propping the elbow on a counter or tabletop, pivoting from the elbow, and only moving the forearm, wrist, and hand in the activity. When muscle weakness is not a major deficit for the individual with incoordination, the use of weighted devices can help with stabilization of objects. A Velcro-fastened weight can be attached to the client’s arm or to the back of the client’s hand to decrease ataxia, or the device being used (e.g., eating utensils, pens, and cups) can be weighted.31
Dressing Activities
To avoid balance problems, the client should attempt to dress while sitting on or in bed or in a wheelchair or chair with arms and feet planted firmly on floor. The following adaptations can reduce dressing difficulties:
1. Use of front-opening garments that fit loosely can facilitate their donning and removal.
2. Use of large buttons, Velcro, or zippers with loops on the tab can facilitate opening and closing fasteners. A buttonhook with a large, weighted handle may be helpful.
3. Elastic shoelaces, Velcro closures, other adapted shoe closures, and slip-on shoes eliminate the need for bow tying.
4. Slacks with elastic tops for women or Velcro closures for men are easier to manage than slacks with hooks, buttons, and zippers.
5. Using bras with front openings or Velcro replacements for the usual hook and eye may make it easier to don and remove these garments. A slipover elastic-type bra or bra-slip combination also may eliminate the need to manage bra fastenings. Regular bras may be fastened in front at waist level, then slipped around to the back and the arms put into the straps, which are then worked up over the shoulders.
Feeding Activities
Feeding can be a challenge for clients with problems of incoordination. A lack of control during eating is not only frustrating, but can also cause embarrassment and social rejection. It is important to make eating safe, pleasurable, and as neat as possible. The following are some suggestions for achieving this goal:
1. Use plate stabilizers, such as nonskid mats (Dycem), suction bases, or even damp dishtowels.
2. Use a plate guard or scoop dish to prevent pushing food off the plate. The plate guard can be carried away from home and clipped to any ordinary dinner plate (Figure 10-20).

3. Prevent spills during the plate-to-mouth excursion by using weighted or swivel utensils to offer stability. Weighted cuffs may be placed on the forearm or glove with weights on the back of the hand to decrease involuntary movement).
4. Use long plastic straws with a straw clip on a glass, or use a cup with a weighted bottom to eliminate the need to carry the glass or cup to the mouth, thus avoiding spills. Plastic cups with covers and spouts may be used for the same purpose22,31 (Figure 10-21).


5. Use a resistance or friction feeder similar to a mobile arm support to help control patterns of involuntary movement during feeding activities of adults with cerebral palsy and athetosis. These devices may help many clients with severe incoordination to achieve some degree of independence in feeding. The device is available in adaptive equipment catalogs and is listed as a Friction Feeder MAS (Mobile Arm Support) Kit.
6. Use a mechanical self-feeding device that turns the plate, scoops the food, and brings it to the mouth. There are several models available.
Personal Hygiene and Grooming Activities
Stabilization and handling of toilet articles may be achieved by the following suggestions:
1. Articles such as a razor, lipstick, and a toothbrush may be attached to a cord if frequent dropping is a problem. An electric toothbrush may be more easily managed than a regular one. It is important to check the weight, operating mechanisms, and other properties of recommended devices to determine if the client can manage.
2. Weighted wrist cuffs may be helpful during the finer hygiene activities, such as hair care, shaving, and applying makeup.31
3. A wall-mounted (or stand-mounted) hair dryer described earlier for clients with limited ROM can also be useful for clients with incoordination.
4. An electric razor, rather than a blade razor, offers stability and safety.31 A strap around the razor and hand can prevent dropping.
5. A suction brush attached to the sink or counter can be used for nail or denture care (Figure 10-22).

6. Soap should be on a rope. It can be worn around the neck or hung over a bathtub or shower fixture during bathing to keep it within easy reach. A bath mitt with a pocket to hold the soap can be used for washing to eliminate the need for frequent soaping and rinsing and wringing a washcloth. A leg from a pair of light-colored panty hose with a bar of soap in the toe may be tied over a faucet or on a bath chair to keep soap within reach and will stretch for use. Liquid soap with a soft nylon scrubber may be used to minimize the handling of soap. Bath gloves can be worn and liquid soap that is not too slippery applied to eliminate the dropping of the soap and washcloth.31
7. An emery board or small piece of wood with fine sandpaper glued to it can be fastened to the tabletop for filing nails.31 A nail clipper can be stabilized in the same manner.
8. Large roll-on deodorants are preferable to sprays or creams.31
9. Sanitary pads that stick to undergarments may be easier to manage than tampons.31
10. Nonskid mats should be used inside and outside the bathtub during bathing. Their suction bases should be fastened securely to the floor and bathtub before use. Safety grab bars should be installed on the wall next to the bathtub or fastened to the edge of the bathtub. A bathtub seat or shower chair provides more safety than standing, while the individual is showering or transferring to a bathtub bottom.31 Many clients with incoordination require supervisory assistance during this hazardous activity. Sponge bathing while seated at a bathroom sink may be substituted for bathing or showering several times a week.
Communication and Environmental Hardware Adaptations
1. Doorknobs may be managed more easily if adapted with lever-type handles or covered with rubber or friction tape (see Figure 10-17).
2. Large button phones, speakerphones, or a holder for a telephone receiver may be helpful. Operator assistance services for dialing may be implemented.
3. Mobile phones or personal digital assistants should be selected based on need for larger key pads and voice dialing capabilities.
4. Writing may be managed by using a weighted, enlarged pencil or pen. A personal computer with a keyboard guard is a helpful aid to communication. A computer mouse may frequently be substituted for the keyboard.31 A voice-recognition program may be used with a personal computer to minimize use of the keyboard or mouse. Most computers have “accessibility” features as a choice on the control panels. These features allow for adjustments such as decreasing sensitivity of the keys to eliminate redundancy of keystrokes and sensitivity of the mouse.
5. Keys may be managed by placing them on an adapted key holder that is rigid and offers more leverage for turning the key. Inserting the key in the keyhole may be difficult, however, unless the incoordination is relatively mild. Locks to cars and homes can be modified with keypads or electronic door openers.
6. Extended lever-type faucets are easier to manage than knobs that turn and push-pull spigots. In order to prevent burns during bathing and kitchen activities, the person with incoordination should turn cold water on first and add hot water gradually.
7. Lamps that can be turned on and off with a wall switch, a light, a signal-type device, or by touch can eliminate the need to turn a small switch.
Functional Mobility
Clients with problems of incoordination may use a variety of ambulation aids, depending on the type and severity of incoordination. Clients with degenerative diseases sometimes need help to recognize the need for and to accept ambulation aids. This problem may mean moving gradually from a cane to crutches to a walker, and finally to a wheelchair for some persons. The following suggestions can improve stability and mobility for clients with incoordination:
1. Instead of lifting objects, slide them on floors or counters.
2. Use suitable ambulation aids.
3. Use a utility cart, preferably a heavy, custom-made cart that has some friction on the wheels.
4. Remove doorsills or thresholds, throw rugs, and thick carpeting.
Home Management, Meal Preparation, and Cleanup Activities
It is important for the occupational therapist to carefully assess performance of homemaking activities to determine (1) which activities can be done safely, (2) which activities can be done safely if modified or adapted, and (3) which activities cannot be done adequately or safely and should be assigned to someone else. The major problems are stabilization, handling and moving hot items, and use of sharp tools. These problems need to be addressed to prevent spilling and accidents, cuts, burns, bruises, electric shock, and falls. The following are suggestions for facilitating home management tasks:17,22,31
1. Use a wheelchair and wheelchair lapboard, even if ambulation is possible with devices. The wheelchair saves energy and increases stability if balance and gait are unsteady.
2. If possible, use convenience and prepared foods to eliminate as many processes (e.g., peeling, chopping, slicing, and mixing) as possible.
3. Use easy-opening containers or store foods in plastic containers once opened. A jar opener is also useful.
4. Use heavy utensils, mixing bowls, and pots and pans to increase stability.
5. Use nonskid mats on work surfaces.
6. Use electrical appliances such as crock pots, electric fry pans, toaster ovens, and microwave or convection ovens because they are safer than using a range-top stove.
7. Use a blender and countertop mixer because they are safer than handheld mixers and easier than mixing with a spoon or whisk.
8. If possible, adjust work heights of counters, sink, and range to minimize leaning, bending, reaching, and lifting, whether the client is standing or using a wheelchair.
9. Use long oven mitts, which are safer than potholders.
10. Use pots, pans, casserole dishes, and appliances with bilateral handles because they may be easier to manage than those with one handle.
11. Use an adapted cutting board with side rails (Figure 10-23) to stabilize meats and vegetables while cutting. The bottom of the board should have suction cups or should be covered with stair tread, or the board should be placed on a nonskid mat to prevent slippage when in use.

12. Use heavy dinnerware, which may be easier to handle because it offers stability and control to the distal part of the upper extremity. On the other hand, unbreakable dinnerware may be more practical if dropping and breakage are problems.
13. Cover the sink, utility cart, and countertops with protective rubber mats or mesh matting to stabilize items.
14. Use a serrated knife for cutting and chopping because it is easier to control.
15. Use a steamer basket or deep-fry basket for preparing boiled foods to eliminate the need to carry and drain pots containing hot liquids.
16. Use tongs to turn foods during cooking and to serve foods because tongs may offer more control and stability than a fork, spatula, chopsticks, or serving spoon.
17. Use blunt-ended loop scissors to open packages.
18. Vacuum with a heavy upright cleaner, which may be easier for the ambulatory client. The wheelchair user may be able to manage a lightweight tank-type vacuum cleaner or electric broom.
19. Use dust mitts for dusting.
20. Eliminate fragile knickknacks, unstable lamps, and dainty doilies.
21. Eliminate ironing by using no-iron fabrics or a timed dryer or by assigning this task to other members of the household. Lower ironing board so that the task can be accomplished from a seated position.
22. Use a front-loading washer, a laundry cart on wheels, and premeasured detergents, bleaches, and fabric softeners.
23. Sit when working with an infant and use foam-rubber bath aids, an infant bath seat, and a wide, padded dressing table with Velcro safety straps to offer enough stability for bathing, dressing, and diapering an infant. Childcare tasks may not be possible unless the incoordination is mild.
24. Use disposable diapers with tape or Velcro fasteners, because they are easier to manage than cloth diapers and pins.
25. Do not feed the infant with a spoon or fork unless the incoordination is very mild or does not affect the upper extremities. This task may need to be performed by another household member.
26. Children’s clothing should be large, loose, and made of nonslippery stretch fabrics, and should have Velcro fastenings.
ADLs for the Person with Hemiplegia or Use of Only One Upper Extremity
Suggestions for performing daily living skills apply to persons with hemiplegia, unilateral upper-extremity amputations, and temporary disorders such as fractures, burns, and peripheral neuropathic conditions that can result in the dysfunction of one upper extremity.
The client with hemiplegia needs specialized methods of teaching, and many such clients have greater difficulty learning and performing one-handed skills than do those with orthopedic or lower motor neuron dysfunction. Because the trunk and leg are involved, as well as the arm, ambulation and balance difficulties may exist. Sensory, perceptual, cognitive, and speech disorders may be present in a mild to severe degree. These disorders affect the ability to learn and retain learning and performance. Finally, the presence of apraxia (or difficulty with motor planning) sometimes seen in this group of clients can have a profound effect on the potential for learning new motor skills and remembering old ones. Therefore, the client with normal perception and cognition and the use of only one upper extremity may learn the techniques quickly and easily. The client with hemiplegia needs to be assessed for sensory, perceptual, and cognitive deficits to determine the potential for ADL performance and to establish appropriate teaching methods to facilitate learning. The following are primarily adaptive techniques versus restorative techniques. However, it is important to incorporate the upper extremity with hemiplegia to assist in returning functional to the extremity.
The major problems for the one-handed worker are reduction of work speed and dexterity and stabilization to substitute for the role normally assumed by the nondominant arm.22 The major problems for the individual with hemiplegia are balance and precautions relative to sensory, perceptual, and cognitive losses.
Dressing Activities
General Setup: If balance is a problem, the client should dress while seated in a locked wheelchair or sturdy armchair. Clothing should be within easy reach. A reacher may be helpful for securing articles and assisting in some dressing activities. Assistive devices should be used minimally for dressing and other ADLs. Compensatory techniques are preferable to using unnecessary devices. For the client with hemiplegia, dressing techniques that employ neurodevelopmental treatment (NDT or Bobath) principles are discussed in Chapter 31. The following one-handed dressing techniques can facilitate dressing for persons with use of only one upper extremity. A general rule is to begin with the affected arm or leg first when donning clothing. Start with the unaffected extremity when doffing (removing) clothing. The following list summarizes the general setup:
• Sturdy chair or wheelchair (and progress to more difficult surfaces)
• Clothing within easy reach; adaptive equipment set up and within reach
• Feet (or foot) supported on floor or sturdy surface
• Body usually in upright and in midline position depending on task
• Therapist usually positioned on affected side or in midline
Shirts: One of the three following methods can be used to manage front-opening shirts. The first method can also be used for jackets, robes, and front-opening dresses.
1. Grasp the shirt collar with normal hand and shake out twists (Figure 10-24, A).
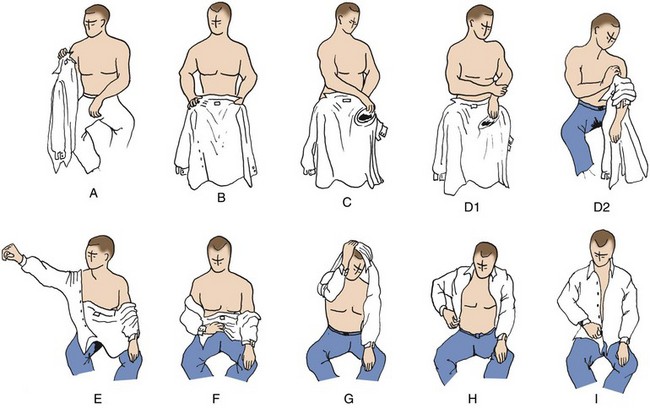
FIGURE 10-24 Steps in donning a shirt: method I. (Courtesy Christine Shaw, Metro Health Center for Rehabilitation, Metro Health Medical Center, Cleveland, Ohio.)
2. Position shirt on lap with inside up and collar toward chest (Figure 10-24, B).
3. Position sleeve opening on affected side so opening is as large as possible and close to affected hand, which is resting on lap (Figure 10-24, C).
4. Using stronger hand, place affected hand in sleeve opening and work sleeve over elbow by pulling on garment (Figure 10-24, D1 and D2).
5. Put stronger arm into its sleeve and raise arm to slide or shake sleeve into position past elbow (Figure 10-24, E).
6. With stronger hand, gather shirt up middle of back from hem to collar and raise shirt over head (Figure 10-24, F).
7. Lean forward, duck head, and pass shirt over head (Figure 10-24, G).
8. With stronger hand, adjust shirt by leaning forward and working shirt down past both shoulders. Reach in back and pull shirttail down (Figure 10-24, H). Adjust shirt so that shirt is smooth, wrinkles removed, and sleeve is properly placed on shoulders and arms. Someone with hemiplegia may not feel that his or her shirt is not positioned properly on his or her body.
9. Line up shirt fronts for buttoning and begin with bottom button (Figure 10-24, I). Button sleeve cuff of affected arm. Sleeve cuff of stronger arm may be prebuttoned if cuff opening is large. Button may be sewn on with elastic thread or sewn onto a small tab of elastic and fastened inside shirt cuff; also, commercially available button extenders can be found in the adaptive equipment catalogs. A small button attached to crocheted loop of elastic thread is another option. Slip button on loop through buttonhole in garment so that elastic loop is inside. Stretch elastic loop to fit around original cuff button. This simple device can be transferred to each garment and positioned before shirt is put on. Loop stretches to accommodate width of hand as it is pushed through end of sleeve.
Donning Shirt: Clients who get their shirts twisted or have trouble sliding the sleeve down onto the stronger arm can use method II.
1. Position shirt as described in method I, steps 1 to 3.
2. With stronger hand, place involved hand into the sleeve opening and work sleeve onto hand, but do not pull up over elbow.
3. Put stronger arm into sleeve and bring arm out to 180 degrees of abduction. Tension of fabric from stronger arm to wrist of affected arm will bring sleeve into position.
Removing Shirt (One Sleeve off at a Time):
2. With stronger hand, push shirt off shoulders, first on affected side, then on stronger side.
3. Pull off cuff of stronger side with stronger hand.
4. Work sleeve off by alternately shrugging shoulder and pulling down on cuff.
5. Lean forward, bring shirt around back, and pull sleeve off affected arm.
1. Position shirt and work onto arm as described in method I, steps 1 to 4.
2. Pull sleeve on affected arm up to shoulder (Figure 10-25, A).
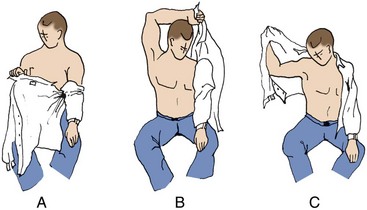
FIGURE 10-25 Steps in donning a shirt: method III. (Courtesy Christine Shaw, Metro Health Center for Rehabilitation, Metro Health Medical Center, Cleveland, Ohio.)
3. With stronger hand, grasp tip of collar that is on stronger side, lean forward, and bring arm over and behind head to carry shirt around to stronger side (Figure 10-25, B).
4. Put stronger arm into sleeve opening, directing it up and out (Figure 10-25, C).
5. Adjust and button as described in method I, steps 8 and 9.
Variation for Donning Pullover Shirt:
1. Position shirt on lap, bottom toward chest and label facing down.
2. With stronger hand, roll up bottom edge of shirt back up to sleeve on affected side.
3. Position sleeve opening so it is as large as possible, and use stronger hand to place affected hand into sleeve opening. Pull shirt up onto weaker arm past the elbow.
4. Insert stronger arm into sleeve.
5. Adjust shirt on affected side up and onto shoulder.
6. Gather shirt back with stronger hand, lean forward, duck head, and pass shirt over head.
7. Adjust shirt. Make sure shirt is adjusted properly on shoulders and in the front and back.
Trousers: Trousers may be managed by one of the following methods, which may be adapted for shorts and women’s panties as well. It is recommended that trousers have a well-constructed button fly front opening, which may be easier to manage than a zipper. Velcro may be used to replace buttons and zippers. Trousers should be worn in a size slightly larger than worn previously and should have a wide opening at the ankles. They should be put on after the socks have been put on but before the shoes are put on. If the client is dressing in a wheelchair, feet should be placed flat on the floor, not on the footrests of the wheelchair.
1. Sit in sturdy armchair or in locked wheelchair (Figure 10-26, A).
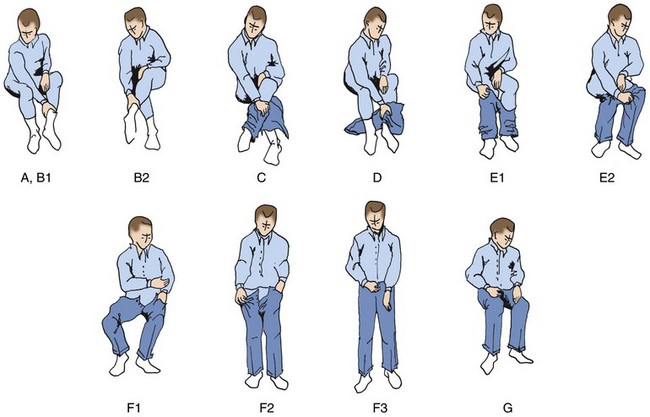
FIGURE 10-26 Steps in donning trousers: method I. (Courtesy Christine Shaw, Metro Health Center for Rehabilitation, Metro Health Medical Center, Cleveland, Ohio.)
2. Position stronger leg in front of midline of body with knee flexed to 90 degrees. Using stronger hand, reach forward and grasp ankle of affected leg or sock around ankle (Figure 10-26, B1). Lift affected leg over stronger leg to crossed position (Figure 10-26, B2).
3. Slip trousers onto affected leg up to position where foot is completely inside trouser leg (Figure 10-26, C). Do not pull up above knee or it will be difficult to insert the stronger leg.
4. Uncross affected leg by grasping ankle or portion of sock around ankle (Figure 10-26, D).
5. Insert stronger leg and work trousers up onto hips as far as possible (Figure 10-26, E1 and E2).
6. To prevent trousers from dropping when pulling pants over hips, place affected hand in pocket or place one finger of affected hand into belt loop. If able to do so safely, stand and pull trousers over hips (Figure 10-26, F1 and F2).
7. If standing balance is good, remain standing to pull up zipper or button (Figure 10-26, F3). Sit down to button front (Figure 10-26, G).
Donning Trousers: Method III is for clients who are in a recumbent position. It is more difficult to perform than those methods done while sitting. If possible, the bed should be raised to a semireclining position for partial sitting:
1. Using stronger hand, place affected leg in bent position and cross over stronger leg, which may be partially bent to prevent affected leg from slipping.
2. Position trousers and work onto affected leg first, up to the knee. Then uncross leg.
3. Insert stronger leg and work trousers up onto hips as far as possible.
4. With stronger leg bent, press down with foot and shoulder to elevate hips from bed. With stronger arm, pull trousers over hips or work trousers up over hips by rolling from side to side.
1. Tuck one end of brassiere into pants, girdle, or skirt waistband and wrap other end around waist (wrapping toward affected side may be easiest). Hook brassiere in front at waist level and slip fastener around to back (at waistline level).
2. Place affected arm through shoulder strap, and then place stronger arm through other strap.
3. Work straps up over shoulders. Pull strap on affected side up over shoulder with stronger arm. Put stronger arm through its strap and work up over shoulder by directing arm up and out and pulling with hand.
Note: It is helpful if the brassiere has elastic straps and is made of stretch fabric. If there is some function in the affected hand, a fabric loop may be sewn to the back of the brassiere near the fastener. The affected thumb may be slipped through the loop to stabilize the brassiere while the stronger hand fastens it. All elastic brassieres, prefastened or without fasteners, may be put on by adapting method I for pullover shirts described previously. Front-opening bras may also be adapted with a loop for the affected hand with some gross arm function.
Donning Necktie: Clip-on neckties are convenient. If a conventional tie is used, the following method is recommended:
1. Place collar of shirt in “up” position and bring necktie around neck and adjust so that smaller end is at desired length when tie is completed.
2. Fasten small end to shirt front with tie clasp or spring clip clothespin.
3. Loop long end around short end (one complete loop), and bring up between “V” at neck. Then bring tip down through loop at front and adjust tie, using ring and little fingers to hold tie end, and thumb and forefingers to slide knot up tightly.
1. Sit in straight armchair or in wheelchair with brakes locked, feet on the floor, and footrest swung away.
2. With stronger leg directly in front of midline of body, cross affected leg over stronger leg.
3. Open top of stocking by inserting thumb and first two fingers near cuff and spreading fingers apart.
4. Work stocking onto foot before pulling over heel. Care should be taken to eliminate wrinkles.
5. Work stocking up over leg. Shift weight from side to side to adjust stocking around thigh.
6. Thigh-high stockings with an elastic band at the top are often an acceptable substitute for panty hose, especially for the nonambulatory individual.
7. Panty hose may be donned and doffed as a pair of slacks, except that the legs would be gathered up one at a time before placing feet into the leg holes.
1. Work socks or stockings down as far as possible with stronger arm.
2. Cross affected leg over stronger one as described in step 2 of process of putting on socks or stockings.
3. Remove sock or stocking from affected leg. Dressing stick may be required by some clients to push sock or stocking off heel and off foot.
4. Lift stronger leg to comfortable height or to seat level and remove sock or stocking from foot.