1 The ophthalmic examination
A full ophthalmic examination should be performed on all animals presenting with an ocular complaint. To perform this properly it is important to have a standard approach to all patients together with appropriate facilities and equipment.
The basic parts of the ophthalmic examination are:
Table 1.1 Facilities and equipment required for the ophthalmic examination
| General practice | Those with an interest in ophthalmology |
|---|---|
| All items listed left plus: |
Disposable items required for ophthalmic examination are:
HISTORY
History taking can be divided into general history and that specifically pertaining to the eyes. A general history should consider the following points:
Once a thorough general history has been taken we can move on to the more specific ophthalmic history. This will include asking the owners the following questions:
THE OPHTHALMIC EXAMINATION
Hands-off examination
While the history is being taken the patient should be observed. Dogs are allowed to wander off the lead and investigate the consulting room while cats are encouraged out of their baskets and then watched from a distance. It is important to look at the behaviour of the pet, along with the gross appearance of the eyes and face. Signs of ocular discomfort – blepharospasm, increased lacrimation or other discharge, symmetry of the eyes and face – sunken or small eyes, enlargement of the globe, periorbital swellings or squints for example. Clues might inform us that the animal has been rubbing – periorbital hair loss and erythema or saliva staining on the front legs where the animal licks then rubs the face might be evidence of self-trauma. Basic assessment of the visual ability of the patient can be undertaken at this time – blind animals will often stay close to the owner and not move around the room, while if they do move they are often very cautious, sniffing the environment and exhibiting a high stepping gait.
Hands-on examination
The first part of the hands-on examination takes place in a well-lit room. The patient should be gently restrained – one hand under the chin and the other behind the back of the head is usually sufficient. A trained nurse is invaluable during ocular examinations – most owners are not very good at restraining their pets in general, and when you are very close to the biting end it is particularly important that the patient is properly held by a confident adult!
A close inspection of the gross appearance of the eyes and face is performed with illumination such as a pen torch. Particular things to consider include the presence of any ocular discharge – the nature of it, whether unilateral or bilateral and the amount of it. Some dogs commonly have a small amount of mucoid discharge at the medial canthus, especially those with doliocephalic conformation such as Dobermanns, and it can be considered a normal finding in such animals. The size of both eyes should be compared – they should be symmetrical but if one is larger than the other it is necessary to establish whether one is enlarged (hydrophthalmic) or if one is shrunken (microphthalmic). In addition to size, the actual position of the eyes should be noted – looking from above the patient directly down on the head can assist in establishing the presence of exophthalmos, enophthalmos or strabismus. General head symmetry and the presence of periorbital swellings should also be noted.
It might be necessary to take samples for laboratory analysis at this stage if indicated. Swabs for bacterial culture and isolation should be taken before any discharges are cleaned away.
Schirmer tear test readings
Schirmer tear test readings should be taken before the eyes are cleaned or handled further. Commercial tear testing strips are used (colour bar calibrated strips are the easiest to use and are available from Schering-Plough). The strips come in sterile plastic wallets. The strips should be bent at the notch while still in their plastic wallet (to prevent sweat and grease from hands interfering with the readings). The packet is opened and each test paper is held at the distal end. The shorter piece is placed in the ventral conjunctival sac half to two-thirds along from the medial canthus (i.e. out of the way of the third eyelid) (Figure 1.1). The strip is left in position for 1 minute before removing it and immediately reading the level of wetting on the scale (see Table 1.2). It is easier to hold the patient’s eye closed to prevent the strip from falling out prematurely. Topical anaesthetics are not used prior to measurement.
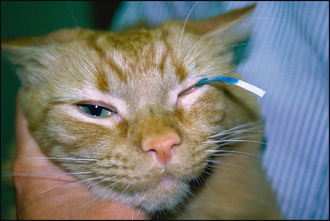
Table 1.2 Schirmer tear test readings in dogs and cats
| Dog | Cat | |
|---|---|---|
| Normal | 15–25 mm/min | |
| Borderline | 10–15 mm/min | |
| Keratoconjunctivitis sicca | <10 mm/min |
Basic vision testing and neurological tests
1. Menace response
A threatening gesture will cause the animal to blink and pull away slightly. The reflex tests the visual pathway (optic nerve, cranial nerve II) and the ability to close the lids (facial nerve, cranial nerve VII), i.e. can the animal see you and, if so, can it react and blink normally? It is important that the stimulus is visual only, and does not generate air currents which would trigger sensory nerve endings on the cornea and skin (trigeminal nerve – cranial nerve V). For this reason some people advocate testing from behind a clear Perspex screen, but in reality this is not really necessary. So long as the hand movements involve just a couple of fingers rather than waving the whole hand in front of the eyes there should not be any confusion over the actual reflex being tested. It is important to stimulate both from directly in front of the eyes and also from other angles – above and below plus medial and lateral. The fellow eye can be covered with your other hand to assess each eye separately.
If the animal is visual but cannot blink, for example with facial nerve paralysis, the third eyelid will move across the globe and the animal will pull back from the stimulus. A palpebral reflex can then be performed to confirm that the animal cannot blink (see below). However, it is clear that it could see, and react to, the menacing gesture. Blind animals will not react at all.
2. Dazzle reflex
A very bright light source is needed for this test – a Finhoff transilluminator is ideal. This is a focussed light source which can be fitted to the handle of the direct ophthalmoscope. Often a pen torch is not bright enough. The animal is seen to blink and sometimes pull away when the bright light is shone into each eye in turn. This tests the same two nerves as the menace response – optic and facial nerves – but unlike the menace response it does not require involvement of the cerebral cortex for the reflex to occur. It is a useful test if the retina and optic nerve cannot be examined due to opacity in the eye – cataract for example. A positive reflex suggests that the retina and optic nerve are functional.
3. Tracking responses (cotton wool balls)
Cotton wool is used because it does not smell strongly and makes no sound when it lands. Thus we can be sure that we are testing vision and not smell or hearing instead! Several small pieces are used and dropped from above the animal’s face once you have gained their attention. Dogs and cats have better movement detection than us and should follow the path of the falling cotton wool. Each eye can be tested separately and the test can be performed in bright and dim lighting conditions. False-negative results are seen when the animals are bored or disinterested – more of a problem in cats. Sometimes dangling a loose piece of bandage will encourage the cat to ‘track’ the movement.
4. Maze testing
An unfamiliar room is used – a large consulting room or empty waiting room for example. A mixture of solid objects (e.g. bins) and open objects (e.g. chairs) is chosen and randomly placed in the room. The animal is held at one corner of the room while the owner stands at the other side of the room and then calls their pet. Normally sighted animals will negotiate the room confidently but visually impaired ones will be hesitant and slow, and may bump into objects. This test should be performed in both bright and dim lighting levels and the objects should be moved about in between tests.
It can be difficult to get cats to cooperate. The test can be adapted for them by placing their basket on the floor behind a chair and watching to see how they manage to get to the safety of their basket!
5. Palpebral (blink) reflex
It is important to check that the animal can blink normally. Sensory stimulation of the trigeminal nerve (cranial nerve V) by tapping the medial and lateral canthal skin should result in a brisk closing of the eyelids (facial nerve – cranial nerve VII). The animal may also try to move away. If the animal cannot feel the stimulation then it will not blink (but should have a normal menace response assuming that it can see). If the animal can feel the stimulus but cannot blink due to a facial nerve paralysis it is likely to move away from the stimulus, and would have an abnormal menace response where the third eyelid crosses the cornea but no blink occurs, as mentioned previously. Corneal sensitivity can also be tested by touching the corneal surface with a wisp of cotton wool and watching a normal blink. It is usually very difficult to touch the cornea in this way without the animal trying to blink.
6. Pupillary light reflexes
Pupillary light reflexes should be assessed both in normal room light and in the dark. They are more sensitive in the dark.
Pupillary light reflexes are not an assessment of vision but an indication of retinal, optic nerve and some central pathway function.
A bright pen torch or Finhoff transilluminator is required. The light is shone into one eye and a normal response is seen as the pupil rapidly constricts. This is the direct reflex. The opposite eye is examined (with the light still shining in the first eye) and constriction of the fellow pupil should have occurred – this is the consensual or indirect reflex. The light should then be moved to the second eye which is tested in the same way. The afferent nerve involved is the optic nerve (cranial nerve II) while the pupillary constriction is mediated by the parasympathetic fibres running in the oculomotor nerve (cranial nerve III).
The light source is then alternated between the two eyes in the swinging flashlight test. The light is shone into the first eye for a couple of seconds and then rapidly moved across to the second eye. A note is made of the response of the second pupil – it could constrict further, stay the same or dilate. A normal response would show both pupils staying miotic, often with further direct constriction of the newly illuminated pupil. If the second pupil suddenly dilates under direct illumination this is an abnormal response (called a positive swinging flashlight test) and indicates a lesion in the retina or optic nerve in this eye.
In addition to examining for the ability to constrict, the speed and degree of constriction should also be evaluated.
Animals which are very excited or aggressive will have slow and incomplete pupillary constriction as a result of increased sympathetic tone.
Additionally, the resting position of both pupils should be assessed. They should be symmetrical and semi-dilated in dim light, with moderate constriction in room light.
Ophthalmoscopy
Once vision has been assessed and the neurological testing performed, the systematic examination of all sections of the eye follows. The adnexa and anterior structures are examined both in the light and in the dark with the use of magnification. Specialists use a slit lamp biomicroscope which gives excellent illumination and magnification but due to the cost they are not routinely available in general practice. A good compromise is the use of magnifying loupes (Figure 1.2) and illumination, although a direct ophthalmoscope can also be used – settings of +20 are best for the lids and cornea while +8 to +12 lenses are selected to examine the lens.
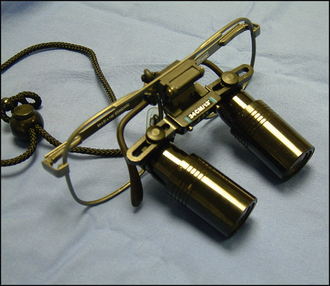
Figure 1.2 Magnifying loupes are useful to examine the adnexa, anterior chamber and lens as well as being indispensable for many ocular surgical procedures.
The eyelids are examined for position, the presence of swellings, eyelash abnormalities and the position and size of nasolacrimal punctae. The third eyelid is checked for colour, position, prolapse of the nictitans gland and abnormalities of cartilage. The conjunctival surfaces are examined for colour, swelling (chemosis), haemorrhage, moisture, masses and foreign bodies. The cornea is checked for transparency, vascularity, cellular infiltration, ulceration and alterations in shape. The anterior chamber is normally optically clear. In the presence of inflammation (uveitis) there will be leakage of proteins, cells and sometimes red blood cells into the anterior chamber. This makes the aqueous cloudy and is termed aqueous flare. Frank blood in the anterior chamber is called hyphaema while an abundant accumulation of white cells is termed hypopyon (and often looks like pus in the anterior chamber although usually hypopyon is sterile). The anterior chamber is also assessed for depth – it might be deeper than normal if the lens is luxated into the posterior segment or shallow if there are adhesions between the iris and the cornea (anterior synechia). Colour, adhesions, masses and persistent pupillary membrane remnants should be considered on iris examination. The lens is examined for optical clarity. The presence of an opacity in the lens is a cataract. Examination of the lens is best performed once the pupil has been dilated but before that distant direct ophthalmoscopy should be performed.
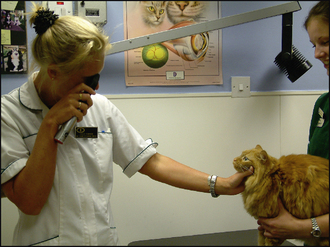
Distant direct ophthalmoscopy
This technique is used to examine the eye for a clear visual axis and to assess pupil symmetry. It should be performed in the dark. A setting of 0 is used and the instrument is held to the examiner’s eye at arm’s length from the dog or cat (Figure 1.3). The tapetal reflex is obtained. Any opacity in the visual axis will block the fundic reflex – either totally or partially. This will be seen as a dark shadow within the bright tapetal reflex. Opacities can be on the cornea, in the aqueous, lens or vitreous. By moving from side to side one can assess the depth of the opacity. For example, a cataract on the anterior lens capsule will not move as you move your head because it is in the same plane as the pupil. A corneal opacity, which is in front of the plane of the pupil, will move in the same direction as you while a cataract at the back of the lens, behind the pupil, will move away. This uses the phenomenon of parallax.
Distant direct ophthalmoscopy is also used to assess pupil size. Anisocoria (a difference in size between the two pupils) is detected more easily using this technique than by looking with the naked eye. The observer looks through the instrument while the light from the ophthalmoscope is shone from one eye to the other and the size of pupils is compared.
Another useful aspect of distant direct ophthalmoscopy is that it can differentiate between a true cataract and the ageing change of nuclear sclerosis. Since a cataract is an opacity in the lens, it will appear as a dark shadow against the tapetal reflex as mentioned above. However, nuclear sclerosis is an age-related hardening of the lens, which although it renders the lens cloudy when viewed in the reflected light of a room, the direct light of the ophthalmoscope will pass right through it, with just a circular ring visible at the junction of the lens nucleus and cortex. Many owners, and unfortunately some veterinary surgeons, mistakenly think a dog has cataracts whereas in fact it only has nuclear sclerosis – if the method of distant direct ophthalmoscopy were used more frequently, then owners would be saved the expense and time involved in referral to a specialist veterinary ophthalmologist only to be told that their pet has normal eyes for an older dog!
Complete examination of the lens, vitreous and fundus can only be achieved following mydriasis (pupil dilation). One drop of tropicamide 1.0% (Mydriacyl, Alcon) is applied to each eye. After 15–20 minutes the pupil should be fully dilated, allowing examination of the intraocular structures.
Close direct ophthalmoscopy
The lens can be examined, after pupil dilation, using a setting of +8 to +12 dioptres. The position of the lens should be assessed and any opacity within it should be localized (discussed further in Section 6).
To examine the fundus a setting of 0 is chosen. If the observer has any known refractive errors (e.g. short sightedness) it will be necessary to adjust this setting in order to have a focussed image of the retina. One needs to be close to the patient – only 2–3 cm away from their eye. Resting one finger on the bridge of the animal’s nose will assist stabilization and alert the observer to any change in position of the animal. It is important to be systematic when examining the retina. Firstly the optic disc is located. It is examined for colour, size and appearance of the blood vessels. The retina is then examined section by section. This can initially be challenging but with practice it becomes second nature and is most easily done by mentally splitting the back of the eye into quarters and, starting from the optic disc, examining each quarter in turn. If you get disoriented by the patient moving its eyes, finding the optic disc again will allow you to continue the systematic examination. It is important to look right out to the periphery although this can be difficult laterally in dogs with long noses. Using your right eye to examine the patient’s right eye and vice versa will keep the nose out of the way but most people manage using just their dominant side. By adding positive dioptre lenses in the ophthalmoscope it is possible to examine the vitreous.
You need to be close to the patient to see properly with direct ophthalmoscopy. Use the comparison of looking through a keyhole (the pupil): the closer you are, the more you will be able to see!
It is sensible to start examining with the light on the ophthalmoscope quite dim, so that the animal gets used to your presence, before gradually increasing the rheostat brightness. This will be more comfortable for the patient rather than diving straight in with the light on full brightness!
Indirect ophthalmoscopy
This technique has advantages over direct ophthalmoscopy in that a large field of view is obtained allowing a quick overview of the fundus and binocular indirect ophthalmoscopy allows an appreciation of the fundus three-dimensionally (therefore depressions and raised areas are more easily imaged). Indirect ophthalmoscopy also provides an improved image through opaque corneas and lenses. However, the image is inverted and back to front and the magnification is less than with direct ophthalmoscopy. Ideally both techniques should be employed.
A condensing lens is required – usually 20D – although panretinal lenses offer a wider field of view (at greater cost!). Monocular indirect ophthalmoscopy uses a bright light source (e.g. Finhoff transilluminator) held at the examiner’s ear, while binocular indirect ophthalmoscopy utilizes a special head or spectacle-mounted light source. The examiner shines the light into the dilated pupil from approximately 50 cm away. Once the tapetal reflex is obtained, the condensing lens is moved into the line of vision just in front of the animal’s eye. An upside down and back to front image of the fundus is obtained. It is often necessary to move both the position and the angle of the lens to achieve the best image. This technique is more difficult to master than direct ophthalmoscopy but is certainly the preferred method of fundus examination among ophthalmologists. In addition, a teaching mirror can be fitted to most indirect headsets, allowing observers to view the same image as the ophthalmologist.
FURTHER EXAMINATION TECHNIQUES
Ophthalmic dyes
Fluorescein is an orange-coloured, water-soluble dye which stains corneal ulcers green. The intact cornea is lipophilic and as such it does not allow uptake of fluorescein but once the epithelium is damaged the dye will adhere to the exposed stroma (which is hydrophilic).
Impregnated strips (Fluorets, Chauvin) or single-use vials (Minims Fluorescein, Chauvin) can be used. If the strips are used they should be moistened with sterile saline before being lightly touched onto the conjunctival surface. Alternatively, a drop can be allowed to fall into the eye, as is done with the single-use vial. Multi-use preparations should be avoided as they are easily contaminated by potentially pathogenic bacteria. It is important to flush excess dye away with sterile saline to prevent false positives (e.g. irregularity of the corneal surface will allow pooling of the dye).
Although corneal ulcers with exposed stroma will stain bright green, very deep ulcers might not – Descemet’s membrane does not take up the dye (because it is lipid-rich like the epithelium). Thus, if a pattern of staining around the edge but with a clear centre is observed, this is likely to be a very deep ulcer and is potentially extremely serious. Fluorescein can be safely used even in ruptured ulcers or corneal perforations as sterile fluorescein does not harm intraocular contents. Sometimes if the cornea has been perforated a small stream of clear aqueous can be seen flowing through the fluorescein on the cornea (Seidel test). Staining is enhanced under blue and ultraviolet light (e.g. Wood’s lamp).
The results of fluorescein testing are immediate and obvious and it is always useful to demonstrate ulcers to owners – it helps them to understand the nature of their pet’s problem much more easily.
A second corneal dye, Rose Bengal, is sometimes used, mainly to detect ulcers due to herpes virus (FHV-1) in cats. It stains dead and devitalized epithelium a bright magenta colour and is more sensitive than fluorescein for the fine epithelial defects seen in herpetic keratitis. However, it is more irritant than fluorescein.
In addition to flushing excess dye away before interpreting the results of the test, it is sensible to flush again at the end of the ophthalmic examination so that the patient is less likely to rub due to discomfort.
Nasolacrimal duct system investigation
Initial assessment of the nasolacrimal drainage system can be made using fluorescein dye. A drop is placed in each eye and the nostrils are observed for the appearance of the bright green colour (Figure 1.4). Although the dye usually appears quickly, it can take up to 5 minutes. If no colour is seen, the mouth should be checked, since sometimes the nasolacrimal ducts have openings in the mouth – especially in brachycephalic breeds (both dogs and cats). This test is quite unreliable and false negatives are common. For this reason nasolacrimal flushing is often performed.
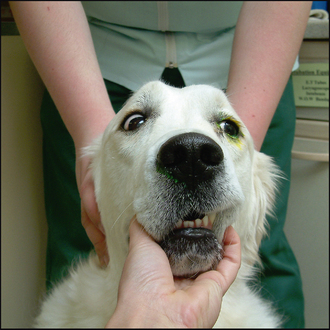
Figure 1.4 Positive nasolacrimal duct patency on the right side showing fluorescein at the nostril while none appears on the left, while excess dye is present around the eye. This side should now be cannulated and flushed to see if a physical blockage is present, as is discussed further in Chapter 18.
Under topical anaesthesia it is possible to cannulate the nasolacrimal punctae in dogs and rabbits, although cats often need sedation. The ducts are assessed for patency using sterile saline solution and this is more accurate than the fluorescein test mentioned above. Pliable plastic cannulae are recommended over metal ones in conscious animals. It is easier to cannulate the upper punctum in cats and dogs (but rabbits only have one large lower punctum!). A Nettleship’s dilator, a pencil-like metal or plastic instrument, can be used to help to locate the punctae. In a normal patient, gentle flushing through the upper punctum, using sterile saline in a 5 ml syringe, will result in saline flowing through the lower punctum. This can be occluded with a finger and saline will drip from the nose as the syringe is gently depressed. Some dogs will swallow or cough as the solution drains into the mouth as well. The procedure is then repeated with the lower punctum cannulated – saline is initially allowed to flow through the upper punctum before occluding this and allowing the solution to drain down to the nasal ostium. If there is a blockage, then further investigation (including contrast radiography) might be indicated. Samples of the flushed material can be collected for bacterial (or occasionally fungal) culture and sensitivity.
Tonometry
Tonometry is the measurement of intraocular pressure (IOP). Normal IOP in dogs and cats is 10–25 mmHg. IOP can vary according to several factors, including breed (often higher in terriers), age (reduces with ageing) and the degree of restraint needed to measure the pressure – holding tightly around the neck will compress the jugular veins and could result in falsely elevated readings. Glaucoma is present if the IOP is clinically raised. Intraocular inflammation, i.e. uveitis, causes the pressure to drop below normal.
The instrument used to measure IOP is called a tonometer. Different types are available, but the most common ones in general use are the Schiotz tonometer (which measures by indenting the cornea – indentation tonometry) and the more expensive Tonopen (which measures by flattening the cornea – applanation tonometry). To measure IOP animals should be unsedated but topical anaesthesia should be instilled into the eyes. Readings should be taken from both eyes. With both types of instrument minimal restraint is required.
To use a Schiotz tonometer the patient must have its eyes in the horizontal plane. This usually means pointing their nose up to the ceiling – but without putting too much pressure around the neck! The footplate of the tonometer is allowed to rest on the cornea and the reading is taken from the scale. Several readings should be taken from each eye. A conversion chart comes with the instrument such that the reading on the scale can be converted to mmHg. This tonometer should not be used in very painful eyes or those with deep ulcers which could rupture. It is accurate to use but is cumbersome and some patients resent it. After each use the instrument should be dismantled and thoroughly cleaned.
The Tonopen is a more user-friendly tonometer. It should be calibrated prior to use each day – instructions are easy to follow and come with the instrument. A new tip-cover is used for each patient and after the application of topical anaesthesia the tip of the Tonopen is held perpendicular to the cornea and gently touched against it – the machine makes a beeping noise each time the cornea is touched and after three to five touches a different beep is heard and the pressure appears as a digital reading in mmHg. The small screen also records the degree of error in the reading, which should be less than 5%. If it is higher than this, the reading is not accurate and the pressure should be measured again. The Tonopen is small and light to use and the cornea does not need to be horizontal for measurements. This means that the patient can have their head in a normal position, thus making them less resentful to the procedure. It can also be used in very small patients such as kittens or rodents, as well as horses and farm animals. As with the Schiotz tonometer, care must be exercised with deep ulcers or corneal lacerations.
Another type of tonometer – the TonoVet tonometer – has recently been introduced into the veterinary market. This is a rebound tonometer which seems to be easy to use and accurate. It is likely to become more popular in the near future, although since it costs the same as the Tonopen, this could limit its appeal!
Gonioscopy
Gonioscopy is the examination of the iridocorneal (drainage) angle and is normally only performed by specialists or those with an interest in ophthalmology. However, an understanding of the concept is essential to the interpretation of types of glaucoma.
It is not possible to see the iridocorneal angle in dogs without the use of special contact lenses (goniolenses). Various different types of lens are available and personal preference usually dictates the type chosen. Koeppe and Barkan lenses are the most frequently encountered. These are placed on the anaesthetized cornea and allow the light to be bent (refracted) such that the drainage angle can be evaluated. The lenses basically allow the observer to look around the corner between the cornea and the iris. The technique is used mainly in dogs to check for abnormalities in this angle (goniodysgenesis) which predispose to the development of primary glaucoma. Figure 1.5 illustrates the normal appearance of the drainage angle and of goniodysgenesis in diagram form while Figure 43.2 is a photograph of a normal drainage angle. If one eye is glaucomatous, the fellow eye is examined for evidence of goniodysgenesis.
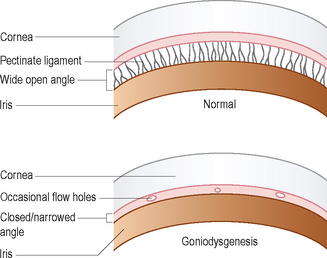
Figure 1.5 Diagram of the gonioscopic appearance of a normal drainage (iridocorneal) angle and one affected with goniodysgenesis.
Gonioscopy is also used to screen dogs for goniodysgenesis in breeds known to suffer from primary inherited glaucoma – for example, Basset hounds, flat coated retrievers and Welsh springer spaniels among others. The technique takes a lot of practice, and interpretation of the findings can prove difficult – even among ophthalmologists there can be a difference of opinion as to the significance of any abnormalities and as such it is perhaps best left for specialists to argue about!
Electroretinography
Electroretinography is not normally available in general practice. However, an understanding of its use is important which is why it is included in this section. The electroretinogram (ERG) is the electrical response recorded when the retina is stimulated with light. It is not a measure of vision (ERG will be normal in central blindness) but measures the integrity of the outer retinal layers, including the retinal pigment epithelium. It is used mainly to establish retinal function when opacification (usually cataract) prevents visualization of the fundus. In this situation it is very important to establish that the retina is working normally if cataract surgery is being considered.
Inherited retinal degenerations are common in pedigree dogs and cataracts frequently develop along with the degeneration – cataract surgery would not restore vision if the retina is atrophied which is why the test is so important. ERGs are also used to investigate cases of sudden blindness where the eye looks normal, in order to differentiate sudden acquired retinal degeneration (SARD) from optic neuritis or central blindness.
Patients are usually lightly sedated to perform an ERG, although in some animals general anaesthesia is preferred. A special contact lens electrode filled with a viscous gel (such as 2% hypromellose or carbomer gel) is placed on the cornea, while ground and reference needle electrodes are placed subcutaneously, usually at the nuchal crest and lateral canthus respectively. These are connected to a computer system and light source. Animals usually need to spend about 20 minutes in the dark (called dark adaptation) prior to ERG testing so that the retina is maximally sensitive to the stimulating light. Different protocols of light stimulation are used – single flashes of differing light intensity, flickers of light and so on – which can stimulate rods and cones separately. The response of the retina is recorded graphically and various measurements can be taken – for example, the amplitude of the response. If no response is recorded this indicates no functional retina and is found in end-stage progressive retinal atrophy and SARD.
Blood pressure measurement
The measurement of blood pressure is routinely performed in ophthalmic patients since hypertension is a common cause of ocular disease in both dogs and especially cats. Indirect measurement is routinely employed and two main methods are available – the Doppler and oscillometric systems. Thankfully these are becoming routine in general practice and details of how to measure blood pressure accurately in both dogs and cats are readily available elsewhere. Suffice to say that readings should be obtained with patients which present with hyphaema, sudden onset blindness due to retinal detachments, retinal haemorrhages and unexplained chorioretinitis lesions.