Lifting, Moving, and Positioning Patients
Upon completing this chapter, you should be able to:
1 Describe the anatomy and function of the musculoskeletal system.
2 Explain the importance of proper body mechanics, alignment, and position change for both patient and nurse.
3 Discuss the principles of body movement and positioning, giving an appropriate example for each principle.
4 Identify ways to maintain correct body alignment of the patient in bed or in a chair.
5 Describe the proper method for transferring a patient between wheelchair and bed.
1 Correctly position a patient in the following positions: supine, prone, Fowler’s, and Sims’.
2 Assist patients to sit up in bed.
3 Demonstrate complete passive range-of-motion (ROM) exercises for a patient.
4 Correctly transfer a patient from a wheelchair to a bed.
5 Transfer a patient from a bed to a stretcher.
6 Demonstrate the correct techniques for ambulating a patient and for breaking a fall while ambulating.
alignment ( , p. 258)
ambulate ( , p. 263)
bone (p. 259)
bursa ( , p. 259)
cartilage ( , p. 259)
contractures ( , p. 262)
dangling (p. 277)
Fowler’s position ( , p. 264)
gait (p. 263)
gait belt (p. 282)
joint (p. 259)
kinesiology ( , p. 258)
lateral position (p. 264)
ligaments ( , p. 259)
logrolling ( , p. 272)
necrosis ( , p. 262)
pivot ( , p. 262)
pressure ulcers ( , p. 262)
prone position ( , p. 264)
semi-Fowler’s position ( , p. 264)
shearing force ( , p. 262)
side-lying (lateral) position ( , p. 264)
Sims’ position (p. 264)
skeletal muscles (p. 259)
supine position ( , p. 263)
symmetry ( , p. 262)
tendons (p. 259)
transfer belt (p. 282)
Lifting, moving, and positioning patients is an integral part of your workday. In order to provide the best patient care and to prevent self-injury, you must know the principles of body mechanics. Coordinated movement involves using the bones, joints, and skeletal muscles properly. Some hospitals and institutions are moving to a policy of “no manual lifting” or to the use of a lift team. The goal of this change is to decrease health care worker back injuries from repetitive lifting. The shift in policy is slowly occurring across the United States. Until equipment or lift teams are in place in all health care institutions, there will be instances when a nurse must lift a patient without assistance or use of a mechanical device. The following principles and practices serve as guides to help prevent injury.
PRINCIPLES OF BODY MOVEMENT FOR NURSES
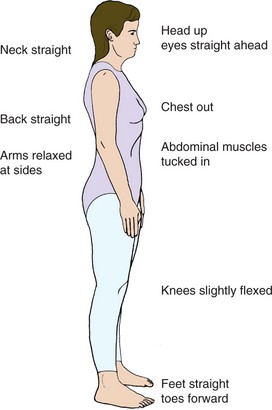
Kinesiology is the study of the movement of body parts (also called body mechanics). There are two main reasons why the use of good body movement is important for you and your patient. The first reason is that the body functions best when it is in correct anatomic position or alignment (arrangement in a straight line, bringing a line into order). Correct body alig nment is generally called “good posture” (Figure 18-2). The second reason for proper body movement is to prevent injuries. One of the most common injuries for health care workers is lower back strain. With proper use of body mechanics, many of these injuries can be avoided.
OVERVIEW OF STRUCTURE AND FUNCTION OF THE MUSCULOSKELETAL SYSTEM
Which structures are involved in positioning and moving patients?
 The musculoskeletal system contains skeletal muscles, ligaments, tendons, bones, joints, and cartilage.
Bone is a dense and hard type of connective tissue. There are four basic types of bones’short, long, flat, and irregular’and they are made up of compact and spongy bone.
A joint is the place of union of two or more bones in the body.
There are freely movable, slightly movable, and immovable joints in the body.
Bursae are small fluid-filled sacs that provide a cushion at friction points in freely movable joints.
Skeletal muscles are striated muscles that are made of bundles of muscle fibers surrounded by a connective tissue sheath.
Tendons are cords of fibrous connective tissue that connect a muscle to a bone to allow for joint movement.
Ligaments connect bones or cartilage to provide support and strength.
Cartilage is a fibrous connective tissue that acts as a cushion.
What are the functions of bones for positioning and moving patients?
Bones provide the scaffolding or framework to the body (Figure 18-1).

The skeleton gives the body shape and supports the internal organs and skin.
The bones provide places for the ligaments and tendons to attach, thereby allowing movement.
The primary function of a joint is to provide movement and flexibility to the skeleton.
What are the functions of muscles for positioning and moving patients?
Muscles can be stimulated electrically, which allows them to contract, stretch, or extend elastically.
Skeletal muscle contraction is accomplished through the stimulation of its many muscle fibers.
The contraction of skeletal muscles provides movement, stabilizes joints, produces body heat, and maintains posture.
What changes in the system occur with aging?
Bone strength and mass are lost because of the resorption of minerals. This may lead to osteoporosis, which is more common in women.
The loss of bone density predisposes the elderly patient to fractures. The fractures do not heal as quickly because of the decreased uptake of minerals.
Muscle cells are lost and replaced by fat. This leads to a loss of muscle strength and endurance.
The elasticity of muscle fibers is decreased or lost, which causes a loss of flexibility.
Joint motion may decrease, limiting mobility, activity, and exercise.
In today’s health care environment, more patients are being cared for at home. In order for these people and their caregivers to be safe, everyone must use correct lifting, moving, and positioning techniques (Box 18-1).
OBTAIN HELP WHENEVER POSSIBLE
Although it is possible to move and position patients independently, additional help is desirable. Combining the efforts of two nurses to change a patient’s position divides the work. Each nurse has less weight or fewer parts of the body to move. Sometimes it may seem difficult to find another staff person to assist you. It is always better to wait for help than to risk injury to yourself or the patient. Encourage the patient to assist when transferring and moving if possible. Use devices such as mechanical lifts and transfer or roller boards where available. Properly used, these items decrease the workload and prevent injury.
USE YOUR LEG MUSCLES
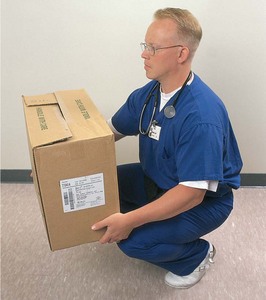
In positioning and transferring, use the muscles in your legs as much as possible. Instead of bending over at the waist to pick up something from the floor, bend at the knees and lower yourself until you can pick up the item without straining your back (Figure 18-3). Use the greatest number of muscles possible when lifting or moving an object. For instance, when turning a patient in bed, flex your knees and use the muscles in your legs as well as your arms. Without the power in your legs, there will be more work for the muscles in your arms. It is far better to use thigh, arm, and leg muscles rather than back muscles.
PROVIDE STABILITY FOR MOVEMENT
Keep your feet about shoulders’ width apart. This establishes a wide base of support and provides stability for movement. Think how easy it is to sway if you stand with your feet together and your eyes closed. Yet, if you spread your feet apart and close your eyes, you do not sway.
USE SMOOTH, COORDINATED MOVEMENTS
Use smooth, coordinated movements instead of jerking or sudden pulling motions. To coordinate effort, tell the patient and other staff members to move, lift, or pull “on the count of 3.” This will help to ensure that everyone is working at the same time to maximize the effort and decrease the individual load.
KEEP LOADS CLOSE TO THE BODY
Keep your elbows and work close to your body. This keeps the work load close to your waist and center of gravity. Pick up your textbook and hold it close to your body. Although it is a heavy book, it is easily managed close to your center of gravity. Slowly start to extend your elbows forward. This moves the book farther from the center of gravity and it becomes increasingly heavier. Do not fully extend your elbows or you will put stress and strain on your back muscles.
KEEP LOADS NEAR YOUR CENTER OF GRAVITY
Work at the same level or height as the object to be moved (Figure 18-4). This way your work load is near your center of gravity. Changing bed linens is a good example of this principle. In most institutions, the bed’s height may be adjusted. When changing linen or moving a patient, raise the bed to about waist level to keep the work near your center of gravity. Injuries are more likely to occur the farther away the work is from the center of gravity.
PULL AND PIVOT
Pulling actions require less effort than pushing or lifting. Whenever possible, use pulling motions. When transferring a patient to a stretcher, two nurses should stand on the far side of the stretcher to pull the patient toward them onto the stretcher. This movement is easier than pushing because it brings the patient closer to each nurse’s center of gravity. Face in the direction of the movement. It is much easier to move an object if you are facing in that direction. For example, place an object on the floor. Stoop down with the object in front of you and move the object forward. Fairly easy. Now place the same object on the floor, stoop down, only this time with the object to the side. Moving the object forward is not as easy in this instance.
In order to move the object at your side forward, you would need to twist to the side. To maintain proper body mechanics, keep your trunk straight when lifting or pulling. Twisting should be avoided. Instead, if turning is needed, pivot (turn or change direction with your feet while remaining in a fixed place). Pivoting prevents twisting, which can lead to back strain and injury.
PRINCIPLES OF BODY MOVEMENT FOR PATIENTS
Body movement and alignment are also important for patients. Many patients are unable to change position or move in bed independently. There are two basic principles for patients:
If these principles are not observed, the patient may experience complications.
HAZARDS OF IMPROPER ALIGNMENT AND POSITIONING
The hazards of improper alignment and positioning include
• Interference with circulation, which may lead to pressure ulcers (ulcers that form from local interference with circulation)
• Muscle cramps and possible contractures (resistance to stretch in damaged muscle that pulls a joint into a fixed or “frozen” position)
Contractures, muscle cramps, and respiratory problems as complications of immobility are discussed more thoroughly in Chapter 39.
Pressure Ulcers
Pressure ulcers, also known as decubitus ulcers or bedsores, occur from pressure on the skin. This pressure causes a local area of tissue necrosis (local death of tissue from disease or injury). Most often the area of pressure occurs between a bony prominence and an external surface. Besides pressure, the other main factor in the development of pressure ulcers is a shearing force. Shearing is an applied force that causes a downward and forward pressure on the tissues beneath the skin. Shearing forces occur when a patient slides down in a chair, if bedclothes are pulled from beneath the patient, or the patient is slid up to the head of the bed without lifting the body. More information on pressure ulcers may be found in Chapter 19.
APPLICATION of the NURSING PROCESS
When assessing the standing patient’s body alignment, begin by noting the head position in relation to the rest of the body (see Figure 18-2). Is the head centered and erect? Are the shoulders and hips parallel? Are the knees and ankles slightly flexed and parallel to the hips and shoulders? Do the arms hang comfortably at the patient’s side? Are the feet slightly apart to provide a base of support? During the assessment, also observe for any muscle weakness or paralysis, and check symmetry (equality in size, form, and arrangement of parts on the opposite sides of a plane; a mirror image) of extremities.
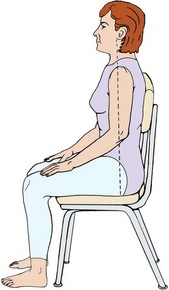
When a patient is sitting, again observe for symmetry (Figure 18-5). Determine if the patient’s head is erect and centered over the shoulders. Are the but tocks in the same plane as the shoulders and are the thighs in line with the shoulders? The patient’s weight should be distributed evenly over the buttocks and thighs. The knees should be flexed at about 90 degrees with the feet resting comfortably on the floor. Provide a footstool if the feet do not reach the floor. The arms should lie comfortably in the lap or be supported by the chair armrests.
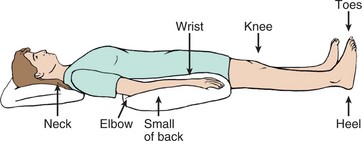
Patients often lie on their back when in bed. It is important that this position be changed frequently to prevent the problems associated with immobility. Support the head with one pillow so the neck is not hyperflexed. The vertebral column should be centered and in alignment and there should not be any observable curves. The mattress should support the body in this position.
Assess the patient’s ability to ambulate (walk) and to change position independently. (A physician’s order is needed for a patient to be out of bed.) Observe the patient walking. Is the head centered over the vertebral column? Is the gait (style of walking) even and unlabored? Is the patient balanced? Is there any weakness or favoring of one side? This will determine the patient’s ability to ambulate independently or determine the type of assistance needed.
Nursing Diagnosis
Nursing diagnoses commonly used for problems with body movement are as follows
The defining characteristics for the patient are added to the nursing diagnosis stem to individualize the care plan. Nursing diagnoses for patients with problems of immobility are covered more extensively in Chapter 39.
Planning
The data collected during the assessment phase give information about how to best promote independence or assist the patient. If the patient is not able to move independently, then the patient’s position will need to be changed at least every 2 hours to avoid complications. Your assessment will indicate whether you can move the patient independently or you will need assistance. During planning, decide how to change the patient’s position and whether you can delegate this task to assistive personnel.
The home setting must also be considered when planning care for the patient. Will the family be able to turn or assist in turning the patient correctly after discharge? Will the patient or family need any assistive devices, and do they know how to use them? Will extra pillows need to be purchased to assist with positioning? Will the patient be able to get around in and out of the home independently? Assessment and planning will answer these questions.
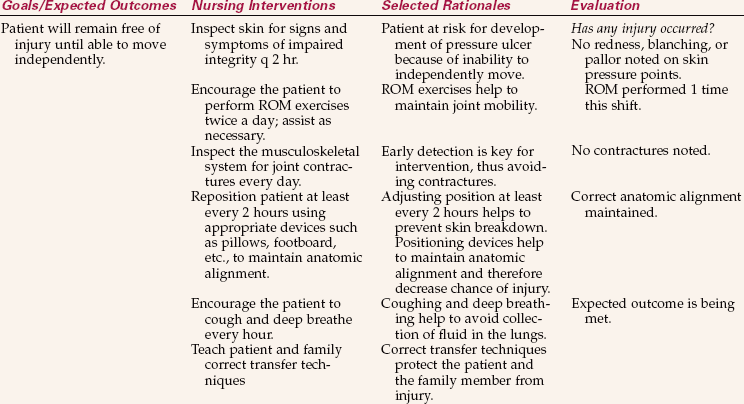
Expected outcomes are written for each nursing diagnosis. Examples related to the above nursing diagnoses might be as follows:
Implementation
Positioning: Basically, changing position accomplishes four things: (1) it provides comfort; (2) it relieves pressure on bony prominences and other parts; (3) it helps prevent contractures, deformities, and respiratory problems; and (4) it improves circulation. It is essential to know how to correctly support and position the patient while maintaining good body mechanics.
Common Positions and Their Variations: While in bed, there are three basic positions for the patient: supine, side-lying, and prone.
The supine position is when patients are resting on their back. It is recommended after spinal surgery and after the administration of some types of spinal anesthetics. The supine position is similar to proper standing alignment except that the body is in the horizontal as opposed to the vertical plane.
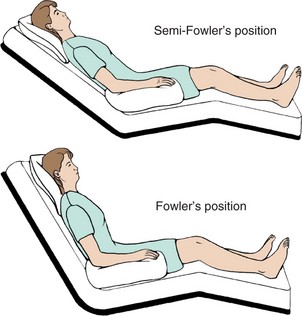
Variations of the supine position are Fowler’s, semi-Fowler’s, and low Fowler’s positions. Fowler’s position is arranged by elevating the head of the bed 60 to 90 degrees. Semi-Fowler’s position is an elevation of 30 to 60 degrees, and low Fowler’s is an elevation of 15 to 30 degrees. Unless contraindicated, the knees can be raised 10 to 15 degrees in these positions. Alternatively, a footboard can be placed at the bottom of the bed to brace the patient’s feet in correct alignment. Cardiac output and respiration are improved and urinary and bowel elimination are promoted in these positions. Do not place a patient who had abdominal surgery in a Fowler’s position unless ordered. Elevation of the knees above 15 degrees is contraindicated in elderly and postoperative patients because it is associated with decreased circulation of the lower extremities; check the orders. Fowler’s position may help the patient who has had a stroke and has paresis to swallow food and secretions.
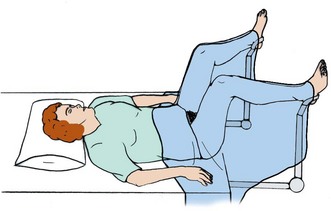
Dorsal recumbent and dorsal lithotomy positions are other variations of the supine position. In the dorsal recumbent position, patients are on their back with knees flexed and soles of the feet flat on the bed (Figure 18-6). This is used for a variety of procedures and examinations. The dorsal lithotomy position (Figure 18-7) is used for examining the pelvic organs. It is like the dorsal recumbent position except the feet are usually placed in stirrups and the legs are spread farther apart and abducted. Patients with joint problems or arthritis may have difficulty assuming this position.
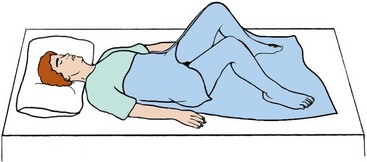
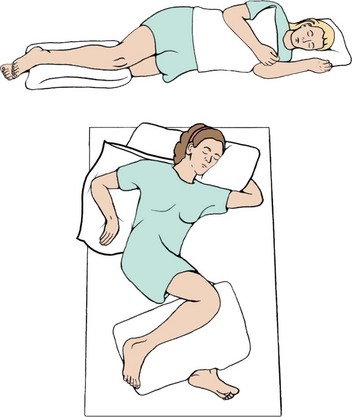
The side-lying or lateral position is achieved by having patients rest on their side. It alleviates pressure from bony prominences on the back. The major portion of the patients’ weight is on the dependent shoulder and hip. Maintain the vertebral column in proper alignment as if they were standing. The oblique side-lying position removes pressure from the dependent shoulder and hip and is easier for patients to maintain.
Sims’ position is a variation of the side-lying position. It is used for rectal examinations, administering enemas, or inserting suppositories, or for an unconscious patient. The distribution of weight is different from the side-lying position because in the Sims’ position the weight is distributed over the anterior ilium, humerus, and clavicle. When positioning on the left side, place the left arm behind the patient and draw the right knee and thigh up above the left lower leg. Tilt the chest and abdomen forward so the patient is resting on them as well.
The prone position is when the patient is lying face down. It provides an alternative for patients who are on prolonged bed rest or are immobilized. Spinal cord–injured patients often use this position. The position is generally not well tolerated because it is boring. In the prone position, for patients who have not had a spinal cord injury, turn the head to one side or the other and support with a small pillow. If the head is not turned, or the patient is not on a special bed with a removable piece at the head, the patient would not be able to breathe.
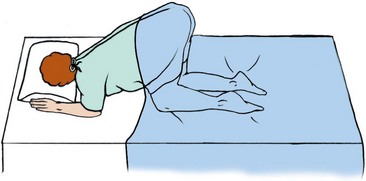
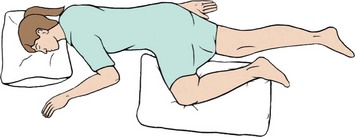
The knee-chest position is a variation of the prone position (Figure 18-8). The patient is face down on the bed with the head turned to one side. The chest, elbows, and knees rest on the bed and the thighs are perpendicular to the bed. The lower legs rest flat on the bed. This is used for rectal examinations and as a method to restore the uterus to a normal position. Do not leave the patient alone in the knee-chest position because the patient may become dizzy, faint, or fall. A patient with arthritis or joint abnormalities may not be able to assume this position.
Skill 18-1 describes how to place the patient in many of the above positions.
Skill 18-1 Positioning the Patient
Correct positioning of patients is essential for maintaining proper alignment. Many patients, because of injury, disease, helplessness, or therapeutic devices, need assistance with repositioning. Change the position of the bed patient at least every 2 hours. Obtain help to prevent injury to yourself and the patient.
Positioning devices as needed for each position:
Review and carry out the Standard Steps in Appendix 3.
RATIONALE Provides easy access to equipment.
RATIONALE Decreases fear and prepares patient to assist when possible.
RATIONALE Promotes safety and reduces back strain.
RATIONALE Reduces transfer of microorganisms.
9. ACTION Move patient to head of bed (see Skill 18-2).
RATIONALE Prepares patient to be repositioned properly in the bed.
RATIONALE Promotes working with gravity.
RATIONALE Prevents flexion contractures of neck.
12. ACTION If needed, place sandbags or trochanter rolls parallel to the lateral aspect of the thighs.
RATIONALE Prevents external rotation of the hips.
13. ACTION Use heel pads or a small pillow or rolled towel under the ankles to lift the heels off the mattress.
RATIONALE Decreases chance of pressure ulcer formation.
RATIONALE Prevents extension of elbows and decreases internal shoulder rotation.
Fowler’s and Semi-Fowler’s Positions
16. ACTION For Fowler’s, elevate head of bed 60 to 90 degrees. For semi-Fowler’s, elevate head of bed 30 to 45 degrees.
RATIONALE Promotes comfort and provides patient with social and recreational opportunities. May assist with breathing, eating, and swallowing for patient with problems in these areas.
RATIONALE Prevents cervical flexion.
RATIONALE Prevents flexion contracture of hands and wrists and shoulder dislocation from pull of arms and hands.
RATIONALE Provides comfort without hyperextension of the knees or occlusion of popliteal artery.
21. ACTION Place patient on back on flat bed, if not contraindicated, or with bed as low as patient can tolerate. Move patient slightly to far side of bed, starting with the head, torso, and then feet; align the body correctly.
RATIONALE Promotes easy access and working with gravity. Body will be centered in the bed when in new position.
RATIONALE Pulling requires less effort than pushing.
RATIONALE Supports and prevents injury to joints.
24. ACTION Ask patient to raise the near arm above the head. Place one hand on patient’s far shoulder and the other hand on patient’s far hip and roll patient toward you with a smooth motion, or use a lift sheet to smoothly turn patient onto her side.
RATIONALE Supports and prevents injury to joints.
25. ACTION Fold pillow lengthwise; tuck upper edge under patient; roll the pillow against the patient’s back, rolling it toward the mattress. Place a lengthwise pillow between the flexed knees from knee to foot.
RATIONALE Supports and promotes alignment. Prevents pressure ulcer formation. Prevents patient from rolling back to prior position.
For Side-Lying Oblique Position
RATIONALE Disperses weight so it is not centered on shoulder.
27. ACTION Flex the arm next to the mattress; raise hand so that it is even with top of patient’s head.
RATIONALE Places less pressure on the shoulder and promotes comfort and flexibility of the elbow.
RATIONALE Promotes chest expansion and decreases adduction and internal rotation of shoulder.
RATIONALE Decreases pressure on the hip by placing the body at an oblique angle.
30. ACTION Slightly flex knees and support upper leg from thigh to ankle with pillow(s) folded lengthwise.
RATIONALE Supports the leg joints and decreases adduction and internal rotation of hip and thigh. Decreases pressure on bony prominences.
31. ACTION Position patient in complete side-lying position, but move slightly to the far side of the bed that back is facing. Partially roll patient forward partly on abdomen.
RATIONALE Patient will be centered in bed when repositioned. Rolling patient partly onto abdomen promotes even weight distribution.
RATIONALE Prevents extension of elbow. Promotes comfort, and weight is not focused on shoulder joint.
33. ACTION Support flexed uppermost arm and leg with pillows so that the hand is level with the shoulder.
RATIONALE Promotes chest expansion; decreases adduction and internal rotation of shoulder.
34. ACTION Lower head of bed to a flat position; place patient in supine position; and move to opposite side of the bed.
RATIONALE Promotes working with gravity.
RATIONALE Positions pillow for support after turn. Aids respirations by decreasing pressure on the diaphragm. Decreases hyperextension of lumbar vertebrae.
RATIONALE Maintains alignment for turning.
37. ACTION Roll patient toward you and place on abdomen (pillow is between patient’s abdomen and the bed). Patient should be centered in bed.

RATIONALE Maintains alignment.
38. ACTION Place a small pillow under patient’s head; turn head to one side, and be sure ear is flat against the pillow.
RATIONALE Decreases flexion of neck.
42. ACTION Observe the newly positioned patient. Is the patient in proper alignment? Are positioning devices correctly placed? Is the patient comfortable? Check Special Considerations for common trouble areas with each position.
RATIONALE Detects if patient is in proper body alignment and position.
43. ACTION Document on the flow sheet or in the nurse’s notes, depending on agency policy. Note date, time, position, and positioning devices used.
RATIONALE Provides for consistency among personnel and validates actions provided.
 Gloves should be worn when moving or positioning a patient if you will be touching blood, body fluid, secretions, excretions, broken skin, mucous membranes, or contaminated items.
A patient who has edema or is dehydrated will need to be turned and repositioned more frequently than every 2 hours to avoid skin breakdown.
After positioning a patient, check the following areas to prevent possible problems.
Maintain the feet in dorsiflexion; you may need to use a positioning device to decrease the chance of footdrop.
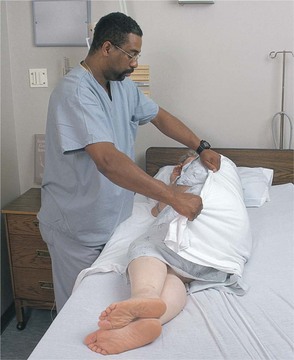
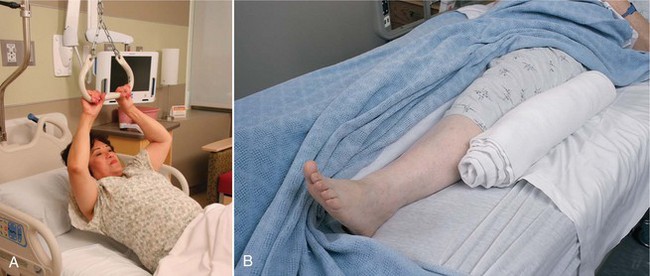
Positioning Devices: Devices used for positioning include pillows, boots or splints, footboards, cushioned boots or high-top sneakers, a trapeze bar (Figure 18-9, A, p. 269), sandbags, hand rolls, trochanter rolls (Figure 18-9, B), side rails, and bed boards. Pillows are used to support the body or extremities and elevate body parts. Boots or splints help to maintain dorsiflexion of the feet and may help to prevent heel pressure. Footboards and high-top sneakers are other devices used to maintain foot dorsiflexion. Trochanter rolls prevent external rotation of the hips and legs when a patient is lying in a supine position. Sandbags immobilize an extremity, provide support, and maintain correct body alignment. Hand rolls and splints for the hands and wrists help to prevent contractures of the hands, promote thumb adduction, keep the fingers slightly flexed, and prevent dorsiflexion of the wrist. A trapeze bar allows a patient to adjust position by enabling the trunk and buttocks to be raised off the bed. The patient may use it to help with moving up in bed or transferring from bed to wheelchair and to strengthen upper extremities. Side rails assist the patient to change position and turn in bed. Bed boards are boards that are placed under the home mattress to give more support to the mattress and thereby improve vertebral alignment.
Moving Patients Up in Bed: Patients need different amounts of help moving in bed. After proper instruction, many are able to reposition and move themselves up in bed independently. Other patients are able to provide assistance after they are told what is expected of them. Totally dependent patients rely on the nursing staff for this procedure. Before moving a patient up in bed, one of the most important steps is to determine how much help will be needed. If lift equipment is available, use it. When manually lifting, if there is any doubt about whether a patient is too heavy or immobile to be moved by you, at least one other person’s help should be enlisted. Skill 18-2 describes how to move patients up in bed.
Skill 18-2 Moving the Patient Up in Bed
Many healthy patients can reposition themselves in bed independently after proper instruction. Others, because of injury, disease, helplessness, or therapeutic devices, may be able to help somewhat or will be totally dependent on you. It is always easier for two people to assist any patient to move up in bed. If the patient is large or heavy, use lift equipment or a slide board if available instead of manually lifting. Check the agency policy.
Review and carry out the Standard Steps in Appendix 3.
RATIONALE Promotes easy access to equipment.
RATIONALE Prepares patient and decreases fear.
RATIONALE Promotes proper body mechanics and reduces back strain.
RATIONALE Protects the right to privacy and reduces embarrassment.
RATIONALE Reduces transfer of microorganisms.
RATIONALE Prevents bed from rolling and provides access.
RATIONALE Prevents the patient from striking head against the headboard.
For the Patient Who Can Assist
11. ACTION Place the patient on back. Ask the patient to flex both knees, reach back with one or botharms, and grab the side rails (or hold trapeze bar if present), place chin on chest, then push down on the bed with both feet, lift the buttocks off the bed, and push upward.
RATIONALE Allows the patient control while promoting exercise and independence. The chin on the chest prevents neck strain and decreases friction on the back of the head.
For the Patient Who Needs Assistance (1 or 2 Nurses)
12. a. ACTION Place the patient on back. Face the head of the bed and, with a broad stance, place one foot in front of the other with the back foot closest to the bed.
RATIONALE Prevents twisting and strain of back. Provides a good base of support.
RATIONALE Decreases resistance of dragging legs.
RATIONALE Decreases resistance of dragging arms.
d. ACTION Place one hand and forearm under the patient’s shoulder, support neck, and place the other hand and forearm under the patient’s upper thighs. If you have help, each person holds the patient in this way on opposite sides of the bed.
RATIONALE Supports the patient’s heaviest parts. Having two people decreases effort needed.
e. ACTION With rocking motion of hips and legs, and on the count of 3, shift body weight forward, moving patient toward the head of the bed. Push with the arms as the patient lifts buttocks and pushes with both feet.
RATIONALE Coordinates movement; helps to overcome forces of inertia.
For the Immobile Patient (1 Nurse)
RATIONALE Promotes working with gravity.
b. ACTION Stand diagonally next to the patient’s legs in a broad stance with one foot in front of the other and the back foot closest to the bed; slide arms under the legs.
RATIONALE Prevents strain or twisting of back and provides a good base of support.
c. ACTION Flex knees and hips so arms are level with patient’s legs. Slide patient’s legs diagonally toward head of bed.
RATIONALE Allows a pulling motion and legs are easier to move.
d. ACTION Stand next to patient’s hips; place one arm under patient’s thighs and the other arm under patient’s lower back. Slide the patient’s hips diagonally toward head of bed.
RATIONALE Maintains body alignment for you and aligns patient’s hips and feet.
e. ACTION Place your arm nearest the head of the bed under patient’s neck; support head and patient’s other shoulder. Place other arm under patient’s chest. Slide trunk, shoulders, neck, and head toward head of bed. Patient is now in alignment on one side of the bed.
RATIONALE Supports the patient’s body weight during movement. Patient is aligned on one side of the bed.
f. ACTION Raise side rail. Switch sides of bed and repeat as necessary until patient reaches desired place in bed.
RATIONALE Promotes safety and moves patient while maintaining alignment.
For the Immobile Patient (2 Nurses with a Lift Sheet)
RATIONALE Less effort is needed to move patient on a sheet than to move with hands.
b. ACTION With patient on side, place the lift sheet under patient by rolling up the edge of the sheet close to the patient and placing it firmly against the patient.
RATIONALE Allows sheet to be pulled easily out from under the patient once turned. Supports the heaviest part of the patient.
c. ACTION Roll the patient back to the other side over the lift sheet. Pull sheet through. Place patient on back; with a nurse on each side of the bed, roll or fan-fold the sheet close to each side of the patient.
RATIONALE Decreases risk of injury. If the patient is large, more than two nurses may be needed to safely transfer the patient.
d. ACTION Each nurse places one foot slightly in front of the other, about shoulders’ width apart, to form a broad base of support.
e. ACTION With hips and knees slightly flexed, and back straight, grasp the sides of the rolled or folded sheet as close as possible to patient. On the count of 3, lift patient to the head of the bed.
RATIONALE Enables you to shift body weight in direction of movement, decreasing force needed to lift patient. Maintains proper body movement, decreasing chance of injury.
15. ACTION Smooth out lift sheet under patient. Position patient in desired position, raise side rails, lower bed, and replace call bell.
RATIONALE Maintains alignment and promotes safety.
16. ACTION Restore the unit and perform hand hygiene.
RATIONALE Promotes comfort and safety. Performing hand hygiene reduces transfer of microorganisms.
17. ACTION Observe patient’s level of comfort, position, body alignment, and potential pressure points.
RATIONALE Maintains support to body and decreases risk of injury.
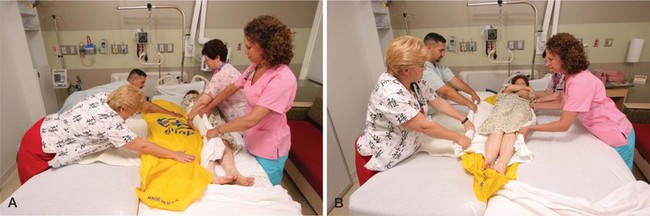
One of the techniques to move patients in bed is called logrolling. Logrolling is turning the patient as a single unit while maintaining straight body alignment at all times. Logrolling is often used for patients with injuries or surgery to the spine and for those who must avoid twisting. The linens for an occupied bed are often changed by using the logrolling turn. Logrolling can be done either with or without a lift sheet. If a lift sheet is used, two or three people are needed to accomplish the move, depending on the size of the patient (Figure 18-10). It takes at least two other people to assist when logrolling a patient without a lift sheet (Figure 18-11).
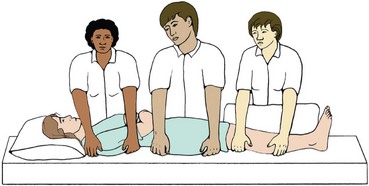
When using a lift sheet, you and preferably two other assistants stand on opposite sides of a locked, flat bed at waist level. Leave a pillow under the patient’s head and lower the side rails. Place a pillow or two, if needed, between the patient’s legs. All the nurses face the bed with one foot slightly in front of the other. Roll the lift sheet close to the patient’s body and, on the count of 3, lift the patient to one side of the bed, keeping the body in straight alignment. By lifting the patient to one side of the bed first, the patient should be centered in the bed after being logrolled. The tallest nurse is positioned on the far side of the bed and should be at the middle portion of the patient. The other two nurses are positioned one at the shoulders and neck and one at the legs and feet of the patient so that they can control movement of these parts. The nurse on the far side of the bed grasps the lift sheet. Again, the sheet is held as close to the patient’s body as possible, and on the count of 3 the patient is rolled in one smooth, coordinated, even motion with the body in straight alignment. The pillow is rearranged under the patient’s head and any other positioning devices are placed before lowering the bed and putting the call bell within the patient’s reach.
Logrolling without a lift sheet is accomplished in a similar manner. Three nurses are evenly spaced along one side of a locked, flat bed at waist level. One nurse supports and rolls the head, neck, and shoulder region; one supports and rolls the waist and hips; and the third supports and rolls the thighs and lower legs.
Therapeutic Exercise: Physical therapy is often ordered for the patient who is immobilized for an extended period of time. The physician indicates the patient’s problems, and the therapist performs an evaluation and then designs an exercise program to help the patient and to prevent further musculoskeletal problems from occurring. If a physical therapist is not available, you will need to assist your patient in performing these exercises. The family and/or significant other can also be shown how to assist the patient with exercise.
Full range-of-motion (ROM) exercises should be performed either actively or passively several times a day. Active ROM exercises are used for the patient who independently performs activities of daily living but for some reason is immobilized or limited in activity or is unable to move one extremity due to injury or surgery. Passive ROM exercises are performed on the patient who cannot actively move. This patient cannot contract muscles, so muscle strengthening cannot be accomplished. All muscles over a joint are maximally stretched to achieve or maintain flexibility of the joint. This is accomplished by moving the muscles to the point of slight resistance but not beyond. To prevent joint injury in performing passive ROM exercises, support the limb to be exercised above and below the joint. Principles related to carrying out ROM exercises for patients are listed in Box 18-2. Skill 18-3 describes how to provide passive ROM exercises.
Skill 18-3 Passive Range-of-Motion (ROM) Exercises
Many patients are paralyzed or have limited mobility of the extremities. To prevent joints from becoming rigid and immovable and to prevent contractures, it is necessary to provide motion to the joints on a regularly scheduled basis. Each exercise is repeated three to five times per session. Remainder of the patient is kept draped while one extremity is exercised.
4. ACTION Place patient in supine position, remove the pillow, and drape with sheet or blanket.
RATIONALE Positions patient for the procedure. A drape provides privacy for the patient.
5. ACTION Perform passive ROM of the head and neck:
• Support the head with your hands, and bring the head forward until the chin touches the chest.
• Extend the neck by elevating the chin and having the patient look upward. Return the head to the neutral position.
• Support the head with your hands, and turn it toward the right shoulder and then toward the left shoulder. Pause in a neutral position.
• Bend the head laterally to the right shoulder and then to the left. Return the pillow under the head.

RATIONALE Exercises the neck and trapezius muscles. Promotes cervical spine mobility. Pillow makes patient more comfortable.
6. ACTION Flex and extend the shoulder and elbow:
• Supporting the elbow with one hand, grasp the wrist with your other hand. Bring the arm straight up over the head, then lower it and bend the elbow. Return the arm to the patient’s side.
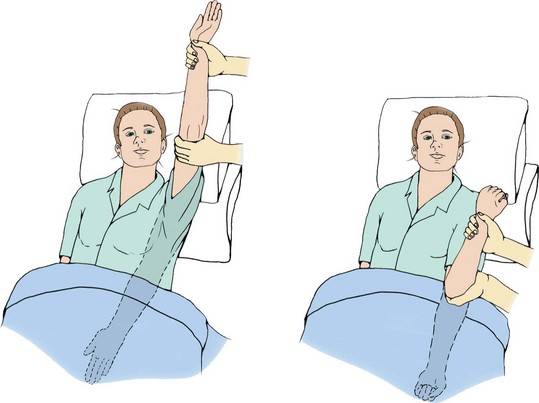
• Internally rotate the shoulder. Place one hand on the patient’s arm above the elbow, and grasp the patient’s hand with your other hand. Lift the arm and move it across the chest toward the other side. Return the arm to the original position.
• Externally rotate the shoulder. Move the arm out from the patient’s side in abduction. Flex the elbow, and move the forearm over the head. Return the arm to the original position.
RATIONALE Promotes joint movement and exercises the shoulder muscles.
7. ACTION Elevate and depress the shoulders. With shoulders level, have the patient elevate them as if shrugging. Have the patient lower the shoulders as far as possible and then return to a level plane.
RATIONALE Loosens the shoulder joints and promotes relaxation.
• Hold the patient’s wrist with one hand and the palm of the hand with your other hand, keeping the patient’s fingers straight. Hyperextend the wrist by bending it backward. Extend the wrist by straightening.
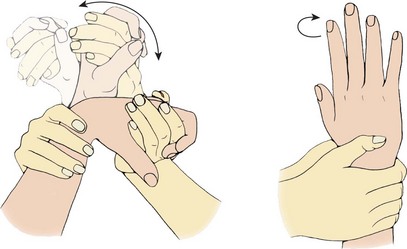
• Flex the wrist by bending the hand forward and closing the fingers to make a fist. Perform circumduction of the hand and wrist. Hold the patient’s wrist with one hand and the palm of the hand with your other hand, keeping the patient’s fingers straight. Bend the wrist forward, and move it in a circular motion.
• Rotate the wrist and hand. Grasp the wrist in both of your hands. Rotate the wrist by turning the palm toward the patient’s face for supination and then toward the feet for pronation.
RATIONALE Exercises the wrist. Circumduction promotes joint flexibility and prevents contractures. Rotation promotes joint flexibility and movement.
9. ACTION Exercise the thumb and fingers:
• Hold the patient’s hand with one hand, and grasp the thumb with your other hand. Avoid pressing on the nail bed. Flex the thumb and then the fingers by bending them onto the palm.
• Extend the fingers by returning them to their original position. Abduct the fingers by spreading them.
• Adduct the fingers by returning them to a closed position. Circumduct the fingers and thumb by moving them in a circular motion.
• Oppose the thumb by touching it to each of the fingers in turn.
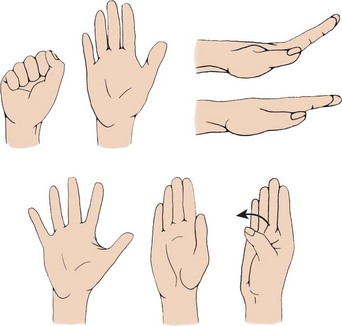
RATIONALE Promotes opposition of thumb and grasp for other fingers needed to perform activities of daily living.
10. ACTION Exercise the hip and knee:
• Place one hand under the knee, and cup the heel in your other hand. Flex the leg by bending the knee and moving the leg toward the chest as far as it will go without causing pain. Extend the leg by lifting the foot upward and then lowering the leg to the bed.
• Abduct the hip joint by keeping the leg straight and slowly moving the entire leg toward the edge of the bed. Adduct the hip joint by moving the leg back to the original position.
• Rotate internally by keeping the leg flat on the bed, and roll the leg inward with toes pointed in toward the opposite foot. Rotate externally by keeping the leg flat on the bed; roll the leg outward with toes pointed away from opposite foot.
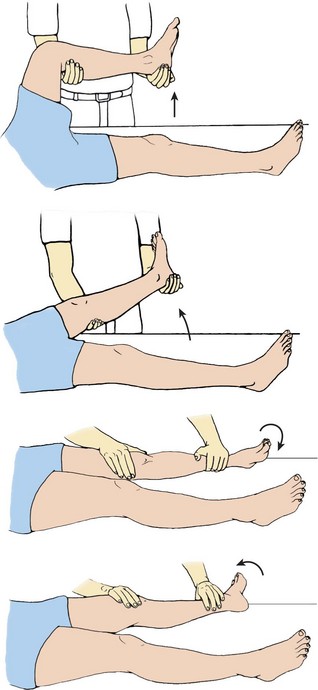
RATIONALE Promotes successful mobility when the patient is able to resume ambulation and prevents hip contracture.

11. ACTION Exercise the ankle and foot:
• With the patient’s leg on the bed, place one hand on the ball of the foot; then place the other hand just above the ankle.
• Perform dorsiflexion by pushing the foot forward toward the body and pushing down on the heel at the same time.
• Perform plantar flexion by pushing the toes away from the body while pushing down on the heel. Circumduct by holding the ankle with one hand and turning the whole foot outward and then inward in a circular motion. Flex, extend, and circumduct the toes as you did the fingers. Avoid holding the nail beds.
RATIONALE Prevents footdrop and promotes mobility when the patient is able to resume ambulation.
Lifting and Transferring: Lifting and transferring patients also require the use of proper body mechanics and positioning principles. Some patients may be independent or need minimal assistance to ambulate. Others may need to be transferred to a chair, wheelchair, or stretcher.
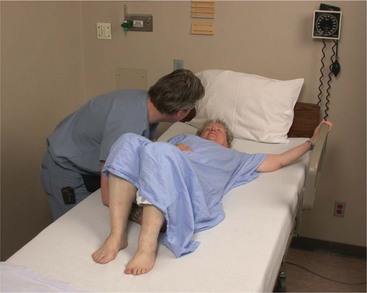
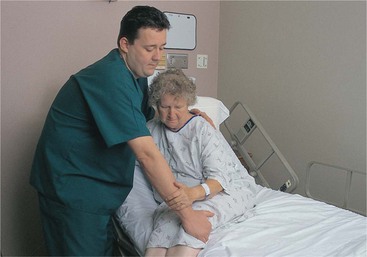
Before transferring a patient to a wheelchair, have her dangle her legs over the side of the bed first (Figure 18-12). Dangling is the term used for the patient position of sitting on the side of the bed with the legs and feet over the side. The feet are either on the floor or supported on a footstool. Dangling is often the first step before sitting in a chair or ambulating. The purpose is to gradually accustom the body to the position change. While the patient is dangling, assess the patient’s balance, and monitor for orthostatic hypotension, dizziness, or nausea before getting the patient out of bed. If a patient has been on prolonged bed rest, she may only be strong enough to dangle for a few minutes and then will need to lie down again.
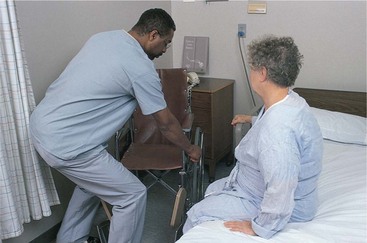
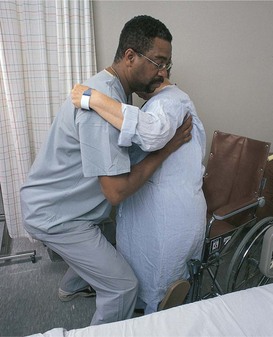
Wheelchairs are often used to transport an ambulatory patient to different areas for tests and procedures, or for the patient who is unable to walk or tolerate the fatigue associated with the effort. Either lift equipment or two nurses should transfer a patient to a wheelchair if the patient is unsteady, weak, or heavy (check agency policy) (Figure 18-13). Transferring a patient to a wheelchair is described in Skill 18-4.
Skill 18-4 Transferring the Patient to a Wheelchair
A patient is often transported to another area of the facility by wheelchair. Patients may be transferred to a wheelchair to provide greater independence. A similar procedure is used to transfer a patient to a chair. If the patient is large or heavy, use lift equipment for the transfer if available. Check agency policy.
Review and carry out the Standard Steps in Appendix 3.
2. ACTION Gather wheelchair and transfer belt if needed.
RATIONALE Provides easy access to equipment.
3. ACTION Maintain privacy by closing door and/or curtain.
RATIONALE Protects right to privacy and reduces embarrassment.
RATIONALE Provides safety for you and patient.
5. ACTION Explain the procedure and what the patient is to do.
RATIONALE Decreases fear of the unknown and prepares patient.
6. ACTION Perform hand hygiene.
RATIONALE Reduces transfer of microorganisms.
7. ACTION Place wheelchair parallel to the side of the bed. Lock wheelchair.
RATIONALE Promotes easy reach and access. Locking wheelchair promotes safety.
8. ACTION Place transfer belt on patient if patient is weak or paralyzed on one side.
RATIONALE Decreases the risk of a fall during transfer and prevents pressure on patient’s axillae.
9. ACTION Lower bed and side rail if elevated. Elevate the head of the bed to the highest level the patient can tolerate.
RATIONALE Decreases the work for you and patient and promotes safety.
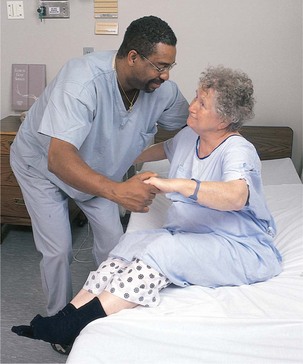
10. ACTION Assist the patient to turn onto side. Support the patient’s shoulders with one arm, and with the other arm at the patient’s thighs, help the patient sit up and move the legs over the edge of the bed. Help patient move forward on bed until feet rest on the floor and allow the legs to dangle.
RATIONALE Maintains alignment and proper body mechanics.
11. ACTION Assist patient in donning robe.
12. ACTION Place slippers or nonskid socks on patient.
RATIONALE Prevents patient’s feet from slipping during transfer.
13. ACTION Reposition wheelchair closer if necessary so the patient can stand, pivot, and sit without having to back up to chair. Place the chair so that it is closest to the patient’s strongest side.
RATIONALE Reduces distance the patient must travel to sit safely in the chair.
14. ACTION Check that both wheels are still locked on wheelchair.
RATIONALE Maintains safety because unlocked wheels allow chair to back away from patient as she sits. This can lead to patient’s falling and possible injury for both parties.
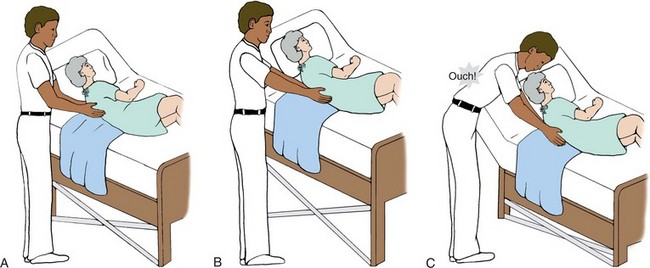
15. ACTION Assist the patient to stand by assuming a moderately wide stance in front of the patient; brace the patient’s legs with your knees, which are slightly flexed.
RATIONALE Provides base of support, maintains alignment, and prevents back injury.
16. ACTION Place your arms under the patient’s axillae and your hands on the patient’s scapula. If the patient is not able to push self off of bed, have patient place arms around your shoulders (not your neck). If the patient is able to help push up from the bed, have patient place hands on the bed.
RATIONALE Brings patient close to your center of gravity and provides a point of leverage for lifting.
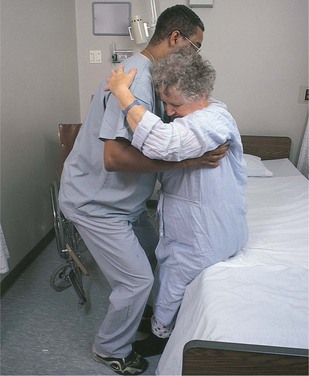
17. ACTION On the count of 3, have the patient push on the bed and lift patient upward while maintaining correct alignment in your back. Depending on your assessment of the patient’s ability, a transfer belt or another nurse on the opposite side may be needed.
RATIONALE Uses leverage to raise patient to a standing position. Assistance helps maintain safety.
18. ACTION Pivot 90 degrees so the patient’s back is toward the seat of the chair. Have the patient reach back and grasp the arms of the chair, if able. Be sure patient’s legs are against seat of chair and lower the body into the chair. Flex your knees as patient lowers into the chair.
RATIONALE Pivoting allows patient to sit down without twisting. Having legs against seat places the patient’s weight directly over the chair, providing safe support during sitting. Flexing your knees prevents self-injury.
19. ACTION Assist the patient to place the feet on the footrests. Avoid striking the patient’s ankles while fixing the footrest. Apply a protective device if ordered. Position patient in the chair in correct alignment’hips should be back in chair. If needed, assist patient to reposition farther back in chair. Provide support for weak or paralyzed extremities.
Transferring the Patient Back to the Bed (a Reversal of the Procedure)
20. ACTION Check to ensure the brakes are locked on the wheelchair. Have patient grasp both arms of the chair and push up and out of the chair to a standing position. Assist patient by placing one arm under the axilla and the other under the elbow.
RATIONALE Maintains safety. Patient assists with lifting. Hands under the axilla and elbow stabilize the patient.
21. ACTION Assist the patient to pivot 90 degrees so the back is next to the bed. When able to stand unassisted, remove the robe. Have patient place hands on bed and lower to sit on bed.
RATIONALE Pivoting allows patient to sit without twisting. Having patient stand aids in removal of robe because patient is not sitting on robe.
22. ACTION Remove slippers. Have patient lean against the elevated head of the bed, and assist in swinging legs up into bed, maintaining good body mechanics.
RATIONALE Positions patient at head of bed so patient will not need to be moved up in bed.
23. ACTION Cover the patient, raise side rail if necessary, and place call bell within reach.
RATIONALE Maintains privacy, and institutes safety measures.
25. ACTION Document, noting date, time, position, length of time patient was out of bed, and how patient tolerated the procedure. If the patient was transported to another area for a test, include this information. Note number of personnel needed to complete the transfer.
RATIONALE Validates effectiveness of nursing care and activity of patient, and provides data for transferring patient.
When transferring a patient to a wheelchair, you may need to help the weak patient readjust position in the wheelchair. To do this, stand behind the wheelchair with your knees flexed. Place your arms under the patient’s axillae and lift the patient up and back by using your leg muscles. Reposition and place call bell within patient’s reach.
Stretchers may also be called litters, gurneys, or carts. They are used for transporting a patient who is unable to sit in a wheelchair or is having certain tests or procedures done’for example, surgery. Stretchers have side rails and a safety belt that should be secured before moving the patient (Safety Alert 18-1).
Moving a wheelchair or a stretcher is an exception to a principle of body mechanics discussed earlier in this chapter. Both devices are pushed rather than pulled. To pull a wheelchair or stretcher would cause back strain and twisting.
Transferring Devices: Devices that may be used in lifting and transferring patients include mechanical lifts, lift or pull sheets, roller boards, slide boards, and transfer or gait belts. Mechanical lifts are discussed in Chapter 39. Lift sheets are often used to move and transfer a patient. Transferring a patient to a stretcher is discussed in Skill 18-5. Lift sheets may be used alone or with the following devices to help maintain the patient’s alignment during a transfer.
Skill 18-5 Transferring the Patient to a Stretcher
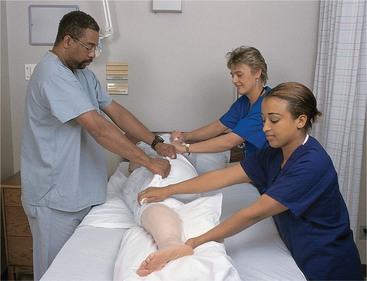
Patients are transferred to a stretcher to be moved from place to place in the hospital for diagnostic tests or surgery. Care must be taken to prevent injury to the patient and yourself during this task. As with any skill, it is important to have the correct number of staff members to transfer the patient safely. Observe proper body movement and alignment to prevent injury. Three staff members or more are needed depending on patient size. Use a roller board or slide device if available.
Review and carry out the Standard Steps in Appendix 3.
2. ACTION Gather stretcher and other supplies needed for the transfer.
RATIONALE Promotes access to equipment for safe transfer.
3. ACTION Maintain patient’s privacy by closing door and/or curtain.
RATIONALE Protects the patient’s right to privacy and reduces embarrassment.
4. ACTION Get other staff members needed to help with transfer.
RATIONALE Provides for a safe transfer.
5. ACTION Explain the procedure to the patient.
RATIONALE Decreases fear of the unknown and prepares patient for what will occur.
6. ACTION Perform hand hygiene.
RATIONALE Reduces transfer of microorganisms.
7. ACTION Lock the wheels of the bed and raise it level with the height of the stretcher.
RATIONALE Prevents the patient from falling between bed and stretcher. Level surfaces allow maintenance of proper body movement and alignment.
8. ACTION Fold the top covers to the foot of the bed, making sure feet are uncovered. Remove any positioning devices from bed. Cover patient with bath blanket or sheet.
RATIONALE Moving covers prevents feet from becoming tangled in bed linen during transfer. Removing positioning devices prevents obstruction during transfer. Covering the patient provides privacy during transfer.
9. ACTION Check for any tubes (e.g., intravenous [IV], nasogastric, urinary catheter, or chest tube), and position them so they will not be pulled out or dislodged during transfer.
RATIONALE Prevents patient injury and loss of access, as with an IV.
10. ACTION Lower the side rail of the bed on the side where the transfer will take place if raised, and have one nurse remain at the bedside to protect the patient from falling.
RATIONALE Improves access to patient and provides for safety.
11. ACTION Place the lift sheet and/or slide device under the patient as described in Skill 18-2. The slide device is placed beneath the lift sheet.
RATIONALE Lift sheet aids transfer. Slide device makes transfer much easier.
12. ACTION Place patient on back; have both nurses grasp the edge of the sheet, and on the count of 3, move patient to the open edge of the bed.
RATIONALE Decreases the risk of injury by using more people. If the patient is large, more than three nurses may be needed to safely transfer the patient.
13. ACTION Place the stretcher firmly against the open side of the bed and lock its wheels.
RATIONALE Maintains safety and prevents patient from falling.
14. ACTION Two nurses stand with a correct stance on the far side of the stretcher. The third nurse stands or kneels on the other side of the bed to assist in guiding the patient from the bed to the stretcher. On the count of 3, the two nurses pull and the third nurse lifts and guides the patient to the stretcher.
RATIONALE Pulling is easier than pushing, and it promotes a smooth transfer.
15. ACTION Smooth out the lift sheet under the patient. Check and straighten the patient’s body alignment. Fasten the safety belt securely over the patient and raise the side rail of the stretcher.
16. ACTION Cover the patient for more warmth if needed and put a pillow under the patient’s head.
17. ACTION Unlock the wheels, move the stretcher away from the bed, and raise the opposite stretcher rail.
RATIONALE Allows patient to be moved to site of test or procedure.
18. ACTION Remake or straighten the patient’s bed in preparation for patient’s return.
RATIONALE Conserves time because bed is ready for patient upon return.
A roller board consists of several roller bars between fixed end bars. The bars are enclosed in a vinyl covering that allows the bars to turn when something or someone is pulled over top of the roller board. It works similar to a conveyor belt.
To use a roller board to transfer a patient to a stretcher, turn the patient to one side and place the roller board and lift sheet underneath the patient. Return the patient to a supine position and place the stretcher against the bed with the side rail down. Lock the stretcher wheels. One or more nurses are on the far side of the bed and you and another nurse are on the far side of the stretcher. The lift sheet is held as close to the patient as possible. On the count of 3, the patient is pulled across the roller board. The nurse(s) on the far side of the bed support the patient’s head and feet and help guide the patient to the stretcher. A slide board works similarly to a roller board except that it does not roll. It has a slippery surface that allows the patient on a lift sheet to be slid across it to a stretcher or to a wheelchair.
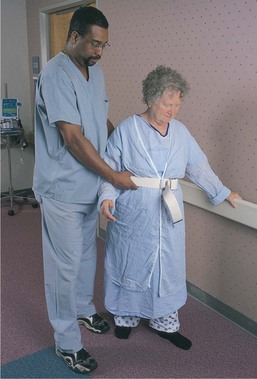
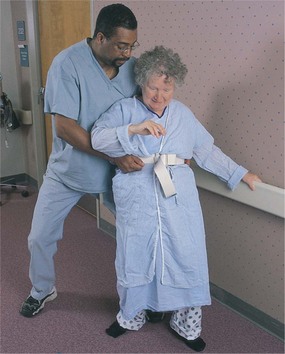
A transfer belt or gait belt may be used to ambulate and/or transfer the weak or unsteady patient. It is made of a tightly webbed canvas material and is very sturdy. Place and buckle the belt around a patient’s waist before having the patient stand. It needs to be tightened just enough to allow space for your hand to grasp it from the rear. Insert your hand into the belt from the bottom so that, if the patient falls, you will be able to support the weight. If you hold the belt from the top, it could slip out of your hand from the patient’s weight during a fall. Skill 18-6 discusses how to assist a patient to ambulate and how to break a fall.
Skill 18-6 Ambulating the Patient and Breaking a Fall
A patient may need assistance with ambulation due to being unsteady from illness or trauma, becoming weak from prolonged bed rest, or needing to manage therapeutic equipment such as drains or intravenous lines. Sometimes during ambulation a patient may begin to fall unexpectedly. It is important to know how to properly ambulate the patient and break a patient’s fall to prevent injury to both the patient and yourself. The patient must be able to stand unassisted before attempting to ambulate.
Review and carry out the Standard Steps in Appendix 3.
1. ACTION Check the patient’s written activity order.
RATIONALE A written order is required to get the patient out of bed.
2. ACTION Assess patient’s comfort level, coordination, activity tolerance, strength, and balance.
RATIONALE Provides baseline data and informs you if more than one staff member will be needed.
6. ACTION With the patient seated on the side of the bed with robe and socks and slippers on, place patient’s feet firmly on the floor. Position yourself in front of the patient with feet apart and outside the patient’s feet. Place your arms under the axillae and hands over both scapulae, and assist the patient to a standing position. (Alternative: For the weak patient, use a transfer or gait belt. Hold belt behind the patient with one hand from underneath.) Support the patient’s arm/elbow on the side closest to you. Check and secure all tubes.
RATIONALE Forms a support base for you and the patient and provides leverage for lifting. Maintains patient’s center of gravity midline. Transfer or gait belt enables you to support the patient’s weight. Tubes must not be pulled on or trip the patient.
7. ACTION Move to the patient’s side, and provide support as the patient balances before walking. Allow to stand for a couple of minutes. Check patient’s posture, and encourage patient to walk with head up and eyes open, looking forward.
8. ACTION Walk at the patient’s side. Match your gait with the patient’s. The patient may hold your elbow or hand for stabilization.
RATIONALE Conveys caring as well as stability, thus encouraging the patient to achieve greater mobility. Support prevents loss of balance and falling.
During ambulation, a patient may unexpectedly stumble or begin to fall.
9. ACTION If the patient begins to fall, stand with your feet apart slightly behind the patient, and grasp the patient’s body firmly at the waist or under the axilla.
RATIONALE Provides a broad base of support.
10. ACTION Extend your near leg against the patient’s leg, and slowly slide the patient down your leg to the floor, keeping your body in straight alignment.

RATIONALE Slows the rate of descent, decreasing the risk of injury. Straight alignment keeps your line of gravity within your base of support.
11. ACTION As the patient slides, bend your knees to lower your body while continuing to support the patient.
RATIONALE Maintains weight within your center of gravity.
12. ACTION Call for additional help, check the vital signs, and examine the patient for any injuries incurred as a result of the fall before allowing the patient to rise.
RATIONALE Prevents any further injury or discomfort to the patient.
Assisting the Patient Back to Bed After Ambulating
13. ACTION Walk to the side of the bed and have patient turn her back to the bed. Patient reaches back for the mattress with both hands for support. Reconnect tubing that was disconnected for ambulation; secure all tubing appropriately. Continue to assist the patient back to bed as described in Skill 18-4.
RATIONALE Mattress provides support and security. Alignment is maintained. Intravenous (IV) tubing, urinary catheter, drainage tubes, and suction must be re-secured and checked for patency.
14. ACTION For ambulating: Note patient’s posture during ambulation, effort, tolerance, comfort level, and the distance ambulated.
RATIONALE Provides data for comparison and modification if necessary.
15. ACTION For breaking a fall: Note difficulty encountered and if injury occurred and physician was notified. Did patient stumble or feel dizzy? Was the patient hypotensive?
RATIONALE Provides data for prevention of fall and highlights necessary modifications.
16. ACTION For ambulating: Record distance ambulated, patient’s tolerance of procedure, and assistive devices or personnel necessary.
RATIONALE Records effectiveness of nursing care and provides for consistency of care among personnel.
3/18/09 1430 Assisted to ambulate the length of the hall. Walked slowly with minimal assistance. No complaint of weakness or dizziness. Back to bed, placed in a semi-Fowler’s position for comfort. Bed down, call bell in reach.
3/18 1030 While ambulating in hallway, patient stated became dizzy and began to fall. Fall broken and patient gradually supported in slide to the floor. Checked for injuries. No cuts, bruises, or abrasions noted. B/P, 110/76; pulse, 92; respirations, 24. Complains of no discomfort, only weakness. Assisted to wheelchair and back to bed. Bed down, call bell in reach. Physician and charge nurse notified.
Assess for signs and symptoms of orthostatic hypotension when the patient is dangling at the side of the bed.
If the patient is weak or partially paralyzed on one side, support the patient on the opposite, unaffected side.
Only suction tubing and oxygen cannula should be disconnected when ambulating the patient out of the room. The IV line needs to be checked for the correct drip rate after the patient is returned to bed. All tubes should be checked for kinks and to determine patency.
Do not overtire the patient when ambulating.
Support the patient’s head when breaking a fall.
For minimal support, hold the patient’s arm with your hand.
For moderate support, encircle the patient’s waist with your near arm and use the other arm to support the patient’s near arm and hand.
For maximal support, have another person help you so that support can be provided on each side of the patient.
Evaluation
During evaluation, determine whether the expected outcomes and goals from the planning phase have been met. Evaluate your own use of proper body mechanics. Feedback from the patient and other personnel should be obtained regarding positioning and transfers. Did you position the patient safely and correctly? Was the patient comfortable when you finished, or did you need to readjust the position? Did pressure areas develop on the skin? If the plan needs to be changed, document the changes for other personnel. Record the progress achieved in meeting the goals and outcomes (Nursing Care Plan 18-1).
NURSING CARE PLAN 18-1 Care of the Patient at Risk for Injury
Darla Porter, age 74, a patient on your orthopedic unit, sustained a proximal fracture of the right tibia during a motor vehicle accident. Mrs. Porter has a long leg cast and a history of arthritis in her hands. You implement this plan of care.
Leg in cast Risk for injury related to inability to change position independently.
Supporting Assessment Data Subjective: States since car accident is unable to move in bed without help.
Objective: Arthritis in her hands makes using a trapeze bar difficult. She is not able to shift her position independently.
Practicing the techniques of proper body mechanics and alignment will increase your confidence in being able to safely move and position any patient. Using your muscles and these techniques correctly will help protect your back. Preventing back injuries is a major concern for all health care professionals.
NCLEX-PN EXAMINATION–STYLE REVIEW QUESTIONS
Choose the best answer(s) for each question.
1. An elderly person may need to be reeducated on how to lift safely because: (Select all that apply.)
2. When moving the patient up in bed:
1. place one foot in front of the other.
2. use only those muscles absolutely necessary.
3. Forgetting to reposition a patient in a wheelchair for more than 1 hour may lead to:
4. When preparing to move a patient up in the bed who can assist, you would first:
1. pull the bed covers down to the foot of the bed.
2. raise the bed to a good working height.
3. ask the patient to grab the upper guard rails.
4. ask the patient to bend the knees and plant the feet on the mattress.
5. The oblique side-lying (lateral) position is helpful because:
1. the patient does not need to be repositioned as often.
2. it takes pressure off of the trochanter and shoulder.
3. all areas of the lung will drain secretions to the bronchus.
6. When placing the elderly patient in Fowler’s position, you must:
1. raise the head of the bed to 45 degrees.
2. use at least five pillows for positioning.
7. When changing the patient’s position:
1. use only those muscles absolutely necessary.
2. stand with feet close together for greater strength.
8. A common pressure point for a patient in the supine position is the:
9. When performing passive range-of-motion exercises:
1. help patients who are independently performing these activities.
2. avoid moving the joint to the point of discomfort.
3. perform each exercise at least 15 to 20 times.
4. support the extremity above the joint to promote movement.
10. When a patient falls, you document in the nurse’s notes:
CRITICAL THINKING ACTIVITIES ? Read each clinical scenario and discuss the questions with your classmates.
You are to get a patient who has left-sided paresis out of bed and into a chair for the first time. The patient has been in this country only a short time. How would you go about doing this? Would you need assistance?