Promoting Musculoskeletal Function
Upon completing this chapter, you should be able to:
1 Discuss the effects of inactivity on respiratory exchange and airway clearance.
2 Describe appropriate care of a cast as it dries.
3 Verbalize the differences among an air-fluidized bed, low air-loss bed, and continuous lateral-rotation bed, listing the reasons for their use.
4 Name at least four pressure relief devices that help prevent skin injury in immobile patients.
5 Describe how to perform a neurovascular assessment on an immobilized extremity.
6 Discuss the use of bandages and slings to immobilize a body part.
1 Correctly care for the patient undergoing skin or skeletal traction.
2 Teach a patient to properly care for a cast following discharge.
3 Correctly apply an elastic bandage to a stump after an amputation.
4 Use lift sheets and roller or slide devices to move immobilized patients.
5 Transfer a patient using a mechanical lift.
6 Assist a patient with the use of each of the following: walker, crutches, cane, brace, prosthesis, and wheelchair.
7 Devise a plan of care for meeting the psychosocial needs of the alert, immobile patient.
bivalved ( , 811
, 811
blanch (816
cast (811
countertraction force (810
dorsum ( , 816
, 816
external fixator (812
hemiparesis ( , 815
, 815
hemiplegia ( , 815
, 815
hydrotherapy ( , 824
, 824
hypostatic pneumonia ( , 807
, 807
immobilization ( , 806
, 806
isometric exercises ( , 808
, 808
kinetic (813
moleskin (811
over-the-bed frame (809
paraplegics ( , 829
, 829
paresthesia ( , 816
, 816
perfusion ( , 816
, 816
prosthesis ( , 830
, 830
quadriplegics ( , 829
, 829
sling (810
spica casts ( , 811
, 811
splint (809
traction (806
trapeze bar ( , 809
, 809
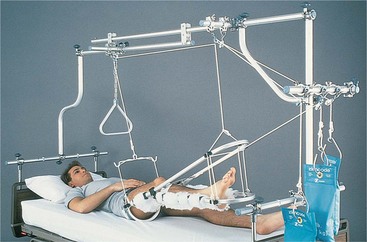
Many conditions require bed rest in order for the patient to heal and recover. Strokes, chronic debilitating illness, trauma, and neuromuscular disorders all can bring periods of immobilization (rendering a part incapable of moving) to the patient. Problems caused by restriction of normal movement include pressure injuries, pneumonia, loss of bone mass, and permanent loss of function in the immobilized part. Many supportive or corrective measures necessary for treatment, such as traction (exertion of a pulling force), casts, or braces, also restrict mobility and may cause the same types of problems (Figure 39-1). Good nursing care is critical in preventing complications for immobilized patients.
SYSTEMIC EFFECT OF IMMOBILIZATION
Decrease in muscle strength, generalized weakness, easy fatigue, stiff joints, abdominal distention, and diminished coordination begin with just a few days of immobility. Pressure ulcers are a frequent consequence of immobility. Table 39-1 presents the more severe problems that may occur when lack of activity occurs for a longer period of time. Pressure ulcer prevention is presented in Chapter 19.

One of the major concerns when a patient’s movement is restricted is the development of respiratory complications. Activity causes people to breathe more deeply, expanding their lungs and encouraging clearing of normal secretions. Without adequate physical activity, these secretions can collect in the lower airways, leading to congestion and, ultimately, to respiratory illness, particularly hypostatic pneumonia (pneumonia caused by stasis of secretions due to inactivity, which provides a medium for bacterial growth) or hospital-acquired pneumonia.
Range-of-motion (ROM) exercises (see Chapter 18), frequent turning, and use of deep-breathing exercises can help prevent pneumonia and increase general oxygenation. Patients who are experiencing pain may be reluctant to move and breathe deeply, and pain control is essential. However, the medications used to control pain may cause sleepiness and further reduce desire to move about. Opioid analgesics such as codeine may depress respirations and further inhibit respiratory clearing (see Chapter 31). Measures to promote respiratory function must be included in the plan of care for the immobile patient.
Circulation is also affected by immobilization. Normal movement assists in venous return by compression of the muscles against the venous walls during muscle activity. Healthy, firm muscles provide general support for the venous walls. This is important throughout the body, but especially in the legs, where the force of blood flow is reduced because of the distance from the heart. Various conditions (such as a fracture, trauma, or debilitating illness) and treatments (such as casts, traction, or bed rest) can impair circulation and predispose the patient to pressure injury and permanent loss of function. For these reasons, the general circulatory status of the patient and blood flow to the affected areas of the body must be monitored on a regular basis; this is covered in the “Assessment” section of this chapter, which discusses assessment of color, sensation, and movement.
Increasing fluids to at least 3000 mL/day, encouraging adequate nutritional intake, and increasing fiber in the diet help prevent complications in the gastrointestinal system. The fluid increase also helps prevent urinary complications. Stool softeners and laxatives are ordered as needed for constipation.
Performing active or passive range-of-motion exercises helps prevent joint stiffness and muscle atrophy. Encouraging active movement of the unaffected extremities throughout the day assists in maintaining muscle tone. When the patient is on extended periods of bed rest, isometric exercises (exercises performed against resistance) may be appropriate if they are not contraindicated.
Turning the patient every 2 hours, keeping linens smooth and clean, and using pressure relief devices help prevent pressure ulcers. The skin must be kept clean and dry. Skin assessment is performed at least every 8 hours and more frequently for the patient at high risk for skin breakdown.
Children who are immobilized for an extended period may regress to an earlier stage of development. Extensive immobilization of a child often causes developmental delays. Diversionary activities for the child are a considerable challenge. Access to a computer and computer learning and recreational games is helpful. Scheduled activities of art, story reading, and movies provide distraction. Developing a relationship with a pen pal by e-mail is another recreational possibility.
PSYCHOSOCIAL EFFECTS OF IMMOBILIZATION
Patients faced with movement restriction may experience a variety of emotional responses. Fear can be a major problem for these patients. They may be afraid that they will not be able to return to work and support themselves and those who depend on them. They may fear abandonment by those they love if they cannot function as they did before. Patients who are facing permanent loss may need professional counseling or a support group. This may also be true for significant others affected by the patient’s condition. Be supportive, use therapeutic techniques of communication that focus on listening, and allow the patient to verbalize concerns. When signs of fear and stress are observed, take time to listen, and refer these patients to social service as appropriate.
Another frequent problem for the alert immobile patient is boredom. Not all patients like television or enjoy reading, and even those who do will become bored with nothing else to do. Chat with patients about things that interest them while providing their daily care. Some patients may want to do something creative, such as crocheting, crossword puzzles, or crafts. Encourage family and friends to space visits so the patient avoids long periods of loneliness. Family members can also help by contacting friends and relatives and asking them to send notes and cards on a regular basis. In addition to creating bright spots in the day, cards, letters, calls, and visits increase the patient’s sense of value to others and feelings of self-worth. Positive feelings are known to play an important role in the healing process.
For the immobile patient being cared for at home, it may be helpful to move the bed into the living room or family room. This move allows the person to participate in family interactions and reduces isolation. It may also save many steps for those providing care, especially if the bedrooms are on a separate floor. Visits by home health aides and friends or respite caregivers can provide a chance for the caregiver to get out of the house and do errands or spend some time with friends or at leisure.
Remember that the nonalert or comatose patient also needs emotional support. Always assume that patients can hear and understand, even when they cannot respond or they respond inappropriately. Talk to the patient in a kind and caring voice. Explain what is being done before and as it is done, and apologize for any unavoidable pain the care may be causing. Talk to the patient about what is going on in the world. If cards or letters arrive, read them to the patient. Patients who have recovered from unconscious states have been known to describe in great detail things that happened while they were unconscious and have expressed thanks to those staff members who continued to treat them as valuable human beings.
TYPES OF IMMOBILIZATION
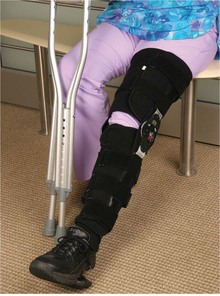
A splint is a device that protects an injured part of the body by immobilizing it. A splint may be used as a first aid measure before a cast or traction is applied to an injured part, or it may be used instead of a cast. Box 39-1 presents the guidelines for applying a splint. Several types of commercial splints are available: molded splints, immobilizers, inflatable splints, cervical collars, and traction splints (Figure 39-2). First aid splints are fashioned from materials at hand and require only some rigid material, padding, and something to secure the splint in place. Splints limit movement of the injured part. Inflatable splints help control bleeding as well as immobilize the injured part. The splint should be inflated until fingertips can only indent it 1½ inches (1.3 cm). Immobilizers are made of cloth and foam with Velcro straps. They are often used on an injured knee to prevent movement while an injury heals or during activity to prevent further injury. Molded splints keep the body part in a functional position to prevent contracture. They are used for chronic disorders. Traction splints are applied and hooked to traction ropes, pulleys, and weights to maintain pull on a fracture. An example is the Thomas splint used for a leg fracture.
TRACTION
Traction is the application of a pulling force, and it is used to maintain parts of the body in extension and alignment. It is used to realign bone ends following fracture and to relieve pain and nerve impairment caused by compression or muscle spasm.
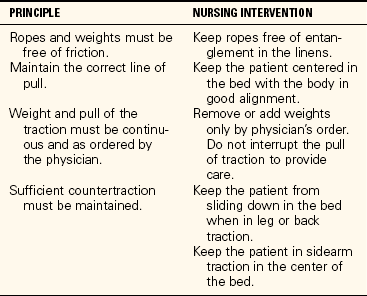
The amount of traction is determined by the pull exerted by weights at the end of the traction ropes. The amount of weight must be ordered by the physician and often changes over the course of treatment. Initially the muscles tend to be tight and may go into spasm. A heavier weight is required to overcome the muscular pull and allow the body to resume a normal alignment. As time goes on, the muscles tire and relax; the amount of weight is then reduced. The physician will leave orders concerning if and how much the head of the bed may be raised. A slight Trendelenburg position may be ordered to keep the patient from slipping down in the bed. Tape a sign to the head of the bed indicating any restrictions related to bed positioning. The weights should swing freely without touching the bed or floor. The ropes must move freely through the pulleys to prevent injury to the patient and alteration in the effects of the traction. Principles to be followed for traction are listed in Table 39-2.
The patient in traction should have an over-the-bed frame (rectangular frame to which traction equipment may be attached) with a trapeze bar (overhead bar that patient can grab) attached to the bed (see Figure 18-9, A). The trapeze bar can be grasped by the patient with the hands to assist in repositioning. Teach the patient how to tell when body alignment is correct in the bed so that as he becomes more active, he can place himself in correct alignment to maintain the traction.
Skin Traction
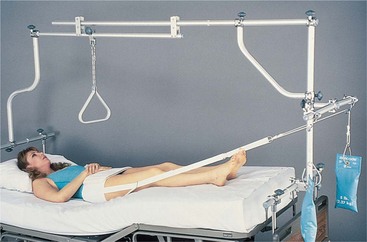
In skin traction, a Velcro boot (Buck’s traction), belt, halter, or sling (bandage for supporting a part) is applied snugly to the skin, and the traction is attached to the appliance (Figure 39-3). Skin traction has the advantage of being noninvasive, and its main purpose is to decrease muscle spasm that accompanies fractures. Damage from skin traction includes blisters, rashes from irritation by adhesives, and skin tears and tissue injuries from the shearing effects of the lateral pull across the skin surface. The amount of weight that can be applied is limited to 5 to 10 lb. The skin must be checked frequently for any indications of injury, and any problems should be reported immediately to the physician or traction technician (Safety Alert 39-1). Any complaints by the patient of skin pain beneath the wrap or appliance must also be reported.
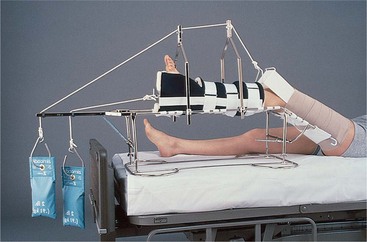
Skeletal Traction
Skeletal traction requires the surgical placement of pins, tongs, screws, or wires that are anchored to or through the bone and, therefore, pierce the skin (Figure 39-4). Traction is thus applied directly to the bone, which can support more weight than the skin. In larger hospitals, an orthopedic technician may set up the traction. The nurse is responsible for maintaining the correct weight and alignment of the traction and for maintaining a balance between traction pull and countertraction force (the weight pulling against the weight of the traction). Countertraction is provided by the weight of the patient and the position of the bed. Care of the skin around the openings for the pins, tongs, or wires is done according to the physician’s order. Sterile technique is used when performing pin care (Box 39-2). After the sites are healed, they may be left open to the air. Clear fluid drainage is expected initially. Follow the physician’s order and the policies of the facility, and report immediately any indication of infection at the wound sites. Circulation checks are performed every hour for the first 24 hours and every 4 hours thereafter.
CASTS
Patients may be placed directly into a cast (a stiff plaster of Paris, fiberglass, or polyester dressing used to immobilize) following a fracture or a variety of orthopedic procedures, or a cast may be applied following a period in traction. The skin is cleansed and inspected and any wounds are treated before a cast is applied. A layer of stockinette is applied first, followed by a thin layer of cotton or synthetic padding and then the cast material. Most casts are made of fiberglass, polyester resin, or thermoplastic material. Plaster of Paris casts are often applied to a lower extremity because they will withstand weight bearing better than the synthetics. Heat may be felt as the casting material is applied, especially with plaster of Paris. Casts made of synthetic material dry rather quickly (7 to 20 minutes), but plaster casts can take from a few hours to a couple of days to dry and be fully hardened. The synthetic cast may be hardened enough to be durable within 30 minutes. It is critical that the cast be protected from uneven pressure during the drying period because the shape or position can be inadvertently changed. When handling the cast, use the palm and flat parts of the fingers rather than the fingertips.
Swelling of the tissues is common during the first days after a cast is applied, and if left uncontrolled, this can impair the circulation and cause a pressure injury. A casted extremity should be elevated on pillows. If not padded sufficiently, the edges of the cast may rub or push against bony areas, causing pain and injury. The stockinette may be folded over the outside edge of the cast and taped to protect from chafing, or the cast edge may be “petaled” with waterproof tape. Changing position may relieve the problem, or adding extra padding beneath the edge of the cast may help.
If the cast becomes too tight, it may be bivalved (cut in half lengthwise) to relieve the pressure on the tissues. If there is a wound under the cast that needs observation, a window may be cut in the cast over the wound area. When edema has decreased, the cast is secured with outside bandaging or by more casting material. Sometimes after edema subsides, the cast is too loose and must be replaced.
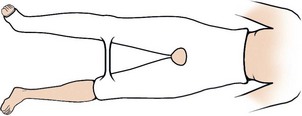
Hip spica (figure-of-8) casts can be particularly challenging for both the patient and caregiver. Hip spica casts encase a portion of the trunk and part or all of both legs (Figure 39-5). A spreader bar is placed between the legs to maintain the desired angle at the hip and incorporated into the cast. Do not use the spreader bar as a handle for lifting and turning the patient. It may be dislodged, ruining the cast and causing pain and possible injury to the patient. Grasp the cast over the leg to assist in turning. Because of their size and thickness, hip spica casts often take longer to dry. Frequent turning is necessary, including placing the patient in a prone position to ensure complete and uniform drying.
Toileting can be difficult for the patient with a hip spica cast. Ingenuity is needed to protect the cast from soiling. Using disposable plastic wrap around the perineal opening is one method of protection. When elevating a wet cast with pillows, use cloth-covered pillows because plastic-covered ones hamper drying.
Most patients can go home soon after cast placement. If the cast is not yet dry before discharge, instruct the patient and family or caregiver in the proper care of the cast to ensure uniform drying. Show them how to check the cast edges for rough spots or crumbling, how to use pillows to elevate the extremity and prevent swelling, and how to pad the rough edges using tape or moleskin (thick, durable form of adhesive material). Cast condition should be assessed every 8 hours, checking for cracks, crumbling, or rough edges. A damaged cast may need to be replaced (Safety Alert 39-2).
A major concern for patients with casts is bathing. Plaster casts must be kept dry, or they can disintegrate. Even fiberglass casts are a problem if they become thoroughly wet. The outside material tolerates water, but the padding inside tends to stay wet, causing irritation to the skin. Small casts, such as those that immobilize the forearm or lower leg, can often be covered with a large plastic bag taped in place to allow the patient to shower. Larger casts, however, usually require that the patient take sponge baths until the cast is removed.
When a child is sent home with a cast, it is important to stress the dangers of placing small items inside the cast. These can cause pressure necrosis and infection.
Casts are removed using an oscillating saw. The saw is noisy and may frighten the patient. The saw does not cut down to the skin, and the patient needs reassurance about this. After separating the cast material, scissors are used to cut through the stockinette and padding and the cast is removed.
EXTERNAL FIXATORS
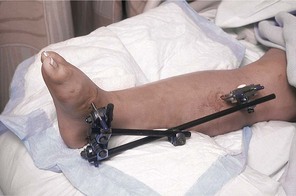
An external fixator is a metal device, such as a pin, screw, or tong, that is inserted into or through one or more bones to stabilize fragments of a fracture while it heals (Figure 39-6). The metal inserts are attached to a metal frame. This type of immobilization allows the patient to be more active during healing while maintaining immobilization of the fractured area. The pins, screws, or tongs and the frame should be checked for stability every 4 hours. The insertion of the metal device through the skin provides a break in skin integrity that requires regular pin care to prevent infection (see Box 39-2). Pin care is included in Skill 39-2 later in this chapter.
Skill 39-2 Care Of The Patient In Traction
Skin traction is mostly used to decrease muscle spasm after a fracture or back muscle injury. Skin traction may be used on small children with a lower extremity fracture. Skeletal traction is used to anchor the traction directly to the bone and is used when significant weight is necessary to maintain bone alignment, such as in the adult with a fractured femur.
 Supplies
1. ACTION Check the physician’s order for the desired amount of weight for traction.
RATIONALE Ensures that the correct amount of weight is applied.
2. ACTION Assess the boot, wrap, or skeletal traction appliance. Check that ropes and pulleys are working smoothly and that weights are hanging free.
RATIONALE Surface of appliance should be smooth and free of wrinkles or gaps to prevent pressure injury to the skin. Appliance should not be rubbing on any skin surface. Traction will not function properly if ropes are hung up in pulleys or weights are resting on the floor or bed.
3. ACTION Assess the skin, distal circulation, and sensation.
5. ACTION Realign the patient in the bed as needed to maintain optimal traction pull.
RATIONALE A direct straight line is needed for traction to be completely effective. Patients need to be pulled up in the bed periodically.
6. ACTION Perform hand hygiene, prepare the supplies, don gloves, and cleanse the skin around pin, wire, or tong insertion sites per agency protocol or physician’s orders; maintain sterile technique. Use a different sterile cotton-tipped applicator for each pin site.
RATIONALE Entry sites into the bone may become infected if sterile technique is not used. Using the same applicator on two different pin sites transfers microorganisms from one site to the other. There is a high risk of osteomyelitis if bone infection occurs.
7. ACTION Apply antibacterial ointment if ordered; follow agency protocol.
RATIONALE Some agencies and physicians do not use antibacterial ointment on insertion sites.
8. ACTION Discard used supplies in the plastic discard bag.
RATIONALE Assists in preventing spread of microorganisms.
10. ACTION Evaluate for signs of complications. Ask yourself: Is there any colored drainage from the insertion sites? Does the patient have a temperature elevation? Is there pain at the insertion sites? Is there a musty or foul odor at the insertion sites? Is the traction apparatus functioning correctly?
RATIONALE Answers to these questions reveal whether the interventions are successful.
 It is important to evaluate and medicate the patient in traction for pain, especially in the first few days when muscle spasm occurs.
Teach family and significant others that they must not tamper with the traction device, ropes, or weights.
A trapeze bar attached to the over-the-bed frame is very helpful so that the patient may assist in repositioning; it also provides opportunity for exercise of the upper extremities.
DEVICES USED TO PREVENT PROBLEMS OF IMMOBILITY
On occasion, illness or injury may result in long-term or permanent immobility. Pressure ulcers, complications of immobility, and hospital-acquired infections such as pneumonia are serious concerns. In such instances, patients may benefit from the use of specialty beds or turning frames designed to prevent tissue or structural injury and hospital-acquired infections. A number of manufacturers make such beds and frames, and they serve a variety of purposes. The use of specialty beds is designed to improve patient outcomes and augment nursing care. Because their use is very expensive, thorough ongoing documentation of need is essential.
Air-Fluidized Beds
Air-fluidized beds have tiny silicone beads contained within the bed under a flexible, air-permeable filter sheet (Figure 39-7). Warmed air passes through the small particles, setting them into motion so that they act as a fluid that suspends the patient free from contact with any stationary, hard surface. The flotation or buoyancy of the patient on the air-fluidized beads prevents pressure occlusion of blood vessels and shearing of tissues against the mattress during movement, unlike conventional mattresses. The loose filter sheet reduces friction, and the warm air protects the skin from damage by wetness. Air-fluidized therapy is effective in the prevention of pressure injury and helps reduce generalized body pain common among bedridden patients. The indications for use include those patients with full-thickness or multiple pressure ulcers, fresh grafts, or flap repairs of injuries and immobile patients whose general condition puts them at high risk for skin breakdown. Air-fluidized therapy is not recommended for patients with unstable spines or patients who are ambulatory. To maximize the beneficial effects of the therapy, the unit should be in the fluidized mode at all times. Exceptions would be during patient transfer in and out of the bed or during nursing procedures for which the patient needs to be in one stable position for the intervention.
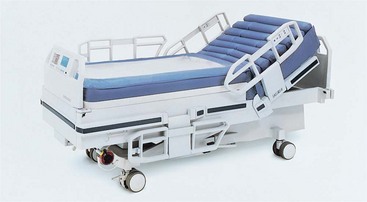
Low Air-Loss Beds
Low air-loss support is achieved by distributing air through multiple cushions connected in a series. The cushions are calibrated to provide maximum pressure relief for the individual patient. Shear and friction are reduced or eliminated because the cushions give with the patient during movement or rest. A low airflow through the cushion controls moisture on the skin. Segments of cushions may be deflated for patient care. The head of the bed can be raised. This bed is contraindicated for the patient with an unstable spine.
Continuous Lateral-Rotation Beds
Lateral-rotation therapy such as that delivered by the Roto-Rest bed is believed to decrease the incidence of lung collapse and hospital-acquired pneumonia, facilitate the normal flow of urine, and reduce the risk for deep vein thrombosis and pulmonary embolism by encouraging venous flow. This intervention may have a significant positive effect on various body systems of the critically ill patient and thereby improve the overall patient outcome. Skin breakdown is reduced by the pressure-reduction foam and gel pack surface. The patient is secured in position on the bed by multiple cushion wedges (Figure 39-8). The bed turns in an arc up to 80 degrees and can be set to pause on either side for up to 30 minutes. The rotation is stopped and the wedge cushions removed as needed for bathing, procedures, or toileting. There is a built-in scale to allow weighing of critically ill patients.

The degree and rate of movement are programmed to meet the individual patient’s requirements. The constant side-to-side movement prevents the accumulation of respiratory secretions and promotes respiratory clearing. Other lateral-rotation beds are combined with low air-loss technology to provide relief of tissue pressure.
PRESSURE RELIEF DEVICES
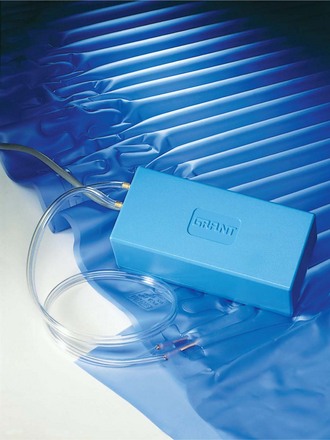
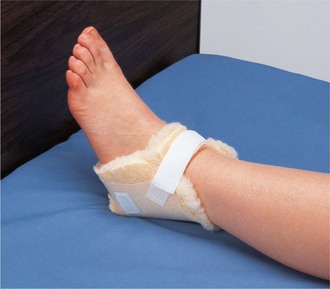
There are a variety of accessories that aid in the reduction of skin trauma from pressure for patients in standard hospital beds. These include foam and gel pads, sheepskin pads, heel and elbow protectors, and pulsating air pads and water mattresses that lie on top of the regular mattress (Figures 39-9 and 39-10).
CONTINUOUS PASSIVE MOTION MACHINE
After orthopedic surgery to replace a joint, continuous passive motion is often ordered to restore joint function. A continuous passive motion machine is used to exercise the extremity and joint, thus preventing contracture, muscle atrophy, venous stasis, and thrombus formation. The equipment extends the extremity to a prescribed angle for a specific period of time and then releases the joint, flexing it again. The machine operates continuously as long as it is switched on. As the degree of joint motion is tolerated, the settings are altered to increase the mobility of the joint (Figure 39-11).
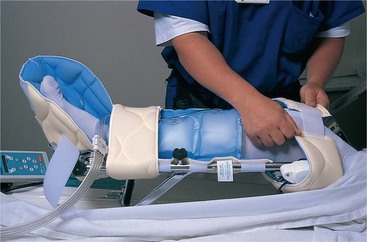
The dressing is checked for need of reinforcement before attaching the extremity to the machine. The machine is placed in position by two people because it is quite heavy. Checks for function of the machine and electrical safety are performed prior to placing the machine on the bed. Follow Steps 39-1 to initiate therapy.
THERAPEUTIC EXERCISE
Physical therapy is often ordered for the patient who is immobilized for an extended period of time. The physician indicates what the problems are for the patient, and the therapist performs an evaluation and then designs an exercise program to help the patient and to prevent further musculoskeletal problems from occurring. Full ROM exercises should be performed either actively or passively several times a day. (Range-of-motion exercises are presented in Chapter 18.) To prevent joint injury while performing passive ROM exercises, support the limb to be exercised above and below the joint. When the physical therapist is not available, the nurse assists the patient to perform these exercises. A family member or significant other can also be shown how to assist the patient with exercise.
APPLICATION of the NURSING PROCESS
When performing head-to-toe assessment of the immobilized patient, be alert to indicators of circulatory impairment such as reddened areas, pale or blue skin, coldness, or diminished or absent pulses. Look for signs of respiratory impairment such as shallow breathing, rapid or depressed respiratory rate, cough, abnormal lung sounds, use of accessory muscles, retractions or grunting, generalized paleness, duskiness, or cyanosis.
In addition to regular assessment, you should determine which activities of daily living the immobilized patient can perform and with which assistance is needed. Incorporate assistance needs into the nursing care plan. Continually assess for pain and discomfort.
Perform a neurovascular assessment for any patient with a cast or traction device (Box 39-3). Assess for cultural beliefs and customs that should be considered in planning care.
When the patient is in traction, assess the pulleys and ropes for proper function and free movement. Ensure that the weights are hanging free and the correct amount of weight is applied. Assess the pin, the wire, or the tong insertion sites for indications of infection.
For the patient in a cast, sniff at the edges of the cast for a foul or musty odor. Other indicators of infection are an elevated temperature, pus-like drainage, and/or an elevated white blood cell (WBC) count.
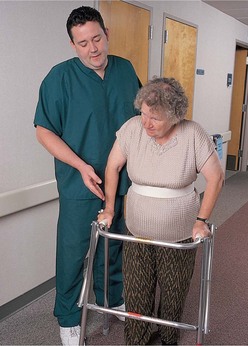
Assess any aids to ambulation for structural problems, fit, and safety as well as the patient’s ability to use them correctly. Assess the assistive device for correct length or height in relation to the patient’s height and posture. Check the foot of the crutch or cane for an intact rubber tip or the walker for properly functioning wheels if they are present. Assess patients’ gait with the device to determine their stability (Figure 39-12).
Nursing Diagnosis
Common nursing diagnoses for patients with immobility are as follows:
• Impaired physical mobility related to hemiparesis/hemiplegia (one-sided weakness/one-sided paralysis)
• Impaired physical mobility related to fractured extremity in traction or a cast
• Ineffective tissue perfusion (circulation of blood through tissue) related to decreased circulation in the lower extremities
• Impaired tissue integrity related to skin disruption
• Pain related to tissue or bone injury, or muscle spasm
• Ineffective airway clearance related to inactivity and bed rest
• Risk for peripheral neurovascular dysfunction related to fracture and cast application
Nursing diagnoses related to the psychosocial needs of the immobile person are as follows:
Planning
Planning care for the immobile patient requires careful consideration of the time needed to assist the patient with various aspects of activities of daily living, the time needed for treatments, and time to be spent providing diversional activity and socialization. Expected outcomes for some of the above nursing diagnoses might be as follows:
• The patient will demonstrate the ability to cope with physical mobility limitations as evidenced by resumption of as many self-care activities as possible within 10 days.
• The skin will remain intact and free of pressure-related injuries.
• The patient will have pain controlled with medication and alternative techniques.
• The patient will maintain good respiratory status as evidenced by effective airway clearing and normal breath sounds bilaterally.
• The patient will not experience contracture or muscle atrophy from immobilization.
• The patient will show no evidence of peripheral neurovascular dysfunction from swelling and/or cast application.
• The patient will maintain regular contact with significant others, participating in diversional activities.
• The patient will maintain interest in events occurring in the outside world.
• The patient will evidence self-esteem by positive self-statements and voluntary participation in self-care and attention to grooming.
Implementation
Appropriate interventions related to the identified nursing diagnoses would include regular turning and positioning, use of pressure relief devices, coughing and deep-breathing exercises, ROM exercises, assisted ambulation, and visitation or activities addressing the psychosocial needs of the immobile patient. Nursing Care Plan 39-1 presents interventions for a specific patient.
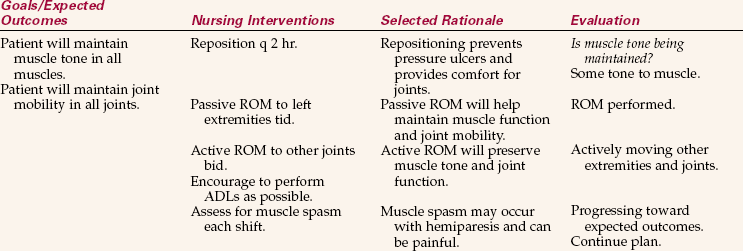
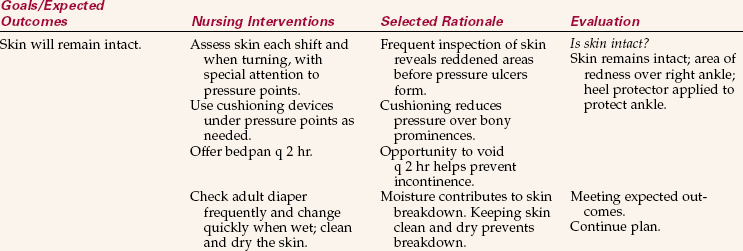
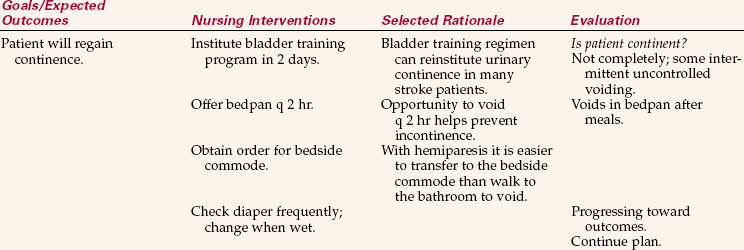
NURSING CARE PLAN 39-1
Care of the Patient Immobilized by a Stroke
Millie Palmer, age 76, is admitted after suffering an apparent cerebrovascular accident (CVA, stroke). She has left-sided hemiparesis and poor bladder control. She is confused and somewhat groggy. A computed tomography (CT) scan shows that the problem is from a thrombosis (clot), and she is started on heparin to prevent further thrombi from forming.
Unable to reposition self/Risk for impaired skin integrity related to decreased mobility and incontinence.
Supporting Assessment Data: Objective: Left-sided weakness, confusion; incontinent of urine.
Clot interrupting blood flow in brain/Ineffective cerebral tissue perfusion related to thrombosis.
Supporting Assessment Data: Objective: Cerebral thrombus demonstrated on CT scan.

Incontinent of urine/Functional urinary incontinence related to CVA.
Supporting Assessment Data: Objective: Left-sided weakness, confusion; incontinent of urine.
1. How might incontinence affect this patient psychologically?
2. If Mrs. Palmer says that she is too tired to do the exercises and all she feels like doing is sleep, how would you respond?
Key: ADLs, Activities of daily living; APPT, activated partial prothrombin time; ROM, range of motion; tid, three times daily.
When caring for a patient in a fresh plaster cast, elevate the cast on pillows if possible. This places a soft, yielding surface against the plaster that is less likely to alter the shape of the cast. Elevating the extremity will reduce the likelihood of swelling. Turn the patient hourly so the cast rests on a different area of its surface. This will help the cast to dry evenly, as will a circulating fan. Skill 39-1 presents the points of care for the patient with a cast. For the patient going home with a cast in place, review cast care and assessment of problems with the patient and caregiver (Patient Teaching 39-1).
Casts may be applied to almost any area of the body. The larger and thicker the cast, the longer it takes to dry fully. Hip spica and full-body casts may take 1 to 2 days to dry completely. Synthetic material casts dry much more quickly than plaster casts.
Review and carry out the Standard Steps in Appendix 3.
1. ACTION Examine the cast for any dents. Handle the cast gently with the flats of the fingers and the palms, not the fingertips.
RATIONALE Dents may cause compression on underlying tissues. Fingertip pressure more easily dents the cast because the pressure is on a small area rather than spread over a broader surface.
2. ACTION Examine the cast for any areas where blood may have seeped through. Circle any such areas in ink and write the date and time on the cast.
RATIONALE Bloodstains seeping through the cast are a common occurrence when surgery has preceded the application of a cast. Marking provides a way to judge further bleeding.
3. ACTION Assess the cast for rough edges and excessive tightness by running a finger along all cast edges and under the edges next to the skin.
RATIONALE A finger should slip easily under the edge of the cast. Checking helps to discover problem areas.
5. ACTION Pad any rough edges by petaling with 1½- to 2-inch pieces of tape or moleskin. Place lamb’s wool beneath cast to pad under rough spots.
RATIONALE Rough spots will cause skin chafing, abrasion, and breakdown.
6. ACTION Notify the orthopedic technician or the physician if any area of the cast is too tight.
RATIONALE The cast may need to be cut to relieve the pressure.
7. ACTION Elevate the casted extremity so that the hand or foot is at the level of the heart.
RATIONALE Elevation aids in reducing or preventing swelling.
8. ACTION For patients in large casts (e.g., hip spica and body), place the bed in a slight Trendelenburg position for the first day or two to help prevent swelling, unless contraindicated by the patient’s condition or the physician’s orders.
RATIONALE Patients in large casts may experience swelling in the legs, thighs, perineum, buttocks, and lower abdomen during the first few days. Placing the bed at an approximate 10-degree angle in a Trendelenburg position will help prevent this swelling.
9. ACTION Turn the patient at intervals so that all surfaces of the cast are exposed to the air to facilitate even drying and to prevent skin pressure ulcers.
• When the cast is still wet, turn the patient hourly.
• As the cast dries, every 2 hours is sufficient unless the patient is uncomfortable.
• Get adequate help when turning the patient to prevent injury.
• Use pillows to prop the patient at different angles as the cast dries.
10. ACTION Instruct patient not to use sharp, pointed, or rigid items to scratch under the cast.
RATIONALE The skin under the cast often itches. Using such items to scratch can injure the skin. If itching is severe, ask for an order for medication to control it.
11. ACTION Smell the open edges of the cast to assess for infection under the cast.
RATIONALE Skin injuries may become infected or necrotic and cause a foul or musty odor.
12. ACTION Evaluate the cast by inspecting for crumbling or cracks. Ask yourself: Is there any discomfort under the cast? Is the cast rubbing the skin anywhere? Are the edges smooth? Is the cast drying evenly? Is swelling in the tissues subsiding?
RATIONALE Answers to these questions tell whether the interventions are successful in meeting the expected outcomes.
13. ACTION Document assessment findings and interventions on the daily flow sheet or in the nurse’s notes.
RATIONALE Verifies that assessment has been performed and interventions carried out.
Provide full instructions for cast care for the patient discharged home with a cast.
Instruct to use a hair dryer only on the “cool” setting to help dry the cast or relieve itching.
Demonstrate how to wrap a cast in plastic for showering, if appropriate.
Demonstrate how to handle the extremity when repositioning, supporting the joints.
Care of the patient in traction is time consuming because the patient’s mobility is severely limited. Skill 39-2 presents the points of care for the patient in traction.
Bandages Used to Support, Apply Pressure, or Immobilize: Elasticized bandages are applied to immobilize a joint, or to apply pressure to reduce swelling. They may also be used to provide support to a wound and hold dressings in place. Elastic bandages are made in rolls of varying widths; the heavy stretch material conforms to the body part and provides support (Box 39-4, p. 822).
Steps 39-2 on 822 show the technique for application of an elastic bandage. The same technique is used for gauze roller bandages. Different bandaging techniques are applied depending on the part to be bandaged.
Circular Turn.: Circular turns are used to anchor the bandage and to terminate the wrap. This turn is useful for bandaging the proximal aspect of the finger or wrist. Simply hold the free end of the rolled material in one hand and wrap it about the area, bringing it back to the starting point (Figure 39-13, A).
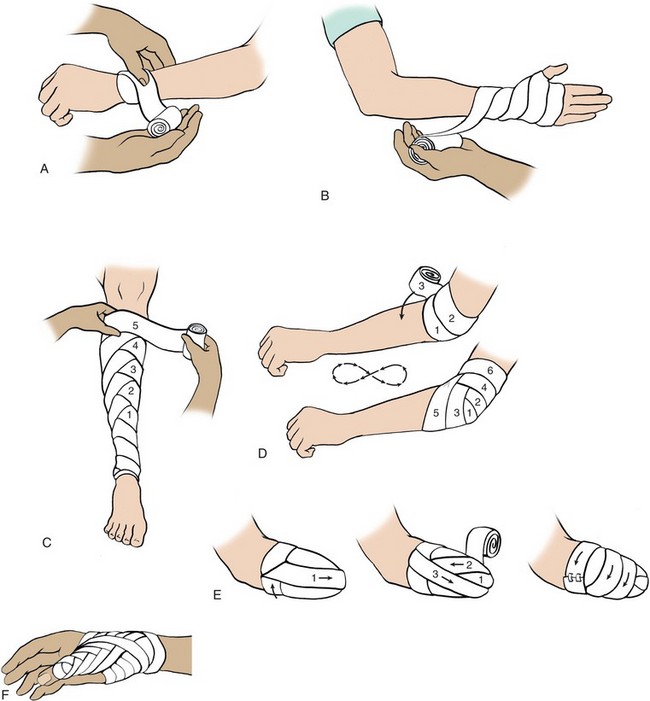
Spiral Turn.: This turn is used to bandage parts of the body that are uniform in circumference, such as the upper arm or upper leg. The spiral turn partly overlaps the previous turn. The amount of overlap varies from one half to three fourths of the width of the bandage (Figure 39-13, B).
Spiral Reverse Turn.: Spiral reverse turns are used to bandage body parts that are not uniform in circumference, such as the lower leg or forearm. After securing the bandage with circular turns, the bandage is brought upward at a 30-degree angle. The thumb of the free hand is placed on the upper edge of the bandage to hold it in place while it is reversed on itself. Unroll the bandage about 6 inches (15 cm) and turn the hand so that the bandage falls over itself. Continue the bandage around the extremity, overlapping each previous turn by two thirds the width of the bandage. Make each turn at the same position on the extremity so that the turns of the bandage are all aligned (Figure 39-13, C). Care should be taken not to apply undue pressure over a major blood vessel.
Figure-of-8 Turn.: Figure-of-8 turns are used to bandage and stabilize an elbow, knee, or ankle, or to immobilize and hold a fractured clavicle in position. Anchor the bandage with two circular turns. Bring the bandage above the joint, around it, and then below it, making a figure-of-8. Continue bandaging above and below the joint, overlapping the previous turn by one third to two thirds the width of the bandage (Figure 39-13, D). Secure the bandage above the joint with two circular turns and fasten it.
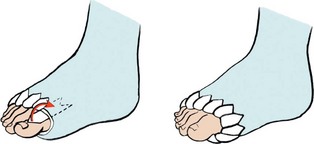
Recurrent Turn.: This turn is used to cover distal parts of the body, such as the end of a finger, the skull, or the stump left by amputation. The bandage is anchored by two circular turns. It is then folded back on itself and brought centrally over the distal end to be covered. Hold it in place with the other hand and bring the bandage back over the end to the right of the center bandage but overlapping it by two thirds the width of the bandage. Then bring the bandage back on the left side, overlapping the first turn by two thirds the width of the bandage. Continue alternating bandaging right and left until the area is well covered. Terminate the bandage with two circular turns and secure the end appropriately (Figure 39-13, E).
Thumb Spica.: This is a variation of the figure-of-8 bandage used to support the thumb in neutral position following a sprain or other injury. The technique can also be used to bandage the hip or shoulder. For the thumb, secure the bandage with two circular turns around the wrist. Bring the bandage down to the distal aspect of the thumb and encircle the thumb. If possible, leave the tip of the thumb exposed. Take the bandage back up and around the wrist, and then back down and around the thumb, overlapping the previous turn by two thirds the width of the bandage. Repeat the above steps, working up the thumb and hand until the thumb is covered (Figure 39-13, F).
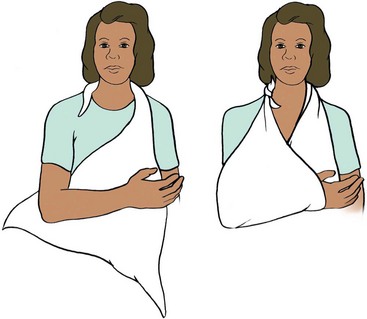
Immobilizing and Supporting with a Sling: A sling may be used to support and immobilize an injured wrist, elbow, or shoulder. The sling holds the extremity in an elevated position to avoid edema of the hand, pain and discomfort, and fatigue. A commercially made arm sling can be placed about the arm and the straps adjusted about the neck. If this type of support is not available, a triangular bandage sling may be used to support the injured upper extremity (Figures 39-14,Steps 3Figure 39-14, Steps 39-3).
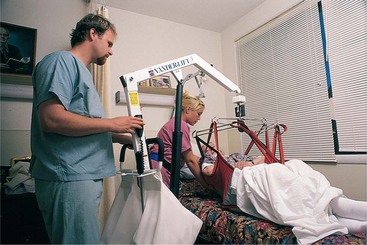
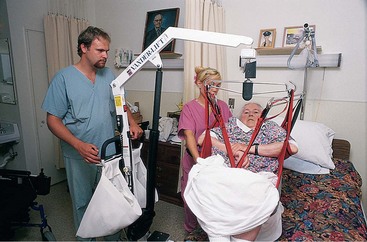
Using a Mechanical Lift to Transfer the Immobile Patient: Lifts can be used to move immobile patients from the bed to a stretcher, a chair, or a wheelchair and back again. Mechanical lifts, such as the Hoyer lift, consist of a sturdy metal frame with a wide base of support from which a canvas sling is suspended. The lift is on wheels and, when empty, can be easily moved by one person. A hydraulic pump device allows one nurse to lift the weight of the patient, but it takes two people to use a mechanical lift safely’one to raise and move the lift and one to guide the patient into the chair or onto the bed or stretcher. Such lifts are also used to place patients into a tub or whirlpool bath for bathing or hydrotherapy (massage or débridement by moving water).
Any patient requiring the use of a lift must never be left unattended in the lift or while in the tub or whirlpool bath. When using a lift, explain to the patient exactly what is being done. Many patients feel somewhat frightened being lifted off the bed or out of a chair by a mechanical device and may need a great deal of reassurance. However, the proper use of a mechanical lift allows the nurse to move weak or helpless patients safely while avoiding self-injury (Skill 39-3).
Skill 39-3 Transferring with a Mechanical Lift
Mechanical lifts allow immobile patients to be moved safely between two points some distance apart. A lift may also be used to elevate helpless patients while the bed is changed under them.
Review and carry out the Standard Steps in Appendix 3.
4. ACTION Position the chair, wheelchair, or stretcher correctly, clearing away any obstructions; set the brakes if applicable.
RATIONALE A clear floor is needed to maneuver the lift. Setting the brakes prevents the chair or stretcher from moving while transferring the patient.
5. ACTION Raise the far side rail, adjust the bed to working height, and lock the wheels.
RATIONALE Bed adjustment allows proper use of body mechanics and decreases the risk of injury to the patient and nurse. Locked wheels prevent the bed from moving while transferring.
6. ACTION Roll the patient onto the side and place the sling on the bed positioned from back of the head or the shoulders to mid-thigh; roll patient onto the sling.
RATIONALE Supports entire trunk and positions patient in sling for transfer.
7. ACTION Position the lift: Widen the stance of the base of the lift and lock it into place. Position the base under the bed so hooks for the sling are over the patient and in line with the hook openings on the sling.
RATIONALE Correct positioning prevents the lift from tipping during the transfer. Allows for easy attachment of the hooks to the sling.
8. ACTION Lower the sling hooks in a controlled manner, and attach them to the sling. Be certain hooks will not press into the patient’s skin when sling is elevated.
RATIONALE Controlling the hooks prevents them from striking the patient. Checking hook location prevents pressure damage to the patient’s skin.
9. ACTION Ask the patient to fold the arms over the chest; support the patient’s head.
RATIONALE Head must be supported if sling is not long enough to do so. One person supports the patient’s head and guides the sling as the other operates the lift.
10. ACTION Using the lift mechanism, elevate the patient in the sling until it clears the bed by several inches.
RATIONALE Allows unimpeded transfer of the patient to the chair or stretcher.
11. ACTION Roll the lift away from the bed while the second helper safely guides the patient over the chair or stretcher.
RATIONALE Keeps the patient secure and safe. Positions the sling for the transfer.
12. ACTION Use the pressure release valve to lower the patient slowly into the chair or onto the stretcher while the helper guides the patient’s body. Lower only enough to allow unhooking the sling.
RATIONALE Safely transfers the patient.
13. ACTION Unhook the sling, elevate the lift, and roll it away from the patient.
RATIONALE Prevents the hook assembly from striking the patient.
14. ACTION Position the patient in good alignment. Smooth the sling or remove it.
RATIONALE The patient is correctly and safely transferred and made comfortable.
15. ACTION Cover the patient with a blanket or sheet; place call light and needed items within reach. Secure the patient in the chair with a security vest, or on the stretcher as appropriate.
RATIONALE Promotes safety and comfort for the patient.
16. ACTION Monitor at least every 15 minutes for sitting tolerance if the patient is in chair.
RATIONALE If patient is unable to use a call light, place chair where it is visible to a nurse at all times, such as in the hallway near the nurse’s station.
17. ACTION With the help of an assistant, return the patient to the bed using the lift and following the same steps.
Allow patient to see how the lift works before attempting transfer of patient if at all possible.
In home situation, instruct caregivers thoroughly in use of lift. Use the life to transfer the caregiver to check the function of the lift and to acquaint caregiver with the process.
1. How would you handle the situation if your patient, who is to be transferred from the bed to a chair with a lift for the first time, is very frightened of this procedure?
2. Why do you think it is essential that the sling for the lift be attached exactly according to the directions that come with it?
Before placing a patient on the sling, be sure the skin is clean and dry. Protect the sling as needed with a sheet or bath blanket. If soiled, the sling must be washed with a disinfectant solution before using it again.
Assisting with Aids to Mobilization: Patients require aids to mobility for a variety of reasons, including recent trauma, corrective surgery, and loss of function as a result of stroke or other debilitating conditions. Although the use of ambulatory aids is often taught by a physical therapist or kinesiologist, it is important for you to know the proper techniques so that learning can be reinforced.
Whenever a patient is using an assistive device for mobility, it is important to keep floors clear of clutter and pathways well lighted. The assistive device should be placed within easy reach of the patient when not in use. In the home, the nurse should assess the main pathways the patient will be using and remove hazards.
Walkers.: A walker is frequently the first mechanical aid used when training an individual to walk following a loss of function. It is particularly helpful for patients who are weak or tend to lose their balance because it offers a broad base of support.
Walkers are rectangular tubular metal frames that are at least waist high and are open on one side. Most walkers have four rubber-capped tips that rest on the floor, although some have wheels on the front. There are handgrips on the side crossbars. Walkers are adjustable in height. The height is correct if the person’s elbow is bent at a 15- to 30-degree angle while standing upright and grasping the handgrips. To use a walker, the individual must have the use of both hands and arms and at least one leg. However, generalized weakness may still allow the patient to use a walker effectively.
Crutches.: Depending on the person and the need for assistance with ambulation, the use of crutches may follow the use of a walker or be the first aid to ambulation (Figure 39-15). Although there are a variety of styles of crutches, three basic types are most commonly seen. These are axillary, Lofstrand, and Canadian crutches. Lofstrand and Canadian crutches are shorter and are designed for patients who will permanently need crutches for mobility. Axillary crutches are commonly used for short-term needs. They are adjustable to a variety of heights using wing nuts and are relatively easy to use. They do present one real danger. Resting the body’s weight on the axillary bar puts pressure on vital nerves and can occlude blood vessels in the axilla, causing temporary or permanent damage, including paralysis. For this reason, it is critical that crutches be adjusted to the proper height and that the patient be instructed to avoid resting the body’s weight on the axillary bar.

Crutches need to adjust both in overall length and from the axillary bar to the handgrip. Measure with the patient standing or supine. If standing, be certain the patient’s shoes are on the feet. For standing measurement, position the crutches with tips at a point 4 to 6 inches (10 to 15 cm) to the side and 4 to 6 inches in front of the patient’s feet. The pads should be ½ to 2 inches (4 to 5 cm) below the axilla. For supine measurement, position the tips 6 inches (15 cm) lateral to the patient’s heel. The pad should be 3 or 4 finger breadths under the axilla. Adjust handgrips for both measurements so that the elbow is flexed 15 or 20 degrees when the palms of the hands are resting on the handgrips. When walking, the patient will need to straighten the elbow and the wrist during weight bearing. This should allow the axilla to pass freely over the axillary bar during forward movement (Box 39-5).
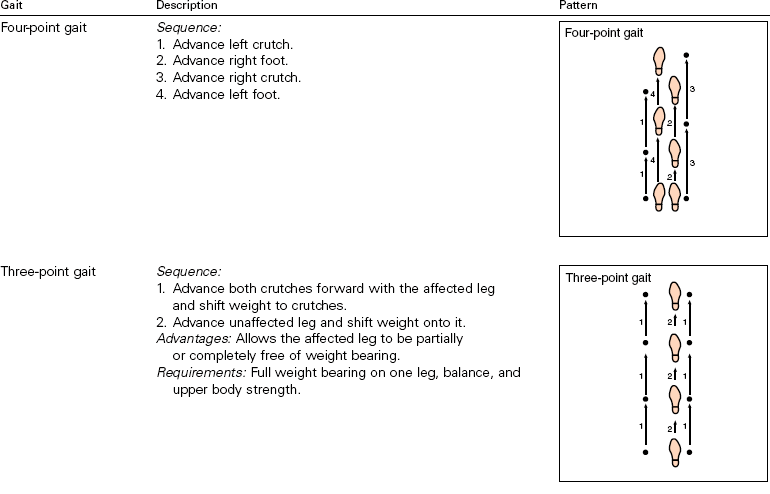
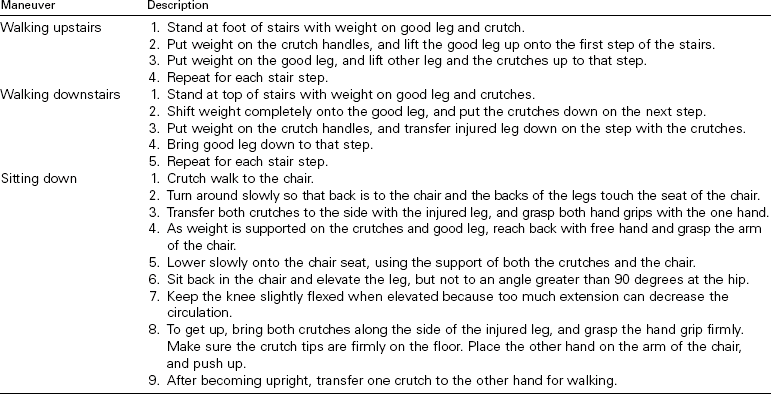
Patient Teaching 39-2 provides directions for the most common crutch gaits. Special maneuvers can be taught using Patient Teaching 39-3.

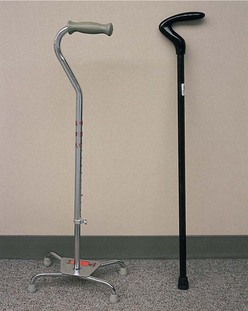
Canes.: The most commonly used canes are the standard (one-point) and the quad (four-point) cane (Figure 39-16). An advantage of a quad cane is that it will stand up by itself (Box 39-6).
Wheelchairs.: Wheelchairs are used for patients who are not able to ambulate either independently or with aids, such as crutches or a walker. Many paraplegics (those without use of the legs), quadriplegics (those without use of both arms and legs), amputees, and individuals with severe hemiparesis are dependent on wheelchairs for movement from place to place. Patients who are wheelchair dependent over the long term need chairs that are made specifically to their body measurements. When a patient brings a wheelchair to the hospital, see that it is clearly labeled with the owner’s name, and never take it for use by someone else.
When moving someone into or out of a wheelchair, always set the brakes. Be sure the person’s feet are correctly placed on the footrests and that clothing or lap robes are tucked safely away from the wheels. Shoes, slippers, or bed socks will protect the feet from direct contact with the cold metal footrests. To prevent accidents, keep patients in wheelchairs well away from stairwells, elevators, and doorways if left to sit stationary. Always have the brakes locked when the chair is not in motion.
Braces, Splints, and Prostheses for Stabilization.: Braces and splints are used to strengthen and support areas of the body affected by weakness or paralysis, such as the legs or back. They may also be used after surgery or trauma to immobilize a part while it heals. Braces and splints are generally made of plastic or metal pieces with padding and straps for attachment. A leg brace may be combined with a shoe. A back brace has metal staves sewn into the fabric; the fabric may be elasticized to provide more support.
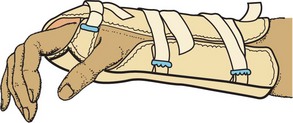
A wrist splint is a padded device with an inner metal frame. It is often used to relieve or prevent carpal tunnel syndrome that sometimes occurs with repetitive hand movements and to immobilize a sprained wrist.
Prostheses are used to replace body parts that are missing, either from birth or following amputation. They are specially fashioned to fit the particular patient and assist with lost function. It takes considerable time for a patient to adjust to the use of a prosthesis (artificial substitute for a body part).
All braces, splints, and prostheses have the potential to irritate and injure the tissues and must be monitored closely. The skin should be carefully evaluated during the initial assessment and then reassessed regularly throughout the hospital stay or at home. Any problems must both be noted in the chart and reported promptly to the physician. Handle prosthetic devices carefully as they are made for the specific individual, are expensive, and take many weeks to obtain. Label all the devices with the patient’s name and do not allow them out of the room unless in place on the patient.
Rehabilitation: As patients recover from immobilization or from serious illness that restricts usual activity, an exercise prescription may be written to improve muscle tone, joint flexibility, and/or cardiovascular fitness. Parameters for exercise are determined by a target heart rate during activity that is based on age and condition. In a healthy person, the target heart rate for aerobic activity is a minimum of 60% of the age-predicted maximum heart rate (subtract the current age from 220 and multiply by the percentage). The ideal training target is 80% of the age-predicted maximum heart rate.
Patients who have had a joint immobilized are often sent to an outpatient physical therapy facility for an individual exercise program to regain maximum strength and mobility of the joint and extremity.
Evaluation
Evaluation is performed daily by considering whether the specific expected outcomes have been met. Does the skin remain healthy, or are there signs of breakdown? Evaluate the breath sounds, and note any developing cough or signs of dyspnea. Observe the patient’s emotional status, including the attitude toward therapy or visitors. Is the patient alert and active in social interactions or withdrawn, hostile, or depressed? If nursing interventions are not achieving the expected outcomes, the plan of care needs to be changed. Evaluation statements indicating that some of the expected outcomes stated earlier are being met might be as follows:
• Performing sponge bath, mouth care, and grooming tasks except for left foot.
• Skin is clean, dry, and without redness or abrasion.
• Respirations normal with clear breath sounds bilaterally.
• Family and friends visiting daily with pleasant interactions.
• Patient is knitting and working on crossword puzzles daily.
• Watching television news show several times a day and discussing events with visitors.
• Asking if a haircut is possible and wants to wear own clothes.
Documentation: Each member of the health care team must maintain a written record of the treatment and its effects. Charting should include any changes in skin integrity, respiratory status, or signs of peripheral circulatory changes. Many aspects of assessment can be recorded on an activity/assessment flow sheet. Because of reimbursement issues, it is vital to document data that indicate a continuing need for use of pieces of equipment and aids to ambulation.
NCLEX-PN® EXAMINATION–STYLE REVIEW QUESTIONS
Choose the best answer(s) for each question.
1. A 56-year-old woman sustained a fracture of the right femur in an automobile accident. She is in balanced skeletal traction. Immobility causes negative effects on the cardiovascular system. The venous stasis that occurs with immobility can lead to the complication of _____________________________________. (Fill in the blank.)
2. You are to perform range-of-motion exercises three times a day with your patient who is immobilized. Range-of-motion exercise promotes circulation by:
1. thinning the blood so that it will move freely.
2. releasing the one-way valves in the veins and arteries.
3. contracting the muscles surrounding a vein, forcing blood to move toward the heart.
4. raising the temperature of the tissues, thereby decreasing blood viscosity so it flows more freely.
3. Passive range-of-motion exercises are performed to prevent the problem of:
4. In addition to good skin care and frequent turning, measures that may help prevent development of pressure ulcers in an immobilized patient are: (Select all that apply.)
1. have family encourage the patient to perform active ROM exercises on unaffected extremities.
2. restrict calories to reduce weight gain while immobile.
5. When assessing the patient with a new cast on the lower arm, if you find that the cast is tight and almost flush to the skin, you would first:
1. immediately call the orthopedic technician to come and check the cast.
2. elevate the extremity on two pillows, making certain it is higher than heart level.
3. report the finding to the charge nurse on the unit.
4. question the patient as to whether the arm has been kept in an elevated position.
6. A cast that is too tight can directly cause: (Select all that apply.)
1. pressure on nerves and nerve damage.
7. The amount of weight exerted by traction is determined by:
1. the amount of weight placed on traction ropes.
2. the height of the weight off of the floor.
8. When caring for traction pins and wires, it is most important to:
1. be very gentle when cleaning around them.
2. use strict aseptic technique to prevent infection.
9. You notice that the heel of the foot on your patient who is using a CPM machine is reddened. You should:
1. pad the portion of the machine that the heel rests on.
2. stop the machine and notify the physician.
3. reassess the area in 8 hours.
4. increase the angle of flexion of the joint to change the pressure on the heel.
10. After applying an elastic bandage to an ankle, you know it is too tight if:
CRITICAL THINKING ACTIVITIES ? Read each clinical scenario and discuss the questions with your classmates.
Margaret Thies, age 17, received multiple injuries in an automobile accident. She underwent surgery for a lacerated spleen and her right leg is in balanced traction due to two fractures. She will be on bed rest for an extended period.
Scenario B
Josh Polaski, age 11, has been treated in the outpatient clinic for a fractured ulna. A short-arm fiberglass cast has been applied.