Assisting with Hygiene, Personal Care, Skin Care, and the Prevention of Pressure Ulcers
Upon completing this chapter, you should be able to:
1 Describe the structure and function of the integumentary system.
2 Describe factors that influence personal hygiene practices.
3 Recall skin areas most susceptible to pressure ulcer formation.
4 Discuss risk factors for impaired skin integrity.
5 Discuss the purposes of bathing.
6 Describe how hygienic care differs for the younger and older patient.
1 Perform a complete bed bath and back rub.
2 Briefly describe how to prevent and stage a pressure ulcer.
3 Provide oral care for an unconscious patient.
4 Prepare to provide personal care for a patient, including nail care, mouth care, perineal care, and shaving.
5 Assist a patient with the care of contact lenses.
6 Instruct a patient in ways to prevent buildup of cerumen in the ears.
blanch (p. 290)
caries ( , p. 304)
cerumen ( , p. 289)
dermis ( , p. 289)
diaphoresis ( , p. 290)
epidermis (p. 289)
eschar ( , p. 292)
exacerbation ( , p. 302)
halitosis (p. 304)
 , p. 288)
induration ( , p. 292)
integumentary ( , p. 289)
maceration ( , p. 290)
melanin ( , p. 289)
reactive hyperemia ( , p. 290)
sebaceous ( , p. 289)
sebum ( , p. 289)
syncope ( , p. 301)
This chapter discusses assisting patients with hygiene and personal care. Hygiene is the practice of cleanliness that is conducive to the preservation of health. Assisting the patient with hygiene and personal care activities is an essential nursing function. The skin is the largest organ of the body and must be kept clean to prevent skin disorders and pressure ulcers. Proper care of the skin, hair, teeth, and nails promotes good health by protecting the body from infection and disease. In turn, this promotes a sense of well-being for your patient. You are responsible for maintaining safety, privacy, and warmth when providing or assisting patients in hygiene practices. You must also encourage patients to function at their highest level of independence.
APPLICATION of the NURSING PROCESS
The bath provides an excellent opportunity for assessment of the patient. Assess the individual factors affecting the patient’s hygiene as well as his ability to perform self-care. During a bath, assess the condition of the patient’s skin as well as his overall physical appearance, emotional and mental status, and learning needs.
Factors Affecting Hygiene: Hygiene practice is affected by such variables as sociocultural background, economic status, knowledge level, ability to perform self-care, and personal preference.
OVERVIEW OF STRUCTURE AND FUNCTION OF THE INTEGUMENTARY SYSTEM
What is the structure of the skin?
The integumentary system contains the skin, hair, nails, and sweat and sebaceous glands. The skin, the largest organ in the body, has two main layers’the epidermis and the dermis (Figure 19-1).
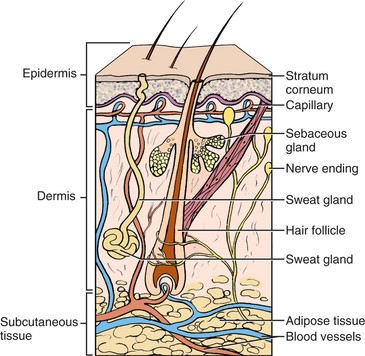
 The epidermis (outer, thicker layer) consists of stratified squamous epithelial tissue and does not contain blood vessels. It receives its nutrition by diffusion from vessels in underlying tissues. It is also called the stratum corneum.
The bottom layer of the epidermis contains melanocytes that secrete melanin, the main determinant of skin color.
The dermis (inner, thinner layer) is made of dense connective tissue that gives the skin strength and elasticity. It is also called the corium.
The dermis contains blood vessels, nerves, fibroblasts, the base of hair follicles, and glands; the nails are derived from the epidermis. Fibroblasts produce new cells to heal skin after injury.
Hair and nails are made of keratin and have no nerve endings or blood supply.
Sebaceous glands secrete an oily substance called sebum. Sweat glands secrete sweat, and ceruminous glands (modified sweat glands) secrete a waxy substance called cerumen.
Mucous membranes, although not strictly part of the integumentary system, line the cavities or passageways of the body that open to the outside, such as the mouth, digestive, respiratory, and genitourinary tracts. Like skin, they are made of a surface layer of epithelial tissue over a deeper layer of connective tissue.
What are the functions of the skin and its structures?
There are four main functions: protection, sensation, temperature regulation, and excretion and secretion.
The skin is the first line of defense in protecting the body from bacteria and other invading organisms. It protects tissues from thermal, chemical, and mechanical injury.
The sebaceous glands produce sebum, which helps make the skin waterproof by preventing water loss from underlying tissues and too much water absorption during bathing and swimming.
Melanin absorbs light and protects against ultraviolet rays. When exposed to ultraviolet light, the skin makes vitamin D, which is needed for absorbing phosphorus and calcium.
The skin has sensory organs for touch, pain, heat, cold, and pressure.
The skin regulates temperature by dilating and constricting blood vessels and activating or inactivating sweat glands.
Sweat glands assist maintenance of homeostasis of fluid and electrolytes. They serve as excretory organs because sweat contains nitrogenous wastes. As sweat evaporates, it produces a cooling effect. Sweat glands in the axillae and external genitalia also secrete fatty acids and proteins.
Sebum lubricates the skin and hair, keeping these structures softer and more pliable. It also decreases the amount of heat lost and bacterial growth.
Mucous membranes protect against bacterial invasion, secrete mucus, and absorb fluid and electrolytes.
What changes in the system occur with aging?
Skin wrinkles and sags from the loss of elastic fibers and adipose tissue in the dermis and subcutaneous layers. This causes the skin to be thinner and more transparent.
The loss of collagen fibers in the dermis makes the skin more fragile and slower to heal.
Dry and itchy skin is caused by the decreased activity of the sebaceous glands.
Temperature control is altered by the decreased sebaceous gland activity and the loss of density of the skin. This results in intolerance to cold and puts the person at risk for heat exhaustion.
Hair becomes thin and grows more slowly because the number of hair follicles decreases. Hair loses its color from the loss of melanocytes at the hair follicles.
One of the most basic factors is a patient’s sociocultural background. Different cultures have different views on hygiene practices. In some cultures, people do not use deodorant products or bathe daily. Other cultures consider the use of deodorant products and a daily bath essential. The economic status of a patient may affect that patient’s hygiene because the money for supplies may or may not be available. The patient may have a lack of knowledge of a particular aspect of hygiene. The ability to perform self-care may be affected by the patient’s mental or physical condition, which may be temporarily altered because of illness or injury. The last factor affecting hygiene practice is personal preference. One patient may prefer to bathe at night, whereas another may prefer to bathe every 2 days.
Self-Care Abilities: You need to assess your patient’s ability to provide self-care by assessing cognitive and physical function. Are there any factors such as poor vision, decreased sense of touch, or limitations in range of motion that interfere with self-care? Are coordination, muscle strength, and balance adequate? A patient with limitations in these areas may need additional, if not total, help with hygiene.
Skin and Pressure Ulcers: Chapter 18 states that a pressure ulcer is an ulcer that forms from a local interference with circulation. The interference with circulation causes the skin to blanch (turn white or, in darker skin, become pale). If the pressure is relieved at this point, the skin will become red or a darker color because of vasodilation (Cultural Cues 19-1). This process in which the blood rushes to a place where there was a decrease in circulation is called reactive hyperemia.
Risk Factors for Pressure Ulcers.: Chapter 18 also notes that pressure and shearing forces can cause the development of pressure ulcers. The Agency for Healthcare Research and Quality (AHRQ) (formerly known as the Agency for Health Care Policy and Research) lists five risk factors in the development of pressure ulcers (Box 19-1).
The first two risk factors deal with a patient’s mobility. If a patient is confined to a bed or chair, the same areas of the body sustain pressure. This also happens if a patient cannot independently change position, such as a patient who is paralyzed, is unconscious, or has recently had a major orthopedic procedure.
Incontinence (loss of bowel and/or bladder control) puts the patient at risk for ulcer development. Skin that is frequently wet leads to maceration (the softening of tissue that increases the chance of trauma or infection). Diaphoresis (perspiration) or not drying a patient properly after a bath also places a patient at risk due to moisture.
A balanced diet is necessary to prevent ulcer development. Without proper nourishment, the body’s cells, capillaries, and tissues are easily damaged.
Lowered mental awareness may predispose a patient to pressure ulcers. Patients with impaired cognition may not realize they have been in the same position for a prolonged period because they have lost the concept of time. Lowered mental awareness may be caused by medication, anesthesia, or health problems.
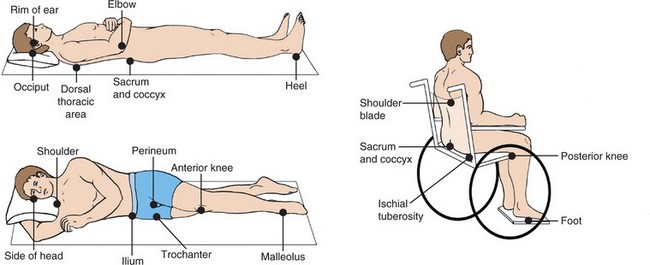
Skin Assessment for Pressure Ulcers.: Perform a skin assessment for pressure ulcer risk upon admission. A commonly used tool is the Braden Scale for Predicting Pressure Sore Risk (Figure 19-2). After the initial assessment, reassess every 24 hours. This may be done while you are bathing your patient. Pay attention to the skin over bony prominences (Figure 19-3). Check the areas that had pressure when turning and repositioning your patient.
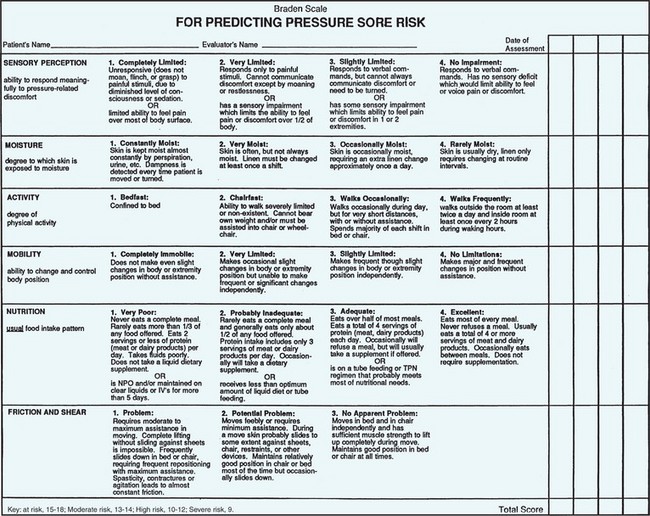
FIGURE 19-2 Braden Scale for Predicting Pressure Sore Risk. (Key: IV, Intravenous; NPO, nothing by mouth; TPN, total parenteral nutrition.)
The AHRQ states that redness can normally be expected to be present for one half to three fourths as long as the pressure prevented blood flow. If the redness subsides during this time, or the area blanches from fingertip pressure, then damage to the tissues is not expected. For example, your patient has been in a supine position for an hour and is now turned to a right side-lying position. You notice a 1-inch diameter area of redness on the sacrum. If there has not been damage, then you expect the redness to subside in 30 to 45 minutes. If the redness persists after that time, then the pressure has damaged the skin and the underlying tissues because they have not received an adequate supply of blood, oxygen, and nutrients. Unrelieved, the damage eventually will lead to tissue necrosis and a pressure ulcer.
If you note a reddened area when repositioning, reassess later to check to see if reactive hyperemia is present. If the redness remains and the skin does not blanch to fingertip pressure, then the patient has a stage I pressure ulcer.
The National Pressure Ulcer Advisory Panel (2007) has issued an updated staging system for pressure ulcers (Figure 19-4):

Suspected Deep Tissue Injury: Localized discolored intact skin that is maroon or purple or a blood-filled blister resulting from damage to underlying soft tissue from pressure or shear. The area may be painful, firm, mushy, boggy, warmer, or cooler when compared to adjacent tissue.
Stage I: An area of red, deep pink, or mottled skin that does not blanch with fingertip pressure. In people with darker skin, discoloration of the skin, warmth, edema, or induration (area feels hard) may be signs of a stage I pressure ulcer.
Stage II: Partial-thickness skin loss involving epidermis and/or dermis. It may look like an abrasion, blister, or shallow crater. The area surrounding the damaged skin may feel warmer.
Stage III: Full-thickness skin loss that looks like a deep crater and may extend to the fascia. Subcutaneous tissue is damaged or necrotic. Bacterial infection of the ulcer is common and causes drainage from the ulcer. There may be damage to the surrounding tissue.
Stage IV: Full-thickness skin loss with extensive tissue necrosis or damage to muscle, bone, or supporting structures; sinus tracts may be present. Infection is usually widespread. The ulcer may appear dry and black, with a buildup of tough, necrotic tissue (eschar), or it can appear wet and oozing.
Unstageable: Loss of full thickness of tissue. The base of the ulcer is covered by eschar (tan, brown or black) in the wound bed, or the base of the ulcer contains slough (yellow, tan, gray, green, or brown).
The AHRQ states that during staging, it is important to be aware of the following:
• Stage I ulcers may be just superficial, or may be a sign of deeper tissue damage.
• Stage I pressure ulcers are not always accurately assessed in people with darker skin.
• When eschar is present, the ulcer cannot be staged accurately. Eschar must be removed to stage the ulcer.
• It may be difficult to assess pressure ulcers if your patient has a cast or other orthopedic device, or support stockings. Extra care is necessary to assess ulcers in these instances.
Healing pressure ulcers are not “reverse staged.” The ulcer is called a “healing stage’pressure ulcer.” Document by objective description and measurement.
Prevention of Pressure Ulcers.: Excellent nursing care is the main factor in the prevention of pressure ulcers. It is your responsibility to be aware of any risk factors your patient may have and attempt to lessen them. Safety Alert 19-1 describes measures helpful in preventing pressure ulcers. Prevention is less time-consuming and less costly than pressure ulcer treatment (Legal & Ethical Considerations 19-1).
Treatment and Care for Pressure Ulcers.: The AHRQ states that the most effective method of pressure ulcer treatment is through a team approach. The team should consist of the patient, the family or caregivers, and health care providers. Treatment options should be explained, and the patient should be encouraged to be an active participant. The plan needs to be consistent with the individual patient and family preferences, goals, and abilities. Include education on how pressure ulcers develop and how to prevent additional ulcers.
The initial care of a pressure ulcer involves débridement, wound cleansing, and the application of dressings. In many cases, the ulcer is infected and antibiotic therapy is used. Surgery is needed to repair some pressure ulcers. Wound care is discussed in more depth in Chapter 38.
Nursing Diagnosis
Nursing diagnoses for a patient who might have problems with hygiene and/or skin integrity are listed in Box 19-2. To individualize the care plan, add the defining characteristics to the nursing diagnosis stem based on the information you obtained regarding your patient.
Planning
The data collected during the assessment will give you information you need to plan hygiene care. Include the patient’s ability to perform the hygiene tasks and any personal preferences or habits. Efforts should be madeto help the patient maintain body image. Educational needs and the home environment must also be considered.
Nursing goals for hygiene might include the following:
• The patient’s skin integrity will be maintained.
Planning must include the times during the day that care will be needed. Box 19-3 describes common times and the types of hygiene care provided during the course of a day.
Implementation
Bathing: There are four basic purposes for bathing: (1) cleanse the skin, (2) promote comfort, (3) stimulate circulation to all areas of the body, and (4) remove waste products secreted through the skin.
Water should be warm but should not burn the patient (approximately 105° F [40.5° C], or according to policy). When water cools, replace it. Bed rails must be up when away from that side of the bed since the bed is raised to working height. Fully draw curtains around the bed to maintain privacy. There should not be any gaps that may expose the patient to others in the room. Place a sign on the outside of the door to indicate that a bath is in progress. Appropriately drape the patient; only the part of the body being bathed should be exposed at any one time. Draping prevents chills and promotes warmth and comfort. Closing the patient’s door and windows provides warmth by decreasing drafts. Encourage the patient to be independent, but offer assistance as needed. Depending on the patient’s ability and activity level, you may need to give either a partial or complete bath.
Types of Baths.: A bath may be cleansing or therapeutic, and complete or partial. A complete bath is when all areas of the patient’s body are washed. The term partial bath has two different meanings depending on your institution. In one case it means only certain parts of the body are bathed, such as the face, hands, axillae, back, and perineal area. In the other case a partial bath means a complete bath is done’partially by the patient (the areas that can be reached) and partially by you (all other areas) (Assignment Considerations 19-1).
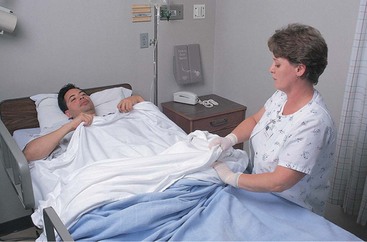
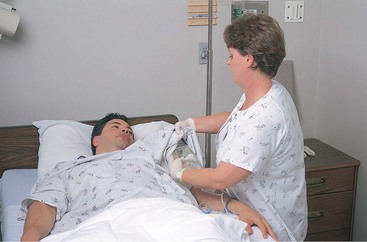
Cleansing Baths.: The most common type of bath is a cleansing bath. It is generally provided in either a bed, tub, or shower. Bed baths are given to patients who are unable to use a tub or shower. Skill 19-1 details how to administer a bed bath.
Skill 19-1 Administering a Bed Bath and Perineal Care
A complete bed bath is given when the patient is dependent and unable to provide hygiene self-care. Examples of such instances are patients with severe pain, injuries, or diseases that limit movement, or when the physician has ordered that the patient not expend the energy to self-bathe. In some instances, special perineal care is ordered.

RATIONALE Provides easy access to equipment needed for hygiene and personal care bathing.
3. ACTION Explain the procedure to the patient.
RATIONALE Decreases fear of the unknown and prepares patient.
4. ACTION Prepare environment for bathing’close doors and windows, adjust room temperature if necessary, pull curtains around bed, and place a sign (“Bath in progress”) on the door.
RATIONALE Promotes comfort by warming room and decreasing chance of drafts. Placing sign on door provides privacy.
5. ACTION Offer bedpan or urinal.
RATIONALE Provides comfort and decreases chance of interruption during bath.
6. ACTION Perform hand hygiene. Wear gloves if you or patient has any broken skin. Gloves must be worn while cleansing perineal area.
RATIONALE Reduces transfer of microorganisms.
7. ACTION Raise the side rails and raise the level of bed to a comfortable working height. Lower rail on side closest to you and position patient in a comfortable position close to you.
RATIONALE Promotes proper body alignment because work is at your center of gravity. Provides comfort for patient.
8. ACTION If a bath blanket is available, fan-fold the blanket horizontally and place it across patient’s chest. Ask the patient to hold the top edge of the bath blanket. Pull the blanket and the covers to the foot of the bed. Remove the top covers out from underneath the bath blanket. Use the top sheet if a bath blanket is not available for a drape.
RATIONALE Drapes patient, protecting privacy.
9. ACTION Remove linens as directed in Skill 20-2.
RATIONALE Prepares linens to be replaced on bed.
10. ACTION Remove patient’s gown, being careful to keep patient draped. If the patient has an intravenous (IV) line in place, remove the gown by gently pulling the gown off the patient’s arm over the IV line without pulling on the line or disturbing the IV cannula. Lift the IV bag and tubing and thread them through the sleeve from the outside toward the inside of the gown to free the gown.
RATIONALE Prepares patient for bathing. Careful removal of gown protects the IV site.
11. ACTION Raise the side rail while preparing the bath water. Water should be warm and checked with either a bath thermometer or the inside of your wrist. Do not leave the soap in the water. Change water when it cools or becomes soiled, or a soap film develops.
RATIONALE Provides for safety. Warm water is soothing, and maintaining warm clean water is comforting.
12. ACTION Lower rail and remove the pillow under the patient’s head or place a towel over the pillow. Make a bath mitt by grasping the washcloth at an edge and folding one third of it over your fingers. Bring the opposite edge across your fingers and hold it with your thumb. Bring the top end of the cloth down to your palm and tuck that end under the lower edge.
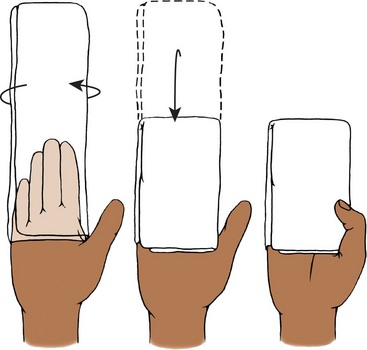
RATIONALE Provides better control of the washcloth; loose ends do not drag across patient. Loose ends cool quickly and chill the patient.
13. ACTION Fold drape to expose only the area being cleaned. Spread a towel across the patient’s chest.
RATIONALE Protects patient privacy and prevents chills.
14. ACTION Ask the patient about preference of using soap on the face. Moisten the bath mitt with water and wash one eye area from the nose to the outer edge near the ear; use a separate part of the mitt to wash the other eye area. Do not use soap near eyes. Wash patient’s face and neck. Dry well. Rinse cloth and wash forehead from the center to each side; wash the rest of face, using a circular motion around the mouth. Rinse and dry the face well. Wash, rinse, and dry each ear and the neck. Patient may wash own face if able.
RATIONALE Using different parts of the cloth to wash eye area prevents moving bacteria from one eye to the other. Rinsing well prevents the soap from drying the skin.
15. ACTION Place a towel under the far arm, make a bath mitt, use soap, and wash the entire arm with long, sweeping strokes from distal to proximal (toward the axilla). Give special care to the axilla with extra soaping. Rinse and pat dry well. Wash the hands and fingers, rinse, and dry. Move the towel, and wash and dry the near arm and hand in the same manner.
RATIONALE Towel protects the mattress from getting wet and is available for drying. Washing distal to proximal promotes circulation. Bacteria collect in the sweat gland areas, and extra cleansing of axilla is needed to remove secretions and decrease body odor.
16. ACTION Keep the towel in place over the patient’s chest and pull the drape down to the waistline. Make a bath mitt and wash under the towel over the entire chest; wash breasts with a circular movement. Wash skin folds under the female patient’s breasts by lifting each breast. Rinse and dry well, paying special attention to skin fold areas. Fold the drape to the top of the pubic bone and wash the lower abdomen; rinse and dry well.
RATIONALE Washing in sections provides privacy and protects the patient from chills.
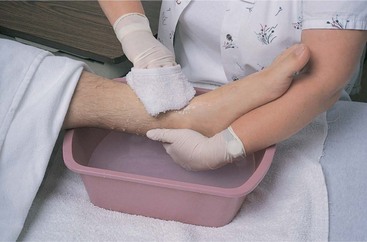
17. ACTION Expose the far leg, and tuck the bath blanket around the patient to prevent chilling. Flex the leg and place a towel lengthwise on the bed. Wash from the foot to the knee with long sweeping strokes and then from the knee to the hip in the same manner. Rinse and dry the leg well. Place the bath basin on the towel and lift the foot, placing your hand under the heel, and place it into the water. Wash the foot and dry it. Dry each toe separately, and place the leg and foot under the drape. Wash the near leg in the same manner.
RATIONALE Tucking bath blanket around patient keeps the patient warm. Stroking from distal to proximal encourages venous return. Placing the foot into warm water is soothing and comforting to the patient.
18. ACTION Change the bath water after washing the legs and feet.
RATIONALE Prevents using water that has been used on the feet on other parts of the body.
19. ACTION Turn the patient to the side, place a towel lengthwise along the back, and wash the back with long, sweeping motions. Rinse and dry well. Then wash the folds of the buttocks and anus well. Wear gloves if patient is incontinent of stool or has diarrhea. Offer a back rub at this time.
RATIONALE Towel protects mattress frommoisture.
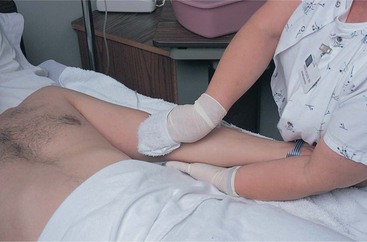
20. ACTION Change water and washcloth. Provide privacy for the patient to wash the genital area. If patient is unable, put on gloves if not done in Step 6; place an underpad beneath the perineum to protect the mattress and wash the area thoroughly, rinse well, and pat dry carefully. For the female patient, wash from the front to the back. For the uncircumcised male patient, retract the foreskin and clean the head of the penis, rinse, and reposition the foreskin. Lift the scrotum and clean the area well. If a catheter is in place, carefully wash around it with soap and water, and rinse the area. Dry the penis and scrotum. Remove the underpad.
RATIONALE Promotes privacy because many patients wish to wash their own perineum. Cleanses areas patient cannot manage. Washing around a catheter removes body secretions.
For Specially Ordered Female Perineal Care
21. ACTION Place the patient in the dorsal recumbent position in bed. Drape with a bath blanket diagonally (it should look like a diamond resting on the patient). Take the point of the bath blanket by the patient’s feet and fold it up to the pubic area. Place the outer sides of the bath blanket over the patient’s knees and wrap the corners around each foot.
RATIONALE Provides privacy and prevents chills.
22. ACTION With gloves in place, remove any peripad or dressings and observe characteristics of the drainage. Discard soiled items in a sealable plastic bag.
RATIONALE Standard Precautions must be used when handling items soiled with body substances.
23. ACTION Slip underpad under the patient’s hips and position patient on the bedpan as described in Chapter 29. Raise the head of the bed slightly or use pillows to support the patient’s head.
RATIONALE Underpad prevents soiling the linens and mattress. Positioning patient prevents back strain by supporting the head and shoulders.
24. ACTION Carefully pour warm water or the prescribed solution over the perineal area to rinse off urine, feces, or vaginal drainage.
RATIONALE Cleanses outer perineum.
25. ACTION Use nondominant hand to separate the labia majora, and, with downward strokes from the pubic area to the rectum, cleanse the skin folds with cotton balls, gauze pads, or a washcloth. Use only one downward stroke with each gauze pad, cotton ball, or portion of the washcloth. Rinse and pat area dry with clean towel or fresh gauze pads. Remove the underpad and replace peripad or redress as needed.

RATIONALE Cleaning with downward strokes prevents carrying bacteria from the dirty rectal area up to the vaginal area and urinary meatus. Peripad or dressing provides for collection of secretions.
26. ACTION Put a clean gown on the patient. If the patient has an IV in place, lift the IV bag and line and put it through the sleeve of the gown from the inside of the gown to the outside, just as the arm will go through the sleeve. Then, carefully place the patient’s arm through the sleeve of the gown. If a patient has a weak or paralyzed side, dress this extremity first.
RATIONALE Maintains IV site and prevents the IV cannula and tubing from coming apart. Dressing is more comfortable and easier for the patient and you.
27. ACTION Complete personal care by combing the patient’s hair, caring for fingernails and toenails, and permitting the male patient to either shave himself or be shaved (see Steps 19-2).
RATIONALE Increases patient’s sense of well-being and self-esteem.
28. ACTION Lower the bed, lower unneeded side rails, and restore the unit. Empty, rinse, and wipe out the basin before returning to storage.
RATIONALE Makes patient comfortable and safe. Cleaning basin prepares it for next use; wiping removes soap scum that rinsing alone leaves behind.
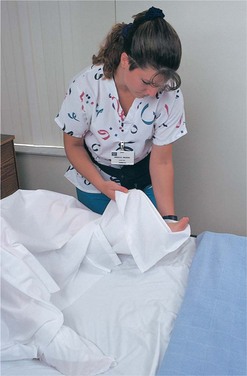
29. ACTION Make the occupied bed if needed (see Skill 20-2).
RATIONALE The patient who needs a bed bath may not be able to get out of bed.
31. ACTION Document on the flow sheet or in the nurse’s notes depending on agency policy. Note type of bath performed or given, the patient’s tolerance of the procedure, any teaching done, and any abnormalities found during the bath.
RATIONALE Validates effectiveness of nursing care and notes teaching provided.
1. You are a male nurse and scheduled to care for a mature woman patient from southern Asia (Indiaor Korea). Does your patient’s culture have any implications for you? Why or why not?
2. The patient in your assignment is the same age as you but of the opposite sex. You will need to provide special perineal care to this patient. What is the best approach in completing this task?
3. Describe three things you would do to promote the comfort of your patient during a complete bed bath.
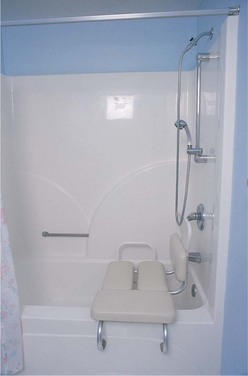
Steps 19-1 on pp. 300–301 explain the procedures for providing a tub bath or shower. Offer the use of the toilet before running the bath water or placing the patient in the tub or shower. A shower chair or bath bench and grab bars are used for the patient who is weak or not ambulatory (Figure 19-5, p. 301). If the patient does not have a problem with balance, assist the patient into a tub that is half filled with warm water. Once the patient is in the tub/shower, add warmer water as desired. A call bell should be within easy reach of the independent patient. Check on this patient every 5 minutes and inform the patient that the bath should not exceed 15 to 20 minutes (Communication Cues 19-1, p. 301).
Provide a towel for the patient to drape the genital area while in the tub to decrease embarrassment. Nursing Care Plan 19-1 on p. 302 presents one plan for hygienic care.
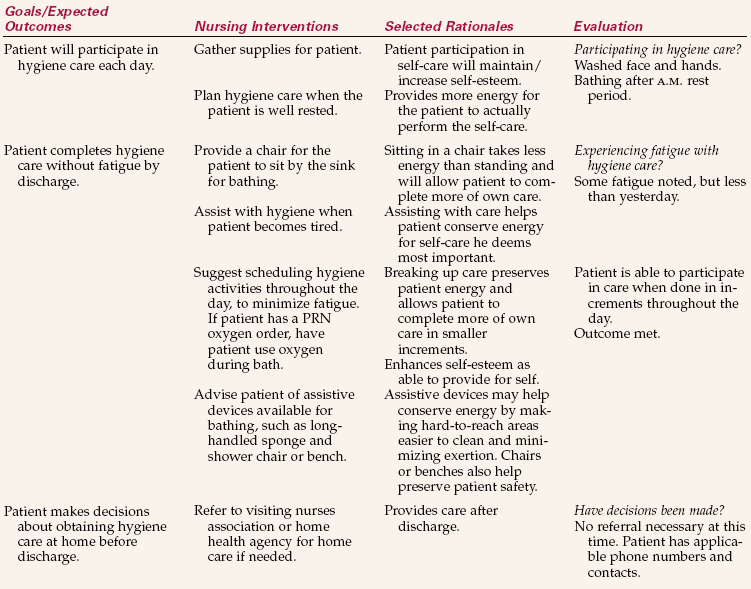
NURSING CARE PLAN 19-1 Care of the Patient with a Self-Care Deficit
Herman Gray, age 67, has a diagnosis of exacerbation (an increase in the severity or symptoms of a disease) of chronic obstructive pulmonary disease. Mr. Gray is widowed and lives alone. He was admitted to your unit this morning, and you devised the following plan for hygiene care.
Fatigue/Self-care deficit in bathing/hygiene related to intolerance to activity. Supporting Assessment Data Subjective: States “I get too tired standing at the sink to wash myself.” Objective: Visibly tired with minimal activity. Becomes short of breath with exertion.
Therapeutic Baths.: Therapeutic means having healing or medicinal qualities. Therapeutic baths are performed to achieve a desired effect and include several types. A whirlpool bath is done in a bathtub or special whirlpool tub that has a device that agitates the water. The heat of the water and agitation gently massage the skin. Whirlpools are used to cleanse, stimulate peripheral circulation, and provide comfort. Starch or oatmeal baths are used for patients with dermatitis. Plain instant oatmeal is added directly to the bath water until the desired consistency is reached. Commercial products are also available and are added accordingto package directions. The skin is patted dry afterthe bath so the nerve endings are not stimulated by rubbing.
Sitz baths are used to apply moist heat and clean the perineal or anal area (Figure 19-6). The bath promotes healing and relieves pain and discomfort. It is commonly used after birth and vaginal or rectal surgery. Body soaks are usually indicated to cleanse open wounds or apply medicated solutions to an area. Feet and arms are the parts of the body most often soaked. Cooling sponge baths are also known as tepid sponge baths. An order is usually needed before this type of bath may be used to bring down a fever. A cool sponge bath can be soothing but also may be uncomfortable if the patient’s fever is high.
Variations of the Bed Bath.: A bag bath is a variationof the bed bath. Instead of using a basin, a self-contained bag with several premoistened disposable cloths is used. The cloths are moistened with a cleansing agent that does not need rinsing. They may be heated or used directly from the bag. The bag contains many cloths, so a different cloth may be used for different body parts. The major disadvantage to this system is that it is more costly.
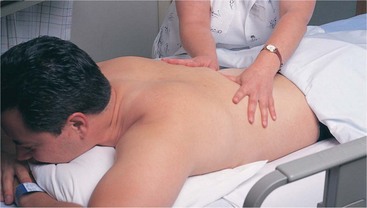
Back Massage: A back massage is an important part of hygiene care and involves the sense of touch. Benefits of the back rub include the following:
• Fosters trust in the nurse-patient relationship
• Provides an opportunity to assess the skin on the back
Box 19-3 notes that a back rub should be performed with morning care and at bedtime. It is essential to provide one to patients confined to bed. Oils, lotions, or powder may be used according to patient preference and the skin’s condition. Avoid open wounds and areas of pressure injury while performing a back rub.
Use more pressure on the up strokes toward the head and less pressure on downward strokes. The pressure should be firm but should not cause tensing or discomfort for the patient. After a few minutes, rub in any remaining lotion using short circular strokes, paying particular attention to the shoulders and neck. During the back rub, remember the following safety/comfort issues:
• Move the patient close to you to maintain proper body mechanics to prevent self-injury.
• Raise the bed to an appropriate height and lower only the rail on the side where you are standing during the back rub.
• Make sure your hands are warm and relaxed before beginning. If using lotion or oils, warm them in your hands before placing them on the patient. Cool hands and cold lotions cause the patient to tense and pull away.
An effective back rub should last approximately 3 to 5 minutes (Figure 19-7).
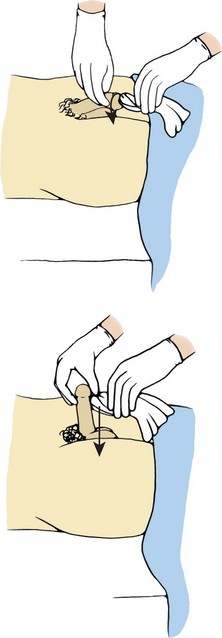
Perineal Care: Usually a patient will accept your assistance with perineal care, although a few will try to avoid it because they feel embarrassment. Perineal care may cause embarrassment to you and the patient as a result of your close contact with the genital area. Proper draping helps promote comfort with the procedure (Figure 19-8). You can reduce your feelings of embarrassment if you re member your purpose is to assist the patient. Explain the procedure to reassure the patient and gain cooperation in the task. Maintain a matter-of-fact attitude and be objective; avoid any sexually suggestive conversation or actions. A professional and dignified attitude can help reduce any embarrassment.
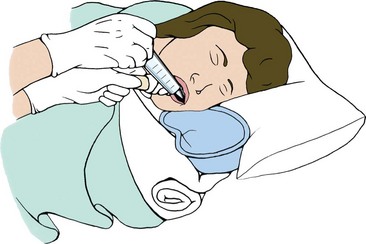
Mouth Care: Mouth care removes food particles and secretions, which prevents halitosis (bad breath), feelings of uncleanliness, and dental caries (cavities). Oral hygiene promotes a better appetite and maintains the healthy state of the mouth, gums, teeth, and lips. It must be provided on a regular basis; ideally, offer it four times a day as noted in Box 19-3.
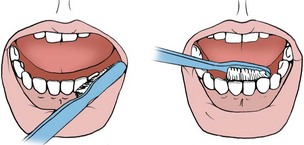
Mouth Care for the Conscious Patient.: To assist a patient with mouth care, raise the head of the bed 45 to 90 degrees. Wear gloves when providing or assisting with mouth care. If the patient is unable to sit up, turn the patient to the side facing you. Place a towel under the chin. Moisten the toothbrush with water or mouthwash and spread it with toothpaste or tooth powder. Brush from the gum line to the edge of the teeth. All surfaces of each tooth should be brushed (Figure 19-9). Have the patient rinse the mouth and spit the solution into the emesis basin. Repeat as desired or necessary. Provide the patient with a cloth or tissue to wipe the mouth when finished.
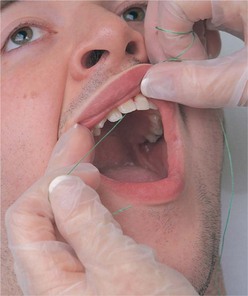
To assist the patient to floss the teeth, obtain 12 to 15 inches of floss. Loosely wrap the ends of the floss around the index finger on each hand and work the floss between each tooth. Slide the floss gently down to the gum line, pulling the floss back and forth. If toothpaste is applied before flossing, then the fluoride can come into direct contact with the tooth surfaces to prevent dental caries. Rinse and wipe the mouth again. Report any excessive bleeding of the gums after flossing.
Mouth Care for the Unconscious Patient.: A patient who is unconscious should be provided full mouth care at least once every 8 hours. If the patient is mouth-breathing, care should be done every 4 hours. Mouth-breathing causes the tongue to dry and become crusty. The dry secretions need to be removed because they cause halitosis and may obstruct airflow. Moist swabbing of the mouth is done every 2 hours or as needed to maintain the integrity of the oral cavity. Mouth care of the unconscious patient is described in Skill 19-2.
Skill 19-2 Administering Oral Care to the Unconscious Patient
Unconscious patients require frequent mouth care. Cleansing is especially important for these patients because they often breathe through their mouths, which leads to dryness and crusting of the area.
2. ACTION Gather supplies and place on paper towels on the over-the-bed table.
RATIONALE Provides easy access to equipment. Paper towels keep table clean.
3. ACTION Explain the procedure to the patient.
RATIONALE Provides stimulation as unconscious patients may be able to hear.
5. ACTION Raise bed level to comfortable working height. Turn patient laterally on side of bed nearest you. Lower side rail.
RATIONALE Promotes good body mechanics; work is at your center of gravity.
6. ACTION Turn on the suction and place the suction device under the corner of the pillow near you. Put a towel under the patient’s head and the emesis basin beneath the patient’s mouth and chin.
RATIONALE Readying suction device provides for immediate use of suction in case patient gags. Towel and basin keep gown and linens clean.
7. ACTION Wear gloves. Use toothettes or toothbrush and toothpaste to cleanse the teeth and mouth. Use hydrogen peroxide (half strength) and mouthwash or water to clean the interior of the cheeks, roof of the mouth, teeth, and tongue. A 4 × 4 gauze pad may be wrapped around an index finger or tongue blade to remove crusts. Repeat as necessary.
RATIONALE Observes Standard Precautions. Hydrogen peroxide and mouthwash or water are good cleansing agents. Removing crusting and debris maintains a healthy mouth.
8. ACTION Floss by holding a 12- to 15-inch piece of floss with the ends wrapped around the middle finger of each hand. Using index fingers and thumbs, gently work floss between each tooth, moving down to gum line and back up to tooth edge.
RATIONALE Removes tartar and plaque.
9. ACTION With the patient’s head turned to the side, intermittently rinse the mouth by gently squirting water in with the syringe; use the suction device to remove water and debris.
RATIONALE Using small amounts of water and turning the head to the side to promote drainage reduce risk of aspiration.
10. ACTION Wipe the patient’s mouth and lubricate the lips and corners of the mouth with water-soluble lubricant.
RATIONALE Prevents drying of lips and cracking.
11. ACTION Explain to the patient that you have finished the procedure.
RATIONALE Provides stimulation because unconscious patients may be able to hear.
12. ACTION Remove gloves and dispose of them properly. Reposition patient, raise side rail, and lower bed.
RATIONALE Proper removal and disposal of gloves prevents spread of microorganisms. Repositioning patient and restoring unit promote safety and comfort.
13. ACTION Clean supplies and tidy unit.
RATIONALE Readies equipment for next use and straightens patient’s environment.
1. Complete oral care is necessary for the patient who is comatose. What precautions will you take to ensure this patient’s safety and your own?
2. Every 8 hours, complete oral care is needed for the comatose unconscious patient. Will you perform any other actions between the full care? If so, what?
3. What purpose does talking to the patient during the procedure serve?
Denture Care.: Patients with dentures who are confined to bed, comatose, or weak or who have trouble with hand and finger dexterity may need you to assist with or provide care for their dentures. Dentures should be cleaned to prevent irritation to the gums and infection. A patient may use an adhesive for a better fit. Usually, a patient who uses adhesive does not like to remove the dentures during the day. Care should then be provided in the morning and at bedtime. Do not place dentures on a meal tray because they are often lost when the trays are removed. When not in the mouth, dentures should be kept in a labeled denture container containing water or normal saline. Skill 19-3 details how to clean dentures.
Dentures must be cleaned at least twice a day to maintain oral hygiene and promote oral health. If the patient is unable to perform this task independently, then you must provide assistance or clean the dentures.
3. ACTION Arrange supplies on over-the-bed table or near sink.
RATIONALE Provides access to equipment.
4. ACTION Pull curtain and close door.
RATIONALE Provides privacy. Many patients are reluctant to be seen without their dentures in place.
5. ACTION Ask patient to remove dentures. If unable, put on gloves and remove upper denture by grasping the front teeth with the thumb and index finger. Move denture up and down slightly to break the vacuum seal. Turn slightly and slip it out of the mouth. Place in the emesis basin. Grasp the lower denture with thumb and index finger and pick it up; turn slightly and carefully remove it from the mouth without stretching lips. Place in the emesis basin.
RATIONALE Allows full access to mouth.
7. ACTION Take emesis basin to the sink and place a washcloth or small towel in the sink. Fill sink with tepid water to about 1 inch in depth.
RATIONALE Placing towel in sink decreases chance of breaking if dentures are accidentally dropped. Tepid water prevents the dentures from becoming softened or deformed.
8. ACTION Brush all surfaces with brush and paste or powder. Dentures may be soaked first in a commercial cleansing soak.

RATIONALE Prevents accumulation of food and bacteria, thereby reducing odor and stains.
9. ACTION Rinse well in tepid water and place in denture cup or emesis basin that is half-filled with cool water.
RATIONALE Rinsing removes toothpaste or powder, bacteria, and food. Placing dentures in cup keeps dentures safe until needed.
10. ACTION Clean the patient’s mouth (gums, palate, and tongue) with a soft brush and toothpaste.
RATIONALE Promotes oral hygiene by removing debris and stimulating circulation.
11. ACTION Assist the patient to replace moistened dentures or replace them yourself. Use a dental adhesive if requested or needed. Insert the top denture first by reversing removal procedure (tilt slightly and push up onto gum), press into place. Insert lower denture.
RATIONALE Wetting dentures aids insertion and provides comfort. Adhesive promotes a better seal and provides a feeling of increased comfort because some patients prefer an adhesive. Upper denture is easier to place first because it is larger. Pressing into place creates a seal against the roof of the mouth.
12. ACTION Store dentures in a labeled denture cup in cool water if they are not being replaced immediately in the mouth.
RATIONALE Prevents loss because cup is labeled. Most patients do not sleep with their dentures in place.
13. ACTION Clean equipment and tidy unit.
RATIONALE Readies supplies for next use and straightens patient’s environment.
15. ACTION Document on flow sheet or nurse’s notes per policy. Note any areas of irritation or abnormality and action taken.
RATIONALE Validates care and promotes continuity. Indicates if there are any problems or abnormalities.
1. Many people feel self-conscious when they remove their dentures. What can you do to make the patient more comfortable for this task?
2. What is the purpose of placing a washcloth or small towel in the sink before cleaning dentures?
3. After removing your patient’s dentures, you note an area of irritation on the right lower gum. What do you do?
Hair Care: Hair care should be given regularly during illness. It consists of brushing and combing, shampooing, shaving, and mustache and beard care. Morale and body image are improved when the patient is comfortable with his appearance. Hair care is usually provided after the morning bath. Brushing and combing the hair stimulates circulation, which helps to promote hair growth, prevent hair loss, distribute oil along hair shafts, and bring nutrients to the roots (Cultural Cues 19-2).
Brushing and Combing.: Use a clean brush or comb to brush from the scalp toward the hair ends to decrease pulling. Separate the hair into three sections; then each of those sections may be split into smaller sections. It is easier and more comfortable for the patient to brush or comb small sections of hair at a time. Be sure to be gentle when providing hair care.
A patient may have tangled or matted hair. To decrease pain, hold the hair between the scalp and the area you are brushing or combing. Braiding the hair helps to reduce tangles. Ask your patient’s permission before braiding. Alcohol, astringents, or water may be used to loosen hair strands that are tangled or matted. Do not cut the hair to remove tangles. A written, informed consent is necessary to cut a patient’s hair.
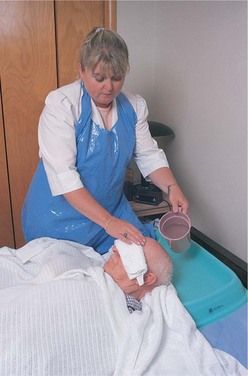
Shampooing.: Shampooing your patient’s hair removes dirt, soil, blood, or solutions from the hair; stimulates circulation of the scalp; and eases brushing and combing. A patient who is able to shower or bathe may be shampooed without difficulty. If the patient is able to be out of bed in a chair, the shampooing may be done in front of the sink. The shampooing will need to be done in bed if the patient is bedridden. Dry or rinseless shampoo is available for cleaning hair, as is a shampoo cap such as “Ready Bath” shampoo. The benefit of this product is that it does not require water. Usually, the product is sprayed into the hair and brushing removes the dirt and oils. Skill 19-4 describes how to shampoo a patient’s hair in bed.
Assistance is given for shampooing the hair when the patient is unable to perform this procedure and the hair needs to be shampooed.
5. ACTION Wear gloves if patient’s scalp has lesions, cuts, or infestation, or there is dried blood in the hair.
RATIONALE Prevents spread of microorganisms.
6. ACTION Raise the bed, lower the near side rail, remove the pillow, and move the patient to the near side of the bed. Place a waterproof pad under the patient’s shoulders and head. Drape patient with a bath blanket. Place a towel around patient’s shoulders.
RATIONALE Promotes proper body alignment and mechanics. Waterproof pad keeps linens dry. Drape prevents chills, and towel helps to keep patient dry.
7. ACTION Brush or comb patient’s hair.
8. ACTION Place basin or pail on chair at the head of the bed to collect the waste water. Place the shampoo tray under the patient’s head. Lower bed and obtain warm water.
RATIONALE Shampoo tray keeps runoff water in basin or pail and protects bed from moisture. Using warm water promotes comfort.
9. ACTION Raise bed and lower near rail. Offer patient a folded washcloth to cover the eyes. Pour a small amount of water through patient’s hair, starting at the front hairline and moving to the back of the head; wet entire hair surface completely. Apply shampoo and lather. Use your fingertips to massage all parts of the scalp. Again, start from the front and work to the back. Lift the head slightly to fully massage and wash the back of the head. Add water as needed to maintain lather.
RATIONALE Promotes proper body alignment. Washcloth protects the eyes from soap and water. Friction aids in making the lather, which will cleanse the hair.
10. ACTION Rinse thoroughly by pouring warm water through the hair. Rinse until the soap is completely out of the hair. Apply one more soaping if the hair does not feel squeaky clean and if the patient can tolerate the procedure again.
RATIONALE A squeaky sound when clean, rinsed hair strands are pulled through your fingers indicates hair is completely rinsed.
11. ACTION Apply a rinse or conditioner if requested or ordered. Rinse thoroughly.
RATIONALE Decreases tangles and adds moisture.
12. ACTION Wrap head in towel, dry face and shoulders. Remove shampoo tray and basin.
RATIONALE Towel decreases chills. Removing tray and basin prevents spills.
13. ACTION Towel-dry hair and scalp, using more towels if needed. Comb hair; use a hair dryer if needed.
RATIONALE Towel drying promotes quicker drying of the hair. Combing removes tangles and styles the hair.
14. ACTION Position patient for comfort and finish arranging the hair as desired by patient.
RATIONALE Promotes comfort and demonstrates respect for patient’s wishes.
15. ACTION Clean equipment and restore the unit, lowering the bed and raising the side rail.
RATIONALE Cleaning readies equipment for next use. Restoring unit promotes safety.
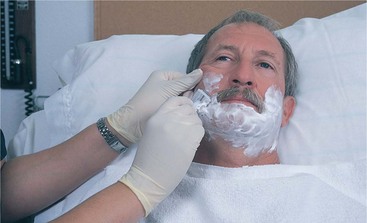
Shaving.: Shaving is the removal of hair from the surface of the skin. Women may shave their leg and/or axillary hair, whereas men may shave their facial hair. Some patients may not want to shave or be shaved. Respect the patient’s request in this instance.
Shaving may be done before, during, or after the bath. Many male patients confined to bed can shave themselves if you set up the equipment. A weak or otherwise debilitated man will need your assistance to care for his facial hair. Either a safety razor or an electric razor may be used. An electric razor must be checked before use for any possible electrical hazard. Any razor should be used on only one patient to provide for infection control. The main considerations in shaving a patient are to be gentle and to use short strokes with the safety razor (Figure 19-10). Check the patient’s chart to see if the patient has any bleeding tendencies or is receiving medication that would contraindicate the use of a safety razor. Steps 19-2 describe how to shave a male patient. A safety razor should not be used when a patient has a low platelet count, is receiving an anticoagulant, is undergoing chemotherapy, or is on high-dose aspirin therapy.
Steps 19-2 Shaving a Male Patient
A shave can improve a man’s appearance and give him a sense of well-being. Unless he has his own electric razor, a safety razor must be used. Practicing by shaving a family member or friend will increase your confidence in the procedure.
Shaving a Male Patient with a Safety Razor
1. ACTION Clean the face and neck with warm water. Place a warm washcloth on the patient’s face for several minutes. Drape the patient and protect the bed linens from water.
RATIONALE Cleaning reduces the surface bacteria should a cut occur. Application of warm washcloth reduces the chance of cuts because warm water softens the skin. Draping patient keeps linens dry and promotes patient comfort.
2. ACTION Apply shaving cream to face and neck or use lathered soap as a substitute.
RATIONALE Lubricates skin so the razor glides more easily.
3. ACTION Hold a safety razor at a 30- to 45-degree angle in your dominant hand. Carefully pull the patient’s skin taut with your other hand. Use firm, short motions in the direction of hair growth to shave the area.
RATIONALE Decreases the chance of cutting or nicking the skin. Prevents pulling of the skin. Many patients, if able, will instruct the nurse on personal preference regarding shaving technique.
4. ACTION Rinse the razor every two or three strokes, changing the water as needed.
RATIONALE Cleans razor of hair and ensures a closer, even shave. Clean water prevents contamination.
5. ACTION Short downward strokes are used for the upper lip area.
RATIONALE Decreases chance of cuts or nicks.
6. ACTION Rinse area with a washcloth and clean, warm water. Dry area.
RATIONALE Promotes comfort, removes shaved hair, and decreases surface bacteria.
7. ACTION Assess area for cuts, nicks, or hair. Apply lotion or aftershave if desired by patient.
RATIONALE Lotion promotes comfort by moisturizing the skin. Aftershave closes the pores opened by the moist heat through astringent action.
Shaving a Male Patient with an Electric Razor
1. ACTION Apply preshave lotion or skin conditioner.
RATIONALE Softens beard and skin.
2. ACTION Turn on razor; holding the skin taut, begin shaving one side of the face. Gently stroke the razor downward in the direction of hair growth.
RATIONALE Prevents pulling of the facial hairs and skin abrasion.
Mustache and Beard Care.: A patient with a mustache and/or beard needs daily care to these areas. The areas must be kept clean and free of food particles. Mustaches and beards may be cleansed with a warm damp washcloth or washed with soap or shampoo. You may not shave off a beard or mustache without a written, informed consent.
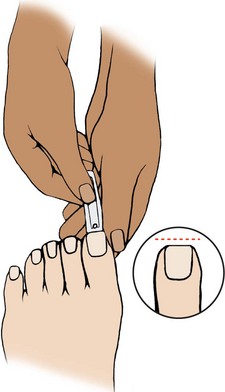
Nail Care: Most patients can perform nail care for themselves as part of their daily hygiene routine. You may need to provide care for those who are unconscious, blind, confused, unsteady, or in a cast or traction. Nail care includes regular trimming, cleaning under the nails, and cuticle care, and is usually done with the bath. Nails should be kept clean and trimmed according to the institution’s policy and patient preference. The toenails of a diabetic patient or one with circulatory disease of the lower extremities should not be cut without a physician’s order. You need to check your agency’s policy to see if an order is needed to trim the fingernails of the diabetic patient.
Soak the nails in warm soapy water for 5 to 10 minutes, especially if they are dirty or thickened. Use an orangewood stick to clean under nails because a metal nail file can make the nails rough and trap dirt. Push cuticles back gently with the stick to prevent hangnails, which are pieces of skin that are partially detached at the base of the fingernail. Hangnails are painful and a possible source of infection.
Use nail clippers to cut the toenails straight across to prevent them from growing into the skin along the sides (Figure 19-11). This can cause pain or infection and leads to a condition called ingrown toenails. Ingrown toenails often require a surgical procedure to correct.
You may need to observe the color of the nail beds continually to monitor circulation in the extremities. Examples of when such monitoring is needed are after surgery, during traction, when the patient is in a cast, or to detect a failure in the general systemic circulation. Nail polish will need to be removed in these instances to allow monitoring. Patient Teaching 19-1 summarizes important points for hygiene and skin care.
Eye Care: Assess your patient’s eyes for drainage, crusting, or redness. Notify the physician if any abnormalities are found. Routine eye care is described in Skill 19-1. If crusting is noted, soak the eyelid with a warm, damp washcloth for 2 to 3 minutes to soften the crust and ease its removal. Use a different part of the cloth for each eyelid. Unconscious patients may need more frequent eye care or the administration of lubricating drops as ordered. Older adults often develop dry eyes (Health Promotion Points 19-1).
Glasses and Contacts.: Store glasses in a case when not in use. Most glasses today have plastic lenses that are easier to scratch than glass. To clean either type of lens, use clean warm water and a soft cloth to wipe dry. Do not use a paper towel on plastic lenses because it may scratch the lenses.
Contact lenses are classified as to whether they are hard or soft. Hard lenses feel like a firm plastic disk, whereas soft lenses have the consistency of a thick plastic food wrap. Before removing lenses, wash hands thoroughly and wear gloves. Many contact lenses today may be worn for an extended period of time.
Removal of Contact Lenses.: To remove a hard lens, perform hand hygiene and cup your nondominant hand below the patient’s eye. Move the lens directly over the cornea. Pull the upper eyelid up above the edge of the lens; pull the lower lid down to the lower edge of the lens. Press slightly on the lower lid at the edge of the lens; the lens should slide out between the eyelids.
To remove a soft lens, perform hand hygiene and place a drop of wetting solution or sterile saline in the eyes to moisten the contact surface. Using your nondominant hand, open the eye with your middle finger and thumb. Use the index finger of your dominant hand and place it gently on the lower edge of the lens and slide it down toward the lower lid. Gently pinch the lens between your index finger and thumb and lift it out (Figure 19-12).
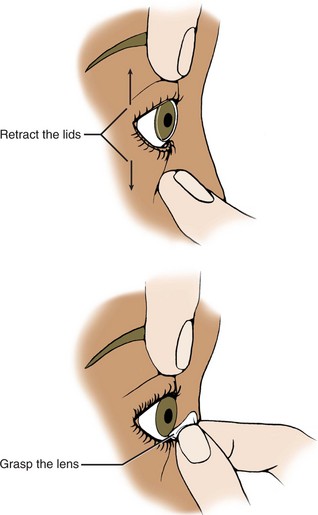
Sometimes the techniques described do not work. In this case, get a lens suction cup to remove the contact lens. If a suction cup is not available, check with a colleague who wears such lenses and is familiar with the procedure for assistance.
Cleaning Contact Lenses.: Lenses should be cleaned with commercially prepared cleaning solutions. Moisten the lens and rub it gently between the fingers to remove accumulated dirt and secretions while holding it over a basin of water or a stoppered sink with some water in the bottom. Rinse with the wetting solution, rinsing solution, or sterile saline. Replace the lens in the patient’s eye or store in sterile saline in the case. It is important to place the lens in the correct compartment of the case, either right or left. If a case is not available, store the contact lenses in sterile cups filled with sterile saline and marked “right” or “left” and labeled with the patient’s name.
Artificial Eye.: Sometimes because of trauma, infection, or tumor, a patient has had an eye removed. The patient may have an artificial eye that is either permanently implanted or removable. An eye that is not implanted needs to be removed on a daily basis for cleaning. Usually the patient will care for this independently, but some may need assistance.
To remove an artificial eye, pull down the lower eyelid and put a little pressure just below the eye. Cup your other hand below the eye to catch it as it moves out of the socket. Assess the socket for any signs of infection. Report any redness or drainage immediately. Cleanse the artificial eye with normal saline. The edges of the eye socket may be cleansed with warm tap water or saline. To replace the eye, pull down the lower lid and lift the upper lid. Place the eye in the socket and be sure the eyelids fit smoothly over the eye.
Ear Care: Hearing acuity may be affected if cerumen or foreign material collects in the external ear canal. Remove these materials by gently washing the external ear canal with a warm washcloth. No object, including cotton-tipped applicators, should be inserted into the ear canal. The applicators compact the cerumen, making it more difficult to clean the ear. You may need to irrigate the ear if the wax is dried or excessive (Home Care Considerations 19-1). Notify the physician if irrigation is needed.
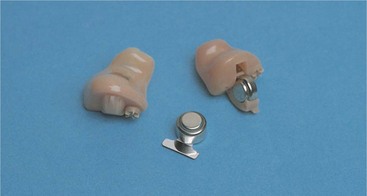
Hearing Aids.: Hearing aids amplify sound and must be cleaned daily (Figure 19-13). There are five types of hearing aids: (1) body worn (rarely seen today), (2) behind the ear, (3) attached to the eyeglasses, (4) in the ear, and (5) in the ear canal. Do not drop or bump hearing aids because this can cause damage. Store the aid in its case to prevent damage and to avoid the accumulation of dust and dirt when not in use. Clean the earpiece with soap and water daily to prevent the buildup of wax and debris. Do not submerge the hearing aid in water. If the hearing aid is not working, check to make sure the unit is turned on, the battery is installed correctly (it may need to be replaced), and there are no cracks or breaks in the plastic housing or tubing.
Evaluation
During evaluation, you determine whether the expected outcomes set during the planning stage of the nursing process have been met. Evaluation statements indicating the expected outcomes for hygiene have been met are as follows:
• No evidence of redness, irritation, or breaks in skin integrity; skin integrity is maintained.
• Hair is clean and neatly styled each day per patient preference.
• The mucous membranes are pink and moist, without signs or symptoms of irritation or odor.
Feedback from the patient and other personnel should be obtained during evaluation.
Self-evaluation is important too. Did you encourage the patient to function independently? Did you use good body alignment when providing care? Were active measures taken to prevent pressure ulcers? The information gathered will indicate if any changes need to be made in the plan. If so, document the progress made and the changes for other staff.
NCLEX-PN® EXAMINATION—STYLE REVIEW QUESTIONS
Choose the best answer(s) for each question.
1. A healthy epidermis is important because it:
1. contains elastic and collagen fibers.
2. acts as a barrier to entry of pathogenic organisms.
2. A factor in skin problems common to elderly adults is: (Select all that apply.)
1. skin tends to be dry because of increased gland activity.
2. hair becomes thicker and grows more slowly.
3. nails become thin and more brittle.
3. Your patient has an area at the left trochanter that is reddened with slightly abraded skin. You would stage this as a __________________ pressure ulcer.
4. The extremities are washed from distal to proximal because this:
5. A stage III pressure ulcer is characterized by:
1. a partial-thickness skin loss involving epidermis/dermis.
2. a reddened area that does not blanch.
4. a full-thickness skin loss that looks like a deep crater.
6. Special attention is given to skin over bony prominences because:
1. pressure ulcers are more likely to develop.
2. pressure ulcers develop only in these areas.
7. A partial bath includes bathing the:
8. When providing foot care for the diabetic patient, you must remember to:
1. cut the cuticles to prevent hangnails.
3. check for an order before trimming the nails straight across.
4. check for an order before trimming the nails in a curved manner so there are not any sharp points to irritate the skin.
9. A back rub should be offered to every patient because it:
1. is an active form of exercise.
2. increases medication absorption.
10. Prevention of pressure ulcers is promoted by: (Select all that apply.)
CRITICAL THINKING ACTIVITIES ? Read each clinical scenario and discuss the questions with your classmates
While assisting a female patient during her bath, you notice that she cleanses herself from the rectum to the pubic area. You remember that she has a history of having recurrent vaginal infections. What will you do? How will you explain perineal care and proper toileting techniquesto her?
Scenario B
Your postoperative patient has a history of a cerebrovas-cular accident (CVA) with weakness on his left side. In the hospital, he has performed most of his hygiene care independently and states that he “likes doing things for himself.” What would you tell the family of your patient when they say they always do their father’s complete bath at home so that he doesn’t get tired?