Administering Intravenous Solutions and Medications
Upon completing this chapter, you should be able to:
1 List four purposes for administering intravenous (IV) therapy.
2 Identify circumstances when it would be appropriate to use an infusion pump to deliver fluids or medications.
3 Describe the possible complications that can arise from the use of the IV route and the corrective actions you should take for each one.
4 State at least seven guidelines related to IV therapy of fluids or medications.
5 Discuss special considerations for elderly patients who need IV therapy.
6 Discuss the signs and symptoms of a blood transfusion reaction and the steps you should take should one occur.
1 Write a care plan for a patient who needs IV fluid therapy and include patient specific data, an identified nursing diagnosis and interventions.
2 Calculate the rate of flow of IV fluid from various IV orders.
3 Initiate IV therapy by performing venipuncture with an IV cannula (catheter over the stylet) using aseptic technique, and starting the ordered infusion.
4 Add a new bag of fluid to replace one from which the solution has infused.
5 Prepare to give medications using each of the following methods:
a Adding the drug to the primary IV solution.
b Using a second IV line as a piggyback.
c Using a controlled-volume device.
d Using an intermittent IV or a PRN (as-needed) lock.
e Giving the medication as a bolus.
7 Safely monitor a patient receiving a blood transfusion; document your actions and the patient’s response to therapy.
8 Collect data on a patient who receiving total parental nutrition; document your findings and the patient’s response to therapy.
autologous ( , p. 740)
bore (p. 724)
burette ( , p. 717)
catheter embolus ( , p. 721)
epidural (p. 721)
hypertonic ( , p. 714)
hypotonic ( , p. 714)
infiltrated ( , p. 718)
infusion (p. 713)
infusion pump (p. 717)
insulin pump (p. 719)
intrathecal (p. 721)
intravenous (IV) (p. 713)
isotonic ( , p. 714)
macrodrops (p. 716)
microdrops (p. 716)
total parenteral nutrition (TPN) (p. 718)
transfusion ( , p. 716)
vascular access devices ( , p. 720)
viscous ( , p. 716)
INTRAVENOUS THERAPY
Basic information about intravenous equipment, the types of solutions that are used, principles related to the ordered route, and the guidelines to monitor the rate of flow is essential for all nurses.
The intravenous (IV) (via the veins) route is the main method of supplying the patient with fluids and medications when the patient is unable to take them orally or rectally. Giving a drug or solution by the IV route has the advantage of making it instantly available for circulation to all tissues. The disadvantage is that the material cannot be retrieved if an error has been made. Because the solution is injected directly through a vein into the circulation, all material must be sterile to avoid introducing bacteria. Patients who require fluids by the IV method are placed on intake and output (I & O) recording to monitor for fluid overload. IV infusion (slow introduction of fluid into a vein) amounts are recorded under parenteral fluid.
IVs are given to supply the body with needed substances or drugs that cannot be supplied as rapidly or efficiently by other means (Cultural Cues 36-1). Examples of substances delivered by the IV route include:
• Fluids and electrolytes that the patient is unable to take in orally in sufficient amounts
• Medications that are more effective when given by this route or cannot be given any other way
• Blood, plasma, or other blood components
• Nutritional formulas containing glucose, amino acids, and lipids
The average adult needs 1500 to 2000 mL of fluids in a 24-hour period to replace fluids eliminated by the body. Patients whose fluid intake has decreased or those who experience an excessive loss of body fluids will require fluid replacement (Nursing Care Plan 36-1). Fluids are lost by elimination; by hemorrhage; by severe or prolonged vomiting or diarrhea; by moderate to excessive drainage from wounds, especially from burn wounds; and by profuse perspiration. Accurate recording of the patient’s intake and output is needed to determine the amount of fluids necessary for daily replacement. The physician will consider laboratory tests related to electrolytes when ordering replacements of sodium, potassium, and chloride, which are the more commonly administered electrolytes.
NURSING CARE PLAN 36-1
Care of the Patient with Deficient Fluid Volume and Hyponatremia
Jane Weston, age 78, is admitted to your unit from the local long-term care facility. She has had the “flu” with nausea and vomiting, has not been eating, and became dehydrated. There is a question as to whether she has suffered a small stroke (cerebrovascular accident, or CVA) or is just dehydrated and has consequent electrolyte imbalance. She is receiving D5 ½NS IV solution and is being encouraged to eat and drink. (Dehydration may increase the viscosity of the blood, which can lead to clotting in susceptible individuals.)
TYPES OF INTRAVENOUS SOLUTION
The physician orders the type of solution to be given, the amount to be infused, and the rate of infusion (as either the number of hours for the solution to infuse or the volume per hour). Many types of solutions are available, and still others can be prepared to meet the specific needs of the individual patient. The solutions most frequently used are those containing glucose, saline, electrolytes, vitamins, and amino acids. In addition to these, blood and blood products are given intravenously. Table 36-1 lists common IV solutions and examples of clinical uses.
Table 36-1
Common Intravenous Therapy Solutions, Tonicity, and Examples of Clinical Use
| SOLUTION | TONICITY | EXAMPLES OF CLINICAL USE |
| 0.9% Saline | Isotonic | Trauma, diabetic ketoacidosis, with blood transfusions, hyponatremia |
| 0.45% Saline | Hypotonic | To supply normal daily salt and water requirements |
| 5% Dextrose in water | Isotonic | Vehicle for some IV piggyback medications, hyperkalemia |
| 10% Dextrose in water | Hypertonic | If TPN is abruptly discontinued |
| 5% Dextrose in 0.9% saline | Hypertonic | Early treatment of burns |
| 5% Dextrose in 0.45% saline | Hypertonic | Postoperative; common maintenance fluid |
| 5% Dextrose in 0.225% saline | Isotonic | Postoperative; common maintenance fluid |
| Ringer’s lactate | Isotonic | Trauma, dehydration from severe diarrhea or vomiting |
| 5% Dextrose in Ringer’s lactate | Hypertonic | Burns, dehydration from severe diarrhea or vomiting |
Intravenous solutions are isotonic, hypotonic, or hypertonic. Isotonic solutions have the same concentration, or osmolality, as blood and are used to expand the fluid volume of the body. Hypotonic solutions contain less solute than extravascular fluid and may cause fluid to shift out of the vascular compartment. Hypertonic solutions have a greater tonicity than blood. They are used to replace electrolytes and, when given as concentrated dextrose solutions, produce a shift in fluid from the intracellular compartment to the extracellular compartment. Concentrated solutions of glucose, mannitol, or sucrose are given to reduce cerebral edema in patients with head injury because the osmotic pressure draws water out of the cells.
Solutions that are given intravenously must be sterile and free of contaminating particles. They are supplied in plastic bags in 250-, 500-, and 1000-mL amounts. Smaller bags of sterile water, dextrose in water, and normal saline are used to dissolve or dilute various drugs for parenteral use. Glass and plastic bottles are still used for a few solutions and some IV drugs. Check the expiration date and inspect the container for clarity of solution; only clear solution should be infused.
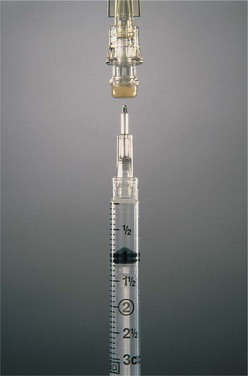
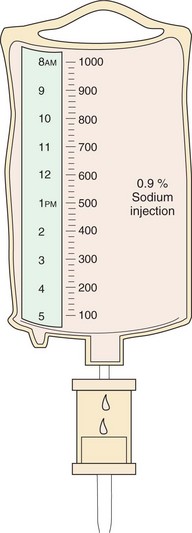
The typical IV bag (Figure 36-1) is marked with calibrations along the sides to determine the amount of fluid when the bag is hanging. A plastic cover on the tubing port is pulled off to allow the tubing spike to be inserted. A plastic or foil tab also covers the port used to add medication to the bag. The bag has a tab with a hole in it that will fit on the hanger of an IV pole.
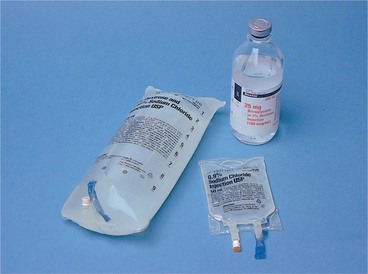
The IV bottle is also marked with calibrations on the side. The flat metal or plastic cover on the top of the bottle is pulled off to expose a rubber stopper or diaphragm held in place by a metal rim. The diaphragm is removed, revealing a rubber stopper with an outletvent into which the IV tubing is inserted, and an inlet for adding medications with a syringe and needle. Some IV bottles contain a tube that acts automatically as an air vent; for others, a vented tubing set must be used to let air in.
EQUIPMENT FOR INTRAVENOUS ADMINISTRATION
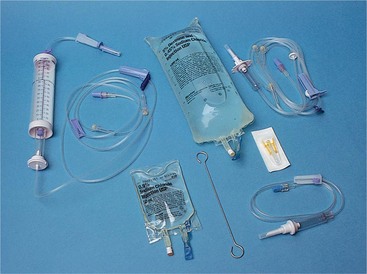
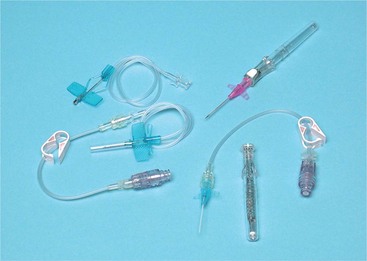
There are many different types of administration sets available for IV use, some of which must be used with a particular brand of IV solution or type of bag (Figure 36-2). Administration sets can be classified as (1) primary intravenous sets, (2) secondary or piggyback intravenous sets, (3) parallel or “Y” intravenous sets, and (4) controlled-volume intravenous sets. Tubing is generally changed every 24–72 hours for infection control purposes (check the agency’s policy for frequency of tubing change) and therefore should be properly labeled with the date and time. (Refer to Steps 36-4: Changing IV Tube on the Companion CD-ROM.)
Solutions can also be given intermittently through an intermittent intravenous device. Filters are recommended for the infusion of many solutions; check your agency’s policy on filter use.
Primary Intravenous Set
The primary IV infusion setup consists of a bag of solution, a regular tubing set, a needleless connector, and an IV stand. A filter may be added. Tubing is either vented or nonvented. The IV tubing set consists of the spike end, which is inserted into the bag, the drip chamber, the tubing, a flow regulator or clamp, and a needle adapter. The spike and the needle adapter at the ends of the tubing are covered with plastic protectors to keep them sterile. The primary line usually has one or two injection ports on it. The primary IV infusion setup is used for any type of IV therapy except the administration of blood products, which requires a special set with a filter in the drip chamber. There are several different brands of IV administration tubing sets on the market, and you will need to check the directions for the type used in your agency.
The primary IV tubing set is selected according to the size of the drop to be delivered into the drip chamber. There are three major sizes:
1. Regular drops (10 to 20 gtt/mL of fluid as specified by the manufacturer)’used for administering IV therapy to most adult patients.
2. Macrodrops (10 gtt/mL)’used for viscous (sticky or gummy) fluids, such as blood; may be used for regular fluids.
3. Microdrops (60 gtt/mL)’used when small amounts of fluid are required or when extreme care must be used to measure the exact amount; most often used for giving IV fluids to infants and children; recommended for the elderly with fragile veins.
Secondary or Piggyback Intravenous Set
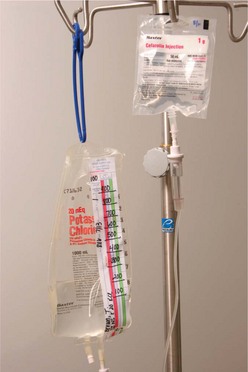
Medications to be given intravenously are often added to an existing IV line by using the piggyback method. Primary administration sets have one or two inlet ports for adding medications or a second IV. When this is used, the primary infusion is interrupted to infuse medications such as antibiotics and antineoplastic drugs at regularly scheduled times. Because these drugs are diluted in amounts of 50 to 150 mL of solution, they must be given by infusion, not by bolus. The advantage of the piggyback system is that when the solution in the smaller bag has been infused, the primary IV begins to flow again without further adjustments.
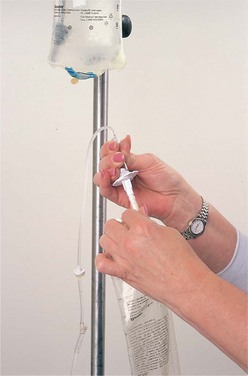
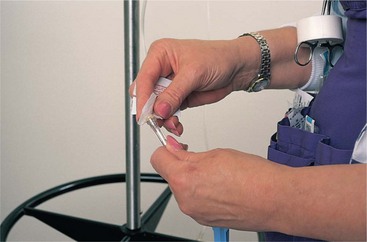
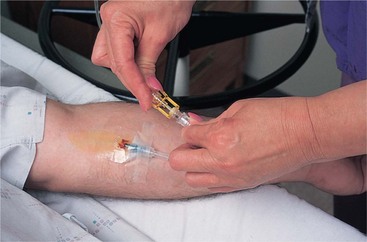
In accordance with Healthy People 2010, a primary occupational health goal is the prevention of needle sticks, which may transmit the human immunodeficiency virus (HIV), hepatitis B, or hepatitis C. Use of needleless devices for attaching secondary tubing or syringes for the infusion of medication is highly recommended to prevent injury and exposure to these diseases (Figure 36-3).
Parallel or “Y” Intravenous Set
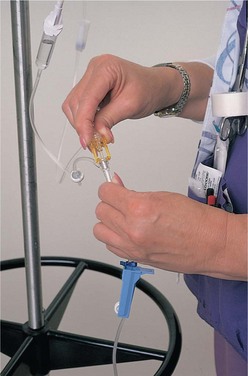
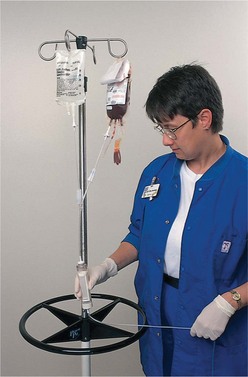
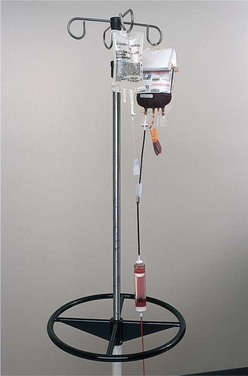
A “Y”-type administration set is used to infuse certain blood products (Figure 36-4). The blood product is placed on one side, and a bag of normal saline is placed on the other side. The saline is started first, and then the blood administration is begun. The saline is stopped while the blood is running. When the transfusion (introduction of blood components into the blood stream) is complete, the tubing is flushed with the normal saline solution.

Controlled-Volume Intravenous Set
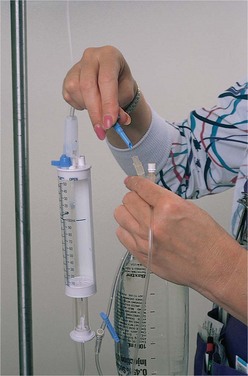
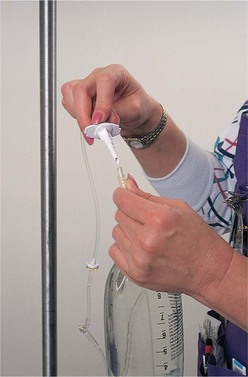
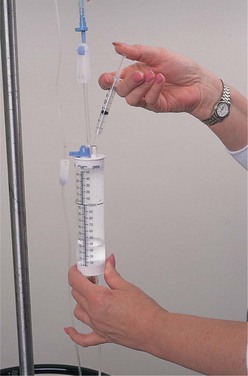
Another way of interrupting a primary infusion is to give a dose of diluted medication through a controlled-volume administration set. In most instances, an infusion pump(machine that delivers IV fluids at a rate that is set by the nurse) is used to administer small volumes of fluid or medication. However, the controlled-volume system is sometimes used as a safety backup between the IV bag and the entry to the infusion pump to prevent free flow of fluid when the tubing is removed from the pump. The set contains a burette (tubelike chamber that will hold 150 mL of fluid) into which the medication is injected along with a specified volume of fluid from the primary bag, which is then clamped off. When an IV infusion pump is not used, the medication from the burette goes into the drip chamber, and the flow is regulated by a clamp on the IV tubing. The burette set is attached to the primary IV line beneath the bag of fluid (Figure 36-5). This set can also be used when a small amount of fluid is to be infused over a long period. It is often used for administration of fluids to infants, children, and the elderly.
Intermittent Intravenous Device (Saline or PRN Lock)
Some patients do not require large amounts of fluid by the IV route but may need to receive IV medications at intervals or have an IV access in case emergency medications are needed quickly. An intermittent access device is preferred for patients who receive antibiotics, heparin, corticosteroids, antimetabolites, and some other drugs. An intermittent IV device is established by applying a Luer-Lok cap or an extension set, which is a very short piece of tubing, to the IV cannula. The peripheral device is called a saline lock, PRN lock, or INT (intermittent) lock (Figure 36-6). One advantage of this method is the freedom of movement for the patient.
Because no solution is continuously infusing through the lock, saline or a dilute heparin flush is periodically used to maintain patency by keeping a clot from forming at the tip of the catheter. Often an IV line is converted to an intermittent device when the patient no longer needs fluids but is still receiving IV medications. This is done by removing the IV tubing and attaching a catheter cap or extension set.
Filters
Filters trap small particles such as undissolved medication or salts that have precipitated from solution. They prevent such particles from entering the vein. A 0.22-micron filter is used for most solutions. For solutions containing lipids or albumin, a 1.2-micron filter is used. A special filter is needed for blood components.
INFUSION PUMPS AND CONTROLLERS
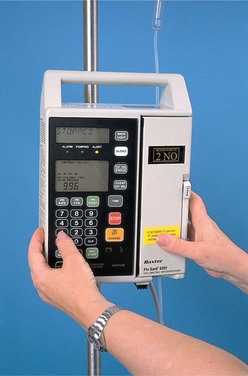
Use of infusion pumps is an added safety measure, and they are used in many facilities to regulate the flow of routine IV fluids on general medical-surgical units. Use of pumps is mandatory when patients are receiving total parenteral nutrition (TPN) (technique of providing needed nutrition intravenously) or for medications that require critical accuracy, such as heparin, insulin, cardiovascular medications, chemotherapy drugs, or medications that are used to induce labor (Figure 36-7).
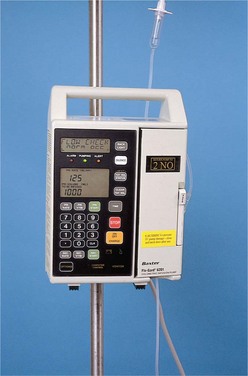
Programmed infusion pumps are more accurate and provide better control over the amount of solution being infused. These pumps deliver IV fluids automatically at a rate that is calculated and programmedby the nurse (Figure 36-8). They have alarms that warn when the IV container is empty, when air is present in the tubing, or when the line is infiltrated (solution is deposited in tissue outside the vein) or occluded, depending on which model of the pump is used (Patient Teaching 36-1). Use of a pump does not replace or substitute for good nursing observation.
Disadvantages of pumps include (1) they exert pressure on the vein, (2) they are expensive, and (3) certain types of pumps require special administration sets. It is advocated that health care facilities purchase only infusion pumps that have administration sets with set-based anti–free-flow mechanisms that prevent gravity free flow by closing off the tubing when the administration set is removed from the pump. Other pumps must have a free-flow safety device attached to the tubing before it enters the pump. There are pumps that will handle multiple infusion lines that can be programmed separately for each line. Box 36-1 includes some tips for using an IV pump.
Rate controller devices operate by gravity flow. Controllers can reduce the risk of infusing fluid too quickly; however, their effectiveness can by altered by patient and mechanical factors. Rate controllers are not used for blood or viscous solutions because they are not as accurate as pumps.
Portable infusion pumps, such as the CADD-PCA, are often used for home care patients. This pump can be attached to a subcutaneous catheter for infusion of pain medication. Portable pumps also are available for the infusion of TPN.
Patient-controlled analgesia (PCA) pumps are commonly used in most hospitals and are also used in the home setting. This type of pump is used for pain control, and it has a remote-control button by which the patient can administer a controlled bolus of pain medication from time to time. The pump is programmed to allow only a certain limited amount of medication to be delivered during a particular period. Analgesia may be delivered continuously subcutaneously for the home care patient by the use of a CADD pump.
There are other small, self-contained pump devices that are used to deliver doses of medication, such as the insulin pump. The insulin pump is a small portable device that can be programmed to deliver a continuous infusion of regular insulin that mimics normal physiology. Use of this device requires intensive patient education and teaching; the patient must be highly motivated and capable of changing the insertion site every 2 to 3 days, refilling the pump with insulin, reprogramming the device, checking blood sugar four to six times per day, and monitoring for signs of infection.
VENOUS ACCESS DEVICES
Intravenous Needles and Catheters
New safety venous access devices decrease the risk of accidental needle sticks for the nurse. These devices have either a stylet that retracts into a closed sleeve or a plastic sleeve that advances over the stylet as it is removed from the skin. There are three basic types of IV needles and catheters used for peripheral IV fluid administration. The winged-tip or butterfly needle is meant for short-term therapy, such as to give single-dose IV medication or to obtain blood samples. After insertion, the wings are taped to the skin. These needles are supplied in odd-numbered gauges (17, 19, 23, and 25). The butterfly needle is also frequently used for pediatric infusions or for the elderly because it comes in a smaller gauge than most catheters. Because these needles are rigid, they may cause more discomfort than do other types of catheters, and mobility may be restricted to prevent dislodgement of the needle.
Over-the-needle catheters consist of a needle with a catheter sheath over it. After the device is placed into the vein and the cannula (catheter sheath) is threaded, the needle is removed, leaving the flexible catheter in the vein. Catheters of this type are thought to cause less irritation, thereby decreasing the incidence of infection and phlebitis. The size of the catheter or needle depends on the type of solution given and the size of a suitable vein. For clear aqueous solutions, a 20- to 22-gauge needle is used, but for more viscous fluids, blood products, or when the patient rapidly needs large amounts of fluid a larger (18- or 19-gauge) needle or catheter is needed. For example, a trauma patient who might need blood should have a large-bore catheter. When using the scalp veins of infants, finer-gauge needles must be used. These catheters are used when therapy will be for 7 or fewer days.
A through-the-needle catheter is not recommended for short-term peripheral use. This type is used for midline catheter insertion for long-term peripheral use. Because the needle is larger in diameter than the catheter, there may be leakage when the needle is removed.
Although an arm board may be used to support and immobilize the arm during IV therapy, this is not desirable because the patient’s elbow or wrist movement may be severely restricted, causing discomfort. When an arm board is the only alternative, tape or gauze secures both ends of the arm board to the arm without restricting the patient’s circulation.
Central Venous Catheters and Peripherally Inserted Central Catheters
When a peripheral vein is difficult to locate in the adult or the veins are not suitable for IV therapy, a catheter is inserted into the large subclavian vein and positioned in the superior vena cava or the right atrium. This type of catheter can be left in place for 6 to 8 weeks. The nurse assists the physician during the subclavian catheter insertion by providing the sterile catheter tray, draping the patient, opening sterile packages, and preparing the IV administration set for use. If the patient needs a central line for more than 6 to 8 weeks, a long-term catheter such as a tunneled Broviac, Hickman, or Groshong is inserted. This procedure is done in the operating room.
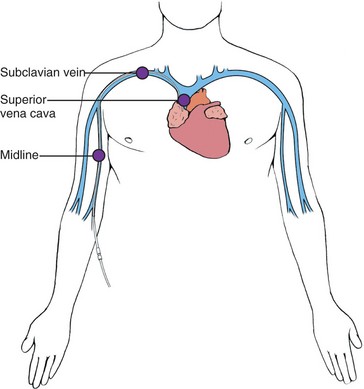
Peripherally inserted central catheters (PICCs), or midline catheters (MLs), are often used in children or in adults who need peripheral IV therapy that requires placement where there is high blood flow. They are also a first choice in home care IV therapy of 6 to 8 weeks. These catheters are long and are inserted in the larger basilic or cephalic vein of the upper arm. The ML ideally sits just inside the subclavian vein; the PICC may be advanced as far as the superior vena cava (Figure 36-9). Other vascular access devices (devices such as a needle, or catheter that allow direct access to the circulatory system) in the form of central venous catheters or implanted infusion ports are used for patients who need long-term drug therapy, fluid therapy, or chemotherapy. These catheters are inserted by the physician or a specially trained nurse.
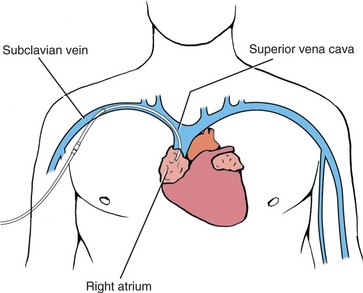
Short-term central venous catheters are inserted into a large vein, usually the subclavian or jugular, by the physician. Long-term central venous catheters that are threaded to the tip of the right atrium of the heart are placed by surgical tunneling through subcutaneous tissue and then through the subclavian vein into the superior vena cava (Figure 36-10). The surgeon first enters the vein and then makes the subcutaneous tunnel or pocket. Central venous catheters range from 15 to 30 cm in length. There are several types available. Some have single lumens; others have two, three, or more lumens.
These catheters are periodically flushed, much the same as for a PRN lock, to keep the lumens patent. Agency policy will dictate specific amounts, frequency, and type of flush solution (i.e., saline or heparin) and size of syringe (i.e., 10-mL syringe) and guidelines for when to obtain an order for special declotting solutions. Agency policy will also indicate if central line management is an RN-only responsibility. Correct placement of subclavian catheters must be verified by radiographic studies before any fluid is infused through them.
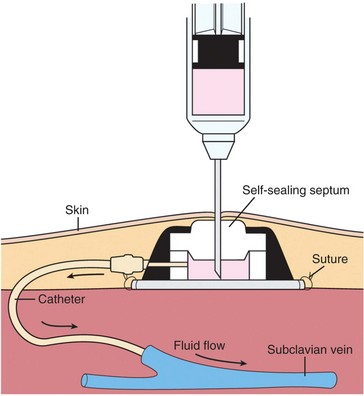
Infusion Port
An infusion port with a single- or dual-lumen catheter can be implanted (Figure 36-11). Most ports are placed subcutaneously on the chest beneath the right clavicle, and the catheter is threaded through a large vein and into the superior vena cava. Sometimes these ports are implanted in other areas for intraspinal or intraperitoneal infusion. Specially designed Huber noncoring needles are used to infuse solutions and medications through the port. No other type of needle should be used because other needles cause damage to the port.
COMPLICATIONS OF INTRAVENOUS THERAPY
Complications of IV therapy are potentially very serious, such as infiltration, phlebitis, systemic infection, and catheter embolus (piece of the catheter obstructing blood flow). Ask the patient about discomfort as you visually inspect and palpate the site. Assess the flow of fluid whenever you are at the patient’s bedside.
INFILTRATION
Infiltration is the most common problem. This occurs when fluid or medication leaks out of the vein into the tissue. There will often be edema around the site, and the tissue will feel cool. The skin may have a pale appearance. Flow can be slow and sluggish when infiltration has occurred; however, this is not a definitive sign, particularly in the early phase of infiltration when the fluid can be progressively leaking into the surrounding tissue. If infiltration has occurred, the infusion is discontinued and another site is initiated to continue therapy. Fluid that is in the tissue will usually reabsorb within 24 hours. Follow agency policy for treatment.
PHLEBITIS
Phlebitis is caused by irritation of the vein by the needle, catheter, medications, or additives in the IV solution. The typical signs of phlebitis are erythema, warmth, swelling, and tenderness. The IV must be discontinued and another site found for reinitiating therapy. Application of warm compresses to the inflamed site will decrease discomfort.
BLOODSTREAM INFECTION
Bloodstream infection (septicemia) occurs when infectious pathogens are introduced into the bloodstream. This may occur from breaks in sterile technique during cannula insertion or any time the system is opened to change the bag or tubing. Signs and symptoms are fever, chills, pain, headache, nausea, vomiting, and extreme fatigue. Blood cultures are ordered and aggressive antibiotic therapy is started. The IV site is immediately discontinued.
OTHER COMPLICATIONS
There are several additional serious complications of IV therapy. Catheter embolus can occur when a piece of the catheter breaks off and travels in the vein until it lodges. Air embolus can occur when changing bags, or when opening the line of a subclavian catheter. Speed shock occurs when fluids or medications given by bolus are administered too rapidly. Table 36-2 lists all the complications with their signs and symptoms and the necessary nursing interventions.
Table 36-2
Complications of Intravenous Therapy and Nursing Interventions
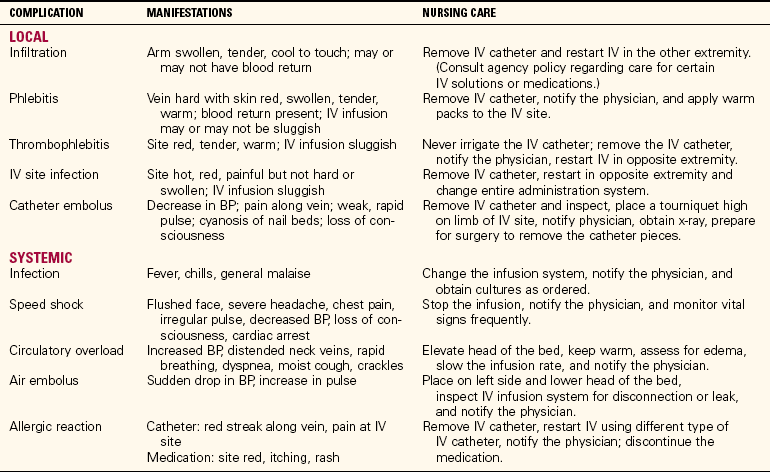
From Leahy, J.M., & Kizilay, P.E. (1998). Foundations of Nursing Practice: A Nursing Process Approach (p. 822). Philadelphia: Saunders.
IV sites must be checked at least once an hour. In accordance with The Joint Commission’s 2009 National Patient Safety Goals, health care professionals are tasked “to improve recognition and response to changes in the patient’s condition.” Your documentation should reflect an absence of complications. If you identify a problem, document your observations and document your follow-up actions that address the problem.
APPLICATION of the NURSING PROCESS
All nurses monitor IV therapy and add IV solutions without medication to existing IV setups (Safety Alert 36-1). Depending on the state nurse practice act and the training program, many practical nurses hang IV piggyback medications, add medications to IV solutions, calculate IV infusion rates, and initiate IV therapy by inserting a catheter. Often an extra course is required for certification to perform IV therapy and to start IVs. Because of the diverse training needs of LPNs/LVNs, all basic IV skills are presented here.
Assessment (Data Collection)
A primary nursing responsibility is to check the patient’s chart and verify the IV orders. Each nurse is responsible for determining that the correct IV solution is hanging. The patient who has IV fluids infusing must have the site assessed periodically, preferably hourly during the shift, to ensure that the site is patent and that the solution is infusing correctly. The flow rate must be assessed to determine that the fluid is running at the prescribed rate. Assessment is performed for the various complications of IV therapy (see Box 36-3 on p. 725).
When giving IV medications, the order must be carefully checked. Review the drug’s action, possible side effects, correct dosage, and nursing implications before preparing the drug. Assess for drug allergies before preparing the IV piggyback medication. Check for possible drug–solution incompatibilities. If incompatibilities exist, the IV line must be flushed with sterile saline before the other drug or solution is started and flushed again when the infusion or injection is finished. Assess for potential drug interactions when more than one drug is being administered. Always assess the patient for adverse or side effects of previously administered doses of IV or piggyback medications before administering the next dose. Assess the existing IV site and catheter size before beginning an infusion of a blood product. The site must be free of any signs of infection or inflammation.
Nursing Diagnosis
Common nursing diagnoses for patients who are undergoing various types of IV therapy might include the following:
• Deficient fluid volume related to inability to take fluids by mouth (fluid replacement)
• Risk for infection related to invasive procedure (IV drug therapy)
• Imbalanced nutrition less than body requirements, related to inability to take oral foods or fluids (TPN)
• Ineffective tissue perfusion (cardiopulmonary) related to loss of red blood cells/fluid volume (blood product transfusion)
Planning
Allow time for the care of the patient’s IV site, hanging of solutions, and needed assessments in the daily work schedule (Assignment Considerations 36-1).
Sample goals/expected outcomes for the previous nursing diagnoses are as follows:
• No signs of dehydration are displayed.
• The patient will display no signs of postoperative infection.
• The patient’s nutritional status will improve as evidenced by a weight gain of 0.5 lb per week and protein levels will be within normal limits.
• The patient’s hemoglobin level will be 11.5 g/dL before discharge.
Calculation of Flow Rates: Another aspect of planning is calculating the rate of flow at which an IV solution or medication is to infuse. To calculate the flow rate, you must know how many drops are contained in each milliliter as it passes through the drip chamber of the tubing, because the size of the drops varies for different types of administration sets. The standard set produces 10 to 20 gtt/mL, the pediatric or microdrip chamber produces 60 gtt/mL, and the macrodrip of the transfusion-type sets gives 10 gtt/mL. For the purpose of demonstrating rate calculations, 10 gtt will be used for the macrodrip, 15 gtt for the regular drip, and 60 gtt for the microdrip chamber.
If there are questions about how to calculate the IV drop rate, check with the instructor. Charts are available that have precalculated rates for the various drip chambers and for the period of time that the infusion is ordered to run in standard amounts, such as 1000 mL. If these charts are not available, it is necessary to solve the problem mathematically. The basic formula for calculating the rate of flow is given in Box 36-2.
Box 36-2 Calculating the IV Flow Rate
• Formula for flow rate calculation:

• When the order reads “1000 mL of D5W over 10 hours,” use a regular drip set (15 gtt/mL):

• When the order reads “D5 ½NS at 125 mL/hr,” use:

• Formula for using a standard adult pump (mL/hr):

• When the order reads “250 mg of medication in 100 mL, deliver over 30 minutes,” use:

When IV therapy is administered, the fluid enters the circulation immediately. The adult adapts best to fluids at a steady rate of 20 to 60 regular gtt/minute’in other words, 80 to 250 mL/hour. Larger amounts of fluids increase the work of the heart, and the fluid overload could lead to congestive heart failure.
Factors that influence the rate of flow of an IV solution are the size of the catheter, the height of the solution container, and the viscosity of the fluid. Fluids flow less rapidly through a catheter with a small bore (internal diameter) than through a catheter with a larger bore. The higher the container is held, the faster is the flow of fluid. Packed red blood cells (RBCs) are more viscous and require a larger catheter.
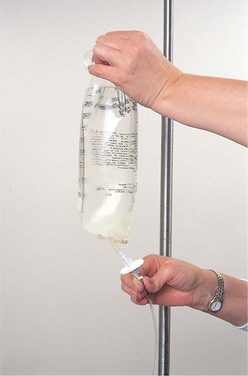
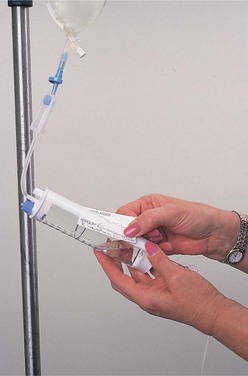
The physician generally orders 1000 mL of IV fluids to infuse over an 8-, 10-, or 12-hour period. This amount should infuse at an even rate so that equal amounts are given each hour. When the number of hours is stated, you should prepare a time tape to be placed on the bag that shows the amount to be infused each hour and the level of the solution remaining in the bag at 0900, 1000, 1100 and so forth (Figure 36-12). To correctly determine the amount of fluid left in the bag, hold the bag on both sides and gently stretch the plastic. At eye level, read the volume of the meniscus for the remaining solution (Figure 36-13). Time tapes are not always placed on the bag when an IV pump is used.

Keep the IV on time by regulating the drip rate. If IV fluids are infusing behind schedule, recalculate or reschedule the time in consultation with the charge nurse or the physician. Check to see that the IV is infusing on time every 30 to 60 minutes, particularly if the fluid is not being administered by an infusion pump. If the infusion will not flow at the ordered rate, a variety of factors may be responsible. Table 36-3 indicates steps for attempting to get sluggish IV flow corrected.
Table 36-3
| CHECK | RATIONALE |
| Height of infusion container | Patient may have changed position. The container should be at least 36 inches above the heart. |
| System vent | Air vent may be absent or occluded, which will prevent the flow. |
| Position of tubing | Tubing may be kinked, obstructing flow. Tubing may be hanging below the bed, interfering with the gravity flow. |
| Position of the extremity where the site is located | Flexion of the extremity may have compressed the vein, slowing the flow. |
| Any possible obstruction to flow | A protective device on the limb may be too tight. Tape may be compressing the circumference of the extremity. |
| When filter was changed | Filter may be occluded. |
| Position of the catheter within the vein | Catheter may be lying against the vein wall, obstructing flow. Slightly turning the catheter to reposition the tip may cure the problem. |
| If other measures have not opened the line, attempt to aspirate blood from the catheter. | A small clot may be obstructing the catheter. Aspiration may withdraw the clot. |
| Never force flush an IV catheter | Forcefully flushing a catheter sends the clot into the bloodstream. This creates an embolus that could lodge anywhere in the body, including the brain, heart or lungs. |
Implementation
The implementation phase of the nursing process includes all the tasks involved in caring for the patient undergoing one of the various types of IV therapy. With practice, the new nurse will become adept at connecting IV tubing, changing old tubing for new, calculating flow rates, adjusting the roller clamp to the correct drop rate, starting the IV, and detecting complications. Nursing guidelines for intravenous therapy are presented in Box 36-3.
The patient who has a peripheral IV will be a bit more limited in performing usual tasks. Help may be needed to open containers on the dietary tray, and if the IV is in the dominant hand, assistance may be required for many of the tasks of daily living.
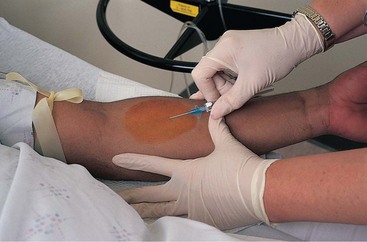
Initiating Intravenous Therapy: Considerable preparation is necessary before venipuncture is performed: gather the equipment, obtain or prepare the IV infusion (with or without medication), select the most appropriate vein, and prepare the site (Skill 36-1). The sites most frequently used for peripheral IVs are the veins of the forearm and hand. The foot veins are used only when no other site is available. The veins that are so prominent in the antecubital space are not used extensively for IV infusions because movement causes irritation or damage to the vein, and keeping the arm extended may cause muscle or nerve damage. Scalp or umbilical veins are frequently used in infants because the veins of the arms are too small or may be too difficult to locate or enter with the catheter.
Skill 36-1 Starting the Primary Intravenous Infusion
Before an IV catheter is inserted, the solution to be infused is set up so that it will be immediately ready to be infused when the IV access is initiated. Be especially careful to maintain aseptic technique when handling IV fluids and tubing, as an IV site provides access for bacteria to enter the bloodstream.

 IV solution with prepared time tape
IV infusion pump (according to agency policy)
IV start kit (usually includes: chlorhexidine swabs, alcohol swabs, label, tape, transparent dressing, tourniquet)
Review and carry out the Standard Steps in Appendix 3.
3. ACTION Obtain the correct IV solution; check the solution with the order.
RATIONALE Following the five rights of medication administration applies to IV fluids and to additives.
4. ACTION Remove the covering from the IV bag, and check the solution for clarity, leaks, and particulate matter. Note the expiration date.
RATIONALE If the sterility or safety of the solution is in question, it must not be infused. The solution must not be out of date.
5. ACTION Open the administration set, and position the roller clamp where it will be easy to reach and regulate while watching the drops in the drip chamber. Close the roller clamp, and remove the pull tab over the IV bag spike port. Be careful to keep it sterile while removing the cap on the tubing spike. Insert the spike, being careful not to touch the spike to anything but the inside of the spike port.
RATIONALE If the roller clamp is not closed, the fluid will run quickly through the tubing and out when the bag is inverted. If a break in aseptic technique occurs, the tubing or solution must be discarded.
6. ACTION Squeeze the drip chamber while raising the bag and then place the container on a hook or IV stand. Allow the drip chamber to fill partially.
RATIONALE Filling the drip chamber in this manner reduces the amount of air bubbles that enter the IV tubing.
7. ACTION Remove the air from the tubing by slowly opening the roller clamp after loosening the protector cap over the needle adapter to allow the air to escape; allow a small amount of fluid to escape from the tubing, verifying that all air is removed. Close the roller clamp and retighten the cap.
RATIONALE Any air left in the tubing might infuse into the patient and cause an air embolus. Although several milliliters of air must accumulate before serious damage could occur, patients are very conscious of the possibility of a problem with air in the tubing, and for psychological reasons, as much air as possible should be removed from the tubing.
8. ACTION Place a time tape label on the IV container, and mark it in gradations of the amount of fluid to be infused every 1 to 2 hours.
RATIONALE When time markings are indicated at different fluid levels, it is easy to see at a glance if the IV is flowing correctly according to the rate ordered.
9. ACTION Verify the IV solution and additives, if any, with the MAR. Take the IV solution and the MAR to the patient’s bedside.
RATIONALE Following the Five Rights prevents medication errors. The MAR is necessary to identify the patient and to perform the third medication check.
10. ACTION Verify the patient’s identification. Prepare commercial securement device or three or four pieces of tape, and place them conveniently.
RATIONALE Proper patient identification prevents medication errors. Tape is needed to secure the IV tubing to the patient.
Placing the IV Catheter and Starting the Infusion
11. ACTION Remove excess hair from the site if necessary by clipping (do not shave) the area around the chosen site and where the adhesive will be applied.
RATIONALE Hair harbors microorganisms and can contribute to infection; the patient experiences discomfort when adhesive is removed if it is placed over hair.
12. ACTION Turn on the examination light, allow the extremity to hang down off the bed for a short time, or wrap it in a warm moist pack for 15 minutes to distend the vein. Prepare the IV start equipment and perform hand hygiene.
RATIONALE Good light is necessary to visualize the vein adequately. The vein must be distended to introduce the cannula.
13. ACTION Apply the tourniquet and check the site suitability. The tourniquet should be positioned on the mid-forearm if the dorsum of the hand is to be used. If the forearm area is to be used, the tourniquet is placed on the upper arm or at least 4 to 6 inches above the site. Do not place the tourniquet so tightly as to restrict arterial flow. Release the tourniquet.
RATIONALE Identifies best site. The venous flow must be restricted in the vein for it to distend enough to introduce the cannula. Releasing tourniquet promotes comfort while preparing equipment.
14. ACTION Put down a protective pad under the extremity, and cleanse the site according to agency policy. Usually, this is done with chlorhexidine. (Povidone-iodine and alcohol may also be used.) Start at the center, and work in a circular motion outward for 2 inches. Allow the area to dry. Do not wave your hands or blow on the area to dry it.
RATIONALE A protective pad will prevent bedding and other surfaces from becoming soiled with the cleansing solution or contaminated with blood. Microorganisms, if left on the skin, may cause infection. (After cleaning area with povidone-iodine, allow area to dry completely and wipe area with an alcohol swab if you have trouble visualizing vein.) Waving over the area or blowing on it deposits microorganisms on the newly cleansed skin.
15. ACTION Don gloves, reapply the tourniquet; ask the patient to open and close the fist a couple of times, and then hold it closed. Stabilize the skin below the IV site by placing your thumb about 2 inches directly below the insertion site. A local anesthetic at the insertion site is sometimes allowed by agency policy.
RATIONALE Gloves are required when contact with blood is possible. Using a tourniquet and opening and closing of the fist distend the vein. For the cannula to enter the vein smoothly, the skin must be taut. This also causes the least discomfort for the patient. The use of a local anesthetic is controversial. Either a physician’s order or an agency protocol is necessary before using an anesthetic.
16. ACTION Insert the IV cannula into the vein by either the indirect or the direct method. Using the indirect method, first insert the cannula into the subcutaneous space directly parallel to the side of the vein, then move the tip toward the vein, and gently ease the cannula into the vein. Using the direct method, hold the cannula with the bevel upright and at a 15- to 25-degree angle to pierce the skin, and then lower the cannula until it is nearly parallel to the skin when piercing the vein. Enter the skin and vein in one quick, steady, forward thrust. Decreased resistance will be felt as the needle enters the vein. A pop may be felt. When the cannula punctures the vein, you will see blood (flashback) return into the hub of the unit.
RATIONALE The indirect method of cannula insertion has less chance of pushing completely through the vein. The direct method is best when the vein is large and stable.
17. ACTION After you see the flashback, insert the cannula an additional  inch and then slide the catheter off the stylet into the vein for its full length while keeping the stylet steady. Remove the tourniquet and ask the patient to open the fist. If you go through the vein wall, remove the tourniquet, withdraw the whole unit, and apply pressure.
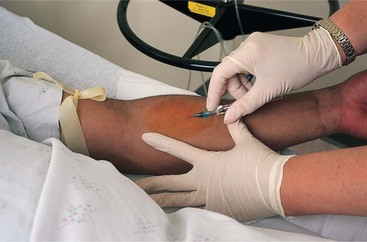
RATIONALE Advancing the cannula when it is not in the vein will cause pain and tissue damage. The stylet should not be advanced after the catheter is positioned through the vein wall; only the catheter should be advanced into the vein. Otherwise, the stylet may go through the vein. The tourniquet will impede the flow of IV solution. Pressure may be applied to the vein with one hand to prevent bleeding while the tubing is attached. If the IV stylet or the catheter goes through the vein, this site cannot be used because fluid will leak out of the vein.
18. ACTION Remove the protective cap over the needle adapter on the IV tubing, attach the tubing to the catheter hub, and open the clamp to begin the infusion slowly. Observe the site for swelling or leaking, indicating that the site is not patent.

RATIONALE Starting the solution flowing slowly establishes the patency of the IV before much fluid is infused. If the IV is not patent, little fluid will infiltrate the tissue. The solution is stopped and the catheter is removed if the site is not patent.
19. ACTION If the site is patent, secure the catheter with a manufactured catheter stabilization device. (This is a new recommendation from the Infusion Nurses Society; use of nonsterile tape around the insertion site is not considered an acceptable method.) Apply a transparent dressing. Loop the IV tubing on the extremity, and secure it again with tape. Supply an arm board as needed to immobilize or support the IV area. Label the dressing with the date and your initials.
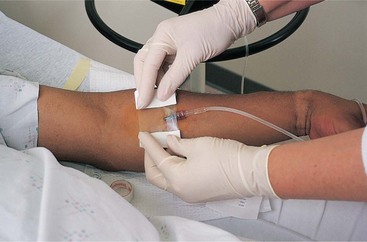
RATIONALE A transparent dressing protects the site from microorganisms while allowing visualization of the site. Taping the IV tubing prevents direct pull on the catheter, which could possibly dislodge when the patient moves around.
20. ACTION Regulate the solution flow according to the order by adjusting the roller clamp and counting the drops per minute (or set the infusion pump to infuse at the correct rate).
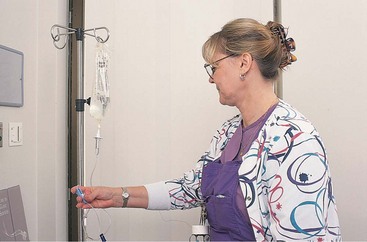
RATIONALE The position of the arm, movement, and securing the catheter to stabilize it in the vein can alter the rate of flow.
21. ACTION Verify that the solution is running at the correct rate into the vein without pain and that the IV catheter is held securely in place.
RATIONALE Ensures that the IV is patent and secure.
22. ACTION Clean up used supplies and make patient comfortable. Remove gloves and perform hand hygiene.
RATIONALE Prevents spread of microorganisms and facilitates patient well-being.
Verify patient allergies before cleansing the skin at the insertion site or touching patient with a latex glove.
If unsuccessful with venipuncture after two tries, ask another nurse to attempt the venipuncture.
Apply an arm board if the IV site is close to the bend of a joint. (See agency policy on protective devices.)
Carefully instruct patient and family about the signs of infiltration and complications of intravenous therapy when receiving home therapy.
An IV site is changed according to agency policy’every 72 hours is recommended for a peripheral IV site.
Never perform venipuncture in an extremity where there is a hemodialysis access shunt or on the side of a mastectomy or paralysis.
If the solution is running too slowly, check the site for infiltration. Adjusting the securing device or dressing over the catheter may help. Slightly rotating the catheter may move the tip away from the vein wall.
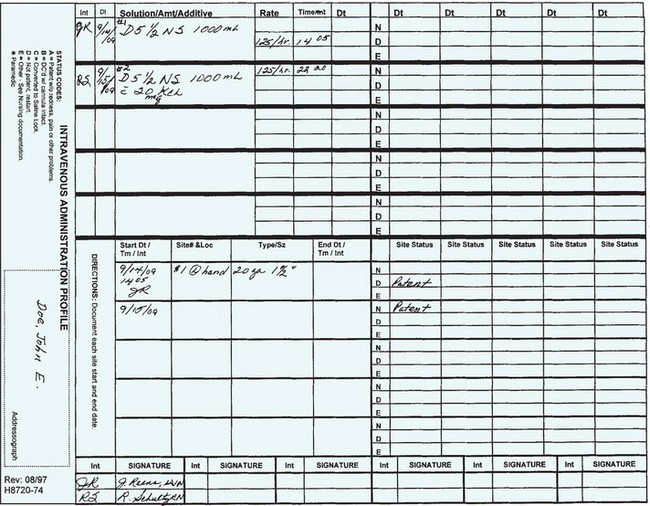
It is necessary to be able to feel or see the vein before initiating venipuncture. If there is difficulty detecting the vein, a device called the venoscope can be used to illuminate the tissue and outline the vein. Agency policy will provide guidelines for IV catheter insertion. Students must have supervision when performing a venipuncture. Gloves must be worn and strict asepsis must be maintained when performing venipuncture to prevent infection. Whenever an IV site is initiated or changed, or an intravenous solution is hung, it is documented on the parenteral infusion record (Figure 36-14).
In the past, the catheter was secured with tape. For example, a strip of ½-inch tape was placed under the hub, sticky side up; then the ends were crisscrossed to form a “V” over the hub or the ends were folded to form a “U” and then secured to the skin. An antibiotic dressing and a small sterile gauze dressing were then applied at the peripheral IV catheter insertion site. However, gauze dressings obscure the site and transparent dressings are now more commonly used. Antibiotic ointment is not recommended because it can actually contribute to the growth of fungal infections and antimicrobial resistance (Kraemer-Cain & Siegel, 2006). In 2006, the Infusion Nurses Society released new standards and now recommends that catheters should be secured with a manufactured catheter stabilization device, usually with a see-through area, rather than using nonsterile tape.
For pediatric patients (or confused elders) who are pulling at the tubing and catheter, a sleeve or roller gauze can be used to cover the site and equipment. Alternatively, a commercial shield shape can be taped over the catheter site (Figure 36-15). Using these devices can prevent accidental dislodgement; however, they do obscure quick visualization of the site.

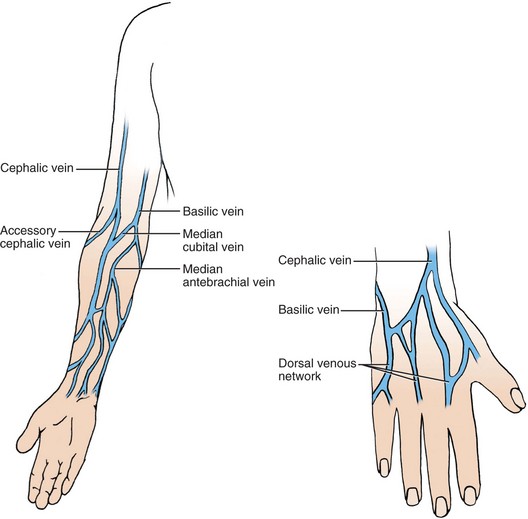
Selection of the IV Site.: Selection of a vein for IV use depends on several factors, including the accessibility of the vein, its general condition, the type of fluid or medication to be given, and the duration of IV therapy. The veins preferred for infusions and intermittent doses of medications are those distal to the antecubital area. The cephalic, basilic, and antebrachial veins of the lower arm and the veins on the back of the hand are the sites of choice for most adult patients (Figure 36-16).
The scalp veins are frequently used in infants because they are easily accessible and the needle is less apt to be dislodged from this site. Veins of the foot are used only when no other site can be used.
Managing Intravenous Therapy: When your patient has an IV, you are responsible for ensuring that the infusion flows at the prescribed rate and that the solution is the one that was ordered. Movement of the patient can alter the rate. It is best to check the flow rate after the patient has been ambulating, returns from a test or treatment, is settled after morning care, has been turned in bed, or has been up to the bathroom.
Keeping the IV Solution Running.: A primary responsibility is to check the IV each time the patient is observed and to see that it is running properly. Check it every 30 to 60 minutes, and observe each of these points with the eyes traveling from the solution container, down the tubing, and to the catheter site:
• The IV flow. The solution should drip into the chamber at regular intervals.
• The rate of the infusion. Check the time tape to see if the level of fluid is where it should be for the time elapsed. Count the rate. If it is too fast or too slow, it should be adjusted to the correct infusion rate per minute.
• If a pump is used, check the programmed rate and volume; the dripping in the chamber will occur intermittently.
• The insertion site. Are there any signs of infiltration or phlebitis?
• Complaints from the patient. After the IV hasbeen started, it should not cause any pain or discomfort and there should be no leaking at the site.
• The level of the fluid remaining in the bag. When there is 50 mL left, a new bag may be added before the current solution is completely infused (Skill 36-2).
Skill 36-2 Adding a New Solution to the Intravenous Infusion
When an IV is to remain in place, another container of solution must be hung before the last solution container runs dry. The new solution is hung when the solution that is infusing reaches a level of about 50 mL remaining.
Review and carry out the Standard Steps in Appendix 3.
4. ACTION Go to the patient’s bedside, and properly identify the patient. Inspect the IV site for signs of complications.
RATIONALE Identifying the patient properly helps prevent medication errors. If the IV site shows signs of infection or infiltration, the site should be changed before the new solution is added.
5. ACTION Hang the IV container on the IV pole. Remove the container that is almost empty, crimp the tubing close to the drip chamber or close the roller clamp, and remove the spike from the used container. Keep the spike from becoming contaminated. Remove the tab from the IV tubing port on the new container, and insert the tubing spike while stabilizing the container with your other hand.
RATIONALE The tubing must be occluded while you change IV containers to prevent air from entering the tubing. If the spike becomes contaminated, new tubing should be obtained. Stabilizing the container helps prevent slipping and contaminating the spike while it is being inserted into the container.
6. ACTION Remove any air bubbles that entered the tubing by tapping the tube with your finger or a pencil as you stretch it taut. Squeezing the tubing below the bubbles will sometimes encourage them to move up to the drip chamber.
RATIONALE Air bubbles can cause an air embolus if sufficient air collects. Patients are disturbed by the sight of air bubbles in the IV tubing. Air will move upward to the drip chamber when dislodged from the side of the tubing.
7. ACTION Check the flow rate and readjust it as needed to the prescribed rate.
RATIONALE The greater quantity of fluid in the new container causes a bigger pressure gradient, and the new solution may flow more rapidly.
8. ACTION Dispose of the empty container in the proper receptacle. Remove and destroy any labels that include the patient’s name.
RATIONALE Some agencies require that the container be drained dry before discard. Careful handling of materials with patient’s name prevents violations of the Health Insurance Portability and Accountability Act (HIPAA).
1. You are performing the initial morning assessment for your patient. You find that the bag that is infusing is not the correct solution according to the report that you received at shift change. What would you do?
2. At what point would you switch out the old IV solution for the new solution? (How much is left in the bag?) Why would you choose to change the solution at this point?
The solution container is hung from an IV stand or pole. The tubing should be long enough to provide room for the patient to move about in bed, to turn over, or to carry out necessary activities. Soft restraints are needed for children and confused patients who might pull out the IV or cause it to infiltrate.
Administering Intravenous Medications: Medications can be given by the IV route as one-time (stat) or PRN doses, as multiple doses to be given at regularly scheduled times, or by continuous infusion. Instructions for preparing medications for IV use frequently require diluting the drug in large amounts of fluid (50 to 250 mL or more); this is essential for such drugs as potassium chloride and antibiotics, which, in concentrated form, cause irritation of the vein.
In coronary or intensive care units, drugs such as lidocaine (Xylocaine) are given very slowly by bolus and by infusion. When the nurse gives the drug in a bolus, the entire amount is injected into the vein over a short period to obtain immediate effects. Therefore, the nurse must be thoroughly familiar with not only the drug’s action and side effects but the proper dose parameters and recommended infusion time frames. One of the 2009 National Patient Safety Goals is to “reduce the likelihood of patient harm associated with the use of anticoagulation therapy.” Nursing measures to meet this goal would include scrupulous attention to dosage and adjustment of IV infusions such as a heparin drip; use of an IV pump is mandatory for safe and controlled delivery. For example, agency protocol may allow RNs to adjust the IV dose of heparin based on laboratory values such as partial thromboplastin time (PTT), or policy may dictate that the physician is notified about each laboratory value and then he will order specific dosage adjustments. Nursing students should not adjust the dosage or change the pump settings of heparin infusions; however, you are responsible for monitoring for bleeding signs such as bruising, bleeding of the gums, or blood in the stool or urine.
If a medication is administered too rapidly, speed shock may occur. Speed shock is a systemic reaction that occurs when a substance unfamiliar to the body is infused rapidly. Signs of speed shock are light-headedness, tightness in the chest, flushed face, and irregular pulse. The patient may lose consciousness, go into shock, and suffer cardiac arrest.
Various methods are used to administer IV medications, such as adding medications to the primary bag of fluids (usually potassium), adding a secondary line or piggyback to the primary line, using controlled-volume burettes, or directly injecting the medication into the vein (Skill 36-3).
Skill 36-3 Administering Intravenous Piggyback Medication
Various types of medications are administered intermittently by piggyback or secondary line administration. The drug solution is prepared by the pharmacy. Some drugs in solution must be refrigerated. If this is the case, the medication should be removed from the refrigerator 30 minutes before administration.
Review and carry out the Standard Steps in Appendix 3.
3. ACTION Open the secondary (piggyback) administration set, close the clamp, and insert the spike end of the tubing into the tubing port, using aseptic technique.
RATIONALE Prepares the solution for infusion.
4. ACTION Squeeze the drip chamber while inverting the IV piggyback container, and hang it from an IV hook.
RATIONALE This maneuver partially fills the drip chamber so that air will not flow into the tubing.
5. ACTION Loosen the connector cover; slowly open the clamp, and clear the air by running fluid through the tubing.
RATIONALE Allows fluid to run through the tubing without allowing more air to bubble into the tubing.
6. ACTION Verify the drug and dosage again, and go to the patient’s room. Properly identify the patient, checking the identification band. If infusing an antibiotic, reverify any allergies the patient might have.
RATIONALE Following the five rights helps prevent medication errors. Antibiotic allergies can be life threatening if a drug is infused to which the patient is allergic.
7. ACTION Hang the piggyback container on the IV pole. Cleanse the injection port of the primary site with an alcohol swab.
RATIONALE Prevents introduction of microorganism into the bloodstream when the IV piggyback is connected.
8. ACTION Attach the IV piggyback tubing to the port with a needleless adaptor or a snap lock device; open the clamp of the secondary set, and adjust the rate of flow. If the piggyback will not flow, lower the primary IV container using an IV hanger.
RATIONALE The flow rate must be set accurately so as not to cause harm to the patient from too rapid infusion.
9. ACTION Evaluate whether the medication is effective by assessing for signs of improvement in the problem for which it is being given. Determine that the vein into which the medication is flowing is not becoming irritated.
RATIONALE Monitoring blood counts and other lab values, as well as vital signs, and assessing the patient’s well-being are all part of the evaluation. Some medications are very irritating to the vein.
10. ACTION Assess for adverse or side effects to the medication administered.
RATIONALE If adverse effects occur, the medication needs to be discontinued.
Always assess for allergies and adverse effects before infusing each dose of medication.
Use a needleless connector with a securing clamp to attach the piggyback to the primary tubing, or tape the connection so it doesn’t pull apart with patient movement.
Always assess the IV site before infusing an IV medication to make certain that the IV site is patent.
Note the times IV medications are to be given on your worksheet; for medication drug levels to stay constant, the medication must be started on time.
Some potent drugs and those causing irritation in concentrated strengths are diluted in 1000 mL of fluids. Typical drugs used in this way are potassium, insulin, sodium bicarbonate, calcium, magnesium sulfate, vitamin B complex, and vitamin C. Most of the time these medications will be added by the pharmacist, but you must know how to do this. Use strict aseptic technique when adding medications to IV fluids (Steps 36-1, p. 737). Needleless systems are most often used to administer IV medications.
Medications that are given intermittently at timed intervals may be diluted in a small amount of fluid and administered by the piggyback method. The medication is added to a small bag of fluid, usually 50 to 150 mL. When the patient has a PRN lock rather than a continuous IV infusion, the method of hanging an intermittent infusion differs slightly (Skill 36-4, pp. 737–738).
Skill 36-4 Administering Medication via Saline or PRN Lock
When the patient does not need large quantities of IV fluid but does need IV medications intermittently, a capped catheter, or PRN lock, is inserted. If an IV is already infusing, it can be changed to an intermittent IV by removing the tubing and attaching an injection cap to the catheter.
IV cannula and injection cap (or extension set with injection cap)
IV start kit (usually includes: chlorhexidine swabs, alcohol swabs, label, tape, transparent dressing, tourniquet)
Syringe and needleless connector or snap connector
Review and carry out the Standard Steps listed in Appendix 3.
Flushing the Saline or PRN Lock
3. ACTION Perform hand hygiene, prepare the skin, don gloves, and insert the IV cannula (see Skill 36-1).
RATIONALE Provides an IV access.
4. ACTION Flush the injection cap (or extension set with cap) with saline and attach it to the catheter; flush with 2 mL of normal saline.
RATIONALE Places solution in the catheter to help prevent clotting and demonstrates patency of the catheter.
5. ACTION Secure the lock with the commercial securement device. Label the site with the date and your initials.
RATIONALE Prevents the lock from dislodging. Shows when the lock was started.
Administering Medications via the Saline or PRN Lock
6. ACTION Prepare the medication following the Five Rights. The medication may be mixed as an IV piggyback or drawn up in a syringe.
RATIONALE Helps prevent medication error.
7. ACTION Prepare a syringe containing normal saline.
RATIONALE Saline injection is used to test the patency of the lock. Flushing with saline will clear the lock of medication and leave fluid in the lock to prevent clotting.
8. ACTION Cleanse the cap with an alcohol swab. Insert the needleless connector into the bull’s eye on the lock or connect the syringe to the lock, and aspirate for blood return to determine the patency of the lock. If you cannot aspirate blood, the lock is not necessarily blocked because the catheter may just be against the side wall of the vein. Slowly inject the saline. If resistance occurs, stop and replace the lock.
RATIONALE Helps prevent introduction of microorganisms. Verifies that the lock is patent before the medication is injected.
9. ACTION Verify the drug, dosage, and patient identification one more time, and then hook up the IV piggyback or inject the medication over the recommended period.
RATIONALE Following the Five Rights helps prevent medication errors.
10. ACTION After the medication administration is completed, flush the lock with 2 mL of normal saline. Some agencies follow the flush with a heparin solution; check agency policy.
RATIONALE Prevents a blood clot from forming and occluding the catheter.
11. ACTION Clean up used equipment and make the patient comfortable. Remove the gloves.
RATIONALE Restores order in the unit. Prevents transfer of microorganisms.
Another method of administering IV medications is to mix them in a small amount of solution in a controlled-volume burette (Skill 36-5). Medications given by the controlled-volume burette will interrupt the primary infusion of fluids, as does the piggyback setup. The controlled-volume burette is different in two respects that limit its usefulness. First, the medication must be monitored closely, and the clamp must be opened to restart the flow of the primary solution when the medication has infused. Second, the tubing has to be reused for subsequent fluids and additional doses of medication, thus increasing the possibility of contamination. It does enable accurate measurement of the amount of fluid infused at one time. All medications are administered following the five rights and are documented on the medication administration record (MAR).
Skill 36-5 Administration of Medication with a Controlled-Volume Set
A controlled-volume set is still sometimes used when small amounts of fluid are required just to keep a vein open, for pediatric or elderly patients, when infusion pumps are not available, or when backup safety for a pump is needed. They are also sometimes used for diluting doses of medication in place of the IV piggyback container.
Review and carry out the Standard Steps listed in Appendix 3.
2. ACTION Calculate the drop rate (or the pump setting) to instill the medication in the correct amount of time. Note the ending time on your daily work sheet.
RATIONALE The medication must be administered over a set period of time. The primary IV must be opened again as soon as the medication finishes.
3. ACTION Prepare the medication, and draw it up in a syringe.
RATIONALE Provides a way to add the medication to the burette.
4. ACTION Take the syringe and the MAR to the patient’s bedside. Properly identify the patient, and recheck the medication.
RATIONALE Helps prevent medication errors.
5. ACTION Fill the burette by opening the upper clamp on the tubing to the primary bag and running 50 to 150 mL of fluid, as specified in the order. Close the clamp on the upper tubing to the solution bag.
RATIONALE Provides for dilution of the medication.
6. ACTION Lower the burette, locate the injection port on the top of it, cleanse the injection port with an alcohol swab, and inject the medication. Mix the medication with the solution by gently tilting the burette back and forth.
RATIONALE Dilutes the medication for the ordered dosage.
7. ACTION Open the lower clamp, and adjust the rate of flow from the burette.
RATIONALE Begins the medication infusion.
8. ACTION Label the burette with the name of the drug, dose, time, rate, and your initials.
RATIONALE Identifies the contents of the burette.
9. ACTION When the burette empties, restart the flow from the primary bag by opening the clamp on the upper tubing. Adjust the flow rate.
10. ACTION Evaluate the IV site to see if the medication causes irritation of the vein. Evaluate the patient for signs that the medication is effective. Assess for adverse effects.
RATIONALE Some medications are irritating to the vein. Points to assess for effectiveness of the medication depend on the type of medication and its purpose. Assessment for adverse effects should be accomplished before administering each successive dose.
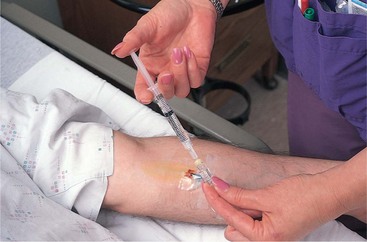
Giving the medication directly into the vein over a few minutes is termed giving a bolus, or IV push injection (Steps 36-2, Safety Alert 36-2). The medication can be instilled via the injection port on the IV tubing, or through a PRN lock, or given directly into the vein. Many state nurse practice acts do not allow LPN/LVNs to give a bolus injection.
Administering Antineoplastic Medications: Antineoplastic medications are used to destroy or alter the growth of malignant cells and are very toxic to normal as well as abnormal cells. Many are very irritating to tissue. These drugs are often referred to as chemotherapy drugs. Because of their toxicity, special precautions are used in preparing and administering these drugs. Each toxic antineoplastic drug usually has a special label attached with a caution warning (Safety Alert 36-3).
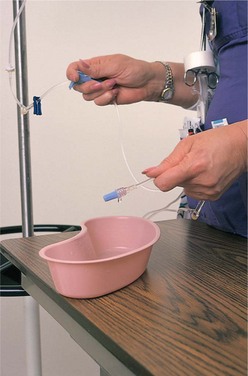
Discontinuing an IV Infusion: When an infusion is to be discontinued, the flow is stopped and the catheter is removed (Steps 36-3). Discontinuation is documented on the IV flow sheet.
Administering Blood and Blood Products: A transfusion is the IV administration of whole blood or one or more of its components. Components frequently transfused include fresh or frozen plasma, packed red blood cells, and platelets. Autologous (from the patient’s own body) infusions are common during and after surgery. In this instance, the patient’s own blood is reinfused. Blood is either collected during surgery (e.g., from chest drainage) or donated by the patient during the weeks prior to surgery for later reinfusion.
A consent to receive blood must be signed by the patient (Legal & Ethical Considerations 36-1). The consent usually must be signed no more than 48 to 72 hours prior to receiving the blood product. If a reaction to the blood occurs, the blood should be instantly shut off. Start the saline (with fresh tubing) to keep the IV access open, in case emergency drugs are needed (Skill 36-6).
Skill 36-6 Administration of Blood Products
Blood components are administered for a variety of reasons. Packed red cells are commonly given for acute or chronic anemia. Platelets and fresh frozen plasma are transfused to replenish platelets and provide clotting factors. There is no margin for error when administering blood products because adverse reactions can be life threatening. In accordance with 2009 National Patient Safety Goals, the nurse must use two identifiers for patient identity, and room number or location cannot be used. The patient name and number on the ID bracelet, or the patient verbally stating name and birth date, are suitable identifiers. Most agencies require that two nurses verify the ordered blood component with the component the blood bank supplies and correctly match up the patient numbers with the blood component unit numbers. In emergency situations, the blood may need to be administered with a pump so that it will flow more quickly. A signed consent is needed before a blood product administration begins. Special tubing with a filter is used for blood components. An extra filter on the bag is required for some blood products. A “Y” tubing set is commonly used for transfusion of packed red cells.
Review and carry out the Standard Steps listed in Appendix 3.
2. ACTION Gather the equipment, verify that the patient is ready, and obtain the blood product from the blood bank. (Packed red cells are the component used for this example.)
RATIONALE Saves time; administration of the blood product must begin within 30 minutes of the time the product leaves the blood bank.
3. ACTION With another nurse, verify the blood component, and compare the donor numbers and the ABO group and Rh type on the request slip with the label and numbers on the blood component bag. One nurse should read the numbers from the blood bank transfusion record slip while the other checks the numbers on the blood component bag. Verify the expiration date on the blood component bag; check the bag for clots.
RATIONALE For safety, two nurses must verify the order, and match the numbers on the blood component with those on the transfusion record slip. The blood component may not be transfused after the expiration date. If the unit contains clots, it should be returned to the blood bank.
4. ACTION Close all clamps on the “Y” administration set. Spike a normal saline container. Prime the filter and tubing with normal saline by opening the slide clamp below the drip chamber of the normal saline and the lower roller clamp. Spike the blood component bag. For packed red cells, invert and lower the packed red cell bag, open the clamp to the bag, and open the slide clamp to the normal saline while keeping the roller clamp closed. Allow about 50 mL of saline to run into the packed red cells. Close the clamps.
RATIONALE A “Y” set is always to be used for blood component infusion. Priming the filter and tubing with normal saline removes air and eases the way for blood flow. Combining a small amount of saline with packed red cells, if within agency protocol, decreases the viscosity and helps the blood infuse more easily. Care is taken to close clamps so that none of the blood product is accidentally lost.
5. ACTION Take the administration set to the patient’s room; properly identify the patient, comparing the full name and hospital identification number on the patient’s wristband with the transfusion record information. Compare the blood bracelet identification number with the number on the blood component.
RATIONALE It is mandatory that all identifying information and numbers match exactly. If discrepancies occur, notify the blood bank. Transfusions are not begun until the discrepancy is resolved.
6. ACTION Don gloves, and connect the “Y” administration set to the indwelling catheter. Start the normal saline to clear the catheter, and verify the patency of the site.
RATIONALE Gloves must be used when contact with blood is likely. The patency of the site must be verified before beginning the transfusion.
7. ACTION Obtain baseline vital signs. If the patient’s temperature is over 100° F, consult the physician. Assess the patient’s physical status, particularly looking for signs or symptoms that mimic a transfusion reaction.
RATIONALE Baseline data are essential. Knowing the patient’s baseline physical status helps determine later if a transfusion reaction is occurring.
8. ACTION Clamp off the saline, and open the clamp to the blood. Set the flow rate at 2 mL/min for the first 15 minutes. Remain with the patient for at least the first 5 minutes. Reassess the patient and take vital signs at the end of 15 minutes. If there are no signs of an adverse reaction, the infusion rate may be increased to the calculated flow rate. Take vital signs at the end of 30 minutes and then every 30 minutes until the transfusion is complete. Follow your agency’s protocol. Ask the patient to tell you if she feels “funny,” or has chills, back pain, itching, or shortness of breath. Watch for flushing. Blood must be infused within 4 hours of release from the blood bank. Monitor the drip rate continuously and use some normal saline to dilute the blood product as needed. Use of an infusion pump is recommended to help control the rate.
RATIONALE Begins the transfusion. Adverse reactions occur most frequently during the first 5 minutes, although delayed reactions can occur. The patient must be monitored throughout the transfusion for any signs of an adverse reaction. It is essential that the patient understand the importance of reporting any symptoms that differ from normal. Average infusion time is 2 hours per unit. Blood is viscous and the filters will clog and the flow will eventually stop; use of saline dilutes the blood product and decreases viscosity.
9. ACTION When the blood component has been infused, flush the line with normal saline. Reinstitute IV fluid orders with a new solution and tubing, or maintain saline at a “keep vein open” rate (30 to 50 mL/hr) until you are certain that the patient is stable and has had no reaction, then convert to a PRN lock, or discontinue the IV site per orders.
RATIONALE Previously hanging IV solution and tubing are considered contaminated and must be discarded.
11. ACTION Document the infusion on the IV flow sheet. Add the amount infused to the IV intake record. Attach the label from the blood bag with numbers of the unit and crossmatch identification numbers with the donor type and Rh type; note volume infused, date and time, any reaction signs and symptoms, and your signature. Adverse reactions must be charted in the nurse’s notes.
11/30 1440 Vital signs: T 98.4° F; BP 132/86; P 74; R 16. First unit of packed RBCs via 18 angiocath in rt. forearm. Begun at 2 mL/min. No signs of adverse effects in 15 min. Vital signs: T 98.4° F, BP 136/86; P 76, R 16. Flow rate adjusted to complete unit in 2 hours. Patient voiced no complaints._____________________ 1700 Transfusion complete; line flushed with normal saline. No adverse effects noted ___________________
A blood product infusion should begin within 30 minutes of leaving the blood bank.
A blood warmer may be used if the patient is in critical condition or is feeling chilly before infusion.
Blood transfusion should be checked every 15 to 30 minutes to ensure that it is running on time.
Blood components that are still hanging after 4 hours without refrigeration must be discontinued.
In the postinfusion period, the patient’s urine is observed for signs of hematuria, indicating a transfusion reaction.
If a transfusion reaction occurs, stop the blood, start saline with fresh tubing (do not merely flush the “Y” tubing with saline because the patient will receive any blood product that remains in the used tubing), stay with the patient, and immediately notify the physician. If shortness of breath occurs, start low-flow oxygen per agency protocol. Return the blood component bag to the blood bank with the transfusion reaction form.
Total Parenteral Nutrition: Patients may require IV therapy for long periods. Short-term therapy is usually considered to last up to 2 weeks; long-term therapy is 6 weeks or more (Home Care Considerations 36-1, p. 745). The nutritional status of patients who are NPO and on IV therapy must be assessed every day. Although the IV solution may contain dextrose, the amount of calories supplied is below the total daily requirement; moreover, the patient lacks other essential nutrients and bulk. One thousand milliliters of 5% glucose solution only provides 200 calories. Supplemental calories may be provided by the use of amino acids and fat emulsions. Dextrose in concentrations greater than 10% is best given through central lines because it is irritating to peripheral veins and can lead to thrombophlebitis. TPN is mainly given through a central line. Specially prepared solutions can be given peripherally, but these provide fewer calories because the dextrose content must be less. Information on TPN is found in Chapter 27 and in medical-surgical nursing texts.
Evaluation
Evaluation requires constant assessment of the patient. Evaluation of the effect of intravenous therapy relates to the reason it was given. If fluids are being given to hydrate the patient, check for good skin turgor, adequate urine output, and moist mucous membranes. If TPN is being given, assess the patient’s weight gain and monitor the blood glucose level. When IV antibiotics are administered, check the leukocyte count, temperature, and any wound to see if signs of infection are clearing; check for signs or symptoms of allergic reaction. When antibiotics are given to prevent infection after surgery, monitor the incision for signs of inflammation and track the body temperature to see if the medication is effective. When a blood product is administered, monitor the blood count to see if values improve. Monitor for signs and symptoms of transfusion reaction.
Documentation: Documentation of IV medication is done on the MAR. Data included in the documentation are similar to those for other types of medications (see Chapter 34 for documentation). In addition, the IV site is assessed every 1 to 2 hours according to agency policy and observations are entered on a flow sheet or in the nurse’s notes. IV fluid is counted as intake and recorded on the I & O sheet.
NCLEX-PN® EXAMINATION–STYLE REVIEW QUESTIONS
Choose the best answer(s) for each question.
1. Which solution is the most common vehicle for mixing IV piggyback medications?
2. A nurse is assessing the patient who has severe vomiting and diarrhea. The purpose of IV infusion for this patient is to:
1. provide fluids to reduce elevated temperature.
2. control the nausea and vomiting.
3. An important nursing responsibility when caring for a patient with a central line is to:
1. use sterile technique during insertion.
2. flush the line according to agency policy.
4. A patient is receiving a total of 4000 mL of D5W over 24 hours. How many calories will this fluid supply?
5. A nurse is adding a secondary piggyback to the patient’s existing IV. In order to use the gravity system, the nurse should hang:
1. the piggyback bag higher than the maintenance IV bag.
2. the maintenance IV bag at the same height as the piggyback bag.
3. the piggyback bag and the maintenance IV bag using “Y” tubing.
4. the maintenance IV bag after the piggyback bag is completed.
6. The nurse needs to establish a peripheral IV access on an adult trauma patient. Which catheter is the best choice?
7. The primary safety advantage of using a burette is that it:
1. is cost effective because it can be used more than once.
2. can be used for pediatric and elderly patients.
8. The nurse must assess for complications of IV therapy. Signs of common complications include: (Select all that apply.)
9. The patient is receiving a blood transfusion and begins to have symptoms within 10 minutes after the start of the transfusion. What is the priority action?
10. A patient returns from physical therapy (PT) and her IV has a very sluggish flow, but it was functioning well before going to PT. What is the priority nursing action?
1. Call PT and asked if anything happened to the IV during the treatment session.
2. Discontinue the IV and restart the IV at a new site.
3. Assess the IV insertion site and tubing and try repositioning the extremity.
11. The doctor orders D5W (5% dextrose in water) to infuse at 150 mL/hr. The nurse is using macrodrip tubing (10 gtt/mL). What is the drop rate? ____________ gtt/min
12. The doctor orders 1000 mL of normal saline (0.9% saline) to infuse over 8 hours. What is the pump setting?
? CRITICAL THINKING ACTIVITIES Read each clinical scenario and discuss the questions with your classmates.
Daris Hostetler has lost a lot of blood from injuries sustained in an automobile accident. The physician orders three units of packed red blood cells (RBCs) for him.
1. Describe the procedure used to prepare to infuse the first unit of packed RBCs.
2. What points are essential to check with another nurse for each unit of packed RBCs?
3. After the second unit is begun, Mr. Hostetler complains of shortness of breath and is very apprehensive. Identify the steps you would take in order of priority.