Principles of Management of Impacted Teeth
INDICATIONS FOR REMOVAL OF IMPACTED TEETH
Prevention of Periodontal Disease
Impacted Teeth Under a Dental Prosthesis
Prevention of Odontogenic Cysts and Tumors
Treatment of Pain of Unexplained Origin
CONTRAINDICATIONS FOR REMOVAL OF IMPACTED TEETH
CLASSIFICATION SYSTEMS OF IMPACTED TEETH
MODIFICATION OF CLASSIFICATION SYSTEMS FOR MAXILLARY IMPACTED TEETH
An impacted tooth is one that fails to erupt into the dental arch within the expected time. The tooth becomes impacted because adjacent teeth, dense overlying bone, excessive soft tissue, or a genetic abnormality prevents eruption. Because impacted teeth do not erupt, they are retained for the patient’s lifetime unless surgically removed or exposed because of resorption of overlying tissues. The term unerupted includes impacted teeth and teeth that are in the process of erupting.
Teeth most often become impacted because of inadequate dental arch length and space in which to erupt; that is, the total length of the alveolar bone arch is smaller than the total length of the tooth arch. The most common impacted teeth are the maxillary and mandibular third molars, followed by the maxillary canines and mandibular premolars. The third molars are the most frequently impacted because they are the last teeth to erupt; therefore, they are the most likely to have inadequate space for eruption.
In the anterior maxilla, the canine is also commonly prevented from erupting by crowding of other teeth. The canine usually erupts after the maxillary lateral incisor and maxillary first premolar. If space is inadequate to allow eruption, the canine becomes impacted or erupts labial to the dental arch. In the anterior mandible a similar situation affects the mandibular premolars because they erupt after the mandibular first molar and mandibular canine. Therefore if room for eruption is inadequate, one of the premolars, usually the second premolar, remains unerupted and becomes impacted or erupts into a buccal or lingual position in relation to the dental arch.
As a general rule, all impacted teeth should be removed unless removal is contraindicated. Extraction should be performed as soon as the dentist determines that the tooth is impacted. Removal of impacted teeth becomes more difficult with advancing age. The dentist should typically not recommend that impacted teeth be left in place until they cause difficulty. If the tooth is left in place until problems arise, the patient may experience an increased incidence of local tissue morbidity, loss of or damage to adjacent teeth and bone, and potential injury to adjacent vital structures. Additionally, if removal of impacted teeth is deferred until they cause problems later in life, surgery is more likely to be complicated and hazardous because the patient may have compromising systemic diseases and the surrounding bone becomes more dense. A fundamental precept of the philosophy of dentistry is that problems should be prevented. Preventive dentistry dictates that impacted teeth are to be removed before complications arise unless removal will cause more serious problems.
This chapter discusses the management of impacted teeth. The chapter is not a thorough or in-depth discussion of the technical aspects of surgical impaction removal. Instead, the goal is to provide the information necessary for proper management and a basis for predicting the difficulty of surgery.
INDICATIONS FOR REMOVAL OF IMPACTED TEETH
All impacted teeth should be considered for removal as soon as the diagnosis is made. The average age for completion of the eruption of the third molar is age 20, although eruption may continue in some patients until age 25. During normal development the lower third molar begins in a horizontal angulation, and as the tooth develops and the jaw grows, the angulation changes from horizontal to mesioangular to vertical. Failure of rotation from the mesioangular to the vertical direction is the most common cause of lower third molars becoming impacted. The second major factor is that the mesiodistal dimension of the teeth versus the length of the jaw is such that inadequate room exists in the alveolar process anterior to the anterior border of the ramus to allow the tooth to erupt into position.
As noted before, some third molars continue to erupt after age 20 particularly in males, coming into final position by age 25. Multiple factors are associated with continued eruption. When late eruption occurs, the unerupted tooth is usually covered with only soft tissue or slightly with bone. These teeth are almost always in a vertical position and are relatively superficially positioned with respect to the occlusal plane of the adjacent second molar, and completion of root development is late.
Finally and perhaps most importantly, sufficient space needs to exist between the anterior border of the ramus and the second molar to allow eruption.1,2 Likewise, if the tooth does not erupt after age 20, it is most likely covered with bone. In addition, the tooth is likely a mesioangular impaction and is located lower in the alveolar process near the cervical level of the adjacent second molar. Therefore the dentist can use these parameters to predict whether a tooth will erupt into the arch or remain impacted.
Early removal reduces the postoperative morbidity and allows for the best healing.3–6 Younger patients tolerate the procedure better, recovering more quickly and with less interference to their daily lives. Periodontal healing is better in the younger patient because of better and more complete regeneration of the periodontal tissues on the distal of the second molar. Also, nerve recovery is better if injured in younger patients. Moreover, the procedure is easier to perform in younger patients because the bone is less dense and root formation is incomplete. The ideal time for removal of impacted third molars is when the roots of the teeth are one third formed and before they are two thirds formed, usually during the late teenage years, between ages 17 and 20.
If impacted teeth are left in the alveolar process, it is highly probable that one or more of several problems will result.7,8
Prevention of Periodontal Disease
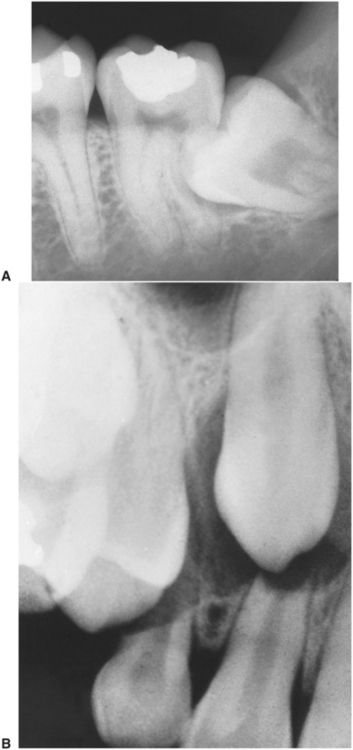
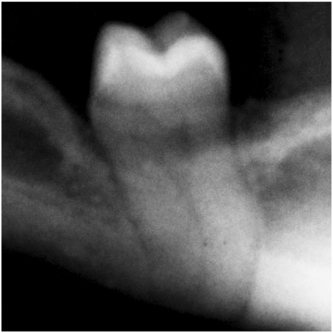
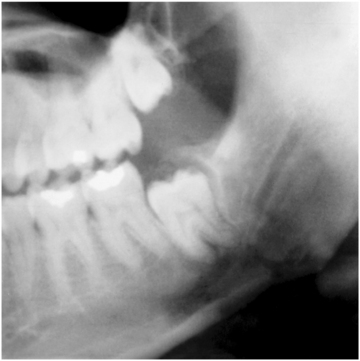
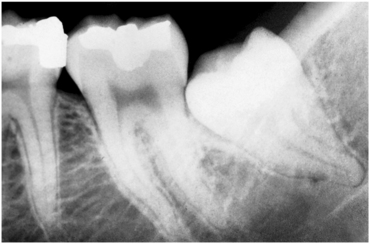
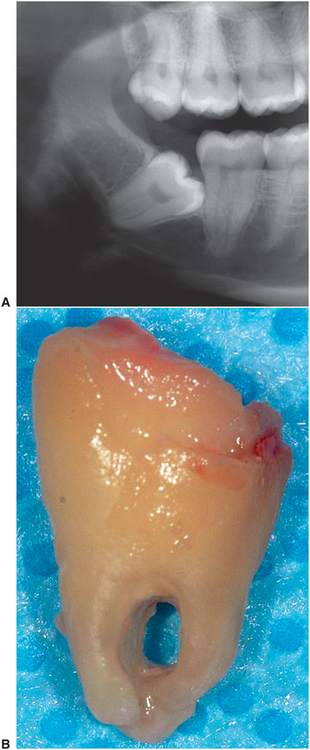
Erupted teeth adjacent to impacted teeth are predisposed to periodontal disease (Figs. 9-1 and 9-2). The mere presence of an impacted mandibular third molar decreases the amount of bone on the distal aspect of an adjacent second molar. Because the most difficult tooth surface to keep clean is the distal aspect of the last tooth in the arch, patients commonly have gingival inflammation with apical migration of the gingival attachment on the distal aspect of the second molar. With even minor gingivitis the causative bacteria have access to a large portion of the root surface, which results in the early formation of tooth-compromising periodontitis. Patients with impacted mandibular third molars often have deep periodontal pockets on the distal aspect of the second molars even though they have normal sulcular depth in the remainder of the mouth.
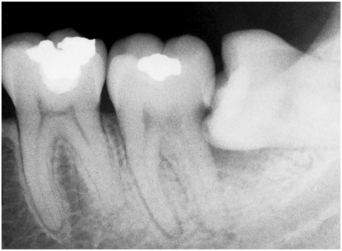
FIGURE 9-1 Radiograph of mandibular third molar impacted against second molar, with bone loss resulting from presence of third molar.
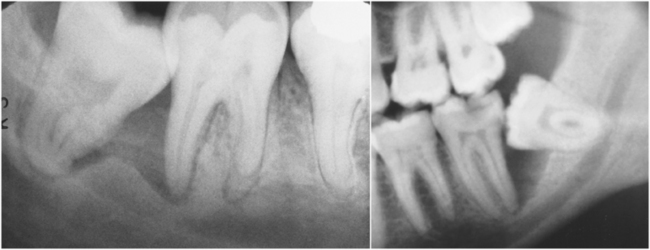
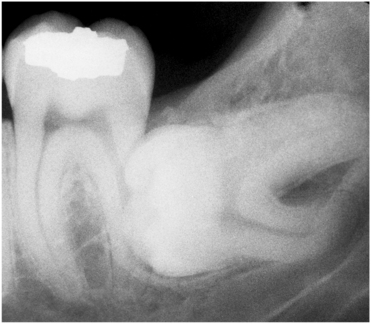
FIGURE 9-2 Radiographs show variations of mandibular third molar impacted against second molar, with severe bone loss resulting from periodontal disease and third molar.
The accelerated periodontal problem resulting from an impacted third molar is especially serious in the maxilla. As a periodontal pocket expands apically, it comes to involve the distal furcation of the maxillary second molar. This occurs relatively early, which makes advancement of the periodontal disease more rapid and severe. In addition, treatment of the localized periodontal disease around the maxillary second molar is more difficult because of the distal furcation involvement.
By removing the impacted third molars early, periodontal disease can be prevented and the likelihood of bony healing and optimal bone fill into the area previously occupied by the crown of the third molar is increased.4–6
Prevention of Dental Caries
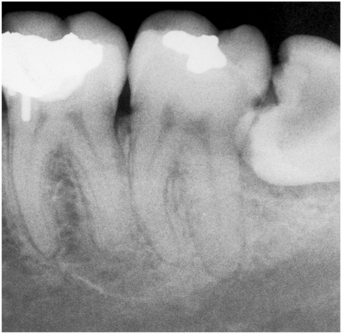
When a third molar is impacted or partially impacted, the bacteria that cause dental caries can be exposed to the distal aspect of the second molar, as well as to the third molar. Even in situations in which no obvious communication between the mouth and the impacted third molar exists, there may be enough communication to allow for caries initiation (Figs. 9-3 to 9-5).

Prevention of Pericoronitis
When a tooth is partially impacted with a large amount of soft tissue over the axial and occlusal surfaces, the patient frequently has one or more episodes of pericoronitis.9 Pericoronitis is an infection of the soft tissue around the crown of a partially impacted tooth and is usually caused by normal oral flora. For most patients the bacteria and host defenses maintain a delicate balance, but even normal host defenses cannot eliminate the bacteria (Fig. 9-6)
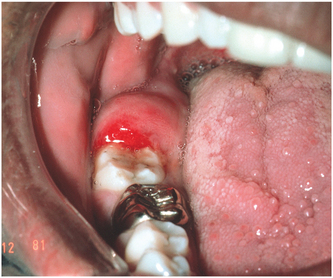
FIGURE 9-6 Pericoronitis in area of impacted tooth #32 exhibiting classic signs of inflammation with erythema and swelling. If opposing tooth #1 is erupted, it commonly impinges on this area of swelling when teeth brought are into occlusion, causing even more pain and swelling.
If the host defenses are compromised (e.g., during minor illnesses, such as influenza or an upper respiratory infection, or because of immune-compromising drugs) infection can occur. Thus although the impacted tooth has been present for some time without infection, if the patient experiences even a mild, transient decrease in host defenses, pericoronitis commonly results and may result even without any immunologic problems.
Pericoronitis can also arise following minor trauma from a maxillary third molar. The soft tissue that covers the occlusal surface of the partially erupted mandibular third molar (known as the operculum) can be traumatized and become swollen. Often the maxillary third molar further traumatizes the already swollen operculum, which causes a further increase in swelling that is now traumatized more easily. This spiraling cycle of trauma and swelling is often interrupted only by removal of the maxillary third molar.
Another common cause of pericoronitis is entrapment of food under the operculum. During eating, food debris may become lodged into the pocket between the operculum and the impacted tooth. Because this pocket cannot be cleaned, bacteria colonize it and pericoronitis results.
Streptococci and a large variety of anaerobic bacteria (the usual bacteria that inhabit the gingival sulcus) cause pericoronitis. Pericoronitis can be treated initially by mechanically débriding the large periodontal pocket that exists under the operculum by using hydrogen peroxide as an irrigating solution. Hydrogen peroxide not only mechanically removes bacteria with its foaming action, it also reduces the number of anaerobic bacteria by releasing oxygen into the usually anaerobic environment of the pocket. Other irrigants, such as chlorhexidine or iodophors, can also reduce the bacterial counts of the pocket. Even saline solutions, if delivered with pressure via a syringe can reduce the bacterial numbers and flush away food debris.
Pericoronitis can present as a mild infection or as a severe infection that requires hospitalization of the patient. Just as the severity of the infection varies, the treatment and management of this problem vary from mild to aggressive.
In its mildest form, pericoronitis is a localized tissue swelling and soreness. For patients with a mild infection, irrigation and curettage by the dentist and home irrigations by the patient usually suffice.
If the infection is slightly more severe with a large amount of local soft tissue swelling being traumatized by a maxillary third molar, the dentist should consider immediately extracting the maxillary third molar in addition to local irrigation.
For patients who have (in addition to local swelling and pain) mild facial swelling, mild trismus resulting from inflammation extending into the muscles of mastication, or a low-grade fever, the dentist should consider administering an antibiotic along with irrigation delivered under pressure and extraction. The antibiotic of choice is penicillin or, in the case of penicillin allergy, clindamycin.
Pericoronitis can lead to serious fascial space infections. Because the infection begins in the posterior mouth, it can spread rapidly into the fascial spaces of the mandibular ramus and the lateral neck. If a patient has trismus (with an inability to open the mouth more than 20 mm), a temperature of greater than 101.2° F, facial swelling, pain, and malaise, the patient should be referred to an oral-maxillofacial surgeon, who is likely to admit the patient to the hospital for parenteral antibiotic administration and careful monitoring.
Patients who have had one episode of pericoronitis, although managed successfully by these methods, are highly likely to continue to have episodes of pericoronitis unless the offending mandibular third molar is removed. The patient should be informed that the tooth should be removed at the earliest possible time to prevent recurrent infections. However, the mandibular third molar should not be removed until the signs and symptoms of pericoronitis have completely resolved. The incidence of postoperative complications, specifically dry socket and postoperative infection, increases if the tooth is removed during the time of active soft tissue infection. More bleeding and slower healing also occur when a tooth is removed in the face of pericoronitis.
Prevention of pericoronitis can be achieved by removing the impacted third molars before they penetrate the oral mucosa and are visible. Although excision of the surrounding soft tissue, or operculectomy, has been advocated as a method for preventing pericoronitis without removal of the impacted tooth, it is painful and is usually ineffective. The soft tissue excess tends to recur because it drapes over the impacted tooth and causes regrowth of the operculum. The gingival pocket on the distal also remains deep after operculectomy. The overwhelming majority of cases of pericoronitis can be prevented only by extraction of the tooth.
Prevention of Root Resorption
Occasionally, an impacted tooth causes sufficient pressure on the root of an adjacent tooth to cause root resorption (Fig. 9-7). Although the process by which root resorption occurs is not well defined, it appears to be similar to the resorption process primary teeth undergo during the eruptive process of the succedaneous teeth. Removal of the impacted tooth may result in salvage of the adjacent tooth by cemental repair. Endodontic therapy may be required to save these teeth.
Impacted Teeth Under a Dental Prosthesis
When a patient has an edentulous area restored, there are several reasons that impacted teeth in the area should be removed before the prosthetic appliance is constructed. After teeth are extracted, the alveolar process slowly undergoes resorption. This is particularly true with tissue-borne prostheses. Thus the impacted tooth becomes closer to the surface of the bone, giving the appearance of erupting. The denture may compress the soft tissue onto the impacted tooth, which is no longer covered with bone; the result is ulceration of the overlying soft tissue and initiation of an odontogenic infection (Fig. 9-8).
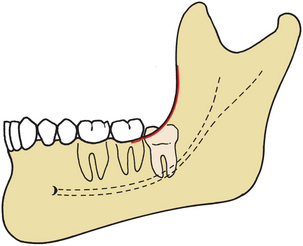
Impacted teeth should be removed before a prosthesis is constructed because if the impacted tooth must be removed after construction, the alveolar ridge may be so altered by the extraction that the prosthesis becomes unattractive and less functional (Fig. 9-9). In addition, if removal of impacted teeth in edentulous areas is achieved before the prosthesis is made, the patient is probably in good physical condition. Waiting until the overlying bone has resorbed and ulceration with infection occurs does not produce a favorable situation for extraction. If extraction is postponed, the patient will be older and more likely to be in poorer health.
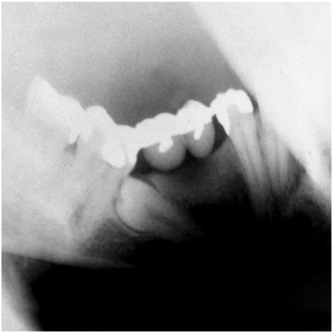
FIGURE 9-9 Impacted tooth under fixed bridge. Tooth must be removed and therefore may jeopardize bridge.
Furthermore, the mandible may have become atrophic, which increases the likelihood of fracture during tooth removal (Fig. 9-10). And if implants are planned near the position of impacted teeth, removal is warranted to eliminate the risk of interference with the implantation procedure.
Prevention of Odontogenic Cysts and Tumors
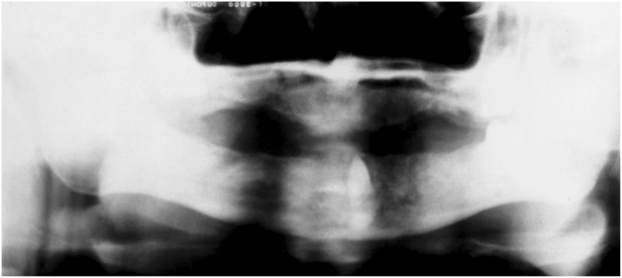
When impacted teeth are retained completely within the alveolar process, the associated follicular sac is also frequently retained. Although in most patients the dental follicle maintains its original size, it may undergo cystic degeneration and become a dentigerous cyst or keratocyst. If the patient is closely followed, the dentist can diagnose the cyst before it reaches large proportions (Fig. 9-11). However, unmonitored cysts can reach enormous sizes (Fig. 9-12). As a general guideline, if the follicular space around the crown of the tooth is greater than 3 mm, the preoperative diagnosis of a dentigerous cyst is reasonable.
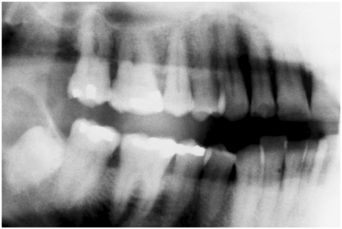
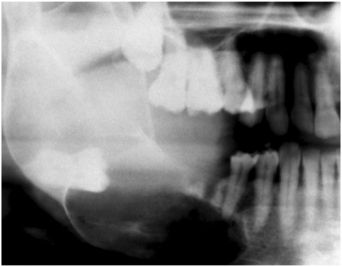
FIGURE 9-12 Large dentigerous cyst that extends from coronoid process to mental foramen. Cyst has displaced impacted third molar to inferior border of mandible.
In the same way that odontogenic cysts can occur around impacted teeth, odontogenic tumors can arise from the epithelium contained within the dental follicle. The most common odontogenic tumor to occur in this region is the ameloblastoma. Usually, ameloblastomas in this area must be treated aggressively by excision of the overlying soft tissue and of at least a portion of the mandible. Occasionally, other odontogenic tumors may occur in conjunction with impacted teeth (Fig. 9-13).
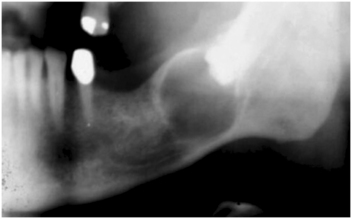
FIGURE 9-13 Ameloblastoma associated with crown of impacted third molar. (Courtesy Dr. Frances Gordy.)
Although the overall incidence of odontogenic cysts and tumors around impacted teeth is not high,10 the overwhelming majority of pathologic conditions of the mandibular third molar are associated with unerupted teeth. It is therefore recommended that impacted teeth be removed to prevent the occurrence of cysts and tumors.
Treatment of Pain of Unexplained Origin
Occasionally, patients come to the dentist complaining of pain in the retromolar region of the mandible for no obvious reasons. If conditions such as myofascial pain dysfunction syndrome and other facial pain disorders are excluded and if the patient has an unerupted tooth, removal of the tooth sometimes results in resolution of the pain.
Prevention of Jaw Fractures
An impacted third molar in the mandible occupies space that is usually filled with bone. This weakens the mandible and renders the jaw more susceptible to fracture at the site of the impacted tooth (Fig. 9-14). If the jaw fractures through the area of an impacted third molar, the impacted third molar is frequently removed before the fracture is reduced, and intermaxillary fixation is applied (see Chapter 24).
Facilitation of Orthodontic Treatment
When patients require retraction of first and second molars by orthodontic techniques, the presence of impacted third molars may interfere with the treatment. It is therefore recommended that impacted third molars be removed before orthodontic therapy is begun.11,12
Some orthodontic approaches to a malocclusion might benefit from the placement of retromolar implants to provide distal anchorage. When this is planned, removal of impacted lower third molars is necessary.
Optimal Periodontal Healing
As noted before, one of the most important indications for removal of impacted third molars is to preserve the periodontal health of the adjacent second molar. A great deal of attention has been given to the two primary parameters of periodontal health after third molar surgery, that is, bone height and periodontal attachment level on the distal aspect of the second molar.
Recent studies have provided information on which to base the likelihood of optimal periodontal tissue healing.13–15 The two most important factors have been shown to be the extent of the preoperative infrabony defect on the distal aspect of the second molar and the patient’s age at the time of surgery. If a large amount of distal bone is missing because of the presence of the impacted tooth and its associated follicle, it is less likely that the infrabony pocket can be decreased. Likewise, if the patient is older, then the likelihood of optimal bony healing is decreased. Patients whose third molars are removed before age 25 are more likely to have better bone healing than those whose impacted teeth are removed after age 25. In the younger patient, not only is the initial periodontal healing better, but the long-term continued regeneration of the periodontium is clearly better.14
As mentioned previously, unerupted teeth may continue to erupt until age 25. Because the terminal portion of the eruption process occurs slowly, the chance of developing pericoronitis increases, and so does the amount of contact between the third molar and second molar. Both of these factors decrease the possibility for optimal periodontal healing. However, it should be noted that the asymptomatic completely bony impacted third molar in a patient older than age 30 should probably be left in place unless some specific pathologic condition develops. Removal of such asymptomatic completely impacted third molars in older patients clearly results in pocket depths and alveolar bone loss, which are greater than if the tooth were left in place.
CONTRAINDICATIONS FOR REMOVAL OF IMPACTED TEETH
All impacted teeth should be removed unless specific contraindications justify leaving them in position. When the potential benefits outweigh the potential complications and risks, the procedure should be performed. Similarly, when the risks are greater than the potential benefits, the procedure should be deferred.
Contraindications for the removal of impacted teeth primarily involve the patient’s physical status.
Extremes of Age
The third molar tooth bud can be radiographically visualized by age 6. Some surgeons think that removal of the tooth bud at age 7 to 9 can be accomplished with minimal surgical morbidity and therefore should be performed at this age. However, most surgeons believe that it is not possible to predict accurately if the forming third molar will be impacted. The consensus is that very early removal of third molars should be deferred until an accurate diagnosis of impaction can be made.
The most common contraindication for the removal of impacted teeth is advanced age. As a patient ages, the bone becomes highly calcified and therefore less flexible and less likely to bend under the forces of tooth extraction. The result is that more bone must be surgically removed to displace the tooth from its socket.
Similarly, as patients age, they respond less favorably and with more postoperative sequelae. An 18-year-old patient may have 1 or 2 days of discomfort and swelling after the removal of an impacted tooth, whereas a similar procedure may result in a 4- or 5-day recovery period for a 50-year-old patient.
Finally, if a tooth has been retained in the alveolar process for many years without periodontal disease, caries, or cystic degeneration, it is unlikely that these unfavorable sequelae will occur. Therefore in an older patient (usually over age 35) with an impacted tooth that shows no signs of disease and that has a radiographically detectable layer of overlying bone, the tooth should not be removed (Fig. 9-15). The dentist caring for the patient should check the impacted tooth radiographically every 1 or 2 years to ensure that no adverse sequelae occur.

FIGURE 9-15 Impacted maxillary right third molar in 63-year-old patient. This molar should not be extracted because it is deeply embedded and no signs of disease are present.
If the impacted tooth shows signs of cystic formation or periodontal disease involving the adjacent tooth or the impacted tooth, if it is a single impacted tooth underneath a prosthesis with thin overlying bone, or if it becomes symptomatic as the result of infection, the tooth should be removed.
Compromised Medical Status
A compromised medical status may contraindicate the removal of an impacted tooth. Frequently, compromised medical status and advancing age go hand in hand. If the impacted tooth is asymptomatic, its surgical removal must be viewed as elective. If the patient’s cardiovascular or respiratory function or host defenses for combating infection are seriously compromised or if the patient has a serious acquired or congenital coagulopathy, the surgeon should consider leaving the tooth in the alveolar process. However, if the tooth becomes symptomatic, the surgeon should consider working with the patient’s physician to plan removal of the tooth with the least operative and postoperative medical sequelae.
Probable Excessive Damage to Adjacent Structures
If the impacted tooth lies in an area in which its removal may seriously jeopardize adjacent nerves, teeth, or previously constructed bridges, it may be prudent to leave the tooth in place. When the dentist makes the decision not to remove a tooth, the reasons must be weighed against potential future complications. For younger patients who may have the sequelae of impacted teeth, it may be wise to remove the tooth while taking special measures to prevent damage to adjacent structures. However, for the older patient with no signs of impending complications and for whom the probability of such complications is low, the impacted tooth should not be removed. A classic example of such a case is the older patient with a potentially severe periodontal defect on the distal aspect of the second molar but in whom removal of the third molar would almost surely result in the loss of the second molar. In this situation the impacted tooth should not be removed.
Summary
The preceding discussion of indications and contraindications for the removal of impacted third molars has been designed to point out that there are various risks and benefits for removing impacted teeth in patients. Patients who have one or more pathologic symptoms or problems should have their impacted teeth removed. Most of the symptomatic, pathologic problems that result from impacted third molars occur because of partially erupted teeth and occur less commonly with a complete bony impaction.
Less clear is what should be done with impacted teeth before they cause symptoms or problems. In making a decision as to whether an impacted third molar should be removed, one must consider a variety of factors. First, the available room in the arch into which the tooth can erupt must be considered. If adequate room exists, then the clinician may choose to defer removal of the tooth until eruption is complete. A second consideration is the status of the impacted tooth and the age of the patient. It is critical to remember that the average age of complete eruption is 20 but that eruption may continue to occur up to age 25. A tooth that appears to be a mesioangular impaction at age 17 may eventually become more vertical and erupt into the mouth. If insufficient room exists to accommodate the tooth and a soft tissue operculum exists over the posterior aspect, then pathologic sequelae are likely to occur.
Although there have been some attempts at making very early predictions of whether a tooth is going to be impacted, these efforts have not yet resulted in a reliable predictive model. However, by the time the patient reaches age 18, the dentist can reasonably predict whether there will be adequate room into which the tooth can erupt with sufficient clearance of the anterior ramus to prevent soft tissue operculum formation. At this time, if surgical removal is chosen, soft tissue and bone tissue healing will occur at its maximal level. At age 18 or 19, if the diagnosis for inadequate room for functional eruption can be made, then the asymptomatic third molar can be removed and the long-term periodontal health of the second molar will be maximized.
CLASSIFICATION SYSTEMS OF IMPACTED TEETH
Removal of impacted teeth can be relatively straightforward or extremely difficult, even for the experienced surgeon. To determine the degree of difficulty preoperatively, the surgeon should examine the clinical circumstances methodically. The primary factor determining the difficulty of the removal is accessibility. Accessibility is determined by adjacent teeth or other structures impairing access or delivery pathway, and the ease of exposing the tooth, of preparing a pathway for its delivery, and of preparing or taking advantage of a preexisting purchase point. With careful classification of the impacted teeth using a variety of systems, the surgeon can approach the proposed surgery in an orderly fashion and predict whether any extraordinary surgical approaches will be necessary or if the patient will encounter certain postoperative problems.
The majority of classification schemes are based on analysis of a radiograph. The panoramic radiograph shows the most accurate picture of the total anatomy of the region and is the radiograph of choice for planning removal of impacted third molars. In some circumstances a well-positioned periapical radiograph is adequate as long as all parts of the impacted tooth are visible along with important adjacent anatomy. When the roots of a lower third molar appear very close to or superimpose over the inferior alveolar canal on a panoramic radiograph, a cone-beam CT scan may be useful. This imaging technique can actually show the relationship of the roots to the canal.
For each patient the surgeon should carefully analyze the factors discussed in this section. By combining these factors, the dentist can assess the difficulty of the surgery and elect to extract the impacted teeth that are within his or her skill level. However, for the patient’s well-being and the dentist’s peace of mind, the patient should be referred to a specialist if a tooth presents a difficult surgical situation or the dentist cannot offer optimal pain and anxiety control.
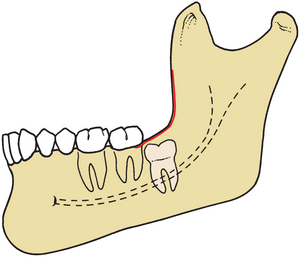
Angulation
The most commonly used classification system with respect to treatment planning uses a determination of the angulation of the long axis of the impacted third molar with respect to the long axis of the adjacent second molar. Teeth at certain inclinations have ready-made pathways for removal, whereas pathways for teeth of other inclinations require the removal of substantial amounts of bone. This classification system provides an initial useful evaluation of the difficulty of extractions but is not sufficient by itself to define difficulty of molar removal fully.
The impaction generally acknowledged as the least difficult impaction to remove is the mesioangular, particularly when only partially impacted (Fig. 9-16). The mesioangular-impacted tooth is tilted toward the second molar in a mesial direction. This type of impaction is the most commonly seen, making up approximately 43% of all impacted teeth.
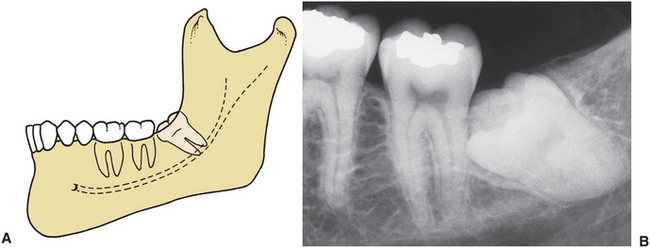
FIGURE 9-16 A, Mesioangular impaction—most common and easiest impaction to remove. B, Mesioangular impaction is usually in proximity to second molar.
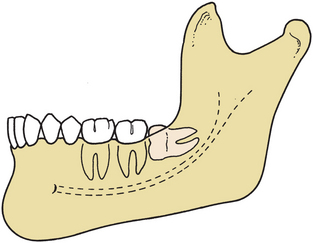
When the long axis of the third molar is perpendicular to the second molar, the impacted tooth is considered horizontal (Fig. 9-17). This type of impaction is usually considered more difficult to remove than the mesioangular impaction. Horizontal impactions occur less frequently, being seen in approximately 3% of all mandibular impactions.
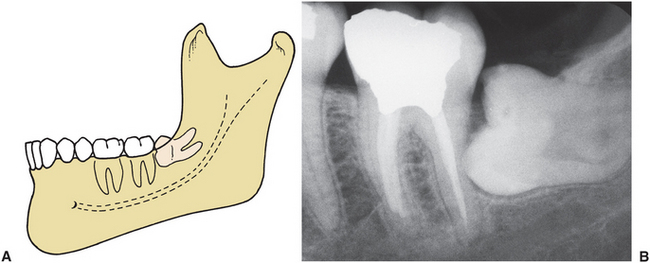
FIGURE 9-17 A, Horizontal impaction—uncommon and more difficult to remove than mesioangular impaction. B, Occlusal surface of horizontal impacted third molar is usually immediately adjacent to root of second molar, which often produces early severe periodontal disease.
In the vertical impaction the long axis of the impacted tooth runs parallel to the long axis of the second molar. This impaction occurs with the second greatest frequency, accounting for approximately 38% of all impactions, and is third in difficulty of removal (Fig. 9-18).
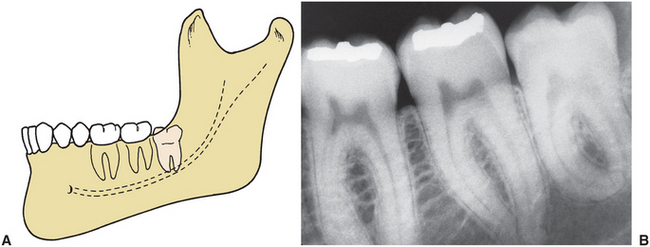
FIGURE 9-18 A, Vertical impaction—second most common impaction and second most difficult to remove. B, Vertical impaction is frequently covered on its posterior aspect with bone of anterior ramus of mandible.
Finally, the distoangular impaction is the tooth with the most difficult angulation for removal (Fig. 9-19). In the distoangular impaction the long axis of the third molar is distally or posteriorly angled away from the second molar. This impaction is the most difficult to remove because the tooth has a withdrawal pathway that runs into the mandibular ramus, and its removal requires significant surgical intervention. Distoangular impactions occur uncommonly and account for only approximately 6% of all impacted third molars. Erupted third molars may be in a distoangular position. When this occurs, they are much more difficult to remove than other erupted teeth. The reason is that the third molar’s mesial root is very close to the root of the second molar.
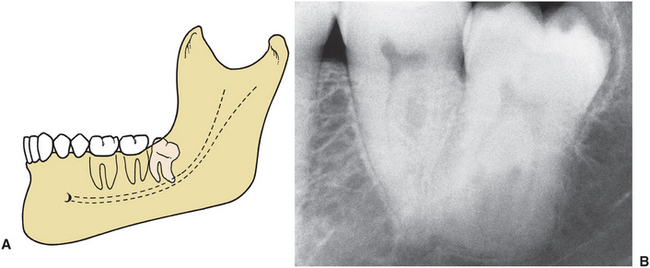
FIGURE 9-19 A, Distoangular impaction—uncommon and most difficult of the four types to remove. B, Occlusal surface of distoangular impaction is usually embedded in ramus of mandible and requires significant bone removal for extraction.
In addition to the relationship between the angulation of the long axes of the second and third molars, the teeth can also be angled in buccal, lingual, or palatal directions. When approaching lower third molars, the possible presence of a high-riding lingual nerve still makes a buccal approach appropriate even when the tooth is inclined toward the lingual.
Rarely, a tooth is a transverse impaction, that is, in an absolutely horizontal position in a buccolingual direction. The occlusal surface of the tooth can face the buccal or lingual direction. To determine buccal or lingual version accurately, the dentist must take a perpendicular occlusal film. However, this determination is usually not necessary because the surgeon can make this identification early in the operation, and the buccal or lingual position of the tooth does not greatly influence the approach to the surgery.
Relationship to Anterior Border of Ramus
Another method for classifying impacted mandibular third molars is based on the amount of impacted tooth that is covered with the bone of the mandibular ramus. This classification is known as the Pell and Gregory classification and is sometimes referred to as the Pell and Gregory classes 1, 2, and 3. For this classification it is important that the surgeon carefully examine the relationship between the tooth and the anterior part of the ramus. If the mesiodistal diameter of the crown is completely anterior to the anterior border of the mandibular ramus, it is in a class 1 relationship. If the tooth is angled in a vertical direction, the chances for the tooth to erupt into a normal position are good if root formation is incomplete (Fig. 9-20).
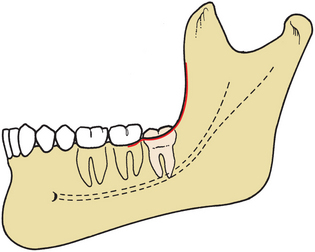
FIGURE 9-20 Pell and Gregory class 1 impaction. Mandibular third molar has sufficient anteroposterior room (i.e., anterior-to-anterior border of ramus) to erupt.
If the tooth is positioned posteriorly so that approximately one half is covered by the ramus, the relationship of the tooth with the ramus is class 2. In the class 2 situation the tooth cannot erupt completely free from bone over the crown and distal aspect because a small shelf of bone overlies the distal portion of the tooth (Fig. 9-21). A class 3 relationship between the tooth and ramus occurs when the tooth is located completely within the mandibular ramus (Fig. 9-22). Obviously, the class 1 relationship provides the greatest accessibility to the impacted tooth and therefore such a tooth is the easiest to remove. The class 3 relationship provides the least accessibility and therefore presents the greatest difficulty.

Relationship to Occlusal Plane
The depth of the impacted tooth compared with the height of the adjacent second molar provides the next classification system for determining the difficulty of impaction removal. This classification system was also suggested by Pell and Gregory and is called Pell and Gregory A, B, and C classification. In this classification the degree of difficulty is measured by the thickness of the overlying bone; that is, the degree of difficulty increases as the depth of the impacted tooth increases. As the tooth becomes less accessible and it becomes more difficult to section the tooth and to prepare purchase points, the overall difficulty of the operation substantially increases.
A class A impaction is one in which the occlusal surface of the impacted tooth is level or nearly level with the occlusal plane of the second molar (Fig. 9-23). A class B impaction is an impacted tooth with an occlusal surface between the occlusal plane and the cervical line of the second molar (Fig. 9-24). Finally, the class C impaction is one in which the occlusal surface of the impacted tooth is below the cervical line of the second molar (Fig. 9-25).
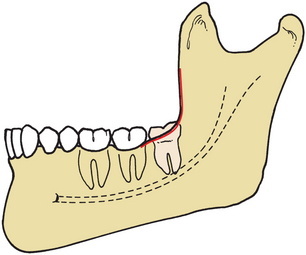
FIGURE 9-23 Pell and Gregory class A impaction. Occlusal plane of impacted tooth is at same level as occlusal plane of second molar.

Summary
The three classification systems discussed so far are used in conjunction to determine the difficulty of an extraction. For example, a mesioangular impaction with a class 1 ramus and a class A depth is usually straightforward to remove (Fig. 9-26). However, as the ramus relationship changes to a class 2 and the depth of the impaction increases to a class B, the degree of difficulty becomes much greater. A horizontal impaction with a class 2 ramus relationship and a class B depth is a moderately difficult extraction and one that most experienced general practitioners do not want to attempt (Fig. 9-27). Finally, the most difficult of all impactions is a distoangular impaction with a class 3 ramus relationship at a class C depth. Even specialists view removing this tooth as a surgical challenge (Fig. 9-28).

FIGURE 9-26 Mesioangular impaction with class 1 ramus relationship and class A depth. All three classifications make it easiest type of impaction to remove.

ROOT MORPHOLOGY
Just as the root morphology of the erupted tooth has a major influence on the degree of difficulty of a closed extraction, root morphology plays a major role in determining the degree of difficulty of the removal of an impacted tooth. Several factors must be considered when assessing the morphologic structure of the root.
The first consideration is the length of the root. As discussed before, the optimal time for removal of an impacted tooth is when the root is one third to two thirds formed. When this is the case, the ends of the roots are blunt (Fig. 9-29). If the tooth is not removed during a formative stage and the entire length of the root develops, the possibility increases for abnormal root morphology and for fracture of the root tips during extraction or the root tips impeding root delivery. If the root development is limited (i.e., less than one third complete), the tooth is often more difficult to remove because it tends to roll in its socket like a marble, which prevents routine elevation (Fig. 9-30). The next factor to be assessed is whether the roots are fused into a single, conical root (Fig. 9-31) or whether they are separate and distinct roots. The fused, conical roots are more straightforward to remove than widely separated roots (Fig. 9-32).
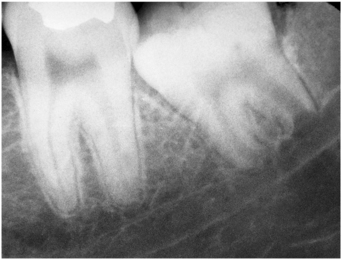
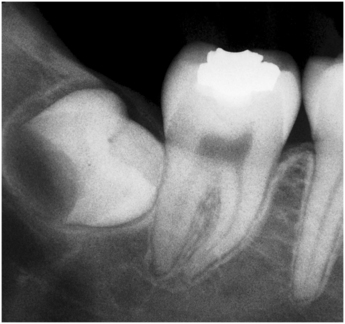
FIGURE 9-30 Lack of root development. If extraction is attempted, crown will often roll around in crypt, making it difficult to remove.
The curvature of the tooth roots also plays a role in the difficulty of the extraction. Severely curved or dilacerated roots are more difficult to remove than straight or slightly curved roots (Fig. 9-32). The surgeon should carefully examine the apical area of impacted teeth on the radiograph to assess the presence of small, abnormal, and sharply hooked roots that will probably fracture if the surgeon does not give them special consideration.
The direction of the tooth root curvature is also important to examine preoperatively. During removal of a mesioangular impaction, roots that are curved gently in the distal direction (following along the pathway of extraction) can be removed without the force that can fracture the roots. However, if the roots of a mesioangular impaction are straight or curved mesially, the roots commonly fracture if the tooth is not sectioned before being delivered.
The total width of the roots in the mesiodistal direction should be compared with the width of the tooth at the cervical line. If the tooth root width is greater, the extraction will be more difficult. More bone must be removed, or the tooth should be sectioned before extraction.
Finally, the surgeon should assess the periodontal ligament space. Although in most patients the periodontal ligament space is of normal dimensions, it sometimes is wider or narrower. The wider the periodontal ligament space, typically the easier the tooth is to remove (Fig. 9-33). However, older patients, especially those over age 40, tend to have a much narrower periodontal ligament space that increases the difficulty of the extraction.
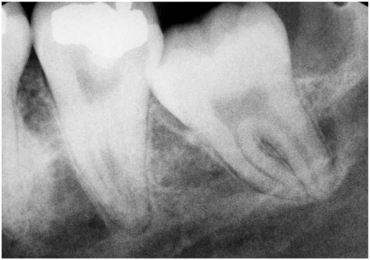
FIGURE 9-33 Wide periodontal ligament space. The widened space makes extraction process less difficult.
Size of Follicular Sac
The size of the follicle around the impacted tooth can help determine the difficulty of the extraction. If the follicular sac is wide (almost cystic in size), much less bone must be removed, which makes the tooth more straightforward to extract (Fig. 9-34). (Young patients are more likely to have large follicles, which is another factor that makes extractions less complex in younger patients.) However, if the follicular space around the crown of the tooth is narrow or nonexistent, the surgeon must create space around the crown, increasing the difficulty of the procedure and usually the time required to remove the tooth.
Density of Surrounding Bone
The density of the bone surrounding the tooth plays a role in determining the difficulty of the extraction. Although some clues can be seen on the radiographs, variations in radiographic density and angulation render bone density interpretations based on radiographs unreliable. Bone density is best determined by the patient’s age. Patients who are 18 years of age or younger have bone densities favorable for tooth removal. The bone is less dense, is more likely to be pliable, and expands and bends somewhat, which allows the socket to be expanded by elevators or by luxation forces applied to the tooth itself. Additionally, the less dense bone is easier to cut with a dental bur and can be removed more rapidly than denser bone.
Conversely, patients who are older than age 35 have much denser bone and thus decreased flexibility and ability to expand. In these patients the surgeon must remove all interfering bone, because it is not possible to expand the bony socket. In addition, as the bone increases in density, it becomes more difficult to remove with a dental bur, and the bone removal process takes longer. Also, excessive force is more likely to fracture very dense bone compared with less dense bone of a similar cross section.
Contact with Mandibular Second Molar
If space exists between the second molar and the impacted third molar, the extraction will be easier to approach because damage to the second molar is less likely. However, if the tooth is a distoangular or horizontal impaction, it is frequently in direct contact with the adjacent second molar. To remove the third molar safely without injuring the second molar, the surgeon must be cautious with pressure from elevators or with the bur when removing bone. If the second molar has caries or a large restoration or has been endodontically treated, the surgeon must take special care not to fracture the restoration or a portion of the carious crown. The patient should still be forewarned of this possibility (see Fig. 9-17, B).
Relationship to Inferior Alveolar Nerve
Impacted mandibular third molars frequently have roots that are superimposed on the inferior alveolar canal on radiographs. Although the canal is usually on the buccal aspect of the tooth, it is still in proximity to the roots. Therefore, one of the potential sequelae of impacted third molar removal is damage to the inferior alveolar nerve. This commonly results in some altered sensation (paresthesia or anesthesia) of the lower lip and chin on the injured side. Although this altered sensation is usually brief (lasting only a few days), it may extend for weeks or months; on rare occasions it can be permanent. The duration depends on the extent of nerve damage. If the root ends of the tooth appear to be close to the inferior alveolar canal on a radiograph, the surgeon must take special care to avoid injuring the nerve (Fig. 9-35), which greatly increases the difficulty of the procedure. The increasing availability of cone-beam computerized tomographic scans will make preoperative assessment of the root and canal relationship easier to view, helping guide surgical decisions.
Nature of Overlying Tissue
The preceding systems classify factors that make third molar extraction more straightforward or difficult. The classification system discussed now does not fit into these categories. However, this classification is the system used by most dental insurance companies and is the one by which the surgeon charges for the services.
The dental insurance companies separate types of third molar impactions into three categories. The three types of impactions are (1) soft tissue, (2) partial bony, and (3) full bony. An impaction is defined as a soft tissue impaction when the height of the contour of the tooth is above the level of the alveolar bone, and the superficial portion of the tooth is covered only by soft tissue (Fig. 9-36). To remove the soft tissue impaction, the surgeon must incise the soft tissue and reflect a soft tissue flap to obtain access to the tooth to elevate it from its socket. The soft tissue impaction is usually the easiest of the three extractions but can be complex based on factors discussed in the preceding sections.
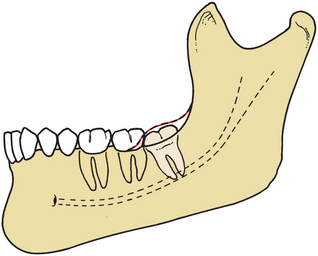
FIGURE 9-36 Soft tissue impaction in which crown of tooth is covered by soft tissue only and can be removed without bone removal.
The partial bony impaction occurs when the superficial portion of the tooth is covered by soft tissue but at least a portion of the height of the contour of the tooth is below the level of the surrounding alveolar bone (Fig. 9-37). To remove the tooth, the surgeon must incise the soft tissue, reflect a soft tissue flap, and remove the bone above the height of the contour. The surgeon may need to divide the tooth in addition to removing bone. A partial bony impacted tooth is commonly more difficult to remove than a full bony impacted third molar.
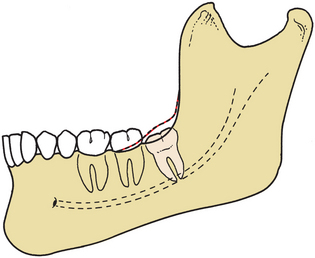
FIGURE 9-37 Partial bony impaction in which part of tooth, usually posterior aspect, is covered with bone and requires bone removal or tooth sectioning for extraction.
The complete bony impaction is an impacted tooth that is completely encased in bone so that, when the surgeon reflects the soft tissue flap, no tooth is visible (Fig. 9-38). To remove the tooth, extensive amounts of bone must be removed, and the tooth almost always requires sectioning.
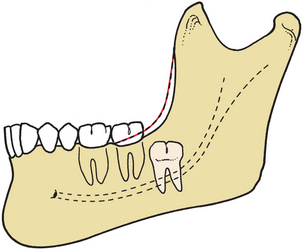
FIGURE 9-38 Complete bony impaction in which tooth is completely covered with bone and requires extensive removal of bone for extraction.
Although this classification is extensively used, it frequently has no relationship to the difficulty of the extraction or the likelihood of complications (Boxes 9-1 and 9-2). The parameters of angulation, ramus relationship, root morphology, and patient age are more relevant to treatment planning than the system used by third-party dental insurers. The surgeon must use all of the information available to determine the difficulty of the proposed surgery.
MODIFICATION OF CLASSIFICATION SYSTEMS FOR MAXILLARY IMPACTED TEETH
The classification systems for the maxillary impacted third molar are essentially the same as for the impacted mandibular third molar. However, several distinctions and additions must be made to assess more accurately the difficulty of removal during the treatment planning phase of the procedure.
Concerning angulation, the three types of maxillary third molars are (1) the vertical impaction (Fig. 9-39, A), (2) the distoangular impaction (Fig. 9-39, B), and (3) the mesioangular impaction (Fig. 9-39, C). The vertical impaction occurs approximately 63% of the time, the distoangular approximately 25%, and the mesioangular position approximately 12% of the time. Rarely, other positions, such as a transverse, inverted, or horizontal position, are encountered; these unusual positions account for less than 1% of impacted maxillary third molars.
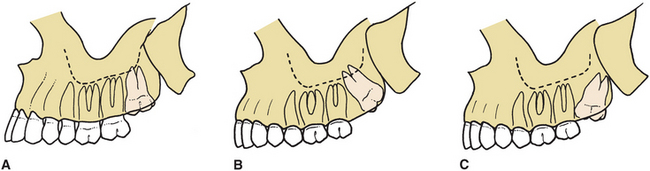
FIGURE 9-39 A, Vertical impaction of maxillary third molar. This angle accounts for 63% of impactions. B, Distoangular impaction of maxillary third molar. This angle accounts for 25% of impactions. C, Mesioangular impaction of maxillary third molar. This angle accounts for 12% of impactions.
The same angulations in mandibular third molar extractions cause opposite degrees of difficulty for maxillary third molar extractions. Vertical and distoangular impactions are the less complex to remove, whereas mesioangular impactions are the most difficult (exactly the opposite of impacted mandibular third molars). Mesioangular impactions are more difficult to remove because the bone that overlies the impaction and requires removal or expansion is on the posterior aspect of the tooth, and is much thicker than in the vertical or distoangular impaction. In addition, access to the mesioangularly positioned tooth is more difficult if an erupted second molar is in place.
The position of the maxillary third molar in a buccopalatal direction is also important for determining the difficulty of the removal. Most maxillary third molars are angled toward the buccal aspect of the alveolar process; this makes the overlying bone in that area thin and therefore easy to remove or expand. Occasionally, the impacted maxillary third molar is positioned toward the palatal aspect of the alveolar process. This makes the tooth much more difficult to extract because greater amounts of bone must be removed to gain access to the underlying tooth and an approach from the palatal aspect risks injury to nerves and vessels of the palatine foramina. A combination of radiographic assessment and clinical digital palpation of the tuberosity area can usually help determine whether the maxillary third molar is in the buccopalatal position. If the tooth is positioned toward the buccal, a palpable bulge is found in the area; if the tooth is palatally positioned, a bony deficit is found in that region. If a more palatal position is determined by clinical examination, the surgeon must anticipate a longer, more involved procedure.
The most common factor that causes difficulty with maxillary third molar removal is a thin, nonfused root with erratic curvature (Fig. 9-40). The majority of maxillary third molars have fused roots that are conical. However, the surgeon should examine the preoperative radiograph carefully to ensure that an unusual root pattern is not present. The surgeon should also check the periodontal ligament, because the wider the ligament space, the less difficult the tooth is to remove. In addition, similar to mandibular third molars, the periodontal ligament space tends to decrease as the patient ages.
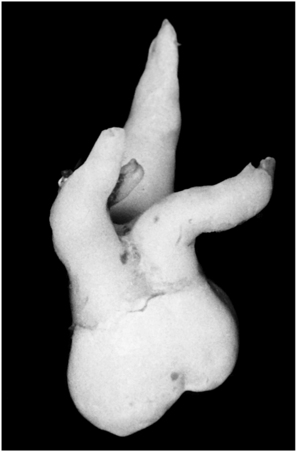
FIGURE 9-40 The maxillary third molar has the most erratic and variable root formation of all teeth.
The follicle surrounding the crown of the impacted tooth also has an influence on the difficulty of the extraction. If the follicular space is broad, the tooth will be easier to remove than if the follicular space is thin or nonexistent.
Bone density is also an important factor in maxillary impaction removal and is related closely to the age of the patient. The younger the patient, the more elastic and expandable the bone surrounding the impacted third molar.
The relationship to the adjacent second molar tooth also influences the difficulty of the extraction. Extraction may require that additional bone be removed to displace the tooth tucked under the height of contour of the closely adjacent second molar. In addition, because the use of elevators is common in the removal of maxillary third molars, the surgeon must be aware of the existence of large restorations or caries in the adjacent second molar. Injudicious use of elevators can result in the fracture of restorations or brittle crowns of teeth.
The type of impaction, with respect to overlying tissue, must also be considered for maxillary third molars. The insurance industry classification system used for maxillary teeth is the same as the system that is used for mandibular teeth: soft tissue impaction, partial bony impaction, and complete bony impaction. The definitions of these types of impactions are precisely the same as those used for the mandibular third molars.
Two additional factors influence the difficulty of maxillary third molar removal but do not exist for the mandibular third molars. Both factors are related to the structure and position of the maxillary sinus. First, the maxillary sinus is in intimate contact with the roots of the molars; and, frequently, the maxillary third molar actually forms a portion of the posterior sinus wall. If this is the case, removal of the maxillary third molar may result in maxillary sinus complications, such as sinusitis or an oroantral fistula. The presence of the maxillary sinus does not necessarily make the removal of the impacted tooth more difficult, but it increases the likelihood of postoperative complications and morbidity.
Finally, in maxillary third molar removal the tuberosity of the posterior maxilla can be fractured. This is true even when the third molar is erupted or if an erupted second molar is the most distal remaining tooth. Such fractures are possible, especially when dense and nonelastic bone exists, such as in older patients. In addition, a large maxillary sinus makes the surrounding alveolar bone thin and more susceptible to fracture when excessive force is applied. A root morphology that has divergent roots requires greater force to remove and can make bone fracture more likely. In addition, mesioangular impactions increase the possibility of fractures (see Fig. 9-39, C). In these situations the overlying tuberosity is heavier, but the surrounding bone is usually thinner. When the surgeon prepares a purchase point at the mesiocervical line, fracture of the tuberosity becomes a greater risk if (1) the bone is nonelastic (as in older patients), (2) the tooth is multirooted with large bulbous roots (as in older patients), (3) the maxillary sinus is large and greatly pneumatized to include the roots of the impacted third molar, or (4) the surgeon uses excessive force to elevate the tooth. Management of the fractured tuberosity is discussed in Chapter 11.
REMOVAL OF OTHER IMPACTED TEETH
After the mandibular and maxillary third molars, the next most commonly impacted tooth is the maxillary canine.
If the dentist decides that the tooth should be removed, it must be determined whether the tooth is positioned labially, toward the palate, or in the middle of the alveolar process. If the tooth is on the labial aspect, a soft tissue flap can be reflected to allow removal of the overlying bone and the tooth. However, if the tooth is on the palatal aspect or in the intermediate buccolingual position, it is much more difficult to remove. Therefore, when assessing the impacted maxillary canine for removal, the surgeon’s most important assessment is of the buccolingual position of the tooth.
Similar considerations are necessary for other impactions, such as mandibular premolars and supernumerary teeth. The supernumerary tooth in the midline of the maxilla, called a mesiodens, is almost always found on the palate and should be approached from the palatal direction for removal.
When a buried canine is positioned in such a way that orthodontic manipulation can assist the proper positioning, the tooth can be exposed and bracketed. A flap is created to allow the soft tissue to be repositioned apically should this be required for maximum keratinized tissue management. The overlying bone tissue is then removed with burs as is necessary. Once the area is débrided, the surface of the tooth is prepared by the usual standard procedures of etching and applying primer. The bracket is then luted onto the surface of the tooth. A wire can be used to connect the bracket to the orthodontic appliance or, more commonly, a gold chain is attached from the orthodontic bracket to the orthodontic arch wire. The gold chain provides a greater degree of flexibility, and the incidence of breakage of the chain is much less than breakage of a wire. The soft tissue is then sutured in such a way as to provide the maximum coverage of the exposed tissue with keratinized tissue. As the tooth is pulled into place with the orthodontic appliances, the soft tissue surrounding the newly positioned tooth should have adequate keratinized tissue, and the tooth should be in an ideal position.
If the tooth is positioned toward the palatal aspect, the tooth may be repositioned or removed. If the tooth is repositioned, it is surgically exposed and guided into position orthodontically. In this procedure the overlying soft tissue is excised; flaps are not needed to gain attached tissue. Because the bone in the palate is thicker, a bur is usually necessary to remove the overlying bone. The exposed tooth then is managed in the same manner as is the labially positioned tooth (Fig. 9-41).
FIGURE 9-41 A, Labially positioned impacted maxillary canine. Tooth should be uncovered with apically positioned flap procedure to preserve attached gingiva. B, Mucoperiosteal flap is outlined, allowing for repositioning of keratinized mucosa over exposed tooth. When flap is reflected, thin overlying bone is removed. C, Tissue is retracted and bonded to tooth with a wire or a gold chain. Flap is apically sutured to tooth. D, After 6 months, exposed tooth is in desired position, with broad zone of attached gingiva. (Courtesy Dr. Myron Tucker.)
SURGICAL PROCEDURE
The principles and steps for removing impacted teeth are the same as for other surgical extractions. Five basic steps make up the technique: The first step is to have adequate exposure of the area of the impacted tooth. This means that the reflected soft tissue flap must be of an adequate dimension to allow the surgeon to retract the soft tissue and perform the necessary surgery without seriously damaging the flap. The second step is to assess the need for bone removal and to remove a sufficient amount of bone to expose the tooth for any needed sectioning and delivery. The third step, if needed, is to divide the tooth with a bur to allow the tooth to be extracted without removing unnecessarily large amounts of bone. Purchase points may also be placed at this step. In the fourth step the sectioned or unsectioned tooth is delivered from the alveolar process with the appropriate elevators. Finally, in the fifth step the bone in areas of elevation is smoothed with a bone file; the wound is thoroughly irrigated with a sterile, physiologic solution; and the flap is reapproximated with sutures. The following discussion elaborates on these steps for the removal of impacted third molars.
Although the surgical approach to the removal of impacted teeth is similar to other surgical tooth extractions, it is important to keep in mind several distinct differences. For instance, the typical surgical extraction of a tooth or tooth root requires the removal of a relatively small amount of bone. However, when an impacted tooth (especially a mandibular third molar) is extracted, the amount of bone that must be removed to deliver the tooth is substantially greater. This bone is also much denser than it is for typical surgical extractions, and its removal requires better instrumentation and a higher degree of surgical skill.
Impacted teeth also frequently require sectioning, whereas other types of tooth extractions do not. Although erupted maxillary and mandibular molars are occasionally divided for removal, it is not a routine step in the extraction of these teeth. However, with impacted mandibular third molars, the surgeon is required to divide the tooth in a substantial majority of patients. The surgeon must therefore have the necessary equipment for such sectioning and the necessary skills and experience for dividing the tooth along the proper planes.
Unlike most other types of surgical tooth extractions, for an impacted tooth removal the surgeon must be able to balance the degree of bone removal and sectioning. Essentially, all impacted teeth can be removed without sectioning if a large amount of bone is removed. However, the removal of excessive amounts of bone unnecessarily prolongs the healing period and may result in a weakened jaw. Therefore the surgeon should remove most bony impacted mandibular third molars only after sectioning them. However, removal of a small amount of bone with multiple divisions of the tooth may cause the tooth sectioning process to take an excessively long time, thus unnecessarily prolonging the operation. The surgeon must remove an adequate amount of bone and section the tooth into a reasonable number of pieces, both to hasten healing and to minimize the time of the surgical procedure.
Step 1: Reflecting adequate flaps for accessibility. The difficulty of removing an impacted tooth depends on its accessibility. To gain access to the area and to visualize the overlying bone that must be removed, the surgeon must reflect an adequate mucoperiosteal flap. The reflection must be of a dimension adequate to allow the placement and stabilization of retractors and instruments for the removal of bone.
In most situations the envelope flap is the preferred technique. The envelope flap is quicker to close and heals better than the three-cornered flap (envelope flap with a releasing incision). However, if the surgeon requires greater access to the more apical areas of the tooth, which might stretch and tear the envelope flap, the surgeon should consider using a three-cornered flap.
The preferred incision for the removal of an impacted mandibular third molar is an envelope incision that extends from the mesial papilla of the mandibular first molar, around the necks of the teeth to the distobuccal line angle of the second molar, and then posteriorly to and laterally up the anterior border of the mandibular ramus (Fig. 9-42, A).

FIGURE 9-42 A, Envelope incision is most commonly used to reflect soft tissue for removal of impacted third molar. Posterior extension of incision should laterally diverge to avoid injury to lingual nerve. B, Envelope incision is laterally reflected to expose bone overlying impacted tooth. C, When three-cornered flap is made, a releasing incision is made at mesial aspect of second molar. D, When soft tissue flap is reflected by means of a releasing incision, greater visibility is possible, especially at apical aspect of surgical field.
The incision must not continue posteriorly in a straight line because the mandible diverges laterally. An incision that extends straight posteriorly falls off the bone and into the sublingual space and may damage the lingual nerve, which is in proximity to the mandible in the area of the third molar. If this nerve is traumatized, the patient will probably have lingual nerve anesthesia, which is extremely disturbing to patients. The incision must always be kept over bone; therefore the surgeon should carefully palpate the retromolar area before beginning the incision.
The flap is reflected laterally to expose the external oblique ridge with a periosteal elevator (Fig. 9-42, B). The surgeon should not reflect more than a few millimeters beyond the external oblique ridge because this results in increased morbidity and an increased number of complications after surgery. The retractor is placed on the buccal shelf, just lateral to the external oblique ridge, and it is stabilized by applying pressure toward the bone. This results in a retractor that is stable and does not continually traumatize the soft tissue. The Austin and the Minnesota retractors are the most commonly used for flap retraction when removing mandibular third molars.
If the impacted third molar is deeply embedded in bone and requires more extensive bone removal, a releasing incision may be useful (Fig. 9-42, C and D). The flap created by this incision can be reflected farther apically, without risk of tearing the tissue.
The recommended incision for the maxillary third molar is also an envelope incision. The incision extends posteriorly over the tuberosity from the distal of the second molar and anteriorly to the mesial aspect of the first molar (Fig. 9-43, A and B). In situations in which greater access is required (e.g., in a deeply embedded impaction), a release incision extending from the mesial aspect of the second molar can be used (Fig. 9-43, C and D).
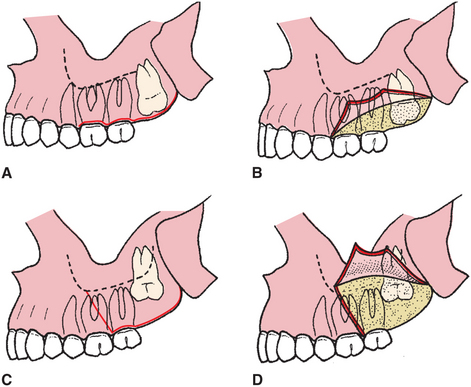
FIGURE 9-43 A, Envelope flap is most commonly used flap for removal of maxillary impacted teeth. B, When soft tissue is reflected, bone overlying third molar is easily visualized. C, If tooth is deeply impacted, a releasing incision into the vestibule can be used to gain greater access. D, When three-cornered flap is reflected, the more apical portions become more visible.
In the removal of third molars it is vital that the flap be large enough for adequate access and visibility of the surgical site. The flap must have a broad base if a releasing incision is used. The incision must be made with a smooth stroke of the scalpel, which is kept in contact with bone throughout the entire incision so that the mucosa and periosteum are completely incised. This allows a full-thickness mucoperiosteal flap to be reflected. The incision should be designed so that it can be closed over solid bone (rather than over a bony defect). This is achieved by extending the incision at least one tooth anterior to the surgical site when a vertical-releasing incision is used. The incision should avoid vital anatomic structures. Only a single releasing incision should be used.
Step 2: Removal of overlying bone. Once the soft tissue is elevated and retracted so that the surgical field can be visualized, the surgeon must make a judgment concerning the amount of bone to be removed. In some situations the tooth can be sectioned with a bur and delivered without bone removal. In most cases, however, some bone removal is required.
The bone on the occlusal aspect and on the buccal and distal aspects down to the cervical line of the impacted tooth should be removed initially. The amount of bone that must be removed varies with the depth of the impaction, the morphology of the roots, and the angulation of the tooth. Bone should not be removed from the lingual aspect of the mandible because of the likelihood of damaging the lingual nerve.
The burs that are used to remove the bone overlying the impacted tooth vary with surgeons’ preferences. A large round bur, such as a No. 8, is desirable, because it is an end-cutting bur and can be used effectively for drilling with a pushing motion. The tip of a fissure bur, such as a No. 703 bur, does not cut well, but the edge rapidly removes bone and quickly sections teeth when used in a lateral direction. Note that a dental handpiece such as used for restorative dentistry should never be used to remove bone around third molars to section them.
The typical bone removal for the extraction of an impacted mandibular tooth is illustrated in Figure 9-44. The bone on the occlusal aspect of the tooth is removed first to expose the crown of the tooth. Then the cortical bone on the buccal aspect of the tooth is removed down to the cervical line. Next, the bur can be used to remove bone between the tooth and the cortical bone in the cancellous area of the bone with a maneuver called ditching. This provides access for elevators to gain purchase points and a pathway for delivery of the tooth. No bone is removed from the lingual aspect so as to protect the lingual nerve from injury.
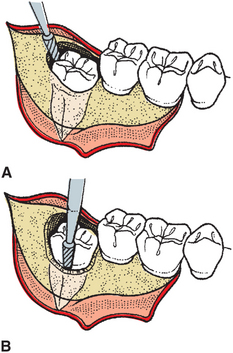
FIGURE 9-44 A, After soft tissue has been reflected, bone overlying occlusal surface of tooth is removed with a fissure bur. B, Bone on buccodistal aspect of impacted tooth is then removed with a bur.
For maxillary teeth, bone removal is usually unnecessary, but when it is, bone is removed primarily on the buccal aspect of the tooth, down to the cervical line to expose the entire clinical crown. Usually bone removal can be accomplished with a periosteal elevator, rather than a bur. Additional bone must usually be removed on the mesial aspect of the tooth to allow an elevator an adequate purchase point to deliver the tooth.
Step 3: Sectioning the tooth. Once sufficient amounts of bone have been removed from around the impacted tooth, the surgeon should assess the need to section the tooth. Sectioning allows portions of the tooth to be removed separately with elevators through the opening provided by bone removal.
The direction in which the impacted tooth should be divided depends primarily on the angulation of the impacted tooth. Although minor modifications are necessary for teeth with divergent roots or for teeth that are more or less deeply impacted, the most important determinant is the angulation of the tooth.
Tooth sectioning is performed with a bur, and the tooth is sectioned three fourths of the way toward the lingual aspect. The bur should not be used to section the tooth completely through in the lingual direction because this is more likely to injure the lingual nerve. A straight elevator is inserted into the slot made by the bur and rotated to split the tooth.
The mesioangular mandibular impaction is usually the least difficult to remove of the four basic angulation types. After sufficient bone has been removed, the distal half of the crown is sectioned off at the buccal groove to just below the cervical line on the distal aspect. This portion is removed. The remainder of the tooth is removed with a No. 301 elevator placed at the mesial aspect of the cervical line. A mesioangular impaction can also be removed by preparing a purchase point in the tooth with the drill and using a Crane pick elevator to elevate the tooth from the socket (Fig. 9-45).
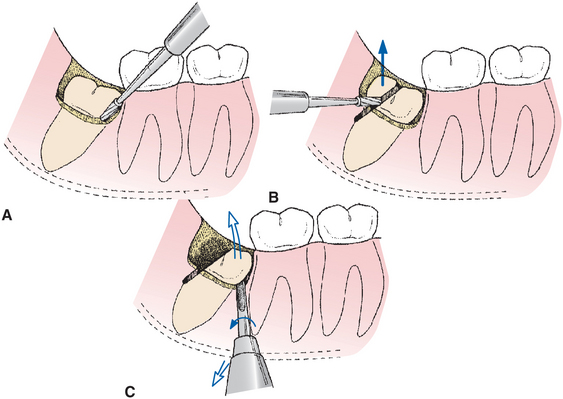
FIGURE 9-45 A, When removing mesioangular impaction, buccodistal bone is removed to expose crown of tooth to cervical line. B, Distal aspect of crown is then sectioned from tooth. Occasionally, it is necessary to section entire tooth into two portions rather than to section distal portion of crown only. C, After distal portion of crown has been delivered, small straight elevator can be inserted into surgically exposed mesial aspect of crown to deliver the remainder of the tooth as shown. Alternatively a purchase point can be placed near the base of the crown near the mesial aspect of the tooth and a Crane pick used to elevate the tooth (not shown).
The next most difficult impaction to remove is the horizontal impaction. After sufficient bone has been removed down to the cervical line to expose the superior aspect of the distal root and the majority of the buccal surface of the crown, the tooth is sectioned by dividing the crown of the tooth from the roots at the cervical line. The crown of the tooth is removed, and the roots are displaced with a Cryer elevator into the space previously occupied by the crown. If the roots of an impacted third molar are divergent, they may require sectioning into two separate portions to be delivered individually (Fig. 9-46).
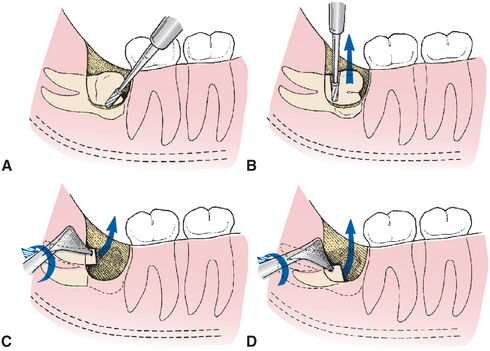
FIGURE 9-46 A, During removal of horizontal impaction, bone overlying tooth (i.e., bone on distal and buccal aspect of tooth) is removed with bur. B, Crown is then sectioned from roots of tooth and delivered from socket. C, Roots are then delivered together or independently by Cryer elevator used with rotational motion. Roots may require separation into two parts; occasionally, purchase point is made in root to allow Cryer elevator to engage it. D, Mesial root of tooth is elevated in similar fashion.
The vertical impaction is one of the two most difficult impactions to remove. The procedure of bone removal and sectioning is similar to the mesioangular impaction; that is, the occlusal buccal and distal bone is removed. The distal half of the crown is sectioned and removed, and the tooth is elevated by applying an elevator at the mesial aspect of the cervical line of the tooth. This is more difficult than a mesioangular removal because access around the mandibular second molar is difficult to obtain and requires the removal of substantially more bone on the buccal and distal sides (Fig. 9-47).
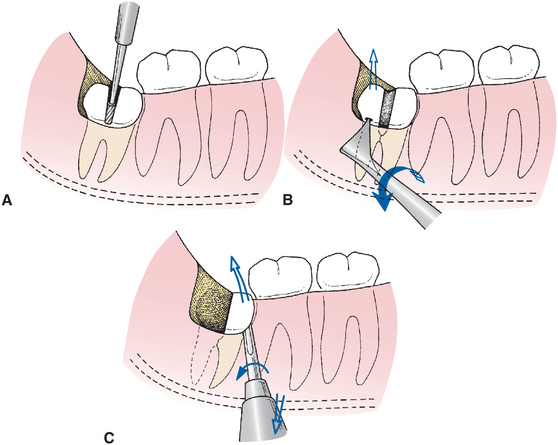
FIGURE 9-47 A, When removing vertical impaction, the bone on the occlusal, buccal, and distal aspects of crown is removed, and the tooth is sectioned into mesial and distal sections. If the tooth has a single-fused root, the distal portion of crown is sectioned off in a manner similar to that depicted for mesioangular impaction. B, Posterior aspect of the crown is elevated first with Cryer elevator inserted into small purchase point in distal portion of the tooth. C, Small straight elevator No. 301 is then used to elevate the mesial aspect of the tooth by rotary-and-lever type of motion.
The most difficult tooth to remove is the distoangular impaction. After sufficient bone is removed from the buccoocclusal and the distal sides of the tooth, the crown is sectioned from the roots just above the cervical line. The entire crown is usually removed because it interferes with visibility and access to the root structure of the tooth. If the roots are fused, a Cryer or straight elevator can be used to elevate the tooth into the space previously occupied by the crown. If the roots are divergent, they are usually sectioned into two pieces and individually delivered. Extracting this impaction is difficult because much distal bone must be removed and the tooth tends to be elevated distally and into the ramus portion of the mandible (Fig. 9-48).
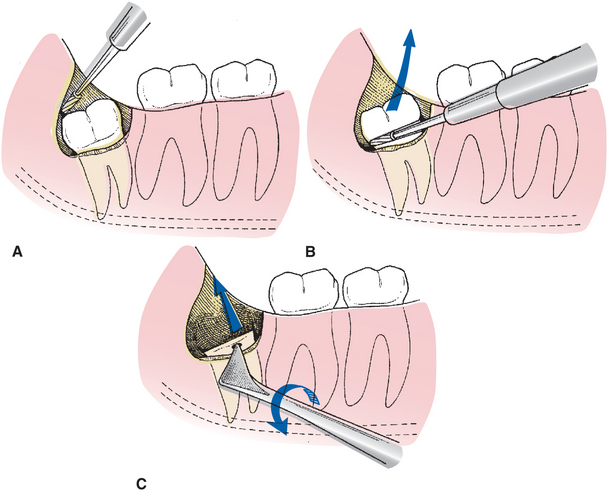
FIGURE 9-48 A, For distoangular impaction, occlusal, buccal, and distal bone is removed with bur. It is important to remember that more distal bone must be taken off than for vertical or mesioangular impaction. B, Crown of tooth is sectioned off with bur, and crown is delivered with straight elevator. C, Purchase point is put into remaining root portion of tooth, and roots are delivered by Cryer elevator with wheel-and-axle type of motion. If roots diverge, it may be necessary in some cases to split them into independent portions.
Impacted maxillary teeth are rarely sectioned because the overlying bone is usually thin and relatively elastic. In situations in which the bone is thicker or the patient is older (and therefore the bone not so elastic), tooth extraction is usually accomplished by bone removal rather than tooth sectioning.
In general, impacted teeth elsewhere in the mouth are usually sectioned only at the cervical line. This permits removal of the crown portion of the tooth, displacement of the root portion into the space previously occupied by the crown, and removal of the root portion.
Step 4: Delivery of the sectioned tooth with elevator. Once adequate bone has been removed to expose the tooth and the tooth has been sectioned in the appropriate fashion, the tooth is delivered from the alveolar process with dental elevators. In the mandible the most frequently used elevators are the straight elevator, the paired Cryer elevators, and the Crane pick.
An important difference between the removal of an impacted mandibular third molar and of a tooth elsewhere in the mouth is that almost no luxation of the tooth occurs for the purpose of expansion of the buccal or linguocortical plate. Instead, bone is removed and teeth are sectioned to prepare an unimpeded pathway for delivery of the tooth.
Application of excessive force may result in unfavorable fracturing of the tooth, of excessive buccal bone, of the adjacent second molar, or possibly of the entire mandible.
Elevators are designed not to deliver excessive force but to engage the tooth or tooth root and to apply force in the proper direction. Some highly skilled surgeons use the periapical curette or root tip pick to remove sectioned roots from their sockets. Because the impacted tooth has never sustained occlusal forces, the periodontal ligaments are weak and permit displacement of the tooth root if appropriate bone is removed and force is delivered in the proper direction.
Delivery of maxillary third molars is accomplished with small straight elevators, which distobuccally luxate the tooth. Some surgeons prefer angled elevators, such as the Potts, Miller, or Warwick elevators, which aid in gaining access to the impacted tooth. The elevator tip is inserted into the area at the mesial cervical line, and force is applied to displace the tooth in the distobuccal direction (Fig. 9-49). The surgeon should be cautious about applying excessive pressure anteriorly to avoid damage to the root of the maxillary second molar. In addition, as pressure is applied to displace the tooth posteriorly, the surgeon should have a finger on the tuberosity of the maxilla (especially if the impaction is mesioangular) so that if a fracture does occur, steps can be taken to salvage the tuberosity of the maxilla by maintaining soft tissue attachments.
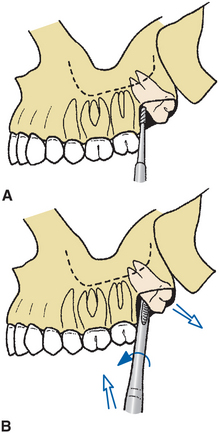
FIGURE 9-49 Delivery of impacted maxillary third molar. A, Once soft tissue has been reflected, small amount of buccal bone is removed with bur or the pointed end of a periosteal elevator. B, Tooth is then delivered by small straight elevator, with rotational and lever motion. Tooth is delivered in distobuccal and occlusal direction. Note that in most circumstances, bone removal using a bur is not required when removing impacted maxillary third molars.
Step 5: Preparing for wound closure. A bone file is used to smooth any sharp, rough edges of bone particularly where an elevator was in bony contact. The surgeon should next direct attention to removing all particulate bone chips and debris from the wound. This is done with vigorous irrigation with sterile saline. Special care should be taken to irrigate thoroughly under the reflected soft tissue flap. A mosquito hemostat can be used to remove any remnants of the dental follicle if present. Once the follicle is grasped, it is lifted with a slow, steady pressure and will pull free from the surrounding hard and soft tissue. A final irrigation and a thorough inspection should be performed before the wound is closed.
The surgeon should check for adequate hemostasis. Bleeding can occur from a vessel in the flap, from the bone marrow that has been cut with a bur, or the inferior alveolar vessels. Specific bleeding points should be controlled if they exist. If brisk generalized ooze is seen after the sutures are placed, the surgeon should apply firm pressure with a small, moistened gauze pack. Postoperative bleeding to a certain degree occurs relatively frequently after third molar extraction but is usually self-limited if adequate hemostasis is achieved at the time of the operation.
At this point many surgeons apply an antibiotic such as tetracycline to the sockets of lower third molars to help prevent osteitis sicca from occurring.
The closure of the incision made for an impacted third molar is usually a primary closure. If the flap was well designed and not traumatized during the surgical procedure, it will fit into its original position. The initial suture should be placed through the attached tissue on the posterior aspect of the second molar. Additional sutures are placed posteriorly from that position and anteriorly through the papilla on the mesial side of the second molar. Usually two or three sutures are necessary to close an envelope incision. If a releasing incision was used, attention must be directed to closing that portion of the incision as well. If the flap for a maxillary third molar rests passively in place postoperatively, suturing may not be necessary.
PERIOPERATIVE PATIENT MANAGEMENT
The removal of impacted third molars is a surgical procedure that is usually associated with a great deal of patient anxiety. In addition, this surgical procedure can involve unpleasant noises and sensations. As a result, surgeons who routinely remove impacted third molars commonly recommend to their patients some type of profound anxiety control such as deep intravenous sedation or general anesthesia.
The choice of technique is based on the surgeon’s preference. However, the goals are to achieve a level of patient consciousness that allows the surgeon to work efficiently and that limits the number of unpleasant memories for the patient.
In addition to the increased need for anxiety control, a variety of medications are used to control the sequelae of third molar extraction surgery. The use of long-acting local anesthetics should be considered in the mandible. These anesthetics provide the patient with a pain-free period of 4 to 8 hours during which prescriptions can be filled and analgesics taken. Analgesics are best begun at the point when the patient first begins to recognize the return of sensation. Some surgeons even have patients begin analgesics before any return of sensation. The surgeon should consider writing a prescription for a potent oral analgesic for every patient who undergoes surgical removal of an impacted third molar, and if the surgeon does separate consultation appointments, he or she should prescribe postoperative medications at that time so the patient and the patient’s escort do not need to stop on the way home from the procedure. Enough doses should be prescribed to last for at least 3 or 4 days. Combinations of codeine, codeine congeners, or oxycodone with aspirin or acetaminophen are commonly used. Nonsteroidal antiinflammatory drugs such as ibuprofen may be of value for patients as well to use when the discomfort is less significant.
To minimize the swelling common after the surgical removal of impacted third molars, some surgeons give parenteral corticosteroids. Intravenous administration of a glucocorticoid steroid provides sufficient antiinflammatory activity to greatly limit edema. Although many different regimens and protocols for intravenous steroid administration exist, a relatively common one is the single administration of 8 mg dexamethasone before surgery. Dexamethasone is a long-acting steroid, and its efficacy in controlling third molar postsurgical edema is documented. This drug can then be continued in an oral dose of 0.75 to 1.25 mg twice a day for 2 to 3 days to continue edema control. Although steroids given in this manner have few side effects or contraindications, the general philosophy of weighing the risks and benefits of drug administration must be carefully followed before the decision is made to give any drugs routinely.
Some surgeons recommend the use of ice packs on the face to help prevent postoperative swelling, even though studies show that it is unlikely that the ice has much effect on preventing or limiting swelling. However, patients frequently report that the ice makes them feel more comfortable. Use of ice also provides patients the opportunity to participate in their postoperative care, which is important for many patients.
Another medication that is sometimes used is an antibiotic. If a patient has a preexisting pericoronitis or periapical abscess, it is common to prescribe antibiotics for a few days after surgery. However, if the patient is healthy and the clinician finds no systemic indication for antibiotics or a preexisting local infection, systemic antibiotics are usually not indicated. The use of a topical antibiotic such as tetracycline has been scientifically shown to greatly lower the incidence of osteitis sicca (dry socket) in mandibular molar extraction sites. One fourth of the contents of a 250-mg capsule is adequate to give the desired protection.
The normal postoperative experience of a patient after surgical removal of an impacted third molar is more involved than after a routine extraction. The patient can expect a modest amount of edema in the area of the surgery for 3 to 4 days, with the swelling completely dissipating by about 5 to 7 days. The amount of swelling depends on the degree of tissue trauma and variability among patients in their potential to swell.
A modest amount of discomfort usually follows the procedure, the degree of which depends on the amount of surgical trauma necessary to remove the teeth. This discomfort can be effectively controlled with potent oral analgesics. Patients usually require potent analgesics for 2 or 3 days routinely and intermittently (particularly at bedtime) for several more days. The patient may have some mild soreness in the region for up to 2 to 3 weeks after the surgery.
Patients who have had mandibular third molars surgically removed frequently have mild to moderate trismus. This inability to open the mouth interferes with the patient’s normal oral hygiene and eating habits. Patients should be warned that they will be unable to open their mouths normally after surgery. The trismus gradually resolves, and the ability to open the mouth should return to normal by 7 to 10 days after surgery.
If pain, edema, and trismus have not greatly improved by 7 days after surgery, the surgeon should investigate why.
All of the sequelae of the surgical removal of impacted teeth are of less intensity in the young, healthy patient and of far greater intensity in the older, more debilitated patient. Even healthy adult patients between the ages of 35 to 40 years have a significantly more difficult time after the extraction of impacted third molars than do most healthy teenaged patients.
See Chapter 10 for a more detailed description of postoperative care.
REFERENCES
1. Venta, I, Murtomaa, H, Turtola, L, et al. Assessing the eruption of lower third molars on the basis of radiographic features. Br J Oral Maxillofac Surg. 1991;29:259–262.
2. Venta, I, Murtomaa, H, Turtola, L, et al. Clinical follow-up study of third molar eruption from ages 20 to 26 years. Oral Surg Oral Med Oral Pathol. 1991;72:150–153.
3. Bruce, RA, Frederickson, GC, Small, GS. Age of patients and morbidity associated with mandibular third molar surgery. J Am Dent Assoc. 1980;101:240.
4. Marmary, J, Brayer, L, Tzokert, A, et al. Alveolar bone repair following extraction of impacted mandibular third molars. Oral Surg Oral Med Oral Pathol. 1986;61:324.
5. Meister, F, Jr., Nery, EB, Angell, DM, et al. Periodontal assessment following surgical removal of mandibular third molars. Gen Dent. 1986;14:120–123.
6. Osborne, WH, Snyder, AJ, Tempel, TR. Attachment levels and crevicular depths at the distal aspect of mandibular second molars following removal of adjacent third molars. J Periodontol. 1982;53:93.
7. Lysell, L, Rohlin, M. A study of indications used for removal of the mandibular third molar. Int J Oral Maxillofac Surg. 1988;17:161.
8. Nordenram, A, Hultin, M, Kjellman, O, et al. Indications for surgical removal of the mandibular third molar. Swed Dent J. 1987;11:23–29.
9. Leone, SA, Edenfield, MJ, Coehn, ME. Correlation of acute pericoronitis and the position of the mandibular third molar. Oral Surg Oral Med Oral Pathol. 1986;62:245.
10. Stanley, HR, Alattar, M, Collett, WK, et al. Pathological sequelae of “neglected” impacted third molars. J Oral Pathol. 1988;17:113–117.
11. Richardson, ME. The effect of mandibular first premolar extraction on third molar space. Angle Orthod. 1989;59:291–294.
12. Richardson, ME. The role of the third molar in the cause of late lower arch crowding: a review. Am J Orthod Dentofacial Orthop. 1989;95:79.
13. Kugelberg, CF. Periodontal healing two and four years after impacted lower third molar surgery. Int J Oral Maxillofac Surg. 1990;19:341.
14. Kugelberg, CF, Ahlstrom, U, Ericson, S, et al. The influence of anatomical, pathophysiological and other factors on periodontal healing after impacted lower third molar surgery. J Clin Periodontol. 1991;18:37–43.
15. Kugelberg, CF, Ahlstrom, U, Ericson, S, et al. Periodontal healing after impacted lower third molar surgery in adolescents and adults. Int J Oral Maxillofac Surg. 1991;20:18–24.
Bean, LR, King, DR. Pericoronitis: its nature and etiology. J Am Dent Assoc. 1971;83:1074.
Pell, GJ, Gregory, GT. Report on a ten-year study of a tooth division technique for the removal of impacted teeth. Am J Orthod. 1942;28:660.
Perciaccante, VJ. Management of impacted teeth. Oral Maxillofac Surg Clin North Am. 2007;19:1–140.
Quee, TA, Gosselin, D, Millar, EP, et al. Surgical removal of the fully impacted mandibular third molar: the influence of flap design and alveolar bone height on the periodontal status of the second molar. J Periodontol. 1985;56:625–630.
von Wowern, N, Nielsen, HO. The fate of impacted lower third molars after the age of 20. Int J Oral Maxillofac Surg. 1989;18:277.