Chapter 28 Vital signs
Mastery of content will enable you to:
• Explain the physiology of normal regulation of body temperature, pulse, respirations, blood pressure and oxygen saturation.
• Identify when vital signs should be taken.
• Accurately assess body temperature, pulse, respirations, blood pressure and oxygen saturation.
• Explain variations in the techniques used to assess an infant’s, a child’s and an adult’s vital signs.
• Identify ranges of acceptable vital sign values for an infant, a child and an adult.
• Accurately record, analyse and report vital sign measurements.
Vital signs are the most frequent measurements obtained by nurses and include temperature, pulse, respiratory rate and blood pressure. For some patients, oxygen saturation is also included as part of their vital signs. These measurements are indicators of the effectiveness of cardiovascular, respiratory, nervous and endocrine body systems. An alteration in vital signs can provide objective evidence of the body’s response to physical and psychological stress or changes in physiological function. Changes in vital signs can, therefore, signal the need for nursing or medical intervention and help monitor a patient’s response to treatment (Kryriacos and others, 2011).
Vital sign measurements are never interpreted in isolation: they form part of the overall clinical assessment of a client. One piece of data rarely provides enough information to make a clinical judgment. Nurses cluster together relevant data to identify actual or potential health problems and develop a plan of care. An informative interpretation of vital signs usually requires:
• knowledge of normal physiology and acceptable ranges
• baseline data or history for the patient
• analysis of trends over time for this patient
• critical thinking and knowledge of how illness or treatments may affect vital signs.
Vital sign assessment and interpretation is integral in determining a patient’s health status. An important aim of assessment of vital signs is to identify early patient deterioration (see Research highlight). Careful measurement techniques, knowledge of the normal ranges, clear specifications of reportable altered vital signs parameters and clear communication channels for reporting patient deterioration will ensure more-accurate interpretation of those findings and timely intervention. Early intervention enables better patient outcomes and reduces future adverse events. Box 28-1 gives a guideline for when to measure vital signs.
BOX 28-1 WHEN TO TAKE VITAL SIGNS
• On admission of the patient to a healthcare facility
• Before and after a surgical or invasive diagnostic procedure
• Before, during and after the administration of medications affecting cardiovascular, respiratory and temperature-control functions
• As indicated by any significant change in the patient’s health status (e.g. loss of consciousness or increased pain)
• Before and after nursing interventions influencing a vital sign (e.g. before a patient previously on bed rest becomes mobile or performs range-of-motion exercises)
• If patient reports non-specific symptoms of physical distress (e.g. dizziness)
• On a routine schedule according to the healthcare facility policy or a medical practitioner’s prescription
The process of detecting and managing the deteriorating patient is complex. Accurate measurement and reporting of changes in vital signs is critical to improve patient outcomes.
Odell and colleagues conducted a systematic review to evaluate nursing practice in caring for deteriorating patients. While ‘early-warning systems’ have been designed to better support nurses, there is little evidence available to confirm their effectiveness. The key findings of the review include the importance of detecting the deteriorating patient; accurate recording and reviewing of vital signs; and timely reporting, response and treatment of the patient.
• The existing evidence suggests that early-warning systems that rely on routine monitoring and recording of vital signs alone is not enough.
• Identifying the deteriorating patient requires high-quality clinical assessment and judgment by appropriately skilled and experienced nurses.
• The context in which nurses work is complex and therefore requires the development of rapid response systems.
• Finally, in order that nurses develop skill proficiency and confidence, more effective education and support is required.
The following guidelines will facilitate the incorporation of vital sign measurement into nursing practice:
• Knowledge—knowledge of the patient’s past medical history, patterns and trends in vital signs, and treatments and prescribed medications is important, as some illnesses or treatments lead to predictable vital sign changes. For example, the medical practitioner may prescribe certain cardiac drugs to be given within a range of pulse or blood pressure values; antipyretics (drugs that reduce fever) are often administered when temperature is elevated outside the acceptable range for the patient.
• Responsibility and delegation—while the registered nurse (RN) has overall responsibility for vital signs, measurement may be delegated to enrolled nurses (ENs). The RN is accountable for analysing and interpreting vital signs values, reporting changes and planning and evaluating interventions that are implemented in response to changes in any of the vital signs.
• Frequency of measurements—nurses and medical staff collaborate to determine the frequency of vital sign measurement. In all situations, however, the RN is responsible for judging whether more-frequent assessments are needed. If, for example, a patient’s physical condition deteriorates, it will be necessary to monitor vital signs as often as every 5–15 minutes until the patient’s situation is stabilised.
• Equipment—equipment should be functional and appropriate for the size, age and condition of the patient to ensure accurate findings (e.g. an adult-size blood-pressure cuff should not be used for a child).
• Approaching the patient—the manner of approach to the patient can alter the vital signs. Approaching the patient in a calm manner while demonstrating proficiency in handling the equipment is important for accurate vital sign measurement.
• Systematic approach—controlling or minimising environmental factors that may affect vital signs and asking the patient about recent activities before measuring vital signs will also contribute to accuracy. Organisation using a step-by-step process facilitates efficiency (e.g. respirations can be assessed while taking the temperature and/or pulse).
• Analysis and interpretation—the RN has a critical role in analysing and interpreting the results of vital sign measurement. Vital signs are not interpreted in isolation, but in conjunction with other physical signs or symptoms, patterns over time, expected outcomes and the patient’s ongoing health status.
• Communicating findings—verification, accurate, clear documentation and timely communication of significant changes in vital signs to the medical practitioner or senior nurse is critical to patient outcomes.
It is a nursing responsibility to determine which vital signs to monitor, when and how often, and to interpret and give appropriate intervention(s), with timely communication and documentation.
General observation charts exist for recording vital signs. Currently in Australia, each institution has its own general observation chart. However, the design of observation charts has been identified as an important factor in the failure to report changes in vital signs, and a national observation chart has been designed to address the problem. This chart is currently being trialled for future use (Australian Commission on Quality and Safety in Health Care, 2011).
In addition to the actual vital sign values, record in the patient’s case notes or progress notes any accompanying or precipitating symptoms, such as chest pain and dizziness with abnormal blood pressure, shortness of breath with abnormal respirations, cyanosis with hypoxaemia, or flushing and diaphoresis with elevated temperature. Documentation includes interventions initiated as a result of vital sign alterations such as administration of oxygen therapy or an antihypertensive medication.
The body temperature is the difference between the amount of heat produced by body processes and the amount of heat lost to the external environment:
Heat produced – Heat lost = Body temperature
Despite extremes in environmental conditions and physical activity, temperature-control mechanisms keep the body’s core temperature (temperature of the deep tissues) relatively constant (Figure 28-1). Surface temperature fluctuates depending on blood flow to the skin and the amount of heat lost to the external environment. While there is no single temperature that is ‘normal’ for all people, the body’s tissues and cells function best within a relatively narrow temperature range, the normal range being approximately 36.2–37.5°C (Gordon and Craft, 2011).
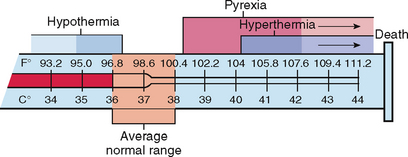
FIGURE 28-1 Ranges of normal temperature values and abnormal body temperature alterations.
From Potter PA, Perry AG 2013 Fundamentals of nursing, ed 8. St Louis, Mosby.
Nurses can use knowledge of temperature-control mechanisms to understand and promote temperature regulation. The balance between heat lost and heat produced, or thermoregulation, is precisely regulated by physiological and behavioural mechanisms.
Body temperature is controlled in the anterior portion of the hypothalamus (preoptic area) at a set-point that is normal for each individual. This thermoregulatory centre is monitored by peripheral thermoreceptors in the skin and mucous membranes and central thermoreceptors in internal organs including the hypothalamus. A fall in environmental temperature activates heat-production mechanisms such as vasoconstriction of blood vessels to reduce blood flow to the skin and extremities. When vasoconstriction is ineffective in preventing additional heat loss, compensatory heat production is stimulated through voluntary muscle contraction and muscle shivering. Disease or trauma to the hypothalamus or to the spinal cord, which carries hypothalamic messages, can cause serious alterations in temperature control.
Heat production within the body is the by-product of metabolism, skeletal muscle tone and contraction, and chemical thermogenesis. Metabolism refers to the chemical reactions in all body cells. Chemical reactions require energy in the form of adenosine triphosphate (ATP). Any ATP metabolic process results in the production of heat. Food is the main fuel source for metabolism; its energy is transferred to ATP which in turn transfers energy to body cells. The amount of energy used for metabolism is the metabolic rate. When metabolism increases, additional heat is produced and vice versa.
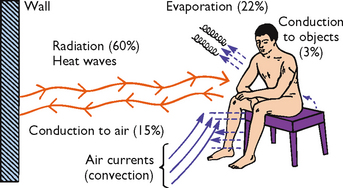
Heat loss and heat production occur simultaneously. The skin’s structure and exposure to the environment result in constant normal heat loss through radiation, conduction, convection and evaporation (see Figure 28-2). Diaphoresis is profuse sweating associated with an elevated body temperature, physical exertion, exposure to heat, and mental or emotional stress.
Individuals voluntarily act to maintain a comfortable body temperature when exposed to temperature extremes. The ability of a person to control body temperature depends on the degree of temperature extreme, the person’s ability to sense feeling comfortable or uncomfortable, thought processes or emotions and the person’s mobility or ability to remove or add clothes. Body temperature control is difficult if any of these abilities are absent or lost. Infants can sense uncomfortable warm conditions, but need help to change their environment. Older adults may need help in detecting cold environments and minimising heat loss. Illness, a decreased level of consciousness or impaired thought processes all result in an inability to recognise the need to change behaviour for temperature control. When temperatures become extremely high or low, health-promoting behaviours such as removing or adding clothing have a limited effect on controlling temperature.
An essential aspect of the nurse’s role is the assessment and modification of variables that place patients at high risk of ineffective thermoregulation.
At birth the newborn leaves a warm, relatively constant environment and enters one in which temperatures fluctuate widely. Extra care is needed to protect the newborn because their temperature-control mechanisms are immature. A newborn loses up to 30% of body heat through the head and therefore needs to wear a cap to prevent heat loss. When protected from environmental extremes, the newborn’s body temperature is maintained within the range of 35.5–37.5°C.
The older adult has a narrower range of body temperatures than the younger adult. The average body temperature of older adults is approximately 36°C. Older adults are particularly susceptible to temperature extremes because of deterioration in control mechanisms, particularly poor vasomotor control (control of vasoconstriction and vasodilation), reduced amounts of subcutaneous tissue, reduced sweat gland activity and reduced metabolism.
Muscle activity requires an increased blood supply and increases carbohydrate and fat breakdown. This increased metabolism increases heat production and thus body temperature. Prolonged strenuous exercise, such as long-distance running, can temporarily raise body temperatures up to 41°C.
Women generally experience greater fluctuations in body temperature than men. Menstrual cycle hormonal variations cause body temperature fluctuations. When progesterone levels are low, the body temperature is a few tenths of a degree below the baseline level; the lower temperature persists until ovulation occurs. During ovulation, greater amounts of progesterone raise the body temperature to previous baseline levels or higher. These variations can predict the most fertile time to achieve pregnancy.
Body temperature changes also occur in women during menopause (cessation of menstruation). Postmenopausal women may experience periods of intense body heat and sweating lasting from 30 seconds to 5 minutes with an intermittent increase in skin temperature of up to 4°C (hot flushes). This is due to the instability of the vasomotor controls for vasodilation and vasoconstriction (Brashers, 2006).
Body temperature follows a circadian pattern, peaking late afternoon (1800–2200 hours) and falling early morning (0200–0400 hours). Interestingly, temperature patterns are not automatically reversed in people who work at night and sleep during the day; it takes 1–3 weeks for the cycle to reverse. In general, the circadian temperature rhythm does not change with age.
Physical and emotional stress increase body temperature through hormonal and neural stimulation. These physiological changes increase metabolism, which increases heat production.
Environment influences body temperature. If temperature is assessed in a very warm room, a person may be unable to regulate body temperature by heat-loss mechanisms, and the body temperature will be elevated. If the person has just been outside in the cold without warm clothing, body temperature may be low because of extensive radiant and conductive heat loss. Infants and older adults are most likely to be affected by environmental temperatures, because their thermoregulatory mechanisms are less efficient.
Fever (or pyrexia) occurs as a part of the inflammatory response caused by trauma, surgery, infection, immune responses and tissue damage. For example, in the immediate postoperative period it is common for a patient to develop a fever as part of the normal inflammatory response to surgery. During fever, white-blood-cell production is stimulated and there is a decrease in the concentration of iron in the blood plasma, suppressing bacterial growth. Fever also stimulates the production of antiviral interferon.
Fever is a host defence response, a febrile response, to invasion from exogenous pyrogens, including microbial pathogens such as bacteria, viruses, mycobacteria and fungi as well as non-microbial antigens such as inflammatory agents and drugs. During the febrile response, the set-point in the thermoregulatory centre is reset to maintain a higher level of body temperature. This higher temperature is maintained through increased heat production, especially through peripheral vasoconstriction and behavioural measures such as covering oneself with blankets in response to chills even though the body temperature is elevated.
The febrile response is a coordinated series of events to defend the body against these invading organisms through the intentional elevation of the body’s core temperature—a mean 1°C increase in body temperature (for that specific measurement site). For example, normal axillary temperature ranges from 34.7–37.4°C with a mean of 36.5°C; 1°C above the mean is 37.5°C. However, body temperature can be raised by excessive clothing, physical activity, hot weather and the digestion of food. Hyperthermia—passive heat gain greater than the body’s capability to dissipate heat—is distinct from fever and the two should not be confused. Temperatures accepted as representative of fever are (El-Radhi and others, 2009):
≥ 38.0°C | |
≥ 37.6°C | |
≥ 36.5°C | |
≥ 37.6°C. |
The widespread and continued prevalence of the febrile response in mammals, reptiles, amphibians and fish suggests that fever is an adaptive response, even though it places substantial demands on the body through increased metabolic demands. In humans and most mammals, fever has an upper limit ranging from 41°C to 42°C. When humans are in a thermoneutral environment, febrile rises in body temperature tend to range from 0.5°C to 3°C, with most infections producing fevers between 38.5°C and 40.5°C, and an average fever of 39.5°C.
The cold phase begins as the hypothalamic set-point is reset to a higher level (see Figure 28-3). This phase lasts approximately 10–40 minutes, during which all heat-producing mechanisms are activated and there is a rapid, steady rise in temperature. Heat production increases oxygen demands by 3–5 times normal resting levels, contributing to a hypermetabolic state. In this state there are associated increases in heart and respiratory rates and thirst. Vasoconstriction causes the skin to look pale with cyanotic nail beds, and to feel cool and dry. During this period, the person experiences chills and rigors, and feels cold even though the body temperature is rising.
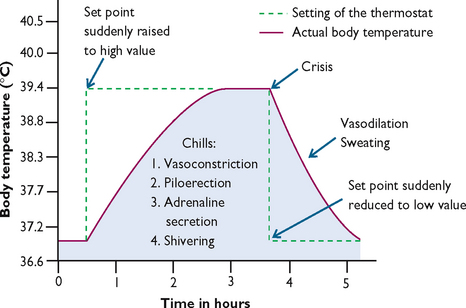
FIGURE 28-3 Effect of changing the set-point of the hypothalamic temperature control during a fever.
Modified from Guyton AC, Hall JE 2011 Textbook of medical physiology, ed 12. Philadelphia, Saunders.
During the hot phase the body has reached a new set-point and maintains the body temperature at this new higher temperature. The length of this phase depends on the time it takes to eradicate the pyrogenic cytokines responsible for the raised set-point. Higher temperatures in this phase are maintained through a balance in heat production and heat loss. Skin is flushed and warm and the individual feels hot. Basal metabolic rate remains high, so tachycardia and thirst continue. Other symptoms associated with this phase include drowsiness, headache, photophobia, reduced activity and appetite, feelings of weakness and/or restlessness and sometimes convulsions. This phase ends when the underlying cause of fever has been treated and/or eliminated by the body, resulting in a decrease in set-point to normal.
The defervescence phase or the ‘breaking’ of the fever occurs when there is a sudden decline in circulating pyrogenic cytokines and resetting of the hypothalamic set-point back to normal. Heat loss mechanisms take over and heat production is inhibited. The skin feels warm and is flushed due to vasodilation and sweating, which can exacerbate existing dehydration. Finally, the temperature returns to normal and the patient becomes afebrile.
In the past, patterns of fever were used to assist in diagnosis, although there is much less focus given to these patterns during febrile illnesses today. There are only a few diseases that show a specific pattern of fever, yet the same disease may also present as a different pattern. Today, diagnosis of febrile illnesses is based on laboratory investigations, enabling an accurate diagnosis even before a specific fever pattern emerges.
Fever is beneficial in a normal healthy person in the home setting, but seriously ill children and adults can become severely compromised by the additional physiological strain of fever. For every 1°C above normal temperature, there are associated physiological changes. Metabolic, heart and respiratory rates increase by 13%, 20 beats per minute and 4–5 respirations per minute, respectively. There is an associated increase in oxygen consumption of 10–12% and an insensible fluid loss of 20%. Increased fluid loss associated with reduced intake leads to dehydration, the most common and dangerous side effect of fever. During the cold stage, blood pressure increases and glomerular filtration rates decrease; this reverses during the hot phase. Increased urine output assists in the removal of the additional metabolic wastes from the catabolic febrile state.
When fever is prolonged, the risk of dehydration increases and anorexia, secondary to generalised weakness and malaise, is common. Psychological effects include apathy, confusion, delirium and withdrawal from people and activities. These physiological and psychological effects of fever are important considerations for nurses and those caring for febrile children and adults. Fever should be reduced in those who are placed at risk due to the additional physiological burden from the febrile response. This includes children and adults who are seriously ill, and those who have cardio-respiratory, neurological or metabolic disorders or are malnourished, dehydrated or have epileptic lesions and may not tolerate the additional physiological demands during fever. In children, fever may trigger convulsions in those with a seizure disorder or a predisposition to febrile convulsions.
Febrile convulsions were defined as:
a seizure in association with a febrile illness in the absence of a central nervous system (CNS) infection or acute electrolyte imbalance in children older than 1 month of age without prior afebrile seizures
by the International League Against Epilepsy (1993). Approximately 30–40% of children who have one febrile convulsion will have another.
Most febrile convulsions (75–85%) are simple, lasting less than 10 minutes. Complex febrile convulsions lasting longer than 15 minutes occur in 9% of cases. Simple febrile convulsions are brief (<15 minutes), bilateral, tonic–clonic seizures of short duration followed by a brief postictal period after which the child readily returns to their pre-morbid baseline state. Complex febrile convulsions are focal, unilateral or prolonged seizures lasting longer than 15 minutes or multiple convulsions within the same illness. Febrile convulsions longer than 30 minutes indicate febrile status epilepticus and occur in 5% of febrile convulsions. Large epidemiological studies have concluded that simple febrile convulsions are benign, common events in children without a history of afebrile convulsions or intracranial involvement associated with rectal temperatures above 38°C.
Febrile convulsions are precipitated by any febrile illness (e.g. otitis media, pneumonia, tonsillitis or influenza) or environmental factors that raise the body temperature. Immunisations such as diphtheria–pertussis–tetanus and measles are environmental precipitants of febrile convulsions. In children who have an environmentally precipitated febrile convulsion, 50% have a genetic predisposition to febrile convulsions.
Less than 2–5% of all children under the age of 5 years will have a febrile convulsion. Predictors of an initial febrile convulsion are a febrile convulsion in a first- or second-degree relative, neonatal discharge at 30 days or later, very pre-term birth, parental report of slow development, more febrile episodes per year, or attending day care. In children with a febrile illness, additional factors include the peak temperature during the illness and the underlying illness. For example, gastroenteritis has a lower risk for febrile convulsions than otitis media or other causes of fever.
No long-term effects have been identified in children aged 6–12 years following febrile convulsions. Large epidemiological studies report that measures to prevent additional febrile convulsions are unlikely to alter the long-term outcome of most children who have a febrile convulsion.
Fever does not always need to be treated, although it should be treated in those it places at risk of further complications. Fever has a role to play in supporting the body’s defence against invading pyrogens, although there is consensus that temperatures above 40°C should be avoided, as there are reduced immunological benefits at these temperatures (Walsh, 2008).
Appropriate management of febrile children includes careful observation of the child’s response to fever, preventing dehydration, supporting the febrile response and reducing distressing symptoms such as pain and discomfort with recommended doses of analgesics. Carers can determine the degree of illness from the child’s interactions with the environment. This is achieved through observing the child’s alertness, playfulness or irritability and consolability, in addition to physical observations such as petechiae, bulging fontanels, nasal flaring and response to stimuli. If a child is shivering and vasoconstricted in a warm environment, it is safe to assume their thermostatic set-point has been raised. If they become flushed and perspire, cooling mechanisms are functioning.
It is important for carers to be watchful when administering antipyretics to dehydrated or severely malnourished children and those with hepatic or renal impairment. In a febrile, irritable, uncomfortable child, analgesia is warranted. Antipyresis is warranted in children with underlying neurological or cardiopulmonary disease (Walsh, 2008). Parents learn to manage fever from healthcare professionals, drawing on their knowledge. This makes it imperative that healthcare professionals have current fever management knowledge based on the latest scientific evidence (see Box 28-2).
BOX 28-2 ADVICE FOR PARENTS WHEN CARING FOR A FEBRILE CHILD
• Mild to moderate fever is beneficial and supports the immune system.
• Observe the child: focus on the child’s wellbeing rather than temperature.
• Dress the child in light clothing.
• Encourage fluids: small, frequent drinks of clear liquid (e.g. water or diluted juice).
• Light blanket for children who are cold or shivering.
• Selectively reduce fevers with medications when fever is:
• Medication dosages for children up to 6 years:
• Do not continue giving regular medication for >48 hours without having the child assessed by a medical or nurse practitioner.
• Seek advice from your healthcare provider if there is no improvement in 48 hours, or if the child:
Adapted from Walsh A 2008 Fever management in children. Aust J Pharm 89(4):66–9.
Hyperthermia is an elevated body temperature related to the body’s inability to promote heat loss or reduce heat production. Whereas fever is an upward shift in the set-point, hyperthermia results from an overload of the body’s thermoregulatory mechanisms (Guyton and Hall, 2011). Any disease or trauma to the hypothalamus can impair heat-loss mechanisms. Malignant hyperthermia is a hereditary condition of uncontrolled heat production, occurring when susceptible people receive certain anaesthetic drugs.
Prolonged exposure to the sun or high environmental temperatures can overwhelm the body’s heat-loss mechanisms and depress hypothalamic function. These conditions cause heatstroke, a dangerous heat emergency with a high mortality rate. People at risk include the very young and very old; a diagnosis of cardiovascular disease, hypothyroidism, diabetes or alcoholism; people taking medications that decrease the body’s ability to lose heat (e.g. phenothiazines, anticholinergics, diuretics, amphetamines and beta-adrenergic receptor antagonists); and those who exercise or work strenuously (e.g. athletes, construction workers and farmers). Signs and symptoms of heatstroke include hot, dry skin, body temperature sometimes as high as 45°C, tachycardia, hypotension, giddiness, confusion, delirium, excessive thirst, nausea, muscle cramps, visual disturbances and even incontinence. Victims of heatstroke do not sweat because of severe electrolyte loss and hypothalamic malfunction. Heatstroke with a temperature greater than 40.5°C produces tissue damage to the cells of all body organs. The brain may be the first organ affected, because of its sensitivity to electrolyte imbalances. As the condition progresses, a person becomes unconscious with fixed, non-reactive pupils. Permanent neurological damage occurs unless cooling measures are rapidly started.
Heat loss during prolonged exposure to cold overwhelms the body’s ability to produce heat, causing hypothermia. In hypothermia the body at first increases metabolic rate (to increase heat production), increases vasoconstriction (to decrease heat loss), shunts blood from the peripheral vascular bed to the core (to reduce heat loss) and increases shivering (to increase heat production). Hypothermia is classified by core temperature measurements (Box 28-3). Some people are more prone to hypothermia than others (Box 28-4). It can be caused unintentionally, such as by falling through the ice of a frozen lake. Hypothermia may also be intentionally induced during surgical procedures, to reduce metabolic demand and the body’s need for oxygen.
BOX 28-3 CLASSIFICATION OF HYPOTHERMIA
Mild | 33.1-36°C |
Moderate | 30.1-33°C |
Severe | 27-30°C |
Profound | < 27°C |
BOX 28-4 PATIENTS AT RISK OF HYPOTHERMIA
Can lose as much as 4.5°C immediately after delivery, as a result of heat evaporation. They also have a larger surface-to-mass ratio and a small amount of subcutaneous tissue.
Often have a decrease in level of thyroxine and therefore a decreased ability to increase metabolic rate and heat production. Have a decreased ability in vasomotor response, including decreased ability to produce heat through shivering.
Hypothermia usually develops gradually and may go unnoticed for several hours. When skin temperature drops to 35°C, the person suffers uncontrolled shivering, loss of memory, depression and poor judgment. As the body temperature falls below 34.4°C, cyanosis occurs, and heart and respiratory rates and blood pressure fall. If hypothermia progresses, cardiac dysrhythmias, loss of consciousness and unresponsiveness to painful stimuli occurs. In cases of severe hypothermia, a person may demonstrate clinical signs similar to death (e.g. lack of response to stimuli and extremely slow respirations and pulse). The assessment of core temperature is critical when hypothermia is suspected. A special low-reading thermometer may be required, because standard devices often do not register below 35°C.
Frostbite occurs when the body is exposed to subnormal temperatures. Ice crystals forming inside the cell can result in permanent circulatory and tissue damage. Areas particularly susceptible to frostbite are the earlobes, tip of the nose, and fingers and toes. The injured area is white, waxy and firm to the touch, and sensation is lost in the affected area. Intervention includes gradual warming measures, analgesia, and protection of the injured tissue.
There are several sites for measuring core and surface body temperature. The non-invasive sites used most commonly for temperature measurement include the tympanic membrane, mouth and axilla (Box 28-5). The rectum is an invasive site, which is occasionally used.
Oral, axillary and skin temperature sites rely on effective blood circulation at the measurement site. The heat of the blood is conducted to the thermometer probe. Non-invasive chemically prepared thermometer patches can also be applied to the skin.
Tympanic temperature relies on the radiation of body heat to an infra-red sensor. Tympanic temperature is considered a core temperature because the tympanic membrane shares the same arterial blood supply as the hypothalamus.
The temperature obtained varies, depending on the site used, but should be between 36°C and 38°C. Research findings from numerous studies are contradictory; however, it is generally accepted that rectal temperatures are usually 0.5°C higher than oral temperatures, and axillary temperatures are usually 0.5°C lower than oral temperatures (Guyton and Hall, 2011). Each of the common temperature measurement sites has advantages and disadvantages (Box 28-6). The nurse chooses the safest and most accurate site for the patient (Skill 28-1). The same site should be used when repeated measurements are necessary.
BOX 28-6 ADVANTAGES AND DISADVANTAGES OF SELECT TEMPERATURE MEASUREMENT SITES
• Minimal patient repositioning required
• Very rapid measurement (2–5 seconds)
• Can be obtained without disturbing or waking patient
• Unaffected by oral intake of food, fluids, smoking
• Can be used for tachypnoeic patients
• More accurately reflects core temperature than any other method (Nimah and others, 2006).
• Affected by ingestion of fluids or foods, smoke and oxygen delivery (Guyton and Hall, 2011)
• Should not be used with patients who have had oral surgery, trauma, history of epilepsy or shaking chills
• Should not be used with infants, small children or confused, unconscious or uncooperative patients
Guyton AC, Hall J 2011 Textbook of medical physiology, ed 12. Philadelphia, Saunders.; Lu S-H, Leasure A-R, Dai Y-T 2010 A systematic review of body temperature variations in older people. J Clin Nurs 19(1–2):4–16.; Nimah MM, Bshesh K, Callahan JD and others 2006 Infrared tympanic thermometry in comparison with other temperature measurement techniques in febrile children. Pediatr Crit Care Med 7(1):48–55.
SKILL 28-1 Measuring body temperature
STEPS | RATIONAL | |||
---|---|---|---|---|
1. Assess for signs and symptoms of temperature alterations and for factors that influence body temperature. | Physical signs and symptoms may indicate abnormal temperature. Nurse can accurately assess nature of variations. | |||
2. Determine any previous activity that would interfere with accuracy of temperature measurement. When taking oral temperature, wait 15-20 min before measuring temperature orally if patient has smoked or ingested hot or cold liquids or foods. | Smoking or oral intake of food or fluids can cause false temperature readings in oral cavity. | |||
3. Determine appropriate temperature site and device for patient. | Chosen based on patient requirements, advantages and disadvantages of each site (see Box 28-6). | |||
4. Explain how temperature will be taken and importance of maintaining proper position until reading is completed. | ||||
5. Perform hand hygiene. | Reduces transmission of microorganisms. | |||
6. Help patient assume comfortable position that provides easy access to temperature site. | Ensures comfort and accuracy of temperature reading. | |||
7. Obtain temperature reading. | ||||
A. Oral temperature measurement with electronic thermometer | ||||
Use of oral probe cover, which can be removed without physical contact, minimises need to wear gloves. | ||||
Charging provides battery power. Ejection button releases plastic probe cover from tip. | ||||
Soft plastic cover will not break in patient’s mouth and prevents transmission of microorganisms between patients. | ||||
Heat from superficial blood vessels in sublingual pocket produces temperature reading. With electronic thermometer, temperatures in right and left posterior sublingual pocket are significantly higher than in area under front of tongue. | ||||
Maintains proper position of thermometer during recording. | ||||
Probe must stay in place until signal occurs to ensure accurate reading. | ||||
Reduces transmission of microorganisms. | ||||
Protects probe from damage. Returning probe automatically causes digital reading to disappear. | ||||
Reduces transmission of microorganisms. | ||||
Maintains battery charge. | ||||
B. Axillary temperature measurement with electronic thermometer | ||||
Provides privacy. | ||||
Provides easy access to axilla. | ||||
Exposes axilla for correct thermometer probe placement. | ||||
Charging provides battery power. Ejection button releases plastic cover from probe. | ||||
Soft plastic cover prevents transmission of microorganisms between patients. | ||||
Maintains proper position of probe against blood vessels in axilla. | ||||
Probe must stay in place until signal occurs to ensure accurate reading. | ||||
Reduces transmission of microorganisms. | ||||
Protects probe from damage. Returning probe automatically causes digital reading to disappear. | ||||
Restores comfort and promotes privacy. | ||||
Reduces transmission of microorganisms. | ||||
Maintains battery charge. | ||||
C. Tympanic membrane temperature with electronic thermometer | ||||
Ensures comfort and exposes auditory canal for accurate temperature measurement. | ||||
Base provides battery power. Removal of handheld unit from base prepares it to measure temperature. Ejection button releases plastic probe cover from tip. | ||||
Lens cover must be unimpeded by dust, fingerprints or earwax to ensure clear optical pathway. | ||||
Correct positioning of the probe with respect to ear canal ensures accurate readings. | ||||
The ear tug straightens the external auditory canal, allowing maximum exposure of the tympanic membrane. | ||||
Depression of scan button causes infra-red energy to be detected. Otoscope tip must stay in place until signal occurs to ensure accurate reading. | ||||
Reduces transmission of microorganisms. Automatically causes digital reading to disappear. | ||||
Lens cover must be free of cerumen to maintain optical path. | ||||
Protects sensory tip from damage. | ||||
Restores comfort and sense of wellbeing. | ||||
Reduces transmission of microorganisms. | ||||
8. Discuss findings with patient as needed. | Promotes participation in care and understanding of health status. | |||
9. If temperature is assessed for the first time, establish temperature as baseline if it is within normal range. | Used to compare future temperature measurements. | |||
10. Compare temperature reading with patient’s previous baseline and acceptable temperature range for patient’s age group. | Normal body temperature fluctuates within narrow range; comparison reveals presence of abnormality. Improper placement or movement of thermometer can cause inaccuracies. Second measurement confirms initial findings of abnormal body temperature. |
RECORDING AND REPORTING | HOME CARE CONSIDERATIONS |
---|---|
The types of thermometers used for determining body temperature are electronic and disposable. The nurse must be skilled in the use of the selected measurement device.
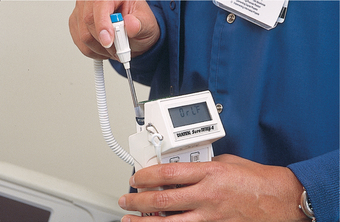
The electronic thermometer consists of a rechargeable battery-powered display unit, a thin wire cord and a temperature-processing probe covered by a disposable plastic sheath (Figure 28-4). One form of electronic thermometer uses a pencil-like probe. Separate non-breakable probes are available for oral and rectal use. The oral probe can also be used for axillary temperature measurement. Within 20–50 seconds of insertion, a reading appears on the display unit. A sound signals when the peak temperature reading has been measured.
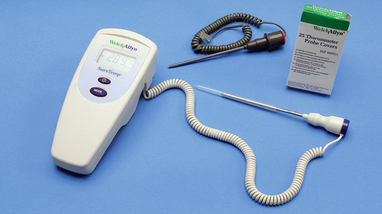
FIGURE 28-4 Electronic thermometer. Blue probe is for oral or axillary use. Red probe is for rectal use.
From Potter PA, Perry AG 2013 Fundamentals of nursing, ed 8. St Louis, Mosby.
Another form of electronic thermometer is used exclusively for tympanic temperature (Figure 28-5). An otoscope-like speculum with an infra-red sensor tip detects heat radiated from the tympanic membrane. The head is stabilised, the ear pulled straight back (children) or up and back (adults), and within 2–5 seconds of placement of the speculum in the auditory canal a reading appears on the display unit. A sound signals when the peak temperature reading has been measured.
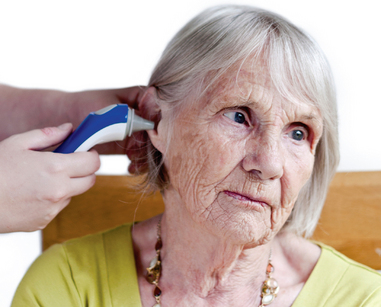
FIGURE 28-5 Tympanic thermometer with probe cover being inserted into auditory canal.
Image: iStockphoto/tbradford.
The greatest advantages of electronic thermometers are ease of insertion, readings within seconds, being easy to read and the plastic sheath being unbreakable and ideal for children. Their expense is a major disadvantage.
Disposable, single-use thermometers are thin strips of plastic with a temperature sensor at one end. The sensor consists of a matrix of dot-like indentations that contain chemicals which melt and change colour at different temperatures. They are used for oral or axillary temperatures, particularly with children (Figure 28-6). Single-use thermometers are inserted the same way as any oral or axillary thermometer. The thermometer is removed after 3 minutes and read after waiting about 10 seconds for the colour change to stabilise.
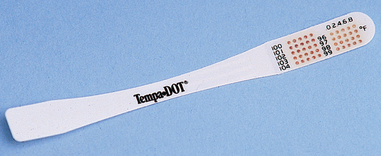
FIGURE 28-6 Disposable, single-use thermometer strip.
From Potter PA, Perry AG 2013 Fundamentals of nursing, ed 8. St Louis, Mosby.
Another form of disposable thermometer is a temperature-sensitive patch or tape. Applied to the forehead or abdomen, the patch changes colour at different temperatures. Both forms of disposable thermometers are useful for screening patients, especially infants, for altered temperature, and are not appropriate for monitoring temperature therapies.
Interpretation of temperature readings is based on norms, patient baseline temperature and clinical situation as well as the nurse’s knowledge of pathophysiology. An important part of the process of making a nursing diagnosis is identifying the cause or aetiology of the problem, as well as the defining characteristics relevant to the patient.
Prevention is the key for patients at risk of altered body temperature. The very old and the very young are most at risk of developing altered body temperature, because of a lack of ability to modify the environment in conjunction with ineffective thermoregulation mechanisms. Other people at risk include those who are debilitated by trauma, stroke, diabetes, drug or alcohol intoxication, sepsis, Raynaud’s disease and alterations in mental health status. People without adequate home heating, shelter, diet or clothing are also at risk.
Prevention involves educating patients, family members and friends. Nursing interventions for diagnoses of hyperthermia and hypothermia are directed towards promoting balance between heat production and heat loss. Level of activity, temperature of the environment and clothing are all considered. For example, avoiding strenuous exercise in hot, humid weather; drinking fluids such as water or clear fruit juices before, during and after exercise; wearing light, loose-fitting, light-coloured clothes; avoiding exercising in areas with poor ventilation; wearing a hat when outdoors; and gradual exposure to hot climates. The ability of an elderly patient or the mother of an infant to explain appropriate actions to take during hot weather is important in monitoring the elimination of a risk factor and in demonstrating the success of patient and family education.
The goal of fever management is to reduce heat production, increase heat loss and prevent complications (see Box 28-7). The procedures used to intervene and treat an elevated temperature depend on the fever’s cause, its adverse effects, its intensity and duration. Following consultation with the medical practitioner, the nurse may be required to obtain samples of urine, blood or sputum or wound-site specimens for culture and sensitivities to determine the cause of fever and direct treatment.
BOX 28-7 NURSING MEASURES FOR PATIENTS WITH A FEVER
• Obtain blood cultures if indicated. Blood specimens are obtained to coincide with temperature spikes when the antigen-producing organism is most prevalent.
• Initiate therapies to minimise heat production.
— Reduce the frequency of activities that increase oxygen demand such as excessive turning and ambulation.
• Initiate therapies to maximise heat loss;
• Initiate therapies to meet requirements of increased metabolic rate:
• Initiate therapies to promote patient comfort:
• Identify onset and duration of febrile episode phases.
Antipyretics such as paracetamol or non-steroidal anti-inflammatory drugs (NSAIDs, e.g. indomethacin) may be prescribed to reduce fever. Paracetamol increases heat loss by reducing the production of prostaglandins in the brain and spinal cord. Other medications that effect body temperature include corticosteroids. This group of medications acts within cells to prevent the release of chemicals that are normally involved in producing immune and allergic responses, resulting in inflammation. Consequently, they affect the body’s ability to fight infection and are not used to treat fever. It is important, however, to be aware of their effect in suppressing the immune system and masking the typical signs of infection.
Non-pharmacological therapy for fever includes methods that increase heat loss by evaporation, conduction, convection or radiation. Nursing measures are aimed at enhancing comfort, reducing metabolic demands and providing nutrients to meet increased energy needs (Box 28-7). Nursing measures to enhance body cooling must avoid the stimulation of shivering. Traditionally, nurses have used tepid sponge baths and cooling fans; however, use of these methods over antipyretic medications may lead to shivering. Shivering is counterproductive because of the heat produced by muscle activity. Vigorous shivering can increase energy expenditure up to 400% (Guyton and Hall, 2011). Shivering intensity ranges from palpable but not visible to violent extremity contractions.
Children and older adults are at risk of dehydration because they can quickly lose large amounts of fluids in proportion to their bodyweight. Prevention of dehydration is managed by accurate documentation of intake and output records, daily weighs and adequate fluid intake. Identifying preferred fluids and encouraging oral fluid intake is an important nursing intervention. It is recommended that antipyretics such as paracetamol in combination with tepid sponge baths is the most effective approach to reducing fever rather than using paracetamol alone (Joanna Briggs Institute, 2010). Care must be taken, however, not to induce shivering. Tepid sponging is not recommended for fever reduction in children (Joanna Briggs Institute, 2009).
The priority treatment for hypothermia is to prevent a further decrease in body temperature. Wet clothes are removed and replaced with dry clothing, and the person is wrapped in blankets. When the patient reaches an emergency department, treatment depends on the severity of the condition. Warmed intravenous fluids, heating blankets, and warm fluids may be used. Patients are monitored closely for cardiac irregularities and electrolyte imbalances. In the acute care setting, patients undergoing surgery may become hypothermic as a consequence of the cooler operating room environment and the effects of the anaesthetic (Kurz, 2008). To avoid the complications associated with hypothermia, use of a warming system such as circulating water garments or forced-air warming are more effective than using extra blankets (Galvão and others, 2010).
Knowledge of the physiology of body temperature regulation positions the nurse to assess the patient’s response to temperature alterations and to intervene safely and effectively. Independent measures can be implemented to increase or minimise heat loss, to promote heat conservation and to increase comfort. Many measures can also be taught to family members, parents of children or other caregivers.
If treatment is effective, body temperature will return to a normal range, other vital signs will stabilise and the patient will report a sense of comfort. The hypothermic patient will also demonstrate a temperature and other vital signs within the normal ranges and report feeling comfortable.
Mr Coburn is a 45-year-old man being treated for pneumonia. His skin is warm and dry to touch. His face is flushed, and he appears to have laboured breathing. He reports that he smokes one packet of cigarettes per day and recently began expectorating yellow-green sputum. Vital signs obtained are: blood pressure 116/62 mmHg, radial pulse 98 beats per minute, regular and bounding; respiratory rate 26 breaths per minute; SpO2 98% on room air; tympanic temperature 39.2°C.
NURSING DIAGNOSIS: Altered body temperature (febrile) related to infectious process.
GOALS | EXPECTED OUTCOMES |
---|---|
Patient will regain normal range of body temperature within next 24 hours. | Body temperature will decline at least 1°C within next 8 hours. |
Patient will attain sense of comfort and rest within next 48 hours. | Patient will report increased satisfaction with rest and sleep pattern. |
Patient will report increase in energy level within next 3 days. | |
Fluid and electrolyte balance will be maintained during next 3 days. |
INTERVENTIONS† | RATIONALE |
---|---|
Fever treatment | |
Promotes heat loss through conduction and convection. | |
Antipyretics reduce set point. | |
Activity and stress increase metabolic rate, contributing to heat production. | |
Fluids lost through insensible water loss require replacement. |
†Intervention classification labels from Bulechek GM, Butcher HK, McCloskey Dochterman J 2008 Nursing interventions classification (NIC), ed 5. St Louis, Mosby.
• CRITICAL THINKING
Marcia, aged 40 years, had a hysterectomy this morning. As you collect her vital signs this evening you note her body temperature is 37.8°C. Marcia asks you if this is normal. How would you respond? Explain the relevance of Marcia’s temperature. What additional assessment will you conduct?
The pulse is the palpable bounding of blood flow noted at various points on the body. It is an indicator of the fluid wave created by ventricular contraction and therefore of the adequacy of circulatory status. Electrical impulses originating from the sinoatrial (SA) node travel through heart muscle to stimulate cardiac contraction. Approximately 60–70 mL of blood (stroke volume) enters the aorta with each ventricular contraction. With each stroke-volume ejection, the walls of the aorta distend, creating a pulse wave that travels rapidly towards the distal ends of the arteries. When a pulse wave reaches a peripheral artery, it can be felt by palpating the artery lightly against underlying bone or muscle. The number of pulsing sensations occurring in 1 minute is the pulse rate.
The volume of blood pumped by the heart during 1 minute is the cardiac output (CO). Cardiac output is the product of the heart rate (HR) and the ventricle’s stroke volume (SV), that is:
CO = HR × SV
In an adult the heart normally pumps 5 L of blood per minute. A change in HR or SV does not always change the CO or the amount of blood in the arteries. Mechanical, neural and chemical factors regulate the strength of heart contractions and the heart’s SV. If the HR increases, the body will respond by decreasing SV to maintain CO. Alternatively if the SV increases, the body will decrease HR to maintain CO. For example, if a person’s heart rate is 70 beats per minute and the stroke volume is 70 mL, the cardiac output is 4.9 L per minute. Box 28-8 shows what happens to SV if the heart rate drops to 60 beats per minute.
BOX 28-8 CARDIAC OUTPUT DETERMINATION
Pulse rate × Stroke volume = Cardiac output
When mechanical, neural or chemical factors are no longer able to alter SV, a change in HR will result in a change in blood pressure. As HR increases without a change in SV, there is less time for the heart to fill and blood pressure will decrease. An abnormally slow, rapid or irregular pulse may alter CO. The heart’s ability to meet the demands of the body’s tissue for nutrients is determined by palpating a peripheral pulse or by using a stethoscope to listen to heart sounds (apical heart rate).
While several arteries can be assessed for pulse rate (Skill 28-2), the radial and carotid arteries are usually the most practical sites at which to palpate the pulse (Figure 28-7). Other peripheral pulses such as the brachial or femoral arteries are assessed when surgery or treatment has impaired blood flow to a body part, there are clinical indications of impaired peripheral blood flow or when a focused cardiovascular physical examination is conducted (Table 28-1). When CO declines significantly, peripheral pulses weaken and are difficult to palpate. The carotid site is the best in this situation because the heart will continue delivering blood through the carotid artery to the brain as long as possible.
SKILL 28-2 Assessing the radial and apical pulses
Pulse measurement can be delegated to enrolled nurses who are informed of:
STEPS | RATIONALE | ||
---|---|---|---|
1. Determine need to assess radial or apical pulse: | Certain conditions place patients at risk of pulse alterations. Heart rhythm can be affected by heart disease, cardiac arrhythmias, onset of sudden chest pain or acute pain from any site, invasive cardiovascular diagnostic tests, surgery, sudden infusion of large volume of intravenous fluid, internal or external haemorrhage and administration of medications that alter heart function. | ||
Physical signs and symptoms may indicate alteration in cardiac function. | |||
2. Assess for factors that normally influence apical pulse rate and rhythm: | Allows for accurate assessment of presence and significance of pulse alterations. | ||
Acceptable range of pulse rate changes with age (see Table 28-2). | |||
Physical activity requires an increase in cardiac output that is met by an increased heart rate and stroke volume. | |||
Heart rate increases temporarily when changing from lying to sitting or standing position. | |||
Antiarrhythmics, sympathomimetics and cardiotonics affect rate and rhythm of pulse; opioid analgesics and general anaesthetics slow heart rate; central nervous system stimulants such as caffeine increase heart rate. | |||
Fever or exposure to warm environments increases heart rate; heart rate declines with hypothermia. | |||
Results in stimulation of the sympathetic nervous system, which increases heart rate. | |||
3. Determine previous baseline apical rate (if available) from patient’s record. | Allows nurse to assess for change in condition. Provides comparison with future apical pulse measurements. | ||
4. Explain that pulse or heart rate is to be assessed. Encourage patient to relax and not speak. | Activity and anxiety can elevate heart rate. Patient’s voice interferes with nurse’s ability to hear sound when apical pulse is measured. | ||
5. Perform hand hygiene. | Reduces transmission of microorganisms. | ||
6. If necessary, draw curtains around bed and/or close door. | Maintains privacy. | ||
7. Obtain pulse measurement. | |||
A. Radial pulse | |||
Provides easy access to pulse sites. | |||
Relaxed position of lower arm and extension of wrist permits full exposure of artery to palpation. | |||
Fingertips are the most sensitive parts of hand to palpate arterial pulsation. | |||
Pulse is more accurately assessed with moderate pressure. Too much pressure occludes pulse and impairs blood flow. | |||
Strength reflects volume of blood ejected against arterial wall with each heart contraction. | |||
Rate is determined accurately only after nurse is assured pulse can be palpated. Timing begins with 0. Count of 1 is first beat palpated after timing begins. | |||
A 30 s count is accurate for rapid, slow or regular pulse rates. | |||
Inefficient contraction of heart fails to transmit pulse wave, interfering with cardiac output, resulting in irregular pulse. Longer time ensures accurate count. | |||
Critical decision point: If pulse is irregular or rapid, assess for pulse deficit that may indicate alteration in cardiac output. Count apical pulse while colleague counts radial pulse. Begin apical pulse count out loud to simultaneously assess pulses. If pulse count differs by more than 2, a pulse deficit exists. | |||
B. Apical pulse | |||
Exposes portion of chest wall for selection of auscultatory site. | |||
(2)Locate anatomical landmarks to identify the point of maximal impulse (PMI), also called the apical impulse. Heart is located behind and to left of sternum with base at top and apex at bottom. Find angle of Louis just below suprasternal notch between sternal body and manubrium; can be felt as a bony prominence. Slip fingers down each side of angle to find second intercostal space (ICS). Carefully move fingers down left side of sternum to fifth ICS and laterally to the left midclavicular line (MCL). A light tap felt within an area 1-2 cm of the PMI is reflected from the apex of the heart. |
Use of anatomical landmarks allows correct placement of stethoscope over apex of heart, enhancing ability to hear heart sounds clearly. If unable to palpate the PMI, reposition patient on left side. In the presence of serious heart disease, the PMI may be located to the left of the MCL or at the sixth ICS. | ||
Warming of metal or plastic diaphragm prevents patient from being startled and promotes comfort. | |||
Allow stethoscope tubing to extend straight without kinks that would distort sound transmission. Normal sounds S1 and S2 are high-pitched and best heard with the diaphragm. | |||
Apical rate is determined accurately only after nurse is able to auscultate sounds clearly. Timing begins with 0. Count of 1 is first sound auscultated after timing begins. | |||
Regular apical rate can be assessed within 30 s. | |||
Irregular rate is more accurately assessed when measured over longer interval. | |||
Regular occurrence of dysrhythmia within 1 minute may indicate inefficient contraction of heart and alteration in cardiac output. | |||
Restores comfort and promotes sense of wellbeing. | |||
Controls transmission of microorganisms when nurses share stethoscope. | |||
8. Discuss findings with patient as needed. | Promotes participation in care and understanding of health status. | ||
9. Perform hand hygiene. | Reduces transmission of microorganisms. | ||
10. Compare readings with previous baseline and/or acceptable range of heart rate for patient’s age (see Table 28-2). | Checks for change in condition and alterations. | ||
11. Compare peripheral pulse rate with apical rate and note discrepancy. | Differences between measurements indicate pulse deficit and may warn of cardiovascular compromise. Abnormalities may require therapy. | ||
12. Compare radial pulse equality and note discrepancy. | Differences between radial arteries indicate compromised peripheral vascular system. | ||
13. Correlate pulse rate with data obtained from blood pressure and related signs and symptoms (palpitations, dizziness). | Pulse rate and blood pressure are interrelated. |
RECORDING AND REPORTING | HOME CARE CONSIDERATIONS |
---|---|
SITE | LOCATION | |
---|---|---|
Apical | Fourth to fifth intercostal space at left midclavicular line | Site used to auscultate for apical pulse |
Brachial | Groove between biceps and triceps muscles at antecubital fossa | |
Carotid | Along medial edge of sternocleidomastoid muscle in neck | Easily accessible site used during physiological shock or cardiac arrest when other sites are not palpable |
Dorsalis pedis | Along top of foot, between extension tendons of great and first toe | Site used to assess status of circulation to foot |
Femoral | Below inguinal ligament, midway between symphysis pubis and anterior superior iliac spine | Site used to assess character of pulse during physiological shock or cardiac arrest when other pulses are not palpable; used to assess status of circulation to leg |
Popliteal | Behind knee in popliteal fossa | Site used to assess status of circulation to lower leg |
Posterior tibial | Inner side of ankle, below medial malleolus | Site used to assess status of circulation to foot |
Radial | Radial or thumb side of forearm at wrist | Common site used to assess character of pulse peripherally and assess status of circulation to hand |
Temporal | Over temporal bone of head, above and lateral to eye | Easily accessible site used to assess pulse in children |
Ulnar | Ulnar side of forearm at wrist |
If the radial pulse is abnormal, irregular or unattainable because of a dressing, a cast or patient-prescribed medication affecting the heartbeat, the apical pulse is assessed. The brachial or apical pulses are the best sites for assessing an infant’s or young child’s pulse because other peripheral pulses are deep and difficult to palpate accurately.
Assessment of the pulse includes measurement of the rate, rhythm, strength and equality. Before measuring a pulse, the patient’s baseline rate is reviewed for comparison (Table 28-2). When assessing the pulse, it is important to consider the variety of factors influencing the HR (Table 28-3). A combination of these factors may cause significant changes. Consideration needs to be given to postural changes, which cause changes in pulse rate because of alterations in blood volume and sympathetic activity. The HR temporarily increases when a person changes from a lying to a sitting or standing position. If an abnormal rate is detected while palpating a peripheral pulse, the next step is to assess the apical rate. The apical rate provides a more accurate assessment of cardiac contraction.
TABLE 28-2 ACCEPTABLE RANGES OF HEART RATE
AGE GROUP | HEART RATE (BEATS PER MINUTE) |
---|---|
Infants | 120–160 |
Toddlers | 90–140 |
Preschoolers | 80–110 |
School-agers | 75–100 |
Adolescents | 60–90 |
Adults | 60–100 |
TABLE 28-3 FACTORS INFLUENCING PULSE RATES
FACTOR | INCREASE PULSE R ATE | DECREASE PULSE R ATE |
---|---|---|
Drugs | Positive chronotropic drugs such as adrenaline | Negative chronotropic drugs such as digitalis |
Emotions | Acute pain and anxiety increase sympathetic stimulation, affecting heart rate | Unrelieved severe pain increases parasympathetic stimulation, affecting heart rate; relaxation |
Exercise | Short-term exercise | A conditioned athlete who participates in long-term exercise will have a lower heart rate at rest |
Haemorrhage | Loss of blood increases sympathetic stimulation | |
Postural changes | Standing or sitting | Lying down |
Pulmonary conditions | Diseases causing poor oxygenation | |
Temperature | Fever and heat | Hypothermia |
The apical rate is assessed by listening to the heart sounds with a stethoscope (see Box 28-9). The first and second heart sounds (S1 and S2) are identified. At normal rates, S1 is low-pitched and dull, sounding like ‘lub’. S2 is higher-pitched and shorter, creating the sound ‘dub’. Each set of heart sounds is counted as one heartbeat. Using the diaphragm or bell of the stethoscope, count the number of heart sounds occurring in 1 minute. When auscultating an apical pulse, it is only possible to assess pulse rate and rhythm.
• The five major parts of the stethoscope are the earpieces, binaurals, tubing, bell chestpiece and diaphragm chestpiece.
• To ensure the best reception of sound:
• As longer tubing decreases the transmission of sound waves, the polyvinyl tubing should be flexible and about 30 cm in length. The tubing should be thick-walled and moderately rigid to eliminate transmission of environmental noise and to prevent the tubing from kinking, which distorts sound-wave transmission.
• Stethoscopes can have single or dual tubes. Dual tubes promote sound clarity by minimising the number of turns the sound wave makes before reaching the earpiece.
• The diaphragm is the circular, flat portion of the stethoscope chestpiece covered with a thin plastic disc. It transmits high-pitched sounds created by the high-velocity movement of air and blood.
• The bell is the bowl-shaped chestpiece usually surrounded by a rubber ring. The ring avoids chilling the patient with cold metal when placed on the skin. The bell transmits low-pitched sounds created by the low-velocity movement of blood. Heart and vascular sounds are auscultated using the bell.
• The bell and diaphragm are rotated into position on the chestpiece, depending on which part you choose to use.
• The diaphragm or bell must be in proper position during use for the nurse to hear sounds through the stethoscope.
• The stethoscope is a delicate instrument and requires proper care for best functioning.
Normally, a regular interval occurs between each pulse or heartbeat. An interval interrupted by an early or late beat or a missed beat indicates an abnormal rhythm or arrhythmia. Arrhythmia threatens the heart’s ability to provide adequate cardiac output, particularly if it occurs repetitively. If an arrhythmia is present, the regularity of its occurrence should be assessed. Arrhythmias may be described as regularly irregular or irregularly irregular. To diagnose arrhythmia, the medical or nurse practitioner may order an electrocardiogram as well as other cardiac investigations. Children often have a sinus arrhythmia, which is an irregular heartbeat that speeds up with inspiration and slows down with expiration. This is a normal finding and can be verified by having the child hold their breath; the heart rate should then become regular.
An inefficient contraction of the heart that fails to transmit a pulse wave to the peripheral pulse site creates a pulse deficit. To assess a pulse deficit, the nurse and a colleague assess radial and apical rates simultaneously and then compare rates. The difference between the apical and radial pulse rates is the pulse deficit. For example, an apical rate of 92 with a radial rate of 78 leaves a pulse deficit of 14 beats. Pulse deficits are frequently associated with dysrhythmias.
The strength or amplitude of a pulse reflects the volume of blood ejected against the arterial wall with each heart contraction and the condition of the arterial vascular system leading to the pulse site. Normally the pulse strength remains the same with each heartbeat. Pulse strength may be graded or described as strong, weak, thready or bounding.
Pulses on both sides of the peripheral vascular system should be assessed. For example, both radial pulses are taken and the characteristics of each compared. A pulse in one extremity may be unequal in strength or absent in many disease states (e.g. peripheral arterial disease). All symmetrical pulses can be assessed simultaneously except for the carotid pulse. Both carotid pulses should never be assessed at the same time because excessive pressure may occlude blood supply to the brain.
Assessment of heart rate determines the general state of cardiovascular health and the response to other system imbalances. For example, changes in body temperature, fluid status, respiratory function or metabolism will typically involve a change to some degree in heart rate, rhythm and/or strength. Common abnormalities in pulse are tachycardia, bradycardia and dysrhythmias. Tachycardia is an abnormally elevated heart rate, above 100 beats per minute in adults. Bradycardia is a slow heart rate, below 60 beats per minute in adults. This means that there is a wide range of normal of 60–100 beats per minute.
Knowledge of cardiovascular physiology is fundamental to assessment of the patient’s response to alterations in heart rate, rhythm and/or strength and to intervene safely and effectively. When interpreting pulse rate, consideration must be given to the patient’s pattern over time. For example, if a patient’s pulse rate has been averaging 72 beats per minute over the last 4 hours but then increases to 96 beats per minute, even though 96 is within the normal range, the increase from 72 to 96 is considerable and must be further investigated.
Knowledge of the structure and function of the respiratory system in combination with understanding of the patient’s clinical situation and the implications for the respiratory system facilitate accurate assessment of respirations. Human survival depends on the ability of oxygen (O2) to reach body cells and for carbon dioxide (CO2) to be removed from the cells. Respiration is the mechanism the body uses to exchange gases between the atmosphere and the blood and between the blood and the cells. Respiration involves ventilation (the movement of gases into and out of the lungs), diffusion (the movement of oxygen and carbon dioxide between the alveoli and the red blood cells) and perfusion (the distribution of red blood cells to and from the pulmonary capillaries), and can be affected by various factors (Box 28-10).
BOX 28-10 FACTORS INFLUENCING CHARACTER OF RESPIRATIONS
• Decreased haemoglobin levels (anaemia) reduce oxygen-carrying capacity of the blood, which increases respiratory rate.
• Increased altitude lowers the amount of saturated haemoglobin, which increases respiratory rate and depth.
• Abnormal blood cell function (e.g. sickle cell disease) reduces ability of haemoglobin to carry oxygen, which increases respiratory rate and depth.
Breathing is generally a passive process. Normally, a person thinks little about it. The respiratory centre in the brainstem regulates the involuntary control of respirations. Adults normally breathe in a smooth, uninterrupted pattern 12–20 times a minute.
Ventilation is regulated by levels of carbon dioxide, oxygen and hydrogen ion concentration (pH) in the arterial blood. The most important factor in the control of ventilation is the level of CO2 in the arterial blood. An elevation in the CO2 level causes the respiratory control system in the brain to increase the rate and depth of breathing; the increased ventilatory effort removes excess CO2 by increasing exhalation. However, some patients with chronic lung disease have ongoing hypercapnoea and are known as CO2 retainers. For patients with hypoxaemia (reduced levels of arterial oxygen) in association with chronic lung disease, controlled oxygen therapy is used. Through frequent patient monitoring, treatment is aimed at achieving oxygen saturation levels of 88–92% using the lowest amount of oxygen to achieve this (Kunisaki and others, 2007). In summary, the general principle is to use the least amount of oxygen for the most benefit.
Although breathing is normally passive, muscular work is involved in moving the lungs and chest wall. Inspiration is an active process. During inspiration, the respiratory centre sends impulses along the phrenic nerve, causing the diaphragm to contract. Abdominal organs move downwards and forwards, increasing the length of the chest cavity to move air into the lungs. The diaphragm moves approximately 1 cm, and the ribs retract upwards from the body’s midline approximately 1.2–2.5 cm. During a normal, relaxed breath, a person inhales 500 mL of air. This amount is referred to as the tidal volume. During expiration, the diaphragm relaxes and the abdominal organs return to their original positions. The lung and chest wall return to a relaxed position (Figure 28-8). Expiration is a passive process. The normal rate and depth of ventilation, eupnoea, is interrupted by sighing. The sigh, a prolonged deeper breath, is a protective physiological mechanism for expanding small airways and alveoli not ventilated during a normal breath.
The accurate assessment of respirations depends on recognition of normal thoracic and abdominal movements (Skill 28-3). During quiet breathing, the chest wall gently rises and falls. Contraction of the intercostal muscles between the ribs or contraction of the muscles in the neck and shoulders, the accessory muscles of breathing, is not visible. During normal quiet breathing, diaphragmatic movement causes the abdominal cavity to rise and fall slowly.
SKILL 28-3 Assessing respirations
Respiration measurement can be delegated to enrolled nurses who are informed of:
STEPS | RATIONALE | ||
---|---|---|---|
1. Determine need to assess patient’s respirations: | |||
Certain conditions place patient at risk of alterations in ventilation detected by changes in respiratory rate, depth and rhythm. Fever, pain, anxiety, diseases of chest wall or muscles, constrictive chest or abdominal dressings, gastric distension, chronic pulmonary disease (emphysema, bronchitis, asthma), traumatic injury to chest wall with or without collapse of underlying lung tissue, presence of a chest tube, respiratory infection (pneumonia, acute bronchitis), pulmonary oedema and emboli, head injury with damage to brain stem and anaemia can result in respiratory alteration. | |||
b. Assess for signs and symptoms of respiratory alterations such as bluish or cyanotic appearance of nail beds, lips, mucous membranes and skin; restlessness, irritability, confusion, reduced level of consciousness; pain during inspiration; laboured or difficult breathing; adventitious breath sounds (see Chapter 27), inability to breathe spontaneously; thick, frothy, blood-tinged or copious sputum produced on coughing. |
Physical signs and symptoms may indicate alterations in respiratory status related to ventilation. | ||
2. Assess pertinent laboratory values: | |||
Arterial blood gases measure arterial blood pH, partial pressure of oxygen (PaO2) and carbon dioxide (PaCO2) and arterial oxygen saturation (SaO2), which reflects patient’s oxygenation status. | |||
B. Pulse oximetry (SpO2). Acceptable SpO2 > 95% on room air. 88-92% may be acceptable for patients with chronic obstructive pulmonary disease. | SpO2 less than 85% is often accompanied by changes in respiratory rate, depth and rhythm. | ||
C. Full blood count (FBC). Normal FBC for adults (values may vary within institutions): | Complete blood count measures red blood cell count, volume of red blood cells and concentration of haemoglobin, which reflects patient’s capacity to carry oxygen and therefore influences interpretation of the results. | ||
3. Determine previous baseline respiratory rate (if available) from patient’s record. | Allows nurse to assess for change in condition. Provides comparison with future respiratory measurements. | ||
4. Be sure patient is in comfortable position, preferably sitting or lying with the head of the bed elevated 45-60 degrees. | Sitting erect promotes full ventilatory movement. | ||
Critical decision point: Patients with difficulty breathing (dyspnoea), such as those with heart failure or abdominal ascites or in late stages of pregnancy, should be assessed in the position of greatest comfort. Repositioning may increase the work of breathing, which will increase respiratory rate. | |||
5. Draw curtain around bed and/or close door. Perform hand hygiene. | Maintains privacy. Prevents transmission of microorganisms. | ||
6. Be sure patient’s chest is visible. If necessary, move bedclothes or gown. | Ensures clear view of chest wall and abdominal movements. | ||
7. Place patient’s arm in relaxed position across the abdomen or lower chest, or place nurse’s hand directly over patient’s upper abdomen (see illustration). | A similar position used during pulse assessment allows respiratory rate assessment to be inconspicuous. Patient’s or nurse’s hand rises and falls during respiratory cycle. | ||
8. Observe complete respiratory cycle (one inspiration and one expiration). | Rate is accurately determined only after nurse has viewed respiratory cycle. | ||
9. After cycle is observed, look at watch’s second-hand and begin to count rate: when second-hand hits number on dial, begin timeframe, counting 1 with first full respiratory cycle. | Timing begins with count of 1. Respirations occur more slowly than pulse; thus timing does not begin with 0. | ||
10. If rhythm is regular, count number of respirations in 30 s and multiply by 2. If rhythm is irregular, < 12 or > 20, count for 1 full minute. | Respiratory rate is equivalent to number of respirations per minute. Suspected irregularities require assessment for at least 1 minute. | ||
Critical decision point: Respiratory rate < 12 or > 20 requires further assessment (see Chapter 27) and may require immediate intervention. | |||
11. Note depth of respirations, subjectively assessed by observing degree of chest wall movement while counting rate. Nurse can also objectively assess depth by palpating chest wall excursion or auscultating the posterior thorax after rate has been counted. Depth is described as shallow, normal or deep. | Character of ventilatory movement may reveal specific disease state restricting volume of air from moving into and out of the lungs. | ||
12. Note rhythm of ventilatory cycle. Normal breathing is regular and uninterrupted. Sighing should not be confused with abnormal rhythm. | Character of ventilations can reveal specific types of alterations. | ||
Critical decision point: Occasional periods of apnoea, the cessation of respiration for several seconds, are a symptom of underlying disease in the adult and must be reported to the medical practitioner or nurse in charge. An irregular respiratory rate and short apnoeic spells are usual in a newborn. | |||
13. Replace bedclothes and patient’s gown. | Restores comfort and promotes sense of wellbeing. | ||
14. Perform hand hygiene. | Reduces transmission of microorganisms. | ||
15. Discuss findings with patient as needed. | Promotes participation in care and understanding of health status. | ||
16. If respirations are assessed for the first time, establish rate, rhythm and depth as baseline if within normal range. | Used to compare future respiratory assessment. | ||
17. Compare respirations with patient’s previous baseline and normal rate, rhythm and depth. | Allows assessment for changes in patient’s condition and for presence of respiratory alterations. |
Assessment of respiration can best be done immediately after measuring pulse rate, with your hand still on the patient’s wrist as it rests over the chest or abdomen. This approach allows assessment of the respiratory rate, pattern and depth without drawing the patient’s attention to the assessment. If the patient is aware, they may unintentionally alter their rate and depth of breathing. Observe a full inspiration and expiration when counting ventilation or respiration rate. The respiratory rate varies with age (Table 28-4). The usual range of respiratory rate declines throughout life.
TABLE 28-4 ACCEPTABLE RANGE OF RESPIRATORY RATES FOR AGE
AGE GROUP | RATE (BREATHS PER MINUTE) |
---|---|
Newborn | 30-60 |
Infant (6 months) | 30-50 |
Toddler (2 years) | 25-32 |
Child | 20-30 |
Adolescent | 16-19 |
Adult | 12-20 |
The depth of respirations is assessed by observing the degree of excursion or movement in the chest wall. Ventilatory movements are described as deep, normal or shallow. A deep respiration involves a full expansion of the lungs with full exhalation. Respirations are shallow when only a small quantity of air passes through the lungs, and ventilatory movement is difficult to see. More-objective techniques are used if you observe that chest excursion is unusually shallow. Table 28-5 summarises types of respiratory alterations.
TABLE 28-5 ALTERATIONS IN BREATHING PATTERN
ALTERATION | DESCRIPTION |
---|---|
Apnoea | Respirations cease for several seconds. Persistent cessation results in respiratory arrest |
Bradypnoea | Rate of breathing is regular but abnormally slow (fewer than 12 breaths per minute) |
Biot’s respiration | Respirations are abnormally shallow for 2–3 breaths followed by an irregular period of apnoea |
Cheyne-Stokes respiration | Respiratory rate and depth are irregular, characterised by alternating periods of apnoea and hyperventilation. Respiratory cycle begins with slow, shallow breaths that gradually increase to abnormal rate and depth. The pattern reverses, breathing slows and becomes shallow, climaxing in apnoea before respiration resumes |
Hyperpnoea | Respirations are laboured, increased in depth and increased in rate (more than 20 breaths per minute). Occurs normally during exercise |
Hyperventilation | Rate and depth of respirations increase. Respiratory alkalosis may occur |
Hypoventilation | Respiratory rate is abnormally low, and depth of ventilation may be depressed. Hypercapnoea may occur |
Kussmaul’s respiration | Respirations are abnormally deep, regular and increased in rate |
Tachypnoea | Rate of breathing is regular but abnormally rapid (more than 20 breaths per minute) |
Determine breathing pattern by observing the chest or abdomen. Diaphragmatic breathing results from the contraction and relaxation of the diaphragm and is best observed by watching abdominal movements. Men and children usually demonstrate diaphragmatic breathing. Women tend to use thoracic muscles to breathe; movements are observed in the upper chest. Laboured respirations usually involve the accessory neck muscles. When a foreign body or tracheal trauma interferes with the movement of air into the lungs, the intercostal spaces retract during inspiration. A longer expiration phase is evident when the outward flow of air is obstructed (e.g. in asthma).
With normal breathing, a regular interval occurs after each respiratory cycle. Infants tend to breathe less regularly. The young child may breathe slowly for a few seconds and then suddenly breathe more rapidly. While assessing respirations, estimate the time interval after each respiratory cycle. Respiration is regular or irregular in pattern.
An integral part of respiratory assessment is listening to the sounds of breathing. The sounds of stertor, stridor, wheezing and inspiratory grunt are indicators of a respiratory obstruction. Stertor, a snoring sound, occurs where secretions block the trachea and large bronchi. Stridor is an inspiratory wheeze or crowing sound occurring with upper airway obstruction (e.g. croup, inhalation of foreign objects, epiglottitis and tracheal trauma). Wheezing is a high-pitched musical sound occurring on expiration when there is a partial obstruction in smaller airways and bronchioles (e.g. bronchiolitis and asthma).
Respiratory monitoring devices that aid your assessment include the apnoea monitor and pulse oximeter. Apnoea monitoring is used frequently with infants in the hospital and at home to observe for prolonged apnoeic events. Leads attached to the infant’s chest wall sense movement; the absence of chest wall movement is interpreted by the monitor as apnoea and triggers an alarm.
Arterial oxygenation can be non-invasively measured using a pulse oximeter (Skill 28-4). Blood flows through the pulmonary capillaries where oxygen attaches to red blood cells. After oxygen diffuses from the alveoli into the pulmonary blood, most of the oxygen attaches to haemoglobin molecules in red blood cells. Red blood cells carry the oxygenated haemoglobin molecules through the left side of the heart and out to the peripheral capillaries, where the oxygen detaches.
SKILL 28-4 Measuring oxygen saturation (pulse oximetry, SpO2)
Oxygen saturation measurement can be delegated to enrolled nurses who are informed of:
• need to notify nurse immediately of any reading lower than SpO2 of 90%
• appropriate sensor site, probe and patient position for measurement of oxygen saturation
• frequency of oxygen saturation measurements
• factors that can falsely lower SpO2 (Box 28-12).
STEPS | RATIONALE | |
---|---|---|
1. Determine need to measure patient’s oxygen saturation: | ||
Certain conditions place patients at risk of decreased oxygen saturation: acute or chronic compromised respiratory function, recovery from general anaesthesia or conscious sedation or traumatic injury to chest wall with or without collapse of underlying lung tissue, ventilator dependence, changes in supplemental oxygen therapy. | ||
b. Assess for signs and symptoms of alterations in oxygen saturation such as altered respiratory rate, depth or rhythm; adventitious breath sounds (see Chapter 27); cyanotic appearance of nail beds, lips, mucous membranes and skin; restlessness, irritability, confusion; reduced level of consciousness; laboured or difficulty breathing. |
Physical signs and symptoms may indicate abnormal oxygen saturation. | |
2. Assess for factors that normally influence measurement of SpO2, such as oxygen therapy, haemoglobin level and temperature. | Allows for accurate assessment of oxygen saturation variations. Peripheral vasoconstriction related to hypothermia can interfere with SpO2 determination. | |
3. Review patient’s medical record for medical practitioner’s order or consult agency policy or procedure manual for standard of care. | Medical order may be required to assess oxygen saturation. | |
4. Determine previous baseline SpO2 (if available) from patient’s record. | Baseline information provides basis for comparison and helps in assessment of current status and evaluation of interventions. | |
5. Explain purpose of procedure to patient and how oxygen saturation will be measured. Instruct patient to breathe normally. | Promotes patient cooperation and increases compliance. Prevents large fluctuations in minute ventilation and possible error in SpO2 readings. | |
6. Assess site most appropriate for sensor probe placement (e.g. digit, earlobe) (see Box 28-11). Site must have adequate local circulation and be free of moisture. | Peripheral vasoconstriction can interfere with SpO2 determination. Dark nail polish and acrylic nails impede sensor detection of emitted light and produce falsely elevated SpO2. | |
7. Perform hand hygiene. | Reduces transmission of microorganisms. | |
8. Position patient comfortably. If finger is chosen as monitoring site, support lower arm. | Ensures probe positioning and decreases movement that interferes with SpO2 determination. | |
9. Instruct patient to breathe normally. | Prevents large fluctuations in respiratory rate and depth and possible changes in SpO2. | |
10. If finger is to be used, remove any fingernail polish with acetone from digit to be assessed. If earlobe is to be used, remove any earrings. Wash site, swab with alcohol and air-dry. | Ensures accurate readings. Opaque coatings decrease light transmission; nail polish containing blue pigment can absorb light emissions and falsely alter saturation. | |
11. Attach sensor probe to monitoring site. Instruct patient that clip-on probe feels like a clothes peg on the finger but should not hurt. | Pressure of sensor probe’s spring tension on a peripheral digit or earlobe may be unexpected. | |
Critical decision point: Do not attach probe to finger, ear or bridge of nose if area is oedematous or skin integrity is compromised. Do not attach probe to fingers that are hypothermic. Select ear or bridge of nose if adult patient has history of peripheral vascular disease. Earlobe and bridge of nose sensors are not used for infants and toddlers because of skin fragility. Disposable adhesive probes contain latex and should not be used if patient has latex allergy. | ||
12. Turn on oximeter by activating power. Observe pulse waveform/intensity display and audible beep. Correlate oximeter pulse rate with patient’s radial pulse. Differences require re-evaluation of oximeter probe placement and may require reassessment of pulse rates. | Pulse waveform/intensity display enables detection of valid pulse or presence of interfering signal. Pitch of audible beep is proportional to SpO2 value. Double-checking pulse rate ensures oximeter accuracy. Oximeter pulse rate, patient’s radial pulse and apical pulse rate should be the same. | |
13. Leave probe in place until oximeter readout reaches constant value and pulse display reaches full strength during each cardiac cycle. Read SpO2 on digital display. Inform patient that oximeter will sound alarm if the probe falls off or if patient moves the probe. | Reading may take 10-30 s, depending on site selected. | |
14. If continuous Sp02 monitoring is planned, verify SpO2 alarm limits and alarm volume, which are preset by the manufacturer at a low of 85% and a high of 100%. Limits for SpO2 and pulse rate should be determined as indicated by patient’s condition. Verify that alarms are on. Assess skin integrity under sensor probe and relocate sensor probe at least every 4 hours (every 2 hours for a spring-tension probe). | Alarms must be set at appropriate limits and volumes to avoid frightening patients and visitors. Spring tension of sensor probe or sensitivity to disposable sensor probe adhesive can cause skin irritation and lead to disruption of skin integrity. | |
15. Discuss findings with patient as needed. | Promotes participation in care and understanding of health status. | |
16. If intermittent or spot-checking Sp02 measurements are planned, remove probe and turn oximeter power off. Clean probe following manufacturer’s instructions and store in appropriate location. | Batteries can be depleted if oximeter is left on. Sensor probes are expensive and vulnerable to damage. | |
17. Help patient return to comfortable position. | Restores comfort and promotes sense of wellbeing. | |
18. Perform hand hygiene. | Reduces transmission of microorganisms. | |
19. Compare SpO2 readings with patient baseline and acceptable values. | Comparison reveals presence of abnormality. | |
20. Correlate SpO2 with SaO2 obtained from arterial blood gas measurements (see Chapter 39) if available. | Documents reliability of non-invasive assessment. | |
21. Correlate SpO2 reading with data obtained from respiratory rate, depth and rhythm assessment. | Measurements assessing ventilation, perfusion and diffusion are interrelated. |
The percentage of haemoglobin bound with oxygen in the arteries is the percentage of saturation of haemoglobin (or SaO2). It is usually between 95% and 100%. SaO2 is affected by factors that interfere with ventilation and perfusion (see Chapter 40). The saturation of venous blood (SvO2) is lower because the tissues have removed some of the oxygen from the haemoglobin molecules. A normal value for SvO2 is 70%. SvO2 is affected by factors that interfere with or increase the tissues’ need for oxygen.
The pulse oximeter (see Box 28-11 and Figure 28-9) emits light wavelengths that are absorbed by the oxygenated and deoxygenated haemoglobin molecules. The light reflected from the haemoglobin molecules is processed by the oximeter, which calculates pulse saturation (SpO2). SpO2 is a reliable estimate of SaO2 when the SaO2 is over 70%, but is less accurate at saturations below 70% (McMorrow and Mythen, 2006). The measurement of SpO2 is affected by factors that affect light transmission or peripheral arterial pulsations (Box 28-12). Selecting the appropriate probe is important for reducing measurement error (Box 28-11). Movement is the most common cause of inaccurate readings.
BOX 28-11 CHARACTERISTICS OF PULSE OXIMETER SENSOR PROBES AND SITES
FIGURE 28-9 Pulse oximeter with spring tension digit probe.
From Potter PA, Perry AG 2013 Fundamentals of nursing, ed 8. St Louis, Mosby.
BOX 28-12 Factors affecting determination of pulse oxygen saturation (SpO2)
• Outside light sources can interfere with the oximeter’s ability to process reflected light.
• Carbon monoxide (caused by smoke inhalation or poisoning) artificially elevates SpO2 by absorbing light similar to oxygen.
• Movement can interfere with the oximeter’s ability to process reflected light.
• Jaundice may interfere with the oximeter’s ability to process reflected light.
• Intravascular dyes (methylene blue) absorb light similar to deoxyhaemoglobin and artificially lower saturation.
• Peripheral vascular disease (Raynaud’s disease, atherosclerosis) can reduce pulse volume.
• Hypothermia at assessment site decreases peripheral blood flow.
• Pharmacological vasoconstrictors (adrenaline, phenylephrine, dopamine) will decrease peripheral pulse volume.
• Low cardiac output and hypotension decrease blood flow to peripheral arteries.
It is important to know that if the patient is having pulse oximeter readings, it is vital that respiratory rates are measured and documented as well (Parkes, 2011). Vital sign measurement of respiratory rate, pattern and depth, along with arterial oxygen saturation using the pulse oximeter (SpO2), allows assessment of ventilation, diffusion and perfusion. Each measurement provides cues in determining the nature of a patient’s problem.
Accurate measurement of respirations requires observation, palpation of chest wall movement and listening to sounds associated with inspiration and expiration. The patient’s usual ventilatory rate and pattern, the influence any disease or illness has on respiratory function, the relationship between respiratory and cardiovascular function, and the influence of therapies on respirations and the patient’s recent pattern are all critical to accurate assessment of respiration rate, pattern and depth. Because respiration is linked to the function of numerous body systems, it is critical to consider all variables when changes occur (Parkes, 2011).
• CRITICAL THINKING
Michael is 18 years old and was involved in a motor vehicle accident 6 hours ago, where he received chest and head injuries. On admission to the unit his respiratory rate was 22 breaths per minute. You note that his respiratory rate is slowly decreasing and your most recent measurement of his respirations is 12 breaths per minute.
1. What additional assessment will you perform? Explain your selection.
2. Identify the actual and potential nursing problems for Michael. What nursing interventions will you implement to ensure Michael’s safety?
You should consult Chapter 27 to help you identify the critical elements of assessment of Michael’s cognition and perception.
Knowledge of the structure and function of the cardiovascular system in combination with understanding of the patient’s clinical situation and the implications for the cardiovascular system facilitate accurate assessment of a patient’s blood pressure. Blood pressure is the lateral force on the walls of an artery from the blood pulsing under pressure from the heart. Systemic or arterial blood pressure, the blood pressure in the system of arteries in the body, is a good indicator of cardiovascular health. Blood flows throughout the circulatory system because of pressure changes. It moves from an area of high pressure to an area of low pressure. The heart’s contraction forces blood under high pressure into the aorta. The peak of maximum pressure, when ejection occurs, is systolic blood pressure. When the ventricles relax, the blood remaining in the arteries exerts a minimum or diastolic pressure.
Even though most sphygmomanometers are now either aneroid (using no fluid) or electronic, the standard unit for measuring blood pressure is millimetres of mercury (mmHg). The measurement indicates the height to which the blood pressure can raise a column of mercury. Blood pressure is recorded with the systolic reading before the diastolic (e.g. 120/80 mmHg). The difference between systolic and diastolic pressure is the pulse pressure. For a blood pressure of 120/80 mmHg, the pulse pressure is 40 mmHg. The pulse pressure varies with arterial elasticity. Rigid vessels incapable of distension and recoil produce increased pulse pressure. Increased pulse pressure indicates increased stroke volume, decreased peripheral vascular resistance, or both. A decreased or narrow pulse pressure reflects reduced stroke volume, increased peripheral vascular resistance, or both.
Blood pressure reflects the interrelationships of cardiac output, peripheral vascular resistance, blood volume, blood viscosity and artery elasticity. Knowledge of these haemodynamic variables helps in the assessment of blood pressure alterations.
A person’s cardiac output is the volume of blood pumped by the heart during 1 minute. The blood pressure (BP) depends on the cardiac output (CO) and the systemic vascular resistance (SVR):
BP = CO × SVR
When volume increases in an enclosed space, such as a blood vessel, the pressure in that space rises. As CO increases, more blood is pumped against arterial walls, causing the BP to rise. Cardiac output can increase as a result of an increase in heart rate, greater heart muscle contractility or an increase in blood volume. Changes in heart rate can occur faster than changes in muscle contractility or blood volume. An increase in heart rate may decrease diastolic filling time and end-diastolic volume. As a result, there is a decrease in blood pressure.
The blood circulates through a network of arteries, arterioles, capillaries, venules and veins. Arteries and arterioles are surrounded by smooth muscle that contracts or relaxes to change the size of the lumen. The size of arteries and arterioles changes to adjust blood flow to the needs of local tissues. For example, when more blood is needed by a major organ, the peripheral arteries constrict, decreasing their supply of blood. More blood becomes available to the major organ because of the resistance change in the periphery. Normally, arteries and arterioles remain partially constricted to maintain a constant flow of blood. Peripheral vascular resistance is the resistance to blood flow determined by the tone of vascular musculature and the diameter of blood vessels. The smaller the lumen of a vessel, the greater peripheral vascular resistance to blood flow. As resistance rises, arterial blood pressure rises. As vessels dilate and resistance falls, blood pressure drops.
The volume of blood circulating within the vascular system affects blood pressure. Most adults have a circulating blood volume of 5000 mL. Normally, the blood volume remains constant. However, if volume increases, more pressure is exerted against arterial walls. For example, the rapid, uncontrolled infusion of intravenous fluids elevates blood pressure. When circulating blood volume falls, as in the case of haemorrhage or dehydration, blood pressure falls.
The viscosity of blood affects the ease with which blood flows through small vessels. The haematocrit, or percentage of red blood cells in the blood, measures blood viscosity. When the haematocrit rises and blood flow slows, arterial blood pressure increases. The heart must contract more forcefully to move the more viscous blood through the circulatory system.
Normally, the walls of an artery are elastic and easily distensible. As pressure within the arteries increases, the diameter of vessel walls increases to accommodate the pressure change. Arterial distensibility prevents wide fluctuations in blood pressure. However, in certain diseases, such as arteriosclerosis, the vessel walls lose their elasticity and are replaced by fibrous tissue that cannot stretch well. With reduced elasticity there is greater resistance to blood flow. As a result, when the left ventricle ejects its stroke volume, the vessels no longer yield to pressure. Instead, a given volume of blood is forced through the rigid arterial walls, and the systemic pressure rises. Systolic pressure is more significantly elevated than diastolic pressure as a result of reduced arterial elasticity.
Each haemodynamic factor significantly affects the others (Figure 28-10). For example, as arterial elasticity declines, peripheral vascular resistance increases. The complex control of the cardiovascular system normally prevents any single factor from permanently changing the blood pressure. For example, if the blood volume falls, the body compensates with an increased vascular resistance.
Blood pressure is not constant, but is continually influenced by many factors during the day. One blood pressure measurement cannot adequately reflect a patient’s blood pressure. Even under the best conditions, blood pressure changes from heartbeat to heartbeat. Blood pressure trends, not individual measurements, guide nursing interventions. Understanding these factors ensures a more accurate interpretation of blood pressure readings.
Normal blood pressure levels vary and gradually increase throughout life (Table 28-6). The level of a child or adolescent’s blood pressure is assessed with respect to body size and age (Hockenberry and Wilson, 2011). Larger children (heavier and/or taller) have higher blood pressures than smaller children of the same age. An adult’s blood pressure tends to increase with advancing age (Table 28-7). Older adults have a rise in systolic pressure related to decreased vessel elasticity.
TABLE 28-6 AVERAGE OPTIMAL BLOOD PRESSURE FOR AGE
AGE GROUP | BLOOD PRESSURE (MMHG) |
---|---|
Newborn (3000 g) | 40 (mean) |
1 month | 85/54 |
1 year | 95/65 |
6 years | 105/65 |
10 –13 years | 110/65 |
14 –17 yea r s | 120/75 |
Middle adult | < 120/80 |
From National Institutes of Health: National Heart, Lung and Blood Institute (NHLBI) Joint National Committee 2004 The Seventh Report of the Joint National Committee on Detection, Evaluation, and Treatment of High Blood Pressure, Bethesda, MD, NHLBI.
TABLE 28-7 CLASSIFICATION OF BLOOD PRESSURE FOR ADULTS
DIAGNOSTIC CATEGORY | SYSTOLIC (mmHg) | DIASTOLIC (mmHg) |
---|---|---|
Normal | <120 | <80 |
High normal | 120-139 | 80-89 |
Hypertension* | ||
Grade 1 (mild) | 140-159 | 90-99 |
Grade 2 (moderate) | 160-179 | 100-109 |
Grade 3 (severe) | ≥180 | ≥110 |
Isolated systolic hypertension | ≥140 | <90 |
Isolated systolic hypertension with widened pulse pressure | ≥160 | ≤70 |
*The diagnosis of hypertension should be based on multiple BP measurements taken on separate occasions.
Adapted from Heart Foundation of Australia (National Blood Pressure and Vascular Disease Advisory Committee) 2010 Guide to management of hypertension 2008: assessing and managing raised blood pressure in adults; updated December 2010. Online. Available at www.heartfoundation.org.au/SiteCollectionDocuments/HypertensionGuidelines2008to2010Update.pdf 27 May 2012. Data reproduced with permission. © 2010 National Heart Foundation of Australia.
Anxiety, fear, pain and emotional stress result in sympathetic stimulation, which increases heart rate, cardiac output and peripheral vascular resistance and ultimately increases blood pressure.
Some medications can directly or indirectly affect blood pressure. During blood pressure assessment, the nurse asks whether the patient is receiving antihypertensive or other cardiac medications, which lower blood pressure (Table 28-8). Opioid analgesics also lower blood pressure through their vasodilatory effect.
TABLE 28-8 ANTIHYPERTENSIVE MEDICATIONS
MEDICATION TYPE | NAMES | ACTION |
---|---|---|
Angiotensin-converting enzyme (ACE) inhibitors | Captopril (Capoten), enalapril (Vasotec), lisinopril (Prinivil) | Lower blood pressure by blocking the conversion of angiotensin 1 to angiotensin II, preventing vasoconstriction; reduce aldosterone production and fluid retention, lowering circulating fluid volume |
Beta-adrenergic blockers | Atenolol (Tenormin), nadolol (Corgard), timolol maleate (Blocadren), propranolol (Inderal) | Combine with beta-adrenergic receptors in the heart, arteries and arterioles to block response to sympathetic nerve impulses; reduce heart rate and thus cardiac output |
Calcium channel blockers | Verapamil hydrochloride (Calan), nifedipine (Procardia) | Reduce peripheral vascular resistance by systemic vasodilation |
Diuretics | Furosemide (Lasix), spironolactone (Aldactone), metolazone, polythiazide, benzthiazide | Lower blood pressure by reducing reabsorption of sodium and water by the kidneys, thus lowering circulating fluid volume |
Vasodilators | Hydralazine hydrochloride (Apresoline), minoxidil (Loniten) | Act on arteriolar smooth muscle to cause relaxation and reduce peripheral vascular resistance |
Blood pressure levels vary over the course of a day. Blood pressure is typically lowest in the early morning, gradually rises during the morning and afternoon and peaks in late afternoon or evening. No two people have the same pattern or degree of variation. Students may find it interesting to have their blood pressure checked by a friend at intervals over 24 hours.
Accurate technique is critical for gaining meaningful blood pressure readings (Plante, 2005; Wallymahamed, 2008). To ensure reliable blood pressure results, you will need to become familiar with the equipment and the principles of blood pressure measurement (Skill 28-5). The blood pressure is measured by auscultation or palpation. Auscultation is the most widely used technique. The process of taking a blood pressure reading will differ depending on your knowledge of the patient and their previous blood pressure readings. You will also need to learn how to use automatic blood pressure equipment, as this is readily available in most clinical venues. Finally, you will need to understand how to manage challenging situations by selecting the most suitable equipment and sites for measuring the blood pressure. Accurate recording and interpretation of results and knowledge of when to report changes are critical to patient safety.
SKILL 28-5 Measuring blood pressure (BP)
Blood pressure measurement can be delegated to enrolled nurses who are informed of:
• appropriate patient position when obtaining blood pressure measurement
• alterations affecting the appropriate limb for blood pressure measurement
• appropriate-size blood pressure cuff for designated extremity
• patient’s risk of orthostatic hypotension
• frequency of blood pressure measurement
• Aneroid or mercury sphygmomanometer
• Cloth or disposable vinyl pressure cuff of appropriate size for patient’s extremity
STEPS | RATIONALE | ||
---|---|---|---|
1. Determine need to assess patient’s BP: | |||
Certain conditions place patients at risk of BP alteration: history of cardiovascular disease, renal disease, diabetes, circulatory shock (hypovolaemic, septic, cardiogenic or neurogenic), acute or chronic pain, rapid intravenous infusion of fluids or blood products, increased intracranial pressure, postoperative conditions, toxaemia of pregnancy. |
|||
Physical signs and symptoms may indicate alterations in BP. (See Table 28-6 for average optimal blood pressure for age.) | |||
2. Determine best site for BP assessment. Avoid applying cuff to extremity when: intravenous fluids are infusing; an arteriovenous shunt or fistula is present; breast or axillary surgery has been performed on that side; extremity has been traumatised, is diseased or requires a cast or bulky bandage. The lower extremities may be used when the brachial arteries are inaccessible. | Inappropriate site selection may result in poor amplification of sounds, causing inaccurate readings. Application of pressure from inflated bladder temporarily impairs blood flow and can further compromise circulation in extremity that already has impaired blood flow. | ||
3. Select appropriate cuff size. |
Improper cuff size results in inaccurate readings (see Table 28-9). If cuff is too small, it tends to come loose while being inflated or results in false high readings. If the cuff is too large, false low readings may be recorded. |
||
4. Determine previous baseline BP (if available) from patient’s record. | Allows assessment for change in condition. Provides comparison with future BP measurements. | ||
5. Encourage patient to avoid exercise and smoking for 30 min before assessment of BP. | Exercise and smoking can cause false elevations in BP. | ||
6. Have patient assume sitting or lying position. Be sure room is warm, quiet and relaxing. | Maintains patient’s comfort during measurement. The patient’s perception that the physical or interpersonal environment is stressful affect the BP measurement. | ||
7. Explain to patient that BP is to be assessed and have patient rest at least 5 min before measurement. Ask patient not to speak when BP is being measured. | Reduces anxiety that can falsely elevate readings. Blood pressure readings taken at different times can be objectively compared when assessed with patient at rest. Talking to a patient when the BP is being assessed increases readings by 10-40%. | ||
8. Perform hand hygiene. With patient sitting or lying, position patient’s forearm or thigh, supported if needed. For arm, turn palm up; for thigh, position with knee slightly flexed. | Reduces transmission of microorganisms. If extremity is unsupported, patient may perform isometric exercise that can increase diastolic blood pressure. | ||
9. Expose extremity (arm or leg) fully by removing constricting clothing. | Ensures proper cuff application. | ||
10. Palpate brachial artery (arm); see illustration or popliteal artery (leg). Position cuff 2.5 cm above site of pulsation (antecubital or popliteal). | Inflating bladder directly over artery ensures proper pressure is applied during inflation. | ||
11. Apply bladder of cuff above artery by centring arrows marked on cuff over artery. If there are not centre arrows on cuff, estimate the centre of the bladder and place this centre over artery. With cuff fully deflated, wrap cuff evenly and snugly around extremity. | Loose-fitting cuff causes false high readings. | ||
12. Position manometer vertically at eye level. Observer should be no further than 1 m away. | Accurate readings are obtained by looking at the meniscus of the mercury at eye level. The meniscus is the point where the crescent-shaped top of the mercury column aligns with the manometer scale. Looking up or down at the mercury results in distorted readings. | ||
13. If you do not know the patient’s baseline BP, estimate systolic pressure by palpating the artery distal to the cuff, i.e. radial artery, with fingertips of one hand while inflating cuff rapidly to pressure 30 mmHg above point at which pulse disappears. Slowly deflate cuff and note point when pulse reappears. Deflate cuff fully and wait 30 s. | Estimating prevents false low readings, which may result in the presence of an auscultatory gap. Maximal inflation point for accurate reading can be determined by palpation. If unable to palpate artery because of weakened pulse, an ultrasonic stethoscope can be used. Deflating cuff prevents venous congestion and false high readings. | ||
14. Place stethoscope earpieces in ears and be sure sounds are clear, not muffled. | Each earpiece should follow angle of ear canal to facilitate hearing. | ||
15. Relocate brachial or popliteal artery and place bell or diaphragm chestpiece of stethoscope over it. Do not allow chestpiece to touch cuff or clothing. | Proper stethoscope placement ensures optimal sound reception. Stethoscope improperly positioned causes muffled sounds that often result in false low systolic and false high diastolic readings. | ||
16. Close valve of pressure bulb clockwise until tight. Rapidly inflate cuff to 30 mmHg above palpated systolic pressure. | Tightening of valve prevents air leak during inflation. Inflation ensures accurate measurement of systolic pressure. | ||
17. Slowly release pressure bulb valve and allow mercury or needle of aneroid manometer gauge to fall at rate of 2-3 mmHg/s. | Too rapid or slow a decline in mercury level or aneroid pressure can cause inaccurate readings. | ||
18. Note point on manometer when first clear sound is heard. The sound will slowly increase in intensity. | First Korotkoff sound indicates systolic pressure. | ||
19. Continue to deflate cuff, noting point at which muffled or dampened sound appears. | Fourth Korotkoff sound involves distinct muffling of sounds and is recommended as indication of diastolic pressure in children. | ||
20. Continue to deflate cuff gradually, noting point at which sound disappears in adults. Listen for 10-20 mmHg after the last sound, and then allow remaining air to escape quickly. | Beginning of the fifth Korotkoff sound is recommended as indication of diastolic pressure in adults. | ||
21. Remove cuff from extremity unless measurement must be repeated. If this is the first assessment of patient, repeat procedure on other extremity. | Continuous cuff inflation causes arterial occlusion, resulting in numbness and tingling of patient’s arm. Comparison of BP in both extremities detects circulation problems. (Normal difference of 5-10 mmHg exists between extremities.) | ||
22. Help patient return to comfortable position and cover upper arm if prev ously clothed. | Restores comfort and promotes sense of wellbeing. | ||
23. Discuss findings with patient as needed. | Promotes participation in care and understanding of health status. | ||
24. Perform hand hygiene. | Reduces transmission of microorganisms. | ||
25. Compare reading with previous baseline and/or acceptable value of blood pressure for patient’s age. | Checks for change in condition and alterations. | ||
26. Compare blood pressure in both arms or both legs. | If using upper extremities, the arm with the higher pressure should be used for subsequent assessments unless contraindicated. | ||
27. Correlate blood pressure with data obtained from pulse assessment and related cardiovascular signs and symptoms. | Blood pressure and heart rate are interrelated. |
Before assessing blood pressure, you need to be confident in using a sphygmomanometer and a stethoscope. A sphygmomanometer comprises a pressure manometer, an occlusive cloth or vinyl cuff that encloses an inflatable rubber bladder, and a pressure bulb with a release valve that inflates the bladder. The aneroid manometer has a glass-enclosed circular gauge containing a needle that registers millimetre calibrations. Cloth or disposable vinyl compression cuffs contain the inflatable bladder and come in several sizes. The size selected is proportional to the circumference of the limb being assessed (Figure 28-11). Ideally, the width of the cuff should be 40% of the circumference (or 20% wider than the diameter) of the midpoint of the limb on which the cuff is to be used (National Institutes of Health, 2004). The bladder, enclosed by the cuff, should encircle at least two-thirds of the arm of an adult and the entire arm of a child. In children, the lower edge of the cuff should be above the antecubital fossa, allowing room for placement of the stethoscope bell or diaphragm. Blood pressure measurements will not be accurate unless the correct size of blood-pressure cuff is applied appropriately.
FIGURE 28-11 Guidelines for proper blood-pressure cuff size. Cuff width = 20% more than the upper arm diameter; or 40% of circumference and two-thirds of arm length.
From Potter PA, Perry AG 2013 Fundamentals of nursing, ed 8. St Louis, Mosby.
Before using a sphygmomanometer, inspect the parts of the release valve and the pressure bulb. The valve should be clean and freely moveable in either direction. If it sticks or becomes too tightly closed, the deflation of the pressure cuff will be hard to regulate. The pressure bulb is made of tough rubber and should be free of leaks. Aneroid manometers have the advantage of being lightweight, portable and compact, but the tendency for metal parts to expand or contract in response to environmental temperature changes can affect their reliability. Aneroid sphygmomanometers require biomedical calibration at routine intervals to verify their accuracy. Before using the aneroid model, be sure that the needle points to zero and that the manometer is correctly calibrated.
Measurement of arterial blood pressure works on a basic principle of pressure. Blood flows freely through an artery until an inflated cuff applies pressure to tissues and causes the artery to collapse. After the cuff pressure is released, the point at which blood flow returns and sound appears through auscultation is the systolic pressure.
In 1905, Korotkoff, a Russian surgeon, first described the sounds heard over an artery distal to the blood pressure cuff:
1. The first Korotkoff sound is a clear rhythmical tapping corresponding to the pulse rate that gradually increases in intensity. Onset of the sound corresponds to the systolic pressure.
2. With the second Korotkoff sound, a murmur or swishing sound occurs as the cuff continues to deflate. As the artery distends, there is a turbulence in blood flow.
3. The third Korotkoff sound is a crisper and more intense tapping.
4. The fourth Korotkoff sound becomes muffled and low-pitched as the cuff is further deflated. Cuff pressure falls below the pressure within the vessel walls; this sound is the diastolic pressure in infants and children.
5. The fifth Korotkoff sound is an absence of sound. In adolescents and adults, the fifth sound corresponds to the diastolic pressure (Figure 28-12).
FIGURE 28-12 The sounds auscultated during blood-pressure measurement can be differentiated into five Korotkoff phases. In this example, blood pressure is 140/90 mmHg.
From Potter PA, Perry AG 2013 Fundamentals of nursing, ed 8. St Louis, Mosby.
In some patients the sounds are clear and distinct. In other patients, only the beginning and ending sounds are clear.
During the initial assessment, ask the patient to state their usual blood pressure. If they do not know, you can tell the patient after measuring and recording the blood pressure. This may also be a good opportunity for relevant patients to discuss optimal values of blood pressure, the risk factors for developing hypertension and the dangers of hypertension. At the initial assessment, blood pressure is measured in both arms. Normally there is a difference of 5–10 mmHg between the arms. In subsequent assessments, the blood pressure should be measured in the arm with the higher pressure. Pressure differences greater than 10 mmHg indicate vascular problems in the arm with the lower pressure.
The palpation technique is often used by the admitting nurse when the patient’s usual blood pressure reading is unknown. This approach is useful for determining how high to inflate the cuff. The palpation technique is also used for patients whose arterial pulsations are too weak to create Korotkoff sounds. Severe blood loss and decreased heart contractility are examples of conditions that result in blood pressures too low to auscultate accurately. Only the systolic blood pressure can be easily assessed by palpation (Box 28-13). Although the diastolic pressure is difficult to determine by palpation, a subtle change in sensation, usually in the form of a thin, snapping vibration, marks the diastolic level. When the palpation technique is used, the systolic value and the manner in which it was measured are recorded (e.g. RA 90/–, palpated, supine).
BOX 28-13 PALPATING THE SYSTOLIC BLOOD PRESSURE
1. Apply blood-pressure cuff to the upper arm in the same manner as the auscultation method (Skill 28-5).
2. Continually palpate the radial artery.
3. Inflate blood pressure cuff 30 mmHg above the point at which the radial pulse can no longer be palpated.
4. Release valve and allow mercury to fall 2 mmHg/sec.
5. As soon as the radial pulse is palpable, note the manometer reading—this is the systolic blood pressure.
The palpation technique is used with auscultation in some instances. In some hypertensive patients, the sounds usually heard over the brachial artery when the cuff pressure is high disappear as pressure is reduced and then reappear at a lower level.
The best environment for blood pressure measurement by auscultation is a quiet room at a comfortable temperature. Although the patient may lie or stand, sitting is the preferred position. If auscultation is not performed correctly (Table 28-9), blood pressure readings will be incorrect. When unsure of a reading, a colleague should reassess the blood pressure.
TABLE 28-9 COMMON MISTAKES IN BLOOD PRESSURE ASSESSMENT
ERROR | EFFECT |
---|---|
Arm above heart level | False low reading |
Arm below heart level | False high reading |
Arm not supported | False high reading |
Bladder or cuff too narrow | False high reading |
Bladder or cuff too wide | False low reading |
Cuff wrapped too loosely or unevenly | False high reading |
Deflating cuff too quickly | False low systolic and false high diastolic readings |
Deflating cuff too slowly | False high diastolic reading |
Inaccurate inflation level | Inaccurate interpretation of systolic and diastolic readings |
Inflating cuff too slowly | False high diastolic reading |
Multiple examiners using different Korotkoff sounds for diastolic readings | False high systolic and low diastolic readings |
Repeating assessments too quickly | False low systolic reading |
Stethoscope applied too firmly against antecubital fossa | False low diastolic reading |
Stethoscope that fits poorly or impairment of the examiner’s hearing, causing sounds to be muffled | False low systolic and false high diastolic readings |
If unable to auscultate sounds because of a weakened arterial pulse, an ultrasonic stethoscope can be used (see Chapter 27). This stethoscope allows you to hear low-frequency systolic sounds, and is commonly used when measuring the blood pressure of infants and children and low blood pressure in adults.
Electronic devices are commonly used to determine blood pressure (Figure 28-13). Whereas the auscultatory technique relies on the detection of Korotkoff sounds, some electronic devices rely on the principle of oscillometry. The system includes either a microphone or a pressure sensor built into the inflatable cuff. The microphone or acoustic system hears Korotkoff sounds and registers diastolic and systolic readings. The pressure sensor or ultrasonic system responds to the pressure waves generated by the movement of blood through the artery. The sensor determines the initial burst of oscillations and translates the information into a systolic pressure reading. The diastolic pressure is measured when the oscillations are lowest, just before they stop (Rauen and others, 2008).
FIGURE 28-13 Automatic vital-signs monitor.
Image: Connex® Vital Signs Monitor, courtesy of Welch Allyn.
Electronic devices work automatically and are applied when frequent blood-pressure assessment is required, such as in the critically ill or potentially unstable patient, during or after invasive procedures or when therapies require frequent monitoring (e.g. intravenous heart and blood pressure medications). However, some patient conditions are not appropriate for automatic blood pressure devices (Box 28-14).
The advantages of automatic devices are the ease of use and efficiency when repeated or when frequent measurements are indicated. The ability to use a stethoscope is not required. However, automatic devices are more sensitive to outside interference and are very susceptible to error. The microphone or pressure sensor must be positioned directly over the artery for proper function. Patient movements, vibration or outside noise can interfere with the microphone or sensor signal. The nurse should avoid speaking to the patient for at least 1 minute before initiating a blood-pressure recording—talking to a patient when the blood pressure is being assessed can increase readings by 10–40%.
A baseline blood pressure should be obtained using the auscultatory method before applying automatic devices. A comparison helps evaluate a patient’s status and allows proper programming of the device. Once the blood-pressure cuff is applied, the device is programmed to obtain and record blood-pressure readings at preset intervals. Alarm limits can be programmed to alarm if the blood-pressure measurement is outside desired parameters. If readings do not match your understanding of the patient’s situation and other assessment data, it is advised that a manual blood-pressure reading be taken to reduce the potential for error.
The patient’s position during routine blood-pressure determination should be the same during each measurement to permit a meaningful comparison of values. Controlling factors responsible for artificially high readings, such as pain, anxiety or exertion, is an important part of blood-pressure measurement. The patient’s perception of a stressful physical or interpersonal environment will affect blood-pressure measurement. For example, blood-pressure measurements taken at the patient’s place of employment or in a medical practitioner’s office are often higher than those taken in the patient’s home.
Some people measure their own blood pressure because of improved technology in home monitoring devices and a greater interest in health promotion. Portable home devices include the aneroid sphygmomanometer and electronic digital readout devices that do not require the use of a stethoscope. The electronic devices inflate and deflate cuffs with the push of a button. They may be easier to manipulate, but can easily become inaccurate and require recalibration more than once a year. Because of their sensitivity, improper cuff placement or movement of the arm can cause electronic devices to give incorrect readings.
Self-measurement of blood pressure has several benefits. Elevated blood pressure may be detected in people previously unaware of a problem, and people with high normal blood pressure can learn about the pattern of blood-pressure values. Patients with hypertension can benefit from participating actively in their treatment through self-monitoring, which may help compliance with treatment. The disadvantages of self-measurement include: improper use of the device; a patient may be needlessly alarmed with one elevated reading; and patients with hypertension may become overly conscious of their blood pressure and make inappropriate self-adjustment of medications.
Blood pressure in children changes with growth and development. The measurement of blood pressure in infants and children is difficult for several reasons:
• Different arm size requires careful and appropriate cuff-size selection. Do not choose a cuff based on the name of the cuff. An ‘infant’ cuff may be too small for some infants.
• Readings are difficult to obtain in restless or anxious infants and children. Delay at least 15 minutes to allow children to recover from recent activities and apprehension. Preparing the child for the blood-pressure cuff’s unusual sensation can increase cooperation. Most children will understand the analogy of a ‘tight hug on your arm’.
• Placing the stethoscope too firmly on the antecubital fossa can cause errors in auscultation.
• Korotkoff sounds are difficult to hear in children because of low frequency and amplitude. A paediatric stethoscope bell can be helpful.
Dressings, casts, intravenous catheters, arteriovenous fistulas or shunts and axillary lymph node dissection can make the upper extremities inaccessible. Blood pressure must then be measured in the lower extremities. Comparing upper extremity blood pressure with that in the legs is also necessary for patients with certain peripheral vascular abnormalities.
The popliteal artery, palpable behind the knee in the popliteal space, is the site for auscultation. The cuff must be wide enough and long enough to allow for the larger girth of the thigh. Placing the patient in a prone position is best. If such a position is impossible, the patient should be asked to flex the knee slightly for easier access to the artery. The cuff is positioned 2.5 cm above the popliteal artery with the bladder over the posterior aspect of the mid-thigh (Figure 28-14). The procedure is identical to brachial artery auscultation. Systolic pressure in the legs is usually higher by 10–40 mmHg than in the brachial artery, but the diastolic pressure is the same.
Two numbers are usually recorded for a blood-pressure measurement:
• the point on the manometer when the first Korotkoff sound is heard for systolic, and
• the point on the manometer when the fifth Korotkoff sound is heard for diastolic.
Some institutions recommend recording the point when the fourth sound is heard as well, especially for patients with hypertension. The numbers are divided by slashed lines (e.g. 120/80 or 120/100/80); the arm used to measure the blood pressure is noted (e.g. right arm (RA) 130/70); and the patient’s position when the pressure is assessed is recorded (e.g. sitting). The importance of obtaining an accurate blood pressure cannot be overemphasised, because many medical decisions and nursing interventions are made on the basis of blood-pressure findings.
The auscultatory gap typically occurs between the first and second Korotkoff sounds. The gap in sound may cover a range of 40 mmHg and thus may cause an underestimation of systolic pressure or an overestimation of diastolic pressure. The nurse must be certain to inflate the cuff high enough to hear the true systolic pressure before the auscultatory gap. Palpation of the radial artery helps to determine how high to inflate the cuff. The nurse inflates the cuff 30 mmHg above the pressure at which the radial pulse was palpated. The range of pressures in which the auscultatory gap occurs is recorded (e.g. BP RA 180/94 with an auscultatory gap from 180 to 160, sitting).
The most common alteration in blood pressure is hypertension. This is a major factor underlying deaths from strokes and is a contributing factor to myocardial infarctions. Hypertension is an often asymptomatic disorder characterised by persistently elevated blood pressure. The diagnosis of hypertension in adults is made when:
• an average of two or more diastolic readings on at least two subsequent visits is 90 mmHg (diastolic hypertension) or higher, or
• an average of multiple systolic blood pressures on two or more subsequent visits is consistently higher than 135 mmHg (systolic hypertension).
Categories of hypertension have been developed and determine medical intervention (see Table 28-7). One elevated blood-pressure measurement does not qualify as a diagnosis of hypertension. However, if the first blood-pressure measurement shows a high systolic or diastolic reading (e.g. 150/90 mmHg), repeated measurements are required.
Hypertension is associated with the thickening and loss of elasticity in the arterial walls. Peripheral vascular resistance increases within thick and inelastic vessels. The heart must continually pump against greater resistance. As a result, blood flow to vital organs such as the heart, brain and kidney decreases. People with a family history of hypertension are at significant risk. Obesity, cigarette smoking, heavy alcohol consumption, high sodium (salt) intake, sedentary lifestyle and continued exposure to stress are also linked to hypertension. The incidence of hypertension is greater in patients with diabetes, older adults and Indigenous Australians. Patients diagnosed with hypertension require education about blood-pressure values, long-term follow-up care and therapy, the usual lack of symptoms (the fact that it may not be ‘felt’), therapy’s ability to control but not cure hypertension and a consistently followed treatment plan that can ensure a relatively normal lifestyle (Heart Foundation of Australia, 2010).
Hypotension is generally considered present when the systolic blood pressure falls to 90 mmHg or below. Although some adults have a low blood pressure normally, for the majority of people low blood pressure is an abnormal finding associated with illness. Hypotension occurs because of the dilation of the arteries in the vascular bed, the loss of a substantial amount of blood volume (e.g. haemorrhage) or the failure of the heart muscle to pump adequately (e.g. myocardial infarction). Hypotension associated with pallor, skin mottling, clamminess, confusion, increased heart rate or decreased urine output is life-threatening and should be reported to a medical practitioner immediately.
Orthostatic hypotension, also referred to as postural hypotension, occurs when a normotensive person (one with normal blood pressure) develops symptoms and low blood pressure when rising to an upright position. When a healthy individual changes from a lying to a sitting to a standing position, the peripheral blood vessels in the legs constrict. Constriction of the lower-extremity vessels when standing prevents the pooling of blood in the legs due to gravity. When patients have a decreased blood volume, their blood vessels are already constricted. When a volume-depleted patient stands, there is a significant drop in blood pressure with an increase in heart rate to compensate for the drop in cardiac output. Patients who are dehydrated or anaemic or who have experienced prolonged bed rest or recent blood loss are at risk of orthostatic hypotension. Some medications can cause orthostatic hypotension, especially in older adults or young patients. Blood pressure should always be measured before administering such medications.
Orthostatic vital sign measurements include obtaining blood pressure and pulse with the patient supine, sitting and standing. When recording orthostatic blood-pressure measurements, record the patient’s position in addition to the blood-pressure measurement (e.g. 140/80 supine, 132/72 sitting, 108/60 standing). The readings are obtained 1–3 minutes after the patient changes position. In most cases, orthostatic hypotension is detected within 1 minute of standing. If orthostatic hypotension is assessed, the patient is helped to a lying position and the medical practitioner or nurse in charge is notified. While obtaining orthostatic measurements, observe for other symptoms of hypotension such as dizziness, weakness or light-headedness. Because the skill of orthostatic measurement requires critical thinking and ongoing nursing judgment, this procedure is not normally delegated to ENs.
Blood pressure is usually measured by using a sphygmomanometer and stethoscope. Changes in blood pressure occur in response to changes in the general state of cardiovascular health and/or in response to changes in other systems. Knowledge of the cardiovascular structure and physiology is critical to assessment and interpretation of blood-pressure changes in order to determine appropriate interventions. The assessment of blood pressure along with pulse assessment is used to evaluate the general state of cardiovascular health and responses to other system imbalances. Hypotension, hypertension, orthostatic hypotension, and narrow or wide pulse pressures are defining characteristics of certain problems and are considered along with other assessment data.
Once the challenge of competently performing each health assessment skill separately has been achieved, you need to learn how to put them together to efficiently and skillfully assess hospitalised patients. Although most nursing health assessment textbooks present a step-by-step approach to a comprehensive or screening health assessment to pull content together, this is rarely applied or practical in the acute care setting (Giddens, 2007; Secrest and others, 2005). Nor is it helpful for the student. It is far more important for you to learn the key elements of a systematic, brief body systems assessment and build on this with specialised or focused assessment skills relevant to the patient’s presenting problem and context of care (Douglas, 2011).
Skill 28-6 brings together important concepts from Chapters 27 and 28 to provide an example of how to perform a brief body systems physical assessment of a hospitalised patient. You may decide to adapt components of this assessment based on the patient’s presentation and reason for admission. However, this skill focuses on the assessment skills RNs use most often in their daily practice. This type of assessment is frequently used by nurses at the beginning of a shift to determine the patient’s problems and priorities of care. Often a complete physical examination is done upon admission to the hospital by the medical or nurse practitioner. Therefore, this shorter format is more practical for ongoing patient assessments.
SKILL 28-6 Brief body systems assessment of the hospitalised patient
Skill developed by Clint Douglas and Leanne Lightfoot, School of Nursing, Queensland University of Technology.
The current emphasis on health promotion and health maintenance, as well as early discharge from hospital settings, means an increase in the need for patients and their families to monitor vital signs in the home. Teaching considerations affect all vital sign measurements and should be incorporated into the patient’s plan of care. Consumers can use self-measurement devices if they are able to perform the procedure correctly and if they know when to seek healthcare. Advising patients of possible inaccuracies in the blood-pressure devices helping them understand the meaning and implications of readings and teaching them proper measurement techniques are part of your responsibility. When considering how to teach patients and their families about vital sign measurements and their importance and significance, the patient’s ability to learn the procedure and understand the readings is critical. Caregivers need to be aware of changes that are unique to older adults. See the box Working with diversity where some of these variations unique to the older adult are identified.
WORKING WITH DIVERSITY FOCUS ON OLDER ADULTS
• The temperature of older adults is at the lower end of the normal temperature range, 36°C.
• Temperatures considered within normal range may reflect a fever in an older adult.
• Older adults are very sensitive to slight changes in temperature.
• Environmental temperature plays a greater role in older adults because their thermoregulatory systems are not as efficient.
• A decrease in sweat gland reactivity in the older adult results in a higher threshold of sweating at high temperature, which can lead to hyperthermia and heatstroke.
• With ageing, a loss of subcutaneous fat reduces the insulating capacity of the skin; older men are at especially high risk of hypothermia.
• It is often difficult to palpate the pulse of an older adult or an obese client. A Doppler device will provide a more accurate reading.
• The older adult has a decreased heart rate at rest.
• Once elevated, the pulse rate of an older adult takes longer to return to normal resting rate.
• When assessing elderly women with sagging breasts, the breast tissue is gently lifted and the stethoscope placed at the fifth intercostal space or the lower edge of the breast.
• Heart sounds may be muffled or difficult to hear in older adults because of an increase in air space in the lungs.
• Older adults, especially those who are frail, have lost upper-arm mass, and require special attention to selection of BP cuff size.
• An older adult’s BP may elevate with age.
• Older adults have an increase in systolic pressure related to decreased vessel elasticity. The diastolic pressure remains the same, resulting in a wider pulse pressure.
• Older adults are instructed to change position slowly and wait after each change to avoid postural hypotension and prevent injuries.
• Ageing causes ossification of costal cartilage and downward slant of ribs, resulting in a more rigid rib cage, which reduces chest wall expansion. The kyphosis and scoliosis that can occur in older adults may also restrict chest expansion and decrease tidal volume.
• Older adults may depend more on accessory abdominal muscles during respiration than on weakened thoracic muscles.
• Decreased efficiency of respiratory muscles results in breathlessness at low exercise levels.
• Responses to hypercapnia and hypoxia are reduced 50% in older adults as compared with the young, limiting the ability of older adults to respond to hypoxia with respiratory changes.
• Identifying an acceptable pulse oximeter probe site may be difficult on older adults because of the likelihood of peripheral vascular disease, decreased cardiac output, cold-induced vasoconstriction, and anaemia.
Adapted from Meiner SE 2011 Gerontological nursing, ed 4. St Louis, Elsevier.
KEY CONCEPTS
• Vital signs include the physiological measurement of temperature, pulse, respirations and blood pressure.
• Oxygen saturation measurement is included in vital signs for relevant patients.
• Vital signs are measured as part of a complete physical examination or in a review of a patient’s condition.
• The nurse assesses vital sign changes with other physical assessment findings, using clinical judgment to determine measurement frequency.
• Knowledge of the factors influencing vital signs helps the nurse determine and evaluate abnormal values.
• Vital signs provide a basis for evaluating response to treatment.
• Fever is one of the body’s normal defence mechanisms.
• The tympanic route is the most accessible and acceptable site for core temperature measurement.
• To assess cardiac function, pulse rate and rhythm are most easily measured using the radial or apical pulse.
• Respiratory assessment includes measurement to determine the effectiveness of ventilation and oxygenation.
• Assessment of respirations involves observing ventilatory movements throughout the respiratory cycle.
• Oxygen saturation is influenced by variables affecting ventilation, perfusion and diffusion.
• Several haemodynamic variables contribute to blood-pressure determination.
• Hypertension is diagnosed only after an average of readings made during two or more subsequent visits reveals an elevated blood pressure.
• Errors in blood-pressure measurement can be made by incorrect selection and application of the cuff.
The author is grateful to Dr Anne Walsh, School of Nursing, Queensland University of Technology, for her contribution to the section on fever.
For a review of the latest evidence-based guidelines for the management of childhood fever, see the guidelines developed by the UK’s National Institute for Health and Clinical Evidence—Quick reference guide: Feverish illnesses in children, assessment and initial management in children younger than 5 years, www.nice.org.uk/nicemedia/live/11010/30524/30524.pdf.
Australian Commission on Quality and Safety in Health Care (ACQSHC). Evidence-based adult general observation chart. Sydney: ACQSHC, 2011. Online Available at www.safetyandquality.gov.au/our-work/recognising-and-responding-to-clinical-deterioration/observation-and-response-charts-2/evidence-based-adult-general-observation-and-response-charts 27 May 2011.
Brashers VL. Clinical applications of pathophysiology, ed 3. St Louis: Mosby, 2006.
Douglas C. Pulling it all together. In: Lewis P, Foley D, eds. Weber & Kelley’s Health assessment in nursing. Sydney: Lippincott Williams & Wilkins, 2011.
El-Radhi AS, Carroll J, Klein N, eds. Clinical manual of fever in children. Berlin: Springer, 2009.
Galvão CM, Liang Y, Clark AM. Effectiveness of cutaneous warming systems on temperature control: meta-analysis. J Adv Nurs. 2010;66(6):1196–1206.
Giddens JF. A survey of physical assessment techniques performed by RNs: lessons for nursing education. J Nurs Ed. 2007;46(2):83–87.
Gordon C, Craft J. Inflammation and fever. In: Craft J, Gordon C, eds. Understanding pathophysiology. Sydney: Mosby, 2011.
Guyton AC, Hall J. Textbook of medical physiology, ed 12. Philadelphia: Saunders, 2011.
Heart Foundation Australia (National Blood Pressure and Vascular Disease Advisory Committee). Guide to management of hypertension 2008: assessing and managing raised blood pressure in adults, updated December 2010. Online. Available at www.heartfoundation.org.au/SiteCollectionDocuments/HypertensionGuidelines2008to2010Update.pdf, 2010.
Hockenberry M, Wilson D. Wong’s nursing care of infants and children, ed 9. St Louis: Mosby, 2011.
International League Against Epilepsy, Commission on Epidemiology and Prognosis. Guidelines for epidemiologic studies on epilepsy. Epilepsia. 1993;34(4):592–596.
Joanna Briggs Institute (JBI). Febrile response (paediatric): care at home. Adelaide: JBI, 2009.
Joanna Briggs Institute (JBI). External cooling methods for treatment of fever in adults: a systematic review. Adelaide: JBI, 2010.
Kunisaki KM, Rice KL, Niewoehner DE. Management of acute exacerbations of chronic obstructive pulmonary disease in the elderly: an appraisal of published evidence. Drugs & Aging. 2007;24(4):303–324.
Kurz A. Thermal care in the perioperative period. Best Practice Res Clin Anesthesiol. 2008;22:39–62.
Kryriacos U, et al. Monitoring vital signs using early warning scoring systems: a review of the literature. J Nurs Manage. 2011;19(3):311–330.
McMorrow R, Mythen M. Pulse oximetry. Curr Opin Crit Care. 2006;12(3):269–271.
National Institutes of Health: National Heart, Lung and Blood Institute (NHLBI). The Seventh Report of the Joint National Committee on Prevention, Detection, Evaluation, and Treatment of High Blood Pressure. Bethesda, MD: NHLBI, 2004. Online Available at www.nhlbi.nih.gov/guidelines/hypertension/jnc7full.pdf 8 May 2012.
Parkes R. Rate of respiration: the forgotten vital sign. Emerg Nurse. 2011;19(2):12–18.
Plante C. Blood pressure measurement: a worthy technique for nurses. Outlook. 2005;28(2):35–39.
Rauen CA, Chulay M, Bridges E, et al. Seven evidence-based practice habits; putting some sacred cows out to pasture. Crit Care Nurse. 2008;28(2):98–124.
Secrest JA, Norwood BR, DuMont PM. Physical assessment skills: a descriptive study of what is taught and what is practiced. J Prof Nurs. 2005;21(2):114–118.
Wallymahamed M. Blood pressure measurement. Nurs Stand. 2008;22(19):45–48.
Walsh A. Fever management in children. Aust J Pharm. 2008;84(9):66–69.