Chapter 27 Health assessment
LEARNING OUTCOMES
Mastery of content will enable you to:
• Explain the purposes of health assessment for nursing practice.
• Apply the functional health patterns framework to systematically collect data required for focused health assessments.
• Identify specific nursing history information to collect across the various areas of the functional health framework.
• Describe interview techniques used to enhance communication during history taking.
• Identify the physical, psychological and environmental considerations and patient preparations required before and during an examination.
• Identify ways of respecting patient preferences when conducting health assessments.
• Describe the physical assessment techniques relevant to each area of health assessment.
• Differentiate normal from abnormal assessment findings.
• Use patient data to formulate problem statements.
Health assessment and physical examination
Learning about health assessment and physical examination is one of the most important and challenging aspects of becoming a registered nurse (RN). While often invisible to others, assessment comprises a major part of what expert RNs do in their daily practice. As a nurse, you will constantly observe and analyse situations to make clinical judgments. Learning to assess patients systematically and comprehensively is important because your assessment drives all components of the nursing process (Douglas and Stolic, 2011). Incomplete or inaccurate assessment leads to errors in identifying problems or making poor judgments, which put your patients at risk of ineffective, inefficient or unsafe nursing care (Alfaro-LeFevre, 2010). Assessment data provide the foundation on which nurses base their decisions, interventions and evaluations.
Nurses are usually the first healthcare professional to identify and act on changes in the patient’s condition. Health assessment skills allow nurses to identify life-threatening complications and recognise subtle, as well as obvious, changes that reflect deterioration of the patient’s health status. Through early detection and intervention for patient problems, nurses save lives and improve patient outcomes every day.
This chapter presents an overview of the fundamental health assessment knowledge and skills you will need as a beginning RN. Advanced or specialised assessment skills and techniques are beyond the scope of this chapter. The interested reader should consult a comprehensive nursing health assessment text such as Jarvis’s Physical examination and health assessment (Forbes and Watt, 2012).
Frameworks for health assessment
Health assessment can be organised in a number of different ways using frameworks such as body systems, head-to-toe, activities of daily living and functional health assessment. A framework provides focus and structure for your assessment. While it is important to become familiar with each of these approaches, the type of assessment required will depend on the patient and the context of nursing care.
This chapter is broadly organised around Gordon’s (1994) 11 functional health patterns framework (see Table 27-1). This holistic framework assists in developing a nursing perspective to health assessment which helps you to focus on relevant aspects of the person and how their health and function are affected by changes in health status. The framework is used to identify possible areas where there is a change in function, as well as associated risks. Once you have collected patient information (subjective and objective data), you are then able to identify actual and potential health problems. Once the problems are known, evidence-based interventions can be implemented.
TABLE 27-1 FUNCTIONAL HEALTH PATTERNS HEALTH ASSESSMENT FRAMEWORK
| FUNCTIONAL HEALTH PATTERN |
FOCUS OF HEALTH ASSESSMENT |
| Health perception–health management pattern |
Describes the individual’s perceived pattern of health and well-being and how health is managed
Reason for seeking healthcare
Description of present illness (onset, course, treatment)
Description of health (usual)
Relevance of health to activities
Preventative measures, general healthcare behaviour
Previous hospitalisations, expectations for this episode
|
| Nutritional–metabolic pattern |
Describes patterns of food and fluid consumption relative to metabolic needs and pattern indicators of local nutrient supply
Usual food and fluid intake (24-hour dietary recall)
Daily eating times
Recent weight change and reason
Food restrictions or preferences, supplements
Swallowing, chewing, eating problems, food allergies
Skin lesions and general ability to heal
Condition of the skin, hair, nails, mucous membranes and teeth
|
| Elimination pattern |
Describes patterns of excretory function (bowel, bladder and skin)
Bowel, bladder and skin excretion
Regularity of urination and bowel evacuation
Colour, quality and quantity of urine and faeces
Aids used to facilitate function, such as routines, devices (laxatives, suppositories, enemas) and methods to control excretion
Changes or disturbances in bowel or bladder elimination
|
| Activity–exercise pattern |
Describes patterns of exercise, activity, leisure and recreation. The activity–exercise pattern describes three functions that are important to everyone’s daily life:
Mobility—movement, posture, balance and gait
Independent self-care—ability to perform activities of daily living (ADLs)
Exercise and leisure—exercise tolerance, activities requiring energy expenditure
|
| Cognitive–perceptual pattern |
Describes sensory-perceptual and cognitive patterns. The ability to collect information from the environment and use it in reasoning and other thought processes
Adequacy of hearing, vision, smell, touch, taste
Impact on ADLs and compensation or devices used such as glasses or hearing aids
Pain and how it is managed
Cognitive functional abilities such as orientation, memory, reasoning, judgment and decision making
|
| Sleep–rest pattern |
Describes patterns of sleep, rest and relaxation in a 24-hour period
Usual sleep routine, sleep pattern
Perception of quality and quantity of sleep
Rest and relaxation or quiet periods during the day
Sleep disturbances
Use of aids to sleep, such as medications or night-time routines
|
| Coping–stress tolerance pattern |
Describes the client’s general coping pattern and the effectiveness of the pattern in terms of stress tolerance
Stressors and stress tolerance
General coping strategies
Support systems
Perceived ability to control or manage situations
|
| Role–relationship pattern |
Describes the work, family and social roles and relationships of individuals that may be influenced by health-related factors or may offer support during illness
Life roles and responsibilities
Satisfaction or dissatisfaction in family, work and social relationships
Impact of illness on roles and relationships
|
| Self-perception–self-concept pattern |
Describes the client’s self-concept pattern and perceptions of self (e.g. self-identity, esteem and body image, self-efficacy, mood state)
Self-description
Effects of illness on self-concept
Body image, identity, self-esteem
Posture, eye contact, voice and speech patterns
|
| Sexuality–reproductive pattern |
Describes the client’s patterns of satisfaction and dissatisfaction with sexuality pattern; describes reproductive pattern
Perceived satisfaction or dissatisfaction with sexuality–reproductive pattern
Impact of illness or treatments on sexual activity
Adequacy of sexual knowledge
Reproductive development and state (e.g. menstruation and menopause)
|
| Values–beliefs pattern |
Describes patterns of values, beliefs (including spiritual) and goals that guide the client’s choices or decisions
Values, goals or beliefs that are basis for decision making
Spiritual or religious affiliation
Spiritual practices and religious needs
|
Adapted from Gordon M 2007 Manual of nursing diagnosis, ed 11. Ontario, Jones & Bartlett.
Examples of how to apply a body systems assessment framework are also provided throughout the chapter with the inclusion of focused assessment skills in each relevant functional health pattern. These can also be contrasted with a head-to-toe assessment framework (e.g. see Boxes 27-1 and 27-2 for examples of focused cardiovascular and respiratory assessments). The important point here is that there are multiple frameworks available, and you must decide which is the most relevant to the clinical situation. The key to a successful nursing assessment is to learn to be organised and systematic during data collection.
BOX 27-1 EXAMPLE OF FOCUSED CARDIOVASCULAR ASSESSMENT USING A HEAD-TO-TOE FRAMEWORK
GENERAL SURVEY
Observe colour and mental status
UPPER LIMBS
Inspect hands and nails for temperature, capillary refill time
Palpate radial pulse rate, rhythm, strength
Measure blood pressure
NECK AND CHEST
Inspect neck veins
Inspect chest
Auscultate heart sounds (for normal S1 and S2)
Auscultate posterior lung sounds
Palpate for sacral oedema
ABDOMEN
Palpate abdomen
Measure urine output
LOWER LIMBS
Inspect and palpate for colour, warmth, movement, sensation
Palpate pulses
Palpate calves for tenderness
Inspect and palpate for oedema
BOX 27-2 EXAMPLE OF FOCUSED RESPIRATORY ASSESSMENT USING A HEAD-TO-TOE FRAMEWORK
General survey
Observe colour, mental status, posture and work of breathing
UPPER LIMBS
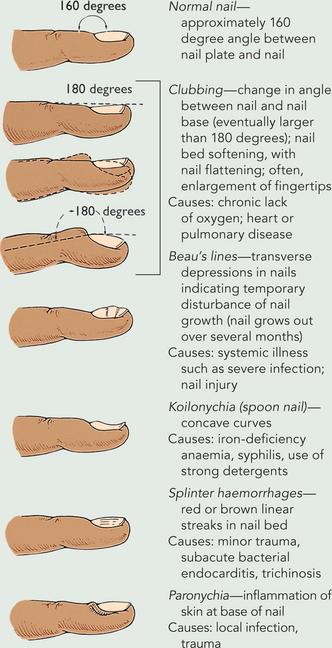
Inspect nails for clubbing and capillary refill time
Measure pulse and blood pressure
Measure peripheral oxygen saturation
HEAD, EARS, EYES, NOSE AND THROAT (HEENT)
Measure temperature
Observe cough/sputum
Inspect for cyanosis
Inspect trachea is midline
CHEST
Measure respiratory rate
Inspect and palpate chest for size, shape, symmetry
Auscultate anterior/posterior lung sounds
Gathering a health history: subjective data collection
The main objective of asking the patient questions is to find out what is central to their concerns so that you can identify the areas requiring physical examination. You would then explore these concerns in depth to determine onset, duration, location, severity, pattern and factors associated with the symptom(s). From there you would determine any risk factors for the patient (e.g. risk of falling or skin breakdown), as well as changes in level of function. These questions may be referred to as a health or nursing history (see Chapter 6).
Physical examination: objective data collection
This component of assessment requires systematic planning and focused data collection so that you can then identify solutions to actual and potential problems. Adherence to basic principles can help in laying the groundwork for a well-organised physical examination. Objective data collection should be designed to accommodate the patient’s immediate and ongoing needs. If a patient is acutely ill, it is essential that you recognise the presenting symptoms and focus the assessment accordingly. A complete examination may be conducted if necessary when immediate and life-threatening needs have been met.
Information gathered during an initial physical assessment provides a baseline of the patient’s functional abilities, symptoms being experienced and areas of risk. The baseline is not necessarily the normal range of physical findings, but rather the pattern of findings identified during initial assessment for that patient. This baseline serves as a comparison for future assessment findings and helps determine the patient’s response to therapeutic interventions.
Nurses use physical assessment skills to:
• gather baseline data about the patient’s health
• supplement, confirm or refute data obtained in the nursing history
• confirm and identify patient problems, areas of risk or change in function
• make clinical judgments about a patient’s changing health status and management
• evaluate the physiological outcomes of care.
• CRITICAL THINKING
What is the purpose of health assessment? How does health assessment from a nursing perspective differ from that in other healthcare disciplines?
Developing problem statements and a care plan
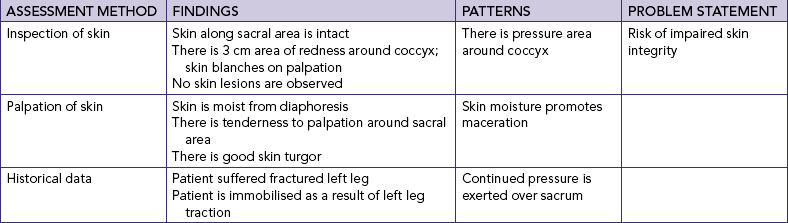
The combination of data from the health history and physical examination allows you to identify the patient problems which you are licensed to treat, either independently or collaboratively with the medical practitioner or allied health team members. The history allows you to gather a complete and detailed database about the patient’s areas of concern. A physical assessment is conducted to refute, confirm or supplement the existing database. Using critical thinking skills helps you to interpret the meaning of the information provided by the patient, apply knowledge from previous clinical care and methodically conduct an examination to create a clear picture of the patient’s status.
It is strongly recommended that you gather as much information as possible to ensure that you can correctly interpret the problem the patient is experiencing. For example, if the patient informs you that they have some abdominal discomfort and bloating, you will have some thoughts as to what the problem might be. You will more than likely ask questions about the person’s urinary and bowel elimination. You will then be in a position to focus your physical assessment to confirm the subjective data. Significant findings are grouped into patterns of data that reveal actual or potential patient problems. In relation to the previous example, you may identify that the person is constipated or has a potential to develop constipation.
The database developed from the history and physical examination allows you to develop individualised problem statements for the patient (Table 27-2). Health assessment findings also help determine the aetiology of problems so that you can select the most appropriate nursing interventions.
Evaluating nursing care
Health assessment is ongoing in order to evaluate the patient’s response to interventions. This is achieved through monitoring physiological and behavioural outcomes of care. For example, palpation of the patient’s pulse is used as part of assessment and is also used to evaluate patient response to nursing interventions. Health assessment tools and techniques are also used to review existing problem statements, identify new problems and update the care plan in line with changes in the patient’s condition.
• CRITICAL THINKING
How will health assessment assist you to provide high-quality and safe nursing care for a patient?
WORKING WITH DIVERSITY FOCUS ON CULTURAL CARE
A physical examination is performed by respecting patients’ preferences. How individuals behave as a result of their cultural heritage, health beliefs, use of alternative therapies, nutritional habits, relationships with family and comfort with the nurse’s physical closeness during an examination must be considered. Being sensitive to patient preferences is an important consideration when planning the assessment. Some patients prefer to have another person present, and this wish must be respected. Recognition of diversity will help you to respect a patient’s uniqueness and to provide person-centred care.
Integration of physical assessment with nursing care
A focused assessment is usually integrated into routine care. For example, you can assess the condition of the skin and other body parts during a bed bath or shower (see Chapter 30). You will have many opportunities to assess the patient during the day. For example, by observing the patient transferring into or out of the bed, walking down the corridor, feeding or dressing gives you a wealth of information about level of energy, activity tolerance, muscle strength, range of motion and gait.
Physical assessment techniques
Chapter 6 briefly described the techniques of inspection, palpation, percussion and auscultation. This chapter provides a more detailed description of those skills and their application to the physical examination.
Inspection
Inspection is the process of observation. The purpose of inspection is to detect normal characteristics or significant physical signs. You can observe many aspects of your patient as you are talking to them. For example, while you are performing nursing interventions such as assisting the patient with a shower or checking an intravenous infusion you will be observing the patient. To use inspection effectively, follow the following principles.
• Keep the patient informed. This includes providing a general explanation before starting the physical examination followed by a more specific explanation for each step of the examination.
• The patient should be relaxed and positioned comfortably because muscle tension impairs the effectiveness of the physical examination.
• Use good lighting and additional light (e.g. a penlight) to inspect body cavities such as the mouth.
• Position and expose body parts so that essential surfaces can be viewed while maintaining the patient’s dignity.
• Be aware of normal physical characteristics related to age and gender.
• Always pay attention to the patient, watching all movements and non-verbal cues.
• Inspect each area for size, shape, colour, symmetry, position, abnormalities and function.
• Compare each area inspected with the same area on the opposite side of the body.
• Do not hurry inspection—be thorough and pay attention to detail.
After inspection is completed, findings may indicate the need for further examination. Palpation is often used in conjunction with or after visual inspection.
Palpation
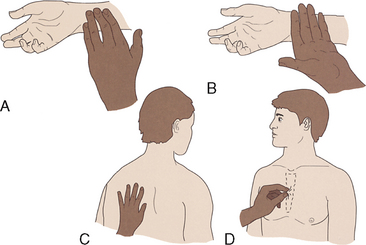
Further assessment is made through the use of touch. Through palpation, the hands can make delicate and sensitive measurements of specific physical signs, including resistance, resilience, roughness, texture and mobility (Table 27-3). Different parts of the hand are used when touching the skin to detect characteristics such as texture and temperature (Figure 27-1). Ask the patient to take slow, deep breaths as this enhances muscle relaxation.
TABLE 27-3 EXAMPLES OF CHARACTERISTICS MEASURED BY PALPATION
| AREA EXAMINED |
CRITERIA MEASURED |
| Skin |
Temperature
Moisture
Texture
Turgor and elasticity
Tender ness
Thickness
|
| Blood vessels (e.g. carotid or femoral artery) |
Symmetry and mobility
Pulse amplitude
Elasticity
Rate
Rhythm
|
Patients appreciate warm hands, short fingernails and a gentle approach. Identify the body area to be palpated, as well as the reason for using palpation. Tender areas are palpated last. Ask the patient to point out the more sensitive areas. Place your hand on the part to be examined and depress the area about 1 cm. Tactile pressure is applied slowly, gently and deliberately. Lightly palpate structures to determine areas of tenderness. Note any non-verbal signs of discomfort.
Percussion
Percussion involves tapping the body with the fingertips to evaluate the size, borders and consistency of body organs and to discover fluid in body cavities. As such, it is a technique that is used in a limited way by beginning RNs. It requires considerable skill and can help to confirm other assessment findings. Percussion helps verify abnormalities assessed through palpation and auscultation. For example, in the case of abnormal or absent bowel sounds on auscultation of the abdomen, percussion may confirm the presence of fluid, air or solid material in the bowel.
Percussion involves striking one object against another, thus producing vibration and subsequent sound waves. When the examiner strikes the body’s surface with a finger, vibration is transmitted through the body tissues. Sound waves are heard as percussion tones arising from vibrations 4–6 cm deep in body tissue (Seidel and others, 2011). The character of the sound depends on the density of the underlying tissue. Percussion produces characteristic sounds: tympany, resonance, dullness and flatness. Each sound is created by certain types of underlying tissues and is judged by its intensity of pitch, duration and quality (Table 27-4). For example, the percussion of the abdomen can elicit sounds with high intensity and low pitch.
Percussion is performed by placing the middle finger of the non-dominant hand (called the pleximeter) firmly against the body surface, keeping the palm and remaining fingers off the skin. The tip of the middle finger of the dominant hand (called the plexor) strikes the base of the distal joint of the pleximeter (Figure 27-2). The examiner uses a quick, sharp stroke with the plexor finger, keeping the forearm stationary. The wrist remains relaxed to deliver the proper blow. If the blow is not sharp, if the pleximeter is held loosely or if the palm rests on the body surface, the sound is dampened or softened, preventing transmission of sound to underlying structures. The same force must be applied to each area so that an accurate comparison of sounds can be made.
Auscultation
Auscultation is listening to sounds produced by the body and helps you to interpret the findings from the other examination techniques. Auscultation is generally carried out after inspection, palpation and percussion techniques are used, with the exception of abdominal assessment (see section on elimination).
To auscultate correctly, you will need practice, good hearing acuity, a good-quality stethoscope and knowledge of how to use the stethoscope properly. The stethoscope should always be placed directly on skin, because clothing obscures sound. The bell is best for low-pitched sounds and the diaphragm is best for high-pitched sounds, such as bowel and lung sounds.
A number of extraneous sounds created by movement of the tubing or chest-piece interfere with auscultation. You will learn to recognise and disregard them during the actual examination (Box 27-3). Through auscultation, note the following characteristics of sounds:
• Loudness, or the amplitude of a sound wave. Auscultated sounds are described as loud or soft.
• Quality, or sounds of similar frequency and loudness from different sources. Terms such as blowing or gurgling describe the quality of sound.
• Duration, or the length of time that sound vibrations last. The duration of sound is short, medium or long. Layers of soft tissue dampen the duration of sounds from deep internal organs.
BOX 27-3 EXERCISES TO INCREASE FAMILIARITY WITH THE STETHOSCOPE
• Ensure that the earpiece follows the contour of the ear canal. Learn what fit is best for you by comparing amplification of sounds with the earpieces in both directions.
• Place the earpieces in your ears with the tips of the earpieces turned towards the face. Lightly blow into the diaphragm. Again place the earpieces in your ears, this time with the ends turned towards the back of the head. Lightly blow into the diaphragm. After you have learned the right fit for the loudest amplification, wear the stethoscope the same way each time.
• Put on the stethoscope and lightly blow into the diaphragm. If the sound is barely audible, lightly blow into the bell. Sound is carried through only one part of the chestpiece at a time. If the sound is greatly amplified through the diaphragm, the diaphragm is in position for use. If the sound is barely audible through the diaphragm, the bell is in position for use. Rotation of the diaphragm and bell places the chestpiece in the desired position. Leave the diaphragm in position for the next exercise.
• Place the diaphragm over the anterior part of your chest. Ask a friend to speak in a normal conversational tone. Environmental noise seriously detracts from hearing the noise created by body organs. When a stethoscope is used, the client and the examiner should remain quiet.
• Put the stethoscope on and gently tap the tubing. It is often difficult to avoid stretching or moving the stethoscope’s tubing. The examiner should be in a position so that the tubing hangs free. Moving or touching the tubing creates extraneous sounds.
CARE OF THE STETHOSCOPE
Earpieces should be removed regularly and cleaned of cerumen (ear wax). The bell and diaphragm are cleaned of dust, lint and body oils. The tubing should be kept away from nurses’ body oils. Avoid draping the stethoscope around the neck next to the skin. Cleansing the tubing with alcohol can dry and crack the material and is not recommended. Mild soap and water are preferred.
To recognise abnormal sounds and their origins, try closing your eyes and considering the part of the body being auscultated and the causes of the sounds. For example, the first heart sound (S1) is caused by closure of the atrioventricular (AV) heart valves and so you can hear S1 at the same time as you feel the carotid pulse.
Olfaction
Familiarity with the nature and source of body odours will assist you to interpret various odours. For example, a patient with a plaster cast is expected to experience discomfort after an injury. However, evidence of a strong odour may be related to wound infection. The discomfort alone does not reveal the presence of infection. Findings from olfaction and other assessment skills allow the detection of serious abnormalities.
Preparation for examination
Proper preparation of the environment, equipment and patient ensures a smooth and accurate health assessment with few interruptions or errors.
Infection control
Hand hygiene is essential before equipment preparation (Box 27-4) and the examination, to reduce the transmission of microorganisms. The equipment needed for an examination should function correctly, be clean and be readily available. The equipment should be warmed as required. For example, the diaphragm of the stethoscope may be briskly rubbed between the hands before it is applied to the skin.
BOX 27-4 EQUIPMENT USED FOR COMPLETE PHYSICAL ASSESSMENT
Cotton applicators
Disposable pad
Drapes
Torch and spotlight
Forms (e.g. physical, laboratory)
Gloves (clean)
Gown for patient
Water-soluble lubricant
Paper towels
Scale with height measurement rod
Sphygmomanometer and cuff
Stethoscope
Tape measure
Thermometer
Tissues
Tongue depressors
Wristwatch with second hand or digital display
Examination techniques increase the risk of contact with body fluids and discharge. Standard precautions should be used throughout the examination (see Chapter 29). Gloves and/or a gown may be necessary during palpation and percussion only if there is a risk of coming into contact with the patient’s body fluids.
Environment
Health assessment requires privacy. Although a well-equipped examination room is preferable, in hospitals the examination usually occurs in the patient’s room. It is necessary wherever the assessment is conducted to use room curtains or dividers around the bed, shut the door and talk to the patient in a low voice if possible. In the home, the examination would normally be conducted in the patient’s bedroom.
Adequate lighting is needed for proper illumination of body parts. The main lighting can be either daylight or artificial light, as long as the light is direct enough to reveal skin characteristics without distortion from shadows. Sometimes it is difficult to examine patients who are in beds or on stretchers. Special examination tables make examinations easier and help patients assume particular positions. In this case, patients who are examined on examination tables require assistance getting on and off the table. Never leave a confused or uncooperative patient unsupervised. When the patient lies supine, provide a small pillow and raise the head of the table about 30 degrees.
Physical preparation of the patient
The patient’s physical comfort is vital to a successful examination. Before starting, ask if the patient needs to use the toilet. An empty bladder and bowel facilitate examination of the abdomen, genitalia and rectum, and provide the opportunity to collect urine or faecal specimens if required.
Preparation involves ensuring the patient is appropriately dressed and draped. A patient in the hospital is likely to be wearing a simple gown. If the examination is limited to certain body systems, it may be unnecessary for the patient to undress completely. The patient should have privacy during undressing and plenty of time to finish—walking into the room as the patient undresses can cause embarrassment. After the patient has undressed and donned the gown, they should sit or lie down with a drape over the lap or lower trunk. Make sure the patient stays warm by eliminating draughts, controlling room temperature and providing warm blankets.
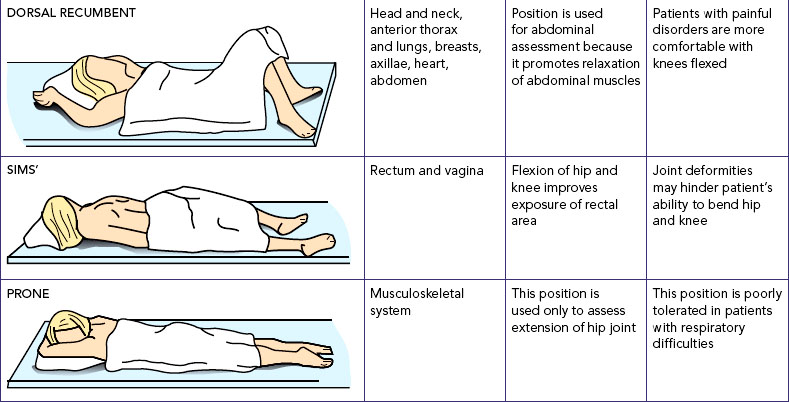
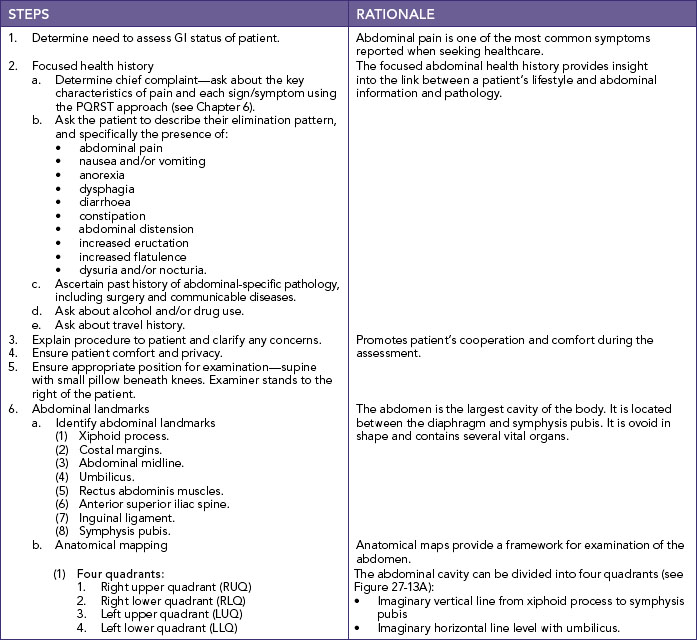
Positioning
You may need to ask the patient to assume positions which increase the accessibility of body parts and facilitate patient comfort (Table 27-5). Patients’ abilities to assume positions will depend on their physical strength, mobility, ease of breathing, age and degree of wellness. The drapes are adjusted to facilitate an examination of a specific area without unnecessarily exposing other body parts. More than one position can be assumed for the same part of an examination (e.g. supine and sitting for assessment of the anterior thorax), so choose the position that provides greater accessibility and accuracy in assessing body parts. However, if the patient is too weak or physically unable to assume a position, you will need to choose an alternative position. Patients should also be positioned so that they avoid looking into the source of light.
Psychological preparation of the patient
Patients can be embarrassed when asked to answer sensitive questions about bodily functions or when body parts are exposed and examined. The possibility of an abnormal finding also creates anxiety, so reduction of this anxiety may be your highest priority before commencing the assessment. This is achieved by conveying an open, receptive and professional approach. A stiff, formal demeanour may inhibit the patient’s ability to communicate, but an overly casual style may fail to instil confidence (Seidel and others, 2011). An initial explanation tells patients what to expect and their role and rights throughout the examination. As the examination progresses, a more detailed explanation of each step is provided.
Simple terms are used when describing the steps of the examination. Complicated terminology may confuse the patient and add to their fears. Encourage the patient to ask questions and to mention any discomfort they feel during the assessment. If the patient is of the opposite gender, it may be necessary to have another person of the same gender in the room, especially during examination of the sexual organs. This third person acts as a witness to the proper conduct of the examination and their presence reassures the patient that the examiner will behave ethically.
During the assessment observe the patient’s emotional responses—does the patient’s facial expression convey fear or concern and body movements reveal anxiety, such as frequently pulling the drape around the body or tensing up as the examiner touches the body? It may be necessary to stop the examination to confirm such findings and take time to reassure the patient and clarify the purpose of the examination, and proceed only when the patient is comfortable. Postponing the examination to a later time may be advantageous because the findings may be more accurate when the patient is more relaxed.
Assessment of age groups
Different interview styles and approaches to physical examinations are used for patients of different age groups.
Children
When assessing children, be sensitive and anticipate the child’s reaction to the examination as a strange and unfamiliar experience. The focus of a comprehensive and routine paediatric examination is on growth and development, sensory screening, dental examination and behavioural assessment. Beginning nurses will not normally perform this type of assessment. However, the following tips help beginning nurses to gather focused health assessment data.
• When obtaining histories on infants and children, you will need to gather all or part of the information from parents or guardians.
• Perform the examination in a non-threatening area and provide time for play so nurse and child can become acquainted.
• Because parents may think they are being tested by the examiner, offer support during the examination and do not pass judgment.
• Call children by their given name, and address the parent(s) using title and family name rather than given name.
• Always use open-ended questions to allow parents to share more information and describe more of the children’s problems.
• Interview older children and observe parent–child interactions. Older children can often provide details about their health history and severity of symptoms.
• Adolescents tend to respond best when treated as adults and individuals.
• Remember, adolescents have the right to confidentiality. After talking with parents about historical information, speak alone with adolescents.
Older adults
Health assessment of older adults should include an evaluation of mental status, review of family relationships, group involvement and religious and occupational pursuits (Ebersole and Hess, 2008). An important part of health assessment involves analysis of the basic activities of daily living (dressing, bathing, toileting, grooming, feeding and continence) and the more complex instrumental activities of daily living (using a telephone, preparing meals, managing money).
Characteristically, older adults present more blunted or atypical signs and symptoms. Do not discount slight changes in expected signs and symptoms (Meiner, 2011). Principles to follow during examination of an older adult include the following:
• Do not stereotype ageing patients. Most are able to adapt to change and learn about their health. Similarly, they are reliable historians.
• Recognise that sensory or physical limitations can affect how quickly you are able to interview older adults and conduct examinations. You may need to plan for more than one examination session.
• Perform the examination with adequate space; this is especially important for patients with mobility aids such as a walking stick or walker.
• Allow for pauses, and observe for details. Recognise normalities of later life that would be abnormal in a younger patient.
• Older patients may find giving certain types of health information stressful. Illness may be seen as a threat to independence and a step towards institutionalisation.
• Perform the examination near bathroom facilities. The patient may experience an urgent need to void.
• Be alert to signs of increasing fatigue, such as sighing, grimacing, irritability, leaning against objects for support and drooping of the head and shoulders.
Organisation of the examination
When performing a health assessment, information from the history is used to focus attention on specific parts of the examination. For example, if the history reveals symptoms of abdominal discomfort, the abdomen is also examined following a specific format. If the patient reports difficulties in performing basic activities of daily living, a focused assessment of the cardiac, respiratory, musculoskeletal and neurological areas is performed. The examination should be systematic and well organised so that important information is not omitted. The following tips will help you to prioritise aspects of your approach to health assessment.
• If a patient is seriously ill, first assess the systems of the body more at risk of being abnormal. For example, a patient with chest pain should undergo a cardiovascular assessment first.
• If a patient gets tired, offer rest periods between assessments.
• Compare both sides of the body for symmetry. A degree of asymmetry is normal (e.g. the biceps muscles in the dominant arm may be more developed than the same muscles in the non-dominant arm).
• Record results of the examination in specific anatomical and scientific terms so that any healthcare professional can interpret the findings (Figure 27-3).
• Use common and accepted clinical terminology and abbreviations to keep notes brief and concise.
• Record quick notes during the examination to avoid keeping the patient waiting.
• Document all assessment findings at the end of the examination.
GENERAL SURVEY
Assessment begins when you first meet the patient. Determine the reason the patient is seeking healthcare, and begin with a review of the patient’s primary health problems. As you do this, note the patient’s behaviour and appearance. The examination begins with a general survey of appearance and behaviour, vital signs and height and weight ratio. The survey provides information about characteristics of an illness, a patient’s hygiene and body image, emotional state, recent changes in weight, and developmental status. If abnormalities or problems are found, the affected body system is then closely assessed.
General appearance and behaviour
Assessment of appearance and behaviour begins as you prepare the patient for the assessment. The review of general appearance and behaviour includes the following.
Gender and cultural background
A person’s gender affects the type of examination performed and the manner in which assessments are made. Different physical features are related to gender and ethnic background.
Age
Age influences normal physical characteristics and the ability to participate in some parts of the examination.
Signs of distress
There may be obvious signs or symptoms indicating pain, difficulty in breathing or anxiety. These signs establish priorities regarding what to examine first.
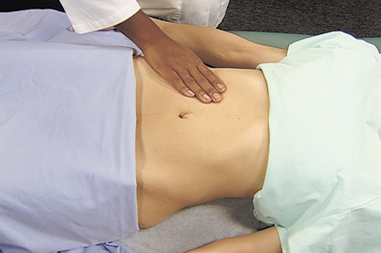
Body type
Observe whether a patient appears trim and muscular, obese, or excessively thin. Body type can reflect the level of health, age and lifestyle.
Posture
Standing posture is normally an upright stance with parallel alignment of the hips and shoulders. Sitting posture normally involves some degree of rounding of the shoulders. Observe whether the patient has a slumped, erect or bent posture. Posture may reflect mood or presence of pain. Many older adults assume a stooped, forward-bent posture, with the hips and knees somewhat flexed and the arms bent at the elbows, raising the level of the arms.
Gait
Observe the patient walking into the room. Note whether movements are coordinated or uncoordinated. A person normally walks with the arms swinging freely at the sides, with the head and face leading the body.
Body movements
Observe whether movements are purposeful and note if there are any tremors involving the extremities. Determine if any body parts are immobile.
Hygiene and grooming
The patient’s level of cleanliness is noted by observing the appearance of the hair, skin and nails. Note whether the patient’s clothes are clean. Grooming may depend on the activities being performed just before the examination, as well as the patient’s occupation. Also note the amount and type of cosmetics used.
Dress
Lifestyle, socioeconomic level and personal preference affect the type of clothes worn. Note whether the type of clothing worn is appropriate for the temperature and weather conditions. Patients who have mental illness may be unable to choose appropriate clothing.
Body odour
An unpleasant body odour may result from physical exercise, stress, poor hygiene or certain disease states. Poor oral hygiene or oral or upper respiratory tract infections may cause bad breath.
Affect and mood
Affect is a person’s feelings as they appear to others. A person’s mood or emotional state is expressed verbally. Note whether verbal expressions match non-verbal behaviour and whether the patient’s mood is appropriate for the situation. For example, the mood is inappropriate if the patient seems unusually happy after recently being diagnosed with cancer. Observe facial expressions as questions are asked.
Speech
Normally speech is understandable and moderately paced, and shows an association with the person’s thoughts. Note whether the patient talks rapidly or slowly—abnormal pace may be caused by emotions or neurological impairment—or in a normal tone with clear inflection of words.
Substance abuse
Healthcare providers’ recognition of patients who abuse alcohol, prescribed medications or illegal drugs is typically poor. Several visits often reveal behaviours that can be confirmed with a well-focused history and physical examination. The patient should be approached in a caring and non-judgmental way, since issues of substance abuse involve both emotional and lifestyle issues. When abuse is suspected, ask general questions and then refer to more experienced members of staff or professionals specialising in the area of substance abuse.
Vital signs
Following on from general inspection and survey, the next stage of health assessment involves assessment of vital signs; this is discussed in Chapter 28. Although vital signs assessment is usually conducted in the first part of the physical examination, it will also be appropriate for you to measure specific vital signs in more detail during assessment of individual body systems. For example, the pulse is palpated for rate, rhythm and strength, but when performing a cardiac assessment a range of pulses are palpated and compared bilaterally.
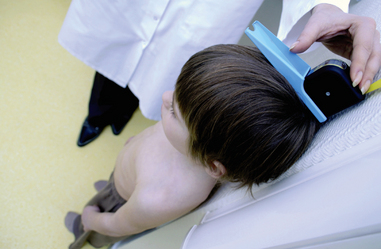
Measurement of head and chest circumference
A more detailed assessment of infants and children requires measurement of the circumferences of the head and chest. A paper measuring tape is used to record the infant’s measurements at each health visit until 2 years of age, and then to measure the child’s head circumference until 6 years of age (Seidel and others, 2011).
Accurate measurements require placement of the measuring tape at the correct anatomical location. The tape is wrapped snugly around the child’s head at the occipital protuberance and supra-orbital prominence. This is the location of the largest circumference. The measurement is recorded to the nearest 0.5 cm and compared with growth charts.
A chest circumference can be compared with the head circumference to rule out problems in head or chest size. The measuring tape is firmly wrapped around the infant’s chest at the nipple line without causing a skin indentation. Measurement is taken midway between inspiration and expiration and read to the nearest 0.5 cm.
Mrs Marsaja, aged 85 years, was admitted to hospital with a fractured neck of femur. She was found on the floor of her bathroom where she had been lying for two days. On admission you note that she is excessively thin, very agitated and her hair is matted. While assisting her to transfer into bed you notice a very unpleasant body odour. She has been a widow for 5 years and now lives alone. She has no past medical history.
• CRITICAL THINKING
How does the general survey assist you in focusing the health assessment of Mrs Marsaja?
Nutritional–metabolic pattern
Nutrition and metabolism are compromised by disease, genetic disorders, injury and surgical and medical treatments. Hospitalisation and illness also put elderly people at risk of malnutrition (Webster and Healy, 2009. Nutrition and metabolism assessment considers the food and fluid intake of the patient and the indicators of how these meet functional needs.
Subjective assessment includes the patient’s description of dietary and fluid intake, use of dietary supplements, food preferences and requirements, eating patterns, ability to chew, nutritional knowledge and activity and exercise patterns. Questions are also focused on recent alterations in appetite, weight, presence of nausea/vomiting, condition of hair, skin and nails, and medications that may affect intake and activity and exercise capacity. Cant (2011) recommends use of a malnutrition screening tool to identify patients at risk of malnutrition. Physical assessment includes examination of the mouth, measurement of height and weight, and assessment of the abdomen, skin, hair and nails. The combination of the subjective and objective data will assist you to identify appropriate nursing interventions to support the person’s nutritional state. Alternatively, you may work collaboratively with other members of the healthcare team to determine collaborative interventions.
BOX 27-5 ALTERATIONS IN NUTRITIONAL STATUS VARY ACCORDING TO CAUSE: TYPICAL ASSESSMENT FINDINGS
MOUTH LIPS, GUMS, TONGUE AND TEETH
• Oral mucosa is swollen, dry and reddened (niacin, folate, vitamin B12 deficiency).
• The tongue may appear pale or raw; there may be swollen lips and cracks at the corner of the mouth.
• Reddening and cracking at the corners of the mouth (vitamin B6 deficiency).
• Teeth may show evidence of poor dentition, cavities.
Skin
• Dry, flaky, rough feel (B vitamins deficiency).
• Bruising, pinpoint haemorrhages (vitamin C deficiency).
• Oedema (protein–calorie malnutrition).
• Pallor (anaemia).
HAIR
• Dull, thin, sparse, coarse, easily plucked, changes in pigmentation (protein–calorie malnutrition).
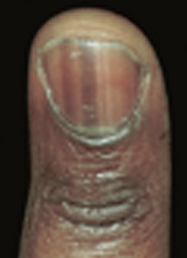
Nails
• Spoon-shaped, ridges across the nail plate, brittle.
HEIGHT–WEIGHT RATIO
• Weight loss (protein–calorie malnutrition).
• Decreased muscle mass, and weakness (protein–calorie malnutrition).
Abdomen
• Ascites (protein–calorie malnutrition).
• Wound healing delayed (vitamin C, zinc deficiency).
OTHER
• Neurological: confusion, irritability (thiamine deficiency); ataxia (vitamin B12 deficiency).
• Cognitive impairment (protein–calorie malnutrition).
• Eyes; night blindness (zinc deficiency).
Adapted from Morley J, Thomas D, Kamel, H 1998 Nutritional deficiencies in long-term care. Ann Long-Term Care 6:183–191.
Mouth
The mouth is assessed (Table 27-6) to detect signs of overall health, determine oral hygiene needs and detect dehydration or chewing difficulties. Assessment of the mouth, lips and tongue will provide information for you to develop interventions for patients who are dehydrated, are on restricted intake or have experienced oral trauma that may affect their ability to maintain an adequate nutritional and fluid intake. To assess the oral cavity, a penlight, tongue depressor or a single gauze square is required. Gloves should be worn during examination of the mouth. Assessment of the oral cavity can also be made during administration of oral hygiene (see Chapter 34).
TABLE 27-6 NURSING HISTORY ORAL ASSESSMENT
| ASSESSMENT QUESTIONS |
RATIONALE |
| Do you wear dentures/retainer? Are they comfortable? |
Dentures must be removed to visualise and palpate gums. Ill-fitting dentures chronically irritate mucosa and gums |
| Have you had a recent change in appetite or weight? |
Symptoms may result from painful mouth conditions or poor oral hygiene |
| Do you smoke? |
Tobacco users have greater risk of mouth and throat cancers than non-users |
| Review daily alcohol intake |
Heavy drinkers appear to have greater risk of oral cancer.
Effects of alcohol are independent of tobacco use
|
| Assess dental hygiene practices, including use of fluoride toothpaste, frequency of brushing and flossing and frequency of dental visits |
Assessment will reveal if patient needs education and/or financial support
Periodontal disease has a higher prevalence in older adults who have history of high plaque build-up, use tobacco and visit the dentist infrequently
|
| Do you have pain when chewing or eating? If so, ask if mouth lesions are present, including duration and associated symptoms |
May be associated with broken tooth, tooth grinding or temporomandibular joint problems |
Lips
The lips are inspected for colour, texture, hydration, contour and lesions. With the patient’s mouth closed, view the lips from end to end. Normally they are pink, moist, symmetrical and smooth. Female patients should remove their lipstick before the examination.
Teeth
The quality of dental hygiene is easily determined by inspecting the teeth (Box 27-6). Ask the patient to clench the teeth and smile, which allows assessment of teeth occlusion. The position and alignment of the teeth are noted. The upper molars should rest directly on the lower molars, with the upper incisors slightly overriding the lower incisors. To examine the posterior surface of the teeth, have the patient open their mouth with the lips relaxed. A tongue depressor will be needed to retract the lips and cheeks, especially when viewing the molars.
BOX 27-6 CLIENT TEACHING DURING ORAL ASSESSMENT
OBJECTIVES
• Patient will practise proper oral hygiene measures and dental care.
• Patient will describe warning signs of oral cancer.
• Older adult will maintain normal solid food intake.
TEACHING STRATEGIES
• Discuss proper techniques for oral hygiene, including brushing and flossing (see Chapter 34).
• Explain the early warning signs of oral cancer, including a sore that bleeds easily and does not heal, a lump or thickening and a red or white patch on the mucosa that persists. Difficulty chewing or swallowing is a late symptom.
• Encourage regular dental examination every 6 months for children, adults and older adults.
• Identify older patients who have difficulty in chewing and changes in the teeth. Teach patients to eat soft foods and cut food into small pieces.
EVALUATION
• Ask patient to demonstrate brushing.
• Have patient identify when to have regular dental check-ups.
• Have patient identify the warning signs of oral cancer.
• Ask older adult to keep a diet record for 3 days.
Tartar along the base of the teeth, dental caries (cavities), extraction sites and tooth colour should be noted. Normal, healthy teeth are smooth, white and shiny. A chalky white discolouration of the enamel is an early indication of caries formation. Brown or black discolourations indicate the formation of caries. In the older adult, loose or missing teeth are common because of bone resorption, teeth often feel rough when tooth enamel calcifies and yellow or darkened teeth are common because of general wear and tear exposing the darker, underlying dentin.
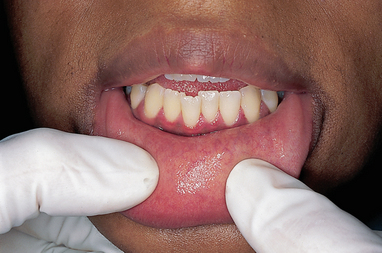
Buccal mucosa and gums
Buccal mucosa and gums are pink, soft, moist and smooth. View the inner oral mucosa by having the patient open and relax the mouth slightly, and then gently retract their lower lip away from the teeth (Figure 27-4). The mucosa is inspected for colour, hydration, texture and lesions such as ulcers, abrasions or cysts. Retracting the cheeks facilitates an inspection for colour, oedema, retraction, bleeding and lesions of the gums (gingivae). This process is repeated for the upper lip. The cheek is palpated with one finger along the inner mucosa and the thumb along the outside cheek to check for deep-seated lumps or ulcerations. Gently palpate any lesions with a gloved hand, assessing for tenderness, size and consistency.
An increase in colour or hyperpigmentation is normal in 10% of the population after the age of 50 years. For patients with normal pigmentation, the buccal mucosa is a good site to inspect for jaundice and pallor. In older adults, the mucosa is normally dry because of reduced salivation. Thick white patches (leucoplakia) can be seen in heavy smokers and alcoholics, and should be reported because they can also be precancerous lesions. Individual or coalescent white deposits adhering to the mucous membrane of any part of the mouth which leave bleeding points when scraped off may be evidence of thrush (Candida albicans). Assessment for thrush is required in infants, the elderly and patients prescribed antibiotics, corticosteroids or immunosuppressant medication. Small, yellow-white raised lesions commonly seen on the buccal mucosa and lips are Fordyce spots, or ectopic sebaceous glands (Seidel and others, 2011).
The gums around the back molars should be viewed because this is a difficult area to reach when cleaning teeth. Healthy gums are pink, smooth and moist, with a tight margin at each tooth. In older adults the gums are usually pale. Using gloves, palpate the gums to assess for lesions, thickening or masses. There should be no tenderness on palpation. Spongy gums that bleed easily indicate periodontal disease and vitamin C deficiency. If the patient has loose or mobile teeth, swollen gums or pockets containing debris at the tooth margins, periodontal disease or gingivitis can be suspected.
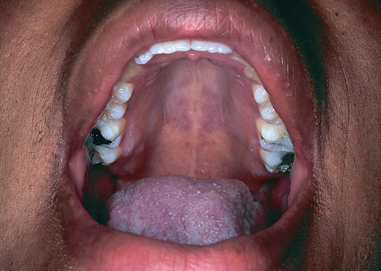
Palate
The patient should extend the head backwards, holding the mouth open to facilitate inspection of the hard and soft palates for colour, shape, texture and extra bony prominences or defects. The hard palate, or roof of the mouth, is located anteriorly (Figure 27-5) and is whitish and dome-shaped. The soft palate, best seen while depressing the tongue with a tongue blade, extends posteriorly towards the pharynx. It is normally light-pink and smooth. A bony growth, or exostosis, between the two palates is common.
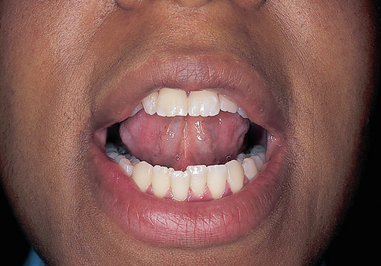
Tongue and floor of mouth
The tongue is examined for colour, size, position, texture and coatings or lesions. The tongue should be medium or dull red in colour, moist, slightly rough on the top surface and smooth along the lateral margins. The tongue is carefully inspected on all sides, and the floor of the mouth is checked. The under-surface of the tongue and the floor of the mouth are highly vascular (Figure 27-6). Extra care is taken to inspect these areas, which are common sites for oral cancer lesions. The patient lifts the tongue by placing its tip on the palate behind the upper incisors. Observe for colour, swelling and lesions such as nodules or cysts. The ventral surface of the tongue is pink and smooth, with large veins between the frenulum folds. Varicosities (swollen, tortuous veins) may be seen. Although common in the older adult, these rarely cause problems.
Assessment of tongue movement is also required. The patient first relaxes the mouth and sticks the tongue out halfway. When the tongue protrudes, it lies midline. The patient raises the tongue and moves it from side to side to test for tongue mobility (should move freely). Any deviation, tremor or limitation in movement may indicate poor hypoglossal nerve function.
Height and weight
A person’s general level of health can be reflected in the ratio of height to weight. Both measures are routine when patients are admitted to a healthcare setting, at health screenings and during medical assessments. Infants’ and children’s height and weight are measured to assess growth and development. In older adults, height and weight coupled with a nutritional assessment are important in determining the cause and treatment of any impairment in nutritional, eating and other functional activities (Box 27-7). Look for overall trends in height and weight changes.
BOX 27-7 DIETARY HISTORY FOR OLDER ADULTS
• Does the older adult need or have help in preparing meals?
• Are meals ever skipped?
• Are the required number of servings (based on age and activity level) from all food groups included in the daily diet?
• Does the older adult take nutritional supplements, such as multivitamins?
• Does the older adult take any medication affecting appetite or absorption of nutrients?
• Does the older adult have a special diet, or does the patient’s diet contain an unusual amount of alcohol, sweets or fried food?
• Does the older adult have problems chewing?
Data from Ebersole P, Hess P 2008 Toward healthy aging, ed 7. St Louis, Mosby.
A patient’s weight will normally vary nominally because of daily fluid loss or retention. The nursing history can help to focus on possible causes for a change in weight (Table 27-7). A weight gain of 0.5–1 kg in a day may indicate fluid retention problems. If the adult patient has lost more than 5% of bodyweight in a month or 10% in 6 months, the loss is significant. A downward trend in weight for a frail older adult may indicate serious reduction in nutritional reserves.
TABLE 27-7 NURSING HISTORY FOR WEIGHT ASSESSMENT
| ASSESSMENT QUESTIONS |
RATIONALE |
| Have you lost or gained weight recently? Over what period of time did this loss/gain occur? |
Determines severity of problem and may reveal whether related to disease process, change in eating pattern or pregnancy |
| If weight loss desired, describe your eating pattern, diet plan followed, usual daily calorie intake and appetite. |
Helps to determine appropriateness of diet plan followed |
| If weight loss undesired, what is your appetite like? Have you had any vomiting, diarrhoea, thirst, frequent urination, change in lifestyle or activity? |
Focuses on problems that may cause weight loss (e.g. gastrointestinal problems) |
Are you experiencing an increase in stress in your life?
What effect has that had on your eating patterns?
|
Lifestyle changes can contribute to weight changes |
| What medications are you taking? |
Weight gain or loss can be a side effect of the following medications: chemotherapy, diuretics, insulin, psychotropics, steroids, non-prescription diet pills or laxatives |
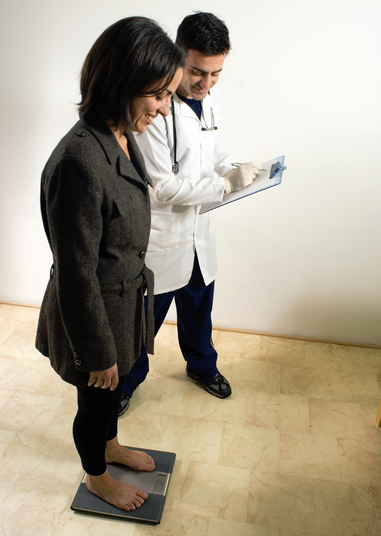
Patients should be weighed at the same time of day, on the same scale and in the same clothes to allow an objective comparison of subsequent weights. Although measuring bodyweight may seem routine, care should be taken to be certain of accuracy, since medical and nursing decisions (e.g. drug dosage determinations, lifting and positioning) may be based on weight. Patients capable of bearing their own weight use a standing scale. Electronic scales are automatically calibrated each time they are used. The patient stands on the scale platform and remains still and the weight is automatically displayed within seconds (Figure 27-7). Stretcher and chair scales are available for patients unable to bear weight. After being transferred to the scale, the patient is lifted above the bed by a hydraulic device and the weight is measured on a balance beam or digital display. Caution must be used when transferring patients to and from the scales.
When weighing infants, remove clothing and weigh in dry disposable nappies to ensure accurate readings. The weight (in grams) can be adjusted later for the weight of the nappy. The room should be warm to prevent chills. A light cloth or paper placed on the scale’s surface prevents cross-infection from urine or faeces. Place the infant in the basket or on the platform and hold a hand lightly above the infant to guard against accidental falls.
Different techniques exist for measuring the height of weightbearing and non-weightbearing patients. Patients able to stand remove their shoes. The patient is asked to stand erect with straight posture, and a measuring stick is placed horizontally at a 90-degree angle on the head (Figure 27-8). A non-weightbearing patient (such as an infant) is positioned supine on a firm surface. Portable devices are available that provide a reliable way to measure height. The infant is placed on the device, with the parent holding the infant’s head against the headboard. With the infant’s legs straight at the knees, the footboard is placed against the bottom of the infant’s feet (Figure 27-9). The infant’s length is recorded to the nearest 0.5 cm.
Once the height and weight measurements have been obtained, the body mass index (BMI) is calculated. The BMI is a standard measure of weight for height and an indicator of overweight, obesity or protein–calorie malnutrition. The BMI formula is:
BMI = (weight in kg) divided by (height in metres)2
Interpretation of BMI for adults (Department of Health and Ageing, 2011) is as follows:
| < 18.5 |
underweight |
| 18.5–24.9 |
normal weight |
| 25.0–29.9 |
overweight |
| 30.0–39.9 |
obesity |
| > 40 |
extreme obesity. |
Skin
Assessment of the skin can reveal a variety of skin conditions, including changes in oxygenation, circulation, nutrition, local tissue damage and hydration. Patients most at risk of significant skin lesions are those suffering from neurological impairments, chronic illnesses, orthopaedic problems, diminished cognitive and/or mental status, poor tissue oxygenation, low cardiac output, inadequate nutrition and immobility. Skin odours are usually noted in the folds of the skin, such as the axillae or under a female patient’s breasts. The skin is routinely assessed for colour, moisture, oedema, temperature, texture, turgor, vascularity and primary lesions. Without proper care, primary lesions can quickly deteriorate to become secondary lesions requiring extensive nursing care. Patients who develop a pressure injury, for example, can have a lengthened hospital stay (Chapter 30).
Table 27-8 shows some examples of questions that you could ask when doing a skin assessment. It helps to ask patients if they have noticed any lesions, what caused them, to describe any recent changes, describe how a lesion bothers them and outline all previous management of the lesion. Many patients react with fear and anxiety to rashes or other lesions. Cancerous lesions often undergo changes in colour and size (Box 27-8). Patients with abnormal lesions should be referred to a specialist because further examination may be required.
TABLE 27-8 NURSING HISTORY FOR SKIN ASSESSMENT
| ASSESSMENT QUESTIONS |
RATIONALE |
Do you have a history of changes in the skin: dryness, pruritus, sores, rashes, lumps, colour, texture, odour, lesion that does not heal?
Have you noticed any changes on a mole or lesion?
|
Patient is best source to recognise change. Skin cancer may first be noticed as a localised change in skin colour
Most skin changes do not develop suddenly. Change in character of lesion might indicate cancer. Bruising indicates trauma or bleeding disorder
|
| Do you have a tendency to burn easily? |
Age over 50; male; fair, freckled, ruddy complexion; light-coloured hair or eyes; tendency to burn easily are risk factors for skin cancer |
Do you work or spend excessive time outside? If so, do you wear a sunscreen?
Do you work with creosote, coal tar and/or petroleum products?
|
Exposed areas such as face and arms will be more pigmented than rest of body. Use of sunscreen is recommended by Cancer Council Australia.
Exposure to these agents creates risk of skin cancer
|
| If skin is dry, ask: How often do you bathe/shower? What type of soap do you use? |
Excessive bathing and use of harsh soaps can cause dry skin |
| Have you had a recent trauma to your skin? |
Injury can cause bruising and changes in skin texture |
| Do you have any allergies? |
Skin rashes commonly occur from allergies |
| Do you use cream, medication or home remedies on your skin? |
Incorrect use of topical agents may cause inflammation or irritation |
| Do you use tanning salons, use sun lamps or take tanning pills? |
Overexposure of skin to these irritants can cause skin cancer |
| Do you have a family history of skin disorders such as skin cancer or psoriasis? |
Family history may reveal information about patient’s condition |
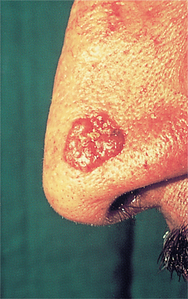
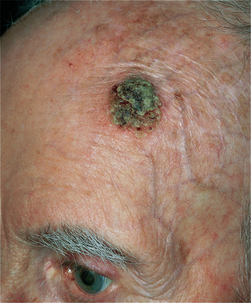
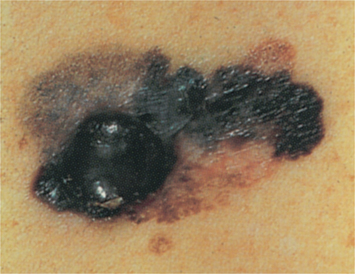
BOX 27-8 SKIN MALIGNANCIES
Illustrations from Belcher AE 1995 Cancer nursing. St Louis, Mosby; Habif TP 2009 Clinical dermatology: a color guide to diagnosis and therapy, ed 5. St Louis, Mosby; Zitelli BJ, Davis HW 2007 Atlas of pediatric physical diagnosis, ed 5. St Louis, Mosby.
BASAL CELL CARCINOMA
• 0.5–1.0 cm crusted lesion that may be flat or raised and may have a rolled, somewhat scaly border.
• Frequently there are underlying, widely dilated blood vessels that can be seen clinically within the lesion.
SQUAMOUS CELL CARCINOMA
• Occurs more often on mucosal surfaces and non-exposed areas of skin, compared with basal cell.
• 0.5–1.5 cm scaly lesion, may be ulcerated or crusted. Appears frequently and grows more rapidly than basal cell.
MELANOMA
• 0.5–1.0 cm brown, flat lesion that may arise on sun-exposed or non-exposed skin. Variegated pigmentation, irregular borders and indistinct margins.
• Ulceration, recent growth or recent change in long-standing mole are ominous signs.
The physical assessment skills of inspection, palpation and olfaction are used to assess the function and integrity of the integument, which includes the skin, hair, scalp and nails. Initially either inspect all skin surfaces or assess the skin gradually while other parts of the body are being examined. You might need to incorporate cardiac and respiratory assessment when assessing the skin, since changes in breathing and circulation will often be reflected in the skin.
Illumination of the skin is required for accurate inspection. The recommended choice is natural or halogen lighting, but sunlight is best for detecting skin changes. Room temperature may also affect skin assessment. A room that is too warm may cause superficial vasodilation, resulting in an increased redness of the skin. A cool environment may cause sensitive patients to develop cyanosis around the lips and nail beds.
Inspection of the skin
COLOUR
An initial, brief but careful, overall visual sweep of the entire body will give you a good idea of the distribution and extent of any lesions, as well as the overall symmetry of skin colour (Seidel and others, 2011). Colour varies from body part to body part and from person to person. Normal skin pigmentation ranges in tone from ivory or light pink to ruddy pink in light skin, and from light to deep brown or olive in dark skin. Despite individual variations (Table 27-9), skin colour is usually uniform over the body. Colour may be masked by cosmetics or tanning agents. Because you will inspect all skin surfaces, the patient must assume several positions. If abnormalities are seen during the examination, palpate the involved areas. The skin is normally free of lesions, except for common freckles or age-related changes such as skin tags, senile keratosis (thickening of skin), cherry angiomas (ruby-red papules) and atrophic warts.
The assessment of colour first involves areas of the skin not exposed to the sun, such as the palms of the hands. Note whether the skin is unusually pale or dark. Areas exposed to the sun, such as the face and arms, will be darker. Areas of increased colour (hyperpigmentation) and decreased colour (hypopigmentation) are common.
Inspect for any patches or areas of skin-colour variation. Localised skin changes, such as pallor or erythema (red discolouration), may indicate circulatory changes. In dark-skinned patients, because erythema is not easily observed, you need to palpate the area for heat and warmth to note the presence of skin inflammation. An area of an extremity appearing unusually pale may result from arterial occlusion or oedema. It is important to ask patients whether they have noticed any changes in skin colouring.
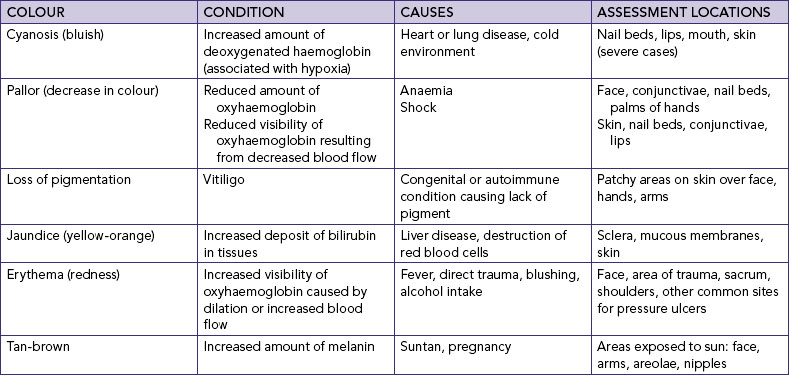
Cyanosis (bluish discolouration) is best observed in the lips, ear lobes, nail beds, palpebral conjunctivae and palms. The lips, nail beds and mucous membranes should also be assessed for generalised pallor; if pallor is present, the mucous membranes will be ashen grey. Cyanosis is a response to cardiopulmonary insufficiency. For further assessment detail refer to the activity and exercise section of this chapter, in particular cardiac and respiratory assessment. The best site to inspect for jaundice (yellow-orange discolouration) is the patient’s sclera and in regions exposed to pressure (sacrum and heels) for normal reactive hyperaemia (redness).
It is more difficult to note changes such as pallor or cyanosis in patients with dark skin. Usually colour hues are best seen in the palms, soles of the feet, lips, tongue and nail beds. Skin creases and folds are darker than the rest of the body in dark-skinned patients. Sites are inspected where abnormalities are more easily identified. For example, pallor is more easily seen in the buccal (mouth) mucosa, conjunctiva and nail beds. In dark-skinned patients, pallor in normal brown skin appears to be yellow-brown and in normal black skin appears to be ashen grey.
MOISTURE
The hydration of skin and mucous membranes helps to reveal fluid imbalances and changes in skin environment, and body temperature regulation. Moisture refers to wetness and oiliness. The skin is normally smooth and dry. Skin folds such as the axillae are normally moist. Increased perspiration may be associated with activity, warm environments, obesity, anxiety or excitement. Ungloved fingertips are used to palpate intact skin surfaces, but gloves are worn for breaks in the skin and obvious exfoliation. The skin should be observed for dullness, dryness, crusting and flaking. Flaking is the appearance of flakes resembling dandruff when the skin surface is lightly rubbed. Scaling involves fishlike scales that are easily rubbed off the skin’s surface. Both flaking and scaling are common in older adults, people who use excessive amounts of soap and in skin conditions such as eczema and dermatitis. Other factors causing dry skin include lack of humidity, exposure to sun, smoking, stress, excessive perspiration and dehydration.
OEDEMA
Areas of the skin become swollen or oedematous from a build-up of fluid in the tissues as a result of direct trauma or impairment of venous return. Oedematous areas should be inspected for location, colour and shape. Typical sites for dependent oedema caused by poor venous return are the feet, ankles and sacrum. The formation of oedema separates the skin’s surface from the pigmented and vascular layers, masking skin colour. Oedematous skin looks stretched and shiny. Palpate areas of oedema to determine mobility, consistency and tenderness. Pitting oedema is where pressure from the examiner’s fingers leaves an indentation in the oedematous area. Pressing the oedematous area firmly with the thumb for 5 seconds, releasing and then assessing the depth of pitting (in millimetres) determines the degree of oedema (Seidel and others, 2011). Record from 1+ to 4+, where 1+ oedema equals a depth of 2 mm.
TEMPERATURE
The temperature of the skin depends on the amount of blood circulating through the dermis. Localised erythema or redness of the skin may often be accompanied by an increase in skin temperature. A reduction in skin temperature reflects a decrease in blood flow. It is important to remember that if the room is cold, the patient’s skin temperature may be affected.
Temperature is more accurately assessed by palpating the skin with the dorsum (back) of the hand. Compare symmetrical body parts. Normally the skin temperature is warm. Skin temperature may be the same throughout the body, or may vary in one area. Assessment of skin temperature is always done for patients at risk of having impaired circulation, such as after a plaster cast application or vascular surgery. In addition, you can identify a stage 1 pressure injury early by noting warmth and erythema on an area of the skin (see Chapter 30).
TEXTURE
Texture refers to the character of the skin’s surface and the feel of deeper portions. Determine whether the patient’s skin is smooth or rough, thin or thick, tight or supple, and indurated (hardened) or soft by stroking it and palpating it lightly with the fingertips. The texture of the skin is normally smooth, soft, even and flexible in children and adults. The skin on the palms of the hand and soles of the feet tends to be thicker. In older adults, the skin becomes wrinkled and leathery because of a decrease in collagen, subcutaneous fat and sweat glands.
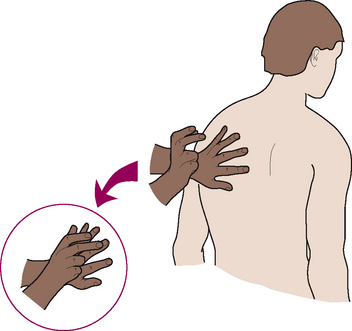
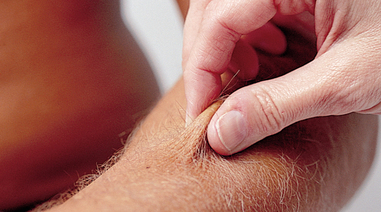
TURGOR
Turgor is the skin’s elasticity, which can be altered by oedema or dehydration. Normally the skin loses its elasticity with age. To assess skin turgor, a fold of skin on the back of the forearm or on the sternal area is grasped with the fingertips and released (Figure 27-10). Normally the skin lifts easily and snaps back immediately to its resting position. The back of the hand is not the best place to test for turgor, since skin is normally loose and thin there (Seidel and others, 2011). When testing skin turgor, note the ease with which the skin moves and the speed at which it returns to place. Slowness of the skin to resume its normal contour or shape and remaining pinched or tented may indicate dehydration.
VASCULARITY
The circulation of the skin affects the appearance of superficial blood vessels. With ageing, capillaries become fragile. Localised pressure areas, found after a patient has been in one position for a time, appear reddened, pink or pale (see Chapter 30). Petechiae are tiny, pinpoint-sized red or purple spots on the skin caused by small haemorrhages in the skin layers. Petechiae may indicate serious blood-clotting disorders, drug reactions or liver disease.
SKIN LESIONS
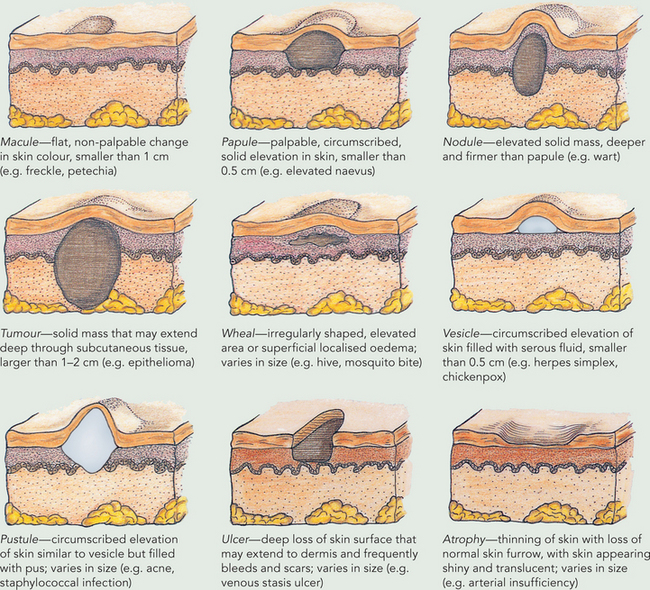
When a lesion is detected, it is inspected for colour, location, texture, size, shape, type, grouping (clustered or linear) and distribution (localised or generalised). Any exudate is observed for colour, odour, amount and consistency. Lesions should be measured in all dimensions (height, width, depth) when possible with a flexible ruler marked in centimetres.
Palpation determines the lesion’s mobility, contour (flat, raised or depressed) and consistency (soft or indurated). Certain types of lesions present a characteristic pattern. For example, a tumour is usually an elevated, solid lesion larger than 2 cm. Primary lesions, such as macules and nodules, arise from stimulus to the skin (Box 27-9). Secondary lesions, such as ulcers, occur as alterations in primary lesions. The lesion is firstly inspected then palpated gently, covering its entire area. If the lesion is moist or draining fluid, gloves are worn during palpation.
BOX 27-9 TYPES OF PRIMARY SKIN LESIONS
Abnormal findings of the skin
Lesions may be primary (occurring as initial spontaneous manifestations of a pathological process), such as the wheal of an insect bite, or secondary (resulting from later formation or trauma), such as a pressure injury.
Cutaneous malignancies are the most common neoplasms seen in patients. It is important to incorporate a thorough skin assessment on all patients with education about self-examination (Loescher and others, 2006) (Box 27-10). Australia has the highest incidence of malignant melanoma in the world, and its incidence is increasing. In 2008 melanoma caused 1437 deaths in Australia (Australian Institute of Health and Welfare, 2010). It is especially prevalent in the tropical north. Melanoma accounts for 11% of all cancers diagnosed in Australia and is the third most common diagnosed cancer in men and women (Australian Institute of Health and Welfare, 2010). In 2008, melanoma was the fourth most common cancer in New Zealand, with 2256 cases; in that same year there were 317 deaths from melanoma in New Zealand (Cancer Society of New Zealand, 2008). Basal cell carcinomas are another type of skin lesion. They are most commonly seen in sun-exposed areas and frequently occur in a background of sun-damaged skin. In older adults, pigmentation increases unevenly, causing discoloured skin.
BOX 27-10 CLIENT TEACHING FOR SKIN ASSESSMENT
OBJECTIVES
• Patient will perform a monthly self-examination of the skin.
• Patient will identify factors that increase the risk of skin cancer.
• Patient will follow hygiene practices aimed at maintaining skin integrity.
TEACHING STRATEGIES
• Teach patient to conduct a complete monthly self-examination of the skin, noting moles, blemishes and birthmarks. Show patient how to inspect all skin surfaces. Cancerous melanomas start as small, mole-like growths that increase in size, change colour, become ulcerated and bleed. A simple ABCD mnemonic outlines warning signals:
B.
is for Border irregularity; edges are ragged, notched or blurred
C.
is for Colour; pigmentation is not uniform
D.
is for Diameter; greater than 6 mm.
• Inform patient to report to their healthcare provider any change in skin lesions or a sore that bleeds or does not heal.
• Teach patient to prevent skin cancer by avoiding overexposure to the sun: wear wide-brimmed hats and long sleeves, apply sunscreens with SPF of 15 or greater approximately 15 minutes before going into the sun and after swimming or perspiring, avoid tanning under the direct sun at midday (10 am to 3 pm) and do not use indoor sunlamps, tanning salons or tanning pills. Medications such as oral contraceptives and antibiotics can make the skin more sensitive to the sun. Special care should be taken to protect children from the sun.
• To treat excessively dry skin, tell patient to avoid hot water, harsh soaps and drying agents such as rubbing alcohol. Use a superfatted (e.g. Dove) soap and pat rather than rub the skin after bathing.
• The patient should apply moisturisers (mineral oil) to the skin regularly to reduce itching and drying, and wear cotton clothing.
EVALUATION
• Patient performs skin assessment.
• Patient describes signs of skin cancer and measures to prevent skin cancer.
• Patient describes methods for keeping the skin lubricated and supple.
Localised changes in texture may result from trauma, surgical wounds, lesions or skin disorders such as eczema or psoriasis. When irregularities in texture such as scars or hardening are found, ask the patient whether there has been a recent injury to the skin. Patients with substance abuse may, for example, have oedematous, reddened and warm areas along the arms and legs. Old injection sites appear as hyperpigmented and shiny or scarred areas. Patients with skin conditions such as psoriasis have lesions which are sharply demarcated, erythematous papules or plaques covered with overlapping silvery or opalescent shiny scales. Psoriatic lesions are usually typically present on the scalp, elbows and knees, the back and buttocks (Green, 2011).
Hair and scalp
The following types of hair cover the body: terminal hair (long, coarse, thick hair easily visible on the scalp, axillae, pubic areas, and in the beard in men) and vellus hair (small, soft, tiny hairs covering the whole body except for the palms and soles). The hair is lubricated from the oil of sebaceous glands.
People are sensitive about their personal appearance. During inspection, explain the need to separate parts of the hair to detect problems. If lesions or lice are probable, wear disposable gloves to avoid infection. Table 27-10 describes the nursing history for assessment of the hair and scalp.
TABLE 27-10 NURSING HISTORY FOR HAIR AND SCALP ASSESSMENT
| ASSESSMENT QUESTIONS |
RATIONALE |
| Do you wear a wig or hairpiece? If so, can you remove it? |
Wigs or hairpieces interfere with inspection of hair and scalp. (Patient may ask to omit this part of examination) |
| Have you noted a change in growth or loss of hair? |
Change may occur slowly over time |
| What type of shampoo and other hair-care products do you use? Do you use a curling iron? |
Excessive use of chemical agents and burning of hair causes drying and brittleness |
| Have you recently had chemotherapy (if hair loss noted) or taken a vasodilator (if hair growth noted)? |
Chemotherapeutic agents kill cells that rapidly multiply, such as tumour cells and normal hair cells |
| Have there been any changes in your diet or appetite? |
Nutrition can influence condition of hair |
Begin by noting the colour, distribution, quantity, thickness, texture and lubrication of body hair. Scalp hair may be coarse or fine, curly or straight, and should be shiny, smooth and pliant. While separating sections of scalp hair, observe characteristics of colour and coarseness. Colour varies from very light blond to black to grey, and may show alterations from rinses or dyes. In older adults the hair becomes dull grey, white or yellow. It also thins over the scalp, axillae and pubic areas. Older men lose facial hair, whereas older women may develop hair on the chin and upper lip. A change in hair growth can negatively affect body image and emotional wellbeing.
Much of the information gathered about characteristics of hair growth comes from the patient and from an awareness of the normal distribution of male and female hair growth. At puberty a change in the amount and distribution of hair growth occurs.
Abnormal findings of the hair and scalp
Changes may occur in the thickness, texture and lubrication of scalp hair. Disturbances such as a febrile illness or a scalp disease can result in hair loss. Conditions such as thyroid disease can alter the condition of the hair, making it fine and brittle. Dry, brittle hair can also occur with ageing and with excessive use of shampoo or other chemical agents. Hair loss (alopecia) or thinning of the hair is usually related to genetic tendencies and endocrine disorders such as diabetes, thyroiditis and even menopause. Poor nutrition can cause stringy, dull, dry and thin hair. Excessively oily hair is associated with androgen hormone stimulation. Although the amount of hair covering the lower extremities may be reduced as a result of ageing or shaving, unilateral hair loss could be a result of arterial insufficiency and warrants further assessment.
The scalp is normally smooth and inelastic, with even colouration. Careful separation of hair strands will facilitate a thorough examination of the scalp for lesions and an assessment of lesion characteristics. If lumps or bruises are found, ask the patient whether they have experienced recent trauma to the head. Moles on the scalp are common. The patient should warn that combing or brushing could cause a mole to bleed.
Scaliness or dryness of the scalp is frequently caused by dandruff or psoriasis. Careful inspection of hair follicles on the scalp and pubic areas may reveal lice or other parasites. The three types of lice are Pediculus humanus capitis (head lice), P. humanus corporis (body lice) and Phthirus pubis (crab lice). Head and crab lice attach their eggs to hair. The tiny eggs look like oval particles of dandruff. The lice themselves are difficult to see. Head and body lice are very small with greyish-white bodies; crab lice have red legs. The nurse looks for bites or pustular eruptions in the hair follicles and in areas where skin surfaces meet, such as behind the ears and in the groin. The discovery of lice or their eggs requires immediate treatment (Box 27-11).
BOX 27-11 CLIENT TEACHING DURING HAIR AND SCALP ASSESSMENT
OBJECTIVE
• Patient will perform proper hygiene practices for care of the hair and scalp.
TEACHING STRATEGIES
• Teach patient about basic hygiene practices for care of the hair and scalp (see Chapter 34).
• Teach patients who have head lice to shampoo thoroughly with pediculicide (available in chemist shops) using cold water, to comb thoroughly with a fine-tooth comb (following product directions) and to discard the comb.
• After combing, remove any detectable nits or nit cases with tweezers or between the fingernails. A dilute solution of vinegar and water may help loosen nits.
• Teach patients and parents about ways to reduce transmission of lice:
—
Do not share personal care items with others.
—
Vacuum all rugs, car seats, pillows, stuffed animals, mattresses and upholstered furniture thoroughly. Discard the vacuum bag.
—
Seal non-washable items in plastic bags for 14 days if unable to dry-clean or vacuum.
—
Use thorough handwashing.
—
Wash all clothing, linen and bedding in hot soap and water and dry in a hot dryer for at least 20 minutes. Dry-clean non-washable items.
—
Instruct patients that partners must be notified if lice were sexually transmitted.
—
Avoid physical contact with infested individuals and their belongings, especially clothing and bedding.
—
Soak combs, brushes and hair accessories in lice-killing products for 1 hour or in boiling water for 10 minutes.
EVALUATION
• Hair and scalp is clean, no flaking of skin, no infestations.
Data from Benenson AS, editor, 1995 Control of communicable diseases manual. Washington, DC, American Public Health Association.
Nails
The nails are normally transparent, smooth, well rounded and convex. The surrounding cuticles are smooth, intact and without inflammation. In light-skinned people, the nail beds are pink with translucent white tips. In people with dark skin, brown or black pigmentation is normally present in longitudinal streaks (Figure 27-11). Nails normally grow at a constant rate, but direct injury or generalised disease can impair growth. With ageing, the nails of the fingers and toes become harder and thicker. Longitudinal striations develop, and the rate of nail growth slows. Nails become more brittle, dull and opaque, and may turn yellow in older adults because of insufficient calcium. Also with age, the cuticle becomes less thick and wide. The condition of the nails can reflect an individual’s general state of health, state of nutrition, occupation and level of self-care. Even a person’s psychological state may be revealed by evidence of nail-biting.
A brief history (Table 27-11) is gathered before assessing the nails. The most visible part of the nail is the nail plate, the transparent layer of epithelial cells covering the nail bed (Figure 27-12). The vascularity of the nail bed creates the nail’s underlying colour. The semilunar, whitish area at the base of the nail bed is called the lunula, from which the nail plate develops.
TABLE 27-11 NURSING HISTORY FOR NAIL ASSESSMENT
| ASSESSMENT QUESTIONS |
RATIONALE |
| Ask whether patient has experienced recent trauma or changes in nails (splitting, breaking, discolouration, thickening) |
Trauma may change shape and growth of nail. Systemic conditions cause changes in colour, growth and shape
Alterations may occur slowly over time.
|
| Has the patient had other symptoms of pain, swelling, presence of systemic disease with fever or psychological or physical stress? |
Can help to indicate whether change in nails is due to local or systemic problem |
| Ask about the patient’s nail care practices |
Chemical agents can cause drying of nails. Improper care may damage nails and cuticles |
| Determine whether patient is at risk of nail or foot problems (e.g. diabetes, older adulthood) |
Vascular changes associated with diabetes reduce blood flow to peripheral tissues; foot lesions and thickened nails are common. Older adult may have trouble performing foot and nail care because of poor vision, lack of coordination or inability to bend over. Obese patients have difficulty bending over |
Inspect the nail bed for colour, cleanliness and length, the thickness and shape of the nail plate, the texture of the nail, the angle between the nail and the nail bed and the condition of the lateral and proximal nail folds around the nail. Inspection of the angle between the nail and nail bed normally reveals an angle of 160 degrees (Box 27-12). The nail base (usually firm) is palpated to determine firmness and the condition of circulation. To palpate, gently grasp the patient’s finger and observe the colour of the nail bed. Next, gentle, firm, quick pressure is applied with the thumb to the nail bed and released. As the pressure is applied the nail bed appears white or blanched; however, the pink colour should return immediately on release of pressure.
BOX 27-12 ABNORMALITIES OF THE NAIL BED
If the nails are ragged, dirty and poorly kept, there is a good indication that the patient either practises infrequent nail care or is physically unable to perform care. The patient’s profession should be considered, as dirty nails may be related to their employment (e.g. mechanics, coal miners and farmers) despite excellent nail care. Jagged, bitten or broken nail edges or cuticles can predispose a patient to localised infection.
Abnormal findings of the nails
Abnormalities such as erythema or swelling should be reported. Splinter haemorrhages can be caused by trauma, cirrhosis, diabetes mellitus and hypertension. Vitamin, protein and electrolyte changes can also cause lines or bands in the nail beds. A larger angle and softening of the nail bed can indicate chronic oxygenation problems. Failure of the pinkness to return promptly following the application of pressure to the nail bed indicates circulatory insufficiency. An ongoing bluish or purplish cast to the nail bed occurs with cyanosis. A white cast or pallor results from anaemia. Calluses and corns are commonly found on the toes or fingers. A callus is flat and painless, and results from a thickening of the epidermis. Corns are caused by friction and pressure from shoes and can usually be seen over a bony prominence. During the examination, instruct patients about proper nail care (Box 27-13).
BOX 27-13 CLIENT TEACHING DURING NAIL ASSESSMENT
OBJECTIVE
• Patient will be able to properly care for fingernails, feet and toenails.
TEACHING STRATEGIES
• Advise patient to avoid use of over-the-counter preparations to treat corns, calluses or ingrown toenails.
• Teach patients to cut nails straight across and even with the tops of the fingers or toes. If patient has diabetes, teach patient to file, not cut, nails.
• Teach patient to shape nails with a file or emery board.
• If patient is diabetic:
—
Wash feet daily in warm water. Inspect feet each day in a place with good lighting, looking for dry places and cracks in the skin. Soften dry feet by applying a cream or lotion such as Nivea, Eucerin or Alpha Keri.
—
Do not put lotion between the toes.
—
Caution patient against using sharp objects to poke or dig under the toenail or around the cuticle.
—
Have patient see a podiatrist for treatment of ingrown toenails and nails that are thick or tend to split.
EVALUATION
• Nails clean.
• No evidence of infection, calluses.
• No pain or tenderness on palpation.
• Skin intact, no cracks.
• CRITICAL THINKING
You observed (see the clinical example above) that Mrs Marsaja’s hair was matted, she was very thin and had a strong body odour. Write a plan for collecting relevant subjective and objective data in order to determine if she has any problems related to nutrition and metabolism.
Elimination pattern
When assessing elimination, the aim is to explore the function of the bowel and bladder in the excretion of wastes. The importance of elimination may vary from person to person, with some viewing ‘regularity’ in this area as a measure of good health. There will be differences in assessment focus across the life span. For children issues of toilet training predominate, while regularity is important to the adult. For the older adult, control may be a primary concern. Assessment of elimination is done in conjunction with nutrition and metabolism and activity and exercise assessment.
Subjective assessment of bowel function includes questions about regularity, characteristics of stools (colour, odour, consistency), amount, discomfort/pain, flatulence, distension, itching, control of elimination and presence of haemorrhoids. Abdominal pain is one of the most common symptoms reported when seeking healthcare. Any changes in usual function are explored by asking about onset, location, duration, severity, pattern and associated factors. It is also important to identify measures taken to correct the problem and the effect of those measures. Past medical history may also be important here. For example, has the patient suffered from gall bladder disease, cancer, liver disease, hepatitis/jaundice or gastrointestinal disease, had past surgery or has there been a recent history of overseas travel?
Subjective assessment of bladder elimination includes questions about frequency of urination, amount at each voiding, colour, odour, discomfort/pain, burning, nocturia and control of urination. Any changes in usual function are explored by asking about onset, duration, measures taken to correct the problem and effect of corrective measures. Additional questions about elimination are focused on the patient’s description of their activity level and usual food and fluid intake, i.e. amount, type, timing, relationship to output, caffeine intake. It is also important to ask the patient to describe the aids they may use to assist excretion, in particular medications and dietary aids. Past medical history may also be important here. For example, has the patient had any surgery on the urinary tract?
Abdomen
Physical assessment includes examination of the abdomen and specimen screening. Identification of landmarks is the first step in abdominal assessment. The xiphoid process (tip of the sternum) and the costal margins mark the upper boundaries of the abdominal region, and the symphysis pubis and anterosuperior iliac spine delineate the lower boundaries. By dividing the abdomen into four imaginary quadrants (Figure 27-13), you can then refer to assessment findings and record them in relation to each quadrant. For example, you may determine that the patient is experiencing tenderness over the left lower quadrant (LLQ) with normal bowel sounds present. The kidneys, located from the T12 to L3 vertebrae, are protected by the lower ribs and heavy back muscles (Figure 27-13).
SKILL 27-1 Assessment of the abdomen and gastrointestinal tract
DELEGATION CONSIDERATIONS
Assessment of the abdomen and gastrointestinal (GI) tract may be undertaken by enrolled nurses under the guidance of the registered nurse.
• Ensure review of the anatomy and physiology of the GI system.
• Ensure that hand hygiene is performed and personal protective equipment is worn when appropriate.
EQUIPMENT
• Stethoscope
• Small pillow for under the knees
• Tape measure or ruler
• Marking pen
• Pen
• Documentation
Patients must be relaxed, as tightening of abdominal muscles hinders accuracy with palpation and auscultation. Ask the patient to empty their bladder, have the room warm and drape the patient’s upper chest and legs. The patient lies supine or in a dorsal recumbent position with the arms at the sides (arms under the head may tighten abdominal muscles) and knees slightly bent (small pillows can be placed beneath the knees). Proceed slowly, making sure there is adequate lighting. The abdomen is exposed from the xiphoid process to the symphysis pubis. Warm hands and a warm stethoscope further promote relaxation. Maintaining conversation except during auscultation helps to distract patients. Patients should be asked to report pain and point out tender areas, which are then assessed last.
Inspection of the abdomen
The order of an abdominal examination differs slightly from that in other assessments. Begin with inspection, followed by auscultation. Note the patient’s posture during routine care activities, and look for evidence of abdominal splinting. To inspect the abdomen for abnormal movement or shadows, stand on the patient’s right side and inspect from above the abdomen.
SKIN
Inspect the skin over the abdomen for colour, scars, venous patterns, lesions and striae (stretch marks). The skin is subject to the same colour variations as the rest of the body. Venous patterns are normally faint, except in thin patients. Striae result from stretching of tissue by obesity or pregnancy. An artificial opening may indicate a drainage site resulting from surgery or an ostomy. Scars indicate past trauma or surgery and may have created permanent changes in underlying organ anatomy.
CONTOUR AND SYMMETRY
Inspect for contour and symmetry of the abdomen, noting any masses, bulging or distension. Sitting down to look across the abdomen allows you to examine the abdominal contour. The examination light is directed over the abdomen. A flat abdomen forms a horizontal plane from the xiphoid process to the symphysis pubis. A round abdomen protrudes in a convex sphere from the horizontal plane. A concave abdomen appears to sink into the muscular wall. Each of these findings is normal if the abdomen’s shape is symmetrical. In older adults there is often an overall increased distribution of adipose tissue.
MOVEMENT OR PULSATIONS
If the patient has severe pain, respiratory movement is diminished and the patient tightens abdominal muscles to guard against the pain. On closer inspection, peristaltic movement and aortic pulsation may be seen by looking across the abdomen from the side to detect movement. It may take several minutes to see a peristaltic wave. In contrast, aortic pulsations occur with each beat of systole and appear in the midline above the umbilicus (epigastric area).
BOWEL SOUNDS
Peristalsis, or intestinal motility, is a normal function of the small and large intestine. Bowel sounds are the audible passage of air and fluid created by peristalsis. The warmed diaphragm of the stethoscope is placed lightly over each of the four quadrants. Normally, air and fluid move through the intestines, creating soft gurgling or clicking sounds that occur irregularly 5–35 times per minute (Seidel and others, 2011). Sounds may last half a second to several seconds. It normally takes 5–20 seconds to hear a bowel sound, but may take 5 minutes of continuous listening before determining the absence of bowel sounds. All four quadrants are auscultated to make certain no sounds are missed. The best time to auscultate is between meals, as auscultating just after a meal will reveal an increase in bowel sounds. Sounds are generally described as normal, audible, absent, hyperactive or hypoactive.
PERCUSSION
Percussion of the abdomen helps reveal the presence of fluid and air in the stomach and intestines and urine in the bladder. The beginning student needs a great deal of practice in this skill to ensure accuracy. To assess bowel elimination, each quadrant is systematically percussed to assess areas of tympany and dullness. Potentially painful areas are always percussed last. Tympany usually predominates because of air in the stomach and intestines. To assess urinary elimination, percuss the abdomen starting at the symphysis pubis and move towards the umbilicus. A dull percussion note is a medium- to high-pitched short sound heard over a distended bladder.
PALPATION
Palpation is aimed mainly at detecting areas of abdominal tenderness and noting the quality of abnormal distensions or masses. After rubbing the hands together, use light palpation over each quadrant. Lay the palm of the hand with fingers extended and close together lightly on the abdomen, keeping the palm and forearm horizontal (Figure 27-14). The pads of the fingertips depress approximately 1.5 cm in a gentle dipping motion. Avoid quick jabs and use smooth, coordinated movements. A systematic palpation of each quadrant assesses for muscular resistance, distension, tenderness and superficial masses. While palpating, observe the patient’s face for signs of discomfort. The abdomen is normally smooth with consistent softness and non-tender without masses. The older adult often lacks abdominal tone. If a sensitive area is palpated, guarding or muscle tenseness may occur. A distended bladder is easy to detect with light palpation. Normally the bladder lies below the umbilicus and above the symphysis pubis. Routine checks for a distended bladder are conducted if a patient has been unable to void (e.g. because of anaesthesia or sedation) or has been incontinent, or if an indwelling urinary catheter is not draining well.
SPECIMEN SCREENING
Urine is routinely assessed by measuring any or all of the following: volume, pH, specific gravity, colour, clarity, odour and consistency. Urine might also be tested for presence of glucose, protein, ketones, bilirubin, blood, leucocytes and nitrites. Laboratory testing of urine may be used to detect presence of and type of bacteria.
Faeces may be collected for laboratory testing for presence of parasites and blood, and fat content. Faeces are inspected for colour, odour, frequency, size, shape, amount, consistency and constituents.
For further details refer to Chapters 37 and 38.
Abnormal findings of the abdomen
Bruising may indicate accidental injury, physical abuse or a type of bleeding disorder. Ask whether the patient self-administers injections (e.g. heparin or insulin). Other unexpected findings when inspecting the abdomen include generalised colour changes such as jaundice or cyanosis. A glistening, taut appearance indicates ascites (Lee and Grap, 2008).
Underlying masses can cause displacement. An everted (pouched-out) umbilicus usually indicates distension. Hernias (protrusions of abdominal organs through the muscle wall) cause upward protrusion of the umbilicus. Normally no umbilical discharge is visible. The presence of masses on only one side may indicate an underlying pathological condition. Intestinal gas, a tumour or fluid in the abdominal cavity may cause distension (swelling). When distension is generalised, the entire abdomen protrudes and skin appears taut, as if it were stretched over the abdomen. The flanks bulge where fluid is the source of the problem and not where gas causes the distension. Ask the patient to roll onto one side. A protuberance forms on the dependent side if fluid is the cause of the distension. In obesity the abdomen is large, rolls of adipose tissue are often present along the flanks and the patient does not report tightness in the abdomen.
If abdominal distension is identified you may choose to measure the abdomen’s girth by placing a tape measure around the abdomen at the level of the umbilicus. Consecutive measurements will show any increase or decrease in distension. A marking pen is used to indicate where the tape measure was applied.
Absent bowel sounds on auscultation indicate a cessation of gastrointestinal motility, possibly resulting from late-stage bowel obstruction, paralytic ileus or peritonitis. Hyperactive sounds are loud ‘growling’ sounds called borborygmi, which indicate increased gastrointestinal motility. Increased intestinal motility can be caused through a multitude of factors (see Table 27-12). Inflammation of the bowel, anxiety, diarrhoea, bleeding, excessive ingestion of laxatives, and reaction of the intestines to certain foods can cause increased motility (Box 27-14). In addition, a dull percussion note may indicate a tumour. When dullness is noted, it may be useful to also use palpation to provide a more detailed assessment. If tightening remains after the patient is helped to relax, peritonitis, acute cholecystitis or appendicitis may be the cause.
TABLE 27-12 NURSING HISTORY FOR ABDOMINAL ASSESSMENT
| ASSESSMENT QUESTIONS |
RATIONALE |
| Describe your usual bowel habits and stool character. Do you use laxatives? |
Data can help identify the nature of elimination problems |
| Have you had recent weight changes or intolerance to diet? (e.g. nausea, vomiting, cramping, especially in last 24 hours) |
Data may indicate alterations in upper gastrointestinal (GI) tract (stomach or gallbladder) or lower colon |
| Have you had difficulty in swallowing? Have you experienced belching, flatulence, blood in vomit (haematemesis), black or tarry stools (melaena), heartburn, diarrhoea or constipation? |
These characteristic signs and symptoms indicate GI alterations |
| What medications are you taking? |
Anti-inflammatory medication (e.g. aspirin, ibuprofen or steroids) or antibiotics may cause GI upset or bleeding |
| Ask patient to identify tender areas. |
Nurse palpates painful areas last to minimise discomfort and anxiety |
| Is there a family history of cancer, kidney disease, alcoholism, hypertension or heart disease? |
Data may reveal risk of alterations identifiable during examination |
| How much alcohol do you drink each day? |
High levels of alcohol ingestion can cause GI and liver problems |
| Have you had any recent abdominal surgery, trauma or diagnostic tests of GI tract? |
Surgical or traumatic alterations of abdominal organs may cause changes in expected findings (e.g. position of underlying organs). Diagnostic tests may change character of stool |
| Do you have any abdominal or low back pain? |
The characteristics of pain (location, onset, frequency, precipitating factors, aggravating factors, type of pain, severity, course) help determine its source |
| Observe patient’s movement and position, including lying still with knees drawn up, moving restlessly to find comfortable position and lying on one side or sitting with knees drawn to chest |
Positions assumed by patient may reveal nature and source of pain |
| Review patient’s history for the following factors: healthcare occupation, haemodialysis, intravenous drug use, household or sexual contact with hepatitis B virus (HBV) carrier, heterosexual person with more than one sex partner in previous 6 months, sexually active homosexual or bisexual male, international traveller in area of high HBV infection. |
Risk factors for HBV exposure |
BOX 27-14 CLIENT TEACHING DURING ABDOMINAL ASSESSMENT
OBJECTIVES
• Patient will maintain normal bowel elimination.
• Patient will achieve pain relief.
• Patients at high risk of hepatitis B virus (HBV) will receive immunisation.
• Patient will identify signs and symptoms of colon cancer.
TEACHING STRATEGIES
• Explain factors that promote bowel elimination, such as diet, regular exercise, limited use of over-the-counter drugs causing constipation, establishment of regular elimination schedule and a good fluid intake (see Chapter 37). Stress importance for older adults.
• Caution patients about dangers of excessive use of laxatives or enemas.
• If patient has acute pain, explain activities or positions to avoid.
• If patient has chronic pain, explain measures used for pain relief (e.g. relaxation exercises, positioning) (see Chapter 41).
• If patient is a healthcare worker or has contact with blood or fluids of an affected person, encourage patient to receive the series of three HBV vaccine doses.
• Instruct patient about warning signs of colon cancer, including bleeding from rectum, black or tarry stools, blood in stool and a change in bowel habits (constipation or diarrhoea).
EVALUATION
• Reassess patient’s bowel elimination pattern and stool character after therapies are started.
• Observe patient using pain-relief measures and reassess character of pain.
• During follow-up clinic or office visit, check patient’s compliance with HBV vaccine schedule.
• Ask patient to state signs and symptoms of colon cancer.
• CRITICAL THINKING
While you are conducting your initial assessment of Mrs Marsaja (see the clinical example above), she tells you she has to go to the toilet urgently. She says that when she gets the urge she cannot hold on very long. After she has used the bed pan, you conduct a detailed assessment of elimination.
1. What questions will you ask?
2. What objective data will you collect?
Activity–exercise pattern
Assessment of activity and exercise is focused on whether or not the person can complete their activities of daily living (ADLs) and the level of mobility and amount of energy the individual has available to support these activities. ADLs include all aspects of maintaining self-care and incorporate leisure activities and assessment of musculoskeletal, cardiac and respiratory function.
When collecting a detailed nursing history in the area of activity and exercise, the focus will be on the person’s perceptions of their general capabilities with walking, running, transferring, turning, bending, lifting and carrying. Questions are aimed at determining the person’s tolerance for activity. Ask specifically about self-care, home management (cooking, cleaning, shopping, laundry and outdoor management), as well as the ability to meet occupational or school requirements. Ascertain the type and frequency of leisure activities and the value the person places on these.
Common symptoms related to activity and exercise include pain, fatigue, weakness, chest pain, headache, dizziness, confusion, visual changes, loss of consciousness, dyspnoea on exertion, cough, oedema, joint stiffness, redness, swelling, heat, tenderness, muscle cramping and muscle weakness. Should the patient report any of these symptoms, further questions are required to determine severity, frequency, location, radiation, onset, precipitating events, associated symptoms, management and response, and any medications. It is also important to identify contributing factors such as arthritis, smoking, allergies, alcohol intake, respiratory infections, chronic respiratory conditions (e.g. asthma, emphysema, bronchitis), family history, hypertension, diabetes, diet, obesity, and stress at work/school/home environment.
Musculoskeletal system
It is important to review the anatomy of bone and muscle placement and joint structure (see Chapter 33). Joints vary in their degree of mobility. Some, as in the knee, are freely moveable. The spinal vertebrae are examples of slightly moveable joints.
The beginning nurse organises the musculoskeletal assessment by examination of gait, arms, legs and spine. This is a screening assessment, which uses inspection and palpation after reviewing information in the nursing history (Table 27-13). Assessment of musculoskeletal integrity is especially important when the patient reports pain or loss of function in a joint or muscle. Frequently, muscular disorders are manifestations of neurological disease and a neurological assessment is often conducted simultaneously.
TABLE 27-13 NURSING HISTORY FOR MUSCULOSKELETAL ASSESSMENT
| ASSESSMENT QUESTIONS |
RATIONALE |
| Describe your usual daily activities. What type of exercise do you routinely perform? |
Provides baseline data about what the person can do for themselves |
| What changes have you experienced in bone, muscle or joint function? Have you had a recent fall, trauma, lifting of heavy objects, history of bone or joint disease with sudden or gradual onset? Location of alteration? |
History helps determine the nature of musculoskeletal problem |
| Assess nature and extent of pain, including location, duration, severity, predisposing and aggravating factors, relieving factors and type |
Alterations in bone, joints or muscle are often accompanied by pain, which has implications not only for comfort but also for ability to perform activities of daily living |
| Are you able to bathe/shower, feed, dress, toilet and groom yourself? Are you able to attend social functions and attend to household chores, work, recreation, sexual activities? |
Level of nursing care will be determined by extent to which patient is able to perform self-care
Type and degree of restriction in continuing social activities influence topics for patient education and ability of nurse to identify alternative ways to maintain function
|
| Do you play sport? |
Involvement in competitive sports (particularly involving collision and contact), failing to warm up adequately, being in poor physical condition or adolescents who have had a rapid growth spurt are risk factors for sports injury |
| Review patient history for heavy alcohol use; cigarette smoking; constant dieting; calcium intake less than 500 mg daily; thin and light body frame; nulliparous status; menopause before age 45; postmenopause status; family history of osteoporosis; Aboriginal, Asian or Caucasian origin |
These are risk factors for osteoporosis |
Inspection of musculoskeletal system
GENERAL INSPECTION
You can integrate portions of the musculoskeletal assessment when observing the patient walking, moving in bed or performing any type of physical activity including self-care activities. The assessment of musculoskeletal function focuses on determining range of joint motion, muscle strength and tone and joint and muscle condition of arms, legs and spine.
POSTURE
The normal standing posture is an upright stance with parallel alignment of the hips and shoulders (Figure 27-15). There should be an even contour of the shoulders, level scapulae and iliac crests, alignment of the head over the gluteal folds, and symmetry of extremities. Look sideways at the patient and note the normal cervical, thoracic and lumbar curves. The head is held erect. As the patient sits, some degree of rounding of the shoulders is normal. Older adults tend to assume a stooped, forward-bent posture with the hips and knees somewhat flexed and arms bent at the elbows, raising the level of the arms (Ebersole and Hess, 2008).
ARMS AND LEGS
During general inspection, look at the extremities for overall size, gross deformity, bony enlargement, alignment and symmetry. There should be bilateral symmetry in length, circumference, alignment and position (Seidel and others, 2011). Ask the patient to place their hands behind their head, with their elbows back. This movement assesses abduction, external rotation of the shoulder and elbow flexion.
PALPATION
Apply gentle palpation to bones, joints and surrounding muscles of the extremities and the spine. As you inspect and palpate, note any heat, tenderness, oedema or resistance to pressure. The patient should feel no discomfort when palpation is applied. Muscles should be firm.
GAIT
Normally the person has an erect posture and a rhythm to their walk. There is a distance of approximately 5–10 cm between the heels and the stride is approximately 35–45 cm in length. The person normally walks with arms swinging freely at the sides and the head and face leading the body when turning. An older adult often walks with smaller steps and a wider base of support. When the patient is unaware of the nature of the observations, the gait is more natural. Later, a more formal test involves having the patient walk in a straight line away from you and then return. Observe for foot dragging, limping, shuffling and the position of the trunk in relation to the legs. Inspect the soles of the person’s shoes for signs of uneven wear.
SPINE
Inspect alignment of head and neck and then palpate spinous processes and muscles. Inspect range of motion of the neck by asking the patient to bring the ear towards their shoulder (assesses lateral cervical flexion). To test the function of the sternocleidomastoid muscle, ask the patient to flex the neck with the chin to the chest. Ask the patient to hyperextend the neck backwards to check the function of the trapezius muscle. Movement of the head sideways so that the ear moves towards the shoulder further tests function of the sternocleidomastoid muscle. The neck should move freely without discomfort or dizziness.
Further spinal assessment involves assessing the rotation of the thoraco-lumbar spine. This is done by holding the patient’s pelvis from behind and asking them to turn from side to side. Finally, you will need to assess lumbar movement by asking the patient to touch their toes. As they do this, palpate for the range of lumbar movement by placing two fingers over the lumbar vertebra. Your fingers should move apart as the patient bends forward.
NECK MUSCLES
Begin the examination by inspecting the neck in the usual anatomical position, in slight hyperextension. Inspect for bilateral symmetry of the neck muscles.
RANGE OF JOINT MOTION
Ask the patient to put each major joint through active or passive full range of motion. It is important to have plenty of room for the patient to fully move each extremity. Assess range of motion passively only if the patient is unable to move the joint through the full range of motion independently. If passive joint movement is required, then gently support and move the joints of the extremities through their range of motion (Figure 27-16). Describe the movements that the joints make by using the correct terminology (Table 27-14). You may need to demonstrate range of motion to the patient. The same body parts are compared for equality in movement.
TABLE 27-14 TERMINOLOGY FOR NORMAL RANGE-OF-MOTION POSITIONS
| TERM |
RANGE OF MOTION |
EXAMPLES OF JOINTS |
| Abduction |
Movement of extremity away from midline of body |
Leg, arm, fingers |
| Adduction |
Movement of extremity towards midline of body |
Leg, arm, fingers |
| Dorsiflexion |
Flexion of toes and foot upwards |
Foot |
| Eversion |
Turning of body part away from midline |
Foot |
| Extension |
Movement increasing angle between two adjoining bones |
Elbow, knee, fingers |
| External rotation |
Rotation of joint outwards |
Knee, hip |
| Flexion |
Movement decreasing angle between two adjoining bones; bending of limb |
Elbow, fingers, knee |
| Hyperextension |
Movement of body part beyond its normal resting extended position |
Head |
| Internal rotation |
Rotation of joint inwards |
Knee, hip |
| Inversion |
Turning of body part towards midline |
Foot |
| Plantar flexion |
Bending of toes and foot downwards |
Foot |
| Pronation |
Movement of body part so that front or ventral surface faces downwards |
Hand, forearm |
| Supination |
Movement of body part so that the front or ventral surface faces upwards |
Hand, forearm |
SKILL 27-2 Assessment of the musculoskeletal system
DELEGATION CONSIDERATIONS
Assessment of the musculoskeletal system may be undertaken by enrolled nurses under the guidance of the registered nurse.
• Ensure review of the anatomy and physiology of the musculoskeletal system for risk factors, specifically the major muscle groups and joints.
• Ensure hand hygiene is performed and personal protective equipment worn when appropriate.
EQUIPMENT
• Tape measure
• Marking pen
• Pen
• Documentation
When assessing range of motion, do not force a joint if there is pain or muscle spasm. Knowledge of each joint’s normal range and the extent to which it can be moved is important (see Chapter 33). Range of motion should be equal between contralateral joints. Ideally, the normal range is assessed to determine a baseline for assessing later change.
When putting each joint through its range of motion, make a number of basic observations, noting pain, limited mobility, spastic movement, joint instability, crepitus, stiffness and contracture. Normal joints are non-tender, without swelling and move freely. In older adults, joints often become swollen and stiff with reduced range of motion resulting from cartilage erosion and fibrosis of synovial membranes. If a joint appears swollen and inflamed, palpate it for warmth.
MUSCLE TONE AND STRENGTH
Muscle strength and tone is assessed during measurement of range of motion. Findings are integrated with those from the neurological assessment. The patient is asked to allow an extremity to relax or hang limp. This may be difficult if the patient feels pain in the extremity. In that case, the extremity is supported and is moved through the normal range of motion (Figure 27-17). Normal tone causes a mild, even resistance to movement through the entire range.
For assessment of muscle strength, the patient assumes a stable position. The patient performs manoeuvres demonstrating strength of major muscle groups (Tables 27-15 and 27-16). Symmetrical muscle pairs are compared. The arm on the dominant side is normally stronger than the arm on the non-dominant side. In the older adult, a loss of muscle mass causes bilateral weakness but muscle strength remains greater in the dominant arm or leg.
TABLE 27-15 MANOEUVRES TO ASSESS MUSCLE STRENGTH
| MUSCLE GROUP |
MANOEUVRE |
| Neck (sternocleidomastoid) |
Place hand firmly against patient’s upper jaw. Ask patient to turn head laterally against resistance |
| Shoulder (trapezius) |
Place hand over midline of patient’s shoulder, exerting firm pressure. Have patient raise shoulders against resistance |
| Elbow |
|
| Biceps |
Pull down on forearm as patient attempts to flex arm. |
| Triceps |
As patient’s arm is flexed, apply pressure against forearm. Ask patient to straighten arm |
| Hip |
|
| Quadriceps |
When patient is sitting, apply downward pressure to thigh. Ask patient to raise leg up from table |
| Gastrocnemius |
Patient sits, holding shin of flexed leg. Ask patient to straighten leg against resistance |
Each muscle group is examined. Ask the patient to first flex the muscle to be examined and then resist when opposing force is applied against that flexion. It is important not to allow the patient to move the joint. Pressure is gradually increased to a muscle group (e.g. elbow extension). The patient resists the pressure applied by attempting to move against resistance (e.g. elbow flexion). The patient resists until instructed to stop. As the examiner varies the amount of pressure applied, the joint moves.
Abnormal findings of the musculoskeletal system
Common postural abnormalities include lordosis, kyphosis and scoliosis (Figure 27-18). Kyphosis, or hunchback, is an exaggeration of the posterior curvature of the thoracic spine. This postural abnormality is common in the older adult. Lordosis, or swayback, is an increased lumbar curvature. A lateral spinal curvature is called scoliosis.
Loss of height is frequently the first clinical sign of osteoporosis, in which height loss occurs in the trunk as a result of vertebral fracture and collapse (Roush, 2011). Although a small amount of height loss is to be expected with ageing, if the amount of loss is greater than expected then osteoporosis is the likely cause (Box 27-15). As men and women age, they are more likely to have osteoporotic fractures of the forearms, hips and vertebrae (Walker, 2010).
BOX 27-15 CLIENT TEACHING DURING MUSCULOSKELETAL ASSESSMENT
OBJECTIVES
• Patient will follow measures to prevent or minimise osteoporosis.
• Patient will assume proper body posture.
• Patient will be able to perform self-care measures.
TEACHING STRATEGIES
• Teach patient about correct postural alignment. Consult with physiotherapist to provide patient with exercises for improving posture.
• To reduce bone demineralisation, instruct older adults about a proper exercise program (e.g. walking) to be followed three or more times a week. Also encourage intake of calcium to meet the recommended daily allowance. Increased vitamin D will aid calcium absorption. Recommendations for daily calcium supplements are 1000 mg before and 1500 mg after menopause.
• Explain to patients with low back pain that they can benefit from modification of worker risk factors (e.g. lifting heavy weights, use of protective equipment), regular aerobic exercise, exercises that strengthen the back and increase trunk flexibility and learning how to lift properly.
• Instruct older adults and those with osteoporosis on proper body mechanics, as well as range-of-motion and moderate weightbearing exercises (e.g. swimming and walking) to minimise trauma and subsequent fracture of bones.
• If patient is unable to perform self-care, instruct on use of aids (e.g. zips on clothing instead of buttons; elevation of chairs to minimise bending of knees and hips).
• Teach older patients to pace activities to compensate for loss in muscle strength.
EVALUATION
• Patient will describe therapies for preventing osteoporosis.
• Patient log of regular weight-training exercises/exercise activities will show regular exercise.
• Patient will demonstrate the ability to perform activities of daily living independently or with the use of self-care aids.
• Patient will have adapted dietary intake of calcium.
If a muscle has increased tone, or hypertonicity, any sudden passive movement of a joint is met with considerable resistance. Continued movement eventually causes the muscle to relax. A muscle that has little tone (hypotonicity) feels flabby. The involved extremity hangs loosely in a position determined by gravity. If muscle weakness is identified, the muscle’s size is compared with its opposite counterpart by measuring the muscle body’s circumference with a tape measure. A muscle that has atrophied (reduced in size) may feel soft and boggy when palpated.
Common joint alterations include tenderness, stiffness and joint deformity seen in patients with rheumatoid arthritis (Oliver, 2009). These patients typically have symmetrical small-joint involvement, such as hands, feet, wrists and elbows, and report accompanying symptoms such as fatigue and malaise. Patients with osteoarthritis report pain on movement and stiffness which improves with exercise. As the condition progresses, joint movement diminishes and flexion contractures develop with tenderness and crepitus (Egan and Mentes, 2010).
• CRITICAL THINKING
Following total hip replacement surgery, Mrs Marsaja commences ambulation with a walking frame under the supervision of the physiotherapist. The physiotherapist tells you that Mrs Marsaja initially had difficulty gripping the frame because of the arthritic changes in her hands, but she is managing well with a different frame. You assist her to mobilise using the walking frame several times a day.
1. What subjective and objective data will you collect?
2. What other areas of Mrs Marsaja’s health might be affected by the arthritic changes in her hands?
Cardiovascular assessment
It is important to review the anatomy of the cardiovascular system (see Chapter 40). It is helpful while performing the assessment to form a mental image of the heart’s exact location (Figure 27-19). In the adult it is in the centre of the chest (praecordium), behind and to the left of the sternum, with a small section of the right atrium extending to the sternum’s right. The base of the heart is the upper portion, and the apex is the bottom tip. The surface of the right ventricle constitutes most of the heart’s anterior surface. A section of the left ventricle shapes the left anterior side of the apex. The apex actually touches the anterior chest wall at approximately the fourth to fifth intercostal space just medial (to the left) of the midclavicular line. This location is known as the apical impulse or point of maximal impulse (PMI). In tall, slender people, the heart hangs more vertically and is positioned more centrally. In people who are stocky and short, the heart tends to lie more to the left and horizontally (Seidel and others, 2011).
An infant’s heart is positioned more horizontally and has a larger diameter than that of an adult. The apex of the heart in an infant is at the third or fourth intercostal space, medial to the midclavicular line. By the age of 7 years, a child’s PMI is in the same location as an adult’s.
To understand the significance of cardiac assessment findings, you will need to have a working knowledge of the cardiac cycle (Figure 27-20). The heart normally pumps blood through its four chambers in a methodical, even sequence. There are two phases to the cardiac cycle: systole and diastole. During systole, the ventricles contract and eject blood from the left ventricle into the aorta and from the right ventricle into the pulmonary artery. During diastole, the ventricles relax and the atria contract to move blood into the ventricles and fill the coronary arteries.
Events occurring on the left side of the heart have the most dramatic effect on assessment findings. Pressure is greatest on the left side, so longer and louder sounds are created. Events on the left side slightly precede those on the right. When the left ventricle is at rest (diastolic phase), the pressure in the left atrium exceeds that in the ventricle, creating a pressure gradient that moves blood through the opened mitral valve. During ventricular filling, pressure rises in the ventricle to exceed the pressure in the left atrium. Just before the ventricle contracts, the mitral valve closes to prevent regurgitation of blood into the atrium, creating the first heart sound (S1), often described as ‘lub’. Ventricular pressure builds, causing the aortic valve to open as the ventricle contracts (systolic phase). Blood flows into the aorta, elevating aortic pressure. When the ventricle empties, pressure within the chamber falls. To prevent regurgitation from the aorta into the left ventricle, the aortic valve closes, creating the second heart sound (S2), described as ‘dub’. As ventricular pressure continues to fall, it drops below that of the left atrium. The mitral valve reopens to again allow ventricular filling.
The beginning nurse organises the cardiovascular assessment by examining the face, nails, lower limbs, arterial pulses and the thorax. Assessment of cardiovascular status is especially important when the patient reports chest pain or fatigue and weakness in response to activity.
• CRITICAL THINKING
During a walk around the unit, Mrs Marsaja tells you she has pain in her chest. She points to the centre of her chest. A patient who reports symptoms such as chest pain may be suffering a life-threatening condition requiring immediate attention. In this case, you need to act quickly and decide on the portions of the examination that are absolutely necessary. When the patient’s condition is stable, a more thorough assessment can be undertaken.
1. What subjective and objective data will you collect in this situation?
2. What assistance will you seek?
SKILL 27-3 Assessment of the cardiovascular and peripheral vascular systems
DELEGATION CONSIDERATIONS
Assessment of the cardiovascular system (CVS) and peripheral vascular system (PVS) may be undertaken by enrolled nurses under the guidance of the registered nurse.
• Ensure review of the anatomy and physiology of the CVS and PVS for risk factors.
• Ensure hand hygiene is performed and personal protective equipment is worn when appropriate.
EQUIPMENT
• Stethoscope
• Sphygmomanometer
• Watch with second hand
• Tape measure
Inspection of the cardiovascular system
GENERAL INSPECTION
The general inspection includes observation of the person’s appearance and how they respond to activity. The condition of the skin, mucosa and nail beds offers useful data about the status of circulatory blood flow. First examine the face and upper extremities, looking at the colour of the skin, mucosa and nail beds. The nails are examined for shape and colour and the capillary refill (should return within 2 seconds).
INSPECTION AND PALPATION OF THE PRAECORDIUM
Assessment of cardiac function is performed through the anterior thorax. Inspection and palpation are used simultaneously. The examination begins with the patient in the supine position. If the patient has a cardiac or respiratory disease, then the patient will need to be positioned with the upper body elevated 45 degrees because such patients often suffer shortness of breath while lying flat. Position yourself at the patient’s right side.
It helps to follow an orderly sequence beginning with assessment of the base of the heart and moving towards the apex. First identify and inspect the landmarks. The angle of Louis, which lies between the sternal body and manubrium, can be felt as a ridge in the sternum approximately 5 cm below the sternal notch. Slip the fingers along the angle on each side of the sternum to feel adjacent ribs. The intercostal spaces are just below each rib. The second intercostal space allows identification of the first two anatomical landmarks (Figure 27-21)—the second right and left interspace. The third and fourth left interspaces can be found by progressing down along the left side of the sternum, palpating each intercostal space. Deeper palpation is required to feel the spaces in obese patients or in those with well-developed chest muscles. To find the apical area, locate the fifth intercostal space just to the left of the sternum and move the fingers laterally, just medial to the left midclavicular line.
After locating each of the six anatomical landmarks of the heart, inspect and palpate each of these sites. Observe for the appearance of pulsations, viewing each area over the chest at an angle to the side. Normally no pulsations can be seen or felt in the second, third or fourth intercostal spaces, except perhaps at the apical impulse site in thin patients or at the epigastric area as a result of abdominal aorta pulsation. Palpation for pulsations is best done using the proximal halves of the four fingers together and then alternating with the ball of the hand. The areas are gently touched to allow movements to lift the hand. If pulsations or vibrations are palpated, their occurrence is timed in relation to systole or diastole by auscultating heart sounds simultaneously. Normally at the apical impulse there is a light tap felt in an area 1–2 cm in diameter at the apex (Figure 27-22).
The apical impulse may be difficult to find in the older adult, because the chest deepens in its anteroposterior diameters, and in a person who is very muscular or overweight. If the apical impulse cannot be felt with the patient in the supine position, the patient is asked to roll onto the left side, which moves the heart closer to the chest wall. The heart’s size is estimated by noting the diameter of the apical impulse and its position relative to the midclavicular line. In cases of serious heart disease, the cardiac muscle enlarges, with the apical impulse found to the left of the midclavicular line. An infant’s apical impulse can usually be easily palpated near the third or fourth intercostal space because of the thin chest wall.
HEART SOUNDS
Auscultation of the heart detects normal heart sounds, extra heart sounds and murmurs. As a beginning-level RN you should be able to detect normal heart sounds (S1 and S2) and identify abnormal findings. S1 is caused by the closure of the mitral and tricuspid valves and signals the beginning of systole. S2 is caused by the closure of the pulmonic and aortic valves and signals the end of systole. Detection of extra heart sounds and murmurs should be validated by more-experienced nurses.
Low-intensity normal sounds created by the closing of the valves are often difficult to hear, especially if breath sounds are noisy. Concentration is needed when detecting heart sounds. To begin auscultation, eliminate all sources of room noise and explain the procedure to relieve the patient’s anxiety. A pattern is followed during auscultation, starting at the second right interspace, moving systematically and inching the stethoscope across each of the anatomical sites (see Figure 27-21). It is important to hear heart sounds clearly at each location. The sequence is repeated using the bell of the stethoscope. The patient may be asked to assume three different positions during the examination (Figure 27-23): sitting up and leaning forwards (good position to hear all areas); supine (good for all areas); and left lateral recumbent (good for all areas and best position to hear low-pitched sounds in diastole).
A female’s left breast must be lifted to listen better to the chest wall. Learn to identify the first (S1) and second (S2) heart sounds. At normal rates, S1 occurs after the long diastolic pause and precedes the short systolic pause. S1 is high-pitched, dull in quality and heard best at the apex. If the nurse has difficulty hearing S1, it can be timed in relation to the carotid pulse—it occurs just before the carotid pulsation. S2 follows the short systolic pause and precedes the long diastolic pause. It is heard best at the aortic area (second interspace).
When both sounds can be heard clearly, auscultate for rate and rhythm. Each combination of S1 and S2 or ‘lub-dub’ counts as one heartbeat. Count the rate for 1 minute, listening for the interval between S1 and S2, and then the time between S2 and the next S1. A regular rhythm involves regular intervals of time between each sequence of beats. There is a distinct silent pause between S1 and S2.
Abnormal findings of the cardiovascular system
Central cyanosis, which indicates poor arterial oxygenation, can be noted by a bluish discolouration of the tongue, oral mucosa and conjunctivae. Peripheral cyanosis, which indicates peripheral vasoconstriction, is noted by blue lips, ear lobes and nail beds. Failure of the heart to beat at regular successive intervals is a dysrhythmia. Some dysrhythmias can be life-threatening. When the heart rhythm is irregular, compare apical and radial pulse rates simultaneously to identify whether a pulse deficit exists (see Chapter 28).
Chest pain is a potentially life-threatening symptom and must be investigated urgently. Chest pain has multiple causes, and it is therefore imperative that care is taken to determine the origin of the pain. If the pain is determined to be cardiac in origin, urgent treatment is required. Typically, descriptions include crushing central chest pain that may or may not radiate to the left arm and left side of the jaw. Accompanying symptoms may also include pallor, nausea and sweating (Tough, 2004).
Peripheral vascular system
Physical examination of the vascular system includes measurement of blood pressure and a thorough assessment of the integrity of the peripheral vascular system (Table 27-17). Vascular assessment is integrated with cardiac assessment and assessment of other aspects of the patient, such as the respiratory system. As you inspect the skin, signs and symptoms of arterial and venous insufficiency may be noted.
TABLE 27-17 NURSING HISTORY FOR VASCULAR ASSESSMENT
| ASSESSMENT QUESTIONS |
RATIONALE |
| Do you experience leg cramps, numbness or tingling in extremities, sensation of cold hands or feet, pain in legs or swelling or cyanosis of feet, ankles or hand? |
These signs and symptoms indicate vascular disease. |
| If you experience pain or cramping in legs or feet are these symptoms relieved or aggravated by walking or standing for long periods or during sleep? |
Relationship of symptoms to exercise can clarify whether problem is vascular or musculoskeletal. Pain caused by vascular condition tends to increase with activity. Musculoskeletal pain is not usually relieved when exercise ends. |
| Review heart risk factors (e.g. smoking, exercise, nutritional problems). |
These predispose patient to vascular disease. |
| Do you have a history of heart disease, hypertension, phlebitis, diabetes or varicose veins? |
Circulatory and vascular disorders influence findings gathered during examination. |
Assessment of the peripheral vascular system
BLOOD PRESSURE
Measurement of blood pressure readings forms part of the cardiovascular assessment. For further detail about measurement of blood pressure, see Chapter 28.
PERIPHERAL ARTERIES AND VEINS
A number of factors can impair circulation to the extremities (Table 27-18). Older adults and those with diabetes suffer physical changes in blood vessel walls that increase the risk of perfusion problems. These patients, in particular, should be taught strategies to minimise risks of circulatory impairment (Box 27-16).
TABLE 27-18 INDICATORS FOR ASSESSING LOCAL BLOOD FLOW
| INDICATOR |
RATIONALE |
| Systemic diseases (e.g. arteriosclerosis, atherosclerosis, diabetes) |
Diseases result in changes in integrity of walls of arteries and smaller blood vessels |
| Coagulation disorders (e.g. thrombosis, embolus) |
Blood clot causes mechanical obstruction to blood flow |
| Local trauma or surgery (e.g. contusion, fracture, vascular surgery) |
Direct manipulation of vessels or localised oedema impairs blood flow |
| Application of constricting devices (e.g. casts, dressings, elastic bandages, restraints) |
Constriction causes tourniquet effect, impairing blood flow to areas below site of constriction |
BOX 27-16 CLIENT TEACHING DURING VASCULAR ASSESSMENT
OBJECTIVES
• Patient will know normal blood pressure range for age and compare it with own blood pressure readings to identify normal ranges of blood pressure.
• Patient with vascular insufficiency will avoid activities that worsen circulatory status.
TEACHING STRATEGIES
• Explain the normal blood pressure reading for the patient’s age. Discuss implications of abnormalities.
• Explain to patient at risk or where there is evidence of vascular insufficiency in the lower extremities to avoid tight clothing over the lower body or legs, to avoid sitting or standing for long periods, to walk regularly and to elevate the feet when sitting.
• Advise patient to avoid cigarette smoking because nicotine causes vasoconstriction.
• Identify older adult with hypertension who may benefit from regular monitoring of blood pressure (daily, weekly or monthly). Teach patient how to use home monitoring kits (see Chapter 28).