Lumbar curve
The secondary lordotic lumbar curve starts to develop when a child is approximately 9 to 12 months of age and beginning to sit up. As the child learns to stand, the curve becomes established, usually by 18 months of age. The lumbar lordosis usually begins at the L1–2 level and gradually increases at each level caudal to the sacrum, with the apex of the curve centering around the L3–4 disc.35
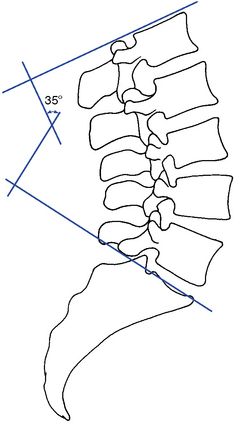
Moe and Bratford36 state that the normal lumbar lordosis should be 40 to 60 degrees but fail to define the levels used for measurement. The often ill-defined radiographic image of the superior aspect of the sacrum makes it difficult to use for measuring the lumbar lordosis. When using the inferior aspect of the L5 vertebral body and the superior aspect of the L1 vertebral body, a normal range for the lumbar lordosis is 20 to 60 degrees37,38 (Figure 5-207).
In the upright bipedal posture, the lumbar curve, as well as the rest of the spine, is balanced on the sacrum. Therefore, changes in the sacral base angle can influence the depth of the A-P curves in the spine. The sacral base angle increases with an anterior pelvic tilt, resulting in an increase in the lumbar lordosis, which places more weight-bearing responsibility on the facets. The sacral base angle decreases with a posterior pelvic tilt, resulting in a decrease in the lumbar lordosis, placing more weight-bearing responsibility on the disc and reducing the spine’s ability to absorb axial compression forces.
Range and patterns of motion
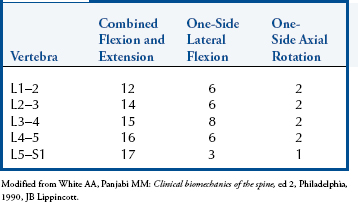
The lumbar spine is significantly more flexible in flexion and extension than any other lumbar movements. Approximately 75% of trunk flexion and extension occurs in the lumbar spine, with approximately twice as much flexion occurring as extension. The first 60 degrees of torso flexion consist of lumbar spine sectional flexion as the pelvis is stabilized by the gluteal and hamstring muscles. After the lumbar flexion, the pelvis begins to flex, producing an additional 30 degrees of motion. In contrast, lumbar lateral flexion exhibits only moderate mobility, and axial rotation is quite limited. The majority of trunk rotation occurs in the thoracic spine. Table 5-7 and Figure 5-24 identify lumbar segmental ROM.
Flexion and Extension
Combined segmental flexion and extension in the lumbar spine averages 15 degrees per segment, with motion increasing in an S-I direction.5,39 Lumbar flexion and extension combines sagittal plane rotation with an average of 2 to 3 mm of sagittal plane translation in each direction.5,40,41 White and Panjabi5 have proposed that 4.5 mm be considered the upper limit for the radiographic investigation of clinical joint instability. Coupling of lateral flexion and rotation with flexion and extension have also been noted,28,41 but are considered by White and Panjabi5 to be abnormal patterns suggestive of suboptimal muscle control.
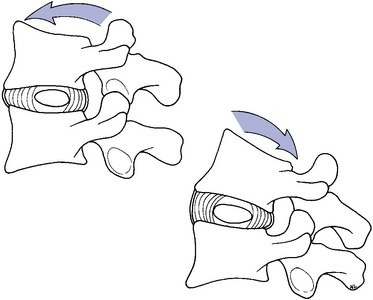
The precise location of the IAR for lumbar movements has not been established.5 The IAR for flexion and extension is most commonly placed within the IVD of the subjacent vertebrae, with flexion located toward the anterior portion and extension toward the posterior (Figure 5-208). During flexion the vertebra tilts and slides anteriorly as the inferior facets move superiorly and away from the lower vertebra. The disc is compressed anteriorly and stretched posteriorly. During extension the facets approximate one another, and the ALL, anterior portion of the joint capsule, and anterior portion of the disc are stretched (Figure 5-209).

Lateral Flexion
Segmental lateral flexion averages approximately 6 degrees to each side. Movement is about the same for each segment, with the exception of the lumbosacral joint, which demonstrates approximately half the movement.5,39 Lateral flexion in the lumbar spine is coupled with opposite-side rotation (e.g., body rotation to the convexity and spinous deviation to the concavity). This leads to a pattern in which the spinous processes end up pointing in the same direction as the lateral flexion (Figure 5-210).5,42 This pattern is opposite to that in the cervical and upper thoracic spine (see Figures 5-116 and 5-117).
There are several theoretic factors producing coupled rotation during lateral flexion. One important factor is the principle that it is not possible to bend a curved rod without producing some rotation. The second force acting on the spine to produce coupled rotation is a product of eccentric muscle activity. Lateral bending is controlled mainly by eccentric activity of the quadratus lumborum, which inserts posteriorly to the normal axis of motion. The normal axis is located in the posterior one third of the disc. Therefore, normal muscular activity leads to posterior rotation of the vertebral bodies on the side of convexity and rotation of the spinous processes to the side of concavity.
The IAR for lateral flexion is placed within the subadjacent disc space.5 For left lateral flexion, the axis is located on the right side, and for right lateral flexion, on the left (see Figure 5-208). During lateral flexion, the vertebra tilts and slides toward the concave side, producing a smooth, continuous arc. The facets approximate on the concave side and separate on the convex side. The disc is compressed on the concave side and stretched on the convex side. The ligamentum flavum, intertransverse ligament, and capsular ligaments are stretched on the convex side.
Grice43 and Cassidy44 have studied the coupling movements for lateral flexion and have proposed classifying segmental lateral flexion into one of four commonly encountered patterns (Figure 5-211). In addition, various pathomechanical theories have been proposed as possible explanations for each abnormal pattern.
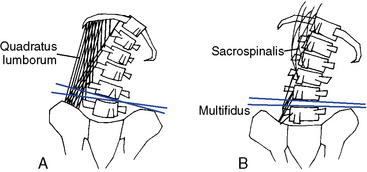
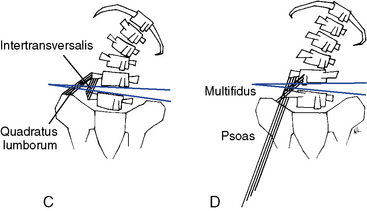
Figure 5-211 A, Type I movement of coupled lateral flexion with contralateral rotation under the control of the quadratus lumborum muscle. B, Type II movement of coupled lateral flexion with ipsilateral rotation under the control of the sacrospinalis and multifidus muscles. This pattern may be sectional, as shown here, or segmental. C, Type III movement, consisting of segmental aberrant lateral flexion because of faulty disc mechanics or quadratus lumborum and intertransversalis muscles. D, Type IV movement, consisting of segmental aberrant lateral flexion and rotation because of faulty disc mechanics or psoas and multifidus muscles.
The first pattern, type I movement, exhibits the normal pattern of coupling in which lateral flexion is associated with axial rotation to the opposite side. This produces a pattern in which posterior body rotation occurs on the side opposite the lateral flexion and in which the spinous processes rotate toward the side of lateral flexion. Purportedly, this pattern is represented when normal motor control is exerted through eccentric unilateral contraction of the quadratus lumborum muscle, although synergistic muscles act as a brake to prevent hypermobility. Type I movement may still be abnormal if it is diminished or excessive (see Figure 5-211, A).
Type II motion combines lateral flexion and axial rotation to the same side. This induces posterior body rotation on the side of lateral flexion and rotation of the spinous process to the side opposite the lateral flexion. A muscular imbalance of the sacrospinalis, especially the longissimus and spinalis portions, is proposed as the source of this abnormal pattern. The semislumped sitting posture may also produce this pattern of movement (see Figure 5-211, B).
Type III movement is represented by aberrant segmental lateral flexion and normal coupled rotation. With type III movement, the involved segment demonstrates no lateral flexion or lateral flexion movement in the direction opposite the bending of the trunk. This pattern is theorized to result from faulty disc mechanics or overdominance of the quadratus lumborum or intertransversalis muscles (see Figure 5-211, C).
The last pattern, type IV, is represented by aberrant segmental rotation and lateral flexion. This pattern may also result from faulty disc mechanics or an imbalance in the psoas or multifidus muscles (see Figure 5-211, D).
These patterns are primarily determined by evaluation of lateral bending functional x-ray studies. The use of lateral flexion and flexion-extension movement radiographs has been described (see Figure 3-23) and recommended for evaluation of segmental motion and instability.43 44 45 46 47 48 49 50 51 52 53 54 55 56 57 58 59 60 61 Although functional radiology should be considered an important potential tool in the evaluation of joint dysfunction, its limitations should also be realized. There is evidence to suggest that findings on lateral bending radiographs do not correlate well with back pain and other abnormal clinical findings.53,62
Rotation
Axial rotation is quite limited in the lumbar spine. Segmental ROM is uniform throughout the lumbar segments and averages only 2 degrees per motion segment.5,39 The sagittally oriented facet joints act as a significant barrier to rotational mobility. During rotation, the facet joints glide apart on the side of rotation and approximate on the side opposite rotation (see Figure 5-202). The instantaneous axis for axial rotation is placed within the posterior nucleus and annulus1 (see Figure 5-208).
Rotation of the lumbar spine is also consistently coupled with lateral flexion and slight sagittal plane rotation. The coupled lateral flexion varies between upper and lower lumbar segments. Rotation in the upper three segments (L1–L3) is coupled with opposite-side lateral flexion. Rotation in the lower two segments (L4 and S1) is coupled with same-side lateral flexion.28,63 The transitional change in coupling that occurs at the L4–5 motion segment may be of clinical significance in predisposing this level to increased torsional stress, clinical instability, and degenerative change.5
The pattern of coupled sagittal plane rotation depends on the starting position of the lumbar spine.28 With the spine in a neutral starting position, the lumbar spine flexes at all levels when rotated. When the spine is rotated from a flexed posture, it has a tendency to extend, and when rotated from an extended posture, it has a tendency to flex. This pattern was also noted for lateral flexion, leading to the generalization that “lateral bending or axial rotation has a tendency to straighten the spine (move it toward a neutral posture) from the flexed as well as the extended postures.”5
Kinetics of the lumbar spine
The control of flexion movements is largely a result of the eccentric contraction of the erector spinae (sacrospinalis) muscles (Figure 5-212), although it is initiated by concentric contraction of the psoas and abdominals. The iliopsoas flexes the spine when the femur is fixed, and the abdominal muscles flex the spine when the pelvis is fixed. During the first 60 degrees of flexion, the pelvis is locked by the gluteus maximus and hamstrings, but after 60 degrees, the weight of the trunk overcomes the stabilizing force of the glutei and hamstrings, and the pelvis rotates an additional 30 degrees at the hips. In full flexion, all the muscles are relaxed, except the iliocostalis thoracis, and the trunk is supported by ligaments and passive muscle tension.
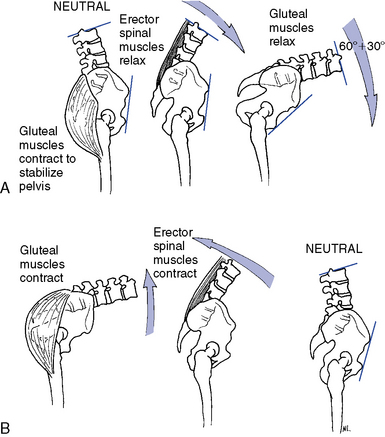
Figure 5-212 Flexion of the trunk. A, The first 60 degrees of flexion involve eccentric contraction of the lumbar paraspinal muscles, followed by an additional 30 degrees of hip flexion after relaxation of the gluteal muscles. B, In extension, the converse occurs.
The return to neutral is the reverse activity, with the pelvis moving first under the control of the hip extensors, followed by extension of the lumbar spine, controlled by erector spinae muscles. Flexion is limited by the ligamentum flavum, PLL, the posterior aspect of the capsular ligament, and interspinal ligament.
Extension is initiated by concentric contraction of the sacrospinalis. Again, after the initial movement, gravity and eccentric activity of the abdominal muscles become the major controlling forces in extension. Extension is limited by the ALL and anterior annulus and most significantly by bony impact of the spinous processes and articular facets.
Lateral flexion is initiated by concentric contraction of the quadratus lumborum on the ipsilateral side and then immediately controlled by eccentric activity of the contralateral quadratus lumborum. Lateral flexion movement is limited by impact of the articular facets on the side of bending, and the capsular ligaments, ligamentum flavum, intertransverse ligament, and deep lumbar fascia on the contralateral side.
Rotation is initiated by concentric activity of the abdominal obliques and assisted by concentric activity of the short segmental muscles (multifidus and rotatores) on the contralateral side. Rotational movements are controlled or limited by eccentric activity of the ipsilateral multifidus and rotatores (although mainly limited by facetal design), as well as the capsular, interspinous, and flaval ligaments. Balancing contraction of the contralateral muscles is important in maintaining the normal instantaneous axis of motion for axial rotation.
Evaluation of the lumbar spine
Observation
The assessment of lumbar function should begin with an evaluation of lumbopelvic alignment and ROM. The sacral base forms the foundation of the spine, and a functional or structural alteration in the pelvis or lower extremities may alter the alignment of the lumbar spine and segments above. Pelvic and hip alignment are evaluated by observing the alignment of the gluteal folds, posterior iliac spines (sacral dimples), and iliac crests.
To palpate the alignment of the pelvis, place the thumbs on the posterior iliac spines and the fingertips along the superior margin of the crests (Figure 5-213). Compare each side for symmetry and their orientation to the greater trochanter for possible leg length inequality.
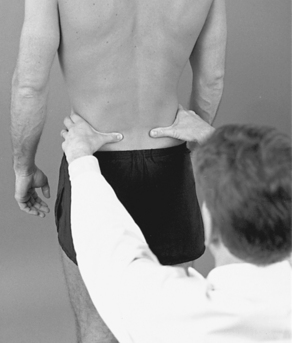
Figure 5-213 Observation of lumbopelvic alignment and posture with palpation of the posterior iliac spines and iliac crests.
Coronal plane alignment of the lumbar spine is evaluated by observing the orientation of the spinous process, status of the paraspinal muscles, and contours of the waist (Figure 5-214). Scoliotic curvatures in the lumbar spine are frequently represented by muscle asymmetry and increased paraspinal muscle mass on the convex side of scoliosis. Compensatory curvatures are common in the lumbar spine, and any noted deviations should be followed up with an assessment of leg length.
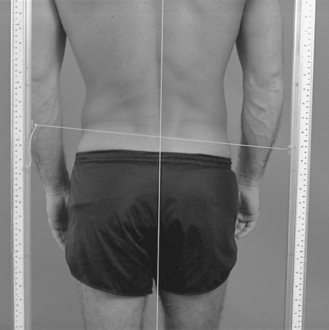
Figure 5-214 Posterior plumb line observation, demonstrating pelvic unleveling low on the right, with a right convex curve in the lumbar spine.
Sagittal plane orientation of the hips, pelvis, and lumbar spine is evaluated from the side. The lumbosacral angle in large part determines the angle of the lumbar curve and is often mirrored by the positioning of the pelvis. Anterior or posterior tilting of the pelvis usually results from alterations in the hip angle. Anterior pelvic tilt results from bilateral hip flexion, and posterior pelvic tilt results from bilateral hip extension (Figure 5-215).
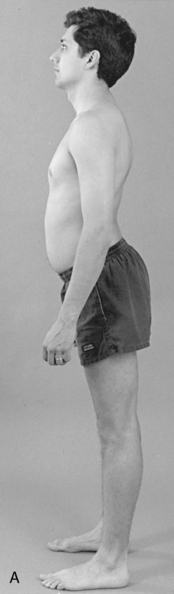
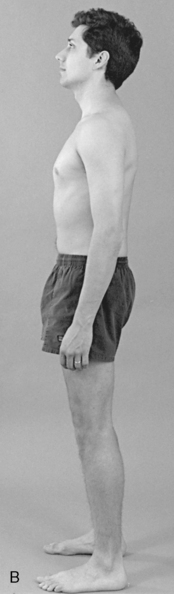
Figure 5-215 Observation of posture from a lateral view, showing an anterior pelvic tilt with lumbar hyperlordosis (A) and a posterior pelvic tilt with lumbar hypolordosis (B).
Anterior pelvic tilt increases the lumbosacral angle and lumbar curve; posterior pelvic tilt reduces the lumbosacral angle and curve. The lumbar curve also alters its angle relative to structural alteration in the thoracic curve. Congenitally straight thoracic curves often lead to straightening of the lumbar and cervical curves. Increased thoracic kyphosis may lead to accentuation of the lumbar and cervical curves.
Lumbopelvic movement should be observed for range and symmetry. Flexion, extension, and lateral flexion are usually assessed with the patient standing. Rotation is more effectively evaluated in the sitting position to fix the pelvis and prevent hip rotation.
To assess flexion, the patient bends forward, and any limitations, painful arcs, or alterations in normal sequencing are observed. With normal range, the patient should be able to come within several inches of the floor with the fingertips, and the lumbar curve should reverse (Figure 5-216).
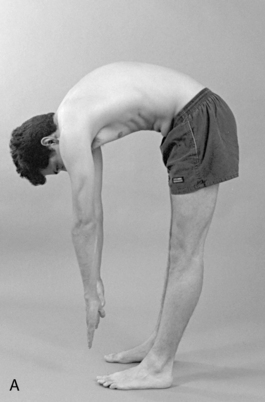
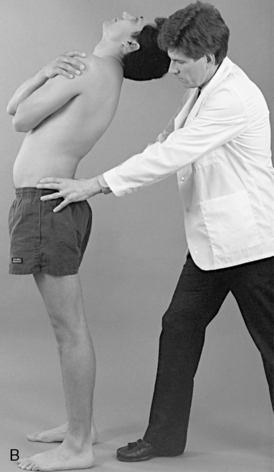
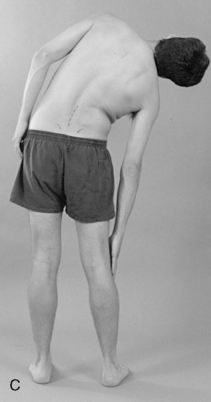
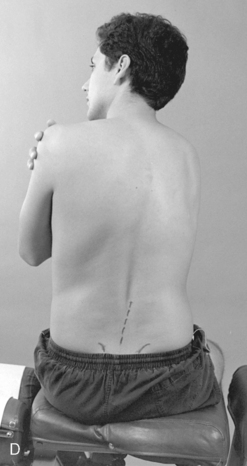
Figure 5-216 Observation of thoracolumbar range of motion. A, Flexion. B, Extension. C, Lateral flexion. D, Rotation.
After the patient returns to neutral, the doctor should stabilize the patient’s hips while extension is performed. Extension is significantly more limited than flexion, and mild midline lumbosacral discomfort is commonly associated with full extension.
Lateral bending is evaluated by instructing patients to bend to one side while running their fingers down the lateral surface of the leg. It is important to ensure that the patient does not axially rotate the trunk, bend the knee, or raise the foot off the floor while bending. The movement should be symmetric, and the doctor should record where the patient’s fingertips pass relative to the knees. A smooth C curve should be observed to the side of bending. Areas of regional restriction or increased movement may be noted by observing for a sudden break (bent-stick configuration) in integrated movement.
To isolate movements of the lumbar spine from hip and thoracic movements, the doctor may use inclinometric methods and measure movement between the thoracolumbar and lumbosacral regions. Table 5-8 lists the normal ranges for lumbar movement; the methods for measuring movement have been previously described (see Figure 3-10).
TABLE 5-8 Global ROMs for the Lumbar Spine
Static Palpation
To evaluate the bony and soft tissue structures of the lumbar spine, the patient is placed in the prone position and scanned for areas of potential tenderness, misalignment, or asymmetry.
To scan the bony landmarks, use the pads of the fingers or thumbs and palpate the spinous processes, interspinous spaces, and mammillary processes (Figure 5-217). Palpation of the interspinous spaces is enhanced by placing a small roll under the abdomen or elevating the lumbar and pelvic sections of an articulating table. The mammillary processes are not distinctly palpable; rather, the doctor feels for a sense of firmness in the soft tissue as the contact passes over each mammillary process. Rotational prominence of lumbar spinal segments is perceived by a sense of fullness in the muscles over the top of the mammillary processes and not by actual palpation of bony rotation.
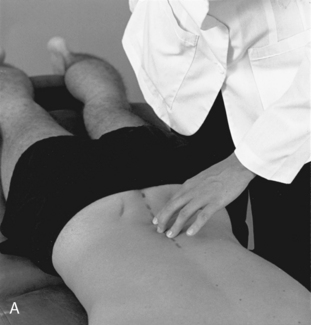
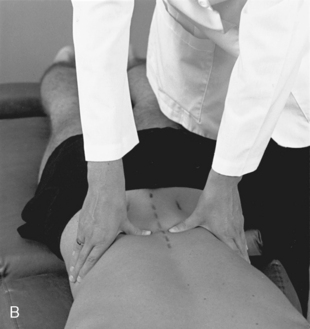
Figure 5-217 Palpation of lumbar interspinous alignment and sensitivity (A) and paraspinal muscle tone, texture, and sensitivity (B).
Palpation of the lumbar paraspinal soft tissues is conducted by applying bilateral contacts with the palmar surfaces of the fingers or thumbs. Evaluation should incorporate an assessment of tone and texture of the erector spinae, quadratus lumborum, deep segmental muscles, and iliolumbar ligaments. The psoas muscle should also be palpated for tone and tenderness. The psoas is accessible for palpation in the supine position, and the belly becomes more evident by inducing hip flexion on the side of palpation.
Motion Palpation
Joint Play
The lumbar spine may be scanned in the sitting or prone position for sites of painful or restricted JP. Sites of suspected abnormality should be further assessed with specific JP tests. The same methods applied in the thoracic spine for assessing P-A glide and counter-rotation may be applied to the lumbar spine (Figure 5-218). Additional options include the evaluation of rotation, the assessment of lateral glide, and a side-posture method for evaluating possible instability.
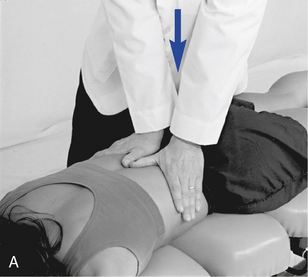
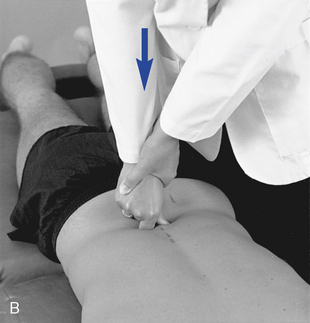
 Figure 5-218 Lumbar joint play evaluation for posterior-to-anterior glide. A, Bilateral thenar contacts over the mammillary processes. B, Digit contact over the spinous process.
To assess rotational JP, the doctor contacts adjacent spinous processes (Figure 5-219) or the spinous process and the anterior crest of the ilium and applies counter-rotation across the joint. Normal movement is pain-free and is associated with a sense of giving with pressure and recoil when pressure is released.
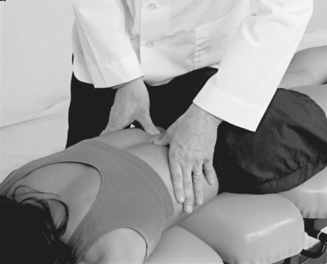
 Figure 5-219 Counter-rotational joint play evaluation for left rotational movement of L3 relative to L4. Opposing forces are directed toward the midline through a contact established on the left side of the L3 spinous process and the right side of the L4 spinous process.
Lateral glide of individual lumbar motion segments may be evaluated with the patient in the prone position by establishing a thumb contact against the lateral surface of adjacent spinous processes with the cephalic hand while the other hand grasps the patient’s anterior and medial thigh (Figure 5-220). Movement is induced by applying medial pressure against the spinous process while the patient’s leg is passively abducted. Normal movement is represented by segmental bending and shifting of the spinous process away from the contact. This procedure can also be performed by moving the pelvic section of a flexion table from side to side.
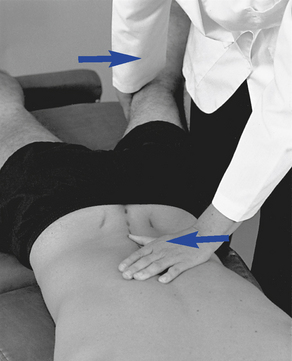
 Figure 5-220 Lumbar joint play evaluation for lateral glide in the L3–4 motion segment, using a thumb contact across the left L3–4 interspinous space.
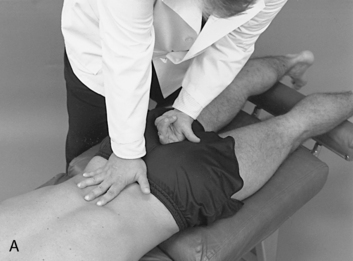
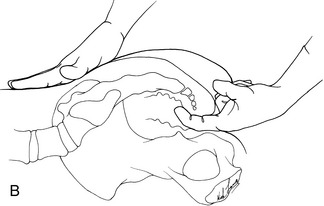
To evaluate segmental stability in side posture, place the patient on either side, with the upper thigh and knee flexed. Establish a fingertip contact over the spinous processes and interspinous spaces with the cephalic hand and straddle the patient’s flexed knee (Figure 5-221). Apply posterior shearing pressure through the patient’s knee and gentle anterior pressure through the palpation hand. Feel for gliding between adjacent spinous processes. Excessive posterior glide (translation) of the inferior spinous process relative to the superior spinous process suggests possible clinical joint instability.
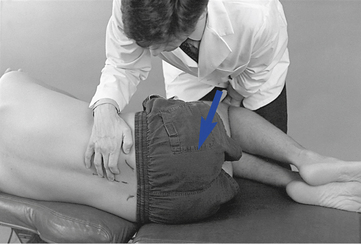
 Figure 5-221
Lumbar Segmental Motion Palpation and End Play
Lumbar segmental motion may be evaluated with the patient in the sitting or side-posture positions. Both postures are effective for assessing lumbar mobility, but side-posture positions do not provide as much freedom for full trunk movement. This is especially true for the evaluation of lumbar lateral flexion and end play.
Sitting Methods
For sitting evaluations, place the patient on an adjusting bench or palpation stool with the arms crossed over the chest. The doctor may sit behind or stand beside the patient. Movement is controlled through contacts on the patient’s shoulders.
Rotation
Lumbar segmental rotation is evaluated by establishing a thumb contact against the lateral surface of adjacent spinous processes. The contact is placed on the side of induced rotation so that the pad spans the interspinous space. The support hand reaches around the front of the patient, hooks the patient’s anterior shoulder or grasps the opposite forearm, and rotates the patient’s trunk toward the side of contact (Figure 5-222). During normal rotation the doctor should palpate the superior spinous process, rotating away from the spinous process below. Movement should occur in the direction of trunk rotation. If separation is not noted and adjacent spinous processes move together, segmental restriction should be suspected.
Lumbar segmental movement is quite limited in rotation (1 to 2 degrees), and the examiner may not be able to discriminate reductions of movement within these limits. Therefore, the doctor should concentrate on movement of the segment from its neutral position (any shifting between adjacent spinous processes) and on the quality of end-play movement.
Although the lumbar facets do provide a bony obstacle to rotation, there is still some normal give to rotational end play. To assess end play, the doctor applies additional overpressure at the end of passive motion. Contacts may be established against the superior spinous process on the side of induced rotation (Figure 5-222) or over the mammillary process and posterior joint on the side opposite the induced rotation.
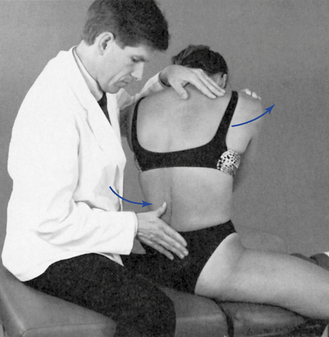
 Figure 5-222
Lateral Flexion
To assess lateral flexion, the palpation contact is also established against the lateral surface of adjacent spinous processes. The contact is placed on the side of desired lateral flexion and the patient is asked to bend toward the side of contact (Figure 5-223). The doctor guides movement by applying downward and medial pressure through the shoulder contact and medial pressure through the contact hand. The indifferent arm and contact arm must work together to maximize bending at the site of palpation. To induce lateral flexion in the lumbar spine, the patient’s upper trunk must be shifted sufficiently to the side of bending. During the performance of lateral flexion, the doctor should feel the spine bend smoothly around the contact and the spinous process shift toward the opposite side (convex side).
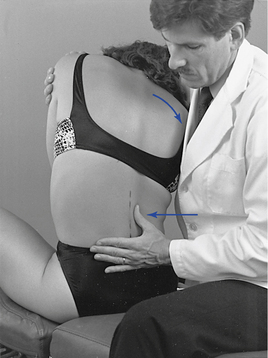
 Figure 5-223 End-feel evaluation for right lateral flexion at the L2–3 motion segment, using a thumb contact across the right lateral aspect of the L2–3 interspace.
End-play evaluation is conducted by shifting the contact to the superior spinous process and applying additional overpressure at the end ROM. Lateral flexion end play is more elastic than rotation; a firm but giving response should be noted.
Flexion and Extension
Lumbar flexion and extension are evaluated by establishing palpation contacts in the interspinous spaces with the doctor’s fingertips or dorsal middle phalanx of the index finger (Figure 5-224). Movement is induced by asking the patient to slouch and arch the lumbar spine. The indifferent arm and palpation hand help guide movement and ensure that the apex of bending is accentuated at the level of palpation. During flexion the interspinous spaces should open, and during extension they should approximate.

Figure 5-224 Movement evaluation of lumbar flexion, with fingertip contacts in the L2–3 and L3–4 interspace.
Flexion end play is assessed by contacting the superior spinous process with the thumb or fingertips while gentle downward pressure is applied through the doctor’s IH and arm against the patient’s shoulders (Figure 5-225, A). To induce extension, push anteriorly against the contact while inducing backward bending (see Figure 5-225, B). Extension end play is inhibited by the impact of the spinous processes and has a more rigid quality than flexion.
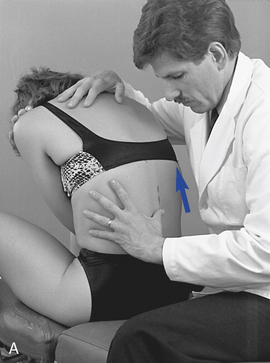
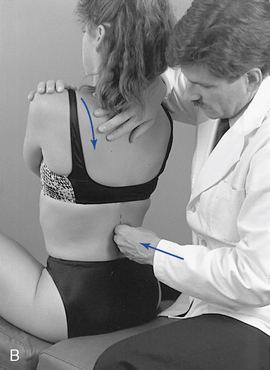
 Figure 5-225
Side-Posture Methods
To conduct side-posture mobility tests, the patient is placed on his or her side, with the down-side arm crossed over the chest and resting on the opposite shoulder. The down-side leg is extended along the length of the table, and the knee and hip of the opposite leg are flexed. The doctor controls movement through the patient’s shoulders and by cradling the patient’s flexed leg.
Flexion and Extension
To evaluate flexion and extension, stand facing the patient and cradle the patient’s flexed knee between your thighs. Palpate the interspinous space with the caudal hand and grasp the patient’s shoulder with the cephalic hand and forearm. Induce flexion and extension by moving the patient’s knees superiorly and inferiorly, and feel for opening and closing of the interspinous spaces (Figure 5-226).
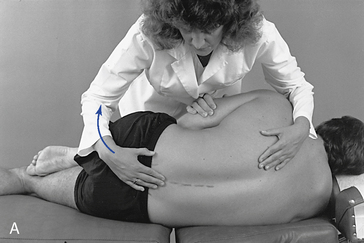
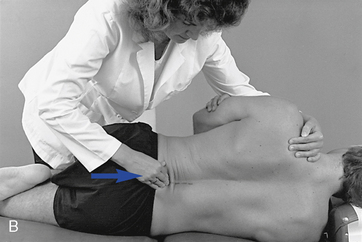
 Figure 5-226
Lateral Flexion
To assess lateral flexion, use the caudal hand to establish a contact on the ischial tuberosity and gluteal soft tissues of the patient’s up-side hip. Place the fingertips or thumb of the doctor’s cephalic hand on either side of adjacent spinous processes and interspinous space. To induce movement, push headward against the patient’s pelvis with the caudal hand while palpating for movement at the interspinous spaces (Figure 5-227). On the concave side of bending, the interspinous spaces should close and open on the convex side. If dysfunction is present, the spinous processes do not move into the doctor’s palpating fingers on the convex side (down side) or remain firm and do not glide away if palpating is done from the concave side (up side).

 Figure 5-227
Rotation
Side-posture lumbar rotation may be assessed by inducing movement through the patient’s trunk or pelvis. If the patient’s trunk is used, the indifferent contacts are established against the patient’s up-side shoulder (Figure 5-228). If the pelvis is used, the indifferent contacts are established against the patient’s thigh or proximal leg. The patient’s torso can be contacted with the doctor’s superior hand or forearm (Figure 5-228, A). When counterrotating the shoulder and pelvis, slide your forearm between the patient’s arm and chest, contact the shoulder, and have the patient grasp the opposite forearm with the up-side hand or the shoulder will not provide enough resistance to induce rotation (Figure 5-228, B). To induce movement through the pelvis, contact the patient’s up-side thigh with the dorsal surface of the caudal ankle or distal thigh. For both methods, locate the palpation contacts at the desired interspinous space with the middle finger or thumb of the caudal hand.
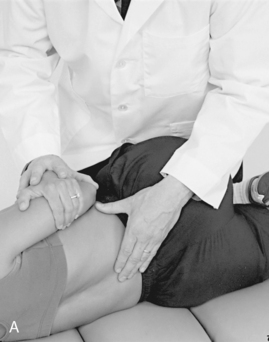
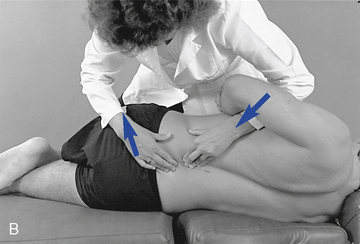
 Figure 5-228 Side-posture movement evaluation of rotation at the L3–4 motion segment. A, Evaluation of right rotation mobility. Caudal hand establishes fingertip contacts over the L3–4 spinous process while the cephalad hand induces posterior trunk rotation. B, Evaluation of left rotation, using fingertip contacts over the left lateral surface of the L3 spinous process and right lateral surface of the L4 spinous process with counterrotation of shoulders and pelvis.
To induce trunk movement, apply posterior pressure against the patient’s shoulder and forearm. To induce pelvic rotation, apply downward pressure against the patient’s distal thigh or proximal leg (5-228B). When movement is initiated through the trunk, the superior spinous process rotates away from the inferior spinous process in the direction of trunk rotation (toward the table). When movement is initiated with the pelvis, the inferior spinous process rotates away from the superior spinous process in the direction of pelvic rotation (away from the table).
Adjustments of the lumbar spine
Side-Posture Adjustments
Side-posture lumbar adjustments are the most frequently applied adjustments for lumbar spinal dysfunction. They offer freedom of movement to alter patient position and adaptability to methods that improve the doctor’s leverage and mechanical advantage. Although they are difficult adjustments to perfect, doctors can reduce frustration by understanding their mechanical principles and effects.
The level of segmental tension is regulated by patient positioning and the degree of induced lumbar flexion, lateral flexion, and the amount of counter-rotation induced between the shoulders and pelvis (Figure 5-229). The direction of adjustive thrust in relation to the direction of torso movement and pelvic movement is also important in localizing the adjustive.
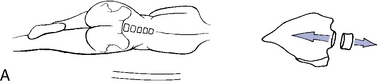
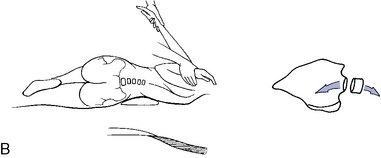
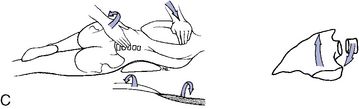
Figure 5-229 Side-posture patient positioning. A, Development of segmental flexion and distraction of the posterior joint by flexing the patient’s upper knee and hip. B, Development of lateral flexion by placing a pillow under the lumbar spine and pulling the patient’s shoulder down and forward. C, Counter-rotation of the pelvis and shoulders to induce gapping distraction in the up-side (left) facet joint.
Adjustments that direct the adjustive thrust in the same direction as torso movement but opposite pelvic movement are defined as assisted adjustments. Adjustments that direct the adjustive thrust in a direction opposite the torso movement and in the same direction as pelvic movement are defined as resisted adjustments (Figure 5-230). Assisted adjustments are applied to develop maximal preadjustive tension in the motion segments inferior to the established contact, and resisted adjustments are applied to develop maximal tension in the motion segments superior to the established contact.
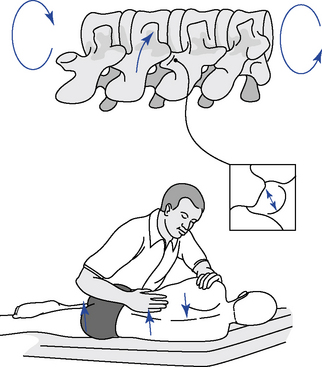
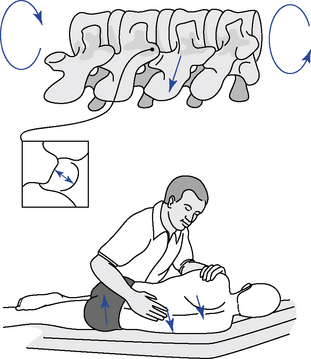
 Figure 5-230 Side-posture positioning for rotational dysfunction. A, Resisted positioning, with contact applied to the inferior vertebra to induce gapping in the joints superior to the contact. B, Assisted positioning, with contact applied to the superior vertebra to induce gapping in the joints inferior to the contact. Arrows indicate adjustive vectors and direction of shoulder and pelvic rotations.
The degree of torso movement is determined by the positioning of the patient’s shoulders, and the degree of pelvic movement is determined by the placement of the patient’s pelvis. Various methods for positioning and contacting the patient’s shoulders and pelvis are pictured in Figures 5-231, 5-232, and 5-233.
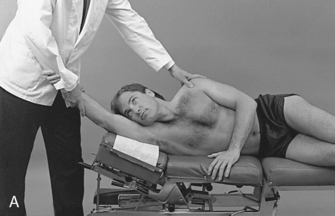
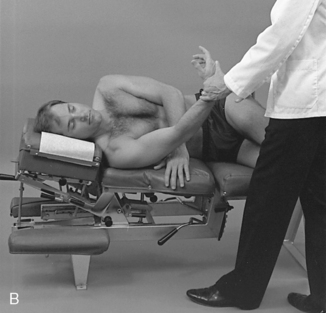
 Figure 5-231 Movement of the patient’s lower arm to assist in the development of lateral flexion. A, Lateral flexion away from the table, induced by pulling the arm headward to place the patient on the lateral surface of the shoulder to produce left lateral flexion (LLF). B, Lateral flexion toward the table, induced by pulling the arm footward to place the patient on the posterolateral surface of the shoulder to produce right lateral flexion (RLF). Elevation of the pelvic and lumbar sections or a pillow placed under the lumbar spine will assist in the development of lateral flexion toward the table.

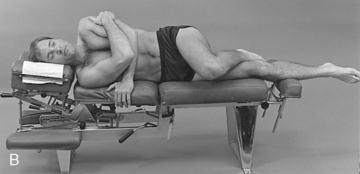
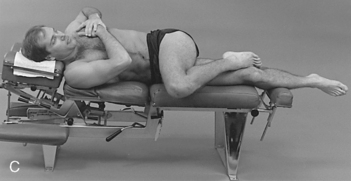
 Figure 5-232 Optional patient arm positioning for side-posture adjusting. A, Forward positioning of the upper arm applied with flexible individuals to maintain neutral trunk positioning. B, Midline positioning of the upper arm to accommodate neutral positions or positions incorporating slight posterior trunk rotation. C, Posterior positioning of the upper arm applied with large patients or specifically to induce posterior movement of the trunk.
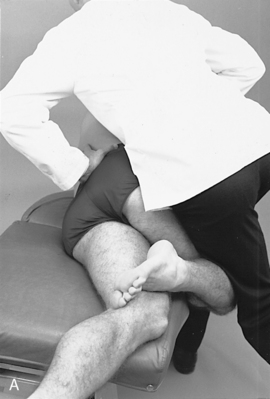
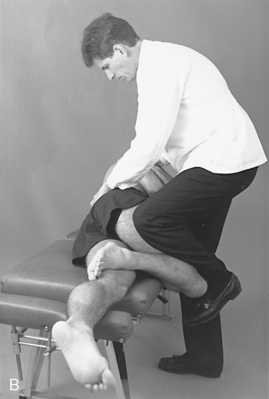
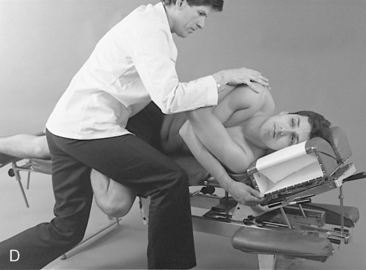
 Figure 5-233 Optional leg contacts that may be used in the application of side-posture pelvic and lumbar adjustments. A, Lateral thigh-to-thigh contact. B, Square stance shin-to-knee contact. C, Straddle thigh contact. D, Straddle flexed-knee contact.
Proper use of body weight and leverage is also critical to the effective application of side-posture adjusting. Side-posture adjustments often demand the added force that is produced by incorporating the doctor’s body weight in the development of preadjustive tension and adjustive thrusts.64
Prone and Knee-Chest Adjustments
Prone and knee-chest adjustments are applied with specific short-lever contacts (Figure 5-234). They are especially suited to the treatment of extension restrictions or adjusting situations in which it is desirable to minimize rotation. Extension is easily induced in the prone or knee-chest positions, and the lumbar sagittal facet facings do not conflict with anteriorly directed adjustive VECs. The doctor also has the advantage of centering their body over the contact.
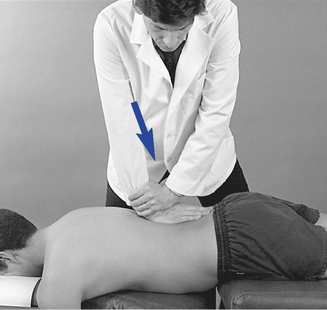
 Figure 5-234
Because the knee-chest positions are especially helpful in maximizing lumbar extension, the patient is vulnerable to hyperextension in this position. Therefore, the doctor must be skilled in the application of this procedure and deliver the adjustive thrust in a shallow and nonrecoiling manner.
Sitting Lumbar Adjustments
Sitting lumbar adjustments (Figure 5-235) conform to the same mechanical principles previously discussed for sitting thoracic adjustments. They use assisted methods and are applied to develop maximal tension in the motion segments below the level of contact. They are typically applied for lumbar rotation or combined rotation and lateral flexion dysfunction. The most frequent and effective site of application occurs at the thoracolumbar region. Critical to their application is an understanding of the thoracolumbar transition to sagittal facet orientation and the effect this has on axial rotation and facet movements.
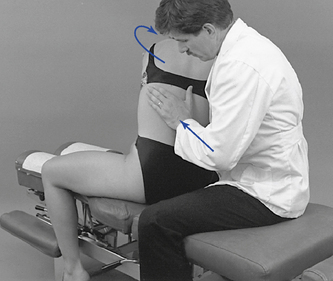
 Figure 5-235
Rotational Adjustments
Rotational dysfunction of the lumbar spine theoretically may result from decreased mobility in the posterior joints on the side of rotational restriction or on the side opposite rotational restriction. Although the movements on each side are small, reduced play in either joint is potentially detrimental to joint function. Fixation in the joint on the side of rotational restriction may produce a loss of facetal separation (Figure 5-236). Fixation in the joint on the side opposite the rotational restriction (compression facets) may theoretically produce a loss of anterior glide of the inferior facet relative to the superior facet (see Figure 5-236). The facet joints on the side opposite the direction of trunk rotation act as a major barrier to axial rotation. Bony impact of these structures is largely responsible for limiting lumbar rotation. As a result, functional changes in the periarticular soft tissues of these joints are unlikely to significantly affect the range of axial rotation. In contrast, the joints on the side of trunk rotation are not limited by bony impact. Therefore, functional changes in these articulations may have a significantly greater potential to limit joint movement.
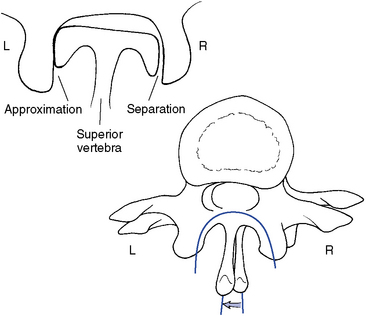
Figure 5-236 Illustration of right rotation, demonstrating gapping of the right articulation and anterior glide and approximation of the left articulation.
Rotational dysfunction leading to a loss of gapping on the side of restricted rotation may be treated with side-posture assisted or resisted methods. With both patient positions, the affected joint is placed up (away from the table) and the patient is flexed, laterally flexed toward the table, and counter-rotated at the level of dysfunction.
With resisted methods, the contact is established on the up-side mammillary process or the down-side of the spinous process of the inferior vertebra. The thrust is delivered in the direction opposite the shoulder rotation. This method is applied to induce rotation and gapping in the facet joints superior to the point of contact (Figure 5-237).
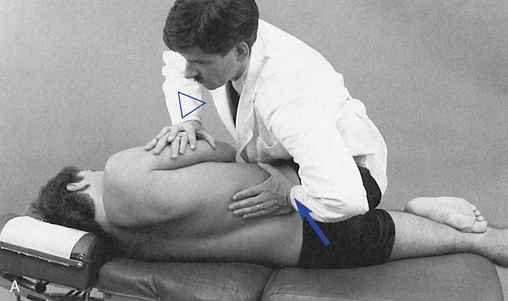
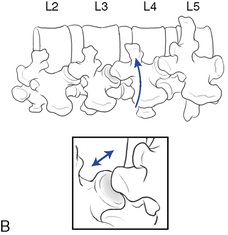
 Figure 5-237 Resisted position with a hypothenar contact applied to the right L4 mammillary process to induce right rotation and gapping of the right L3–4 articulation.
With assisted methods, the contact is established on the spinous process of the superior vertebra and the thrust is delivered in the direction of shoulder rotation. This method is also applied to induce facet gapping, but the point of distraction is directed to the articulations below the contact (Figure 5-238). To incorporate forces applied in each of the previous two methods, apply a combination spinous push-pull adjustment (Figure 5-239).

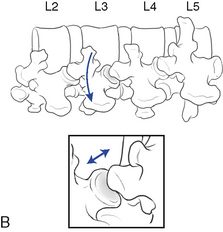
 Figure 5-238 Assisted position, with a hypothenar contact applied to the right L3 spinous process to induce right rotation and gapping of the right L3–4 articulation.
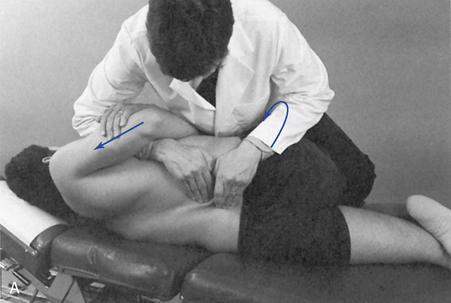
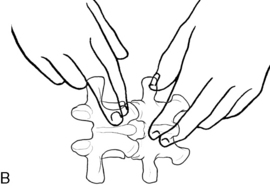
 Figure 5-239 Digital contacts applied to the right lateral surface of the L3 spinous process and left lateral surface of the L4 spinous process to induce right rotation and gapping of the right L3–4 articulation.
To induce rotation and facet gapping in the sitting position, use patient postures that are identical to those used with side-posture assisted spinous push adjustments. Contact the lateral surface of the superior spinous process on the side of rotational restriction (side of spinous rotation) or over the mammillary process on the side opposite the rotational restriction. Laterally flex the patient away from the side of desired facet gapping and rotate the torso in the direction of restriction (Figure 5-240).
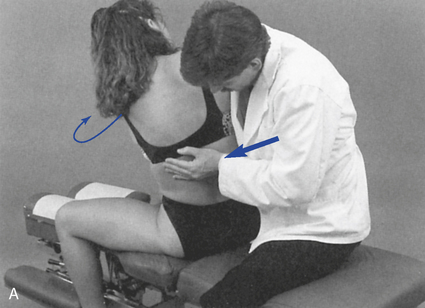
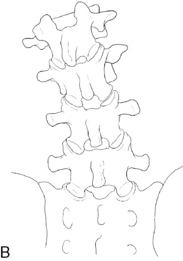
 Figure 5-240 Assisted method, with a hypothenar contact applied to the right lateral surface of the L3 spinous process to induce right rotation and gapping of the right L3–4 articulation.
Rotational restrictions may also be treated with assisted side-posture mammillary push adjustments or assisted sitting mammillary push adjustments. The contacts are applied to the superior vertebra of the involved motion segment on the side of posterior body rotation (side opposite the rotational restriction). These methods are directed at distracting the motion segment inferior to the point of contact. These procedures establish a contact on the side of facet approximation contralateral to the side of facet gapping. Therefore, they may be less effective at inducing joint gapping then the previous methods described, which establish contacts on the same side of the desired joint gapping.
In the side-posture method, take care to maintain the patient’s relatively neutral shoulder position. Excessive posterior shoulder rotation opposes the direction of adjustive thrust and may place unwanted distractive tension at the joint above the desired level. In addition, consider incorporating a superior inclination to the adjustive thrust (Figure 5-241). This serves to direct the thrust along the plane of the lumbar sagittal facets and may minimize compression of the facet joints.
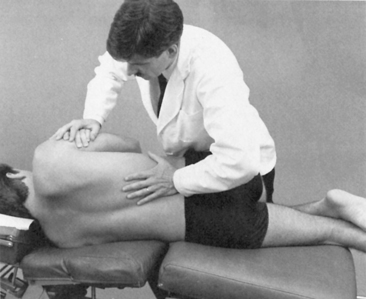
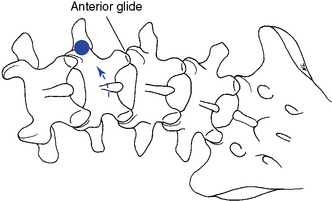
 Figure 5-241 Assisted method, with a hypothenar contact applied to the right L3 mammillary process (dot) to induce left rotation.
When using a sitting mammillary push adjustment, some lateral flexion of the patient away from the side of contact may assist in distraction the affected joint (Figure 5-242). If the patient is laterally flexed toward the side of contact and the adjustive thrust is directed anteriorly without superior distraction, there is a risk of unnecessary compression of the joint.
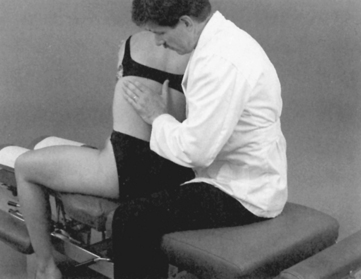
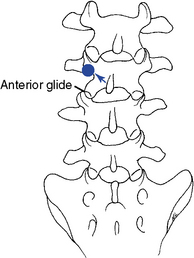
 Figure 5-242
Lateral Flexion Adjustments
Lateral flexion dysfunction in the lumbar spine may result from a loss of disc closure and approximation of the facet joints on the side of lateral flexion dysfunction or contralateral loss of distraction of the facet and soft tissues on the side opposite the lateral flexion restriction (Figure 5-243).
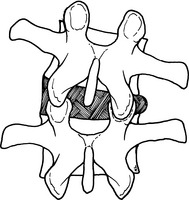
 Figure 5-243 Illustration of right lateral flexion, demonstrating the right facet joints gliding together and the left facet joints gliding apart.
Lateral flexion dysfunction is commonly treated with side-posture adjustments, but may also be treated in sitting positions. In side-posture positions, the adjustive contacts are established on the spinous process or the mammillary processes. Assisted patient positions are used with spinous process contacts with pillows or positioning of the lumbar and pelvic sections to enhance the lateral flexion position. The patient is placed on the side opposite the lateral flexion restriction and the patient is laterally flexed away from the table (laterally flexed toward the doctor) (Figure 5-244). After tension is developed, the doctor thrusts posteriorly to anteriorly and laterally to medially to induce segmental lateral flexion and closure of the up-side facet joint and disc and separation of the down-side facets and disc.
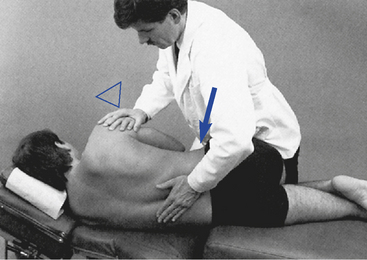
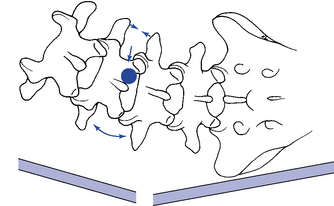
 Figure 5-244 Assisted method, with a hypothenar contact applied to the right lateral surface of the L3 spinous process (dot) to induce right lateral flexion of the L3–4 motion segment.
When using mammillary contacts, the patient is placed with the side of lateral flexion restriction down. The patient is laterally flexed toward the table to distract the up-side joint. A roll may be placed under the patient to assist in the development of distraction. The contacts are established on either the upper or lower vertebra. With a contact on the superior vertebra, the thrust is delivered anteriorly and superiorly in the direction of trunk bending to distract the joints below the contact (Figure 5-245). With an inferior vertebra contact, the thrust is directed anteriorly and inferiorly to distract the joints above the contact. Upper vertebra contacts are much more commonly applied and easier on the doctor’s wrist and shoulder.
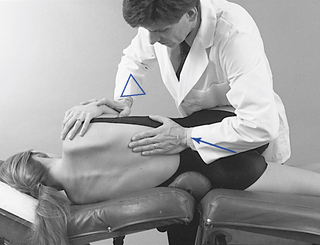
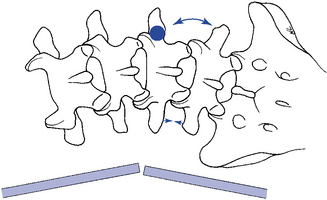
 Figure 5-245 Assisted method, with a hypothenar contact applied to the right L4 mammillary process (dot) to induce left lateral flexion of the right L4–5 motion segment.
When mammillary contacts are applied to accentuate disc closure, the patient is placed with the side of lateral flexion restriction up. The patient is laterally flexed away from the table, and the doctor thrusts posteriorly to anteriorly, laterally to medially, and superiorly to inferiorly to induce approximation of the facets and disc closure (Figure 5-246). This procedure is not commonly used unless lateral flexion restrictions are also coupled with opposite-side rotation restrictions (posterior right inferior [PRI] or posterior left inferior [PLI listings].
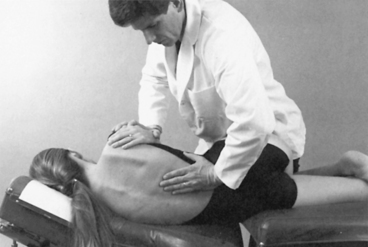
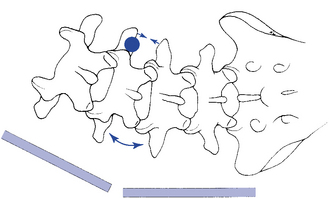
 Figure 5-246 Assisted method, with a hypothenar contact applied to the right L3 mammillary (dot) to induce right lateral flexion of the L3-4 motion segment.
It is unlikely that adjustive VECs directed up or down the spine in a patient positioned in a neutral position will induce lateral flexion.32 The production of lateral flexion is more likely if the patient is prestressed and allowed to move in the direction of lateral flexion restriction (Figure 5-246). The use of rolls, wedges, and articulating tables can assist in this capacity.
Flexion and Extension Adjustments
Flexion dysfunction is commonly treated in the side-posture position, with contacts established over the spinous processes. The spine is flexed at the level of dysfunction, and contacts are applied to the superior or inferior vertebra of the involved motion segment to induce separation of the interspinous space and posterior joints. With assisted methods, the contact is established on the superior vertebra, and the thrust is directed anteriorly and superiorly (Figure 5-247). With resisted methods, the contact is applied to the inferior vertebra and the thrust is directed anterior and inferiorly. Resisted methods are not commonly applied, except at the lumbosacral junction, where the contacts are established on the sacral apex.
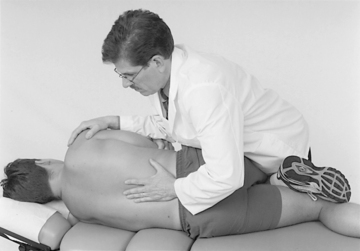
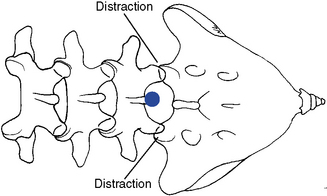
 Figure 5-247 Assisted method, with hypothenar contact applied over the L5 spinous process to induce distraction in the L5–S1 motion segment.
Extension dysfunction is also treated in side-posture position with spinous contacts. In this case, the involved motion segment is allowed to extend, and the doctor establishes contacts over the superior or inferior spinous process and directs the adjustive thrust to induce approximation of the posterior joints and disc and distraction of the anterior elements (Figure 5-248). The resisted method may be the procedure of choice because of the associated slight I-S VEC that minimizes stress to the doctor’s shoulder.
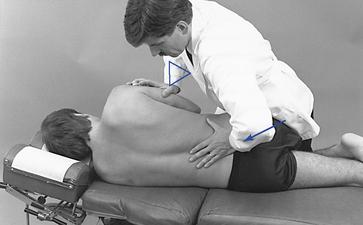
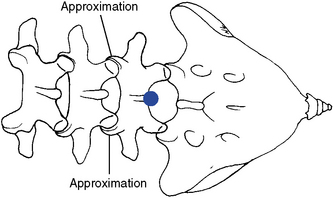
 Figure 5-248 Resisted method, with a hypothenar contact applied to the L5 spinous process (dot) to induce extension in the L4–5 motion segment.
It is unlikely that adjustive VECs directed up or down the spine in a patient positioned in a neutral position will induce flexion or extension.32 The production of flexion or extension is more likely if the patient is prestressed and allowed to move in the direction of restriction.
As mentioned previously, prone or knee-chest adjustments may be especially efficient in the delivery of lumbar extension adjustments. They are applied with unilateral or bilateral contacts, depending on whether you wish to induce extension with or without coupled rotation. The contacts may be established over the spinous processes but are more commonly applied over the mammillary processes.
Lumbar adjustments (BOX 5-9)
Side Posture
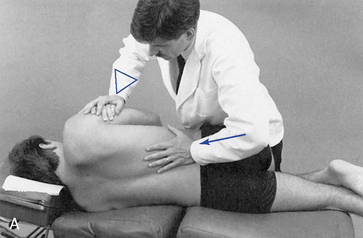
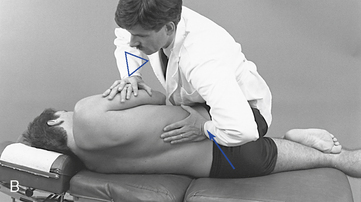
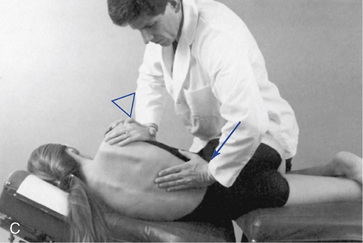
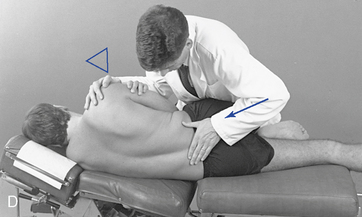
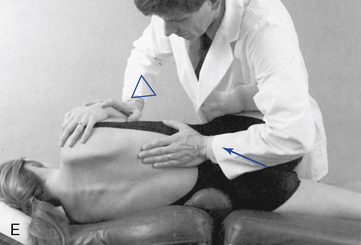
 Figure 5-249 A, Assisted method, with a hypothenar contact applied to the right L4 mammillary process to induce left rotation at the right L4–5 motion segment. B, Resisted method, with a hypothenar contact applied to the right L4 mammillary process to induce right rotation and gapping of the right L3–4 articulation. C, Assisted method, with a hypothenar contact applied to the right L4 mammillary process to induce right lateral flexion of the left L4–5 motion segment. D, Resisted method, with a hypothenar contact applied to the right sacral base to induce right lateral flexion in the L5–S1 motion segment. E, Assisted method, with a hypothenar contact applied to the right L3 mammillary process to induce left lateral flexion in the L3–4 motion segment.
To develop preadjustive tension, rotate the patient’s shoulders posteriorly, laterally flex the trunk toward the adjusting bench, and counter-rotate the patient’s pelvis anteriorly. This should induce gapping distraction in the motion segment ipsilateral superior to the point of contact.
Shoulder rotation and lateral flexion are induced by pulling the patient’s down-side arm anteriorly and inferiorly (see Figure 5-231, B and C). Lateral flexion of the patient may be assisted by elevating the thoracolumbar section of an articulating adjustive bench or by placing a roll under the patient’s lumbar spine. Forward rotation of the patient’s pelvis is aided by downward traction along the patient’s flexed thigh and hip by the doctor’s anterolateral thigh (see Figure 5-223, A) or lower abdomen (see Figure 5-233, C and D).
The degree of shoulder rotation depends on the area being treated. It is greater in the upper lumbar spine as compared with the lower lumbar spine. Excessive counter-rotation through the shoulders may be unnecessarily uncomfortable to the patient and may be stressful to his or her intercostal muscles.
At tension, deliver an impulse thrust through the body and contact arm. The adjustive VEC follows the movement of the pelvis and should not be directed straight anteriorly. Thrusts directed anteriorly have a tendency to induce segmental extension instead of rotation and joint gapping. The contact must remain light, and the VEC must reinforce the pelvic rotation by incorporating a strong M-L component (see Figure 5-249, B).
Resisted adjustive methods may also be used to treat rotational restriction coupled with opposite-side lateral flexion restrictions ([PRI], [PLI], left posterior superior [LPS], right posterior superior [RPS] listings).
To maximize forces of approximation, contact the side of lateral flexion restriction (see Figure 5-249, C and D). To maximize forces of distraction, contact the side opposite the lateral flexion restriction (see Figure 5-249, E).
When contacting the open-wedge side, place the patient on the side opposite the lateral flexion restriction and laterally flex the patient away from the table. Lateral flexion is induced by elevating the patient’s shoulders and pulling headward on the down-side arm (see Figure 5-232, A). The thoracolumbar section of an articulating adjusting bench may be lowered and released to aid in the production of lateral bending (see Figure 5-249, C and D). Establish the contact on the superior vertebra or on the inferior vertebra. At tension, deliver an impulse thrust anteriorly, medially, and inferiorly with a superior vertebral contact (see Figure 5-249, C) and anteriorly, medially, and superiorly with an inferior vertebral contact (see Figure 5-249, D). Simultaneously gently pulling down on the patient’s shoulder with IH contact effectively assists in the production of lateral flexion (see Figure 5-249, D). This superior vertebral contact method is commonly applied in the Gonstead technique to treat rotational restrictions coupled with opposite-side lateral flexion restrictions (PRI, PLI listings).
When contacting the closed-wedge side, place the patient on the side of lateral flexion restriction and laterally flex the patient toward the table. The thoracolumbar section of the adjustive bench may be elevated or a roll may be placed under the patient’s lumbar spine to assist in the development of lateral flexion (see Figure 5-249, E). Deliver the adjustive thrust superiorly and posterior to anterior.
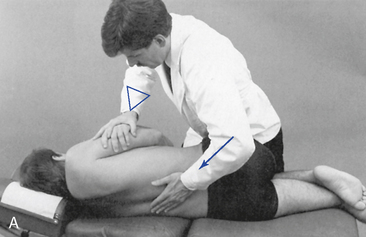
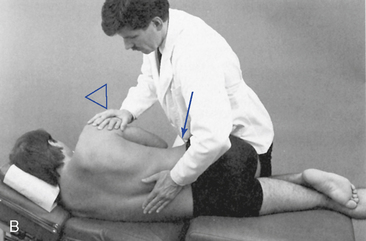
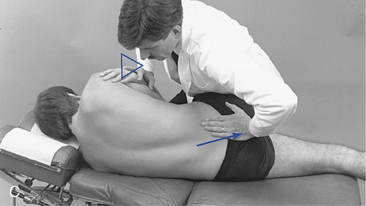
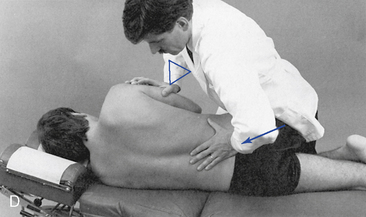
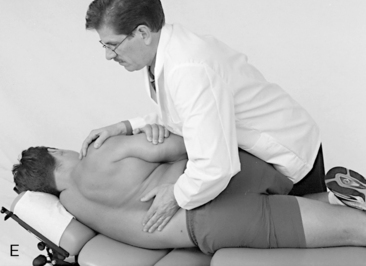
 Figure 5-250 A, Assisted method, with a hypothenar contact applied to the right lateral surface of the L3 spinous process to induce right rotation in L3- motion segment. B, Assisted method, with a hypothenar contact applied to the right lateral surface of the L3 spinous process to induce right lateral flexion in the L3–4 motion segment. C, Resisted method, with a hypothenar contact applied to the sacral apex to induce flexion in the L5–S1 motion segment. D, Resisted method, with a hypothenar contact applied to the spinous process of L5 to induce extension in the L4–5 motion segment. E, Assisted spinous push adjustment, with contact established over the right lamina of the L4 spinous process to induce L4–5 right rotation and right lateral flexion.
Develop preadjustive tension by rotating the patient’s shoulder and contacted vertebra posteriorly while the patient’s pelvis and the segments below are rotated anteriorly. The forward rotation of the patient’s pelvis is aided by downward traction along the patient’s flexed thigh and hip by your anterolateral thigh. At tension, deliver an impulse thrust through the body and contact arm.
Establish the adjustive contact and remove superficial tissue slack by sliding medially onto the lateral surface of the superior spinous process. Develop preadjustive tension by transferring additional weight through your trunk into the spinous contact. At tension, deliver an impulse thrust through the body and contact arm. Simultaneously gently pulling down on the patient’s shoulder with IH contact effectively assists in the production of lateral flexion (Figure 5-250, E).
When using a resisted method, slide inferiorly to contact the inferior vertebra and thrust anteroinferiorly. The resisted approach is commonly applied only when treating lumbosacral flexion restriction with a sacral contact (see Figure 5-250, C).
To induce extension at the lumbosacral junction with an inferior vertebral contact, contact the sacral base at the level of S1 and thrust anteriorly and slightly superiorly (see Figure 5-250, D).
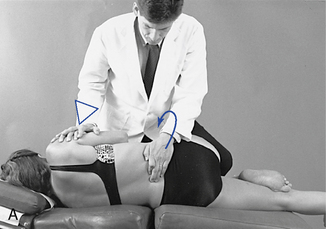
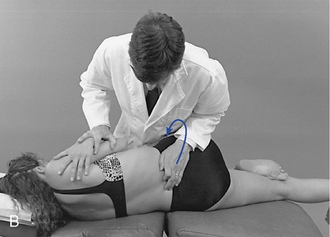
 Figure 5-251 A, Assisted method, illustrating a digital contact applied to the left lateral surface of the L4 spinous process to induce left rotation in the L4–5 motion segment. B, Resisted method, illustrating a digital contact applied to the left lateral surface of the L5 spinous process to induce right rotation in the L4–5 motion segment and gapping of the right L4–5 articulation.
When using a square stance, contacts on the patient’s leg are established with the doctor’s knee or distal shin (Figure 5-251, A). When using a fencer stance, the contacts are established on the patient’s leg with the doctor’s mid-thigh (Figure 5-251, B).
At tension, a pulling impulse is generated by extending your contact shoulder while simultaneously inducing anterior pelvic rotation by accelerating through the patient’s leg contact. To generate anterior pelvic rotation with a square stance and distal shin–to–patient knee contact, quickly extend the contact knee (Figure 5-251, A). With a knee-to-knee contact, extend your hip and drop your body weight through the patient’s knee and forearm contact on the patient’s lateral hip. With a fencer stance and thigh–to–patient’s shin contact, generate rotation by accelerating your body weight through the contacts on the patient’s lateral hip and shin (Figure 5-251, B). The digit contacts on the spinous are primarily used for sensing preadjustive tension. The primary adjustive force is generated through the leveraged contacts established on the patient’s lateral thigh and lower extremity.
Develop preadjustive tension by rotating the patient’s shoulders posteriorly in the direction of segmental restriction as you rotate the patient’s pelvis anteriorly with your leg and forearm. Induce posterior shoulder rotation and lateral flexion of the patient’s trunk toward the table by pulling the patient’s down-arm anteroinferiorly.
Resisted spinous pull adjustments may also be applied for combined rotational and opposite-side lateral flexion restrictions (PRI, PLI listings). The contacts and positioning are the same, but lateral flexion toward the adjusting bench is maximized. This may be accomplished by raising the thoracolumbar section of an articulating adjusting bench or by placing a roll under the patient’s lumbar spine.

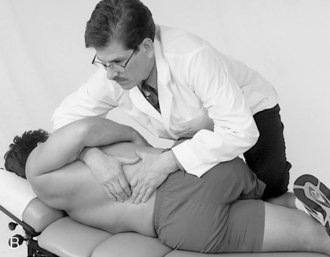
 Figure 5-252 Digital contacts applied to the right lateral surface of the L2 spinous process and left lateral surface of the L3 spinous process to induce right rotation and gapping of the right L2–3 articulation. A, Illustrates contact between the doctor’s thigh and patient’s leg. B, Illustrates contact between the patient’s knee and the doctor’s knee.
The doctor establishes appropriate contacts on the adjacent spinous process and develops local joint tension by counter-rotating the pelvis, shoulders, and segmental contacts. As the shoulders are rotated posteriorly, the patient’s pelvis and contacted vertebra are counter-rotated anteriorly. This should induce distraction in the motion segment between the established contacts. Posterior shoulder rotation is greater when treating upper lumbar dysfunction as compared with lower lumbar dysfunction.
At tension, deliver a high-velocity countertorquing thrust through both contact arms, reinforced by a shallow thrust through the contacts established on the patient’s shoulder, leg, or shin. Take care not to apply undue pressure to the patient’s lateral rib cage with the superior forearm contact. (The digit contacts on the spinous are primarily used for sensing preadjustive tension. The primary adjustive force is generated through the leveraged contacts established on the patient’s lateral thigh, proximal shoulder and lower extremity.)
Prone
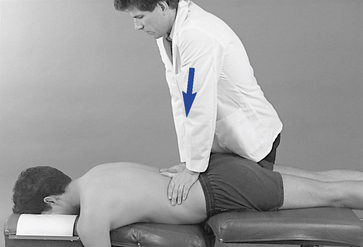
 Figure 5-253 Bilateral thenar contacts applied to the mammillary processes of L3 to induce extension at the L3–4 motion segment.
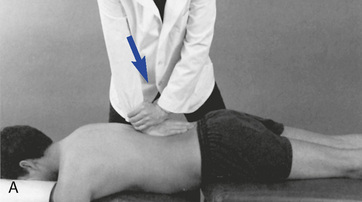
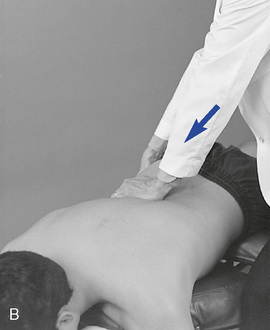
 Figure 5-254 A, Hypothenar contact applied to the right L1 mammillary process to induce extension and left rotation at the L1–2 motion segment. B, Hypothenar contact applied to the right L1 mammillary process, with countertraction applied through the anterior pelvis to induce left rotation at the right L1–2 motion segment.
The contact may be reinforced with the IH, or the IH may contact the ipsilateral anterior ilium. When applying a reinforcing contact, stand on the side of adjustive contact (see Figure 5-254, A). If the IH contacts the ilium, stand on the side opposite the adjustive contact (see Figure 5-254, B).
When using an ilial contact, develop preadjustive tension by lifting and tractioning inferiorly against the ilium as the weight of your trunk is transferred anteriorly and superiorly against the contact. The counterdistractive tension through the ilium should be limited, and the patient’s pelvis should not be rotated off the table more than 1 to 2 inches. Deliver the thrust with an impulse and body-drop thrust through the contact hand. It is unlikely that lateral flexion can be effectively induced in prone neutral positions. Prestressing the patient into lateral flexion and inducing lateral flexion during the delivery of the adjustment may assist in the production of lateral flexion.
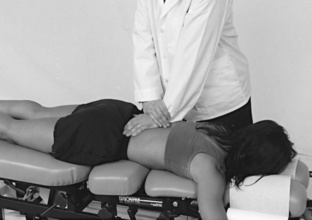
 Figure 5-255 Hypothenar contact applied to the left L2 spinous process to induce extension, left lateral flexion, and left rotation of the L2–3 motion segment.
Develop preadjustive tension by transferring additional body weight into the contacts. At tension, deliver an impulse thrust through the arms, trunk, and body. The thrust should be shallow to avoid hyperextension of the patient’s back. The thrust may be applied with a lumbar drop section. This adjustment is commonly applied in the treatment of coupled restrictions in rotation and same-side lateral flexion (PRS, PLS listings)
Knee-Chest
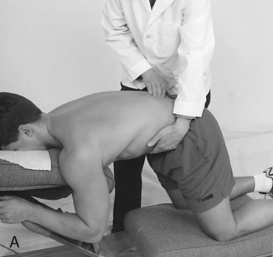

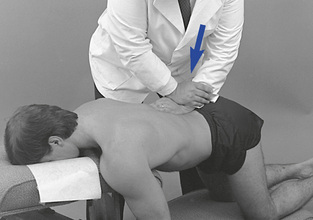
 Figure 5-256 Knee-chest adjustment. A, Development of the adjustive contact and use of an adjusting bench in circumstances in which a knee-chest table is not available. B, Hypothenar contact applied to the left L1 spinous process to induce extension, left lateral flexion, and left rotation of the L1–2 motion segment.
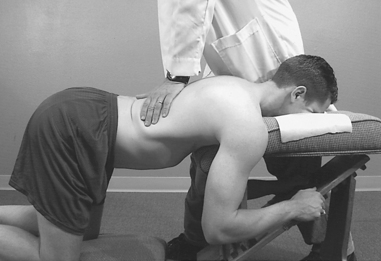
 Figure 5-257 Bilateral thenar contacts established over the mammillary processes of L2 to induce extension at the L2–3 motion segment.
The patient is instructed to allow the abdomen to drop and, at tension, an impulse thrust is delivered. The patient is vulnerable to hyperextension in this adjustment, so the thrust must be shallow and nonrecoiling.
Sitting
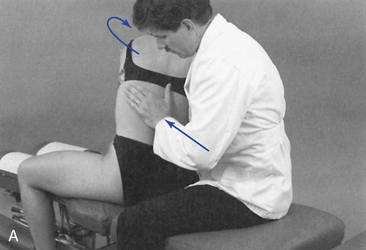
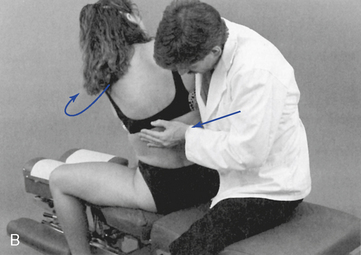
 Figure 5-259 A, Hypothenar contact applied to the left mammillary process of L2 to induce right rotation or right lateral flexion of the L2–3 motion segment. B, Hypothenar spinous contact applied to the right lateral surface of L2 to induce right rotation or left lateral flexion of the L2–3 motion segment.
To use a spinous process contact, slide medially and establish a fleshy mid-hypothenar contact on the lateral surface of the spinous process on the side of rotation restriction (side of spinous rotation). Develop preadjustive tension by flexing, rotating, and laterally flexing the patient away from the side of contact (Figure 5-259, B). At tension, deliver a thrust to induce rotation. This contact should induce maximal distraction in the facet joint ipsilateral inferior to the side of spinous contact. This method is also commonly applied when treating combined restrictions in rotation and opposite-side lateral flexion (e.g., right or left rotation restriction coupled with the opposing right or left lateral flexion restriction).
Sitting lumbar adjustments produce rotational tension in the patient’s spine, regardless of the dysfunction being treated. If the patient cannot tolerate rotation of the spine, he or she is not a good candidate for sitting lumbar adjustments.

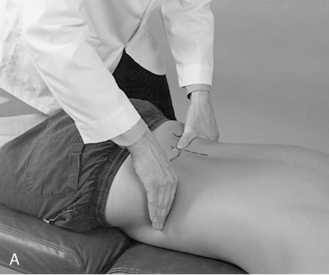
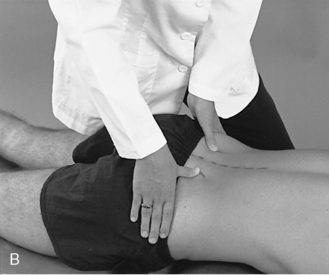
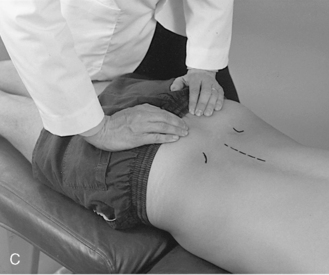
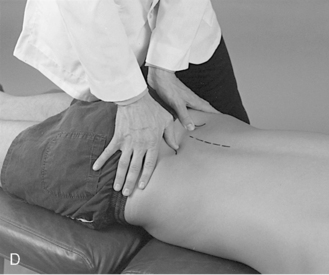
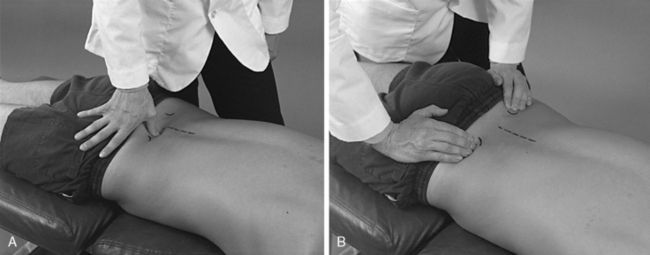
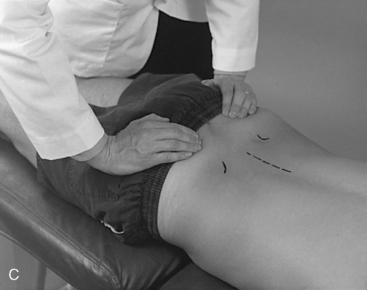
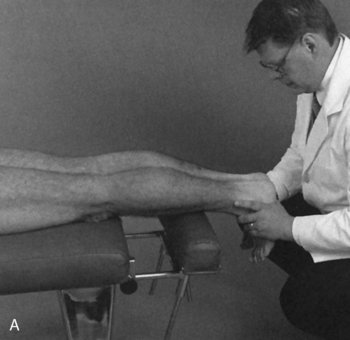
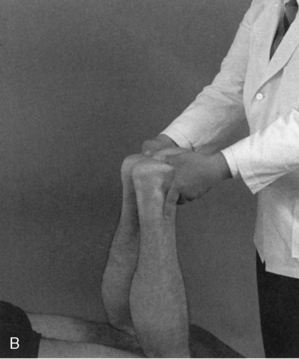
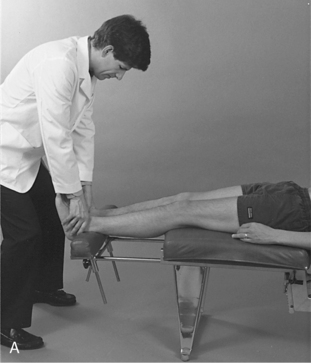
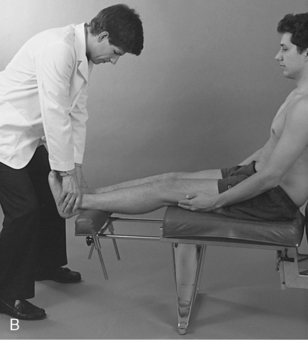
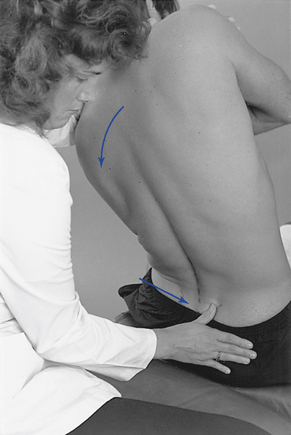
 Figure 5-273
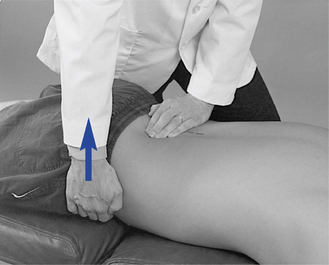
 Figure 5-274
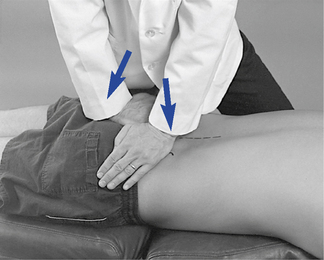
 Figure 5-275
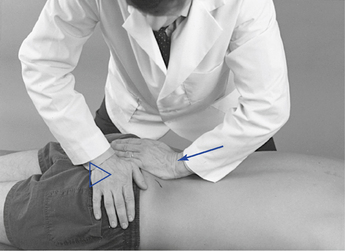
 Figure 5-276
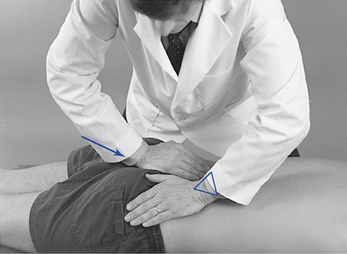
 Figure 5-277
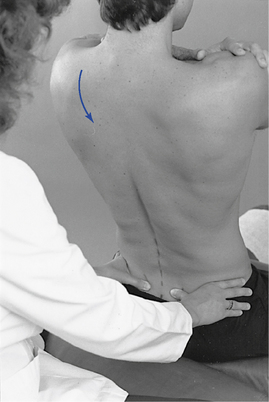
 Figure 5-278
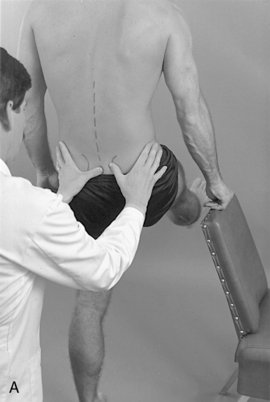

 Figure 5-279
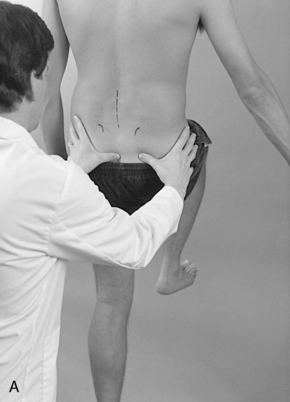
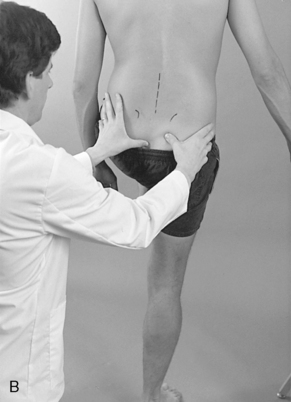
 Figure 5-280
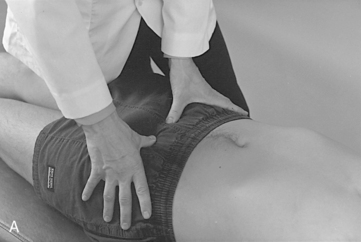
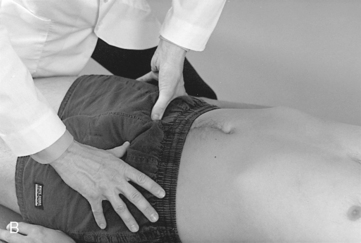
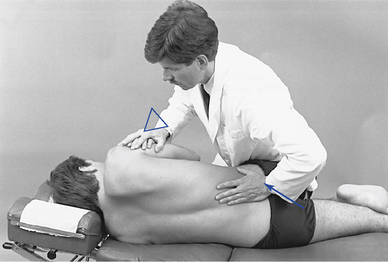
 Figure 5-282
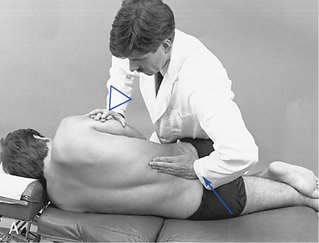
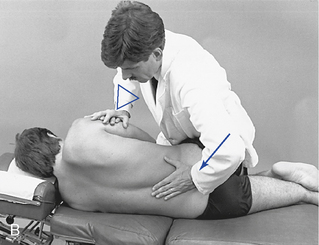
 Figure 5-283
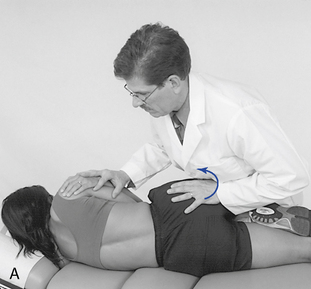
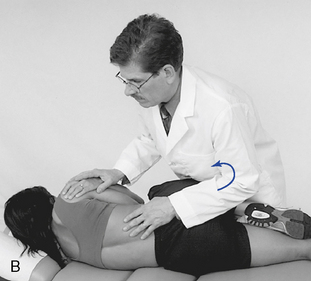
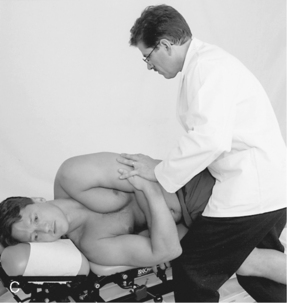
 Figure 5-284
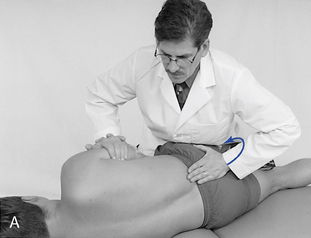
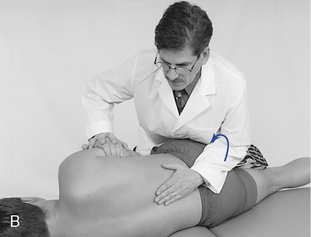
 Figure 5-285
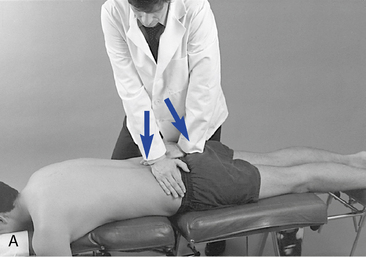
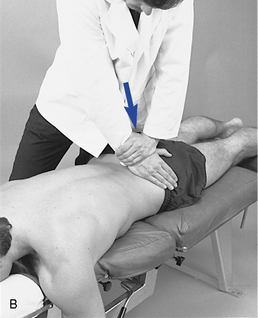
 Figure 5-286
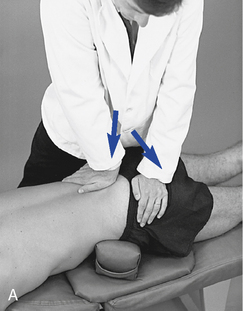
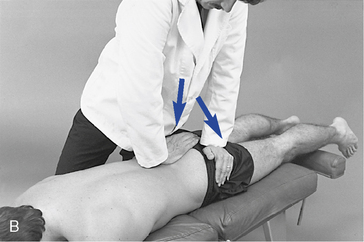
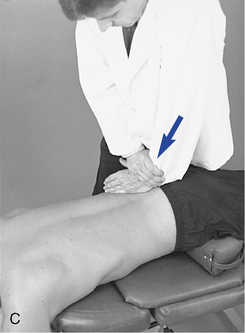
 Figure 5-287
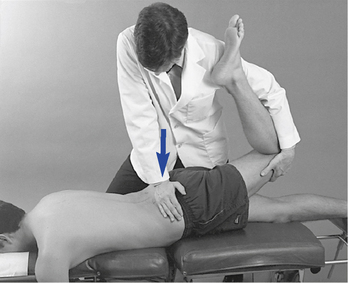
 Figure 5-288
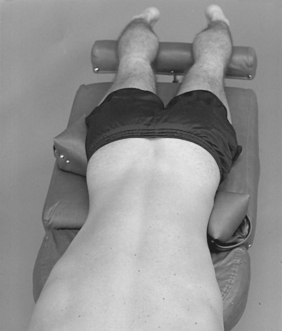
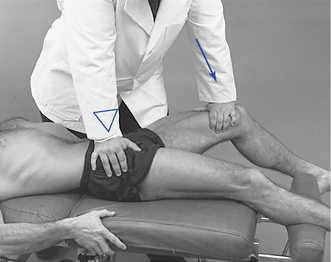
 Figure 5-290
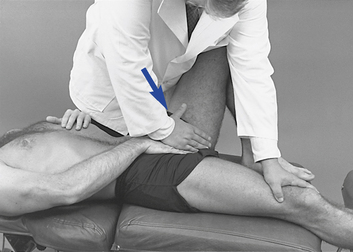
 Figure 5-291
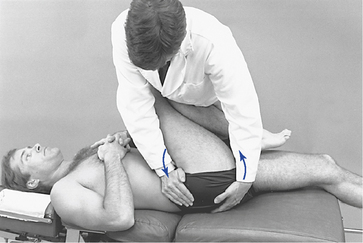
 Figure 5-292
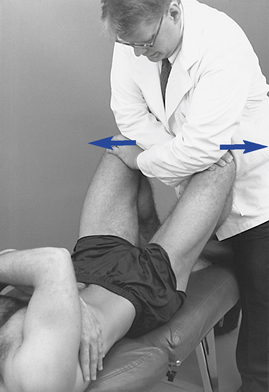
 Figure 5-293
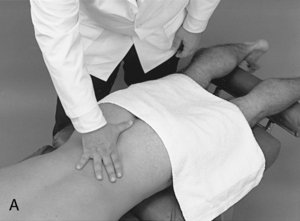
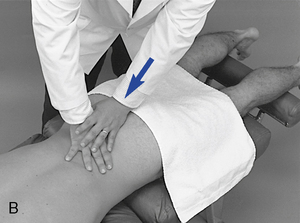
 Figure 5-294