CHAPTER 66 Restorative Interrelationships
The relationship between periodontal health and the restoration of teeth is intimate and inseparable. For restorations to survive long term, the periodontium must remain healthy so that the teeth are maintained. For the periodontium to remain healthy, restorations must be critically managed in several areas so that they are in harmony with their surrounding periodontal tissues. To maintain or enhance the patient’s esthetic appearance, the tooth/tissue interface must present a healthy natural appearance, with gingival tissues framing the restored teeth in a harmonious manner. This chapter reviews the key areas of restorative management necessary to optimize periodontal health, with a focus on the esthetics and function of restorations.
Biologic Considerations
Margin Placement and Biologic Width
One of the most important aspects of understanding the periodontal-restorative relationship is the location of the restorative margin to the adjacent gingival tissue. Restorative clinicians must understand the role of biologic width in preserving healthy gingival tissues and controlling the gingival form around restorations. They must also apply this information in the positioning of restoration margins, especially in the esthetic zone, where a primary treatment goal is to mask the junction of the margin with the tooth.
A clinician is presented with three options for margin placement: supragingival, equigingival (even with the tissue), and subgingival.70 The supragingival margin has the least impact on the periodontium. Classically, this margin location has been applied in unesthetic areas because of the marked contrast in color and opacity of traditional restorative materials against the tooth. With the advent of more translucent restorative materials, adhesive dentistry, and resin cements, the ability to place supragingival margins in esthetic areas is now a reality (Figures 66-1 and 66-2). Therefore, whenever possible, these restorations should be chosen not only for their esthetic advantages but also for their favorable periodontal impact.
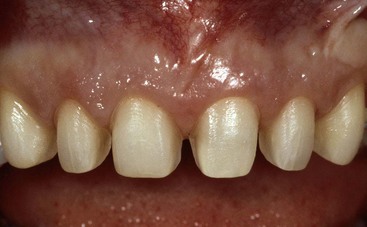
Figure 66-1 With the advent of adhesive dentistry and ultrathin ceramic veneers, it now is possible to prepare restorations equigingival without visible margins. The preparations for six porcelain veneers with the margins placed at the level of tissue are shown.
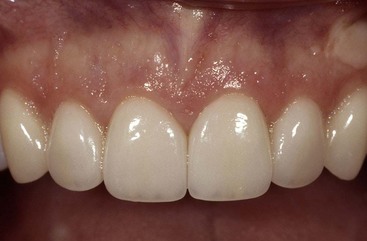
Figure 66-2 The completed veneers from Figure 66-1. Note the invisible gingival finish line, even though the margin has not been carried below tissue.
The use of equigingival margins traditionally was not desirable because they were thought to retain more plaque than supragingival or subgingival margins and therefore result in greater gingival inflammation. There was also the concern that any minor gingival recession would create an unsightly margin display. These concerns are not valid today not only because the restoration margins can be esthetically blended with the tooth but also because restorations can be finished easily to provide a smooth, polished interface at the gingival margin. From a periodontal viewpoint, both supragingival and equigingival margins are well tolerated.
The greatest biologic risk occurs when placing subgingival margins.43 These margins are not as accessible as supragingival or equigingival margins for finishing procedures. In addition, if the margin is placed too far below the gingival tissue crest, it violates the gingival attachment apparatus.
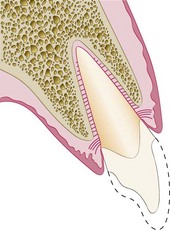
As described in Chapter 2, the dimension of space that the healthy gingival tissues occupy between the base of the sulcus and the underlying alveolar bone is comprised of the junctional epithelial attachment and the connective tissue attachment. The combined attachment width is now identified as the biologic width. Most authors credit Gargiulo, Wentz, and Orban’s study in 196119 on cadavers with the initial research establishing the dimensions of space required by the gingival tissues. They found that, in the average human, the connective tissue attachment occupies 1.07 mm of space above the crest of the alveolar bone and that the junctional epithelial attachment below the base of the gingival sulcus occupies another 0.97 mm of space above the connective tissue attachment. The combination of these two measurements, averaging approximately 1 mm each, constitutes the biologic width (Figure 66-3). Clinically, this information is applied to diagnose biologic width violations when the restoration margin is placed 2 mm or less away from the alveolar bone and the gingival tissues are inflamed with no other etiologic factors evident.
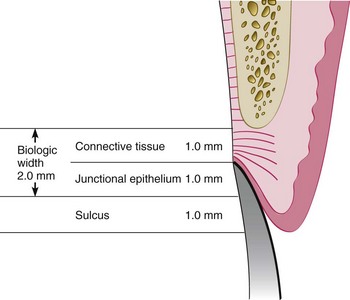
Figure 66-3 Average human biologic width: Connective tissue attachment 1 mm in height; junctional epithelial attachment 1 mm in height; sulcus depth of approximately 1 mm. The combined connective tissue attachment and junctional epithelial attachment, or biologic width, equals 2 mm.
Restorative considerations frequently dictate the placement of restoration margins beneath the gingival tissue crest. Restorations may need to be extended gingivally (1) to create adequate resistance and retentive form in the preparation, (2) to make significant contour alterations because of caries or other tooth deficiencies, or (3) to mask the tooth/restoration interface by locating it subgingivally. When the restoration margin is placed too far below the gingival tissue crest, it impinges on the gingival attachment apparatus and create a violation of biologic width.50 Two different responses can be observed from the involved gingival tissues (Figure 66-4).
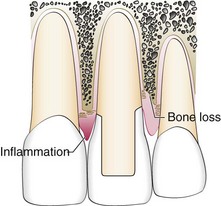
Figure 66-4 Ramifications of a biologic width violation if a restorative margin is placed within the zone of the attachment. On the mesial surface of the left central incisor, bone has not been lost, but gingival inflammation occurs. On the distal surface of the left central incisor, bone loss has occurred, and a normal biologic width has been reestablished.
One possibility is that bone loss of an unpredictable nature along with gingival tissue recession occurs as the body attempts to recreate room between the alveolar bone and the margin to allow space for tissue reattachment. This is more likely to occur in areas in which the alveolar bone surrounding the tooth is very thin in width. Trauma from restorative procedures can play a major role in causing this fragile tissue to recede. Other factors that may impact the likelihood of recession include (1) whether the gingiva is thick and fibrotic or thin and fragile and (2) whether the periodontium is highly scalloped or flat in its gingival form. It has been found that highly scalloped, thin gingiva is more prone to recession than a flat periodontium with thick fibrous tissue.48
The more common finding with deep margin placement is that the bone level appears to remain unchanged, but gingival inflammation develops and persists. To restore gingival tissue health, it is necessary to establish space clinically between the alveolar bone and the margin. This can be accomplished either by surgery to alter the bone level or by orthodontic extrusion to move the restoration margin farther away from the bone level.
Biologic Width Evaluation
Radiographic interpretation can identify interproximal violations of biologic width. However, with the more common locations on the mesiofacial and distofacial line angles of teeth, radiographs are not diagnostic because of tooth superimposition. If a patient experiences tissue discomfort when the restoration margin levels are being assessed with a periodontal probe, it is a good indication that the margin extends into the attachment and that a biologic width violation has occurred.
A more positive assessment can be made clinically by measuring the distance between the bone and the restoration margin using a sterile periodontal probe. The probe is pushed through the anesthetized attachment tissues from the sulcus to the underlying bone. If this distance is less than 2 mm at one or more locations, a diagnosis of biologic width violation can be confirmed. This assessment is completed circumferentially around the tooth to evaluate the extent of the problem. However, biologic width violations can occur in some patients in whom the margins are located more than 2 mm above the alveolar bone level.23 In 1994, Vacek et al71 also investigated the biologic width phenomenon. Although their average width finding of 2 mm was the same as that previously presented by Gargiulo et al,19 they also reported a range of different biologic widths that were patient specific. They reported biologic widths as narrow as 0.75 mm in some individuals, whereas others had biologic widths as tall as 4.3 mm (Figure 66-5).
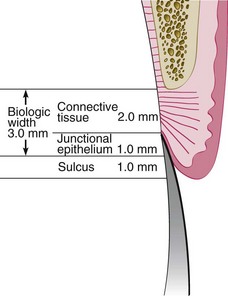
Figure 66-5 Possible variations exist in biologic width. Connective tissue attachments and junctional epithelial attachments may be variable. In this example the connective tissue attachment is 2 mm in height, the junctional epithelial attachment 1 mm in height, and the sulcus depth 1 mm, for a combined total tissue height above bone of 4 mm. However, the biologic width is 3 mm. This is just one variation that can occur from the average depicted in Figure 66-3.
This information dictates that specific biologic width assessment should be performed for each patient to determine if the patient needs additional biologic width, in excess of 2 mm, for restorations to be in harmony with the gingival tissues. The biologic, or attachment, width can be identified for the individual patient by probing to the bone level (referred to as “sounding to bone”) and subtracting the sulcus depth from the resulting measurement. This measurement must be done on teeth with healthy gingival tissues and should be repeated on more than one tooth to ensure an accurate assessment. The technique allows the variations in sulcus depths found in individual patients to be assessed and factored into the diagnostic evaluation. The information obtained is then used for definitive diagnosis of biologic width violations, the extent of correction needed, and the parameters for placement of future restorations.
Correcting Biologic Width Violations
Biologic width violations can be corrected either by surgically removing bone away from proximity to the restoration margin or by orthodontically extruding the tooth and thus moving the margin away from the bone. Surgery is the more rapid of the two treatment options.58 It is also preferred if the resulting crown lengthening creates a more pleasing tooth length. Indications and contraindications for surgical crown lengthening are presented in Chapter 65 and illustrated with clinical examples. In these situations the bone should be moved away from the margin by the measured distance of the ideal biologic width for that patient, with an additional 0.5 mm of bone removed as a safety zone.
There is a potential risk of gingival recession after removal of bone.7 If interproximal bone is removed, there is a high likelihood of papillary recession and the creation of an unesthetic triangle of space below the interproximal contacts. If the biologic width violation is on the interproximal side or if the violation is across the facial surface and the gingival tissue level is correct, orthodontic extrusion is indicated28 (Figures 66-6 to 66-9). The extrusion can be performed in two ways. By applying low orthodontic extrusion force, the tooth will erupt slowly, bringing the alveolar bone and gingival tissue with it. The tooth is extruded until the bone level has been carried coronal to the ideal level by the amount that needs to be removed surgically to correct the attachment violation. The tooth is stabilized in this new position and then is treated with surgery to correct the bone and gingival tissue levels. Another option is to perform rapid orthodontic extrusion where the tooth is erupted to the desired amount over several weeks.32 During this period, a supracrestal fiberotomy is performed circumferentially around the tooth weekly in an effort to prevent the tissue and bone from following the tooth. The tooth is then stabilized for at least 12 weeks to confirm the position of the tissue and bone, and any coronal creep can be corrected surgically.
Figure 66-6 The left central incisor was fractured in an accident 12 months ago and restored at that time. The patient is unhappy with the appearance of the tissue surrounding the restoration (See Figures 66-7, 66-8, and 66-9).
Figure 66-7 Radiograph reveals a biologic width violation on the mesial surface interproximally. Removal of interproximal bone would create an esthetic deformity. This patient is better treated with orthodontic extrusion (see Figures 66-6 and 66-8).
Figure 66-8 After orthodontic eruption. The tooth has been erupted 3 mm to move the bone and gingiva coronally 3 mm on the left central incisor. It is now possible to reposition the bone surgically to the correct level and position the gingiva to the correct level, reestablishing normal biologic width.
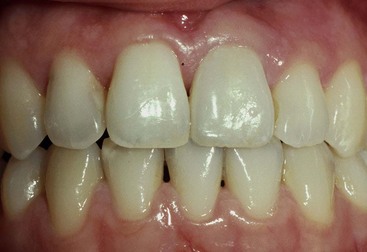
Figure 66-9 One-year recall photograph after orthodontic extrusion, osseous surgery, and placement of a new restoration for patient in Figure 66-6. Note the excellent tissue health after the reestablishment of biologic width.
Margin Placement Guidelines
When determining where to place restorative margins relative to the periodontal attachment, it is recommended that the patient’s existing sulcular depth be used as a guideline in assessing the biologic width requirement for that patient. The base of the sulcus can be viewed as the top of the attachment, and therefore the clinician accounts for variations in attachment height by ensuring that the margin is placed in the sulcus and not in the attachment.4,37,38,57 The variations in sulcular probing depth are then used to predict how deep the margin can safely be placed below the gingival crest. With shallow probing depths (1.0 to 1.5 mm), extending the preparation more than 0.5 mm subgingivally risks violating the attachment. This assumes that the periodontal probe will penetrate into the junctional epithelial attachment in healthy gingiva an average of 0.5 mm. With shallow probing depths, future recession is unlikely because the free gingival margin is located close to the top of the attachment. Deeper sulcular probing depths provide more freedom in locating restoration margins farther below the gingival crest. In most circumstances, however, the deeper the gingival sulcus, the greater is the risk of gingival recession.
The first step in using sulcus depth as a guide in margin placement is to manage gingival health. Once the tissue is healthy, the following three rules can be used to place intracrevicular margins:
The rationale for Rule 3 is that deep margin placement is more difficult and the stability of the free gingival margin is less predictable when a deep sulcus exists. Reducing the sulcus depth creates a more predictable situation in which to place an intracrevicular margin. The clinician cannot be sure that the tissue will remain at the corrected level, however, because some gingival rebound can occur after gingivectomy. However, sulcular depth reduction ensures that the restorative margins will not be exposed and visible in the patient’s mouth (Figures 66-10 to 66-14).

Figure 66-10 A 78-year-old woman presents with the maxillary anterior restorations placed 6 months earlier. She is unhappy with the exposed margins and notes that the margins were covered the day the restorations were placed (see Figures 66-11 to 66-14).
Figure 66-11 Depth from the attachment to the level of the preparation margin is greater than 3 mm. This patient in Figure 66-10 had an altered eruption pattern and a sulcus depth of more than 3 mm when these restorations were placed.
Figure 66-12 Two options were available to manage treatment appropriately: (1) place the original margins to half the depth of the sulcus, in which case the recession that occurred would not have exposed them, or (2) perform a gingivectomy, creating a 1-mm to 1.5-mm sulcus. The second option was chosen when the restorations were redone. The margins were then placed 0.5 mm below the tissue after the gingivectomy (see Figures 66-11 and 66-13).
Figure 66-13 At 6 weeks after the gingivectomy and preparation of the teeth. Note the tissue level and that the tissue is rebounding coronally over the margins. This is a common finding when a pure gingivectomy is done.
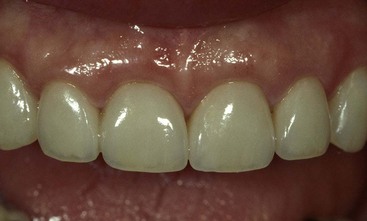
Figure 66-14 Four-year recall photograph after placement of the final restorations for patient in Figure 66-10. Note the tissue level has been maintained, with a sulcus depth of 2 mm on the facial surface.
Clinical Procedures in Margin Placement
The placement of supragingival or equigingival margins is simple because it requires no tissue manipulation. With regard to overall tooth preparation, the amount reduced incisally or occlusally, facially, lingually, and interproximally is dictated by the choice of restorative materials. Before extending subgingivally, the preparation should be completed to the free gingival margin facially and interproximally. This allows the margin of the tooth preparation to be used as a reference for subgingival extension once the tissue is retracted (Figure 66-15).
Tissue Retraction
Once the supragingival portion of the preparation is completed, it is necessary to extend below the tissue.6,24 The preparation margin must now be extended to the appropriate depth in the sulcus, applying the guidelines presented previously. In this process the tissue must be protected from abrasion, which will cause hemorrhage and can adversely affect the stability of the tissue level around the tooth. Access to the margin is also required for the final impression, with a clean, fluid-controlled environment. Tissue management is achieved with gingival retraction cords using the appropriate size to achieve the displacement required. Thin, fragile gingival tissues and shallow sulcus situations usually dictate that smaller diameter cords be chosen to achieve the desired tissue displacement.
For a Rule 1 margin (sulcus depth 1.5 mm or less), the cord should be placed so that the top of the cord is located in the sulcus at the level in which the final margin is to be established, which will be 0.5 mm below the previously prepared margin (Figure 66-16). On the interproximal aspects of the tooth, the cord is usually 1.0 to 1.5 mm below the tissue height because the interproximal sulcus is often 2.5 to 3.0 mm in depth. With this initial cord in place, the preparation is extended to the top of the cord, with the bur angled to the tooth so that it does not abrade the tissue (Figure 66-17). This process protects the tissue, creates the correct axial reduction, and establishes the margin at the desired subgingival level. To create space and allow access for a final impression, it is now necessary to pack a second retraction cord. The second cord is pushed so that it displaces the first cord apically and sits between the margin and the tissue (Figure 66-18). For the final impression, only the top cord is removed, leaving the margins visible and accessible to be recorded with the impression material (Figure 66-19). The initial cord remains in place in the sulcus until the provisional restoration is completed.

Figure 66-16 Second step in margin placement is to place a single layer of deflection cord below the previously prepared margin to the desired final margin level. Here, a single cord has been placed 0.5 mm below the previously prepared margin.
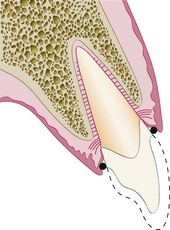
Figure 66-17 Margin of the preparation is now extended apically to the top of the retraction cord; this represents the correct placement of the margin below the previously nonreflected, free gingival margin.
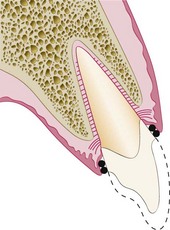
Figure 66-18 To provide space for impression material, a second impression cord is now placed on top of the first deflection cord. This impression cord is placed so that it is between the margin of the preparation and the gingiva to create adequate space for impression material after removal of the cord.
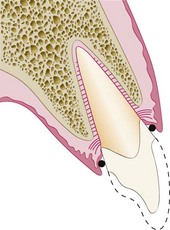
Figure 66-19 Ideal situation after removal of impression cord. The deflection cord is still in place maintaining the open sulcus but has been displaced apically another 0.5 mm by the placement of the impression cord, exposing tooth structure apical to the margin so that it can be captured in the impression.
As an alternative to additional retraction cords, electrosurgery can be used to remove any overlying tissue in the retraction process. A fine-wire electrode tip is held parallel to the tooth and against the margin in the sulcus and moved through the overhanging tissue, opening up the margin and the retraction cord to visual access (Figures 66-20 to 66-23). The electrosurgery tip sits on top of the retraction cord in place in the sulcus. This controls the vertical position of the tip and results in the removal of the least tissue needed for access.
Figure 66-20 Deflection cord and impression cord are in place. The soft tissue is falling over the margins of the preparation. In this situation, if the impression cord were removed, the impression would not capture the margins in the areas in which the tissue is overhanging.
Figure 66-21 Overhanging tissue has been removed and space created for the impression material with electrosurgery. Note that the deflection cord and the impression cord are still in place. The impression cord is now visible completely around the tooth, allowing easy access for the impression material to the margin after removal of the impression cord.

Figure 66-22 Using electrosurgery, the fine-wire electrode tip is held parallel to the tooth preparation and rests on the cord as the tip is moved around the tooth.
Figure 66-23 After removal of the impression cord, an adequate space is created for the impression material, with no soft tissue overhanging the margins to trap or tear the impression material. Note the first cord, or deflection cord, is still in place.
For Rule 2 situations in which the sulcus is deeper, two larger-diameter cords are used to deflect the tissue before extending the margin apically (Figures 66-24 to 66-26). The top of the second cord is placed to identify the final margin location at the correct distance below the previously prepared margin, which was at the gingival tissue crest level. The margin is lowered to the top of the second cord (Figure 66-27), then a third cord is placed in preparation for the impression (Figures 66-28 and 66-29). In the patient with a deep sulcus in which the margin may be 1.5 to 2.0 mm below the tissue crest, electrosurgery is often required to remove overhanging tissue. To avoid altering the gingival tissue height, it is important to hold the electrosurgery tip parallel to the preparation (Figure 66-30).
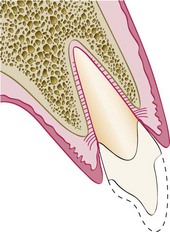
Figure 66-24 First step in margin placement for the patient with altered eruption or a deep sulcus is to prepare to the existing free gingival margin, as in the “Rule 1” patient (see text).
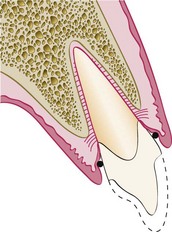
Figure 66-25 Second step for the patient with altered eruption is to place the deflection cord. Note that the placement of a single deflection cord does not provide adequate deflection of the tissue to allow the margin to be carried below tissue without abrading the gingiva with the bur.
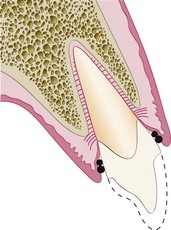
Figure 66-26 Third step for the patient with altered eruption and a deep sulcus is to place a second, larger-diameter deflection cord on top of the first deflection cord. Combined, these two cords allow adequate deflection to open up the sulcus so that the margin can be carried below tissue without abrading the gingiva.

Figure 66-27 Preparation is now extended to the top of the second deflection cord, finalizing margin location.
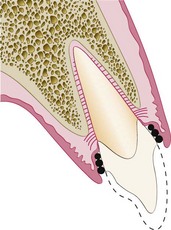
Figure 66-28 After extension of the margin to the top of the deflection cord, a third layer of cord is applied that will act as the impression cord. This impression cord should be placed so that it fits between the free gingival margin and the margin of the preparation. Its placement will also apically displace the two previously positioned deflection cords.
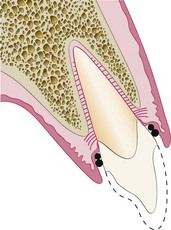
Figure 66-29 Removal of the impression cord creates an adequate space for the impression material to capture the margin and 0.5 mm of tooth structure below the margin in which the impression cord had displaced the first two cords.
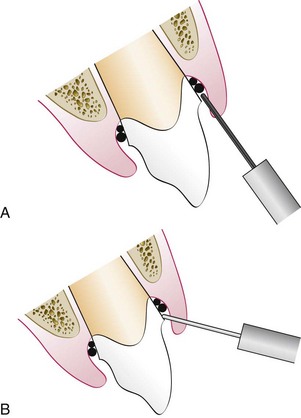
Figure 66-30 If it is necessary to use electrosurgery, either in the normal or altered-eruption patient, the correct inclination of the electrosurgery tip is important. A, Electrosurgery tip being held parallel to the preparation and resting on the previously placed retraction cord. This removes a minimal amount of tissue, and the presence of the retraction cord protects the attachment from the electrosurgery. B, Incorrect inclination of electrosurgery tip. The tip is leaning away from the preparation. This inclination results in excess tissue removal.
Provisional Restorations
Three critical areas must be effectively managed to produce a favorable biologic response to provisional restorations.3,75 The marginal fit, crown contour, and surface finish of the interim restorations must be appropriate to maintain the health and position of the gingival tissues during the interval until the final restorations are delivered. Provisional restorations that are poorly adapted at the margins, that are overcontoured or undercontoured, and that have rough or porous surfaces can cause inflammation, overgrowth, or recession of gingival tissues. The outcome can be unpredictable, and unfavorable changes in the tissue architecture can compromise the success of the final restoration.
Marginal Fit
Marginal fit has clearly been implicated in producing an inflammatory response in the periodontium. It has been shown that the level of gingival inflammation can increase corresponding with the level of marginal opening.16 Margins that are significantly open (several tenths of a millimeter) are capable of harboring large numbers of bacteria and may be responsible for the inflammatory response seen. However, the quality of marginal finish and the margin location relative to the attachment are much more critical to the periodontium than the difference between a 20-µm fit and a 100-µm fit.43,47,60
Crown Contour
Restoration contour has been described as extremely important to the maintenance of periodontal health.27,76 Ideal contour provides access for hygiene, has the fullness to create the desired gingival form, and has a pleasing visual tooth contour in esthetic areas. Evidence from human and animal studies clearly demonstrates a relationship between overcontouring and gingival inflammation, whereas undercontouring produces no adverse periodontal effect.49,52 The most frequent cause of overcontoured restorations is inadequate tooth preparation by the dentist, which forces the technician to produce a bulky restoration to provide room for the restorative material. In areas of the mouth in which esthetic considerations are not critical, a flatter contour is always acceptable.
Subgingival Debris
Leaving debris below the tissue during restorative procedures can create an adverse periodontal response. The cause can be retraction cord, impression material, provisional material, or either temporary or permanent cement.56 The diagnosis of debris as the cause of gingival inflammation can be confirmed by examining the sulcus surrounding the restoration with an explorer, removing any foreign bodies, and then monitoring the tissue response. It may be necessary to provide tissue anesthesia for patient comfort during the procedure.
Hypersensitivity to Dental Materials
Inflammatory gingival responses have been reported related to the use of nonprecious alloys in dental restorations.53 Typically, the responses have occurred to alloys containing nickel, although the frequency of these occurrences is controversial.51 Hypersensitivity responses to precious alloys are extremely rare, and these alloys provide an easy solution to the problems encountered with the nonprecious alloys. More importantly, tissues respond more to the differences in surface roughness of the material rather than to the composition of the material.1,67 The rougher the surface of the restoration subgingivally, the greater are the plaque accumulation and gingival inflammation. In clinical research, porcelain, highly polished gold, and highly polished resin all show similar plaque accumulation. Regardless of the restorative material selected, a smooth surface is essential on all materials subgingivally.
Esthetic Tissue Management
Managing Interproximal Embrasures
Current restorative and periodontal therapy must consider a good esthetic result, especially in the maxillary anterior “esthetic zone.” As discussed in Chapter 63, the interproximal papilla is a very important part in creating this esthetic result. The interproximal embrasure created by restorations and the form of the interdental papilla have a unique and intimate relationship.62,63 The ideal interproximal embrasure should house the gingival papilla without impinging on it and should also extend the interproximal tooth contact to the top of the papilla so that no excess space exists to trap food and to be esthetically displeasing.
Papillary height is established by the level of the bone, the biologic width, and the form of the gingival embrasure. Changes in the shape of the embrasure can impact the height and form of the papilla. The tip of the papilla behaves differently than the free gingival margin on the facial aspect of the tooth. Whereas the free gingival margin averages 3 mm above the underlying facial bone, the tip of the papilla averages 4.5 to 5.0 mm above the interproximal bone (Figure 66-31). This means that if the papilla is farther above the bone than the facial tissue but has the same biologic width, the interproximal area will have a sulcus 1.0 to 1.5 mm deeper than that found on the facial surface.
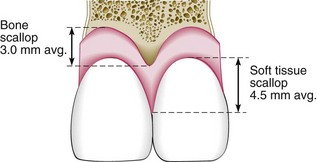
Figure 66-31 Comparison of the behavior of the interproximal papilla relative to bone and the free gingival margin relative to bone in the average human. There is a 3-mm scallop from the facial bone to the interproximal bone. However, on average, a 4.5- to 5.0-mm gingival scallop exists between the facial tissue height and the interproximal papilla height. This extra scallop of 1.5 to 2.0 mm of gingiva compared with bone is the result of the extra soft tissue height above the attachment interproximally.
Van der Veldon73 completely removed healthy papillae to the bone level and found that they routinely regenerated 4.0 to 4.5 mm of total tissue above bone, with an average sulcus depth of 2.0 to 2.5 mm. The height above bone that the papilla strives to maintain was indirectly confirmed by Tarnow et al,68 who studied the relationship of the papilla between the interproximal contact and the underlying bone. When the gingival level of the interproximal tooth contacts measured 5 mm or less to the alveolar bone, the papilla always filled the space. When the contact was 6 mm from bone, only 56% of the papillae could fill the space. Finally, when the contact was 7 mm from bone, only 37% of the papillae could fill the spaces.
Knowing that there is individual variability to the required biologic width, this information relative to the papilla is applied by locating the lowest point of the interproximal contact in relation to the top of the epithelial attachment. The ideal contact should be 2 to 3 mm coronal to the attachment, which coincides with the depth of the average interproximal sulcus. As in assessing the facial tissues for margin location, this technique requires that the tissue is healthy to allow accurate probing. If the sulcus measures greater than 3 mm, there is some risk of papillary recession with restorative procedures.
The clinician most frequently confronts a normal or shallow sulcus with a papilla that appears too short rather than a tall papilla with a deep sulcus. Management of this situation is best approached by viewing the papilla as a balloon of a certain volume that sits on the attachment. This balloon of tissue has a form and height dictated by the gingival embrasure of the teeth. With an embrasure that is too wide, the balloon flattens out, assumes a blunted shape, and has a shallow sulcus (Figure 66-32).
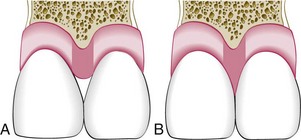
Figure 66-32 Relationship between gingival embrasure volume and papillary form. A, gingival embrasure of the teeth is excessively large as the result of a tapered tooth form. Because of the large embrasure form, the volume of tissue sitting on top of the attachment is not molded to the shape of a normal papilla but rather has a blunted form and a shallower sulcus. B, Ideal tooth form in which the same volume of tissue sits on top of the attachment as in A. Because of the more closed embrasure form from the teeth in B, however, the papilla completely fills the embrasure and has a deeper sulcus, averaging 2.5 to 3.0 mm. Note that the ideal contact position is 3 mm coronal to the attachment.
If the embrasure is the ideal width, the papilla assumes a pointed form, has a sulcus of 2.5 to 3.0 mm, and is healthy. If the embrasure is too narrow, the papilla may grow out to the facial and lingual, form a col, and become inflamed. This information is applied when evaluating an individual papilla with an open embrasure. The papilla in question is compared to the adjacent papillae. If the papillae are all on the same level, and if the other areas do not have open embrasures, the problem is one of gingival embrasure form. If the papilla in the area of concern is apical to the adjacent papillae, however, the clinician should evaluate the interproximal bone levels. If the bone under that papilla is apical to the adjacent bone levels, the problem is caused by bone loss. If the bone is at the same level, the open embrasure is caused by the embrasure form of the teeth and not a periodontal problem with the papilla.
Correcting Open Gingival Embrasures Restoratively
There are two causes of open gingival embrasures: (1) the papilla is inadequate in height because of bone loss or (2) the interproximal contact is located too high coronally. If a high contact has been diagnosed as the cause of the problem, there are two potential reasons. If the root angulation of the teeth diverges, the interproximal contact is moved coronally, resulting in the open embrasure. However, if the roots are parallel, the papilla form is normal, and an open embrasure exists, then the problem is probably related to tooth shape, specifically an excessively tapered form. Restorative dentistry can correct this problem by moving the contact point to the tip of the papilla. To accomplish this, the margins of the restoration must be carried subgingivally 1.0 to 1.5 mm, and the emergence profile of the restoration is designed to move the contact point toward the papilla while blending the contour into the tooth below the tissue (Figure 66-33). This can be accomplished easily with direct bonded restorations because the soft tissue can clearly be seen (Figures 66-34 to 66-36). For indirect restorations, the desired restoration contours and embrasure form should be established in the provisional restorations, and the gingival tissues are allowed to adapt for 4 to 6 weeks before the tissue contour information is relayed to the laboratory for use in the final restorations.
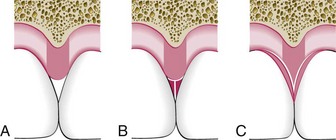
Figure 66-33 Methods of altering gingival embrasure form. A, Typical open gingival embrasure caused by excessively tapered tooth form. B, Common method employed by restorative dentists to correct the embrasure, in which material is added supragingivally. This closes the embrasure by moving the contact to the tip of the papilla but results in overhangs that cannot be cleaned using dental floss. Removing these overhangs restoratively reopens the embrasure. C, Correct method of closing the gingival embrasure, in which the margins of the restoration are carried 1.0 to 1.5 mm below the tip of the papilla. Note that this does not encroach on the attachment because the average interproximal sulcus probes 2.5 to 3.0 mm. This allows easy cleaning because of the convex profile. It also reshapes the papilla to a more pleasing profile esthetically.
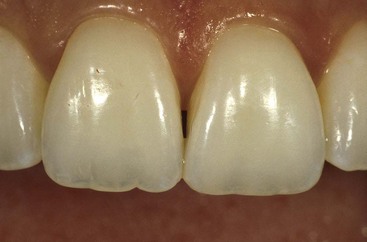
Figure 66-34 This patient has parallel roots, has recently completed orthodontic therapy, and is unhappy with the open gingival embrasure between her central incisors. An evaluation of papillary height reveals that all are at an equal level. This can only mean that the open embrasure is the result of an overly tapered tooth form (see Figures 66-35 and 66-36).

Figure 66-35 One method of correctly altering tooth form of patient in Figure 66-34. A metal matrix band has been shaped to the desired tooth form and placed 1.0 to 1.5 mm below the tip of the papilla. Restorative material then was added to the tooth against the matrix band, forming the new mesial surface of the left central incisor.
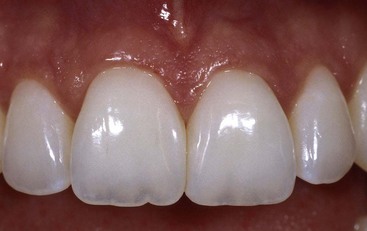
Figure 66-36 One-year recall photograph after restoring the mesial surfaces of the right and left central incisors, moving the proximal contact to the tip of the papilla and extending the restorations 1.0 to 1.5 mm below the papilla, blending them into the tooth and making an easily cleaned area (see Figures 66-34 and 66-35).
Managing Gingival Embrasure Form for Patients with Gingival Recession
Management of the gingival embrasure form for patients who have experienced gingival recession varies, depending on whether the treatment is in the anterior or posterior regions of the mouth.31 In esthetic areas, it is necessary to carry the interproximal contacts apically toward the papilla to eliminate the presence of large, open embrasures. With multiple-unit restorations, it is also possible with tissue-colored ceramics to bake porcelain papillae directly on the restoration. In the posterior areas where the interroot widths are significantly greater, it is often impossible to carry the proximal contacts to contact the tissue without creating large overhangs on the restorations. In these situations, the contact should be moved far enough apically to minimize any large food traps while still leaving an embrasure of a convenient size to be accessed with an interdental brush for hygiene. It should be noted that developing excessively long interproximal contacts, whether on anterior or posterior teeth, always creates rectangular, somewhat unesthetic, tooth forms.
Pontic Design
Classically, there are four options to consider in evaluating pontic design: sanitary, ridge-lap, modified ridge-lap, and ovate designs (Figure 66-37). Regardless of design, the pontic should provide an occlusal surface that stabilizes the opposing teeth, allows for normal mastication, and does not overload the abutment teeth. The restorative material for all four designs can be glazed porcelain, polished gold, or polished resin. The biologic response of the tissue in contact with the restoration is no different in regard to of the material chosen, as long as it has a smooth surface finish.26,54,64
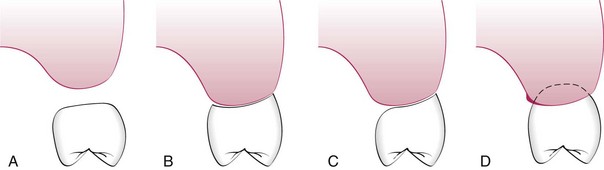
Figure 66-37 Four options to designing the shape of a pontic. A, Sanitary pontic. tissue surface of the pontic is 3 mm from the underlying ridge. B, Ridge-lap pontic. Tissue surface of the pontic straddles the ridge in saddlelike fashion. The entire tissue surface of the ridge-lap pontic is convex and very difficult to clean. C, Modified ridge-lap pontic. Tissue surface on the facial is concave, following the ridge. However, the lingual saddle has been removed to allow access for oral hygiene. D, Ovate pontic. The pontic form fits into a receptor site within the ridge. This allows the tissue surface of the pontic to be convex and also optimizes esthetics.
The key differences between the four pontic designs relate to the esthetics and access for hygiene procedures. The primary method for cleaning the undersurface of pontics is to draw dental floss mesiodistally along the undersurface. The shape of this undersurface determines the ease with which plaque and food debris can be removed in the process. The sanitary and ovate pontics have convex undersurfaces, which makes them easiest to clean. The ridge-lap and modified ridge-lap designs have concave surfaces, which are more difficult to access with the dental floss. Although the sanitary pontic design provides the easiest access for hygiene procedures, it is rarely used because of its unesthetic form and a variable acceptance of the open contour by patients.
The ovate pontic is the ideal pontic form.62 It is created by forming a receptor site in the edentulous ridge with a diamond bur or by electrosurgery. The site is shaped to create either a flat or a concave contour so that when the pontic is created to adapt to the site, it will have a flat or convex outline. The depth of the receptor site depends on the esthetic requirements of the pontic. In highly esthetic areas such as the maxillary anterior region, it is necessary to create a receptor area that is 1.0 to 1.5 mm below the tissue on the facial aspect. This creates the appearance of a free gingival margin and produces optimal esthetics (Figure 66-38). This site can then be tapered to the height of the palatal tissue to facilitate hygiene access from the palatal side. In the posterior areas, a deep receptor site can complicate hygiene access. In these situations, the ideal site has the facial portion of the pontic at the same level as the ridge, and then the site is created as a straight line to the lingual side of the pontic. This removes the convexity of the ridge and produces a flat, easily cleanable tissue surface on the pontic (Figure 66-39).
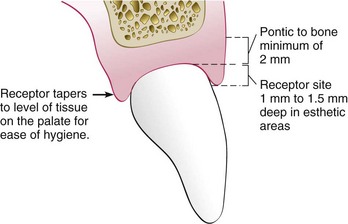
Figure 66-38 Ideal shape and form of an ovate pontic in the esthetic area. The receptor site has been created 1.0 to 1.5 mm apical to the free gingival margin on the facial aspect. This creates the illusion of the pontic erupting from the tissue. On the palatal side, the pontic is tapered so that the receptor site is not extended below tissue; this allows easier access for oral hygiene. Note that when the receptor site is created, the bone must be a minimum of 2 mm from the most apical portion of the pontic.
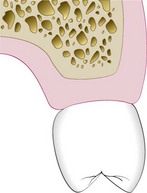
Figure 66-39 Option for creating an ovate pontic receptor site in less esthetic areas of the mouth. Rather than creating the receptor site so that the pontic extends into the ridge, it is possible to create a flattened receptor site in which the pontic sits flush with the ridge. This facilitates oral hygiene.
When the ridge is being surgically modified, it is important to know the thickness of soft tissue above the bone. This measurement is obtained by probing to the bone through the anesthetized tissue. If the tissue is removed to less than 2 mm in thickness, significant rebound in ridge height may occur. If it is necessary to reduce the tissue height to less than 2 mm above the bone to create the desired pontic form, some bone will need to be removed to achieve the desired result.
It is important when considering an ovate pontic to realize that certain soft tissue ridge parameters must exist to optimize the ovate pontic form. First, the ridge height needs to match the ideal height of the interproximal papillae where interproximal embrasures are planned, either between pontics or next to abutment teeth. Second, the gingival margin height must also be at the ideal level, or the pontic will appear too long. Third, the ridge tissue must be facial to the ideal cervical facial form of the pontic so that the pontic can emerge from the tissue. If any of these three areas is inadequate, some form of ridge augmentation is needed to produce a ridge that can have an adequate receptor site created (Figure 66-40). Any ridge augmentation procedures should be completed before, or in conjunction with, fabricating an ovate pontic. When constructing the final restorations, the contours of the developed ovate pontic receptor site can be conveyed to the laboratory by capturing a soft tissue impression 4 to 6 weeks after the site has been created.
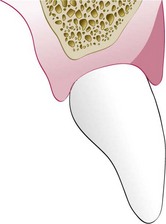
Figure 66-40 Ridge considerations when an ovate pontic is desired. For an ovate pontic to be properly created, the soft tissue ridge must be labial to the desired cervical portion of the pontic. When the pontic is facial to the ridge, it is not possible to create what appears to be a “free gingival margin” correctly. The shaded area represents the necessary amount of tissue that would be augmented to produce an ideal ovate pontic in this particular site.
The ovate pontic can serve another important periodontal function by maintaining the interdental papilla next to abutment teeth after extraction.62 When a tooth is removed, the gingival embrasure form is lost. The normal response of the papilla to this loss of embrasure form is to recede 1.5 to 2.0 mm, which corresponds to the additional soft tissue that exists above bone on the interproximal versus the facial aspect. However, this recession can be prevented. By inserting the correct pontic form 2.5 mm into the extraction site the day the tooth is removed, the gingival embrasure form and papilla can be maintained. At 4 weeks, the 2.5-mm extension can be reduced to a 1.0- to 1.5-mm extension to facilitate hygiene. This procedure can maintain the papilla next to the abutment teeth as long as the bone on the abutment tooth is at a normal level (Figures 66-41 to 66-48). The procedure is also illustrated in Figure 65-5.
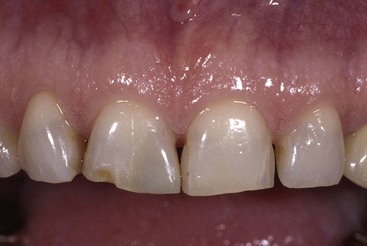
Figure 66-41 Patient who will have the right central incisor extracted because of periodontal disease. The patient is choosing to have a fixed partial denture rather than an implant as the method of replacement. An ovate pontic will be used to maintain the papillary form after the removal of this central incisor (see Figures 66-42 to 66-48).
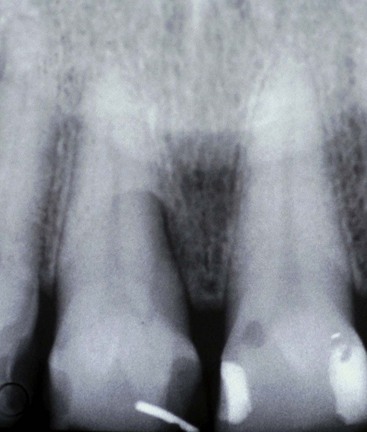
Figure 66-42 Note radiographic appearance of a palatal well caused by a deep palatal groove on this right central incisor of patient in Figure 66-41. Two attempted periodontal surgeries have failed to correct this, and it still probes 10 mm with suppuration.
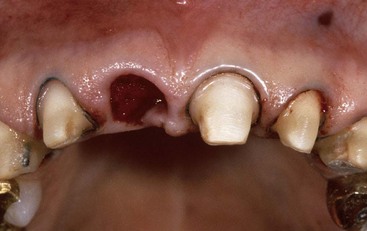
Figure 66-43 Because the patient in Figure 66-41 desired to alter the esthetics of her remaining anterior teeth, all the anterior teeth were prepared before removal of the right central incisor.
Figure 66-44 The key to maintenance of the interproximal papilla is that the ovate pontic extend 2.5 mm into the extraction site on the day of extraction. This will maintain gingival embrasure form and therefore maintain interproximal papillary height.
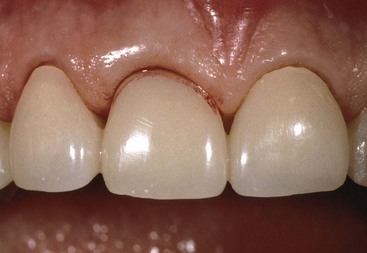
Figure 66-45 Note that when the provisional restoration is seated on the day of the extraction, 2.5 mm of the pontic extends upward into the extraction socket. Also note the open gingival embrasures present to allow space for the papillae to rebound coronally.
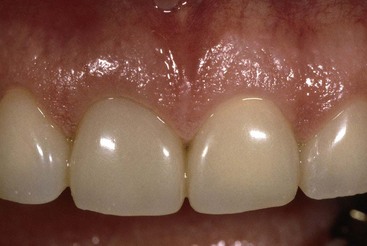
Figure 66-46 Nine months after placement of the provisional restoration. (At 4 weeks after placement, the pontic was shortened to extend 1.5 mm into the extraction site to facilitate oral hygiene.) Note maintenance of papillary form and free gingival margin height, predictable in this patient because she has excellent interproximal and facial bone.
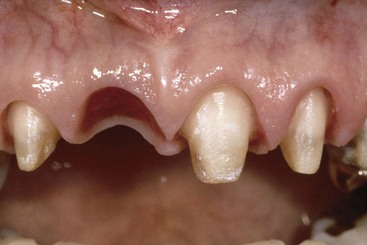
Figure 66-47 Ovate pontic site after removal of the provisional restoration and before final impressions. Note that the papillary form has been maintained because of the ovate pontic maintaining gingival embrasure volume.
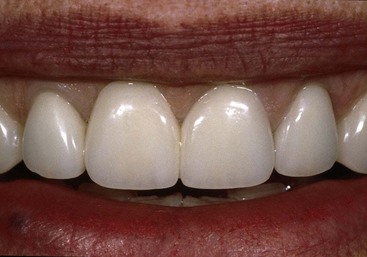
Figure 66-48 Two-year recall photograph of the final fixed prosthesis of patient in Figure 66-41. Note how the final ovate pontic also has maintained papillary form.
The “full ridge-lap pontic” is an outdated design that straddles the convexity of the ridge buccolingually and creates an undersurface that is entirely concave and cannot be cleaned. It is not recommended for use in any situations. However, a modified ridge-lap pontic can be an acceptable design if inadequate ridge exists to create an ovate pontic. With the modified ridge-lap design, the pontic follows the convexity of the ridge on the facial aspect but stops on the lingual crest of the ridge without extending down the lingual side of the ridge. Although the facial aspect of the undersurface has a concave shape, the more open lingual form allows adequate access for oral hygiene.
Occlusal Considerations in Restorative Therapy
The biology of occlusion and related clinical evaluation procedures are presented in detail in Chapter 49. The importance of occlusal trauma as a factor in periodontal disease and its role in orofacial pain have been deemphasized in numerous papers.* However, the role that occlusion plays in restorative dentistry has been reemphasized. The increased use of dental implants and nonmetallic cosmetic restorations has resulted in greater concern over force management. These restorations are more sensitive to occlusal trauma, with subsequent structural failure, than are traditional restorations on teeth. Consequently, for the restorative dentist wanting a high degree of predictability in the final result, understanding occlusion is critical. The clinician must know how to create an occlusion, with the following guidelines as a goal:
To manage the occlusion as previously described, the clinician must be able to make accurate casts, use a facebow, and create centric relation records so that the information can be transferred to a suitable articulator. Although the details of these procedures are beyond the scope of this chapter, they are a routine part of any restorative treatment plan and must be mastered for the clinician to achieve predictable, long-term restorative success. The reader is referred to Chapter 49 for a more comprehensive overview of occlusal evaluation and therapy.
Special Restorative Considerations
Although the availability of implant therapy has greatly reduced the frequency with which root-amputated teeth are saved, restoration of root-resected teeth is still a viable mode of treatment. Diagnosis and management of multirooted teeth with furcation involvement including the rationale for root resection is presented in detail in Chapter 62. Structural challenges are created in restoring these teeth because of the amount of tooth structure lost in the resection process (Figure 66-49). Conservative tooth preparation will maintain as much of the remaining tooth as possible, but the resulting supragingival or minimally prepared subgingival finish lines will require additional metal display in the final restoration. A cast post and core may be indicated to create an adequate foundation for the final restoration. Because the remaining roots are often very thin mesiodistally, it is difficult to cement premade posts and have adequate bulk to place a foundation core on the mesial and distal surfaces of the post. This problem is avoided with the one-piece cast post and core restoration.
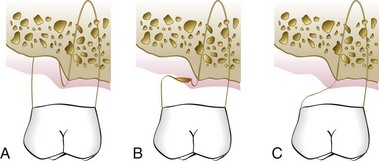
Figure 66-49 A, Maxillary molar with a class III furcation and bone loss surrounding the distal buccal root. B, Contour created when the distal buccal root is removed, but the coronal contour has not yet been reshaped. Note the overhang, which can trap food and plaque and create gingival inflammation. C, Correct contour after the restoration or reshaping of the tooth. Note this illustration is only of the facial portion of the tooth. The palatal portion of the crown and the palatal root do not appear. Note how the contour has been altered to allow easy access for an interdental brush to the gingival tissue and the tooth in the area in which the root was removed.
Another area of concern when restoring root-resected teeth is the development of appropriate contours for hygiene access. The primary concern is to avoid any excessively heavy convexities of contour that would prevent access (Figures 66-50 and 66-51). Facially and lingually, the contours should be essentially a straight line from the margin coronally, while interproximally, the contour emerges from the margin as a straight line or is slightly convex as it slopes up to the contact point. The interproximal areas of root-amputated and hemisected teeth often present with surface concavities on the root trunk, and these areas cannot be adequately cleaned with floss because it will bridge across the concavity. The gingival embrasure form created in the restoration must be fluted into these areas so that the surfaces can be accessed with an interdental brush.
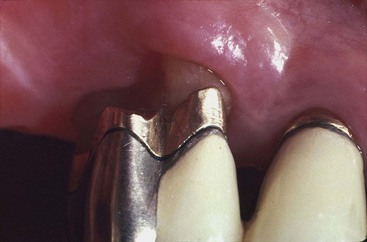
Figure 66-50 Photograph taken 6 weeks after the removal of the distal buccal root on this maxillary first molar. Note that the crown contour has not yet been altered. Also note the presence of a large overhang that easily traps debris.
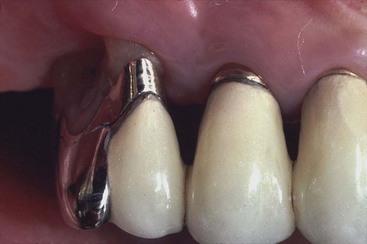
Figure 66-51 Correct modification of the crown form seen in Figure 66-50. The roof of the furcation of the remaining distal buccal root has been completely removed and the crown re-formed to allow easy access to the remaining roots and soft tissue.
Esthetics is usually not a major concern unless the tooth in question is a maxillary molar with a mesiobuccal root amputation and the patient has a broad smile. The solution is to create an artificial mesiobuccal root with normal crown contour coronal to it and a furcation made of restorative material that is easily cleanable with an interdental brush.
Splinting therapy may be applied with bonded external appliances, intracoronal appliances, or indirect cast restorations to connect multiple teeth, with the goal of improving tooth stability. Unstable teeth may be caused by a lack of periodontal support from bone loss, a lack of support from tooth loss, or the need to splint abutment teeth to support pontics. Indications for splinting are: (1) mobility of teeth that is increasing or that impairs patient comfort, (2) migration of teeth, or (3) prosthetics in which multiple abutments are necessary.
Before considering splinting, the clinician must identify the etiology of the instability.2 Excessive occlusal forces from parafunction or deflective tooth contacts are frequent causes of excessive mobility. Whenever the occlusion is the cause, occlusal therapy is always performed first. The mobility is then evaluated over time to determine if it resolves before splinting is considered. In addition, any inflammation of the periodontal supporting apparatus must be controlled before making a decision on splinting because inflammation can produce mobility in the presence of normal occlusal forces and normal periodontal support. When the teeth are splinted, all the teeth in the splint share the occlusal load to some extent.17 The rigidity of the splint and the number of teeth utilized determine how the forces are distributed.
The most common indication to splint mobile teeth is to improve patient comfort and to provide better control of the occlusion. If the anterior teeth are mobile. adequate crown length on the teeth being splinted is critical so that the interproximal connectors do not impinge on the interdental papilla. Also, adequate space must exist between the connector and the papilla for access with dental floss anteriorly and with an interproximal brush on posterior teeth.
The importance of gingiva in relation to anterior esthetics has been well documented.10,29,59,65 Various methods for altering gingival levels have been described, including gingivectomy, apically positioned flaps with osseous recontouring, and the use of orthodontic therapy to position the gingival tissue level apically or coronally by intruding or extruding the teeth.5,13,33,69
Whenever an alteration in gingival levels is contemplated, the expected outcome must be communicated to the patient to determine if the planned surgery is acceptable. Computer imaging can be used to provide the patient with a visual plan for the final esthetic result.18 However, the imaging process does not allow the dentist or patient to include the dynamics of lip movement in the evaluation of the proposed changes. Computer imaging provides enough information to depict the final outcome accurately when the planned surgery will alter the gingiva on one or two teeth while leaving the gingival levels of adjacent teeth in their existing position.
However, when the surgery will involve many or all of the anterior teeth and will result in moving gingiva several millimeters, to the extent that a flap will be raised and bony levels altered, an additional guide is desirable before surgery. Constructing these guides directly on a stone cast is the easiest and least time-consuming method. Before constructing the guide, treatment planning is completed on the patient to determine the desired incisal edge position and the desired gingival level of the tissues. This will establish the amount of tooth display at rest and at full smile. The information is transferred to a stone cast of the patient’s teeth, and the desired shape of the gingival margins for each tooth is drawn on the cast. The existing incisal edge position of each tooth is used as a reference in establishing the desired gingival level. A composite or acrylic resin veneer is then constructed on the cast, extending gingivally to the desired tissue position. The veneer guide can also be extended incisally to the desired incisal edge position so that this information can also be included in the veneer. The veneer is trimmed, polished, and tried in the patient’s mouth.
When the patient approves the gingival levels established with the guide, the desired gingival correction can be completed using the veneer guide as a surgical template. In addition to locating the initial incisions at the correct level, the guide can also be employed after flap reflection to aid in the bony recontouring to ensure adequate biologic width and sulcus depth at the new gingival position. The surgeon replaces the flap at closure to the gingival level established with the guide. Employing an esthetic template in this manner optimizes the predictability of the surgical therapy and establishes the ideal tissue framework to complete the esthetic restorations (Figures 66-52 to 66-59).
Figure 66-52 This patient is unhappy with the appearance of her maxillary teeth and the discrepancies of tissue height and tooth form (see Figures 66-53 to 66-59).
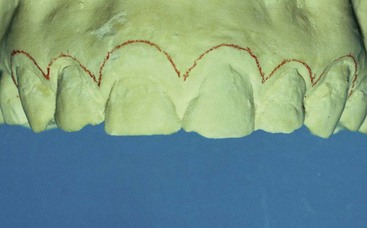
Figure 66-53 To create a surgical guide for patient in Figure 66-52, a stone cast is modified by drawing the desired soft tissue profile with a red wax pencil.
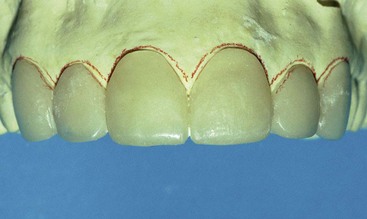
Figure 66-54 Composite-resin surgical guide is fabricated on this stone cast, extending to the line drawn. This guide can be taken to the mouth for try-in and verification by the patient (see Figure 66-52).
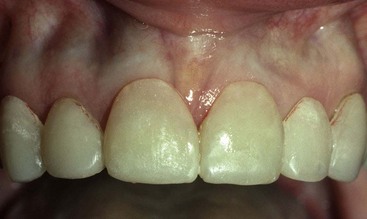
Figure 66-55 Photograph taken the day the surgical guide was tried-in. This patient in Figure 66-52 approved the new length of the maxillary anterior teeth and the form created by altering the soft tissue profile.
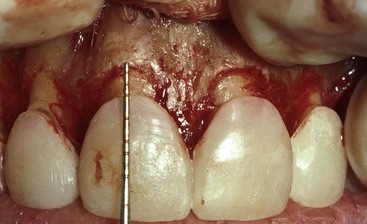
Figure 66-56 By placing the surgical guide during the surgery, it is possible to recognize where the bone needs to be placed. The surgical guide represents the desired final free gingival margin position and can be used as a reference for osseous recontouring. This patient had an average biologic width of 2 mm (see Figure 66-52). Allowing an additional 1 mm for sulcus depth, the desired distance between the bone and the free gingival margin will be 3 mm. With this knowledge, the periodontist can use the guide and remove bone until it is 3 mm from the position of the guide on each tooth.
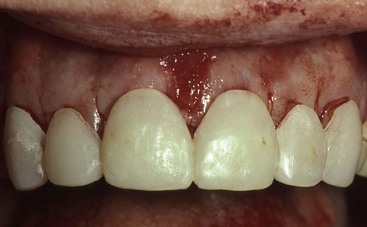
Figure 66-57 Surgical guide is also useful during suturing. Because the guide represents the desired free gingival margin position, it is possible to suture to the level of the guide, knowing that the surgery has now recreated biologic width and a 1-mm sulcus. This shortens the amount of time necessary for healing and eliminates the need to wait for tissue rebound before restorative dentistry.
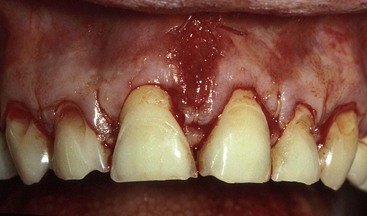
Figure 66-58 Soft tissue profile as seen the day of surgery with the guide removed. Note that in this patient, the interproximal papillae were not changed because the interproximal papillary form and height were deemed acceptable (see Figures 66-52 to 66-57).
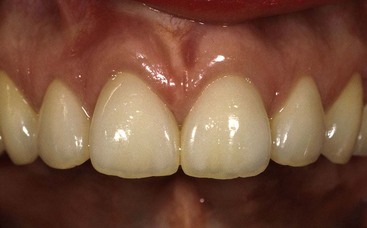
Figure 66-59 Photograph taken 4 years after placement of the final restoration of patient in Figure 66-52. Note the excellent soft tissue health and the attainment of the desired free gingival margin and papillary form.
 Science Transfer
Clinicians need to combine their pursuit of technical excellence of restorative preparations and crowns with a biologic sense of reducing the deleterious effects of restorative dentistry on the periodontium. Restorative margins on both teeth and implants provide an enhancement of the formation of the bacterial biofilm that causes periodontal disease and so the further away the crown margin is from supporting bone, the better expectation there is for periodontal health. Tooth restorative margins should be placed at least 2 mm distance from the crest of the alveolar bone process, and patients need to be instructed in the best approaches to oral hygiene.
To maintain periodontal health, overcontouring of restorations should be avoided. Undercontoured dental restorations rarely cause periodontal complications. A distance of 5 mm or greater between the contact point and the bone margin usually results in an unesthetic black triangle. Occlusal schemes need to be harmonized, and the use of a repeatable condylar position means that a stable centric relation is important, with avoidance of posterior guidance for protrusion. Lateral excursions should be smooth and free of balancing interferences.
1 Adamczyk E, Speichowics E. Plaque accumulation on crowns made of various materials. Int J Prosthodont. 1990;3:285.
2 Amsterdam M. Periodontal prosthesis: twenty-five years in retrospect. Alpha Omegan. 1974;67:30.
3 Amsterdam M, Fox L. Provisional splinting: principles and techniques. Dent Clin North Am. 1959;4:73.
4 Armitage GC, Svanberg GK, Löe H. Microscopic evaluation of clinical measurements of connective tissue attachment levels. J Clin Periodontol. 1977;4:173.
5 Becker W, Ochsenbein C, Becker B. Crown lengthening: the periodontal-restorative connection. Compend Contin Educ Dent. 1998;19:239.
6 Benson BW, Bomberg TJ, Hatch RA, et al. Tissue displacement in fixed prosthodontics. J Prosthet Dent. 1986;55:175.
7 Bragger U, Laachenauer D, Lang NP. Surgical lengthening of the clinical crown. J Clin Periodontol. 1992;19:58.
8 Carlsson G, De Boever J. Epidemiology. In: Zarb G, Carlsson G, Sessle B, et al, editors. Epidemiology. Copenhagen: Munksgaard, 1994.
9 Carlsson GE, Ingerval B, Kocak G. Effect of increasing vertical dimension on the masticatory system in subjects with natural teeth. J Prosthet Dent. 1979;41:284.
10 Chiche GJ, Pinault A. Esthetics of anterior fixed prosthodontics. Chicago: Quintessence; 1994.
11 Christensen J. Effect of occlusion-raising procedures on the chewing system. Dent Pract Dent Rec. 1970;20:233.
12 Dahl BL, Krogstad O. Long-term observations of an increased occlusal face height obtained by a combined orthodontic/prosthetic approach. J Oral Rehabil. 1985;12:173.
13 Dolt A, Robbins J. Altered passive eruption: an etiology of short clinical crowns. Quintessence Int. 1997;28:363.
14 Downs DH. An investigation into condylar position with leaf gauge and bimanual manipulation. J Gnathol. 1988;7:75.
15 Ericsson I, Lindhe J. Effect of longstanding jiggling on experimental periodontitis in the beagle dog. J Clin Periodontol. 1982;9:497.
16 Felton DA, Kanoy Be, Bayne SC, et al. Effect of in vivo crown margin discrepancies on periodontal health. J Prosthet Dent. 1991;65:357.
17 Foucher RR, Bryant RA. Bilateral fixed splints. Int J Periodont Restor Dent. 1983;5:9.
18 Ganz CH, Brisman SA, Tauro V: Computer video imaging: computerization, communication, and creation, QDT Yearbook, 1989, p 64.
19 Gargiulo AW, Wentz FM, Orban B. Dimension and relations of the dentogingival junction in humans. J Periodontol. 1961;32:262.
20 Gibb CH, Mahan PE, Wilkenson TM, et al. EMG activity of the superior belly of the lateral pterygoid muscle in relation to other jaw muscles. J Prosthet Dent. 1984;51:691.
21 , The glossary of prosthodontic terms, ed 8, 2005, Elsevier/Mosby, St Louis
22 Gross MD, Ormianer Z. A preliminary study on the effect of occlusal vertical dimension increases on mandibular postural rest position. Int J Prosthodont. 1994;7:216.
23 Günay H, Seeger A, Tschernitschek H, et al. Placement of the preparation line and periodontal health: a prospective 2-year clinical study. Int J Periodont Restor Dent. 2000;20:173.
24 Hansen PA, Tira DE, Barlow J. Current methods of finish line exposure by practicing prosthodontists. J Prosthodont. 1999;8:163.
25 Hatcher DC, Faulkner MG, Hay A. Development of mechanical and mathematic models to study temporomandibular joint loading. J Prosthet Dent. 1986;55:377.
26 Henry PJ, Johnson JF, Mitchell DF. Tissue changes beneath fixed partial dentures. J Prosthet Dent. 1966;16:937.
27 Hochman N, Yaffe A, Ehrlich J. Crown contour variation in gingival health. Compend Contin Educ Dent. 1983;4:360.
28 Ingber JS. Forced eruption. II. A method of treating nonrestorable teeth: periodontal and restorative considerations. J Periodontol. 1995;47:203.
29 Kay HB. Esthetic considerations in the definitive periodontal prosthetic management of the maxillary anterior segment. Int J Periodont Restor Dent. 1982;2(3):44.
30 Kohno S, Bando E. Die funcktionelle anpassung der kaumuskulatur bei starker beisshenbung [Functional adaptation of masticatory muscles as a result of large increases in the vertical dimension]. Dtsch Zahnartzl Z. 1983;38:759.
31 Kois JC, Spear FM. Periodontal prosthesis: creating successful restorations. J Am Dent Assoc. 1992;123:108.
32 Kozlovsky A, Tal H, Lieberman M. Forced eruption combined with gingival fiberotomy: a technique for clinical crown lengthening. J Clin Periodontol. 1991;18:330.
33 Lie T. Periodontal surgery for the maxillary anterior area. Int J Peridont Restor Dent. 1992;12(1):73.
34 Lindauer SJ, Gay T, Rendell J. Effect of jaw opening on masticatory muscles: EMG-force characteristics. J Dent Res. 1993;72:51.
35 Lindhe J, Ericsson I. The influence of trauma from occlusion on progression of experimental periodontitis in dogs. J Clin Periodontol. 1982;53:562.
36 Lindhe J, Svanberg G. Influence of trauma from occlusion on progression of experimental periodontitis in the beagle dog. J Clin Periodontol. 1974;1:3.
37 Listgarten MA. Periodontal probing: what does it mean? J Clin Periodontol. 1980;7:165.
38 Listgarten MA, Mao R, Robinson PJ. Periodontal probing and the relationship of the probe tip to periodontal tissues. J Periodontol. 1976;47:511.
39 Long JH. Locating centric relation with a leaf gauge. J Prosthet Dent. 1973;29:608.
40 MacKenna BR, Türker KS. Jaw separation and maximum incising force. J Prosthet Dent. 1983;49:726.
41 Manns A, Mirallees R, Guerrs F. The changes in electrical activity of the postural muscles of the mandible upon varying the vertical dimension. J Prosthet Dent. 1981;45:438.
42 Manns A, Spreng M. EMG amplitude and frequency at different muscular elongations under constant masticatory force or EMG activity. Acta Physiol Lat Am. 1977;27:259.
43 Marcum JS. The effect of crown margin depth upon gingival tissue. J Prosthet Dent. 1967;17:479.
44 McKee JR. Comparing condylar position respectability for standardized versus nonstandardized methods of achieving centric relation. J Prosthet Dent. 1997;77:280.
45 Meitner S. Co-destructive factors of marginal periodontitis and repetitive mechanical injury. J Dent Res. 1975;54:78.
46 National Institutes of Health Technology. Management of temporomandibular disorders, Assessment conference statement, 1996. Oral Surg Oral Med Oral Pathol Oral Radiol Endod. 1997;83:177.
47 Newcomb GJ. The relationship between the location of subgingival crown margins and gingival inflammation. J Periodontol. 1974;45:151.
48 Olsson M, Lindhe S. Periodontol characteristics in individuals with varying forms of the upper central incisors. J Clin Periodontol. 1991;18:78.
49 Parkinson CF. Excessive crown contours facilitate endemic plaque niches. J Prosthet Dent. 1976;35:424.
50 Parma-Benfenati S, Fugazzoto PA, Ruben MP. The effect of restorative margins on the postsurgical development and nature of the periodontium. Part I. Int J Periodont Restor Dent. 1985;6:31.
51 Pelton L. Nickel sensibility in the general population. Contact Derm. 1979;5:27.
52 Perel ML. Axial crown contours. J Prosthet Dent. 1971;25:642.
53 Pierce LH, Goodkind RJ. A status report of possible risks in base metal alloys and their components. J Prosthet Dent. 1989;62:234.
54 Podshadley AG. Gingival response to pontics. J Prosthet Dent. 1968;19:51.
55 Polson AM, Meitner SW, Zander HA. Trauma and progression of marginal periodontitis in squirrel monkeys. III. Adaptation of interproximal alveolar bone to repetitive injury. J Periodontal Res. 1976;11:279.
56 Price C, Whitehead FJH. Impression material as foreign bodies. Br Dent J. 1972;133:9.
57 Robinson PJ, Vitek RM. The relationship between gingival inflammation and the probe resistance. J Periodontal Res. 1975;14:239.
58 Rosenburg ES, Garber DA, Evian CL. Tooth lengthening procedures. Compend Contin Educ Dent. 1980;1:161.
59 Rufenache CR. Fundamentals of esthetics. Chicago: Quintessence; 1990.
60 Sillness J. Treated with dental bridges. III. The relationship between the location of the crown margin and the periodontal condition. J Periodontal Res. 1970;5:225.
61 Smith DM, McLachlan KR, McCall WDJr. A numerical model of temporomandibular joint loading. J Dent Res. 1986;65:1046.
62 Spear FM. Maintenance of the interdental papilla following anterior tooth removal. Pract Periodont Aesthet Dent. 1999;11:21.
63 Spear FM, Mathews DM, Kokich VG. Interdisciplinary treatment: integrating orthodontics with periodontics, endodontics, and restorative dentistry. Semin Orthodont. 3(1), 1997.
64 Stein RS. Pontic-residual ridge relationship: a research report. J Prosthet Dent. 1966;16:251.
65 Studer S, Zellweger U, Scharer P. The esthetic guidelines of the mucogingival complex for fixed prosthodontics. Pract Periodont Aesthet Dent. 1996;8:333.
66 Suvinen T, Hanes K, Gerchman J, et al. Psychophysical subtypes of temporomandibular disorders. J Orofac Pain. 1997;11:200.
67 Swartz ML, Phillips RW. Comparison of bacterial accumulations on rough and smooth surfaces. J Periodontol. 1957;28:304.
68 Tarnow DP, Magner AW, Fletcher P. The effects of the distance from the contact point to the crest of bone on the presence or absence of the interproximal dental papilla. J Periodontol. 1992;63:995.
69 Townsend CL. Resective surgery: an esthetic application. Quintessence Int. 1993;24:535.
70 Tylman SD. Theory and practice of crown and bridge prosthodontics, ed 5. St Louis: Mosby; 1965.
71 Vacek JS, Gher ME, Assad DA, et al. The dimensions of the human dentogingival junction. Int J Periodont Restor Dent. 1994;14:155.
72 Vallon D. Studies of occlusion adjustment therapy in patients with craniomandibular disorders, Malmö, Lund University (thesis). Swed Dent J. 1997. suppl 124
73 Van der Veldon U. Regeneration of the interdental soft tissue following denudation procedures. J Clin Periodontol. 1982;9:455.
74 Wood DP, Elliott RW. Reproducibility of the centric relation bite registration technique. Angle Orthod. 1994;64:211.
75 Yuodelis RA, Faucher R. Provisional restorations: an integrated approach to periodontics and restorative dentistry. Dent Clin North Am. 1980;24:285.
76 Yuodelis RA, Weaver JD, Sapko S. Facial and lingual contours of artificial complete crowns and their effect on the periodontium. J Prosthet Dent. 1973;29:61.
Suggested Readings
Chiche GJ, Pinault A. Esthetics of anterior fixed prosthodontics. Chicago: Quintessence; 1994.
Felton DA, Kanoy Be, Bayne SC, et al. Effect of in vivo crown margin discrepancies on periodontal health. J Prosthet Dent. 1991;65:357.
Günay H, Seeger A, Tschernitschek H, et al. Placement of the preparation line and periodontal health: a prospective 2-year clinical study. Int J Periodont Restor Dent. 2000;20:173.
Kois JC, Spear FM. Periodontal prosthesis: creating successful restorations. J Am Dent Assoc. 1992;123:108.
Rufenache CR. Fundamentals of esthetics. Chicago: Quintessence; 1990.
Spear FM. Maintenance of the interdental papilla following anterior tooth removal. Pract Periodont Aesthet Dent. 1999;11:21.
Studer S, Zellweger U, Scharer P. The esthetic guidelines of the mucogingival complex for fixed prosthodontics. Pract Periodont Aesthet Dent. 1996;8:333.
Tarnow DP, Magner AW, Fletcher P. The effects of the distance from the contact point to the crest of bone on the presence or absence of the interproximal dental papilla. J Periodontol. 1992;63:995.
Vacek JS, Gher ME, Assad DA, et al. The dimensions of the human dentogingival junction. Int J Periodont Restor Dent. 1994;14:155.
Van der Veldon U. Regeneration of the interdental soft tissue following denudation procedures. J Clin Periodontol. 1982;9:455.