Health Care Adaptations for the Child and Family
1 Define each key term listed.
2 List five safety measures applicable to the care of the hospitalized child.
3 Illustrate techniques of transporting infants and children.
4 Plan the basic daily data collection for hospitalized infants and children.
5 Identify the normal vital signs of infants and children at various ages.
6 Devise a nursing care plan for a child with a fever.
7 Discuss the techniques of obtaining urine and stool specimens from infants.
8 Position an infant for a lumbar puncture.
9 Calculate the dosage of a medicine that is in liquid form.
10 Demonstrate techniques of administering oral, eye, and ear medications to infants and children.
11 Compare the preferred sites for intramuscular injection for infants and adults.
12 Discuss two nursing responsibilities necessary when a child is receiving parenteral fluids and the rationale for each.
13 Demonstrate the appropriate technique for gastrostomy tube feeding.
14 Summarize the care of a child receiving supplemental oxygen.
15 Recall the principles of tracheostomy care.
16 List the adaptations necessary when preparing a pediatric patient for surgery.
 , p. 493)
 , p. 508)
 , p. 519)
 , p. 487)
 , p. 505)
 , p. 500)
 , p. 515)
 , p. 509)
 , p. 517)
 , p. 507)
 , p. 504)
 , p. 508)
 , p. 519)
 , p. 495)
 http://evolve.elsevier.com/Leifer
Admission to the Pediatric Unit
Specific pediatric skills can be found in chapters that discuss related diagnoses or conditions.
Informed Consent
When the child is admitted to the pediatric unit, a written informed consent is obtained for treatments that are given. An informed consent implies that the parent or legal guardian is capable of understanding information given to him or her, including the purpose and risks of the procedure, and voluntarily agrees to that procedure. The consent must be signed by the parent, the health care provider who provides the information, and a witness. The nurse acts as a patient advocate by ensuring that the proper consent has been signed before a procedure and that the child is also given age-appropriate information concerning the procedure and its possible outcomes.
Identification
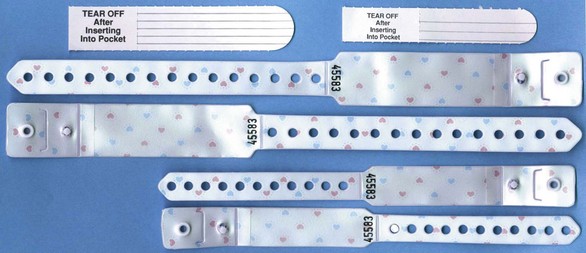
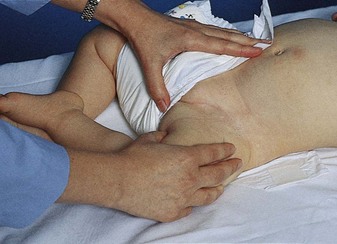
Every child admitted to the pediatric unit must have an identification (ID) bracelet applied. The ID bracelet of the patient should be checked before medications are administered or treatments are carried out. If a bracelet applied on admission is taken off by the child or falls off, identification should be verified and a new bracelet reapplied (Figure 22-1). The bracelet should be snug enough to prevent voluntary removal by the child. Many hospitals attach a security chip to the identification band that will activate an alarm if the child leaves the unit.
Essential Safety Measures in the Hospital Setting
The nurse must be especially conscious of safety measures in the children’s unit of the hospital. Accidents are a major cause of death among infants and children. By demonstrating concern about safety regulations, the nurse not only reduces unnecessary accidents but also sets a good example for parents. Although the physical layout of each institution cannot be altered by personnel, many simple safety measures can be carried out by the entire hospital team. The following lists of positive (Do’s) and negative (Do Not’s) measures are applicable to the children’s unit:
• Keep crib sides up and locked in place at all times when the child is unattended in bed (Figure 22-2).
FIGURE 22-2 The nurse should maintain hand contact if it is necessary to turn away from the infant or toddler. The side of the crib should be raised before leaving the infant or child to get equipment that is out of reach or for any other purpose. (Courtesy Pat Spier, RN-C.)
• Identify a child by ID bracelet, not room number.
• Use a bubble-top or plastic-top crib for infants and children capable of climbing over the crib rails (Figure 22-3).
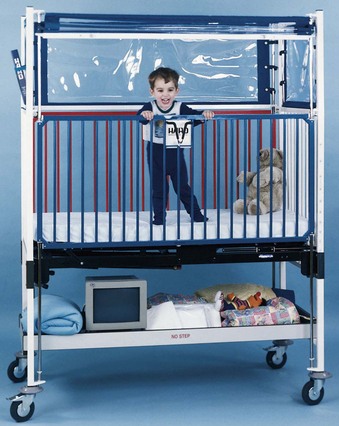
FIGURE 22-3 A hard plastic “bubble top” or a soft plastic crib extender must be in place on the crib if the child is capable of climbing over the side rails. The extender stays in place when the side rails are lowered.
• Place cribs so that children cannot reach sockets and appliances.
• Inspect toys for sharp edges and removable parts.
• Keep medications and solutions out of reach of the child.
• Identify the child properly before giving medications.
• Keep items such as powder, lotions, tissues, baby wipes, disposable diapers, and safety pins out of the infant’s reach.
• Prevent cross-infection. Diapers, toys, and materials that belong in one patient’s unit should not be borrowed for another patient’s use.
• Remain with the child who uses the bathtub or shower.
• Apply a safety belt to the child in a high chair.
• Take proper precautions when oxygen is in use.
• Locate fire exits and extinguishers on your unit and learn how to use them properly. Become familiar with your hospital’s fire procedure.
• Do not prop nursing bottles or force-feed small children. There is a danger of choking.
• Do not allow ambulatory patients to use wheelchairs or stretchers as toys.
• Do not leave an active child in a baby swing, feeding table, or high chair unattended.
• Do not leave a small child unattended when out of the crib.
Many other safety measures must be carried out as the nurse becomes more familiar with the hazards of individual units. Nurses must use their eyes to scrutinize, not just to look at, and then must take the necessary precautions.
 Safety Alert!
Crib Safety
• The mattress must fit securely into the crib.
• Blankets should not be tucked in.
• Soft or contour pillows should not be placed in cribs.
• The distance between crib slats should be no more than 6 cm ( inches).
• Decorative extensions on the corners of cribs can become caught on clothing and strangle the child.
• A bubble top or extension should be in place if the child is capable of climbing over the crib side.
Preparation Steps for Performing Procedures
Nurses must take specific steps to prepare for performing any procedure on any patient. A simple explanation and discussion with the parent or an age-appropriate explanation to the child should precede any nursing intervention. The parent can be allowed to assist whenever possible, and the child should be familiarized with the equipment to be used or even allowed to assist in the simple aspects of the procedure when appropriate. Common nursing actions before the actual skill is performed include checking the written order of the health care provider, gathering equipment, identifying the patient, explaining the procedure to the parent and the child, providing privacy, performing hand hygiene, and using standard precautions or transmissions-based precautions as needed. These preparatory steps appear as icons within each skill as appropriate.
Transporting, Positioning, and Restraining
The means by which the child is transported within the unit and to other parts of the hospital depends on age, level of consciousness, and how far the child must travel. Older children are transported in the same way as adults. Younger children are often transported in their cribs, in a wagon or wheelchair, or on a stretcher. The side rails on a stretcher are raised during transport. The nurse ensures that the child’s ID band is secured before leaving the unit. A notation is made describing where the child is being taken, for what purpose, and who is accompanying the child.
Figure 22-4 depicts four safe methods for holding an infant. Head and back support are necessary for young infants. The movements of small children are often random and uncoordinated; therefore they must be held securely. The football hold is useful when one hand needs to be free, such as for bathing the infant’s head. The mummy restraint is a short-term restraint that might be necessary for examination or treatments such as a venipuncture or placement of a nasogastric tube. This restraint effectively controls the child’s movements and can be modified to expose an arm, a leg, or the chest as needed (Rushing, 2009). Swaddling of the newborn infant is accomplished by the same technique. Many young infants respond positively to snug wrapping with a light baby blanket. Skill 22-1 describes the application of a mummy restraint (swaddling) for infants and children.
Skill 22-1 The Mummy Restraint (Swaddling)


1. Place a small, light blanket flat on the bed with the top at the infant’s shoulders.
2. Fold the blanket over the body and under the arm at the opposite side, tucking in the excess under the infant.
3. Place the other arm at the side and fold the blanket over the body, tucking the excess under the infant. The weight of the infant holds the restraint in place.
4. Separate the bottom of the blanket and fold upward toward the shoulder, tucking the sides under the infant’s body.
5. The arms should be in anatomical position. This restraint provides a feeling of snug security for the infant. It may be used for jugular venipunctures, nasogastric tube insertion, and other procedures.
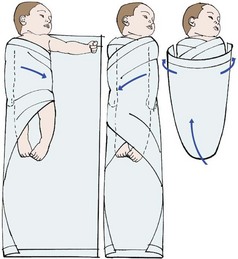
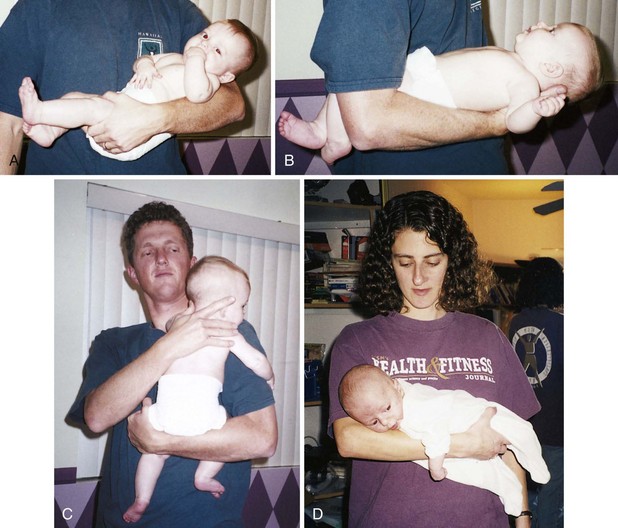
FIGURE 22-4 A, The cradle position. B, The football position. C, The upright position. D, The colic carry.
Restraints may be used for infants and children to facilitate examinations or treatments and to maintain safety. The reason for the restraint must be explained to the parents and the child. Restraints are used only when necessary. They are not a substitute for close observation, and should involve the fewest joints possible in order to enable free movement, which is necessary for growth and development. Excessive restraints can result in the infant or child fighting the restraint, thereby wasting energy and increasing oxygen consumption needs. Parents should be taught the importance of fastening safety straps on infants who are in high chairs, shopping carts, and infant seats. The colic carry is a position that can be used for infants when they are irritable because it typically confers a calming effect.
Assessment and Basic Data Collection
Children are different from adults both anatomically and physiologically. Basic data collection is done to determine the level of wellness, the response to medication or treatment, and any need for referral.
Organizing the Infant Assessment
In order to obtain accurate results, the organization of the infant assessment is important:
1. Select an area that is warm and not stimulating for the infant.
2. Expose only those areas of the body to be examined to prevent heat loss.
3. Without touching the infant, observe the following:
7. Utilize pacifier to comfort infant.
8. Swaddle and hold after assessment is complete.
Basic Data Collection
Basic data collection involves casual observation without touching. The child’s general appearance will indicate if his or her condition is serious or within normal limits. In general, serious illness may be suspected if the child is not alert and responsive to the environment. If the child is lethargic, prompt intervention by a health care provider is essential. Applying knowledge of basic growth and development will enable the nurse to determine whether the activities and behavior of the child are age appropriate. A child who has not mastered age-appropriate milestones should be referred for follow-up care. The presence of bruises on the body of the child that may be in different stages of healing, the lack of body cleanliness or appropriate dress, and the interaction or lack of interaction between parent and child are also areas that may require prompt referral for follow-up care. Is the child tipping his head or rubbing the ears? Is the child maintaining a rigid body position to breathe? If stridor or grunting sounds are heard during respiration, prompt referral should be made.
The History Survey
The personal history survey affords the nurse the opportunity to teach parents about the child’s needs and prevention of injury and illness. The admission history should include information concerning the child’s usual health habits and practices regarding eating, sleeping, toileting, activity patterns, and use of special words or gestures. Information concerning coping patterns, siblings, and family values is helpful. Questions concerning the use of complementary and alternative medicine (CAM) and over-the-counter medications should be included in every history data collection. This information can be used to formulate a nursing diagnosis in the plan of care for the individual child. The immunization record should be reviewed and plans for future immunizations discussed. Encouraging safe environments that include the use of car seats and protective gear for sports activities should be part of every teaching plan.
The Physical Survey
The physical survey includes a head-to-toe review that should be completed, at minimum, once each shift or once each clinic visit, even if the clinic visit is for a specific problem. The nurse may assist with an ear examination by properly restraining the child in a position that will enable safe and quick assessment by the health care provider (Figure 22-5). Obtaining vital signs is a priority. Often the first sign of shock or body stress in infants or children is tachycardia (a rapid heartbeat). However, a drop in blood pressure may be a late sign of shock in children because of a compensatory mechanism that is activated early. Therefore hypotension in an infant or child is considered an acute emergency. Extreme irritability or pupils that are unequal in response to light should be reported immediately. The anterior fontanelle, which is usually open until age 18 months, should be palpated. A sunken fontanelle may indicate dehydration, whereas a bulging fontanelle indicates increased intracranial pressure (ICP). A fontanelle that feels flat to the contour of the head is normal. Increased ICP in the older child and adult is manifested by an increase in systolic blood pressure and a widening pulse pressure, irregular respirations, and bradycardia. In the infant, however, the open fontanelles allow brain swelling to occur without these classic signs, and a decreased level of consciousness may be the only manifestation of increased ICP.
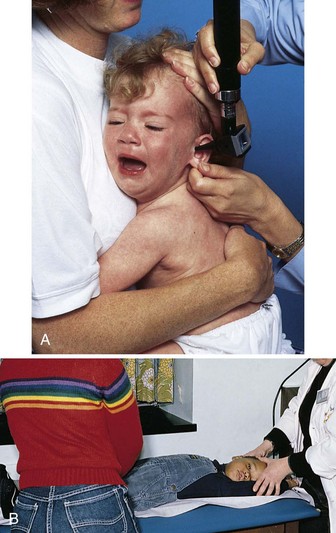
FIGURE 22-5 Positioning the child for an ear examination. A, The parent or nurse can hold the infant close with one hand immobilizing the head. B, The nurse holds the arms above the child’s head and prevents movement of the head with the thumbs. The parent or assistant can hold the hips or thighs.
Bradycardia (a slow heartbeat) is always treated as a medical emergency in infants and young children. Unlike adults, infants and children cannot increase the stroke volume of their heart for a more effective cardiac output when the heart slows; instead, they must rely on increased heart rate alone to increase output. Therefore fatigue and heart failure may result. Mottling of the skin of the extremities may be normal in infants because of their immature temperature control mechanisms. Maintaining warmth during observation is essential for infants. Because of their large body surface area and high metabolic rate, they are prone to fluid loss and hypothermia as well as cold stress.
An accurate weight should be recorded (see Figure 12-11) because the dosage of medications for infants and children is based on milligrams per kilogram of body weight. The temperature of infants may be taken via the axilla or in the ear (see Skill 22-3). The lungs should be clear to auscultation, and the chest should move symmetrically. Bowel sounds should be active in all four quadrants, and the abdomen should not be distended or tender to palpation. The skin should be observed for rashes or lesions.
Pulse and Respirations
The nurse counts a pulse rate by placing the finger pads over the site and feeling the wave of blood as it is forced through the artery. The pulse rate varies considerably in different children of the same age and size. The pulse rate and respiratory rate of the newborn are high (Tables 22-1 and 22-2). Both pulse rate and respiratory rate gradually slow down with age until adult values are reached.
Table 22-1
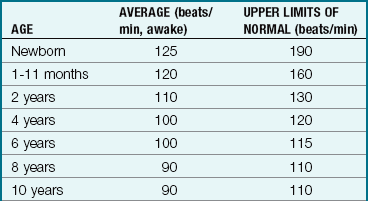

Modified from Kliegman, R., Behrman, R.E., Jenson, H.B., & Stanton, K. (2007). Nelson’s textbook of pediatrics (18th ed.). Philadelphia: Saunders.
Table 22-2
Normal Respiratory Ranges for Children
| AGE | RATE (breaths/min) |
| Birth–1 month | 30-40 |
| 1 month–1 year | 26-40 |
| 1-2 years | 20-30 |
| 2-6 years | 20-30 |
| 6-10 years | 18-24 |
| Adolescent | 16-24 |
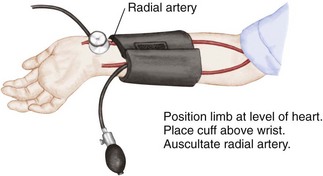
The pulse of the older child is taken just like that of an adult. Apical pulses are advised for children under 5 years of age (see Figure 12-10). The apical pulse is heard through a stethoscope at the apex of the heart. The nurse counts the rate for 1 full minute. Another common site is the radial pulse (at the thumb side of the wrist just above the radial artery). Actually, the pulse may be assessed in any area where a large artery lies close to the skin, especially if the artery runs across a bone and has little soft tissue around it. The following are the most common sites: radial, temporal (just in front of the ear), mandibular (on the lower jawbone), femoral (in the groin), and carotid (on each side of the front of the neck). The carotid pulse may not be appropriate to use in infants with chubby necks.
The child’s respirations are counted in the same way as for an adult. The nurse notes the number of times the chest or abdomen rises and falls for 1 minute. The rate and character of respirations are important in determining the patient’s general condition. The relationship of the pulse rate to the temperature and the respiratory rate should be assessed; the pulse rate will increase as the temperature increases because of the increased cardiac output and increased oxygen consumption needs that occur with an elevated temperature. When taking the vital signs in infants, the respirations are often taken first because they are the least invasive and once the infant cries, it is difficult to obtain an accurate respiratory rate.
Blood Pressure
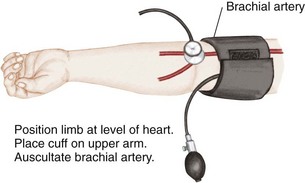
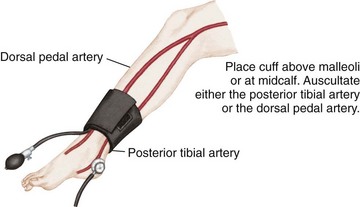
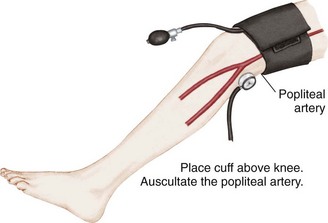
Blood pressure is defined as the pressure of the blood on the walls of the arteries. It is an index of elasticity of arterial walls, peripheral vascular resistance, efficiency of the heart as a pump, and blood volume. Common sites for measuring blood pressure in children are the brachial artery, popliteal artery, and posterior tibial artery. The 50th percentile is the midpoint of the normal range of blood pressure for children. Blood pressure readings in the 90th percentile are defined as prehypertension. Readings in the 90th percentile are considered stage 1 hypertension, and those in the 99th percentile are considered stage 2 hypertension (see Appendix J).
All children over 3 years of age should have their blood pressure checked and recorded (Brady et al., 2008). Children under 3 years of age who require blood pressure readings include children with a history of the following:
• Prematurity, low birth weight (LBW), or neonatal intensive care unit (NICU) admission
• Congenital heart or genitourinary anomaly
• Family history of kidney disease
• Recurrent urinary tract infection (UTI), hematuria, or proteinuria
• Taking medication that alters blood pressure, including antihistamines and nonsteroidal antiinflammatory drugs (NSAIDs)
Auscultation: Auscultation of blood pressure is done the same way as for an adult but with a pediatric stethoscope and blood pressure cuff. The cuff should be long enough to encircle the extremity. The width of the cuff should cover two thirds of the upper arm. The following sizes are suggested: birth to 1 year, 3.8 cm ( inches); 2 to 8 years, 7.6 cm (3 inches); and 8 to 12 years, 11.4 (
 inches). Pressure is normally slightly higher in the lower extremities. The American Heart Association designates the muffled tone as the most accurate index of diastolic pressure but recommends recording both that and the final distinct sound as the complete record; thus 120/80/78 mm Hg. Nurses should clarify this with the physician or institution to ensure uniformity. To determine pulse pressure, the diastolic reading is subtracted from the systolic reading. This usually varies from 20 to 50 mm Hg. Widening pulse pressure may be a sign of increased ICP. The American Medical Association has recommended that mercury manometers not be used when taking the blood pressure of patients. Digital manometers are environmentally safer (Skill 22-2).
Skill 22-2 Blood Pressure Measurement in Children
Common sites for measuring blood pressure in children are the radial artery, brachial artery, popliteal artery, and posterior tibial artery. Blood pressure may be taken with a manometer and stethoscope or by an electronic machine using a cuff with a sensor that provides a digital readout of the blood pressure. A stethoscope is not necessary when this method is used.
Palpation: Palpation is one of the oldest methods of measuring blood pressure. The cuff is applied and inflated above the expected pressure. The fingers are placed over the brachial or radial artery. The systolic pressure is recorded at the point when the pulse reappears. Diastolic pressure is unobtainable. This method is useful in newborns.
Electronic or Ultrasonographic Measurement: This is a noninvasive type of blood pressure monitoring that ultrasonically detects motion of the arterial wall. A transducer with an attached cuff is secured over an artery, usually the brachial, femoral, or popliteal artery. The cuff is inflated above systolic pressure and is then gradually deflated. The transducer transmits vascular sounds, and the measurement appears on a digital readout. Both systolic and diastolic pressures are recorded. Electronic blood pressure machines do not require auscultation with a stethoscope. A cuff is applied, the machine is turned on, and a digital reading is obtained, usually in less than 1 minute.
The nurse should explain what is about to happen; for example, “This will hug your arm and feel tight for a few seconds.” The child is allowed to examine the sphygmomanometer and cuff.
Blood pressure is lower in children than in adults. If a patient needs blood pressure measurements throughout hospitalization, the nurse observes the previous readings before charting the current one. Many factors account for variations in blood pressure measurements, including time of day, sex, age, exercise, pain, and emotion. A blood pressure reading taken when a child is frightened or crying is not accurate. If a significant change is observed, the blood pressure should be rechecked. Abnormal readings are charted and reported to the nurse in charge. See Appendix J for blood pressure readings in infants and children.
Temperature
Pathogenesis of Fever and the Use of Antipyretics: An infection from bacteria or other toxins stimulates immune substances to work along with prostaglandins in the body and stimulate the hypothalamus to raise the body temperature. This triggers a body response of vasoconstriction, shivering, and decreased peripheral perfusion that decreases body heat loss while maintaining homeostasis, and therefore the body temperature rises. Antipyretic medications such as ibuprofen or acetaminophen inhibit prostaglandin production, thereby preventing shivering, vasoconstriction, and alteration in perfusion, resulting in heat loss and lowering of body temperature.
Fever differs from hyperthermia. Hyperthermia is an increase in core body temperature occurring with central nervous system impairment. Prostaglandins are not involved, and the homeostasis mechanism is bypassed. Hyperthermia can result from a drug reaction, trauma, or environmental overheating, such as when a baby is bundled and left in a hot automobile. Treatment of hyperthermia involves vigorous cooling measures such as cold blankets and intravenous (IV) fluids.
Fever results in an increased metabolic demand on the heart and lungs, and children with cardiopulmonary disease require antipyretics to minimize the increase in oxygen consumption that causes an increased demand on the heart. Antipyretics also provide comfort and may aid in enabling the child to consume fluids, lessening the risk of dehydration. Antipyretics may also be recommended for children with a history of febrile seizures to prevent a second seizure. Excessive use of antipyretics should be avoided because these drugs can burden the kidneys and liver. Fever is thought to be a protective mechanism that aids in the recovery from infection.
Temperature Measurement: Fever is most often defined as a rectal temperature above 38° C (100.4° F), a tympanic temperature above 38° C (100.4° F), an oral temperature above 37.8° C (100° F), or an axillary temperature above 37.2° C (99° F) (Crocetti & Serwirt, 2005).
When evaluating the degree of illness in a febrile child, the response of the child to cuddling, alertness, hydration, sociability, and quality of cry should be assessed and recorded. A quiet, lethargic child who does not respond readily to the environment may be acutely ill. Because dehydration is a common problem in infants and children, skin turgor should be assessed (see Figure 12-13). Measures to reduce fever may promote comfort for the child.
There are several types of thermometers available to measure body temperature. The American Medical Association has recommended that thermometers containing mercury not be used. Temperatures are most often measured using the axillary technique. An oral temperature technique may be used in children over 5 years of age if the child can keep his or her mouth closed and has not ingested hot or cold fluids before measurement. Rectal temperatures are not recommended for pediatric patients. The electronic thermometer, the plastic strip thermometer, and the tympanic membrane sensor are commonly used in the pediatric unit. The electronic thermometer works quickly and is ideal because the plastic sheath is replaceable. The plastic strip changes color according to sensed temperature changes. Tympanic thermometers have a blunt tip that is covered with a disposable cover and can be inserted into the ear. They record temperature from the tympanic membrane (eardrum) by an infrared emission. This site is of importance because the hypothalamus (temperature-regulating center) and the eardrum are perfused by the same circulation. Table 22-3 shows normal temperature ranges. The documentation of the patients temperature should indicate the method used, such as “O” for oral; “Ax” for axillary; or “T” for tympanic.
Table 22-3
Normal Temperature Ranges for Children
| METHOD | RANGE |
| Oral | 36.4°-37.4° C (97.6°-99.3° F) |
| Rectal | 37.0°-37.7° C (98.6°-100.0° F) |
| Axillary | 35.8°-36.6° C (96.6°-98.0° F) |
| Tympanic | 36.9°-37.5° C (98.4°-99.5° F) |
Oral temperature: The procedure is the same as for adults and may be appropriate for older children.
Axillary temperature: Axillary temperatures are usually taken for newborns and/or according to unit policy (Skill 22-3).
Skill 22-3 Axillary Temperature Technique
1. Hold the thermometer in the axilla with the infant’s arm pressed against the side.
2. Use a paper thermometer, digital thermometer, or long-term sensor to measure the axillary temperature.
4. Document the temperature and route used in the medical record.
A skin sensor thermometer adheres to the armpit on intact skin for up to 48 hours. Raising the arm will facilitate reading the temperature level. The last dot to turn black indicates the correct temperature. The sensor is intended for single use and is disposable. The temperature range of this continuous-reading thermometer is 35.0° C to 40.0° C (95.0° F to 104.0° F).
Temporal artery temperature: The temporal artery thermometer measures infrared emissions over the temporal artery by rolling the transducer over the child’s forehead.
Tympanic temperature: The tympanic thermometer measures core body temperature by detecting the infrared energy emitted from the tympanic membrane. (Core body temperature is the estimated temperature of the internal body organs.) The tympanic technique is accurate for all ages. However, some brands of tympanic thermometers have ear probes that do not fit well into the auditory canal of infants under age 3 months. These thermometers should be used only for infants over 3 months of age (Skill 22-4).
Skill 22-4 Tympanic Temperature Technique
1. Gently pull the pinna (earlobe) down and back in infants less than 3 years of age and pull the auricle slightly up and back in children more than 3 years of age to straighten the auditory canal and provide an accurate temperature reading.
2. Aim the probe of the thermometer at the opposite eyebrow.
4. Document the temperature and route used in the medical record.

The tympanic thermometer. Note that for a child older than 3 years the nurse pulls the pinna of the ear up and back before inserting the ear thermometer; this maneuver straightens the auditory canal so that the infrared ray will reach the tympanic membrane. If the auditory canal is not straightened, the infrared ray will reach the walls of the ear canal, providing an inaccurate body temperature.
The accuracy of the tympanic temperature is not affected by illness such as otitis media. A table of Celsius and Fahrenheit temperature equivalents appears in Appendix H. Nursing Care Plan 22-1 reviews the care of a child with a fever.
 Nursing Care Plan
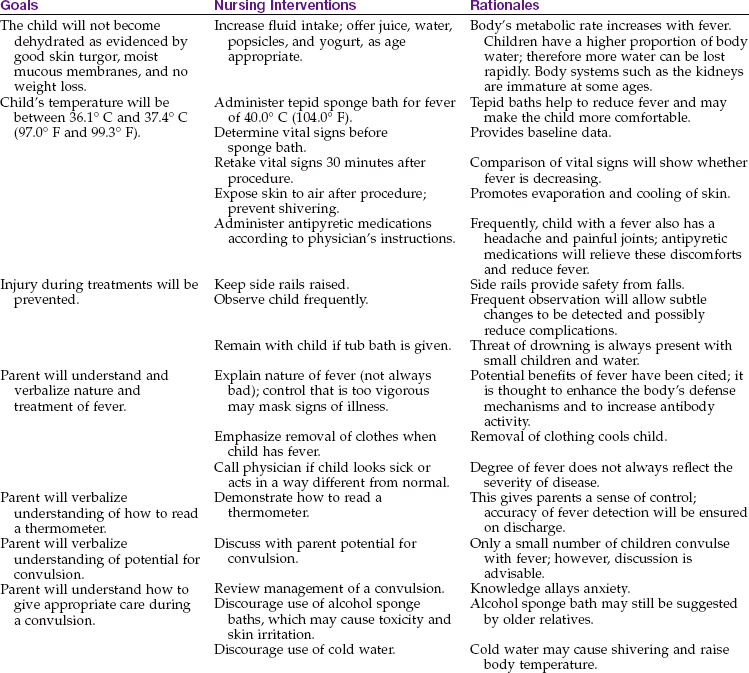
Pain
Pain is a fifth vital sign that must be addressed in the plan of care. See Chapter 12 for pain in the newborn and Chapter 21 for pain in the child or adolescent.
Weight
Weight must be accurately recorded on admission (see Figure 12-11). The weight of a patient provides a means of determining progress and is necessary to determine the dosage of certain medications. The way in which the nurse weighs the child depends on the age.
The infant is weighed completely naked in a warm room. A fresh absorbent pad or scale paper is placed on the scale. This prevents cross-contamination (the spread of germs from one infant to another). The scale is balanced to compensate for the weight of the pad. The infant is placed gently on the scale. The nurse’s hand is held slightly above the infant to prevent falling. Once the exact weight appears on the digital readout, the infant is removed from the scale, wrapped in a blanket, and soothed. The weight is immediately recorded. The scale paper is disposed of in the proper receptacle.
The older child is weighed in the same manner as an adult. A paper towel is placed on the scale for the patient to stand on. The patient is generally weighed in a hospital gown. The shoes are removed. If the child is unable to stand on the scales, it may be necessary for the nurse to hold the child and read the combined weights. The nurse is then weighed and that number subtracted from the combined weight to obtain the patient’s weight. Occasionally a child is weighed while wearing a cast. The nurse records this; for example, “weight 34 lb with cast on right arm.” It is often desirable to record the weight in pounds as well as kilograms. Some parents find pounds a more familiar term. Kilograms are used to calculate safe dosages of medications.
Height
The child’s height is measured along with weight. The infant’s height must be measured while the infant is lying on a flat surface alongside a metal tape measure or yardstick. The knees should be pressed flat on the table. The measurement is taken from the top of the head to the heels and recorded (see Skill 15-1).
Head Circumference
Head circumference increases rapidly during infancy as a result of brain growth. It is generally measured on infants and toddlers and on all children with neurological defects. The tape measure is placed around the head slightly above the eyebrows and ears and around the occipital prominence of the skull (see Skill 12-1). The measurement is recorded.
Specimen Collection
A urine specimen is usually obtained from the newly admitted patient. There are certain general principles of collecting specimens:
• Explain the procedure to the child (as age appropriate).
• Use a clean container or urine collection device.
• Check frequently for results.
• Label all specimens clearly and attaching the proper laboratory slip.
• Send specimen to laboratory according to hospital policy.
• Record in nurses’ notes and on intake and output (I&O) sheet.
The procedure for collecting a urine specimen from an infant is described in Skill 22-5.
Skill 22-5 Collecting a Urine Specimen in Infants
1. Clean and dry the infant’s skin, avoiding use of oil, baby powder, or lotion soap, which may leave a residue on the skin and interfere with the ability of the adhesive to stick.
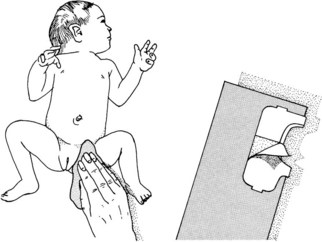
2. Begin by applying the urine collector to the tiny area of skin between the anus and the perineum. The narrow “bridge” on the adhesive patch keeps feces from contaminating the specimen and helps to position the collector correctly. After applying the adhesive section between the anus and perineum, the remainder of the urine collector is fitted to the rest of the genital area.
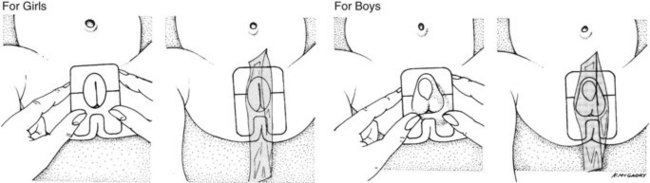
3. Recover the specimen. Drain the urine bag collector into a clean beaker or specimen bottle by removing the tab in the lower corner, or seal the specimen inside the collector itself by folding the sticky adhesive sides together.
4. Place the collector with specimen into a plastic bag.
5. With small infants a cotton ball may be placed at the opening of the collector. When the infant voids into the cotton ball, a small volume of urine can be retrieved by aspirating the cotton ball with a syringe.
6. Replace infant’s clean diaper, position in crib, and raise side rails.
7. Remove gloves and perform hand hygiene.
8. Label specimen container for transport to laboratory according to hospital protocol.
9. Document in medical record amount of urine collected and time sent to laboratory.
Urine collected directly from ultra-absorbent disposable diapers may yield inaccurate protein, pH, and specific gravity measurements because of the chemicals in the diaper.
Obtaining a Clean-Catch Specimen: Special sterile containers are available for clean-catch specimens; the manufacturer’s directions should be followed. The procedure necessitates cleansing of the perineum with an antiseptic. Rinsing and drying the perineum are important to prevent contamination of urine from the antiseptic. Wiping is done from front to back. After the urine stream has started, the midstream specimen is caught in the sterile container. The nurse’s participation is either direct or supervisory depending on the child’s age or the availability of a parent. Adolescents, who may be embarrassed by carrying a urine specimen through the halls, may be given a bag or other suitable camouflage. The specimen should be sent to the laboratory promptly.
Obtaining a 24-Hour Specimen: At times a 24-hour urine specimen may be requested to determine the rate of urine production and measure the excretion of specific chemicals from the body. The nurses on each shift must closely supervise this test to maintain its accuracy, because lost specimens necessitate restarting the test. Problems can arise if the collection device does not adhere to the skin properly; therefore the nurse must be alert for this occurrence. Diversions suitable to the child’s age are used. A sign is attached to the infant’s crib to alert personnel of a 24-hour urine collection. The average daily amount of urine excreted, by age, is given in Table 22-4.
Table 22-4
Average Daily Excretion of Urine
| AGE | FLUID OUNCES | MILLILITERS (mL) |
| 1st and 2nd days | 1-2 | 30-60 |
| 3rd to 10th days | 3-10 | 100-300 |
| 10th day to 2 months | 9-15 | 250-450 |
| 2 months to 1 year | 14-17 | 400-500 |
| 1-3 years | 17-20 | 500-600 |
| 3-5 years | 20-24 | 600-700 |
| 5-8 years | 22-34 | 650-1000 |
| 8-14 years | 27-47 | 800-1400 |
Testing for Albumin: The nurse working in a physician’s office or clinic may also be requested to test urine for albumin (protein). Normally, little or no albumin is found in the urine of a healthy child. Reagent strips especially intended for this purpose are available. The nurse dips the end of the strip into urine and compares the strip with a special color chart. Specific instructions accompany test materials.
Stool Specimens
Stool specimens are obtained from older children in the same manner as from adults. This is embarrassing for most children, who are “turned off” by the suggestion. The ambulatory child can use a bedpan or “hat” placed beneath a toilet seat. It is difficult for a child to tell the nurse that the sample has been collected. The nurse can acknowledge these feelings by giving the child permission to express them without being critical; for example, the nurse could say, “I know this must be embarrassing for you. It is for grown-ups too, but we need this specimen.” An infant’s stool specimen can be obtained from the infant by scraping the specimen from the diaper with a tongue depressor and placing it in the specimen container. Some specimen containers contain a portion of liquid. The label indicates a “fill line.” The amount of infant stool needed for a specimen is the amount which, when placed into the container, results in the fluid level rising to the fill line.
Some specimens must be sent to the laboratory while they are warm. The specimen container is labeled properly and placed in a plastic bag, and the laboratory slip is attached. The nurse charts the time; color, amount, and consistency of the stool; the purpose for which it was collected (e.g., blood, ova, parasites, or bacteria); and any related information.
Blood Specimens
Positioning the Child: Positioning the child for blood drawing is extremely important. The nurse is often asked to assist in these procedures. Figure 22-6 depicts how to position the patient for a femoral venipuncture. Both the jugular and the femoral veins are large; therefore the patient is frequently checked to ensure that there is no bleeding afterward. These sites are used mainly when other areas have been exhausted. Therefore the infant is soothed, because crying and thrashing may precipitate oozing. The nurse charts the site used, the name of the blood test, and any untoward developments.
Lumbar Puncture
The nurse often assists the physician with a lumbar puncture, which is also referred to as a spinal tap. It is done to obtain spinal fluid for examination or to reduce pressure within the brain in conditions such as hydrocephalus or meningitis. Disposable lumbar puncture sets are used.
Normal spinal fluid is clear like water. The opening pressure ranges from 60 to 180 mm Hg. It is somewhat lower in infants. The procedure for children is essentially the same as that for adults. The main difference lies in the patient’s ability to cooperate with positioning. The nurse explains that the child must lie quietly and will be helped to do this. Sensations during a lumbar puncture include a cool feeling when the skin is cleansed and a feeling of pressure when the needle is inserted. The way in which the child is held can directly affect the success of the procedure.
The child lies on the side with the back parallel to the side of the treatment table. The knees are flexed, and the head is brought down close to the flexed knees. The nurse can keep the child in this position by placing the child’s head in the crook of one arm and the knees in the crook of the other arm. The nurse’s hands are then clasped together or placed as shown. The nurse leans forward, gently placing the chest against the patient (Figure 22-7).
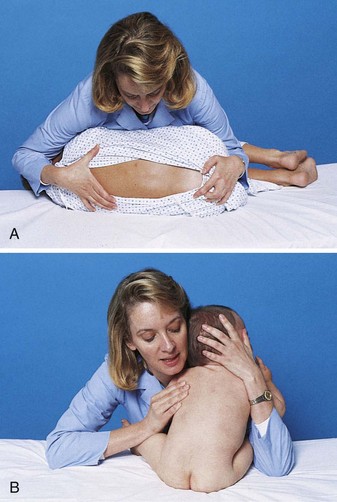
FIGURE 22-7 A child positioned for a lumbar puncture. A, An older child may be placed in a side-lying fetal position and held firmly by the nurse. B, Placing an infant in a sitting position allows for flexion of the lumbar spine. The nurse hugs the child for support and security.
Once the child is positioned, the physician prepares the lower back using sterile technique. A vial of local anesthetic may be necessary unless this is provided in the sterile setup. The top of the vial is cleansed according to hospital protocol. Once the area has been locally anesthetized, the physician inserts a special hollow needle into the patient’s lower back and collects the spinal fluid in two or three test tubes. When the procedure is completed, a sterile bandage is placed over the injection site, and the child is comforted. Specimens are labeled and taken to the laboratory with the appropriate requisition form.
The adolescent may avoid post–lumbar puncture headache by lying flat for some time. The nurse charts the date and time of the lumbar puncture and the name of the attending physician. Also charted are the amount of fluid obtained and its character (e.g., cloudy or bloody), whether or not specimens were sent to the laboratory, and the patient’s reaction to the procedure.
Physiological Responses to Medications in Infants and Children
Medication administration is a primary responsibility of the nurse. It is important for the nurse to understand that the responses of infants differ from those of children and that the responses of infants and children differ from those of adults. These concepts must also be communicated to the parents, who often administer over-the-counter medications to their growing child. The most common over-the-counter medication administered by parents to infants and children is acetaminophen (Tylenol). A health care provider may advise the parents to “give a teaspoon of acetaminophen” to their young child. However, the parents who purchase the medication may choose acetaminophen in the form of drops instead of an elixir. The 1-teaspoon dose of acetaminophen elixir is the intended dose ordered. However, if the parent gives the child 1 teaspoon of acetaminophen in the form of drops, it would be a massive overdose that can harm the young child. These types of accidents can be prevented by parent education.
Understanding the differences in drug absorption, distribution, metabolism, and excretion between children and adults is essential to provide safe pediatric medication administration. Age is the most important variable in predicting response to any drug therapy. The functions of various organs in the body mature as the child grows and develops.
Absorption of Medications in Infants and Children
In the neonate there is an absence of free hydrochloric acid in the stomach. The acid content of the stomach reaches adult levels by age 2 years. Therefore medications that require an acid medium in the stomach for absorption may not be completely absorbed if the child is under 2 years of age. The administration of such medications near the time of formula feedings will further decrease the acid content of the stomach. After 2 years of age, the ingestion of orange juice increases gastric acidity, causing more effective absorption of medication that requires an acid medium to absorb.
Intestinal Influences
Children under 5 years of age have a more rapid intestinal transit time than adults. Medication may move out of the small intestines before it is completely absorbed. Therefore delayed or timed-release oral medication may not be fully absorbed by children younger than 5 years of age. There may be a low amount of pancreatic enzymes under 1 year of age. Some medications depend on pancreatic enzymes to help absorb the drug.
Topical Medications (Ointments)
Pediatric patients have a thin stratum corneum that allows topical medications to be absorbed. The larger skin surface area also increases the amount of absorption of topical medication as compared to adults. The use of a plastic diaper can also cause increased absorption of a topically applied medication in the diaper area of the skin. Hydrocortisone and hexachlorophene may produce adverse systemic responses when applied to the buttocks and covered with a plastic diaper.
Parenteral Medications
Poor peripheral perfusion in the young infant will slow intramuscular (IM) drug absorption. IM drugs administered to infants and children under 4 years of age should be water soluble to prevent precipitation. In neonates, medication may pass through the blood-brain barrier more easily than in older children and adults. Therefore medications that depress respiration may have a more powerful effect on neonates than in adults.
Metabolism of Medications in Infants and Children
Most medications are metabolized in the liver. Because the liver and its enzymes do not function at a mature level until 2 to 4 years of age, drugs generally metabolize more slowly in the infant and young child compared to the adult. Medications given at frequent intervals to infants and children may result in toxic levels and responses.
Excretion of Medications in Infants and Children
Many medications such as penicillin and digoxin depend on the kidneys for excretion. The immature kidney function prevents effective excretion of drugs from the body in infants under 1 year of age.
The combination of slow stomach emptying (delays medication from being absorbed), rapid intestinal transit time (may prevent the full amount of medication from being absorbed), unpredictable liver function (may impair metabolism of the drug), and inability to effectively excrete medications via the kidney can result in altered responses to medication and a high risk for toxicity.
Nursing Responsibilities in Administering Medications to Infants and Children
It is a legal and ethical responsibility of the nurse to understand that growing children differ in their ability to respond to medications. Nurses must observe for toxic symptoms whenever medications are administered and document positive and negative responses. Close attention must be paid to pediatric dose calculations. Every medication administered should have the safety of the dose prescribed calculated before administration. Official sources for safe dosage levels for various age-groups are provided by the manufacturer’s pocket insert, the Physician’s Desk Reference (PDR), or other current drug reference books. See Box 22-2 for one method of determining safe dosage for infants and children.
Parent Teaching
Parent teaching is essential to ensure compliance when the child is sent home. Instructions should cover the following six areas:
1. The importance of administering the medicine.
2. The importance of completing the prescribed course of treatment.
3. Techniques of measuring the amount of medication to give in each dose. The use of the teaspoon in the home is not advisable when administering medication to infants and children. Inexpensive and accurate measuring devices are available in pharmacies.
4. Techniques of administering medications to the infant or child:
• Using a dropper, a syringe, or a measured cup
• Not mixing medication with formula, food, or water
5. Techniques of encouraging child compliance:
• Allowing toddlers and young children autonomy of assisting with taking their own medication by squirting the contents into their own mouth or drinking it from the cup
• Providing praise for cooperation and perhaps a chart of stars or stickers for compliance
• Providing a good-tasting liquid or an ice-pop following administration of a medication that has a bad taste
6. The importance of writing a schedule and documenting the administration to avoid forgetting or double-dosing.
Administering Oral Medications
The administration of medication by mouth is preferred in children but is not always possible because of vomiting, malabsorption, or refusal. Children younger than 5 years of age find it difficult to swallow tablets or capsules. Most pediatric medications are available in liquid, suspension, or chewable tablets. Only scored tablets should be divided. Suspensions must be fully shaken before use.
Medications may need to be disguised in a pleasant-tasting medium when the medication is bitter or otherwise unpalatable. Cherry syrup or jelly may be used. The use of important sources of nutrients, foods, or liquids (e.g., orange juice) for this purpose is discouraged because the child may develop distaste for these foods. The medication is never referred to as “candy.” Medication is administered slowly, especially if the child is crying. The child’s head and shoulders are elevated to prevent aspiration. Toddlers may attempt to push away the medicine cup. In anticipation of this response, the nurse holds the child, with hands restrained, in the nurse’s lap in a semisitting position (Skill 22-6).
Skill 22-6 Administering Oral Medications
1. Verify medication orders and assemble supplies.
2. Place the infant’s legs between your knees to maintain control of them.
3. Place one of the infant’s arms behind your back and restrain the other arm by “hugging” the child (this helps to prevent the child from tipping the medication cup).
4. Give the medication slowly by cup or syringe to allow the child time to swallow. An older child may be given the choice to self-administer the medication by cup or syringe.
5. Provide “chasers” of water, fruit juice, or frozen ice-pops to help lessen the residual taste of the medicine. The patient’s age and diet prescription are considered when choosing a chaser.
6. Remove gloves and perform hand hygiene.
7. Document in the medication administration record (MAR) the medication, route, time, and dose given.
The syringe or cup method of administering oral medications to infants or children. Note that one of the infant’s arms is behind the nurse’s back while the other is restrained by the nurse. The legs of the infant can be held firmly between the knees of the nurse for better control during medication administration.
If a nasogastric tube is in place, the nurse tests for proper placement of the tube before pouring medication into the funnel. A small amount of water is administered afterward to cleanse the tube. The procedure is recorded on the intake and output (I&O) sheet.
For infants, an oral syringe is an excellent device for measuring small quantities. It is easily transported, and medication can be given directly from the syringe. The syringe is placed midway back at the side of the mouth. A bib is placed on an infant before performing the procedure. Medication should not be placed in a bottle of juice or water; if some of the contents are refused, there is no way to determine how much of the drug was consumed. A Medibottle, a device that consists of a syringe attached to a nipple, can be used for infants who will suck the medication from the nipple as the plunger of the syringe is slowly depressed (Figure 22-8).
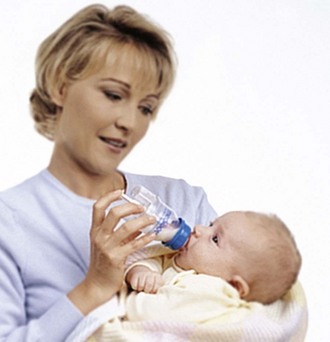
FIGURE 22-8 The Medibottle is attached to the syringe so the infant can suck on the nipple to consume the medication. The nurse controls the flow with gentle pressure on the syringe barrel.
A plastic medicine dropper is useful, and the drug manufacturer may provide one with the medication. It is used only for the medication specified; it is not intended for measuring other liquids. A drug ordered in teaspoons should be measured in milliliters to ensure accuracy (5 mL = 1 teaspoon). The nurse administering medications on the pediatric unit must keep the medicine tray or cart in sight at all times. This prevents other patients from upsetting or ingesting the contents.
Administering Parenteral Medications
Nosedrops, Eardrops, and Eyedrops
Except for a few differences, the principles for administering nosedrops, eardrops, and eyedrops to children are essentially the same as for adults. Infants and small children may need to be restrained in a mummy restraint (see Skill 22-1).
Nosedrops: The procedure for administering nosedrops to a small child is detailed in Skill 22-7.
Skill 22-7 Administering Nosedrops
1. Immobilize the infant with a mummy restraint.
2. Wipe excess mucus from nose with a tissue.
3. Place the infant on his or her back, with the head over the side of the mattress or the neck extended over a pillow.
4. Encircle the infant’s cheeks and chin with the left arm and hand to steady.
5. Instill drops with the right hand.
6. Keep infant in this position for 30 seconds to 1 minute to allow the drops to reach the proper area.
7. Remove restraints. Make the infant comfortable.
8. Remove gloves and perform hand hygiene.
9. Chart the following: time, name of nosedrops, strength, and number of drops instilled, how the patient tolerated the procedure, and untoward reactions.
Eardrops: The health care provider may prescribe a drug to be instilled into the ear to relieve pain. If the drops were refrigerated, they are allowed to warm to room temperature before administration (Skill 22-8).
Skill 22-8 Administering Eardrops
1. Place child in supine position with unaffected ear down.
2. Instill the ordered number of drops:
a. In children under 3 years of age, pull the pinna (earlobe) of the affected ear down and back to straighten the canal.
b. In older children, pull the upper pinna (auricle) up and back to straighten the canal.
3. Gently massage the area in front of the ear to facilitate entry of the drops.
4. Keep the patient in a supine position for a few minutes to permit the fluid to be absorbed.
5. Remove gloves and perform hand hygiene.
6. Document the time, name of drug, number of drops administered, area (right or left ear), untoward reactions, and whether or not the patient obtained relief.
Eyedrops and Creams: Ophthalmic medication is administered to a child in the same manner as for the adult. The child is informed of the need for the medication. The patient is identified, and the orders and the label on the bottle are checked for correct medication and concentration. The nurse ascertains which eye requires treatment. Hand hygiene is performed before and after the procedure, and clean gloves are worn. With the thumb and index finger, gentle pressure is applied in opposite directions to open the eye. The older child is instructed to “look up.” Supporting the hand on the patient’s forehead, the medication is instilled into the center of the lower lid (conjunctival sac) (see Skill 6-6 and accompanying illustration). The child is instructed to close the eye but not to squeeze it, because this could expel some of the solution.
Ointment is applied to the same conjunctival sac as eyedrops. The mummy restraint is applied when only one nurse is available and the patient is an infant. Occasionally children refuse to open their eyes. The nurse must use ingenuity to coax reluctant children. It may help to involve the parents.
Rectal Medications
Some drugs, such as sedatives and antiemetics, come in the form of suppositories. Children’s suppositories are long and thin in comparison with the cone-shaped types administered to adults. Wearing a latex glove or finger cot, the nurse inserts the lubricated suppository well beyond the anal sphincter about half as far as the forefinger will reach. The nurse applies pressure to the anus by gently holding the buttocks together until the child’s desire to expel the suppository subsides.
Subcutaneous and Intramuscular Injections
Most medications given to infants and children are given by the oral or intravenous (IV) route. However, some medications must be given by the subcutaneous (SubQ) route, such as insulin for diabetic children. Some medications must be given via the intramuscular route (IM), such as immunizations or vitamin K to newborn infants. The site and technique of injection can affect the absorption rate and the effect of the drug on the child. Needles should not be recapped, and the syringe must be disposed of in the appropriate container after use.
The Subcutaneous Route: In subcutaneous (SubQ) injections, absorption occurs by slow diffusion into the capillaries. If a medication such as epinephrine is given IM instead of SubQ, a life-threatening cardiac dysrhythmia could occur. If the extremity in which the SubQ medication was given is exercised immediately before or after a SubQ injection, the absorption rate is increased. (If insulin is the drug injected, hypoglycemia could occur because of the rapid absorption.) Sites should be rotated. Irritating solutions should not be injected SubQ.
The Intramuscular Route: An intramuscular (IM) injection places medication into the skeletal muscle below the subcutaneous tissue. The medication spreads among the muscle’s elastic fibers and absorbs rapidly. Aspirating the plunger after insertion and observing for a flashback of blood will confirm correct placement of the needle. A flashback of blood should not occur if the needle is correctly placed into the muscle. Accidental injection into a vein can cause a toxic response. Accidental injection into the subcutaneous tissue can cause tissue necrosis.
Intramuscular Sites: IM injections are given into the vastus lateralis muscle of the thigh in all infants (Figure 22-9). The site is free of major nerves and blood vessels, but small nerve endings can cause the injection to be painful. The ventrogluteal site places the medication into the gluteus medius and gluteus minimus muscles, which are free of major nerves and blood vessels. This site can be used in children after they have been walking for 1 year.
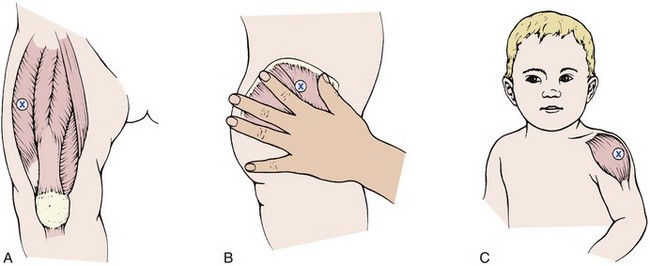
FIGURE 22-9 Appropriate sites for intramuscular (IM) injection in children A, The thigh. B, Ventrogluteal. C, Deltoid. The vastus lateralis (A) is preferred in children under 3 years of age.
The dorsogluteal site involves a high risk for sciatic nerve injury or piercing of a major blood vessel. This site is small and poorly developed in infants and is not used for IM injections. The deltoid site in the upper arm has a small muscle mass that limits the amount of medication that can be injected at one time. There are major blood vessels in this area, and the radial nerve can be injured. However, absorption of medication is more rapid in the deltoid than in the buttock or the thigh.
Reducing the Pain of Injections: Nurses can take the time to reduce the discomfort associated with injections. Positioning the patient properly can minimize muscle tenseness and ease the procedure. The child can lie face down or on the side with the upper leg placed in front of the lower one to relax the muscles. For a vastus lateralis injection, the child’s toes should be turned so that the hip rotates internally. The child can flex the elbow and support the arm for a deltoid injection. A topical anesthetic such as a eutectic mixture of local anesthetics (EMLA) (see Figure 21-3) can be used when the time of injection can be planned in advance. Storing alcohol sponges in the refrigerator or rubbing the site with an ice cube before injection will numb the site. The current design of many syringes minimizes accidental needle punctures to the caregiver that can spread infections and increase risk of blood-borne pathogen exposure. The needle should be inserted rapidly while the child is distracted. The medication is injected slowly to minimize the increasing pressure within the muscle. Rapid removal of the needle and mild massage or exercise of the extremity will increase absorption and comfort.
The sizes of the syringe and needle vary with the size of the child, the volume of medication prescribed, the amount and general condition of the muscle tissue, the frequency of injections, and the viscosity (thickness) of the drug. A small needle gauge, such as 25 to 27, and a length of 1.3 to 2.5 cm ( to 1 inch) are commonly used. As a general rule, 1 mL is the maximum volume to be given in one site to infants and small children. Small or premature infants may tolerate even less. For volumes less than 1 mL, a tuberculin syringe or low-dose syringe is preferred. Some syringes are designed to automatically retract the needle into the syringe after injections, and some have a plastic sleeve (Figure 22-10) to push over the needle after use. This eliminates the practice of recapping the needles and reduces the risk of accidental needle sticks.
FIGURE 22-10 This syringe has a plastic sleeve that covers the needle after medication is administered. This helps to protect the nurse from an accidental needle stick.
The nurse should anticipate some protest from children about injections. Whenever possible, a second person should assist by distracting and restraining the child. The child’s first injection is particularly important because it establishes the pattern for future reactions (Figure 22-11). The school-age child may assist in selecting the site, if possible. This helps to increase feelings of mastery and control. Injections are more of a threat to toddlers and preschool children, who are too young to understand their necessity. The nurse should be careful not to shame the uncooperative child. Fortunately, the necessity for administering IM injections to children is decreasing because most medications can now be given orally, rectally, or intravenously.
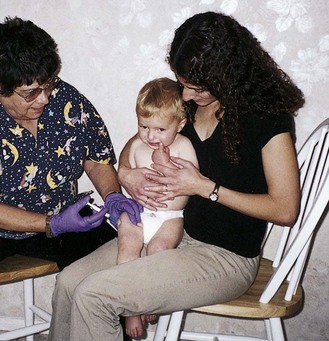
FIGURE 22-11 The “hug” restraining position for administration of intramuscular injections. Note that the arms are restrained by the mother and that the child’s legs are restrained between the mother’s knees. The mother comforts the child during the procedure and may breastfeed after the procedure. The site for intramuscular injections in infants is the thigh, and the nurse wears a protective glove.
Intravenous Medications
An IV injection places the drug directly into the bloodstream in a faster, more predictable time frame.
Medications given by the IV route are being administered routinely in pediatric patients. In some cases this prevents repeated IM injections. Other drugs are effective only if given by this method. The medication is also absorbed more rapidly, which is of value. Each hospital has its own policies about who may start IV lines or add medications to an established line. The nurse monitors the IV site carefully for patency, infiltration, and inflammation.
IV medications can cause phlebitis, and the nurse must observe the child’s IV site hourly for reddened areas or signs of inflammation. Infiltration is a risk for children who are active, and the site should be observed hourly because infants cannot communicate the burning or pain that may accompany infiltration. Leakage at the IV site, a tense tissue turgor, and cool, blanched skin around the IV site may indicate infiltration; the registered nurse (RN) should be notified. Because the medication reaches the heart and brain within seconds, adverse reactions can occur quickly. The nurse must be aware of the side effects associated with each drug administered. A rapid rate of flow of IV solution can cause fluid overload (manifested by increased pulse rate or blood pressure, distended neck veins, and puffy eyes), or a slow rate of infusion can result in clot formation that obstructs the patency of the IV line. The nurse should monitor the rate of the IV flow, refill the burettes hourly (Figure 22-12), observe the condition of the IV site, identify the responses of the child, and document findings.
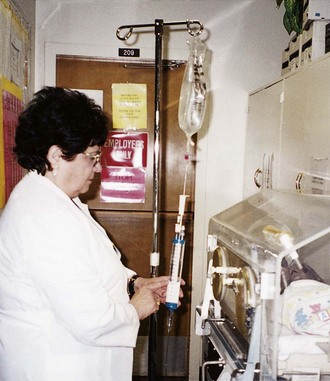
FIGURE 22-12 The graduated control (burette) chamber delivers microdrops, making it easier to calculate the rate and the amount of fluids absorbed by infants and children. The burette is filled with the amount of solution to be administered in 1 hour. The intravenous (IV) pump will sound an alarm when the level in the burette is low, reminding the nurse to assess the IV site. The burette is then refilled and the site reevaluated every hour.
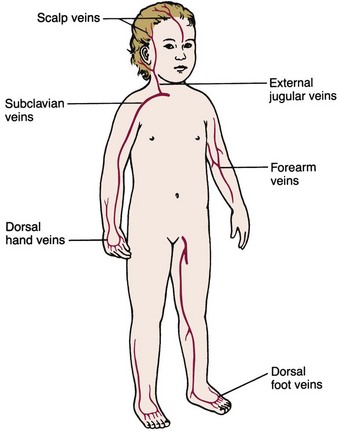
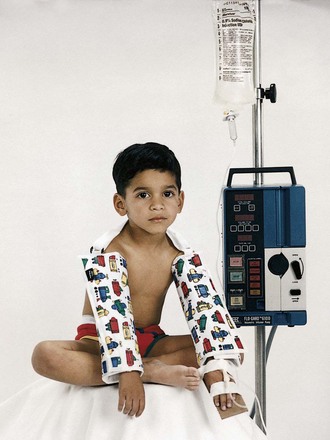
Sites for IV infusion in children are illustrated in Figure 22-13. A pediatric armboard is used (Figure 22-14) to restrain the extremity used for IV access, and the insertion site is secured and covered to prevent tampering by the child or parents. The child with an IV in the extremity or the scalp will benefit from being held and rocked and need not have his or her whole body immobilized. Infusion pumps are used in pediatrics to control the administration of small volumes of fluid and to prevent changes in rate resulting from changes in position or activity of the infant or child. A pacifier should be provided for infants who are given nothing by mouth (NPO status) to fulfill their developmental need for sucking. When the health care provider orders IV access discontinued before discharge from the hospital, the licensed practical or vocational nurse (LPN/LVN) can remove the IV catheter (Skill 22-9).
Skill 22-9 Removal of a Peripheral Intravenous Catheter
1. Turn off the infusion pump and clamp the IV tubing.
2. Perform hand hygiene and don clean gloves.
a. To remove the Tegaderm or Opsite, pull the opposing edges parallel to the skin to loosen the bond
b. To remove sticky adhesive, use an adhesive removal pad and wash the skin afterward.
4. When all tape is removed and the catheter is movable and free, pull the catheter out of the vessel (in the opposite direction to that of insertion), keeping a straight line and not pulling upward or downward.
5. Exert firm pressure at the site with a dry sterile gauze.
6. Apply dry dressing or adhesive bandage at the insertion site.
7. Inspect catheter tip to ensure it is intact.
Note: Encourage the child’s participation when appropriate (for example, when removing the tape).
Long-Term Peripheral Venous Access Devices:
Saline lock: A saline lock is a long-term peripheral venous access device (VAD), a device that keeps a vein open for long-term intermittent medication administration. It allows children to be more ambulatory because they are free of IV tubing. Repeated “sticks” can be avoided when a patient has a saline lock in place. The apparatus consists of an IV catheter attached to an 8.3-cm ( -inch) plastic tube plugged by a resealable rubber insert. This rubber top allows the insertion of a needle so that blood can be drawn or medications administered. The original catheter remains in place and is periodically flushed with saline solution to prevent clotting. Each catheter flushing should be documented.
Central Venous Access Devices: A peripherally inserted central catheter (PICC) is a type of central venous access device that is inserted for moderate-length therapy. The median, cephalic, or basilic vein is used in the antecubital area and threaded into the superior vena cava. Specially trained RNs may insert the PICC line. Dressings are changed per established protocol, the insertion site is assessed, and care is taken to prevent dislodgement during this procedure.
Long-Term Central Venous Access Devices:
Hickman, Groshong, and Broviac catheters: Hickman, Groshong, and Broviac catheters are tiny, flexible tubes that can be inserted into a vein in the chest to establish a long-term IV site. Medications, chemotherapy, IV fluids, and blood products can be given through the catheter. They can also be used for total parenteral nutrition (TPN). The pediatric Broviac catheter is used for children. The line is inserted while the patient is under local or general anesthesia. It remains in the patient from 1 month to 1 year or even longer. The Groshong catheter is used most often for teenage patients.
The child or parents are taught how to care for the catheter during hospitalization so they may continue the procedure at home under the supervision of home care nurses. Some catheters are flushed daily or weekly with heparin or saline solution. Activities of daily living are not curtailed; however, the physician should be contacted about any unusual change in activity. The exit site should be kept dry. The patient and family must participate in the home care, and the presence of the catheter may affect the child’s self-image. A light shirt with a pocket, worn inside out, provides a place for any excess tubing and covers the area to protect it from the fingers of a curious child. If a catheter leak occurs, the tubing should be taped, a clamp applied, and medical intervention obtained.
Implanted ports: Infusion ports that can be implanted under the skin are also available (Port-A-Cath, MediPort, Infuse-A-Port, Groshong venous port). These small plastic devices are generally implanted under the skin beneath the clavicle. A small catheter is threaded from the port into a large central vein. The procedure is performed using a local or general anesthetic. Blood samples can be obtained, and medicines are injected by a puncture through the skin into the port. Special needles are provided by the manufacturer. The use of a local or topical anesthetic makes the skin puncture less painful. The advantage is that nothing protrudes from the body that can be dislodged, and it is less apparent. This is especially important for the self-conscious young adolescent. Activities such as swimming need not be curtailed, because the skin is intact. Vigorous contact sports are curtailed, and the child should be cautioned not to play with the bulge created by the device. Removal of the implanted port necessitates minor surgery.
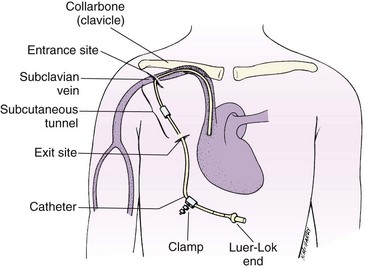
Total parenteral nutrition: Total parenteral nutrition (TPN) is also known as hyperalimentation and provides the total nutritional needs for infants and children who cannot use the gastrointestinal tract for nourishment for a prolonged period. It allows highly concentrated solutions of proteins, glucose, and other nutrients to infuse directly into a large vessel such as the superior vena cava (Figure 22-15). In general, these concentrated solutions are not given through peripheral veins. The nursing responsibilities are similar to those for other IV infusions. The solution is prepared by the pharmacist and is sterile. Monitoring vital signs, recording I&O, and tracking laboratory reports are essential nursing responsibilities.
Hypoglycemia, hyperglycemia, and electrolyte imbalances can occur. Before discontinuing TPN therapy, the rate is gradually decreased, and the child is monitored for adverse responses. Parents may need extensive teaching and return demonstrations if they are expected to care for their child who is to receive TPN treatment at home. Community agencies should be contacted to aid and support the family.
Nursing Care of a Child Receiving Parenteral Fluids: Parenteral (para, “beside or apart from,” and enteron, “intestine”) fluids are those given by some route other than the digestive tract. They are necessary when sickness is accompanied by vomiting or loss of consciousness or when the gastrointestinal system requires rest. The extremity in which the IV catheter is inserted is restrained on an armboard, and the insertion site is secured and covered. If the infant is on NPO status, a pacifier should be offered. Diversional therapy will prevent the child from focusing on the IV tubing and using it as a toy. The infant should be picked up, rocked, and played with.
IV pumps prevent a change in IV infusion rate when position or activity changes. The IV pump allows the administration of microdrops of IV solution so that a slow rate of infusion can be maintained. Adult IV sets administer 15 drops per 1 mL. Pediatric IV sets administer 60 drops per 1 mL. A burette is attached between the IV tubing and the pump and enables the nurse to fill the burette with the amount of solution to be administered in 1 hour (see Figure 22-12). The infusion pump sounds an alarm to alert the staff that the burette must be refilled or that the insertion site is occluded; this allows the nurse to monitor the IV site hourly. The nurse observes the child hourly for the following:
• Low volume in the bag or the need to refill the burette
• The rate of flow of the solution
An accurate I&O record is kept for all children receiving IV fluids. Nursing guidelines for IV therapy at various stages of development are described in Table 22-5.
Table 22-5
Nursing Guidelines for Pediatric Intravenous (IV) Lines at Various Stages of Development
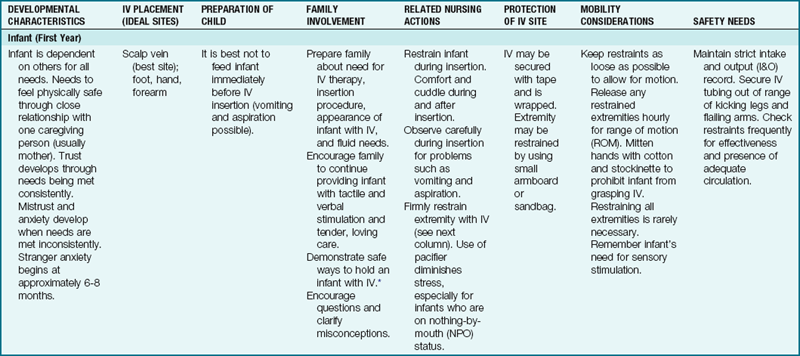
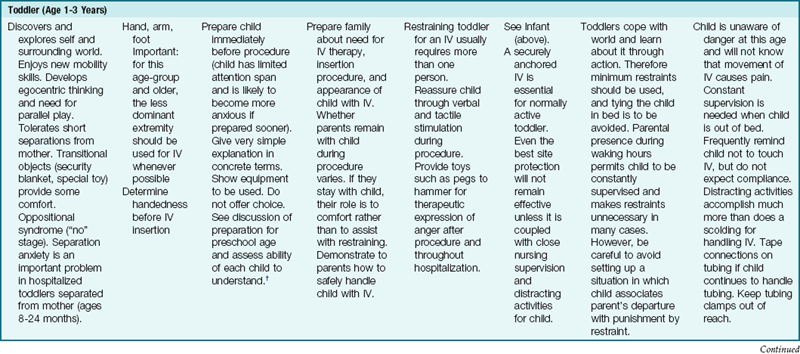


*No child should be restricted to bed simply because of having an IV!
†Each stage builds on the earlier ones, and during hospitalization many children regress to behaviors appropriate to earlier levels of development.
Modified from Guhlow, L.J., & Kolb, J. (1979). Pediatric IVs: special measures you should take. RN, 42, 40. Published in RN, the full-service nursing journal. Copyright 1979 Medical Economics Co. Inc., Oradell, NJ. Reprinted by permission.
Preventing Medication Errors
Adhering to the six rights of medication administration used for any patient, adult or pediatric, is not always a guarantee of error-proofing medication administration to children. The fact that the medication dose is ordered by the health care provider is not in itself a guarantee of safety, and the nurse has a responsibility to double-check the medication dosage with the recommended dosage published in a current recognized drug source. Prescribing medication in a tense emergency setting increases the challenge of maintaining safety of the dosage prescribed for the small infant or young child.
There have been many efforts to decrease medication errors by the design of charts and use of color-coding systems, and nurses must be familiar with those used at their hospital or clinic. Broselow pediatric emergency tape is used to determine the length of the child and serves as a guide in the administering of emergency medications; it correlates dosage calculation and equipment sizes for emergency use. Based on the successful use of Broselow tape for many years, a system of color-coded ID bracelets for each child admitted to a hospital unit, based on the child’s weight, correlates to reference guides for each weight group and provides an extra check point for the nurse to monitor the safety of the dose for that individual child before administering (Broselow et al., 2008).
The PEDI Slide Chart from A.C.T.N.T. Healthcare Services is another product; it was developed in 2007 and is used in many hospitals. Also a length-based tool (as the Broselow tape is), it serves to determine accurate weight in kilograms of a child by using Centers for Disease Control (CDC) weight-to-height growth charts. The PEDI Slide system uses a disposable tape to measure from the top of the head to the heel of the foot of the fully extended leg. The body type is also estimated to determine if the child is average weight (50th percentile), at risk for overweight (75th percentile), or overweight (95th percentile). When the PEDI Slide is aligned with the appropriate length and body type, the estimated weight and correlated dosages of commonly used drugs will appear on the slide. The nurse should be familiar with the use of these systems as tools to reduce medication errors in pediatric patients (Figure 22-16).
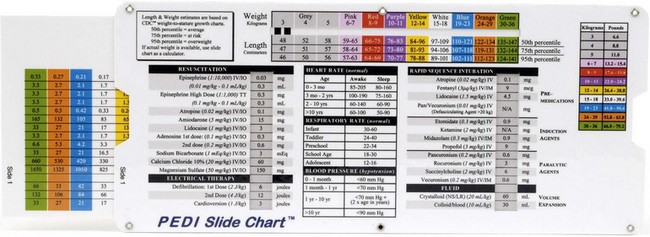
FIGURE 22-16 The PEDI Slide Chart is a tool for determining the correct dosage of medication and equipment sizes for the pediatric patient based on their length, and is most useful in emergency situations where the child cannot be weighed. The PEDI Slide comes with disposable tape measures to measure head-to-toe length. This system also takes into consideration the body type—whether 50th, 75th, or 95th percentile—to further refine the dosage accuracy.
Medication Safety Alert!
For each pediatric patient the right dose involves calculating the recommended dose in mg/kg, comparing with the dose ordered, and checking with the pharmacist or health care provider if there is any question or discrepancy. Insulins, hypoglycemics, narcotics, digoxin, inotropic drugs, anticoagulants, potassium, and calcium salts must be checked by a second licensed nurse before being administered.
Selected tips in giving medication to children of various ages are offered in Box 22-1.
Calculating Pediatric Drug Dosages
Body Surface Area: Most pediatric medications are prescribed in milligrams per kilogram of body weight per 24 hours. A hospital drug reference is usually available on the unit to enable the nurse to determine the safety of a particular dose. If there is any question, one should consult the charge nurse, the physician who wrote the order, or the hospital pharmacist. The nurse should not be interrupted when preparing medications.
The physician calculates a particular dosage of a medication for each child. One method, calculation by body surface area (BSA), is considered to be the most accurate. In this method, a nomogram is used (Figure 22-17).
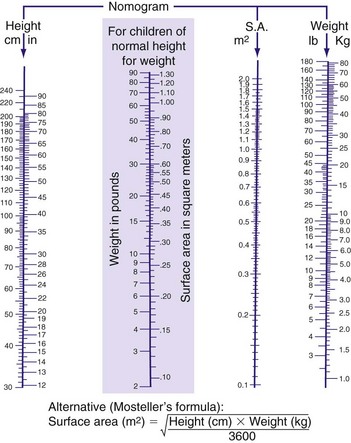
FIGURE 22-17 Nomogram for estimating surface area. The body surface area of the child is at the point where the height and weight levels intersect the surface area column. If the patient is of average size, the surface area can be deduced on the basis of weight alone (see shaded box).
On the nomogram, the child’s height is located on the left scale and the weight on the right scale. A line is drawn between the two points. The point at which the line transects the surface area (SA) gives the BSA of the individual child. If the patient’s size is roughly average, the SA can also be estimated from the weight alone by using the shaded area of Figure 22-17. The results are inserted into a formula, as follows (note that the average adult BSA is approximately 1.7 m2):

Calculating the Safe Drug Dose
Milligrams per Kilogram (mg/kg): For adults, most medications have an “average dose.” There is no average dose in pediatrics because the weight of the child can vary from 1 kg (2.2 lb) to 68 kg (150 lb), and at different ages the ability to metabolize and excrete drugs may be limited. Therefore it is necessary for the nurse to calculate if the ordered dose is safe. The mg/kg protocol can be used by the nurse when calculating safe doses for an infant or child. For example, the physician orders 25 mg of a medication to be administered. The nurse checks the PDR or other current drug reference book and finds that the safe dose for that medication is 2 to 4 mg/kg. This child weighs 7 kg. Using the highest safe dose, the nurse inserts the actual weight of the child in kilograms (kg) into the formula so that the formula now reads as follows: the safe dose of this medication for this child is 4 mg × 7 kg, or 28 mg. The physician’s order does not exceed 28 mg, and therefore the dose ordered is safe to give. If the physician’s order had exceeded the computed safe dose, the nurse calls a supervisor or the physician.
Dimensional Analysis: Dimensional analysis is one method of calculating dosages using basic arithmetic and algebra (Box 22-2). Some examples are given in this section.

Example: A physician orders 0.025 g of a drug. Each tablet is 12.5 mg. How many tablets will you give?
You know that 1000 mg = 1 g. Therefore:
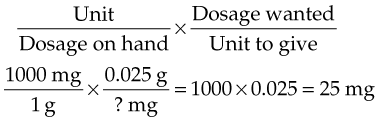
You will give 25 mg. Remember that each tablet is 12.5 mg:
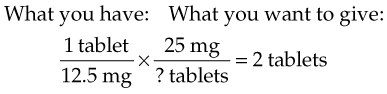
Example: A physician orders 5 mg of a drug. The label reads 10 mg/2 mL. How many mL do you give?

Determining Whether a Dose Is Safe for an Infant: A physician orders 200 mg q6h. The PDR states that a 40-mg/kg dose is a safe dose for infants. This infant weighs 12 lb.
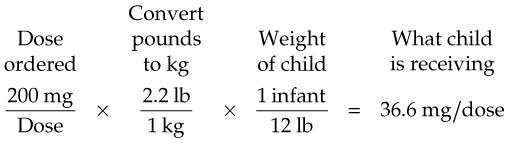
Because 36.6 mg/kg does not exceed the stated safe dose of 40 mg/kg, the dose ordered is safe for this child.
Besides knowing the correct amount and route of a drug, the nurse must also be aware of the toxic side effects that might occur. The absorption, distribution, metabolism, and excretion of drugs differ substantially in children, who also react more quickly and violently to medication. Drug reactions are therefore not as predictable as they are in adult patients. The drug’s impact on normal growth and development must be considered. Drug inserts must be read carefully to determine the suitability of a particular drug for children. Drugs should be given only by the route indicated.
Double-checking with another nurse may be required in some hospitals when administering drugs such as digoxin (Lanoxin), insulin, or heparin. The child should be correctly identified by using two identifiers on the hospital ID band. The nurse must always know what medications the patient is receiving, whether or not the nurse personally administers them. See Box 22-1 for further age-appropriate techniques of administering pediatric medications.
Preventing Drug Interactions
Selected Drug-Environment Interactions: Some medications can cause skin reactions when the child is exposed to the sun (phototoxicity). Parents should be advised to keep their child protected from the sun while he or she is taking these medications. Drugs that decompose when exposed to the air or light are dispensed in darkened bottles. These drugs should not be purchased in the large economy size because some tablets may deteriorate before all are used. Table 22-6 lists some examples of drug-environment interactions.
Selected Drug-Drug Interactions: The nurse should be alert to possible interactions between drugs prescribed and between prescription drugs and drugs that parents may purchase without a prescription. Table 22-7 is a partial list of some common drug-drug interactions.

Selected Drug-Food Interactions: The nurse should be aware that food and nutrients can influence the absorption, metabolism, and excretion of certain drugs. Foods that influence gastrointestinal motility or the pH of gastric secretions can affect absorption, thus lessening the drug’s therapeutic value. Table 22-8 lists some drug-food interactions.
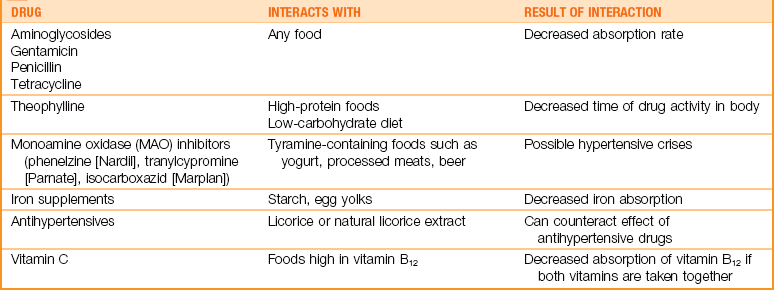
Adaptation of Selected Procedures to Children
Nutrition, Digestion, and Elimination
Gavage Feedings
A gavage feeding may be ordered when an infant cannot take food or fluids by mouth but the gastrointestinal tract is functioning. A gavage feeding places nutrients directly into the stomach so that natural digestion can occur. This can be accomplished by placing a nasogastric tube into the stomach via the nose and securing it in place with tape or by using the oral route, and reinserting a new tube with each feeding. When long-term feeding is required, a gastrostomy may be performed and a tube inserted directly into the stomach (see Skill 22-10).
Skill 22-10 Gastrostomy Tube Feeding
1. Verify order for type and amount of feeding.
2. Position child comfortably either flat or with head slightly elevated if not contraindicated. Provide pacifier to relax infant. Place absorbent pad under gastrostomy tube extender to protect bed linens.
3. Check residual stomach contents by attaching syringe to gastrostomy tube and aspirating. If amount of residual is large (10 to 25 mL for newborns, more than 50 mL for older children), replace residual and decrease present formula by equal amount or delay feeding for a short time. (This may vary according to the pediatrician’s protocol.) Overloading the stomach can cause reflux and increases the danger of aspiration. If residual continues or increases, report this to the physician. If no residual is obtained, inject 2 to 5 mL of air into the tubing while listening via the stethoscope placed on the abdomen for a “whoosh” sound indicating that air has entered the stomach.
4. Attach the syringe barrel (if not already present for continuous infusion) to the gastrostomy tube. If the tube has more than one lumen, be sure to use the port labeled for food or formula. Fill with formula. Remove clamp. This prevents air from entering the stomach and causing distention.
5. Elevate the receptacle. Allow the formula to flow slowly by gravity—force should not be used. (Note: Medications and feedings should flow by gravity and be followed with enough fluid as a flush to ensure the medication or feeding is in the stomach and does not remain in the tubing.)
6. Continue to add formula to the syringe before it empties completely (to prevent excess air from entering the tubing).
7. Clamp the tube as the final formula or water is passing through the lower part of the syringe. The gastrostomy tube extender may remain in place and clamped or may be removed from the gastrostomy button and the button closed and locked. (Note: With infants, some physicians may prefer that the gastrostomy tube remain open at all times to produce a safety valve in the event that the infant vomits. In such cases, the tube is elevated above the patient’s body.)
8. Whenever possible, hold the patient quietly after feeding. Reposition in Fowler’s position or on right side to promote gastric emptying.
9. Remove gloves and perform hand hygiene.
10. Record the type (gastrostomy feeding), the amount given, the amount and characteristics of residual, and how the child tolerated the procedure in the medical record.
11. Record the intake on the Intake and Output record.
12. An increase in gastric residual, abdominal distention, vomiting, or bradycardia should be reported to the health care provider promptly.
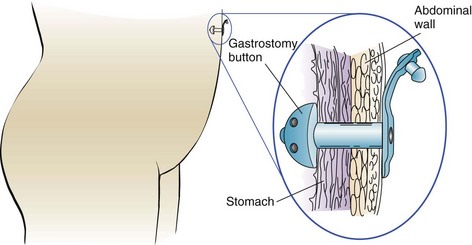
Gastrostomy
A gastrostomy (gastro, “stomach,” and stoma, “opening”) is designed to introduce food directly into the stomach through the abdominal wall by means of a surgically placed tube or button (Skill 22-10). It is used in infants or children who cannot have food by mouth because of anomalies or strictures of the esophagus or who are severely debilitated or in a coma. Cleansing of the skin around the tube prevents irritation from formula or gastric secretions. The nurse observes and reports vomiting or abdominal distention. Brown or green drainage may indicate that the tube has slipped through the pylorus into the duodenum. This could cause an obstruction and is reported immediately.
 Nursing Tip
One way of determining fluid loss in infants is to weigh a wet diaper and then weigh a dry diaper of the same type and size and to mark the weight on the outside of the dry diaper. Subtract the weight of the dry diaper from the weight of the wet diaper, and record results on the I&O record. Include both urine and liquid stools (1 g = 1 mL of output).
Enema
Administering an enema to a child is essentially the same as for adults; however, the type, the amount, and the distance for inserting the tube require modifications. In addition, a child’s bowel is more easily perforated under pressure. An isotonic solution (saline) is used in children. Tap water enemas are contraindicated because plain tap water is hypotonic to the blood and could cause rapid fluid shift and overload if absorbed through the intestinal wall. The type of solution intended is always confirmed. The amount of fluid varies somewhat in procedure recommendations. The smaller the child, the less solution is used. The exact amount for infants should be prescribed by the health care provider’s order. Guidelines range from a low of 50 mL (1.7 oz) for infants to a high of 500 to 750 mL (16.9 to 25.4 oz) for the adolescent. The nurse consults the procedure manual for the institution’s guidelines. The tube is inserted from 0.4 to 1.6 cm (1 to 4 inches) according to the size and age of the child. Infants and small children may be unable to retain the solution; therefore it may be necessary to hold the buttocks together for a short time. Commercial enemas specific for the child may be used; however, some are not recommended for infants and children. The Fleet Enema contains sodium biphosphate and sodium phosphate and has an osmotic action that can result in metabolic acidosis. Other commercially prepared enemas can cause complications in a dehydrated child. An oral polyethylene-glycol lavage solution, GoLytely or NuLytely, can be used to cleanse the bowel, as can a solution of magnesium citrate, without causing a risk for an electrolyte imbalance.
Respiration
A tracheostomy is a surgical procedure in which an opening is made in the trachea to enable the patient to breathe. This artificial airway may be necessary in emergency situations, may be an elective procedure, or may be combined with mechanical ventilation. Some of the childhood conditions that may require tracheostomy are acute epiglottitis, head injury, and burns. Nursing care is indispensable to the survival of the child, because blockage of the tube by mucus or other secretions can lead to suffocation. In many hospitals the child is placed in the intensive care unit immediately after surgery because this is a critical period that requires frequent suctioning and close observation. The child is placed on heart and respiratory monitors. When the child’s condition stabilizes, the child is usually transferred to a general unit.
The child is placed in an area of high visibility. This is important because small children communicate their needs by crying and the tracheostomy prohibits vocalization. Whenever possible, one person is assigned to the child and to work with the parents. The nurse reinforces preoperative teaching and explains what happened; for example, “You were having a lot of trouble breathing. This operation is called a tracheostomy and helps you to breathe more easily. A small opening has been made in your neck. A hollow tube was inserted to keep the area open. It is frightening not to be able to speak. When you are better, the hole will close by itself and your voice will return.” An explanation of suction might be, “We have to keep the area in your neck open. This tube goes into the throat and clears it.” The use of suction can be shown in a glass of water. The child is prepared for the unfamiliar sound. “You might feel like gagging, but afterward you will feel better. I know this is difficult for you and I’m sorry.”
The nursing care of the child with a tracheostomy is a significant responsibility. The anatomical differences between children and adults and the small child’s inability to communicate through writing increase the need for close observation. In addition, toddlers often have short, stubby necks that become easily irritated. It may be helpful to place a reminder on the intercom at the clerk’s desk or in other suitable areas indicating that this patient cannot cry or speak. The nurse’s touch and quiet voice and the presence of significant others help to make the child feel secure. Routines are incorporated by repeating familiar stories. A favorite article, such as a blanket or toy, is kept nearby. A supply of teaching aids and of dramatic play material is made available. Puppets are particularly valuable.
Tracheostomy Tube: Maintaining patency of the tracheostomy tube is of utmost importance. Plastic or Silastic tubes are generally used because they are flexible and reduce crust formation. They are lightweight and disposable, and most do not have inner cannulas. Cuffed tubes are not usually necessary in infants and small children, because their air passages are smaller and the tracheostomy tube provides a sufficient seal. The surgeon chooses a tracheostomy tube that is appropriate for the patient’s neck size and condition. Administering oxygen by manual resuscitator (“bagging”) before or after the procedure helps to prevent hypoxia.
Suctioning: Selection of a suction catheter is important. The nurse chooses one that does not block the tube during suctioning. The diameter should be about half the size of the tracheostomy tube. Hands are washed before proceeding. The nurse uses sterile gloves for the procedure, and all equipment used in the care of a tracheostomy should be sterile. Suction is applied as the catheter is withdrawn. The tube is rotated to allow the removal of secretions on all sides. With Y-tube technique, suction is achieved by closing the port with the thumb. A drop of saline solution may be inserted before suctioning to aid in loosening secretions. Because variations in this procedure exist and modifications are often required, the nurse must understand what is intended for the particular patient and must ask for clarification of specific procedures of the institution.
Suctioning is done periodically and when necessary. Indications for suctioning include noisy breathing, bubbling of mucus, and moist cough or respirations. Patients can rapidly become hypoxic during suctioning, and therefore it is limited to no more than 15 seconds. Two or three breaths for reoxygenation are allowed between suctioning. The depth of suctioning is important. In general, suctioning is limited to the length of the tracheostomy tube or slightly beyond to stimulate coughing. The catheter is cleared with sterile water between insertions. Unnecessary suctioning is avoided. The suction catheter is discarded after use. Disposing of water after suctioning prevents the growth of opportunistic organisms.
Tracheal Stoma: The tracheal stoma is treated as a surgical wound. The area is kept free of secretions and exudate to minimize the risk of infection. Cotton-tipped applicators dipped in half-strength hydrogen peroxide and saline solution can be used to remove crusted mucus. Tapes around the child’s neck should be loose enough to allow one finger to be easily inserted. The knot is placed to the side of the neck (Figure 22-18). The condition of the skin beneath the tape is assessed. The tape is changed as necessary. Two people are used for this procedure—one to hold the outer cannula and the other to change the tape. When feeding the infant, the nurse covers the tracheostomy with a bib or moist piece of gauze to prevent aspiration of food particles.
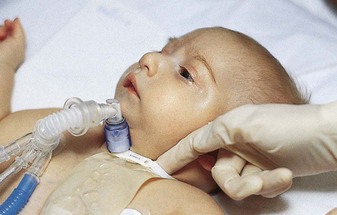
Observing for Complications: The nurse observes the patient for symptoms such as restlessness, rising pulse rate, fatigue, apathy, dyspnea, sternal retractions, pallor, cyanosis, and inflammation or drainage around the incision. Possible complications include tracheoesophageal fistula, stenosis, tracheal ischemia, infection, atelectasis, cannula occlusion, and accidental extubation. Baseline monitoring of the patient is done on each shift and before suctioning. The patient’s mental status, respirations, pulse rate and rhythm, and chest sounds are of particular importance. Accurate recording of observations is essential to evaluation. The time and frequency of suctioning, the character of secretions, the relief afforded the patient, the behavior of the patient, the appearance of the wound, and other pertinent data are recorded.
A sterile hemostat is kept at the bedside for emergency use. Accidental extubation, or expulsion of the tube, is uncommon but can occur from severe coughing if the tapes are too loose. Patency of the airway is maintained by spreading the edges of the wound with the sterile clamp until a duplicate sterile tube is inserted. An extra tracheostomy tube and the equipment needed for its replacement are always kept in a visible, easily reached area at the bedside for use in such emergencies. As the child’s condition improves, he or she is weaned from the tube. The opening gradually closes by granulation. Children whose tubes must remain in place for a longer time may require periodic tube changes.
Additional Nursing Measures: Additional nursing measures include frequent changes of position, use of elbow restraints, oral feedings (unless contraindicated), and careful bathing to prevent water from entering the tube. Range-of-motion exercises are a must for long-term patients, and in acute cases arm restraints are removed one at a time to allow for passive exercises. The diet is ordered by the health care provider. Although patients may initially have nothing by mouth, they progress to a soft or normal diet as the condition improves. The Fowler’s position is preferred during feedings. The older child can cooperate by holding the head flexed with the chin down. This decreases swallowing difficulties, because the esophagus opens and the airway narrows.
Discharge: Certain patients are discharged with a tracheostomy. This is anticipated, and instruction and demonstration for the parents begin early. Parents who are comfortable with the procedure during hospitalization will feel more secure when the child returns home. Information about parent support groups, visiting home nurses, and other referrals is provided before discharge.
Oxygen Therapy
Box 22-3 reviews selected considerations for the child receiving oxygen. See Chapter 13 for care of a child in an incubator.
Safety Considerations: All equipment used for oxygen therapy must be inspected periodically. Combustible materials and potential sources of fire are kept away from oxygen equipment. These materials are essentially the same as for adults; for the child, however, friction toys are also to be avoided because the sparks they can create could ignite. Nylon or wool blankets are not to be used. One should know where the nearest fire extinguisher is located. Parents are alerted to the precautions and to the presence of “no smoking” signs.
Infection prevention and control are extremely important. It is imperative that cross-infection via unclean equipment be prevented. Humidifiers and nebulizers, which are warm and moist, serve as an excellent medium for the growth of disease-producing organisms. Although most masks, tents, and cannulas that come into direct contact with the child are disposable, other pieces of mechanical equipment cannot be discarded. They require periodic cleansing if therapy is extended and terminal cleansing according to product direction. The respiratory therapy department should be contacted as necessary.
Prolonged exposure to high oxygen concentrations can be toxic to some body tissues (e.g., the retina in preterm infants and the lungs in the general population) but particularly in children with pulmonary diseases such as asthma or cystic fibrosis. The amount of oxygen administered depends on the child’s arterial oxygen concentration. Blood gas determinations (oxygen and carbon dioxide pressures, or Po2 and Pco2, respectively) ensure safe and accurate therapy. Noninvasive pulse oximeters that measure blood oxygen saturation via the skin are used whenever oxygen is administered to patients (see Skill 13-1).
Oxygen is a dry gas and requires the addition of moisture to prevent irritation of the respiratory tract. High-humidity concentrations may be achieved by the use of jet humidifiers on several oxygen units. Compressed air rather than oxygen may also be used for this purpose. Oxygen therapy is terminated gradually. This allows the patient to adjust to ambient (environmental) oxygen. The nurse slowly reduces liter flow, opens air vents in Isolettes, or opens zippers in croup tents. The child’s response is closely monitored. An increase in restlessness and in pulse rate and respirations indicates that the child is not tolerating withdrawal from the oxygen-enriched environment.
Methods of Administration: Oxygen is administered to children as age appropriate via Isolette, nasal cannula, mask, hood, tent, or tracheostomy. Regardless of the method used, the child is observed frequently to determine the effectiveness of the oxygen therapy. The desired goals include decreased restlessness and improved breathing, vital signs, and color. High concentrations of oxygen can be delivered by way of a plastic hood (see Figure 13-4). Warmed, humidified oxygen is delivered directly over the child’s head. It may be used in a radiant warmer.
Mist tent: A mist tent provides an atmosphere of fine particles of water suspended in a cool air or oxygen environment. The zippered openings in the clear plastic canopy facilitate easy access and observation of the child (Figure 22-19). A nebulizer can be attached to provide medicated inhalation therapy. The child should be dressed warmly when inside the tent to prevent hypothermia. The oxygen concentration should be checked periodically, and a pulse oximeter assessment of oxygen saturation should be monitored.
FIGURE 22-19 This infant is in an infant seat to maintain Fowler’s position while in a mist tent. This method of oxygen administration allows the parent and the child to see each other.
A physician’s order often reads “keep O2 saturation at 93%.” This means that if the O2 saturation on the pulse oximeter reads above 93%, the oxygen liter flow can be lowered and the child carefully monitored. If the O2 saturation level reads below 93%, the liter flow can be gradually increased and the child closely monitored until the reading reaches 93% (see Chapter 13 for discussion of pulse oximeters). A parent at the bedside stroking the infant through the zippered opening in the canopy can have a calming effect. Keeping a child dry in a high-humidity tent can be a challenge. Frequent linen and clothing changes are essential.
Safety Alert!
The nurse should inspect all toys when a child is undergoing oxygen therapy. Stuffed toys absorb moisture from the humidity in the oxygen tent and mechanical or battery toys can create a spark that can be dangerous in high oxygen environments. Neither toy is acceptable for a child receiving oxygen therapy.
Low-flow oxygen: Low-flow oxygen is a method of oxygen delivery used for children with chronic lung disease (e.g., cystic fibrosis) who are oxygen dependent for prolonged periods. These children react poorly to high oxygen concentrations. Approximately 1 or 2 L/min of oxygen is administered via nasal cannula or a “blow-by” catheter that is placed on the upper lip just below the nostrils (Figure 22-20). Because this type of oxygen delivery is used for prolonged periods, parent teaching concerning home management is a nursing responsibility.
Management of Airway Obstruction
Emergency abdominal thrusts and back blows are recommended to dislodge food or foreign bodies from the airway. This technique works on the principle that forcing the diaphragm up causes residual air in the lung to be forcefully expelled, resulting in popping the obstruction out of the airway.
Older Child Standing or Sitting: The nurse stands behind the standing or sitting victim and wraps the arms around the victim’s waist, with one hand made into a fist (Figure 22-21). The thumb side rests against the victim’s abdomen, slightly above the navel and well below the tip of the sternum (xiphoid process). The fist is grasped with the other hand and pressed into the victim’s abdomen with a quick upward thrust. From 6 to 10 thrusts may be necessary to dislodge the object. Each thrust should be a separate and distinct movement. The child may be placed in a side-lying position for the recovery phase.
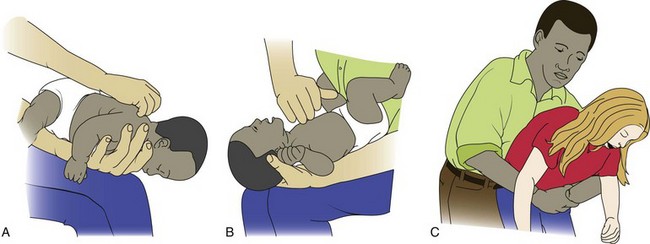
Older Child Lying Down (Conscious or Unconscious): The child is positioned on his or her back. The nurse kneels at the child’s feet if the child is on the floor or stands at the child’s feet if the child is on a table. The heel of one hand is placed on the child’s abdomen in the midline, slightly above the navel and well below the rib cage. The fist is grasped with the other hand and pressed into the victim’s abdomen with a quick upward thrust. The 6 to 10 thrusts are repeated as needed. Thrusts are directed upward into the midline and not to either side of the abdomen. The smaller the child, the gentler the procedure.
Infant: The nurse should determine airway obstruction. If the object is visualized, it is removed, trying not to push the object deeper into the throat. If this approach is unsuccessful, the infant is positioned prone with the head lower than the trunk. Support the head and neck with one hand and straddle the infant face down over the forearm, which is supported on the nurse’s thigh (see Figure 22-21). Resting the infant on the thigh, the nurse performs five forceful back blows between the shoulder blades with the heel of one hand. After delivering the back blows, the free hand is placed on the infant’s back so that he or she is sandwiched between the two hands; the infant is then turned on his or her back, with the head still lower than the trunk. Five thrusts are delivered in the midsternal region in the same manner as for external chest compressions, but at a slower rate (3 to 5 seconds). This is repeated until the foreign body is expelled. The nurse should not perform abdominal thrusts because this may cause injury to the infant’s abdominal organs. Conventional cardiopulmonary resuscitation (CPR) can be initiated when the airway is cleared. Because all student nurses are required to have basic CPR certification, the technique is not reviewed at this time.
Preoperative and Postoperative Care
Children are particularly fearful of surgery and require both physical and psychological preparation at the child’s level of understanding. Listening to the child is especially valuable to clarify misunderstandings. The child is asked to point to the operative site on a body outline. “Show me what they are going to fix.” Anesthesia is explained, and the child is allowed to play with a mask (Figure 22-22). Children and adults need reassurance.
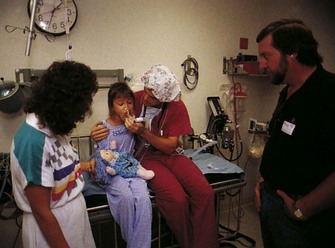
FIGURE 22-22 Preparing the child for the sights and sounds of surgery. The parents may be present during early induction of anesthesia to relieve anxiety during the preoperative period.
Nursing interventions after surgery are aimed at assisting the child to master a threatening situation and minimizing physical and psychological complications. Tables 22-9 and 22-10 summarize preparation for surgery and postoperative care. Parents are included in all aspects of preoperative and postoperative care.
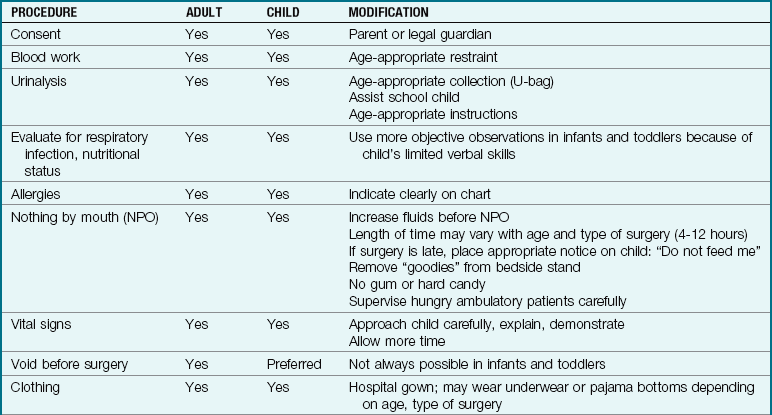
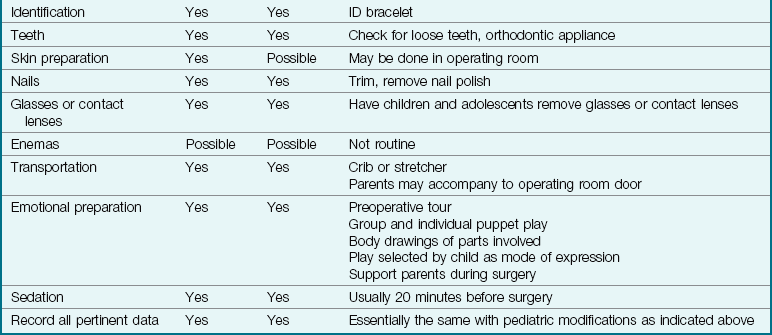
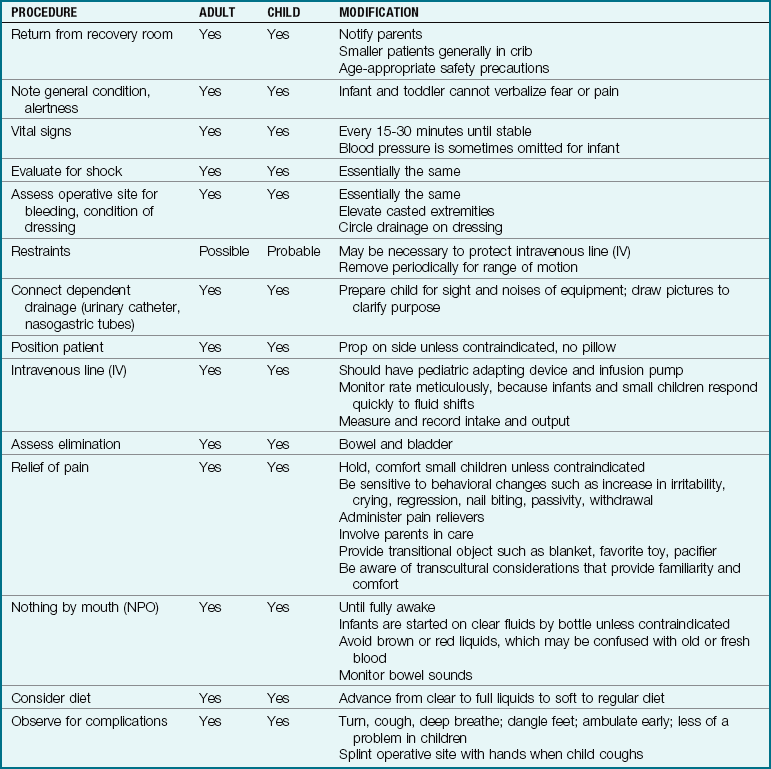
When adults are prepared for surgery, they are usually kept on NPO status from midnight before the scheduled surgery date. The surgery may be done in the morning or afternoon. Infants should not be maintained on NPO status for longer than 4 to 6 hours because of the high risk for dehydration. It is a nursing responsibility to check that the test procedure or surgery is scheduled as early as possible in the morning to avoid a prolonged wait. Pacifiers should be provided to infants who are on NPO status to meet their developmental need for sucking.
Surgery and Body Piercing, Body Jewelry, and Tattoos
Body piercing jewelry and tattoos are very common today among teens at every socioeconomic level. Most body jewelry is designed to stay in place and can be covered with an occlusive dressing during surgery without being removed as long as it is not in the operative area (DeBoer, 2008). If removed, the teen should supply a flexible plastic retainer to preserve the opening. Although nipple rings need to be removed before mammography, most body jewelry is made of titanium, niobium, or stainless steel and is not ferromagnetic and therefore can safely remain in place during MRI (DeBoer et al., 2008b). Patients with tattoos or permanent cosmetics are at risk for developing edema or burning during magnetic resonance imaging (MRI). Tattoo pigments can interfere with the quality of the MRI results; therefore, the radiologist should be made aware of the tattoo through accurate documentation. Appropriate equipment such as ring-opening pliers should be used to remove body jewelry when necessary to avoid skin trauma. The nurse needs to know policies and best practices when the teen with body art is hospitalized (Armstrong, 2009).
Get Ready for the NCLEX® Examination!
Key Points
• The nurse must be especially conscious of safety measures on the children’s unit, particularly the following: keeping crib sides up when the child is unattended, careful application of restraints, safe transport, and proper identification of the child.
• The parents are included in both planning and implementing care. Children are prepared for and encouraged to express their feelings about treatments.
• Weight measurements must be accurate because medication is often calculated according to the child’s weight.
• The correct size blood pressure cuff must be used for children to obtain an accurate reading. It should cover two thirds of the upper arm.
• Special urine collection devices are used for newborns and infants.
• Proper positioning of the child for jugular and femoral puncture is important. Because these are large veins, the infant is frequently checked for bleeding after these procedures.
• Medications for children must be adapted to size, age, and body surface. The absorption, distribution, metabolism, and excretion of drugs differs substantially in children. Their reactions to drugs are less predictable than those of adults.
• The nurse should be familiar with tools and techniques that decrease medication errors in pediatric patients.
• The recommended IM injection site for children under age 3 years is the vastus lateralis.
• Careful observation of the child receiving IV fluids is necessary because overload of fluids in an infant can lead to cardiac failure. IV pumps are used to ensure accuracy of intravenous fluid infusions. Intake and output sheets must be accurate.
• The nurse must monitor the rate of the IV flow, refill the burettes, observe the condition of the IV site, and assess the response of the child hourly.
• When administering eardrops to children under 3 years of age, the pinna of the ear is pulled down and back to straighten the ear canal. In the older child, the pinna of the ear is pulled up and back.
• A pacifier should be offered to infants whose status is NPO (nothing by mouth).
• Weighing a wet diaper and subtracting the dry weight of a similar diaper is one method of recording the output of infants.
• Preoperative and postoperative care assists the child to master threatening situations and minimize physical and psychological complications.
• Most body jewelry made of titanium or surgical stainless steel is not ferromagnetic and may not have to be removed before MRI or surgery.
Additional Learning Resources
 Go to your Study Guide for additional learning activities to help you master this chapter content.
 Go to your Evolve website (http://evolve.elsevier.com/Leifer) for the following FREE learning resources:
• Answer Guidelines for Critical Thinking Questions
• Answers and Rationales for Review Questions for the NCLEX® Examination
• Glossary with English and Spanish pronunciations
• Interactive Review Questions for the NCLEX® Examination
• Patient Teaching Plans in English and Spanish
 Online Resources
• Children’s blood pressure measurements: www.scribd.com/doc/8791142/Pediatrics-Hypertension-2008
• Electronic medical library: www.statref.com
• Pediatric information: www.drgreene.com
• Trauma information: www.trauma.org
Review Questions for the NCLEX® Examination
1. Which approach is best when administering an oral medication to a young child?
1. “Would you please take your medicine now, David?”
2. “Look how good Johnny took his medication. Can you do that too, David?”
3. “You must take your medicine now if you want to get better.”
4. “It’s time for your medication, David. Would you like water or juice after it?”
2. The preferred site for an intramuscular injection in infants is:
3. The physician orders 10 mg of Demerol for an infant after surgery. If the label reads 50 mg/mL, the nurse would administer:
4. When preparing an enema for a young child, the nurse would select which solution?
5. The mother and grandmother of a child are at the bedside, rubbing the skin of the child. When the nurse enters the room the visitors are startled and drop the item they were using to rub the child’s skin. The nurse picks up the item and recognizes it as a penny. The best response of the nurse is to:
1. ask, “What on earth are you doing to that child with this penny?”
2. give the penny back to the mother and leave the room to give them their privacy.
3. tell them they could hurt the child with the penny and there are many germs on coins.
4. return the penny to the mother and open a dialogue about the practice they are using.