22 INVESTING AND CASTING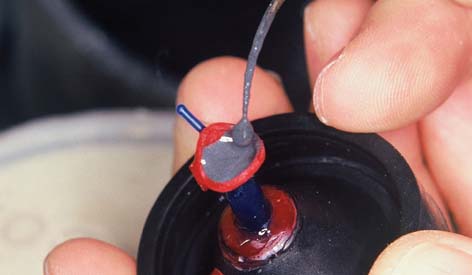
The lost-wax casting technique has been used since ancient times to convert wax patterns to cast metal. It was first described1,2 at the end of the 19th century as a means of making dental castings.
The process consists of surrounding the wax pattern with a mold made of heat-resistant investment material, eliminating the wax by heating, and then introducing molten metal into the mold through a channel called the sprue. In dentistry, the resulting casting must be a highly accurate reproduction of the wax pattern in both surface details and overall dimension. Small variations in investing or casting can significantly affect the quality of the final restoration. Successful castings depend on attention to detail and consistency of technique.
An understanding of the exact influence of each variable in the technique is important for making rational decisions to modify the technique as needed for a given procedure.
PREREQUISITES
When the wax pattern has been completed and its margin has been reflowed (see p. 578), it is carefully evaluated for smoothness, finish, and contour (see Chapter 18). The pattern is inspected under magnification, and any residual flash (wax that extends beyond the preparation margin) is removed. A sprue is attached to the pattern, then removed from the die, and attached to a crucible former (Fig. 22-1). The wax pattern must be invested immediately because any delay leads to distortion of the pattern as a result of stress relief of the wax.3
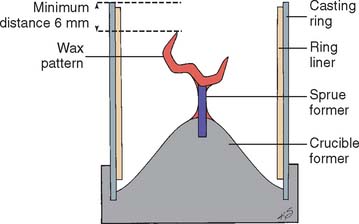
Fig. 22-1 Wax pattern attached to the crucible former with a sprue ready for investing. A ring liner is in place.
Sprue
Sprue design (Fig. 22-2) varies depending on the type of restoration being cast, the alloy used, and the casting machine. There are three basic requirements, as follows:
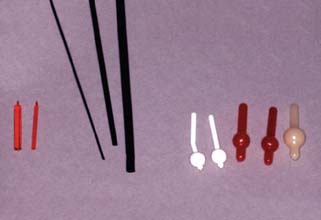
Fig. 22-2 Prefabricated plastic and wax sprues are preferred over metal sprues because the material is eliminated during the heating cycle.
The shape of the channel in the refractory mold is determined by the sprue that connects the wax pattern to the crucible former. The sprue can be made from wax, plastic, or metal. Wax sprues are preferred for most castings because they melt at the same rate as the pattern and thus allow easy escape of the molten wax. Solid plastic sprues soften at a higher temperature than the wax pattern and may block the escape of wax, which results in increased casting roughness. However, plastic sprues can be useful when casting fixed dental prostheses in one piece because their added rigidity minimizes distortion. Also, hollow plastic sprues that allow the escape of wax are available.
If a metal sprue is used, it should be made of noncorroding metal to avoid possible contamination of the casting. Metal sprues are often hollow to increase contact surface area and strengthen the attachment between the sprue and pattern. They are usually separated from the investment at the same time the crucible former is. Special care must then be taken to examine the orifice for small particles of investment that may break off when such a sprue is removed, because these can cause an incomplete casting if undetected (see p. 701).
Diameter
In general, a relatively large-diameter sprue is recommended because this improves the flow of molten metal into the mold and ensures a reservoir during solidification.4,5
A 2.5-mm (10-gauge) sprue is recommended for molar and metal-ceramic patterns. A smaller 2.0-mm (12-gauge) sprue is adequate for premolar castings and most partial-coverage restorations.
In some casting techniques other than the commonly used centrifugal technique, a narrow sprue, or a sprue design that narrows at the point of attachment to the wax pattern, is essential. For instance, with air-pressure machines, the melt is made directly in the depression created by the crucible former and then forced into the mold by the sudden change in air pressure. With this technique, a narrow sprue prevents the molten metal from flowing into the mold prematurely.
Location
The sprue should be attached to the bulkiest noncritical part of the pattern, away from margins and occlusal contacts. Normally, the largest nonfunctional cusp is used (Fig. 22-3). The point of attachment should allow a stream of metal to be directed to all parts of the mold without having to flow in an opposite direction to the casting force (Fig. 22-4).
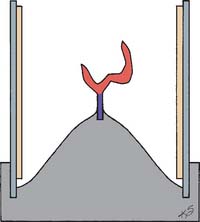
Fig. 22-3 Correct sprue placement on the bulkiest nonfunctional cusp allows molten alloy to flow to all parts of the mold.
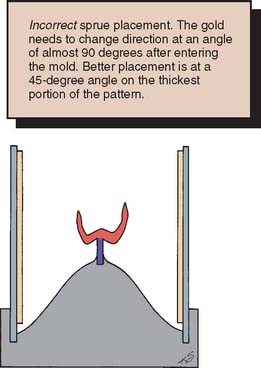
Fig. 22-4 Incorrect sprue placement in the central fossa obliterates occlusal anatomy and may result in poor mold filling because the molten metal is not pushed into the cusp tips by centrifugal force.
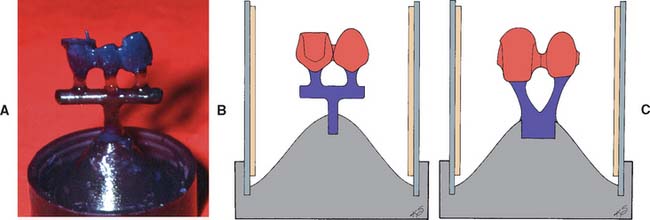
The sprue must also allow for proper positioning of the pattern in the ring. This can be crucial because expansion within the mold is not uniform.6,7 For example, spruing on the cusp tip can give good results, but spruing on the proximal contact may produce a casting that is too wide mesiodistally and too short occlusocervically.
Attachment
The sprue’s point of attachment to the pattern should be carefully smoothed to minimize turbulence. For the centrifugal casting technique, the attachment area should not be restricted because necking increases casting porosity and reduces mold filling.8 Similarly, excessively widening the attachment can cause this part of the cooling melt to solidify last, causing a void on the internal aspect of the casting, known as shrink-spot porosity.
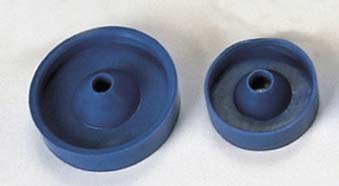
Crucible Former
The sprue is attached to a crucible former* (Fig. 22-6), usually made of rubber, which serves as a base for the casting ring during investing. The exact shape of the crucible former depends on the type of ring and casting machine used. With most modern machines, the crucible former is tall, to allow use of a short sprue and also to enable the pattern to be positioned near the end of the casting ring.
Casting Ring and Liner
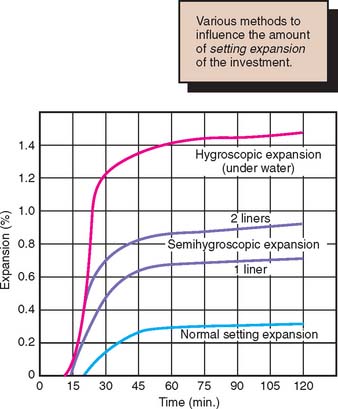
The casting ring serves as a container for the investment while it sets and restricts the setting expansion of the mold. Normally a liner is placed inside the ring to allow for more expansion, because the liner is somewhat compressible. Use of two liners allows for additional compression and enables increased setting expansion of the investment material. At one time, asbestos was used as the liner, but this has been replaced by other materials to avoid the health risks associated with asbestos fibers. Like many other factors that come into play in achieving consistent casting with the proper quality of fit, changes in the liner are important. Wetting the liner increases the hygroscopic expansion of the mold and should be carefully controlled. An absorbent dry liner removes water from the investment and makes a thicker mix, which leads to increase in the total expansion.11,12 To prevent expansion restriction, care must be taken not to squeeze the liner against the ring. Increased expansion can be obtained by placing the mold in a water bath. This is because of hygroscopic expansion (Fig. 22-7). The position of the pattern in the casting ring also affects expansion. For consistent results, a single crown should be centered in the ring, equidistant from its walls. When fixed prostheses are cast as one piece, greater accuracy is achieved if the pattern is placed near the center of a large or special oval ring, rather than if a portion of a multiunit wax pattern is only partially centered and partially near the edge of a smaller ring.6
Ringless Investment Technique
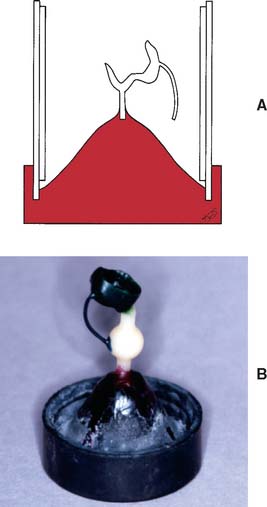
With the use of higher strength, phosphate-bonded investments, the ringless technique has become quite popular (Fig. 22-8).13 The method entails the use of a paper or plastic casting ring and is designed to allow unrestricted expansion.14 This can be useful with higher melting alloys that shrink more because of a larger cooling trajectory.
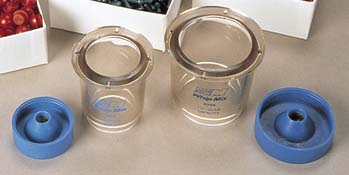
Fig. 22-8 Ringless investment technique. Crucible formers and cone-shaped plastic rings for a ringless casting system. The crucible former and plastic ring are removed before wax elimination, leaving the invested wax pattern. The systems are designed to achieve expansion that is unrestricted by a metal ring.
(Courtesy of Whip Mix Corporation, Louisville, Kentucky.)
Spruing Technique
Armamentarium (Fig. 22-9)
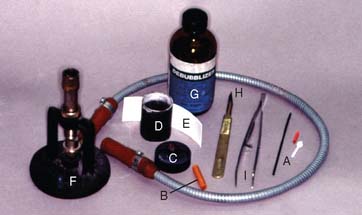
Step-by-step procedure for a single casting
A 2.5-mm (10-gauge) sprue form is recom-mended for molar crowns or metal-ceramic castings, and a 2-mm (12-gauge) sprue for premolar and partial-coverage restorations. The procedure is as follows:
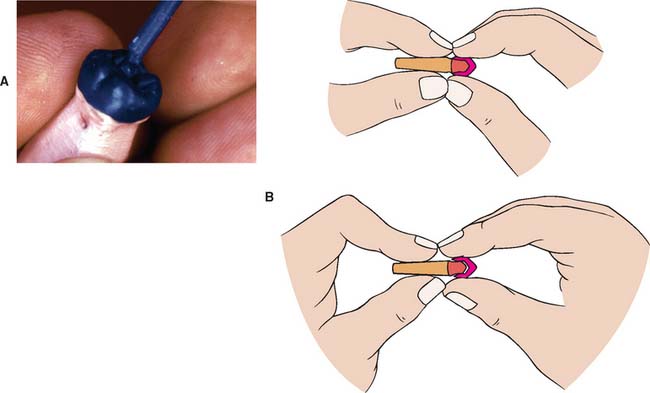
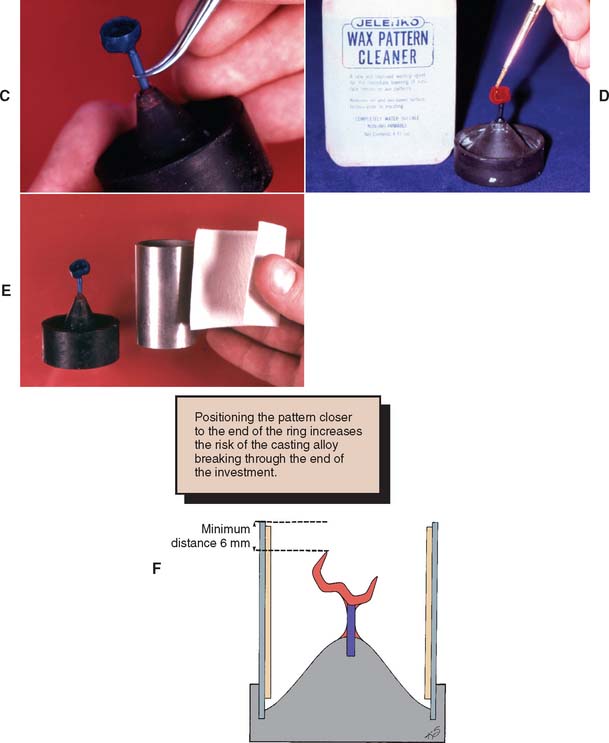
Fig. 22-10 Spruing technique for a single casting. A, Attaching the sprue to the pattern. B, Removing the pattern from the die (see p. 566 for a description of this technique). C, Positioning the pattern on the crucible former. D, Application of surfactant. E, A ring liner increases the setting expansion. F, The pattern must be positioned sufficiently away from the end of the ring.
Procedure for multiple castings
When more than two units are being cast together, each is joined to a runner bar (Fig. 22-11). A single sprue is used to feed the runner bar. Two units may be cast with a runner bar, or each unit may be fed from a separate sprue.
MATERIALS SCIENCE
Several investment materials are available for fabricating a dental casting mold. These typically consist of a refractory material (usually silica) and a binder material, which provides strength. Additives are used by the manufacturer to improve handling characteristics.
When investments are classified by binder, three groups are recognized: gypsum-bonded, phosphate-bonded, and silica-bonded investments. Each has specific applications. The gypsum-bonded investments are used for castings made from American Dental Association (ADA) type II, type III, and type IV gold alloys. The phosphate-bonded materials are recommended for metal-ceramic frameworks. The silica-bonded investments are for high-melting base metal alloys used in casting partial removable dental prostheses. However, because of their limited application in fixed prosthodontics, silica-bonded investments are not included in the following discussion.
Gypsum-Bonded Investments
Gypsum is used as a binder, along with cristobalite or quartz as the refractory material, to form the mold. The cristobalite and quartz are responsible for the thermal expansion of the mold during wax elimination. Because gypsum is not chemically stable at temperatures exceeding 650°C (1200°F), these investments are typically restricted to castings of conventional types II, III, and IV gold alloys.
Expansion
Three types of expansion can be manipulated to obtain the desired size of casting: setting, hygroscopic, and thermal.
Setting expansion
As the gypsum investment sets after mixing, it expands and slightly enlarges the mold. The pattern, metal casting ring, and compressibility of the ring liner all influence this expansion.
The water/powder ratio can be altered to reduce or increase the amount of setting expansion. The use of less water increases the setting expansion and results in a slightly larger casting. Use of an additional ring liner increases the setting expansion, as does a slight increase in mixing time. If a smaller casting is desired, more water can be used or the liner can be eliminated, both of which curtail the amount of expansion. When attempting to alter setting expansion, the clinician should not deviate more than minimally from the manufacturer’s recommendations, to ensure that there are no changes in the essential properties of the investment.
Hygroscopic expansion
Hygroscopic expansion occurs when water is added to the setting gypsum investment immediately after the ring has been filled. Usually this is accomplished by submerging the ring in a water bath at 37°C (100°F) for up to 1 hour immediately after investing. A significant amount of additional setting expansion results, enabling the use of a slightly lower wax elimination temperature. A wet ring liner also contributes hygroscopic expansion to the portion of the mold with which it is in contact (see Fig. 22-7).
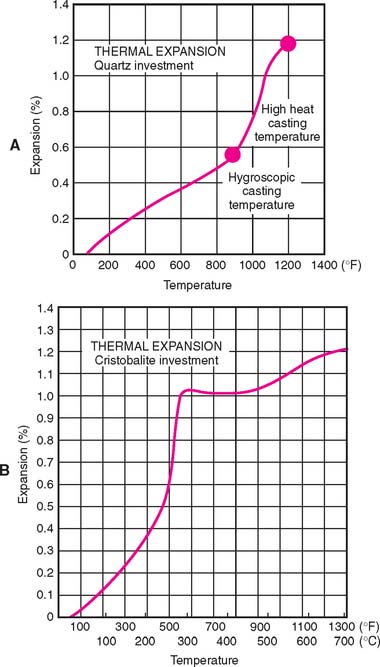
Thermal expansion
As the mold is heated to eliminate the wax, thermal expansion occurs (Fig. 22-12). The silica refractory material is principally responsible for this because of solid-state phase transformations. Cristobalite changes from the α to the β (high-temperature) form between 200°C (392°F) and 270°C (518°F); quartz transforms at 575°C (1067°F). These transitions involve a change in crystal form, an accompanying change in bond angles and axis dimension, and a decreased density, producing a volume increase in the refractory components.
Phosphate-Bonded Investments
Because most metal-ceramic alloys fuse at approximately 1400°C (2550°F) (as opposed to conventional gold alloys at 925°C [1700°F]), additional shrinkage occurs when the casting cools to room temperature. To compensate for this, a larger mold is necessary. The added expansion can be obtained with phosphate-bonded investments.
The principal difference between gypsum-bonded and phosphate-bonded investments is the composition of the binder and the relatively high concentration of silica refractory material in the latter. The binder consists of magnesium oxide and an ammonium phosphate compound. In contrast to gypsum-bonded products, this material is stable at burnout temperatures above 650°C (1200°F) (Fig. 22-13), which allows for additional thermal expansion. Most phosphate-bonded investments are mixed with a specially prepared suspension of colloidal silica in water. (Some, however, can be mixed with water alone.)
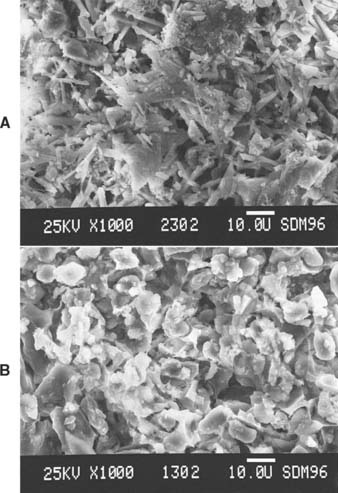
Fig. 22-13 Scanning electron micrographs of a gypsum-bonded investment (A) and a phosphate-bonded investment (B), each heated to 700°C (1292°F).
Some phosphate-bonded investments contain carbon and therefore are gray in color. Carbon-containing materials should not be used for casting base metals because the carbon residue affects the final alloy composition. They may be used for casting high-gold or palladium content alloys.
Expansion
Compared to gypsum-bonded investments, phosphate-bonded investments offer greater flexibility in controlling the amount of expansion. The liquid/powder ratio needs only slight modification to effect a significant change in setting expansion. Increasing the proportion of special liquid (colloidal silica) also increases expansion.
Working time
Phosphate-bonded investments have a relatively short working time in comparison with gypsum materials. Their exothermic setting reaction accelerates as the temperature of the mix rises during manipulation. The filled ring feels warm to the touch even shortly after it has been filled. A longer mixing time significantly accelerates the setting reaction and temperature and thus reduces the working time even further. The addition of water to the colloidal silica suspension increases the working time, with some loss of setting expansion. Many technicians therefore vary the quantity of special liquid and water between batches and make trial mixes for each new shipment. This has been a reliable means of adjusting expansion.15
Gas is formed during the reaction and must be removed for a sufficiently long period to minimize nodules on the casting.16 Maintaining a vacuum for about 60 seconds appears to be adequate.
SELECTION OF MATERIALS
Selecting a Casting Alloy
The choice of casting alloy largely determines the selection of investment and casting techniques and therefore is discussed first.
The number and variety of alloys suitable for casting have expanded dramatically, largely because of changes in the price of gold. Many alloys are available, especially for metal-ceramic restorations (see Chapter 19). The dentist must be able to make a rational choice on the basis of current information.
Factors to be considered
Intended use
Alloys for casting were traditionally classified on the basis of their intended use, as follows:
Physical properties
In 1965, the ADA adopted the specifications of the Fédération Dentaire Internationale (FDI), which classified casting alloys according to their physical properties (specifically their hardness), as follows:
Porcelain-type alloys with a high noble metal content were found to have hardness similar to that of type III alloys, and base metal alloys were found to be harder than type IV alloys (see Chapter 19).
Color
Manufacturers place considerable emphasis on the color of their alloys, and color preference is often given to gold over silver. The patient’s views on the subject should be sought if the metal will be visible in the mouth; otherwise, the color of the dental alloy is irrelevant.
Color is not a good guide to gold content: 9-carat jewelry alloy with only 37.5% gold looks considerably more yellow than does a metal-ceramic dental alloy with 85% gold but no copper.
Composition
To be accepted by the ADA as an alloy suitable for dental restorations,17 the manufacturer must list the percentage composition by weight of the three main ingredients and any noble metal percentage. The functional characteristics of corrosion resistance and tarnish resistance were traditionally predicted on the basis of gold content. In general, if at least half the atoms in the alloy are gold (which would be 75% by weight), good resistance to corrosion and tarnish can be predicted. Nevertheless, clinical evaluations have failed to show statistically significant differences in the tarnish resistance of high-gold (77%) and low-gold (59.5% to 27.6%) alloys.18 However, a poorly formulated alloy, even of high gold content, can rapidly tarnish intraorally.
Cost
Treatment plans are often modified to suit the financial capabilities of the patient or a third party. Base metal alloys have found favor principally because of their low cost. Similarly, alloys containing approximately 50% gold have been found to offer some economic advantage (although the savings are not proportional to the reduced gold content of the alloy). Alloys containing primarily palladium and only a small percentage of gold are an alternative for use in the metal-ceramic technique, although soldering procedures may be less predictable.
When the intrinsic metal cost of a restoration is calculated, the volume of the casting, rather than its weight, should be determined. Dental casting alloys can vary considerably in density from below 8 g/mL to over 18 g/mL (see Table 19-1). An “average” restoration has a volume of 0.08 mL; an all-metal pontic may have a volume reaching 0.25 mL.19 Therefore, it is conceivable that the cost of a large pontic cast in a low-density alloy would be equal to or less than the cost of a complete cast crown fabricated from a high-density alloy. When noble metal prices are high, more sophisticated techniques of scrap recovery become economically attractive. These can range from installing conventional metal catchers in all areas where castings are finished to equipping all work stations with filtered suction machines.
Clinical performance
In most respects, clinical performance (biologic and mechanical) is more important than cost. Biologic properties that can be evaluated include gingival irritation, recurrent caries, plaque retention, and allergies. Mechanical properties include wear resistance and strength, marginal fit, ceramic bond failure, connector failure, and tarnish and corrosion.
A risk in choosing a new alloy is that defective clinical performance may fail to appear in laboratory testing or in short-term animal and clinical trials. For example, manufacturers introduced copper-based casting alloys with very poor corrosion resistance20 when the price of gold was rapidly rising.* Although the clinically established alloys all have disadvantages, their performance is likely to have been well documented, and the prognosis of restorative treatment can be more accurately predicted.
Laboratory performance
Sound laboratory data are essential in the selection of a casting alloy. Important areas of consideration are casting accuracy, surface roughness, strength, sag resistance, and metal-ceramic bond strength. Currently available data suggest that nickel-chromium alloys have lower casting accuracy21 and greater surface roughness22 than do gold alloys (Fig. 22-14) but higher strength and sag resistance because of their higher melting ranges.23
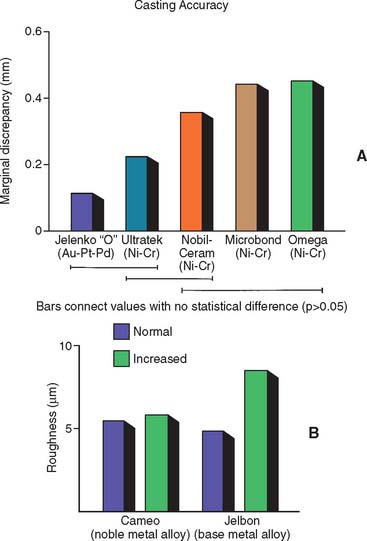
Fig. 22-14 A, Comparison of casting accuracies with different alloys. Au-Pt-Pd, gold-platinum-palladium; Ni-Cr, nickel-chromium. B, Influence of metal casting temperature and alloy selection on casting roughness.
(A, From Duncan JD: The casting accuracy of nickel—chromium alloys for fixed prostheses. J Prosthet Dent 47:63, 1982; B, from Ogura H, et al: Inner surface roughness of complete cast crowns made by centrifugal casting machines. J Prosthet Dent 45:529, 1981.)
Handling properties
The ease with which an alloy can be manipulated may influence its selection. An alloy that produces satisfactory clinical results, but only under extremely critical conditions or with expensive equipment, may be rejected in favor of one that produces acceptable results with less critical manipulation.
The ability to burnish an alloy to reduce marginal gap width and thus reduce the exposed thickness of the luting agent is important,24 although the areas where marginal adaptation is clinically most important (interproximally and subgingivally) are usually not very accessible for such manipulation.
Biocompatibility
All materials for intraoral use should be biocompatible. In addition, it should be possible to handle them safely in the office or laboratory. Many hazardous materials are commonly used in dentistry, such as mercury, chloroform, silver cyanide, and hydrofluoric acid. Consequently, restrictions have been imposed on their shipping and use. For instance, asbestos in casting ring liners and uranium salts in dental porcelain are no longer used. There is also concern25 for the possible health hazards (see Chapter 19) associated with alloys containing nickel and beryllium. Although no definite conclusions can be drawn, appropriate safety precautions are advisable when these alloys are being ground. Filtered suction units and appropriate barriers (masks) should be used. The ADA26 requires nickel-containing alloys to carry a precautionary label stating that their use should be avoided in patients with a known nickel allergy (Fig. 22-15).
Selecting an Investment Material
After the choice of casting alloy has been made, the investment material can be selected.
Ideal properties
An ideal investment should incorporate the following features:
Gypsum-bonded investments
Gypsum-bonded investments satisfy most of the requirements for an ideal material, although they are not suitable for casting metal-ceramic alloys because the gypsum is unstable at the high temperatures required and sulfide contamination of the alloy can occur. In addition, with some materials, obtaining adequate expansion may be difficult. This can be critical in casting complete crowns. A casting that is slightly oversized (in a controlled manner) is advantageous for accurate seating (see Chapters 7 and 29). Factors that increase expansion27 of gypsum-bonded investments include the following:
Phosphate-bonded investments
Phosphate-bonded investment materials offer certain advantages over gypsum-bonded investments. They are more stable at high temperatures and thus are the material of choice for casting metal-ceramic alloys. They expand rapidly at the temperatures used for casting alloys, and their expansion can be conveniently and precisely controlled. The increased expansion that they exhibit results from a combination of the following factors:
However, castings made with phosphate-bonded investments are rougher than those made with gypsum-bonded investments29 and are more difficult to remove from the investment.30 Because phosphate-bonded investments have lower porosity,31 complete mold filling is more difficult. Castings also are more likely to have surface nodules, which must be removed. (Vacuum mixing and a careful investing technique help reduce but do not eliminate the occurrence of nodules.)
INVESTING
Vacuum mixing of investment materials (Fig. 22-16) is highly recommended for consistent results in casting with minimal surface defects, especially when phosphate-bonded investments are used. Good results are possible with brush application of vacuum-mixed investment or when the investment is poured into the ring under vacuum. Vacuum mixing with brush application of the investment is the suggested mode. To expedite the procedure and minimize distortion, all necessary items and materials should be prepared before the wax pattern is reflowed and removed from the die.
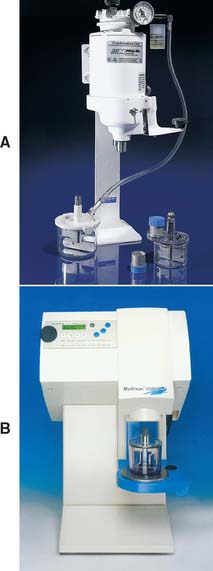
Fig. 22-16 Vacuum investing machines. A, The Whip Mix combination unit. B, The Multivac Compact.
(A, Courtesy of Whip Mix Corporation, Louisville, Kentucky; B, courtesy of DENTSPLY Ceramco, York, Pennsylvania.)
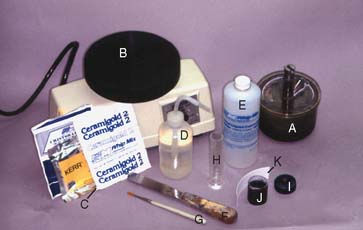
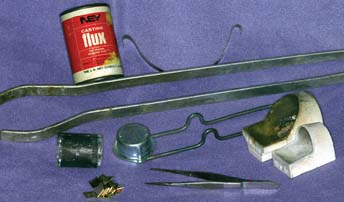
Armamentarium (Fig. 22-17)
Step-by-Step Procedure
Brush technique
In this technique, the pattern is first painted with surface tension reducer; the surface must be wet completely. The procedure is as follows:
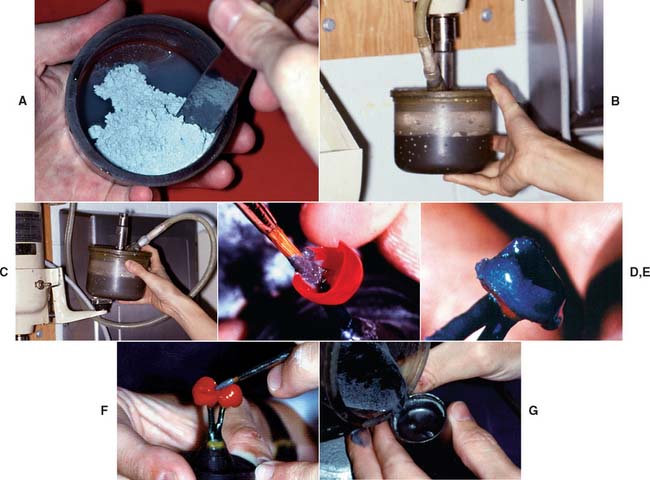
Fig. 22-18 Investing procedure: brush technique. A, The mix is hand-spatulated to incorporate powder quickly. B, The investment is vacuum-mixed according to manufacturer’s recommendations. C, The mix is vibrated for a few seconds. D. The wax pattern is carefully coated, the investment teased ahead of the brush. E, Be sure that all surfaces of the pattern are covered. F, Note the finger that is interposed between the crucible former and the top of the vibrator as these patterns are being brush invested. G, The ring is slowly filled, with the bowl held on the vibrator to facilitate investment flow. The ring is tilted from side to side to avoid trapping air under the pattern.
A finger positioned under the crucible former on the table of the vibrator minimizes the risk of excessive vibration and possible breaking of the pattern from the sprue (Fig. 22-18F). After the pattern has been completely coated, the ring is immediately filled by vibrating the remaining investment out of the bowl.
Vacuum Technique
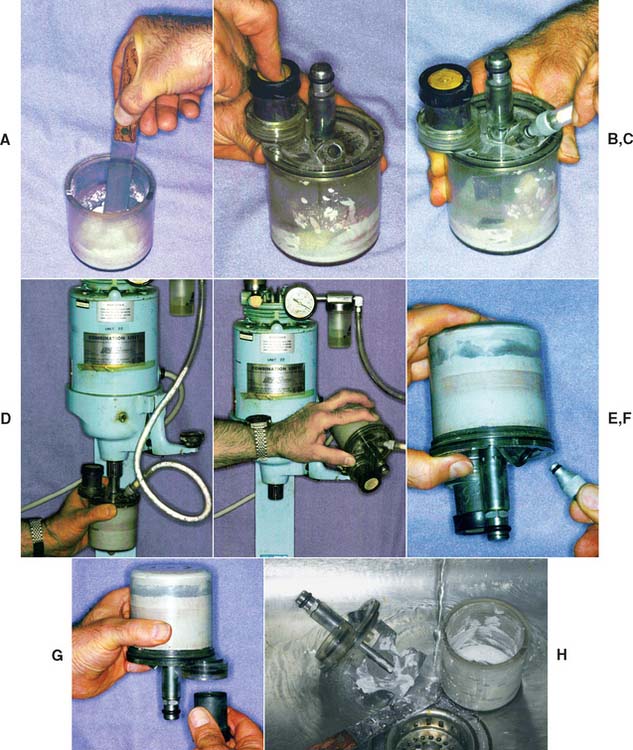
Fig. 22-19 Investing procedure: vacuum technique. A, The mix is hand-spatulated. B, With the crucible former in place, the ring is attached to the mixing bowl. C, The vacuum hose is attached. D, Mixing is performed according to manufacturer’s recommendations. E, The bowl is inverted, and the ring is filled under vibration. F, The vacuum hose is removed before the mixer is shut off. G, The filled ring and crucible former are removed from the bowl. H, The bowl and mixing blade are cleaned immediately under running water.
Wax Elimination
Wax elimination or burnout consists of heating the investment in a thermostatically controlled furnace (Fig. 22-20) until all traces of the wax are vaporized. The temperature reached by the investment determines its thermal expansion.
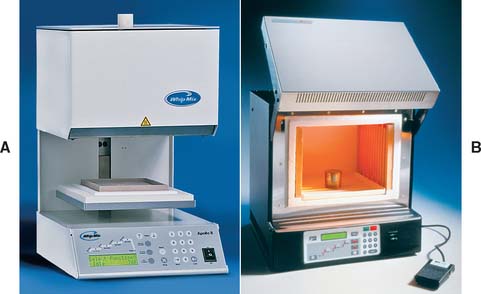
Fig. 22-20 Burnout ovens are available with manual, semiautomatic, or fully programmable controls. A, Whip Mix Apollo II; B, Ney Vulcan.
(A, Courtesy of Whip Mix Corporation, Louisville, Kentucky; B, courtesy of DENTSPLY Ceramco, York, Pennsylvania.)
All water in the investment must be driven off during wax elimination. The temperature to which the ring is heated during wax elimination must be sufficiently high. It should be maintained long enough (“heat soak”) to minimize a sudden drop in temperature upon removal from the furnace. Such a drop may result in an incomplete casting because of excessively rapid solidification of the alloy as it enters the mold. Once the investment is heated during the wax-elimination procedure, heating must be continued, and casting must be completed. Cooling and reheating of the investment can cause casting inaccuracy because the refractory mold and binder do not revert to their original forms (hysteresis). Inadequate expansion and cracking of the investment are typical results.
Step-by-Step Procedure
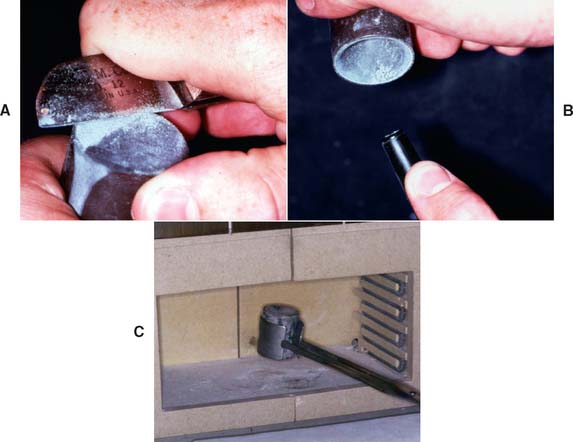
Fig. 22-21 A, When the investment has set, the “skin” at the top of the ring is trimmed off. B, The rubber crucible former is removed, and any loose particles of investment are blown off. C, The ring is then placed in the furnace for the recommended burnout schedule.
When the casting ring is transferred to the casting machine, a quick visual check of the sprue in shaded light is helpful to see whether it is properly heated. It should be a cherry-red color.
ACCELERATED CASTING METHOD
Conventional casting techniques require considerable time, typically 1 hour for bench set (generally judged as the time taken for the investment to reach its maximum exothermic setting reaction temperature) for the investment and 1 to 2 hours for the wax elimination. An accelerated casting procedure that reduces this time to 30 to 40 minutes has been proposed.33-35 Initially suggested as a way to make cast post-and-core restorations in a one-visit procedure,* the procedure has been found to produce castings with accuracy and surface roughness similar to those produced by traditional methods.36,37 The technique entails the use of a phosphate-bonded investment that is given approximately 15 minutes for bench set and a 15-minute wax elimination by placing the ring in a furnace preheated to 815°C (1500°F).
CASTING
Casting Machines
A casting machine (Fig. 22-22) requires a heat source to melt the alloy and a casting force. For a complete casting, the casting force must be high enough to overcome the high surface tension of the molten alloy,38 as well as the resistance of the gas within the mold.
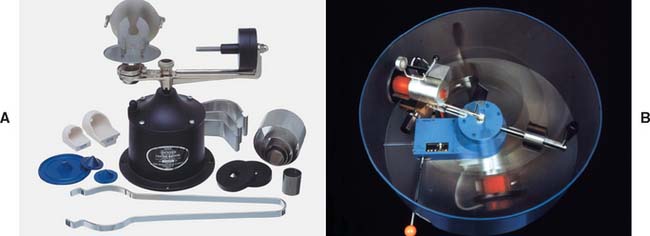
Fig. 22-22 Casting machines. A, Kerr Broken-Arm. B, Degussa Model TS-1.
(A, Courtesy of Kerr Corporation, Orange, California; B, courtesy of DENTSPLY Ceramco, York, Pennsylvania.)
The heat source can be either the reducing flame of a torch or electricity. Conventional alloys can be melted with a gas-air torch (Fig. 22-23A and B), but for the metal-ceramic alloys in a higher melting range, a gas-oxygen torch (Fig. 22-23C) is needed. For base metal alloys, a multiorifice gas-oxygen torch (Fig. 22-23D) or oxyacetylene torch is needed. Electric heating can occur by convection from a heating muffle or by generation of an induction current in the alloy. Advocates of the latter39 maintain that heating can be more evenly controlled, which prevents undesirable changes in alloy composition caused by volatilization of the elements with lower melting points. In general, the electric machines are expensive and more appropriate for larger dental laboratories, whereas a torch may be the method of choice for smaller laboratories and dental offices.
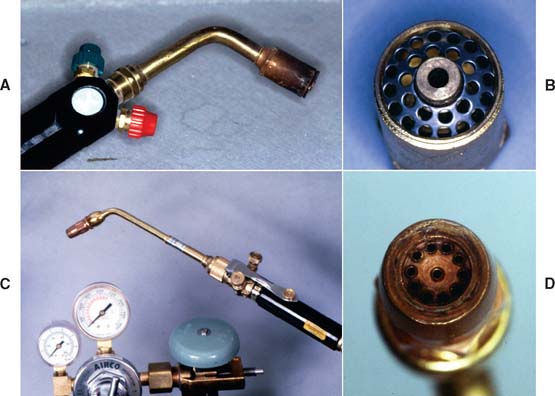
Fig. 22-23 A, Gas-air casting torch. B, Gas-air tip. C, Gas-oxygen casting torch. D, Multiorifice tip.
In present-day casting machines, either air pressure or centrifugal force is still used to fill the mold; both were first proposed in the early days of lost-wax castings.2,40 Some machines evacuate the mold before it is filled with metal, and vacuum has been shown to improve mold filling,41 although it is not clear whether the difference is clinically significant.42
Casting Technique
The ring is not removed from the burnout furnace until the alloy has been melted and is ready to cast.
Cleaning a previously cast alloy is necessary to remove investment debris and oxides before its reuse. Noble metal alloys can be melted on a charcoal block with a gas-air torch, which provides a reducing atmosphere. Remaining impurities are removed through pickling and ultrasonic or steam cleaning. Alloys from different manufacturers should not be mixed, even if they are similar.
Similarly, a dedicated crucible should be used for each alloy. Overheated or otherwise abused alloys, as well as grindings and old restorations, should be returned to the manufacturer as scrap materials, rather than being reused.
Armamentarium (Fig. 22-24)
Procedure
The casting machine is given three clockwise turns (four if metal-ceramic alloys are used) and locked in position with the pin. The cradle and counterbalance weights are checked for the appropriate size of the casting ring. A crucible for the alloy being cast is placed in the machine. The torch (gas-air for regular alloys, gas-oxygen for metal-ceramic) is lit and adjusted. For metal-ceramic alloys, the clinician should wear a pair of colored goggles to protect the eyes and also to enable direct viewing of the melt.
The crucible is preheated (Fig. 22-25A), particularly over the trajectory that will be in contact with the alloy, and the alloy is added. Preheating avoids excessive slag formation during casting. Also, when metal-ceramic alloys are cast, a crucible that is too cool can “freeze” the alloy, resulting in an incomplete casting. Sufficient mass of alloy must be present to sustain adequate casting pressure. With a high-density noble metal alloy, 6 g (4 dwt*) is typically adequate for premolar and anterior castings, 9 g (6 dwt) is adequate for molar castings, and 12 g (8 dwt) is adequate for pontics.
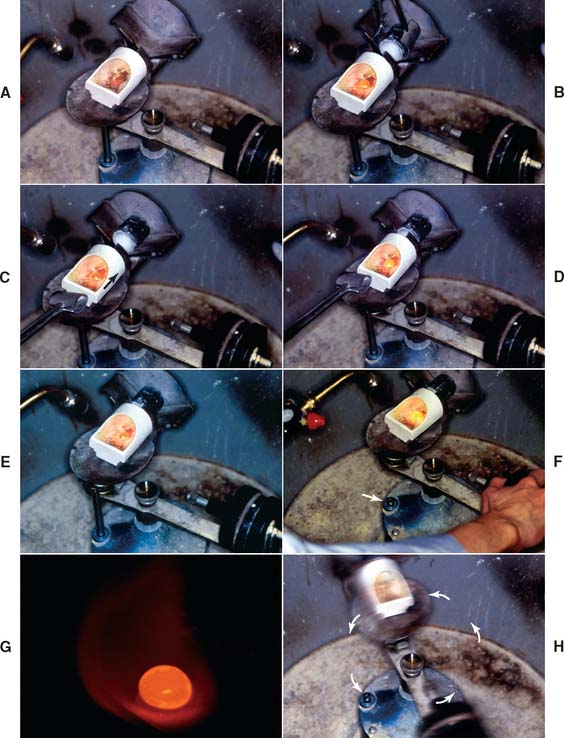
Fig. 22-25 Casting technique. A, Preheating the crucible. B, Making the melt. When the alloy is molten, the casting ring is removed from the furnace and placed in the cradle. C, Tongs are used to slide the crucible platform into contact with the casting ring (arrow). D, The orifice of the crucible aligns with the sprue. E, Heating continues for a few seconds so that the melting is complete and casting can proceed. F, The casting arm is pulled forward until the pin drops (arrow). G, The melt, seconds before casting. H, Centrifugal force carries the melt into the mold cavity (arrows show the direction of spin).
The alloy is heated in the reducing part of the flame until it is ready to cast. A little flux can be added to conventional gold alloys (not metal-ceramic alloys). Gold alloys ball up and have a mirror-like shiny surface that appears to be spinning. Nickel-chromium and cobalt alloys are ready to cast when the sharp edges of the ingot round over. The mold is placed in the cradle of the casting machine (Fig. 22-25B) and kept on the alloy with the reducing flame until the crucible is moved into position (Fig. 22-25C to G). The casting machine arm is then released to make the casting (Fig. 22-25H). The machine is allowed to spin until it has slowed enough that it can be stopped by hand, and the ring is removed with casting tongs.
Recovery of the casting
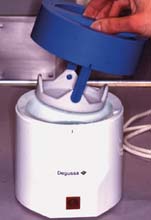
After the red glow has disappeared from the button, the casting ring is plunged under running cold water into a large rubber mixing bowl (Fig. 22-26).

Fig. 22-26 The ring is quenched in cold water in a plaster bowl. Gypsum-bonded investments readily disintegrate; phosphate-bonded investments are much stronger and need careful devestment.
Gypsum-bonded investments quickly disintegrate, and elimination of residue is easily accomplished with a toothbrush. Final traces can be removed ultrasonically. Oxides are removed by pickling in 50% hydrochloric acid (or, preferably, a nonfuming substitute) (Fig. 22-27). Phosphate-bonded investments do not disintegrate equally well, and some must be forcibly removed from the casting ring. They can be handled as soon as they have been sufficiently cooled under running water.
A knife is used to trim the investment at the button end of the ring (Fig. 22-28A). The other end is not trimmed because of the risk of damaging the margin. When the ring liner is exposed, the investment can be pushed out of the ring (Fig. 22-28B). It is then broken apart under running water (because it is still hot [Fig. 22-28C]). The remaining investment is carefully removed with a small blunt instrument (Fig. 22-28D), and any traces are dissolved in hydrofluoric acid or a less caustic substitute. Care must be taken to prevent scratching of the internal surface of the casting or damage to the margins.

Evaluation
The casting is never fitted on the die until the inner surface has been carefully evaluated under magnification; even tiny imperfections can cause damage to the stone die. A die may be rendered useless in a matter of seconds if a casting is fitted prematurely.
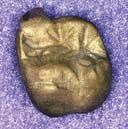
Defects in the casting
Investing and casting requires meticulous attention to detail to obtain a successful, properly fitting casting. Table 22-1 summarizes and provides examples of the more common causes of various problems.
Table 22-1 COMMON CAUSES OF CASTING FAILURE
| Problem | Possible causes | Appearance |
|---|---|---|
| Rough casting |
 |
|
| Large nodule | Air trapped during investing procedure |
 |
| Multiple nodules |
 |
|
| Nodules on occlusal surface | Excessive vibration |
 |
| Fins |
 |
|
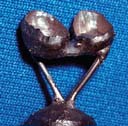
| Incomplete casting |
 |
|
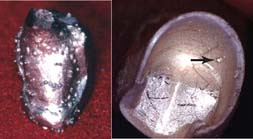
| Incomplete casting with shiny, rounded defect | Incomplete wax elimination |
 |
| “Suck-back” porosity | Improper pattern position |
 |
| Narrow, long sprue | ||
| Inclusion porosity | Particle of investment dislodged during casting |
 |
| Marginal discrepancy | Wax pattern distortion |
 |
| Uneven expansion | ||
| Inadequate or excessive expansion | Improper water/powder ratio |
 |
| Improper mixing time | ||
| Improper burnout temperature |
Roughness
The surface of a casting should be smooth, although finishing and polishing are still required (see Chapter 29). Lines or grooves in the casting are usually present but overlooked in the wax pattern. They may necessitate a remake, particularly if they were positioned near the margin or on the fitting surface. Generalized casting roughness may indicate a breakdown of the investment from excessive burnout temperature.
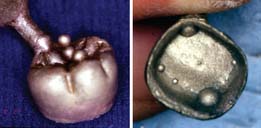
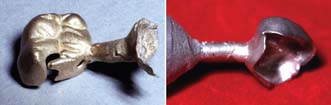
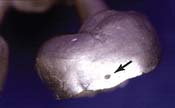
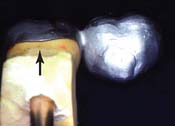
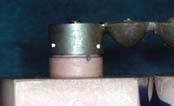
Nodules
Bubbles of gas trapped between the wax pattern and the investment produce nodules on the casting surface. Even minute nodules can limit the seating of the casting to a considerable degree. When they are large or situated on a margin, they usually necessitate remaking of the restoration. When small, they can often be removed with a No. ¼ or No. ½ round bur (Fig. 22-29). A binocular microscope is extremely helpful for detecting and removing nodules. A slight excess of metal should be removed to ensure that the nodule does not interfere with complete seating.
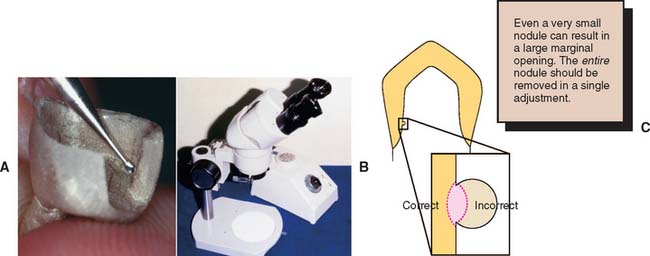
Fig. 22-29 Removing casting nodules. Small nodules are frequently present, particularly with phosphate-bonded investments. They interfere with seating and must be identified before the casting is placed on the die. A, Once they are identified, a small round bur can be used to remove them. B, Magnification is helpful for this. C, Remove slightly more, rather than less, metal than the size of the nodule to ensure the casting does not bind during seating.
Keys to avoiding nodules include a careful investing technique, use of a surfactant, vacuum spatulation, and careful coating of the wax pattern with investment. Castings made with phosphate-bonded investment are especially prone to imperfections, and experience and care are necessary to produce castings that are routinely free of nodules.
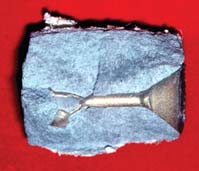
Fins
Fins are caused by cracks in the investment that have been filled with molten metal. These cracks can result from a weak mix of investment (high water/powder ratio), excessive casting force, steam generated from too-rapid heating, reheating an invested pattern, an improperly situated pattern (too close to the periphery of the casting ring), or even premature or rough handling of the ring after investing.
Incompleteness
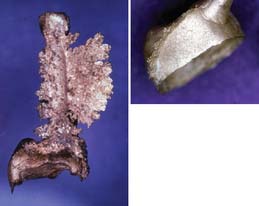
If an area of wax is too thin (less than 0.3 mm), which occurs occasionally on the veneering surface of a metal-ceramic restoration, an incomplete casting may result. Thickening of the wax in these areas is recommended. Incomplete casting of normal-thickness wax patterns may result from inadequate heating of the metal, incomplete wax elimination, excessive cooling (“freezing”) of the mold, insufficient casting force, not enough metal, or metal spillage.
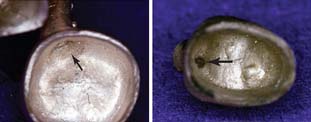
Voids or porosity
Voids in the casting (in particular in the margin area) may be caused by debris trapped in the mold (usually a particle of the investment undetected before wax elimination). A well-waxed smooth sprue helps prevent this. Porosity resulting from solidification shrinkage (“suck-back”) occurs if the metal in the sprue solidifies before the metal in the mold, as may happen when a sprue is too narrow, too long, or incorrectly located or when a large casting is made in the absence of a chill vent. Gases may dissolve in the molten alloy during melting and leave porosity.
Back pressure porosity43 may be caused by air pressure in the mold as the molten metal enters. Its occurrence is reduced by using a more porous investment, locating the pattern near the end of the ring (6 to 8 mm), and casting with a vacuum technique.
REVIEW OF TECHNIQUE
The following list summarizes the steps involved in investing and casting (Fig. 22-30) and should prove helpful in reviewing the material covered in this chapter:
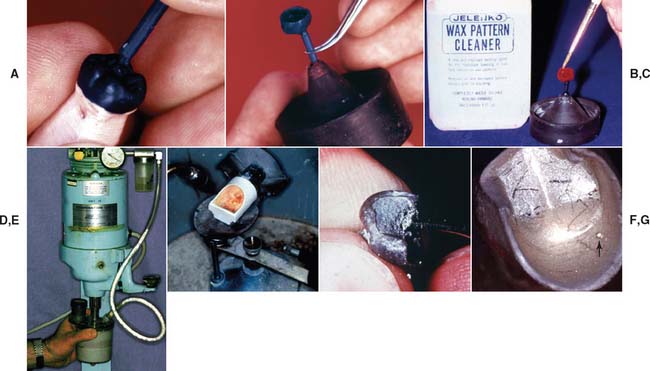
Fig. 22-30 Technique review. A, A sprue 2 or 2.5 mm in diameter (10- or 12-gauge) is attached to the bulkiest nonfunctional cusp; multiple units can be sprued with a runner bar. B, The pattern is carefully removed from the die and attached to a crucible former. C, The pattern is painted with surface tension reducer. D, The pattern is then carefully coated with vacuum-mixed investment. E, After wax elimination, the casting machine is prepared, and the crucible is preheated. The alloy is melted, the ring is transferred, and the casting is made promptly. F, The casting is recovered from the investment. G, Defects (arrow) are identified and corrected if possible.
SUMMARY
Investing and casting, a series of highly technique-sensitive steps, converts the wax pattern into a metal casting. Accurate and smooth restorations can be obtained if the operator pays special attention to each step in the technique. When initial attempts at casting produce errors or defects, appropriate corrective measures must be taken so that they do not recur.
 GLOSSARY*
al·loy \ăl′oi′, a-loi′\ n (14c): a mixture of two or more metals or metalloids that are mutually soluble in the molten state; distinguished as binary, ternary, quaternary, etc., depending on the number of metals within the mixture. Alloying elements are added to alter the hardness, strength, and toughness of a metallic element, thus obtaining properties not found in the pure metal. Alloys may also be classified on the basis of their behavior when solidified—usage: see BASE METAL, NOBLE METAL
alloying element \a-loi′ ng
ng  l′a-ment\ (1998): metallic or non-metallic elements added to or retained by a pure metal for the purpose of giving that metal special properties
an·neal \a-nēl′\ vt (1580) 1: to heat a material, such as metal or glass, followed by controlled cooling to remove internal stresses and create a desired degree of toughness, temper, or softness to a material 2: to heat a material, such as gold foil, to volatilize and drive off impurities from its surface, thus increasing its cohesive properties. This process is termed degassing 3: to homogenize an amalgam alloy by heating in an oven
back pressure porosity \băk prsh′er pa-r s′-tē\: porosity produced in dental castings thought to be due to the inability of gases in the mold to escape during the casting procedure
base metal \bās mt′l\: any metallic element that does not resist tarnish and corrosion—see NOBLE METAL
car·at \kăr′at\ n (15c): a standard of gold fineness. The percentage of gold in an alloy, stated in parts per 24. Pure gold is designated 24 carat
1cast \kăst\ vb (13c): to produce a shape by thrusting a molten liquid or plastic material into a mold possessing the desired shape
1cast·ing \kăs′tng\ n (14c): something that has been cast in a mold; an object formed by the solidification of a fluid that has been poured or injected into a mold
casting ring \kăs′tng rng\: a metal tube in which a refractory mold is made for casting dental restorations
compressive stress \km-prs′v strs\: the internal induced force that opposes the shortening of a material in a direction parallel to the direction of the stresses; any induced force per unit area that resists deformation caused by a load that tends to compress or shorten a body
crist·o·bal·ite \krs′tō-bă′līt\ n: an allotropic form of crystalline silica used in dental casting investments
cru·ci·ble \krōō′sa-bal\ n (15c): a vessel or container made of any refractory material (frequently porcelain) used for melting or calcining any substance that requires a high degree of heat
crucible former \krōō′sa-bal fôr′mer\: the base to which a sprue former is attached while the wax pattern is being invested in refractory investment; a convex rubber, plastic, or metal base that forms a concave depression or crucible in the refractory investment
dental casting investment \dn′tl kăs′tng n-vst′ment\: a material consisting principally of an allotrope of silica and a bonding agent. The bonding substance may be gypsum (for use in lower casting temperatures) or phosphates and silica (for use in higher casting temperatures)
de·vest \d-vst\ vb: the retrieval of a casting or prosthesis from an investing medium
dwt: abbr [denarius + weight] pennyweight; called also pennyweight; a measurement of weight in the troy system equal to 24 grains, or 0.05 ounce. Its metric equivalent is 1.555 grams
flux \flŭks\ n (14c) 1: in physics, the rate of flow of a liquid, particles or energy 2: in ceramics, an agent that lowers the fusion temperature of porcelain 3: in metallurgy, a substance used to increase fluidity and to prevent or reduce oxidation of a molten metal 4: any substance applied to surfaces to be joined by brazing, soldering or welding to clean and free them from oxides and promote union
gyp·sum \jp′sum\ n (14c): the natural hydrated form of calcium sulfonate, CaSO4 2H2O gypsum dihydrate
hygroscopic expansion \hī′gra-skp′k k-spăn′shun\: expansion due to the absorption of moisture
in·vest·ing \n-vs′tng\ v: the process of covering or enveloping, wholly or in part, an object such as a denture, tooth, wax form, crown, etc. with a suitable investment material before processing, soldering, or casting
in·vest·ment n: see DENTAL CASTING I., REFRACTORY I.
investment cast \n-vst′ment kăst\: a cast made of a material that will withstand high temperature without disintegration—comp REFRACTORY CAST
1met·al \mt′l\ n (13c): any strong and relatively ductile substance that provides electropositive ions to a corrosive environment and that can be polished to a high luster. Characterized by metallic atomic bonding
muf·fle \mŭf′al\ n: the portion of a furnace, usually removable or replaceable, in which material may be placed for processing without direct exposure to heating element
noble metal \nō′bal mt′l\: those metal elements that resist oxidation, tarnish, and corrosion during heating, casting, or soldering and when used intraorally; examples include gold and platinum—comp BASE METAL
occluded gas porosity \a-klōō′dd găs pa-rs′-tē\: a porosity produced in castings due to the inability of gasses in the mold to escape
1pick·le \pk′al\ n (15c): a solution or bath for preserving or cleaning; any of various baths used in cleaning or processing
2pick·le \pk′al\ vt pick·led \pk′ald\ pick·ling \pk′lng\ (1552): to treat, preserve, or clean in or with an agent
1pol·ish \pl′sh\ vb (14c): to make smooth and glossy, usually by friction; giving luster; the act or process of making a denture or casting smooth and glossy
2pol·ish \pl′sh\ n (1704): a smooth, glossy surface; having luster
pol·ish·ing \pl′sh-ng\ v, obs 1: to make smooth and glossy, usually by friction; to give luster to (GPT-1) 2: obs: the act or process of making a denture or casting smooth and glossy (GPT-1)
po·ros·i·ty \pa-rs′-tē, pô-\ n, pl -ties (14c) 1: the presence of voids or pores within a structure 2: the state or quality of having minute pores, openings or interstices—see BACK PRESSURE P., OCCLUDED GAS P., SHRINK-SPOT P., SOLIDIFICATION P.
proportional limit \pra-pôr′sha-nal lm′t\: that unit of stresses beyond which deformation is no longer proportional to the applied load
quartz \kwôrts\ n (ca. 1631): an allotropic form of silica; the mineral SiO2 consisting of hexagonal crystals of colorless, transparent silicon dioxide
re·frac·tory \r-frăk′ta-rē\ adj (1606): difficult to fuse or corrode; capable of enduring high temperatures
refractory investment \r-frăk′ta-rē n-vst′mant\: an investment material that can withstand the high temperatures used in soldering or casting
refractory mold \r-frăk′ta-rē mōld\: a refractory cavity into which a substance is shaped or cast
setting expansion \st′tng k-spăn′shun\: the dimensional increase that occurs concurrent with the hardening of various materials, such as plaster of paris, dental stone, die stone, and dental casting investment
shrink-spot porosity \shrngk-spt pa-rs′-tē\: an area of porosity in cast metal that is caused by shrinkage of a portion of the metal as it solidifies from the molten state without flow of additional molten metal from surrounding areas
si·li·ca \sl′-ka\ n (ca 1301): silicon dioxide occurring in crystalline, amorphous, and usually impure forms (as quartz, opal, and sand, respectively)
solidification porosity \sa-ld′a-f-kā′shun pa-rs′-tē\: a porosity that may be produced by improper spruing or improper heating of either the metal or the investment
sprue \sprōō\ n (1880) 1: the channel or hole through which plastic or metal is poured or cast into a gate or reservoir and then into a mold 2: the cast metal or plastic that connects a casting to the residual sprue button
sprue button \sprōō bŭt′n\: the material remaining in the reservoir of the mold after a dental casting
sprue former \sprōō fôr′mar\: a wax, plastic, or metal pattern used to form the channel or channels allowing molten metal to flow into a mold to make a casting
thermal expansion \thûr′mal k-spăn′shun\: expansion of a material caused by heat
vacuum casting \väk′yōō-um kăst′ng\: the casting of a material (i.e., metal, plastic) in the presence of a partial vacuum
vacuum investing \väk′yōō-um n-vst′ng\: the process of investing a pattern within a partial vacuum
vacuum mixing \väk′yōō-um mks′ng\: a method of mixing a material such as plaster of paris or casting investment below atmospheric pressure
wax elimination \wăks -lm′a-nā′shun\: the removal of wax from a mold, usually by heat
wax expansion \wăks k-spăn′shun\: a method of expanding a wax pattern to compensate for the shrinkage of gold during the casting process
wax pattern \wăks păt′urn\: a wax form that is the positive likeness of an object to be fabricated
STUDY QUESTIONS
1 Philbrook D. Cast fillings. Iowa State Dent Soc Trans. 277, 1897.
2 Taggart WH. A new and accurate method of making gold inlays. Dent Cosmos. 1907;49:1117.
3 Anusavice KJ. Phillips’ Science of Dental Materials, 10th ed. Philadelphia: WB Saunders, 1996.
4 Ryge G, et al. Porosities in dental gold castings. J Am Dent Assoc. 1957;54:746.
5 Johnson A, Winstanley RB. The evaluation of factors affecting the castability of metal ceramic alloy—investment combinations. Int J Prosthodont. 1996;9:74.
6 Mahler DB, Ady AB. The influence of various factors on the effective setting expansion of casting investments. J Prosthet Dent. 1963;13:365.
7 Takahashi J, et al. Nonuniform vertical and horizontal setting expansion of a phosphate-bonded investment. J Prosthet Dent. 1999;81:386.
8 Verrett RG, Duke ES. The effect of sprue attachment design on castability and porosity. J Prosthet Dent. 1989;61:418.
9 Strickland WD, Sturdevant CM. Porosity in the full cast crown. J Am Dent Assoc. 1959;58:69.
10 Rawson RD, et al. Photographic study of gold flow. J Dent Res. 1972;51:1331.
11 Earnshaw R. The effect of casting ring liners on the potential expansion of a gypsum-bonded investment. J Dent Res. 1988;67:1366.
12 Davis DR. Effect of wet and dry cellulose ring liners on setting expansion and compressive strength of a gypsum-bonded investment. J Prosthet Dent. 1996;76:519.
13 Engelman MA, et al. Oval ringless casting: simplicity, productivity, and accuracy without the health hazards of ring liners. Trends Tech Contemp Dent. 1989;6:38.
14 Shell JS. Setting and thermal expansion of investments. III. Effects of no asbestos liner, coating asbestos with petroleum jelly, and double asbestos liner. J Alabama Dent Assoc. 1969;53:31.
15 Ho EK, Darvell BW. A new method for casting discrepancy: some results for a phosphate-bonded investment. J Dent. 1998;26:59.
16 Lacy AM, et al. Incidence of bubbles on samples cast in a phosphate-bonded investment. J Prosthet Dent. 1985;54:367.
17 American Dental Association. Dentist’s Desk Reference: Materials, Instruments and Equipment, 1st ed. Chicago: The American Dental Association, 1981.
18 Sturdevant JR, et al. The 8-year clinical performance of 15 low-gold casting alloys. Dent Mater. 1987;3:347.
19 Goldfogel MH, Nielsen JP. Dental casting alloys: an update on terminology. J Prosthet Dent. 1982;48:340.
20 Johansson BI, et al. Corrosion of copper, nickel, and gold dental casting alloys: an in vitro and in vivo study. J Biomed Mater Res. 1989;23:349.
21 Duncan JD. The casting accuracy of nickel-chromium alloys for fixed prostheses. J Prosthet Dent. 1982;47:63.
22 Ogura H, et al. Inner surface roughness of complete cast crowns made by centrifugal casting machines. J Prosthet Dent. 1981;45:529.
23 Moffa JP, et al. An evaluation of nonprecious alloys for use with porcelain veneers. I. Physical properties. J Prosthet Dent. 1973;30:424.
24 Moon PC, Modjeski PJ. The burnishability of dental casting alloys. J Prosthet Dent. 1976;36:404.
25 Moffa JP, et al. An evaluation of nonprecious alloys for use with porcelain veneers. II. Industrial safety and biocompatibility. J Prosthet Dent. 1973;30:432.
26 American Dental Association Council on Dental Materials, Instruments, and Equipment. Biological effects of nickel-containing dental alloys. J Am Dent Assoc. 1982;104:501.
27 Lacy AM, et al. Three factors affecting investment setting expansion and casting size. J Prosthet Dent. 1983;49:52.
28 Vieira DF, Carvalho JA. Hygroscopic expansion in the upper and lower parts of the casting ring. J Prosthet Dent. 1976;36:181.
29 Cooney JP, Caputo AA. Type III gold alloy complete crowns cast in a phosphate-bonded investment. J Prosthet Dent. 1981;46:414.
30 Chew CL, et al. Investment strength as a function of time and temperature. J Dent. 1999;27:297.
31 Abu Hassan MI, et al. Porosity determination of cast investment by a wax-infiltration technique. J Dent. 1989;17:195.
32 Papadopoulos T, Axelsson M. Influence of heating rate in thermal expansion of dental phosphate-bonded investment material. Scand J Dent Res. 1990;98:60.
33 Campagni WV, Majchrowicz M. An accelerated technique for casting post-and-core restorations. J Prosthet Dent. 1991;66:155.
34 Campagni WV, et al. A comparison of an accelerated technique for casting post-and-core restorations with conventional techniques. J Prosthodont. 1993;2:159.
35 Bailey JH, Sherrard DJ. Post-and-core assemblies made with an accelerated pattern elimination technique. J Prosthodont. 1994;3:47.
36 Konstantoulakis E, et al. Marginal fit and surface roughness of crowns made with an accelerated casting technique. J Prosthet Dent. 1998;80:337.
37 Schilling ER, et al. Marginal gap of crowns made with a phosphate-bonded investment and accelerated casting method. J Prosthet Dent. 1999;81:129.
38 Henning G. The casting of precious metal alloys in dentistry: a rational approach. Br Dent J. 1972;133:428.
39 Preston JD, Berger R. Some laboratory variables affecting ceramo-metal alloys. Dent Clin North Am. 1977;21:717.
40 Jameson A: British patent no. 19801, 1907.
41 Hero H, Waarli M. Effect of vacuum and supertemperature on mold filling during casting. Scand J Dent Res. 1991;99:55.
42 Eames WB, MacNamara JF. Evaluation of casting machines for ability to cast sharp margins. Operative Dent. 1978;3:137.
43 Anusavice KJ. Phillips’ Science of Dental Materials, 11th ed. Philadelphia: WB Saunders, 2003.