29 FINISHING THE CAST RESTORATION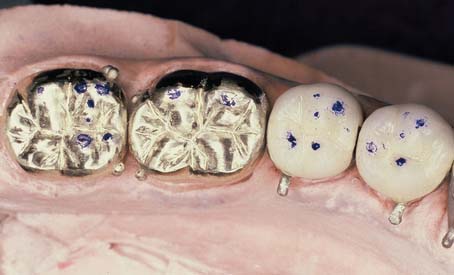
A cast metal restoration is not ready for evaluation and cementation merely because it has been stripped of its investment. The unpolished surface is relatively rough, and a series of finishing procedures are needed to produce highly polished axial surfaces. Such surfaces limit the accumulation1,2 and retention3 of plaque and facilitate maintenance of health of the supporting periodontal tissues. The sprue needs to be removed, and the area of its attachment needs to be recontoured. Any nodules or other minor irregularities remaining on the cast surface must be eliminated.
Metal finishing for metal-ceramic restorations is similar to that for cast metal. The discussion in this chapter is applicable to both restoration types. In practice, the final polishing of metal-ceramic restorations is not done until after characterization and glazing (see Chapter 30).
OBJECTIVES AND PROCEDURES
The objectives and procedures for finishing are different for each part of the cast restoration. The following discussion is sequentially divided into corresponding phases; each is identified as a zone (Fig. 29-1).
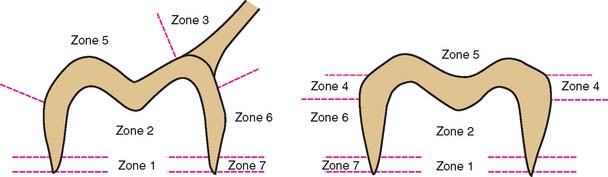
Fig. 29-1 Recommended sequence for finishing of a cast restoration. All procedures for a zone should be completed before the next zone is started. Zone 1 is the internal margin; Zone 2, the internal surface; Zone 3, the sprue; Zone 4, the proximal contacts; Zone 5, the occlusal surface; Zone 6, the axial walls; and Zone 7, the external margins.
Zone 1: Internal Margin
Objective
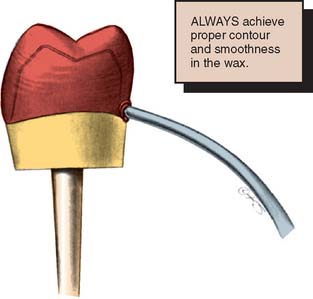
To minimize any dissolution of the luting agent, a 1-mm-wide band of metal must be obtained that is closely adapted to the tooth surface.4 A defect within this zone can significantly reduce a restoration’s longevity. Good adaptation is obtained by carefully reflowing the wax pattern (Fig. 29-2). With careful standardization of technique, the dentist can achieve predictable and consistent results.
Procedure
If a defect occurs in the marginal area, the restoration must be remade. This may require an additional patient visit to make the new impression. Defects can be prevented or minimized by paying particular attention to reflowing the margins of the wax pattern and through careful investing (see Chapter 22).
Even small nodules can prevent a casting from seating completely. Careful examination under ample magnification helps identify interferences. Small nodules, if far enough away from the margin itself, can be removed under a binocular microscope with exceptionally cautious use of very small rotary instruments (e.g., a No. ¼ round bur). However, great care is needed to avoid damage to the margin and annoying remakes.
Zone 2: Internal Surface (Intaglio)
Objective
No contact should exist between the die and the internal surface (intaglio) of the casting. A uniform space of 25 to 35 μm is necessary for the luting agent to spread evenly. Any contacts must be identified and relieved by careful selective grinding of the internal surface.
Procedure
Under normal circumstances, a casting’s internal surface does not require finishing. It should, however, be examined for nodules (Fig. 29-3) before the restoration is seated on the die. Nodules can be removed with a small round carbide bur, which can be time consuming because it may need to be repeated several times. If the internal surface needs to be adjusted more than occasionally, the investing procedure should be reexamined for flaws.
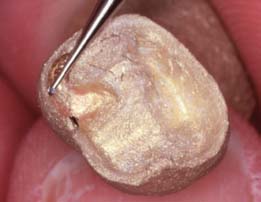
Fig. 29-3 Nodules on a casting have resulted from improper investing. To enable complete seating of the casting, even small ones such as these must be removed entirely.
Even a very small nodule can result in significant increase of the marginal gap width (Fig. 29-4). A binocular microscope is especially helpful in identifying nodules. High-quality loupes can also be used. Great care should be exercised when seating a casting on its die. Any significant force will abrade or chip the die so that the casting will seat on the die but will not seat fully on the prepared tooth. Overlooking this at the cementation appointment will result in a restoration with open margins and a poor prognosis. If a casting does not seat, a nodule may have been overlooked and may have scratched the die, or a little stone may have been picked up in the process. Close examination of the internal surface of the casting or the axial walls of the die (Fig. 29-5) will reveal this. Corrective action is often relatively simple, and the casting may be acceptable. Care must be taken not to seat a faulty casting repeatedly, thereby abrading the die. After a die has been abraded by a casting, it should not be used for rewaxing a restoration. If rewaxing is necessary, a new impression is required.
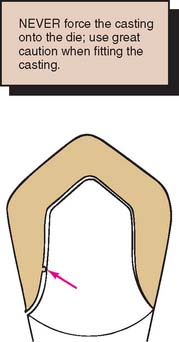
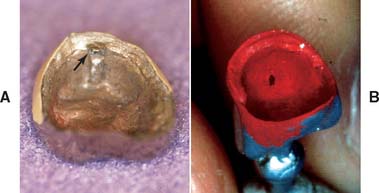
Fig. 29-5 A, Internal surface of a casting. Note the stone (arrow) adhering where the die has been abraded by the casting. B, A suitable marking agent (e.g., rouge and turpentine) can be used to detect areas that must be relieved to allow complete seating.
When a nodule is removed from the internal aspect of a casting, deliberately removing a slightly greater amount of alloy in the area is recommended. Once the casting has been adjusted, determining the exact location of the nodule is no longer possible. Therefore, the nodule should be removed entirely in one step, rather than through sequential relief of the internal surface (Fig. 29-6).
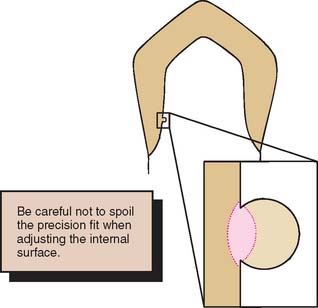
Fig. 29-6 When removing a nodule, remove slightly more than the defect to ensure complete seating of the restoration.
Indiscriminately removing material from the internal aspect of any casting is not an acceptable alternative. This results in excessive loss of retention and resistance form, and the restoration must be remade.
Marking agents
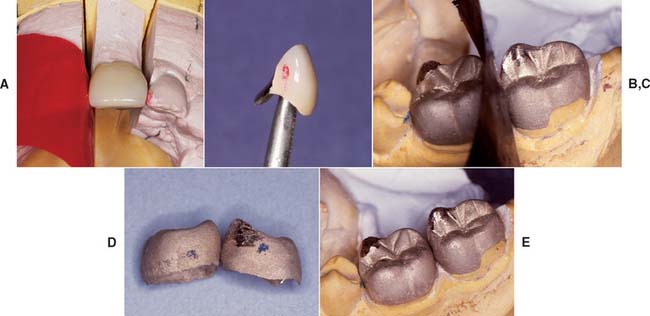
Several agents are commercially available to facilitate identification of the seating interference between the casting and the die. These include water-soluble dies (e.g., Liqua-Mark*), solvent-based dies (e.g., AccuFilm IV†), and powdered sprays (e.g., Occlude‡). A suspension of rouge in turpentine or an elastomeric detection paste (e.g., Fit Checker, Fit Checker II§) can also be used as an alternative.5,6 These agents should be applied as a thin film to the internal surface of the casting. High magnification of the casting after seating reveals initial contact for grinding (Fig. 29-7). Regardless of the method used, the internal surface of the casting should always be thoroughly cleaned before the luting procedure (see Chapter 31).
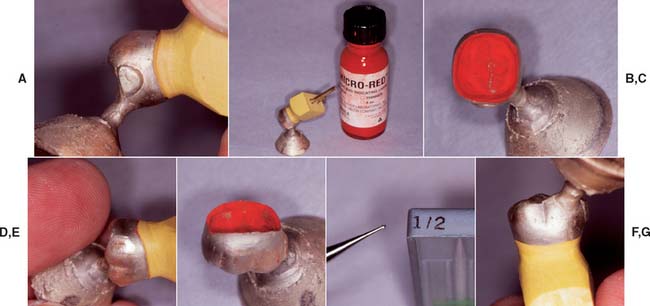
Fig. 29-7 Liquid marking agents can be helpful if the internal surface of a casting has a nodule. A, Incomplete seating. B, Liquid marking agent. C, A thin coat is applied to the internal surface and air dried. D, Casting gently returned to the die. E, Area of interference identified. F, Nodules are best removed with a small round bur. G, Seated casting.
Zone 3: The Sprue
Objective
To reestablish proper coronal structure and function, the sprue must be sectioned, and the casting must be recontoured in the area of its attachment.
Procedure
Once the fit of the casting has been verified on the die and it has been found to be acceptable, the sprue is sectioned, and the area of its attachment to the casting (Fig. 29-8) is reshaped.
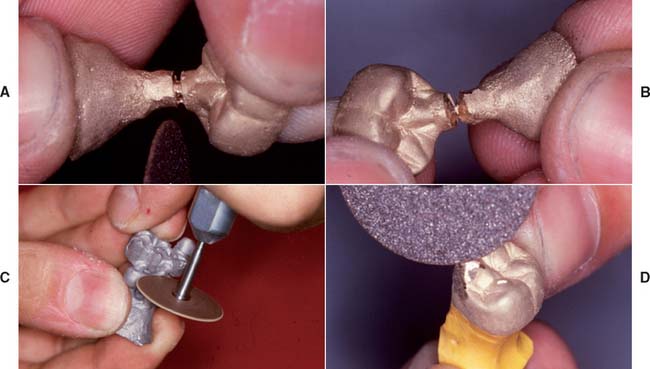
Fig. 29-8 A, The button is most effectively removed by cutting around the sprue and then twisting it off (B). C, With multiple castings made simultaneously, access is more difficult. When it is necessary to sever a sprue completely, care must be taken not to damage the margin inadvertently. D, Disks and stones are used for gross recontouring.
A carborundum separating disk is used to cut through the sprue. Cutting should be performed circumferentially, with a small area maintained in the center of the sprue. This last connection is broken by twisting and separating it from the casting. Wire cutters are not recommended, because they may lead to distortion of the casting. Any excess in the area of the sprue attachment is removed with the disk, and the area is refined with stones and sandpaper disks.
Zone 4: Proximal Contacts
Objective
The proximal contact areas are adjusted in the laboratory so that they will be correct (or slightly too tight) when the casting is evaluated in the mouth.
Procedure
Special care is needed to prevent the finishing procedures from producing an overreduced and, consequently, inadequate proximal contact. Although this can be corrected with solder (see p. 889), it is a time-consuming and unnecessary procedure.
A slightly excessive contact, however, may be corrected easily during clinical evaluation. The proximal contacts on the stone cast can be minimally relieved by careful scraping with a scalpel (Fig. 29-9). The casting is then adjusted until it just seats. When adjacent castings are made, they should not be simultaneously adjusted to seat on the definitive cast. Under these circumstances, the proximal contacts should be left slightly too tight in the dental laboratory. For such multiple castings, clinical evaluation is done sequentially and on an individual basis. Adjustments are made for each casting independently.
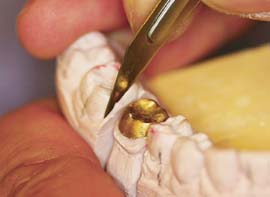
Fig. 29-9 Rather than risk a deficient proximal contact at evaluation, the technician may reduce the cast slightly by scraping the adjacent teeth with a blade.
When proximal contacts are adjusted, placing a thin Mylar articulating film between adjacent castings or between the casting and the adjacent tooth is helpful (Fig. 29-10). Doing this allows the areas where binding contact occurs to be adjusted through selective adjustment where markings result.
Connectors
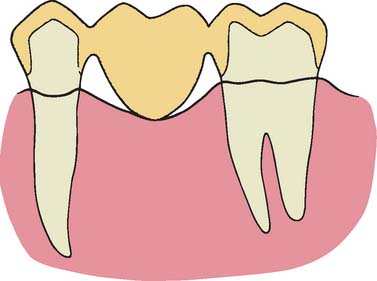
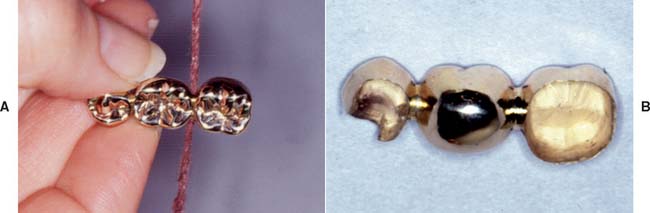
When a partial fixed dental prosthesis is being finished, the connectors require special attention. Unless they are properly contoured and highly polished, periodontal health is invariably adversely affected, even in the presence of the most meticulous oral hygiene. Mesiodistally, a properly finished connector has a parabolic configuration (Fig. 29-11). Rotary instruments such as rubber wheels, which allow access to the cervical aspect of the connector for finishing while not jeopardizing the margin, are essential in these situations. In cases of root proximity between adjacent teeth, this can be quite problematic. After preliminary finishing with rubber wheels, a piece of twine can be used to impart the final polish to the cervical aspect of the connector (Fig. 29-12).
Zone 5: Occlusal Surface
Objective
Occlusal contacts are reestablished in static and dynamic relationships to the opposing arch. Obtaining accurate and stable contacts does not require highly polished metal occlusal surfaces. A satin finish is acceptable. Occlusal structure must ensure positional stability and satisfy all functional requirements (see Chapter 4).
Procedure
The occlusal contacts are checked with thin Mylar articulating film (Fig. 29-13) to ensure that they match the design in the waxing stage. If they do not, the occlusion must be adjusted. Wax is subject to elastic recovery. If an occlusal contact is heavy in wax, it springs back slightly when the articulator is opened and produces an occlusal prematurity in the casting (Fig. 29-14). If “pinpoint” contacts are established carefully during the waxing phase, significant occlusal adjustment should not be necessary.
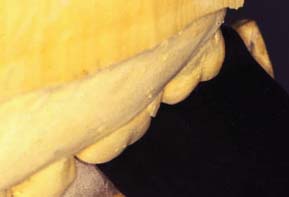
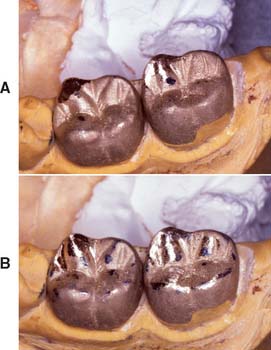
Fig. 29-14 A and B, Occlusal prematurities are generally the result of excessively heavy contact on the wax pattern.
Occlusal adjustments can be performed with flame-shaped finishing burs or diamonds (Fig. 29-15). A large stone creates unwanted concavities in the occlusal surface. The correct technique for occlusal adjustment is to redevelop the anatomy of the entire ridge or cusp rather than grinding only the point of interference. Simultaneously, any nodules can be removed, and grooves can be defined with a finishing bur or a small round bur.
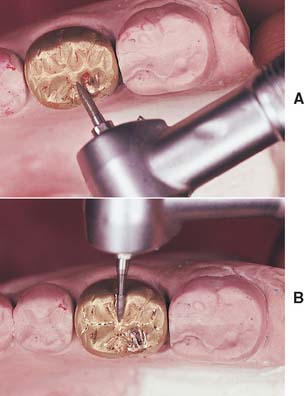
Fig. 29-15 A, Occlusal adjustment is readily accomplished with a pointed diamond or carbide bur. B, The grooves and fissures are concurrently refined.
Before starting any adjustment, the practitioner should use a thickness gauge on the metal. If only minimum clearance was established at the tooth-preparation stage, indiscriminate adjustment leads to inadequate thickness of the casting (Fig. 29-16) and possible perforation. Although soldering such a hole in a casting is possible, the occurrence of this complication usually indicates an earlier error that requires correction (e.g., inadequate clearance necessitates additional reduction of the tooth preparation).
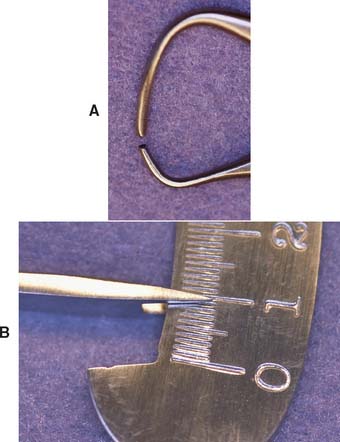
Fig. 29-16 As occlusal adjustments are made (A), the residual thickness is continually monitored with an appropriately designed thickness gauge (B). For structural durability, less than 1.0 mm is inadequate metal thickness and is the result of insufficient occlusal reduction.
After the occlusal contacts have been refined, they must not be altered by extensive polishing. A high polish may be essential for plaque control on axial surfaces (Zones 6 and 7), but its benefit is questionable on the occlusal surface of metal castings. In fact, an accurate occlusion so painstakingly established in wax can be rapidly destroyed by overzealousness to make a casting “look pretty.”
If the wax pattern has been carefully finished, a smooth casting results, and removing surface oxides with a soft wire brush wheel is sufficient. The surface can then be polished with rouge on a soft brush wheel (which removes only 5 μm from the surface of the casting7) (see Fig. 29-19).
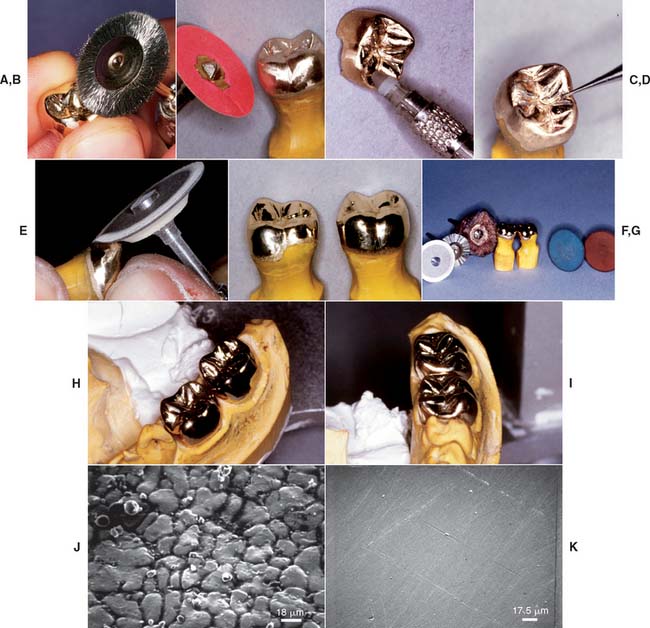
Fig. 29-19 Finishing and polishing. A, Initially a wire brush is used on the occlusal surfaces. B, A fine-grit sandpaper disk is applied for removing pits and irregularities from the axial walls. Note that the margin is not touched at this time. C and D, Rubber points and small carbides for selective finishing of the occlusal structure. E, A rubber wheel is then used on the axial walls. F, Castings, after polishing with buffing compound, immediately before clinical evaluation. G, When the fit has been verified clinically, the margins are polished. H and I, The completed castings immediately before cementation. J, Scanning electron micrograph of a gold alloy in the “as-cast” state. K, The same casting after finishing and polishing with a series of abrasives culminating in rouge.
(J K, Courtesy of Dr. J. L. Sandrik.)
Some authorities8 recommend producing a matte finish on the occlusal surfaces to aid in the initial identification of wear facets during function, which show up as shiny marks on an otherwise dull surface. This type of finish is usually achieved with an airborne particle abrasion unit and 25- to 50- μm Al2O3 (alumina) particles. However, a 5-second blast with 50-μm alumina at 0.5 MPa (73 psi) pressure removes about 20 μm of metal from the air-abraded surfaces9; therefore, the margins should be protected.10 An exposure of about 1 second usually produces a smooth satin finish. If this cannot be accomplished, it is likely that the preparation before this step was deficient, and further refinement is necessary.
Zone 6: Axial Walls
Objective
When axial wall finishing is completed, the walls should be smoothly contoured and highly polished, enabling the patient to carry out optimum plaque control.
Procedure
Surface defects are removed by grinding with abrasive particles bound into a grinding stone or rubber wheel, on a paper disk, or applied as an abrasive paste (Fig. 29-17). Each particle acts as a cutting tool on the metal surface.
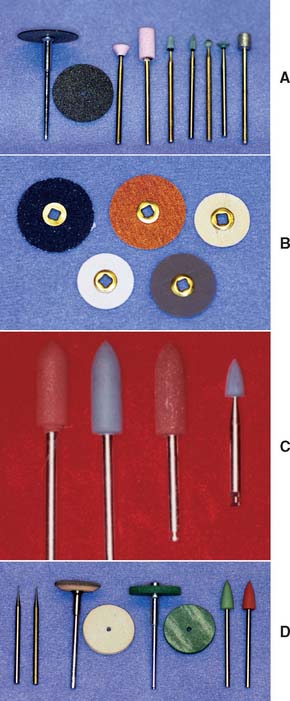
Fig. 29-17 Abrasives for finishing. A sequence of progressively finer grades is used to attain the desired surface. Carborundum disks and stones of varying degrees of coarseness (A) are typically used first; these are followed by garnet paper and sandpaper disks (B), rubber points and white Arkansas stones (C), and rubber wheels and points along with small carbide burs for removing nodules (D).
The most efficient method of polishing11 is a sequence of progressively finer abrasives (Fig. 29-18), each removing the scratches made by the previous grade. Time is wasted if the progression to a finer grade abrasive is too rapid, because the coarser grits remove material much more efficiently.
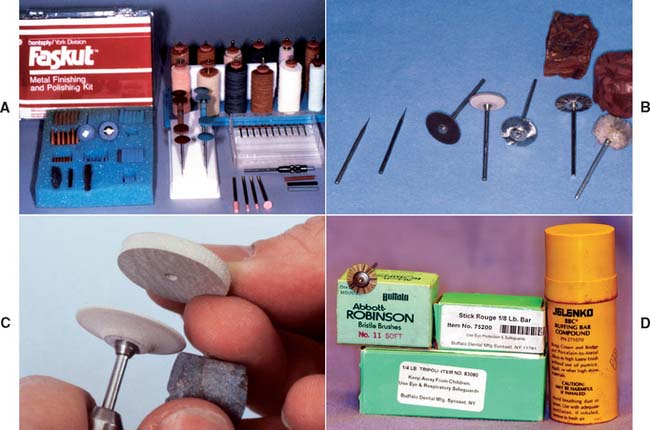
Fig. 29-18 Finishing armamentarium. A, Assorted abrasives, sandpaper disks, rubber points, and polishing wheels. B, Instruments used range from small carbides (for removing nodules) and a steel wire brush (for occlusal surface smoothing) to buffing wheels and compounds. C, A coarse wheel is used to true and thin the edge of a rubber wheel. D, Buffing compounds applied on a felt wheel or bristle brush.
Light pressure is applied when abrasives are used, and the instrument must be kept rotating; otherwise, the surface of the casting is ground into a series of facets that ultimately impede plaque control. When all surface irregularities have been removed and the progression through the series of abrasives has left a finish with only minute scratches, the axial surfaces of the restoration are polished. Jeweler’s rouge rapidly produces a high polish on a well-prepared surface of a dense casting (Fig. 29-19K). This is carried on a wheel or brush, with heavier pressures and higher rotational speeds than were used in finishing (see Fig. 29-19).
Zone 7: External Margins
Objective
Margin finishing is crucial for a restoration’s longevity and therefore merits special attention. The objective of all cast restoration finishing is a highly polished metal surface without ledges or steps as the transition is made from restoration to unprepared tooth. Failure to accomplish this leads to compromised plaque control.
Procedure
Where access allows, cavosurface margins should be finished directly on the tooth (see Fig. 30-10). Unfortunately, the areas where access for finishing is restricted (e.g., proximally or subgingivally) are precisely where plaque control presents the most problems. Therefore, only the least crucial areas can be finished intraorally. An advantage of partial-coverage restorations over complete crowns is that they allow better access for finishing margins and for subsequent plaque control.
The parts of the margin that cannot be finished on the tooth are finished on the die (Fig. 29-20). Care must be taken not to remove more metal than is strictly necessary. Excessive finishing creates problems similar to those caused by incomplete polishing. This raises the issue of how much material can be removed from the surface of a casting without compromising the ultimate fit and emergence profile of the finished restoration.
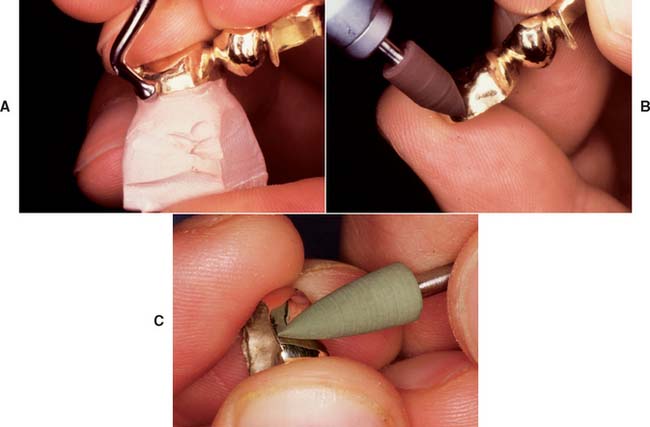
Fig. 29-20 When subgingival margins do not allow access, final finishing is performed on the die. A to C, During final polishing, the margin is carefully supported with a finger.
A stone die from a polysulfide impression is approximately 25 μm wider than the tooth because of polymerization and thermal shrinkage of the impression material and expansion of the gypsum.12 In theory, therefore, if 12.5 μm is removed during finishing, the casting will be flush with the tooth surface. Although these values cannot be measured on a day-to-day basis in a dental office, they illustrate the tolerances of, and restrictions imposed by, the materials that are currently in use.
The edge of the margin must not be distorted during finishing, although carefully rubbing a smooth instrument along the length of the margin (burnishing) (see Fig. 29-20A) may improve the margin,13,14* but only when softer alloys are used.15
Finishing should be performed by gently brushing a fine-grit stone over the surface to remove casting roughness (see Fig. 29-20B). This is followed by a soft rubber wheel or point (see Fig. 29-20C) and finally by rouge on a brush. The margin should be supported with a finger during final polishing.
When the casting is smooth on all critical surfaces, any remaining polishing compound can be removed with a soft toothbrush, by ultrasonic cleaning in an appropriate solution, or by steam cleaning.
REVIEW OF TECHNIQUE
Figure 29-21 presents the steps involved in finishing a restoration and should be consulted when techniques are reviewed.
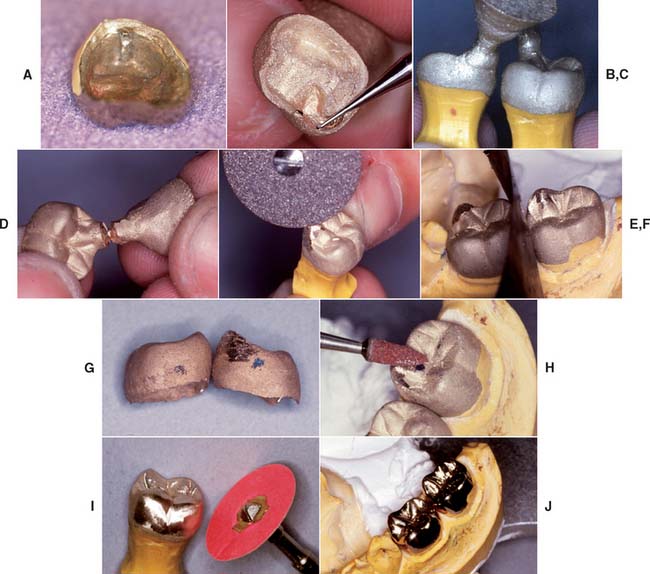
Fig. 29-21 Technique review. A, The internal margin is inspected to confirm that the casting accurately reproduces the prepared tooth and is intimately adapted to the prepared surfaces adjacent to the margin. B, The internal surface is inspected under magnification and adjusted as necessary with small stones and carbide burs. C, The casting should seat completely without force and without noticeable rocking or instability. D, The sprue is removed. E, The area of its attachment is reshaped. F, The proximal contact areas are adjusted. G, On the cast, proximal contacts can be left slightly tight before the clinical evaluation appointment. H, The occlusal surfaces are evaluated and adjusted. I, The axial surfaces are finished and polished. J, The polished restoration is cleaned.
 GLOSSARY*
adaptation \ăd′ăp-tā′shun\ n (1610) 1: the act or process of adapting; the state of being adapted 2: the act of purposefully adapting two surfaces to provide intimate contact 3: the progressive adjustive changes in sensitivity that regularly accompany continuous sensory stimulation or lack of stimulation 4: in dentistry, (a) the degree of fit between a prosthesis and supporting structures, (b) the degree of proximity of a restorative material to a tooth preparation, (c) the adjustment of orthodontic bands to teeth
airborne-particle abrasion \âr′bôrn′ pär′t -kal a-brā′zhun\: the process of altering the surface of a material through the use of abrasive particles propelled by compressed air or other gases
aluminum oxide \a-lōō′mi-num  k′sīd′\ 1: a metallic oxide constituent of dental porcelain that increases hardness and viscosity 2: a high strength ceramic crystal dispersed throughout a glassy phase to increase its strength as in aluminous dental porcelain used to fabricate aluminous porcelain crowns 3: a finely ground ceramic particle (frequently 50 um) often used in conjunction with air-borne particle abrasion of metal castings before the application of porcelain as with metal ceramic restorations
articulating paper \är-tk′ya-lāt′ing pā′per\: ink-coated paper strips used to locate and mark occlusal contacts
Beilby layer [Sir George Thomas Beilby, British chemist, 1850–1924]: eponym for the molecular disorganized surface layer of a highly polished metal. A relatively scratch-free microcrystalline surface produced by a series of abrasives of decreasing coarseness.
Beilby GT. Aggregation and flow of solids, 1921.
bur·nish \bûr′nsh\ vt (14c): to make shiny or lustrous by rubbing; also to facilitate marginal adaptation of restorations by rubbing the margin with an instrument
de·vest \d-v st\ vb: the retrieval of a casting or prosthesis from an investing medium
finish \fn′sh\ n (1779): to put a final coat or surface on; the refinement of form prior to polishing
in·tagl·io \n-tăl′yō, -täl′-\ n, pl -ios \-yōs\ (1644) 1: an incised or engraved figure in stone or any hard material depressed below the surface of the material such that an impression from the design would yield an image in relief 2: something carved in intaglio
intaglio surface \n-tăl′yō, täl′- sûr′fas\: the portion of the denture or other restoration surface that has its contour determined by the impression; the interior or reversal surface of an object
man·drel \măn′dral\ also man·dril \măn′dral\ n (1790) la: usually a tapered or cylindrical axle, spindle, or arbor placed in a hole to support it during machining lb: a metal bar which serves as a core about which material may be cast, molded, compressed, forged, bent or shaped 2: the shaft and bearings on which a tool is mounted
pol·ish·ing \pl′sh-ng\ v, obs 1: to make smooth and glossy, usually by friction; to give luster to (GPT-1) 2: obs: the act or process of making a denture or casting smooth and glossy (GPT-1)
polishing agents \pl′sh-ng ā′jants\: any material used to impart luster to a surface
rouge \rōōzh\ n (1753): a compound composed of ferric oxide and binders used for imparting a high luster to a polished surface, glass, metal, or gems
STUDY QUESTIONS
1 Gildenhuys RR, Stallard RE. Comparison of plaque accumulation on metal restorative surfaces. Dent Surv. 1975;51:56.
2 Shafagh I. Plaque accumulation on cast gold complete crowns polished by a conventional and an experimental method. J Prosthet Dent. 1986;55:339.
3 Keenan MP, et al. Effects of cast gold surface finishing on plaque retention. J Prosthet Dent. 1980;43:168.
4 Mesu FP. Degradation of luting cements measured in vitro. J Dent Res. 1982;61:665.
5 White SN, et al. Improved marginal seating of cast restorations using a silicone-disclosing medium. Int J Prosthodont. 1991;4:323.
6 Troendle GR, Troendle KB. Polyvinyl siloxane as a disclosing medium. J Prosthet Dent. 1992;68:983.
7 Phillips RW. Skinner’s Science of Dental Materials, 7th ed., Philadelphia: WB Saunders; 1973:632.
8 Shillingburg HT, et al. Fundamentals of Fixed Prosthodontics, 2nd ed. Chicago: Quintessence Publishing, 1981.
9 Adams HF. Effect of abrasive blasting on castings of gold alloys. Op Dent. 1981;6:11.
10 Felton DA, et al. Effect of air abrasives on marginal configurations of porcelain-fused-to-metal alloys: an SEM analysis. J Prosthet Dent. 1991;65:38.
11 Troxell RR. The polishing of gold castings. J Prosthet Dent. 1959;9:668.
12 Rosenstiel SF: The marginal reproduction of two elastomeric impression materials. Master’s thesis, Indiana University, 1977.
13 Eames WB, Little RM. Movement of gold at cavosurface margins with finishing instruments. J Am Dent Assoc. 1967;75:147.
14 Goretti A, et al. A microscopic evaluation of the marginal adaptation of onlays in gold. Schweiz Monatsschr Zahnmed. 1992;102:679.
15 Sarrett DC, et al. Scanning electron microscopy evaluation of four finishing techniques on margins of gold castings. J Prosthet Dent. 1983;50:784.
16 Beilby GT. Aggregation and Flow of Solids; Being the Records of an Experimental Study of the Micro-structure and Physical Properties of Solids in Various States of Aggregation, 1900-1921. London: Macmillan, 1921.