30 EVALUATION, CHARACTERIZATION, AND GLAZING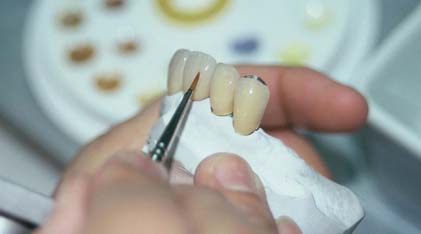
EVALUATION
When the laboratory procedures have been completed, the restoration is ready to be evaluated in the patient’s mouth before final finishing and cementation. The completed prosthesis is cleaned either ultrasonically or with a steam cleaner to remove any residual polishing compound and then disinfected. Metal castings need to be evaluated in terms of proximal contacts, margin integrity, stability, internal fit, external contours, occlusion, and surface finish.
Metal-ceramic restorations often require two evaluations: a metal evaluation stage, followed by reevaluation after the esthetic veneer has been applied. At the metal evaluation appointment, the margin integrity, stability, occlusion, and substructure design are evaluated. Especially important at this appointment is the assessment of the cut-back area. Minor adjustments can be made: for instance, by extending the veneering surface slightly interproximally to enhance the appearance of the completed prosthesis. During the subsequent bisque evaluation, marginal integrity and stability are reassessed to determine whether any distortion has occurred during porcelain firing. Proximal contacts are also evaluated during this stage, as are porcelain contours, stability, and the shade, texture, and glaze. For fixed dental prostheses (FDPs), tissue contact of the pontics and the location and shape of connectors need careful assessment; otherwise, tissue irritation may occur. Primarily because of the inevitable inaccuracies that result during the indirect technique and the high degree of precision needed for a successful fixed prosthesis, only rarely does the restoration not require some chairside adjustment.
Interim Restoration and Luting Agent
The interim restoration is removed by gently positioning hemostats or a Backhaus towel clamp on the buccal and lingual surfaces and rocking it gently in a buccolingual direction to break the seal of the interim luting agent. Special band removers (Fig. 30-1) may also be used. Most of the luting agent or interim cement adheres to the interim restoration when it is taken out of the mouth. Any remaining cement should be loosened from the prepared tooth surface with an explorer, followed by careful application of a water-pumice mixture* in a prophylaxis cup. Slow speed and relatively light pressure are essential. Polishing the preparation is undesirable because it may lessen retention. The preparations are rinsed with water and air spray, and after drying, the area is inspected. All residual luting agent must have been removed, because even a very small particle of interim cement can prevent a casting from seating completely.
Evaluation Sequence
Following a logical sequence during the evaluation procedures is important if mistakes are to be avoided. The recommended sequence is as follows:
The proximal contacts are evaluated first because excessive contact there prevents the restoration from seating, leading to a marginal discrepancy. Obviously, if a restoration is not seating completely, assessing stability and sectioning, or adjusting the occlusion, is premature.
Proximal Contacts
The location, size, and tightness of a restoration’s proximal contacts should resemble those of the natural teeth. Typically, textbooks refer to contacts that allow unwaxed floss to “snap” through “relatively easily.” Although this is not a very scientific definition, the use of floss is a convenient method for comparing the contacts with other contacts between adjacent teeth in the arch. If the floss does not pass, the contact is excessively tight; if it goes through too easily, food impaction may result (Fig. 30-2). The use of shim stock (thin Mylar film) is probably a more reliable indicator of proximal contact. The ideal contact should allow for positional stability of the abutments and adjacent teeth, as well as easy maintenance of the supporting structures. Most patients give reliable information as to a tight proximal contact when asked whether they “feel as though they have a seed between their teeth,” provided that a local anesthetic has not been administered. A deficient contact is easily overlooked but invariably results in discomfort as food becomes impacted.
Excessive tightness
All-metal restorations
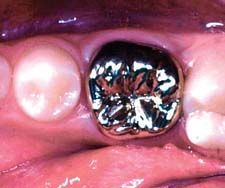
If a tight contact prevents the seating of an all-metal restoration, adjustments are readily made with a rubber wheel. The satin finish produced helps identify where binding occurs, because a shiny spot (Fig. 30-3) appears where adjustment is necessary.
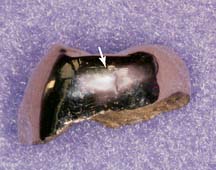
Fig. 30-3 Identifying the location of a tight proximal contact. The metal is given a matte finish by grinding with a rubber wheel. A shiny mark is formed where the contact is excessive.
When a contact is too tight, the restoration is removed from the mouth, adjusted, and then reevaluated intraorally. The dentist must remember to allow a small degree of excessive tightness for polishing. When both proximal contacts of a crown are excessively tight, the dentist should make adjustments on an alternating basis, verifying whether additional material needs to be removed before proceeding with further adjustments.
Porcelain restorations
A tight proximal contact in unglazed porcelain is easily adjusted with a cylindrical stone. The area of contact (Fig. 30-4) can be identified with red pencil or thin marking tape.
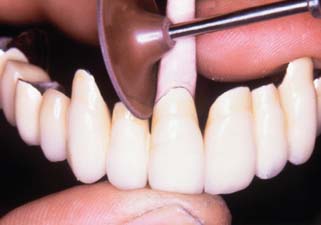
After glazing, a slight change in the contact may be observed because of the pyroplastic surface flow that occurs during firing. If adjustment of a glazed restoration is needed, it can be repolished with diamond-impregnated silicone points, pumice, or diamond-polishing paste.
Deficiency
All-metal restorations
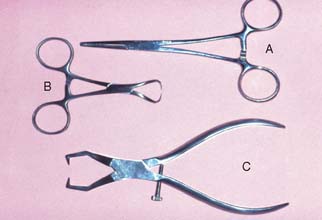
A gold casting with a deficient proximal contact can usually be corrected by soldering (Fig. 30-5). The procedure is simple and can be performed in the dental office in a matter of minutes. However, soldering a proximal contact should not be routinely necessary. After soldering, the restoration requires repolishing.

Fig. 30-5 Adding a proximal contact with gold solder. A, Armamentarium. B, Roughening the deficient proximal surface. C, Adding antiflux (graphite or rouge/turpentine) to the margin. D, Segment of solder positioned with paste flux. E, Heated over a Bunsen burner flame until the solder just melts. F, Proximal contact readjusted.
Armamentarium (see Fig. 30-5A)
Step-by-step procedure
Porcelain restorations
A deficient proximal contact in porcelain requires additional firing. At the bisque stage, this is time consuming, but adding additional porcelain is not a problem. However, if a restoration has been completely finished, glazed, and characterized at the time the deficient contact is discovered, a lower fusing “add-on” or correction porcelain can be used to solve the problem (Fig. 30-6).
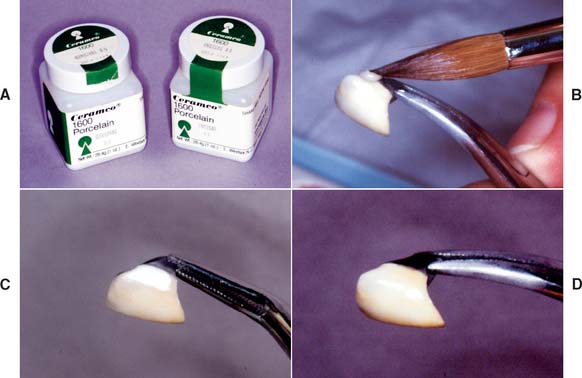
Fig. 30-6 Correction of a defective proximal contour with low-fusing, add-on porcelain (A). B, Applying the porcelain. C, Corrected proximal contours. D, Fired restoration.
These correction porcelains are a mixture of body porcelain and overglaze with additional modifiers to produce a maturation temperature as low as 850° C (1562° F). Minor corrections can thus be made with little risk of dimensional change in any other part of the restoration. Major corrections should be made by performing an additional firing with the conventional body and incisal powders, although there are limits to the number of times a restoration can be fired if devitrification is to be avoided (see Fig. 24-36B).
Margin Integrity
The completed restoration should go into place without binding of its internal aspect against the occlusal surface or the axial walls of the tooth preparation; in other words, the best adaptation should be at the margins. If the indirect procedure is handled properly, there should be no noticeable difference between the fit of a restoration on the die and that in the mouth.
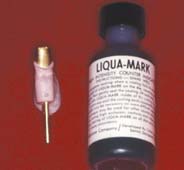
Several techniques have been used to detect where a casting binds against an occlusal or axial wall, including disclosing waxes, a suspension of rouge in turpentine or acetic acid, air abrasion to form a matte finish surface, powdered sprays, water-soluble marking agents (Fig. 30-7), and special elastomeric detection pastes. However, none has proved to be entirely satisfactory. Most techniques are rather messy and time consuming and should not be needed on a routine basis.
Nevertheless, elastomeric paste (Fig. 30-8) has some advantages. The material is similar to a silicone impression material and is obtained as a two-paste system. Its viscosity is similar to that of the final luting agents, and so it can be used not only to identify unwanted internal contacts but also to assess adequate marginal fit. The degree of clinically acceptable marginal opening (i.e., the discrepancy unlikely to have an adverse effect on the prognosis) is hard to define. Margin integrity has been the subject of many laboratory and clinical evaluations. Obviously, to limit dissolution of the luting agent, the thickness of the cement film at the margins should be kept minimal. Through careful technique, a marginal gap width of less than 30 μm can be obtained consistently.1,2
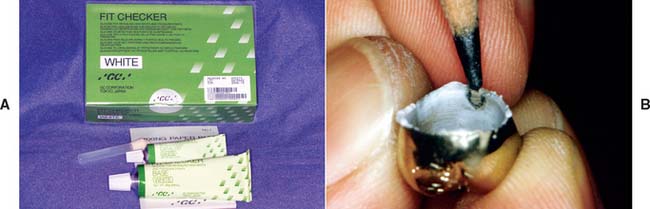
Fig. 30-8 A, Elastomeric detection paste, recommended for evaluating the internal surface of a restoration. B, The interference is seen as a perforation in the film of silicone material, which can be marked with a colored pencil. Note: The residual film of silicone should be thoroughly removed before cementing the restoration.
(B, Courtesy of Dr. J. H. Bailey.)
Assessment
Figure 30-9 illustrates some of the possibilities that may be encountered in verifying margin integrity. The presence of a small ledge does not necessarily mean that the restoration must be remade. It may merely require additional finishing where accessibility allows.
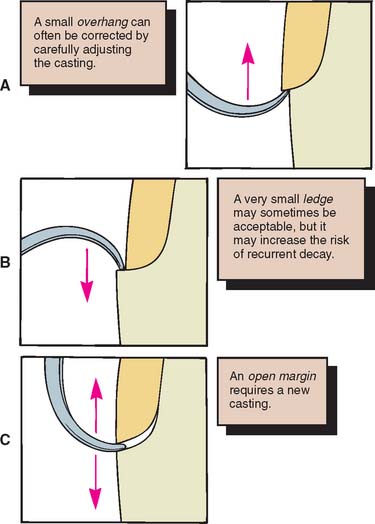
Fig. 30-9 Assessing margin integrity with an explorer. A, An overhang. B, A ledge. C, An open margin.
A sharp explorer moved from restoration to tooth and from tooth to restoration can be used in evaluating the marginal adaptation. If resistance is encountered in both directions, a gap or open margin exists, and its cause must be determined. If the gap is the result of an excessive proximal contact or of residual interim luting agent that prevents the casting from being seated, corrective action can be easily taken and the situation remedied. However, an obviously inaccurate restoration should be quickly rejected. Trying to “make it fit” should be avoided, because a new impression is a better use of time.
Finishing
Subgingival margins are not accessible for finishing in the mouth. They must be finished on the die. Because clinical examination of subgingival margins is not always easy, a precementation radiograph may be justified.
Supragingival margins are generally finished with the casting seated on the tooth. White stones and cuttle disks rotating from restoration to tooth structure should result in a suitably finished margin (Fig. 30-10), which, if the casting is properly adapted, is virtually undetectable with the tip of a sharp explorer.3
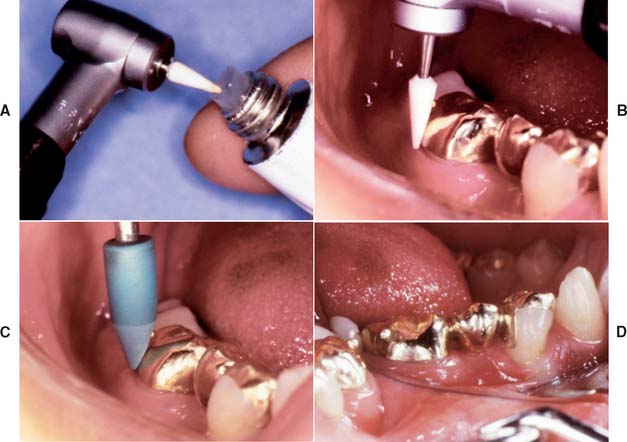
Fig. 30-10 Supragingival margins allow access for finishing the restoration directly on the tooth. A and B, Fine-grit white stone lubricated with petroleum jelly. C, Rubber point. D, Completed restoration.
Accessible margins can also be burnished during the cementation procedure before initial setting of the cement.4 However, the less accessible proximal margins are the critical ones in terms of prognosis. They are the most common site of recurring caries and periodontal disease, and they can neither be evaluated readily nor finished easily. It has also been demonstrated5,6 that correcting a poorly fitting cast restoration with finishing procedures is not possible.
Stability
The restoration should then be assessed for stability on the prepared tooth. It should not rock or rotate when force is applied. Any degree of instability is likely to cause failure during function. If instability is caused by a small positive nodule, this can usually be corrected; however, if it is caused by distortion, a new casting is necessary.
Occlusion
After the restoration has been seated and the margin integrity and stability are acceptable, the occlusal contact with the opposing teeth is carefully checked. The criteria for these relationships, both static and dynamic, have been discussed in Chapters 4 and 18. Any undesirable eccentric contacts as well as centric interferences must be identified. Minor adjustment of eccentric contacts may be needed if a semiadjustable (as opposed to a fully adjustable) articulator is used.
Evaluation and adjustment
Armamentarium
Only restorations in supraocclusion can be adjusted. For those that are out of occlusion, there is no satisfactory solution other than remaking (if in metal) or adding porcelain and refiring (if a metal-ceramic restoration).
Step-by-step procedure (Fig. 30-11)
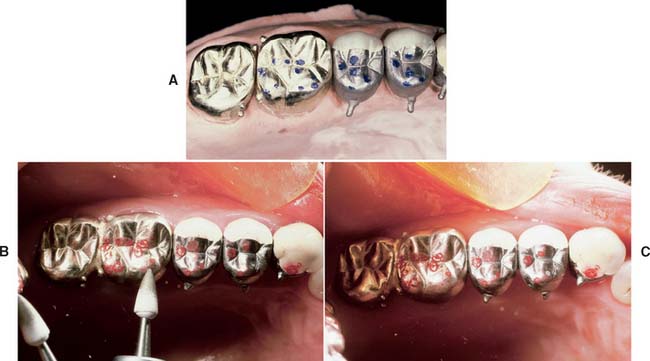
Fig. 30-11 Evaluating and adjusting the occlusion. A, Refinement on the articulator before evaluation. B, Testing the occlusal relationship with shim stock and marking with tape. Typically, some adjustment is needed, especially in more complex treatments, but this should not be extensive unless an error has been made. C, After adjustment, the occlusal contacts should always be verified with shim stock because ribbon markings can be misinterpreted.
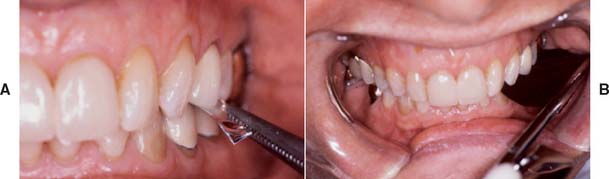
Fig. 30-12 A, Use Mylar shim stock to identify presence or absence of occlusal contacts. B, Use articulating tape to identify the location of occlusal contact.
An alternative technique requires the use of an airborne particle abrasion unit with aluminum oxide (Fig. 30-13). A matte finish is obtained on the occlusal surfaces of the casting in question, and the patient is asked to close. Where shiny marks appear, an adjustment is made. This technique, however, presents the following disadvantages:
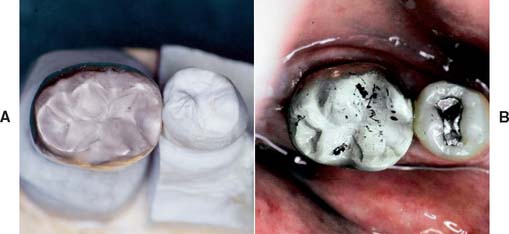
Fig. 30-13 Occlusal prematurities can be identified by giving the casting a matte finish with an air-abrasion unit. A and B, The prematurities appear as shiny areas.
(Courtesy of Dr. M. T. Padilla.)
Gross occlusal adjustment involving dental porcelain is better done in the bisque stage, because interferences are more easily marked on a bisque surface than on glazed porcelain. Minor adjustments are needed after glazing because of the pyroplastic flow of the porcelain.7 After adjustment, the porcelain can be polished with silicone wheels or diamond-polishing paste.
Remount
If there is a need for significant occlusal adjustment, a remount procedure8 may be recommended. It is typically used when extensive restorative dentistry has been performed, and it serves to convey the relationships of the restorations and teeth to the dental laboratory (Fig. 30-14). Detailed adjustments can then be made in an organized manner. Any inaccuracy (e.g., slight tooth movement, previous mounting discrepancies, or small dimensional change inherent with the indirect process) can be compensated for relatively easily, thus reducing the amount of chair time needed for precementation adjustment.
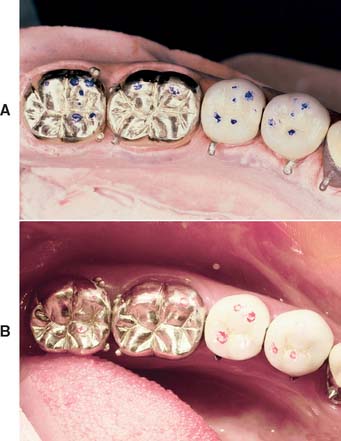
Fig. 30-14 A and B, Accurate transmission of occlusal relationships to the laboratory should be the rule when a careful technique has been followed. If discrepancies occur, they are often better corrected by a remount procedure in the laboratory.
Intraoral occlusal refinement is limited because of visibility and access difficulties. Laboratory adjustments offer optimum access and visibility and the opportunity to evaluate lingual contact relationships.
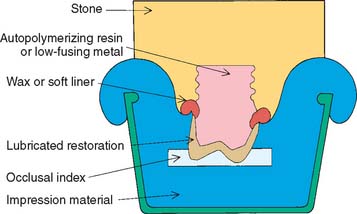
The remount procedure consists of making an impression of the castings in the patient’s mouth, with an occlusal index in place. The index is made with reinforced resin or impression plaster and provides the opportunity to accurately reposition the castings back into the impression after it has been removed from the patient’s mouth. A new definitive cast can then be fabricated. To enable easy removal of the castings from the newly fabricated definitive cast, resin is usually poured into the castings, after which the rest of the impression is poured in conventional type IV stone (Fig. 30-15). The cast can then be articulated with a conventional facebow transfer and occlusal registration techniques (see Chapter 2).
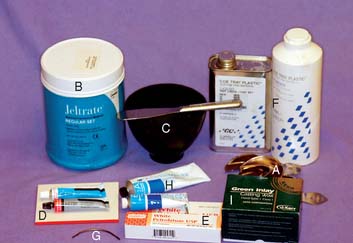
Armamentarium (Fig. 30-16)
Step-by-step procedure (Fig. 30-17)
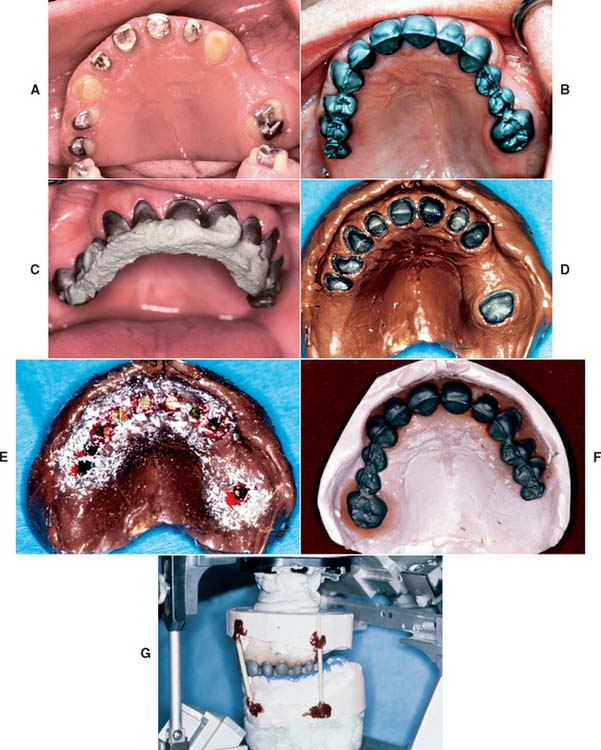
Fig. 30-17 Remount technique. A, A maxillary arch is prepared for metal-ceramic crowns and fixed dental prostheses. B, The metal framework is evaluated clinically; a remount procedure is needed. C, Impression plaster is used to register the location of each unit. D, The registration is picked up with an elastomeric material. E, Restorations are lubricated, and soft lining resin is painted around them. Their internal surfaces are filled with hard resin. Acrylic chips provide retention for the soft resin. Small wood screws are inserted into the hard acrylic, which are also for retention. F and G, The remainder of the cast is poured and articulated in the usual way.
(Courtesy of Dr. J. H. Bailey.)
This completes the remount procedure. The restoration can now be reassessed and adjusted in the dental laboratory. Although a remount procedure is not routinely needed, it may be advantageous with an extensive restoration to reduce the amount of chair time required for occlusal adjustment.
Ceramic Restorations
Ceramic restorations need certain additional steps during evaluation to satisfy esthetic, biologic, and mechanical requirements. Achieving an esthetic result depends on the contour of the restoration, surface characterization, and color match.
Contouring
Armamentarium (Fig. 30-18)
When contouring a restoration that is to be evaluated during the bisque stage, it should be moistened first with water or saliva. The moist surface reflects light in the same manner as the glazed restoration.
Step-by-step procedure
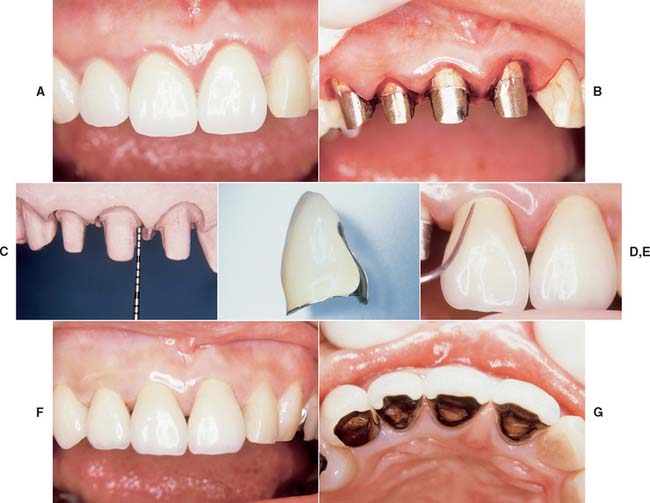
Fig. 30-19 A, Periodontal disease associated with excessively contoured restorations. B and C, Teeth reprepared to allow appropriate facial contours. D, Correct emergence profile established in restoration. E, Clinical adaptation verified. F, Note tissue response to new restorations. G, Appropriate embrasure form allows plaque control.
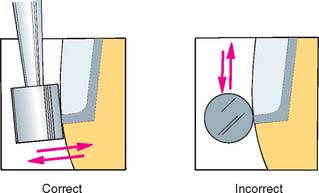
Fig. 30-20 If it is necessary to grind at the metal-porcelain junction, the stone should be held perpendicular to the junction. Otherwise, metal particles may contaminate the porcelain.
If too much adjustment is made, the incisal porcelain layer will be ground away, and the esthetic effect will be spoiled. Incisal edge position is important in obtaining good esthetics and function. Specific criteria for what constitutes “normal” are hard to define, but an average of 1 to 2 mm of the clinical crown should be visible on maxillary central and lateral incisors when the upper lip is relaxed. Additional help in contouring the incisal edges can be obtained by looking at the patient’s smile and listening to speech characteristics. Ideally, the incisal edges of the maxillary anterior teeth follow the curvature of the lower lip when the patient smiles.9 Ordinarily, the incisal edges of the lateral incisors (Fig. 30-22) are 1 to 2 mm shorter than the central incisors, which may touch the internal aspect of the lower lip when it is relaxed.
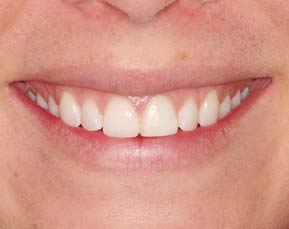
Fig. 30-22 Typical incisal edge position.
(From Monteith BD: A cephalometric method to determine the angulation of the occlusal plane in edentulous patients. J Prosthet Dent 54:81, 1985.)
Surface texture characterization
When the contour of the restoration has been finalized, the next goal is to duplicate the surface detail of the patient’s natural teeth.
Step-by-step procedure
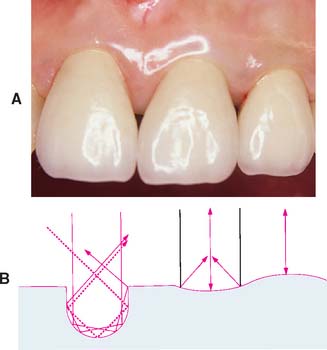
Fig. 30-25 A, Restoration texture should closely match natural enamel. B, Sharp grooves should not be cut into the ceramic surface because these “trap” light. A curved surface looks more natural and results in either converging or diverging reflections.
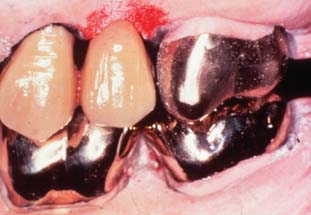
Fig. 30-26 The texture of these metal-ceramic units has been overemphasized, which has led to an artificial appearance.
On occasion, altering the apparent size of a restoration by these techniques may be possible. A smooth tooth appears larger than one that is identical in size but has intensive surface texture characterization.
CHARACTERIZATION AND GLAZING
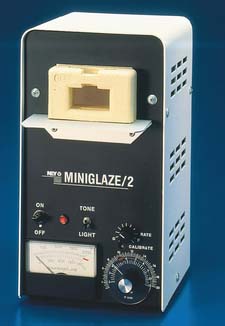
The surface luster or degree of gloss of a porcelain restoration depends on the autoglazing procedure (see Chapter 24). Both time and temperature must be carefully controlled. During a glazing firing, the surface layers of porcelain melt slightly, coalescing the particles and filling in surface defects.
The restoration should not be glazed in a vacuum, because included air may be drawn to the surface and result in bubbling (Fig. 30-27). Because air-fired glazing furnaces are relatively compact and inexpensive, some dentists prefer to glaze porcelain restorations in the operatory. This is particularly convenient if surface stains are to be used. The glazing step is straightforward; the degree of glaze depends on furnace temperature and how long the restoration is held at that temperature. Excessively glazed anterior teeth look unnatural. The patient should moisten the restoration because saliva affects its appearance. A dry crown looks misleadingly underglazed. Underglazing and refiring a restoration is better than overglazing it. If a restoration is not sufficiently glazed, it will retain more plaque and may be more liable to fracture. After glazing, the metal surfaces of the restoration are polished.
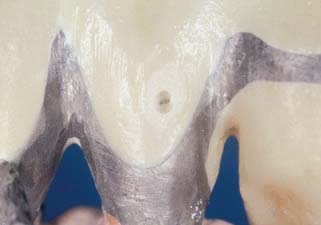
Fig. 30-27 A bubble that surfaced immediately before the evaluation stage. These types of defects must be addressed before delivery of the prosthesis.
An alternative to glazing is to polish the porcelain surfaces of the restoration.13 This provides greater control of the surface luster and distribution than glazing.14 For example, having a higher gloss on the cervical area and a lower gloss on the incisal area is possible. This is not possible with glazing because the entire crown is subjected to the same time-temperature combination.
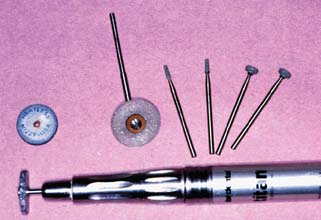
Polishing dental ceramics has long been advocated as an expedient way of restoring luster after adjusting by grinding. A number of commercially available polishing kits are available for this purpose. If used correctly (i.e., without omitting the successively finer grits), most are capable of producing smooth porcelain surfaces.15,16 As an alternative, the use of finishing wheels followed by pumice is satisfactory.17 More recently, ceramists have advocated polishing as a way to improve luster control. To achieve the precise degree and distribution of luster required, the porcelain is polished rather than glazed.
Despite the esthetic advantages of polishing, there is concern whether the strength of a polished restoration might be reduced or its abrasiveness increased. Glazing has been cited as strengthening a dental restoration,18 presumably because it causes a reduction of the flaws that initiate fracture. However, polishing also reduces flaws, and in laboratory studies, polishing has not been found to result in reduced physical properties, in comparison with glazing.19-23 Laboratory studies have shown that polished porcelain is no more abrasive than glazed porcelain.24 However, unpolished porcelain is much more abrasive on opposing enamel and is more plaque retentive than is polished or glazed porcelain.
External Color Modification and Characterization
The accomplishment of a perfect color match by using the basic shades supplied in the porcelain kits, without the need for chairside modification, is the goal of all dental ceramists. However, there are difficulties and inaccuracies inherent in the technique. There are also difficulties in duplicating the appearance of a patient’s tooth without the patient’s actually being present in the dental laboratory. These problems make perfect shade matching very difficult to achieve routinely. In many situations, a restoration that does not blend well with the adjacent teeth can be improved by simple chairside color modification or characterization procedures.25 These are done concurrently with final glazing, and it is therefore recommended that restorations be tried in the patient’s mouth contoured but unglazed (bisque stage).
Armamentarium
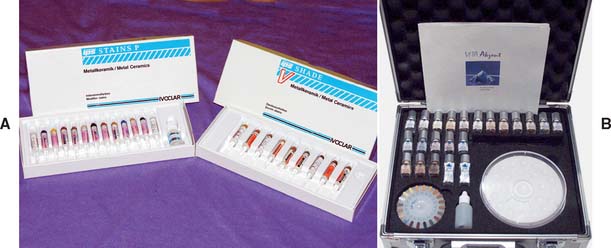
A number of stain kits are available from porcelain manufacturers, and most contain a fairly wide range of colors. The stains themselves are highly pigmented surface colorants that contain a small amount of glass, allowing the color to fuse into the porcelain surface.
Available characterization kits are illustrated in Figure 30-29. They come in various colors. Additional colors can be made by mixing the stains with each other; the color intensity can also be toned down with a colorless porcelain.
Step-by-step procedure
The application of stain has advantages and disadvantages. One advantage is that the dentist or technician can modify the shade after a restoration is completed with the patient present. The greatest disadvantage is that the color can be applied only to the surface, and so it is ineffective in producing characterizations that look realistic (i.e., deep within the tooth). Also, if surface characterization is applied excessively,26 it can cause a loss of fluorescence in the finished restoration, as well as an increase in the metameric effect (shade mismatch is more apparent under some lighting conditions). Furthermore, a characterized crown is slightly rougher than an autoglazed one,27 and the stain will eventually wear away under normal toothbrushing28,29 (10 to 12 years).
Three aspects of characterization may be used singly or in combination to achieve a natural appearance: shade modification (increasing the chroma, changing the hue, or reducing the value); specific characterization (e.g., hypocalcified areas or cracks); and special illusions of form or position (Fig. 30-30).
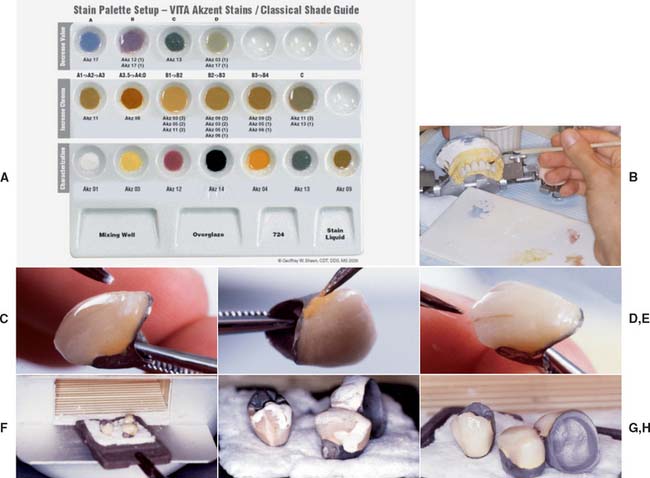
Fig. 30-30 Characterization and glazing technique. A, The colored stains are mixed to a stiff consistency on a suitable palette. B, Applying the stain. Often the procedure is repeated, or modifications are made after removal from the mouth. C, White stain is used to mimic hypocalcification. D, Stain with increased chroma is used for proximal coloration. E, A thin brown check line is made by painting a line of stain on the porcelain. This is reduced to the desired width by wiping a clean brush on each side of it. F and G, Stain is dried to a chalky consistency in front of the furnace muffle. H, Characterized and glazed restorations after firing.
(A, Courtesy of Dr. G. W. Sheen.)
Shade modification (see Chapter 23)
When a porcelain shade is being altered with external stain, certain limitations must be considered, particularly because surface characterization causes a loss of fluorescence and increases the effect of metamerism. It cannot be used to make major corrections or compensate for gross errors.
When the correctness of shade is assessed, simulating the appearance of glazed porcelain is necessary. This can be done by painting on some of the liquid provided in the stain kit. It may also help to paint the adjacent natural tooth to prevent dehydration during the characterization procedure, which would increase the value of the tooth.
Chroma and hue adjustment
Increasing the chroma (saturation) is one of the simplest shade alterations to achieve.30 The addition of yellow stain increases the chroma of a basically yellow shade, whereas adding orange has the same effect on a yellow-red shade. When an alteration in hue is necessary, pink-purple moves yellow toward yellow-red, whereas yellow decreases the red content of a yellow-red shade. These are the only two modifications that should be necessary, because the hue of a natural tooth always lies in the yellow-red to yellow range.
A metal-ceramic restoration that has too high a chroma is difficult to modify. Choosing a shade with a lower chroma is always better, because a lower chroma can be altered easily. Using the complementary color of a restoration reduces its chroma: Yellow requires purple-blue and orange requires blue or blue-green. However, the addition of these stains lowers the value of the restoration and increases the metameric effect; it is rarely successful in practice.
Value adjustment
Value can be reduced by adding a complementary color (see Fig. 23-1). Violet is used on yellow restorations and has the added effect of increasing the translucency. Gray is not encouraged because it tends to reduce translucency and makes the surface cloudy.
Attempting to increase the value is generally less successful, although value can be increased if the dominant color added has a higher lightness ranking. For example, a crown can be stained with white, but opacity will be greatly increased.
Characterization
Characterization is the art of reproducing natural defects, and it can be particularly successful in making a crown blend with the adjacent natural teeth. In general, defects should be reproduced to a slightly lesser extent on the restoration than as they appear on the natural teeth. The temptation to overcharacterize is strong but must be resisted.
Characterization looks slightly more natural and is more permanent if applied intrinsically during the buildup of the restoration (see Chapter 24) rather than by subsequent extrinsic application.31 However, communicating the exact characterization needed to the laboratory may be difficult; therefore, copying natural defects at chairside may be more practical.
Hypocalcified areas
These are produced with white stain and may be some of the easiest and most commonly made modifications.
Proximal coloration
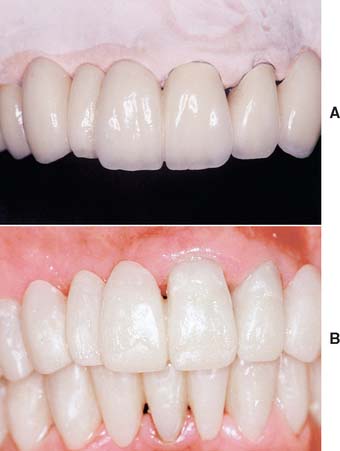
Many natural teeth exhibit proximal characterization. By reproducing this in the restoration, the dentist is able to create the illusion of depth and separation and is also able to tone down excessive opacity at the cervical area. The stains used are brown and orange. They are applied lightly to the proximal area and extended slightly onto the buccal surface apical to the contact. Proximal coloring is particularly useful in creating the illusion of separate units of an FDP.
Enamel cracks
This characterization is better if done intrinsically, although it can be added extrinsically. A linear vertical crack interrupts the light transmission across the tooth surface, causing a shadow. Thus, both the highlight and the shadow of the crack must be simulated for an authentic result.
The highlight is developed with white and yellow mixed in the ratio of 4 : 1, and gray stain is used for the shadow. A thin line is drawn with a brush in the desired area with the white and yellow stains. Then a thin line of gray is placed distal to the first line to create the illusion of a shadow.
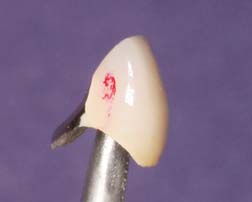
Stained crack line (Fig. 30-31)
Cracked enamel stains quickly on natural teeth. An orange-brown mixture applied in as thin a line as possible will effectively simulate a crack.
Exposed incisal dentin
This is usually seen on the mandibular incisors of older patients and is caused by enamel wear. The incisal edge should be “cupped out,” with orange and brown colorants used to reproduce the dentinoenamel junction.
Incisal halo
Translucent incisal edges are more common on the incisors of younger patients. Often, although the incisal area is translucent, the edge is totally opaque. This may be difficult to reproduce internally. A mixture of white and yellow stains in the ratio of 4 : 1 is placed in the linguoincisal area, with an extension just onto the labial area, to produce the halo effect.
Translucency
Translucency can be mimicked with violet stain, although the results are usually disappointing in comparison with those achieved with correct application of the incisal porcelain. For optimum results, both labial and lingual surfaces should be coated. Decreasing the translucency is accomplished by adding the dominant hue over the labiolingual surface.
Special illusions
Form and position are undoubtedly the most important factors in achieving an attractive result. However, restoring the original form may not always be possible. Loss of supporting tissue, the size of a pontic space, or a poor occlusal position may impede the attempt.
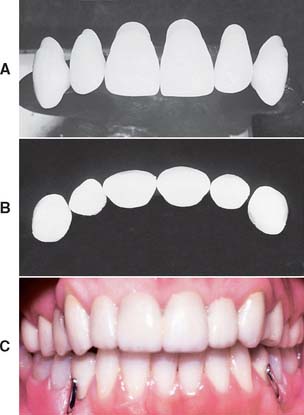
An FDP pontic may be very long because of loss of supporting bone. Simulating a root surface can partially improve the appearance. The root extension is contoured for length and width, and then an orange-brown mixture is placed over the extension. Pink stain can be used to simulate gingival tissue, but results are better with pink body porcelain.
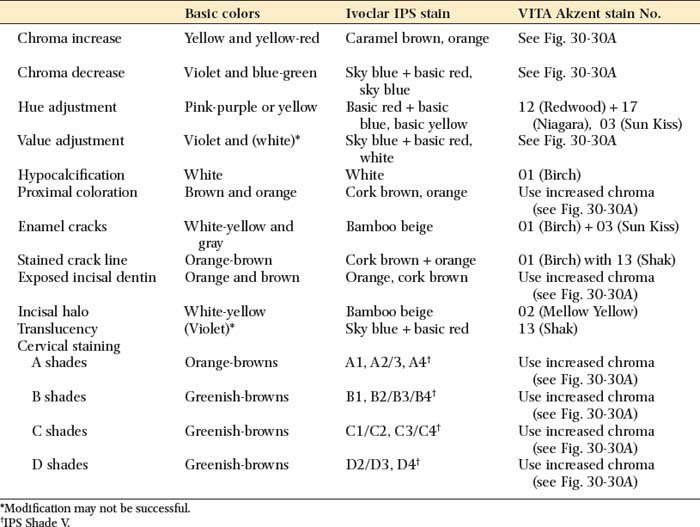
Recommended characterization procedures are summarized in Table 30-1.
SUMMARY
When a restoration is evaluated in the mouth, the proximal contacts are assessed first, followed by margin integrity, stability, and occlusion. Minor occlusal discrepancies can usually be adjusted intraorally. For extensive prosthodontic treatment, a remount procedure may be needed, which will reduce the chair time needed to achieve an optimum occlusal scheme in the restoration.
With a metal-ceramic restoration, proper contouring of the porcelain in the cervical third is crucial for facilitating maintenance of health of the supporting structures. Proper shaping of the gingival and incisal embrasures, along with contouring and characterization, significantly improves the esthetic result. Small corrections and subtle changes can be made with surface stains.
 GLOSSARY*
antiflux \ăn′tē-flŭks′\ n: materials that prevent or confines solder attachment or flow
1cast·ing \kăs′t ng\ n (14c): something that has been cast in a mold; an object formed by the solidification of a fluid that has been poured or injected into a mold
2cast·ing \kăs′tng\ vt: the act of forming an object in a mold—see VACUUM C.
characterization: to characterize by application of unique markings, indentations, coloration and similar custom means of deliniation on a tooth or dental prosthesis thus enhancing natural appearance
char·ac·ter·ize \kăr′ak-ta-rīz\: to distinguish, individualize, mark, qualify, singularize, or differentiate something
emergence profile \-mûr′jens proōfīl\: the contour of a tooth or restoration, such as a crown on a natural tooth or dental implant abutment, as it relates to the adjacent tissues
extrinsic coloring \k-strn′sk kŭl′or-ng\: coloring from without; applying color to the external surface of a prosthesis
glaze \glāz\ vb glazed \glāzd\; glaz·ing \glaōzng\ vt (14c) 1: to cover with a glossy, smooth surface or coating 2: the attainment of a smooth and reflective surface 3: the final firing of porcelain in which the surface is vitrified and a high gloss is imparted to the material 4: a ceramic veneer on a dental porcelain restoration after it has been fired, producing a nonporous, glossy or semi-glossy surface—see NATURAL G., OVERGLAZE
intrinsic coloring \n-trn′zk, -sk kŭl′ar-ng\: coloring from within; the incorporation of a colorant within the material of a prosthesis or restoration
line angle \līn ang′gal\: the point of convergence of two planes in a cavity preparation
natural glaze \năch-ar-al, năch′ral glāz\: the production of a glazed surface by the vitrification of the material itself and without addition of other fluxes or glasses
o·ver·glaze \oōvar-glāz\ adj (1879): the production of a glazed surface by the addition of a fluxed glass that usually vitrifies at a lower temperature
pig·ment \pg′mant\ n (14c): finely ground, natural or synthetic, inorganic or organic, insoluble dispersed particles (powder), which, when dispersed in a liquid vehicle, may provide, in addition to color, many other essential properties such as opacity, hardness, durability, and corrosion resistance. The term is used to include an extender, white or color pigments. The distinction between powders that are pigments and those that are dyes is generally considered on the basis of solubility—pigments being insoluble and dispersed in the material, dyes being soluble or in solution as used
primary colors (additive) \prī′m r′ē, -ma-rē kŭl′erz ăd′-tv\: three colored lights from which all other colors can be matched by additive mixture. The three must be selected so that no one of them can be matched by mixture of the other two. Generally, red, green, and blue are used. Additive primaries are the complements of the subtractive primaries
primary colors (subtractive) \prī′mr′ē, -ma-rē kŭl′erz sab-trăk′tv\: colors of three colorants or colored materials which, when mixed together subtract from one another, resulting in black or a very dark neutral color. Subtractive primaries are generally cyan, magenta, and yellow
remount cast \rē-mount′\: a cast formed of a prosthesis for the purpose of mounting the prosthesis on an articulator
remount procedure \rē-mount′ pra-sē′jur\: any method used to relate restorations to an articulator for analysis and/or to assist in development of a plan for occlusal equilibration or reshaping
remount record index \rē-mount′ rk′ard n′dks′\: a record of maxillary structures affixed to the mandibular member of an articulator useful in facilitating subsequent transfers
speaking space \spē′kng spās\: the space that occurs between the incisal or/and occlusal surfaces of the maxillary and mandibular teeth during speech
1stain \stān\ n (1583) 1: a soiled or discolored spot; a spot of color in contrast to the surrounding area 2: a preparation used in staining 3: in dentistry, the discoloration of a tooth surface or surfaces as a result of ingested materials, bacterial action, tobacco, and/or other substances. This may be intrinsic, extrinsic, acquired, or developmental
2stain \stān\ vb (14c) 1: to suffuse with color 2: to color by processes affecting chemically or otherwise the material itself 3: in dentistry, to intentionally alter restorations through the application of intrinsic or extrinsic colorants to achieve a desired effect, best termed characterization or to characterize a restoration
STUDY QUESTIONS
1 Byrne G, et al. Casting accuracy of high-palladium alloys. J Prosthet Dent. 1986;55:297.
2 Schilling ER, et al. Marginal gap of crowns made with a phosphate-bonded investment and accelerated casting method. J Prosthet Dent. 1999;81:129.
3 Christensen GJ. Marginal fit of gold inlay castings. J Prosthet Dent. 1966;16:297.
4 Goretti A, et al. A microscopic evaluation of the marginal adaptation of onlays in gold. Schweiz Monatsschr Zahnmed. 1992;102:679.
5 Lofstrom LH, Asgar K. Scanning electron microscopic evaluation of techniques to extend deficient cast gold margins. J Prosthet Dent. 1986;55:416.
6 Eames WB. Movement of gold at cavosurface margins with finishing instruments [Letter]. J Prosthet Dent. 1986;56:516.
7 Hobo S. Distortion of occlusal porcelain during glazing. J Prosthet Dent. 1982;47:154.
8 Huffman RW, Regenos JW. Principles of Occlusion, 4th ed. London: Ohio, H & R Press, 1973.
9 Monteith BD. A cephalometric method to determine the angulation of the occlusal plane in edentulous patients. J Prosthet Dent. 1985;54:81.
10 Matthews TG. The anatomy of a smile. J Prosthet Dent. 1978;39:128.
11 Rahn AO, Heartwell CM. Textbook of Complete Dentures, 5th ed. Philadelphia: BC Decker, 1993.
12 Blancheri RL. Optical illusion and restorative dentistry. Rev Asoc Dent Mex. 1950;8:103.
13 al-Wahadni A, Martin DM. Glazing and finishing dental porcelain: a literature review. J Can Dent Assoc. 1998;64:580.
14 Hubbard JR. Natural texture and lustre in ceramics. In: Preston JD, editor. Perspectives in Dental Ceramics. Chicago: Quintessence Publishing, 1988.
15 Goldstein GR, et al. Profilometer, SEM, and visual assessment of porcelain polishing methods. J Prosthet Dent. 1991;65:627.
16 Fuzzi M, et al. Scanning electron microscopy and profilometer evaluation of glazed and polished dental porcelain. Int J Prosthodont. 1996;9:452.
17 Newitter DA, et al. An evaluation of adjustment and postadjustment finishing techniques on the surface of porcelain-bonded-to-metal crowns. J Prosthet Dent. 1982;48:388.
18 Binns DB. The physical and chemical properties of dental porcelain. In: Yamada HN, editor. Dental Porcelain: The State of the Art 1977. A Compendium of the Colloquium Held at the University of Southern California School of Dentistry on Feb. 24-26, 1977. Los Angeles: University of Southern California; 1977:25.
19 Levy H. Effect of laboratory finishing technics and the mechanical properties of dental ceramic. Inf Dent. 1987;69:1039.
20 Rosenstiel SF, et al. Comparison of glazed and polished dental porcelain. Int J Prosthodont. 1989;2:524.
21 Brackett SE, et al. An evaluation of porcelain strength and the effect of surface treatment. J Prosthet Dent. 1989;61:446.
22 Fairhurst CW, et al. The effect of glaze on porcelain strength. Dent Mater. 1992;8:203.
23 Giordano R, et al. Effect of surface finish on the flexural strength of feldspathic and aluminous dental ceramics. Int J Prosthodont. 1995;8:311.
24 al-Hiyasat AS, et al. The abrasive effect of glazed, unglazed, and polished porcelain on the wear of human enamel, and the influence of carbonated soft drinks on the rate of wear. Int J Prosthodont. 1997;10:269.
25 Abadie FR. Porcelain surface characterization and staining in the office. J Prosthet Dent. 1984;51:181.
26 Weiner S. Staining porcelain veneer restorations. J Prosthet Dent. 1980;44:670.
27 Cook PA, et al. The effect of superficial colorant and glaze on the surface texture of vacuum-fired porcelain. J Prosthet Dent. 1984;51:476.
28 Aker DA, et al. Toothbrush abrasion of color-corrective porcelain stains applied to porcelain-fused-to-metal restorations. J Prosthet Dent. 1980;44:161.
29 Bativala F, et al. The microscopic appearance and effect of toothbrushing on extrinsically stained metal-ceramic restorations. J Prosthet Dent. 1987;57:47.
30 Lund TW, et al. Spectrophotometric study of the relationship between body porcelain color and applied metallic oxide pigments. J Prosthet Dent. 1985;53:790.
31 Winings JR. A method of making decalcifications in the porcelain build up. J Dent Technol. 1998;15:13.