Instrument Processing
STERILIZATION VERSUS DISINFECTION
INSTRUMENT PROCESSING PROCEDURES
DESIGN OF THE INSTRUMENT PROCESSING AREA
STERILIZATION OF HEAT-LABILE ITEMS
OTHER METHODS OF STERILIZATION
PROPERTIES OF DECONTAMINATION AND STERILIZATION EQUIPMENT AND PRODUCTS
After completing this chapter, the student should be able to do the following:
 Differentiate between sterilization and disinfection.
Differentiate between critical, semicritical, and noncritical patient care items and describe differences in how such items are processed.
List the steps involved in instrument processing.
Describe the rationale for each step in instrument processing.
Describe the three methods for instrument cleaning and the techniques for performing this task safely.
Determine which packaging materials are used for which methods of sterilization.
Describe the physical conditions, advantages, and precautions related to steam, dry heat, and unsaturated chemical vapor sterilization.
Compare the three methods of sterilization monitoring and describe how to perform each method.
Describe what causes sterilization failures and what to do when they are detected.
Describe how to handle, store, and distribute sterilized instruments to maintain sterility.
Describe how to sterilize handpieces and heat-sensitive instruments.
Describe the factors to consider when designing a sterilization facility within a dental office.
Instrument processing is a collection of procedures that prepares contaminated instruments for reuse. Box 11-1 presents the major steps for instrument processing and the explanations for each step. One must perform the processing carefully so that disease agents from a previous patient, from a member of the dental team who handled the instruments, or from the environment are not transferred by the instruments to the next patient. One also must perform processing correctly to keep instrument damage to a minimum. The overall process consists of seven steps, which are described in this chapter. Although the steps are not particularly difficult to perform, each must be performed properly in a routine, disciplined manner to ensure the desired outcome of patient protection with minimal instrument damage.
STERILIZATION VERSUS DISINFECTION
Because killing of microorganisms is an important step of instrument processing, an important first step is to have a general understanding of microbial killing methods before other steps in the process are described.
Sterilization
Sterilization is a process intended to kill all microorganisms and is the highest level of microbial kill that can be achieved. Because routinely determining whether a microbial killing process actually kills all microorganisms is not possible, a highly resistant microorganism is selected as the standard challenge. If the process kills this microorganism, the process is considered to be a sterilization process. The bacterial endospore is selected as the standard challenge for sterilization because of its high resistance to killing by heat and chemicals (Figure 11-1). Spores are described more fully in Chapter 2 and in Sterilization Monitoring in this chapter. These spores are more difficult to kill than all of the common pathogenic microorganisms, including Mycobacterium tuberculosis, hepatitis viruses, human immunodeficiency virus type 1, fungal spores, herpesviruses, Staphylococcus aureus, and the thousands of other microorganisms. Thus a process cannot be called a sterilization process unless it is capable of killing high levels of bacterial endospores (is sporicidal). Three types of sterilization processes are used in dentistry: (1) heat sterilization, (2) gas sterilization, and (3) liquid chemical sterilization. Other types of sterilization procedures exist, but they have not been applied to the field of dentistry or have not yet been made practical for use in the dental office. Heat sterilization involving steam, dry heat, and unsaturated chemical vapor is the most common type of sterilization used in offices today.
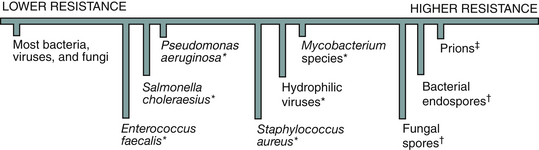
FIGURE 11-1 Relative resistance of microorganisms to killing with chemicals and heat. ∗Higher resistance to killing with chemicals; †higher resistance to killing with chemicals and heat; ‡are proteins, not microorganisms.
The heat sterilizers operate at 250° F to 375° F, and their sterilization processes can be monitored routinely for effectiveness using bacterial spores (called biologic monitoring).
One also can monitor ethylene oxide gas sterilizers that operate at 72° F to 140° F (much lower than heat sterilizers) with bacterial endospores, but this type of sterilization is not used commonly in dental offices because of the long exposure time required for sterilization, the high cost of gas sterilizers, and the required special handling of the ethylene oxide gas sterilant.
Liquid chemical sterilization at room temperature is used on items that are damaged by heat sterilization. Examples of liquid chemical sterilants/high-level disinfectants used are glutaraldehyde, glutaraldehyde-phenate, special hydrogen peroxide, and hydrogen peroxide–peracetic acid. Although these liquid sterilants can be shown to be sporicidal in controlled laboratory testing, the microbial killing that occurs during actual use in the office cannot be monitored routinely as it can for heat sterilization. Spore tests for biologic monitoring have not been developed yet for office testing of liquid sterilants. The best that can be done is to estimate chemically the concentration of active sterilant remaining in the used solution. The sterilant slowly becomes inactive. More information about sterilization is given later in this chapter.
Disinfection
Disinfection is a less lethal process than sterilization and is intended to kill disease-producing microorganisms but not bacterial endospores. Disinfection usually refers to the use of liquid chemicals to kill microorganisms at room temperature on surfaces. If the chemical is not sporicidal but can kill other microorganisms, it is called a disinfectant. Several types of disinfectants are available—for example, synthetic phenolics, phenol, iodophors, alcohol-phenolics, sodium hypochlorite, quaternary ammonium compounds, alcohol, and alcohol–quaternary ammonium compounds. Chemicals classified as disinfectants cannot be expected to achieve sterilization. Chapter 12 gives details on these disinfectants and their uses, but an important point to understand is that one cannot determine routinely the level of microbial killing actually achieved by these disinfectants during use in the office. Thus one never knows how well disinfectants are working.
Some liquid chemicals can serve as a sterilant or a high-level disinfectant, depending on how they are used. Chapter 12 explains this use further, but in general these chemicals are sterilants (kill high levels of bacterial spores) when used for long exposure times and are high-level disinfectants (kill low levels of bacterial spores) when used for shorter exposure times. For example, 2.0% to 3.4% glutaraldehyde is a sterilant when precleaned items are submerged for 10 hours of contact time but is a high-level disinfectant when contact time is less than 10 hours. When used at lower concentrations or for shorter times, glutaraldehyde can achieve only disinfection. Also, as already mentioned, one cannot determine microbial killing by liquid chemicals in the office.
Categories of Patient Care Items
The Centers for Disease Control and Prevention (CDC) categorizes patient care items as critical, semicritical, or noncritical based on the potential risk of infection during use of the items (Table 11-1). These categories are referred to as the Spaulding classification, first proposed by Spaulding in 1968. The CDC indicates the following:
TABLE 11-1
Categories of Patient Care Items as Identified by the Centers for Disease Control and Prevention
| Category | Definition | Examples |
| Critical | Penetrates soft tissue, contacts bone, enters into or contacts the bloodstream or other normally sterile tissue of the mouth | Surgical instruments, scalers, blades, surgical dental burs |
| Semicritical | Contacts mucous membranes but will not penetrate soft tissue, contacts bone, enters into or contacts the bloodstream or other normally sterile tissue of the mouth | Dental mouth mirror, amalgam condenser, reusable dental impression trays, dental handpieces∗ |
| Noncritical | Contacts intact skin | Blood pressure cuff, stethoscope, pulse oximeter |
∗Although dental handpieces are considered a semicritical item, heat sterilization is recommended.
Adapted from Centers for Disease Control and Prevention: Guideline for infection control in dental health-care settings, 2003, MMWR 52(No. RR-17):20, 2003.
• Critical and semicritical items are to be cleaned and sterilized by heat.
• Semicritical items that are heat sensitive must, at a minimum, be cleaned and treated with a high-level disinfectant.
• Noncritical items are cleaned and treated with a low-level disinfectant (if no blood is visible on the item) or an intermediate-level disinfectant (if blood is visible).
Sterility Assurance for Patient Protection
Universal sterilization means that all reusable instruments and handpieces are sterilized (rather than just disinfected) between use on patients. This provides the highest level of patient protection. If an item used in the patient’s mouth cannot be sterilized or cannot withstand the conditions of sterilization or cannot be prevented from becoming contaminated during use, the item should not be used or should be discarded after use on one patient.
Maximum patient protection with universal sterilization can be achieved only by practicing sterility assurance. Because the sterility of each processed instrument cannot be measured routinely, one must depend on the reliability of the instrument processing procedures being performed. Thus sterility assurance is the correct performance of the proper instrument processing steps and monitoring of the sterilization step with biologic, mechanical, and chemical indicators. This assurance program requires taking four steps:
1. Select the proper procedure and confirm the correct way to perform that procedure.
2. Prepare a written step-by-step description of the correct procedure to be used as a reference in training and to document patient safety techniques used in the office.
3. Incorporate the procedure into the office training program to ensure that new employees learn the correct procedure.
4. Monitor the performance of the procedure to ensure its routine use and, when possible, measure the results of the procedure.
The statement that “instruments have been sterilized” is true only if sterility assurance is practiced, that is, showing by frequent biologic, mechanical, and chemical monitoring that the process used kills bacterial endospores.
INSTRUMENT PROCESSING PROCEDURES
Procedure 11-1 presents suggested step-by-step procedures and rationales for instrument processing. One must handle contaminated instruments carefully to avoid cuts and punctures from sharp items, any of which constitutes an exposure. One always should use personal protective equipment, including utility gloves, mask, and protective eyewear and clothing during these procedures, as described in Chapter 10.
Holding (Presoaking)
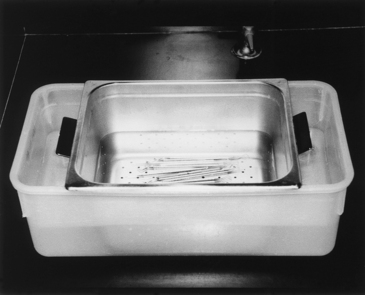
If instruments cannot be cleaned soon after use, they should be placed in a holding solution to prevent drying of the saliva and blood and to facilitate the actual cleaning. Some plastic/resin cassette manufacturers do not recommend presoaking, so one should follow their instructions for cleaning. Extended presoaking for more than a few hours is not recommended because this may enhance corrosion of some instruments. The holding solution may be the same detergent as that to be used for subsequent cleaning or may be water or an enzyme solution. One should place loose instruments in a perforated cleaning basket and then place the basket in the holding solution (Figure 11-2). Use of the basket reduces direct handling of instruments through the subsequent rinsing, cleaning, and rinsing steps. The presoaked instruments and the holding solution must be considered contaminated. One should discard the solution at least once a day (or earlier if visibly soiled) while wearing protective equipment.
Precleaning
Precleaning is an essential step before any sterilization or disinfection procedure. Instruments become contaminated with blood, saliva, tissue fluids, and dental materials. Mixed in with these are microbes from the patient’s saliva and blood. This microbe-laden debris is referred to as bioburden. The organic components in the blood and saliva (e.g., proteins, fats) coat the microbes and provide insulation from sterilizing agents in steam, dry heat, and unsaturated chemical vapor sterilizers and from chemicals in sterilants and disinfectants. Precleaning reduces the bioburden and gives the subsequent sterilization or disinfection step the best chance to work. A “dirty” instrument may in some instances become sterile during subsequent processing, but one cannot confirm this. (Besides, a patient will never be convinced that a visibly dirty instrument is safe for use, even if it really is sterile.) Two basic types of dental instrument cleaning systems that have been cleared by the Food and Drug Administration (FDA) for safety and effectiveness are ultrasonic cleaners and instrument washers or washer-disinfectors.
ULTRASONIC CLEANING
Ultrasonic cleaning, compared with scrubbing instruments by hand, reduces direct handling of the contaminated instruments and the chances for cuts and punctures. Ultrasonic cleaning is also an excellent cleaning mechanism, and staff can do other tasks while the instruments are being cleaned. The ultrasonic energy produces billions of tiny bubbles in the cleaning solution that collapse and create high turbulence at the surface of the instruments. This turbulence dislodges the debris and suspends it in the solution or dissolves it. Few instruments cannot be cleaned ultrasonically. One exception is some high-speed handpieces, although others can withstand ultrasonic cleaning. One should check the handpiece manufacturer’s instructions for cleaning.
Ultrasonic cleaning units come in several sizes that are freestanding (Figure 11-3) or can be built into countertops. Many ultrasonic cleaners have automatic drains that eliminate having to lift the cleaner and pour the used cleaning solution into the sink. Some cleaners can be connected directly to water lines and have automatic rinsing cycles. These cleaners can accommodate any office or clinic and can process instruments that are loose or are in cassettes. One always should use a cleaning basket or cassette rack to suspend the items in the cleaning solution because better cleaning is achieved when items are off the bottom of the chamber. In addition, use of the basket or rack eliminates the need to scoop up the instruments by hand at the end of the cycle. Operate the unit with the cover in place to reduce the noise level and keep dust from further contaminating the cleaning solution. Follow the manufacturer’s directions for proper use.
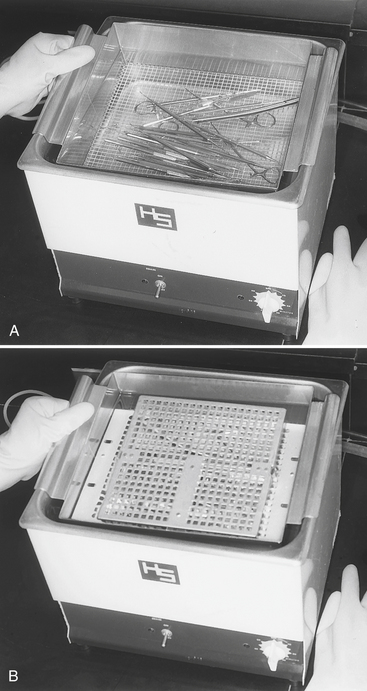
FIGURE 11-3 Ultrasonic cleaning of instruments. A, Loose instruments in a basket. B, Instruments in cassettes that can be held in a basket or cleaning rack.
One should use a cleaning solution designed for use on dental or medical instruments and recommended for use in ultrasonic cleaners. Maintain the solution at the proper level in the cleaning chamber, ensuring that all items being cleaned are submerged completely. Cleaning solutions that also have antimicrobial activity will reduce the buildup of microorganisms in the solution as it is used repeatedly. However, one should not use common disinfectants in place of a detergent solution unless they are designed for this use. One should process instruments in the cleaner until they are visibly clean. This time may vary, depending on the instruments, the amount or type of material on the instruments, and the efficiency of the ultrasonic unit. This time ranges from about 4 to 16 minutes. One determines the time by the visible cleanliness of the instruments. Instruments in plastic/resin cassettes require longer cleaning times because the plastic/resin absorbs some of the ultrasonic energy.
After cleaning, one removes the basket or cassette rack and thoroughly rinses the instruments under tap water with a minimum of splashing (unless the cleaner has automatic rinsing). Used ultrasonic cleaning solutions can contain large numbers of microbes; the rinsing removes the residual cleaning solution and further reduces the bioburden. The cleaned and rinsed instruments and cassettes still are contaminated and must be handled with gloves. One should drain or otherwise discard the cleaning solution at least daily, earlier if it becomes visibly soiled. One should rinse, disinfect, rinse, and dry the cleaning chamber at the end of the day while wearing protective equipment.
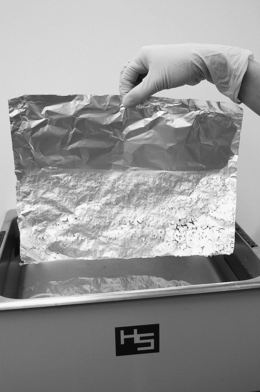
One can test the functioning of an ultrasonic unit using the aluminum foil test as follows: Cut a piece of lightweight aluminum foil about 1 inch shorter than the length of the chamber and 1 inch longer than the depth of the solution in the chamber. Insert the foil vertically into the filled chamber with the length of the foil running the length of the chamber and the bottom of the foil about 1 inch above the bottom. Do not let the foil touch the bottom of the tank. Operate the unit for 20 seconds. Remove the foil and observe for small indentations (pebbling) on the foil (Figure 11-4). This pebbling should be distributed fairly evenly over the entire submerged part of the foil. If areas greater than ½ square inch have no pebbling, the unit may need servicing. Some ultrasonic unit manufacturers may use variations of this aluminum foil procedure described here; one should follow their specific directions.
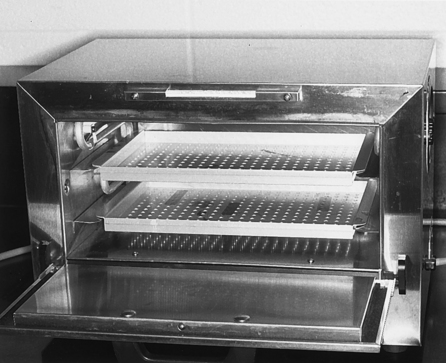
INSTRUMENT WASHERS
Instrument washers designed to clean medical and dental instruments are used in hospitals, dental schools, and in some smaller dental offices. Like ultrasonic cleaners, these washers remove bioburden, reduce the direct handling of instruments, and can clean loose instruments in baskets or instruments in cassettes. Three different sizes of instrument washers are available: a bench top model, a floor unit, and a large production model (Figure 11-5). These washers automatically provide cleaning and rinsing, and some (called washer-disinfectors) use hot water and achieve disinfection of the instruments with cleaning. One should be sure to use the detergent recommended by the washer manufacturer. Instrument washers are FDA-regulated medical devices. Household dishwashers are not recommended for use on contaminated instruments because their manufacturers did not design them for this purpose and have not sought FDA assurances of safety and effectiveness.

MANUAL SCRUBBING OF INSTRUMENTS
Scrubbing contaminated instruments by hand is dangerous even though the procedure is an effective method of removing debris, if performed properly. One should thoroughly brush all surfaces of all instruments while the instruments are either submerged in a cleaning solution to avoid spattering or at least scrubbed near the bottom of a deep sink. Use of a long-handled brush is best to keep the scrubbing hand as far away from the sharp instrument tips as possible. One follows the scrubbing with thorough rinsing with a minimum of splashing.
Routine manual scrubbing of instruments is not recommended because it requires maximum direct contact with the contaminated instruments, increasing the chances for cuts or punctures through the gloves. One also should not hand scrub instruments before processing them through ultrasonic cleaners or instrument washers. If the mechanical cleaners are working properly, hand scrubbing is not necessary.
Corrosion Control, Drying, and Lubrication
Instruments or portions of instruments and burs made of carbon steel will rust during steam sterilization. Examples include non–stainless steel cutting or scraping instruments such as burs, scalers, hoes, hatchets, the cutting surfaces of orthodontic pliers, and the grasping surfaces of forceps. Although one can spray rust inhibitors (e.g., sodium nitrite) on the instruments or use a dip to reduce rusting of some of these items, the best approach is not to process such items through steam. Instead one should dry the instruments thoroughly and use dry heat or unsaturated chemical vapor sterilization on the items most susceptible to rusting in steam. Another alternative is to switch to stainless steel–type instruments, if available.
Instruments to be processed through a steam sterilizer should at least be shaken to remove excess water or dried more thoroughly if they will be packaged in paper or paper-plastic sterilization wrap. This avoids accidental tearing of wet paper during packaging. Some hinged instruments may need to be lubricated to maintain proper functioning, but one should remove as much excess lubricant as possible before heat processing. Hinged instruments should be opened before packaging to facilitate access of the sterilizing agents to all parts of the instruments.
Packaging
Proper instrument processing is more than just sterilizing instruments between patients; it is delivering sterile instruments to chairside for use on the next patient. To do this, one must maintain the sterility of the instruments after they are processed through the sterilizer. Packaging instruments before processing through the sterilizer prevents them from becoming contaminated after sterilization during storage or when being distributed to chairside. Unpackaged instruments are exposed completely to the environment immediately after the sterilizer door is opened and can be contaminated by dust or aerosols in the air, by contact with moisture, by improper handling, or by contact with contaminated surfaces.
Packaging involves wrapping cleaned instrument cassettes or organizing cleaned loose instruments in functional sets and wrapping them or placing them in sterilization pouches, bags, trays, or cassettes. One adds biologic and chemical indicators (described later) during the packaging procedures.
GENERAL PACKAGING PROCEDURES
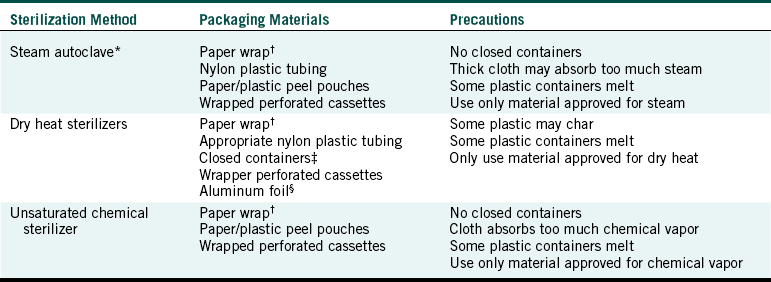
One should use only packaging material or open containers that have been designed for use in sterilizers and should use the appropriate sterilization packaging materials for the sterilization method being used (Table 11-2). Sterilization packaging materials are medical devices and are to be cleared by the FDA for safety and effectiveness. These materials must be shown to allow penetration of the sterilizing agents and to maintain sterility for at least 6 months before being cleared for sale in the U.S. Other general wrap, plastic bags, containers, or paper may melt, prevent the sterilizing agent from penetrating to the instruments inside, or release unwanted chemicals into the sterilizer chamber. Cloth should not be used as a sterilization wrap because it is not a barrier to microbes. Paper sterilization bags should not be used to package heavy or sharp instruments because they will commonly protrude through the paper. Such bags are better used for gauze pads, cotton rolls or pledgets, or paper products. Sterilization pouches, wraps, or bags should never be sealed with metal closures, including staples or anything that can puncture the material and breech sterility.
TABLE 11-2
Types and Use of Sterilization Packaging Materials
∗Flash (or unwrapped) sterilization cycles that operate at higher temperatures for shorter times indicate that the items being processed are not to be packaged.
†Heavy or sharp items may penetrate paper bags
‡Biologic indicators (spore tests) should be used to confirm that sterilizing conditions are achieved within any closed containers used.
§Aluminum foil will tear easily or be punctured.
Closed containers such as trays or pans with solid tops and bottoms, capped glass vials, or wrap such as aluminum foil should never be used to package items for sterilization in steam or unsaturated chemical vapor sterilizers. The steam or hot chemical vapor will not penetrate these containers or materials to reach the items inside. These containers may be appropriate for sterilization in dry heat, however, if sufficient exposure time is used. Sharps containers and biohazard bags containing regulated waste that will be sterilized before disposal must be left open during the sterilization process and then closed after removal from the sterilizer (see Chapter 16). If these containers are closed before heat-processing, the steam or chemical vapor will not reach the items inside the containers or bags. Not all sharps containers and biohazard bags can withstand the high temperature in heat sterilization. Those that can are usually marked “sterilizable.”
One can test penetration of steam, hot chemical vapor, or heated air through a particular type of packaging material or container by placing spore strips inside and processing through the sterilizer to make sure the spores are killed. This procedure is not recommended for testing filled sharps containers unless one takes special care to avoid injuries when placing and retrieving the spore strips.
WRAPPING OR BAGGING
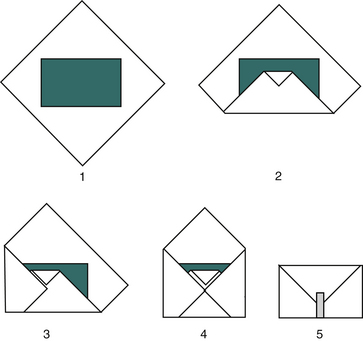
One can place functional sets of instruments on a small sterilizable tray and wrap the entire tray with sterilization wrap. Figure 11-6 diagrams the wrapping procedure. One should seal the wrap with tape that will withstand the heat process (e.g., autoclave tape).
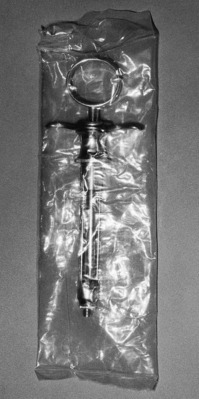
One also may place functional sets in see-through paper/plastic pouches that have clear plastic film on one side and heavy sterilization paper on the other side (Figure 11-7). These pouches are available in many different sizes, can be used in steam or unsaturated chemical vapor sterilizers, and have chemical indicators (discussed later) printed directly on the paper side of the pouch. Some pouches have chemical indicators inside the pouch and most are self-sealing; others need to be sealed with tape. The pouches are easy to open after sterilization by peeling the plastic away from the paper. A nylon type of clear plastic tubing comes on a roll and may be cut to varying lengths, filled with instruments, and heat sealed or taped. One can use one type in steam and another type in dry heat sterilizers (Figure 11-8). Paper bags are available, but one must take care because sharp and pointed instruments can puncture the paper easily, and paper becomes wet during steam sterilization and will tear if handled before drying. One should expel as much air as possible from the bags and pouches before sterilization.

USE OF INSTRUMENT CASSETTES
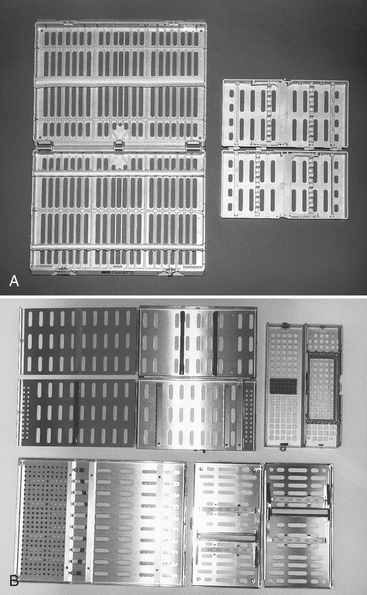
Numerous styles of cassettes are available that contain functional sets of instruments during use at chairside and during the precleaning, rinsing, and sterilizing processes (Figure 11-9). Use of cassettes reduces direct handling of contaminated instruments and keeps the instruments together through the entire processing of cleaning, sterilization, and presentation to the next patient. After ultrasonic cleaning, rinsing, and drying, one may add sterilizable supply-type items to the cassette and wrap, sterilize, and store or use the cassette immediately. Use of an instrument cassette system requires planning to ensure that the proper size of ultrasonic cleaner and sterilizer is available for processing. Cassettes are available in stainless steel, aluminum, and plastic/resin material that can withstand steam, chemical vapor, and dry heat sterilization. One should follow the cassette manufacturer’s recommendations for ultrasonic cleaning, wrapping or bagging, and sterilization. One should wrap cassettes before processing them through a sterilizer.
UNWRAPPED INSTRUMENTS
Sterilizing unpackaged instruments using the short exposure times (flash sterilization) is the least satisfactory approach to patient protection because it allows for unnecessary contamination before the instruments actually are used on the next patient. The CDC recommendations state that flash sterilization should not be used as a routine sterilization procedure for patient care items. If for some reason unwrapped instruments are sterilized (e.g., flash sterilization of an item in short supply that was dropped on the floor during patient care and will be used immediately), the instruments subsequently must be handled with special care to reduce poststerilization contamination as much as possible. If semicritical instruments will be used immediately or in a short time, they can be sterilized unwrapped and handled aseptically during removal from the sterilizer and transport to the point of use. Critical instruments intended for immediate reuse may be sterilized unwrapped, provided that the instruments are maintained sterile during removal from the sterilizer and transport to the point of use. One may accomplish this using sterile tongs to remove the instruments from the sterilizer and placing them in a sterile covered transport container. A carefully written protocol for minimizing the risk of poststerilization contamination of unpackaged instruments should be prepared and strictly followed. One also should monitor every flash sterilization cycle with mechanical, chemical, and biologic monitors using procedures described later in the chapter.
Sterilization
Precleaned, packaged instruments are ready for processing through a heat sterilizer. One should use only FDA-cleared medical devices for sterilization. Although regular cooking ovens or toaster ovens certainly get hot, they are not intended for use as sterilizers and have not gone through the same rigorous testing or quality assurance in manufacturing to show safety and effectiveness, as is true for sterilizers. Table 11-3 compares the three most common types of sterilizers used in dental offices. Most metal hand instruments and equipment can be sterilized in any of these three sterilizers. The most notable exceptions are handpieces, for they cannot be processed through dry heat. If there is ever a question, check with the manufacturer of the instrument.
TABLE 11-3
Comparison of Heat Sterilization Methods Using Small Office Sterilizers
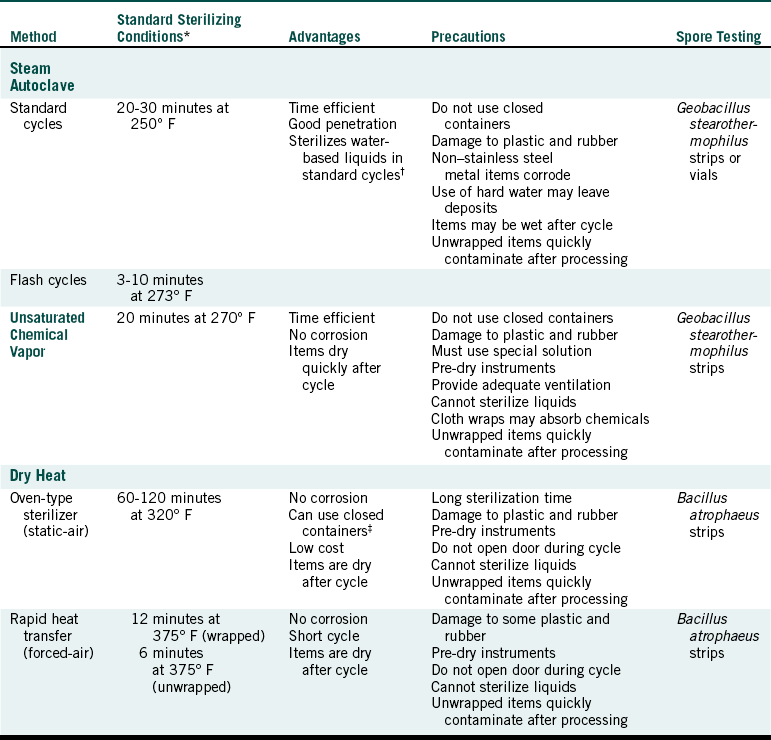
∗These conditions do not include warm-up or cool-down time, and they may vary depending on the nature and volume of the load and brand of the sterilizer. Sterilizing conditions actually achieved in the office should be defined by results of spore testing.
†To use purchased sterile irrigating fluids with certified sterility for clinical use is best.
‡Processing in closed containers should be checked carefully by spore testing.
Adapted from Miller CH: Take the safe approach to disease prevention, RDH 9:35, 1989; and Miller CH: Sterilization and disinfection: what every dentist should know, J Am Dent Assoc 123:26, 1992.
STEAM STERILIZATION
TYPES OF STEAM STERILIZERS: Steam sterilization involves heating water to generate steam in a closed chamber, producing a moist heat that rapidly kills microorganisms.
Boiling water (212° F or 100° C) is not hot enough to routinely kill all microbes, but steam under pressure can. In the steam sterilizer it is very important that the steam reaches all surfaces of the instruments to be sterilized. Since air can act as a barrier (insulator) around the instruments, it is important to remove the air from the sterilizer chamber or cassette. Any air pockets left there will never be heated to above 100° C. As the sterilizer heats up it boils the water and produces steam, which pushes the air out of an escape valve that then closes and allows a buildup of pressure. There are three types of steam sterilizers based on how air is removed from the chamber or sterilizing cassette.
• Gravity displacement steam sterilizer
As steam is generated it forces the air out the bottom of the chamber through a drain. When sterilizing temperatures are reached (e.g., 121° C), the drain closes and the temperature is held for the prescribed time.
• Vacuum pump sterilizer (type B sterilizer)
A vacuum pump removes air before steam is generated.
• Positive steam flush/pressure pulse sterilizer
A positive steam flush/pressure pulse sterilizer uses repeated sequences of steam flushes and pressure pulses to remove the air.
The heat, not the pressure inside a steam sterilizer, is what actually kills the microorganisms. In the absence of air in a closed system, the steam creates higher temperatures than steam coming from an open pan of boiling water, which allows the steam to be mixed with cooler air above the pan. Manufacturers set their sterilizers to reach maximum steam temperatures of about 250° F (121.1° C) or 273° F (134° C) with respective pressures of 103 or 206 kPa, which is the same as 15 or 30 psi.
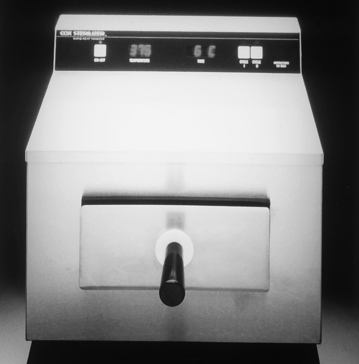
A typical dental office steam sterilizer (Figure 11-10) usually operates through four steps: the heat-up cycle, the sterilizing cycle, the depressurization cycle, and the drying cycle. After adding the water, one loads the chamber, closes the door, and turns on the unit, and the heat-up cycle begins to generate the steam and remove air. Once the sterilizing temperature is reached, the sterilization cycle begins and the temperature is held for the set time, usually ranging from 3 to 30 minutes. Typical preset sterilizing cycles are these:
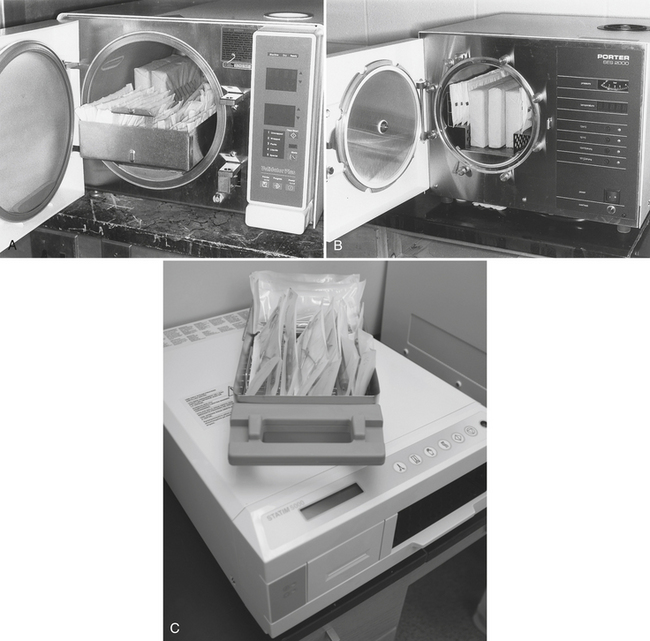
FIGURE 11-10 Examples of small office steam sterilizers. A, A model with a 10-inch diameter chamber. B, A model with an 8-inch diameter chamber. C, A model with a removable chamber.
At the end of the sterilizing cycle, the depressurization cycle begins and the steam is slowly released, with a decrease in temperature and pressure. At the end of this cycle, all of the items inside are wet, and the drying cycle (if available) is initiated. Drying packages before removing them from the sterilizer chamber is important (see Drying and Cooling later in this chapter). Some steam sterilizers pull in fresh air through a microbial filter (e.g., a high-efficiency particulate air filter) at the end of the sterilizing cycle to facilitate drying. Some sterilizers have a poststerilization vacuum cycle to facilitate drying, then pull in fresh air through a filter. Other sterilizers have an automatic open door drying cycle. This cycle maintains heat inside the chamber to evaporate the remaining water, but the chamber is open to the air so that water vapor can escape and the items can dry. With other sterilizers, one opens the door manually about ½ inch for a time to let the moisture escape.
Small office steam sterilizers usually have chambers of 8 to 12 inches in diameter or have a closable cassette containing the instruments that is inserted into the sterilizer, serving as the sterilizer chamber (see Figure 11-10, C). Some units also have printout devices that record the time, temperature, and pressure for mechanical monitoring of each sterilizing cycle to help maintain sterility assurance records.
Steam sterilizers used in hospitals, dental schools, and some large clinics have much larger chambers and are connected directly to a steam line, which eliminates the need for the sterilizers to generate their own steam, or are connected to a water line that allows them to generate their own steam (Figure 11-11). Most of these sterilizers have a vacuum system for air removal from the chamber so that when the steam enters, it has a better chance of coming into direct contact with everything in the chamber because no air is around the items that can insulate them from the hot steam. These units also have a poststerilization vacuum cycle that removes the steam and water after the sterilizing cycle to dry instrument packs. No matter what type of sterilizer one uses, one must be sure to follow all of the manufacturer’s directions for routine maintenance, loading, monitoring, and safe operation.
LOADING: One should load the sterilizer as instructed by the manufacturer and keep packs, pouches, or cassettes separated from each other so that steam has access to all package surfaces. One should place items on their edges as shown in Figure 11-10, A and B. Some sterilizers come with racks for packages that keep them separated and on their edge. One should not stack packages, pouches, or cassettes flat in layers as shown in Figure 11-12; stacking impedes steam circulation and air removal in the chamber.
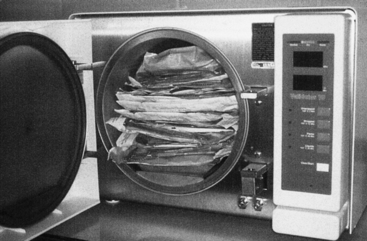
FIGURE 11-12 Do not load a sterilizer like this. Place the items on their edges as shown in Figure 11-10, A and B.
STERILIZING: One should follow the manufacturer’s instructions for the time and temperature of exposure and should remember that the sterilizing cycle does not begin until the chamber reaches a temperature of 250° F (121° C) or 273° F (134° C). The exposure times of about 3 to 30 minutes at these temperatures are set to include extra time to ensure microbial killing (safety factor). Thus use of shorter times reduces safety factors. This is of particular concern with flash sterilization cycles (defined previously) that operate in the range of 3 minutes at the higher temperature. These flash cycles originally were designed for use only in emergency situations, for example, when an expensive instrument in short supply is dropped on the floor while one is caring for a patient and the instrument has to be cleaned and resterilized quickly for continued use. Not only is the time shortened in a flash cycle but the item to be sterilized also is not wrapped or packaged in any way so that it can have immediate contact with the steam in this short cycle. Because the item is not wrapped, it is open to immediate recontamination on removal from the sterilizer. Thus one should not use flash sterilization of instruments routinely as a substitute for purchasing additional instruments or simply to reduce instrument processing time because this weakens sterility assurance and might jeopardize patient protection.
UNLOADING: Drying of packages inside the steam sterilizer is important to maintain the sterility of the instruments. Handling of wet packages can easily tear the paper, causing contamination of the instruments. Exposing wet packages to the environment outside the sterilizer also can cause wicking. Wicking is the process that allows bacteria and fungi to penetrate wet sterilization paper (paper/plastic peel pouches, sterilization wrap, or paper pouches). Wicking enables microbes from the air, spatter, dust, fingers, or other contaminated surfaces that contact the outer surface of a wet instrument package to be drawn through to the instruments inside. Thus one should not handle wet packs or expose wet packs to the office environment. One should let these packages dry inside the sterilizer before handling them.
UNSATURATED CHEMICAL VAPOR STERILIZATION
Unsaturated chemical vapor sterilization involves heating a special chemical solution in a closed chamber, producing hot chemical vapors that kill microorganisms. The chemical solution contains 0.23% formaldehyde (the active ingredient) and 72.38% ethanol plus acetone, ketone, water, and other alcohols. One should protect the skin and eyes from contact with the solution and should not breathe its vapors.
The unsaturated chemical vapor sterilizer is called the Thermo Scientific Harvey sterilizer and was formerly known as the Chemiclave (Figure 11-13). This sterilizer operates through four cycles: the heat-up/vaporization cycle, the sterilization cycle, the depressurization cycle, and an optional purge cycle. After one adds the special chemical solution, one loads the chamber by placing items on their edges, closes the door, and turns on the unit. The heat-up cycle causes the chemical solution to vaporize, yielding a pressure of about 172 kPa (25 psi), and when the temperature reaches about 270° F (132° C), the sterilizing cycle begins. The temperature is maintained for 20 minutes, and the chamber is depressurized, with a decrease in temperature.
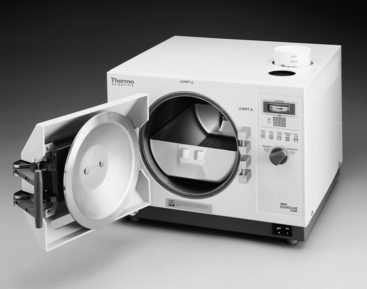
FIGURE 11-13 The unsaturated chemical vapor sterilizer. (Courtesy Thermo Fisher Scientific, Dubuque, Iowa.)
A positive feature of chemical vapor sterilization is that it greatly reduces or eliminates corrosion of carbon steel instruments. The amount of water in the chemical solution used is below the level that causes corrosion. For this reason, drying of the instruments before processing them in this sterilizer is important. Residual water remaining on wet instruments could override the rust-free process. Because the chemical solution used rapidly vaporizes in heat, items processed through this sterilizer are essentially dry at the end of the depressurization cycle. So there is no need for an additional drying cycle.
One should follow the manufacturer’s directions for packaging, loading, and operating and should wear gloves and protective eyewear when handling the special chemical solution. As with the steam sterilizer, leaving space around the packages being processed through the chemical vapor sterilizer is important to ensure adequate contact with the chemical vapors. One can achieve this best by placing packages or cassettes on their edges. One should not use closed containers; however, paper/plastic peel pouches, paper bags, or paper sterilization wrap indicated for this use in these units is appropriate for packaging. One should not use as packaging or attempt to sterilize linens, textiles, fabrics, or other absorbent materials such as paper towels. These materials may absorb the chemicals and reduce vaporization.
One should operate the sterilizer in a room that has at least normal ventilation. A purge system that collects chemicals from the vapors in the chamber at the end of the process can be purchased as an attachment to the sterilizer. This system greatly reduces the smell from the chemicals when one opens the door. In California, the chamber vapors are to be vented outside the office.
DRY HEAT STERILIZATION
Dry heat sterilization involves heating air with transfer of heat energy from the air to the instruments. This form of killing requires higher temperatures than steam or unsaturated chemical vapor sterilization. Dry heat sterilizers operate at 320° F to 375° F (160° C to 190° C), depending on the type of sterilizer. The main advantage of dry heat sterilization is that carbon steel items do not corrode as they do during steam sterilization.
STATIC-AIR TYPE OF DRY HEAT STERILIZER: This type of dry heat sterilizer is sometimes referred to as the oven type of dry heat sterilizer. The heating coils in the bottom or on the sides of these sterilizers cause the hot air to rise inside the chamber through natural convection (Figure 11-14). Heat energy from the static air is transferred to the instruments, and sterilization is reported to occur after 1 to 2 hours at 320° F (160° C). Because sterilization time may vary depending on the load, spore testing of these units is important (as is true for all types of sterilizers) to determine the proper exposure time under the conditions of actual use.
The heat-up time for this type of sterilizer may be 15 to 30 minutes from a cold start. Thus the sterilization cycle is not started until the proper temperature (e.g., 320° F or 160° C) is reached. The instruments then are held at this “sterilizing temperature” for the proper time. Because many of these units do not have automatic timers, one must include sufficient time for heat-up in the timer setting. After the sterilizing temperature is reached, one must not open the chamber door (e.g., to add forgotten items) until the scheduled time. If opened during the cycle, the temperature drops greatly and the cycle must be started again from time zero. One should follow the sterilizer manufacturer’s directions carefully for loading and operating these sterilizers. Again, one should not layer or stack items in the chamber but should place them on their edges.
The type of packaging or wrapping material used must be able to withstand the high temperatures of dry heat sterilizers. Some wraps appropriate for steam or chemical vapor sterilization may melt in dry heat units. One can use closed containers in dry heat sterilizers if sterilization inside the containers is confirmed routinely by biologic monitoring (spore testing). Although the static-air type of dry heat sterilizer requires longer sterilization times than the forced-air type described next, it is the least expensive.
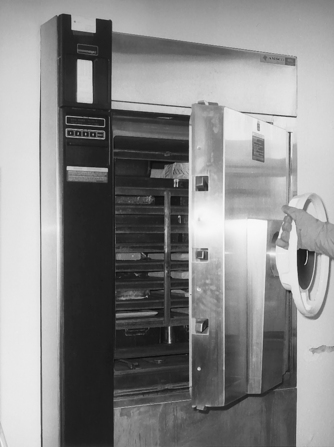
FORCED-AIR TYPE OF DRY HEAT STERILIZER: This type of dry heat sterilizer is sometimes referred to as a rapid heat transfer sterilizer. The sterilizer circulates the heated air throughout the chamber at a high velocity (Figure 11-15). This circulation permits a more rapid transfer of heat energy from the air to the instruments, reducing the time needed for sterilization.
One type of forced-air unit is a continuous heating type. One places the instruments into a preheated chamber and, when the unit reaches the factory-set temperature of 375° F (190° C), the selected exposure time for the sterilizing cycle automatically begins. One removes the instruments from the chamber at the end of the exposure period and allows them to cool. A second type of forced-air dry heat sterilizer begins from a cold (room temperature) start. After the chamber is loaded and the unit activated, the sterilizing cycle automatically begins when the unit reaches the factory-set temperature and continues for the selected exposure time. At the end of the exposure period, the heating elements automatically turn off and the unit circulates air in the chamber to cool the instruments.
Exposure time after the sterilizing temperature has been reached in these forced-air units ranges from 12 minutes for packaged items to 6 minutes for unpackaged items. As with the static-air dry heat sterilizers, important procedures to achieve successful sterilization are to keep the chamber door closed, use proper packaging material and routine spore testing, and follow manufacturer’s directions for loading and operating forced-air dry heat sterilizers.
Sterilization Monitoring
The goal of sterilization is the complete killing of all forms of microbial life on the items being processed. The only way to determine if all items processed through a sterilizer are truly sterile is to test each item for all living microorganisms. This is impossible because such tested items then could not be used for patient care. Thus no procedures or products can be used to prove sterility of the items absolutely. Therefore a degree of risk that a nonsterile item exists in a processed load is always present. The object is to keep this risk as low as possible by using properly designed sterilization equipment in a carefully controlled manner. With such efforts, achieving a 99.9999% or better probability of success is possible, which means the possibility of the presence of a nonsterile item is only 1 in 1,000,000. Sterilization monitoring is part of the overall controlled sterilization process needed to achieve this sterility assurance level.
Heat sterilization failures result when direct contact between the sterilizing agent and all surfaces of items being processed does not occur for the appropriate length of time. Several things can cause sterilization failures, including improper instrument cleaning and packaging and improper use and functioning of the sterilizer (Table 11-4). In many instances, one does not detect these failures unless one performs proper sterilization monitoring. Three forms of sterilization monitoring, all of which must be used to achieve sterility assurance, are biologic, chemical, and mechanical monitoring.
TABLE 11-4
Some Causes of Sterilization Failure
| Causes | Potential Problem |
| Improper Cleaning of Instruments | Debris may insulate organisms from direct contact with the sterilizing agent |
| Improper Packaging | |
| Wrong packaging material for method of sterilization | Prevents penetration of the sterilizing agent; packaging material may melt |
| Excessive packaging material | Retards penetration of the sterilizing agent |
| Cloth wrap in chemical vapor sterilizer | Cloth may absorb chemicals, preventing sufficient vaporization needed for sterilization |
| Closed container in steam or chemical vapor sterilizer | Prevents direct contact with the sterilizing agent |
| Improper Loading of Sterilizer | |
| Overloading | Increases heat-up time and retards penetration of the sterilizing agent to the center of the sterilizer load |
| No separation between packages or cassettes even without overloading | May prevent or retard thorough contact of sterilizing agent with all items in the chamber |
| Improper Timing | |
| Incorrect operation of the sterilizer | Insufficient time at proper temperature to achieve kill |
| Timing for sterilization started before proper temperature is reached in units with nonautomatic timers | Insufficient time at proper temperature to achieve kill |
| Dry heat sterilizer door opened during sterilizing cycle without starting cycle over | Insufficient time at proper temperature to achieve kill |
| Sterilizer timer malfunction | Insufficient time at proper temperature to achieve kill |
| Improper Temperature | |
| Incorrect operation of the sterilizer | Insufficient heat for proper time to achieve kill |
| Sterilizer malfunction | Insufficient heat for proper time to achieve kill |
| Improper Method of Sterilization | |
| Solutions or water processed in a chemical vapor sterilizer | Sterilizing agent will not penetrate the solution |
| Solutions or water processed in a dry heat sterilizer | Will boil over and evaporate |
| Processing of heat-sensitive item (e.g., some plastics) | Items will melt or be distorted |
BIOLOGIC MONITORING
Biologic monitoring (also called spore testing) provides the main guarantee of sterilization. Since we cannot test for the death of all microorganisms on all processed items, we select the most difficult microbe to kill and test for its death. Thus biologic monitoring involves processing highly resistant bacterial spores (see Figure 11-1) through the sterilizer and then culturing the spores to determine whether they have been killed.
TYPES OF BIOLOGIC INDICATORS: Biologic indicators (BIs) contain the bacterial endospores used for monitoring. The spores used are Geobacillus stearothermophilus, previously known as Bacillus stearothermophilus (for testing steam or chemical vapor sterilization), or Bacillus atrophaeus, previously known as Bacillus subtilis (for testing dry heat or ethylene oxide gas sterilization). No BIs are available to test liq-uid chemical sterilants or disinfectants routinely during use in the office.
Biologic indicators are packaged in different forms (Figure 11-16). Spore strips are paper strips about 1 inch long that contain one type of spore or may contain both types of spores (dual species BIs) that can be used to test all four types of sterilizers. Spore strips are enclosed in a protective glassine envelope, and after processing through the sterilizer, one removes the internal spore strip aseptically and places it in a tube of appropriate culture medium for incubation for 2 to 7 days at 55° C (for G. stearothermophilus) or at 37° C (for B. atrophaeus). If live spores are still present, they will grow and produce cloudiness or change the color of the growth medium, indicating sterilization failure. One can use spore strips to monitor all forms of heat sterilization.

FIGURE 11-16 Examples of biologic indicators. Self-contained spore vials used in steam sterilizers (left); spore strips in protective glassine envelopes used in steam, unsaturated chemical vapor, or dry heat sterilizers (right).
Another form of BI is called a self-contained vial and contains a spore strip or disk with an ampule of growth medium in a plastic vial with a vented cap to permit entrance of the sterilizing agent into the vial (see Figure 11-16). After processing through the sterilizer, one squeezes the vial or pushes down the cap to break the internal ampule, mixing the growth medium with the spores. One then incubates the vial at 55° C, and if live spores are still present, they will grow and change the color of the growth medium, indicating sterilization failure. One can use currently available self-contained vials to monitor steam sterilization.
USE OF BIOLOGIC INDICATORS: In hospital-type steam sterilizers, BIs are placed inside of a standardized test pack of towels, processed through the sterilizer, and analyzed. Test packs are still under development for use with small office steam, chemical vapor, and dry heat sterilizers. Until such test packs are developed and verified, routine biologic monitoring of small office sterilizers should involve placement of the BI inside one of each type of package (pouch, bags, pack, cassette) processed through the sterilizer. A control BI that is not processed through the sterilizer but is otherwise handled the same way as the test BI must be analyzed along with the test BI that is processed through the sterilizer. The control BI should yield growth of the spores, confirming that if live spores are present, they can grow and be detected.
The CDC, American Dental Association, Organization for Safety and Asepsis Procedures, and Association for the Advancement of Medical Instrumentation recommend at least weekly spore testing of each sterilizer in the office. Spore tests also should be performed with every flash sterilization cycle. Some states have passed laws requiring routine spore testing of dental office sterilizers, including California, Florida, Indiana, Ohio, Oregon, and Washington. Nonroutine use of biologic monitoring is also important, as described in Table 11-5.
TABLE 11-5
Spore Testing of Small Office Sterilizers
| When | Why |
| Once per week | To verify proper use and functioning |
| Whenever a new type of packaging material or tray is used | To ensure that the sterilizing agent is getting inside to the surface of the instruments |
| After training of new sterilization personnel | To verify proper use of the sterilizer |
| During initial uses of a new sterilizer | To make sure unfamiliar operating instructions are being followed |
| First run after repair of a sterilizer | To make sure that the sterilizer is functioning properly |
| With every implantable device and hold device until results of test are known | To take extra precaution for sterilization of item to be implanted into tissues |
| After any other change in the sterilizing procedure | To make sure change does not prevent sterilization |
Reprinted with permission from Miller CH, Palenik CJ: Sterilization, disinfection and asepsis in dentistry. In Block SS, editor: Sterilization, disinfection and preservation, Philadelphia, 1991, Lea & Febiger.
ANALYSIS OF BIOLOGIC INDICATORS: Proper analysis of a microbiologic test such as use of a BI involves confirming that the test organisms were alive before the test (by using a control BI that is not processed through the sterilizer but is handled like the test BI in every other way) and confirming that organisms that grow after the test BI has been processed through the sterilizer are indeed the actual test microorganisms and not just a contaminant from hands or the air that accidentally entered the growth medium before incubation. Thus control BIs should always yield growth of the spores, and growth from test BIs should be gram-positive bacilli when a sample of the growth medium is smeared on a glass slide, gram-stained, and observed at a magnification of about 1000 times under the microscope. These techniques, with use of a growth medium that has been verified as being sterile to begin with and able to support growth of the test spores, confirm the reliability of each biologic monitoring test. The equipment and supplies necessary to perform these verification techniques are not commonly found in dental offices. Self-contained vials also do not lend themselves easily to microbiologic analysis of a positive test BI through sampling of the growth medium inside the capped vial.
MANAGEMENT OF BIOLOGIC MONITORING: Two acceptable approaches to biologic monitoring are in-office monitoring and mail-in monitoring (Procedure 11-2).
In-office monitoring involves purchasing the appropriate supplies and equipment, analyzing the test and control BIs in the office, and preparing appropriate records. One can monitor steam sterilizers in the office by purchasing a self-contained vial type of BI of G. stearothermophilus and a 55° C incubator available from the BI supplier. One must take care to handle the BIs aseptically and to perform the incubation and analysis as described in the manufacturer’s directions. Records of the testing should include the date of the test, type of sterilizer, time and temperature of the sterilizing conditions, type of packaging material (packs, pouches, cassettes), location in the sterilizer, results of the test and of the control BI, and name of whoever conducted the test. Microbiologic confirmation of growth in the self-contained vial should not be attempted in the office unless specific training to do so has been provided. Self-contained plastic vial BIs are not currently available for in-office testing of chemical vapor or dry heat sterilizers. One can use spore strip types of BIs to test these sterilizers and the steam sterilizer, but this requires the purchase of separate tubes of growth medium plus the incubator and even greater care to avoid contamination of the growth medium used for analysis.
Mail-in monitoring involves the office subscribing to a mail-in sterilization monitoring service available from private companies or through some dental schools. These services can monitor any type of sterilizer and provide the office with the appropriate BIs (usually spore strips) and instructions for their use. After processing through the sterilizer, one mails the BIs to the service where they are analyzed, and a report of the results is sent to the office for record keeping. If the service detects a sterilization failure, the service usually notifies the office by phone. The most complete mail-in services provide a control BI and two test BIs for each test. Some also provide newsletters on asepsis, a certificate of participation, and a phone number to call with questions about spore testing or any aspect of office infection control. Mail-in services should use FDA-cleared BIs, perform microbiologic confirmation of results, and use a growth medium that has been verified for sterility and growth promotion.
WHAT TO DO AFTER A STERILIZATION FAILURE: The desired outcome of biologic monitoring is the killing of test spores. Failure to kill the spores (i.e., having a positive spore test) is a significant event that requires immediate action so as not to compromise patient safety. However, before one can put this action program in place, the office has to develop confidence in the biologic monitoring procedure used, so that when a positive spore test result occurs, the validity of the test itself is not questioned. One can elicit confidence in the spore-testing procedures by using the same four steps described previously to achieve sterility assurance (p. 133). One should ask the following questions and act accordingly to ensure the correctness of the spore testing procedure:
• Were the proper BIs used and were they stored properly as described on their labels?
• Did all of the BIs used in the testing have the same manufacturer’s lot number?
• Were the BIs used before their expiration date?
• Were the BIs handled properly before and after processing through the sterilizer?
• Were all the BIs mailed back to the service together or analyzed in the office together?
• Were the BIs incubated for the correct time at the correct temperature?
• Did the unprocessed control BI from the same lot number show growth (yield a positive result) after culturing?
• If a mail-in service is used, did the service confirm the positive result by microbiologic means?
When a spore test is positive, indicating a sterilization failure, one should follow the steps given in Procedure 11-3.
CHEMICAL MONITORING
Chemical monitoring uses heat-sensitive chemicals (rather than live spores as in biologic monitoring) to assess the physical conditions during the sterilization process. Chemical monitoring involves the use of indicators that change color or physical form when exposed to high temperatures or to certain combinations of time, temperature, and the presence of steam. Examples include autoclave tape; special markings on pouches and bags; chemical indicator strips; and tabs, packets, or tubes of colored liquid (Figure 11-17).
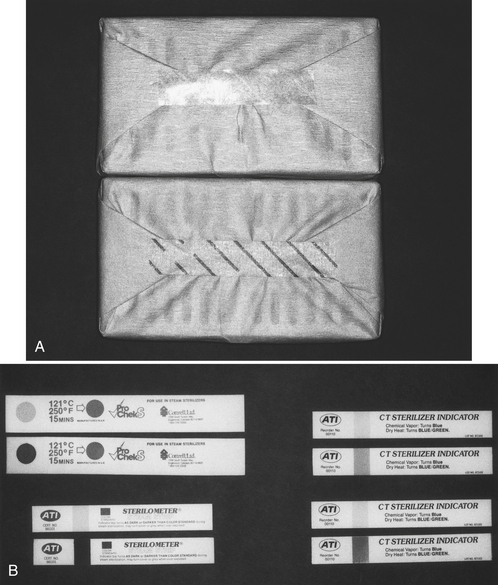
FIGURE 11-17 Examples of chemical indicators. A, Autoclave tape before being heat processed (top), and autoclave tape after being heat processed (bottom). B, Other chemical indicators. The top of each pair shows appearance before heat processing, and the bottom shows the color change after heat processing.
Two types of chemical indicators exist. One indicator changes color after a certain temperature has been reached (e.g., autoclave tape and special markings on pouches and bags). This type of indicator is used commonly as an external indicator on the outside of every pack, pouch, or cassette to indicate that the item has at least been processed through a heat sterilizer. This identifies items that have been heat-processed and items that have not, for otherwise they may look identical. This differentiation prevents the accidental clinical use of unprocessed items. These indicators do not indicate that sterilization has been achieved or even that a complete sterilization cycle has occurred. A sterilizer could heat up to the proper temperature, causing a change in the chemical indicator, and then immediately malfunction, preventing sterilization, but the indicator already would have changed color. Thus these indicators demonstrate only that an item has been exposed to a certain temperature for some unknown length of time.
The second type of chemical indicator is called an integrated indicator that changes color or form slowly, responding to a combination of time and temperature or time, temperature, and the presence of steam. These indicators are used commonly on the inside of every pack, pouch, or cassette to assess whether the instruments have been exposed to sterilizing conditions. Procedure 11-4 summarizes use of chemical indicators.
MECHANICAL MONITORING
Mechanical monitoring of the sterilization process involves observation of the gauges and displays on the sterilizer and recording of the sterilizing temperature, pressure, and exposure time. Although correct readings do not guarantee sterilization, incorrect readings can give the first indication that a problem likely has occurred. Many small office sterilizers now have recording devices that print out these parameters, providing a mechanical monitoring record for each run (Figure 11-18). One must remember that sterilizer gauges and displays indicate the conditions in the sterilizer chamber rather than conditions within the packs, pouches, or cassettes being processed. Thus mechanical monitoring may not detect problems resulting from overloading, improper packaging material, or use of closed containers.
COMPLETE MONITORING PROGRAM
Appropriate sterilization monitoring (as recommended for dentistry by the CDC) involves use of a chemical indicator on the inside and outside (if the internal indicator cannot be seen from the outside) of each pack, pouch, and cassette. Each load should undergo mechanical monitoring, and biologic monitoring of each type of pack, pouch, or cassette should be performed at least once a week. One should maintain records of all three types of monitoring to document sterility assurance. Those who may investigate the infection control practices in the office may request such information, which one also can use to demonstrate the use of safe practices to curious patients. Mechanical monitoring alone will not detect all of the potential problems that may cause sterilization failure. Spore testing provides the main guarantee of sterilization but is performed only periodically and takes 2 to 7 days before the results are available. Use of internal chemical indicators in every pack, pouch, and cassette provides an immediate indication as to whether the sterilizing agent has penetrated the packaging material and actually reached the instruments inside. If the internal chemical indicator displays the appropriate color or form, and mechanical and biologic monitoring has not indicated any problems, the instruments are considered safe to use. Use of external chemical indicators (or internal chemical indicators that can be seen from the outside) on every pack, pouch, and cassette helps manage and maintain clear separation of processed and nonprocessed items, eliminating the possibility of using nonsterilized instruments.
Handling of Processed Instruments
One should maintain instrument sterility until the sterilized packs, pouches, or cassettes are opened for use at chairside. Thus proper handling of processed items is an important part of the sterility assurance program for the office.
DRYING AND COOLING
Packs, pouches, or cassettes processed through small office steam sterilizers will be wet at the end of the sterilizing portion of the cycle and must be allowed to dry before handling. This is particularly true when paper or paper/plastic pouches are used because the wet paper may “draw” microorganisms through the wrap or be torn easily when handled. Most steam sterilizer manufacturers provide drying instructions, and some even may have a programmed closed-door or open-door drying cycle, as described earlier.
Hospital-type and some small office steam sterilizers have a poststerilization vacuum cycle that removes the moisture by evacuating the chamber at the end of the cycle. Unsaturated chemical vapor and dry heat sterilizers yield dry packs after the sterilization cycle.
Cooling of warm packs should be done slowly to avoid the formation of condensation on the instruments. One should not place warm packs under air-conditioning or cool-air vents or transfer them to cold surfaces. Use of a fan or blower in the sterilizing room to dry or cool down instruments is not recommended; this causes undue circulation of potentially contaminated room air around the packs.
If one processes unpackaged instruments through the sterilizer (e.g., in an emergency “flash” sterilization cycle), they must be covered immediately or otherwise be protected from the air and from coming into contact with contaminated surfaces before presentation at chairside.
STORAGE
One should keep handling of sterile packages to a minimum, and those that are dropped on the floor, are torn, are compressed, or have become wet must be considered as contaminated. One also must act to prevent the mingling of sterile packs with nonsterile packs. External chemical indicators serve as the primary control measure to identify items that already have been processed through the sterilizer.
Storage of sterile packs for more than a few days at the most is uncommon in dentistry because a short turnaround time reduces the total number (and expense) of instrument sets needed. Nevertheless, proper sterility assurance dictates the need for protection of sterile instruments from recontamination, regardless of the time between sterilization and reuse at chairside.
One should store sterile packages in covered or closed cabinets in dry, enclosed, low-dust areas protected from obvious sources of contamination. One should store sterile packages away from sinks and sewer and water pipes and a few inches away from ceilings, floors, and outside walls. This prevents packages from becoming wet with splashed water, floor-cleaning products, and condensation on pipes or walls. One also should store the packages away from heat sources that may make the packaging material brittle and more susceptible to tearing or puncture.
Shelf life of sterile packages is the period of time during which sterility is assumed to be maintained. If sterile packages become wet or are torn or punctured, sterility is compromised. Unwrapped instruments have no shelf life. Because shelf life primarily depends on maintaining the integrity of the packaging material, no exact time exists for which all instrument packages may be stored safely. Thus shelf life is mainly a function of how carefully the packages are handled and stored. This concept is referred to as event-related storage. One should use the “oldest” sterile packs first, as long as the packaging material is intact. This is referred to as the “first in, first out” system of stock rotation. FDA-cleared packaging materials have been shown to maintain sterility of the contents for a minimum of 6 months under ideal storage conditions. But a maximum storage time in the office might be considered as 1 month, at which time all unused items would be unpackaged, repackaged with new packaging material, and reprocessed through the sterilizer.
A key point in sterility assurance and event-related storage is to examine each pack, pouch, and cassette carefully before opening it to ensure that the barrier wrap has not been compromised during storage.
DISTRIBUTION
One can place instruments from sterile packs or pouches on sterile, disposable, or at least cleaned and disinfected trays at chairside. Sterilized instrument cassettes are distributed to and opened at chairside. Placement of unwrapped or wrapped instruments in drawers or cabinets for direct use at chairside during patient care is not recommended. The drawers or cabinets and their contents are contaminated too easily from retrieval of items with saliva-coated fingers and from contaminated aerosols. This type of storage/distribution system at chairside for instruments or supplies is fraught with great potential for cross-contamination.
OPENING OF INSTRUMENT PACKAGES
For routine dentistry, one should check instrument packages at chairside for tears or punctures and, if intact, should open the packages without touching the instruments inside. As described in Chapter 10, one should open the packages with clean, ungloved hands after the patient is seated and then put on gloves just before first contact with the patient’s mouth. Alternatively, one may open the packages with ungloved hands and immediately cover the instruments with a sterile drape before seating the patient. If one opens instrument packages with gloved hands, the gloves will become contaminated with any microorganisms on the outside of the packaging. If one must manipulate instruments just before patient treatment begins (e.g., arranging bagged instruments on the bracket table), one should handle them with sterile tongs. Prearranging instruments on packaged trays or in cassettes before placing them into the sterilizer eliminates the need to manipulate the instruments after sterilization. The trays or cassettes hold the instruments at chairside.
For surgery, the instruments commonly are double wrapped to enhance sterility maintenance. Any contamination of the packaging during storage and transport to the surgical operatory can be removed by removing the outer packaging. On removing the outer packaging, one may touch and open the protected inner packaging with gloved hands.
DESIGN OF THE INSTRUMENT PROCESSING AREA
One should accomplish three goals when designing or organizing an instrument processing area in a dental office:
• Locate in a low-contamination low traffic environment.
• Base physical design on work flow.
• Separate “clean” instruments from “dirty” instruments (sterile from contaminated).
General Location and Utilities
The instrument processing area should be located centrally, if possible, for easy access from all operatories, but it should be away from traffic flow. That is, the area should be a facility dedicated only to instrument processing, be physically separated from the operatories and dental laboratory, and not be part of a common walkway. The processing area should not have a door that opens to the outside and should not have open windows because these enhance entrance of dust. The processing area should have good ventilation to control the heat generated by the sterilizers and should allow good access to the room air filters for frequent changing. The size of the facility must accommodate all the equipment and supplies needed to perform instrument processing, such as those listed in Table 11-6. Utilities should include multiple outlets and proper lighting, water, and an air line and vacuum line for lubricating and flushing high-speed handpieces. The cabinetry should include chemical- and heat-resistant countertops wide enough for sterilizers and other equipment, a deep sink with hands-free controls for instrument rinsing, closed storage areas, and (if space permits) a separate handwashing sink with hands-free controls. Accessories should include a hands-free soap dispenser and foot-operated or other hands-free trash receptacle. The flooring should be an uncarpeted, seamless hard surface.
TABLE 11-6
Equipment and Supplies Used in the Instrument Processing Facility
| Item | Use |
| Decontamination Area | |
| Gloves, mask, eyewear, clothing | Prevent exposure to contaminated materials |
| Sharps container | Receives any sharps not discarded in the operatory |
| Tongs | Picks up sharps |
| Biohazard bags | Receives nonsharp solid regulated waste |
| Trash receptacle | Receives nonregulated waste |
| Instrument cleaner | Ultrasonically cleans or washes instrument |
| Instrument detergent | Use in instrument cleaner |
| Cleaners/lubricants | Clean/lubricate handpieces |
| Air line and vacuum line | Flush materials out of handpieces into vacuum line |
| Sink with hands-free faucets | Handwashing and instrument rinsing |
| Disinfectant and towels | Disinfect countertops and ultrasonic cleaner chamber |
| Instrument scrub brush | Clean occasional item still soiled after mechanical cleaning |
| Handwashing dispenser and detergent | Wash hands |
| Drainer | Dry instruments/cassettes after cleaning and rinsing |
| Signs identifying decontamination area | Prevent intermingling of sterile and contaminated items |
| Packaging Area | |
| Rust inhibitor | Retards corrosion of non–stainless steel items in steam |
| Replacement instruments and burs | Replace damaged items in instrument setups |
| Instrument cassettes | Hold instruments during processing and use |
| Gauze pads | Place in cassettes or packages before heat processing |
| Biologic indicators (spore tests) | Monitor the use and functioning of the sterilizers |
| Chemical indicators | Monitor the sterilization process |
| Instrument packaging materials | Protect instruments from contamination after sterilization |
| Heat sealer | Seal nylon plastic instrument packaging tubing |
| Heat-resistant (e.g., autoclave) tape | Seal wrapped cassettes or other instrument packages |
| Signs identifying packaging area | Prevent intermingling of sterile and contaminated items |
| Sterilizing Area | |
| Sterilizers | Heat process cleaned and packaged instruments |
| Distilled water or special solution | Use with sterilizer |
| Liquid sterilant (e.g., glutaraldehyde) | Kill microorganisms on items that cannot be heat processed |
| Covered container for liquid sterilant | Use with liquid sterilant |
| Glutaraldehyde monitor | Estimates the potency of the glutaraldehyde sterilant |
| Handpiece lubricant | Lubricates sterilized handpieces |
| Air line and vacuum line | Flush excess lubricant from handpieces into vacuum line |
| Incubator | Cultures spore tests for in-office analysis |
| Enclosed storage | Store sterile instruments and clean disposable items |
| Signs identifying sterilizing area | Prevent intermingling of sterile and contaminated items |
Work Flow Design
Just about any room or group of adjacent rooms can be used for instrument processing if space is sufficient; the utilities, flooring, and ventilation are appropriate; and the placement of the equipment in the room or rooms is based on the work flow pattern. One approach to the general layout of the instrument processing area is to have a long, narrow room with doors at each end and a linear work flow proceeding from one end to the other. Figure 11-19 shows a U-shaped work flow pattern in a room with a single door.
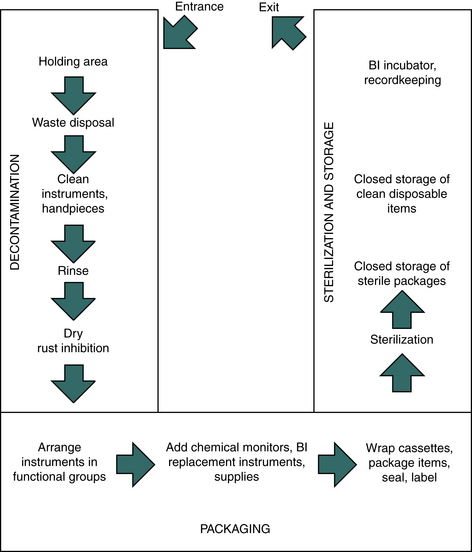
FIGURE 11-19 U-shaped sterilization room work flow pattern. Work flow proceeds through the area from decontamination to packaging to sterilization and storage.
A key aspect in design of the processing area is to separate the three main areas of activity:
Ideally, three adjoining rooms should be separated physically, but such space seldom is available in a dental office. Usually a single room is involved and the separation is by space designation, using signs rather than walls or partitions. Proper placement of signs (e.g., “Contaminated Items Only,” “Cleaned Items Only,” “Sterile Items Only,” “Decontamination Area,” “Clean Packaging Area,” “Sterilization Area”), with training on the exact meaning of the signs used, can work well in preventing the intermingling of contaminated and sterile items.
As shown in Table 11-6, the decontamination area contains the items needed for personal protection, waste disposal, and cleaning and rinsing of instruments and handpieces. The packaging area contains the materials and space for rust inhibition, wrapping and bagging, addition of spore tests and chemical indicators, and addition of replacement instruments, burs, and supplies. The sterilizing area contains the sterilizers and related supplies and incubators for analyzing spore tests in the office and can contain enclosed storage for sterile items and disposable (single-use) items.
If one uses carts for distribution and collection of instruments to and from the operatories, one also should identify the carts for “Contaminated” or “Sterile” items and should clean them properly and disinfect or cover them with barriers between uses.
INSTRUMENT SHARPENING
Instrument sharpening is difficult to manage from an infection control point of view. Sharpening of contaminated instruments presents a risk for disease spread through accidental cuts or punctures. The greatest safety is achieved by cleaning, sterilizing, sharpening, and resterilizing the instruments. If instruments (e.g., scalers) need to be resharpened while being used on a patient, the best (and safest) option is to provide several scalers in each instrument setup rather than to sharpen contaminated scalers. If one must sharpen instruments at chairside, one should provide cleaned and sterilized sharpening stones for each patient. One must take great care when sharpening a contaminated instrument and should consider taping the sharpening stone to the countertop and using one hand to sharpen the instrument.
INSTRUMENT PROTECTION
Instrument processing can cause damage to instruments, but one can take several steps to keep damage at a minimum (Box 11-2).
Stainless steel instruments are least affected by corrosion from moisture and heat, but some dentists prefer instruments with carbon steel rather than stainless steel because carbon steel cutting surfaces may retain a sharp edge longer. Unfortunately, carbon steel items corrode and lose sharpness during steam sterilization. For example, tungsten carbide burs lose about 64% of their cutting efficiency after steam sterilization. Use of dip or spray rust inhibitors usually reduces corrosion, but with repeated steam sterilization cycles, the items will be damaged. Carbon steel items are sterilized best in a non–corrosion-producing environment such as dry heat or unsaturated chemical vapor sterilizer. One should make every effort to rinse away or remove biologic debris, disinfecting or sterilizing solutions, chloride salts, and highly alkaline detergents before heat processing instruments. These substances may cause pitting or staining of metal surfaces, which can be aggravated with heat. Packaging together of items of widely dissimilar metals during heat processing is not prudent because of a potential for electrolytic damage to instrument surfaces. However, this procedure is difficult to accomplish practically because of the wide variety of instruments needed for single procedures.
HANDPIECE ASEPSIS
One should clean, package, and sterilize high-speed handpieces, reusable prophylaxis angles, contra-angles, nose cones, and slow-speed handpiece motors by heat processing between patients. Patient material possibly may enter the internal portions of handpieces and their attachments during use. Likewise, these materials may exit into the mouth of the next patient if this equipment has not been decontaminated properly. Thus decontamination procedures must address the outside and the inside of handpieces and other intraoral devices that can be removed from the air and water lines of the dental unit. Procedure 11-5 presents guidelines for processing handpieces.
Although some dental units contain antiretraction valves in their water lines that prevent retraction of fluids back into the high-speed water spray handpieces and air/water syringe when they are turned off, these valves periodically fail. Thus one should flush the high-speed handpiece, air/water syringe, and ultrasonic scalers for about 25 seconds at the completion of each appointment. This helps flush out any foreign materials and brings fresh water (and chlorine if city water) into the system. One also should check the functioning of the antiretraction valves at least every month.
One should carefully follow the handpiece manufacturer’s directions for cleaning, lubricating, and heat processing, which is essential to achieve maximum longevity of the working parts. As with any decontamination process, one should wear personal protective equipment such as gloves, mask, protective eyewear or face shield, and protective clothing during these procedures. Also, when flushing out cleaner or lubricant, one should spray into a vacuum line or container to avoid spread of potentially contaminated aerosols. Handpiece cleaning equipment that automatically cleans, flushes, and captures the flushed aerosols is available.
STERILIZATION OF HEAT-LABILE ITEMS
Although most reusable instruments can withstand heat processing, a few plastic-type items such as certain rubber dam frames, shade guides, rulers, and x-ray collimating devices will be damaged by the heat. Thus one can use a liquid sterilant/high-level disinfectant (e.g., 2.0% to 3.4% glutaraldehyde; a special 7.0% hydrogen peroxide) to sterilize these items. Sterilization in a liquid sterilant/high-level disinfectant requires an extended contact time that ranges from 3 to 12 hours, depending on the product (e.g., glutaraldehyde requires a 10-hour contact time, anything less than 10 hours is disinfection, not sterilization). Use of a liquid sterilant/high-level disinfectant or other liquid germicide to disinfect heat-tolerant instruments is not recommended. Procedure 11-6 gives step-by-step procedures for the use of a liquid sterilant.
OTHER METHODS OF STERILIZATION
The use of ethylene oxide gas is a recognized method of sterilization. The advantage is that the method operates at low temperatures, permitting sterilization of plastic and rubber items that melt in heat sterilizers. Disadvantages are that this method requires from 4 to 12 hours for sterilization, depending on the sterilizer model; requires at least 16 hours of poststerilization aeration to remove gas molecules that have bound to plastic and rubber surfaces; is ineffective on wet items; and is potentially toxic if not handled properly.
A more recently developed low-temperature sterilizer involves vaporized hydrogen peroxide gas plasma. Unfortunately, these units are still expensive for use in dental offices.
Bead “sterilizers” provide a form of dry heat processing. These small, flower pot–shaped units contain an electric heater that heats up glass beads (or sand or salt) to temperatures near 425° F. The tips of instruments, endodontic files, and broaches then are immersed into the hot beads for 25 to 30 seconds. However, the temperature varies at different levels in the beads, and biologic indicators are not available for monitoring these units. Thus one should not use bead sterilizers as a means of sterilizing instruments for reuse on another patient.
Hot oil sterilizers are not commonly used today but consist of a pan of mineral oil and a heater. As with bead sterilizers, uneven temperatures occur in the oil, and no method exists for routinely verifying effectiveness. Thus one should not use the hot oil bath as a means of sterilizing instruments for reuse on another patient.
PROPERTIES OF DECONTAMINATION AND STERILIZATION EQUIPMENT AND PRODUCTS
Boxes 11-3 and 11-4 give properties to consider when selecting cleaners, sterilizers, instrument cassettes, packaging materials, spore testing services, and in-office monitoring.
American Dental Association. Councils on Scientific Affairs and Dental Practice: Infection control recommendations for the dental office and the dental laboratory. J Am Dent Assoc. 1996;127:972.
Centers for Disease Control and Prevention. Guideline for infection control in dental health-care settings, 2003. MMWR. 2003;52(No. RR-17):1–68.
Chin, J.R., Miller, C.H., Palenik, C.J. Internal combination of air driven low-speed handpieces and attached prophy angles. J Amer Dent Assoc. 2006;137:1275–1280.
Herd, S., Chin, J., Palenik, C.J., Ofner, S. The in vivo contamination of air-driven low-speed handpieces with prophylaxis angles. J Am Dent Assoc. 2007;138:1360–1365.
Miller, C.H. Cleaning, sterilization and disinfection: the basics of microbial killing for infection control. J Am Dent Assoc. 1993;124:48–56.
Miller, C.H. Infection control assurance. Dent Prod Rpt. 2002;36:92–98.
Miller, C.H. Instrument processing: the cycle made simple. Dent Prod Rpt. 2003;37:92–98.
Miller, C.H. Make clean routine. Dent Prod Rpt. 2008;42:84–87.
Miller, C.H. Select and protect: Part II. Dent Prod Rpt. 2007;41:132–136.
Miller, C.H. Instrumentally clean, part 1. Dent Prod Rpt. 2008;42:120–124.
Miller, C.H. Strategies for infection control in dentistry. In ADA guide to dental therapeutics, ed 3. Chicago: ADA Publishing, 2003. pp 551–566
Miller, C.H., Hardwick, L.M. Ultrasonic cleaning of dental instruments in cassettes. Gen Dent. 1988;36:31–36.
Miller, C.H., Palenik, C.J. Sterilization, disinfection, and asepsis in dentistry. In: Block S.S., ed. Sterilization, disinfection, and preservation. ed 5. Philadelphia: Lea & Febiger; 2001:1049–1068.
Miller, C.H., Riggen, S.D., Sheldrake, M.A., Neeb, J.M. Presence of microorganisms in used ultrasonic cleaning solutions. Am J Dent. 1993;6:27–31.
Spaulding, E.H. Chemical disinfection of medical and surgical materials. In: Lawrence C.A., Block S.S., eds. Disinfection, sterilization and preservation. Philadelphia: Lea & Febiger; 1968:517–531.
Review Questions
______1. How should one load a sterilizer?
a. Place the packages on their edges.
b. Pack the packages tight to eliminate as much air as possible.
______2. The rationale for packaging instruments before placing them into a sterilizer is to:
b. maintain their sterility after sterilization
c. prevent rusting of carbon steel items
d. reduce by half the time needed at the sterilizing temperature
______3. Spores of Geobacillus stearothermophilus are used to monitor what types of sterilizers?
______4. What type of sterilization causes carbon steel instruments to rust?
______5. How should one sterilize a plastic rubber dam frame that melts at 100° C?
______6. Spores of Bacillus atrophaeus are used to monitor what type of sterilizer?
______7. What information does a chemical indicator provide?
c. that an item has been packaged properly
d. that an item has been processed through a heat sterilizer
______8. The leading cause of sterilization failure is:
a. not pushing the correct buttons to operate the sterilizer
b. using the wrong type of sterilizer for heat-sensitive items
______9. The purpose of an aluminum foil test is to:
a. see if the steam in a sterilizer is at the proper temperature
b. measure the strength of a liquid sterilant/high-level disinfectant
c. assess the kill of bacterial spores in a sterilizer
d. determine whether an ultrasonic cleaner chamber has an even distribution of sonic energy
______10. The main rationale for cleaning instruments before sterilization is to:
a. give the sterilization procedure the best chance to work
b. prevent the formation of water spots on the instruments
______11. Placing wet instruments into a dry heat sterilizer or an unsaturated chemical vapor sterilizer can:
______12. Instrument packages are wet after the sterilization portion of which of the following sterilizer cycles?
______13. Wet packages should be allowed to dry inside the sterilizer because paper packaging material may tear on handling and because:
______14. A high-speed handpiece that is destroyed at 300° F cannot be sterilized in:
______15. The active ingredient in the unsaturated chemical vapor sterilization process is:
______16. The first thing to do after a sterilization failure is to:
a. retest the sterilizer with biologic indicators
b. take the sterilizer out of service for processing patient care items
______17. The sterilization process is described best as being:
______18. When analyzing spore tests, Geobacillus stearothermophilus is incubated at what temperature?
______19. What sterility assurance procedure should be performed while setting up for the next patient?
a. The instrument packages should be opened and the instruments should be wiped with alcohol.
b. The instrument packages should be observed for tears or punctures before being opened.
c. The outside of the instrument packages should be wiped with alcohol to remove dust.
______20. Critical patient care items are to be cleaned and ______________ for reuse.