10 American neuromuscular therapy
History
As detailed in Chapter 2, neuromuscular therapy (NMT) evolved out of the work of a number of clinicians working in both Europe and the USA.1 The ‘evolutionary’ development of NMT produced some confusion regarding the name itself. In its earlier stages, American ‘NMT’ represented neuromuscular ‘therapy’, whereas, in Europe, the preferred term had been neuromuscular ‘technique’. In the past decade, as a number of methods emerged, practitioners began to use these two terms interchangeably. Distinctions between the various NMT methods still exist, although there is less separation with regards to the use of the terms ‘therapy’ and ‘technique’, apart from osteopathic training in the UK, where the ‘T’ element of NMT refers to ‘technique’.
The first American protocols of NMT, developed in the late 1970s and early 1980s were based largely on the methods devised and taught by the late Raymond Nimmo (DeLany 1999). Nimmo’s research into the pathological influences and relevance, as well as the therapeutic implications of treating ‘noxious pain points’ mirrors closely that of his contemporary, Janet Travell, in relation to her research into myofascial trigger points. Nimmo’s protocols were subsequently modified and expanded by Paul St John, who studied with Nimmo, and then by St John and Judith (Walker) DeLany, who worked together in the 1980s. Both St John and DeLany have continued expanding their separate NMT programmes over the last decade.
While the American protocols of NMT were initially based on that of Nimmo, the platform of application was strongly influenced by the writings and research of Travell & Simons (1983, 1992), Vannerson & Nimmo (1971), Cailliet (1977), Chaitow (1980) and others. Both St John’s and DeLany’s variations on Nimmo’s protocols resulted in revisions of previous concepts and methodology, leading to significant changes in recommended treatment techniques. St John incorporated structural homeostasis of the body and cranium as the basis of his St John Method™, while DeLany took a broader view in NMT American version™ (Chaitow & DeLany 2000, 2002, 2008), where she utilized a systematic approach with attention paid to biochemical, biomechanical and psychosocial factors.
In 2000, DeLany and co-author Leon Chaitow, published the first of two volumes that present NMT American version™ alongside the European NMT protocols, positional release, muscle energy techniques and other modalities that can be used as adjuncts to its application. Clinical Application of Neuromuscular Techniques, volumes 1 (2nd edn 2008) and 2 (2002), distinguish NMT American version™ as a practical, systematic approach for training palpation and assessment skills, as well as for clinical application.
The following introduction to NMT American version™ will concentrate on the basic techniques and examples of application to selected muscles. Although these techniques can easily be practised from the descriptions given, it is important to remember that those given are incomplete protocols, and that ‘missing elements’, such as treatment of anterior, lateral and deep abdominal muscles, must be included for safe and effective application. There is no substitute for supervised hands-on instruction, which is highly recommended as the safest means of acquiring NMT skills.
Platform of NMT American version™
Homeostasis incorporates the processes through which the various functions of the body, including everything from postural adjustments to the chemical compositions of the body’s fluids, are maintained in balance (Stedman 1998). It is through this goal of equilibrium that the body deals with the many stresses and demands placed upon it in daily life, accomplishing this through adaptation and compensation. If stresses are excessive, or if compensation mechanisms have been compromised or overloaded, the adverse effects of decompensation, where frank disease and degeneration occur, are likely to emerge (Chaitow & DeLany 2008).
Categories
The broad foundation of NMT American version™ is based on the assessment of three categories capable of adaptation that, on a constant basis, modify, adjust to and compensate for the stresses of life (Table 10.1). Within the three categories – biomechanical, biochemical and psychosocial – are to be found subdivisions of most of the major influences on health, with a number of these features being commonly involved in causing or intensifying pain (Chaitow 1996, 2003, Chaitow & DeLany 2000, 2008). In addressing these categories, it is acknowledged that there can be local and/or global (systemic) causes of pain and dysfunction, as well as numerous perpetuating factors, that, if left untreated, may cause ‘mysterious’ recurrence of the condition (Simons et al 1999). Local, global and perpetuating factors should all be considered in a thorough recovery programme. These include Chaitow & DeLany (2000, 2008), amongst others, locally dysfunctional states such as:
as well as the following global factors that affect the whole body systemically:
• genetic predisposition (e.g. connective tissue factors leading to hypermobility) and inborn anomalies (e.g. short leg)
• nutritional deficiencies and imbalances
• toxicity (exogenous and endogenous)
• infections (chronic or acute)
• endocrine (hormonal) imbalances and deficiencies (especially thyroid)
• global (systemic) inflammation
• stress (physical or psychological)
• trauma (abrupt as well as cumulative)
• posture (both static and dynamic and including patterns of misuse and muscle substitution)
Table 10.1 Major influences on health that are commonly involved in causing or intensifying pain can be broadly classified into three categories. The examples given can be readily seen as not only individually problematic, but to profoundly interact with each other and create a cascade of effects.
| Biomechanical | Biochemical | Psychosocial |
|---|---|---|
| Trauma | Inflammation | Stress |
| Postural | Dehydration | Guilt |
| Muscular (including trigger points) | Nutritional | Fear |
| Congenital | Hormonal | Anxiety |
| ‘Wear and tear’ | Ischaemia | Emotions |
| Joint dysfunction | Toxicity | Litigation |
| Overuse, misuse, disuse, abuse | Immune response | Depression |
| Neural entrapment and/or compression | Somatization |
In its early stages, NMT American version™ focused largely on six ‘subdivisions’ from this list, with practitioners focusing on ischaemia, trigger points, neural entrapments/compressions, postural/structural imbalance, nutritional components/deficiencies and emotional/stress factors. As clinical application has broadened and NMTs are working in exceedingly greater multidiscipline interface, it has become more apparent that, while focusing on the six factors alone may get (sometimes astounding) results, this is insufficient in many cases to achieve a long-lasting resolution. As a result of broadening the NMT perspective, it is often necessary for the astute practitioner to expand clinical understanding beyond the base education of licence requirements. This poses a challenging problem, since application of that knowledge may not lie within the practitioner’s scope of practice. The solution to this situation is to build a strong network of practitioners to whom the patient can be referred when presenting symptoms arouse suspicion that the root cause of the problem may be other than myofascial. Any factors that lie outside the scope of practice and licence of the practitioner should be considered for referral.
It should be kept in mind that the influences of a biomechanical, biochemical and psychosocial nature do not produce single changes. Their interaction with one another is profound, and intervention in one category can affect the others remarkably. The practitioner’s role may be to alleviate the stress burden or simply to lighten the load. At times, all that may be accomplished is to work towards more efficient handling of the adaptive load by teaching and encouraging the individual to alter daily habits. While it is important to remove or modify as many aetiological and perpetuating influences as can be identified, this must be done without creating further distress or a requirement for excessive adaptation. For each therapeutic intervention applied, adaptation will probably also be required. It is important that the adaptive mechanisms are not overloaded in the healing process.
The original six factors of NMT
Although the current approach of NMT American version™ encompasses consideration of many additional factors beyond the classic six, the original six still remain the primary focus of the approach. When working with a person in chronic pain, these six subdivisions derived from the local and global lists above should be addressed systematically to assess for and, hopefully, reduce underlying causes of discomfort and/or dysfunction. If assessment of one or more of these factors is omitted, the person may plateau or regress in his or her recovery. These particular six factors should be considered, assessed for, and clinically addressed (if needed) by the practitioner in all patients (Chaitow & DeLany 2000, 2008). If the practitioner is without skill or licence in one or more of these foundational tools, it is suggested that the patient be referred to another practitioner who is suitably trained and licensed in the subject. If progress is not seen within a few treatments, or if pain, fatigue, or other primary symptoms return, other factors (hormonal, organ or bone health, toxicity, etc.) should be considered. The six factors, as noted by DeLany (2002), are:
Ischaemia – a state in which the current oxygen/blood supply is inadequate for the current physiological needs of tissue. Causes of ischaemia can be pathological (narrowed artery or thrombus), biochemical (vasoconstriction by the body to reduce flow to a particular area), anatomical (tendon obstruction of blood flow) or as a result of overuse or facilitation. Ischaemia reduces the level of oxygen, nutrients and waste removal and the tension produced by the resultant muscle shortening can alter joint mechanics and/or entrap neural structures. Ischaemia, and its resultant local energy crisis, can also lead to the production of trigger points (Simons et al 1999).
Trigger points (TrPs) – localized areas within muscle bellies (central TrPs) or at myotendinous or periosteal attachments (attachment TrPs) which, when sufficiently provoked, produce a referral pattern to a target zone. The referral pattern may include pain, tingling, numbness, itching, burning or other sensations. In addition to its location (central or attachment), a TrP can be classified as to its state of activity (active or latent) as well as whether it is primary, key or satellite. (See also trigger point formation theories, described in detail in Ch. 3.)
Neural interferences – compression (by osseous structures) or entrapment (by myofascial tissues) of neural structures may result in muscle contraction disturbances, vasomotion, pain impulses, reflex mechanisms and disturbances in sympathetic activity. Since neurovascular structures course along fascial structures (sheaths, planes, etc.), entrapment by fascial distortions is common. Release of the fascia and mobilization of the neural structures should be components of the manual protocols.
Postural and biomechanical dysfunctions – repeated postural and biomechanical insults over a period of time, combined with the somatic effects of emotional and psychological origin, will often present altered patterns of tense, shortened, bunched, fatigued and, ultimately, fibrotic tissues with resultant alterations from healthy postural positioning. Muscle substitution occurs, with resultant alterations in firing patterns that can escalate to further dysfunctional use. Although structural assessment (postural analysis) has inherent value, it fails to consider patterns of use that may not be displayed in static position. Dynamic pronation, alterations in gait, and other use patterns should be assessed and corrected due to their ability to perpetuate obvious and very subtle dysfunctions.
Nutritional factors – nutritional deficiencies/imbalances, sensitivities, allergies and stimulants all play roles in myofascial health as well as hormonal, emotional and mental health. The author of this chapter considers the nutritional component to be the most important factor in health. Excess or lack of those that provide energy (protein, carbohydrate, fat) as well as those that support metabolism (vitamins, minerals, water) can have a significant impact on health and chronic pain.
Emotional well-being – the degree and type of the emotional and stress loads the individual is carrying can influence various systems of the body. Hormones and neurotransmitters are chemical messengers of the body that are strongly affected by stress, thought and emotions. Likewise, they can impact mental, physical and emotional response to stress, with resultant cascades of further chemical interfaces. Ultimately, if excessive or prolonged, these factors can result in distress and disease.
Application of NMT
Effective application of NMT techniques may be achieved more easily by applying the following guidelines. As knowledge of anatomy is enhanced and the necessary skills are attained, each practitioner will develop his or her own style by blending NMT knowledge with that acquired from other disciplines studied.
Note: In the USA, laws regarding scope of practice vary from state to state and among the many healthcare professions. Most states require a ‘licence to touch’ in order to treat patients. It is suggested that each practitioner perform within the scope of his or her own licence regardless of what is presented within this text. NMT is practised in multiple disciplines in many different states and countries, and this text may contain techniques or concepts that lie outside of the scope of a particular licence. It is each practitioner’s responsibility to know his or her scope of practice and to work within the boundaries of licensure.
Order of the routine
What should be treated first? Where should treatment begin? Sequencing is an important element in bodywork and, to some extent, is a matter of experience and preference. However, in many instances protocols and prescriptions based on clinical experience – and sometimes research – can be offered.
NMT is written about and usually applied as a sequence of steps. Each step of the ‘routine’ is performed in the initial examination to assure maximum results, as skipping some steps may cause a significant detail to be missed and result in less than optimal outcomes. In subsequent treatment sessions some of the steps may be omitted if particular tissues are not involved.
The techniques are applied to the muscles in a suggested order that is designed to enter the tissues by layers, to treat the proximal portion of an extremity before the distal portion, and to best manage the therapy time. When the order of the routine needs to be altered, two rules should always be applied:
Clinical application of NMT
The clinical examination that uses NMT moves almost seamlessly from the gathering of information into application of treatment. The process of discovery leads to therapeutic action as the practitioner searches for evidence of tissue dysfunction, and then applies the technique to turn ‘finding into fixing’. This transition from examination to treatment and back to examination is a characteristic of NMT and will become habitual as the methods and objectives of NMT and its associated modalities become more familiar. NMT palpation techniques can be blended with the application of muscle energy techniques and positional or myofascial release methods by moving from one modality to the other and back to examination without delay.
A variety of techniques is used in NMT, the choice of which depends on the practitioner’s skills and what is discovered in examination, as well as the desired effect on the tissues. The use of skin lubrication will vary from step to step depending upon the technique being applied. Dry techniques, such as connective tissue work or tissue lifting techniques, should be applied before lubrication, because some techniques become more difficult when the skin is oiled. Generally, gliding procedures require lubrication, while friction and tissue lifting techniques do not. Applying the appropriate amount of lubrication is important, since excessive amounts generally decrease palpatory perception and affect control of the hands during the gliding strokes. An inadequate amount may produce skin drag, friction and moderate discomfort.
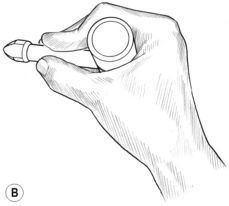
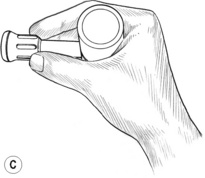
Application of dry techniques is generally followed by manipulation or lightly lubricated gliding, which is aimed at increasing blood flow and ‘flushing’ tissues while simultaneously evaluating for ischaemic bands and/or trigger points. Static digital pressure is subsequently employed in order to release ischaemic bands and for treatment of trigger points, and is usually applied after several repetitions of gliding or other forms of manipulation of the tissues have been completed. Pressure bars may be used instead of (or in addition to) finger or thumb compression (Fig. 10.1B,C) in certain areas; however, precautions apply and proper training is suggested. Manually applied gliding strokes are usually repeated after applications of compression, friction or pressure bar techniques.
NMT techniques
The choice of NMT technique depends upon what is discovered in examination as well as the desired effect on the tissues.
• Skin rolling and tissue lifting techniques can be applied to soften the fascia associated with the skin and underlying muscles. The skin can be grasped and lifted, thereby creating mechanical tension on the subcutaneous fascia, which assists in changing the state of the fascia’s ground substance from a ‘gel’ to a ‘sol’ (Oschman 1997) due to its thixotropic properties (DeLany 2000a). The tissue can also be rolled between the fingers and thumb. Subcutaneous tissue layers and/or muscle bellies may be grasped and lifted, then manipulated between the fingers and thumb, if tolerable, thereby stretching fascia and separating fascial layers. Any of these may result in increased blood and/or lymph flow. Areas where the skin is adherent are often an indication that the underlying muscles need further treatment.
• Effleurage (gliding stroke) is an important and powerful component of the NMT American version™. It warms the fascia, flushes blood through the tissues, and therefore increases oxygenation and perfusion of nutrients while simultaneously eliminating waste products from the tissues (Yates 1989). During the gliding process, the practitioner will discover contracted bands, nodules and tender points unique to that individual. Gliding repeatedly on these bands often reduces their size and tenacity, lessening the time and effort needed to modify or eliminate them. Clinical experience indicates that the best results tend to come from gliding on the tissues several times, then working somewhere else and returning to glide again. The direction of application of glides may be either with or across the direction of the muscle fibres, and usually involves a combination of both. Following the course of lymphatic flow is particularly suggested if tissues are congested. Unless contraindicated (by inflammation, oedema, etc.), a moist hot pack can be placed on the tissues between gliding repetitions to enhance the effects further. A short time of rest of the tissues is usual before additional gliding. This allows circulatory and drainage functions to flush the tissues further. Tenderness and ischaemia are commonly reduced rapidly in this way.
• To glide on the tissues most effectively, the practitioner’s fingers, spread slightly, support and stabilize the hands (Fig. 10.1A) while the thumbs are (most often) the treatment tools. The hand and forearm move as a unit, with the wrist being stable. Little or no motion is allowed in the wrist joints or the thumb joints. Excessive movement in the wrist or thumb may lead to joint problems and inflammation of the practitioner’s forearms, wrists and hands. A proper and stable hand position helps avoid practitioner injury. When two-handed glides are used, the thumbs are side by side (almost parallel), or one ahead of the other, with the tips of the thumbs leading the glide.2 When the distal tips of the thumbs are touching during the glide and the medial side of the thumbs lead the stroke, excessive strain is placed on the thumb joints and practitioner injury is a considerable risk.
• When dealing with tissue that is not excessively tender or sensitive, the ‘glide’ should cover 3–4 inches per second (speed of application is reduced for comfort if tissues are sensitive), which is significantly faster than the thumb stroke used in Lief’s NMT. It is important to develop a moderate gliding speed in order to ensure adequate opportunity for simultaneous palpation of muscles. Too rapid a movement may cause unnecessary discomfort and may also skim over congestion in the tissues, missing vital information sources. Movement that is too slow may displace the tissues, making identification of an individual muscle difficult. A moderate speed will allow for repetitions that significantly increase blood flow and, at the same time, palpation of bands or nodules of ischaemia within the tissues.3
• Compression techniques can be used to press soft tissues against a bone or underlying muscle (flat compression), or the non-lubricated tissues may be lifted and grasped between the finger(s) and thumb (pincer compression). Pincer compression can be broadly applied with flattened fingers (like a clothes’ peg; see Fig. 10.2A) or precisely applied with curved fingers (resembling a ‘C’ clamp; see Fig. 10.2D).
• Static compression (also called TrP pressure release, ischaemic compression or sustained pressure) applies pressure to tissues without movement of the fingers or thumb. Tissues that are ischaemic or those that contain TrPs usually respond well to static compression (see below regarding use of static pressure). For those that are extremely tender, pressure must be modified so as not to be excessive.
• Compression with manipulation can be applied by lifting the tissues and then rolling, bending or twisting them between the fingers and thumb. It is an effective way of mechanically distressing the connective tissue and altering its ground substance from a gel to a sol (DeLany 2000b), and may also help to separate the fibres and increase blood flow. Generally, this technique is used after the tissue tenderness has been decreased by the use of gliding strokes and static compression. It can follow those techniques or be used before TrP pressure release.
• Friction techniques can usually be applied to myofascial tissues with variations, depending on the condition of the tissues and the desired results. It is most often used to soften fibrotic tissues and to alter the quality of adhesions. Friction techniques may include those applied transversely (cross-fibre friction, strumming, snapping or transverse friction) or those applied with the fibre direction (longitudinal friction). If tissues are tender, caution should be exercised as tenderness may be indicative of inflammation. If significant tenderness is present or if application of friction results in tenderness, ice may be applied for 10–15 minutes. Friction on that particular tissue should then be avoided until no evidence of inflammation is present.
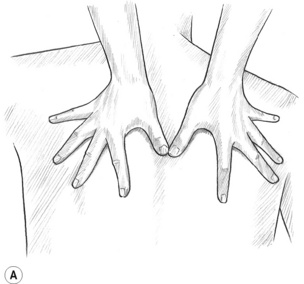
Figure 10.1A The fingers support and steady the hands while the thumbs are the primary tools used in most of the gliding techniques.
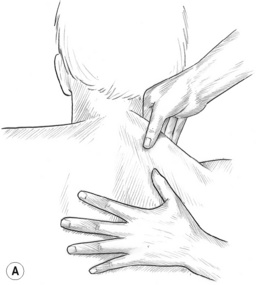
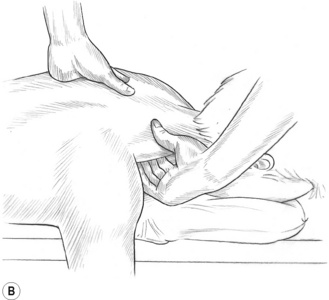
Figure 10.2A,B (A) Broad, flat compression can be applied between the thumb and fingers. (B) To uncoil the tissue, the fingers should curl completely around the upper trapezius to touch the anterior surface of the muscle under the forward ‘lip’.
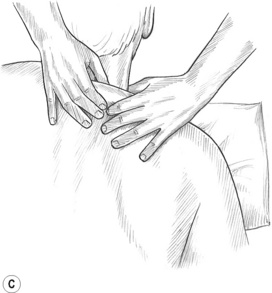
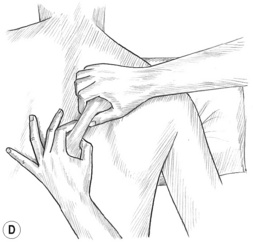
Figure 10.2C,D With appropriate positioning of the arm, portions of the middle and lower portions of trapezius may be effectively lifted and compressed on most people. Elevation of the head of the humerus to shorten the fibres may be needed.
Pressure considerations
After gliding and manipulation of tissues, the muscles may be compressed with static (ischaemic compression) pressure. Pressure should be constant and could even be mildly increased as the tissues relax and release. The length of time for which pressure is maintained will vary, although, as a rule, it is found that tissue tension begins to ease within 8–12 seconds when the ideal pressure is being used. The pressure may be sustained, even increase, for up to 20 seconds. The practitioner should feel the tissues ‘melting and softening’ under the pressure. Patients frequently reports that they believe the practitioner is reducing the degree of applied pressure.4
Pain reduction not always an adequate guide
While a reduction of pain may be achieved via static compression that is sustained for longer than suggested, this is usually of only short-term benefit. Increased pain and a reduction in local mobility may result from the irritation caused by sustained or excessive pressure. A greater, longer-lasting, beneficial effect will usually be gained when the practitioner goes back to an area four or five times for a shorter duration, rather than once for one or two minutes. If release of palpated contractions has not commenced within 8–12 seconds, the pressure may be too heavy or too light and should probably be altered.
Degree of pressure
The appropriate degree of pressure utilized in static compression varies with the individual (and even from one part of the body to another); however, it usually matches the tension palpated in the tissues. Pressure that is too light may not produce a tissue response, whereas heavy pressure may result in reflexive spasms. Age, oxygenation, past trauma, exercise status, previous therapies, hydration, nutritional and hormonal imbalances/deficiencies, tissue toxicity and dysfunctional postures all appear to influence the amount of pressure most appropriately applied.
How does one determine the amount of pressure to use? In addition to matching the tension within the tissues, a 1–10 scale of patient discomfort in the tissues being treated can be established and may be used to help guide the practitioner, where 1 = no discomfort and 10 = extreme pain. Only enough pressure to elicit mild to moderate discomfort is used, with a score of 5, 6 or 7 representing an ideal report. A score of 9 or 10 has no place in therapy! ‘Biting the bullet’ and ‘digging it out’ has no advantage – and offers real disadvantages – in NMT. Pressure should be adjusted routinely until the ideal level is found for that particular tissue.
Application of static pressure
Static pressure can be applied to soft tissues as an effective means of reducing spasm and contractures as well as for deactivating TrPs. While the blanching effects of applied compression may enhance blood flow when pressure is subsequently released, restriction of blood flow can produce an ischaemic state if held for too long. Additionally, the patient may not tolerate long applications of pressure if the tissue is extremely tender or inflamed. The amount and duration of pressure appropriate for an individual can vary greatly – even from one muscle to the next.
It is important to be specific when applying pressure to dysfunctional soft tissues. To treat TrPs most successfully, the practitioner should be directly on the TrP rather than next to it. When the patient keeps asking for more pressure, moving the point of pressure slightly, in one direction or another along the muscle fibres, may reveal that the practitioner was close to but not right on, the desired spot.
As discussed previously, the length of time for which static pressure should be applied will vary; with practice, the practitioner will develop the skill to feel tension released. This should begin to occur within 8–12 seconds, although compression may be maintained for up to 20 seconds. A reduction of discomfort may be achieved with pressure that lasts longer than suggested, although clinical experience suggests that increased pain and decreased mobility often result when overly sustained or heavy pressure is used. Pressure should be constant and may be mildly increased as the tissues begin to soften. The patient should be encouraged to report if the pressure is too heavy, if a tissue ‘melting’ sensation is felt and, if there is a referred sensation, to what region it refers. (See Box 3.6 and further discussion in Ch. 3 for details of algometer usage.)
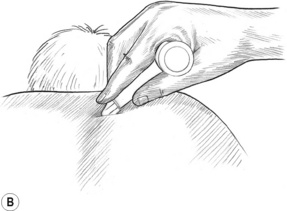
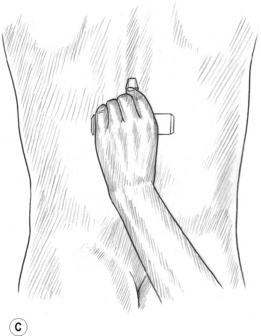
Use of pressure bars
Pressure bars may be used as valuable treatment tools to protect the practitioner’s thumbs from excessive pressure and to access crevices that the thumbs may not be able to reach. These classical tools for NMT are constructed of lightweight wood and comprise a 1-inch dowel horizontal cross-bar and smaller vertical dowel shaft. Each has either a flat rubber tip or a bevelled rubber tip at the end of the vertical shaft (see Fig. 10.1B,C). The large flat tip is used to press into large muscle bellies, such as in the gluteal region, or to glide on flat broad muscles, such as the tibialis anterior. The bevelled tip is useful in the lamina groove, under the spine of the scapula, and to friction certain tendons that are difficult to reach with the thumb. The bevelled end of a flat typewriter eraser can also be used, although it is not as easy to hold as the pressure bar. The pressure bars are never used on extremely tender tissues, at vulnerable nerve areas such as above or below the clavicle, or to ‘dig’ into tissues. Contracted tissues, fibrosis and bony surfaces may be ‘felt’ through the bars – just as a grain of sand or a crack in the table under writing paper may be felt through a pencil when writing.
The pressure bar is held securely on the shaft while wrapping the hand around the horizontal dowel, as shown in Fig. 10.1B,C. The practitioner’s wrist is kept relatively straight so as to avoid strain. The pressure bar and the practitioner’s hand and forearm generally move as a unit. Although flexion of the wrist might occur with certain uses (such as in scraping the palmar fascia), very little ulnar and radial deviation at the wrist should occur.
Pressure bar tips and handles should be cleaned after each use and can be scrubbed as the hands would be, using an antibacterial soap and scrub-brush. The use of alcohol on the rubber tips is not recommended because it may cause them to become dry and brittle. If the tip contacts oil, the rubber may begin to break down, causing it to split open. Scrubbing oil residue off the rubber tip should help prevent this.
The pressure bars should not be used on the face, in the cervical region, under the posterior base of the cranium, in soft, fleshy regions (such as the abdomen or groin) or on arteries or veins. Avoid placing the pressure bar tip on a bony surface where nerves are exposed (such as the head of the fibula), above or under the clavicle, behind the knee, or on any other vulnerable part of the body.
The use of pressure bars to treat myofascial tissues is considered to be an advanced massage technique, the use of which requires experience and training to determine when the technique may be used safely and effectively, and to prevent injury or strain of the practitioner’s hands. The author suggests that the practitioner seek training in the proper use and handling of pressure bars before attempting to use them.
NMT methods
The following descriptions and illustrations of NMT American version™ are excerpts of the more complete routines taught as the protocols of NMT and are intended only to introduce the reader to the NMT method. They are not meant to be fully comprehensive; they do, however, provide accurate examples of the way in which NMT would be used if restrictions were being addressed and/or trigger points were being sought and treated in these structures. A thorough discussion of NMT routines, as well as regional anatomy, dysfunctional conditions and precautions, and a variety of associated modalities, is offered by Chaitow & DeLany (2000, 2002, 2008).
The following protocols are described for the right side of the body. All steps should be repeated on the left side. It is particularly important to treat both sides of muscles that attach to the spine, because release of one side only could result in reflexive shortening of the muscles of the untreated side and potentially moderate postural distortions.
Trapezius
The patient lies prone with the arm hanging off the side of the table or with the ipsilateral hand placed near the head.
1. Grasp the upper trapezius between the thumb and first two or three fingers with the thumb on the posterior surface and the fingers wrapping all the way around and up underneath the anterior fibres (Fig. 10.2A,B). This ‘flat compression’ is suitable for this muscle as well as (with slight variations) the sternocleidomastoid and other muscles.
‘Uncoil’ the fibres of the outermost portion of the upper trapezius by dragging three fingers over the anterior surface against posteriorly applied thumb pressure. Do not allow the fingers to flip over the uppermost edge of the trapezius as this area can be very tender and often houses violent trigger points. Keep the wrist low to angle the fingers around the most anterior fibres. Thoroughly examine the toothpick size strands of the outermost edge; these often contain trigger points that induce noxious referrals into the face and eyes.5
2. Place the prone patient’s arm on the table at his or her side. To define the middle trapezius, draw parallel lines from the two ends of the spine of the scapula to form right angles with the spinous processes. The fibres of middle trapezius lie between these two lines. Elevation of the humeral head 3–6 inches by use of a rolled-up towel, wedge, etc. will usually shorten the middle and lower trapezius, which allows it to be treated more easily.
Grasp the middle trapezius with both hands and compress and/or manipulate the belly of the middle portion (Fig. 10.2C). Repeat the grasping manipulation to the outer (diagonal) edge of the lower trapezius (Fig. 10.2D). This manipulation is similar to skin rolling techniques (see Ch. 8 for details of skin rolling) but includes more than the skin: lifting, evaluating and stretching the fibres of the muscle itself. If trigger points are found, static pincer-like compression is used to treat them.
3. Place the bevelled tip of the pressure bar against the lateral aspect of the spinous process of C7 (in the lamina groove) and at a 45° angle. Friction cephalad to caudad at tip-width intervals all the way down to L1 to treat the trapezius attachments on the spinous processes as well as deeper attachments (Fig. 10.2E).6 When tissues are excessively tender, gliding strokes applied with the thumb or finger can be substituted for the pressure bar frictional techniques.
4. The bevelled pressure bar may be used on the scapular and acromial attachments of the trapezius. Gliding strokes with the thumb may be substituted for the pressure bar frictional techniques if tissue tenderness warrants a gentler approach. Thumb glides may be used with caution on the clavicular attachments where the pressure bar is never used.
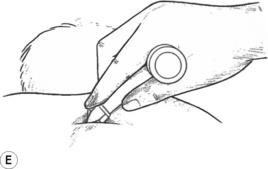
Figure 10.2E A bevelled-tip pressure bar may be used in grooves and under bony ledges not easily reached with the thumbs, such as here in the spinal lamina groove.
Caution: It is suggested that the pressure bar not be used on clavicular attachments of the trapezius due to the proximity of the brachial plexus.
5. Gliding strokes can be used to soothe the tissues that have been treated with the pressure bar and with the manipulation techniques. Unless contraindicated, moist hot packs can be placed on the trapezius to increase blood flow. A cold pack or lymphatic drainage should follow the hot pack to enhance fluid drainage.
Levator scapula
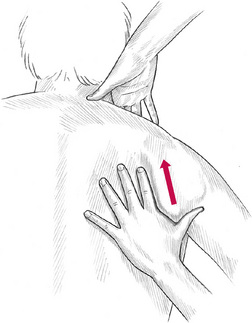
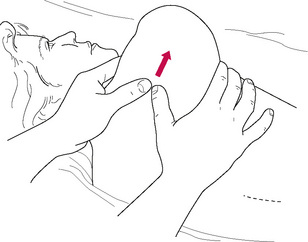
1. Grasp the lower angle of the scapula and ease it toward the patient’s ear to elevate the upper angle of the scapula away from the torso. The practitioner’s lower hand is used to increase and secure this elevation at the lower angle of the scapula (Fig. 10.3).
2. The practitioner’s fingers of the cephalad hand are passed around the anterior fibres of the trapezius and directly on to the anterior surface of the upper angle of the scapula. It is necessary to ensure that the trapezius fibres are bypassed, because trying to access levator scapula by pressing through the trapezius fibres will fail to achieve optimal results. Friction should be applied gently as these fibres are often extremely tender and referral patterns can produce a dull to moderate ache in the shoulder or trapezius area. The cephalad ends of these fibres attach to the atlas transverse process and are therefore involved in its stability.
3. Careful palpation can be applied at its attachments on the transverse processes of C1–C4 and gliding strokes may be applied to the remainder of the muscle. However, caution should be exercised to avoid intrusion into the suboccipital triangle where the vertebral artery lies and the anterior surfaces of the transverse processes, where the brachial plexus courses near sharp foraminal gutters.
Posterior mid-thorax
1. Gliding strokes are applied repeatedly to the interscapular region, which lies between the two vertebral borders of the scapulae. Avoid pressing on the spinous processes. Unless contraindicated, moist hot packs can be placed on the rhomboid region between repetitions of gliding strokes. Taut bands within the muscle can be assessed for the presence of trigger points, which can be treated with trigger point pressure release.
2. Place the patient’s hand behind the small of the back, if possible, so distracting the vertebral border of the scapula from the ribs; this will allow additional access and deeper palpation. The following steps may be performed more easily if the practitioner stands on the contralateral side and reaches across to apply treatment.
3. Place the thumbs on the medial anterior surface of the scapula and introduce a glide or use cranial/caudal friction to examine the attachments of the serratus anterior and the subscapularis along the entire anterior vertebral border of the scapula (Fig. 10.4A).
4. With the scapula still elevated, rotate the thumbs so that the thumb pads press onto the thorax. Apply pressure anteriorly, deep to the vertebral border of the scapula, and glide or friction while pressing down onto the rib-cage (Fig. 10.4B). This step may address the ‘hidden’ tendinous attachments of the serratus posterior superior and its associated trigger point. Trigger points in this area refer significantly into the chest and down the arm, duplicating anginal pain. They may be hidden from palpation unless the scapula is sufficiently elevated.7 An alternative position to better access this area is shown in Box 10.1.
5. Apply gliding strokes in all directions between the scapulae while avoiding the spinous processes to treat several layers of muscles, including (from superficial to deep) trapezius, rhomboid major and minor, serratus posterior superior, erector spinae and possibly portions of the intercostal group.
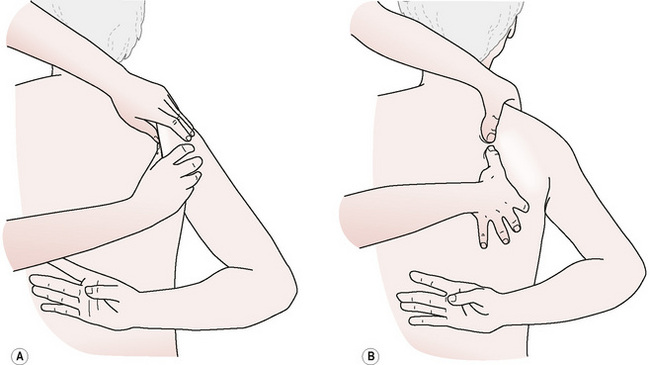
Figure 10.4A,B ‘Hidden’ trigger points in serratus posterior superior may be accessed under the vertebral border of the scapula.
Box 10.1 Alternative positioning of the patient
Alternative positions for applying NMT routines sometimes offer advantages over those given in classic protocols. For instance, when the patient is unable to lie comfortably in a prone or supine position, it is usually possible to adapt the techniques for side-lying or sitting positions.
When using a side-lying position, the patient’s head is supported on a pillow or bolster so that the cervical spine is maintained in neutral position. The head should not remain unsupported during the session nor should the patient attempt to support the head with an arm, as cervical and upper extremity musculature might become stressed and uncomfortable. This could lead to activation of trigger points as well as produce exacerbation of the current condition or discomfort in additional areas.
In a side-lying position, the lowermost leg (the one lying on the table) is kept fairly straight while the uppermost leg is flexed at the hip and knee, which brings it forward, where it is laid on a bolster or thick support pillow to maintain the leg in a neutral sagittal plane. This positioning of the legs stabilizes the pelvis, discourages torsioning of the torso and protects the lumbar area while allowing considerable access to the shoulder region, lateral thorax, lateral hip and medial aspect of the thigh of the lower leg.
An example is offered here for treatment of serratus posterior superior, discussed elsewhere in this chapter in prone position. The tissue that lies deep to the medial edge of the scapula is often more easily and effectively accessed when the patient is placed in a side-lying position with the uppermost arm draped across the patient’s chest (horizonal adduction) (Fig. 10.5). This allows the scapula to translate laterally on the torso (protract), thereby exposing considerably more subscapular region than in the prone position. The tendon attachment at the angle of the rib and the ‘hidden’ trigger point associated with this muscle are often much more accessible. This position is especially convenient to use when the patient is unable to reach behind the back as is necessary in the prone position.
Posterior cranium
Palpation and friction techniques can be carefully applied to the base of the occiput to assess the suboccipitals and overlying muscles. However, caution must be exercised to avoid deep friction to the rectus capitis posterior minor and to the vertebral artery, which lies relatively exposed in the suboccipital triangle. See Box 10.2.
Box 10.2 Precautions for vertebral artery
Three of the four suboccipital muscles (all except RCPMin) form the suboccipital triangle. The vertebral artery, which courses through the transverse processes of C1–C6, lies relatively exposed and vulnerable to injury (Fig. 10.6). When pressure or friction is applied to this region, the artery should be avoided especially when the tissues are placed on stretch. Knowing the location of the suboccipital triangle and the optimum angle to orient the treating digits is important to safe treatment in this area. It is suggested that direct contact with the artery be avoided in all manner when working in the upper cervical region and extreme head rotation, particularly with extension, should also be avoided.
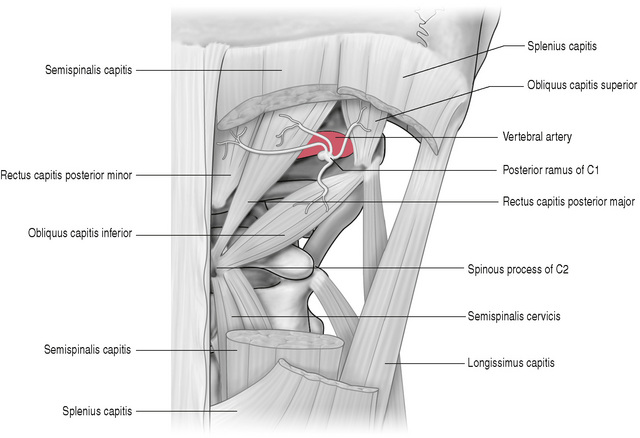
Figure 10.6 Caution must be exercised when approaching the suboccipital triangle, where the vertebral artery lies relatively exposed and is vulmerable to injury.
Reproduced with permission from Gray’s Anatomy for Students (2005).
In the last decade considerable concern has surfaced regarding safe application of manual techniques and the upper cervical unit. Points in the following discussion have been borrowed from a Powerpoint™ presentation titled Cervical Spine Adjusting and the Vertebral Artery produced by the Association of Chiropractic Colleges and posted to www.chirocolleges.org (last viewed online 8/2/09). It is with appreciation to those who prepared the material that the author of this chapter takes the liberty to include some of these as points of concern for all manual practitioners.
Approximately 10% of patients have some form of vertebral artery anomaly and compression of the artery is seen in 5% of patients in neutral position and the same in rotation. Of considerable concern is the development of a serious vertebral artery dissection (VAD). This can arise from minor or major traumas and, particularly in the vulnerable patient with pre-existing concerns, from trivial actions, such as painting, nose blowing, receiving a shampoo, vomiting, sneezing, and the application of certain manual therapy techniques.
Dissections arise from intimal tears, which produce an alteration of normal blood flow through the artery, the creation of a thrombogenic environment, the formation of a thrombus and the potential generation of emboli. The incidence of VAD is of such significance that the provocative tests for vertebral artery competency (such as George’s test or DeKlyne’s test) are no longer considered to be safe nor effective screening tests.
In 2004, US chiropractic schools collectively agreed to abandon the teaching of and use of provocation tests for vertebral artery insufficiency. To this author’s knowledge there are no reliable, safe tests to rule out a VAD in progress. So what is a practitioner to do? – Stop! Ask questions, listen, act and think.
| Five ‘Ds’ | ‘And’ | Three ‘Ns’ |
|---|---|---|
| Dizziness | Ataxia | Nausea |
| Drop attacks | Numbness | |
| Diplopia | Nystagmus | |
| Dysarthria | ||
| Dysphagia |
If the patient shows any of the above symptoms pay attention, particularly following a cervical injury. Other symptoms of concern are slurred speech, giddiness, a change in voice pattern, lack of context in speech and inappropriate reactions to situations. Many patients present to manual therapists with these conditions. While it is possible to display these conditions without having a VAD, it is also important to search for them as clues to one in progress. One phrase that should be the strongest flag and should not be ignored is ‘I have the worst pain in my head (or neck), unlike anything that I have ever experienced before.’
It is best to be conservative and rule out vertebral artery involvement rather than to ignore these symptoms since the consequences can be devastating.
1. The prone patient’s chin is tucked slightly, in order to gently open the suboccipital space between the occiput and C1 (atlas). The fingers provide stability and support for the movements of the thumbs (Fig. 10.7). Transverse (medial/lateral) friction is applied in small increments from the mid-line to the mastoid process to assess the cranial attachments of the posterior cervical muscles. Static pressure may also be applied when trigger points are located in the suboccipital muscles or posterior cervical muscles lying superficial to them, or when tissues are too tender to be frictioned. This suboccipital region is often involved in forward head posture and chronic headache patterns.
2. Use combination friction to examine the belly of the thin, flat, occipitalis muscle which is located about 1.5–2 inches lateral to the occipital protuberance. Movement of this muscle may be palpated on some individuals when the eyebrows are raised repeatedly, as it merges with the cranial aponeurosis and connects with the frontalis muscle. Trigger points in this muscle may refer strongly into the eye and into the frontal sinus area.8
Cervical lamina supine
1. Lubricate the lamina groove from the occiput to T1. The left hand lifts and supports the head. The fingers of the right hand lie across the back of the neck at the occipital ridge with the thumb placed next to the lateral surface of the spinous process of C1 (Fig. 10.8A). To achieve the best position, the forearm and hand should be fully supinated. Glide from C1 to T1 while simultaneously pressing toward the ceiling. Repeat the gliding movements five or six times, increasing pressure slightly with each repetition, if appropriate. The practitioner’s elbow should remain low and the treating arm should remain in the same plane as the spine. Observe the head and neck extending slightly as the gliding movements of the thumb help to restore flexibility to the posterior cervical muscles.
2. Rotate the patient’s head contralaterally (away from the side being treated). Move the right thumb laterally one thumb’s width (about 1 inch) and repeat the gliding movements five or six times (Fig. 10.8B). The head and neck will not extend while gliding on the lateral strips.
Caution: Extreme head rotation is not recommended, particularly for the elderly, as it may induce stress to the vertebral artery, which lies within the transverse processes.
3. Continue a series of caudad glides with the thumb, moving laterally in strips until the entire lamina groove has been treated (Fig. 10.8C). The treating thumb should remain posterior to the transverse processes. The muscles being treated include trapezius, semispinalis capitis, semispinalis cervicis, splenius capitis, splenius cervicis, levator scapula, rotatores and multifidus.
Caution: It is necessary to ensure that the gliding strokes remain posterior to the transverse processes (indicated in Fig. 10.8 by a dashed line) because the brachial plexus exits the vertebrae on the anterior aspect of the transverse processes. The foraminal gutters, which cradle the nerves, are sharp and, if placed anteriorly, pressure from the gliding thumb could press the nerves against the sharp processes.
4. Return to any ischaemic bands or trigger points found and treat with static compression.9
Splenii tendons
Caution: Use no pressure until the thumb is securely in place, as described below.
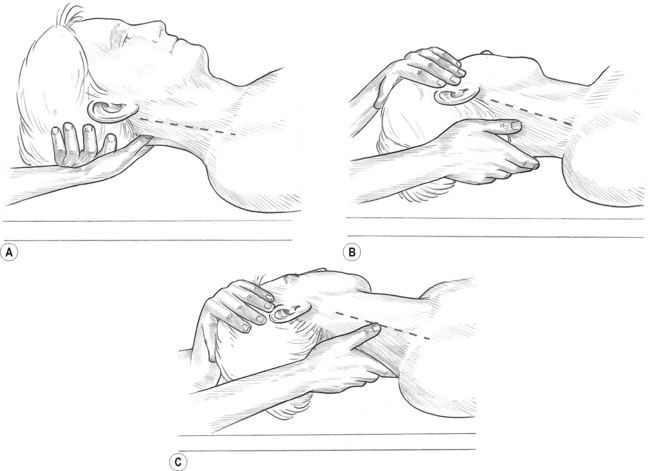
1. To treat the right-side splenius capitis, the patient is supine and the practitioner’s right-hand fingers cup across the back of the neck like a shirt collar. Place the right thumb anterior to the trapezius and posterior to the transverse processes, while pointing the thumb towards the patient’s feet. Use the left hand to rotate the head towards the side being treated (Fig. 10.9A).
2. The right hand should rotate with the neck as if glued to the back of the neck, while the forearm and hand fully supinate. This rotation will open a ‘pocket’ anterior to the trapezius, allowing room for the thumb to slide into position. The thumb is angled towards the nipple of the opposite breast and is pressed lightly against the lateral surface of the spinous processes (Fig. 10.9B,C). This hand position will rotate the thumb so that the thumb pad faces toward the ceiling. Slide the right thumb into the ‘pocket’ formed by the trapezius. If the ‘pocket’ does not allow penetration of the thumb due to excessive tension, or if pressure of the thumb produces more than moderate discomfort, press lightly at the ‘mouth’ of the pocket until the tissues relax enough to allow the thumb to slide in further.
3. Apply pressure inferiormedially, toward the lateral surface of the spinous processes and simultaneously toward the ceiling for 8–12 seconds. The thumb will press into the tendons of the splenius capitis and splenius cervicis, as well as the deeper muscles (rotatores and multifidus). After the initial application of pressure, allow the tissues to rest for a few seconds and then press the thumb into the pocket a little deeper to repeat the manoeuvre. When the tissues prevent any further caudad movement of the thumb, mild to moderate static pressure that is sustained for a few seconds may produce more opening of the pocket and allow the thumb to slide a little further down the spinal column.
4. If tender, repeat the entire process three or four times during a session. This step will usually help restore cervical rotation as well as reduce tilting pull on the transverse processes of C1–3. Trigger points in the splenii tendons can refer strongly into the eye, causing eye (pressure-like) discomfort. Practitioners should rule out glaucoma or other serious eye conditions as a cause of such discomfort, in addition to treating these tissues.
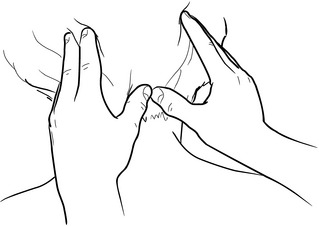
Sternocleidomastoid
The release of the SCM muscle is important because of its propensity to distract the head anteriorly. Compensating postural distortions relating to such forward head positions can include anterior rotation of the pelvis and changes in cervical, thoracic and/or lumbar curvature. The effects of compensations can have substantial impact on the body’s centre of gravity and thereby, demand a cascade of compensations. Trigger points in SCM can cause severe eye pain, visual changes, temporomandibular joint pain, sore throat, ear pain, hearing loss and tinnitus, and can mimic migraine headaches.
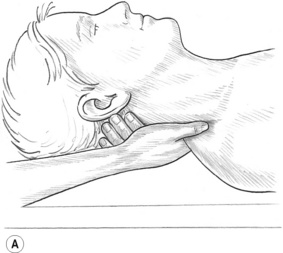
1. Grasp the tendon of the non-lubricated SCM lightly between the thumb and first two fingers as close to the mastoid process as possible. Rotate the head toward the side being treated to rotate the SCM away from the carotid artery. Passively tilt (side-bend) the head toward the side being treated to grasp the SCM more easily and so lift it away from the deeper tissues (Fig. 10.10A). Both heads of the SCM can be grasped in the cephalad half of SCM, although they separate into two distinct bellies in the caudad half. A paper tissue or very thin cloth placed between the treating hand and the patient’s skin may help to prevent slippage if the area is oily.
Caution: If a pulse from the carotid artery is noted while compressing the SCM, release the muscle immediately and reposition the fingers to ensure the artery is not compressed.
2. Compress the SCM for 8–12 (up to 20) seconds at 1-inch intervals from the mastoid process to the sternal and clavicular attachments. Each head can be treated separately. Medial to lateral friction may be used on the sternal and clavicular attachments (Fig. 10.10B).
3. Support the head at 45° of flexion and rotate it away from the side being treated. Glide caudally on the upper 1 inch of the mastoid attachment of the SCM, while being careful to avoid the styloid process located anterior to it. Do not glide further down the SCM as gliding pressure across the carotid sinus may stimulate baro-receptors, resulting in a rapid drop in the patient’s blood pressure.
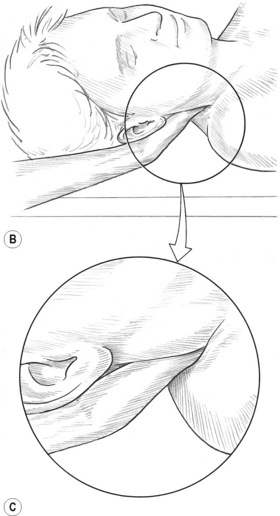
4. Place the thumb posterior to the SCM tendon at the mastoid process and displace the tendon anteriorly while simultaneously pressing onto the mastoid attachment of the longissimus capitis (erector spinae) and the splenius capitis. Use static pressure or combination friction to treat them (Fig. 10.10C).10 Avoid encroaching into the suboccipital triangle where the vertebral artery courses.
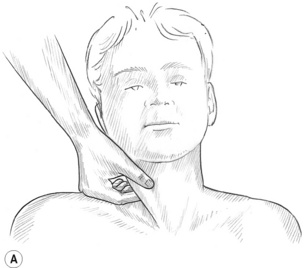
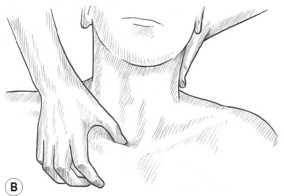
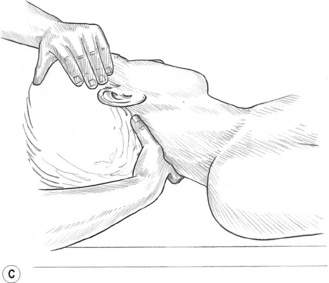
Figure 10.10A,B,C Thorough treatment of the sternocleidomastoid often relieves symptoms associated with migraine headaches, temporomandibular joint dysfunction and hearing problems. (C) The medial border of the attachment of longissimus capitis and splenius capitis may be reached under the posterior aspect of the mastoid attachment of the SCM. The suboccipital triangle is avoided due to the location of the vertebral artery.
Spinal lamina groove
Trigger points lying close to the lamina of the spinal column often refer pain across the back, wrapping around the rib-cage and/or anteriorly into the chest or abdomen, and frequently refer ‘itching’ patterns. Although a more complete protocol would be used, the treatment technique described below is particularly useful if scoliosis is evident as it addresses the many layers of muscular attachment to the posterior aspect of the spine.
1. Angle the bevelled tip of a pressure bar at 45° against the lateral surface of the spinous processes (Fig. 10.11A,B). Use caudad/cephalad friction at tip-width intervals from C7 to the coccyx on each side of the spine. Avoid pressing on the coccyx.
2. When moving the pressure bar, lift it and place it at the next site to avoid gliding it as the bevelled tip may cause tissue irritation. Avoid treating the cervical lamina with the pressure bar as the cervical vertebrae are less stable than those below C7. (See Cervical lamina supine (above) for procedures used in the cervical region.)
3. Friction may also be performed between spinous processes with the bevelled tip in order to treat interspinalis muscles and the supraspinous ligament (Fig. 10.11C).11

Intercostal muscles
The patient is treated in supine, side-lying and prone positions in order to access as many of the intercostal spaces as possible.
Caution: When use of the pressure bar as described produces excessive discomfort, the tip of an index finger should be substituted for the pressure bar tip in the frictional work. Should this procedure also produce moderate discomfort, single-digit gliding strokes can be applied repeatedly with the index finger in each intercostal space and the frictional work delayed until a subsequent treatment session.
1. Place the bevelled tip of the pressure bar inferior to the clavicle of the supine patient, just lateral to the sternum, in the first palpable intercostal space (Fig. 10.12A). The bevelled tip should lie between the ribs and parallel with them. Using medial/lateral friction at each application site, move the bar laterally at tip intervals until just before the pectoralis minor is reached. Avoid pressure into pectoralis minor because of sensitive neural structures in the area.
2. Return to the sternum, move down one rib space and repeat the tip-width examination while using frictional pressure as described in step 1, until just before pectoralis minor is reached.
3. Avoid contact with breast tissue. When working around the breast, use the patient’s hand to displace the breast away from the treatment site inferiorly, laterally, superiorly and medially, as appropriate, in order to allow access for the pressure bar to treat the muscles that lie deep to the margins of the breast.
4. Continue the intercostal work as far caudad and laterally as possible. The patient can also be placed in a side-lying position, which allows access to the more lateral aspects of the intercostal spaces (Fig. 10.12B,C). Treatment is performed on each side of the thorax.
5. With the patient prone, place the pressure bar into the intercostal space lateral to the first thoracic vertebra. With the bevelled tip placed parallel to the ribs and in the rib space, use medial/lateral friction at tip-width intervals in the same manner as that applied on the anterior surface. Continue the treatment in all intercostal spaces as far caudad and laterally as possible.12 Distinction of the rib spaces may be difficult in the upper posterior thorax where superficial tissue is thicker. The rib spaces will be more distinct in the lower posterior thorax, but caution should be exercised regarding pressure on the last two ‘floating’ ribs.
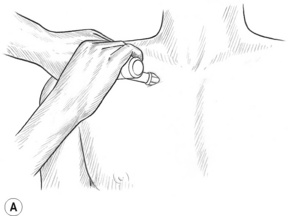
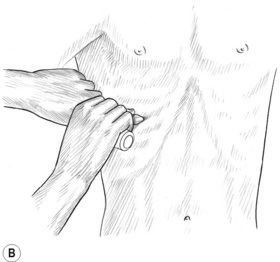
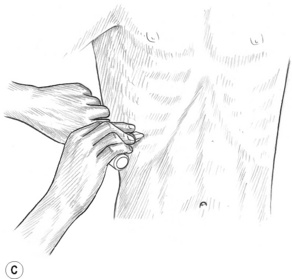
Figure 10.12A,B,C The bevelled tip of the pressure bar may be used at tip-width intervals throughout each intercostal space, especially on people with respiratory ailments. Avoid pressing on the brachial plexus or breast tissue. Friction with a fingertip (or a fingertip gliding stroke) should be substituted when tissue is excessively tender.
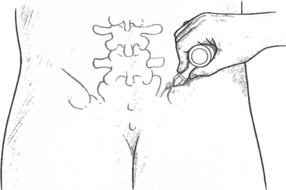
Iliolumbar ligament and sacroiliac ligament
1. The iliolumbar ligament attached the transverse process of L5 (and sometimes L4) to the crest and inner surface of the ilium. To contact the iliolumbar ligament most directly, the tip is placed lateral to the erector spinae and under that muscle’s lateral edge. A cross-fibre movement is used with the bevelled tip while it is angled in this described manner in order to access the tissues anterior to the lateral edge of the erector spinae muscles (Fig. 10.13), which includes the iliolumbar ligament.
2. In order to treat the sacroiliac ligament using NMT, the bevelled tip of the pressure bar is placed at a 45° angle onto the lateral aspect of the sacral tubercles (Fig. 10.14A) with the edge of the bevelled tip being parallel to the tubercles. This position is similar to that previously described for the lamina groove. Commencing at the cephalad aspect of the sacrum, a cephalad/caudad frictional movement is introduced in order to examine the tissues that lie superficial to the sacrum. The pressure bar is then moved one tip-width caudad and the friction is repeated. This continues to the cephalad edge of the coccyx, which should not itself receive any treatment of this sort.
3. Returning to the sacral base, the pressure bar is applied into the soft tissues one tip-width lateral to the initial contact, at 90° to the surface (i.e. to the dorsum of the sacrum) (Fig. 10.14B). The procedure as above is then repeated until the coccyx is reached. In this way the entire sacral dorsal surface should be treated in ‘strips’. No pressure should be applied onto the sacroiliac joint (SIJ) or to the tissues lateral to the border of the sacrum.
A uniform pattern should be visible with no gaps between the prints left by the tip pressure applications. All the strips of prints should be parallel to the sacral tubercles until the last column, which will angle more diagonally along the medial aspect of the SIJ.
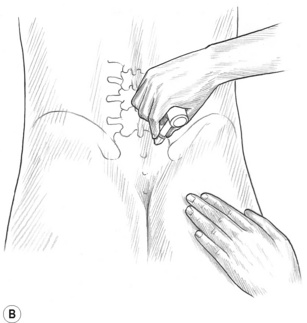
Erector spinae
1. The erector spinae muscles are lubricated from the level of C7 to the sacrum. The thumbs or palm are used to glide along this pathway (C7 to sacrum) repeatedly, then alternating from side to side while gradually increasing pressure in order to relax and warm the tissues (Fig. 10.15A).
2. Standing at waist level with the forward foot at shoulder level and the back foot at waist level, face towards the head with knees slightly flexed. The olecranon process of the practitioner’s table-side elbow is placed against, but not onto, the spinous processes at the level of L5 (Fig. 10.15B). With a moderate pressure and speed, the entire length of the paraspinal tissues, including the erector spinae, receives the benefit of a glide from this contact. The pressure should be moderated when the thoracic region is being traversed. Modification of the angle of contact will be necessary when covering the erector spinae medial to the scapulae. Care should be taken not to apply pressure onto the spinous processes themselves (Fig. 10.15C). The stroke ceases at C7, and the thumbs are used in the cervical region.
3. Turn to face the feet. Apply forearm contact in a similar manner as described in step 2 to the erector spinae as a series of glides is performed from C7 to the iliac crest. No pressure should be applied in this way onto the iliac crest itself or the sacrum or spinous processes.
4. The thumbs, knuckles or large pressure bar may be used cautiously to cross-fibre the long tendons of the erectors; however, the spinous processes should not be involved in these contacts.13
Quadratus lumborum
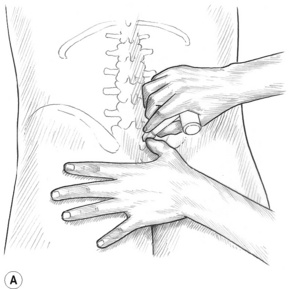
1. After application of a lubricant, a glide up quadratus lumborum is made using both thumbs, from the crest of the ilium to the 12th rib. The initial contact remains just lateral to the erector spinae as four or five repetitious glides are applied to the medial aspect of the muscle (Fig. 10.16A). The thumbs are then placed approximately 1 inch laterally and the glides are repeated. A series of glides is then performed, in ‘strips’, moving laterally until the entire muscle has been treated. If necessary, by moving more laterally, the obliques can be treated as well.
2. While standing at chest level and facing the feet of the prone patient, glide caudad from the 12th rib to the crest of the ilium, ensuring that contact is lateral to the erector spinae. A series of glides moving laterally is then performed (Fig. 10.16B) in a manner similar to the upward glides discussed in step 1.
3. Facing the head, and with the fingers of the lateral hand moulded around the curve of the trunk and the thumb angled at 45° to the spine, the thumb is glided medially on the inferior surface of the 12th rib until it reaches the lateral aspect of the erector spinae. Apply static pressure or friction on posterior aspect of the transverse process of L1. In order to avoid trauma, no pressure should be applied onto the lateral aspect of the tip of the transverse process. Follow this with similar applications of friction or pressure onto the lumbar transverse processes at 1–2-inch intervals down to the level of L4 (Fig. 10.16C).14
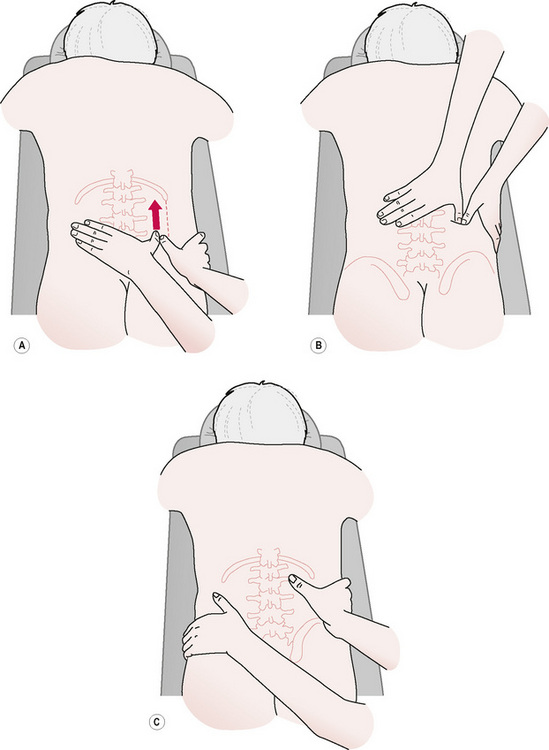
Figure 10.16A,B,C The quadratus lumborum will be treated lateral to the erector spinae by gliding between the crest of the ilium and the last rib. Quadratus lumborum’s transverse process attachments may be felt on some people just lateral to the erector spinae. L2 and L3 are palpable on most people. L1 and L4 may be more difficult to locate.
Overview of differences
The key variations existing between the European (Lief’s) and NMT American version™ – which emerge from these examples – seem to relate to a far more structured and prescriptive approach in American NMT, with a variety of additional ‘tools’ being used, including elbows and pressure bars. While Lief’s version also has a (different) structured outline, it seems to require fewer ‘strokes’ or ‘glides’, while remaining in assessment mode until something is discovered that calls for therapeutic input. In therapeutic mode, the way in which tissues are addressed (ischaemic compression and frictional or cross-fibre methods) seems very similar to the American method, apart from the more restricted variety of contacts (European relies almost solely on finger or thumb contact).
NMT American version™ seems to move directly into a therapeutic ‘glide’ which has assessment potential, whereas Lief’s approach separates assessment from therapeutic input more definitively. Both approaches have proven to be successful training systems for those who are learning NMT techniques as well as reliable clinical protocols, which can be used as primary modalities for treating chronic pain and soft tissue dysfunction.
It is suggested that professional training be sought by those practitioners who want to practice NMT American version™ to help assure skill and safety. Although many of the steps can be learned through reading textbook descriptions, supervised training that includes performing and receiving the detailed routines is important. This method will help to develop skills that will be effective while also protecting both the patient and the practitioner.
Cailliet R. Soft tissue pain and disability. Philadelphia: FA Davis, 1977.
Chaitow L. Soft tissue manipulation: a practitioner’s guide to the diagnosis and treatment of soft tissue dysfunction and reflex activities. Rochester: Healing Arts Press, 1980.
Chaitow L. Modern neuromuscular techniques, ed 1. Edinburgh: Churchill Livingstone, 1996.
Chaitow L. Modern neuromuscular techniques, ed 2. Edinburgh: Churchill Livingstone, 2003.
Chaitow L., DeLany J. Clinical application of neuromuscular techniques. vol. 1. Edinburgh: Churchill Livingstone; 2000. The upper body
Chaitow L., DeLany J. ed 2. Clinical application of neuromuscular techniques. vol. 1. Edinburgh: Churchill Livingstone; 2008. The upper body
Chaitow L., DeLany J. Clinical application of neuromuscular techniques. vol. 2. Edinburgh: Churchill Livingstone; 2002. The lower body
DeLany J. The roots and branches of neuromuscular therapy. Florida: American Massage Therapy Association, 1999;16-17. no. 11
DeLany J. Connective tissue perspectives: introduction. Journal of Bodywork and Movement Therapies. 2000;4(4):273-275.
DeLany J. Connective tissue perspectives: neuromuscular therapy. Journal of Bodywork and Movement Therapies. 2000;4(4):276-277.
DeLany J. Neuromuscular therapy: care of soft tissue pain and dysfunction. Applications pack. St Petersburg, Florida: NMT Center, 2002.
Oschman J.L. What is healing energy? Pt 5: gravity, structure, and emotions. Journal of Bodywork and Movement Therapies. 1997;1(5):307-308.
Simons D., Travell J., Simons L. ed 2. Myofascial pain and dysfunction: the trigger point manual. vol. 1. Baltimore: Williams & Wilkins; 1999. The upper body
Stedman’s electronic medical dictionary. 1998. Version 4.0. Online Available http://www.stedmans.com
Travell J., Simons D. Myofascial pain and dysfunction: the trigger point manual. vol. 1. Baltimore: Williams & Wilkins; 1983. The upper body
Travell J., Simons D. Myofascial pain and dysfunction: the trigger point manual. vol. 2. Baltimore: Williams & Wilkins; 1992. The lower body
Vannerson J., Nimmo R. Specificity and the law of facilitation in the nervous system. Reprinted. Schneider M., Cohen J., Laws S., editors. The collected writings of Nimmo & Vannerson, pioneers of chiropractic trigger point therapy. Pittsburgh, Pennsylvania: Self-published, 1971. 2001
www.chirocolleges.org. Cervical spine adjusting and the vertebral artery. 2006. Powerpoint™ presentation available online; last viewed 8/2/09
Yates J. Physiological effects of therapeutic massage and their application to treatment. Vancouver: Massage Therapy Association of British Columbia, 1989.