Infection Control and Safety Issues in the Clinic
After studying this chapter, the student or practitioner will be able to do the following:
1 Recognize the role of occupational therapy personnel in preventing accidents.
2 Identify recommendations for safety in the clinic.
3 Describe the purposes of special medical equipment.
4 Identify precautions that should be taken when treating clients who require special equipment.
5 Identify Standard Precautions for infection control and explain the importance of following them with all clients.
6 Describe proper techniques of hand-washing.
7 Recognize the importance for all health care workers to understand and follow standard procedures used in client care to prevent the transmission of infectious agents.
8 Identify proper procedures for handling client injuries.
9 Describe guidelines for handling various emergency situations.
 Threaded Case Study
Donna, Part 1
Donna is a registered occupational therapist hired as Director of Occupational Therapy (OT) Services in a recently opened community hospital. This 300-bed general acute care hospital provides inpatient and outpatient services for individuals with a wide range of medical needs, including cardiac problems, brain injury, neurologic and orthopedic problems, and needs in oncology, obstetrics, and gynecology. Occupational therapy services are provided in acute care, skilled nursing, acute rehabilitation, and outpatient units.
As Director of OT Services, Donna must establish policies and procedures pertaining to client safety, infection control, medical emergencies, and precautions with special equipment. Donna must develop written guidelines and must identify and/or develop training requirements to ensure adequate orientation and preparation of OT personnel.
In preparing these policies and procedures, Donna must consider the following:
1. What general safety procedures and infection control standards should be followed to maintain a safe clinic environment?
2. What items of specialized medical equipment are occupational therapy personnel likely to encounter in their intervention with clients, and what precautions should be taken when treating a client who requires special equipment?
3. What are the basic guidelines and/or procedures to be applied in emergency situations?
4. What resources are available to health care providers that offer the most current information pertaining to safety procedures and infection control?
As you read through the chapter, keep in mind these questions and any other concerns confronting Donna in developing protocols, policies, and procedures for the safety of clients and OT personnel.
 Ethical Considerations
Occupational therapists have an ethical obligation to “demonstrate a concern for the well-being and safety of the recipients of their services” (S21).1 To meet these ethical obligations to clients, and to provide a physical context that supports clients’ engagement in meaningful occupations, occupational therapists need to be educated in proper safety procedures, infection control standards, and emergency interventions.
The Occupational Therapy Practice Framework-2 (OTPF-2) describes occupational therapy service delivery as a collaborative process between the client and the occupational therapy practitioner.2 This collaboration can occur in a variety of settings (e.g., hospitals, schools, community settings, home). Environment is an aspect of the domain of occupational therapy that can influence a client’s engagement in occupations. Environment is the “external physical and social environments that surround the client and in which the client’s daily life occupations occur” (p. 642).2 Therefore, the setting, or physical context, in which occupational therapy intervention occurs plays a significant role in the delivery of services in terms of supporting or inhibiting the client’s performance.
Medical technology and cost control pressures have made it necessary for rehabilitation professionals to treat seriously ill clients early in their illness and for shorter periods. In the hospital setting, it is not unusual for occupational therapists to work with clients using interventions that include specialized medical equipment such as catheters, intravenous (IV) lines, monitoring devices, and ventilators. These circumstances increase the potential for injuries to clients. In addition to ethical obligations to provide safe and proper intervention, OT personnel can be held legally liable for negligence if a client is injured because staff failed to follow proper procedures or standards of care.6
This chapter reviews specific safety precautions for use with a variety of clients. It identifies precautions to consider when encountering equipment commonly used with clients. Guidelines for handling various emergency situations are reviewed. It is important to note that the chapter is only an overview and cannot substitute for training in specific procedures used in many facilities. In addition to following these procedures, it is incumbent upon the occupational therapist to teach clients and their families applicable techniques that can be followed at home.
Safety Recommendations for the Clinic
Prevention of accidents and subsequent injuries begins with consistent application of basic safety precautions for the clinic:
1. Wash your hands for at least 15 seconds before and after treating each client to reduce cross-contamination.4
2. Make sure space is adequate to maneuver equipment. Avoid placing clients where they may be bumped by equipment or passing personnel. Keep the area free from clutter.10
3. Do not attempt to transfer clients in congested areas or in areas where your view or movement is blocked.10
4. Routinely check equipment to ensure that it is working properly.
5. Make sure that the furniture and equipment in the clinic are stable. When not using items, store them out of the way of the treatment area.
6. Keep the floor free of cords, scatter rugs, litter, and spills. Ensure that the floors are not highly polished, because polished floors may be very slippery.10
7. Do not leave clients unattended. Follow federal guidelines for the proper use of restraint equipment (bed rails, belts, vests, etc.) to protect clients when they are not closely observed.
8. Have the treatment area and supplies ready before the client arrives.
9. Allow only properly trained personnel to provide client care.
10. Follow the manufacturer’s and the facility’s procedures for handling and storing potentially hazardous material. Make sure that such materials are marked and stored in a place that is in clear view. Do not store such items above shoulder height.
11. Clearly label emergency exits and evacuation routes.
12. Have emergency equipment, such as fire extinguishers and first aid kits, readily available.
Precautions With Special Equipment
Newly hired OT personnel need orientation and education regarding the types of medical equipment they are likely to encounter when treating clients. Before providing any intervention to a client at bedside, the OT should carefully review the medical chart to determine whether any specific instructions regarding movement precautions, positioning, or handling should be followed. For example, a client may need to follow a turning schedule and may be limited in the length of time allowed to remain in one position. Certain joint movements may be contraindicated, or special bed and wheelchair positioning requirements may need to be followed, such as with clients recovering from burn injury, spinal cord injury, stroke, hip replacement surgery, and so forth. Special handling techniques may be required when working with clients who have catheters, feeding tubes, IV lines, or special monitors. The various chapters throughout this book that address specific diagnoses will identify necessary precautions and handling recommendations.
Hospital Beds
OT personnel must be educated in the proper use of hospital beds to ensure client safety. The most commonly used hospital bed is electrically powered, but some are adjusted manually (cranked) or by hydraulic methods. All hospital beds are designed to make it easier to support the client and to change a client’s position. Other, more specialized beds are needed for management of more complicated or more traumatic cases. Whatever type is used, the bed should be positioned so that the client is easily accessed and the therapist can use good body mechanics during mobility activities (see Chapter 11).
Most standard electrically adjustable beds are adjusted by means of electrical controls attached to the head or the foot of the bed or to a special cord that allows the client to operate the controls. The controls are marked according to their function and can be operated with the hand or foot. The entire bed can be raised and lowered, or upper and lower sections of the bed can be elevated or lowered to meet client needs. When the upper portion is raised 45 to 60 degrees, the client’s position is referred to as Fowler’s position.10 This commonly used position facilitates lung expansion, improves breathing, and decreases cardiac workload (as compared with supine lying). However, an important precaution for the OT to observe and address is that, in this position, the client may slide down in the bed, which increases shearing forces on tissues of the back.14
Side rails are attached to most beds as a protective measure. Some rails are lifted upward to engage the locking mechanism, whereas others are moved toward the upper portion of the bed until the locking mechanism is engaged. If a side rail is used for client security, the OT should be sure the rail is locked securely before leaving the client. The rail should be checked to ensure that it does not compress, stretch, or otherwise interfere with any IV or other tubing.
A rotating kinetic bed allows for realignment and stabilization of the client and places him/her in perpetual slow motion from side to side, which provides pressure relief and mobilization of respiratory secretions. The bed is constructed with hinged sections that can be removed to allow access to all areas of the body so that health care providers can provide necessary care and treatment.5 This bed is used most frequently with clients who have spinal cord injuries requiring immobilization. Another option is a turning frame (e.g., Stryker wedge frame), which has front and back frames that are covered with canvas. The support base allows elevation of the head or foot ends of the frame or of the entire bed. One person can easily turn the client horizontally from prone to supine or from supine to prone. The turning frame allows access to the client and permits the client to be repositioned without being removed from the frame.5 Because of the limited number of possible positions, the skin of clients using this type of bed should be monitored frequently.
The circular turning frame (circo-electric bed) has a front and a back frame attached to two circular supports. The frames on which the client is positioned move the client vertically from supine to prone or from prone to supine. The circular support frames are moved by an electric motor and can be stopped at any point within a 210-degree range.9 The client or another person can use a control switch to adjust the position. The circular turning bed is used with clients in traction, and to facilitate turning clients with severe burn injury. It provides the benefit of frequent position changes to relieve skin pressure. However, the client is still at risk for skin problems because of pressure forces that may occur when the bed is turned or rotated vertically. The bed can also serve as a standing frame when stopped in the vertical position, which is helpful for clients who can benefit from increased weight bearing and stress to the bones and muscles of the lower extremity.5 However, clients may experience symptoms of motion sickness such as vertigo, nausea, or hypotension when being turned. Devices that turn the client, such as the circo-electric bed, are potentially dangerous. Personnel should be fully trained in correct operation, and patients need to be carefully monitored for signs of discomfort, dizziness, respiratory changes, and faintness following repositioning. This bed is contraindicated for use with clients with unstable spinal fractures or certain other pathologic conditions.5
The air-fluidized support bed (e.g., Clinitron [Hill-Rom, Batesville, Ind]) rests the client on an air-permeable mattress that contains millions of silicon-coated beads called microspheres.9 Heated, pressurized air flows through the beads to suspend a polyester cover that supports the client. When set in motion, the microspheres develop properties associated with fluids. Clients feel as if they are floating on a warm waterbed. The risk for skin problems is reduced because of minimal contact pressure between the client’s body and the polyester sheet, which allows for even weight distribution and improved capillary blood flow to the skin. Friction and shearing of the skin are minimal. This bed is used with clients who have several infected lesions, or who require skin protection and whose position cannot be altered easily.5 Care should be taken to prevent puncturing the polyester cover (which would allow the microspheres to be expelled).
Ventilators
Ventilators (respirators) move gas or air into the client’s lungs and are used to maintain adequate air exchange when normal respiration is decreased.9 Two frequently used types of ventilators are volume-cycled ventilators and pressure-cycled ventilators. Both ventilators deliver a predetermined volume of gas (air) during inspiration and allow for passive expiration.14 The gas delivered by the ventilator usually will be introduced into the client through an endotracheal tube (ET), which is a catheter inserted through the nose or mouth into the trachea.9 When the tube is in place, the client is intubated. Insertion of the ET will prevent the client from talking. When the ET is removed, the client may complain of a sore throat and may have a distorted voice for a short period. It is important to avoid disturbing, bending, kinking, or occluding the tubing or accidentally disconnecting the ventilator tube from the ET. The client who uses a ventilator may participate in various bedside activities, including sitting and ambulation.13 Make sure the tubing is sufficiently long to allow the activity to be performed. Because the client will have difficulty talking, ask questions that can be answered with head nods or by other nonverbal means. A client using a ventilator may have a lower tolerance for activities and should be monitored for signs of respiratory distress such as a change in the respiration pattern, fainting, or blue lips.13
Monitors
Various monitors are used to observe the physiologic state of clients who need special care. Therapeutic activities can be performed by clients who are being monitored, provided that care is taken to prevent disruption of the equipment. Many of the units have auditory and visual signals that are activated by a change in the client’s condition or position or by a change in the function of the equipment. It may be necessary for a nurse to evaluate and correct the cause of the alarm unless the OT has received special instruction.
The cardiac monitor provides a continuous check on the function of the client’s heart, including electrical activity (electrocardiogram [ECG]), heart rate, blood pressure, and respiration rate.9 Acceptable or safe ranges for the three physiologic indicators can be set in the unit. An alarm is activated when the upper or lower limits of the ranges are exceeded, or if the unit malfunctions. A monitoring screen provides a graphic and digital display of the values so that healthcare staff can observe the client’s responses to treatment.
The pulmonary artery catheter (PAC) (e.g., Swan-Ganz catheter) is a long, plastic IV tube that is inserted into a thoracic vein through the right side of the heart and is terminated in the pulmonary artery. It provides accurate and continuous measurements of pulmonary artery pressures and will detect subtle changes in the client’s cardiovascular system, including responses to medications, stress, and activity.3 Activities, including OT interventions, can be performed with the PAC in place, providing they do not interfere with the location of insertion of the catheter. For example, if the catheter is inserted into the subclavian vein, elbow flexion should be avoided and shoulder motions restricted.
The intracranial pressure (ICP) monitor measures pressure exerted against the skull by brain tissue, blood, or cerebrospinal fluid (CSF).9 It is used to monitor ICP in clients with a closed head injury, cerebral hemorrhage, brain tumor, or overproduction of CSF. Some of the complications associated with this device are infection, hemorrhage, and seizures. Two of the more commonly used ICP monitoring devices are the ventricular catheter and the subarachnoid screw. Both are inserted in a hole drilled in the skull. Physical activities should be limited when these devices are in place. Activities that would cause a rapid increase in ICP, such as isometric exercises, should be avoided. Positions to avoid include neck flexion, hip flexion greater than 90 degrees, and the prone position. The client’s head should not be lowered more than 15 degrees below horizontal. Care must be taken to avoid disturbing the plastic tube.
The arterial monitoring line (A line) is a catheter that is inserted into an artery to continuously and accurately measure blood pressure or to obtain blood samples without repeated needle punctures.3 OT intervention can be provided with an A line in place, but care should be taken to avoid disturbing the catheter and inserted needle.
Feeding Devices
Special feeding devices may be necessary to provide nutrition for clients who are unable to ingest, chew, or swallow food. Some of the more commonly seen devices are the nasogastric (NG) tube, the gastric tube, and intravenous (IV) feedings.
The NG tube is a plastic tube inserted through a nostril, terminating in the client’s stomach. The tube may cause the client to have a sore throat or an increased gag reflex. Feeding training can be initiated while the NG tube is in place. However, care should be taken as the tube may desensitize the swallow mechanism.3 Caution should be used when moving the client’s head and neck, especially in forward flexion, to prevent dislodging of the tube.
The gastric tube (G tube) is a plastic tube inserted through an incision in the client’s abdomen directly into the stomach.3 The tube should not be disturbed or removed during the intervention.
Intravenous feeding, total parenteral nutrition (TPN), or hyperalimentation devices permit infusion of large amounts of nutrients needed to promote tissue growth. A hyperalimentation device is used when a client is unable to eat or absorb nutrients through the gastrointestinal tract.3 A catheter is passed into a large vein (typically the subclavian vein) that empties directly into the heart. The catheter may be connected to a semipermanently fixed cannula, or sutured at the point of insertion. The OT should carefully observe the various connections to be certain they are secure before and after intervention. A disrupted or loose connection may result in the development of an air embolus, which could be life threatening.3
The system usually includes a specialized feeding pump, which will administer fluids and nutrients at a preselected, constant flow rate. An audible alarm will be activated if the system becomes imbalanced, or when the fluid source is empty.3 Intervention activities can be performed as long as the tubing is not disrupted, disconnected, or occluded, and as long as undue stress to the infusion site is prevented. Motions of the shoulder on the side of the infusion site may be restricted, especially abduction and flexion.
Most intravenous (IV) lines are inserted into superficial veins. Various sizes and types of needles or catheters are used, depending on the purpose of the IV therapy, the infusion site, the need for prolonged therapy, and site availability. Care should be taken during intervention to prevent any disruption, disconnection, or occlusion of the tubing. The infusion site should remain dry, the needle should remain secure and immobile in the vein, and no restraint should be placed above the infusion site.3 For example, a blood pressure cuff should not be applied above the infusion site. The total system should be observed, to ensure that it is functioning properly when intervention begins and ends. If the infusion site is in the antecubital area, the elbow should not be flexed. The client who ambulates with an IV line in place should be instructed to grasp the IV support pole so that the infusion site will be at heart level.3 If the infusion site is allowed to hang lower, blood flow may be affected. Similar procedures to maintain the infusion site in proper position should be followed when the client is treated while in bed or at a treatment table. Activities involving elevation of the infusion site above the level of the heart for a prolonged period should be avoided. Problems related to the IV system should be reported to nursing personnel. Simple procedures such as straightening the tubing or removing an object that is occluding the tubing may be performed by the properly trained therapist.
Catheters
A urinary catheter is used to remove urine from the bladder when the client is unable to satisfactorily control retention or release.9 Urine is drained through plastic tubing into a collection bag, bottle, or urinal. Any form of trauma, disease, condition, or disorder affecting neuromuscular control of the bladder sphincter may necessitate the use of a urinary catheter. The catheter may be used temporarily or for the remainder of the client’s life.
A urinary catheter can be applied internally (indwelling catheter) or externally. Female clients require an indwelling catheter inserted through the urethra and into the bladder. Males may use an external catheter. A condom catheter is applied over the shaft of the penis and is held in place by an adhesive applied to the skin or by a padded strap or tape encircling the proximal shaft of the penis. The condom is connected to a drainage tube and a urine collection bag.3
When clients with urinary catheters are receiving OT intervention, several precautions are important. Disruption or stretching of the drainage tube should be prevented, and no tension should be placed on the tubing or the catheter. The urine collection bag must not be placed above the level of the bladder for longer than a few minutes to avoid backflow of urine into the bladder or kidneys (if indwelling catheter) or soiling of the client (if external catheter). The bag should not be placed in the client’s lap when the client is being transported. The production, color, and odor of the urine should be observed. The following observations should be reported to a physician or nurse: foul-smelling, cloudy, dark, or bloody urine, or a reduction in the flow or production of urine. The collection bag must be emptied when it is full.3
Infection is a major complication for persons using catheters, especially for those using indwelling catheters. Everyone involved with the client should maintain cleanliness during treatment. The tubing should be replaced or reconnected only by those properly trained. Treatment settings in which clients with catheters are routinely treated have specific protocols for catheter care.3
Two types of internal catheters that are frequently used are the Foley catheter and the suprapubic catheter. The Foley catheter is a type of indwelling catheter that is held in place in the bladder by a small balloon inflated with air, water, or sterile saline solution. For removal of the catheter, the balloon is deflated and the catheter is withdrawn. The suprapubic catheter is inserted directly into the bladder through incisions in the lower abdomen and the bladder. The catheter may be held in place by adhesive tape, but care should be taken to avoid its removal, especially during self-care activities.3 Catheter application and bladder management are activities of daily living (ADL) that are frequently taught to clients as part of a comprehensive OT intervention program (see Chapters 10 and 36 for examples).
Infection Control
Infection control procedures are used to prevent the spread of disease and infection among clients, health care workers, and others. They are designed to interrupt or establish barriers to the infection cycle. In 1996, the Centers for Disease Control and Prevention (CDC) published Guidelines for Isolation Precautions in Hospitals.
Universal Precautions (UP) were established to protect health care workers and the clients they serve from infectious agents such as the human immunodeficiency virus (HIV) and diseases such as acquired immunodeficiency syndrome (AIDS), hepatitis B, and hepatitis C. UP placed an emphasis on preventing the transmission of pathogens (infectious microorganisms) through contact with blood and bodily fluids.12 The CDC revised and developed additional guidelines for a system of isolation, called body substance isolation (BSI), which focused on isolating moist and potentially infectious body substances (blood, feces, urine, sputum, saliva, wound drainage, and other body fluids) from all patients.12 These guidelines recommended the use of Standard Precautions, which synthesized the primary features of BSI and UP. Standard Precautions apply to blood, all bodily secretions and fluids, mucous membranes, and nonintact skin (Box 9-1 and Figure 9-1).12
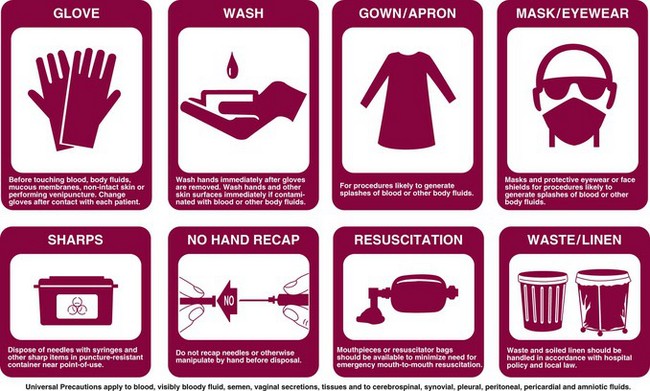
FIGURE 9-1 Universal blood and body fluid precautions. (Courtesy Brevis Corp, Salt Lake City, Utah.)
The most recent revision to the CDC guidelines (2007) recommends the use of two tiers of precautions to prevent transmission of infectious agents: Standard Precautions and Transmission-Based Precautions.12 “Standard Precautions are intended to be applied to the care of all patients in all healthcare settings, regardless of the suspected or confirmed presence of an infectious agent. Implementation of Standard Precautions constitutes the primary strategy for the prevention of healthcare-associated transmission of infectious agents among patients and healthcare personnel” (p. 66).12 Standard Precautions include hand hygiene; use of protective clothing such as gloves, gowns masks, or eye protection, depending on anticipated exposure; and safe injection practices. Specific recommendations for each area of the Standard Precautions are detailed in the CDC guidelines. Key features of these recommendations are summarized in Tables 9-1 and 9-2. Transmission-Based Precautions are additional standards that are implemented with clients who are known to be infected with infectious agents and require additional control measures to effectively prevent transmission.12 The new standards of the CDC also reflect current trends in the transition of health care delivery from primarily acute hospital settings to other settings (e.g., long-term care, home care). The new recommendations “can be applied in all healthcare settings using common principles of infection control practice, yet can be modified to reflect setting-specific needs” (p. 7).12 Additionally, the term nosocomial infection (i.e., hospital-acquired infection) has been replaced by health care–associated infection (HIA) “to reflect the changing patterns in healthcare delivery and difficulty in determining the geographic site of exposure to an infectious agent and/or acquisition of infection” (p. 7).12
TABLE 9-1
Warning Signs and Symptoms of Insulin-Related Illnesses
| Insulin Reaction (Insulin Shock) | Ketoacidosis (Diabetic Coma) | |
| Onset | Sudden | Gradual |
| Skin | Moist, pale | Dry, flushed |
| Behavior | Excited, agitated | Drowsy |
| Breath odor | Normal | Fruity |
| Breathing | Normal to shallow | Deep, labored |
| Tongue | Moist | Dry |
| Vomiting | Absent | Present |
| Hunger | Present | Absent |
| Thirst | Absent | Present |
TABLE 9-2
Recommendations for Application of Standard Precautions in the Care of All Patients in All Health Care Settings
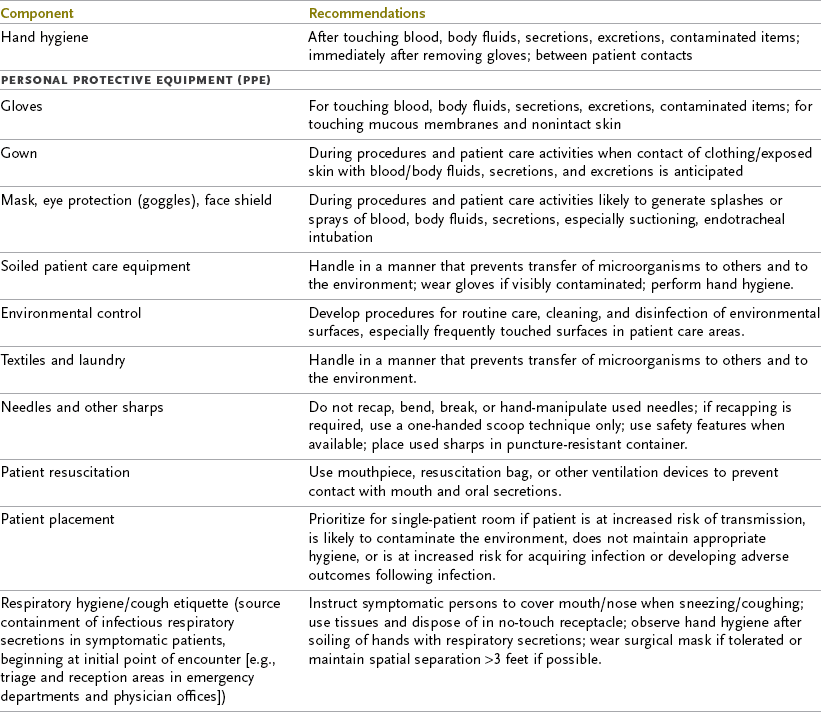
From Siegel JD, Rhinehart E, Jackson M, Chiarello L, Healthcare Infection Control Practices Advisory Committee: 2007 guideline for isolation precautions: preventing transmission of infectious agents in healthcare settings. Available at: http://www.cdc.gov/hicpac/pdf/isolation2007.pdf
The Occupational Safety and Health Administration (OSHA) issues regulations to protect the employees of health care facilities. All health care settings must do the following to comply with federal regulations:
1. Educate employees on methods of transmission and on prevention of hepatitis B, HIV, and other infections.
2. Provide safe and adequate protective equipment and teach employees where the equipment is located and how to use it.
3. Teach employees about work practices used to prevent occupational transmission of disease, including, but not limited to, Universal Precautions, proper handling of client specimens and linens, proper cleaning of body fluid spills (Figure 9-2), and proper waste disposal.
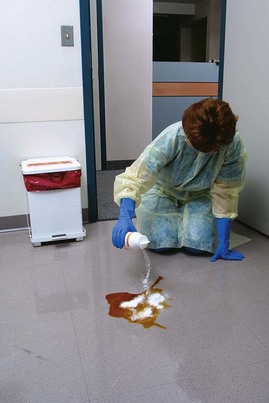
FIGURE 9-2 Spills of body fluids must be cleaned up by a gloved employee using paper towels, which should then be placed in an infectious waste container. Afterward, 5.25% sodium hypochlorite (household bleach) diluted 1:10 should be used to disinfect the area. (From Young AP: Kinn’s the medical assistant, ed 11, St Louis, 2011, Elsevier, Inc.)
4. Provide proper containers for the disposal of waste and sharp items, and teach employees the color coding system used to distinguish infectious waste.
5. Post warning labels and biohazard signs (Figure 9-3).
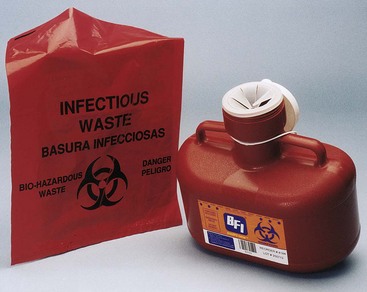
FIGURE 9-3 Biohazard label. (From Young AP: Kinn’s the medical assistant, ed 11, St Louis, 2011, Elsevier, Inc.)
6. Offer the hepatitis B vaccine to employees who are at substantial risk of occupational exposure to the hepatitis B virus.
7. Provide education and follow-up care to employees who are exposed to communicable disease.
OSHA has also outlined the responsibilities of health care employees. These responsibilities include the following:
1. Use protective equipment and clothing provided by the facility whenever the employee contacts, or anticipates contact with, body fluids.
2. Dispose of waste in proper containers, applying knowledge and understanding of the handling of infectious waste, and using color-coded bags or containers.
3. Dispose of sharp instruments and needles into proper containers without attempting to recap, bend, break, or otherwise manipulate them before disposal.
4. Keep the work environment and the client care area clean.
5. Wash hands immediately after removing gloves and at any other times mandated by hospital or agency policy.
6. Immediately report any exposures such as needle sticks or blood splashes or any personal illnesses to immediate supervisor, and receive instruction about any further follow-up action.
Although it is impossible to eliminate all pathogens from an area or object, the likelihood of infection can be greatly reduced. The largest source of preventable client infection is contamination from the hands of health care workers. Hand hygiene (Box 9-2 and Figure 9-4) and the use of gloves are the most effective barriers to the infection cycle.4,12 The use of gloves does not eliminate the need for hand-washing, and vice versa. Latex gloves provide the best protection from infectious materials. However, many individuals have latex allergies, so nonlatex gloves should be used for activities that are not likely to involve contact with infectious materials (e.g., food preparation, routine housekeeping, general maintenance).5 The CDC also recommends the use of alcohol-based hand rubs as an acceptable alternative to hand-washing. Alcohol-based hand rubs are fast acting, cause minimal skin irritation, and significantly reduce the presence of microorganisms on the skin.4
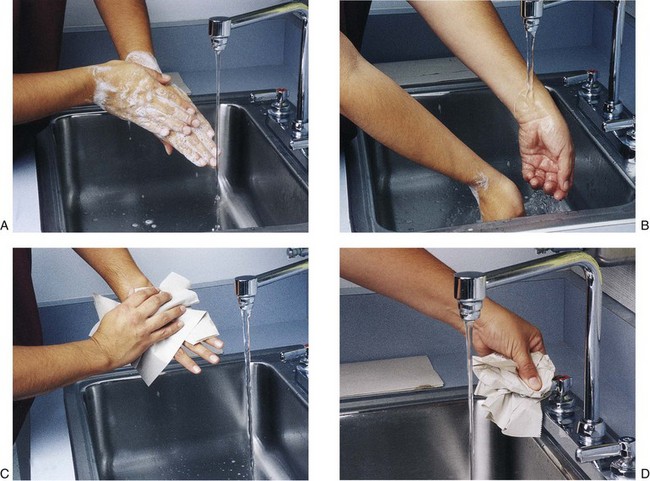
FIGURE 9-4 A, Hand-washing technique. Create a lather with soap. Keep hands pointed down. B, Rinse hands well, keeping fingers pointed down. C, Use a paper towel to dry hands thoroughly. D, After drying your hands, turn water faucet off, using a dry paper towel. (From Young AP: Kinn’s the medical assistant, ed 11, St Louis, 2011, Elsevier, Inc.)
In the clinic, general cleanliness and proper control of heat, light, and air are important for infection control. Spills should be cleaned up promptly. Work areas and equipment should be kept free from contamination.
To decontaminate is to “remove, inactivate, or destroy blood-borne pathogens on a surface or item to the point where they are no longer capable of transmitting infectious particles and the surface or item is rendered safe for handling, use, or disposal.”12 Items to be sterilized or decontaminated should first be cleaned thoroughly to remove any residual matter. Sterilization is used to destroy all forms of microbial life, including highly resistant bacterial spores. An autoclave is used to sterilize items by steam under pressure. Ethylene oxide, dry heat, and immersion in chemical disinfectants are other methods of sterilization.3
A variety of disinfectants may be used to clean environmental surfaces and reusable instruments. When liquid disinfectants and cleaning agents are used, gloves should be worn to protect the skin from repeated or prolonged contact. The CDC, local health department, or hospital infection control department can provide information about the best product and method to use.
Instruments and equipment used to treat a client should be cleaned or disposed of according to institutional or agency policies and procedures. Contaminated reusable equipment should be placed carefully in a container, labeled, and returned to the appropriate department for sterilization. Contaminated disposable items should be placed carefully in a container, labeled, and disposed of.
Contaminated or soiled linen should be disposed of with minimal handling, sorting, and movement. It can be bagged in an appropriate bag and labeled before transport to the laundry, or the bag can be color-coded to indicate the type or condition of linen it contains. Other contaminated items such as toys, magazines, personal hygiene articles, dishes, and eating utensils should be disposed of or disinfected. They should not be used by others until they have been disinfected.
 OT Practice Note
Therapists should routinely clean and disinfect personal items such as pens, keys, and clipboards, because these objects are touched frequently and may become contaminated.
Isolation Systems
Isolation systems are designed to protect a person or object from becoming contaminated or infected by transmissible pathogens. Various isolation procedures are used in different institutions. It is important for all health care workers to understand and follow the isolation approach used in their facilities so protection can be ensured. The CDC established Transmission-Based Precautions, which are intended for patients documented or suspected of being infected with highly transmissible or epidemiologically important pathogens. “Transmission-Based Precautions are used when the route(s) of transmission is (are) not completely interrupted using Standard Precautions alone” (p. 69).12 Three types of Transmission-Based Precautions may be used singly or in combination to control infectious transmission: contact precautions, droplet precautions, and airborne precautions. The CDC provides specific recommendations for each infection control measure. In addition, Appendix A of the 2007 guidelines provides a comprehensive list of the types of precautions (e.g., standard, contact, airborne, droplet) recommended for selected infections and conditions.12
When Transmission-Based Precautions are needed, a client is usually isolated from other clients and the hospital environment because he or she has a transmissible disease. Isolation involves placing the client in a room alone or with one or more clients with the same disease to reduce the possibility of transmitting the disease to others. Specific infection control techniques must be followed by all who enter the client’s room. These requirements are based on the type of infectious organism and common routes of transmission (i.e., airborne, direct or indirect physical contact, and droplets). Specific instructions are listed on a color-coded card and are placed on or next to the door of the client’s room. Strict isolation and respiratory isolation procedures are shown in Figure 9-5. Protective clothing, including gown, mask, cap, and gloves, may be needed. When leaving the client, the caregiver must dispose of protective clothing before leaving the room and must dispose of it in an appropriately designated area or container for storage, washing, decontamination, or disposal. Examples of diseases that require Transmission-Based Precautions include tuberculosis, severe acute respiratory syndrome (SARS), Clostridium difficile, chicken pox, measles, and meningitis.12
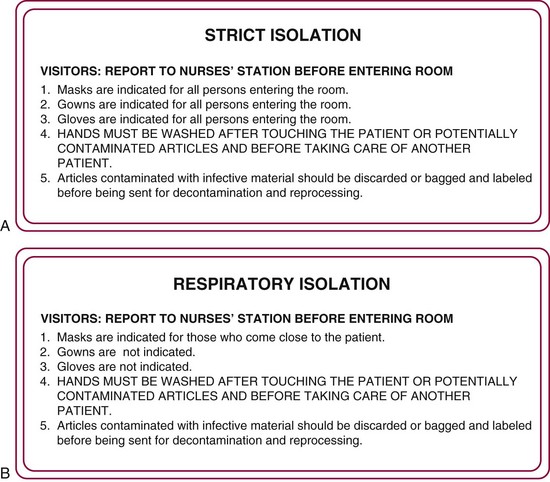
FIGURE 9-5 A, Strict isolation procedures sign. Card will be color-coded yellow and will be placed on or next to the door of the client’s room. B, Respiratory isolation procedures sign. Card will be color-coded blue and will be placed on or next to the door of the client’s room.
Occasionally, a client’s condition (e.g., burns, systemic infection) makes him or her more susceptible to infection. This client may be placed in protective isolation. In this approach, persons entering the client’s room may have to wear protective clothing to prevent the transmission of pathogens to the client. The sequence and method of donning the protective garments are more important than the sequence used to remove them.
Health care–associated infections continue to be a significant problem in a variety of health care delivery settings.12 It is critical that OT personnel be given proper education and training in infection control standards to prevent the spread of unnecessary infections.
Incidents and Emergencies
Occupational therapists should be able to respond to a variety of medical emergencies and to recognize when it is better to get assistance from the most qualified individual available, such as a doctor, emergency medical technician, or nurse. Securing such assistance should be relatively easy in a hospital but may require an extended period before response if the OT intervention is conducted in a client’s home or an outpatient clinic. It is a good idea to keep emergency telephone numbers readily available. The therapist will need to determine at the time of the incident whether it is wiser to ask for assistance before or after beginning emergency care.
Ethical Considerations
In most cases, it is best to call for assistance before initiating emergency care, unless delay is life threatening to the client.
All OTs should be certified in cardiopulmonary resuscitation (CPR) and should have received basic first aid training. Training and certification can be obtained through organizations such as the American Heart Association (www.americanheart.org) and the American Red Cross (www.redcross.org).
Consistently following safety measures will prevent many accidents. However, the therapist should always be alert to the possibility of an injury and should expect the unexpected to happen. Most institutions have specific policies and procedures to follow. In general, the therapist should do the following when an injury to a client occurs:
1. Ask for help. Do not leave the client alone. Prevent further injury to the client and provide emergency care.
2. When the emergency is over, document the incident according to the institution’s policy. Do not discuss the incident with the client or significant others or express information to anyone that might indicate negligence.11
3. Notify the supervisor of the incident and file the incident report with the appropriate person within the organization.
Falls
The risk of falling is always present when functional mobility is addressed with clients. The OT can reduce the risk of falling by carefully preparing the environment before initiating intervention. This includes use of a gait belt during mobility activities, clearing the environment of potential hazards, and having a wheelchair or chair nearby to pull into position for clients who might be prone to falling. The therapist can prevent injuries from falls by remaining alert and reacting quickly when clients lose their balance. Proper guarding techniques must be practiced. In many instances, it is wise to resist the natural impulse to keep the client upright. Instead, the therapist can carefully assist the client to the floor or onto a firm object.
If a client begins to fall forward, the following procedure should be used: Restrain the client by firmly holding the gait belt. Push forward against the pelvis and pull back on the shoulder or anterior chest. Help the client stand erect once it is determined that no injury has occurred. The client may briefly lean against you for support. If the client is falling too far forward to be kept upright, guide the client to reach for the floor slowly. Slow the momentum by gently pulling back on the gait belt and the client’s shoulder. Step forward as the client moves toward the floor. Tell the client to bend the elbows when the hands contact the floor to help cushion the fall. The client’s head should be turned to one side to avoid injury to the face.
If the client begins to fall backward, the following procedure should be used: Rotate your body so one side is turned toward the client’s back, and widen your stance. Push forward on the client’s pelvis and allow the client to lean against your body. Then, assist the client to stand erect. If the client falls too far backward, to stay upright, continue to rotate your body until it is turned toward the client’s back, and widen your stance. Instruct the client to briefly lean against your body or to sit on your thigh. You may need to lower the client into a sitting position on the floor using the gait belt and good body mechanics.
Burns
Generally, only minor, first-degree burns are likely to accidentally occur in occupational therapy. These can be treated with basic first aid procedures. Skilled personnel should be contacted for immediate care if the burn has any charred or missing skin or shows blistering. The following steps should be taken for first-degree burns in which the skin is only reddened7:
1. Rinse or soak the burned area in cold (not iced) water.
2. Cover with a clean or sterile dressing.
3. Do not apply any cream, ointment, or butter to the burn because this will mask the appearance and may lead to infection or a delay in healing.
4. Report the incident, so that the injury can be evaluated by a physician.
Bleeding
A laceration may result in minor or serious bleeding. The objectives of first aid treatment are to prevent contamination of the wound and to control bleeding. The following steps should be taken to stop the bleeding:
1. Wash your hands and apply protective gloves. Continue to wear protective gloves while treating the wound.
2. Place a clean towel or a sterile dressing over the wound, and apply direct pressure to the wound. If no dressing is available, use your gloved hand.
3. Elevate the wound above the level of the client’s heart to reduce blood flow to the area.
4. In some instances, the wound can be cleansed with an antiseptic or by rinsing it with water.
5. Encourage the client to remain quiet and to avoid using the extremity.
6. If arterial bleeding occurs (demonstrated by spurting blood), it may be necessary to apply intermittent, direct pressure to the artery, above the level of the wound. The pressure point for the brachial artery is on the inside of the upper arm, midway between the elbow and the armpit. The pressure point for the femoral artery is in the crease of the hip joint, just to the side of the pubic bone.
7. Do not apply a tourniquet unless you have been trained to do so.
Shock
Clients may experience shock as a result of excessive bleeding, sepsis, and respiratory distress; as a reaction to the change from a supine to an upright position; or as a response to excessive heat or anaphylaxis (severe allergic reaction). Shock causes a drop in blood pressure and inefficient cardiac output, resulting in inadequate perfusion of organs and tissues. Signs and symptoms of shock include pale, moist, and cool skin; shallow and irregular breathing; dilated pupils; a weak or rapid pulse; dizziness or nausea; and altered level of consciousness.7 Shock should not be confused with fainting, which would result in a slower pulse, paleness, and perspiration. Clients who faint generally will recover promptly if allowed to lie flat. If a client exhibits symptoms of shock, the following actions should be taken:7
1. Get medical assistance as soon as possible, as shock can be life threatening.
2. Try to determine the cause of shock and correct it if possible. Monitor the client’s blood pressure, breathing, and pulse rate.
3. Place the person in a supine position, with head slightly lower than the legs. If head and chest injuries are present, or if respiration is impaired, it may be necessary to keep the head and chest slightly elevated.
4. Do not add heat, but prevent loss of body heat if necessary by applying a cool compress to the client’s forehead and covering the client with a light blanket.
5. Do not allow exertion. Keep the client quiet until emergency medical help arrives.
Seizures
Seizures may be caused by a specific disorder, brain injury, or medication. The OT should be able to recognize a seizure and should take appropriate action to keep the client from getting hurt. A client having a seizure will usually become rigid for a few seconds and then will begin to convulse with an all-over jerking motion. The client may turn blue and may stop breathing for up to 50 to 70 seconds. A client’s sphincter control may be lost during or at the conclusion of the seizure, so the client may void urine or feces involuntarily.7 When a client shows signs of entering a seizure, the following steps should be taken:7
1. Place the person in a safe location, and position away from anything that might cause injury. Do not attempt to restrain or restrict the convulsions.
2. Loosen clothing around the person’s neck to assist in keeping the client’s airway open.
3. Do not insert any objects into the person’s mouth; this can cause injury.
4. Remove sharp objects (glasses, furniture, and other objects) from around the person to prevent injury.
5. When the convulsions subside, lay the person on his or her side to maintain an open airway and to prevent the person from aspirating any secretions.
6. After the convulsions cease, have the client rest. He or she may experience confusion for a period of time. It may be helpful to cover the client with a blanket or screen to provide privacy.
Insulin-Related Illnesses
Many clients seen in OT have insulin-related episodes. These episodes can occur as the result of severely inadequate insulin levels (hyperglycemia) or from excessive insulin (hypoglycemia).7 It is very important for the OT to be able to differentiate between the conditions of hypoglycemia (insulin reaction) and hyperglycemia (ketoacidosis), which can lead to diabetic coma, as shown in Table 9-1. Both conditions can result in loss of consciousness, but medical intervention for each condition is very different.
An insulin reaction (also called insulin shock) can be caused by too much systemic insulin, the intake of too little food or sugar, or too much physical activity.7 If the client is conscious, some form of sugar (e.g., candy, orange juice) should be provided. If the client is unconscious, glucose may have to be provided intravenously. The client should rest, and all physical activity should be stopped. This condition is not as serious as ketoacidosis, but the client should be given the opportunity to return to a normal state as soon as possible.
Hyperglycemia can develop when a person with diabetes fails to take enough insulin or deviates significantly from a prescribed diet. Ketoacidosis and dehydration occur, and can lead to a diabetic coma and eventual death if not treated.7 This should be considered a medical emergency requiring prompt action, including assistance from qualified personnel. The client should not be given any form of sugar. Usually, an injection of insulin is needed, followed by IV fluids and salt. A nurse or physician should provide care as quickly as possible.
Respiratory Distress
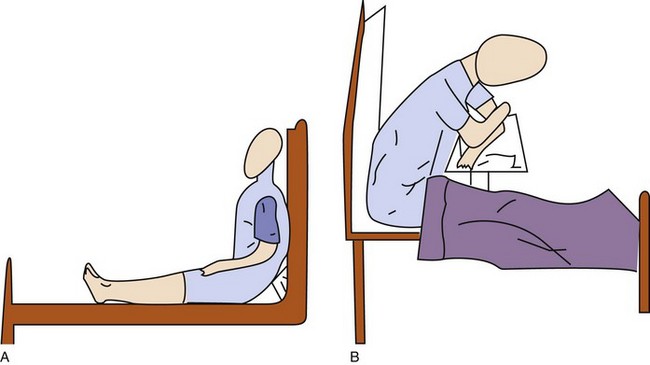
Dyspnea control postures may be used to reduce breathlessness in clients in respiratory distress.8 The client must be responsive and must have an unobstructed airway. The high-Fowler’s position (Figure 9-6, A) may be used for clients in bed. The head of the bed should be in an upright position at a 90-degree angle. If available, a footboard should be used to support the client’s feet. The orthopneic position (Figure 9-6, B) may be used for clients who are sitting or standing. In either case, the client bends forward slightly at the waist and supports the upper body by leaning the forearms on a table or counter. Pursed-lip breathing, which is a breathing pattern of inhaling through the nose and slowly exhaling through pursed lips, can help decrease dyspnea and the respiratory rate8 (see Chapter 44 for additional suggestions).
Choking and Cardiac Arrest
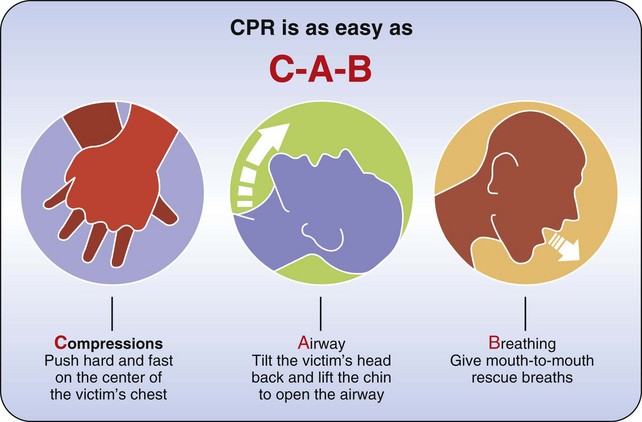
All health care practitioners should be trained to treat clients who are choking or suffering from cardiac arrest. Cardiopulmonary resuscitation (CPR) “is a series of life-saving actions that improve the chance of survival following cardiac arrest” (S.676).15 CPR certification involves instruction in recognizing a cardiac arrest, activating the emergency response system, performing specific CPR techniques, and using an automatic external defibrillator (AED). In addition, training in recognizing and providing intervention when an individual is choking is provided. In 2010, the American Heart Association introduced new standards for the performance of CPR and emergency cardiovascular care. Previous guidelines comprised three basic steps to CPR: establish airway, provide mouth-to-mouth resuscitation (breathing), and provide chest compressions (e.g., A-B-C). The new guidelines advise initiating chest compressions first, followed by establishing the airway, and then breathing (e.g., C-A-B) (Figure 9-7).15 Specific certification training courses are offered by both the American Heart Association and the American Red Cross. The following information is presented as a reminder of the basic techniques and is not meant to be substituted for training.
The urgency of choking cannot be overemphasized. Immediate recognition and proper action are essential. When assisting a conscious adult or a child who is older than 1 year, the following steps should be taken15:
1. Ask the client, “Are you choking?” If the client can speak or cough effectively, do not interfere with the client’s own attempts to expel the object.
2. If the client is unable to speak, cough, or breathe, check the mouth and remove any visible foreign object.
3. If the client is unable to speak or cough, position yourself behind the client. Clasp your hands over the client’s abdomen, slightly above the umbilicus but below the diaphragm.
4. Use the closed fist of one hand, covered by your other hand, to give three or four abrupt thrusts against the person’s abdomen by compressing the abdomen in and up forcefully (also known as the Heimlich maneuver). Continue to apply the thrusts until the obstruction becomes dislodged or is relieved, or the person becomes unconscious. It is no longer recommended that a rescuer perform a finger sweep to remove the object.
When assisting an adult or a child who is older than 1 year who appears to be unconscious, the following steps should be taken15:
1. Ensure that it is safe for you to intervene (no hazards or risky environmental conditions).
2. Activate the emergency response system (call for help, or call 9-1-1). Get an AED (defribrillator), if available. If two persons are available, one should call for help and get the AED, while the other individual initiates CPR.
3. Attempt to awaken or arouse the individual.
4. If the individual is unresponsive, place the person in a supine position on a firm surface.
5. Initiate chest compressions. Kneel next to the client, and place the heel of one hand on the inferior portion of the sternum superior to the xiphoid process (approximately in line with the nipples). Put your other hand over your first hand with the fingers interlaced. Position your shoulders directly over the client’s sternum, keep your elbows extended, and press down firmly, depressing the sternum approximately 2 inches with each compression. Relax after each compression, allowing the chest to fully recoil after each compression, but do not remove your hands from the sternum. The relaxation and compression phases should be equal in duration. Compressions should be applied at a rate of approximately 100 per minute.15
6. If you are not trained in CPR, continue to perform chest compressions until help arrives or the victim awakens.
7. If you are trained in CPR, perform 30 chest compressions, then open the victim’s airway using the head-tilt, chin-lift method.
8. Check for respiration by observing the chest or abdomen for movement, listen for sounds of breathing, and feel for breath by placing your cheek close to the person’s mouth. If no sign of breath is present, the client is not breathing, and you should initiate breathing techniques.
9. Pinch the client’s nose closed and maintain the head tilt to open the airway. Place your mouth over the client’s mouth and form a seal with your lips. Perform two full breaths. Your breaths should be strong enough to make the victim’s chest rise. Some persons prefer to place a clean cloth over the client’s lips before initiating mouth-to-mouth respirations. If available, a plastic CPR device can be used to decrease contact between the caregiver’s mouth and the client’s mouth and any saliva or vomitus.
10. Evaluate for circulation by palpating the carotid artery for a pulse. Sometimes it can be difficult to locate a pulse, so also observe the client for signs of life—breathing, movement, consciousness. If no pulse or signs of consciousness are noted, you must return to performing external chest compressions.
11. If you are performing CPR procedures without assistance, you should repeat 30 chest compressions followed by 2 breaths. Continue this sequence (30 compressions/2 rescue breaths) for 5 cycles, then stop to recheck the victim for breathing (chest rising, breath sounds) and evaluate for circulation (check carotid pulse). If the victim still is not breathing, resume CPR. Repeat this process, checking for breathing and pulse every 5 cycles, until qualified assistance arrives, or the client is able to sustain independent respiration and circulation.15 In all instances, the client will require hospitalization and evaluation by a physician.
12. If you have access to an AED, continue to perform CPR until you can attach the chest pads and turn the machine “on.” If you are alone and you observed the victim collapse, put the AED on immediately. If you did not observe the collapse, attach the AED after approximately 1 minute of CPR. The AED will analyze the victim’s heart for rhythm and will provide a shock if necessary. The AED machine provides auditory instructions for operation. After placement of the chest pads, it will analyze the victim’s heart for rhythm and will direct the rescuer to provide a shock or to continue CPR.15
(Note: Extreme care must be taken to open the airway of a person who may have experienced a cervical spine injury. In such cases, use the chin lift, but avoid the head tilt. If the technique does not open the airway, the head should be tilted slowly and gently until the airway is open.)
These procedures are appropriate to use for adults and for children 8 years of age and older. CPR is contraindicated if clients have clearly expressed their desire for “do not resuscitate” (DNR). This information should be clearly documented in the medical chart. A pamphlet or booklet containing diagrams and instructions for CPR techniques can be obtained from most local offices of the American Heart Association or from a variety of Websites.
Summary
All occupational therapy personnel have a legal and professional obligation to promote safety for self, the client, visitors, and others. The OT should be prepared to react to emergency situations quickly, decisively, and calmly. The consistent use of safe practices helps reduce accidents for both clients and workers and reduces the length and cost of treatment.
Threaded Case Study
Donna, Part 2
To adequately prepare the OT clinic as a safe environment for clients and staff, clear policies and procedures pertaining to client safety, medical emergencies, client safety, infection control, and precautions with special equipment need to be developed and implemented. In the case study presented at the beginning of this chapter, Donna, the Director of OT Services, was responsible for developing such policies and procedures. It should be mandatory for all OT personnel to become certified in CPR and first aid. Employee manuals can be produced that orient staff to general safety procedures and infection control standards. Furthermore, in-service education should be developed for newly hired personnel that familiarizes them with the types of specialized medical equipment that occupational therapy personnel are likely to encounter in their interventions with clients.
Many resources are available that can assist Donna in establishing these policies and procedures. The Centers for Disease Control and Prevention (www.cdc.gov), the Occupational Safety and Health Administration (www.OSHA.gov), and the National Institutes of Health (www.NIH.gov) are government organizations that provide the most current information pertaining to health standards, infection control, medical research, and workplace safety. Information on first aid, choking, and CPR can be obtained from most local offices of the American Heart Association and from the American National Red Cross. In addition, information on emergency procedures may be found at a variety of Websites.
1. Why is it important to teach the client and significant others guidelines for handling various emergency situations?
2. Describe at least four behaviors that you can adopt to improve client safety.
3. Why is it important to review a client’s chart before initiating an intervention?
4. What types of activities are appropriate when providing an intervention to a client who is ventilator dependent? What precautions must be taken during such activities?
5. Define the following: IV line, A line, NG tube, TPN or hyperalimentation, and catheter.
6. Describe Standard Precautions.
7. Why is it important to follow Standard Precautions with all clients?
8. Demonstrate the proper technique for hand-washing.
9. How should you respond to a client emergency?
10. Distinguish between an insulin reaction and ketoacidosis (diabetic coma). What is the appropriate medical intervention for each condition?
11. Describe how you would help a client who is falling forward and one who is falling backward.
12. Which emergency situations might require getting advanced medical assistance, and which situations could a therapist handle alone?
References
1. American Occupational Therapy Association. Occupational therapy code of ethics and ethics standards. Am J Occup Ther. 2010;60(6 Suppl):S17–S26.
2. American Occupational Therapy Association. Occupational therapy practice framework: domain and process, ed 2. Am J Occup Ther. 2008;62:625–683.
3. Bolander VB, ed. Sorensen and Luckmann’s basic nursing: a psychophysiologic approach, ed 3, Philadelphia: WB Saunders, 1994.
4. Centers for Disease Control and Prevention. Guideline for hand hygiene in health-care settings. MMWR. 2002;51(RR-16):1.
5. Dubois, R. Preventing complications of immobility. In Bolander VB, ed.: Sorensen and Luckmann’s basic nursing: a psychophysiologic approach, ed 3, Philadelphia, Pa: WB Saunders, 1994.
6. Ekelman Ranke, BA, Moriarty, MP. An overview of professional liability in occupational therapy. Am J Occup Ther. 1996;51:671–680.
7. Frazier, MS, Drzymkowski, JW. Essentials of human diseases and conditions, ed 4. St Louis, Mo: Elsevier; 2008.
8. Migliore, A. Management of dyspnea: guidelines for practice for adults with chronic obstructive pulmonary disease. OT Health Care. 2004;18:1–8.
9. Mosby’s dictionary of medicine nursing and health professions, ed 8, St Louis, Elsevier, 2009.
10. Occupational Safety and Health Administration. Hospital etool: healthcare wide hazards, slips/trips/falls. Available at http://www.osha.gov/SLTC/etools/hospital/hazards/hazards.html.
11. Pierson, FM. Principles and techniques of client care, ed 2. Philadelphia, Pa: WB Saunders; 1999.
12. Siegel, JD, Rhinehart, E, Jackson, M, Chiarello, L, Healthcare Infection Control Practices Advisory Committee. 2007 guideline for isolation precautions: preventing transmission of infectious agents in healthcare settings: from the US Department of Health and Human Services. Centers for Disease Control. Available at http://www.cdc.gov/ncidod/dhqp/pdf/isolation2007.pdf.
13. Smeltzer, SC, Bare, BG, Hinkel, JL, Cheever, KH. Brunnner and Suddarth’s textbook of medical-surgical nursing, ed 12. Philadelphia: Lippincott Williams & Wilkins; 2009.
14. Sussman, C, Bates-Jensen, B. Wound care: a collaborative practice manual for health professionals, ed 3. Philadelphia, Pa: Lippincott Williams & Wilkins; 2006.
15. Travers, AH, Rea, TD, Bobrow, BJ, et al. Part 4: CPR overview: 2010 American Heart Association guidelines for cardiopulmonary resuscitation and emergency cardiovascular care. Circulation. 2010;122(Suppl 3):S676–S684.