Providing Wound Care and Treating Pressure Ulcers
Upon completing this chapter, you should be able to:
1 Describe the physiologic process by which wounds heal.
2 Discuss factors that affect wound healing.
3 Describe four signs and symptoms of wound infection.
4 Discuss actions to be taken if wound dehiscence or evisceration occurs.
5 Identify the advantages of vacuum-assisted wound closure.
6 Explain the major purpose of a wound drain.
7 Compare and contrast the therapeutic effects of heat and cold.
1 Perform wound care, including emptying a drainage device and applying a sterile dressing.
2 Provide appropriate care for a pressure ulcer.
4 Remove sutures or staples from a wound and apply Steri-Strips.
abscess ( , p. 781)
adhesions ( , p. 777)
adipose ( , p. 780)
approximate ( , p. 778)
approximation ( , p. 787)
binders (p. 785)
cellulitis ( , p. 781)
collagen ( , p. 777)
débridement ( , p. 782)
erythema ( , p. 777)
eschar ( , p. 782)
exudate ( , p. 781)
fibrin (p. 776)
first intention ( , p. 778)
fistula ( , p. 781)
granulation tissue ( , p. 792)
hemostasis ( , p. 776)
immunocompromised ( , p. 780)
integument ( , p. 775)
keloid ( , p. 777)
laceration ( , p. 778)
lysis ( , p. 777)
maceration ( , p. 796)
macrophages ( , p. 777)
necrosis ( , p. 776)
phagocytosis ( , p. 777)
platelet aggregation ( , p. 776)
purulent ( , p. 780)
sanguineous ( , p. 780)
second intention (p. 778)
serosanguineous ( , p. 782)
sinus ( , p. 781)
sloughing ( , p. 782)
suppuration ( , p. 801)
third intention (p. 778)
TYPES OF WOUNDS AND THE HEALING PROCESS
Wounds occur in a variety of ways. Trauma may cause a break in the skin or partial- or full-thickness loss of skin. A surgical incision causes a break in skin integrity. Pressure can cause tissue breakdown and disruption of skin integrity. Burns can partially or completely destroy skin. The skin and mucous membranes are protective barriers for the body against infection. Injury to the integument (skin) brings risk of infection and may cause permanent damage. When the integument is damaged, a complex healing process is initiated. Nurses act to prevent the invasion of microorganisms into wounds and to support and enhance the body’s ability to effect wound repair.
Wounds may be open, occurring through the skin, or closed, without a break in the skin (Table 38-1). Closed wounds are caused by blunt trauma, twisting, pulling, straining, or deceleration force against the body.
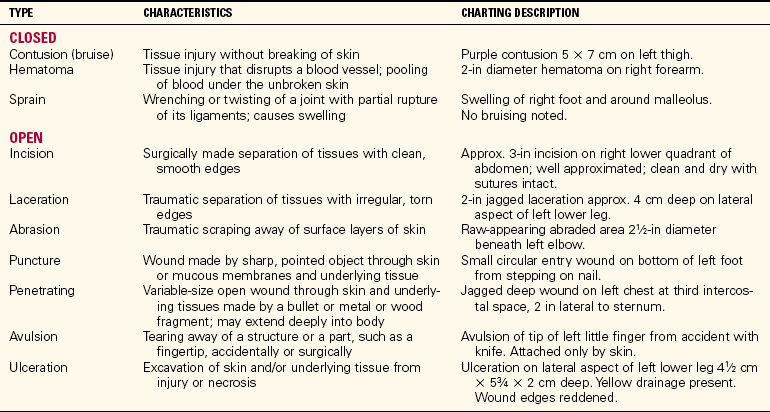
Wounds may be partial thickness (superficial) or full thickness. Partial-thickness wounds heal more quickly and do so by production of new skin cells by the epithelial cells remaining in the dermal layer of the skin. The fibrin clot that forms acts as the framework, and regrowth occurs across the open area. When a full-thickness wound occurs, the dermal layer is no longer present except at the wound margins. In order to heal, all dead (necrotic) tissue must be removed so that granulation tissue can gradually fill in the defect (Figure 38-1). The wound heals by contraction.
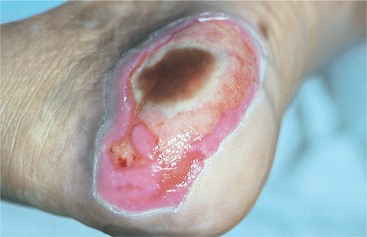
FIGURE 38-1 The brown necrotic tissue must be débrided before healing can take place in this pressure ulcer.
Wounds may be clean or dirty, indicating they are free of microorganisms or contain microorganisms, respectively. A wound is infected when it contains a large number of microorganisms.
When a wound occurs, either regeneration or replacement of cells occurs as it heals. When cells are not damaged beyond recovery, they will restore themselves, and there will be little permanent evidence of injury. If the cellular blood supply has been disrupted and necrosis (fatal injury to cells) has occurred, the affected tissue must heal by regeneration. New cells similar in structure and function to the dead ones are produced if the tissue is a type that will regenerate. Skin, mucous membranes, bone marrow, muscle, bone, liver, kidney, and lung tissue can regenerate with tissue that is structurally similar to that which was lost. Heart muscle and nerve cells are generally unable to regenerate. Replacement occurs in the form of fibrous connective tissue that does not have the same functional characteristics as the tissue lost when the wound occurred.
PHASES OF WOUND HEALING
No matter what the cause of the wound, there are three distinct phases of wound healing: the inflammatory phase, the proliferation or reconstruction phase, and the maturation or remodeling phase. Inflammation is a localized protective response brought on by injury or destruction of tissues. The inflammatory phase begins immediately after injury and lasts about 4 days. It includes constriction of blood vessels, platelet aggregation (clumping), and the formation of fibrin (insoluble protein essential to clotting) from the action of thrombin on fibrinogen and epithelial cell migration. This is the process of hemostasis (arrest of escaping blood by clotting or vessel compression) and clot formation. A scab forms to protect against the invasion of pathogens. Epithelial cells migrate from the margins of the wound toward the base of the scab, and within about 48 hours a thin layer of epithelial tissue forms over the wound. Chemical reactions releasing histamine and prostaglandin occur. Small blood vessels then dilate and become more permeable, causing serous fluid to leak into the traumatized area. The collection of plasma and electrolytes leaking into the interstitial spaces causes edema. The wound becomes reddened, swollen, and tender. More chemical reactions bring phagocytic neutrophils to cleanse the wound. The phagocytic cells remove debris and protect against bacterial invasion by phagocytosis (engulfing of microorganisms or foreign particles). The clinical signs of the inflammatory process are as follows:
• Swelling or edema of the injured part
• Erythema (redness) resulting from the increased blood supply
• Heat or increased temperature at the site
• Pain stemming from pressure on nerve receptors
• A possible loss of function resulting from all these changes
The proliferation stage begins on the third or fourth day after injury and lasts 2 to 3 weeks. Macrophages (monocytes that are phagocytic) continue to clear the wound of debris, stimulating fibroblasts, which synthesize collagen. Collagen (fibrous structural protein of all connective tissue) is the main ingredient of scar tissue. New capillary networks are formed to provide oxygen and nutrients to support the collagen and for further synthesis of granulation tissue. This tissue is deep pink in appearance. A full-thickness wound begins to close by contraction as the new tissue is grown. Scarring is influenced by the degree of stress on the wound. In 15 to 20 days, the risk of wound separation or rupture is less likely (Communication Cues 38-1).
The final stage of healing, maturation, begins about 3 weeks after injury. Scar maturation, or remodeling, is the process of collagen lysis (breakdown) and collagen synthesis by the macrophages to produce the strongest scar tissue possible. Scar tissue slowly thins and becomes paler in color. At the end of this process, the scar is firm and inelastic. The length of each phase is dependent on the type of injury and whether the wound heals by first, second, or third intention. Note that the stages of healing are interwoven rather than linear. Different parts of a wound can be in different stages of healing. The process of wound healing is presented in Concept Map 38-1.
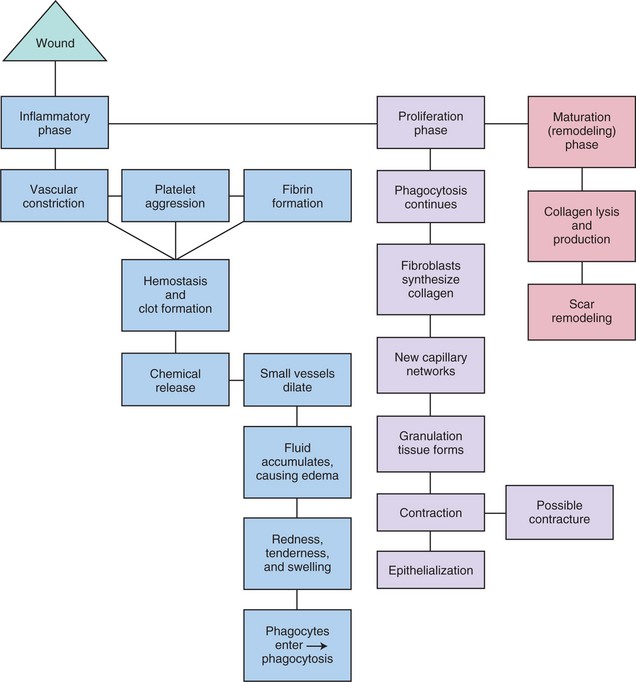
When a wound occurs around a joint, special attention is needed to maintain joint mobility and prevent a contracture (abnormal shortening of muscle tissue) that will restrict joint extension. If collagen overgrowth occurs, which is frequent in dark-pigmented skin, a keloid (permanent raised, enlarged scar) occurs (Figure 38-2). In the interior of the body, adhesions (fibrous bands that hold together tissues that are normally separated) may grow and interfere with the normal function of the internal organs around which they form.
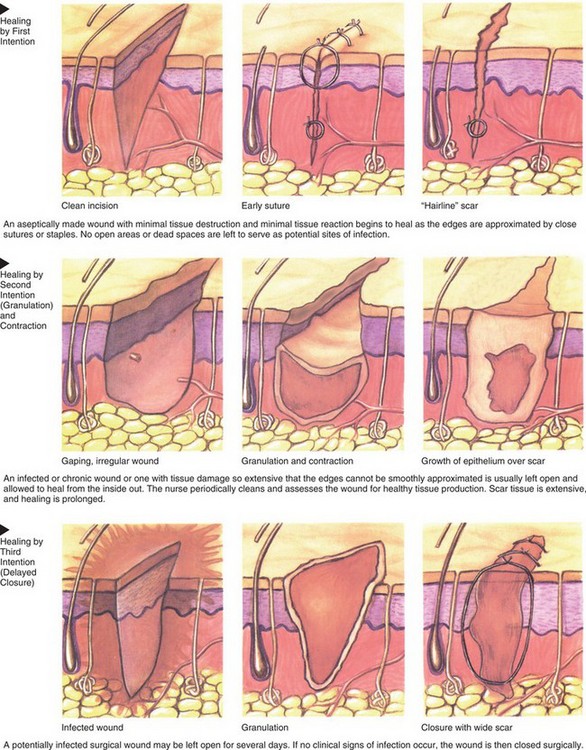
A wound with little tissue loss, such as a surgical incision, heals by first intention (closure) (Figure 38-3). The edges of the wound approximate (close together), and there is only a slight chance of infection. A wound with tissue loss, such as a pressure ulcer or severe laceration (a torn, ragged, or mangled wound), heals by second intention. The edges of the wound do not approximate, and the wound is left open and fills with scar tissue. Because of the longer healing period, the chance of infection is higher. Third intention healing, also known as delayed or secondary closure, occurs when there is delayed suturing of a wound. Such wounds are sutured after the granulation tissue has begun to form. An abdominal wound left open for drainage and then later closed is an example of healing by third intention.
FACTORS AFFECTING WOUND HEALING
Healthy children and adults heal more quickly than the elderly. Metabolism in the older adult is slower, and regeneration does not occur as quickly. The elderly may have chronic diseases that interfere with healing. Peripheral vascular disease impairs blood flow, which can impede healing. Atherosclerosis and atrophy reduce skin capillaries and impair blood flow to the wound. A decline in immune function reduces the formation of antibodies and monocytes necessary for wound healing. Reduced liver function impairs the synthesis of blood factors. Decreases in lung function reduce available oxygen needed for synthesis of collagen and the formation of new epithelial cells. The skin of the elderly is much thinner and more fragile and is easily damaged; patients’ skin should be handled carefully when performing wound care to avoid further wound formation.
NUTRITION
A diet rich in protein, carbohydrates, lipids, vitamins A and C, thiamine, pyridoxine, and riboflavin, and the minerals zinc, iron, and copper is needed for wound healing. See Chapter 26 for more information on nutrition. Malnourished patients are at risk for delayed wound healing. Added protein and adequate fluid are of great importance when a patient has a chronic wound. Adipose (fatty) tissue has less blood supply and predisposes the obese patient to risk of wound infection and slower healing.
LIFESTYLE
Regular exercise contributes to enhanced blood circulation and promotes healing because blood brings oxygen and nutrients to the wound. Smoking reduces the functional hemoglobin of the blood, which limits oxygen-carrying capacity. Cells need oxygen to function effectively. The person who does not smoke and who exercises regularly will heal more quickly.
MEDICATIONS
Steroids and other anti-inflammatory drugs, heparin, and antineoplastic agents interfere with various aspects of the healing process. Steroids in particular may mask the signs of wound infection because they inhibit the inflammatory response. The fact that infection is occurring would usually be evident due to inflammation, which may not occur when steroids are present.
INFECTION
A wound infection slows the healing process. The acute phase of an infection is characterized by a sudden onset of symptoms as well as by the vascular changes of inflammation, especially swelling caused by fluid collecting in tissue. The acute phase is followed by an increase in white blood cells to overcome the invaders and to clear away the damaged tissues so that healing can occur. A bacterial infection of the skin or mucous membranes frequently causes fluid drainage from the wound or damaged tissue.
CHRONIC ILLNESS
Patients who also have a chronic illness such as diabetes, cardiovascular disease, or a disorder of the immune system may heal more slowly. Slowed wound healing occurs from a decrease of available oxygen and nutrients at the cellular level, disruptions in the normal metabolism of substances in the body, or inability of the body to fight infection adequately.
Patients who are immunocompromised (with poorly functioning immune systems) have delayed wound healing because fibroblast function, collagen synthesis, and phagocytosis are affected. These patients are at high risk for hospital-acquired infection.
COMPLICATIONS OF WOUND HEALING
Some escape of blood from a wound is normal, but hemorrhage is abnormal. Internal hemorrhage is evidenced by swelling or distention in the area of the wound and, perhaps, sanguineous (bloody) drainage from a surgical drain.
If internal hemorrhage is extensive, hypovolemic shock may occur with a fall in blood pressure, rapid thready pulse, increased rate of respirations, restlessness, diaphoresis, and cold clammy skin. Intervene promptly to prevent a potentially life-threatening situation.
In other cases, a hematoma may occur. A hematoma may appear as a swelling that is bluish red. If a hematoma is large, it may place pressure on blood vessels and obstruct blood flow. The risk of hemorrhage is greatest during the first 48 hours after surgery, and when it occurs, it is an emergency. If external hemorrhage occurs, apply extra sterile pressure dressings to the site, closely monitor the patient’s vital signs, and report to the surgeon. The patient may need to be immediately returned to the operating room for further intervention.
INFECTION
A wound may be infected with microorganisms at the time of injury, during surgery, or postoperatively. Local signs that a wound is infected include increased pain at the wound site, redness around the wound, warmth in the surrounding tissues, and purulent exudate. Traumatic wounds are more likely to become infected than surgical wounds. A localized infection called an abscess is an accumulation of pus made up of debris from phagocytosis when microorganisms have been present. The liquid may be white, yellow, pink, or green, depending on the infecting microorganisms. Surgical wound infection is often a nosocomial infection, but can be from microorganisms that are present in the colon or on the surface of the skin.
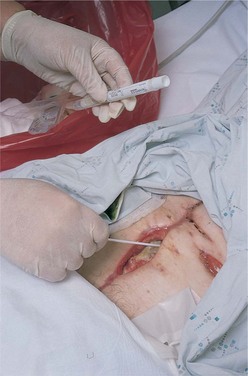
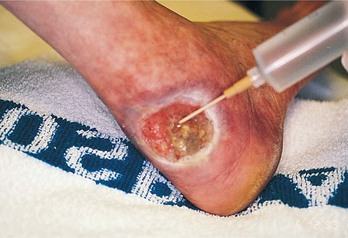
The microorganism most frequently present in wound infections is Staphylococcus aureus. Other microorganisms frequently responsible for wound infections include Escherichia coli, Streptococcus pyogenes, Proteus vulgaris, Aerobacter aerogenes, and Pseudomonas aeruginosa. When wound infection is suspected, a specimen of wound exudate (fluid accumulation containing cellular debris) is obtained and tested. A Culturette tube is used to obtain a specimen for the culture, and a sensitivity test is performed to determine which antibiotic is effective against the offending organism (Figure 38-4). Directions for obtaining a wound culture are found in Chapter 24.
Cellulitis is an inflammation of the tissue surrounding the initial wound, characterized by redness and induration. A fistula is an abnormal passage or communication usually formed between two internal organs or leading from an internal organ to the surface of the body. A fistula may result from an infection, or it may have a congenital origin. Common postoperative fistulas are designated according to the organs or parts with which they communicate, such as a rectovaginal, fecal, anal, or biliary fistula. A sinus is a fistula leading from a pus-filled cavity to the outside of the body.
The best way to prevent wound infection is to maintain strict asepsis when performing wound care. Use sterile equipment, meticulous handwashing, sterile gloves, and sterile dressings. Your hair should be contained so that it is not swinging over the wound during care, and the stethoscope should be removed from around the neck to prevent dropping microorganisms into the wound from it. Refrain from talking while dressing the wound to prevent microorganisms in your mouth or saliva from possibly landing in the wound.
DEHISCENCE AND EVISCERATION
Dehiscence is the spontaneous opening of an incision. Dehiscence of an abdominal wound often involves separation of the layers beneath the skin as well. Evisceration is the protrusion of an internal organ through the incision. Risk factors for dehiscence are obesity, poor nutrition, multiple trauma, excessive coughing, vomiting, strong sneezing, suture failure, and dehydration. The greatest risk for wound dehiscence is on the fourth or fifth postoperative day, before extensive collagen has been built up. A sign of impending de hiscence may be an increase in the flow of serosanguineous (serum and blood mixture) drainage into the wound dressing. When dehiscence occurs, the patient may state that “something has given way.” If dehiscence or evisceration occurs, quickly place the patient supine, and place large sterile dressings or towels soaked in normal saline over the incision and viscera. Notify the surgeon immediately and prepare the patient for return to surgery as soon as possible.
TREATMENT OF WOUNDS
Sutures and staples are used to hold the edges of a surgical wound together until the wound can heal. Traumatic wounds are usually cleaned, trimmed, and sutured. Sutures used to attach tissues beneath the skin are made of absorbable material and are not removed. They disappear within a few days. Skin sutures are made of silk, cotton, linen, wire, nylon, or Dacron. Silver wire clips are also sometimes used. Large retention sutures may be used on a wound when the surgeon believes that there is a danger of dehiscence. These are usually wire, and the portion of the suture outside the skin is covered with rubber. Sometimes the wound is small and Steri-Strips can be used. These are small, reinforced adhesive strips placed over the break in the skin that effectively hold the edges of the wound together while healing takes place.
Dermabond is a synthetic, noninvasive glue that decreases the trauma from removing a dressing, while providing a seal that protects underlying tissue without the need for bandages. This may sometimes be used in place of sutures in small areas. It loosens and comes off in 7 to 10 days. It is not used on mucous membranes.
The recommended method of open-wound classification is based on the color of the wound rather than its cause or dimensions. There are three basic wound types: red, yellow, and black. The type of wound indicates what type of dressing is needed. Red wounds are clean and ready to heal. Protection is the best method of treatment. A yellow wound has a layer of yellow fibrous debris or exudate. Sloughing (natural shedding of dead tissue) may cause drainage. A yellow wound needs to be continually cleansed and should have a dressing that will absorb the drainage and act to débride the surface mechanically. A yellow wound often becomes infected. Black wounds need débridement (removal of all foreign or unhealthy tissue from a wound) of the eschar (sloughing dead tissue, usually caused by a thermal injury or gangrene) to heal. Eschar can be mechanically débrided by a surgeon, softened by soaks or enzyme substances, and gradually removed as it separates.
DRAINS AND DRAINAGE DEVICES
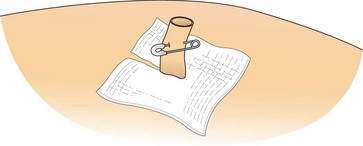
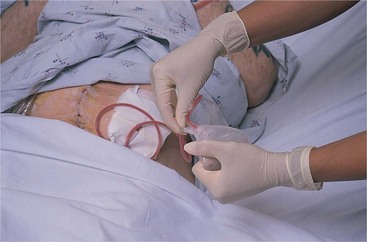
At surgery, one or more drains may be placed to provide an exit for blood and fluids that accumulate during the inflammatory process. The drain may be active or passive. An active drain is attached to a wound suction device. A passive drain has no suction device attachment; it works by gravity and capillary action. The drain is placed within the surgical area and exits through a “stab” wound (a puncture or slit made by the surgeon) at a location different from the incision. A Penrose drain is a flat rubber tube. Often a safety pin is placed at the external end of the drain to prevent it from slipping into the wound (Figure 38-5). Whenever this drain is ordered to be shortened, you would place a new safety pin proximal to where you will cut the drain tubing to the desired length before cutting the tubing. Various sizes of catheters can be used as drains also.
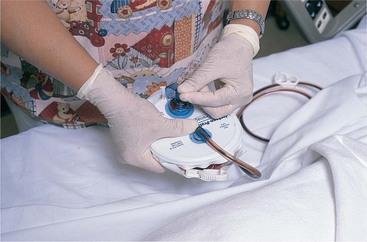
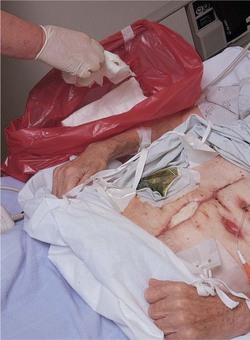
Plastic drainage tubes can be connected to a closed drainage system that is compressed and closed and thus applies slight suction to the drainage tube to help evacuate the fluids within the wound (Figure 38-6). The Hemovac and Jackson-Pratt devices are examples of such a system (Figure 38-7). The drainage device is emptied at the end of each shift, and the fluid is measured and entered on the intake and output record as output (Steps 38-1). Draining excess fluid from a wound area helps prevent the formation of an abscess or a fistula. Drains are sometimes used when traumatic wounds are sutured as well. The skin around the drain is cleansed during each dressing change.
DÉBRIDEMENT
Necrotic tissue must be removed from the wound before healing can occur. Sharp débridement is done at the bedside or in the operating room using sterile scissors, forceps, and a scalpel blade. Sharp débridement is performed when there are signs of cellulitis or sepsis. It is a painful procedure and the wound will bleed afterward. Usually, the surgeon performs this function. Nurses often are directed to perform enzymatic débridement, which uses topical substances that break down and liquefy the dead tissue. These substances are placed in the wound and another dressing is placed over it to hold them in place. This is very useful for uninfected wounds.
Chemical débridement using Dakin’s solution or sterile maggots is occasionally used on a wound with necrotic tissue that isn’t responding to other treatments. Autolytic débridement is a longer process that uses the body’s enzymes to break down nonviable tissue in the wound. It is best used on small, uninfected wounds as the type of dressing provides a warm, moist environment that could encourage growth of bacteria if they are present. The wound must be monitored closely for signs of infection during the autolytic process. Mechanical d ébridement is the physical removal of wound debris by irrigation or hydrotherapy with a whirlpool bath or ultrasound mist. The physical therapist performs the whirlpool procedure. With ultrasound mist therapy, microscopic saline bubbles and sound waves clean and débride the wound bed and remove bacteria while stimulating cell growth. Treatments are usually ordered three times a week. The procedure is painless, but may cause tingling and redness of the site after the treatment. The mist is delivered perpendicular to the wound. The mist is applied in a grid pattern.
Wet-to-dry dressings act to mechanically débride because they stick to the tissue, removing a layer of cells when removed. They are occasionally used but are no longer recommended because they also disrupt newly regenerated tissue.
DRESSINGS
Dressings, which are protective coverings placed over wounds, serve a number of different purposes. They prevent microorganisms from entering or escaping freely from the wound, and they absorb drainage. Dressings can be used for applying pressure to control bleeding and for improving the adherence of a skin graft to the grafted site. Finally, dressings help to support and stabilize tissues and reduce the discomfort from the wound.
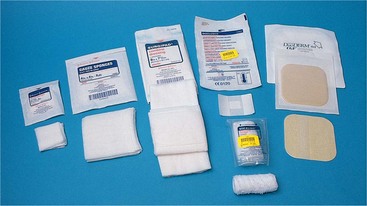
A wide variety of dressing materials are available for dressing a wound (Figure 38-8). Choices are based on the location, size, and type of wound; whether infection is present or débridement is needed; and the frequency with which the dressing will be changed. Several standard sizes of dry sterile gauze are available: 5 × 5 cm (2 × 2 inch), 10 × 10 cm (4 × 4 inch), and 10 × 20 cm (4 × 8 inch). The size and number of gauze pads needed depend on the size of the wound and the amount of exudate. Dressings may be folded or cut to fit around drains.
Telfa and other nonadherent dressings have a shiny, nonadherent surface on one side that is applied to the wound. Exudate seeps through this surface and collects in the absorbent material on the other side. This dressing causes less trauma to the wound when it is removed.
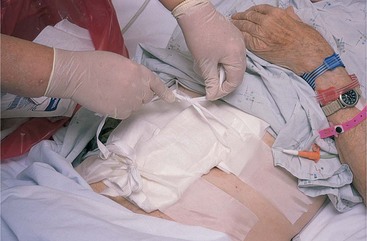
Surgi-Pads or abdominal pads (ABDs) are used to cover small gauze dressings. They hold the dressings in place and absorb and collect excess drainage. The more absorbent surface of the Surgi-Pad is placed facing the wound; the less absorbent outward side helps protect from external contamination. The outer side is usually indicated by a blue stripe or a seam. Whichever dressings are used, the purpose is to fully cover the wound and supply sufficient absorbent material to contain exudate produced. The outermost dressing should completely cover the inner dressings.
Since the early 1990s, it has been known that superficial wounds heal faster when kept moist than when kept dry. A variety of air or fluid occlusive and semiocclusive wound dressings have been developed, including thin films, hydrocolloids, and foams. These dressings keep the wound moist while insulating and protecting it from external contamination. Foam dressings absorb drainage. These dressings are used more frequently than gauze for chronic or hard-to-heal wounds.
Many combination varieties and other wound dressings are available now. It is important to assess exactly what the desired action for treatment of the wound is before choosing the appropriate dressing. The articles about wound dressings listed in the bibliography for this chapter can provide you with a wealth of specific information. Other types of dressings include hydrogels, foams, calcium alginate, composites, collagens, and enzymatic débriders. The two dressings most commonly used are transparent film and hydrocolloid dressings.
Transparent Film Dressings
Clear film dressings such as OpSite allow you to assess the wound without removing the dressing. The transparent dressing does not require the use of tape and is less bulky than a gauze dressing. These dressings are often used to cover intravenous catheter sites and to protect a Stage I or II pressure ulcer. They are useful for superficial, partial-thickness wounds. They do not absorb drainage. A transparent film dressing should be changed when it no longer adheres to the skin properly (Assignment Considerations 38-1). They may remain in place from 3 to 7 days. They are not used over an infected wound.
Hydrocolloid Dressing
Dressings such as DuoDERM keep a wound moist. They are water and air occlusive and self-adhesive. You cannot see through a hydrocolloid dressing. This dressing facilitates autolytic débridement and provides thermal insulation, keeping the wound warm. Once applied, this dressing may stay in place for 3 to 5 days as long as it stays intact with good skin contact on all edges. Hydrocolloids are not recommended for heavily draining wounds.
Securing Dressings
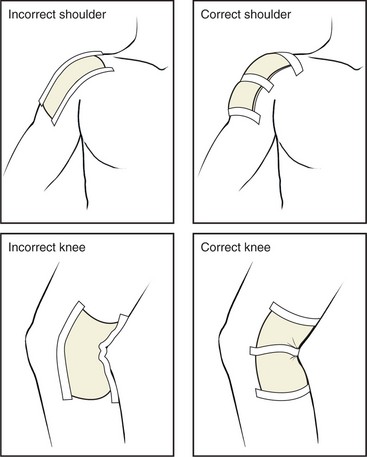
The dressing is secured to the wound using tape, stretch roller gauze (Conform, Kerlix, Kling), mesh netting, an elastic bandage, or Montgomery straps (tie tapes) (Figure 38-9). The correct product must be elected for the purpose. Elastic tape or bandages provide pressure, stretch gauze and mesh netting allow some movement without dislodging the dressing, and Montgomery straps allow changing of the dressing without removing and reapplying tape, which can cause repeated skin irritation (Figure 38-10). Tincture of benzoin may be applied before the tapes are applied to protect sensitive skin (Box 38-1). Strips of hydrocolloid dressing can be placed on either side of the wound edges, the dressing applied, and then tape applied to the hydrocolloid strips for wounds that need frequent dressing changes. Nonallergenic tapes are available for the patient who has an allergy to other types of tape. Ensure that tape adheres to the skin for several inches on both sides of the dressing, and place a length of tape across the middle of the dressing. Do not apply tape over irritated or broken skin. To remove tape, gently loosen the tape ends and gently pull each parallel to the skin surface toward the wound while applying light traction to the skin away from the wound as the tape is loosened. If the tape will not loosen, adhesive remover may be used.
BINDERS
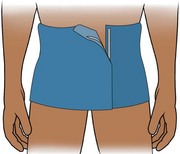
Binders (wide elasticized fabric bands) are used to decrease tension around a wound or suture line, increase patient comfort, decrease lactation after childbirth, or hold dressings in place. An abdominal binder provides support and comfort for an abdominal incision when the patient must perform deep breathing and coughing exercises and when getting in and out of bed (Figure 38-11). An elastic athletic supporter is used to hold dressings in place on the male scrotum and perineum. Elastic mesh panties or a sanitary belt is used to hold dressings in place for the female perineum.
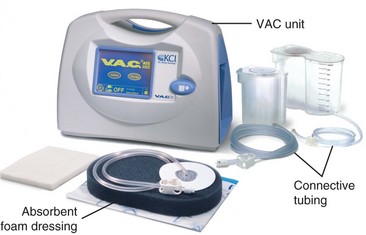
NEGATIVE PRESSURE TREATMENT
Wounds that are difficult to heal may respond to negative pressure wound therapy. This treatment can increase healing rate by 40% while minimizing the need for dressing changes. The therapy, known as vacuum-assisted closure (VAC), applies a suction device to a special wound dressing to institute negative pressure at the wound site, drawing the edges together (Figure 38-12). Mechanical stretch of cells occurs, which increases cellular proliferation and tissue growth. The negative pressure and suction remove fluid from the wound, allowing penetration of fresh blood (Box 38-2). After a few days of therapy, bacterial counts in the wound bed drop. The VAC system keeps the wound moist (Figure 38-13). The system may be used on a wound before a skin graft is performed to close the wound completely. Dressing changes for the system depend on the type of wound being treated. If the wound is infected, the dressing may be changed every 12 to 24 hours. For a clean wound, the dressing is changed three times a week.

TREATMENT OF PRESSURE OR VASCULAR ULCERS
Causes, staging, and prevention of pressure ulcers are presented in Chapter 19. An illustration of an ulcer at each stage is found there also. Treatment is discussed here along with care for all wounds.
Clean ulcers at each dressing change. Use only normal saline and apply light mechanical force with sponges or irrigation fluid to prevent damage to granulation tissue. Use 250 to 500 mL of solution and irrigate using a syringe with a small catheter to reach undermined areas and tunnels (Figure 38-14). Cover the wound with a dressing selected by the characteristics of the wound. Thin film dressings are used on Stage I ulcers to protect them from shearing forces and to keep them moist. For Stage II ulcers that are noninfected, use a hydrocolloid dressing that can be left on for up to a week, which will protect against bacterial contamination. For a Stage III ulcer that is draining, use a dressing that will absorb exudate and maintain a moist environment. For infected ulcers, a nonocclusive dressing is always used. Chemical enzyme formulas may be used in the wound to help débride eschar in Stage IV ulcers. Sometimes a wet-to-dry dressing may also be applied to help the sloughing of necrotic tissue by mechanical débridement. Occasionally hyperbaric oxygen chamber treatment is used to treat nonhealing wounds.
APPLICATION of the NURSING PROCESS
Assessment includes a complete inspection of all skin areas. Every abrasion, laceration, contusion, reddened pressure area, ecchymosis, and incision should be noted. Be alert for signs of inflammation: redness, swelling, pain, heat, and loss of function. The location and appearance of skin wounds should be documented each day in specific terms because changes can occur quite rapidly.
Wounds are assessed by visual inspection, palpation, and the sense of smell, noting the wound’s appearance and any drainage, swelling, odor, separation, and pain. Note the color of the wound and surrounding tissue as well as the approximation (degree of closure) of the wound edges, and determine whether signs of inflammation or infection are present. Assess for signs of systemic infection by checking temperature trend, white blood cell (WBC) count, and feelings of malaise. A temperature greater than 101° F (38.3° C), a WBC count greater than 10,000/dL, and a feeling of malaise may indicate wound infection. Assess acute wounds every 8 hours and chronic wounds once a day. Chronic wounds and pressure ulcers should be measured periodically to determine whether healing is occurring.
In a dark-skinned person, you must rely on localized skin color changes at and around the wound site. The affected skin may be darker than normal skin, or more shiny. Use the back of a gloved hand to detect increased warmth around the wound. Carefully assess the site for surrounding edema. Gently palpate the periphery of the wound for signs of pain.
Assess the progress of healing by checking the decrease in the size of the wound. The size of a nonsurgical wound should be measured and the length, width, and depth recorded. It is especially important to measure chronic wounds such as pressure or vascular ulcers. Moderate postoperative pain is normal for 3 to 5 days, but persistent severe pain or sudden onset of new pain may indicate infection or internal hemorrhage.
If the initial dressing is in place, it is not touched until the physician changes it or leaves orders for the nurse to do so; the dressing is assessed. The appearance of the dressing provides some indirect information about the wound underneath it. The dressing may be dry and intact, or it might be soaked with serous or serosanguineous drainage.
While changing a dressing, assess the color, consistency, odor, and amount of exudate. Note the number and type of dressings saturated or the diameter of the drainage on the dressing. With a gloved hand, gently palpate around the wound for tautness of tissues and swelling. Assess for drain placement and security, the amount and character of the drainage, and the effectiveness of any suction device. It is important to also assess the patient’s reaction to the wound and her readiness to learn to do wound care. Document your findings after the dressing change.
Nursing Diagnosis
Common nursing diagnoses used for patients with wounds are as follows:
• Impaired skin integrity related to surgical incision (or trauma)
• Risk for infection related to nonintact skin or impaired skin integrity
• Acute pain related to infected wound
• Activity intolerance related to pain and malaise from wound infection
• Disturbed body image related to wound appearance
Planning
Time for wound assessment and care must be included in the daily work organization plan. Consideration of whether dressings may become damp from bathing dictates whether wound care is provided before or after a shower or bath. Check orders for directives regarding wound care. Dressing changes require a physician’s order, and irrigations may only be done with an order. Check the chart for the date of wound occurrence or the surgical procedure in order to understand how old the wound is. This information is essential to assess the progress of wound healing. Determine what supplies will be necessary for a dressing change or irrigation.
Sample goals/expected outcome statements related to the nursing diagnoses listed above are as follows:
• Incision will be well approximated without disruption.
• Wound will be clean and dry without redness or swelling.
• Pain will resolve when infection is cleared.
• Activity tolerance will improve when infection resolves.
• Patient will verbalize acceptance of wound appearance.
• Patient will learn to properly perform wound care before discharge.
• Practice of wound care before discharge will alleviate anxiety.
A specific time frame for the outcome to be met is attached for individual patients.
Implementation
When implementing wound care, the nurse must use the principles of asepsis presented in Chapters 16 and 17. Careful technique is essential in preventing contamination of the wound and spread of infection if it is present. Standard Precautions are used for all patient care and are particularly important during wound care, when one comes into direct contact with body fluids. Sterile gloves or sterile forceps are used whenever an open or fresh surgical wound is touched. After the wound is sealed, nonsterile disposable gloves may be used. If a dressing becomes wet, it must be changed (Nursing Care Plan 38-1).
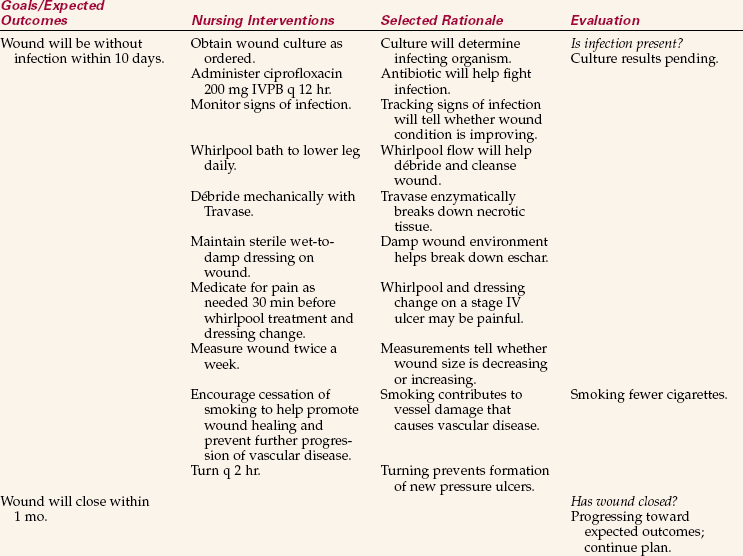
NURSING CARE PLAN 38-1
Care of the Patient with a Vascular Ulcer
Frank Walters, age 62, has a vascular ulcer on his left lower leg. He had originally bruised the spot when working in the garden. Now he has a stage IV ulcer that is not improving. His physician has admitted him for débridement and whirlpool treatments because he lives 75 miles from the city.
Open wound/Impaired skin integrity related to injury and decreased peripheral blood supply.
Supporting Assessment Data: Subjective: “It’s been there for 2 months. It will not heal.” Objective: 5 × 4½-cm open wound on lower outside aspect of lower left leg with area of black eschar on upper aspect, yellow tissue, and purulent drainage.
Wound Cleansing and Dressing Change: Wounds should be cleaned with warmed isotonic saline or lactated Ringer’s solution. Sometimes antibiotic solutions are ordered for wound irrigation. These must be kept refrigerated, and the amount to be used should be allowed to come to room temperature before the irrigation. Using cold solution lowers the wound temperature, which slows healing. If antimicrobial solution is used, be sure it is properly diluted. Grossly contaminated or infected wounds are cleaned at each dressing change. Cleaning a healthy wound incorrectly can cause mechanical trauma and delay healing (Safety Alert 38-1). Use gauze squares and avoid using cotton balls to cleanse because fibers can become imbedded in the wound. For superficial, noninfected wounds, rinse lightly with normal saline rather than cleansing by using gauze. This reduces mechanical trauma to the wound. Avoid drying a wound after cleaning so that it will stay moist. Surgical wounds are cleansed from the center outward to prevent pulling microorganisms from the skin into the wound. Surgical wound and open wound dressings are changed using sterile technique (Skill 38-1).
Skill 38-1
Sterile dressing changes are performed for surgical wounds, open wounds, and pressure or vascular ulcers. The physician orders the frequency of the dressing change.
 Supplies
Review and carry out the Standard Steps listed in Appendix 3.
4. ACTION Perform hand hygiene. Loosen the binder or tape; put on clean gloves and remove the old dressing; pull off the tape toward the wound while stabilizing the skin with the other hand. If tape won’t loosen, rub over it with an alcohol swab for several seconds or use adhesive remover. Assess the drainage on the dressings and place them in the plastic discard bag. Wet the dressing with normal saline solution if it sticks to the suture line and wait a few minutes before removing it.
RATIONALE Gloves prevent spread of microorganisms; removing old dressing allows visual assessment of the wound and drainage. Pulling tape toward the wound prevents disruption of the wound. Alcohol helps loosen stubborn adhesive, as does adhesive remover.
5. ACTION Inspect the wound, noting degree of healing, presence of pus, and necrosis; check for odor, drainage, and condition of sutures or drain. Remove gloves and discard them. Perform hand hygiene.
RATIONALE Provides data for determining progress of wound healing or presence of infection.
6. ACTION Set up sterile field, placing items in the order in which they will be used. Open the sterile supplies.
RATIONALE Assists in maintaining a sterile field during the procedure and allows the procedure to be done efficiently. Readies supplies for use.
7. ACTION Put on sterile gloves and clean the area around the wound using normal saline or ordered disinfectant. Cleanse by one of the following methods:
a. Use a separate swab from top to bottom on each side of the incision and continue outward.
b. Use a separate swab from the wound edge outward on one side and then on the other side from top to bottom. Do not cleanse directly over the wound unless there is excessive drainage and if it is an agency policy. Cleanse the drain sites using a circular motion from the drain outward.
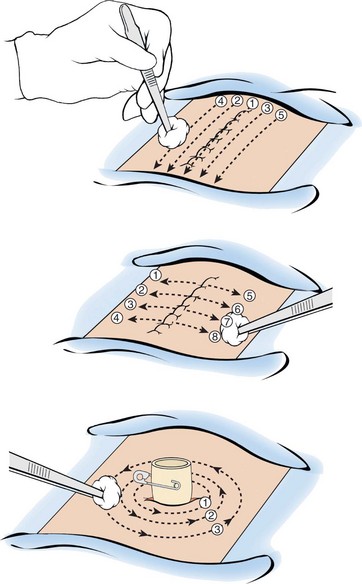
c. Use a circular motion from the wound outward in an ever-widening circle.
RATIONALE Sterile technique prevents contamination of the wound. The top of the wound is considered the cleanest area. Cleansing by these methods prevents contaminating the wound. If considerable drainage is present, the wound itself is gently cleansed using a fresh swab for each single stroke.
8. ACTION Apply ointment or medication using applicators if ordered.
RATIONALE An order is essential for any medication. Using applicators decreases the chance of contamination of the tube or the medication container.
9. ACTION Apply the dressings by positioning them lightly over the wound area; cover the entire wound and do not move dressing once it is placed over the wound. Remove and discard the gloves. Secure the dressing in place. If there is difficulty in getting the tape to stick to the skin, a skin preparation can be used on the skin surface to make the adhesive stick. A binder or Montgomery straps may be used to hold the dressings in place.
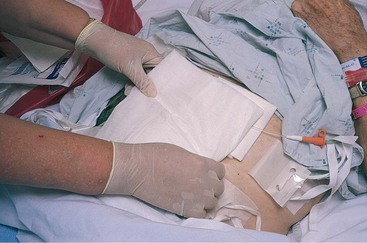
RATIONALE Moving the dressing from one area to another may transfer microorganisms; securing the dressing ensures that the wound stays covered.
10. ACTION Contain the used dressings in the discard bag and deposit into the biohazard trash container. Perform hand hygiene.
11. ACTION Ask yourself: Are there signs of infection, such as redness and warmth around the wound edges; is thick or colored exudate present? Is the amount of drainage decreasing? Is the wound drain still in place? Had drainage soaked through the dressing? Did the dressing stay intact?
RATIONALE Answers to these questions provide data regarding wound healing and whether the dressing was sufficient to cover the wound and contain the drainage.
7/19 1430 Dressing changed with sterile technique using six 4 × 4s and two combined ABDs. Incision clean, dry, and well approximated. Small amount of serous drainage on dressing. Skin cleansed with alcohol swabs. Reinforced teaching re: keeping dressing dry and in place, technique for wound cleansing and dressing change, and signs and symptoms of infection to report immediately.
• Wound care instruments can be cleaned with warm, soapy water and boiled for 10 minutes to sterilize. Allow to air dry and store them in a covered container.
• Remind the patient and family to dispose of soiled dressings in impermeable bags to prevent the spread of infection.
• Montgomery straps can be devised by using wide adhesive tape folded back on itself, making holes in the flap ends, and using a shoelace or rubber bands and safety pins to secure the straps together after they are attached to the skin.
• Provide patients with information on where to obtain dressing materials.
• Provide a wound flow sheet to encourage the patient or family to record the characteristics of the wound when the dressing is changed. Include columns for date and for a description of characteristics of the wound.
• For a child, helping the child change a dressing on a stuffed bear or doll helps decrease anxiety about dressing changes.
• The elderly often have decreased vision and may need more assistance than realized to perform wound care and assess the wound.
• Arthritis in the hands may make it difficult for a person to manage a dressing change independently.
Hydrocolloid Dressings: Hydrocolloid dressings are only applied to uninfected wounds; they keep the wound moist and block entry of microorganisms. A variety of hydrocolloid dressings are available. These are often used on a vascular or pressure ulcer to promote healing after the wound is clean (Steps 38-2).
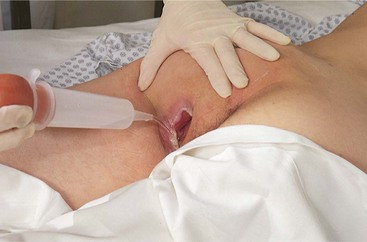
Wound Irrigation, Débridement, and Packing: An irrigation is the flushing out of an area with a liquid. Wound irrigation is done only with an order from the physician and requires sterile technique. Using a piston syringe instead of a bulb syringe helps prevent the aspiration of drainage and contamination of the syringe. For deep wounds with small openings, a sterile straight catheter may be attached to the syringe. The wound edges may need to be held open so that the solution can reach the depths of the wound. Skill 38-2 presents the steps in irrigating a wound.
Skill 38-2
Wound irrigations are ordered by the physician. They are performed when a wound is infected, has large amounts of drainage, or contains necrotic material.
 Irrigation set Syringe with large-bore blunt needle or sterile angiocath
Review and carry out the Standard Steps listed in Appendix 3.
3. ACTION Perform hand hygiene. Put on clean gloves. Using aseptic technique, expose the wound, placing the soiled dressings in the discard bag. Remove gloves and perform hand hygiene.
RATIONALE Prevents transfer of microorganisms; prepares the wound for irrigation.
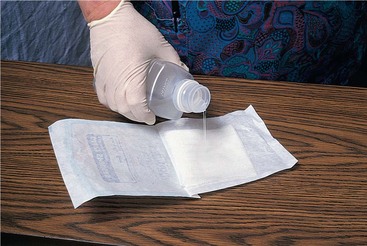
4. ACTION Aseptically prepare the irrigation set by pouring the solution into the container and checking the action of the syringe plunger. Place an underpad beneath the area to be irrigated. Place a basin to catch drainage against the side of the area being irrigated. Have the patient hold the basin in place if possible.
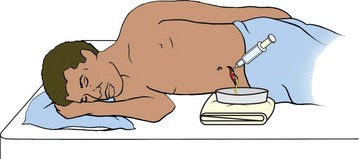
RATIONALE Preparing the irrigation set ensures that the equipment is ready before putting on sterile gloves. An underpad protects linens from moisture. The basin catches most of the irrigation fluid.
5. ACTION Don sterile gloves. Draw up solution into the syringe by pulling back on the plunger or squeezing the bulb. Hold the tip of the syringe about 1 inch from the wound surface, and steadily push on the plunger or squeeze the bulb to eject fluid into the wound. Repeat until all debris is washed from the wound or the amount of solution ordered for irrigation has been used. Irrigate all areas of the wound.
RATIONALE Keeping the syringe tip 1 inch away from the wound surface prevents contamination of the syringe. Using a 20-gauge needle or angiocath on the syringe causes an effective spray to cleanse the wound. Fluid washes out debris and necrotic tissue.
6. ACTION Dry the skin with gauze sponges so that tape will stick, and apply a sterile dressing.
RATIONALE Prepares the wound for the dressing; covers the wound.
7. ACTION Remove the gloves and discard them. Perform hand hygiene.
7/19 1830 Left buttock wound irrigated with 150 mL normal saline using sterile technique. Wound with pink tissue and serous drainage; no odor noted. Sterile dressing applied.
When the irrigation is not ordered as a sterile procedure, equipment is kept as clean as possible and reused. This is common in the home environment.
All irrigations of deep wounds should be done with sterile technique.
If the patient cannot hold a basin against the area in which it is needed, use pillows covered with plastic and underpads to position the basin firmly against the skin.
A wound may be packed with gauze packing to facilitate formation of granulation tissue (connective tissue with multiple small vessels) and healing by second intention or to débride the wound. Usually moistened or medicated non–cotton-filled gauze is used in the form of fluffed (unfolded and loosely placed) 4 × 4s or strips. Either a wet-to-dry or a wet-to-damp technique is used. In the wet-to-dry technique, the dressings are moistened and packed into the wound and allowed to dry between dressing changes, which are done every 4 to 6 hours. As the dressings dry, they trap necrotic material and mechanically débride the wound when the dressing is removed. Removal of the dry packing is painful because it may remove some granulation tissue also. This technique is falling out of favor, but is still occasionally used. The wet-to-damp technique for packing is the preferred treatment for noninfected wounds (Skill 38-3). Moistened gauze packing is placed in the wound to absorb exudate, but is not allowed to dry before removal and therefore does not damage newly formed tissue.
Skill 38-3 Applying a Wet-to-Damp or Wet-to-Dry Dressing
Wet-to-damp dressings are used to keep a wound moist and promote healing; wet-to-dry dressings help débride wounds and encourage cellular growth from the base of the wound up to the surface. Wet-to-dry dressings have been largely replaced by other methods of débridement because they may harm new cell growth when the dressing is removed.
2. ACTION Plan the appropriate time in your work schedule to perform the dressing change. Determine if all needed supplies are available and on hand at the patient’s bedside. Wet-to-damp dressings are changed more frequently than wet-to-dry dressings.
RATIONALE Assists in performing the procedure smoothly and quickly.
3. ACTION Prepare the work space, and open the dressing packages and sterile container for the wetting solution; perform hand hygiene and don clean gloves.
RATIONALE Readies the dressings and solution for work. Institutes Standard Precautions.
4. ACTION For wet-to-damp dressing, slowly and carefully remove the gauze. If it is stuck to the wound, add a little normal saline to loosen it. For wet-to-dry dressing, gently and steadily pull the gauze to remove it, débriding the necrotic tissue. Place used dressings in the discard bag.
RATIONALE Pulling a stuck dressing loose damages new tissue. A wet-to-dry dressing is not remoistened when removing it.
5. ACTION Remove dirty gloves, perform hand hygiene, and pour the sterile wetting solution into the basin.
RATIONALE Solution should be poured before putting on sterile gloves.
6. ACTION Don the sterile gloves.
RATIONALE Prepares hands for sterile procedure.
7. ACTION Place the needed dressings in the wetting solution or moisten by pouring solution on them.
RATIONALE Dressings should be thoroughly soaked.
8. ACTION Wring out dressings one by one and lightly press fluffed gauze into the wound, covering all exposed surface.
RATIONALE Dressings should be moist without dripping. Moisture encourages healthy tissue growth. Gauze pads must be unfolded and lightly packed to be most effective.
9. ACTION Cover with a second moist dressing for a wet-to-damp dressing and then a dry, sterile 4 × 8-inch combined dressing in a single layer on top of the wet dressings. Additional dry dressings may be added as needed to keep the outside dry.
RATIONALE To promote wound healing, the entire wet-to-damp dressing must be changed at regular intervals before the inner dressing dries out. The physician may order how frequently this is to be done; if not, change the entire dressing at least every 2 hours. If moisture reaches the outside of the sterile dressing, it can provide an avenue for pathogens to enter the wound.
10. ACTION Remove the gloves and discard them; tape the edges of the dressing; perform hand hygiene.
RATIONALE Secures the dressing. A binder may be used in place of tape.
11. ACTION Ask yourself: Did the inner dressing stay damp in the wet-to-damp dressing? Did the outer dressing stay dry? Is necrotic tissue being removed from the wound by the wet-to-dry dressing? Is pink granulation tissue appearing in the wound? If the inner dressing for the wet-to-damp dressing is drying, change the dressing more frequently. Add sufficient dressing material to keep the outer dressing dry.
RATIONALE “Yes” answers to these questions determine that the procedure is successful
7/19 1430 Wound packed with fluffed 4 × 4s moistened with normal saline at 0830, 1030, 1230, and 1430. Sterile technique maintained. Wound 2.2 × 3.4-cm area of black eschar at 1500; wound yellow at base. Pink tissue at edges.
Using a moisture barrier ointment on the skin around the wound protects the skin from maceration (softening of tissue from soaking in moisture). Petroleum jelly protects the skin from moisture.
If a wet-to-dry dressing is ordered, leave out the second moist dressing and cover with only one layer of dry dressing.
Débridement of necrotic tissue may be performed by using enzymatic powder, ointment, or granules that are packed into the wound, or by cutting (sharp débridement) away dead tissue. Enzymes break down the necrotic tissue, and wound packing absorbs the debris. Surgical débridement is performed by a surgeon or an advanced practice nurse. The wound heals slowly from the base upward. In many instances, the body’s own healing processes cause sloughing (autolytic débridement) of the necrotic tissue. Petroleum jelly may be used on the skin around the wound to prevent maceration from wet dressings.
Patient Teaching for Wound Care: Before the patient is discharged, proper technique for cleaning and dressing the wound must be taught. It is important to send the patient home with sufficient dressings to last until someone in the family can purchase the needed items. By teaching the patient the signs and symptoms of infection, and insisting that they be reported immediately, intervention can be started quickly to treat the infection. Written instructions should be sent home with the patient to reinforce the teaching. Patient Teaching 38-1 reviews points of patient teaching for wound care.
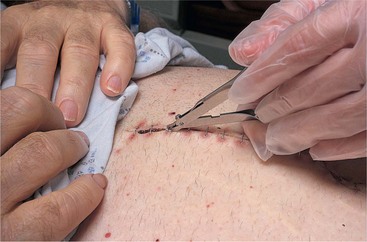
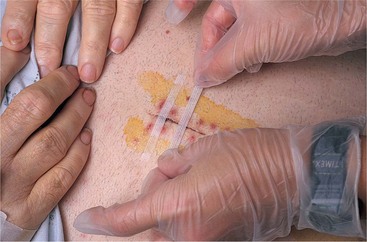
Suture Removal: The physician orders the removal of sutures. Some physicians prefer to remove their own sutures. Some states do not allow LPN/LVNs to remove sutures, but others do. Suture scissors, forceps, and sterile technique are used to remove sutures (Figure 38-15). The suture is clipped so that the exposed part will not be pulled through the skin (Steps 38-3). A special staple remover implement is used to remove staples (Figure 38-16). Inspect the suture after it is pulled out to see that it appears whole. Parts of sutures left under the skin cause inflammation because they are foreign bodies. Steri-Strips are often applied to reinforce the incision as sutures are removed (Figure 38-17).
Step 38-3 Removing Sutures or Staples
Sutures or staples are removed when the wound is well sealed and connective tissue has formed. This occurs in 7 to 10 days, although the time for suture removal may vary. An order is required for removal of sutures or staples.
Review and carry out the Standard Steps in Appendix 3.
1. ACTION Perform hand hygiene, don clean gloves, and remove the dressing, discarding it in a plastic discard bag. Remove gloves and perform hand hygiene.
RATIONALE Prevents transfer of microorganisms; exposes the sutures or staples.
3. ACTION Pick up the forceps with the nondominant hand and the suture scissors with the dominant hand.
RATIONALE This allows good control of the instruments.
4. ACTION Lift the knot of the suture away from the skin with the forceps, and slip the curved tip of the scissors under the suture beneath the knot. The suture is cut beneath the knot and pulled from the skin in one smooth motion.
RATIONALE Prevents pulling exposed suture back through the skin. The entire suture must be pulled free.
5. ACTION As long as the skin stays well approximated, remove every other suture. If wound shows no signs of separation, remove the remaining sutures.
RATIONALE Removing every other suture provides a safeguard in case the wound begins to separate.
3. ACTION After opening the equipment, place the lower jaw of the staple remover under the staple. Be certain the tip is all the way under the staple.
RATIONALE Positions the tool to crimp the staple.
4. ACTION Press the handles of the staple remover together all the way to depress the center of the staple.
RATIONALE The staple must be firmly pressed between the two parts of the staple remover to allow it to be pulled free of the skin.
5. ACTION When both ends of the staple are visible, lift it up and away from the skin. Drop the staple into the discard bag.
RATIONALE Removes the staple; prevents transfer of microorganisms and injury by a sharp object.
6. ACTION Gently cleanse any dried blood from the suture or staple sites with an antiseptic sponge.
RATIONALE Suture holes are open to the atmosphere and can admit bacteria. Dried blood may contain microorganisms.
7. ACTION Place Steri-Strips or a dressing over the incisional area as ordered. Often the incision will simply be left open to the air.
8. ACTION Place all used supplies in the discard bag. Remove gloves and discard them. Perform hand hygiene.

Eye, Ear, and Vaginal Irrigations: Irrigations must be performed when the face is involved in an injury and there is a possibility of debris or caustic substance in the eye. Irrigate the affected eye(s) with Standard Precautions and sterile solution or tap water depending on what is available. In the emergency room, special eyecups and a continuous irrigation system are used (Steps 38-4).
Step 38-4
Irrigating the Eye or Adult Ear
The eye may need irrigating when it has been injured by debris or chemicals. Irrigation is gently continued until debris is cleared away, or for 10 to 30 minutes after a chemical injury. The ear is irrigated when wax or debris is obstructing the canal and preventing sound from reaching the tympanic membrane.
Review and carry out the Standard Steps in Appendix 3.
1. ACTION For irrigation with a syringe, place the patient in a supine position and turn the head in the direction of the affected eye. Position the examination light to illuminate the affected eye. Place an underpad and towel on the bed to protect the linens and clothes. Place an irrigation basin close to the face to catch the irrigation solution.
RATIONALE Irrigation fluid will run away from the eye and not contaminate the other eye. Good light is needed to visualize the area well.
2. ACTION Prepare the irrigation set and fluid.
RATIONALE Fluid should be at room temperature. Sterile normal saline or tap water is used.
3. ACTION Don gloves and remove any crusty discharge on the eyelid with a cotton ball moistened with sterile normal saline. Discard the used cotton balls in a discard bag.
RATIONALE Using a fresh cotton ball for each stroke from the inner canthus to the outer edge maintains aseptic technique.
4. ACTION Load the irrigation syringe with fluid. With the nondominant hand, gently but firmly pull the upper eyelid toward the eyebrow and pull the lower lid down toward cheek to expose the conjunctival sac. Ask the patient to look downward.
RATIONALE Assists in maintaining the eye in an open position to receive the irrigation fluid.
5. ACTION Hold the irrigation syringe about ½ to 1 inch above the eye and gently depress the plunger or bulb of the syringe to irrigate the eye, directing the stream from the nasal edge of the eye across to the outer edge. Repeat the irrigation until the desired result occurs or the total amount of solution ordered has been used. Allow patient to close eye between washings if large amount of solution is required.
RATIONALE Solution removes debris or contaminant from eye. Too much pressure of fluid may damage the cornea.
6. ACTION Dry the eyelid with a sterile cotton ball.
RATIONALE Makes the patient comfortable.
1. ACTION Place the patient in a sitting position. Drape the shoulder on the side to be irrigated with an underpad and towel, and place the light so that the area is well illuminated.
RATIONALE The syringe is easier to use with the patient in a sitting position. Underpad and towel help keep the patient dry.
2. ACTION Fill the syringe with warm solution (98.6° F, or 37° C). Have the patient hold the basin firmly against the neck under the ear.
RATIONALE Cool water is very uncomfortable and causes dizziness and nausea through stimulation of the equilibrium sensors in the semicircular canal. Positioning the basin properly prevents water from running down the neck.
3. ACTION Straighten the ear canal by grasping the upper portion of the adult pinna and gently pulling upward and backward.
RATIONALE The canal is straightened so water can penetrate better and debris can be washed out.
4. ACTION Place the tip of the syringe just into the entrance of the external meatus, and point the tip upward and inward toward the posterior auditory canal; push the plunger or depress the bulb in slowly and carefully.
RATIONALE The flow of solution is directed forward to wash out debris.
5. ACTION Inspect the ear canal to see that it is clean. Dry the ear and the neck area.
RATIONALE Cerumen may still be blocking the canal.
6. ACTION Repeat until the canal is clean. Be certain solution is still warm.
RATIONALE Allows visualization of the tympanic membrane and allows sound to reach the membrane.
7. ACTION Document the procedure.
RATIONALE Records how the procedure was done and what result was obtained.
Ear irrigations are used to remove cerumen or foreign bodies that occlude the canal and prevent sound from reaching the tympanic membrane. An ear irrigation is ordered by a physician and should not be performed if there is a possibility that the tympanic membrane is perforated. The irrigation is performed in a fashion similar to the eye irrigation except the solution is directed toward the roof of the auditory canal while holding the pinna of the older adult up and out with the other hand (see Steps 38-4). The pinna for the child is pulled slightly up and back; for the infant, pull the pinna down and back. Sometimes a Water-Pik with a special nozzle is used to irrigate the ear. Only the lowest settings on the device should be used.
A vaginal irrigation may be ordered for infection or surgical preparation of the vagina. Most frequently the patient will administer the irrigation herself. Patient Teaching 38-2 presents the teaching guidelines.
Hot and Cold Applications: Either dry or moist forms of heat and cold can be applied to the body to promote healing. Usually a physician’s order is necessary for a treatment because systemic as well as local effects occur. The order should include the body site to be treated, the type of treatment, and the frequency and duration of the application. Check your agency’s policy for various types of heat and cold treatments.
Assessment of the patient and the area to be treated is essential to determine if there are contraindications for the treatment (Box 38-3). Always assess circulation in and around the area to be treated. Be certain that the patient has intact sensation so that damage will not occur from temperature extremes. When cold is applied to a lower extremity, assess for capillary refill, note skin color, and palpate skin temperature and distal pulses so that a baseline of the area can be documented in the chart.
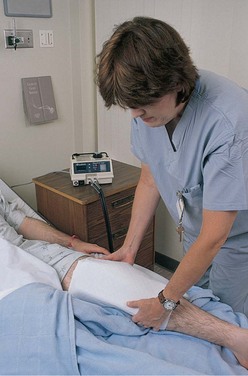
Use of Heat.: Heat is applied to the skin surfaces to provide general comfort and to speed the healing process (Table 38-2). Heat is often used for patients with musculoskeletal problems such as joint strains or low back pain. The amount of blood diverted to the skin through vasodilation reduces the blood circulating through internal organs and tissues. The degree of systemic effect is related to the size of the area to which heat is applied. Systemic circulatory changes may cause faintness, a faster pulse, and some degree of dyspnea. If such changes occur, closely monitor the patient’s vital signs. The principles for application are the same for each method used when applying heat (Box 38-4). Heat can be applied locally by means of a hot water bottle, electric pad, aquathermia pad, or disposable heat pack (Figure 38-18). Moist heat is used in the form of compresses, hot packs, soaks, or a sitz bath. (See Chapter 19 for information about the sitz bath.) Table 38-3 provides general ranges of temperature for heat application, but check the agency procedural manual for recommended temperatures.
Table 38-2
Therapeutic Effects of Heat and Cold Applications
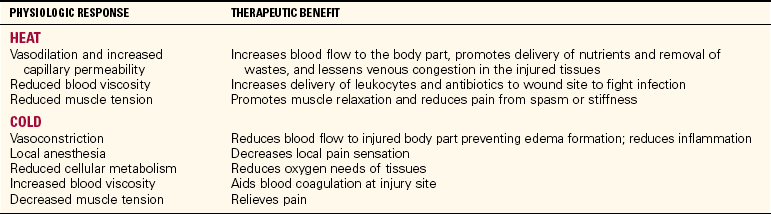
Adapted from Potter, P.A., & Perry, A.G. (2005). Fundamentals of Nursing (6th ed., p. 1555). St. Louis: Elsevier Mosby.
Table 38-3
Temperature Ranges for Heat and Cold Treatments*

*Discontinue the treatment when numbness occurs.
To protect patients from burns caused by heat applications, measure the temperature of the liquid if possible. If no thermometer is available, place the prepared pack against the inner aspect of your own arm. If there is any doubt about whether it is too hot, cool it down. Use a flannel or cloth cover for all hot and cold packs. Observe the condition of the skin frequently for signs of burning or blistering and be attentive to complaints. Caution the patient and family not to increase the temperature of heating pads or of water in hot water bottles.
Heat Applications.: Hot water bottles are filled two thirds full, the air is expelled, and the plug attached. A heat lamp is a gooseneck lamp with a 60-watt bulb. A heat lamp provides heat by radiation and is placed 18 to 24 inches (45 to 60 cm) from the area of treatment. Heat applications are left in place for 15 to 30 minutes and may be ordered to be repeated each hour or several times a day (Assignment Considerations 38-2).
An aquathermia pad, or K-pad as it is often called, is constructed with tubes containing water (Safety Alert 38-2). An electrically controlled unit pumps warmed water through the tubing network. The reservoir of the K-pad is filled to two thirds full with distilled water. The temperature is usually set with a key for 105° F (40.5° C). The pad is covered before application (see Figure 38-18).
When hot compresses are ordered, the solution is heated to the temperature ordered, and gauze or cloth is dipped in the solution and wrung out. When the skin is broken in the area of treatment, sterile technique is required. Sterile gloves and supplies must be used. A small amount of solution is heated at a time. Petroleum jelly may be used beneath the compress or pack to protect the skin.
In the home, hot compresses can be made with washcloths dipped in hot water and wrung out. Once the compress is in place, placing a plastic wrap covering on top will help retain the heat longer. A towel may be placed over the plastic wrap. Gel packs are also available that can be heated in a microwave oven. A freshly boiled egg with the shell removed can be placed inside a sock to apply heat to an eye where inflammation is causing discomfort. The egg can be reheated in hot water. Dispose of the egg when treatment is finished.
When a soak is ordered, the part to be treated is submerged in warm water or solution for 15 to 20 minutes. A commercial pack is used to apply heat to a large area of the body.
Whenever heat is used, the safety of the patient must be protected. Some patients are much more likely to suffer burns: those with sensory impairment, impaired mental status with decreased level of consciousness or confusion, and impaired circulation from peripheral vascular disease, diabetes, or congestive heart failure (Safety Alert 38-3). When an appliance is no longer in use, return it to central service immediately so that charges to the patient will cease. Documentation of the use of heat or cold devices each shift is essential for insurance payment to the agency.
Use of Cold.: Cold is used for two main purposes: (1) to decrease swelling and (2) to decrease pain (see Table 38-2). Cold is often immediately applied to an injury to prevent swelling. When cold is applied to the skin or a part of the body, vasoconstriction causes the skin to become pale and cool. When it interferes with adequate circulation, it can cause damage to body tissues, as in the necrosis caused by frostbite.
Systemic effects of cold are the reverse of those of heat. More blood is sent to the internal organs and the body acts to conserve heat. The autonomic nervous system is activated, and muscle contractions may produce shivering in an effort to produce heat.
The physician will usually indicate the temperature to be used for cold applications (see Table 38-3). Very cold applications are used for 15 to 20 minutes at a time; longer application can damage the skin and underlying tissue.
Cold Applications.: Cold is applied in the form of compresses, packs, ice bags, or ice collars, or by hypothermia blanket. Cold compresses consist of gauze or cloth material placed in a basin containing ice chips and a small amount of cold water. The compress is then wrung out and placed on the designated site. The compresses are changed every 15 to 20 minutes.
Cold packs are used for tonsillectomies, perineal wounds, sprains, nosebleeds, fractures of bones, dental extractions, and reduction of postoperative swelling of some parts of the body. Most disposable cold packs are applied directly to the skin, but check the manufacturer’s directions. Ice bags or ice collars are reusable. Small ice bags can be made by placing ice chips loosely in a rubber glove and tying it with a knot. This works especially well for applications to the nose or eye. Gel packs are reusable and are placed in the freezer until frozen. When the gel pack becomes warm, it is cleansed and returned to the freezer.
A hypothermia blanket is used to lower body heat for patients who are running a persistently high fever. Because this treatment decreases the rate of metabolic processes, it may be used during surgery to reduce blood flow and oxygen requirements and is often used for patients who have severe brain injuries. The cooling blanket is attached to a machine that supplies the blanket with a cooled solution of distilled water and 20% ethyl alcohol. The blanket is placed in direct contact with the patient’s skin. The patient’s temperature is continually monitored when the blanket is in use. Chilling to the point of shivering is to be avoided because this activity causes the temperature to rise.
Most cold treatments require a physician’s order before application. Care must be taken to assess the skin and circulation in the area of application, and distal to it, before, during, and after the treatment. Prolonged, very cold applications may cause frostbite. Cold therapy is applied for a maximum of 20 minutes at a time. Precautions taken are the same as those for patients who are at risk with heat applications (Home Care Considerations 38-1).
Patient Teaching for Hot and Cold Applications.: Assess the caregiver’s ability and availability to administer the hot or cold treatment safely. Sterile compresses can be prepared at home in a pressure cooker if one is available. Caution the patient and family not to heat washcloths or other linens in the microwave oven because fire can occur. Check the cords on home lamps to be used for heat treatments and on heating pads. Instruct the patient not to fall asleep on a heating pad and never to use the high setting because burns may occur.
A quick, efficient cold pack may be made by wetting a washcloth, folding it in quarters, and freezing it inside a zipper-locking–type of plastic bag.
Evaluation
Evaluative statements indicating that some previously stated goals/expected outcomes have been met are as follows:
• Wound edges well approximated.
• Wound is clean and dry without redness or swelling.
• Patient states that pain is gone.
• Patient states that energy has returned and is up walking in the hall.
• Return demonstration of dressing change properly performed.
It is important to evaluate the outcome of the heat or cold treatment. Is it producing the desired effect? If not, it should be discontinued, or another method tried. When the outcome is such that the initial problem is gone, the physician is notified and the treatment is discontinued.
NCLEX-PN® EXAMINATION–STYLE REVIEW QUESTIONS
Choose the best answer(s) for each question.
1. Your patient has had abdominal surgery for a ruptured appendix and requires postoperative care and dressing changes. The wound has been left open and irrigations are ordered. When irrigating a wound, it is most important to:
1. irrigate slowly to prevent discomfort.
2. ensure the solution reaches the depths of the wound.
2. If a wound appears infected, you should:
1. cleanse it with an antiseptic solution.
2. obtain an order for a culture to be performed.
3. The assessment of the wound indicates healing is occurring when:
4. When assessing for wound infection, you know that signs of wound infection may be: (Select all that apply.)
2. increasingly rapid respirations.
3. a white blood cell count above 10,000/dL.
5. When caring for a pressure ulcer, you know that:
1. eschar must usually be removed before the wound will heal.
2. pink granulation tissue should be cleansed with antiseptic solution.
6. Hydrocolloid dressings are useful for open wound dressings because they:
1. keep the wound moist while blocking entry of microorganisms.
2. débride the wound and soften eschar.
3. supply bacteriostatic action to clean the wound.
4. contain an antiseptic, allow moisture to evaporate, and protect the wound.
7. If you are assisting a surgical patient to the bathroom and he suddenly says, “It feels like something has given way,” you would suspect that _____________________ has occurred. (Fill in the blank.)
8. Proper technique for removal of sutures is to:
1. clip the suture opposite the knot.
2. assure the patient that suture removal does not hurt.
9. Cold packs applied during the first 24 hours after injury decrease swelling by:
CRITICAL THINKING ACTIVITIES
Read each clinical scenario and discuss the questions with your classmates.
Scenario A
Gregory Hansen requires a sterile dressing change for an abdominal incision.
1. How would you determine what is needed in the way of supplies?
2. How would you set up your sterile field? (Be specific.)
3. Because it is best not to talk while doing a sterile procedure, how would you begin to teach Mr. Hansen to do the dressing change himself?
4. Describe the factors you would assess to determine whether Mr. Hansen’s wound is infected.
Scenario B
Joshua Weintaub just had surgery on his nose for a deviated septum. Ice packs are ordered. What would you use and how would you perform the ice applications?